
RE6503 - Whiteboards and Accessories BENQ - Free user manual and instructions
Find the device manual for free RE6503 BENQ in PDF.


| Product Type | Interactive Flat Panel (Whiteboard & Accessories) |
| Model | RE6503 |
| Display Size | 65 inches (diagonal) |
| Resolution | 3840 x 2160 (4K UHD) |
| Brightness (Typical) | 350 cd/m² (with glass), 400 cd/m² (without glass) |
| Contrast Ratio | 1200:1 |
| Touch Technology | Infrared (IR) |
| Touch Points | 40 points touch |
| Touch Method | Finger & Stylus (2 pens simultaneous) |
| Response Time | <10 ms |
| Glass Protection | 3.2 mm thickness, Anti-Glare, 9H pencil hardness, Germ-resistant |
| Operating System | Android 11 |
| CPU/GPU/RAM/ROM | A55 x 4 / G52 MP2 / 4 GB / 32 GB |
| Dimensions (W x H x D) | 1488.3 x 896.6 x 87.5 mm |
| Net Weight | 36 ± 1.5 kg |
| Power Consumption | 393.7 W (max), <0.5 W (standby) |
| Power Input | AC 100-240V, 50/60 Hz |
| Input Connectors | HDMI x3 (2 rear, 1 front), VGA x1, USB Type-C (65W PD), USB 3.0 x4, USB 2.0 x2 (including Wi-Fi), RS232, LAN (RJ45) x2, SPDIF, Audio In/Out, Touch USB x2 |
| Speakers | 2 x 16W built-in |
| VESA Mount | 600 x 400 mm (M8 x 25L screws) |
| Orientation | Landscape only |
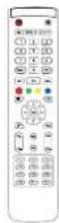
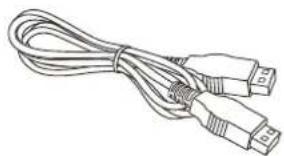
| Package Contents | LCD display, power cord, VGA cable, HDMI cable, Touch USB cable, USB Type-C cable, remote control (with batteries), touch pen x2, quick start guide, wall mount kit |
Frequently Asked Questions - RE6503 BENQ
User questions about RE6503 BENQ
0 question about this device. Answer the ones you know or ask your own.
Ask a new question about this device
Download the instructions for your Whiteboards and Accessories in PDF format for free! Find your manual RE6503 - BENQ and take your electronic device back in hand. On this page are published all the documents necessary for the use of your device. RE6503 by BENQ.
USER MANUAL RE6503 BENQ
RE6503/RE7503/RE8603
Interactive Flat Panel
User Manual

natural_image
Abstract halftone dot pattern with gradient shading, no text or symbols presentCopyright and disclaimer
Disclaimer
BenQ Corporation makes no representations or warranties, either expressed or implied, with respect to the contents of this document. BenQ Corporation reserves the right to revise this publication and to make changes from time to time in the contents thereof without obligation to notify any person of such revision or changes.
HDMI trademark disclaimer
The terms HDMI and HDMI High-Definition Multimedia Interface, and the HDMI Logo are trademarks or registered trademarks of HDMI Licensing Administrator, Inc. in the United States and other countries.

HIGH-DEFINITION MULTIMEDIA INTERFACE
Copyright
Copyright 2022 BenQ Corporation. All rights reserved. No part of this publication may be reproduced, transmitted, transcribed, stored in a retrieval system or translated into any language or computer language, in any form or by any means, electronic, mechanical, magnetic, optical, chemical, manual or otherwise, without the prior written permission of BenQ Corporation.
Typographics
| Icon / Symbol | Item Meaning | |
 | Warning | Information mainly to prevent the damage to components, data, or personal injury caused by misuse and improper operation or behavior. |
 | Tip Useful information for completing a task. | |
 | Note Supplementary information. | |
In this document, the steps needed to reach a menu are shown in condensed form, for example: System > Information.
Product Support
This document aims to provide the most updated and accurate information to customers, and thus all contents may be modified from time to time without prior notice. Please visit the website for the latest version of this document and other product information.
Available files vary by model.
- Make sure your computer is connected to the Internet.
- Visit the local website from www.BenQ.com. The website layout and content may vary by region/country.
- User manual and related document: www.BenQ.com > Business > SUPPORT > Downloads > model name > User Manual
- (EU only) Dismantled information: Available on the user manual download page. This document is provided based on Regulation (EU) 2019/2021 to repair or recycle your product. Always contact the local customer service for servicing within the warranty period. If you wish to repair an out-of-warranty product, you are recommended to go to a qualified service personnel and obtain repair parts from BenQ to ensure compatibility. Do not disassemble the product unless you are aware of the consequences. If you cannot find the dismantled information on your product, contact the local customer service for assistance.
Table of contents
Copyright and disclaimer ....i
Product Support......ii
Safety warnings and precautions.... I
Important safety instructions 2
Notes on this display....2
Notes on the LCD panel of this display....3
Safety notice for remote control....3
Battery safety notice....4
BenQ ecoFACTS 4
Package contents.... 5
Setting up the display 6
Installing the display on a wall....6
Installing an external PC 7
Parts of the display and their functions 8
Front panel....8
Input/output terminals 9
Remote control ....
Using the remote control....12
Connections....14
Connecting power 14
Connecting the VGA input....15
Connecting the touch module .... 16
Connecting the digital inputs....17
Connecting the video output 18
Connecting to serial port....18
Basic operations....19
Turning the display on or off....19
Initial setup....20
OSD Settings....20
Switching input signals....20
Account Information 21
User Management 22
Setting up the Internet connection 24
Updating software....26
Adjusting audio volume level 26
Using the touch screen.... 27
Important instructions for using the touch screen....28
Menu operations.... 29
Settings menu 29
Proxy settings....38
Startup & Shutdown 39
Android system interface....41
Main interface....41
Side tool bar 42
AMS file manager overview....44
Multimedia files 46
Apps....51
BenQ App Store 52
InstaShare 2....53
InstaQPrint....54
WPS Office 55
Email 57
Product information 58
Dimensions(RE6503)....62
Dimensions(RE7503)....63
Dimensions(RE8603)....64
Supported input signal resolution....65
Troubleshooting.... 66
Safety warnings and precautions
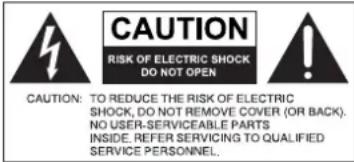

The lightning flash with arrowhead symbol, within an equilateral triangle, is intended to alert the user to the presence of uninsulated "dangerous voltage" within the product's enclosure that may be of sufficient magnitude to constitute a risk of electric shock to persons.

The exclamation point within an equilateral triangle is intended to alert the user to the presence of important operating and maintenance (servicing) instructions in the literature accompanying the appliance.
THIS EQUIPMENT MUST BE GROUNDED To ensure safe operation, the three-pin plug must be inserted only into a standard three-pin power outlet which is effectively grounded through normal household wiring. Extension cords used with the equipment must have three cores and be correctly wired to provide connection to the ground. Wrongly wired extension cords are a major cause of fatalities. The fact that the equipment operates satisfactorily does not imply that the power outlet is grounded or that the installation is completely safe. For your safety, if you are in any doubt about the effective grounding of the power outlet, please consult a qualified electrician.
The mains plug of the power supply cord shall remain readily operable. The AC receptacle (mains socket outlet) shall be installed near the equipment and shall be easily accessible. To completely disconnect this equipment from the AC mains, disconnect the power cord plug from the AC receptacle.
- Do not place this display on an uneven, sloping or unstable surface (such as a trolley) where it may fall and cause damage to itself or others.
- Do not place this display near water, like a spa or pool, or in a position which will allow the splashing or spraying of water onto the display, like in front of an open window where rain water may enter.
- Do not install this display in a confined space without proper ventilation and air circulation, such as in a closed cabinet. Allow proper space around the display for dissipating heat inside. Do not block any openings and vents on the display. Overheating may result in hazards and electric shock.
- Installation of this display should only be performed by a qualified technician. Failure to install this display properly may cause injuries and damages to the personnels and the display itself. Check the installation regularly and maintain the display periodically to ensure the best working condition.
- Use only the accessories approved or recommended by the manufacturer to mount this display. Using wrong or unsuitable accessories may cause the display to fall and result in serious personal injuries. Make sure that the surface and fixing points are strong enough to sustain the weight of the display.
- To reduce the risk of electric shock, do not remove covers. No user serviceable parts inside. Refer servicing to qualified service personnel.
- To prevent personal injuries, mounting the display or installing desktop stands is required before use.
Important safety instructions
I. Read these instructions.
2 Keep these instructions.
3. Heed all warnings.
4. Follow all instructions.
5. Do not use this apparatus near water.
6. Clean only with dry cloth.
-
Do not block any ventilation openings. Install in accordance with the manufacturer's instructions.
-
Do not install near any heat sources such as radiators, heat registers, stoves, or other apparatus (including amplifiers) that produce heat.
-
Do not defeat the safety purpose of the polarized or grounding-type plug. A polarized plug has two blades with one wider than the other. A grounding-type plug has two blades and a third grounding prong. The wide blade or the third prong are provided for your safety. If the provided plug does not fit into your outlet, consult an electrician for replacement of the obsolete outlet.
-
Protect the power cord from being walked on or pinched particularly at plugs, convenience receptacles, and the point where they exit from the apparatus.
II. Only use attachments/accessories specified by the manufacturer.
-
Use only with the cart, stand, tripod, bracket, or table specified by the manufacturer, or sold with the apparatus. When a cart is used, use caution when moving the cart/apparatus combination to avoid injury from tip-over.
-
Unplug this apparatus during lightning storms or when unused for long periods of time.
-
Refer all servicing to qualified service personnel. Servicing is required when the apparatus has been damaged in any way, such as power-supply cord or plug is damaged, liquid has been spilled or objects have fallen into the apparatus, the apparatus has been exposed to rain or moisture, does not operate normally, or has been dropped.
Notes on this display
- To prevent the risk of physical injuries, do not attempt to lift the display alone.
- Make sure you have four or more people available to help lift or a flat cart to transport the display to its final location.
- Keep the display horizontal as much as possible.
- Clear a floor space before unpacking.

Notes on the LCD panel of this display
- The Liquid Crystal Display (LCD) panel of this display has a very thin protective layer of glass which is liable to marking or scratching, and cracking if struck or pressured. The liquid crystal substrate is also liable to damage under excessive force or extreme temperatures. Please handle with care.
- The response time and brightness of the LCD panel may vary with the ambient temperature.
- Avoid placing the display in direct sun or where direct sun or spot lighting will shine onto the LCD panel, as the heat may damage the panel and the external casing of the display, and the bright light will make viewing the display more difficult than necessary.
- The LCD panel consists of individual pixels to display images and is manufactured according to the design specifications. While 99.9% of these pixels work normally, 0.01% of the pixels may remain constantly lit (in red, blue or green) or unlit. This is a technical limitation of the LCD technology and is not a defect.
- LCD screens, like plasma (PDP) and conventional CRT (Cathode Ray Tube) screens, are also susceptible to ‘screen burn-in’ or ‘image retention’ which can be found on the screen as visible fixed lines and shades. To avoid such damage to the screen, avoid displaying still images (like On-Screen Display menus, TV station logos, fixed/inactive text or icons) for more than 30 minutes. Change the aspect ratio from time to time. Fill the entire screen with the image and eliminate the black bars whenever possible. Avoid displaying images in 16:9 aspect ratio over a long period of time, otherwise there may be visible burn marks on the screen as two vertical lines.
- Note: Under certain circumstances, condensation may occur on the inner side of the cover glass, it's a natural phenomenon and will not affect the operation of the display. This condensation will usually disappear after around 2 hours of normal operation.
- RE series does not offer image retention function. For more information, please refer to installation guide. If a still image is required for a display, it is recommended to enable Pixel shift.
- RE series does not support portrait use; portrait use may cause display damage. BenQ warranty will not cover faulty usage.
Safety notice for remote control
- Do not put the remote control in the direct heat, humidity, and avoid fire.
- Do not drop the remote control.
- Do not expose the remote control to water or moisture. Failure to do so could result in malfunction.
- Confirm there is no object between the remote control and the remote sensor of the product.
- When the remote control will not be used for an extended period, remove the batteries.
Battery safety notice
The use of the wrong type of batteries may cause chemical leaks or explosion. Please note the following:
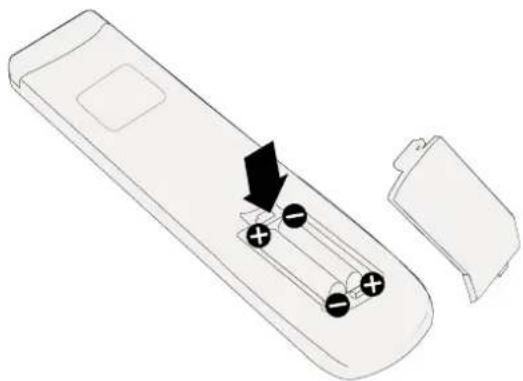
- Always ensure that the batteries are inserted with the positive and negative terminals in the correct direction as shown in the battery compartment.
- Different types of batteries have different characteristics. Do not mix different types.
- Do not mix old and new batteries. Mixing old and new batteries will shorten battery life or cause chemical leaks from the old batteries.
- When batteries fail to function, replace them immediately.
- Chemicals which leak from batteries may cause skin irritation. If any chemical matter seeps out of the batteries, wipe it up immediately using a dry cloth, and replace the batteries as soon as possible.
- Due to varying storage conditions, the battery life for the batteries included with your product may be shortened. Replace them within 3 months or as soon as you can after initial use.
- There may be local restrictions on the disposal or recycling of batteries. Consult your local regulations or waste disposal provider.
BenQ ecoFACTS
BenQ has been dedicated to the design and development of greener product as part of its aspiration to realize the ideal of the “Bringing Enjoyment ‘N Quality to Life” corporate vision with the ultimate goal to achieve a low-carbon society. Besides meeting international regulatory requirement and standards pertaining to environmental management, BenQ has spared no efforts in pushing our initiatives further to incorporate life cycle design in the aspects of material selection, manufacturing, packaging, transportation, using and disposal of the products. BenQ ecoFACTS label lists key eco-friendly design highlights of each product, hoping to ensure that consumers make informed green choices at purchase. Check out BenQ’s CSR Website at http://csr.BenQ.com/ for more details on BenQ’s environmental commitments and achievements.

Open the sales package and check the contents. If any item is missing or damaged, please contact your dealer immediately.
natural_image
Blank whiteboard with gray border and faint watermark text at bottom (no legible content)LCD display
natural_image
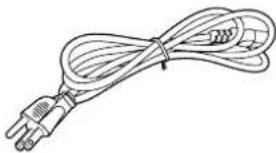
Line drawing of a coiled cable or wire with two terminal connectors (no text or symbols)Power cord (by region)
natural_image
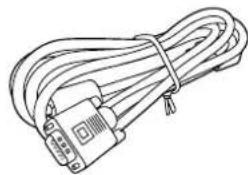
Line drawing of a cable with multiple connectors (no text or symbols)VGA cable x I Remote control
natural_image
Coiled network of three Ethernet connectors (no text or symbols visible)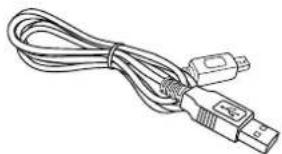
natural_image
Line drawing of a USB cable with connector (no text or symbols)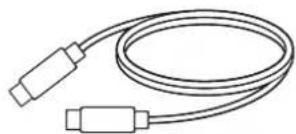
natural_image
Simple line drawing of a coiled cable with two connectors (no text or symbols)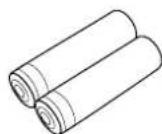
HDMI cable xI Touch USB cable xI USB Type-C cable xI
AAA battery x2 (by region)
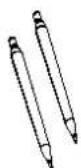
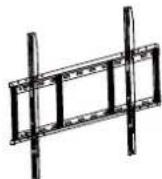
Touch pen x2 Quick start guide Wall mount

- The type of power cord supplied may differ from that illustrated depending on your region of purchase.
- Before discarding the package, check that you haven't left any accessories inside the box.
- Dispose of packaging materials wisely. You can recycle the cardboard carton. Consider storing the package (if possible) for future transport of the display.
- Do not leave plastic bags within reach of young children or babies
Setting up the display

Please pay attention to the following notes during installation:
- This display should be installed by at least two adult persons. Attempting to install this display by only one person may result in danger and injuries.
- Refer the installation to qualified technicians. Improper installation may cause the display to fall or malfunction.
- Stability Hazard: The flat panel may fall, causing serious personal injury or death. To prevent injury, this flat panel must be securely attached to the wall in accordance with the installation instructions.
Installing the display on a wall
I. Place a clean, dry and lint-free cloth on a flat, horizontal and object-free surface. Make sure that the size of the cloth is larger than the display.
2 Gently lay the display on the cloth with the LCD screen facing down.
3. Identify the wall mounting screw holes on the back of the display as shown in the illustration.
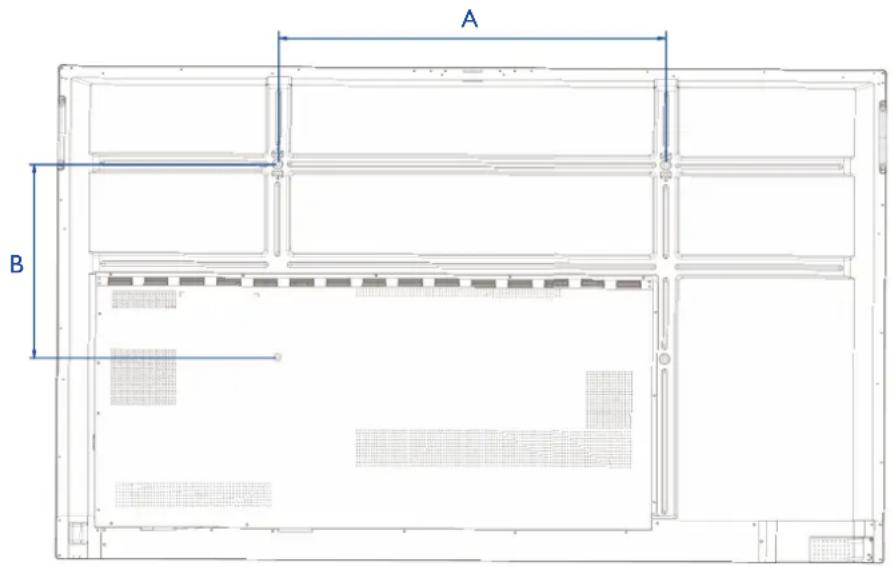
Dimension VESA spec. (A x B) Screw type Quantity
| 65" 600 × 400 mm | M8 × 25L | 4 |
| 75" 800 × 400 mm | M8 × 25L | 4 |
| 86" 800 × 600 mm | M8 × 25L | 4 |
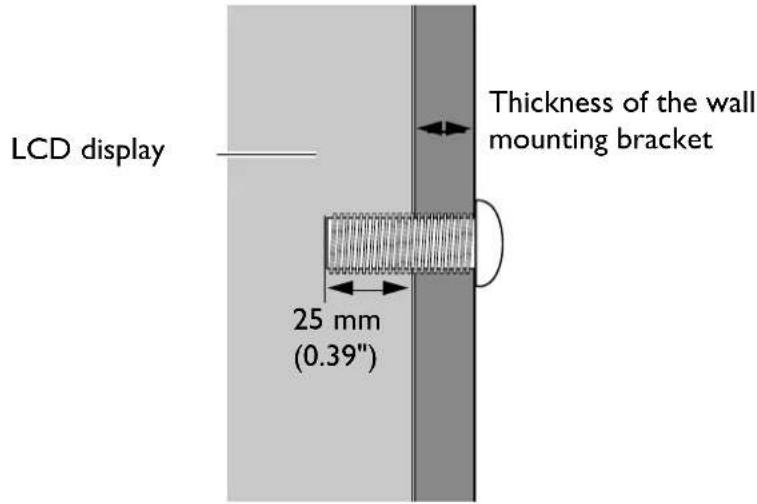
- Install the wall mounting bracket on the display and attach the display to the wall according to the mounting bracket's instructions. The length of the screw should exceed the thickness of the wall mounting bracket by at least 25 mm. Make sure that all screws are tightened and secured properly. (Recommended torque: 470 - 635N•cm). The mounting means should be strong enough to bear the weight of the display.

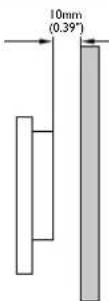
- To maintain proper ventilation, keep at least 10 mm of clear space from the back cover of the display to the wall.
- Please consult a professional technician for wall mount installations. The manufacturer accepts no liability for installations not performed by a professional technician.
Installing an external PC
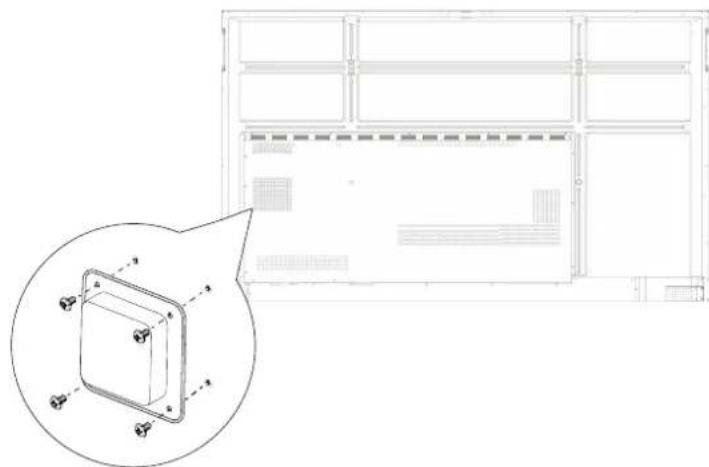
You can mount an external PC to the display using either one of the following methods:
- The back of the display has four screw holes at its bottom-left side with a dimension of VESA mount 100x100mm. You can secure the PC onto the display with four screws (maximum torque: 4-5 kgf-cm).
natural_image
Technical line drawing of a modular device with a magnified inset showing internal components (no text or symbols)Parts of the display and their functions
Front panel
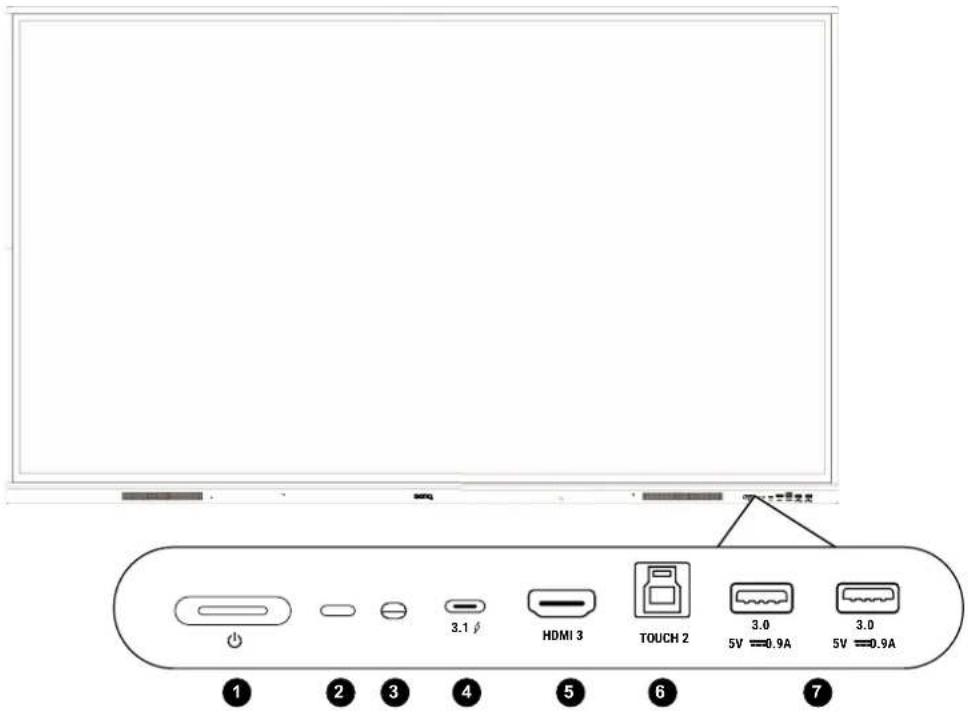
No. Name Description
| 1 | Power | Tap to enter energy saving mode. Press and hold for 4 seconds or more to power off. |
| 2 | Remote control sensor | Receives signals from remote control. |
| 3 | Ambient light sensor | Detects the ambient light around the display. |
| 4 | TYPE-C | Connects to USB-C devices for charging, data transfer and transmission of video, audio, and touch function. |
| 5 | HDMI Connects to a source device using a HDMI cable. | |
| 6 | TOUCH-USB Supports touch signal input from an external computer. | |
| 7 | USB 3.0 | Connect USB devices such as keyboards, mouse, and USB flash drives. |
Input/output terminals
See Connections on 14 for connection details.
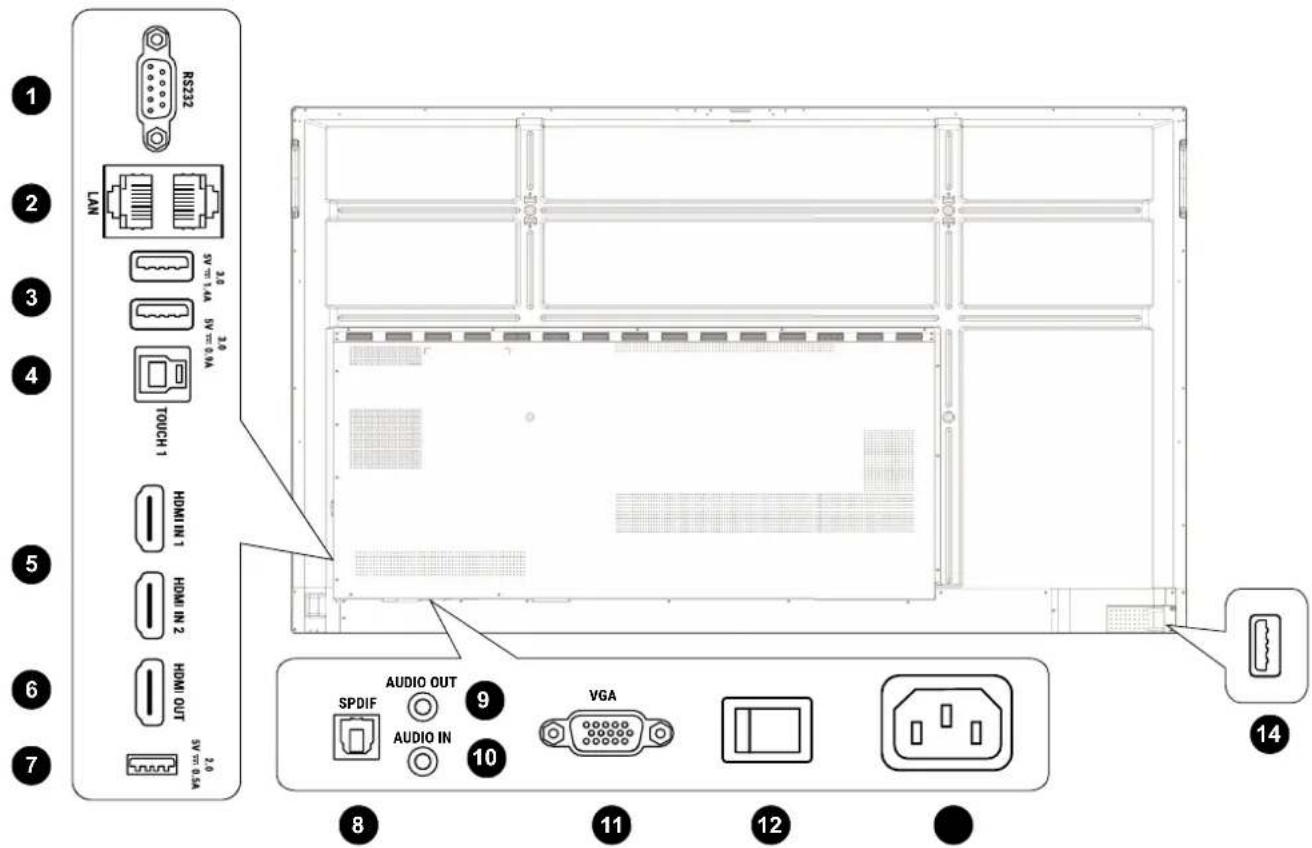
No. Name Description
| 1 | RS232 | Serial interface, used for mutual transfer of data between devices. |
| 2 | LANI/LAN2 | Support LAN In and Out, 10/100/1000 Mbps for external device. |
| 3 | USB 3.0 | Connect USB devices such as keyboards, mouse, and USB flash drives. |
| 4 | TOUCH-USB | Supports touch signal input from an external computer. |
| 5 | HDMI I/HDMI 2 | Connect to PC with an HDMI output, a set-top-box, or other video devices capable of realizing touch function. |
| 6 | HDMI-OUT | Connect to the display devices with an HDMI input. |
| 7 | USB 2.0 | Connect USB devices such as keyboards, mice, and USB flash drives. |
| 8 | SPDIF | Connect the SPDIF cable from external audio devices to the display for audio out. |
| 9 | AUDIO-OUT Connect to external speakers or earphones. | |
10 AUDIO-IN Receive audio input from an external device.
| 11 | VGA | Receive input from an external device (such as a computer). |
| 12 | Power Switch | Isolates the power supply from the system.When the switch is set to ON (I), the system will automatically enter standby mode.When the switch is set to OFF (O), this will completely cut off the power supply. |
13 Power-in Connects with the supplied power cord.
14 USB 2.0 Unscrew the cover to access the USB slot for hte Wi-Fi dongle.

- USB 2.0=5V=500mA/USB3.0=5V 900mA/USB3.0=5V 1400mA
- Front Type-C =5V=3A; 9V 3A, 15V 3A=20V 3.25A=
• OPS= 18V=4A; 72W - Direct Current / DC
• \~Alternating Current /AC - The maximum length for the cables to be used with the USB slots are 5m (USB 2.0) and 3m (USB 3.0).
Remote control
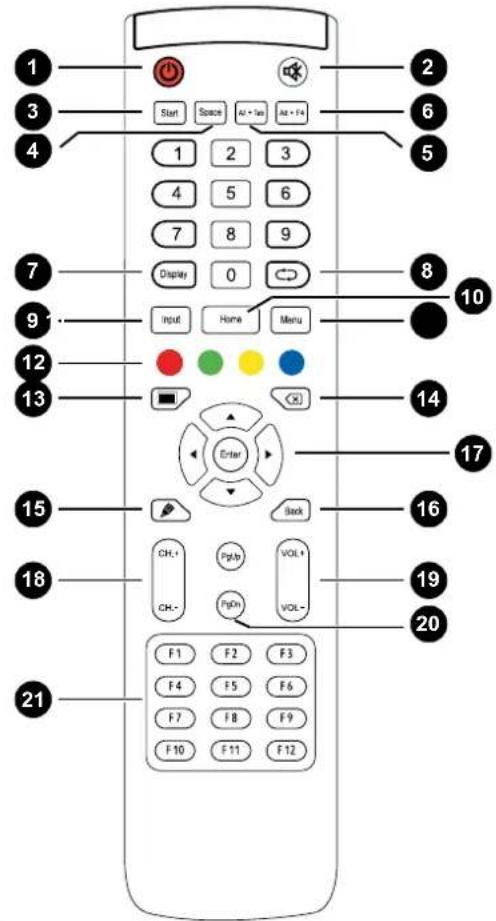
1
Turns the display on or off.
2
Mute/unmute.
3 Start
Built-in computer Windows key.
4 Space
Built-in computer space key.
⑤ Alt+Tab
Built-in computer Alt+Tab key.
6 Alt+F4
Built-in computer program window close button.
⑦ Display
Show the current input source and information.
8
Return key
9 Input
Select the input source.
10 Home
Android system main screen button.
11 Menu
Open or close the menu.
12 Four color buttons
- Lock the keyboard and touch function.
- : Lock keypad.
- : Lock touch.
- : Freeze screen.
13
One key for blank screen.
14
Backspace key.
15
Quickly start writing application (EZWrite).
Select writing pen quickly if the application is started.
16 Back
Return key.
17 Direction keys & Enter
- Press for upward selection.
• ◀: Press for left selection.
• ▶: Press for right selection.
- ▼: Press for downward selection.
- Enter: Confirms your selection or save changes.
18 CH+/CH-
Channel switch key.
19 VOL+/VOL-
Volume switch key.
20 PgUp/PgDn
Built-in computer page (previous/next page).
21 F1-F12
Built-in computer page F1 - F12 function keys.
Using the remote control
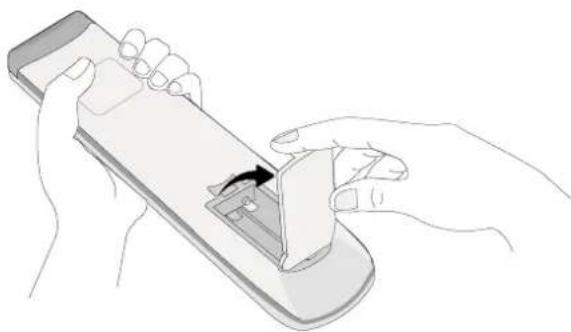
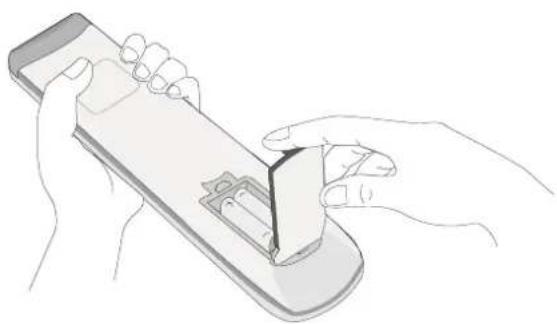
Installing remote control batteries
natural_image
Illustration of hands using a smartphone to interact with a device (no text or symbols visible)I. Open the remote control battery cover.
natural_image
Diagram of a remote control casing with battery and indicator lights, showing no text or symbols2 Insert the supplied batteries, ensuring that the positive and negative ends are facing in the correct direction.
The supplied batteries are provided for your convenience so that you can operate the display straight away. You should replace them as soon as possible.
natural_image
Illustration of hands using a smartphone to interact with a device (no text or symbols visible)- Replace the cover.
Remote control usage tips
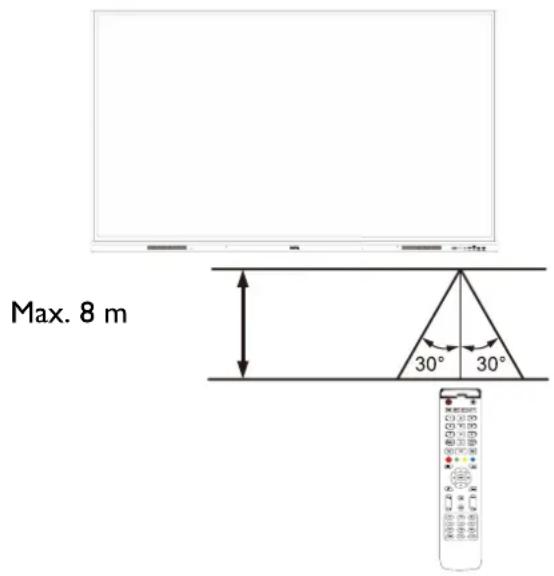
- To power on/off the display, aim the top front of the remote control directly at the display's remote control sensor window when you press the buttons.
- Avoid getting the remote control wet or store it in humid environments (like bathrooms).
- If the display's remote control sensor window is exposed to direct sunlight or strong light, the remote control may not operate properly. In this situation, change the light source, readjust the angle of the display, or operate the remote control from a location closer to display's remote control sensor window.
Connections
Connecting power
Plug one end of the power cord into the power jack on the display and the other end into an appropriate power outlet.
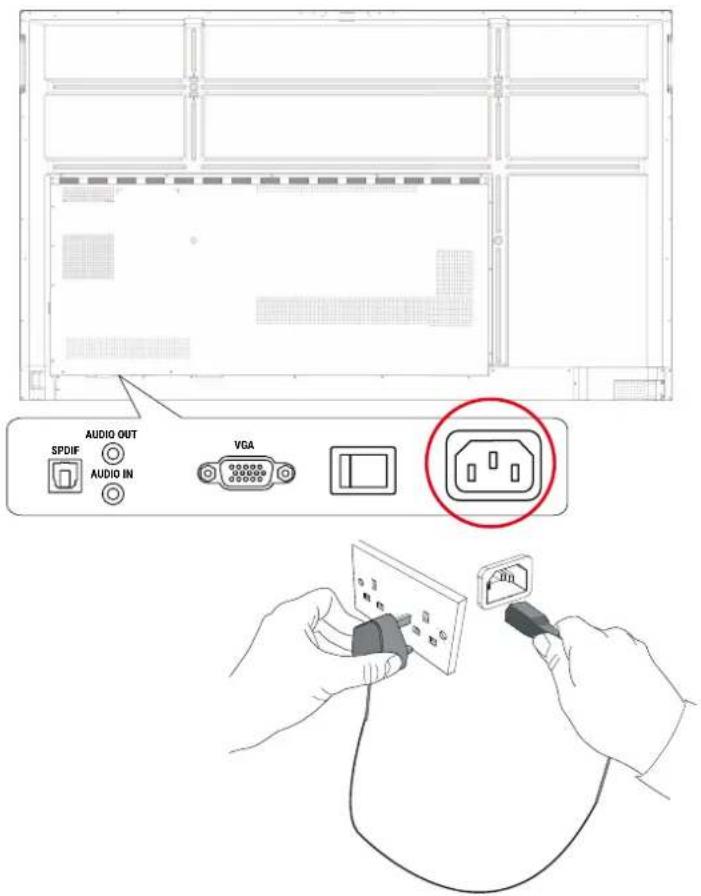

- The supplied power cord is suitable for use with 110-240V AC power only.
- The power cord and outlet illustrated may differ from the ones used in your region.
- Only use an appropriate power cord for your region. Never use a power cord which appears damaged or frayed, or change the plug type on the power cord.
- Be aware of the power loading when you use extension cords or multiple outlet power boards.
- There are no user serviceable parts in this display. Never unscrew or remove any covers. There are dangerous voltages inside the display. Turn off the power and unplug the power cord if you intend to move the display.
• The illustration is for your reference only.
Connecting the VGA input
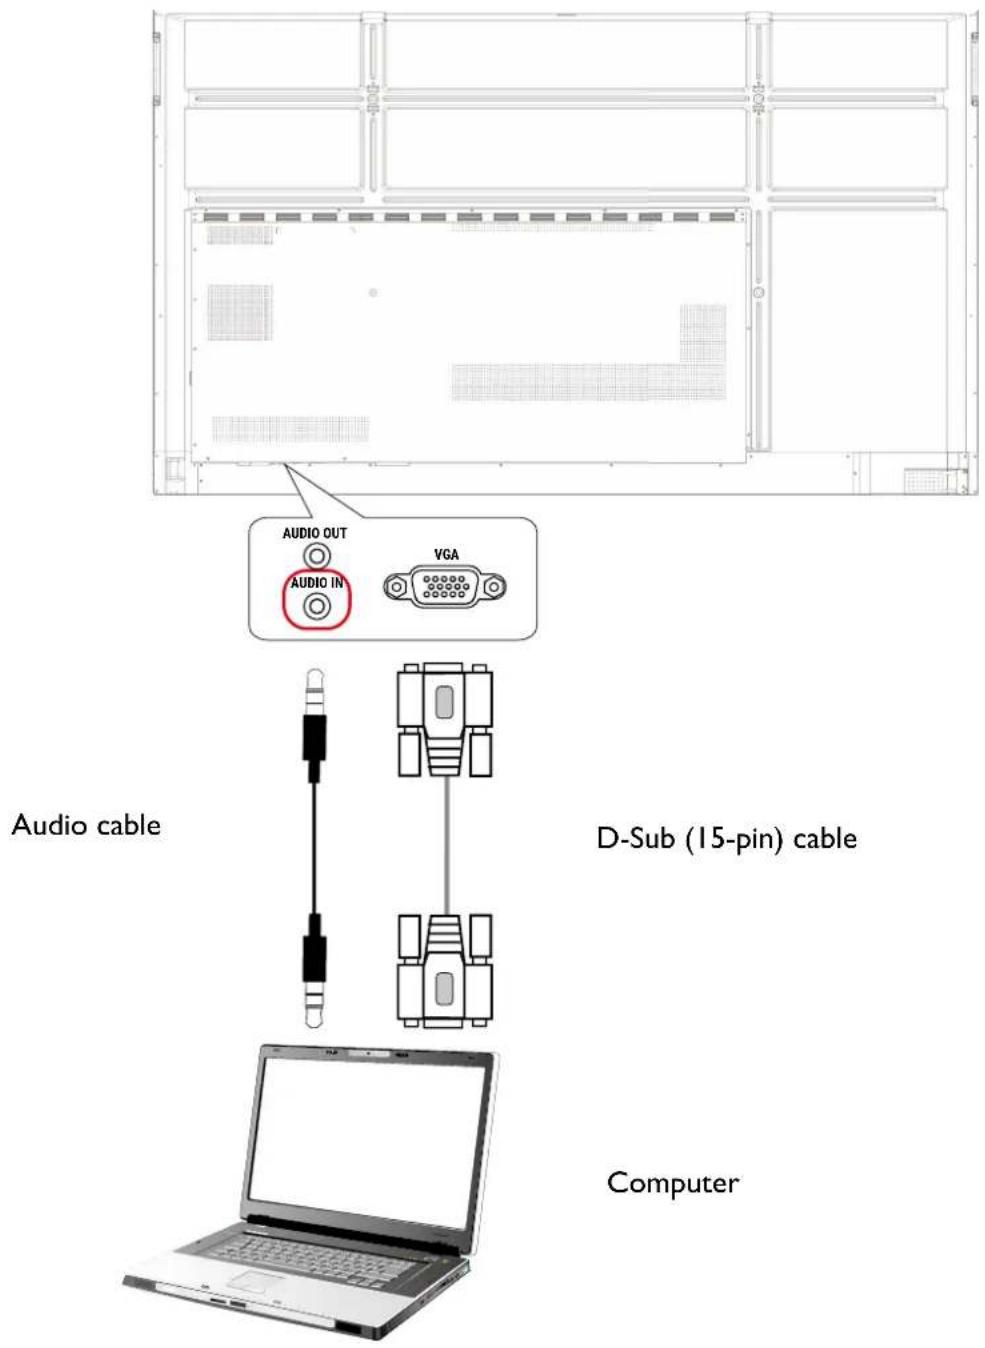
I. Connect the VGA port on the display to the VGA output port on a computer using a D-Sub (15-pin) cable.
- Connect the computer's audio output port to the AUDIO-IN jack on the display using a suitable audio cable.
Connecting the touch module
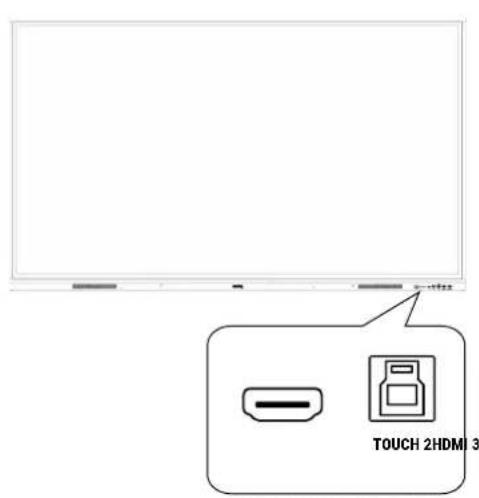
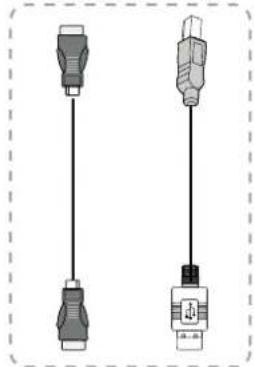
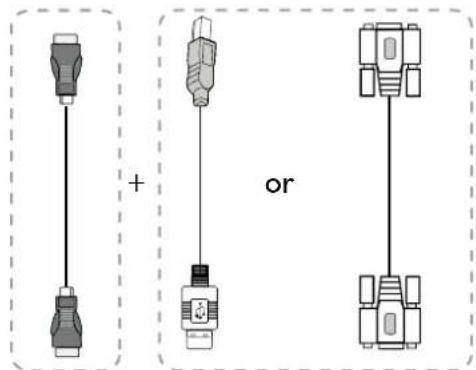
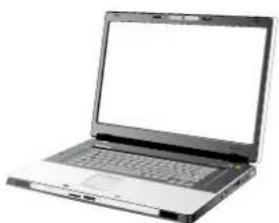
Connect the TOUCH-USB port on the display to the USB port of a computer using the supplied USB cable. The touch module of the display supports easy Plug-and-Play operation. There is no need to install additional drivers on the computer.
- TOUCH I must be used with HDMI I or VGA.
• HDMI 3 must be used with TOUCH 2 at the front panel.
natural_image
Two identical cable connectors with black and gray plastic bands, shown vertically (no text or symbols)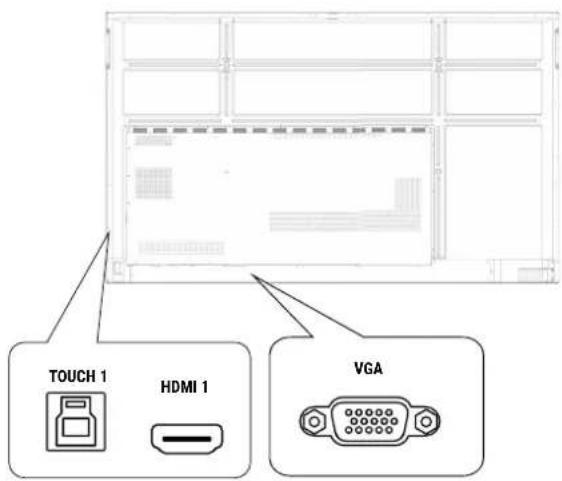
natural_image
Front view of a modern laptop computer with blank screen (no visible text or symbols)
- Avoid blocking the touch screen frame (where sensors are located) when initiating the touch module.
- It is highly recommended that you connect the display to the PC or laptop directly. Avoid connecting the display to a face plate device which may cause failures in touch operations.
- If any ghost image occurs, please try to un-plug and then re-plug all USB cables. If the failure image still exists, use another USB Type-A to Type-A cable.
Connecting the digital inputs
I. Connect the HDMI output port of a computer or A/V device (such as a setup box or DVD player) to the HDMI input port on the display using a HDMI cable.
2. To view video from this input, press Menu on the remote control to switch to the respective input source.
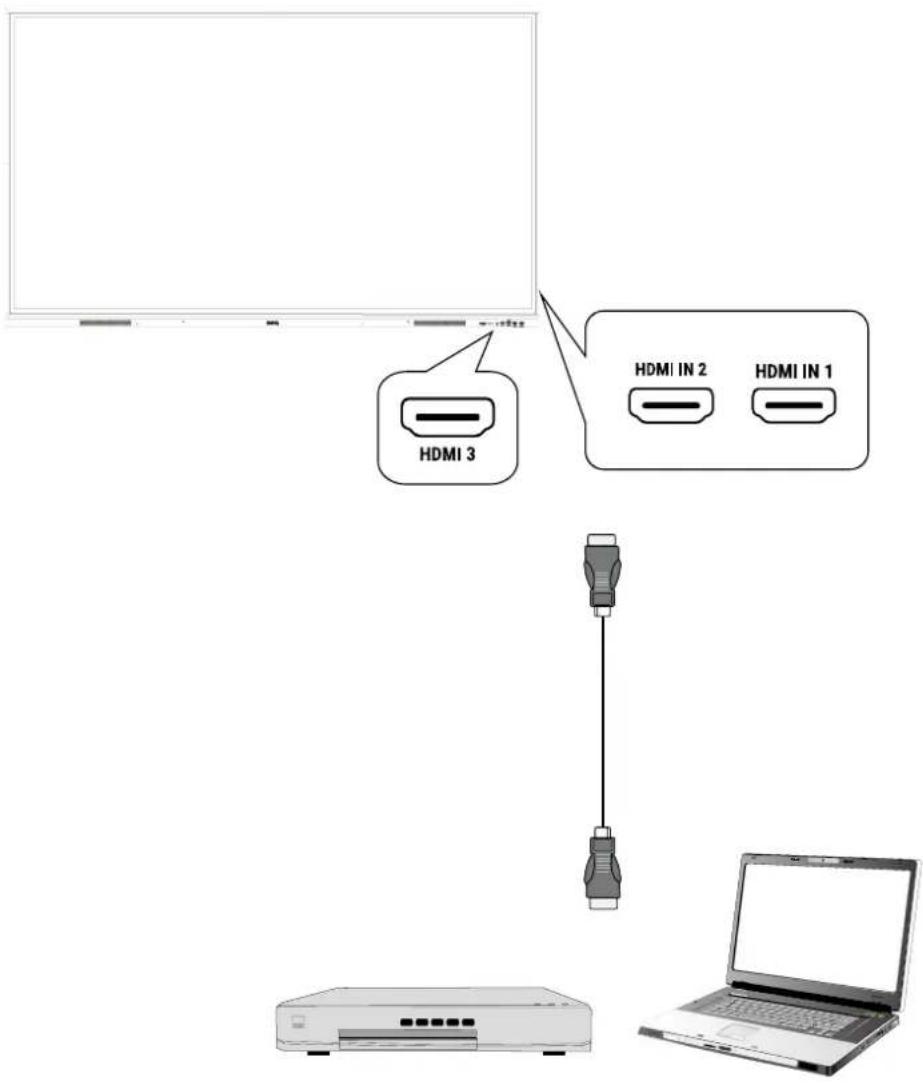

The applicable cable is not supplied and should be purchased separately.
Connecting the video output
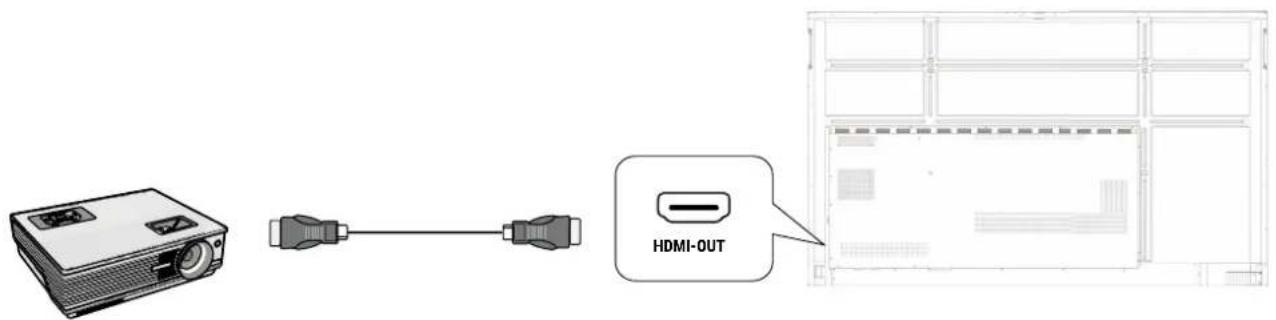
I. Use an HDMI cable to connect the HDMI-OUT port to the respective input port on the device.
2. Plug in the power cord and switch the power on.
3. Press ⏻ on the remote control to turn on the display.
Connecting to serial port
Directly connect a computer to the RS232 port on the input/output terminals.
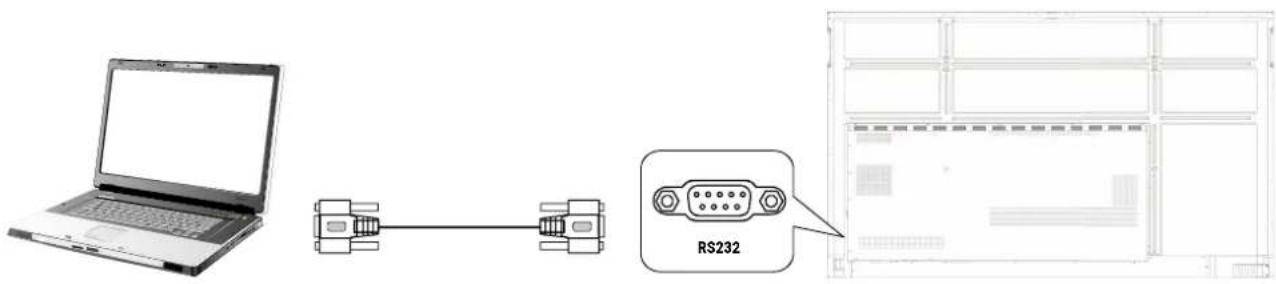

- The applicable cable is not supplied and should be purchased separately.
- This connection is applicable to straight-through RS-232C cable only.
• After using serial port line to connect central control equipment and machine, certain function of the machine can be controlled via central control equipment, such as: machine on/off, and adjustment of sound volume, etc.
Basic operations
Turning the display on or off
I. Be sure to follow the instruction of Connecting power on page 14.
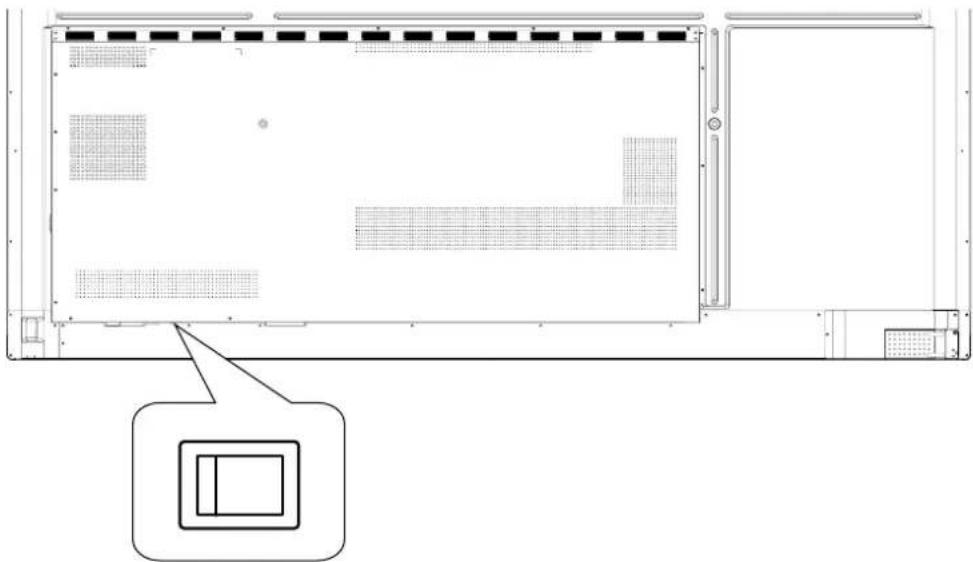
2. At the back of the display, flip on the power switch located on the lower left side to On. The system will enter standby mode.
natural_image
Technical line drawing of a rectangular enclosure with grid patterns and a highlighted square (no text or symbols)- To turn on the display, press the power button on the control panel or on the remote control.
- To turn off the display, press the power button on the control panel or on the remote control. The system will automatically enter standby mode.
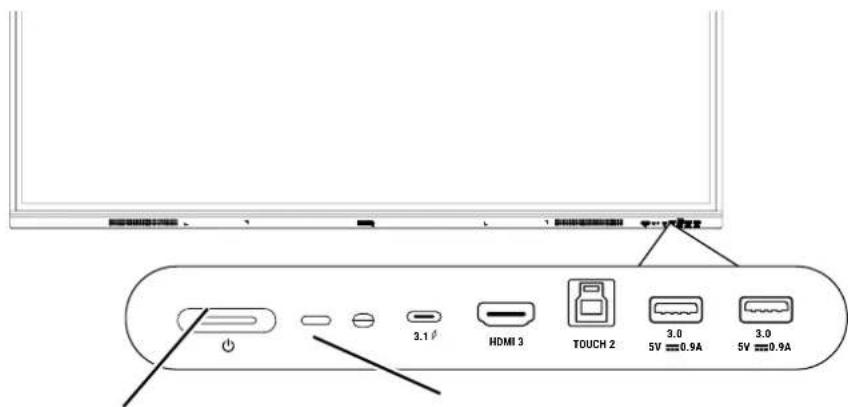
Power button
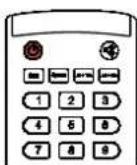
Signal receiver

The display's standby mode still consumes power. To completely cut off power supply, set the power switch to OFF (O) and then disconnect the power cord from the power outlet.
Initial setup
After you have connected the display to the power, you are ready to power on the display. The first time you power on the display, you will be guided through a series of setup screens. Follow the on-screen instructions or the steps below to start up your display and complete the initial setup.
I. Turn on the display. Wait for the display to boot up with the BenQ screen. This may take a moment.
2. Tap Next on the screen to begin. Follow the on-screen instructions to set up the language, date and time, and network. Or your can skip some of these steps and complete the setup later.
OSD Settings
Use one of the following methods to enter the OSD menu:
- Press Menu on the remote control.
- Press the Menu button (💡) on the front panel.
- Drag the OSD menu up from the bottom-center of the screen.
See Menu operations on page 30 for more information on the OSD menus and their settings.
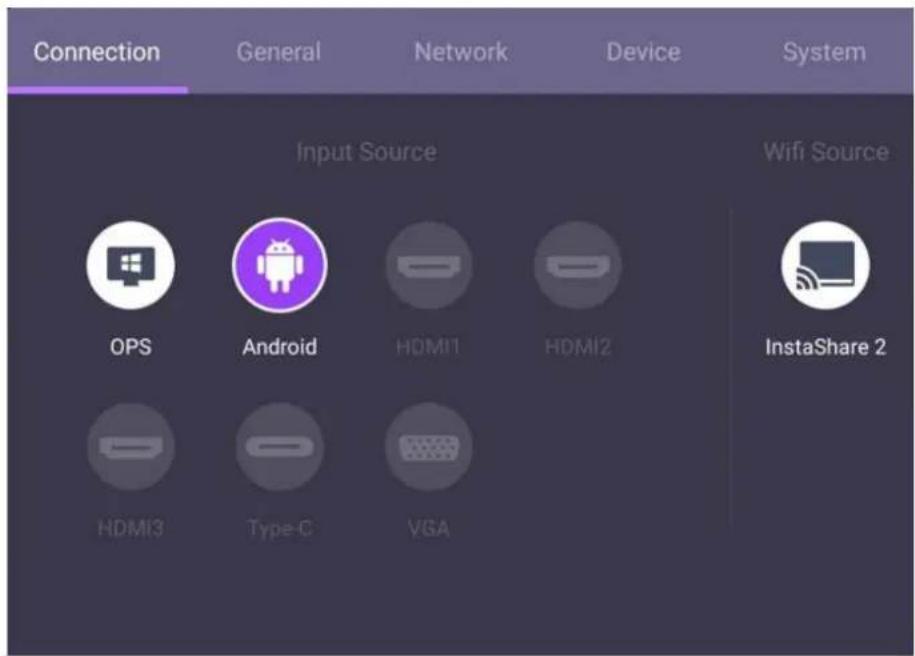
Switching input signals
Under the Connection tab of the OSD menu, you can select a desired input source. See Input settings on page 30 for more information.
Account Information
Three types of accounts are provided: Guest, Admin, and Multiple users.
Guest
It's for public use under Guest account. You are able to change the headshot, wallpaper, volume and brightness.
Admin
Log in as Admin. Under Personal settings, you can change the headshot, wallpaper, and password. You can also enable AMS service, set available offline accounts, and check device information.
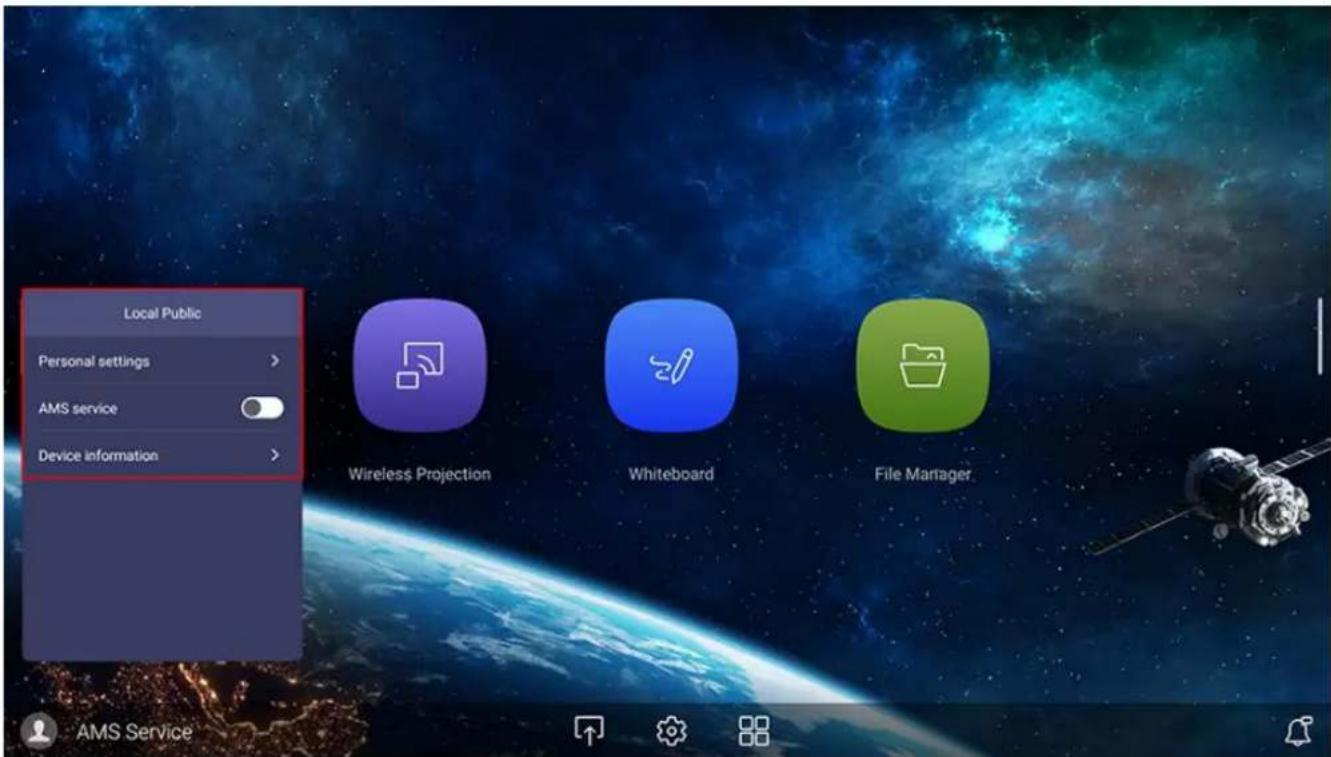
Multiple users
Before logging in as User, be sure to enter the correct email address and activate AMS service.
To access your personal account, you have to ask the administrator to activate AMS service first and create your account through IAM service. See User Management on page 23 for more information.
For more information and tutorial videos about the AMS service please visit https://www.benq.com/en-us/business/ifp/account-management-system.html.
User Management
To add a new user, please contact your IT manager to create your account through BENQ IAM web service.
Creating a new account
I. As an administrator to create a new account for regular users, go to BenQ Service website: https://iam.benq.com. Suggested browsers are Chrome and Firefox.
2. Log in and choose IAM.
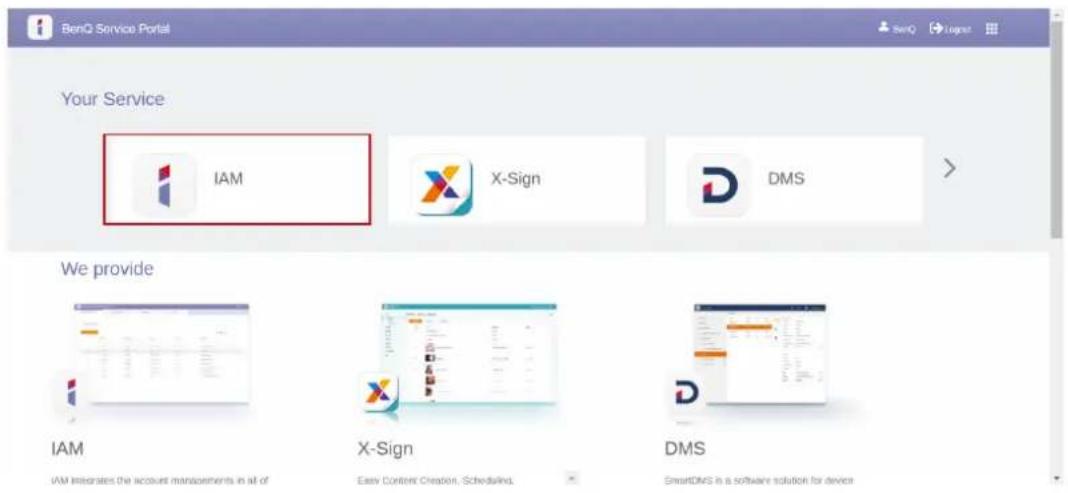
- Click Create New Account to continue.

Account Management
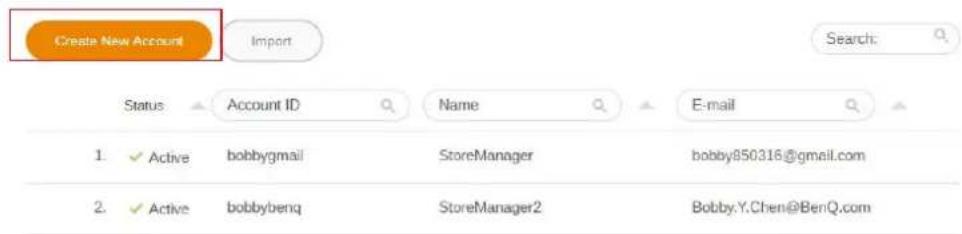
- Fill in the following fields. Be sure to enter the correct email address. Click Submit to create a new account.

- If some members in your organization need more privilege to control the AMS service, you can activate the users as other roles.
- You can also activate X-Sign, DMS, and Broadcast when creating user accounts. Switch to different services, X-Sign, DMS, or Broadcast by clicking the icon on the upper right corner.
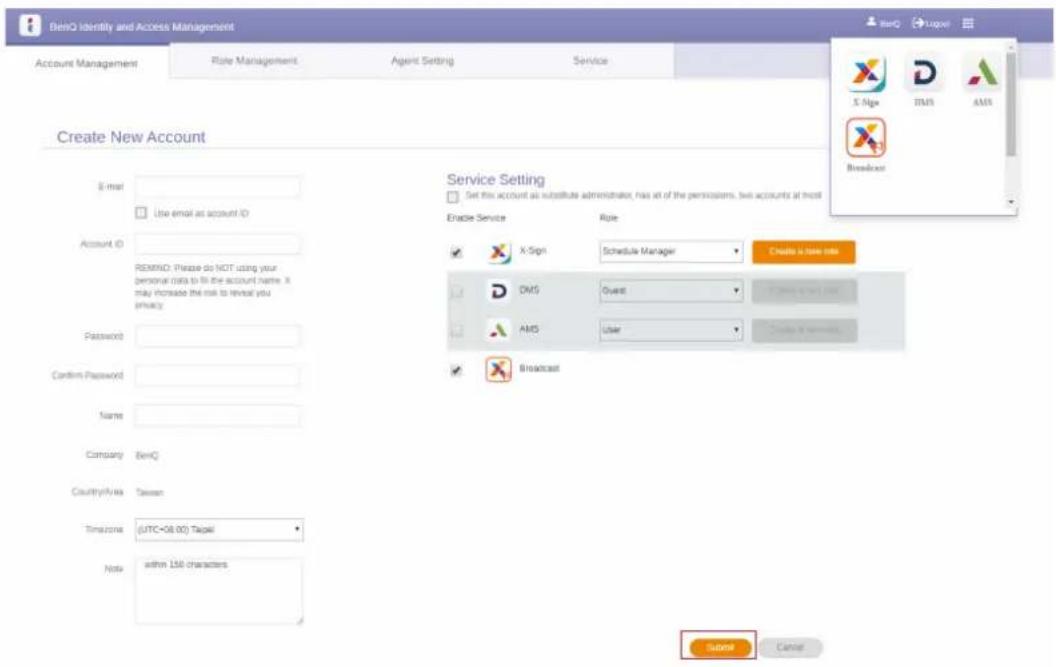
- The account has been created and a verifying email is sent to the new account owner.
Setting up the Internet connection
Your display must be connected to a network to conduct OTA updates or surf the Internet.

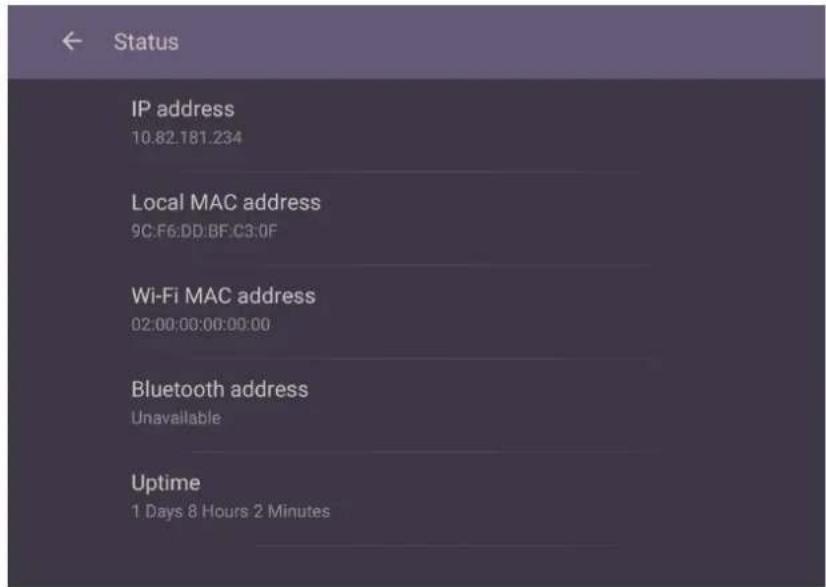
To find the MAC address in Android OS, please go to Setting > System > About > Status.
Network setting
On the home screen, go to Setting > System > About > Status. If there is no IP address shown, please connect the display to the ethernet cable.
Wireless connection
You must use a wireless adapter in order to connect the display to the Internet wirelessly. Please contact your local dealer for more information on configuring the wireless connection.
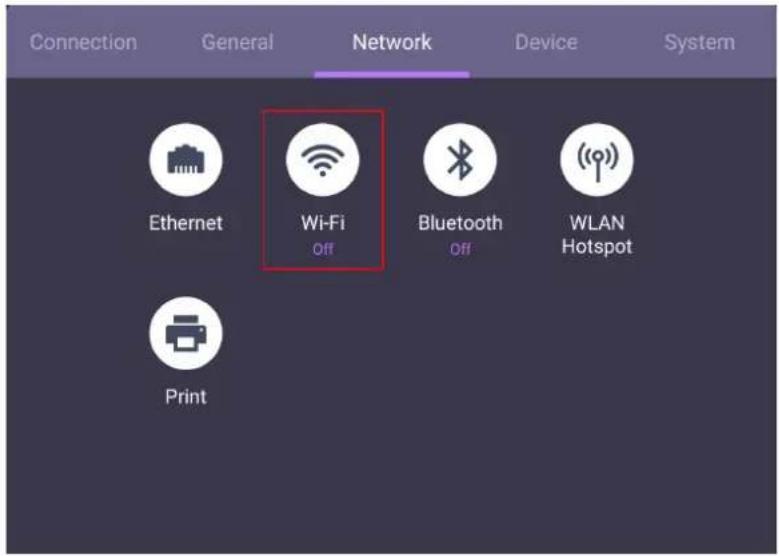
I. Press Menu on the remote control, or go to Network >Wi-Fi.
- Insert the Wi-Fi dongle and the switcher will automatically change to ON. A list of available networks will show on the screen.
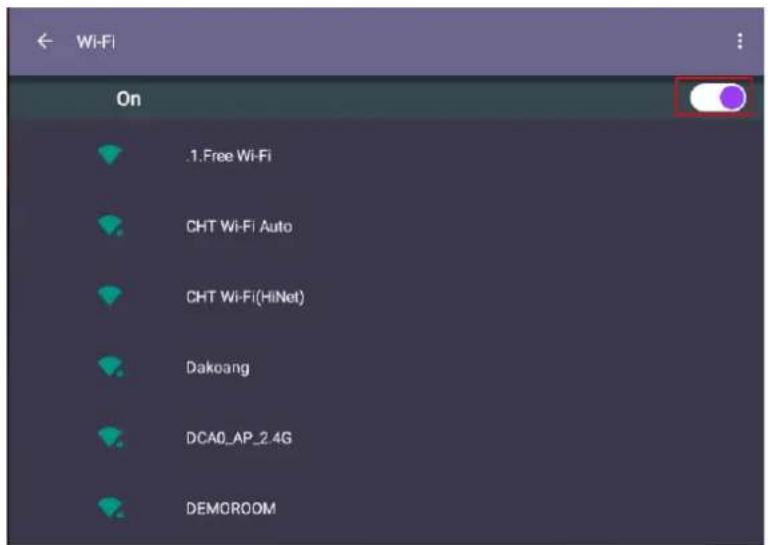
- Touch the network's name to connect to the network. The password is needed if it is your first time to use the network. Key in the password and press Connect. The device is now connected to the WLAN.

- If you are connecting to a secured wireless network, enter the password for the wireless network access when prompted and tap Connect.
- For wireless connection, BenQ shipment does not include wireless dongles; therefore, you may purchase it separately via the local dealer.
Updating software
Whenever a new version of software is available, the system will automatically detect the update and will prompt you to download it every time you turn on the display. If you want to update the software, choose NETWORK UPDATE or USB UPDATE to continue the update. Or your can skip this step and update the software later.
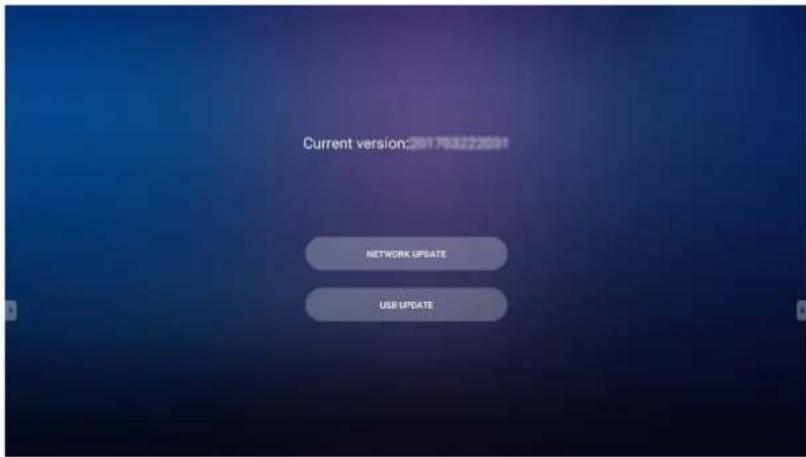
To manually update the software:
I. Go to System > About > System updates.
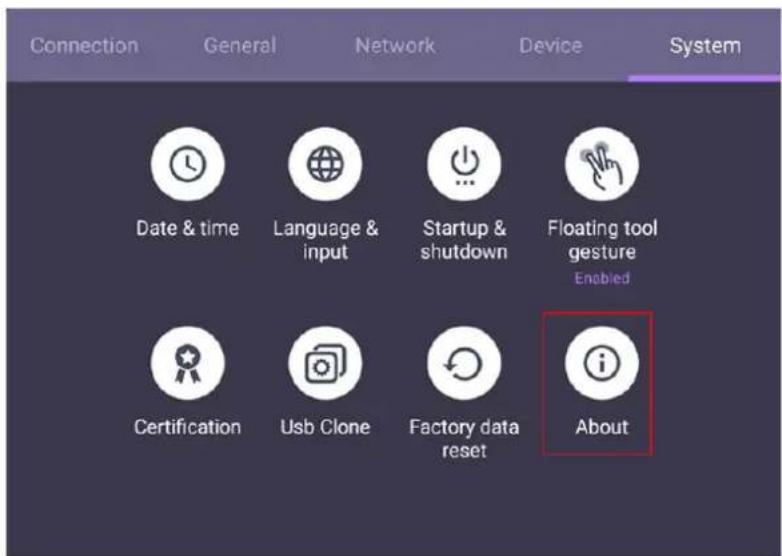
2 If there is an update available, the system will begin updating.

- Software update process may take some time to complete.
- During the update process, do not turn off the device or disconnect the Internet connection. Any interruptions during the software update process may permanently damage your display.
Adjusting audio volume level
To adjust the audio volume level do either one of the following:
- Press VOL+ / VOL- on the remote control to adjust the volume.
- Go to Setting > General to adjust the volume. See General settings on page 31 for more information.
Using the touch screen
You can use the optical touch screen to control your operating system. The following table shows a list of gestures you can use on the touch screen.

Ensure that you have installed the USB cable on the display to a computer.
| OS functions Gesture actions | |
| Click | Tap the screen once.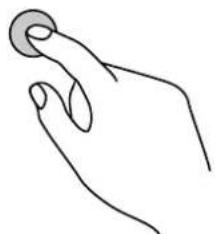 |
| Double-click | Tap the screen twice.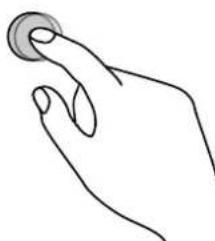 |
| Right-click | 1. Press on the target.2. Hold and wait for a blue ring to appear.3. Release your finger.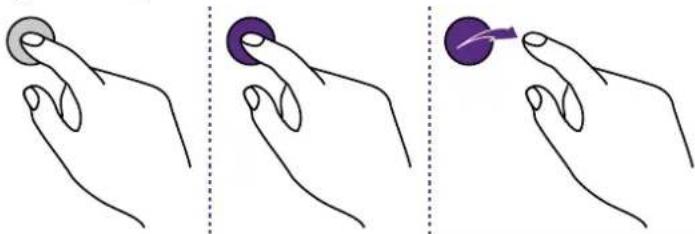 |
| Drag | Drag one finger left or right.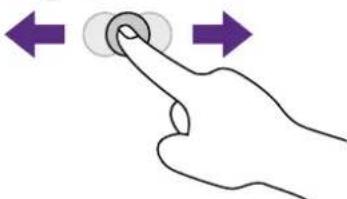 |
| Pan up / Pan down / Back / Forward | Quickly drag your finger (Flick) in a desired direction.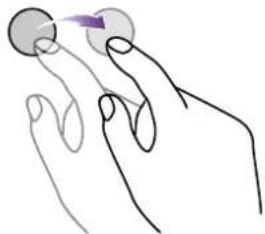 |
| Scrolling | Drag one or two fingers up or down.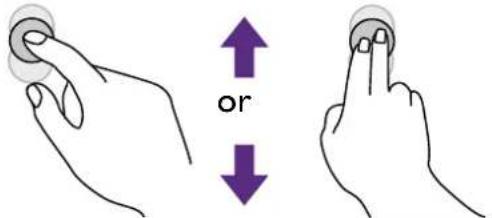 |
| Zoom | Move two fingers apart or toward each other.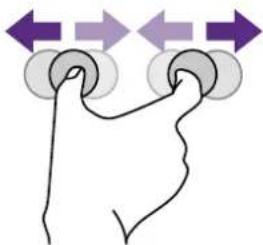 |
Important instructions for using the touch screen
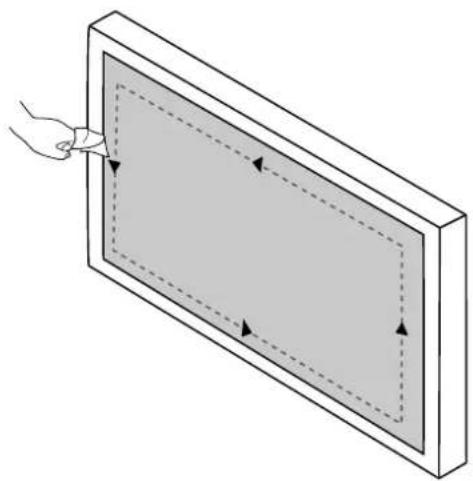
Please clean the frame when there is sign of malfunction on the touch screen.
- Before you clean the screen, make sure the display is turned off, and unplug the power cord.
- Remove dust or dirt from the screen and the infrared plastic filter periodically. It is suggested using a small amount of alcohol to clean the infrared plastic filter.
- To avoid damage to the screen, never use any type of abrasive materials to wipe the screen.
- Use a neutral detergent to clean the touch screen. Avoid using detergents with erosive substance, such as banana oil or ammonia.
- Moisten a clean soft, lint-free cloth with a neutral detergent and then clean the touch screen.
- Do not spray a detergent on the screen surface or the body directly. It may result in a short circuit to the touch screen.
- Keep the touch screen out of direct sunlight or spotlights.
natural_image
Diagram of a hand interacting with a rectangular panel with dashed arrows indicating rotation or movement (no text or symbols)Menu operations
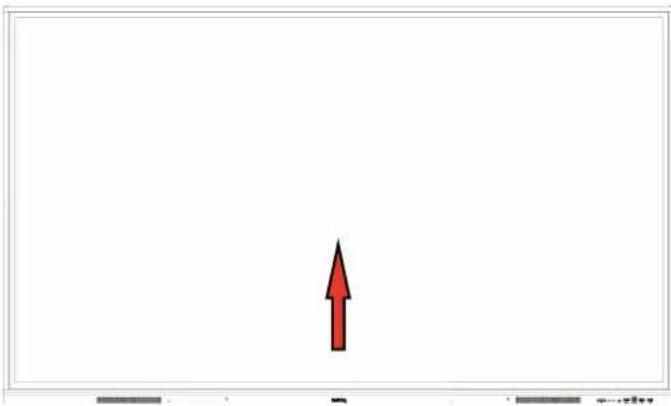
To enter the OSD menu:
- Press Menu on the remote control
- Drag from the bottom-center of the screen
natural_image
Simple red upward arrow centered on a white background, no text or symbols presentTo make selections:
- Press ▲ / ▼ / ◀/ ▶ on the remote control and press OK to confirm or directly click an item.
- PressBack on the remote control or click a blank area outside the menu to exit the menu.
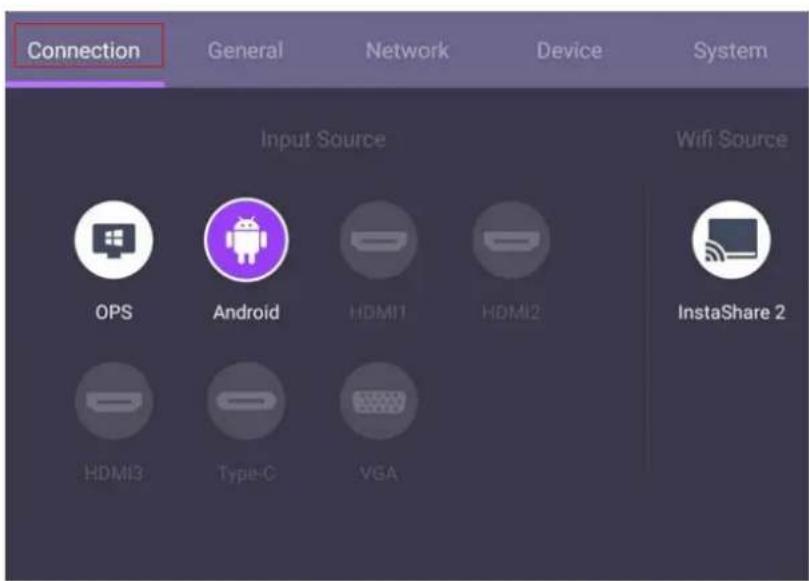
Under Connection, you can select a desired input source and adjust backlight. See Input settings on page 30 for more information.
Settings menu
Input settings
Under Connection, you can select a desired input source.
General settings
Go to General to access the Audio and Picture settings.
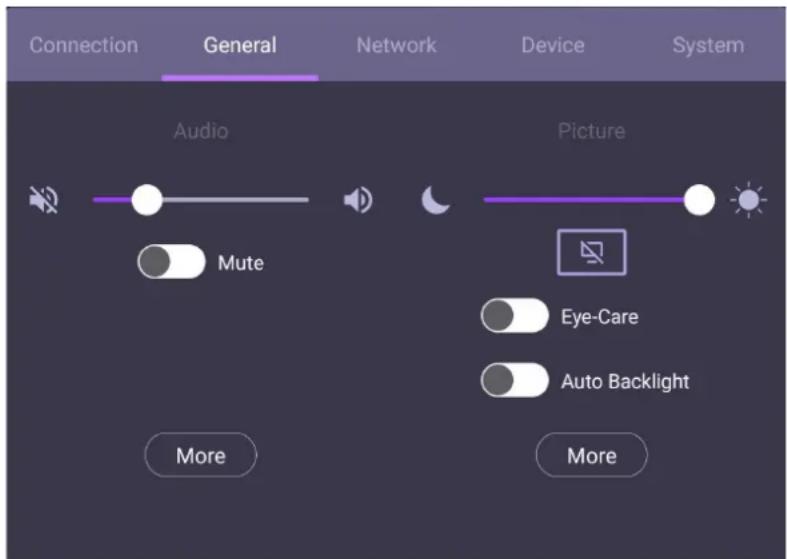
Audio
- Under Audio, use the volume bar to adjust the volume for the display.
- Directly swipe to enable or disable Mute.
- Go to More to enter the Audio menu.
Picture
- Under Picture, use the brightness bar to adjust the brightness for the display.
- You can enable the Eye-Care function on the OSD menu. Eye-Care switches the display's low blue light mode.
- Directly swipe to enable or disable Auto Backlight.
- Go to More to enter the Picture menu.
Eye-Care solutions
Blue light with wavelengths under 455 nm could affect vision. Eye-Care solution is designed for eyesight protection: the display provides proprietary eye-care technology with ultra-low blue light emission and no visible or invisible flicker within the range of 0-3000Hz, preventing eyestrain caused by extended sessions in front of a display. In addition, advanced anti-glare screen treatment minimizes distracting reflections and glare for optimal productivity and comfort.
Suggestions for long-term use of the display:

- Rest your eyes for 10 minutes after 30 minutes of continuous use.
- For every 20 minutes of display viewing, look into the distance for 20 seconds.
- When your eyes get sore and strained, close your eyes for a minute and then roll your eyes in all directions.
To activate the smart eye care solution, enable the Eye-Care function under General.
Low blue light & flicker free:
- To accord with Low blue light TUV certificate, the default setting is Picture Mode: Standard, Color Temperature: Standard and then enable Eye-Care function.
- To accord with Flicker Free TUV certificate, the default setting is Picture Mode: Standard and Color Temperature: Standard.

For more information about Picture settings, see Picture settings on page 34.
Audio settings
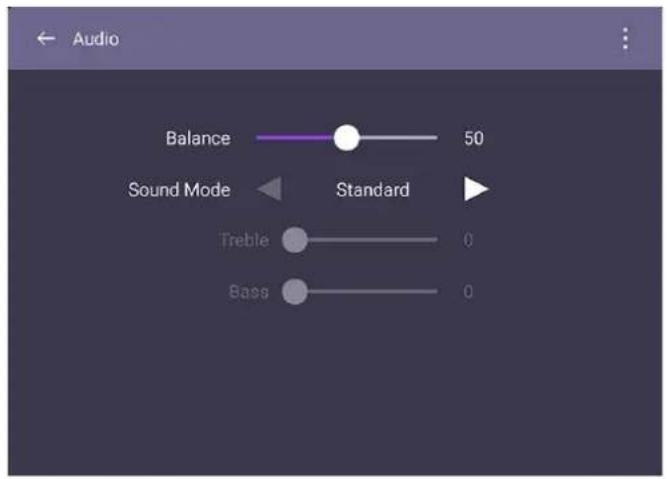
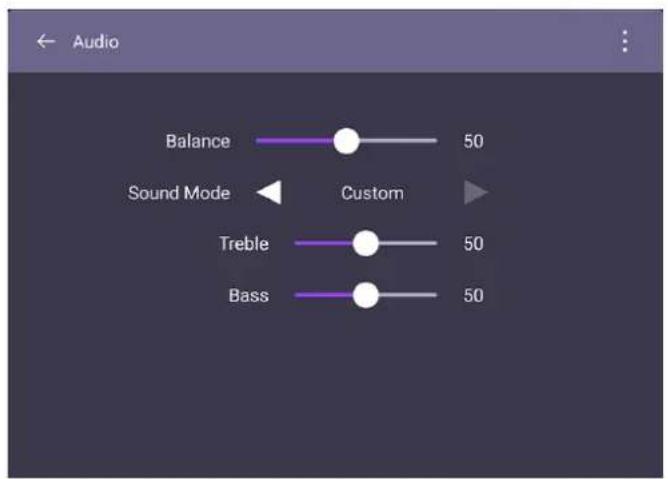
Menu Descriptions
| Balance | Drag the knob to adjust the balance. |
| Sound Mode | Touch a preset sound environment. Options are Standard, Movie, Class, Meeting or Custom mode.Under Custom mode, you can adjust the level of Treble and Bass. |
Picture settings
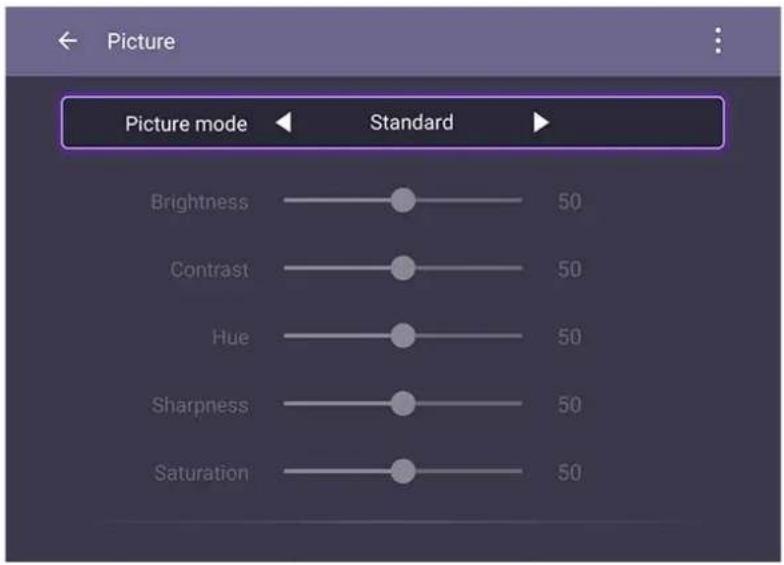
Menu Descriptions
Picture Mode
Press ▲ / ▼ / ◀/ ▶ on the remote control or click a picture mode. Options are Eco, Standard, Bright, Soft, Custom1, Custom2 and Custom3.
Under Android OS, all picture parameters (e.g., Brightness, Contrast) are locked. Users may only adjust the parameters while connecting to other input sources. See Input settings on page 32 for more information.
Color Temperature
Press ◀/▶ on the remote control or click a preset color temperature for the image. Options are Standard, Cool, and Warm.
Device settings
Go to Device to access the device settings.
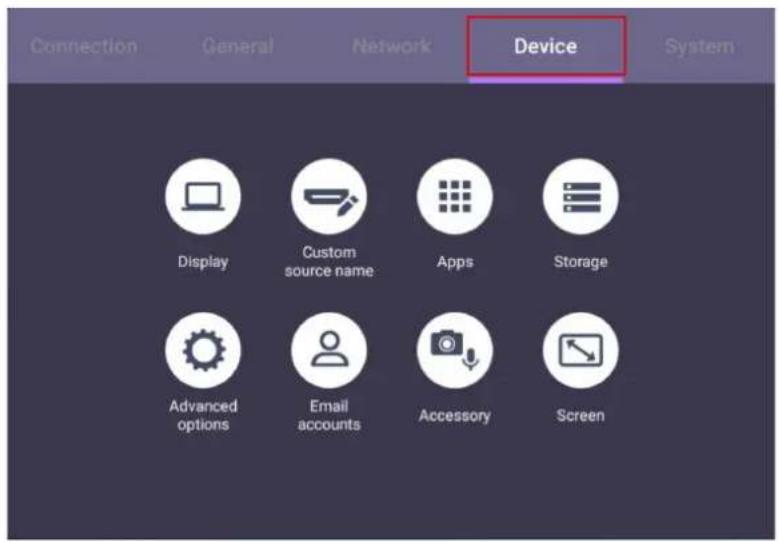
Menu Descriptions
| Display | Allows you to adjust the display's parameters. See General settings on page 31 for more information. |
| Custom Source Name | Allows you to set unique names for each input source. |
| Apps | Accesses all the applications installed in the dispaly. |
| Storage | Allows you to manage the display's storage. |
| Advanced settings | Accesses more device settings. See Advanced settings on page 36 for more information. |
| Email Accounts | Sets the display's email accounts. |
| Accessory | Displays current microphone information. |
| Screen | Allows you to adjust the display's image settings. See Screen settings on page 37 for more information. |
Advanced settings
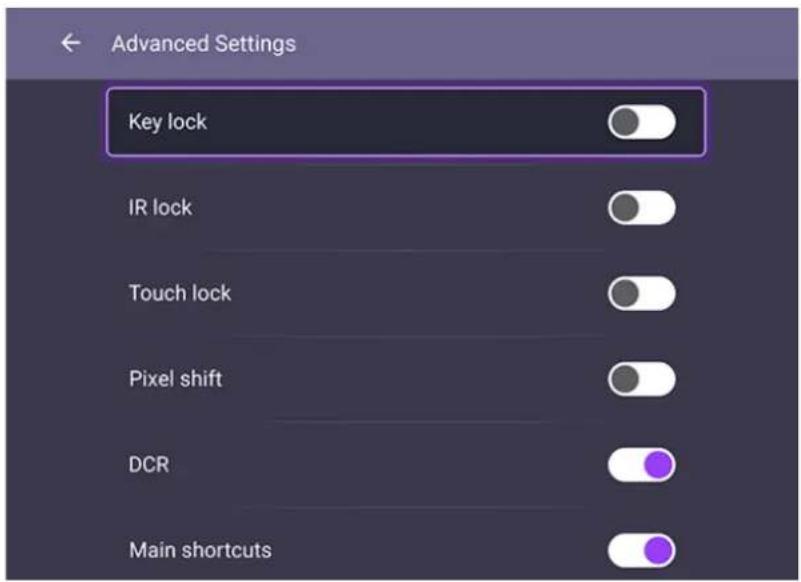
| Menu Descriptions Notes | ||
| Key lock | To lock or unlock the buttons on the front panel of the display. | If keypad, IR and touch are locked all at once, pressMenuon the remote control for five seconds to unlock. |
| IR lock | To lock or unlock the remote control IR sensor on the front panel of the display. | |
| Touch lock To lock or unlock the screen. | ||
| Pixel shift | To set a pixel shift preventing from image retention. | For image retention, please see Notes on the LCD panel of this display on page 3 for more information. |
| DCR | To enable or disable DCR (Dynamic Contrast Ratio). | Under Android OS, both DCR and Main shortcuts are locked.Users may only adjust the options while connecting to other input sources. |
| Main shortcuts To enable or disable main shortcuts. | ||
Screen settings
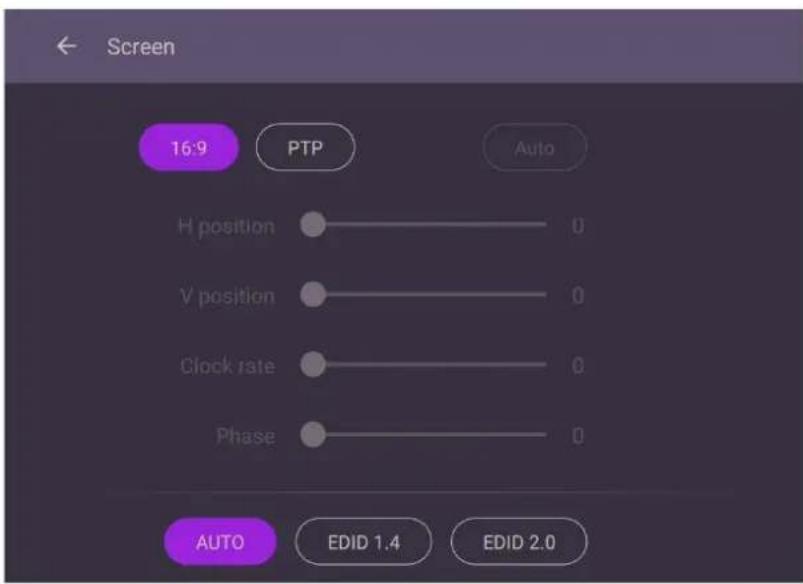
Menu Descriptions
| Aspect ratio | Press ◀/▶on the remote control or click an aspect ratio. Options are 16:9 or PTP. You can also select Auto to automatically adjust the image. |
Use the H position, V position, Clock rate, and Phase functions to manually adjust the image.
Menu Descriptions
| H position, | Press to move the screen to the left or right. |
| V position, | Press to move the screen to the top or bottom. |
System settings
On the home screen, select Setting > System to enter system settings.
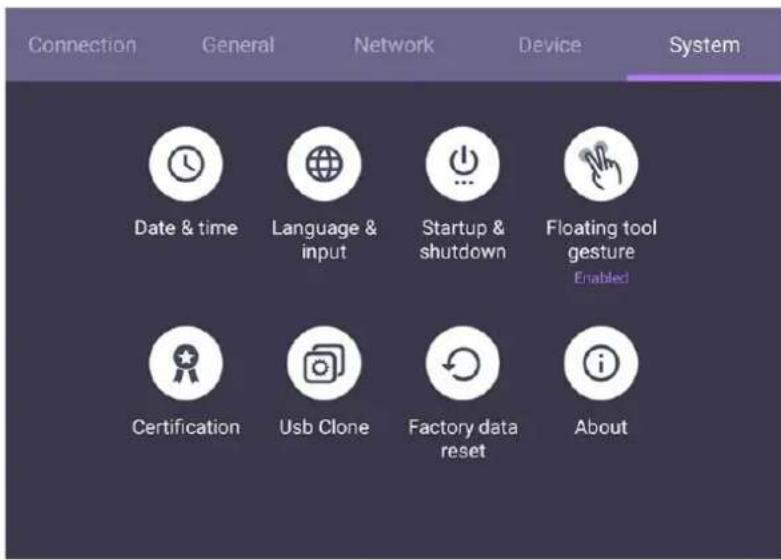
Menu Descriptions
Date & TimeClick to set date, time, and their formats in Android.
| Language & Input | Click to set Language, Keyboard & Input methods in Android. |
| Startup & Shutdown | Click to set the Startup channel, Built-in OPS startup option, Wake on LAN, and Power off reminder. See Startup & Shutdown on page 40 for more information. |
| Floating tool | Click to open and close the floating tool. See EZ Floating Tool on page 44 for more information. |
About Click to view system information in Android.

The amount of available storage space for the user varies according to the amount of pre-installed apps and images occupying the total storage space.
Proxy settings
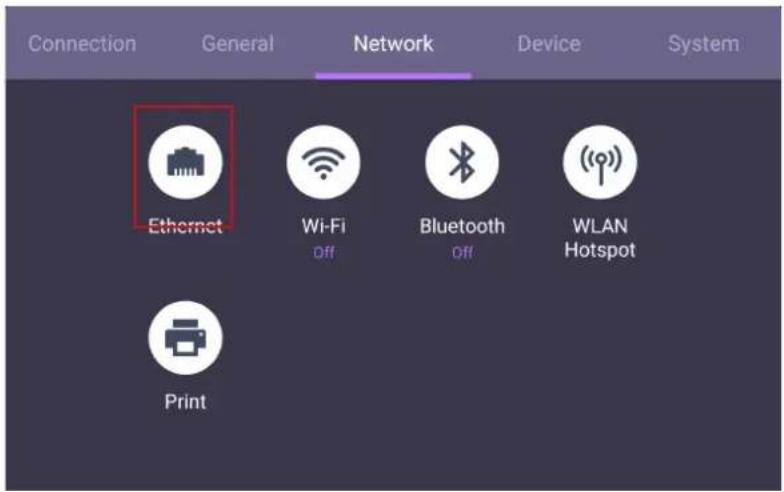
- Go to Network > Ethernet.
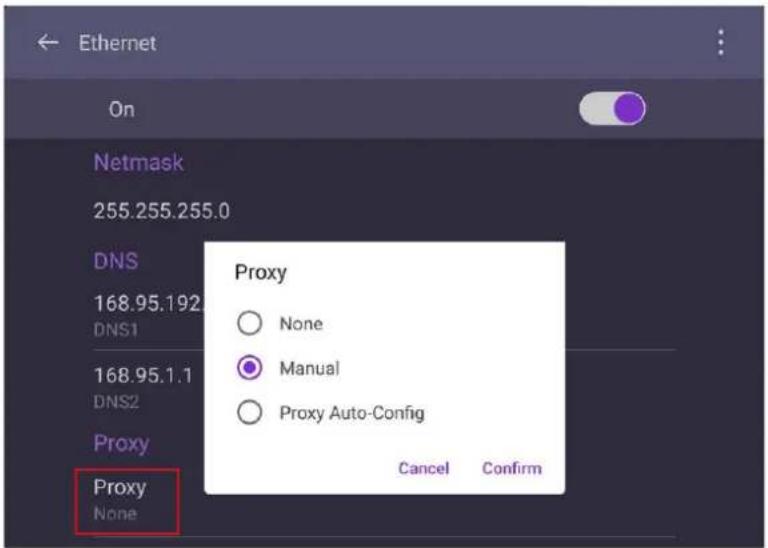
- Select Proxy > Manual and click Confirm to enter the proxy settings.
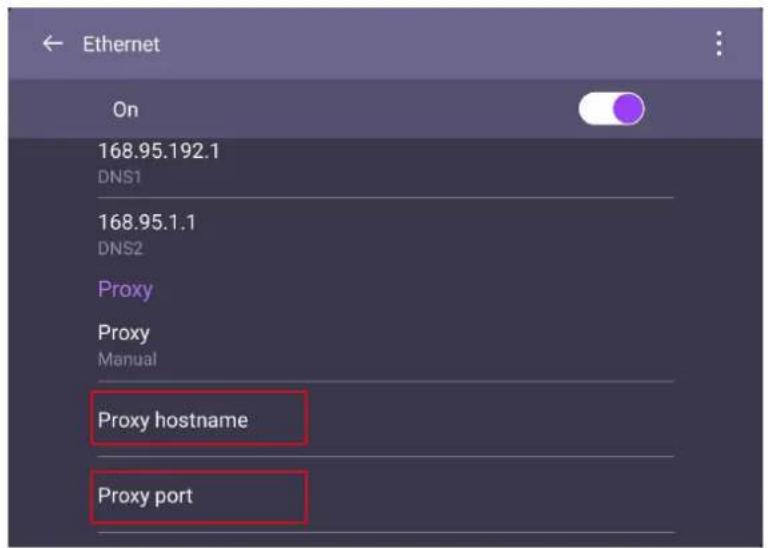
- Select Proxy hostname and Proxy port to enter the host name and the using channel.
Startup & Shutdown
- Go to System > Startup & Shutdown.
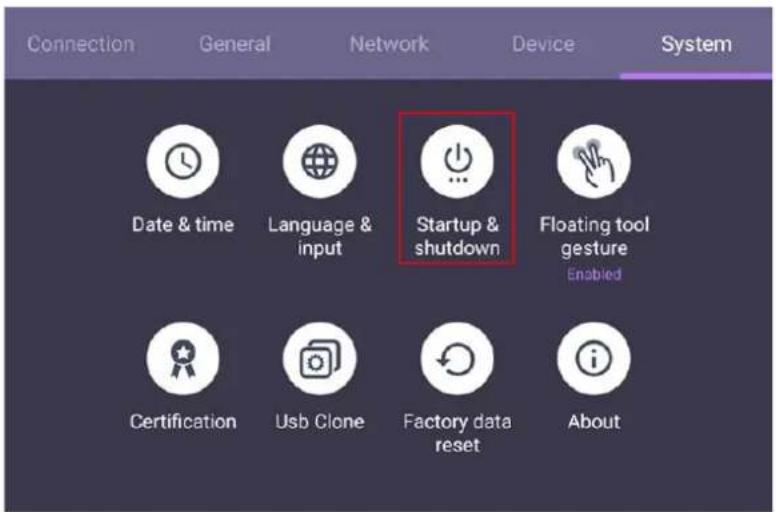
- For Startup channel, you can choose Last shutdown channel or other sources.
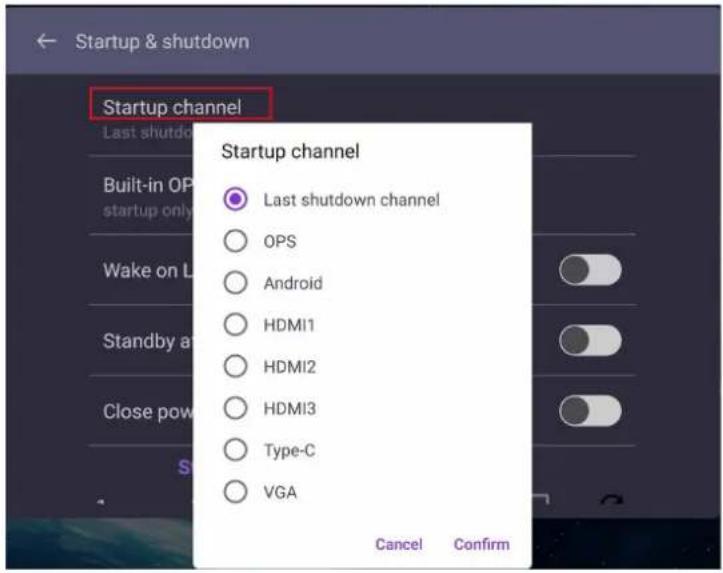
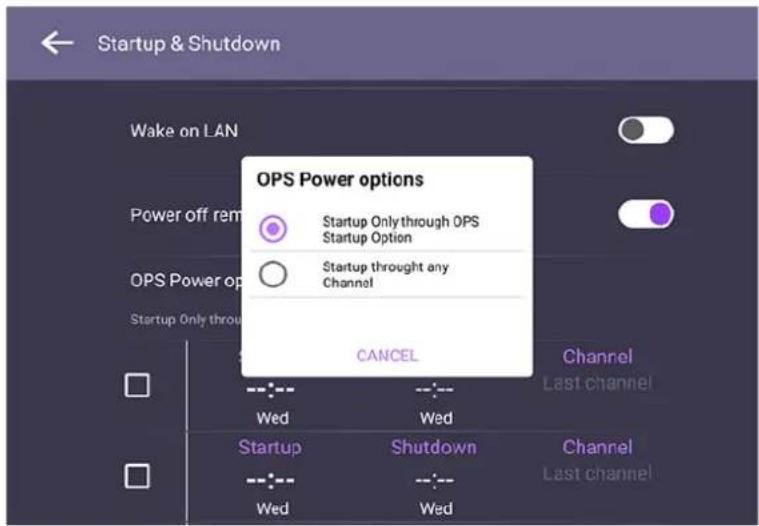
- For Built-in OPS startup option, you can choose Startup only through OPS built-in startup option or Startup through any channel.
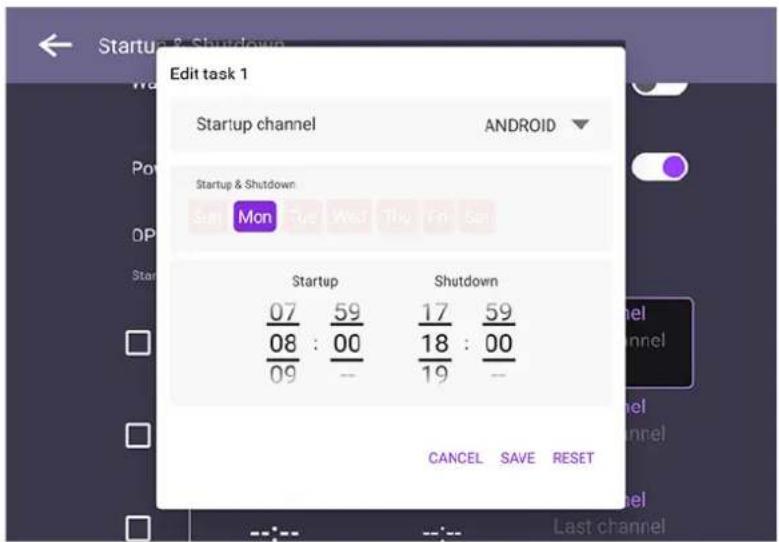
- For Power off reminder, you can set on or off time. Schedules can be made by choosing the days of the week.
Android system interface

Note that this is a closed Android OS. Download and use of unauthorized apps on this system are not available.
Main interface
The display launches the Android main interface by default. To navigate the Android main interface:
- Press Home on the remote control or Home button on the front panel to return to the main interface.
- Press Menu on the remote control or drag the OSD menu up from the bottom-center of the screen to enter the OSD menu to select an input.
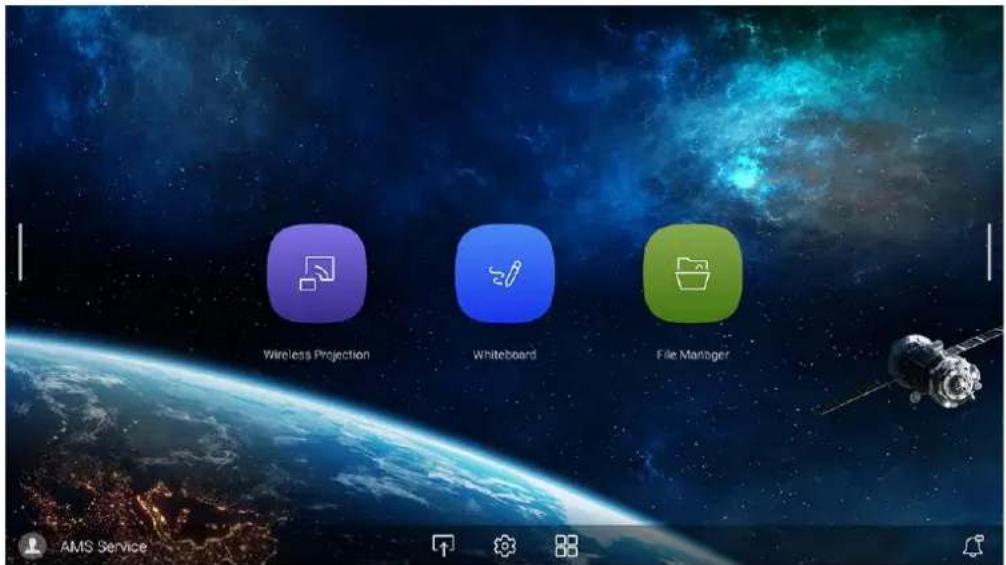
Icon Function Descriptions

Source Press to enter the Connection menu to set input source.

OSD Settings Press to open or close the OSD settings menu.

All Apps Press to access all apps and widgets.
Side tool bar
Tap the side bars at the left or right of the Android main interface to access the side tool bar.
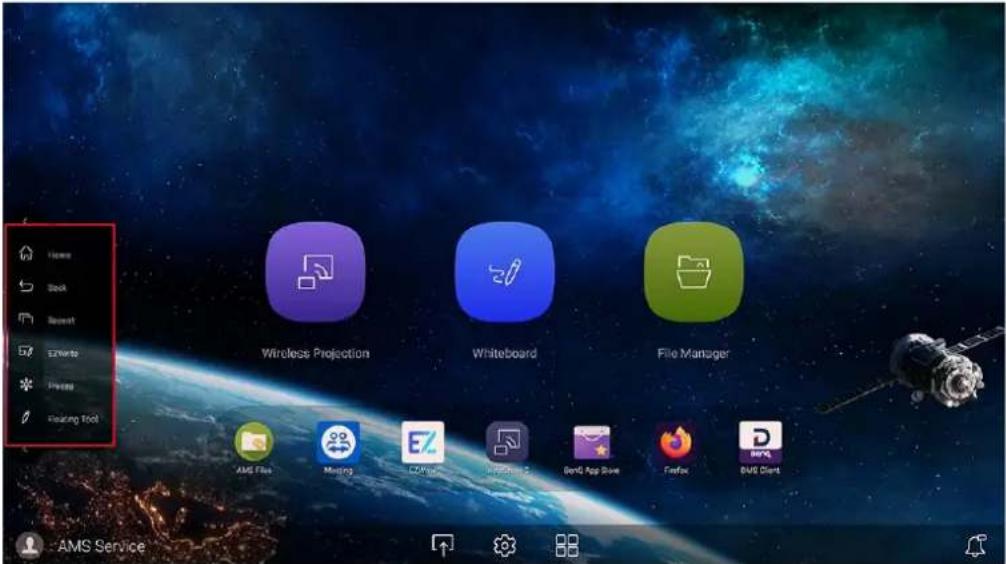

You may drag the tool to the top or bottom of the screen to suit your preference.
Icon Function Descriptions

Home Tap to return to the main interface.

Back Tap to return to the previous screen.

Recent Tap to switch between recent apps and input sources.

EZWrite Tap to enter EZWrite annotation software.

Freeze Tap to freeze the current screen.

FloatingToolTap to open the floating annotation tool.
EZ Floating Tool
The EZ Floating Tool allows you to quickly write or create annotations on any screen that the display is showing.
To access the floating tool use either one of the following methods:
• In the Android interface, tap in the side tool bar.
- Under any input source or in the Android interface, touch and hold two fingers spaced about 20 – 50 mm apart on the screen for more than two seconds to launch the EZFloating Tool menu as shown below.
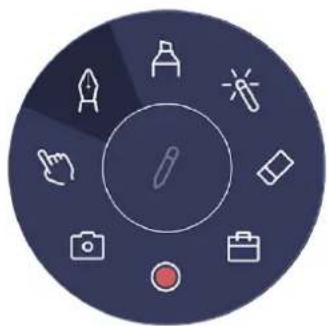
natural_image
Circular icon set with white line art symbols including pencil, magnifying glass, eraser, photo, briefcase, and pen (no text or labels)Icon Function Descriptions
| Minimize/Restore Click to minimize or restore the floating tool. | ||
 | Close Click to close the floating tool. | |
 | Pen Click to enable the Pen tool. | |
 | Highlighter Click to enable the highlighter tool. | |
 | Laser pointer | Click to enable the laser point on the screen. |
 | Eraser | Click to erase annotations on the screen. You may use a finger eraser or choose to clear all annotations |
 | Toolbox | Click to open the toolbox which includes the Calculator, Timer, Stopwatch, Scoreboard, and Draw tools. |
 | Recording | Click to start recording the screen. |
 | Screenshot | Click to take a screenshot of the screen. |
 | Operation mode | Click to hide all the annotations and operate the main interface. |
AMS file manager overview
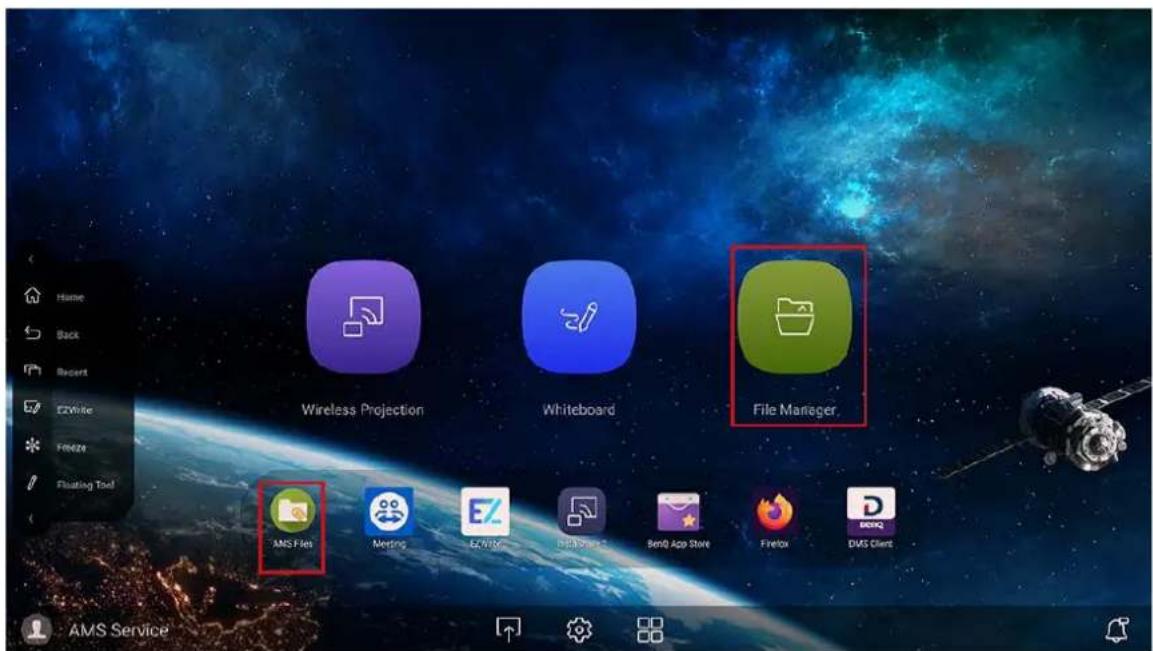
With this application, you can access your personalized workspace environment and settings, and manage your files and accounts on any IFP that you have logged into.
To access the AMS files use either of the following methods:
- Tap the file manager shortcut

- Tap the AMS shortcut
While logging in, you will see four main parts, as described in the table below:
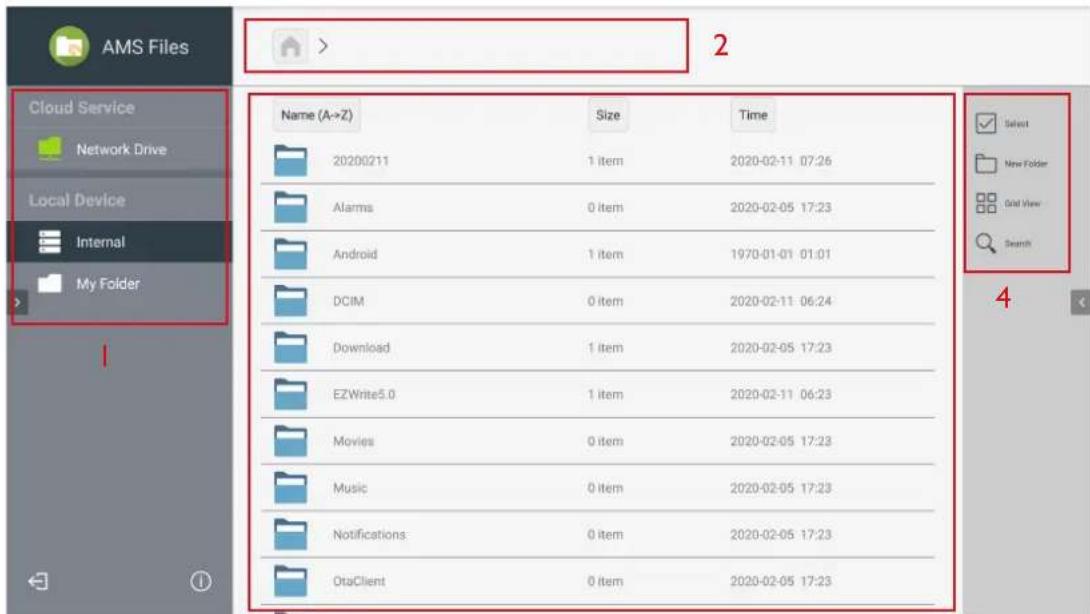
Item Description
I. Source Selection
- You can open files from the cloud storage services like Google Drive, Dropbox, or Samba.
- You can also open files from the local devices like Internal, My Folder, or connected USBs.

The icon next to Google Drive, Dropbox shows that the account is bound to AMS service.
2 Folder Path You can browse the file folder in this area.
-
Listing Files You can see a list of files from the storage device you select.
-
Operating Tab You can edit the files using the operating tabs here.

Regular users can only view their own files, while the local admin can view all users' files in the domain.
Multimedia files
Multimedia files such as images, audio files, and videos can be played by directly tapping on the file icon.
Image
Select an image file you want to show on the display and perform any of the functions shown on the screen.
natural_image
Historical sailing ship at sunset with golden sky and trees (no text or symbols)
Icon Function

Magnifies the image.

Shrinks the image.

Adjusts the size of the image.

Rotates the image clockwise.

Tap to enter image settings.
Supported photo format (Codec)
| File Format Supported range Remark | ||
| .bmp BMP | 8000x8000 | Memory limitation, 8000x8000 pixels tested |
| .gif GIF | 6000x4500 | Memory limitation, 6000x4500 pixels tested |
| File Format Supported range Remark | |||
| .jpeg/jpg JPEG | Base-line 8000x8000 | Memory limitation, 8000x8000 pixels tested | |
| Progressive 8000x8000 | |||
| .png PNG | 8000x8000 | Memory limitation, 8000x8000 pixels tested | |
Audio/Video
Select an audio/video file you want to play on the display and perform any of the functions shown on the screen.
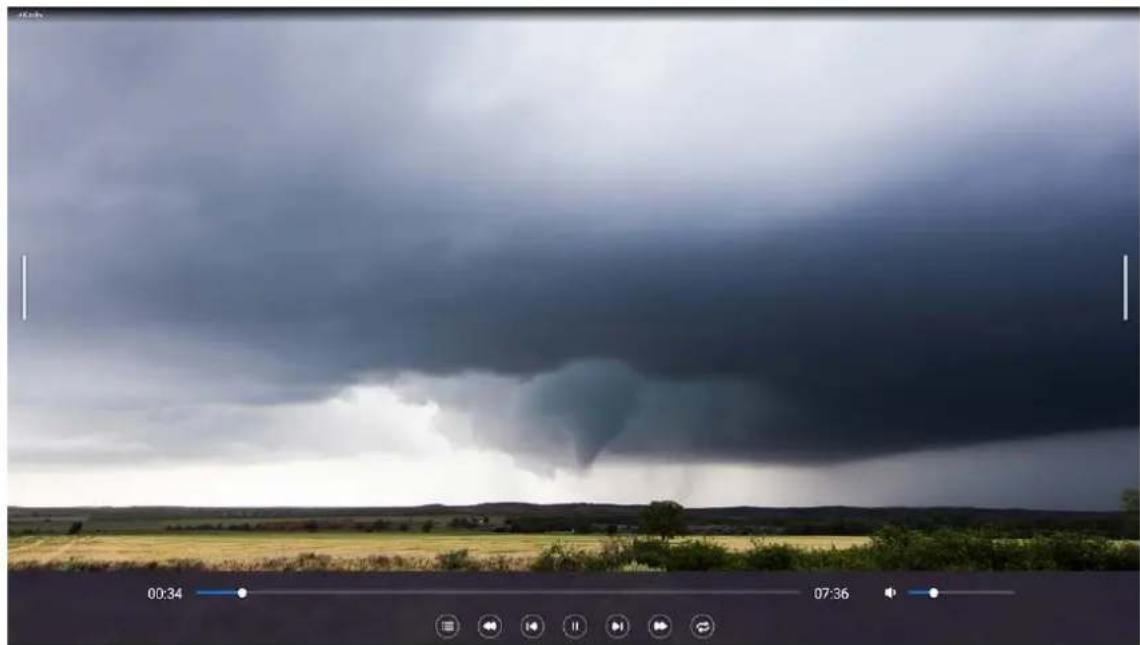
natural_image
Dramatic storm cloud over a rural landscape with fields and trees, captured in video player interface (no text or symbols on the main image)Icon Function

Tap to view the audio/video files in the playlist.

Rewinds the audio/video.

Plays the previous audio/video file.


Plays/pauses the current audio/video file.

Plays the next audio/video file.

Fast forwards the audio/video.


Adjust repeats, including repeat all/repeat one/no repeat.

Adjusts the audio/video volume.
Supported audio format (Codec)
| File Format Supported range Remark | |||
| .aac AAC | AAC/HE-AAC | Sample Rate: 8K~96KHz | |
| Bit Rate: VBR | |||
| .ape | Monkey's Audio | Monkey's Audio | Sample Rate: 8KHz-48KHz |
| Bit Rate: VBR | |||
| .flac FLAC | FLAC | Sample Rate: 8K~96KHz | |
| Bit Rate: VBR | |||
| .pcm PCM | PCM Sample | Rate: 8KHz-48KHz | |
| .alac ALAC | ALAC | Sample Rate: 8KHz-48KHz | |
| .mp3 | MPEG Audio Layer3 | MPEG1/2 layer3 | Sample Rate: 8K~48KHz |
| Bit Rate: 8~320Kbps | |||
| .ogg | Vorbis | Vorbis | Sample Rate: 8K~96KHz |
| .wav WAV | PCM | Sample Rate: 8K~48KHz | |
| Bit Rate: Up to 1.5Mbps | |||
Supported video format (Codec)
| File | Codec | ||
| Extensions | Video | Audio | Maximum transmit ratio |
| .3gp/3GP2 | Mpeg1/2 | Mpeg1/2 Layer1/2/3, AAC-LC, HE-AAC, PCM | Spec: Max Solution: 1920*108060 Fps |
| Mpeg-4 | Spec: Max Solution: 1920*108060 Fps | ||
| H.263 | Spec: Max Solution: 352*288 30Fps | ||
| .avi | Mpeg1/2 | Mpeg1/2 Layer1/2/3, AAC-LC, PCM | Spec: Max Solution: 1920*108060 Fps |
| Mpeg-4 | Spec: Max Solution: 1920*108060 Fps | ||
| H.263 | Spec: Max Solution: 352*288 30Fps | ||
| H.264 | Spec: Max Solution: 3840*216030 Fps 100Mbps | ||
| Mjpeg | Spec: Max Solution: 1920*108030 Fps | ||
| File Codec | |||
| Extensions Video Audio Maximum transmit ratio | |||
| .dat Mpeg1/2 Mpeg1/2 Layer1/2/3 Spec: Max Solution: 1920*108060 Fps | |||
| .flv/f4v | Mpeg-4 | Mpeg1/2 Layer1/2/3, AAC-LC, HE-AAC, PCM | Spec: Max Solution: 1920*108060 Fps |
| H.263 | Spec: Max Solution: 352*288 30Fps | ||
| H.264 | Spec: Max Solution: 3840*216030 Fps 100Mbps | ||
| .mkv | Mpeg1/2 | Mpeg1/2 Layer1/2/3, AAC-LC, PCM | Spec: Max Solution: 1920*108060 Fps |
| Mpeg-4 | Spec: Max Solution: 1920*108060 Fps | ||
| H.264 | Spec: Max Solution: 3840*216030 Fps 100Mbps | ||
| vp8 | Spec: Max Solution: 1920*108030 Fps | ||
| vp9 | Spec: Max Solution: 3840*216060 Fps 60Mbps Spec: MaxSolution: 7680*4320 30 Fps22.3Mbps | ||
| H.265 | "Spec: Max Solution: 3840*216060 Fps 97.7MbpsSpec: Max Solution: 7680*432030 Fps 100Mbps" | ||
| .mov | Mpeg1/2 | Mpeg1/2 Layer1/2/3, AAC-LC, PCM, vorbis, PCM | Spec: Max Solution: 1920*108060 Fps |
| Mpeg-4 | Spec: Max Solution: 352*288 30Fps | ||
| H.263 | Spec: Max Solution: 3840*216030 Fps | ||
| H.264 | Spec: Max Solution: 3840*216030 Fps 100Mbps | ||
| Mjpeg | Spec: Max Solution: 1920*108030 Fps | ||
| .mp4 | H.265 | Mpeg1/2 Layer1/2/3, AAC-LC, HE-AAC, PCM, vorbis, PCM | Spec: Max Solution: 3840*2160 60 Fps 97.7Mbps Spec: Max Solution: 7680*4320 30 Fps 100Mbps |
| Mpeg1/2 | Spec: Max Solution: 1920*1080 60 Fps | ||
| Mpeg-4 | Spec: Max Solution: 352*288 30 Fps | ||
| H.263 | Spec: Max Solution: 3840*2160 30 Fps | ||
| H.264 | Spec: Max Solution: 3840*2160 30 Fps 100Mbps | ||
| Mjpeg | Spec: Max Solution: 1920*1080 30 Fps | ||
| .VOB Mpeg1/2 | Mpeg1/2 Layer1/2/3, AAC-LC, PCM | Spec: Max Solution: 1920*1080 60 Fps | |
| .mpg/.mpeg | Mpeg1/2 | Mpeg1/2 Layer1/2/3, AAC-LC, PCM | Spec: Max Solution: 1920*1080 60 Fps |
| Mpeg-4 | Spec: Max Solution: 352*288 30 Fps | ||
| H.264 | Spec: Max Solution: 3840*2160 30 Fps | ||
| .webm | vp9 | Mpeg1/2 Layer1/2/3, AAC-LC, PCM | Spec: Max Solution: 1920*1080 30 Fps 100Mbps |
| VP8 | Spec: Max Solution: 3840*2160 60 Fps 60Mbps Spec: Max Solution: 7680*4320 30 Fps 22.3Mbps | ||
| .ts | H.265 | Mpeg1/2 Layer1/2/3, AAC-LC, HE-AAC, PCM | Spec: Max Solution: 3840*2160 60 Fps 97.7Mbps Spec: Max Solution: 7680*4320 30 Fps 100Mbps |
| Mpeg1/2 | Spec: Max Solution: 1920*1080 60 Fps | ||
| Mpeg-4 | Spec: Max Solution; 352*288 30 Fps | ||
| H.264 | Spec: Max Solution: 3840*2160 30 Fps 100Mbps | ||
Apps
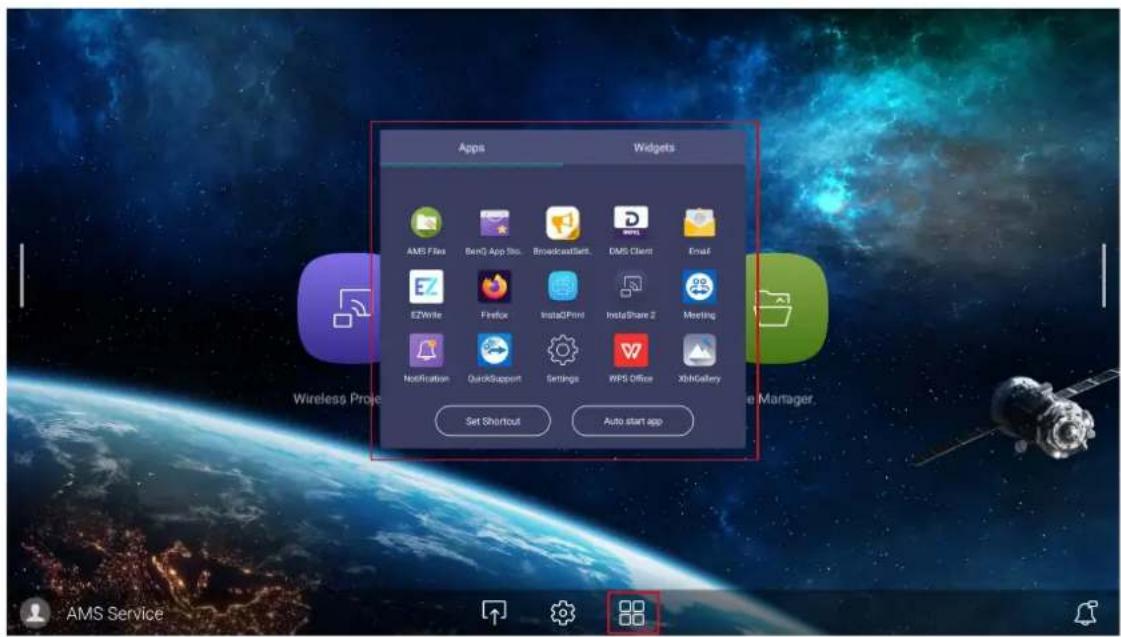
Tap the desired app to launch the app.
| Application Name Description | |
BenQ App Store  | Allows you to download recommended apps. See BenQ App Store on page 53 for more information. |
BenQ Notification  | Allows you to receive upgrade notifications of existing apps and information of new apps available for download. |
InstaShare 2  | Allows screen mirroring and touch control for collaborative meetings. See InstaShare 2 on page 54 for more information. |
InstaQPrint  | Allows you to print a file or website image using a Wi-Fi or remote printer. |
WPS Office  | Allows you to read PDF files or edit files created in Microsoft Office, PowerPoint, or Excel. See WPS Office on page 56 for more information. |
Email  | See Email on page 58 for more information. |
TeamViewer Meeting  | Gives you access to instant or scheduled group meetings with any other TeamViewer Meeting users. |
BenQ App Store
Tap 📋 to launch BenQ App Store. With this application, you can view apps suggested by BenQ for download.
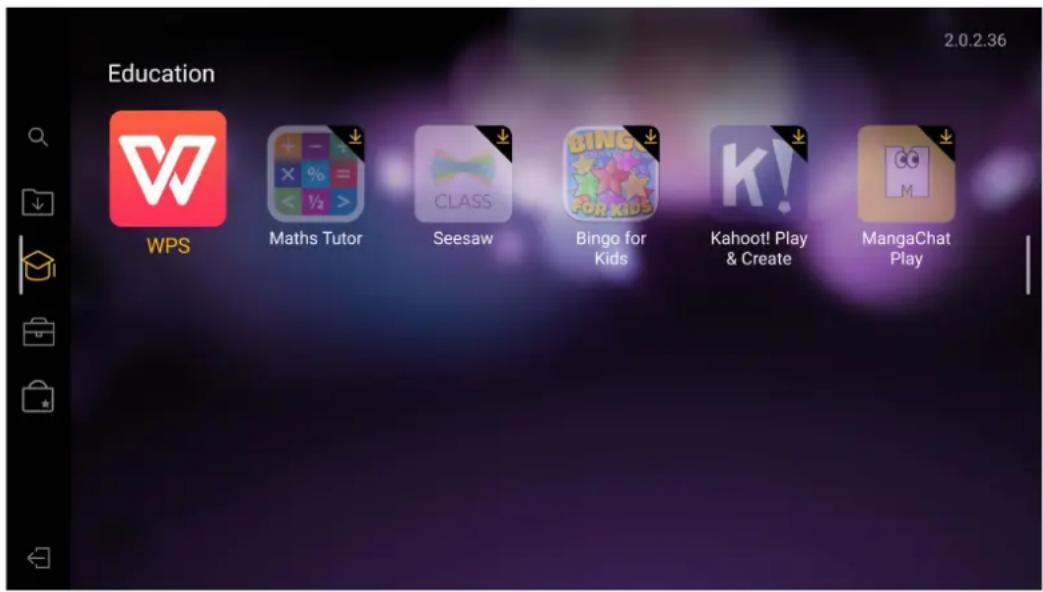
Tap the category on the left panel to browse the suggested apps.
| Function Description | |
Search  | Search for an app. |
Update Center (  ) ) | Allows you to update the BenQ Store app. |
Education (  ) ) | Lists th suggested apps in the Education category |
Corporation (  ) ) | Lists the suggested apps in the Corporation category |
BenQ Apps (  ) ) | Lists the available BenQ apps. |
Exit (  ) ) | Close BenQ Store. |
InstaShare 2
InstaShare 2 (播放) is a software-based solution for multi-user collaboration, which lets users to share contents with all devices in a meeting wirelessly.
Two ways are provided for you to access InstaShare 2:
- On the Android main interface, select Wireless Projection ( ).
- Select All Apps( ) > InstaShare 2 ( )

Before launching the application, make sure your display is properly connected to Internet.
When you enter InstaShare 2, the main interface is shown as below:
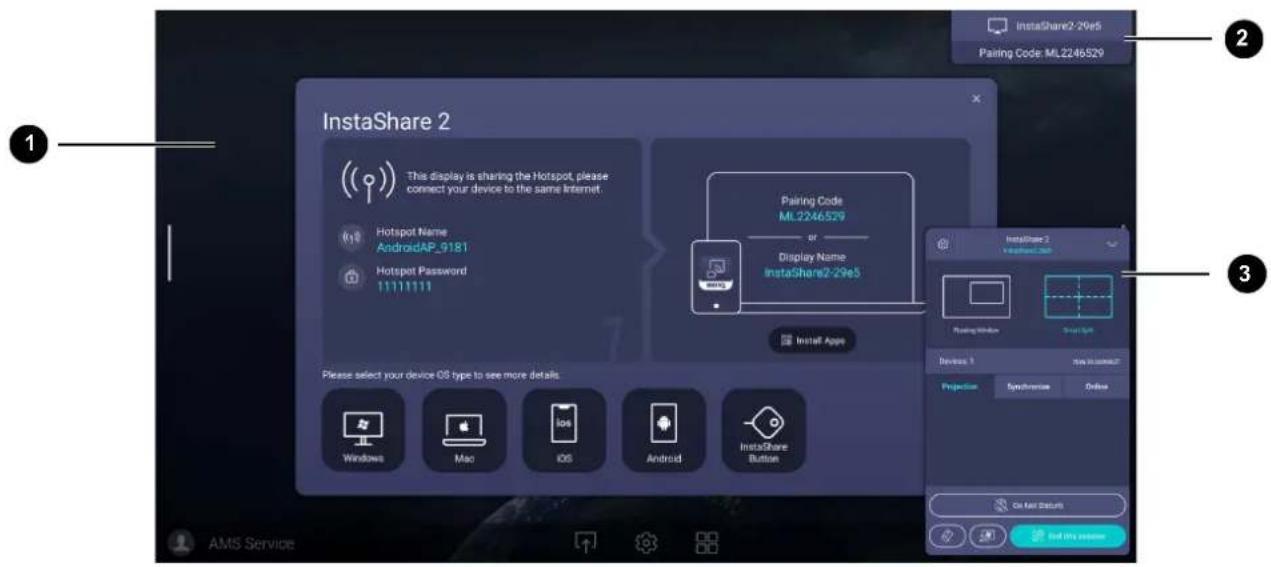
No Function Description
| 1 Tutorial window | Follow the guide to connect and pair your device with the display. Select the device OS type below to see the projection tutorial respectively. |
| 2 Information window | Shows the display name, pairing code and connection password while presenting. |
| 3 Host Controls window | Allows you to control the whole session and participant actions. You can also install InstaShare 2 app to manage the meeting session remotely |
InstaQPrint
Tap 📋 to launch InstaQPrint. With this application, you can print a file or website image using a Wi-Fi or remote printer.

- Before launching the application, make sure your display is properly connected to Internet.
- For the list of supported printers, see https://printhand.com/list_of_supported_printers.php.
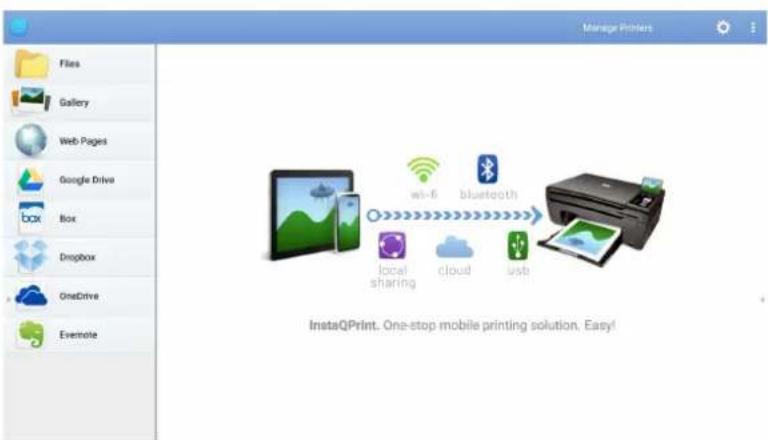
I. Tap the options on the left panel to browse and select the desired file, photo, page, or image you want to print.
2. Tap Manage Printers to choose which printer that you want to use.
-
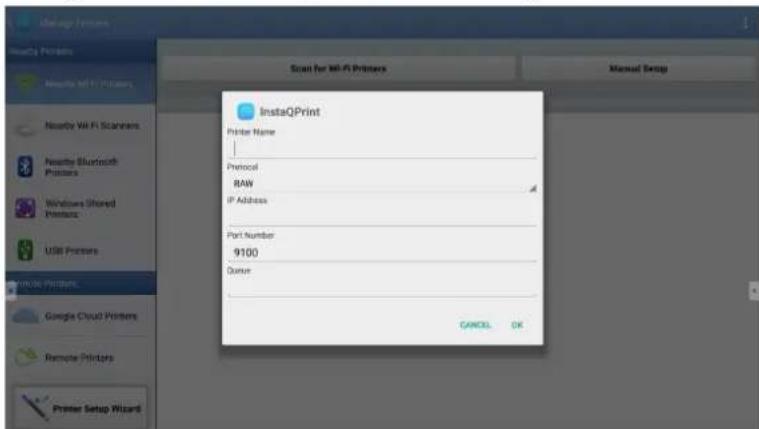
To select a printer:
-
Tap an option from the list of available printers on the left panel.
- Tap Scan for Wi-Fi Printers to search for printers automatically.
- Tap Manual Setup to add a new printer manually.
WPS Office
Tap W to launch WPS Office. With this application, you can open document files including PDFs as well as Microsoft Word, PowerPoint and Excel documents.
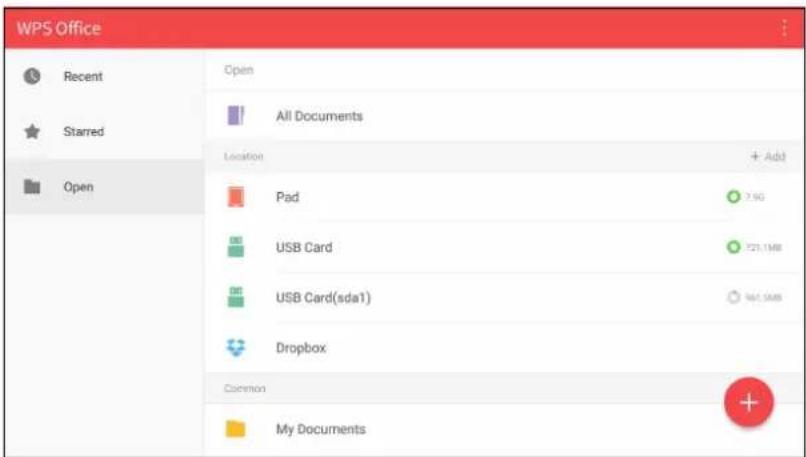
To edit a file with WPS Office:
I. Tap Open on the left panel to browse and open a file located in either the display's internal memory, an external storage device, or cloud storage.
2 Tap the function menu on the top panel to access the file format's various functions.

The description below is for a PowerPoint file, the function menus for other file formats will vary.
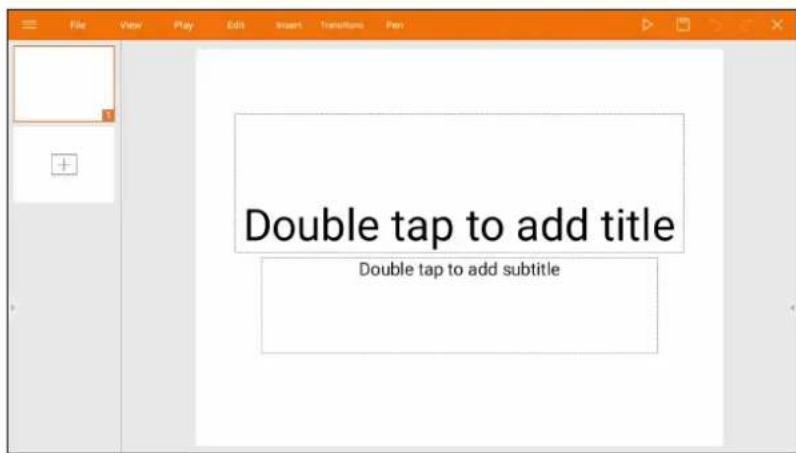
Function Description
File Tap to open, save, share, print, and manage your presentations.
View Tap to change or edit the presentation views.
Play Tap to start or set up a slide show.
Edit Tap to edit the content or format of the slides.
Insert Tap to insert tables, pictures, charts, comments, video, or audio.
Function Description
Transitions Tap to apply or adjust the timing of a transition.
Pen Tap to write, draw, paint or sketch to the slides.
Play Tap to start a slide show.
Save As
Tap to save the presentation file on either the display's internal memory, an external storage device, or cloud storage.
Undo Tap to undo an action.
Redo Tap to redo the last action.
Close Tap to close the presentation file.
Back Tap to return to the previous page.
Next Tap to go to the next page.
Exit Tap to exit WPS Office.
Supported Office versions and file formats
Supported Office versions: 97 / 2000 / XP / 2003 / 2007 / 2010 / 2013 / 2016
Supported Office software formats:
| Office Software | Supported file formats |
| Word | wps / wpt / doc / docx / dot / dotx / txt / log / irc / c / cpp / h / asm / s / java / asp / bat / bas / prg / cmd |
| Excel | et / ett / xls / xlsx / xlt / xltx / csv / xlsm / xltm |
| PowerPoint | ppt / pptx |
Tap 📋 to launch Email. To use Email, set up an account first. Type your Email address and click NEXT.
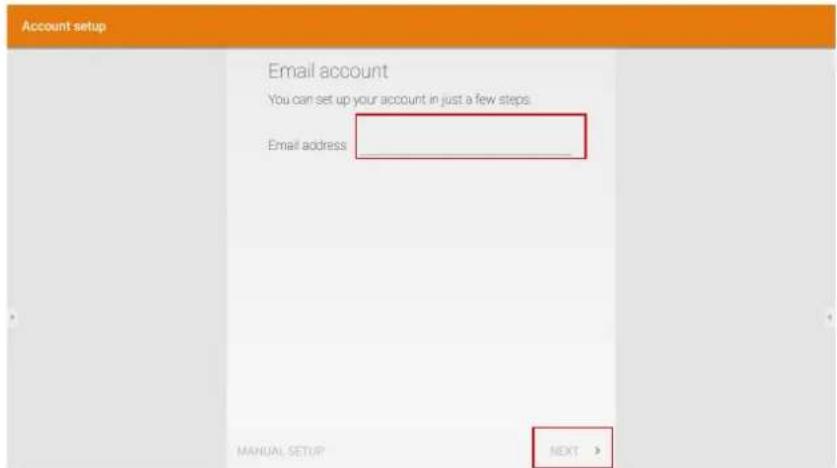
After you've signed up, you will receive a verification email. After you respond to the Email verification, you can begin writing email.
Product information
Specifications
| Item RE6503 / RE7503 / RE8603 | ||
| Panel | Size | RE6503: 65" / RE7503: 75" / RE8603: 86" |
| Light Source | DLED | |
| Aspect Ratio | 16:9 | |
| Resolution | 3840 x 2160 | |
| Pixel Pitch(mm) | RE6503: 0.372 (H) x 0.372 (V)RE7503: 0.4296 (H) x 0.4296 (V)RE8603: 0.4935 (H) x 0.4935 (V) | |
| Brightness with Glass(Typical) | RE6503: 350 (typical)RE7503: 350 (typical)RE8603: 350 (typical) | |
| Brightness without Glass(Typical) | RE6503: 400 (typical)RE7503: 400 (typical)RE8603: 400 (typical) | |
| Contrast Ratio (Typical) | 1200:1 | |
| Viewing Angle | 178 | |
| Touch | Technology | IR |
| Touch Method | Finger & Stylus | |
| System | Windows 7/8/10/XP/Linux/Mac/Android/Chrome OS | |
| Touch Point | 40pts touch | |
| Minimum Object Size | 2.8 mm, supports 2 pens writing with 2 colors simultaneously | |
| Response Time | <10 ms | |
| Accuracy | ±1.5 mm, 90% area | |
| Glass | 3.2 mm thickness, AG, 9H pencil, germ-resistant | |
| Connectors | HDMI IN | Rear: x 2, Front: x 1 (2.0) |
| HDMI Output | x 1 (4K@60Hz with audio) | |
| VGA IN | x 1 | |
| PC-Audio IN (3.5 mm audio-in) | x 1 | |
| SPDIF (Optical) | x 1 | |
| Audio Output (3.5mm Earphone) | x 1 | |
| USB 2.0 (Type A) | Rear I/O: x1; Wi-Fi dongle: x1 | |
| USB 3.0 (Type A) (OPS/ External Follow) | Rear: x2 (1.4, 0.9 A)Front: x2 (0.9 A) | |
| USB Touch Output (OPS/ External pass through MIC/Camera/USB) | Rear: x 1 (USB2.0), Front: x 1 (USB 3.0) | |
| RS232 | x1 | |
| LAN (RJ45) | OPS: 10M/100M/1000MAndroid: 10M/100M/1000MLAN IN x1 / LAN Out x1 | |
| USB Type-C | Front: Data/Power(65W)/Touch/DP | |
| Android System | System Version | Android 11 |
| CPU | A55 x 4 | |
| GPU | G52 MP 2 | |
| RAM | 4 GB | |
| ROM | 32 GB | |
| Video / Audio | Speaker Type | Built in speaker |
| Output Power | 2 x 16W | |
| Power | Power Requirements | AC 100V-240V, 50/60 Hz |
| Standby Power | <0.5W | |
| Max Power Consumption (W) | RE6503: 393.7 WRE7503: 408.2 WRE8603: 542.5 W | |
| Wake Up | LAN/HDMI/VGA | |
| Others Light Sensors | Yes | |
| Mechanical | Dimension (WxHxD) | RE6503: 1488.3 x 896.6 x 87.5 mmRE7503: 1709.4 x 1020.2 x 87.7 mmRE8603: 1957.0 x 1159.9 x 99.7 mm |
| Dimension (Package)(WxHxD) | RE6503: 1628 x 1005 x 208 mmRE7503: 1863 x 1140 x 225 mmRE8603: 2110 x 1283 x 225 mm | |
| Net Weight | RE6503: 36±1.5kgRE7503: 48±1.5kgRE8603: 60±1.5kg | |
| Gross Weight | RE6503: 46±1.5kgRE7503: 62±1.5kgRE8603: 77±1.5kg | |
| Thickness of Machine and Wall Mount | Wall mount (VESA Mount) | |
| VESA for NUC | 100 x 100 mm | |
| Wall-Hanging Screw Spec | M8*25L x 4 | |
| VESA | RE6503: 600 x 400mmRE7503: 800 x 400mmRE8603: 800 x 600mm | |
| Accessories | Power Cord By Region | 3M x 1 |
| VGA Cable | 3M x 1 | |
| USB Cable (Type A-Type B)_USB 3.0 | 3M x 1 | |
| Type C Cable | 1.5 M x 1 | |
| HDMI Cable | 3M x 1 | |
| Writing Pen | 2 pcs | |
| Wall Mount | x 1 | |
| Remote Control | 1 pcs | |
| Features | Image Setting | Yes |
| Source/Volume Control | Yes | |
| HDMI Daisy Chain | Yes | |
| RS232 Control | Yes | |
| Sharpness Enhancement | Yes | |
| Proof of Image Retention | Yes | |
| HDMI-HDCP | Yes (2.0) | |
| 10 Bit Color Processing | Yes | |
| Features (continued) | Video Wall OSD Setting | No |
| Ambient Light Sensor | Yes | |
| Total Turn-on Time | Yes | |
| CEC Control | Yes | |
| RTC Function | Yes | |
| FW Update | Yes (USB, OTA) | |
| Freeze/Blank | Yes | |
| Front I/O | Yes | |
| Advanced Menu (Debug Menu) | Yes | |
| Double Lan Bridging | Yes | |
| Public USB Port Auto Switch | Yes | |
| Auto Detect Channel | Yes | |
| All channel can loop out by HDMI | Yes | |
| Button Lock | Yes | |
| Channel Lock | Yes (Signage mode) | |
| Screen Lock | Yes | |
| Smart Sidebar | Yes | |
| Environment | Operating Temperature | 0 - 40°C |
| Operating Humidity | 10 - 90% (without condensation) | |
| Storage Temperature | -20 - 60°C | |
| Storage Humidity | 10 - 90% (without condensation) | |
| Display Orientation | Landscape Only | |

Specifications and functions are subject to change without notice.
Dimensions(RE6503)
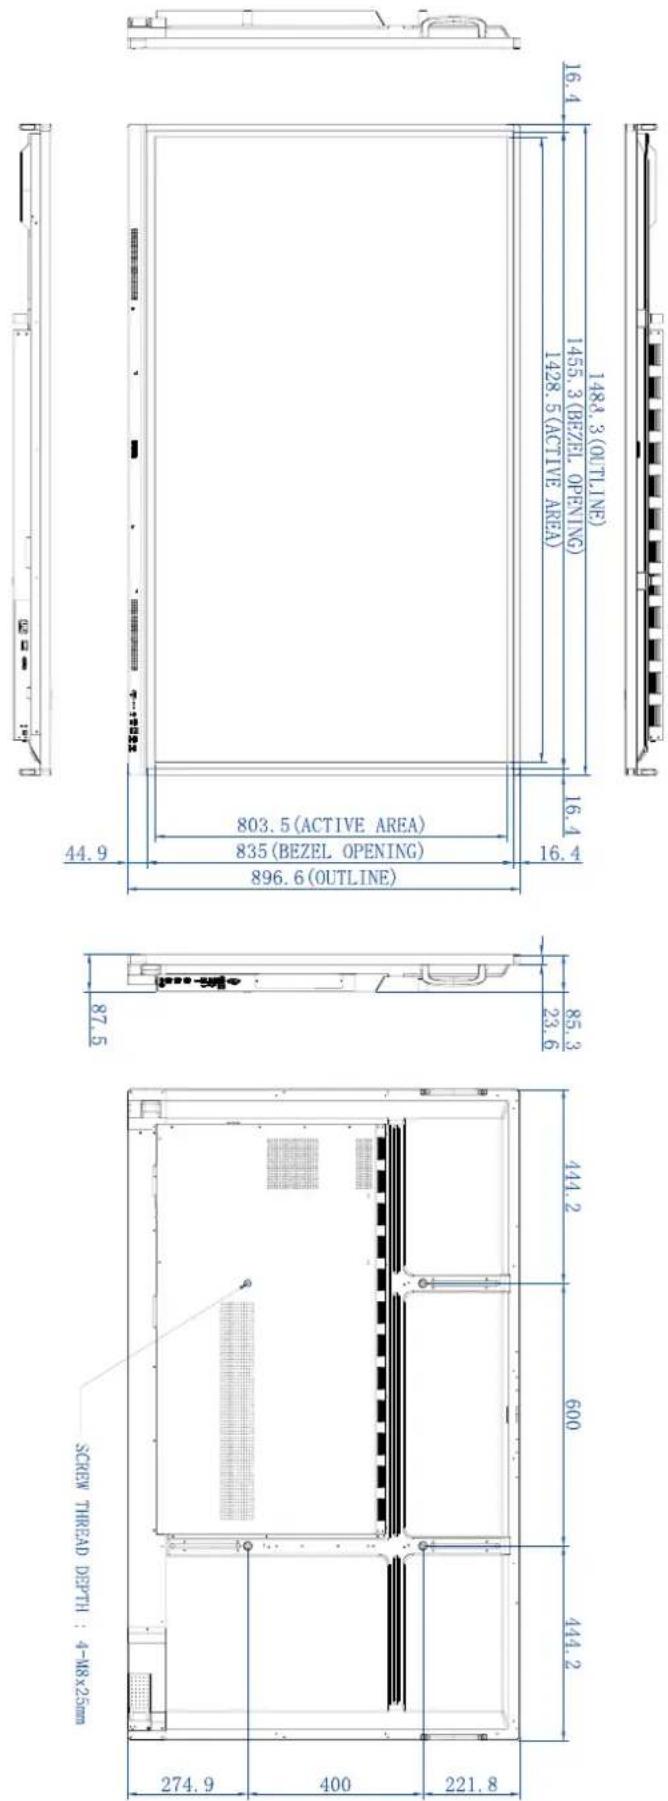
Unit: mm
Dimensions(RE7503)
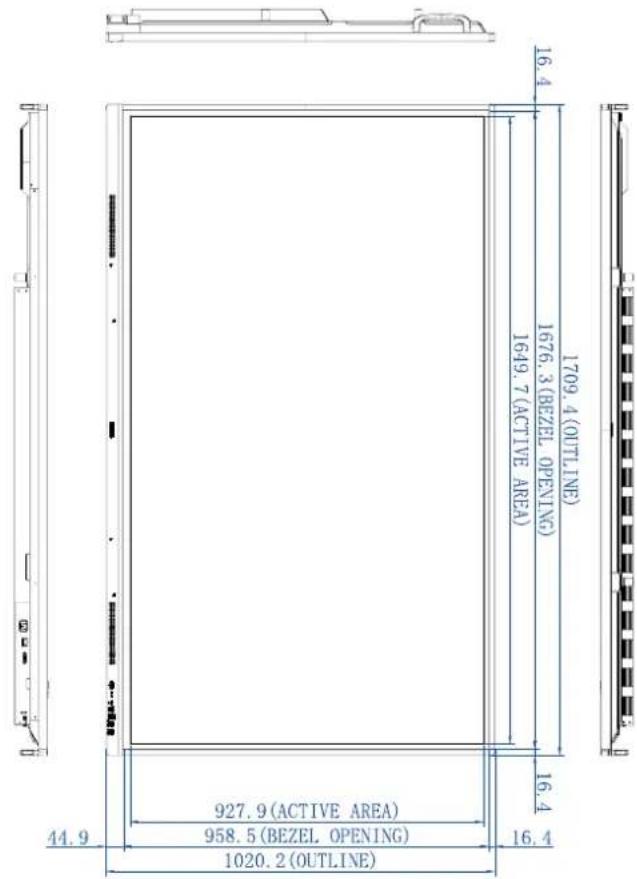
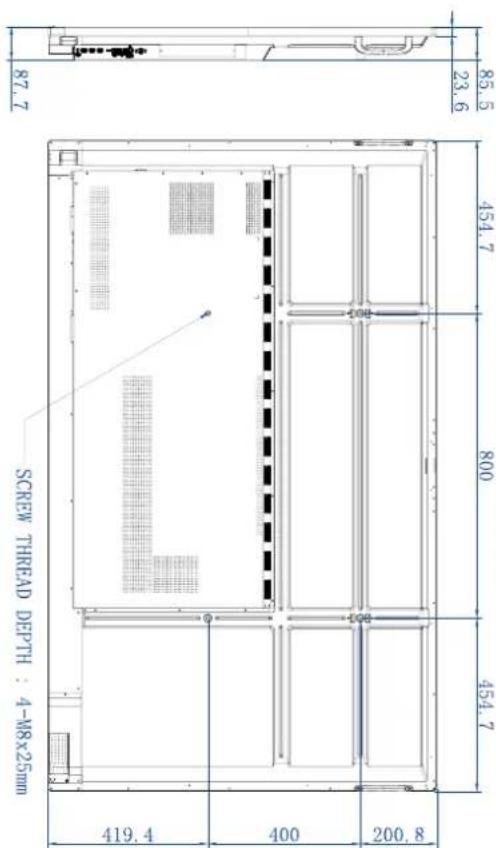
Unit: mm
Dimensions(RE8603)
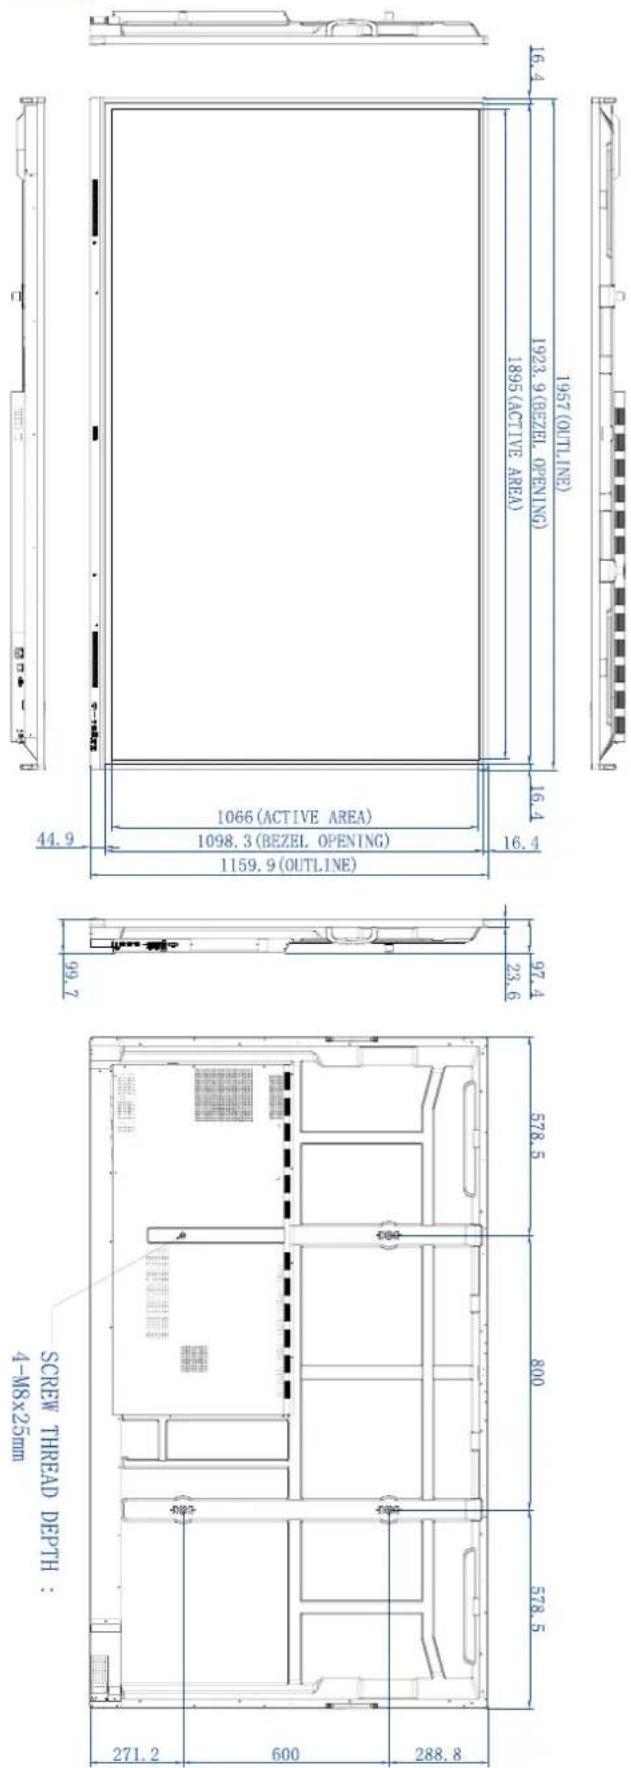
Unit: mm
Supported input signal resolution
- O: supported
- Blank: not supported
Troubleshooting
| Problem Solution | |
| No picture Check the following: | • Is the display turned on? Check the power indicator of the display.• Is the signal source device turned on? Turn on the device and try again.• Are there any loose cable connections? Make sure that all cables are connected firmly.• Have you chosen an unsupported output resolution on the computer? Refer to Supported input signal resolution on page 66 to select a supported resolution and try again.• Have you chosen an unsupported output resolution on the DVD or Blu-ray disc player? Refer to Supported input signal resolution on page 66 to select a supported resolution and try again. |
| No sound Check the following: | • Have you turned on the mute function on the display or the input source device? Turn off the mute function or increase the audio volume level and try again.• Are there any loose cable connections? Make sure that all cables are connected firmly. |
| The computer input image looks strange | • Have you chosen an unsupported output resolution on the computer? Refer to Supported input signal resolution on page 66 to select a supported resolution and try again.• Use the Auto function (VGA only) to let the display automatically optimize the display of computer image.• If the result of the Auto function is not satisfactory, use the Phase, H Position and V Position functions to manually adjust the image. |
| The control panel buttons do not work | Have you locked the control panel buttons? Unlock thebuttons and try again. |
| The remote control does not work | Have you locked the remote control function? Unlock the function and try again.Check for incorrect battery orientation.Check for dead batteries.Check your distance and angle from the display.Check whether remote control is properly being pointed at the display's remote control sensor window.Check for any obstacle between the remote control and the remote control sensor window.Check that the remote control sensor window is not under strong fluorescent lighting, or in direct sunlight.Check for any devices (computer or personal digital assistant, PDA) nearby that transmit infrared signals which may cause interference to signal transmission between the remote control and the display. Turn off the infrared function of these devices. |
| Remote control failure | Check whether there are other objects between remote control and television remote control receiving window, thus leading to failure of remote control.Check whether the battery electrode in the remote control is correct.Check whether remote control needs to replace battery. |
| Machine automatically shutdown | Whether set sleep or not.Check whether there is sudden power outage.Check whether there is no signal automatic shutdown. |
| Signal out of range • Check | whether display is set correctly.Check whether resolution is the best resolution.Adjust line and field synchronization in menu. |
| Background has vertical lines or streaks | Select automatic correction in menu.Adjust clock and phase position in menu. |
| Image lack of color, color is incorrect | Check whether VGA is not well connected or has quality problem.Adjust chromaticity and brightness or contrast in menu. |
| Display format that is not supported. | Select automatic correction in menu.Adjust clock and phase position in menu. |
| Touch function invalid | ·Check whether touch driver is installed and started.·Check whether the size of article touched is comparable with finger. |
| Touch positioning not correct | ·Check whether driver is properly installed and make correction.·Check whether touch pen is facing the screen. |
| No picture and no sound | ·Check whether the machine is started state.·Check whether signal wire is well plugged, whether INPUT is corresponding to it.·If in internal computer mode, check whether internal computer is started. |
| With horizontal or vertical stripes or image dithering | ·Check whether signal wire is well connected.·Check whether other electronic equipment or power tools are placed around the machine. |
| No color, color is weak or image is weak | ·Adjust chromaticity and brightness or contrast in menu.·Check whether signal wire is well connected. |
| With image but without sound | ·Check whether mute button is pressed for mute.·Press VOL+/VOL- to adjust volume.·Check whether audio line is connected correctly. |
| Only one speaker has sound | ·Adjust sound balance in menu.·Check whether computer sound control panel only sets up one sound channel.·Check whether audio line is connected correctly. |
| VGA output without sound | ·Check whether connect external device with headphone cable. |



- RE6503/RE7503/RE8603
- Interactive Flat Panel
- User Manual
- Copyright and disclaimer
- Disclaimer
- HDMI trademark disclaimer
- Copyright
- Product Support
- Table of contents
- Copyright and disclaimer ....i
- Product Support......ii
- Safety warnings and precautions.... I
- Important safety instructions 2
- Package contents.... 5
- Setting up the display 6
- Parts of the display and their functions 8
- Connections....14
- Basic operations....19
- Using the touch screen.... 27
- Menu operations.... 29
- Android system interface....41
- Apps....51
- Product information 58
- Troubleshooting.... 66
- Safety warnings and precautions
- Important safety instructions
- Notes on this display
- Notes on the LCD panel of this display
- Safety notice for remote control
- Battery safety notice
- BenQ ecoFACTS
- Setting up the display
- Installing the display on a wall
- Installing an external PC
- Parts of the display and their functions
- Front panel
- Input/output terminals
- Remote control
- Using the remote control
- Installing remote control batteries
- Remote control usage tips
- Connections
- Connecting power
- Connecting the VGA input
- Connecting the touch module
- Connecting the digital inputs
- Connecting the video output
- Connecting to serial port
- Basic operations
- Turning the display on or off
- Initial setup
- OSD Settings
- Switching input signals
- Account Information
- Guest
- Admin
- Multiple users
- User Management
- Creating a new account
- Setting up the Internet connection
- Network setting
- Wireless connection
- Updating software
- Adjusting audio volume level
- Using the touch screen
- Important instructions for using the touch screen
- Menu operations
- Settings menu
- Input settings
- General settings
- Audio
- Picture
- Eye-Care solutions
- Audio settings
- Picture settings
- Menu Descriptions
- Picture Mode
- Color Temperature
- Device settings
- Advanced settings
- Screen settings
- System settings
- Proxy settings
- Startup & Shutdown
- Android system interface
- Main interface
- Icon Function Descriptions
- Side tool bar
- EZ Floating Tool
- AMS file manager overview
- Item Description
- Source Selection
- Multimedia files
- Image
- Icon Function
- Audio/Video
- Apps
- BenQ App Store
- InstaShare 2
- InstaQPrint
- WPS Office
- Function Description
- Save As
- Supported Office versions and file formats
- Product information
- Troubleshooting
Brand : BENQ
Model : RE6503
Category : Whiteboards and Accessories