
X-E - Camera LEICA - Free user manual and instructions
Find the device manual for free X-E LEICA in PDF.


| Product Type | Digital Compact Camera |
| Brand | Leica |
| Model | X-E |
| Sensor Type | APS-C CMOS |
| Effective Megapixels | 16.2 MP |
| Lens | Leica Summicron 35mm f/2.8 (fixed) |
| ISO Range | 100 – 12500 |
| Shutter Speed | 30 s – 1/2000 s |
| Display | 2.7-inch LCD, 230k dots |
| Viewfinder | None (optional external) |
| Built-in Flash | Yes, pop-up |
| Storage Media | SD/SDHC/SDXC |
| Power Source | Lithium-ion battery (BP-DC8) |
| Battery Life | Approx. 350 shots (CIPA) |
| Dimensions (W x H x D) | 133 x 73 x 78 mm |
| Weight (with battery) | 390 g |
| Interface | USB 2.0, HDMI Mini |
| Cleaning | Use soft cloth; avoid solvents |
| Repairability | Spare parts available through Leica service |
Frequently Asked Questions - X-E LEICA
User questions about X-E LEICA
0 question about this device. Answer the ones you know or ask your own.
Ask a new question about this device
Download the instructions for your Camera in PDF format for free! Find your manual X-E - LEICA and take your electronic device back in hand. On this page are published all the documents necessary for the use of your device. X-E by LEICA.
USER MANUAL X-E LEICA
English instructions on pages 82 - 164
natural_image
Black and white photo of a Leica brand camera with visible lens and grille (no text or symbols on body)natural_image
Line drawing of a kitchen appliance with a handle and ring (no text or symbols)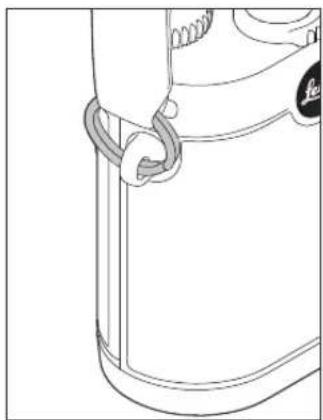
natural_image
Line drawing of a mechanical component with a looped arm (no text or symbols)LADEN DES AKKUS
natural_image
Technical diagram of a mechanical assembly with a component and directional arrow (no text or symbols)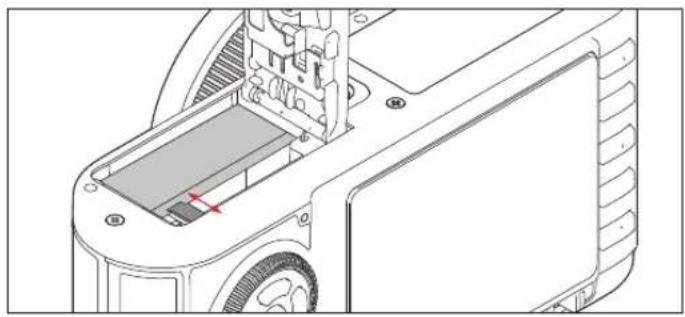
natural_image
Technical line drawing of a mechanical device interior showing internal components and a red arrow indicating a specific part (no text or symbols present)natural_image
Technical line drawing of a mechanical device with a highlighted internal component and red arrow indicating direction (no text or symbols)flowchart
graph TD
    A["Step 1: Grid with red squares, white squares, white triangles"] --> B["Step 2: Grid with red squares, white squares, white triangles"]
    B --> C["Step 3: Grid with red squares, white squares, white triangles"]
    C --> D["Step 4: Grid with red squares, white squares, white triangles"]
    D --> E["Step 5: Grid with red squares, white squares, white triangles"]
SPOTMESSUNG
Product Support / Software Support
Am Leitz-Park 5
D-35578 Wetzlar
Telefon: +49(0)6441-2080-111 /-108
Telefax: +49(0)6441-2080-490
info@leica-camera.com / software-support@leica-camera.com
Leica Customer Care
This is a Class B product based on the standard of the Voluntary Control Council for Interference from Information Technology Equipment (VCCI). If this is used near a radio or television receiver in a domestic environment, it may cause radio interference. Install and use the equipment according to the instruction manual.
FCC Note: (U. S. only)
This equipment has been tested and found to comply with the limits for a Class B digital device, pursuant to Part 15 of the FCC Rules. These limits are designed to provide reasonable protection against harmful interference in a residential installation. This equipment generates, uses, and can radiate radio frequency energy and, if not installed and used in accordance with the instructions, may cause harmful interference to radio communications. However, there is no guarantee that interference will not occur in a particular installation. If this equipment does cause harmful interference to radio or television reception, which can be determined by turning the equipment off and on, the user is encouraged to try to correct the interference by one or more of the following measures:
- Reorient or relocate the receiving antenna.
- Increase the separation between the equipment and receiver.
- Connect the equipment into an outlet on a circuitdifferent from that to which the receiver is connected.
- Consult the dealer or an experienced radio/TV technician for help.
FOR CANADA ONLY:
CAN ICES-3 (B)/NMB-3(B)
You can find your camera's production date on the stickers in the Guarantee Card and on the packaging. The digits stand for YYYY/MM/DD
FCC Caution:
To assure continued compliance, follow the attached installation instructions and use only shielded inter face cables with ferrite core when connecting to computer or peripheral devices.
Any changes or modifications not expressly approved by the party responsible for compliance could void the user's authority to operate this equipment. Trade Name: LEICA
Model No.: Leica X-E
Responsible party/
Support contact: Leica Camera Inc.
1 Pearl Count, Unit A
Allendale, New Jersey 07401
Tel.: +1 201 995 0051
Fax: +1 201 995 1684
technicalinfo@leicacamerausa.com
This device complies with Part 15 of the FCC Rules. Operation is subject to the following two conditions:
(1) This device may not cause harmful interference, and (2) this device must accept any interference received, including interference that may cause undesired operation.
This Class B digital apparatus complies with Canadian ICES-003
Leica X-E (Typ 102)
FOR HOME OR OFFICE USE

LEICA X-E
Instructions
FOREWORD
Dear Customer,
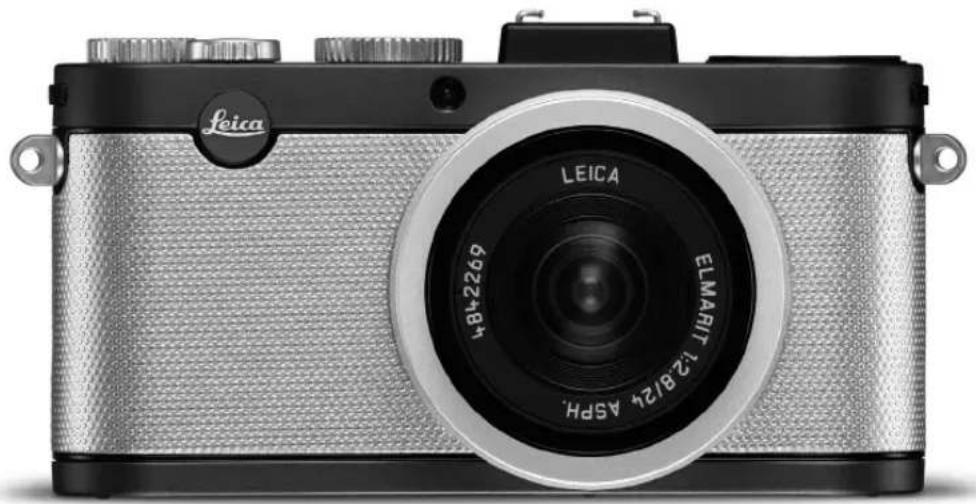
We wish you a great deal of pleasure and success using your new Leica X-E. The high-performance Leica DC Elmarit 24mm f/2.8 Asph. lens will give you excellent picture quality.
Thanks to its fully automatic programmed exposure control mode and autoflash feature, the Leica X-E provides uncomplicated photography. Alternatively, you can take over picture composition yourself at any time using the manual settings.
You can select from numerous special functions to improve the picture quality even in very difficult exposure conditions.
Please read these instructions so that you can make the most of your Leica X-E's capabilities.
SCOPE OF DELIVERY
Before using your Leica X-E for the first time, please check that the supplied equipment is complete.
A. Battery Leica BP-DC 8 (order no. 18 706)
B.Batterycase
(order no. 423-089.003-012)
C. Battery charger Leica BC-DC8 with interchangeable plugs (order no. 423-089.003-008)
D.USBcord
(order no. 423-089.003-022)
E. Leather carrying strap (order no. 439-612.060-000)
F. Lenscap
(order no. 423-097.001-024)
G. Hot shoe/viewfinder socket cover (order no. 439-097.001-026)
H. Camera registration booklet with TAN to download Adobe ^® Photoshop ^® Lightroom ^® (after registering the camera on the Leica Camera AG homepage)
These instructions are printed on 100% chlorine free bleached paper, whose high-quality manufacturing process protects the water and is environmentally friendly.
The CE identification of our products documents adherence to the fundamental requirements of the valid EU guidelines.
WARNING MESSAGES
- Modern electronic components react sensitively to electrostatic discharge. As people can easily pick up charges of tens of thousands of volts, by walking on synthetic carpets for example, a discharge can occur when you touch your Leica X-E, particularly if it is placed on a conductive surface. If only the camera housing is affected, this discharge is harmless to the electronics. However, despite built-in safety circuits, the outer contacts, such as those on the base of the camera, should not be touched if at all possible for safety reasons. For any cleaning of the contacts, do not use an optical micro-fiber cloth (synthetic); use a cotton or linen cloth instead. Before touching the contacts, you can make sure you discharge any electrostatic charge by deliberately touching a heating or water pipe (conductive, earthed material). You can also avoid soiling and oxidization of the contacts by storing your Leica X-E in a dry place with the lens cap attached.
- You should exclusively use the recommended accessories to prevent faults, short circuits or electric shock.
- Do not attempt to remove parts of the body (covers); specialist repairs can be carried out only at authorized service centers.
LEGAL NOTES
- Please ensure that you observe copyright laws. The recording and publication of pre-recorded media such as tapes, CDs, or other published or broadcast material may contravene copyright laws.
• This also applies to all of the software supplied.
• The SD, HDMI, and USB logos are registered trademarks. - Other names, company or product names referred to in this manual are trademarks or registered trademarks of the relevant companies.
DISPOSAL OF ELECTRICAL AND ELECTRONIC EQUIPMENT
(Applies within the EC, and for other European countries with segregated waste collection systems)
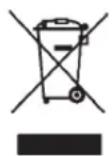
This device contains electrical and/or electronic components and should therefore not be disposed of in general household waste! Instead it should be disposed of at a recycling collection point provided by the local authority. This costs you nothing.
If the device itself contains replaceable (rechargeable) batteries, these must be removed first and, if necessary, also be disposed of in line with the relevant regulations.
Your local authority or waste disposal authority, or the store where you bought this device, can provide you with further information on this issue.
TABLE OF CONTENTS
FCC Note 82
Foreword 84
Scope of delivery 84
CE Notice 85
Warning messages 85
Legal notes....85
Disposal of electrical and electronic equipment 85
Designation of parts....88
Displays
In record mode 90
In review mode.... 93
Menu items....94
Quick guide....95
Detailed instructions
Preparations
Attaching the carrying strap 96
Charging the battery 96
Inserting and removing the battery / the memory card....100
The most important settings/controls
Switching the camera on/off /
Selecting the exposure frequency....104
Selecting the record and review modes .....105
Shutter release button....107
Menu control 108
Presets
Basic camera settings 112
Menu language....112
Date 112
Time....112
Automatic stand-by mode....113
Key acknowledgement (response)
and shutter sounds....113
Monitor and electronic viewfinder settings....114
Switching the display sets .....114
Determining the monitor as
the exclusive display for reviewing images....114
Switching the monitor off .....115
Brightness and color rendition.....115
Timeout mode....115
Basic picture settings
JPEG resolution 116
File format/compression rate....116
White balance....116
Fixed presets 116
Manual setting by metering....117
Direct color temperature setting.....117
Fine-tuning white balance settings.....117
ISO sensitivity....118
Image properties/contrast, sharpness, color saturation .....118
Color rendition....119
Record mode
Focusing....120
Autofocus 121
AF Assist Lamp 121
AF metering modes....122
1 point mode 122
11 point mode....123
Spot mode 123
Face detection mode....124
Manual focusing....124
Manual focus assist function ..... 125
Exposure metering and control
Exposure metering modes 126
Multi-field metering 126
Center-weighted metering 126
Spot metering 126
The histogram 126
Exposure control 127
Programmed automatic
exposure mode 128
Shifting program mode 128
Speed priority mode 129
Aperture priority mode.... 129
Manual mode 130
Metering memory-lock......130
Exposure compensation 131
Automatic exposure bracketing ..... 132
Flash photography
Taking photographs with the built-in flash unit....134
Flash modes 134
Automatic flash activation....134
Automatic flash and pre-flash activation .135 Manual flash activation....135
Manual flash and pre-flash activation.....135
Automatic flash activation with slower shutter speeds....135
Automatic flash and pre-flash activation with slower shutter speeds....135 Studio mode....136
Flash range....136
Synchronization to the end of the exposure....136
Flash exposure compensation .....137
Using external flash units ......137
Additional Functions
Self-timer 138
Formatting the memory card....139
Working color space....140
Copying image data from the internal memory to a memory card ....140
Creating new folder numbers......140
User Profile....141
Image stabilization 141
Review mode
Selecting review modes....142
Selecting pictures....143
Enlarging the picture/Simultaneous review of 16 pictures....143
Selecting the trimming....144 Deleting pictures....14
Protecting/Unprotecting pictures......146
Review of portrait-format pictures......148
Playback with HDMI equipment....148
Miscellaneous
Transferring data to a computer .....149
Connecting and transferring data with the camera as an external drive....149
Connecting and transferring data using card readers 150
Working with DNG raw data....150
Installing Adobe Photoshop® Lightroom® ..... 150
Installing firmware updates....151
Accessories
Leather Case X 152
Camera Protector X 152
Ever-ready Case X....152
Small System Bag 152
Wrist Strap X....152
Bright Line Finder 36mm....152
Electronic Viewfinder EVF 2....152
Handgrip X....153
Flash units 153
HDMI cable....153
Replacement parts....153
Precautions and care instructions
General precautions 154
Care instructions....155
For the camera 155
For the lens....155
For the battery 155
For the charger....156
For memory cards....156
Storage 157
Technical data 158
Leica information service 161
Leica customer care....161
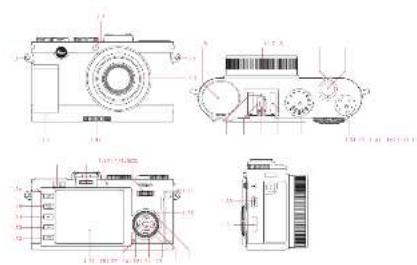
DESIGNATION OF PARTS
FRONT VIEW (optional Hand Grip attached, flash retracted)
1.1 Eyelets for carrying strap
1.2 Self timer LED / AF assist light
1.3 Lens
1.4 Hand Grip with
a. Fastening screw
TOP VIEW
1.5 Flash
1.6 Attachment thread protection ring
1.7 Main Switch with detent positions for
- OFF (camera switched off)
- S (single shot)
- C (continuous shooting)
1.8 Shutter release button
1.9 Aperture dial with
- A Detent position for automatic aperture control (speed priority- / program modes)
1.10 Shutter speed dial with
- A Detent position for automatic shutter speed control (aperture priority- / program modes)
1.11 Flash (hot) shoe with
a. Center (firing) contact
b. Control contacts
c. Hole for locking pin
REAR VIEW
1.12 INFO button for
- selecting monitor displays in record and review modes
- resetting manually displaced AF metering frame to center
- calling up display for set resolution, compression, white balance, and image stabilization status (after pressing ≥ 1 s, disappears after approx. 5s)
1.13 ISO button for calling up the sensitivity menu
1.14 WB button for calling up the white balance menu
1.15 DELETE / FOCUS button for
- calling up the delete menu
- calling up the focus metering mode menu
- activating AF metering area frame
1.16 PLAY button for
- activating (continuous) review mode
- returning to full 1:1 picture display
1.17 Flash unit release slider
1.18 Socket for external electronic viewfinder (cover removed)
1.19 Focus/exposure status LED
(only lights up when the shutter release button is pressed to pressure point, not with manual focusing)
a. Flashing: Focusing not possible
b. Permanently lit: Focusing and exposure set and locked
1.20 Setting wheel for
- manual in focusing
- scrolling in menu list
- scrolling through picture memory
1.21 Door over USB and HDMI sockets
1.22 Setting ring for
- scrolling in menu and submenu item lists
- setting an exposure compensation, exposure bracketing, flash exposure bracketing value
- scrolling through picture memory
- enlarging/reducing the pictures viewed
1.23 EV+/- Direction button for
- calling up exposure compensation, exposure bracketing, and flash exposure compensation menus
- scrolling in menu and submenu item lists
- scrolling through picture memory
- moving the AF metering area
1.24 Direction button for
- calling up / setting the flash mode menu
- accessing submenus
- scrolling through picture memory
- moving the AF metering area
1.25 MENU/SET-button for
- calling up the menu
- saving menu settings and exiting submenus and menus
1.26 AF/MF Direction button for
- calling up focus mode menu
- scrolling in menu and submenu item lists
- scrolling through picture memory
- moving the AF metering area
1.27 Direction button for
- calling up / setting the self timer menu
- exiting submenus and menus without saving menu settings
- moving the AF metering area
1.28 LED indicating data loading for review mode / saving image data (appears only briefly in all modes, permanently lit when monitor is switched off)
1.29 Monitor
VIEW FROM THE RIGHT (door open)
1.30 USB socket
1.31 HDMI socket
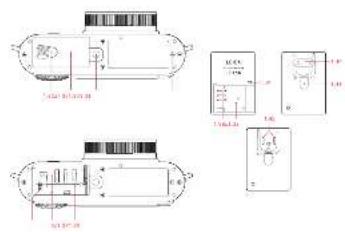
BOTTOM VIEW
1.32 Battery compartment / Memory card slot door with a. Locking lever
1.33 Tripod thread A ^1 / _4 " DIN 4503 (1/4")
1.34 Hole for Hand Grip guide pin (door open)
1.35 Battery locking slider
1.36 Battery compartment
1.37 Memory card slot
CHARGER
1.38 Battery bay with a. Contacts
1.39 Status LED
1.40 Interchangeable power plug
1.41 Plug release button (interchangeable power plug removed)
1.42 Contact pins
DISPLAYS
2.1 IN RECORD MODE
Note:
The displays listed here and mentioned throughout these instructions all appear either in the monitor or the optionally available external electronic viewfinder, depending on whether the latter is switched on or off with its own respective button. None the less, these instructions only refer to the monitor.
For more information on the Leica EVF 2, see p. 152 and the viewfinder's instructions.
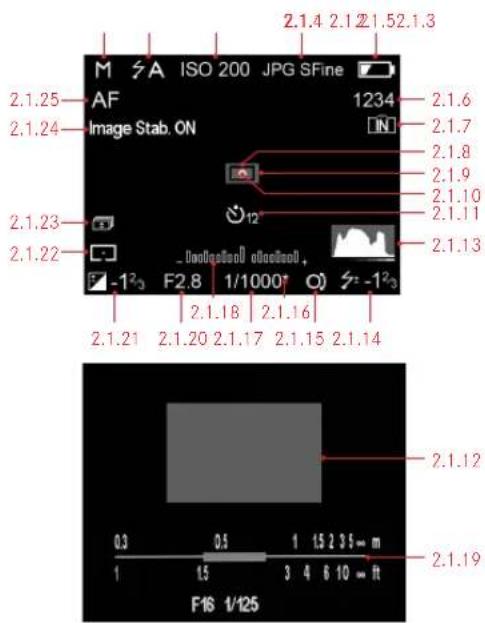
2.1.1 Exposure mode
a. P: Programmed automatic exposure mode
b. A: Aperture priority mode
c. T: Speed priority mode
d. M: Manual setting of shutter speed and aperture
2.1.2 Flash mode
(for built-in and external flash units, flashes in red if flash is not ready, otherwise white)
a. ♂A: Automatic flash activation
b. ⚡A☉ Automatic flash activation with pre-flash
c. ♦ : Manual flash activation
d. ⚡: Manual flash activation with pre-flash
e. ∘S : Automatic flash activation with slower shutter speeds
f. S Automatic flash activation with pre-flash and slower shutter speeds
g. Studio fixed flash power to release slave flash lights
2.1.3 ISO sensitivity
(apears in the place of 2.1.2 when flash is switched off; AUTO ISO values appear even if displays are switched off when shutter release button is pressed)
a. AUTO ISO
b. 100
c. 200
d. 400
e. 800
f. 1600
g. 3200
h. 6400
i. 12500
2.1.4 Compression rate
a. JPG Super fine
b. JPG fine
c. DNG + JPG S. fine
d. DNG + JPG fine
2.1.5 Battery charge level
a. Sufficient capacity
b. Falling capacity
c. Insufficient capacity
d. □ Replacement or recharging necessary
2.1.6 Frame counter (Number of remaining pictures) (If memory capacity is low, 0 flashes as a warning)
2.1.7 Indication that internal memory is used to store images (when no memory card is inserted)
2.1.8 Spot autofocus metering field (alternatively to 2.1.9)
2.1.9 Normal autofocus metering field
2.1.10 Indication that spot exposure metering is switched on
2.1.11 Self-timer switched on/ running (alternativ zu 2.1.9/2.1.10/2.1.12)
a2 2 seconds delay
b ^12 seconds delay
2.1.12 Enlarged central section of the image (appears only with manual focusing)
2.1.13 Histogram
(appears only when activated, yellow when flash unit is switched on, and/or with shutter speeds slower than 1/2s, otherwise white)
2.1.14 Flash exposure compensation set, including compensation value (appears in the area of 2.1.37 with autofocus mode)
2.1.15 Indication of program shift option / for setting the slowest shutter speeds with the setting dial (appears only with programmed automatic exposure mode / only when shutter speed dial is set to 2+)
2.1.16 Indication of shifted pair of values
(appears only with programmed automatic exposure mode and after shifting)
2.1.17 Shutter speed
(appears immediately with manual setting, i.e. with speed priority and manual modes, after tapping the shutter release button with automatic setting, i.e. with programmed automatic exposure and aperture priority modes, red after pressing the shutter release button to the pressure point when the setting range is exceeded with programmed automatic exposure, aperture priority and speed priority modes, otherwise white)
2.1.18 Light balance
(alternatively to 2.1.19, appears only with manual setting of shutter speed and aperture)
2.1.19 Distance / depth of field scale
(appears only with manual focusing, with meter and feet graduations)
2.1.20 Aperture value
appears immediately with manual setting, i.e. with aperture priority and manual modes, after lapping the shutter release button with automatic setting, i.e. with programmed automatic exposure and speed priority modes, red after pressing the shutter release button to pressure point when the setting range is exceeded with programmed automatic exposure, aperture priority and speed priority modes, otherwise white)
2.1.21 Exposure compensation set, including compensation value (not with manual setting of shutter speed and aperture)
2.1.22 Exposure metering method
a□ Center-weighted exposure metering
b Multi-field metering
2.1.26 INFO-screen with settings for
- Resolution
- File format/Compression rate (see 2.1.4)
- White balance
(Symbols with additional * - if white balance fine tuning is set)
a. No display: automatic setting
b. For tungsten lighting
c. ⚙: For daylight
d. ♦ : For electronic flash units
e. ☎: For cloudy conditions
f. For shady conditions
g. Manual setting 1
h. Manual setting 1
i. K: For Color temperature setting
- Color bias ( Preset Film setting)
- Image stabilization
2.2 IN REVIEW MODE
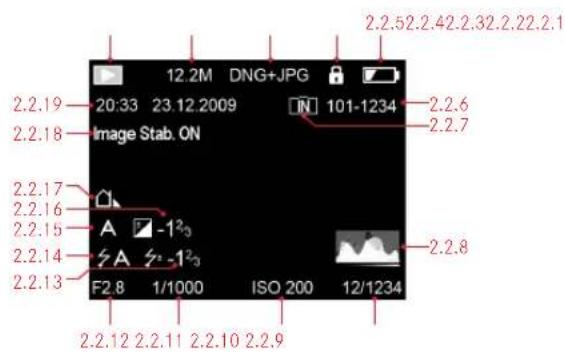
2.2.1 Review mode indication
2.2.2 Resolution
2.2.3 File format / Compression rate (see 2.1.4)
2.2.4 Protected picture
2.2.5 Battery charge level (see 2.1.5)
2.2.6 Folder/picture number
2.2.7 Indication that internal memory is used to store images (when no memory card is inserted)
2.2.8 Histogram (see 2.1.13)
2.2.9 Continuous picture numbers/total number of pictures on memory card
2.2.10 ISO sensitivity (see 2.1.3)
2.2.11 Shutter speed (see 2.1.17)
2.2.12 Aperture (see 2.1.20)
2.2.13 Flash exposure compensation (see 2.1.14)
2.2.14 Flash mode (see 2.1.2)
a. No display: picture without flash
$$ \begin{array}{l} \text { b. } \mathbb {A} / \mathbb {I} / \mathbb {S} \quad \text { Studio:Flashpicture without pre - flash} \ \text { c. } \mathbb {A} \odot / \mathbb {O} / \mathbb {S} \odot : \text { Flashpicture with pre - flash } \end{array} $$
2.2.15 Exposure mode(see 2.1.1)
2.2.16 Exposure compensation (see 2.1.21)
2.2.17 White balance (see 2.1.26)
2.2.18 Image stabilization (see 2.1.24)
2.2.19 Picture date and time for picture shown
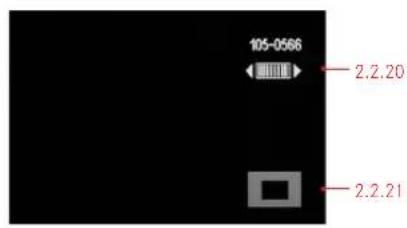
2.2.20 Indication to use setting wheel 1.20 for changing pictures with enlarged Section
2.2.21 Position of enlarged section in picture
MENU ITEMS
Menu items Explanation Page
| 3.1 Resolution File size 116 | |||
| 3.2 Compression File format / Compression rate 116 | |||
| 3.3 AUTO ISO Settings | 118 | ||
| 3.4 Metering Mode Exposure metering 126 | |||
| 3.5 Continuous Series exposure frequency 104 | |||
| 3.6 AF Assist Lamp Low light AF function 121 | |||
| 3.7 MF Assist Monitor image enlargement 125 | |||
| 3.8 Image Stabilization Anti camera shake settings 141 | |||
| 3.9 Preset Film Color bias settings 119 | |||
| 3.10 Sharpening Picture sharpness 118 | |||
| 3.11 Saturation Picture saturation 118 | |||
| 3.12 Contrast Picture contrast 118 | |||
| 3.13 Opt. Viewfinder Monitor off for external optical viewfinder 115 | |||
| 3.14 Flash Sync Firing at start or end of exposure 136 | |||
| 3.15 Monitor Brightness Settings 115 | |||
| 3.16 EVF Brightness Settings 115 | |||
| 3.17 Monitor Color Adjustment Settings 115 | |||
| 3.18 EVF Color Adjustment Settings 115 | |||
| 3.19 Play on Monitor Settings 114 | |||
| 3.20 | Rec. Histogram | Graphic indication of brightness distribution | 127 |
| 3.21 | Play Histogram | Graphic indication of brightness distribution | 127 |
| 3.22 | Reset Picture Numbering | Settings | 140 |
| 3.23 | Auto Review | Automatic review of the last picture taken | 106 |
| 3.24 | Auto Power Off | Operation time out | 113 |
| 3.25 | Auto LCD Off | Monitor/electronic viewfinder image time out | 115 |
| 3.26 | Color Space | Working color space | 140 |
| 3.27 | Date | Date settings | 112 |
| 3.28 | Time | Time settings | 112 |
| 3.29 | Shutter Volume | Acoustic Shutter Signal | 113 |
| 3.30 | Acoustic Signal | Acknowledgement tones / Signal for memory card capacity limit | 113 |
| 3.31 | Language | Menu language | 112 |
| 3.32 | Auto Rotate Display | Automatic upright review | 148 |
| 3.33 | HDMI | Slide show settings | 148 |
| 3.34 | Protect | Delete protection menu | 146 |
| 3.35 | Copy | Data transfer from internal memory to card | 140 |
| 3.36 | Format | Memory card formatting | 139 |
| 3.37 | Firmware Version | Info only | 151 |
| 3.38 | User Profile | User-specific profile | 141 |
QUICK GUIDE
You will need the following items:
- Camera
- Battery (A)
- Battery charger with appropriate power plug (C)
• Memory card (not included in scope of delivery)
PRESETS
- Attach the appropriate power plug to the charger (see p. 99).
- Place the battery (A) in the battery charger (C) to charge it (see p. 99).
- Attach the charger to a power outlet (see p. 99).
- Set the main switch (1.7) to OFF (see p. 104).
- Place the charged battery in the camera (see p. 100).
- Insert a memory card (see p. 102).
- Remove the lens cap (F).
- Set the main switch (1.7) to S (see p. 104).
- Set the date and time (see p. 112).
- Set the desired menu language (see p. 112).
TAKING PHOTOGRAPHS
11.Set
a. both shutter speed (1.10) and aperture (1.9) dials to A (see p. 126),
b. Focusing mode to AF (see p. 120),
c. Exposure metering mode to (see p. 126).
Note:
The settings recommended above ensure simple, quick and reliable photography for your first shots with the Leica X-E. Details on the various modes/functions can be found in the relevant sections on the pages indicated.
- Press the shutter release button (1.8) to the first pressure point to activate focusing and exposure metering (see p. 124).
- Press the shutter release button all the way down to take the photograph.
VIEWING PICTURES
- Press the PLAYbutton (1.16).
- Press right or left direction buttons (1.23/1.27) to view other pictures.
ENLARGING PICTURES
Turn the setting ring (1.22) clockwise for an enlarged view of the displayed picture (see p. 142).
DELETING PICTURES
Press the DELETE/FOCUS button (1.15) and, in the menu appearing, select the desired function.
DETAILED INSTRUCTIONS
PREPARATIONS
ATTACHING THE CARRYING STRAP
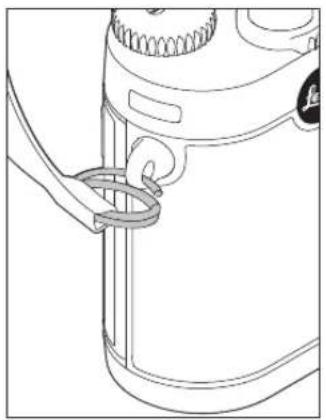
natural_image
Line drawing of a mechanical device with a handle and ring attachment (no text or symbols)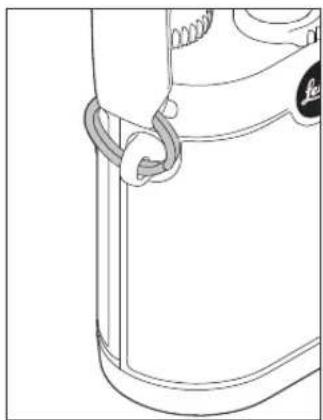
natural_image
Line drawing of a mechanical component with a looped arm (no text or symbols)CHARGING THE BATTERY
The Leica X-E is supplied with the required power by a lithium ion battery (A).
Caution:
- Only the type of battery specified and described in these instructions should be used. The use of other batteries not approved by Leica Camera AG can cause damage to the battery and/or the camera, and in extreme cases can cause an explosion.
- Defective batteries should be disposed of according to the respective instructions (see p. 85) at a collection point to ensure proper recycling.
Attention:
- This battery may only be used in the units for which it is designed and may only be charged exactly as described below.
- Using this battery contrary to the instructions can under certain circumstances result in an explosion.
- The batteries may not be exposed to sunlight, heat, humidity or moisture for long periods. Likewise, the battery may not be placed in a microwave oven or a high-pressure container to prevent a risk of fire or explosion.
- Never throw batteries into a fire as this can cause them to explode!
- Humid or wet batteries may not be charged or used in the camera under any circumstances.
- Always ensure that the battery contacts are clean and freely accessible. While lithium ion batteries are proof against short circuits, they should still be protected against contact with metal objects such as paper clips or jewelry. A short-circuited battery can get very hot and cause severe burns.
-
If a battery is dropped, check the casing and the contacts immediately for any damage. Using a damaged battery can damage the camera.
-
In case of noise, discoloration, deformation, overheating of leaking fluid, the battery must be removed from the camera or charger immediately and replaced. Continued use of the battery carries a risk of overheating, resulting in fire and/or explosion.
- In case of leaking fluid or a smell of burning, keep the battery away from sources of heat. Leaked fluid can catch fire.
- Only the charger specified and described in these instructions, or other chargers specified and described by Leica Camera AG, may be used. The use of other chargers not approved by Leica Camera AG can cause damage to the batteries and, in extreme cases, to serious or life-threatening injuries.
- The charger supplied should be used exclusively for charging this battery type. Do not attempt to use it for other purposes.
- Ensure that the mains outlet used is freely accessible.
- The battery and charger may not be opened. Repairs may only be carried out by authorized workshops.
- Ensure that batteries cannot be accessed by children. Swallowing batteries can cause asphyxiation.
First aid:
- If battery fluid comes into contact with the eyes, there is a risk of blinding. Rinse out the eyes thoroughly with clean water immediately. No not rub the eyes. Seek medical attention immediately.
- If leaked fluid gets onto the skin or clothing, there is a risk of injury. Wash the affected areas with clean water. There is no need to seek medical attention.
Notes:
• The battery can only be charged outside the camera.
- Batteries should be charged before the camera is used for the first time.
- The battery must have a temperature of 0^ - 35^ / 32^ - 95^ to be charged (otherwise the charger will not switch on, or will switch off again).
- Lithium ion batteries can be charged at any time, regardless of their current charge level. If a battery is only partly discharged when charging starts, it is charged to full capacity more quickly.
- Lithium ion batteries should only be stored when partially charged, i.e. not when fully discharged or fully charged. For very long storage periods, they should be charged for around 15 minutes twice a year to prevent total discharge.
- The batteries and the charger heat up during the charging process. This is normal and not a malfunction.
- A new battery only reaches its full capacity after it has been fully charged and – by use in the camera – discharged again 2 or 3 times. This discharge procedure should be repeated around every 25 cycles.
- Rechargeable lithium ion batteries generate power through internal chemical reactions. These reactions are also influenced by the external temperature and humidity. To ensure a maximum service life of the battery, it should not be exposed to constant extremes (high or low) of temperature (e.g. in a parked car in the summer or winter).
- Even when used under optimum conditions, every battery has a limited service life! After several hundred charging cycles, this becomes noticeable as the operating times get significantly shorter.
- The replaceable battery provides power to a back-up battery that is permanently fitted in the camera. This back-up battery retains the set date and time for up to 2 days. If this back-up battery becomes discharged it must be recharged by inserting a charged, main battery. Once the replaceable battery has been inserted, the full capacity of the back-up battery is recovered after about 60 hours. This process does not require the camera to be turned on. However, you will have to set the date and time again in this situation.
- Remove the battery if you will not be using the camera for a long period of time. When doing so, turn the camera off using the main switch first (see p. 104). Otherwise, after several weeks the battery could become totally discharged, i.e. the voltage is sharply reduced as the camera still consumes a small amount of current (for saving your settings) even when it is turned off.
Preparing the charger (C)
The charger must be equipped with the right plug (1.40) for the local power outlets.
To attach the plug,
The appropriate plug type is pushed onto the charger until it clicks into place.
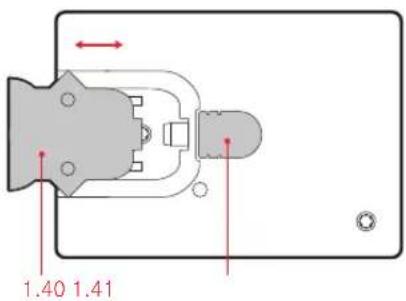
To remove a plug, simultaneously
a. press the locking button (1.41) and
b. pull the attached plug off upwards from its normal position.
Note:
The charger automatically switches to the prevailing mains voltage.
Inserting the battery into the charger
- Connect the charger to a power outlet.
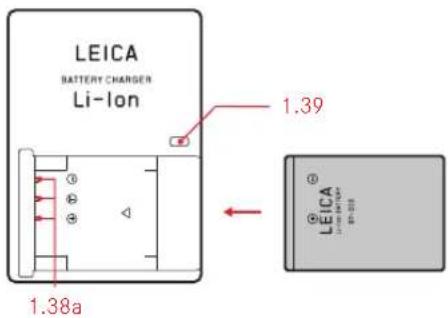
- Insert the battery into the charger by
a. positioning it with its contacts face down and pointing at the counterparts (1.38a) in the battery bay, and
b. pushing it down until it lies flat in the bay.
Charge status indications
Correct loading is indicated by the status LED (1.39) glowing red, when it turns green the battery is completely charged.
INSERTING AND REMOVING THE BATTERY / THE MEMORY CARD
Turn off the camera (see also p. 104) with the main switch (1.7).
Opening the battery / memory card door
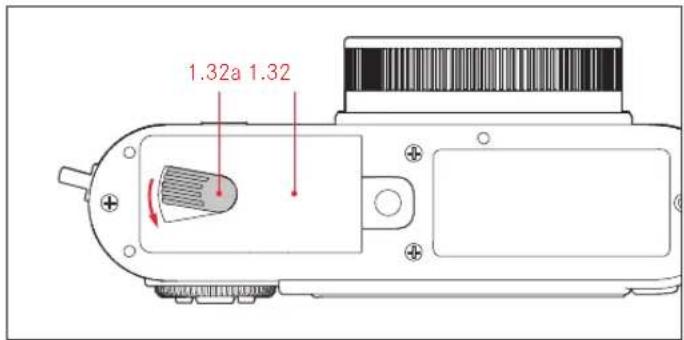
Turn the locking lever (1.32a) clockwise. The spring-loaded door (1.32) then opens automatically.
Inserting and removing the battery
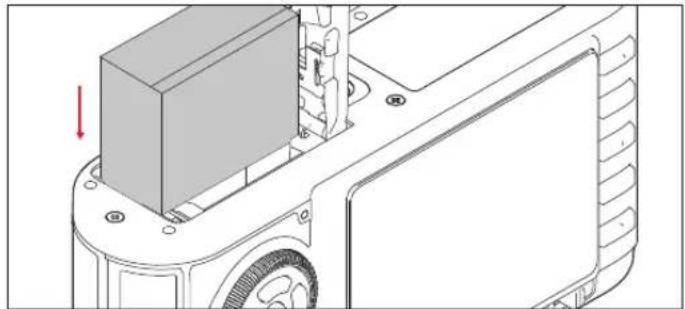
Inset the battery (A) into the compartment with its contacts towards the back of the camera. Push it all the way into the compartment (1.36) until the light gray spring locking catch (1.35) moves over the battery to hold it in place.
natural_image
Technical diagram of a mechanical assembly with a component and directional arrow (no text or symbols)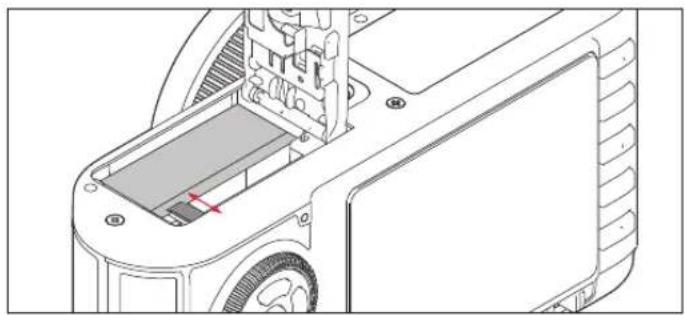
natural_image
Technical line drawing of a mechanical device interior showing internal components and a red cross marker (no text or symbols)To remove the battery, follow these instructions in reverse order. The light grey sprung locking catch at the battery compartment must be pushed aside to unlock the battery.
Important:
Removing the battery while the camera is switched on (see p. 104) can result in the settings you made in the menus being erased (see p. 105), and it may also damage the memory card.
Charge level displays
The charge level of the battery is displayed on the screen (see p. 90, 2.1.5).
Notes:
- Remove the battery, if you will not be using the camera for a long period of time. When doing so, turn the camera off using the main switch (1.7, see p. 104) first.
- The date and time must be reset after approx. 3 days at the latest after the capacity of a battery in the camera has expired (see p. 112).
Inserting and removing the memory card
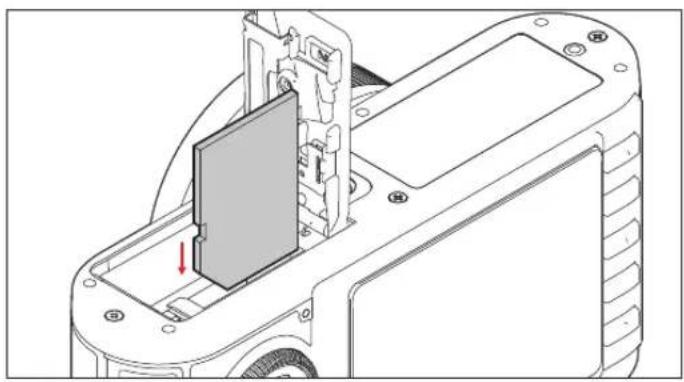
The Leica X-E takes SD, SDHC, or SDXC memory cards. These cards have a write-protection switch that can be used to prevent unintentional storage and deletion of pictures. This switch takes the form of a slider on the non-beveled side of the card; in the lower position, marked LOCK, the data on the card is protected.
SD, SDHC, and SDXC memory cards are available from different suppliers and with different capacities and read/write speeds.
Note:
Do not touch the memory card contacts.
natural_image
Technical line drawing of a mechanical device with a highlighted internal component and a red arrow indicating direction (no text or symbols)Insert the memory card (B) into the slot (1.37) with the contacts facing the battery. Push it in against the spring resistance until you hear it click into place.
To remove the memory card, follow these instructions in reverse order. For unlocking, the card – as specified in the cover – it must first of all be pushed a little further in.
Notes:
- With a memory card inserted, image data will be saved to the card. If no card is inserted, image data will be saved to the camera's internal memory.
- If you cannot insert the memory card, check that it is aligned correctly.
- The range of SD/SDHC/SDXC cards available is too extensive for Leica Camera AG to fully test all available types for compatibility and quality. Therefore, we recommend for example the “Extreme III” cards from the leading brand “SanDisk”.
Although no damage to the camera or the card is to be expected when using other card types, because some unbranded cards in particular do not fully comply with the SD/SDHC/SDXC standards, Leica Camera AG cannot provide any guarantee of function.
- Do not open the door and do not remove the memory card or the battery for as long as the LED 1.28 indicating that the camera accessing the memory is lit. Otherwise, the data on the card can be destroyed and the camera may malfunction.
- As electromagnetic fields, electrostatic charge, as well as defects on the camera or the card can lead to damage or loss of the data on the memory card, we recommend that you also transfer the data to a computer and save it there (see p. 149).
- For the same reason, it is recommended that cards are always stored in an antistatic case.
Closing the battery / memory card door
Close the battery / memory card compartment door (1.32) and turn the locking lever (1.32a) anti-clockwise.
THE MOST IMPORTANT SETTINGS / CONTROLS
SWITCHING THE CAMERA ON / OFF / SELECTING THE EXPOSURE FREQUENCY
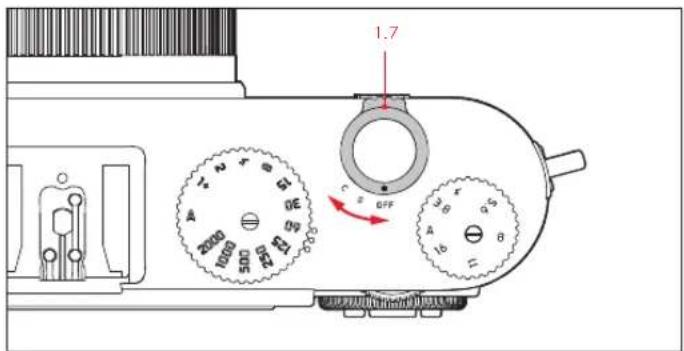
The Leica X-E is turned on and off using the main switch (1.7). This is done by turning it from OFF to the desired mode, i.e. to S (single shot), or C (continuous shooting).
• The image (2.1) appears on the screen.
Note:
If you forget to remove the lens cap before switching the camera on, a respective message will appear. The same applies if the camera is activated from stand-by mode (see p. 113) with the cap on.
When the main switch is set to C, the Leica X-E produces continuous picture sequences. Frequencies of either 3fps (Low) or 5fps (High) are available. In the menu, select Continuous (3.5), and in the submenu the desired setting.
Notes:
- Exposure series are not possible when using the flash. If a flash function is activated, only one picture is taken.
- When C mode and the self timer (see p. 138) are being used in conjunction, only a single exposure will be created.
- The maximum frequency of 5fps is only achieved with shutter speeds of 1/60 s or faster ( 1/4 s with 3fps).
- Regardless of how many pictures are taken in a series, the PLAY (see p. 106) and Auto Review (see p. 106) functions always show the last picture fi rst. The other pictures in the series can be selected by pressing the right and/or left direction buttons (1.24/1.27).
SELECTING THE RECORD AND REVIEW MODES
Normally, when the Leica X-E is switched on (see previous section), or when it is reactivated (from stand-by mode, see p. 113) by pressing the shutter release button (1.8, see p. 107), it is to record mode (see p. 120).
To review the pictures, you can choose between two modes:
- PLAY Unlimited review
- Auto review Brief review after taking the picture
REVIEW FOR UNLIMITED TIME - PLAY
Pressing the PLAY button (1.16) switches to review mode.
- The last picture taken appears on the screen along with the corresponding displays (see p. 93).
However, if neither the internal memory nor an inserted card contain any image files, the following message appears when you switch to review mode: No valid image to play.
Note:
If you wish to switch the camera on directly to review mode, you can do so by keeping the PLAY button pressed while turning it on.
AUTOMATIC REVIEW OF THE LAST PICTURE
If Auto Review is turned on, every picture is shown on the screen immediately after it has been taken. This provides a quick and easy way for you to check whether the picture was taken successfully or you need to repeat it. The function allows selection of the length of time for which the picture is to be shown, a setting for permanent review, and the option to have the Histogram displayed as well.
In the Menu, select Auto Review (see p. 108/94, 3.23), in the first sub-menu either Duration or Histogram, and the respective second level submenus the desired settings.
Note:
If you have taken photographs using the serial exposure (see p. 104) or the automatic exposure bracketing functions (see p. 132), in both review modes the last picture in the series is displayed first, or the last one saved to the card/the internal memory, if not all of them have been transferred from the camera's buffer memory at the time of viewing. Details of how to select the other pictures in the series and further options in review mode are described in the sections under "Review mode" starting on p. 142.
SHUTTER RELEASE BUTTON
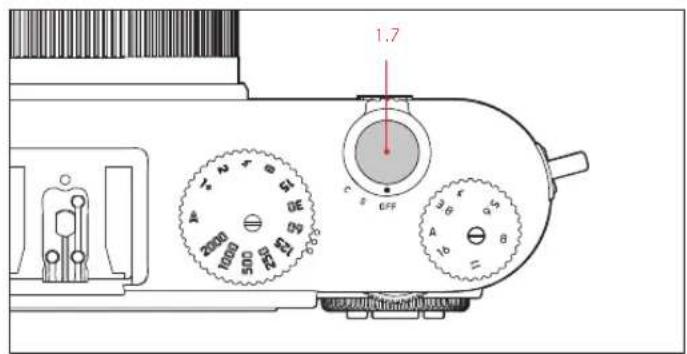
The shutter release button (1.7) works in two stages. Pressing it lightly (to the first pressure point) activates automatic focusing if set, exposure metering, and exposure control and also saves the respective settings/ values (see p. 126). If the camera was previously in stand-by mode (see p. 113), this activates the camera again and the monitor image reappears (see also p. 114).
Before completely depressing the shutter release button make sure that focusing/autofocus (if switched on) and exposure metering have been completed (for details on exposure settings, AF, and the corresponding indications in the monitor, please see pp. 126, 121, 90, respectively).
Pressing the shutter release button all the way down takes the picture.
Notes:
- The menu system can be used to select and set key and shutter acknowledgement tones, and to adjust their volume (see p. 113).
- The shutter release button should be pressed gently and not jerkily to prevent camera shake.
MENU CONTROL
Most settings on the Leica X-E are performed in the menu. Navigating in the menu is done with the setting ring (1.22) and the 4 direction buttons (1.23/.24/.26/.27). The setting wheel (1.20) can be used as an alternative for quick scrolling in the menu item list.
Note:
Menu control operations are possible either with the help of the monitor (1.29, see p. 114) or the electronic viewfinder (see p. 152).
ENTERING THE MENU
Press the MENU/SET button (1.25).
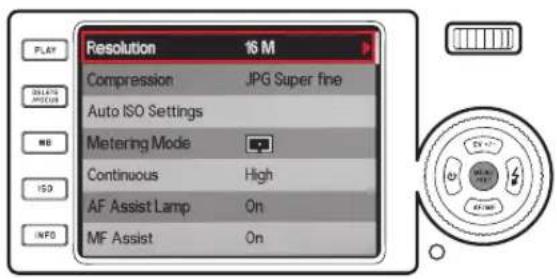
- The menu list appears. The active menu item is boxed, i.e. outlined in red with white characters on a black background.
A red triangle on the right indicates how to access the respective submenu.
A yellow bar on the right edge moves along while scrolling in the list, making it easy to immediately see which page of the menu list you are on.
SCROLLING IN THE MENU ITEM LIST
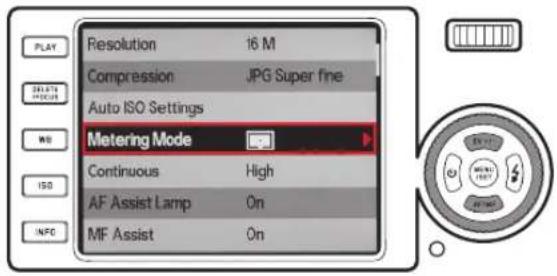
You can choose to scroll either item by item, or page by page.
SCROLLING ITEM BY ITEM
- Either rotate the setting ring 1.22 (clockwise = down, anticlockwise = up), - or press the upper (1.23) or lower (1.26) direction button.
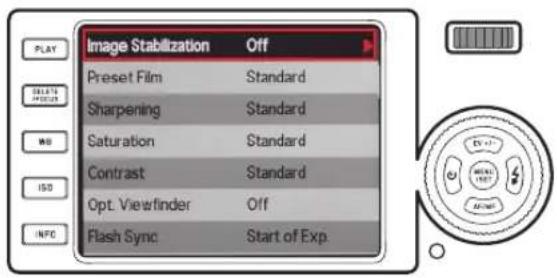
SCROLLING PAGE BY PAGE
Rotate the setting wheel 1.20 to the right (= down) or to the left (= up).
CALLING UP A MENU ITEM'S SUBMENU
Press the right direction button (1.24).
- The submenu list appears, it is boxed, i.e. outlined in red. The active item is indicated by white characters on a black background.
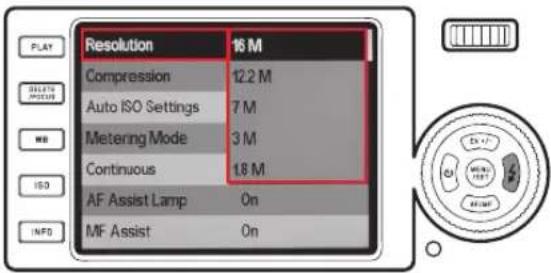
SELECTING A SETTING / A VALUE IN A SUBMENU
Rotate the setting ring (1.22) or press the upper (1.23) or lower (1.26) direction button.
• The active item moves up or down in the box.
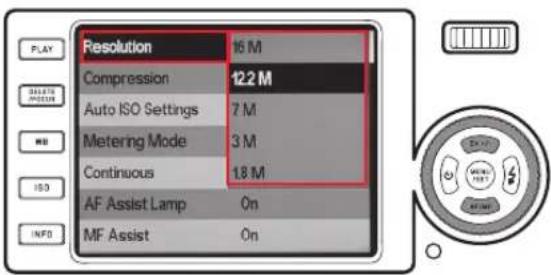
CONFIRMING A SETTING
Press the MENU/SET button (1.25).
- The submenu box disappears, the confirmed (new) setting is displayed on the right side of the active menu item line.
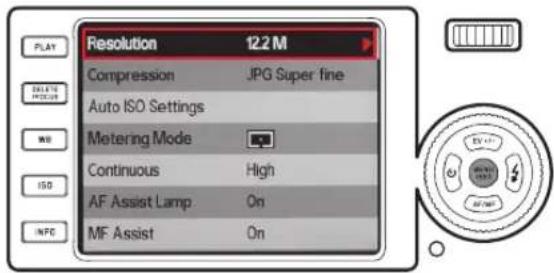
EXITING A SUBMENU WITHOUT CONFIRMING A SETTING
Press the left direction button (1.27) or the shutter release button (1.8).
- The submenu box disappears, the retained (former) setting is displayed on the right side of the active menu item line.
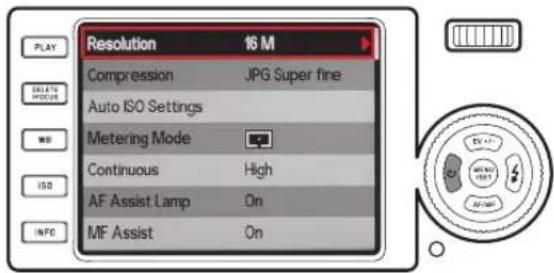
EXITING THE MENU
Press either
-the MENU/SET button (1.25),
• The menu screen returns to record mode (see p. 120).
or the shutter release button (1.8),
- The menu screen returns to record mode (see p. 120).
or the PLAY button (1.16).
- The menu screen returns to review mode (see p. 125).
Notes:
- Some functions are not available depending on other settings, in this case the menu item is displayed in grey and cannot be selected.
- The menu usually opens at the position of the last item that was set before.
- Some menu items include settings in second level submenus. In these cases a red triangle instead of a setting on the right side of the line serves as an indication.
Settings in second level submenus are accessed and performed exactly as described above.
Second level submenus occupy the complete menu screen, i.e. the menu item list is no longer displayed in the background.
- A number of other functions are also controlled in principally the same way, after being accessed by pressing the respective buttons:
- ISO (1.13) for Sensitivity
- WB (1.14) for White balance
- DELETE/FOCUS (1.15) for deleting image files/selecting focus metering modes (only in review /record modes, respectively)
- EV+/- (1.23) for exposure compensation, exposure bracketing, and flash exposure compensation settings
- ♣ (1.24) for selecting flash modes
- AF/MF (1.26) for selecting focus modes
- (1.27) for switching on the self timer and selecting the delay time
As opposed to the menu items, you can also confirm your settings for these functions using the shutter release button (1.8) (by pressing to the first pressure point).
See the respective sections for further details.
PRESETS
BASIC CAMERA SETTINGS
MENU LANGUAGE
The following languages can be selected:
German, Japanese, English, French, Spanish, Italian or traditional Chinese, simplified Chinese, Russian and Korean.
In the menu, select Language (3.31), and in the submenu the desired setting.
DATE
The date can be set anywhere between 2009 and 2099.
In the Menu, select Date (3.27), in the first submenu either Setting or Sequence, and the respective second level submenus the desired settings.
In the Setting submenu, use the setting ring (1.22) or the up and down direction buttons (1.23/1.26) to change the figures and the month, the left and right direction buttons (1.24/1.27) to switch between the three groups.
TIME
In the menu, select Time (3.28), in the first submenu either Setting or View, and the respective second level submenus the desired settings.
In the Setting submenu, use the setting ring (1.22) or the up and down direction buttons (1.23/1.26) to change the figures, the left and right direction buttons (1.24/1.27) to switch between the two groups.
In the View submenu, either the 24-hour or 12-hour format can be selected.
Note:
Even if no battery is used or if it is flat, the date and time setting is stored by a built-in buffer battery for around 2 days. However, after this period, the data and time have to be reset as described above.
AUTOMATIC STAND-BY MODE
If active, this function switches the camera to stand-by mode after the selected time to save power.
In the menu, select Auto Power Off (3.24), and in the submenu the desired setting.
Note:
Even if the camera is in stand-by mode, it can be turned on again at any time by pressing the shutter release button (1.8) or by turning it off and back on with the main switch (1.7).
KEY ACKNOWLEDGEMENT (RESPONSE) AND SHUTTER SOUNDS
With the Leica X-E, you can decide whether you want your settings and other functions to be acknowledged by an acoustic signal – two volumes are available, or whether operation of the camera and actually taking photographs should be predominantly free of noise.
For shutter sounds
In the menu, select Shutter Volume (3.29), and in the submenu the desired setting, Off, Low, or High.
For key acknowledgement and memory card capacity limit sounds
In the Menu, select Acoustic Signal (3.30), in the first submenu Volume, and in the second level submenu the desired setting, Off, Low, or High.
The sounds acknowledging key presses and a memory card capacity limit can be switched on or off separately in the respective submenus Keyclick and SD card full.
MONITOR AND ELECTRONIC VIEWFINDER SETTINGS
Note:
The monitor and the optional electronic viewfinder image displays are identical. Where they appear depends on whether the viewfinder is switched on or off with its own respective button.
The respective settings remain active even if
- the camera automatically switches itself to stand-by mode (see p. 113),
- the camera is switched off with the main switch (see p. 104), or
- the battery is removed (see p. 100).
For details on the Leica EVF 2 (available as accessory, see p. 152), see the viewfinder's instructions.
SWITCHING THE DISPLAY SETS
Select the desired option with the INFO button (1.12). Scroll through the different options (in an endless loop) by pressing once or several times.
The sequences:
In record mode
a. all displays (see p. 90, plus histogram if set, see p. 127)
b. only basic exposure settings (see p. 90) and AF and exposure metering areas
c. with gridlines (plus histogram if set, see p. 127)
d. monitor switched off (In this case, the LED 1.28 is permanently lit as an indication)
In review mode
a. all displays (see p. 93, plus histogram if set, see p. 127)
b. basic exposure settings (see p. 93) only
Notes:
- Mode d. is only available if previously set in the menu, see next section.
- In record mode, you can press the INFO button ≥1s to call up a screen listing five important settings (2.1.26, see p. 92).
DETERMINING THE MONITOR AS THE EXCLUSIVE DISPLAY FOR REVIEWING IMAGES
You can determine that the monitor is automatically switched on every time you press the PLAY button (1.16) to review images, even if the Leica EVF 2 is being used.
In the menu, select Play on Monitor (3.19), and in the submenu On so the monitor is always switched on with review mode, or Off if you wish to use the EVF 2's display instead (if it is switched on, see above and the viewfinder's instructions).
Note:
This function is only effective for PLAY mode, not for Auto Review mode, i.e. regardless of whether Play on Monitor is switched on or off, when the EVF 2 and Auto Review (see p. 106) are switched on, the images are displayed in the viewfinder.
SWITCHING THE MONITOR OFF
When using the optional external optical viewfinder (see p. 152) the monitor image may be distracting. To prevent this, you can switch the monitor off altogether during record mode.
In the menu, select Opt. Viewfinder (3.13), and in the submenu On to switch the monitor off, or Off to switch it on.
Note:
Even if the monitor is switched off in the menu, a monitor image is always available in review mode, and for menu control.
To ensure perfect visibility and to adapt to different ambient lighting situations, the brightness and the color rendition of both the monitor and the optional external electronic viewfinder can be adjusted.
For brightness Settings
In the menu, select Monitor Brightness (3.15) or EVF Brightness (3.16), and in the respective submenus one of the five levels.
For color adjustments
- In the menu, select Monitor Color Adjustment (3.17) or EVF Color Adjustment (3.18).
- A picture is played back with an overlaid cross. The cross ends have yellow, green, blue, and magenta color marks which represent the possible adjustments.
- Use the direction buttons to move the initially centered cursor in the desired direction, any setting within the screen area is possible.
- The color rendition of the screen changes according to the setting.
MONITOR AND ELECTRONIC VIEWFINDER TIMEOUT MODE
If active, this function switches the monitor and, if attached, the electronic viewinder off after the selected time. This not only saves power, but also reduces the heat induced by the monitor.
In the menu, select Auto LCD Off (3.25), and in the submenu the desired setting.
BASIC PICTURE SETTINGS
JPEG RESOLUTION
When one of the JPG formats is selected (see next section) image recording is possible with 4 different resolutions (numbers of pixels). This allows you to adjust the pictures precisely to the intended use or to the available memory card capacity.
In the menu, select Resolution (3.1), and in the submenu the desired setting.
Note:
Raw images (DNG-format) are always recorded with the highest resolution, regardless of the settings for JPG-images.
FILE FORMAT / COMPRESSION RATE
Two different JPG-compression rates are available: JPG fine and JPG super fine. Both can be combined with simultaneous DNG (RAW-image data format) recording.
In the menu, select Compression (3.2), and in the submenu the desired setting.
Note:
The remaining number of pictures or recording time indicated on the screen are an approximation due to the fact that the file size for compressed images can vary strongly depending on the photographed subject.
WHITE BALANCE
In digital photography, white balance ensures neutral, i.e. natural, reproduction of color in any light. It is based on the camera being preset to reproduce a particular color as white. You can choose from several presets, automatic white balance, two fixed manual settings and direct color temperature setting.
Furthermore, you also have the option to fine-tune all settings precisely to the current photographic conditions and/or your own ideas.
Fixed presets
Press the WB button (1.14), and in the menu appearing on the screen, select either AWB for automatic setting, or (for incandescent lighting), (for outdoor sunlight shots), (for electronic flash lighting), (for outdoor shots in cloudy conditions), (for outdoor shots of subjects in the shade).
Manual setting by metering
Press the WB button (1.14), and in the menu appearing on the screen, select

Aim the yellow frame appearing in the center of the screen at an object with a uniformly white or grey surface that completely fills the frame and press the MENU/SET button (1.23) as indicated by the message.
The settings are saved and can be recalled at any time with the options 1 or 2
Direct color temperature setting
Press the WB button (1.14), and in the menu appearing on the screen, select SET K.
Use the setting ring (1.22) or the up and down direction buttons (1.23/1.26) to change the figure in the box appearing in the center of the monitor image. The setting is saved and can be recalled at any time with the option K.
FINE-TUNING WHITE BALANCE SETTINGS
After finishing any of the above settings, access the WB Adjust screen from the white balance menu by pressing the right direction button (1.24) as indicated by the red triangle.
With the direction buttons, move the circular cursor to the position that delivers the desired color reproduction on the screen, i.e. in the direction of the respective colored squares at the edges.
The settings are saved together with the respective basic setting.
ISO SENSITIVITY
The ISO setting determines the possible shutter speed/aperture combinations for a given illumination level. Higher sensitivities allow faster shutter speeds and/or smaller apertures (for “freezing” fast action or creating a larger depth of field, respectively) at the expense of increasing image noise.
Press the ISO button (1.13), and in the menu appearing on the screen, select either AUTO ISO for automatic setting or one of the six fixed settings.
Within the AUTO ISO option it is possible to limit the range of sensitivities used – e.g. to control the image noise level, and also to determine the longest shutter speed used – e.g. to prevent blurred images of moving subjects.
In the menu, select Auto ISO Settings (3.3), in the first submenu either Slowest Speed or Max ISO, and the respective second level submenus the desired settings.
Note:
The AUTO ISO value (2.1.3) set by the camera can be viewed even if the monitor displays are switched off (see p.115) by pressing the shutter release button (1.8, see p.107) to its first pressure point.
IMAGE PROPERTIES / CONTRAST, SHARPNESS, COLOR SATURATION
One of the many advantages of digital photography is that it is very easy to change critical properties of an image, i.e. those that determine its character. The Leica X-E allows you to influence three of the most important image properties even before taking the picture:
- The contrast, i.e. the difference between light and dark areas, determines whether a picture appears as more „flat“ or „brilliant“. As a consequence, the contrast can be influenced by increasing or reducing this difference, i.e. by making light areas lighter and dark areas darker.
- Sharpness reproduction - at least of the main subject - by using the correct distance setting is a prerequisite for a successful picture. In turn, the impression of sharpness given by a picture is, to a great extent, determined by the contour sharpness, i.e. how small the light/dark transition is on contours in the picture. The sharpness effect can therefore be changed by increasing or reducing these areas.
- The color saturation determines whether the colors in the picture appear as „pale“ and pastel-like or „bright“ and colorful. While the lighting and weather conditions (hazy / clear) are given conditions for the picture, the reproduction can definitely be influenced here.
Besides the Standard, i.e. unchanged rendition, you can - independently - also selected two weakened or strengthened levels for each of the three image properties.
In the menu, select either Sharpening (3.10), Saturation (3.11), or Contrast (3.12), and in the respective submenus the desired settings.
Note:
These settings only come into effect with JPG files, DNG files remain unchanged.
COLOR RENDITION
In addition to the adjustments concerning sharpness, saturation, and contrast (see previous section) you can also select basic color rendition options. You can choose between Standard, Vivid - for highly saturated colors, and Natural- for slightly less saturated colors and slightly softer contrast, plus two black and white settings B&W Natural and B&W High Contr. (high contrast).
In the menu, select Preset Film (3.9), and in the submenu the desired setting.
Notes:
- This setting only comes into effect with JPG files, DNG files remain unchanged.
- All five settings can be adjusted further with the image properties and noise reduction options described in the previous and following sections, respectively. In such cases, the color rendition options are marked with an additional asterisk, e.g. Standard*.
RECORD MODE
FOCUSING
The Leica X-E offers both automatic and manual focusing modes, both cover a distance range of 30cm to infinity.
Selecting the mode
Press the lower direction button (AF/MF, 1.26), and in the appearing menu, select AF or MF. Confirm the setting by pressing either the shutter release button (1.8) or the MENU/SET button (1.25).
• The following information appears on the screen:
- the active focus mode (2.1.25)
- the metering area, indicated by a white rectangle (in the case of 1 area, 11 area, and spot AF metering modes, see pp. 90/122/123)
AUTOMATIC DISTANCE SETTING / AUTOFOCUS
With the AF mode set, focusing is performed automatically when the shutter release button is pressed to the first pressure point (1.8), i.e. the distance is measured, set, and locked (see also p. 147).
• To indicate a correct and locked AF setting,
- the frame color changes to green,
- up to 9 green rectangles appear in the case of 11 area metering (see p.123),
- the green focus status LED (1.19) lights up, and
- an acoustic signal is generated (if selected, see p. 123).
Notes:
-
AF settings are locked together with the exposure settings (see p. 126).
• In certain conditions, the AF system cannot set the correct focus, e.g. -
if the distance to the targeted subject is outside the available range, and/or
- if the subject is not sufficiently illuminated (see next section). To indicate such situations/subjects
- the frame color changes to red,
- in the case of 11 area metering, the display changes to a single red frame, and
- the focus status LED (1.19) flashes.
Important:
The shutter release button (1.8) is not locked, regardless of whether a subject is correctly focused or not.
AF ASSIST LAMP
The built-in AF assist lamp (1.2) extends the AF system's operational range into low light conditions. With the function activated, the lamp lights up automatically in such situations whenever the shutter release button (1.8) is pressed.
In the menu, select AF-Assist Lamp (3.6), and in the submenu the desired setting.
Note:
The range of the AF assist lamp is approx. 4 m/13 ft. Therefore, in low light conditions, AF operation is not possible for distances beyond this limit.
AF METERING MODES
The Leica X-E offers a choice of four AF metering modes. This allows you to adapt the AF system to cope best with different subjects, situations, and compositional ideas.
Press the DELETE/FOCUS button (1.15), and in the appearing menu, select the desired setting. It is confirmed by pressing either the shutter release button (1.8) or the MENU/SET button (1.25).
1 AREA MODE
Focusing is based on the area indicated by an AF frame (2.1.9) in the center of the screen. Since the area is larger than with Spot mode, targeting is less discriminate and therefore easier, while still allowing selective metering. In addition, you can move the AF-frame to anywhere on the screen, e.g. for easier composition in the case of off-center subjects.
Press the DELETE/FOCUS button (1.15) for ≥1 second.
- On the screen, all displays except for the AF frame disappear. Red triangles on all sides of the frame indicate the possible movement directions. To indicate the movement limits, the respective triangles disappear near the edges.
Use the direction buttons to move the AF frame to the desired position. You can return the frame to the central position at any time with the INFO button (1.12). Press either the shutter release button (1.8) or the MENU/SET button to exit this mode.
11 AREA MODE
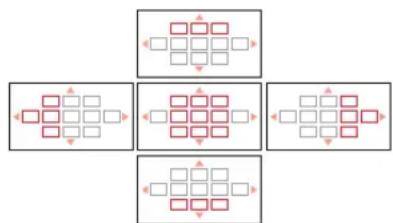
Focusing is based on the areas indicated by the 11 AF frames. They are grouped so as to cover a major part of the image, thus ensuring maximum focusing security for snapshot type photography. Sharpness is registered in all 11 areas, but focusing is automatically determined by the closest objects registered.
In addition, you can concentrate focusing to any of the four sides of the image by reducing the number of areas used and selecting respective groups.
Press the DELETE/FOCUS button (1.15) for ≥1 second.
- On the screen, all displays are replaced by the 11 AF frames. Initially, only the 9 frames constituting the central group have red outlines. Red triangles on all sides indicate the possible settings.
Besides the central group, you can select groups of either the top or bottom three or the four left or right AF areas. Use the direction buttons to select the desired AF frame group. You can return to the central 9 frame group at any time with the INFO button (1.12). Press either the shutter release button (1.8) or the MENU/SET button to exit this mode.
flowchart
graph TD
    A["Step 1: Square"] --> B["Step 2: Square"]
    B --> C["Step 3: Square"]
    C --> D["Step 4: Square"]
    D --> E["Step 5: Square"]
    E --> F["Step 6: Square"]
SPOT MODE
Focusing is based on the area indicated by a small AF frame in the center of the screen. The size of this area allows concentrating the metering on even the smallest subject details. For portraits, e.g., it is normally recommended that the eyes are rendered totally sharp.
In addition, you can move the AF-frame to anywhere on the screen, e.g. for easier composition in the case of off-center subjects.
Press the DELETE/FOCUS button (1.15) for ≥1 second.
- On the screen, all displays except for the AF frame disappear. Red triangles on all sides of the frame indicate the possible movement directions. To indicate the movement limits, the respective triangles disappear near the edges.
Use the direction buttons to move the AF frame to the desired position.
You can return the frame to the central position at any time with the INFO button (1.12). Press either the shutter release button (1.8) or the MENU/SET button to exit this mode.
FACE DETECTION MODE
In this mode the Leica X-E automatically recognizes faces in the image and bases the focus on the closest ones registered. If no faces are detected, the 11 point mode is used.
MANUAL FOCUSING
For certain subjects and situations, it can be beneficial to set the focus yourself, rather than using autofocus (see the previous sections). For example, if the same setting is needed for several pictures and using metering memory-lock (see p. 130) would therefore involve more effort, or if the setting for e.g. landscape pictures is to be kept at infinity, or if poor, i.e. very dark, lighting conditions do not allow any or only slower AF operation.
Press the lower direction button AF/MF, 1.24, and in the menu appearing on the screen, select MF. Confirm the setting by pressing either the shutter release button (1.8) or the MENU/SET button (1.25).
Once set, manual focusing is performed by rotating the setting wheel (1.20) until the image of the important part/s of your subject is/are rendered as desired.
- A distance scale (2.1.20) appears. A green bar on the scale indicates the depth of field resulting from the respective distance setting (and the automatically controlled or manually set aperture, see also the sections about "Exposure metering and control", p. 126). The scale disappears approx. 5s after the last focus setting.
Manual focusing operation is determined by how quickly the setting wheel is rotated:
- For rough focusing: rotate the wheel quickly
- For fine focusing: rotate the wheel slowly
This allows both quicker and more precise setting.
You can improve manual focusing accuracy with the help of the MF Assist function (see next section).
Notes:
- A manually set focus position can be locked by pressing the DELETE/FOCUS button (1.15) for more than one second. This can prove to be very useful to prevent unintentional miss-setting, especially in the case of several consecutive shots of the same subject.
- A manually set focus position is retained even after switching the camera off and back on (see p. 127). This can prove to be helpful, e.g. when several shots of subjects in similar distances are made over a longer stretch of time, and the camera is turned off in between to save battery power.
Manual focus assist function
The larger subject details are shown on the screen, the better their focus can be assessed, and the more accurate the focusing. For this purpose, the Leica X-E offers an optional help of a magnification function, where a central section of the image is reproduced in enlarged form.
In the menu, select MF Assist (3.7), and in the submenu the desired setting. Focus using the setting wheel (1.20).
- With the function activated, an approx. 6x enlarged section of the image appears above the scale. It disappears approx. 5s after the last focus setting.
Note:
You can also let the enlarged section appear at any time by pressing the DELETE/FOCUS button (1.15), e.g. to recheck the setting and thus avoid any risk of accidentally changing it again.
In addition, you can move the enlarged section to anywhere on the screen using the direction buttons, e.g. for easier focusing in the case of off-center subjects, or to keep other parts of the image visible.
You can return the enlarged section to the central position at any time with the INFO button (1.12).
EXPOSURE METERING AND CONTROL
EXPOSURE METERING MODES
The Leica X-E offers you a choice of three exposure metering modes. They allow adjustment to the prevailing light conditions, the situation and your style of work and your creative ideas.
In the menu, select Metering Mode (3.4), and in the submenu the desired setting.
MULTI-FIELD METERING -
With this metering method, the camera automatically analyses the brightness differences in the subject and, by comparing them with programmed brightness distribution patterns, arrives at the likely position of the main subject and the corresponding best exposure.
By consequence, this method is particularly suitable for spontaneous, uncomplicated but reliable photography even under difficult conditions and therefore for use together with programmed automatic exposure (see p. 128).
CENTER-WEIGHTED METERING - □
This metering method allocates the highest weighting to the center of the image field, but also records all other areas.
In conjunction with metering memory-lock in particular (see p. 130) it allows selective adjustment of the exposure to particular sections of the subject with simultaneous consideration of the entire image field.
SPOT METERING - .
This mode concentrates exclusively on a tiny area in the center of the image indicated in the monitor by a green spot (2.1.10).
It allows exact measurement of even minute details for precise exposure – preferably in conjunction with manual setting (see p. 130).
For example, in backlit pictures it is normally necessary to prevent the brighter background causing underexposure of the main subject. With its tiny metering area, spot metering allows you to selectively evaluate this kind of details.
THE HISTOGRAM
The histogram (2.1.13/2.2.8) shows the distribution of brightness in the photograph. In this connection, the horizontal axis corresponds to the tones from black (left) through gray to white (right). The vertical axis corresponds to the number of pixels in each brightness.
This form of representation allows - alongside the image itself - an additional, quick and simple assessment of the exposure setting, both before and after taking the picture. The histogram is particularly suitable for manual setting of the exposure (see p. 130) or to check the automatic exposure control (P, T, A; see pp. 128/129).
The histogram is available with both record and review modes (see pp. 120/142).
For record mode, select Rec. Histogram (3.20) in the menu, and in the submenu the desired setting.
Note:
In the case of flash photography, the histogram cannot represent the final exposure, as the flash is fired after the display.
For review mode, select Play Histogram (3.21) in the menu, and in the submenu the desired setting. Select an option with clipping to have too bright or dark parts of the picture marked.
Notes:
- The histogram is not available in conjunction with simultaneous review of reduced or enlarged photographs (see p. 143).
- In record mode the histogram should be understood as a „tendency display“, and not as a representation of the exact numbers of pixels.
- When playing back a picture the histogram can differ slightly from that while the picture was taken.
EXPOSURE CONTROL
The Leica X-E offers you a choice of four exposure modes, with which you can adjust the camera perfectly to your preferred working method or the relevant subject.
Both the four modes and manual settings of the shutter speed and the aperture are selected with the respective dials (1.10/1.9).
Shutter speeds from 30s to 1/_2000 s and apertures from 2.8 to 16 are available. Both controls have manual setting ranges with click-stop positions - the speed dial in whole steps and the aperture dial in 1/3-steps, and both also have an A-position for automatic operation.
Shutter speeds of 1s and slower are set by first turning the shutter speed dial to the 1+ position, and then selecting the speed with the setting ring (1.22).
- As an indication, (2.1.15) appears additionally.
Note:
Depending on the prevailing light conditions, the brightness of the screen image can differ from that of the actual pictures taken. Particularly for long exposures on dark subjects, the monitor image appears considerably darker than the - correctly exposed - picture.
PROGRAMMED AUTOMATIC EXPOSURE
For fast, fully automatic photography. In this mode, exposure is controlled by automatic setting of shutter speed and aperture.
To set this mode, turn both dials to their A positions.
• The mode is indicated by P (2.1.1).
To take a picture with this mode
- Press the shutter release button (1.8) to its pressure point.
- The shutter speed (2.1.17) and aperture (2.1.20) appear in white. In addition, the indication of the possibility to use the program shift function also appears (2.1.15, see next section). If even the fully opened or closed aperture in conjunction with the slowest or fastest shutter speed would result in under- or overexposure, both values turn red as an indication.
If the automatically set pair of values seems appropriate for the intended composition:
- Press the shutter release button all the way down to take the photograph.
If not, you can change the pair of values before pressing the shutter release button:
SHIFTING PROGRAM MODE
Shifting the program mode curve combines the reliability and speed of fully automatic exposure control with the possibility of being able at any time to vary the speed/aperture combination selected by the camera according to your ideas.
This is done with the setting ring (1.22). For example, if you are taking sports photographs and prefer to use fast speeds, turn it to the left (anticlockwise). If, on the other hand, you would rather have a large depth of field (small aperture) and accept the associated slower speeds that are necessary, then turn it to the right (clockwise) (e.g. for landscape photography).
The overall exposure, i.e. the brightness of the image, remains unchanged. The shift range is limited in order to keep a correct exposure.
- Whenever a value pair is changed by shifting, there are two indications, an asterisk next to the values (2.1.16) and a symbol representing the setting ring (2.1.15). This allows the automatic default pair of values can be recognized at any time.
- When exposure metering is switched off automatically after 12s, the program shift is defaulted, i.e. reset to the values suggested by the camera.
- Program shift is also defaulted after taking a picture, thus preventing accidental use.
SPEED PRIORITY MODE
The speed priority mode automatically controls the exposure based on the manually set shutter speed. It is therefore particularly well suited for taking pictures of moving subjects, where the sharpness of the movement portrayed – which is determined by the shutter speed used – is the crucial element of composition.
By manually pre-selecting an appropriately fast shutter speed, you can therefore prevent unwanted blurring of the movement – you can “freeze” your subject. Or, in reverse, you can express the dynamics of the movement with a deliberate „wiping” effect using a correspondingly slower shutter speed.
To set this mode, turn the aperture dial (1.9) to the A position and set the desired shutter speed with the respective dial (1.10).
- The mode is indicated by T (2.1.1). In addition, the manually set shutter speed appears - in white - (2.1.17).
To take a picture with this mode
- Press the shutter release button (1.8) to its pressure point
• The automatically set aperture appears in white (2.1.20).
If even the fully opened or closed aperture in conjunction with the set shutter speed would result in under- or overexposure, both values turn red as an indication.
If the automatically set aperture value seems appropriate for the intended composition:
- Press the shutter release button all the way down to take the photograph. If not, you can change the shutter speed before pressing the shutter release button.
APERTURE PRIORITY MODE
Aperture priority mode automatically controls the exposure based on the manually set aperture. It is therefore particularly well suited for taking pictures where the depth of field – which is determined by the aperture used – is the crucial element of composition.
By manually pre-selecting an appropriately low aperture value (= large aperture) you can reduce the depth of field, for example in a portrait to let a face "stand out", i.e. be shown clearly in front of an unimportant or distracting background. Or, in reverse, with a correspondingly high aperture value (= small aperture) you can increase the depth of field, in order to reproduce everything from the foreground to the background clearly in a landscape photograph.
To set this mode, turn the shutter speed dial (1.10) to the A position and set the desired aperture with the respective dial (1.9).
- The mode is indicated by A (2.1.1). In addition, the manually set aperture appears in white (2.1.20).
To take a picture with this mode
- Press the shutter release button (1.8) to its pressure point.
- The automatically set shutter speed appears in white (2.1.17). If even the fastest or slowest shutter speed in conjunction with the set aperture speed would result in under- or overexposure, both values turn red as an indication.
If the automatically set shutter speed seems appropriate for the intended composition:
- Press the shutter release button all the way down to take the photograph.
If not, you can change the shutter speed before pressing the shutter release button.
MANUAL MODE
If, for example, you want to achieve a particular effect, which is only possible with a quite specific exposure, or if you want to ensure that several pictures with different trimming have an absolutely identical exposure, then you can manually set both shutter speed and aperture.
To set this mode, set the desired values on both the shutter speed and aperture dials (1.10/1.9).
- The mode is indicated by M (2.1.1). In addition, the manually set shutter speed (2.1.17) and aperture (2.1.20) appear in white.
To take a picture with this mode
- Press the shutter release button (1.8) to its pressure point.
- The light balance scale (2.1.18) appears. It covers a range of ± 2EV (exposure value) in increments of 1 / _3 EV.
Settings within ±2EV of the correct exposure for the targeted subject are represented by one of the scale marks turning red. Settings beyond ±2EV are indicated by the - or + marks at the ends of the scale turning red.
To achieve a correct exposure, adjust your shutter speed and/or aperture settings so that the center mark is red.
- Press the shutter release button all the way down to take the photograph.
METERING MEMORY-LOCK
For composition reasons, it can be beneficial not to have the main subject in the center of the picture. However, placing it off-center from the start would often lead to the metering being based on a part of the subject significantly closer or further away. This is equally valid for the 1 point and spot AF metering modes (see pp. 122/123) with respect to sharpness, and the exposure modes P, T and A (see pp. 128/129) with respect to differences in brightness. The result would then be that the main subject is out of focus and/or rendered unfavorably dark or light.
As a solution, the Leica X-E's metering memory-lock function allows you to measure the main subject first and then to retain this setting until you have decided on your final trimming and take the picture.
The procedure:
- Aim the respective AF-frame (2.1.8/2.1.9) and/or the green exposure metering spot (2.1.10) at that part of your subject which you want to have correctly focused and exposed. As soon as focus and exposure have been set and locked by pressing the shutter release button to the first pressure point (s. p. 147), the color of the AF frame changes to green and the focus signal (1.19) lights up as confirmation.
- Continue to hold the shutter release button halfway down and then select your final trimming by moving the camera.
- Press the shutter release button all the way down to take the photograph.
Note:
You can lock measured values any number of times before taking the picture.
EXPOSURE COMPENSATION
Exposure meters are calibrated to a normal, i.e. average photographic subject. If the relevant subject detail does not meet these requirements, for example large areas of snow or, in the opposite case, a black steam locomotive filling the frame, and if you wish to bias the exposure identically in such cases for a number shots, it may be more convenient to apply an appropriate exposure compensation than to use metering memory lock every time (see previous section).
- To set a compensation, press the upperEV+/-direction button (1.23) once.
- The corresponding sub-menu appears.
- Select the desired compensation value with the left and right direction buttons (1.24/1.27). Values from +3 to -3EV with 13 EV increments are available.
- While setting, you can observe the effect as the monitor image gets correspondingly darker or brighter.
- Confirm the setting by pressing either the shutter release button (1.8) or the MENU/SET button (1.25).
- The exposure compensation symbol and the set value (2.1.21) appear.
Notes:
- An exposure compensation cannot be set when using manual exposure mode (see p. 119)
- The EV+/- direction button is also used to call up the menus for exposure bracketing (see next section) and flash exposure compensation (see p. 130). They scroll through in an endless loop and can therefore be selected by repeatedly pressing the button.
- A set compensation remains active until it is set to ± 0 (see step 2.), i.e. after any number of shots and even if the camera is switched off.
AUTOMATIC EXPOSURE BRACKETING
Many attractive subjects are very rich in contrast, i.e. they have both very bright and very dark areas. The resulting effect can be quite different, depending on which sections you base your exposure on. In such cases, you can use automatic exposure bracketing to produce a series of three shots with graduated exposures. You can then select the most appropriate picture for further use.
- To set a bracketing series, press the upperEV+/-direction button (1.23) twice.
• The corresponding sub-menu appears.
-
Select the desired interval with the left and right direction buttons (1.24/1.27). Values from +3 to -3EV with ^1/_3 EV increments are available.
-
Confirm the setting by pressing either the shutter release button (1.8) or the MENU/SET button (1.25).
• The bracketing symbol (2.1.23) appears.
Notes:
- Depending on the available shutter speed/aperture combination, the working range of the automatic exposure bracketing can be limited.
- The EV+/- direction button is also used to call up the menus for exposure compensation (see previous section) and flash exposure compensation (see p. 137). They scroll through in an endless loop and can therefore be selected by repeatedly pressing the button.
- A set bracketing series remains active until it is set to Off (see step 2.), i.e. after any number of series and even if the camera is switched off.
FLASH PHOTOGRAPHY
TAKING PHOTOGRAPHS WITH THE BUILT-IN FLASH UNIT
The Leica X-E is equipped with a built-in flash unit (1.5) that rests hidden in the camera body when not in use. For flash photography, it must be extended.
To do so, push the release slider 1.17 towards the camera center. The spring-loaded flash unit then unfolds into its working position whereby it is also switched on. Whenever you do not want to use the flash, simply keep it retracted or carefully push it down until it clicks into place in its home position.
- The respective display (2.1.2) for the flash mode set (see below) appears in white. Initially it may flash in red fore a short while instead to indicate that it is not yet fully charged and therefore not ready.
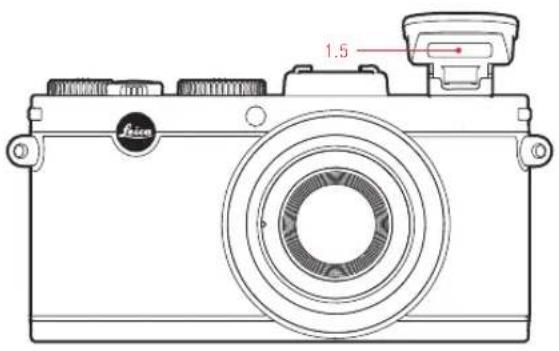
Flash exposures are controlled by the camera using a pre-flash measurement. For this purpose, a metering flash is triggered immediately before the main flash. The amount of light reflected then determines the strength of the main flash.
Note:
Flash use is not possible with exposure series (see p. 104) and automatic bracketing (see p. 132). Correspondingly, the flash indication will not appear even if the flash unit is extended, and the flash will not fire.
FLASH MODES
Press the right direction button (1.24), and in the appearing menu, select the desired flash mode. This can be done alternatively with the setting ring (1.22), the up and down direction buttons (1.23/1.26), or by repeatedly pressing the right direction button again.
Confirm the setting by pressing either the shutter release button (1.8) or the MENU/SET button (1.25).
• The flash mode display (2.1.2) changes accordingly.
AUTOMATIC FLASH ACTIVATION - 7A
This is the standard mode. The flash is always fired automatically when, because of poor lighting conditions, long exposure times on freehand shots could lead to blurring, for example, in a dimly lit room and outdoors, at twilight or in poor weather.
AUTOMATIC FLASH AND PRE-FLASH ACTIVATION - 7A
(to reduce „red eye“ effect)
„Red eye“ effect is caused by light from the flash reflecting off the cornea straight back to the camera and can occur when taking portrait and group photos. It is therefore best if the people being photographed do not look straight at the camera. As the effect is worsened when the pupils are wide open in low light conditions, when taking photographs indoors for example, you should switch on as much room lighting as possible, so that the pupils become narrower.
Due to the pre-flash, which is triggered shortly before the main flash by pressing the shutter release button, the pupils of the person looking at the camera contract to reduce the „red eye effect“.
MANUAL FLASH ACTIVATION -
For backlit pictures, where your main subject does not fill the frame and is in shadow, or in cases where you want to moderate high contrasts (e.g. in direct sunlight) (fill-in flash).
As long as this mode is activated, the flash unit is fired for every picture, regardless of the prevailing lighting conditions, otherwise the functioning corresponds exactly with those modes with automatic flash activation.
In this case, flash performance is controlled depending on the outdoor brightness metered: in poor light as with the automatic mode, with increasing ambient brightness, however, with reduced output (up to a maximum of -1^2/_3 EV ). The flash then works as a fill-in light, for example to illuminate dark shadows in the foreground or backlit subjects, in order to obtain more balanced lighting overall.
MANUAL FLASH AND PRE-FLASH ACTIVATION -
For the combination of the situations and functions described most recently above.
AUTOMATIC FLASH ACTIVATION WITH SLOWER SHUTTER SPEEDS - 7S
For simultaneous more appropriate (brighter) reproduction, particularly for dark backgrounds and flash fill-in for the foreground. To minimize the risk of blurring, the shutter speed is not extended beyond 130 s in the other modes with flash activation. For pictures where the flash is used, this means that objects in the background, which the flash cannot reach, are often badly underexposed. To take appropriate account of the available ambient light, the longer shutter speeds necessary in these exposure situations (up to 30s) are permitted here.
Note:
The longest shutter speed used by the camera can be determined with the AUTO ISO Settings settings (3.3, see p. 118).
Also depending on the AUTO ISO Settings settings, slower shutter speeds may not have to be set by the camera since in such cases its priority is to raise the ISO sensitivity first.
AUTOMATIC FLASH AND PRE-FLASH ACTIVATION WITH SLOWER SHUTTER SPEEDS - 7S
For the combination of the situations and functions described immediately above.
STUDIO MODE - Studio
This mode is intended exclusively to trigger other flash units, e.g. studio flash units equipped with a slave function (triggered optically by the camera flash), i.e. it cannot be used for normal flash photography.
Note:
To prevent blurred pictures with the slower shutter speeds in the modes S ,
S and S should hold the camera steady, i.e. support it or use a tripod. Alternatively, you can select a higher ISO-speed (see p. 118).
FLASH RANGE
The effective range of the flash depends on the aperture and the ISO speed set. For good results, it is crucial that the main subject is within the appropriate flash range. See the table below for details.
| Sensitivity Maximum flash range | |
| ISO 100 | 2.0m/6ft |
| ISO 200 | 2.8m/9ft |
| ISO 400 | 4.0m/13ft |
| ISO 800 | 5.6m/18ft |
| ISO 1600 | 8.0m/26ft |
| ISO 3200 | 11m/36ft |
| ISO 6400 16m/53ft | |
| ISO 12500 22m/73ft | |
1 Ranges based on aperture set to 2.8. With other aperture settings, the ranges are correspondingly shorter.
SYNCHRONIZATION TO THE END OF THE EXPOSURE
Flash photographs are illuminated by two light sources, the available light and the light from the flash. Parts of the subject that are exclusively or primarily illuminated by the flash are almost always reproduced extremely sharply (provided focusing is correct) due to the extremely fast pulse of light. By contrast, all other parts of the subject – those that are sufficiently illuminated by the available light or illuminate themselves – are portrayed with different degrees of sharpness in the same picture.
Whether these parts of the subject are reproduced sharply or „blurred“, and the degree of blurring, is determined by two independent factors.
- The length of the exposure, i.e. for how long these parts of the subject "act upon" the sensor and
- How quickly these parts of the subject – or the camera itself – are moving during the exposure.
The longer the shutter speed/exposure time or the faster this movement, the more clearly the two - superimposed - parts of the picture can differ.
With the flash fired at the normal moment, at the beginning of the exposure, i.e. immediately after the shutter is completely open, this can even lead to apparent contradictions, e.g. a vehicle seeming to be "overtaken" by the traces of its own taillights.
The Leica X-E gives you a choice between this normal flash firing moment and synchronization to the end of the exposure, i.e. immediately before the shutter begins to close again. In this case, the sharp image is located at the end of the movement. In the mentioned example, the taillight traces would follow the vehicle as one would expect. Thus, this flash technique often gives a more natural impression of movement and dynamics.
In the menu, select Flash Sync (3.14), and in the submenu the desired setting.
Note:
When using faster shutter speeds, in terms of the image there is hardly any difference, or only for rapid movements between the two firing moments.
FLASH EXPOSURE COMPENSATION
This function can be used to selectively reduce or strengthen the flash exposure regardless of the exposure of the available light, e.g. in a picture taken outside in the evening, to lighten the face of a person in the foreground while retaining the lighting atmosphere.
- To set a flash exposure compensation, press the upper EV+/- direction button (1.23) three times.
• The corresponding sub-menu appears. - Select the desired compensation value with the left and right direction buttons (1.24/1.27). Values from +3 to -3EV with ^1/_3 EV increments are available.
- Confirm the setting by pressing either the shutter release button (1.8) or the MENU/SET button (1.25).
- The exposure compensation symbol and the set value (2.1.14) appear.
Notes:
- A brighter flash illumination chosen with a plus compensation requires higher flash output and vice versa. Therefore flash exposure compensations influence the flash range more or less considerably: A plus compensation reduces the range, a minus compensation increases it.
- The EV/direction button is also used to call up the menus for exposure bracketing (see next section) and flash exposure compensation (see p. 132). They scroll through in an endless loop and can therefore be selected by repeatedly pressing the button.
- A set compensation remains active until it is switched to ± 0 (see step 2.), i.e. after any number of shots and even if the camera is switched off.
USING EXTERNAL FLASH UNITS
The ISO flash shoe (1.11) of the Leica X-E also allows the use of more powerful, external flash units. We specifically recommend using dedicated units such as the Leica SF 24D (see p. 153).
As soon as an external flash unit is attached, if flash modes with pre-flash function ( A// S ) are set, they are changed to the otherwise same modes without pre-flash ( A// S ) and displayed accordingly.
However, when the flash unit is removed, the camera is reset to the originally set mode.
On the Leica SF 24D, the mode TTL/GNC should be set to allow automatic control by the camera. When set to A, subjects with above or below average brightness may not be optimally exposed. When set to M, the flash exposure must be adjusted to the aperture and distance values specified by the camera by setting a corresponding reduced power output level.
Notes:
- When an external flash unit is attached, it must also be turned on, i.e. ready to use, otherwise incorrect exposures and incorrect messages on the camera may result.
- Simultaneous use of the electronic viewfinder EVF 2 (see p. 152) is not possible.
ADDITIONAL FUNCTIONS
SELF-TIMER
The self timer allows you to take a picture with a delay of either 2 or 12s. This is particularly useful for group photographs, where you want to appear in the picture yourself or if you want to avoid the picture being out of focus due to camera shake when releasing the shutter. In such cases, we recommend that you mount the camera on a tripod.
Setting
- Press the left direction button (1.27).
• The respective indication appears (2.2.11).
- In the appearing menu, select the desired delay time. This can be done alternatively with the setting ring (1.22), the up and down direction buttons (1.23/1.26), or by repeatedly pressing the left direction button again.
• The indication (2.2.11) changes accordingly.
- Confirm the setting by pressing either the shutter release button (1.8) or the MENU/SET button (1.25).
Operation
Press the shutter release button (1.8, see p. 127) all the way down to take the photograph.
• Progress is indicated by flashing of the self-timer LED (1.2)
- with 12s delay, first of all slowly (at 1Hz) and more quickly (at 2Hz) in the last 2s,
- with 2s delay as described above for the last 2s.
On the monitor, a message counts down the remaining time (2.1.11).
Notes:
- A running delay time can be restarted at any time by pressing the shutter release button again.
- Cancelling a running delay time is possible only with the main switch, either by selecting another mode, or by turning the camera off.
- When the self-timer is activated, only single pictures are possible, i.e. exposure series (see p. 104) and automatic exposure bracketing (see p. 132) cannot be combined with self-timer mode.
FORMATTING THE MEMORY CARD
Normally, it is not necessary to format (initialize) a memory card that has already been used. However, if a card that has yet to be formatted is inserted for the first time, it must be formatted. In such cases the Format sub-menu appears automatically.
Nonetheless, we recommend formatting the memory card from time to time, as certain residual quantities of data (subsidiary information) can take up some of the memory capacity.
In the menu, select Format (3.32), and in the submenu, confirm or reject the formatting process.
Notes:
- Simple formatting does not irretrievably delete the data on the card. It merely deletes the directory, which means that the existing data is no longer directly accessible. The data can be accessed again using appropriate software.
Only the data that is then overwritten by saving new data is actually completely deleted.
Nevertheless, you should make a habit of transferring all your pictures onto a secure bulk storage medium, e.g. the hard drive on your computer, as soon as possible. - Do not switch off the Leica X-E while the memory card is being formatted.
- If the memory card has been formatted in another device, such as a computer, you should reformat it in the Leica X-E.
- If the memory card cannot be formatted, you should ask your dealer or contact the Leica Information Service (address, see p. 160) for advice.
- Even protected pictures (see p. 146) are deleted when formatting the memory card.
- If no memory card is inserted, the internal memory will be formatted.
WORKING COLOR SPACE
The requirements in terms of color reproduction differ considerably for the various possible uses of digital picture files. Different color spaces have therefore been developed, such as the standard RGB (red/green/blue) that is perfectly adequate for simple printing. For more demanding image processing using appropriate programs, e.g. for color correction, Adobe© RGB has become established as the standard in the relevant sectors.
In the menu, select Color space (3.26), and in the submenu the desired setting.
Notes:
- If you have your prints produced by major photographic laboratories, mini labs or Internet picture services, you should always select the sRGB setting.
- The Adobe RGB setting is only recommended for professional image processing in completely color-calibrated working environments.
COPYING IMAGE DATA FROM THE INTERNAL MEMORY TO A MEMORY CARD
Thanks to its 110 MB internal memory, the Leica X-E can store several images without a card in the camera. If you wish to save these images permanently though, you should copy the image data to a memory card.
In the menu, select Copy (3.35), and in the submenu, confirm or reject the copying process.
CREATING NEW FOLDER NUMBERS
The Leica X-E saves the picture numbers to the memory card in ascending order. Initially, the corresponding files are all stored in one folder. However, you can create a new folder at any time, which you can use to store subsequent pictures, e.g. to group them together more clearly.
In the menu, select Reset Image Numbering (3.22), and in the submenu, confirm or reject the resetting process.
Notes:
- The file names (e.g. L1002345.jpg), comprise two groups100 and 2345. The first 3 digits are the number of relevant folder, the second 4 digits are the consecutive picture number within the folder. This ensures that there are no duplicated file names after the function is used and the data is transferred to a computer.
- If you wish to reset the folder number to 100, you can do so by formatting the card or the internal memory and, immediately afterwards, reset the image number. This also resets the picture number (to 0001).
USER PROFILE
With the Leica X-E, any combination of all menu settings can be permanently stored, e.g. so that they can be retrieved quickly and easily at any time for recurring situations / subjects. A total of three memory slots are available for such combinations. You can also reset all the menu items to the factory setting.
Creating a profile
- Set the desired functions in the menu.
- In the menu, select User Profile (3.38),
- in the submenu Save User Profile,
- in the second level submenu, select the desired memory slot, and
- confirm your setting by pressing the MENU/SET button (1.25).
Using a profile
In the menu, select User Profile, and in the submenu the desired memory slot.
DEFAULTING ALL MENU SETTINGS
In the menu, select User Profile, and in the submenu Factory Setting.
Note:
Defaulting does not reset your time and date settings.
IMAGE STABILIZATION
Especially in low light situations, the necessary shutter speed may be too slow to ensure sharp pictures, even with the activated AUTO ISO function (see p.118). The Leica X-E offers a function that will often produce sharp pictures even with such slow shutter speeds.
In the menu, select Image Stabilization, and in the submenu the desired setting.
Notes:
- The camera takes two pictures automatically in series with this function, one with a faster and one with a slower shutter speed (you will hear the shutter operate twice during the operation). Then, it takes the data of the two exposures and combines them into one with digital image processing.
- Therefore, please hold the camera steady until the shutter has released the second time.
- Due to the function using two exposures, it can only be applied with static subjects.
- Image stabilization is only possible with shutter speeds within the range of 1/4 s to 1/30 s and sensitivities up to ISO 1600.
REVIEW MODE
SELECTING REVIEW MODES
You can switch from record or menu setting mode to review at any time by pressing the PLAY button (1.16).
In addition, you can choose to have every picture taken to be shown automatically immediately after the shot.
- In the menu, select Auto Review (3.23),
- in the submenu Duration, and
- in the respective second level submenu the desired function or duration.
- To select whether pictures should be shown with or without histogram (see p. 127), call up the first sub-menu again,
- select Histogram, and then
- the desired option.
- The last picture taken is shown in the monitor and the selected displays for review mode (see p. 73) appear.
If no image file is saved in the internal memory (see p. 140) and/or on the memory card, the message No valid image to play appears instead.
Notes:
- If a memory card is inserted (see p. 82), only the pictures on the card are accessible for reviewing, i.e. if you want to review a picture saved to the internal memory, the card must be removed first.
- The Leica X-E saves pictures according to the DCF standard (Design Rule for Camera File System).
- It may not be possible to review files not created by the Leica X-E.
- In some cases, the monitor image may either be of poorer quality than usually, or the monitor may even remain black except for the displayed file name.
SELECTING PICTURES
You can select the other saved pictures using either
- the left and right direction buttons (1.24/1.27), or
- the setting wheel (1.20).
Pressing/turning left takes you to the pictures with lower numbers, pressing/turning right to those with higher numbers. Keeping the buttons pressed results in continuous scrolling at a rate of approx. 2s per picture.
After the highest and lowest numbers, the series of pictures begins again in an endless loop, so you can reach all pictures in either direction.
• The picture and file numbers change accordingly.
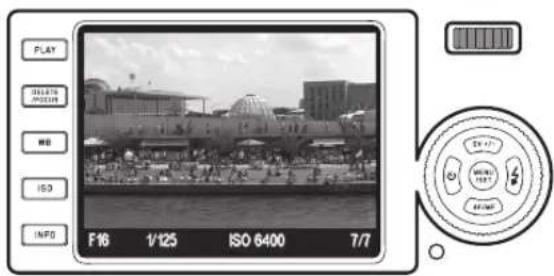
ENLARGING THE PICTURE/
SIMULTANEOUS REVIEW OF 16 PICTURES
The Leica X-E allows you to enlarge a section of the picture by up to 16x, e.g. in order to study it more closely. Conversely, it is also possible to simultaneously
view 16 pictures, e.g. to gain an overview or to find the picture you want more quickly.
Turn the setting ring (1.22) clockwise to enlarge the picture, counterclockwise beyond the normal size for the 16 picture display.
- With enlarged pictures, displays appear, indicating the approximate size of the section (2.2.21) and that the setting wheel is still available for selecting other pictures (2.2.20).
With the 16 picture display, the one previously viewed at normal size is indicated by a red frame.
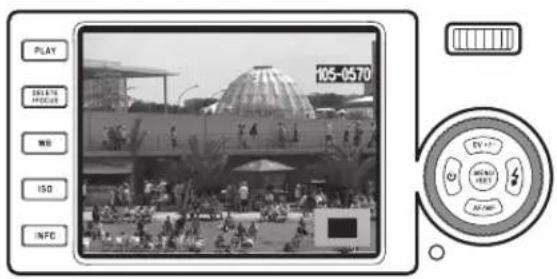
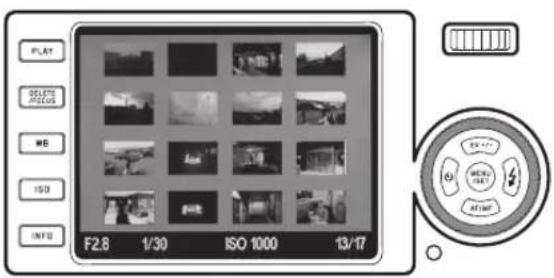
Notes:
- The more the picture is enlarged, the more the quality of reproduction in the monitor is reduced, due to the proportionally lower resolution.
- It may not be possible to enlarge pictures created on other cameras.
- If an enlarged section is being shown, using the setting wheel to view other pictures results in these also being shown as enlarged sections.
- A histogram (see p. 127) is not available with enlarged viewing.
With the 16 picture display, selecting other pictures is the same as with normal size viewing, except that keeping the buttons pressed results in very fast scrolling.
- The selected picture is identified by a red frame.
You can return any indicated picture to normal size by turning the setting ring clockwise, or by pressing the MENU/SET button (1.25).
SELECTING THE TRIMMING
When a picture is enlarged, you can move the enlarged section out of the central position, e.g. to control the rendition of off-center subject detail.
Use the respective direction buttons to move the enlarged section up, down, to the left or the right (1.23/1.24/1.26/1.27).
- The display 2.2.21 indicates the approximate position of the section within the picture.
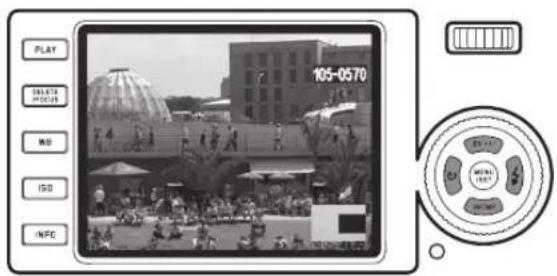
DELETING PICTURES
Pictures on the memory card and the internal memory can be deleted at any time. This can be useful, e.g. if you have already saved the pictures to other media, if you no longer need them or if you need to free up more memory space on the card.
The Leica X-E also offers you the option of deleting single or all pictures at the same time, as required.
Notes:
- If a memory card is inserted (see p. 102), only the pictures on the card are accessible for deleting, i.e. if you want to delete a picture saved to the internal memory, the card must be removed first.
- Protected pictures must be unprotected before they can be deleted. See p. 146 for details.
- Deleting a picture causes the subsequent pictures in the frame counter (2.2.9) to be renumbered according to the following pattern: If you delete picture no. 3, for example, what was previously picture no. 4 then becomes no. 3, while the picture that was previously no. 5 becomes no. 4 etc.. However, this does not apply to the numbering of the remaining picture files in the folder (2.2.6), which always remains unchanged.
Important:
Pictures are permanently deleted. You cannot subsequently retrieve them.
To call up the delete function, press the DELETE/FOCUS button (1.15).
• The delete menu appears.
The subsequent actions depend on whether you want to delete single pictures or all pictures simultaneously.
Deleting single pictures
- Select Single and press the MENU/SET button (1.25).
- After deleting, the next picture appears. If the picture is protected (see p. 146), it continues to be displayed and This is protected appears for a short time.
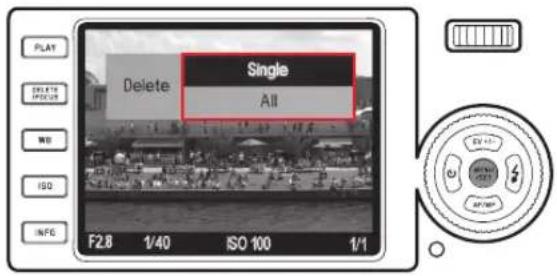
Deleting all pictures
- Select All and press the MENU/SET button (1.25).
- A submenu appears.
- Confirm or reject the process and press the MENU/SET button again.
- The message No valid image to play or the originally shown picture appears again, if it has not been deleted after all.
However, if the pictures included some with protection (see also next section), Protected images were not deleted appears for a short time instead, and finally the first of these pictures reappear.
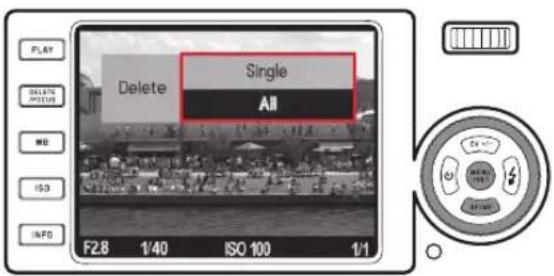
Note:
If you reconsider and do not want the delete one or all pictures, you can exit the delete menu by pressing the DELETE/FOCUS button again.
PROTECTING/UNPROTECTING PICTURES
The pictures saved on the memory card and in the internal memory can be protected against being accidentally deleted.
- In the menu, selectProtect (3.34).
- After a short moment the picture shown before reappears along with a menu. Depending on whether the picture is protected or not, the menu contains the options Unprotect or Protect, respectively.
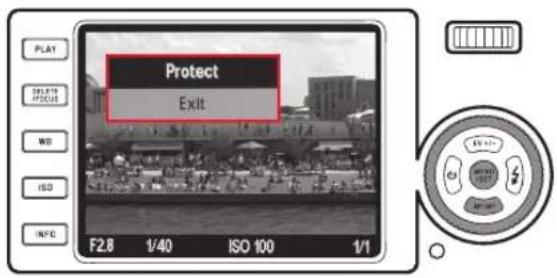
- select the respective option, and
- confirm by pressing the MENU/SET button (1.25).
• A protected picture is indicated by the lock display (2.2.4).
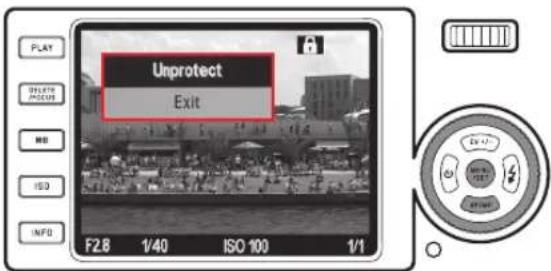
Notes:
- If a memory card is inserted (see p. 102), only the pictures on the card are accessible for protecting/unprotecting, i.e. if you want to protect/unprotect a picture saved to the internal memory, the card must be removed first.
- You can return to normal review mode at any time by pressing Exit.
- With the protect/unprotect menu displayed, you can select the other pictures using the left and right direction buttons (1.24/1.27).
- Even protected pictures are deleted when formatting the memory card (see p. 139).
- If you attempt to delete (see p. 146) protected pictures, warning messages appear. To delete them, remove the protection as described above.
- Protection is only effective on this camera.
- You can also prevent accidental deletion by sliding the memory card's write protection switch to the position marked LOCK (see p. 102).
REVIEW OF PORTRAIT-FORMAT PICTURES
Normally, the pictures on the monitor are shown how they were taken, i.e. if the camera was held horizontally, the picture will be shown that way too. In the case of portrait format pictures though, i.e. if the camera was held vertically for the shot, this may be inconvenient since, with the camera held horizontally afterwards as usual, the monitor image will not show an upright picture.
The Leica X-E offers a remedy for this.
In the menu, select Auto Rotate Display (3.32), and in the submenu the desired setting.
When On is selected, portrait format pictures are automatically displayed upright.
Notes:
- Portrait format pictures shown perpendicularly on the monitor are necessarily considerably smaller.
• This function is not available for automatic review (see p. 106).
PLAYBACK WITH HDMI EQUIPMENT
The Leica X-E allows you to view your pictures on a TV, monitor, or projector equipped with HDMI input, thus ensuring the best possible rendition. In addition, you can choose between three resolution levels: 1080i, 720p, and 480p.
Setting
In the menu, select HDMI (3.33), and in the submenu the desired setting.
Connecting / Playing back pictures
- Plug the HDMI cable into the camera's and the TV's, monitor's or projector's HDMI sockets.
- Turn on the TV, monitor, or projector and select HDMI input.
- Turn on the camera and press the PLAY button (1.16) to set to play mode.
Notes:
- A HDMI cord is necessary for this connection to a TV, monitor, or projector. Use only the cord available as accessory from Leica for this camera (see p. 153)
- If the TV's, monitor's, or projector's maximum resolution is lower than the selected level on the camera, it automatically switches to the attached unit's maximum resolution. E.g., if you set 1080i on the camera and the connected unit has maximum of 480p, the camera automatically uses 480p.
- Please refer to the instructions of the relevant TV, monitor, or projector for details on their required settings.
- The image shown on an external display does not include any of the information on the camera monitor / viewfinder.
MISCELLANEOUS
TRANSFERRING DATA TO A COMPUTER
The Leica X-E is compatible with the following operating systems:
Microsoft®: Windows® XP / Vista® / 7®
Apple ^® Macintosh ^® : Mac ^® OS X (10.4) and higher
The Leica X-E is equipped with a USB 2.0 High Speed interface for transferring data to a computer. This allows fast data transfer to computers with the same kind of interface. The computer used must have either a USB port (for direct connection to the Leica X-E) or a card reader for SD/SDHC/SDXC cards (including UHS I standard types).
CONNECTING AND TRANSFERRING DATA WITH THE CAMERA' AS AN EXTERNAL DRIVE
With Windows operating systems:
If the Leica X-E is connected to the computer using a USB cable, the operating system detects it as an external drive and assigns it a drive letter. Use Windows Explorer to transfer the picture data to your computer and save it.
With Mac operating systems:
If the Leica X-E is connected to the computer using a USB cable, the memory card used appears as a storage medium on the desktop. Use the Finder to transfer the picture data to your computer and save it.
Important:
- Only use the USB cable (D) supplied.
- While data is being transferred from the Leica X-E to the computer, the connection may not under any circumstances be broken by removing the USB cable, as otherwise the computer and/or the Leica X-E may “crash” and the memory card may even be irreparably damaged.
- The Leica X-E cannot be switched off or automatically switch itself off due to a lack of battery power while data is being transferred from the camera to the computer, as this may cause the computer to crash ^4 . For the same reason the battery must never be removed from the camera while the connection is active. If the battery capacity runs short during data transfer, the INFO screen (2.1.26) appears with the battery capacity indication (2.1.5) flashing. In this case, stop the data transfer, switch off the Leica X-E (see p. 104) and charge the battery (see p. 100).
CONNECTING AND TRANSFERRING DATA USING CARD READERS
The picture files can also be transferred to other computers using a standard card reader for SD/SDHC/SDXC memory cards (including UHS I standard types). Card readers with a USB interface are available for computers with a USB interface.
Note:
The Leica X-E is equipped with an internal sensor which detects the position of the camera – horizontal or vertical (both directions) – for each picture. This information automatically allows the pictures to be displayed upright when subsequently displayed on a computer running the appropriate programs.
WORKING WITH DNG RAW DATA
If you have selected the standardized and future-proof DNG (Digital Negative) format, you require highly specialized software to convert the saved raw data into optimum quality, for example the professional Adobe ^® Photoshop ^® Light-room ^® raw data converter. It provides optimum quality algorithms for digital color processing, allowing pictures that simultaneously have low picture noise and exceptional resolution.
During editing, you have the option of adjusting parameters such as white balance, noise reduction, gradation, sharpness etc. to achieve an optimum image quality.
Adobe ^® Photoshop ^® Lightroom ^® is available as a free download when you register your Leica X-E on the Leica Camera AG homepage. Further details can be found in the registration booklet enclosed in the camera packaging.
INSTALLING ADOBE® PHOTOSHOP® LIGHTROOM®
To start the installation, your computer must have an active Internet connection (i.e. it must be online).
You also need a valid e-mail address to activate the software.
Have the required software license code ready - you will receive it in the reply mail from Leica after you have chosen to download the software.
Should you need any support concerning Adobe ^® Photoshop ^® Lightroom ^®
Home: You will find a support contact on the Leica Camera AG homepage in the owners area where you registered your camera and downloaded the software.
System requirements
Like every software, every version of Adobe® Lightroom® calls for different versions of the employed operating system (Windows/Mac). Therefore, please check your operating system's compatibility before downloading Adobe® Lightroom®.
On some Windows versions, it is possible that the operating system will issue a warning about a missing Windows signature. Ignore this message and continue with the installation.
INSTALLING FIRMWARE UPDATES
Leica is constantly working on developing and optimizing its products. As digital cameras have many functions that are controlled electronically, some of these improvements and enhancements to the functions can be installed on the camera at a later date.
To do this, Leica provides firmware updates at irregular intervals, which you can easily download from our homepage.
When you have registered your camera, Leica will inform you of any new updates.
ACCESSORIES
Important:
Only the accessories specified and described below, and/or those specified and described by Leica Camera AG, may be used in this camera.
Leather case X
Case made of high-quality real leather (black). The case carries the camera in vertical position, camera slips in and out of the case for carrying and shooting. Comes with longk strap.
(Order no. 18 755)
Camera protector X
The protector gives free access to all operating elements with the camera inside. The camera can remain in the protector for shooting. Made of high-quality real leather (black).
(Order no. 18 731)
Ever ready case X
The high quality camera case is made of vegetable tanned calf leather. It protects without restricting your spontaneity. The camera can remain in the case when taking photos.
(Order no. 18 754)
Small System bag
Small, soft system case made of high quality water proof canvas cloth (black). Takes the camera plus accessories such as handgrip, viewfinder, and flash unit.
(Order no. 18 757)
Wrist strap X
Contour shaped, made of real leather (black).
(Order no. 18 713)
External Viewfinders
Bright Line Finder 36mm
High quality external optical viewfinder. Bright line fames indicate the image field both for distances between 60cm and infinity, as well as between 30 and 60cm.
(Order no. 18 707)
Electronic Viewfinder EVF 2
The EVF 2 delivers a nearly 100% TTL view of the image frame with a 1.4M pixel resolution. This allows precise and easy composition as well as simultaneous comprehensive control of all relevant image parameters. The EVF 2 proves especially useful in lighting situations that reduce the visibility of the monitor image, and, thanks to its hinged design, also in the case of below eye level shots.
(Order no. 18 753)
Both viewfinders are mounted on the camera's hot shoe just like – and therefore only instead of – an external flash unit. See pp.114/115 for details on the relevant settings for the monitor when using an external viewfinder.
Handgrip X
The handgrip for the Leica X-E allows the camera to be held safely and comfortably. It is attached to the camera's tripod thread by means of the knurled screw on the bottom of the handgrip. (Order no. 18712)
Notes:
- This handgrip is designed exclusively for the Leica X-E, Leica X2 and the Leica X1. It cannot be attached to any other camera due to their differing dimensions and tripod thread positioning.
- Since the handgrip covers the camera's battery / card compartment, it must be removed to replace the battery and/or card.
- Take care to align the handgrip's guide pin with the camera's respective drilling (1.34) to prevent the camera from getting scratched.
Flash units
The Leica SF 24D system flash unit is particularly suitable with its compact size and design that matches the camera. It has a permanently attached flash foot with all the required contacts and is extremely easy to operate. (Order no. 14 444)
HDMI cable
The HDMI cable allows exceptionally fast transfer of image data to playback equipment with corresponding HDMI sockets. Length = approx. 1.5m/5 ft. (Order no. 14 491)
REPLACEMENT PARTS Order no.
Lens cap....423-097.001-024
Hot shoe/viewfinder socket cover....423-097.001-026
Leather carrying strap 439-612.060-000
USB cord 423-089.003-022
Lithium-Ion-Battery Pack Leica BP-DC 8 ^1 ....18 706
Battery case....423-089.003-012
Leica BC-DC8 Charger (includes exchangeable plugs).... 423-089.803-008
AC-plug EU 423-089.003-014
AC-plug US/JP 423-089.003-016
AC-plug UK/HK 423-089.003-018
AC-plug China 423-089.003-020
AC-plug Korea 423-089.003-028
AC-plug Australia 423-089.003-030
PRECAUTIONS AND CARE INSTRUCTIONS
GENERAL PRECAUTIONS
Do not use the Leica X-E in the immediate vicinity of devices with powerful magnetic, electrostatic or electromagnetic fields (e.g. induction ovens, microwave ovens, television sets or computer monitors, video game consoles, cell phones, radio equipment).
- If you place the Leica X-E on or very close to a television set, its magnetic field could interfere with picture recordings.
- The same applies for use in the vicinity of cell phones.
- Strong magnetic fields, e.g. from speakers or large electric motors, can damage the stored data or the pictures.
- If the Leica X-E malfunctions due to the effects of electromagnetic fields, remove the battery and then switch the camera on again.
Do not use the Leica X-E in the immediate vicinity of radio transmitters or high-voltage power lines.
• Their magnetic fields can also interfere with picture recordings.
Protect the Leica X-E from contact with insect sprays and other aggressive chemicals. Petroleum spirit, thinner and alcohol may not be used for cleaning.
- Certain chemicals and liquids can damage the Leica X-E body or the surface finish.
- As rubber and plastics sometimes emit aggressive chemicals, they should not remain in contact with the Leica X-E for extended periods.
Ensure that sand and dust cannot get into the Leica X-E, e.g. on the beach.
- Sand and dust can damage the camera and the memory card. Take particular care when inserting and removing the card.
Ensure that water cannot get into the Leica X-E, e.g. when it is snowing or raining and on the beach.
- Moisture can cause malfunctions and even permanent damage to the Leica X-E and the memory card.
- If salt water spray gets onto the Leica X-E, wet a soft cloth with tap water, wring it out thoroughly and wipe the camera with it. Then wipe down thoroughly with a dry cloth.
Important:
Only the accessories specified and described in these instructions, and/or those specified and described by Leica Camera AG, may be used with this camera.
MONITOR
- If the Leica X-E is exposed to significant temperature fluctuations, condensation can form on the monitor. Wipe it carefully with a soft dry cloth.
- If the Leica X-E is very cold when switched on, the monitor will initially be slightly darker than normal. It will revert to its normal brightness once it has warmed up.
- The monitor is manufactured using a high-precision process. This ensures that, of the total of around 230,000 pixels, more than 99.995% work correctly and only 0.005% remain dark or are always light. However, this is not a malfunction and it does not impair the reproduction of the picture.
SENSOR
Cosmic radiation (e.g. on flights) can cause pixel defects.
CONDENSATION
If condensation has formed on or in the Leica X-E, you should switch it off and leave it to stand at room temperature for around an hour. Once the camera temperature has adjusted to room temperature, the condensation will disappear by itself.
CARE INSTRUCTIONS
As any soiling also represents a growth medium for microorganisms, you should take care to keep the equipment clean.
FOR THE CAMERA
- Only clean the Leica X-E with a soft, dry cloth. Stubborn dirt should first of all be covered with a well-thinned cleaning agent and then wiped off with a dry cloth.
- To remove stains and fingerprints, the camera should be wiped with a clean lint-free cloth. Tougher dirt in hard to reach corners of the camera body can be removed with a small brush.
- All mechanically operated bearings and sliding surfaces on your Leica X-E are lubricated. Please remember this if you will not be using the camera for a long period of time. To prevent the lubrication points becoming gummed up, the camera shutter should be released a number of times every three months. It is also recommended that you repeatedly move and use all other controls.
FOR THE LENS
- Normally, a soft hair brush is sufficient to remove dust from the outer lens element. However, in case of more stubborn dirt, they can be carefully cleaned with a very clean, soft cloth that is completely free of foreign matter, using circular motions from the inside to the outside. We recommend micro-fiber cloths (available from photographic and optical specialists) that are stored in a protective container and can be washed at temperatures of up to 40°C/104°F (without fabric softener, never iron!). Cloths for cleaning glasses, which are impregnated with chemicals, should not be used as they can damage the lens glass.
- The lens cap included in the delivery also protects the lens from unintentional fingerprints and the rain.
FOR THE BATTERY
Rechargeable lithium ion batteries generate power through internal chemical reactions. These reactions are also influenced by the external temperature and humidity. Very high or low temperatures reduce the life of the battery.
- Always remove the battery if you will not be using the Leica X-E for a long period of time. Otherwise, after several weeks the battery could become totally discharged, i.e. the voltage is significantly reduced.
- Lithium ion batteries should be stored only when partially charged, i.e. not completely discharged or fully charged (in the corresponding display (2.1.5/2.2.5). For very long storage periods, it should be charged up for around 15 minutes twice a year to prevent total discharge.
-
The battery must have a temperature of 0^ - 35^ / 32^ - 95^ to be charged (otherwise the charger will not switch on, or will switch off again).
-
Always ensure that the battery contacts are clean and freely accessible. While lithium ion batteries are proof against short circuits, they should still be protected against contact with metal objects such as paper clips or jewelry. A short-circuited battery can get very hot and cause severe burns.
- If a battery is dropped, check the casing and the contacts immediately for any damage. Using a damaged battery can damage the Leica X-E.
- Batteries have only a limited service life.
• Take damaged batteries to a collection point to ensure correct recycling. - Never throw batteries into a fire as this can cause them to explode.
FOR THE CHARGER
- If the charger is used in the vicinity of radio receivers, it can interfere with the reception; make sure there is a distance of at least 1m between the devices.
- When the charger is in use, it can make a noise (buzzing) – this is quite normal and is not a malfunction.
- When it is not in use, disconnect the charger from the mains as otherwise it uses a certain (very small) amount of power even when no battery is inserted in it.
• Always keep the charger contacts clean, and never short circuit them.
FOR MEMORY CARDS
- While a picture is being stored or the memory card is being read, it may not be removed, nor may the Leica X-E be switched off or exposed to vibrations.
- For safety, memory cards should only ever be stored in the antistatic cover supplied.
- Do not store memory cards where they will be exposed to high temperatures, direct sunlight, magnetic fields or static discharge.
- Do not drop or bend a memory card as this can damage it and result in loss of the stored data.
- Always remove the memory card if you will not be using the Leica X-E for a long period of time.
- Do not touch the connections on the rear of the memory card and keep them free of dirt, dust and moisture.
- It is recommended that the memory card be reformatted from time to time, as fragmentation occurs when deleting, which can block some of the memory capacity.
STORAGE
- If you are not using the Leica X-E for an extended period of time, we recommend that you:
a. switch it off (see p. 104),
b. remove the memory card (see p. 102), and
c. remove the battery (see p. 100) (after a maximum of 3 days, the time and date will be lost, see p. 102). - A lens works like a magnifying glass if bright sunlight shines on the front of the camera. The camera must therefore never be set aside in strong sunlight without protection. Use the lens cap and keep the camera in the shade (or immediately put it away in the case) help to prevent damage to the interior of the camera.
- You should preferably store the Leica X-E in a closed and padded container so that nothing can damage it and it is protected from dust.
-
Store the Leica X-E in a dry, adequately ventilated place, where neither high temperatures nor high humidity will occur. When used in humid conditions, it should be completely cleared of all moisture before being stored away.
-
Photo cases that became wet during use should be emptied to prevent damage to your equipment caused by moisture and any leather-tanning residue released.
- To prevent fungal growth during use in hot, humid tropical climates, the camera should be exposed to the sun and air as much as possible. Storage in airtight containers or cases is recommended only if a desiccant such as silica gel is placed in the container.
- To prevent the formation of fungus, do not store the Leica X-E in a leather case for extended periods of time.
- Note the serial numbers of your Leica X-E, as it is extremely important in case of loss.
TECHNICAL DATA
Camera type Leica X-E (Typ 102)
Sensor APS-C-size CMOS Sensor (23.6x15.7mm) with 16.5/16.2 Megapixels (in total/effective), aspect ratio 3:2
Resolution Selectable for JPEG format: 4928 x 3264 pixels (16.2M), 4288 x 2856 pixels (12.2M), 3264 x 2160 pixels (7M), 2144 x 1424 pixels (3.1M), 1632 x 1080 pixels (1.8M), DNG: 4944 x 3272 pixels.
Lens Leica Elmarit 24mm f/2.8 Asph. (corresponds to 36mm with 35mm-format), 8 lens elements in 6 groups, 1 aspherical surface.
Aperture settings From f/2.8 to f/16 in 1/3EV increments
Smallest object field 18 × 27cm / 7^7/g × 10^5/s (from a distance of 30cm/1 ft.).
Image data file formats/compression rates Selectable: JPG Super fine, JPG fine, DNG + JPG S. fine, DNG + JPG fine.
Storage media SD/SDHC/SDXC Memory Cards, MultiMedia Cards.
Internal buffer memory approx. 110 MB.
ISO Sensitivity setting ^2 Automatic, optionally with shutter and/or ISO sensitivity limits, ISO 100, ISO 200, ISO 400, ISO 800, ISO 1600, ISO 3200, ISO 6400, ISO 12500.
White balance Selectable modes: Automatic, presets for daylight, cloud, halogen lighting, shade, electronic flash, 2 manual settings, optionally fine tuning for all settings.
Color settings Selectable: Standard, Vivid, Natural, B&W natural, B&W high contrast.
Autofocus system Contrast-based system using the image sensor, optional AF assist lamp for low light conditions.
Focusing range From 30cm/1 ft. to infinity. Automatic (Autofocus) or manual focusing with setting wheel on back of camera body, optionally magnification function as focusing aid.
Autofocus metering modes 1 area, 11 area, spot, face detection.
Exposure modes Programmed automatic exposure mode (P), program shift option, aperture priority (A), shutter speed priority (T) and manual setting (M).
Exposure metering Multi-field, center-weighted, spot, optionally with histogram display to analyze brightness distribution.
Exposure compensation ±3EV in 13 EV increments.
Automatic exposure bracketing 3 pictures with intervals up to 3EV settable in ^1/_3 EV increments.
Shutter speed range 30s to ^1/2000 s, with normal flash modes from ^1/30 s, with slow flash modes from 30s.
Series exposures Selectable: 3fps or 5fps, max. 8 pictures, with constant frame rate and DNG + JPG fine.
Flash modes Flash switched on and off by extending/retracting the unit, automatic flash activation with and without pre-flash, manual flash activation with and without pre-flash, automatic flash activation with slower shutter speeds with and without pre-flash, studio mode for triggering slave equipped external flash systems.
Flash exposure compensation ±3EV in^1/_3EV increments.
Working range of the built-in flash unit (for ISO 100/21°) approx. 0.3-2.0m/1-6 ft., guide number 5.
Recycling time of built-in flash unit approx. 5s with fully loaded battery.
Monitor 2,7" TFT LCD with 230,000 pixels.
Displays see p. 90
Self-timer Delay optionally 2 or 12s.
Connections 5-pin mini USB socket 2.0 high-speed for quick data transfer to the computer, HDMI socket for digital direct connection to corresponding equipment, proprietary socket for external electronic viewfinder Leica EVF 2 ^1 .
Power supply Lithium ion battery, 3.7V, 1600mAh, capacity (according to CIPA standards): approx. 450 images, charging time (from full discharge): approx 200 min.
Mains/charging unit Input: Alternating current 100-240 V, 50/60Hz, automatically switched.
Housing Housing in Leica Design made of solid, ultra-light magnesium. Two eyelets for carrying strap. ISO flash shoe with central and control contacts for connection of external, more powerful flash units, e.g. Leica SF 24D and the external electronic viewfinder Leica EVF 2 ^1 .
Tripod thread A ^1 / 4 DIN 4503 ( ^1 / 4 ^a ).
Dimensions (WxHxD) approx. 124 x 69 x 51.5 mm / 47/8 x 211/32 x 21/32 inches
Weight approx. 307/345g / 10.83/12.17oz (with/without battery)
^1 Available as accessory; see also p. 152
^2 According to CIPA DC-004 Standard
Construction and design subject to change.
Leica Product Support
The Product Support department at Leica AG can provide you with an answer to any technical questions relating to Leica products, including software supplied, either in writing, on the telephone or by e-mail.
They are also the contact point for purchasing advice and to order instruction manuals. Alternatively, you can send us your questions using the contact form on the Leica Camera AG homepage.
Leica Camera AG
Product Support / Software Support
Am Leitz-Park 5
D-35578 Wetzlar
Telephone: +49(0)6441-2080-111 /-108
Fax: +49(0)6441-2080-490
info@leica-camera.com / software-support@leica-camera.com
Leica Customer Service
For servicing your Leica equipment or in the event of damage, the Leica Camera AG Customer Care department or the repair service provided by authorized Leica agents in your country are available (see the Warranty Card for a list of addresses).
Leica Camera AG
Customer Care
Am Leitz-Park 5
D-35578 Wetzlar
Telephone: 06441 2080-189
Fax: 06441 2080-339
customer.care@leica-camera.com
You will find your local contact partner on the service page:
http://uk.leica-camera.com/service/service_and_repair/worldwide_network
- LADEN DES AKKUS
- SPOTMESSUNG
- Leica Customer Care
- FCC Note: (U. S. only)
- FOR CANADA ONLY:
- CAN ICES-3 (B)/NMB-3(B)
- FCC Caution:
- FOREWORD
- SCOPE OF DELIVERY
- WARNING MESSAGES
- LEGAL NOTES
- DISPOSAL OF ELECTRICAL AND ELECTRONIC EQUIPMENT
- TABLE OF CONTENTS
- Flash photography
- Additional Functions
- Review mode
- Miscellaneous
- Accessories
- Precautions and care instructions
- DESIGNATION OF PARTS
- FRONT VIEW (optional Hand Grip attached, flash retracted)
- TOP VIEW
- REAR VIEW
- VIEW FROM THE RIGHT (door open)
- BOTTOM VIEW
- CHARGER
- DISPLAYS
- IN RECORD MODE
- Note:
- Exposure mode
- Flash mode
- ISO sensitivity
- Compression rate
- INFO-screen with settings for
- MENU ITEMS
- QUICK GUIDE
- PRESETS
- TAKING PHOTOGRAPHS
- VIEWING PICTURES
- ENLARGING PICTURES
- DELETING PICTURES
- DETAILED INSTRUCTIONS
- CHARGING THE BATTERY
- Caution:
- Attention:
- First aid:
- Notes:
- Preparing the charger (C)
- To attach the plug,
- To remove a plug, simultaneously
- Inserting the battery into the charger
- Charge status indications
- INSERTING AND REMOVING THE BATTERY / THE MEMORY CARD
- Opening the battery / memory card door
- Inserting and removing the battery
- Important:
- Charge level displays
- Inserting and removing the memory card
- Closing the battery / memory card door
- SWITCHING THE CAMERA ON / OFF / SELECTING THE EXPOSURE FREQUENCY
- SELECTING THE RECORD AND REVIEW MODES
- REVIEW FOR UNLIMITED TIME - PLAY
- AUTOMATIC REVIEW OF THE LAST PICTURE
- MENU CONTROL
- ENTERING THE MENU
- SCROLLING IN THE MENU ITEM LIST
- SCROLLING ITEM BY ITEM
- SCROLLING PAGE BY PAGE
- CALLING UP A MENU ITEM'S SUBMENU
- SELECTING A SETTING / A VALUE IN A SUBMENU
- CONFIRMING A SETTING
- EXITING A SUBMENU WITHOUT CONFIRMING A SETTING
- EXITING THE MENU
- BASIC CAMERA SETTINGS
- MENU LANGUAGE
- DATE
- TIME
- AUTOMATIC STAND-BY MODE
- KEY ACKNOWLEDGEMENT (RESPONSE) AND SHUTTER SOUNDS
- For shutter sounds
- For key acknowledgement and memory card capacity limit sounds
- MONITOR AND ELECTRONIC VIEWFINDER SETTINGS
- SWITCHING THE DISPLAY SETS
- The sequences:
- In record mode
- In review mode
- DETERMINING THE MONITOR AS THE EXCLUSIVE DISPLAY FOR REVIEWING IMAGES
- SWITCHING THE MONITOR OFF
- For brightness Settings
- For color adjustments
- MONITOR AND ELECTRONIC VIEWFINDER TIMEOUT MODE
- BASIC PICTURE SETTINGS
- JPEG RESOLUTION
- FILE FORMAT / COMPRESSION RATE
- WHITE BALANCE
- Fixed presets
- Manual setting by metering
- Direct color temperature setting
- FINE-TUNING WHITE BALANCE SETTINGS
- ISO SENSITIVITY
- IMAGE PROPERTIES / CONTRAST, SHARPNESS, COLOR SATURATION
- COLOR RENDITION
- RECORD MODE
- FOCUSING
- Selecting the mode
- AUTOMATIC DISTANCE SETTING / AUTOFOCUS
- AF ASSIST LAMP
- AF METERING MODES
- AREA MODE
- AREA MODE
- SPOT MODE
- FACE DETECTION MODE
- MANUAL FOCUSING
- Manual focus assist function
- EXPOSURE METERING AND CONTROL
- EXPOSURE METERING MODES
- MULTI-FIELD METERING -
- CENTER-WEIGHTED METERING - □
- SPOT METERING - .
- THE HISTOGRAM
- EXPOSURE CONTROL
- PROGRAMMED AUTOMATIC EXPOSURE
- SHIFTING PROGRAM MODE
- SPEED PRIORITY MODE
- APERTURE PRIORITY MODE
- MANUAL MODE
- To take a picture with this mode
- METERING MEMORY-LOCK
- The procedure:
- EXPOSURE COMPENSATION
- AUTOMATIC EXPOSURE BRACKETING
- TAKING PHOTOGRAPHS WITH THE BUILT-IN FLASH UNIT
- FLASH MODES
- AUTOMATIC FLASH ACTIVATION - 7A
- AUTOMATIC FLASH AND PRE-FLASH ACTIVATION - 7A
- MANUAL FLASH ACTIVATION -
- MANUAL FLASH AND PRE-FLASH ACTIVATION -
- AUTOMATIC FLASH ACTIVATION WITH SLOWER SHUTTER SPEEDS - 7S
- AUTOMATIC FLASH AND PRE-FLASH ACTIVATION WITH SLOWER SHUTTER SPEEDS - 7S
- STUDIO MODE - Studio
- FLASH RANGE
- SYNCHRONIZATION TO THE END OF THE EXPOSURE
- FLASH EXPOSURE COMPENSATION
- USING EXTERNAL FLASH UNITS
- SELF-TIMER
- Setting
- Operation
- FORMATTING THE MEMORY CARD
- WORKING COLOR SPACE
- COPYING IMAGE DATA FROM THE INTERNAL MEMORY TO A MEMORY CARD
- CREATING NEW FOLDER NUMBERS
- USER PROFILE
- Creating a profile
- Using a profile
- DEFAULTING ALL MENU SETTINGS
- IMAGE STABILIZATION
- SELECTING REVIEW MODES
- SELECTING PICTURES
- ENLARGING THE PICTURE/
- SIMULTANEOUS REVIEW OF 16 PICTURES
- SELECTING THE TRIMMING
- Deleting single pictures
- Deleting all pictures
- PROTECTING/UNPROTECTING PICTURES
- REVIEW OF PORTRAIT-FORMAT PICTURES
- PLAYBACK WITH HDMI EQUIPMENT
- Connecting / Playing back pictures
- TRANSFERRING DATA TO A COMPUTER
- CONNECTING AND TRANSFERRING DATA WITH THE CAMERA' AS AN EXTERNAL DRIVE
- With Windows operating systems:
- With Mac operating systems:
- CONNECTING AND TRANSFERRING DATA USING CARD READERS
- WORKING WITH DNG RAW DATA
- INSTALLING ADOBE® PHOTOSHOP® LIGHTROOM®
- System requirements
- INSTALLING FIRMWARE UPDATES
- Leather case X
- Camera protector X
- Ever ready case X
- Small System bag
- Wrist strap X
- External Viewfinders
- Bright Line Finder 36mm
- Electronic Viewfinder EVF 2
- Handgrip X
- Flash units
- HDMI cable
- REPLACEMENT PARTS Order no.
- GENERAL PRECAUTIONS
- MONITOR
- SENSOR
- CONDENSATION
- CARE INSTRUCTIONS
- FOR THE CAMERA
- FOR THE LENS
- FOR THE BATTERY
- FOR THE CHARGER
- FOR MEMORY CARDS
- STORAGE
- TECHNICAL DATA
- Leica Product Support
- Leica Customer Service
Brand : LEICA
Model : X-E
Category : Camera