
CMPTRAL-W69 - Doorbell Infiniton - Free user manual and instructions
Find the device manual for free CMPTRAL-W69 Infiniton in PDF.


| Product Type | Cooker Hood (Range Hood) |
| Brand | Infiniton |
| Model | CMPTRAL-W69 |
| EAN | 8445639002407 |
| Installation Type | Wall-mounted, ducted to outside |
| Extraction Type | Ducted (vent outside) |
| Minimum Distance from Hob (Electric) | 55 cm |
| Minimum Distance from Hob (Gas) | 65 cm |
| Number of Speed Settings | 3 (Low, Mid, High) |
| Control Type | Push-button (Timer, Lamp, Speed, Power) |
| Timer Function | Yes, 9 minutes auto-off |
| Lighting | LED, 2 x 1.5W, DC 12V |
| Grease Filter | Metal mesh, washable |
| Carbon Filter | Optional, not supplied |
| Filter Cleaning Frequency | Monthly for grease filters; 3–6 months for carbon filter |
| Duct Diameter | 150 mm |
| Material | Stainless Steel |
| Auto Speed Reduction | Yes, from high to mid after 7 minutes |
| Safety Features | Auto-shutoff, child safety warnings, fire risk precautions |
| Service | Authorized service center, qualified electrician required |
| Disposal | WEEE recycling |
| Energy Saving Tips | Switch off light after cooking, clean regularly |
| Bulb Replacement | By qualified person; ILCOS D code DSR-1.5/65-S-64 |
Frequently Asked Questions - CMPTRAL-W69 Infiniton
User questions about CMPTRAL-W69 Infiniton
0 question about this device. Answer the ones you know or ask your own.
Ask a new question about this device
Download the instructions for your Doorbell in PDF format for free! Find your manual CMPTRAL-W69 - Infiniton and take your electronic device back in hand. On this page are published all the documents necessary for the use of your device. CMPTRAL-W69 by Infiniton.
USER MANUAL CMPTRAL-W69 Infiniton
natural_image
Line drawing of a kitchen interior with a stainless steel oven and microwave oven (no text or symbols)CMPTRAL-W69
ean: 8445639002407
natural_image
Illustration of a lamp illuminating a small heating element with a crossed-out black X (no text or symbols)HACER SIEMPRE
natural_image
Technical line drawing of a mechanical component with an inset showing a close-up view of a component (no text or symbols present)natural_image
Diagram of airflow around a mechanical component with directional arrows indicating movement (no text or symbols)natural_image
Diagram of a wall-mounted device mounted on a box, with arrows indicating motion (no text or symbols)natural_image
Diagram of a brick wall with a diagonal line and a labeled section (no text or symbols on the diagram itself)Pic 5
Pic 6
natural_image
Diagram of a brick wall with a mounted structure and directional arrows, labeled 'Pic 7' (no text or symbols on the diagram itself)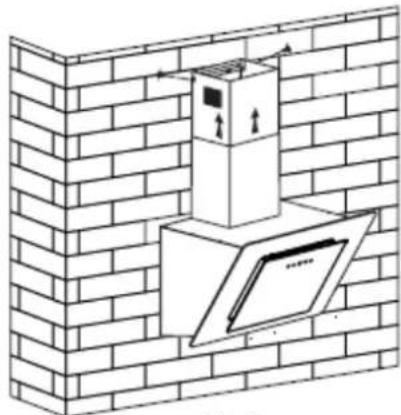
natural_image
Technical line drawing of a brick wall with a mounted air duct and ventilation unit (no text or symbols)Pic 8
natural_image
Diagram of a 3D geometric structure with arrows indicating rotation or transformation (no text or symbols)natural_image
Illustration of a hand inserting a tablet into a device, with a downward arrow indicating the next step (no text or symbols present)natural_image
Line drawing of a vintage television set with a key inserted into the front panel (no text or symbols)Servicio
natural_image
Symbol of a trash bin crossed out by two diagonal lines (no text or labels)
natural_image
Line drawing of a kitchen interior with microwave oven, stainless steel kitchen unit, and oven (no text or symbols)CMPTRAL-W69
ean: 8445639002407
Before using your new Infiniton product, please read this user manual carefully to learn how to safely and efficiently use the features offered by this device.
| Content | English |
| Safety instructions | 3 |
| Installation | 5 |
| How to use | 9 |
| Troubleshooting | 10 |
| Manteinance and cleaning | 11 |
Tips on how to get the most out of your new cooker hood
The operation of an Infiniton cooker hood is very simple thanks to the technology we have created to make your day-to-day life easier. Follow these simple tips and enjoy your kitchen.
Turn it on a few minutes before you start cooking, a small gesture that helps to keep the air clean of impurities. Do not turn it off just after cooking, leave it running for a few more minutes until it completes its function of purifying the cooking vapours.
Protect the stainless steel surface easily
To preserve the original appearance of your new Infiniton stainless steel cooker hood, it is advisable to treat it with a clean cloth impregnated with a specific product that prevents fingerprints and marks. There are baby oils and professional products that treat stainless steel to prevent dust, lint and dirt in general from sticking to it.
What is the recommended distance between the hob and the hood?
It will always depend on each model, although the minimum distance between the cooking zone and the extraction zone is generally
extraction zone will generally be 55 cm for vitro-ceramic or induction hobs. If the hob is a gas hob, the recommended distance will be slightly greater, 65 cm.
For built-in modules, this minimum distance should always be 50 cm for electric hobs and 65 cm for gas hobs.
In extra-flat hood models, the distance may be reduced to 43 cm if a glass-ceramic or induction hob is used.
Prevents odours
Our engineering team recommends using the extended run function, if the hood does not have this function, you can leave it running for 5 to 10 minutes manually to absorb the rest of the vapours given off during cooking.
Preventing odours while the hood is operating
When this happens, your filter is probably saturated and cannot absorb any more grease. If this happens, the solution is simple: clean it and if it is in bad condition, you will have to replace it.
Grease filters should be cleaned once a month, either by hand or in your dishwasher. In the latter case, try to do it at a low temperature. Place the filters of your cooker hood carefully on the grilles and not next to other pieces of crockery. If you do it by hand, we recommend that you soak them in hot soapy water for a couple of hours and then brush the filters, wash them again and leave them to drain.
How to clean the metallic filters of a cooker hood?
The filters can be cleaned by hand or in the dishwasher. Tips for washing by hand: soak the filters in hot soapy water, clean them and rinse them thoroughly, then just drain them well.
then just drain them well. To do this in the dishwasher, be careful not to wash them together with the crockery or cutlery if they are excessively greasy. Treat them beforehand with a concentrated degreaser to remove the most stubborn grease.
This manual explains the correct installation and use of your cooker hood, please read it carefully before use, even if you are familiar with the product. Please read it carefully before use, even if you are familiar with the product. The manual should be kept in a safe place for future reference.

CAUTION! The appliance and its accessible parts can become hot during operation. Be careful to avoid touching the heating elements. Children younger than 8 years old should stay away unless they are under permanent supervision.

- There shall be adequate ventilation of the room when the cooker hood is used at the same time as appliances burning gas or other fuels.
- There is a fire risk if cleaning is not carried out in accordance with the instructions.
- Regulations concerning the discharge of air have to be fulfilled.
- Clean your appliance periodically by following the method given in the chapter MAINTENANCE.
- For safety reason, please use only the same size of fixing or mounting screw which are recommended in this instruction manual.
- Regarding the details about the method and frequency of cleaning, please refer to maintenance and cleaning section in the instruction manual.
- Cleaning and user maintenance shall not be made by children without supervision.
- When the cooker hood and appliances supplied with energy other than electricity are simultaneously in operation, the negative pressure in the room must not exceed 4 Pa (4 x 10⁻⁵ bar).

WARNING! Danger of fire: do not store items on the cooking surfaces.

WARNING! A steam cleaner is not to be used.

WARNING! NEVER try to extinguish a fire with water, but switch off the appliance and then cover flame e.g. with a lid or a fire blanket.
NEVER TO DO
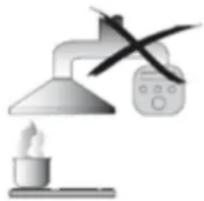
- Do not try to use the cooker hood without the grease filters or if the filters are excessively greasy!
- Do not install above a cooker with a high level grill.
• Do not leave frying pans unattended during use because overheated fats or oils might catch fire.
- Never leave naked flames under the cooker hood

- If the cooker hood is damaged, do not attempt to use.
- Do not flambé under the cooker hood.
- CAUTION: Accessible parts may become hot when used with cooking appliances.
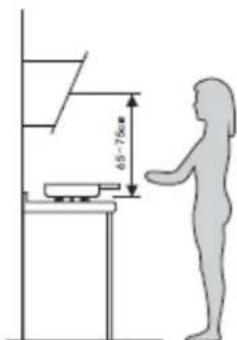
- The minimum distance between the supporting surface for the cooking vessels on the hob and the lowest part of the cooker hood. (When the cooker hood is located above a gas appliance, this distance shall be at least 65 cm)
- The air must not be discharged into a flue that is used for exhausting fumes from appliances burning gas or other fuels. Range hoods and other cooking fume extractors may adversely affect the safe operation of appliances burning gas or other fuels (including those in other rooms) due to back flow of combustion gases. These gases can potentially result in carbon monoxide poisoning. After installation of a range hood or other cooking fume extractor, the operation of open flued gas appliances should be tested by a competent person to ensure that back flow of combustion gases does not occur.
natural_image
Illustration of a lamp illuminating a wall-mounted device with a crossed-out black X mark (no text or symbols)ALWAYS TO DO
IMPORTANT! Always switch off the electricity supply at the mains during installation and maintenance such as light bulb replacement.
- The cooker hood must be installed in accordance with the installation instructions and all measurements followed.
- All installation work must be carried out by a competent person or qualified electrician.
- Please dispose of the packing material carefully. Children are vulnerable to it.
• Pay attention to the sharp edges inside the cooker hood especially during installation and cleaning.
- Make sure the ducting has no bends sharper than 90 degrees as this will reduce the efficiency of the cooker hood.
WARNING! Failure to install the screws or fixing device in accordance with these instructions may result in electrical hazards
WARNING! Before obtaining access to terminals, all supply circuits must be disconnected.
• Always put lids on pots and pans when cooking on a gas cooker.
- When in extraction mode, air in the room is being removed by the cooker hood. Please make sure that proper ventilation measures are being observed. The cooker hood removes odours from room but not steam.
- Cooker hood is for domestic use only

- If the supply cord is damaged, it must be replaced by the manufacturer, its service agent or similarly qualified persons in order to avoid a hazard.
- This appliance can be used by children aged from 8 years and above and persons with reduced physical, sensory or mental capabilities or lack of experience and knowledge if they have been given supervision or instruction concerning use of the appliance in a safe way and understand the hazards involved. Children shall not play with the appliance. Cleaning and user maintenance shall not be made by children without supervision.
INSTALLATION (VENT OUTSIDE)
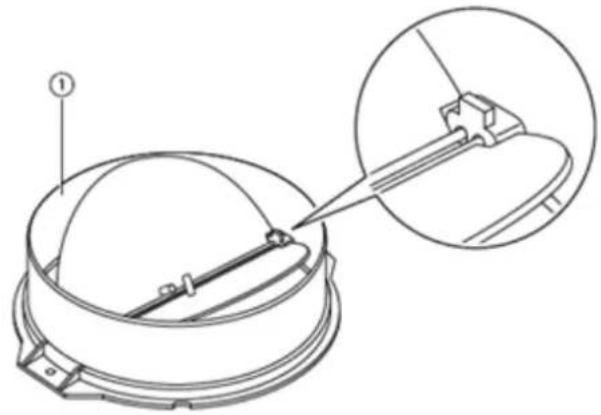
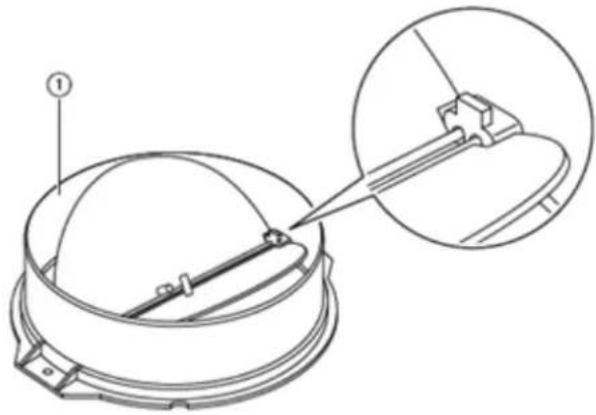
MOUNTING OF THE V-FLAP
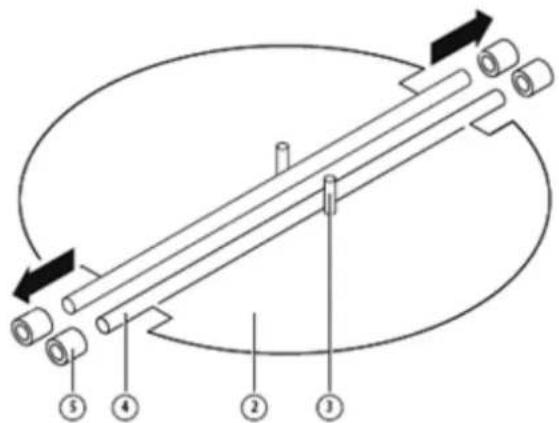
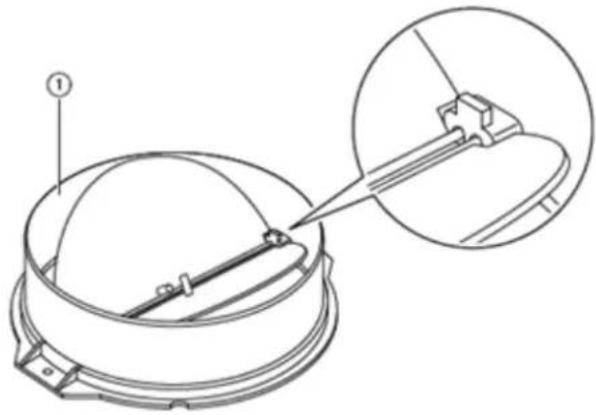
If the cooker hood does not have an assembled V-flap 1, you should mount the half-parts to its body. The images only show an example of how to mount the V-flap, because the outlet may vary according to different models and configurations.
To mount the V-flap 1 you should:
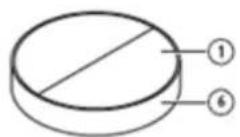
- Mount the two half parts (2) on the body (6).
- The pin (3) must be facing upwards.
- The shaft (4) must be inserted into the holes (5) of the body;
- Repeat all operations for the other half of the flap.
natural_image
Technical line drawing of a mechanical component with an inset close-up showing a detail (no text or symbols)Installing the cooker hood
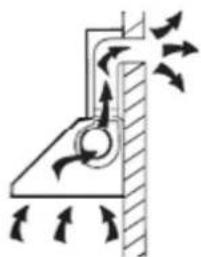
If you have an outlet to the outside, your cooker hood can be connected as below picture by means of an extraction duct (enamel, aluminum, flexible pipe or non-flammable material with an interior diameter of 150mm)
natural_image
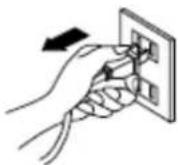
Diagram of a mechanical or fluidic system with directional arrows indicating flow or movement (no text or symbols)- Before installation, turn the unit off and unplug it from the outlet.
- The cooker hood should be placed at a distance of 65\~75cm above the cooking surface for best effect.
Pic 1
- Using a drill bit with an 8 mm diameter, make 8 holes in the wall at the position that you reserve for installing the chimney and cooker hood body. See Pic 2.
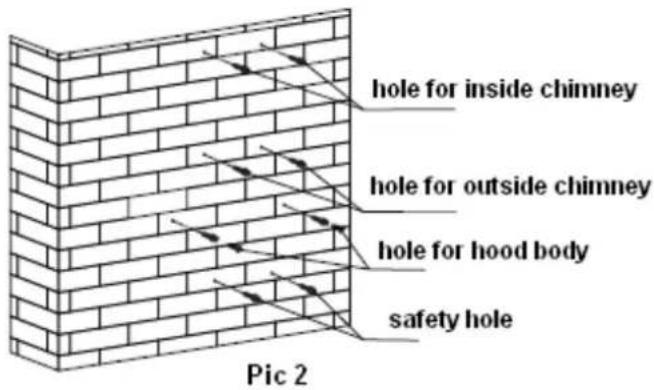
- Insert wall plugs into the holes that you have drilled for the cooker hood body, fasten 2 pcs support screw ST4*40 mm halfway in, leaving them 2 mm out of the wall. See Pic 2.
- Hang the cooker hood onto the support screws.
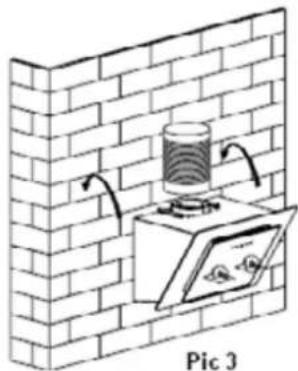
- Insert self-tap screw ST4*30 mm into the safety holes and fully fasten it to ensure the cooker hood is well fixed. Note: The two safety vents are positioned on the back housing, with diameter of 6mm. See pic 3.
natural_image
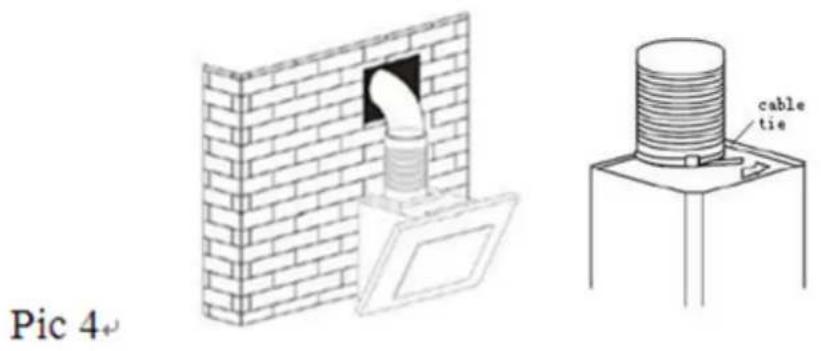
Diagram of a wall-mounted device mounted on a box, with arrows indicating motion (no text or symbols)- Attach the expansion pipe on the outlet as shown below. Fix the expansion pipe on the outlet by cable tie. Lift up expansion pipe till it out of the wall through the hole on the wall. See pic 4
- Install the inside chimney bracket: Use ST4*40 screws to install the inside chimney bracket onto the wall. See Pic 5.
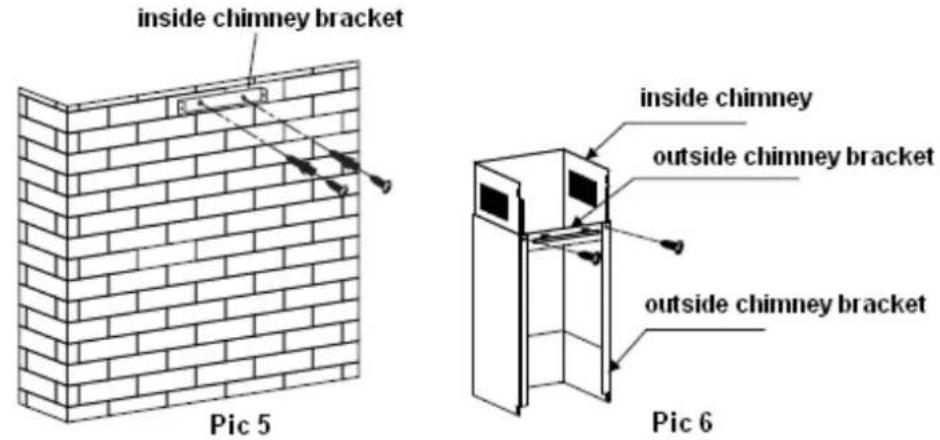
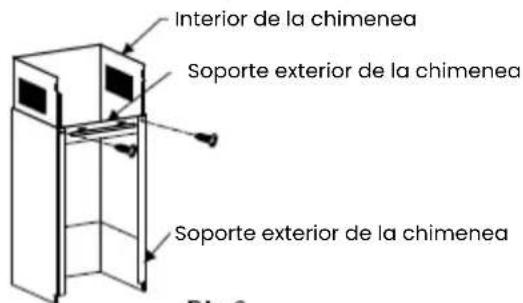
- Equip the inside chimney and outside chimney: Install the outside chimney bracket on the outside chimney with 2pcs ST4*8mm screws, make sure that the inside chimney could be moved inside freely, see Pic 6.
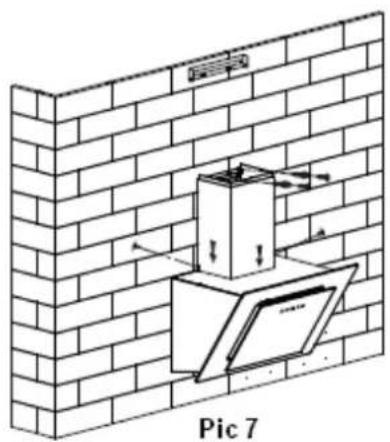
- Fix the chimneys onto the cooker hood: Use 2pcs ST4*8mm screws to fix the outside chimney bracket onto the cooker hood, then fix the outside chimney bracket on the wall with ST4*40mm screws. See Pic 7.
natural_image
Diagram of a brick wall with a mounted box and directional arrows, labeled 'Pic 7' (no text or symbols on the diagram itself)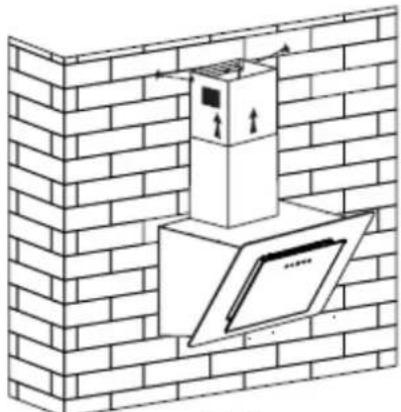
natural_image
Diagram of a brick wall with a mounted structure and a fan, showing airflow or ventilation (no text or symbols)Pic 8
- Adjust the height of the inside chimney to the position of the inside chimney bracket and fix it with 2pcs ST4*8mm screws. See Pic 8.
Hints for exhaust duct installation
The following rules must be strictly followed to obtain optimal air extraction:
- Keep exhaust duct short and straight
- Do not reduce the size or restrict the exhaust duct
- When using the flexible duct always install the duct pulled taut to minimize pressure loss
- Failure to observe these basic instructions will reduce the performance and increase noise levels of the range hood.
- Any installation work must be carried out by a qualified electrician or competent person.
- Do not connect the ducting system of the hood to any existing ventilation system which is being used for any other appliance, such as warmer tube, gas tube, hot wind tube.
- The angle of the bend of the ventilation pipe should not be less than 120^ ; you must direct the pipe horizontally, or, alternatively, the pipe should go up from the initial point and should be led to an outer wall.
• After the installation, make sure that the cooker hood is level to avoid grease collection at on end.
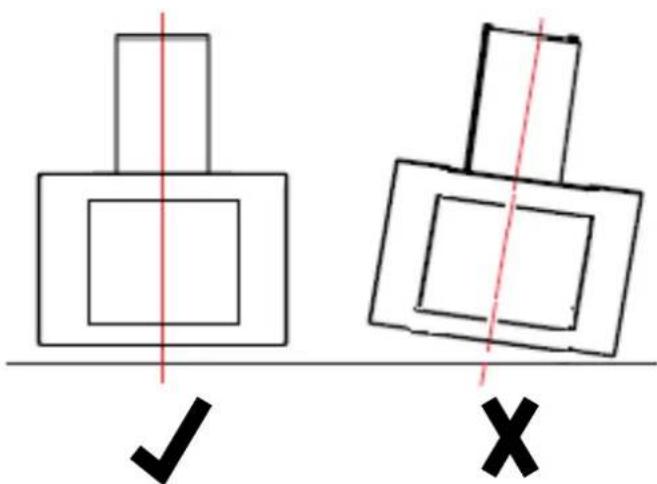
Note: Ensure the exhaust ducting selected for installation complies with relevant standards and is fire retardant
WARNING! | For safety reason, please use only the same size of fixing or mounting screws which are recommended in this instruction manual. |
| Failure to install the screws or fixing device in accordance with these instructions may result in electrical hazards. |

The control panel has 4 buttons:

Timer

Lamp

Speed

Power
- Press the "Power" button, the button control the "on" & "off" of the hood.
- Press the button "Speed" time after time, the motor runs as low / mid / high / low / mid..., the speed runs circularly; and the LED display will indicate as 1-2-3-1-2... circularly.
- Press "Lamp" button, the light is on, press this button again, the light is off. Please note the Lamp is not under control of the on/off button.
- When the hood is working, if press the "Timer" button, the hood will go into the status of acquiescent working (acquiescent time is 9mins), and then, LED display will be shown 9.8.7.6 ...decreasing by 1,when time is up, the hood will be off automatically and the lamp will extinguish. If pressing "Timer" button, the hood will go in or go out "Timer" function.
- When the cooker hood working in high speed, it will automatically switch to mid speed after seven minutes working.
Whenever there is a problem with the appliance, check if you can solve it by following the tables below. If the problem persists, please contact customer support.
| PROBLEM POSSIBLE | CAUSE SOLUTION | |
| Light on, but motor does not work | Fan switch turned offFan switch failedMotor failed | Select a fan switch position.Contact service center.Contact service center. |
| Light does not work, motor does not work | House fuses blownPower cord loose or disconnected | Reset/Replace fuses.Refit cord to power outlet.Switch power outlet on. |
| Oil leakage | One way valve and the outlet are not tightly sealedLeakage from the connection of chimney and cover | Take down the one way valve and seal with sealant.Take chimney down and seal. |
| Lights not working Broken/Faulty globes | Replace globes as per this | instruction. |
| Insufficient suction | The distance between the cooker hood and the gas top is too far | Refit the cooker hood to the correct distance. |
| The Cooker hood inclines The fixing screw not tight enough | Tighten the hanging screw and make it horizontal. | |
Note: Any electrical repairs to this appliance must conform to your local, state and federal laws. Please contact the service centre if in any doubt before undertaking any of the above. Always disconnect the unit from the power source when opening the unit.
CAUTION! Before maintenance or cleaning is carried out, the cooker hood should be disconnected from the mains power supply. Ensure that the cooker hood is switched off at the wall socket and the plug removed.
Note External surfaces are susceptible to scratches and abrasions, so please follow the cleaning instructionsto ensure the best possible result is achieved withoutdamage.
General
Cleaning and maintenance should be carried out with the appliance cold especially when cleaning. Avoid leaving alkaline or acid substances (lemonjuice, vinegar etc.) on the surfaces.
Stainless steel
The stainless steel must be cleaned regularly (e.g.weekly) to ensure a long life expectancy.Dry with a clean soft cloth. A specialized stainlesssteel cleaning fluid may be used.
Note: Ensure that wiping is done along with the grain of the stainless steel to prevent any unsightly crisscross scratching patterns fromappearing.
Control panel surface
The inlay control panel can be cleaned using warmsoapy water. Ensure the cloth is clean and well wrungbefore cleaning. Use a dry soft cloth to remove anyexcess moisture left after cleaning.
Important! Using neutral detergents and avoid using harsh cleaning chemicals, stronghousehold detergents or products containing abrasives, as this will affect the appearance of the appliance and potentially remove any printing of artwork on the control panel and will void manufactures warrantee.
Grease mesh filters
The mesh filters can be cleaned by hand. Soak them for about 3 minutes in water with a mild detergent and then brush it gently with a soft brush. Do not apply too much pressure so as to avoid any damage to it . (Leave to dry naturally out of direct sun light)
Filters should be washed separately to crockery andkitchen utensils.It is advisable not to use rinseaid.
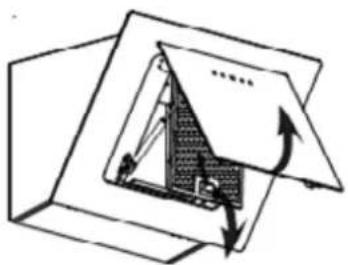
natural_image
Diagram of a 3D geometric structure with arrows indicating rotation or movement, no text or symbols presentInstalling grease mesh filters
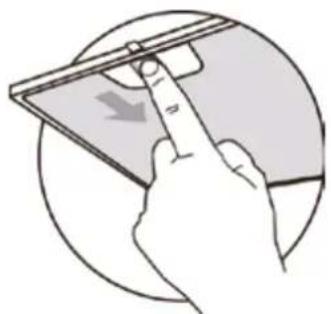
To install filters for the following four steps:
- Angle the filter into the slots at the back of the hood.
- Push the button on the handle of the filter.
- Release the handle once the filter fits into a resting position.
- Repeat to install all filters.
natural_image
Illustration of a hand holding a clipboard with a scroll, showing a downward arrow (no text or symbols)Carbon filter - not supplied
Activated carbon filter can be used to trap odors. Normally the activated carbon filter should be changed every 3 to 6 months according to your cooking habits. The installation procedure of activated carbon filter is as below:
- Before installing or replacing the carbon filters, disconnect the mains power to the unit.
- Press the filter lock and remove the mesh filter.
- Turn the carbon filter on both sides of the motor anti-clockwise.
Replace thecarbon filters with the new carbon filters. - Place the mesh filter.
- Connect the power supply to the wall socket.
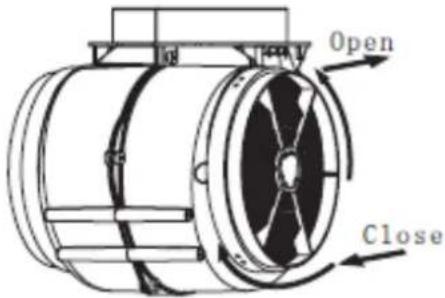
Note: Make sure the filter is securely locked. Otherwise, it would loosen and cause danger. When activated carbon filter attached, the suction power will be lowered.
Bulb replacement
IMPORTANT! | The bulb must be replaced by the manufacturer, its service agent or similarly qualified persons. |
| Always switch off the electricity supply before carrying out any operations on the appliance. When handling bulb, make sure it has completely cooled down before any direct contact with hands. | |
| When handling bulbs hold with a cloth or gloves toensure perspiration does not come in contact with the bulb as this can reduce the life of the bulb. |
Note: Before changing the lights, make sure that the appliance is turned off and unplugged. Protect against danger when changing lights, such as wearing gloves.
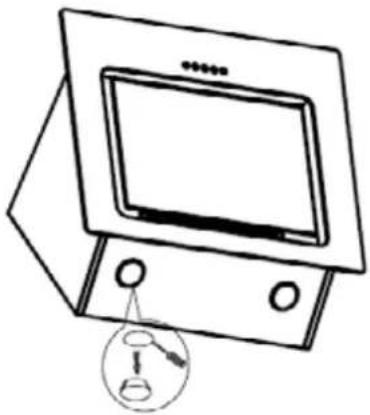
To change the cooker hood lights, follow the steps below:
Remove the grease filter.
Use a tool or the hand to press the spring splinter of both sides of LED light to the inside, until the light is pressed out. Then slightly pull the light connecting wire out and replace the lights.
Apply the reverse procedure to install the light back.
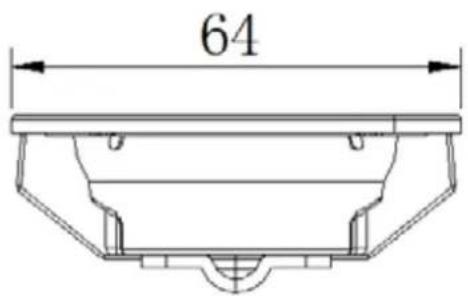
ILCOS D code for this lamp is: DSR-1.5/65-S-64
- LED modules- round lamp
- Max wattage: 2×1.5 W
- Voltage range: DC 12V
- Dimensions:
natural_image
Line drawing of a vintage television set with a small inset showing a device (no text or symbols)Service & Disposal
- Any electrical work required to service the appliance must be carried out by a qualified electrician or competent person.
- This product must be serviced by an authorised Service Centre, and only original spare parts must be used.
natural_image
Symbol of a trash bin crossed with a diagonal line and a horizontal bar below (no text or labels)This symbol on the product or on its packaging indicates that this product must not be treated as household waste. Instead, it must be taken to the appropriate collection point for the recycling of electrical and electronic equipment.
By ensuring this product is disposed of correctly, you will help prevent potential negative consequences for the environment and human health, which could otherwise be caused by inappropriate waste handling of this product.
For more detailed information about recycling of this product, please contact your local authorities, your household waste disposal service or the shop where you purchased the product.
Packing materials
Materials with the symbol 🎨 are recyclable. Dispose of the packaging in a suitable collection container for recycling.
Disposal of the device
- Disconnect the plug from the socket.
- Cut the power cord and discard it.
Energy saving
The following shows how to reduce total environmental impact (e.g. energy use) of the cooking process).
- Install the cooker hood in a proper place where there is efficient ventilation.
- Clean the cooker hood regularly so as not to block the airway.
- Remember to switch off the cooker hood light after cooking.
- Remember to switch off the cooker hood after cooking.
INFINITON
EXAUSTOR
natural_image
Line drawing of a kitchen interior with microwave oven, stainless steel kitchen unit, and oven (no text or symbols)CMPTRAL-W69
ean: 8445639002407
natural_image
Illustration of a lamp illuminating a small electronic device with a cross mark (no text or symbols)SEMPRE FAZER
natural_image
Technical line drawing of a mechanical component with an inset close-up showing a detail (no text or symbols)natural_image
Diagram of airflow around a mechanical component with directional arrows indicating movement (no text or symbols)natural_image
Diagram of a brick wall with a mounted box and directional arrows, labeled 'Pic 7' (no text or symbols on the diagram itself)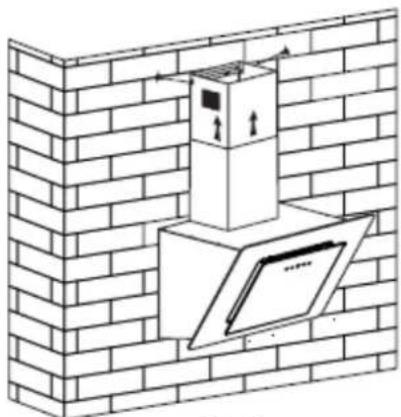
natural_image
Diagram of a brick wall with a mounted air conditioner unit and a fan cover (no text or symbols)Pic 8
The control panel has 4 buttons:

Timer

Lamp

Speed

Power
- Press the "Power" button, the button control the "on" & "off" of the hood.
- Press the button "Speed" time after time, the motor runs as low / mid / high / low / mid..., the speed runs circularly; and the LED display will indicate as 1-2-3-1-2... circularly.
- Press "Lamp" button, the light is on, press this button again, the light is off. Please note the Lamp is not under control of the on/off button.
- When the hood is working, if press the "Timer" button, the hood will go into the status of acquiescent working (acquiescent time is 9mins), and then, LED display will be shown 9.8.7.6 ...decreasing by 1,when time is up, the hood will be off automatically and the lamp will extinguish. If pressing "Timer" button, the hood will go in or go out "Timer" function.
- When the cooker hood working in high speed, it will automatically switch to mid speed after seven minutes working.
natural_image
Diagram of a mechanical assembly with arrows indicating motion, no text or symbols presentnatural_image
Illustration of a hand using a pen to interact with a tablet device (no text or symbols visible)natural_image
Simple line drawing of a vintage television set with a magnified inset showing a device (no text or symbols)natural_image
Symbol of a trash bin crossed with two crossed lines, representing no waste or discharge (no text or labels)
¿Necesitas ayuda?
natural_image
Silhouette icon of a person wearing a headset with a crossed wrench symbol (no text or numbers)
INFINITON
TÉRMINOS Y REGISTRO DE GARANTÍA

- HACER SIEMPRE
- Servicio
- Tips on how to get the most out of your new cooker hood
- Protect the stainless steel surface easily
- What is the recommended distance between the hob and the hood?
- Prevents odours
- Preventing odours while the hood is operating
- How to clean the metallic filters of a cooker hood?
- NEVER TO DO
- ALWAYS TO DO
- INSTALLATION (VENT OUTSIDE)
- MOUNTING OF THE V-FLAP
- Installing the cooker hood
- Hints for exhaust duct installation
- General
- Stainless steel
- Control panel surface
- Grease mesh filters
- Installing grease mesh filters
- Carbon filter - not supplied
- Bulb replacement
- Service & Disposal
- Packing materials
- Disposal of the device
- Energy saving
- INFINITON
- EXAUSTOR
- SEMPRE FAZER
- ¿Necesitas ayuda?
- TÉRMINOS Y REGISTRO DE GARANTÍA
Brand : Infiniton
Model : CMPTRAL-W69
Category : Doorbell