
WLAN outdoorcam_fisheye 180° HD 510914 - Security Camera STABO - Free user manual and instructions
Find the device manual for free WLAN outdoorcam_fisheye 180° HD 510914 STABO in PDF.


| Product Type | Security Camera |
| Brand | Stabo |
| Model | WLAN Outdoorcam Fisheye 180° HD 510914 |
| Lens | 180° fisheye |
| Resolution | HD (1920x1080 pixels) |
| Night Vision | Yes, infrared LEDs |
| Connectivity | WiFi (WLAN) |
| Power Supply | 12V DC adapter (included) |
| Housing Material | Weatherproof (IP65) |
| Mounting | Wall or ceiling mounting bracket included |
| Field of View | 180° horizontal |
| App Support | Available for iOS and Android |
| Motion Detection | Yes, with push notifications |
| Audio | Two-way audio (built-in microphone and speaker) |
| Storage | microSD card slot (up to 128GB) |
| Operating Temperature | -10°C to 50°C |
| Dimensions | Approximately 120mm x 80mm x 80mm |
| Weight | Approximately 400g |
| Warranty | 2 years |
| Included Accessories | Power adapter, mounting bracket, screws, manual |
Frequently Asked Questions - WLAN outdoorcam_fisheye 180° HD 510914 STABO
User questions about WLAN outdoorcam_fisheye 180° HD 510914 STABO
0 question about this device. Answer the ones you know or ask your own.
Ask a new question about this device
Download the instructions for your Security Camera in PDF format for free! Find your manual WLAN outdoorcam_fisheye 180° HD 510914 - STABO and take your electronic device back in hand. On this page are published all the documents necessary for the use of your device. WLAN outdoorcam_fisheye 180° HD 510914 by STABO.
USER MANUAL WLAN outdoorcam_fisheye 180° HD 510914 STABO
WLAN outdoorcam\_fisheye HD
Videoüberwachung video monitoring
Art.-Nr. 51095
text_image
ungs- fung manual stabo WLAN outdoorcam_fisheye HDWichtig/Important
Prior to using the device for the first time, carefully and completely read through all operating instructions. Keep these operating instructions in a safe place; it contains important hints for operating the device.
stabo is eco-friendly.
To help us save trees and reduce paper waste, you will find all operating instructions with care and safety instructions as well as warranty information only online.
natural_image
Close-up of a medical device's internal structure with a black connector and metallic components (no visible text or symbols)natural_image
Aerial view of a modern building with curved roof and surrounding greenery, captured in a fisheye lens (no visible text or symbols)natural_image
Aerial fisheye view of a curved building with greenery, captured in an image editing interface (no readable text or symbols on the scene itself)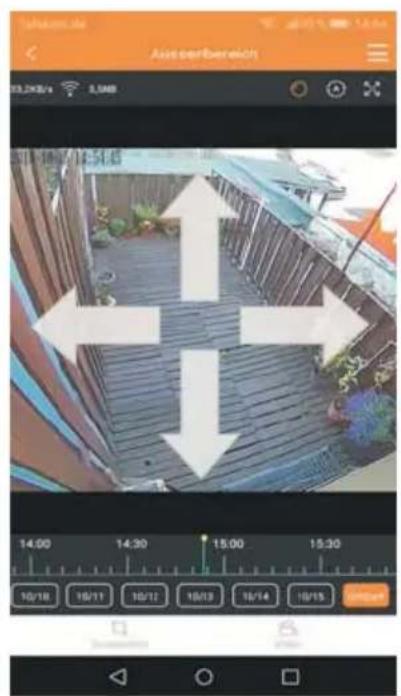
text_image
Tahakama.de Auto door/benelict 33.2KB/s 3.0MB 14:00 14:30 15:00 15:30 10/18 10/11 10/12 10/13 10/14 10/15 Suzhou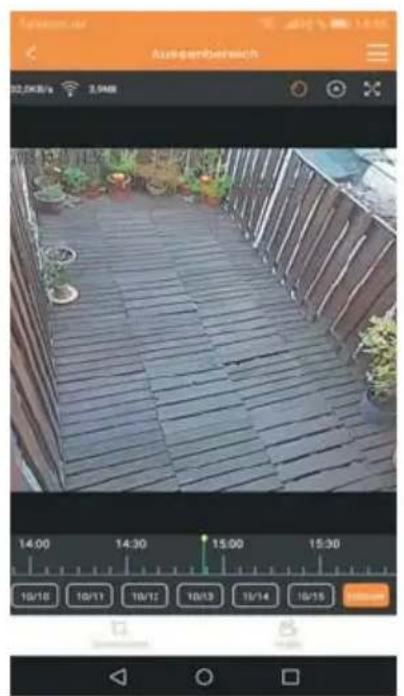
natural_image
Exterior view of a wooden deck with potted plants and garden background (no signage or text)natural_image
Exterior view of a modern building with wooden balconies and tiled roof, captured in a fisheye camera interface (no readable text or symbols on the main scene)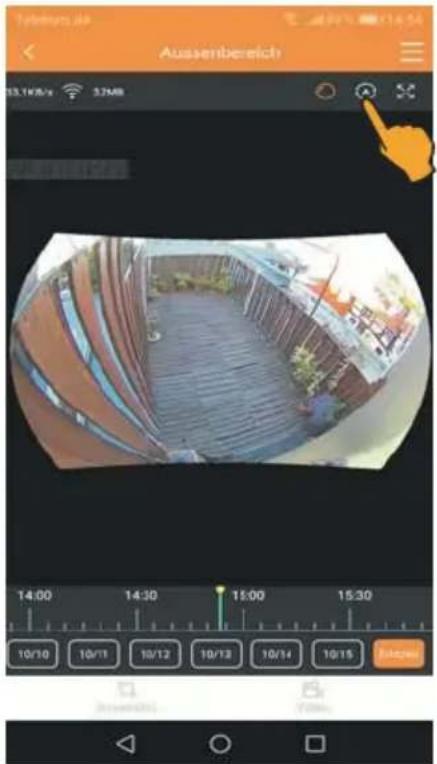
text_image
Ausentbereich 13.1/08/26 5:30 PM 14:00 14:30 15:00 15:30 10/10 10/11 10/12 10/13 10/14 10/15 10/153
natural_image
Exterior view of a modern building with tiled roof and people on the sidewalk (no signage)stabo WLAN outdoorcam\_fisheye HD
WiFi-Frequenz 2,4 - 2,4835 GHz
WiFi-Sicherheit WPA/PSK
WiFi-Standard IEEE 802.11b/g/n
SIMPLIFIED EU DECLARATION OF CONFORMITY
Hereby, stabo Elektronik GmbH declares that the radio equipment type
stabo WLAN outdoorcam_fisheye HD
is in compliance with Directive 2014/53/EU.
The full text of the EU declaration of conformity
is available at the following internet address:
http://stabo.de/fileadmin/DoC/DoC_stabo_WLAN_outdoorcam_fisheye_HD_DE_EN.pdf

Note: When aligning and operating the camera, please make sure not to orientate it towards a neighboring property or public area! A stable/fast WLAN is required to operate the camera!

Note: Due to the permanent updates of product and software, these operating instructions and the user interface of the app will possibly deviate from each other. All instructions depend on the actual user interface.
Scope of delivery
waterproof HD color camera (1080P) with integrated WLAN module
Power supply unit (12 V DC / 1 A) with power cable (6 m)
Quick start guides (Android/iOS)
Mounting material
Please check the contents of the package for completeness.
Prior to using the sets examine them with respect to any external damage. In case of an external damage, do not put the product into operation, but contact your specialist dealer immediately.
Product description / intended use
The weatherproof (IP66) WLAN outdoorcam_fisheye HD is equipped with a 1080 HD resolution and an angle of view of 180^ in live view mode. The camera provides a digital panning / tilting function and a digital zoom. With the help of a local home network (WLAN router), video and audio signals of the monitored area are transmitted to your smart phone or tablet PC. The camera can be connected with the local home network via (wireless) WLAN.
Its WiFi standard (IEEE 802.11b/g/n) is used to assure a transmission which is almost free from interferences and secure against eavesdropping thus protecting your privacy, the WPA encryption is used to prevent unauthorized persons from having access to your camera.
The camera is suitable for outdoor and indoor applications.
Two recording modes are available: Continuous recording or recording via VMD (Video Motion Detection). If a movement is detected via VDM, recording is automatically started and stored afterwards (microSD card required, max. 128 GB, not included in the scope of delivery). This recording is afterwards available on your mobile radio set. In addition, a notification (push notification) can be sent.
12 infrared LEDs assure high visibility in the dark (range of 10 - 15 m).
Thanks to the snapshot or recording function, the mobile device can be used to manually take photos or record video sequences and to store them.
The required app Pano360S can either be downloaded for free as iOS version from the App Store or as Android version via Google Play.
Safety notes and warnings

Observe the legal provisions on video surveillance! Please observe the applicable data privacy regulations which are laid down in the Federal Data Protection Act!
Without the respective express written permission, monitoring third parties is prohibited and may entail legal actions.
For commercial areas, it is essential to observe the corresponding information duty!
The WLAN outdoorcam_fisheye HD is weatherproof (protection type IP 66) and suitable for mounting in outdoor areas. However, the camera's power supply unit has to be protected against humidity and moisture!
The supplied power supply unit should be used only! For powering the camera, the delivered power supply unit must be used only.
If the power supply unit shows damage, do not touch it: There is danger to life through an electric shock! In this case, first disconnect the mains voltage to the socket and only afterwards disconnect the power supply unit from the mains. Replace it only with an original power supply unit.
The devices must be kept out of the reach of children! Prevent children from playing with the device, accessories, or the packing material!
Do not use in hospitals and/or nursing facilities! Your stabo WLAN outdoorcam_fisheye HD produces radio waves which might affect the proper functioning of the hospital equipment. If necessary, contact the responsible personnel to clarify whether safe commissioning is possible.
Do not open the devices or make any modifications to them! Never open parts of the housing and do not make any modification on the devices. Otherwise, no further guarantee claim can be accepted and the devices could lose their approval for use!
If the housing is damaged, disconnect the power plug! Immediately disconnect the device from the mains, if damage on the housing is found. Ensure that possibly required repairs are performed by a qualified person only.
Control elements and connections
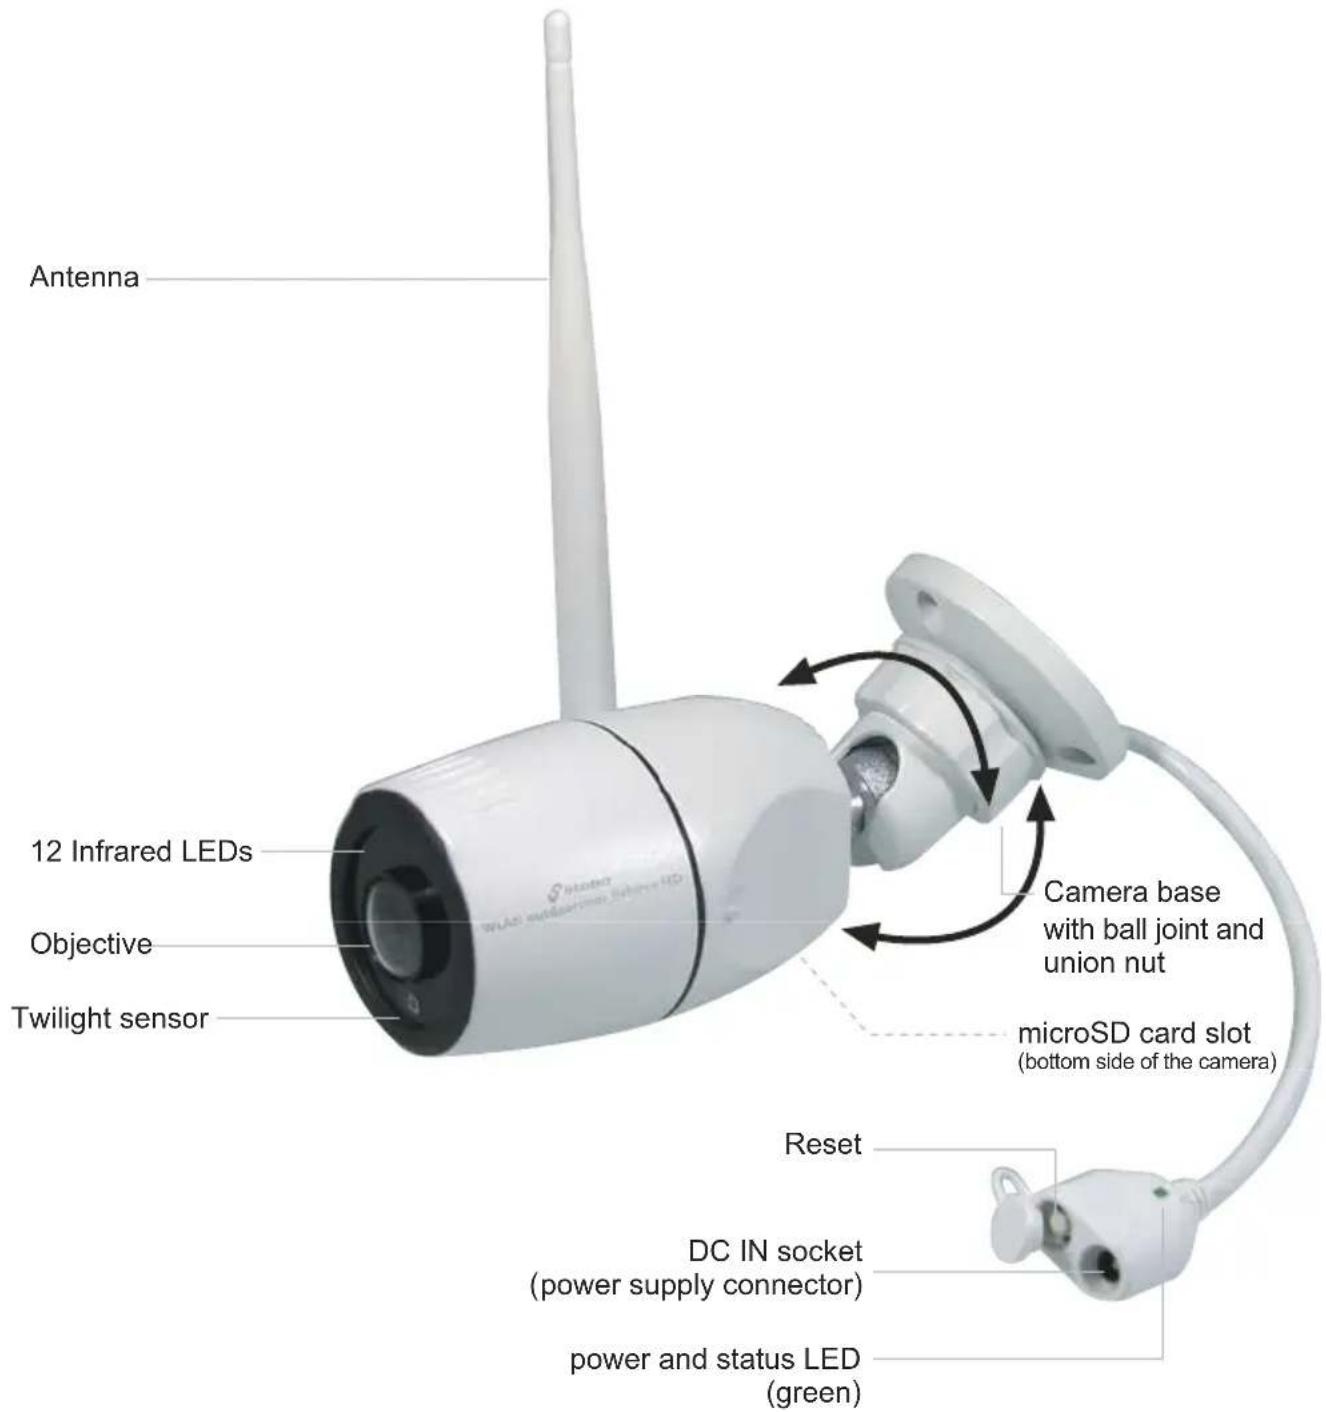
text_image
Antenna 12 Infrared LEDs Objective Twilight sensor Camera base with ball joint and union nut microSD card slot (bottom side of the camera) Reset DC IN socket (power supply connector) power and status LED (green)Status LED indication
flashes green slowly (every 2 sec.) Camera is ready for setup
Green light Camera is connected to the Internet and is operable
flashes green rapidly (every 0.5 sec.) Connection to WLAN router is established

Mounting and connecting the camera refer page 37
Commissioning/initial installation of the camera
First download the iOS or Android version of the app Pano360S from the App Store or Google Play Store according to the operating system of your mobile device. To do so, enter Pano360S into the search bar, highlight the app, download and install it.
Note: In these operating instructions, all operational steps are described for the Android version of the app.
Mounting and connecting the camera
Note: It is highly advisable to configure and test the camera before mounting.
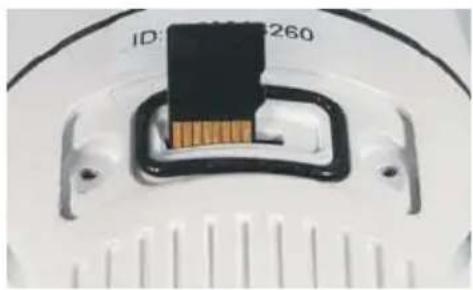
Inserting a microSD card (max. storage capacity of 128ÊGB)
Remove the cover from the microSD card slot.
Insert the microSD card with the contacts facing towards the camera base into the microSD card slot until the SD card is locked in.
Afterwards install the card slot cover again.
natural_image
Close-up of a medical device's internal structure with a black connector and metallic bands (no visible text or symbols)Switching on and connecting the camera
Plug the power supply unit into a socket (230 V) and connect the plug to the camera's DC IN socket which is automatically switched on when inserting the plug.
After approx. 30 sec., the power LED slowly flashes green and the camera is ready for setup.
Setting up a user account and connecting the camera and a mobile device
text_image
Telekom.de Share 79% 09:54-
Make sure that your mobile device is connected with your WLAN router.
-
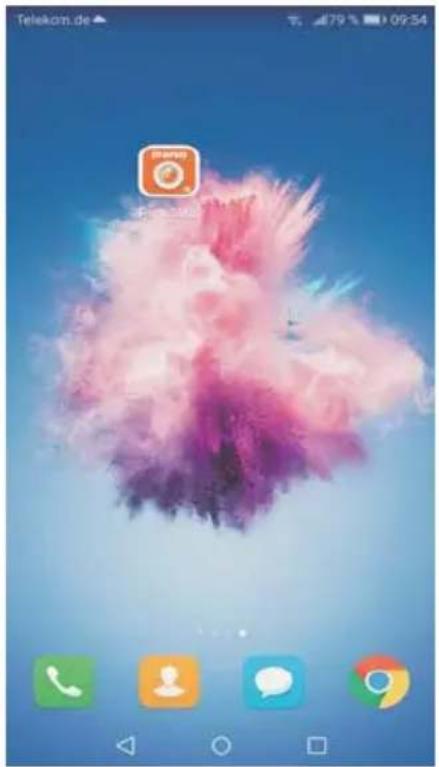
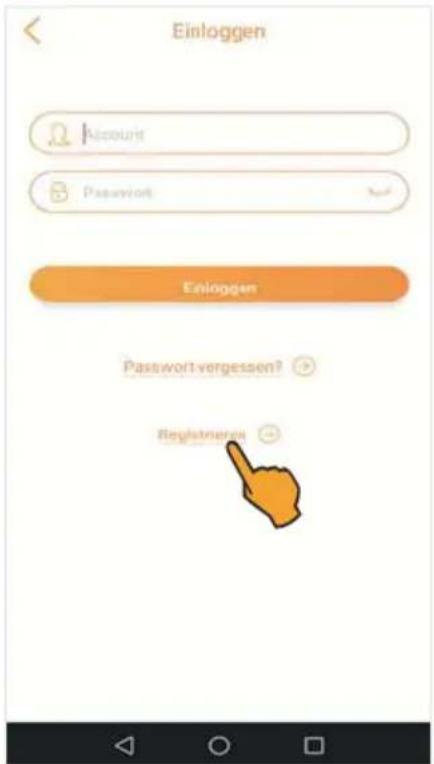
Open the app Pano360Sfor setting up your user account. Now tap "Registrieren" (Register).
text_image
Einloggen Account Password Enloggen Password-vergessen? Registrar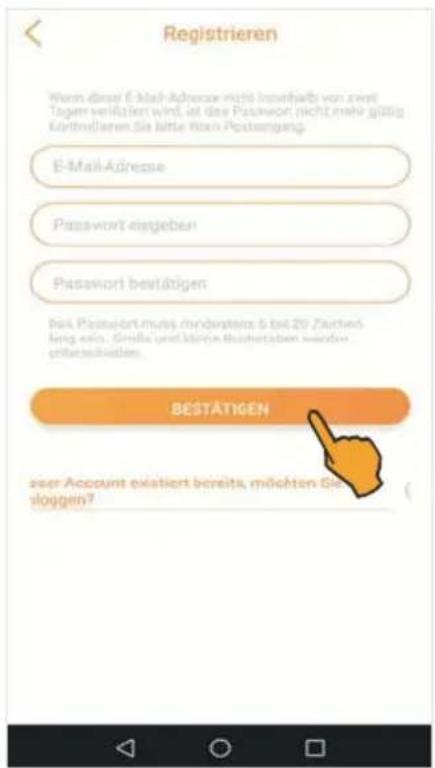
- Enter your e-mail address and your password twice. Afterwards tap "Bestätigen" (Confirm).
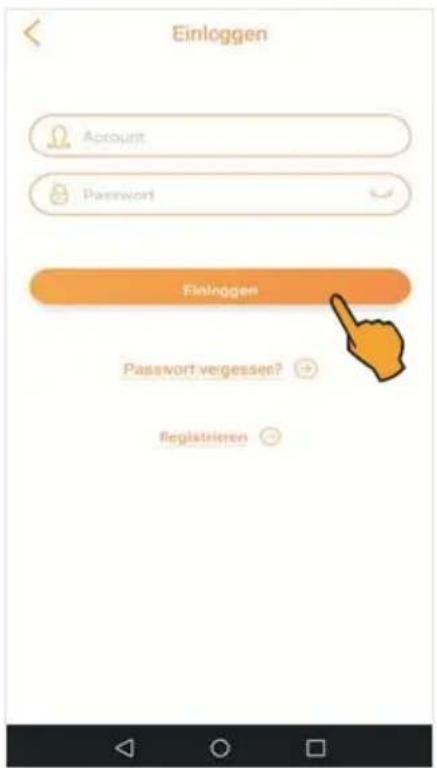
For starting the app, enter your e-mail address in the "Account" (Konto) field, your password in the "Passwort" (Passwort) field and tap "Einloggen" (Login).
text_image
Einloggen Account Password Einloggen Password vergessen? registrieren
Important note: Make a note of your user name and password. You will need both to log in later to the app via "Einloggen" (Login).

Important note: Important for Android mobile phones. Before adding the device, activate GPS/position determination!
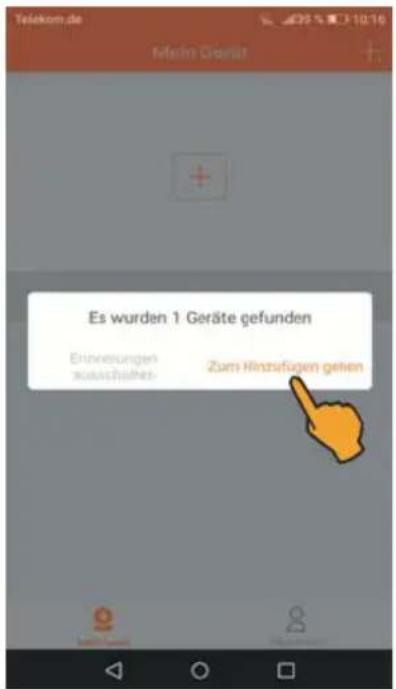
- The following notification window "Es wurde ein neues Gerät gefunden" (A new device has been detected) is displayed now: To continue the installation, tap "Zum Hinzufügen gehen" (Continue adding), the display shows "Geräte hinzufügen" (Add devices) afterwards. Now tap the detected ID number.

Note: If this notification window does not appear, tape the “+” sign to continue the installation.
- Use Password to enter the WPA encryption code for your WLAN network and tap "Weiter" (Next) afterwards.
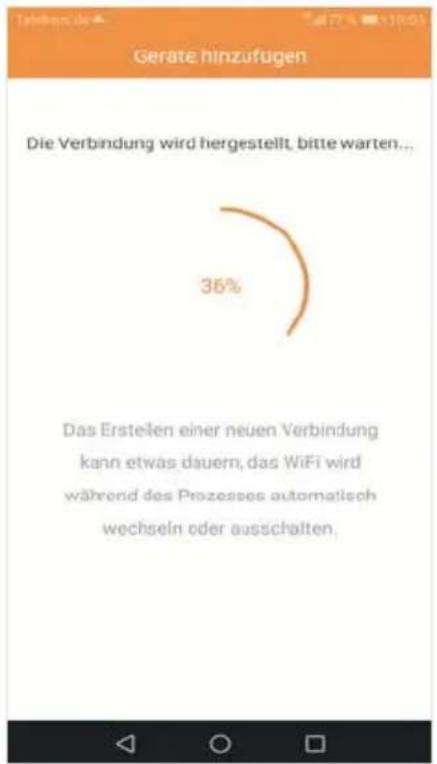
- The connection between camera and your WLAN network is established.
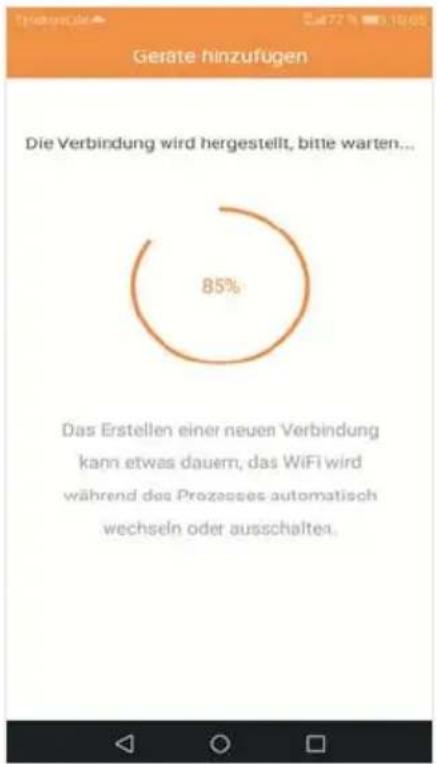
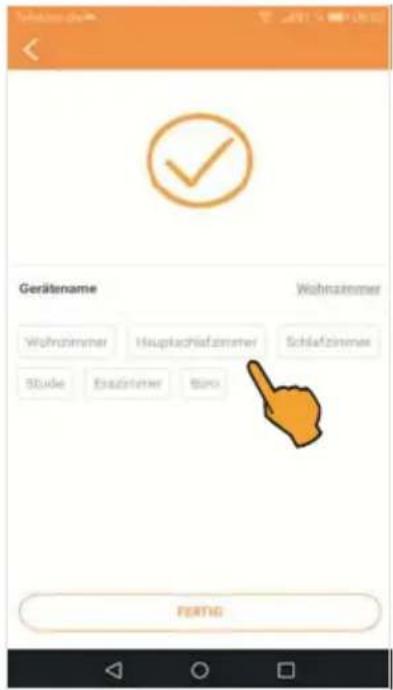
- After successful installation, a device name can be assigned to the camera. Now tap on one of the default names or enter a name in the device name field. Afterwards tap "Fertig" (Done). The connection between app and camera is established. Afterwards the camera switches on-line. For displaying the camera's live image, tap the "Pano360S icon".
natural_image
Aerial fisheye view of a curved outdoor structure with greenery, captured in a mobile app interface (no readable text or symbols on the scene itself)Mounting and connecting the camera
Important information:
Consider the following when selecting the camera position:
Range: Check whether the connection between the camera and your WLAN network is stable at the intended position.
Lighting conditions: The camera should not be orientated towards direct, strong light sources/sunlight, since overexposed images may result.
Power supply: The camera's power supply unit must not be exposed to the weather in the open!
Mounting: The camera support is suitable for ceiling and wall mounting.
Make sure that the mounting surface is stable and does not give rise to strong vibrations and/or falls.
First, install the camera only provisionally and check whether the desired monitored area is completely covered prior to drilling the holes for the camera support! Make sure that no cables or conducts are placed in the wall which may be damaged when drilling!
Mark the desired position for the drilling holes of the fixing screws and use the camera mount as drilling jig.
Drill the mounting holes and fix the camera using screws which are suitable for the respective base material.
For adjusting the horizontal and vertical camera position, undo the union nut by turning it in counterclockwise direction.
Adjust the camera to the desired position and angle. Afterwards tighten the union nut in clockwise direction to fix the adjusted position.
Plug the power supply unit into a socket (230 V) and connect the plug to the DC IN socket of the camera. If the power LED lights green, the camera is operable.

natural_image
Aerial fisheye view of a curved building with visible interior and surrounding greenery, captured in a video editing interface (no readable text or symbols on the image itself).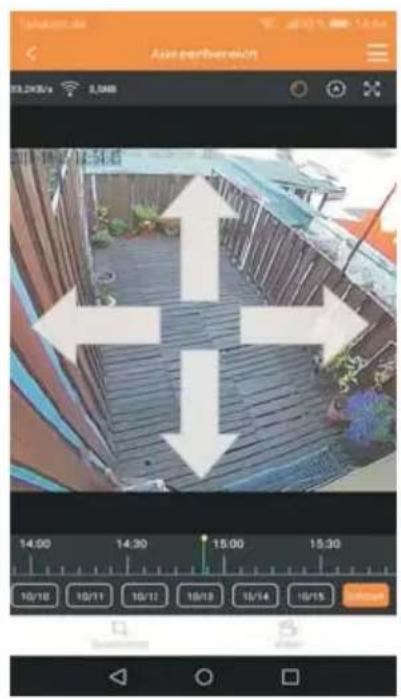
text_image
Auto-per-berein 83,200s 3,048 14:00 14:30 15:00 15:30 10/18 10/11 10/12 10/13 10/14 10/15 OK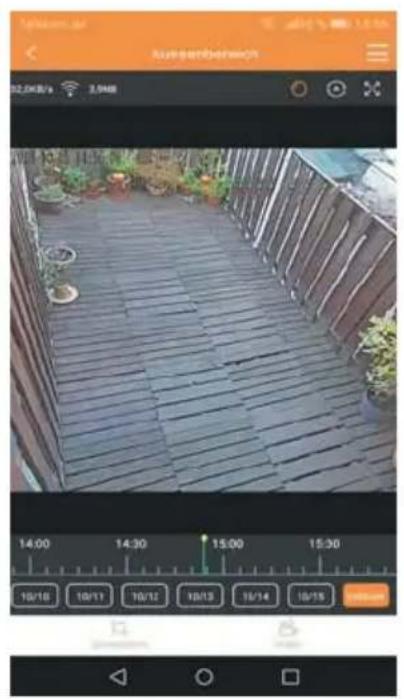
natural_image
Exterior view of a wooden deck with potted plants and garden equipment (no signage or text visible)PTZ function (pan, tilt, zoom)
Digital panning, tilting and zooming
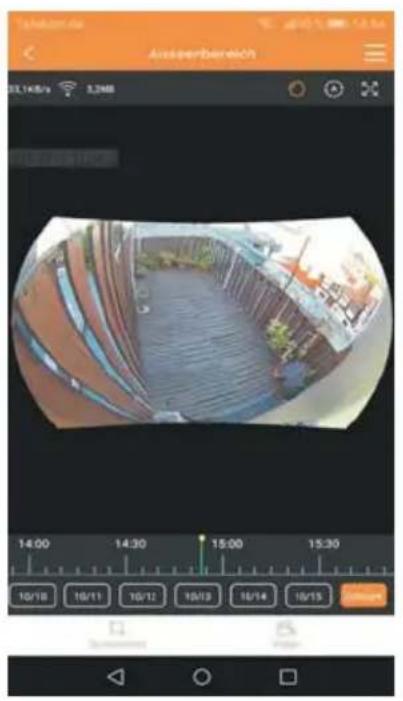
1 Changeover between normal and fish eye view (tap twice).
2 Digital panning and tilting: Tap the middle of the live image and swipe in the desired direction.
3 Digital zoom: For zooming the live image, use the familiar pinch gesture.
text_image
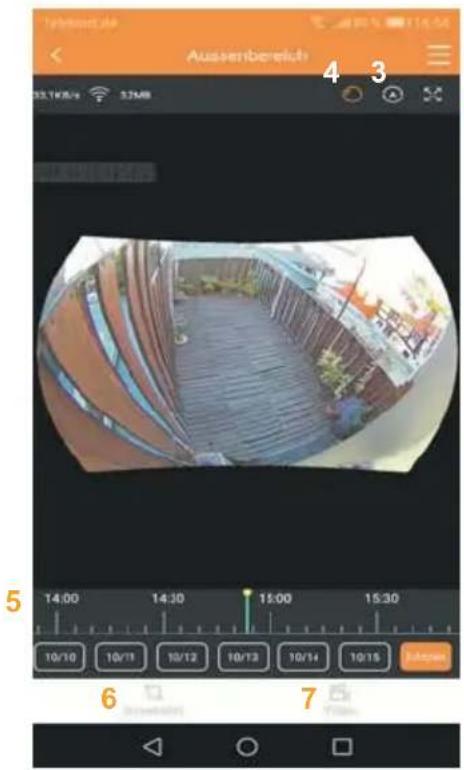
Außenbereich 32.16/04/06 32:58 4 3 14:00 14:30 15:00 15:30 10/10 10/11 10/12 10/13 10/14 10/15 6 7 VideoFunctions of live view mode
1 Camera settings
2 Switchover between horizontal and vertical view
3 Automatic panning the 180° view
4 Image switchover between 180° view and rectangular view
5 Timeline
6 Snapshot trigger
7 Manual recording
1
Camera settings: Refer to page 42
2
Switchover between horizontal and vertical view
text_image
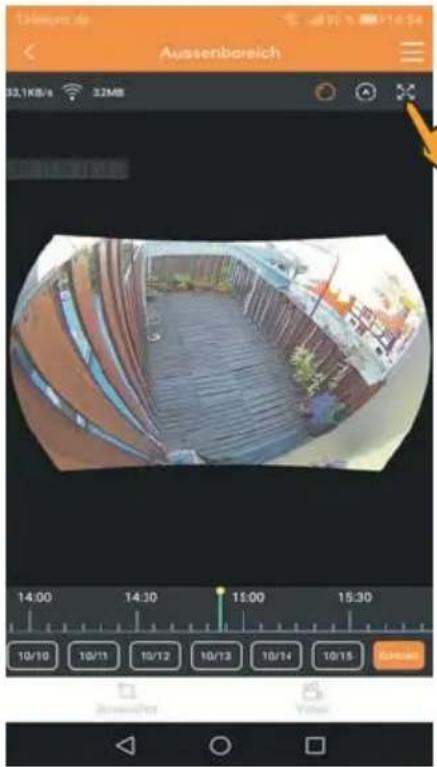
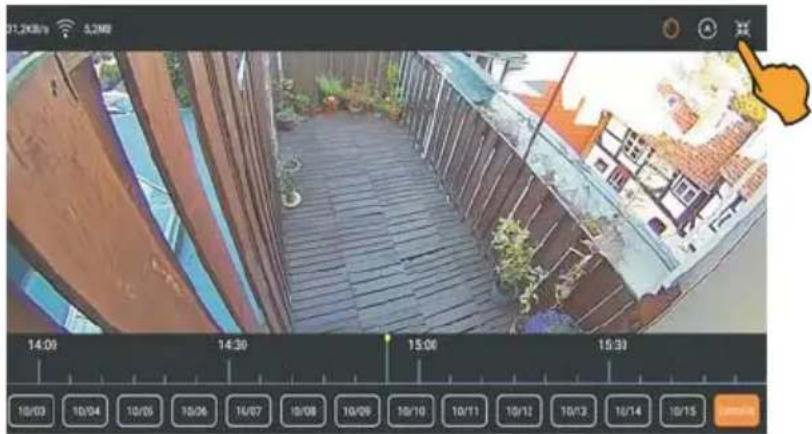
Aussenboreich 53.1KB/s 32MB 14:00 14:30 15:00 15:30 10/10 10/11 10/12 10/13 10/14 10/15 Audio VideoFor switching over from horizontal to vertical view, tap the View icon. For returning again to horizontal view, tap the View icon again.
natural_image
Exterior view of a modern building with wooden balconies and greenery, captured from a camera interface (no readable text or symbols on the main scene)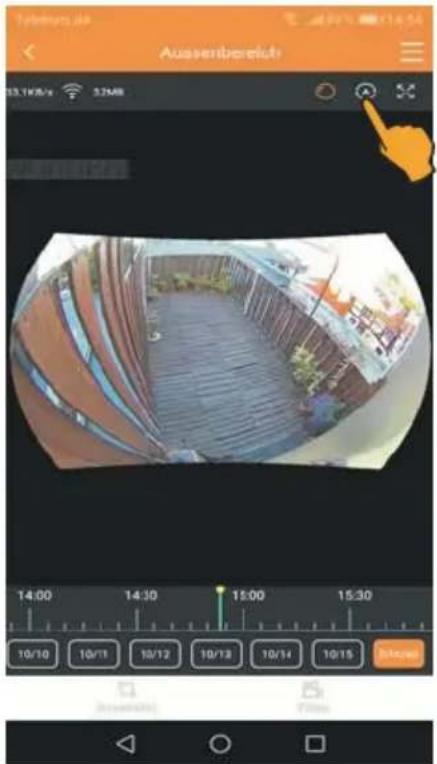
text_image
Ausentbereich 33.14/8/s 3:54M 14:00 14:30 15:00 15:30 10/10 10/11 10/12 10/13 10/14 10/15 Show3
Automatic panning the 180° view
In live image mode, the panning function can be activated.
Tap the Panning icon to activate or deactivate this function. If the Panning icon is color-marked, the function is activated.
text_image
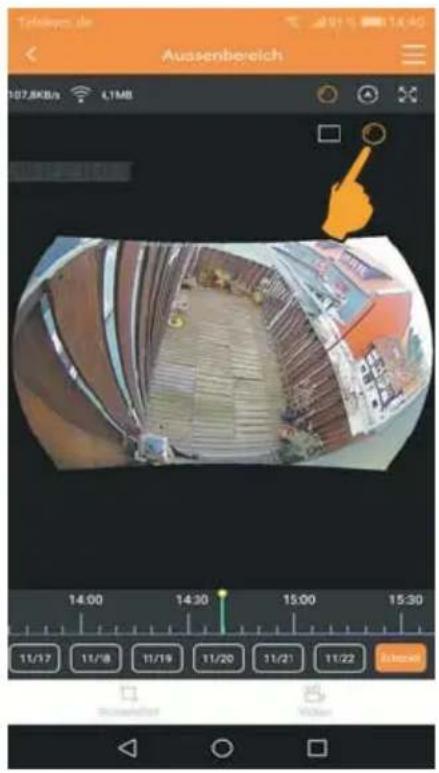
Ausenbereich 107.8Kbps 4.1MB 14:00 14:30 15:00 15:30 11/17 11/18 11/19 11/20 11/21 11/22 Select4 Switchover between 180° view and rectangular view Tap the Image switcho- ver icon to activate the respective view. The color-marked Image switchover symbol is activated.
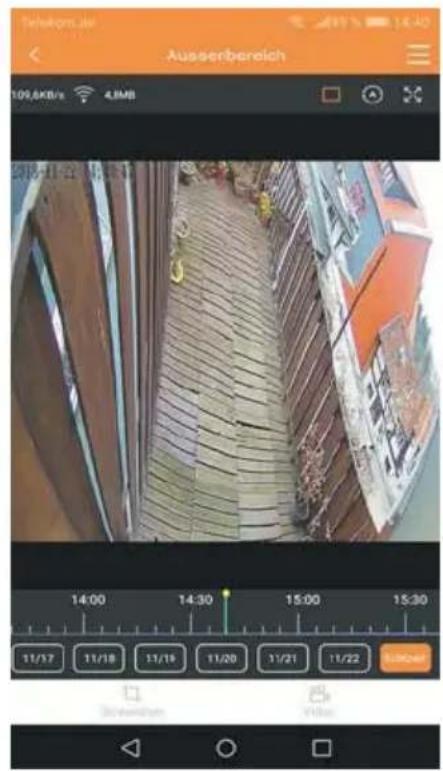
text_image
Außenbereich 109,6KB/s 4.8MB 2016-11-22 14:30 14:00 14:30 15:00 15:30 11/17 11/18 11/19 11/20 11/21 11/22 Südamer Vilker5
Timeline (video playback)
With the help of the timeline, the video recordings stored on the microSD card can be activated. A colored block is used for presenting the recordings.
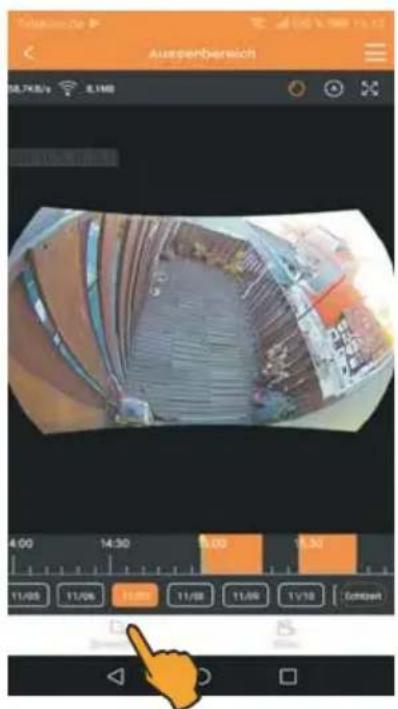
For displaying the recordings of a certain day, tape the corresponding Datum (Date) button (which is color-marked now). All recording of this day are displayed.
Note: The first recording of a day is played at first.
For accessing earlier or later recordings, use your finer to swipe the timeline to the left or right.
text_image
Ausserbereich 18.7KB/s 1.1MB 4:00 14:30 9:00 8:30 11/05 11/06 12:00 11/08 11:06 11/18 Gmbert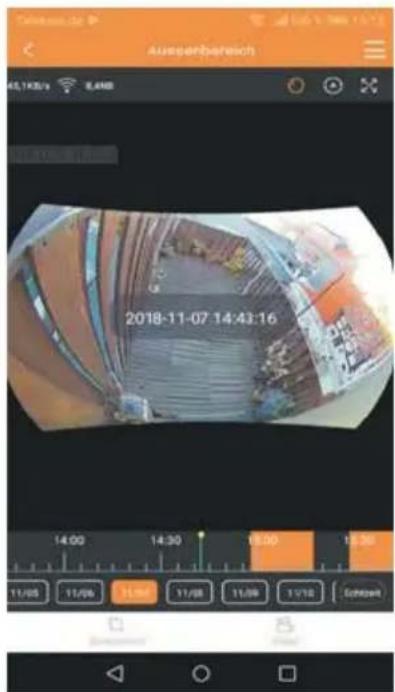
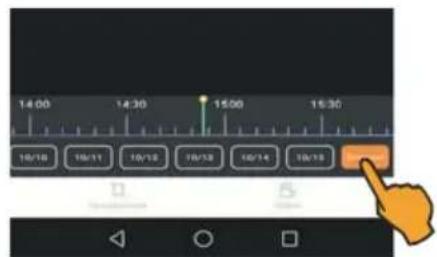
Date and time or the current position on the timeline are shown in the center of the display. Playback of the recording is now started at the position where you stopped.
text_image
14:00 14:30 15:00 15:30 16/18 16/11 16/13 16/14 16/15 15:00For returning to the live image, tap the Echtzeit (Real time) button.

text_image
Auszenbereich 121,2KB/s 1.8MB 14:30 15:00 15:30 16:00 11/17 11/18 11/19 11/20 11/21 11/22 Startout Start6
Snapshot trigger
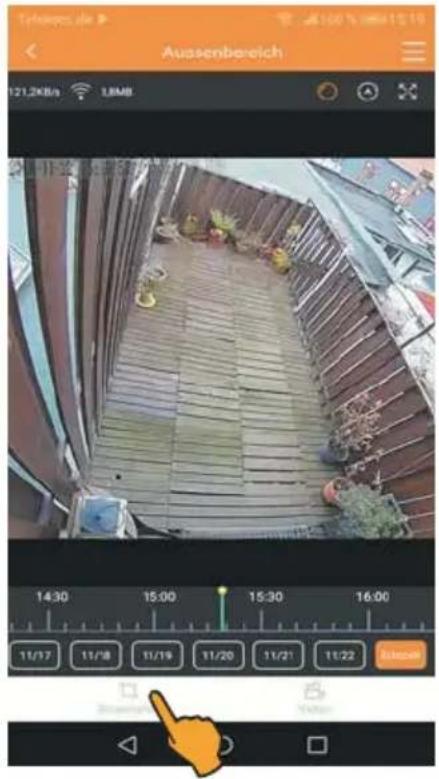
Creates snapshots of the live image. The photo is automatically stored on your smart phone/mobile device.
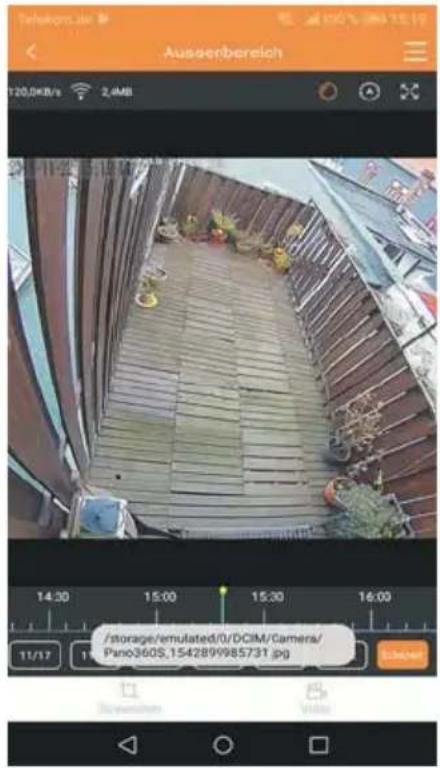
For making a photo from the live image, tap the screenshot icon. Afterwards a message is shown to inform you where the taken photo is stored on your mobile device.
Note: You can use the user center Mein Profil (My profile) to view the photo under Screens-hot/Aufzeichnen (Screenshot/record).
text_image
Telekom.de Aussenbereich 120,0KB/s 2.4MB /storage/emulated/0/DCIM/Camera/ Pano360S,1542899985731.jpg7
Manual recording
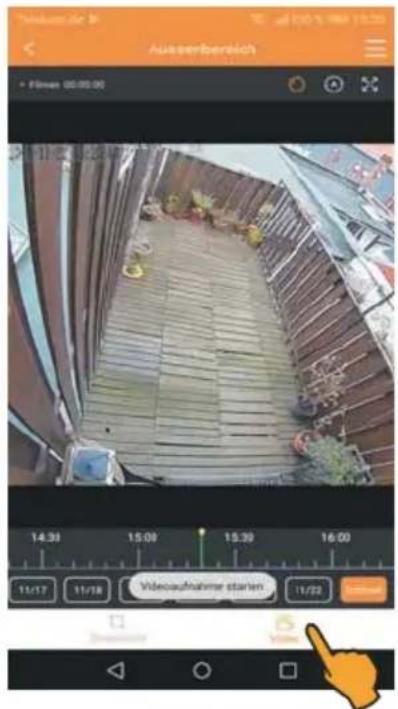
Starts and stops the recording of the live image.
Tap the video icon to start recording. The message Videoaufnahme starten (Start video recording) is displayed. A red dot, Filmen (Film) and the current recording time appear in the top left corner of the display. For stopping the recording, tap the video icon once again. Afterwards a message is shown to inform you where the video recording is stored on your mobile device.

Note: You can use the user center Mein Profil (My profile) to view the recording under Screens-hot/Aufzeichnen (Screenshot/record).
text_image
Ausserberich • Flösen 00:00:00 14:30 15:00 15:30 16:00 11/17 11/18 Videoaufnahme starten 11/22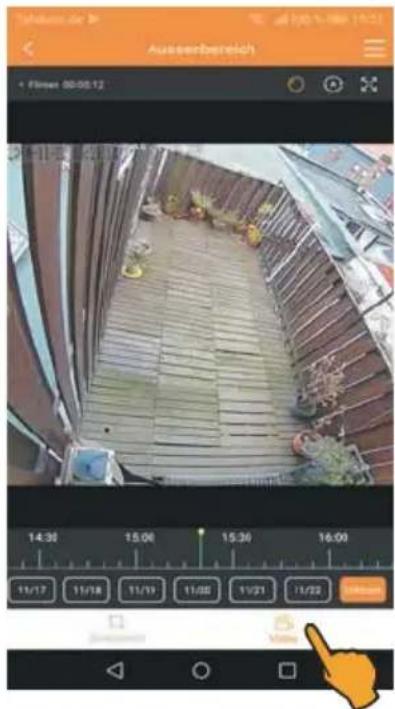
text_image
Ausserbereich Flinen 00:00:12 14:30 15:00 15:30 16:00 11/17 11/18 11/19 11/20 11/21 11/22 OK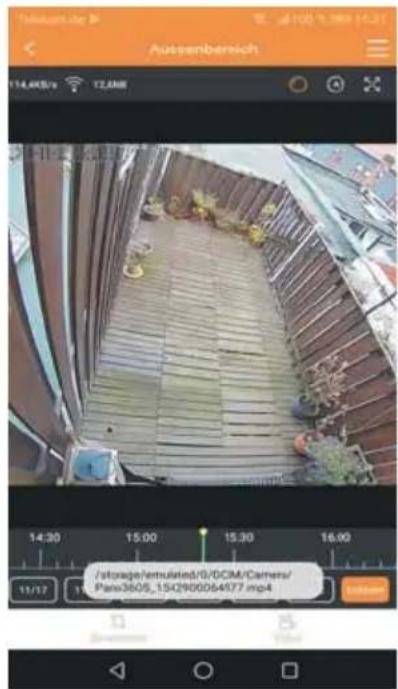
text_image
Aussembersicht 14.4K5/s 12.6M / storage/emulated/0/DCM/Camers/ Pans3605_1542900064977.mp41
Camera settings: Applies individual camera settings.
Tap the Menu icon to open the menu. This menu is used to indicate different information and to apply individual settings.
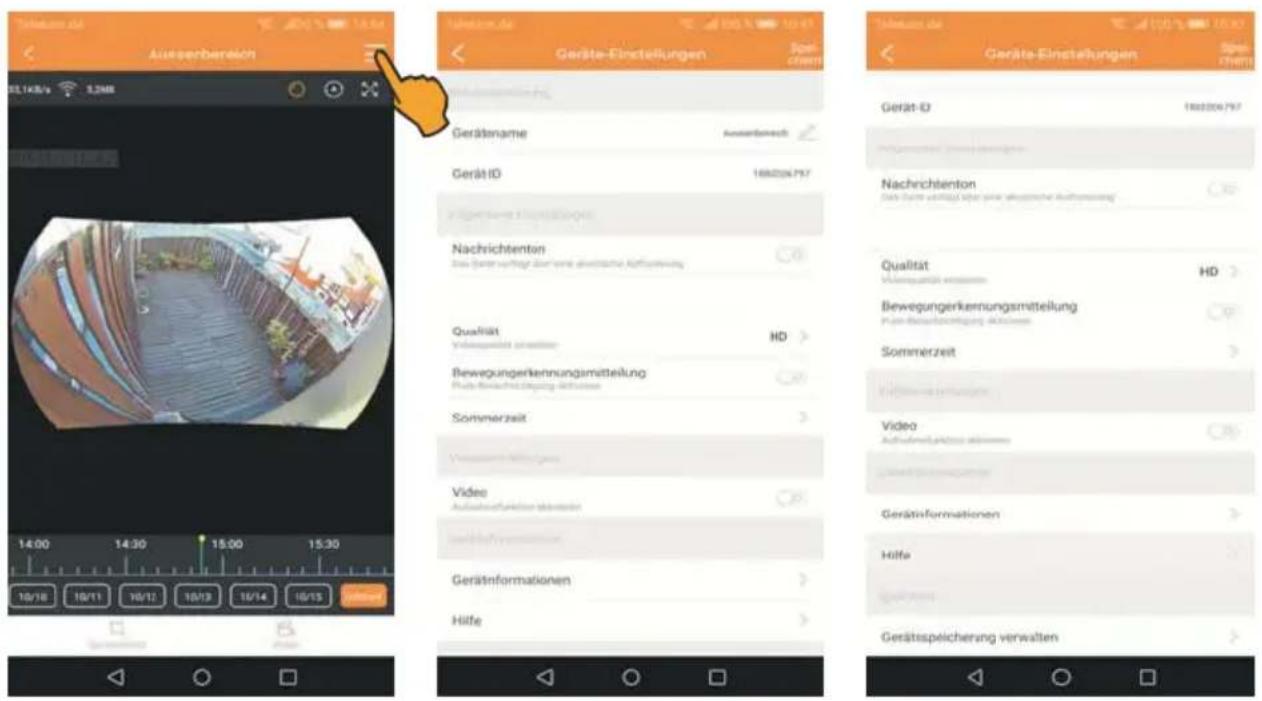
Information and settings:
Device name
Device ID of the camera
Message tone
Quality (image resolution)
Push notification
Summer/winter time (daylight saving time)
Video
Device info
Help
Administration of device storage

Important note: For storing modified settings, tap the "Speichern" (Save) button in the upper right corner.
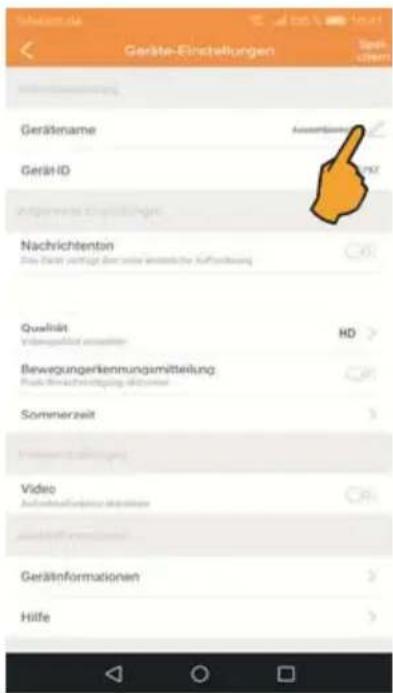
Assigns a new device name.
Tape the last letter of the name, delete the name and assign a new one afterwards. For saving the new name, tap the "Spei-chern" (Save) button.
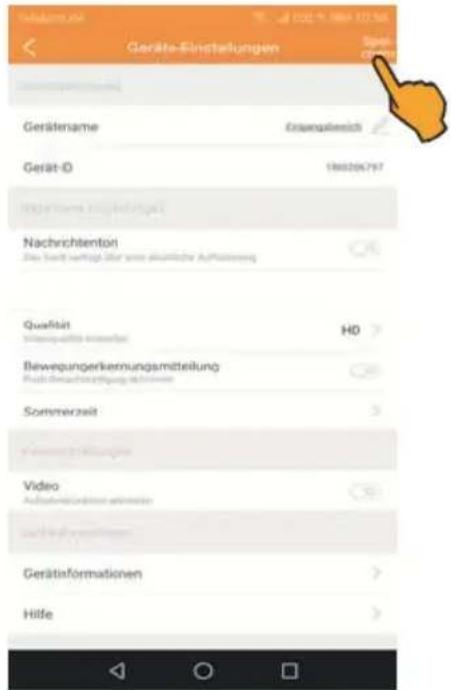
Switches the speech an- nouncement of the cam- ra on and off.
For activating the message tone, move the white dot to the right until the button has a green background. For deactivating the message tone, move the white dot to the left until the button is shown in white. Save the settings by tapping the "Speichern" (Save) button.
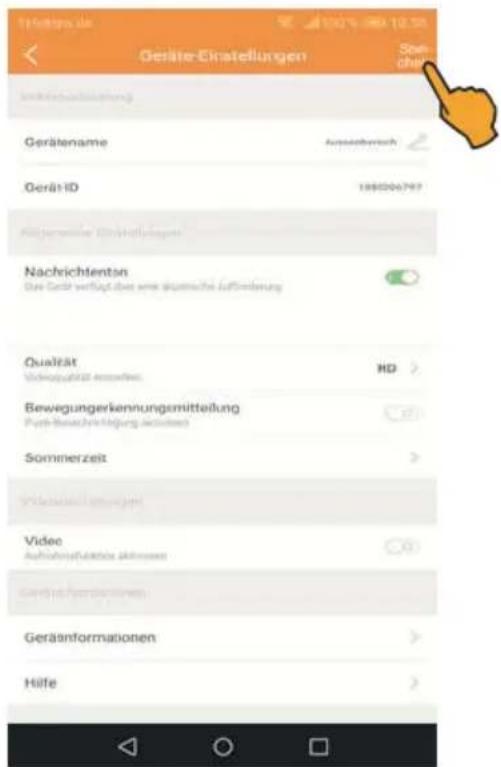
Quality (image resolution)
Setting of the image re- solution:
Automatic
HD: 1080p
SD: VGA.
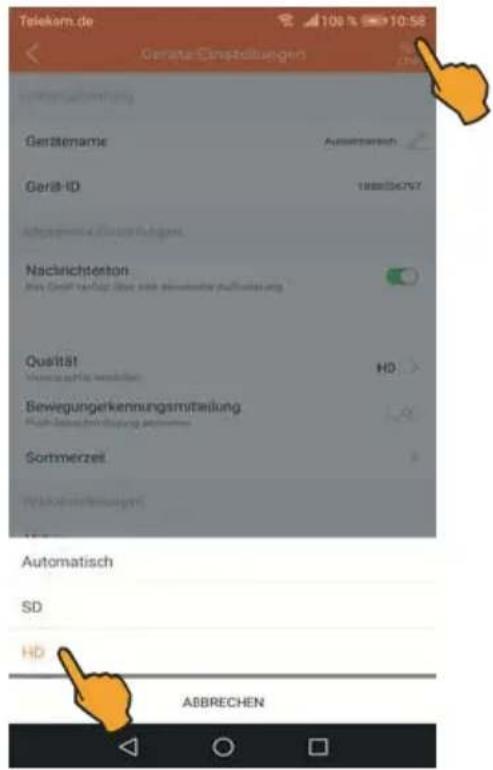
Tap the > icon and select the requested image resolution. Tap HD for high resolution (1080p), SD for low resolution (VGA) or "Automatisch" (Automatic) so that the camera automatically adjusts the best possible resolution. For saving, tap the "Speichern" (Save) button.
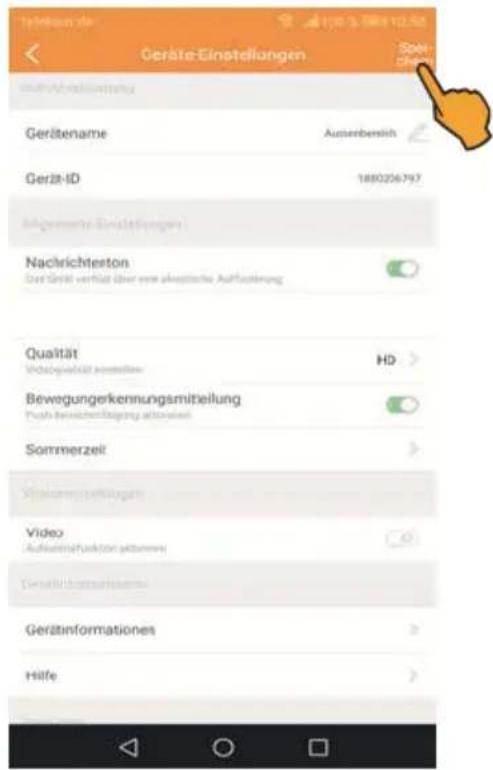
Movement detection notification
Activate the function "Push-
Benachrichtigung"
(Push notification) and notifications (Push notifications) are sent to your mobile device.
For activating the function, move the white dot to the right until the button has a green background.
For deactivating the function, move the white dot to the left until the button is shown in white. For saving, tap the
"Speichern" (Save) button.
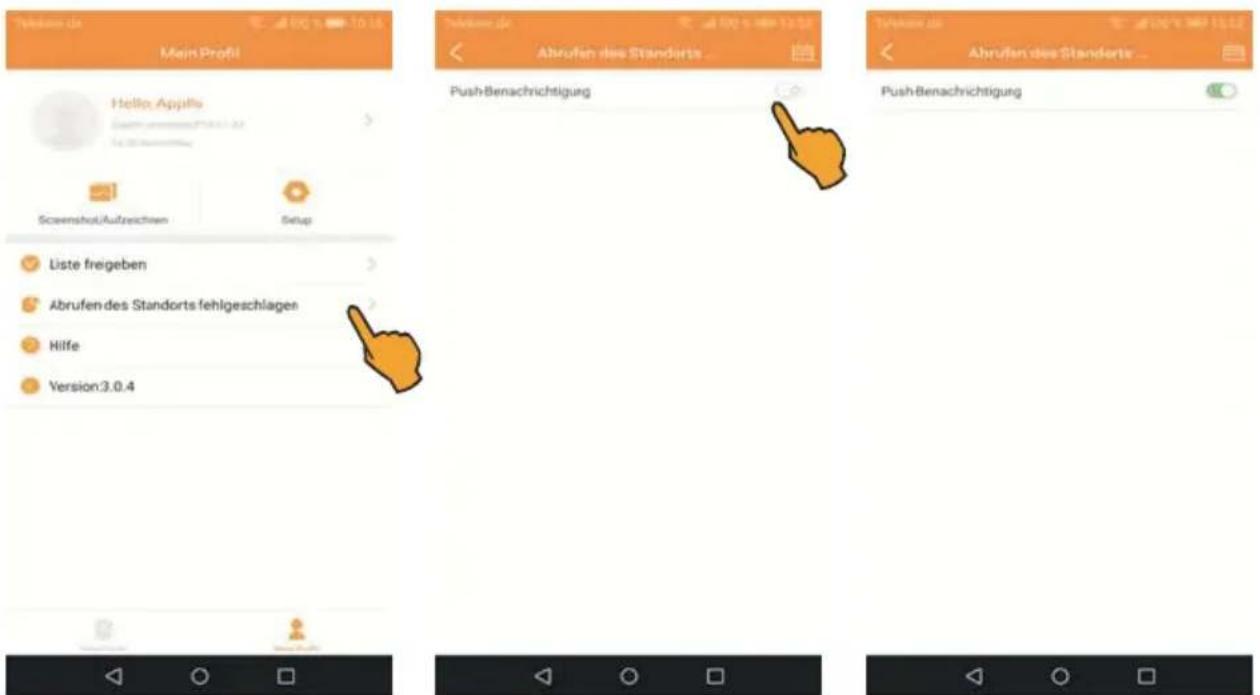
Important note: In addition, the function "Push-Benachrichtigungen" (Push notifications) must be activated in the menu "Abrufen des Standorts fehlgeschlagen" (Location detection failed) in the user center "Mein Profil" (My profile).
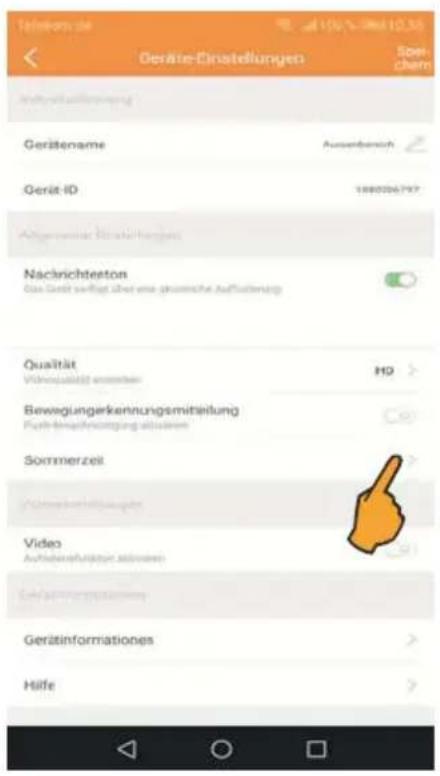
Setting summer/winter time
Tap Daylight saving time.
For activating the summer or daylight savings time, move the white dot to the right until the button has a green background.
Now select the requested region. Afterwards tap
Speichern (Save) to accept the adjusted settings.
For returning to normal standard time, move the white dot to the left and save.
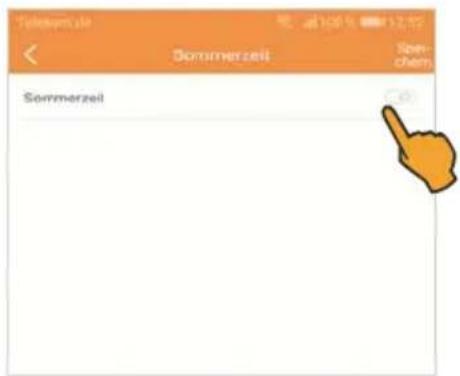
Activates the recording function. You can choose between two recording modes: Continuous recording or recording at movement detection.
For activating the function, move the white dot to the right until the button has a green background. Now tap the > icon and the recording mode afterwards. For storing the settings, tap the "Speichern" (Save) button. For deactivating the function, move the white dot to the left until the button is shown in white.
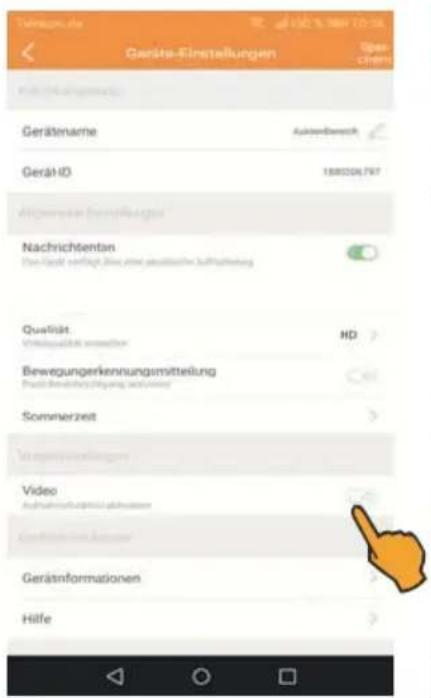
This options allows you to check whether the camera uses the current firmware version.
Tap the > icon and Firmware update afterwards. Firmware-Update. You should see now whether the latest firmware is used on your camera.
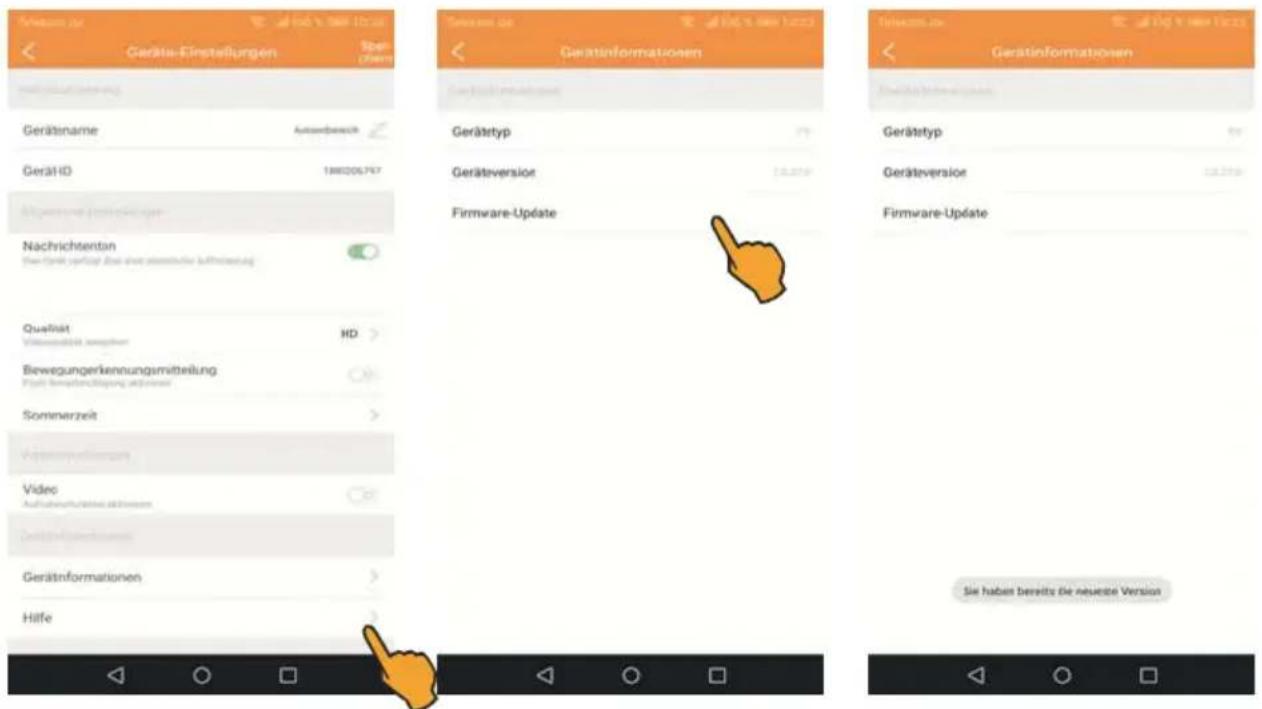
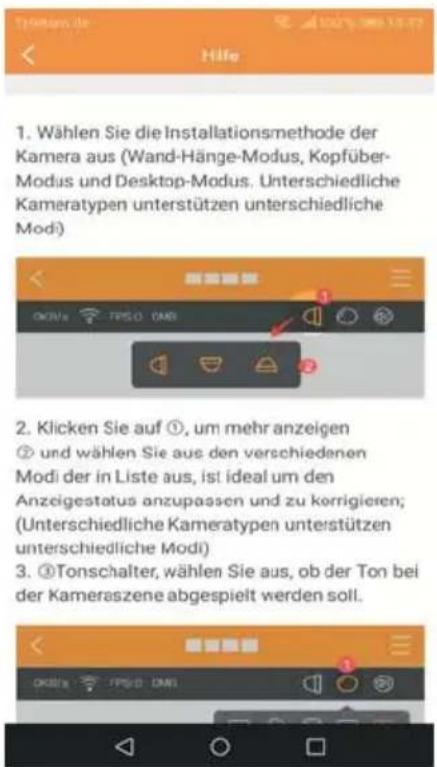
The help file is available here.
Tap the > icon and the help file is displayed.
Administration of device storage
Tap the > icon. The following information on the inserted microSD card are available here: TF-Speicherkartenstatus (TF memory card status), Kapazität (Capacity): Verfügbarer Speicherplatz (Available memory) and Gesamtspeicherplatz (Total memory).
Important note: If the total memory of the SD card is occupied, the function "File overwrite" (for deleting the oldest recordings) is activated.
Important note: Prior to using the memory card, it must be formatted!
Various information and further menus are available here.
■Account
For opening the menu tap the > icon.
The following information is available here:
The account name, nick name (if assigned), e-mail address (is not displayed for confidentiality reasons).
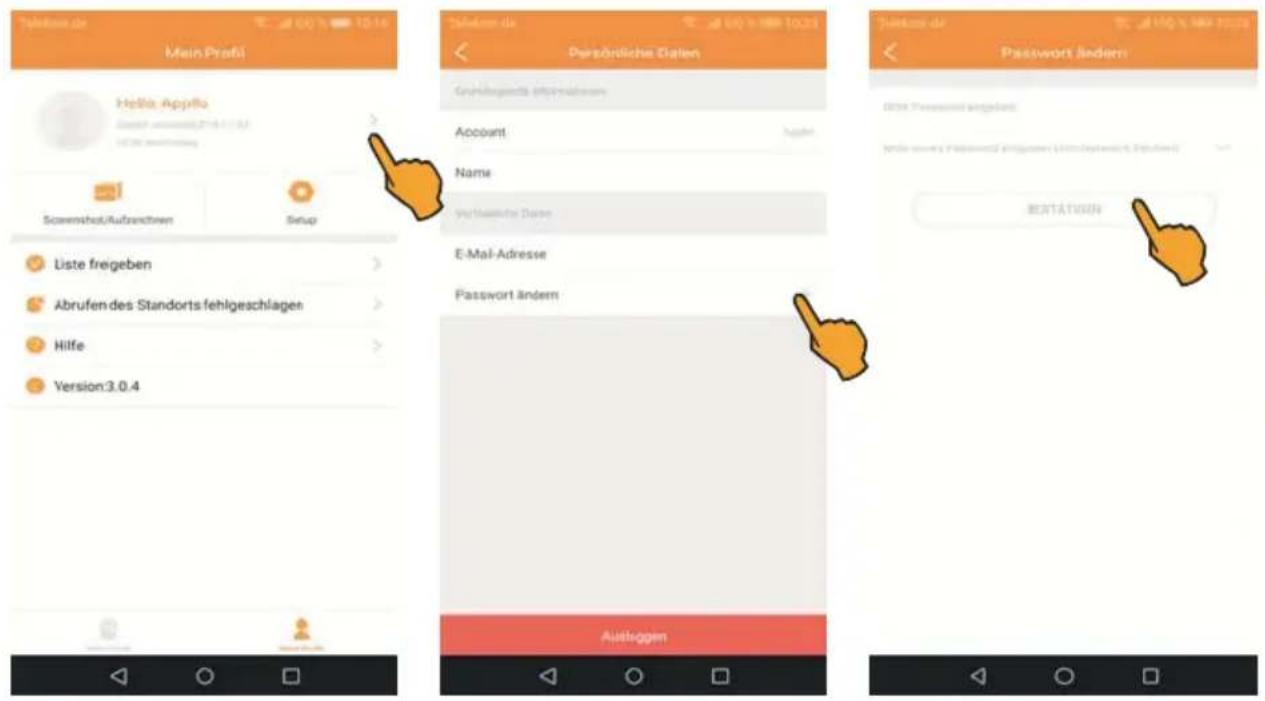
Furthermore, you can modify your old password.
Tap the > icon. Enter your old password and afterwards your new password. Now tap "Bestätigen" (Confirm).
Important note: Make a note of the new password. You will need it to log in later to the app via "Einloggen" (Login).
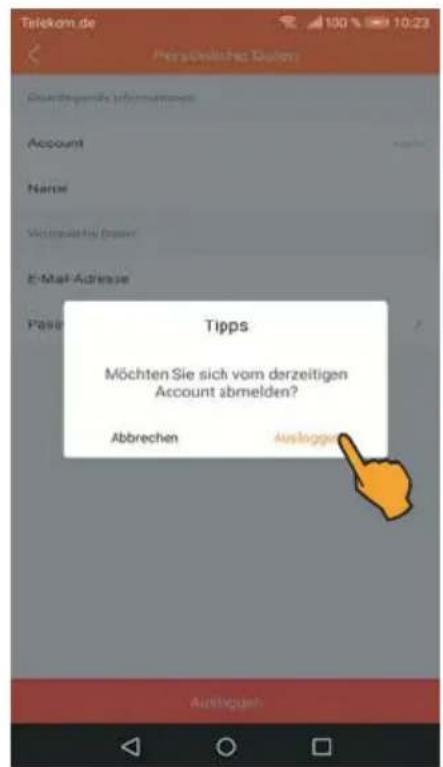
Logout from the app If you do not use the app anymore, log off from your account. Note: If you do not log off, the app remains active in the background.
Tap "Ausloggen" (Log off). The message "Möchten Sie sich vom derzeitigen Account abmelden?" (Do you want to log off from your current account). Tap "Log off".
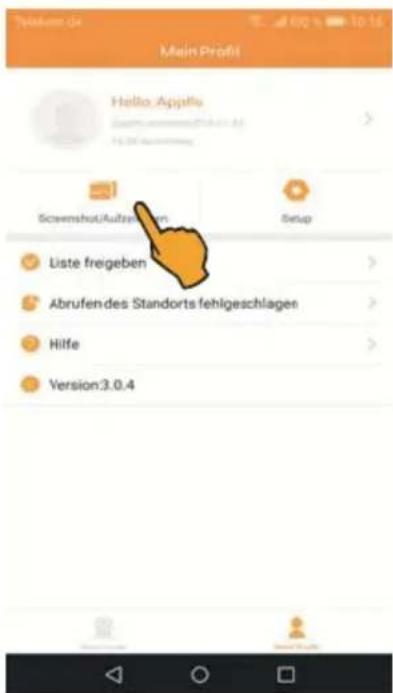
Manually created photos and video recordings can be shown with this menu item.
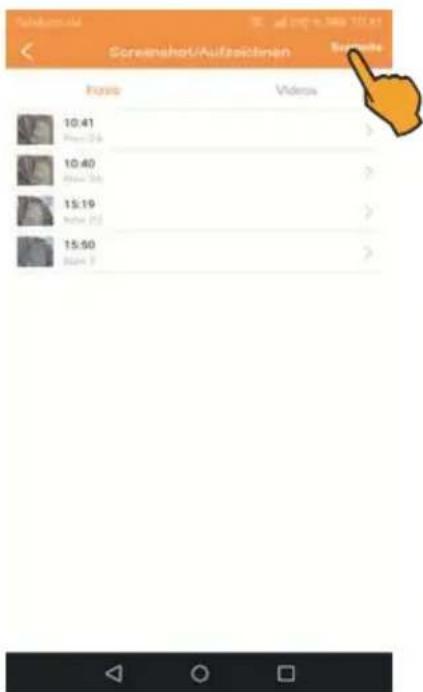
Tap Screenshot/Aufzeichnen (Screenshot/record), the folder including the taken photos automatically opens. Tap the respective thumbnail to display the photo.
natural_image
Exterior view of a modern building with wooden paneling and a potted plant on the ground (no signage)Deleting individual photos
Tap Bearbeiten (Edit). Check the photos to be deleted by tapping to place a checkmark and tap the wastebin icon. Tap Bestätigen (Confirm) to definitely delete the photos.
text_image
Screenshot/Aufesödnen Video 10:41 10:40 15:19 15:50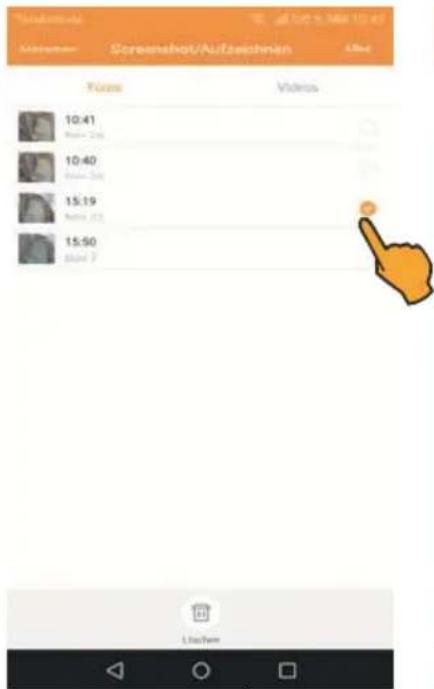
text_image
Museum Screenshop/Aufzschnen Füsse Videos 10:41 Video 26 10:40 Video 30 15:19 Video 13 15:50 Video 7 Lischen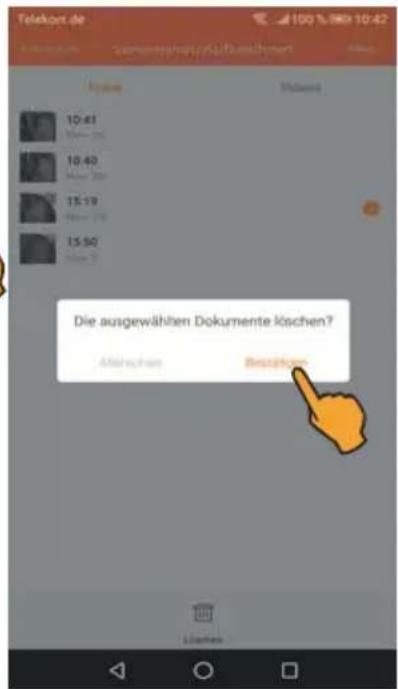
Viewing manual recordings
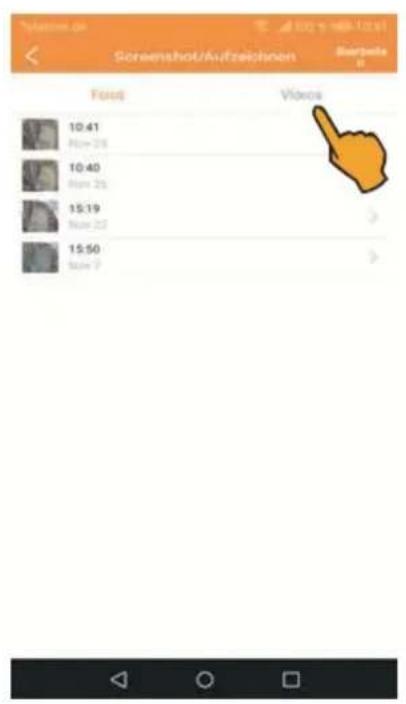
Tap the Video button and the folder including the recordings opens. Tap the thumbnail to view the recording.
text_image
Screenshot/Aufzeichnen Barbelle Foods Videos 10:41 low 28 10:40 low 25 15:19 low 22 15:50 low 7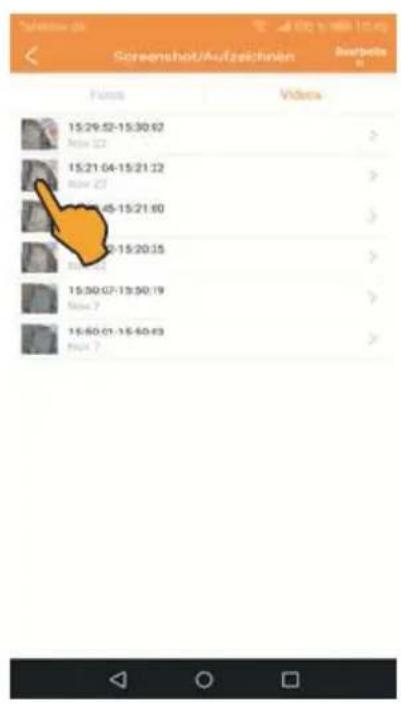
text_image
Screenshot/Aufzechnen Barbets Fores Videos 15:29:52-15:30:62 Movie 21 15:21 04:15:21:22 Movie 21 15:21 45:15:21:60 Movie 21 15:21 15:20:35 Movie 21 15:30:07-15:30:19 Movie 7 15:30:01-15:30:43 Movie 7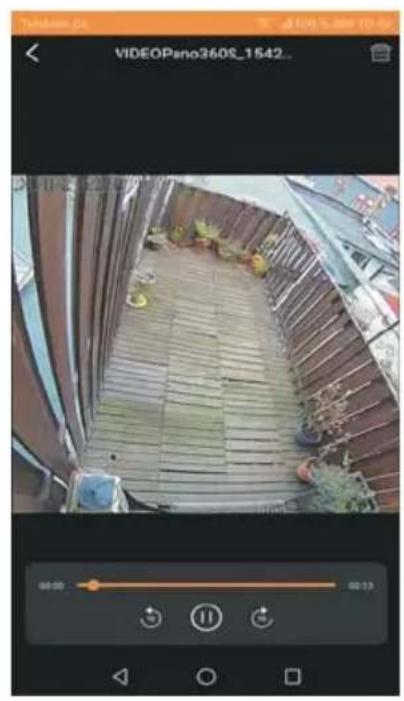
text_image
VIDEOPeno360€_1542.Deleting individual recordings
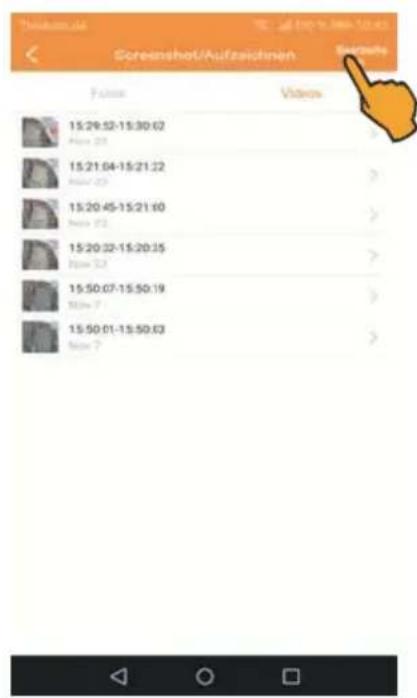
Tap Bearbeiten (Edit). Check the recording to be deleted by tapping to place a checkmark and tap the wastebin icon. Tap Bestätigen (Confirm) to definitely delete the recording.
text_image
Screenshot/Aufzeichnen Futue Videos 15:29:52-15:30:02 Now 22 15:21:04-15:21:22 Now 23 15:20:45-15:21:00 Now 22 15:20:32-15:20:35 Now 22 15:50:07-15:50:19 Now 7 15:50:01-15:50:03 Now 7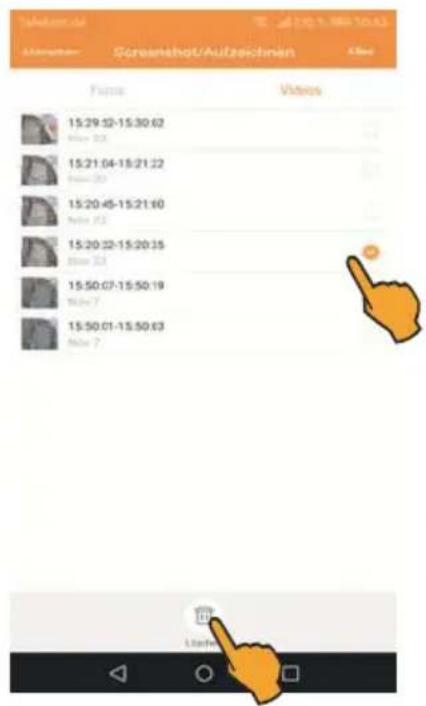
text_image
Telephone/Ad Userphone: Screenshot/Aufzechnen File Edit View 15:29:32-15:30:62 Date 23 15:21:04-15:21:22 Date 20 15:20:45-15:21:60 Date 23 15:20:22-15:20:35 Date 23 15:50:07-15:50:19 Date 7 15:50:01-15:50:63 Date 7 Listen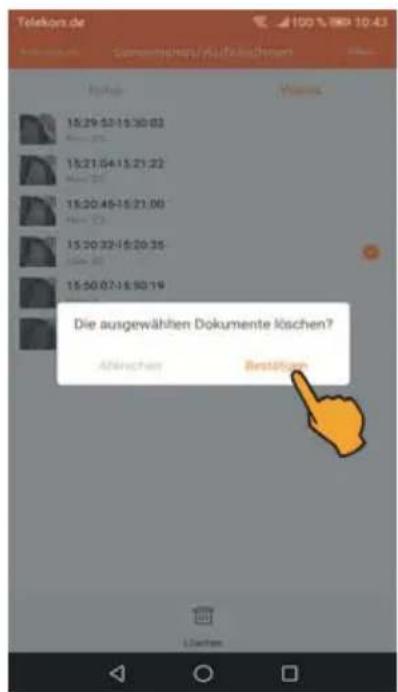
The following functions are available in the Setup menu:
Reminder of mobile phone network usage
Data network statistics
Automatic search for nearby devices
Reminder of mobile phone network usage
If your smartphone is connected to the mobile phone network and you activate the live image function of your camera, a message is displayed informing you that you use the mobile phone network and thus you data volume can be increased. Tap Weiter (Next) to continue.
Switching the reminder of mobile phone network usage on/off
Tap Setup. For activating this function, move the white dot to the right until the button has a green background. For deactivating the function, move the white dot to the left until the button is shown in white.
Data network statistics
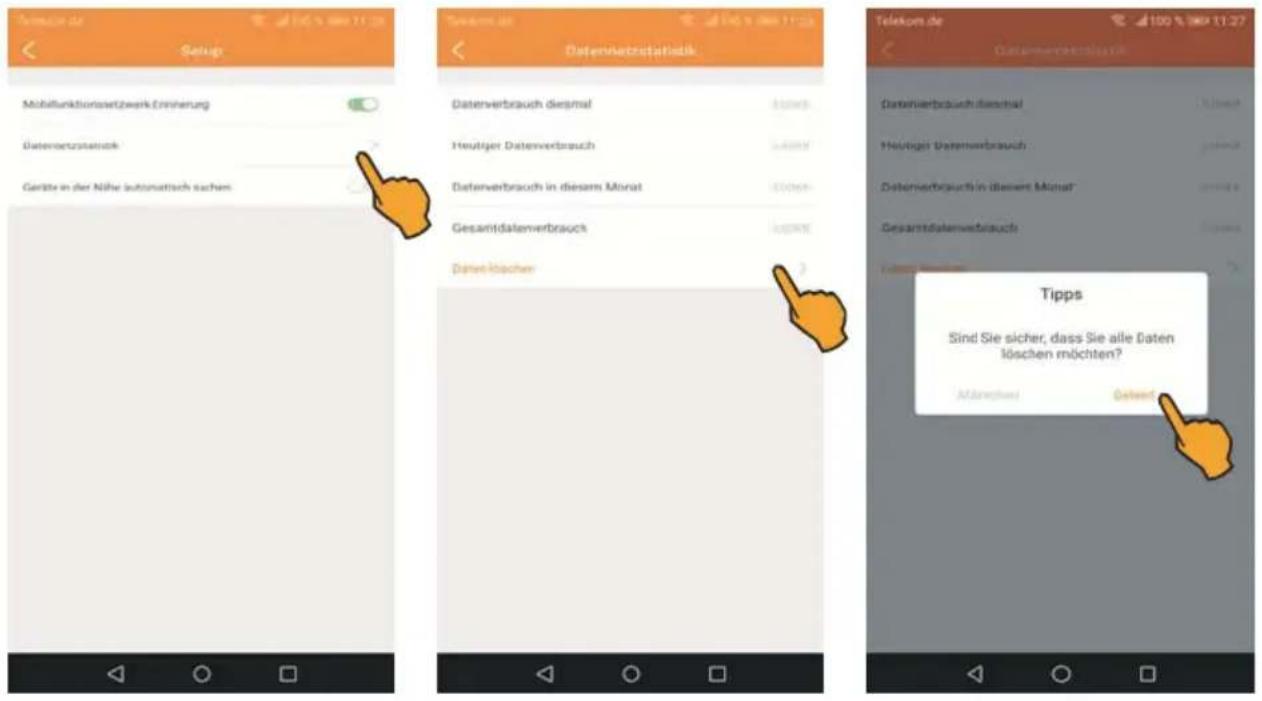
For checking the data volume used, tap the > icon. For deleting these data, tap the > icon under Daten löschen (Delete data). In the following message window, tap the "Geleert" (Deleted) button.
Automatic search for nearby devices
An activated camera is automatically detected and its ID number is displayed.
text_image
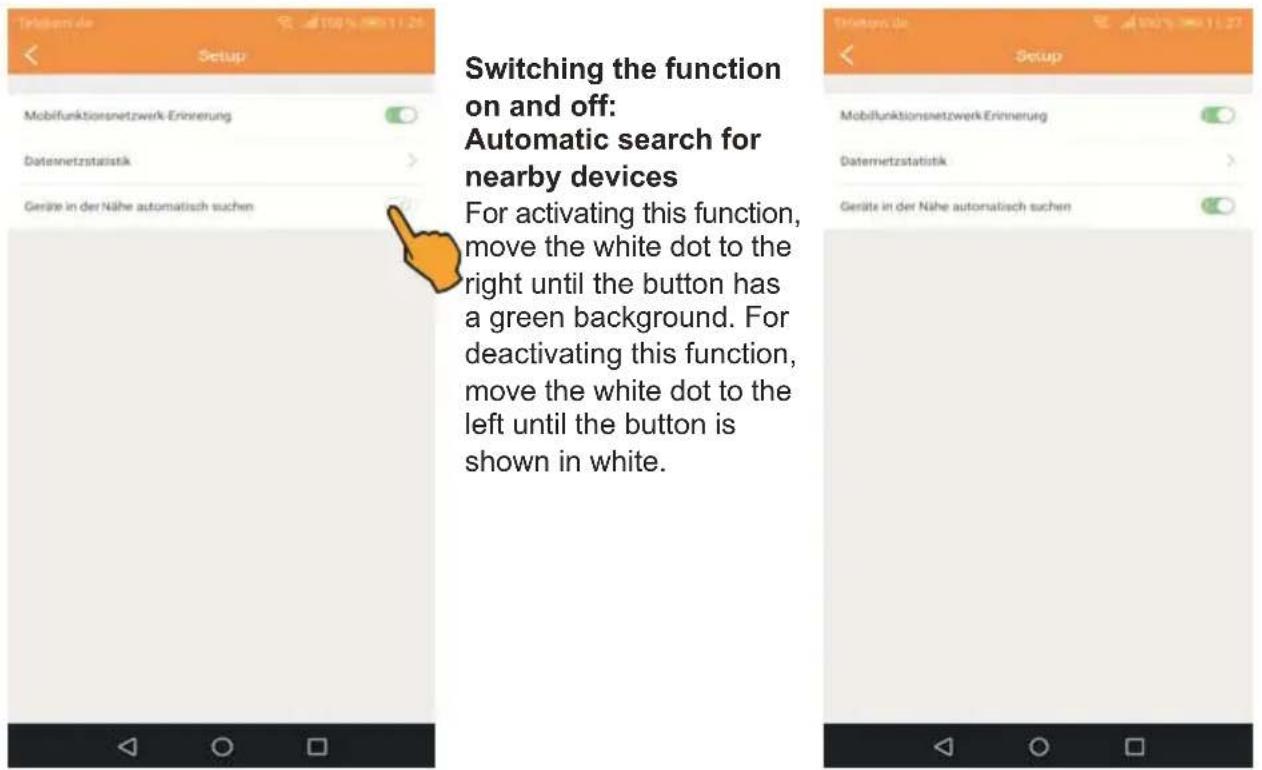
Switching the function on and off: Automatic search for nearby devices For activating this function, move the white dot to the right until the button has a green background. For deactivating this function, move the white dot to the left until the button is shown in white.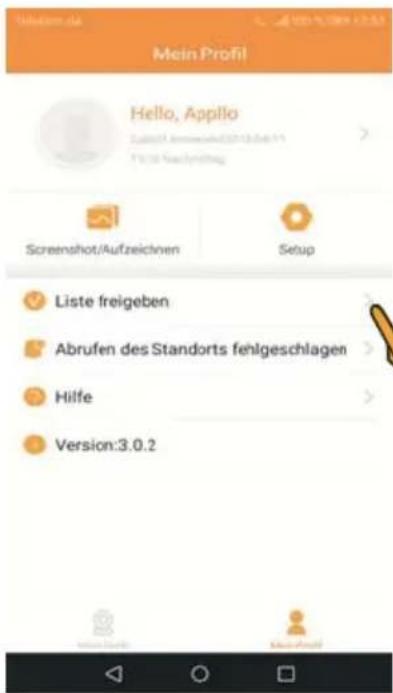
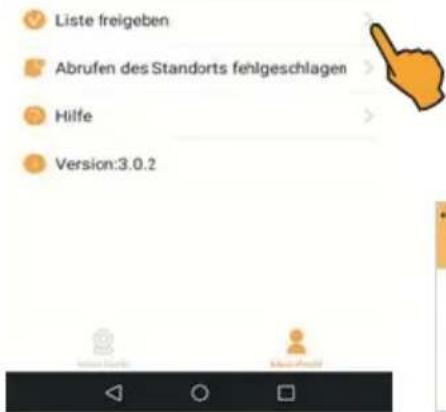
If you use the "Freigeben" (Release) function (see page 29) to allow a further account to access your camera, the camera and account are displayed in this listing.
Tap Liste freigeben (Release list). Your camera is displayed. Tap the > icon and the released account is displayed.
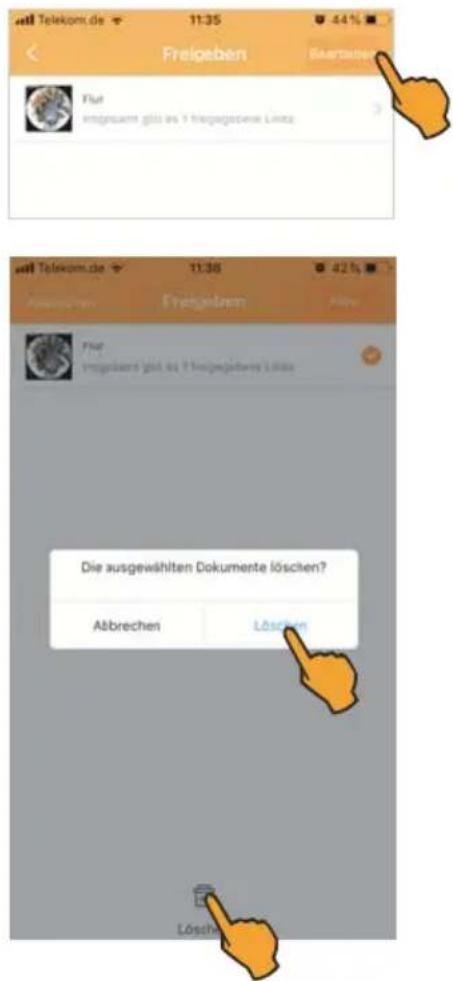
Deleting the released camera and account from the listing
Tap Bearbeiten (Edit). Mark the camera by placing a checkmark and tap the wastebin icon afterwards. Tap Löschen (Delete) to delete the camera.
Tap Bearbeiten (Edit). Mark the account by placing a checkmark and tap the wastebin icon afterwards. Tap Löschen (Delete) to delete the account.
Tap Abrufen des Standorts fehlgeschlagen (Location detection failed). For activating this function, move the white dot to the right until the button has a green background. For deactivating this function, move the white dot to the left until the button is shown in white.
Receiving notifications on your mobile device
When the camera detects a movement, a notification (push notification) is sent to your mobile device. Each notification is saved in addition.
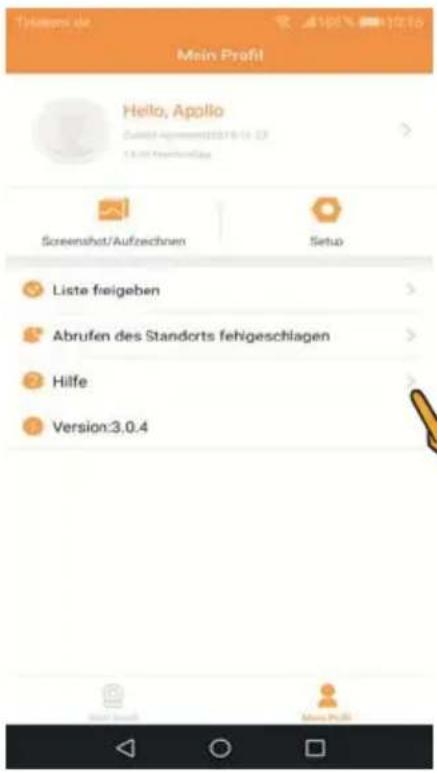
Displaying saved no- tifications
(Location detection failed). A list containing the number of currently triggered motion alarms plus the date and time is shown.
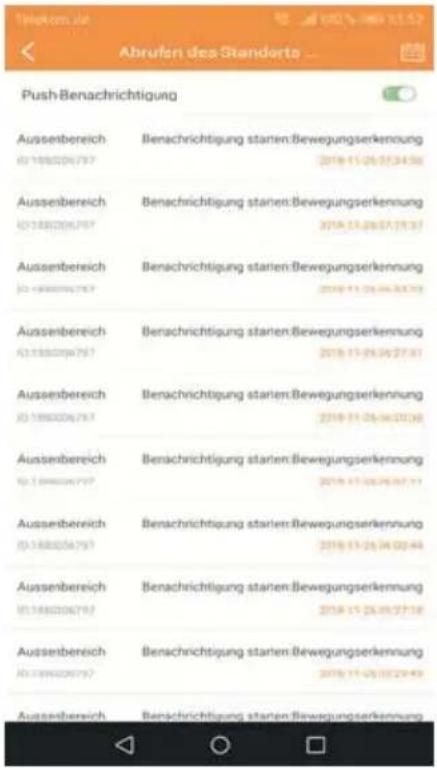
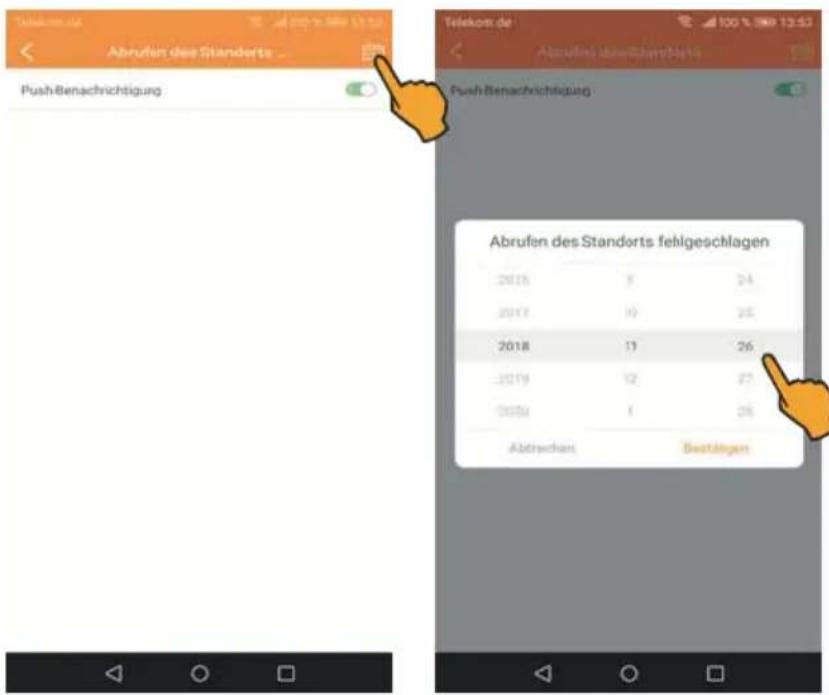
Use the calendar function to view the motion alarms triggered on the last days.
Tap the calendar icon. Set the day now and tap Bestätigen (Confirm). A list containing the number of currently triggered motion alarms plus the date and time is shown.
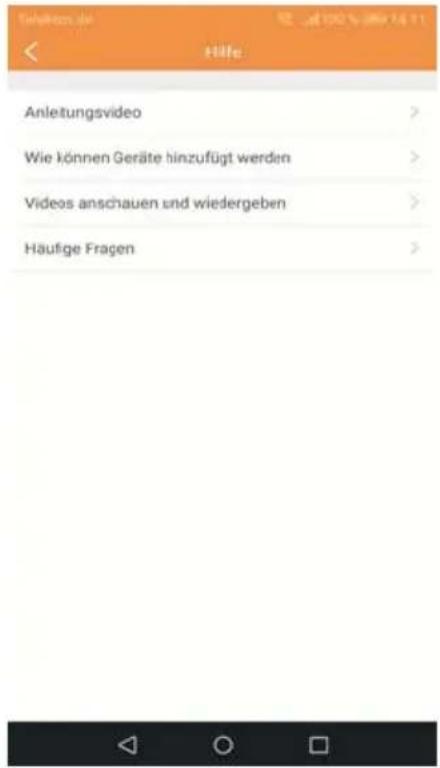
Different help files are available.
After successful login the welcome screen is shown. For activating the camera's live image, tap the Play icon.
The following functions are available:
■ + sign
■ ... Menu
Switchover between "Mein Gerät" (My device) and "Mein Profil" (My profile).
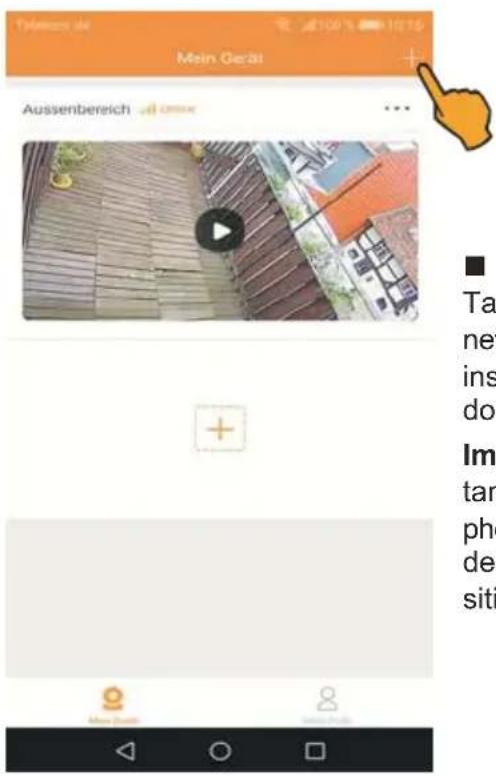
Tap the + sign to add a new camera. Observe the installation instructions to do so.
Important note: Important for Android mobile phones. Before adding the device, activate GPS/position determination!
■ ... Menu
For activating the menu, tap ...
The following three functions are available here:
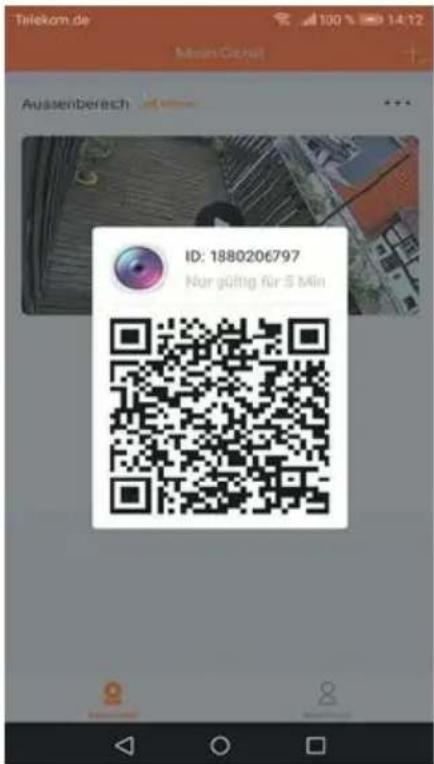
Thanks to this function, the camera can be released for another account. Open the app on another smartphone and log in to your account. Tap Gerät hinzufügen (Add device) using the Scannen (Scan) function.
Now tap Freigeben (Release) and the QR code is displayed. Scan it by means of the second smartphone. You can now use the second account to access the camera.
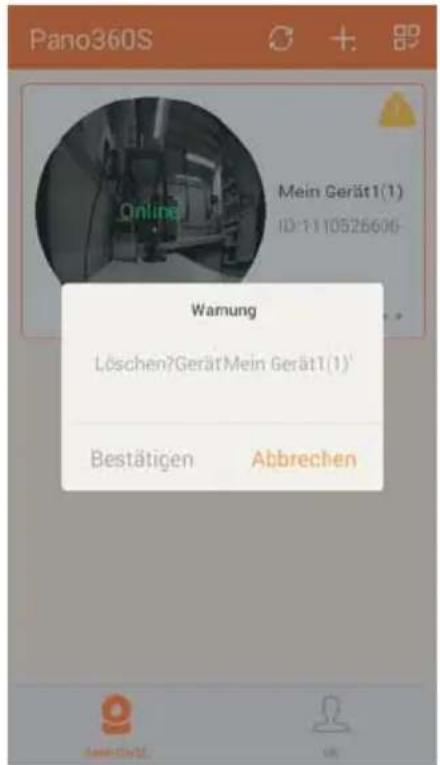
Tap Löschen, (Delete) if you wish to remove a camera from the app.
Tap Bestätigen (Confirm) to finish the delete process.
stabo WLAN outdoorcam\_fisheye HD
WiFi frequency 2.4-2.4835 GHz
WiFi security WPA/PSK
WiFi standard IEEE 802.11b/g/n
Image resolution 1920 x 1080 HD
Image sensor 14 " CMOS sensor
Angle of view (diagonal) 180°
Frame rate 25 fps
Objective Fish eye, f:1.44 mm
Alarm mode Motion detection
Operating voltage 12 V DC / 1A
Service temperature range - 15°C \~ 50°C
Vision at night 10-15 m.
Micro SD card slot
Dimensions
Dimensions/weight
max. 128 GB (card not included)
∅ 76 mm, height 120 mm
∅ 63 mm, length 102 mm (167 mm with foot), 285 g

Disposal instructions
Electric and electronic devices are not to be thrown into the domestic waste. Deliver devices that are out of order/used with a corresponding collecting point. Please contact your local authorities for corresponding information.
Notizen/Notes
Notizen/Notes
Notizen/Notes
Herstellergarantie
Errors and technical modification reserved, pictures may vary.