
TSU-471 - Sewing machine JUKI - Free user manual and instructions
Find the device manual for free TSU-471 JUKI in PDF.


| Product Type | Industrial Single-Needle Lockstitch Sewing Machine |
| Brand | Juki |
| Model | TSU-471 |
| Dimensions (approx.) | 60 cm x 30 cm x 50 cm (head only) |
| Weight (approx.) | 40 kg (head with motor) |
| Power Supply | Single-phase 220V, 50/60 Hz, 0.5 A |
| Max Sewing Speed | 5,000 stitches per minute |
| Max Stitch Length | 5 mm |
| Needle System | DBx1 (#14 to #23) |
| Thread Trimmer | Automatic, with solenoid activation |
| Presser Foot Lift | Manual lever and knee lift (optional) |
| Lubrication | Automatic wick system with oil pan |
| Safety Features | Finger guard over needle, safety clutch on handwheel |
| Typical Applications | Light to medium-weight fabrics, shirts, trousers, jeans |
| Maintenance | Daily: clean lint and oil specified points; weekly: check needle and thread tension; monthly: oil pan level |
| Spare Parts | Available through authorized Juki distributors (needles, bobbin cases, feed dogs, etc.) |
| Repairability | Modular design; repairs by qualified technician recommended; service manual available |
| Warranty | 1 year (varies by region; check with seller) |
| Included Accessories | One needle, three bobbins, screwdrivers, oil bottle |
Frequently Asked Questions - TSU-471 JUKI
User questions about TSU-471 JUKI
0 question about this device. Answer the ones you know or ask your own.
Ask a new question about this device
Download the instructions for your Sewing machine in PDF format for free! Find your manual TSU-471 - JUKI and take your electronic device back in hand. On this page are published all the documents necessary for the use of your device. TSU-471 by JUKI.
USER MANUAL TSU-471 JUKI
NOTE: Read safety instructions carefully and understand them before using.
Retain this Instruction Manual for future reference.

JUKI 株式会社
縫製機器ユニット
SEWING MACHINERY BUSINESS UNIT
2-11-1, TSURUMAKI, TAMA-SHI,
Copyright © 2012-2013 JUKI CORPORATION
• All rights reserved throughout the world.
Please do not hesitate to contact our distributors or agents in your area for further information when necessary.
* The description covered in this instruction manual is subject to change for improvement of the commodity without notice.
日本語
安全にご使用していただくために
2. 糸立装置の取り付け
3. はずみ車の取り付け
★縫い目長さの調節
★下糸張力の調節
下糸張力を調節するには、
★釜の引き位置
★針棒の高さ
針とトンビのすきまを調整するには、
[針と釜剣先のすきま調整方法の目安]
★送り足の前後位置の調整
★送り足と押え中足の交互上下運動量
★送り足の送り量調節
TO ENSURE SAFE USE OF YOUR SEWING MACHINE
For the sewing machine, automatic machine and ancillary devices (hereinafter collectively referred to as "machine"), it is inevitable to conduct sewing work near moving parts of the machine. This means that there is always a possibility of unintentionally coming in contact with the moving parts. Operators who actually operate the machine and maintenance personnel who are involved in maintenance and repair of the machine are strongly recommended to carefully read to fully understand the following SAFETY PRECAUTIONS before using/maintaining the machine. The content of the SAFETY PRECAUTIONS includes items which are not contained in the specifications of your product.
The risk indications are classified into the following three different categories to help understand the meaning of the labels. Be sure to fully understand the following description and strictly observe the instructions.
( I ) Explanation of risk levels

DANGER :
This indication is given where there is an immediate danger of death or serous injury if the person in charge or any third party mishandles the machine or does not avoid the dangerous situation when operating or maintaining the machine.

WARNING :
This indication is given where there is a potentiality for death or serious injury if the person in charge or any third party mishandles the machine or does not avoid the dangerous situation when operating or maintaining the machine.

CAUTION :
This indication is given where there is a danger of medium to minor injury if the person in charge or any third party mishandles the machine or does not avoid the dangerous situation when operating or maintaining the machine.

Items requiring special attention.
(II) Explanation of pictorial warning indications and warning labels
| Pictorial warning indication |  | There is a risk of injury if contact-ing a moving section. | Pictorial warning indication |  | Be aware that holding the sewing machine during operation can hurt your hands. |
 | There is a risk of electrical shock if contacting a high-voltage section. |  | There is a risk of entanglement in the belt resulting in injury. | ||
 | There is a risk of a burn if contact-ing a high-temperature section. |  | There is a risk of injury if you touch the button carrier. | ||
 | Be aware that eye deficiency can be caused by looking directly at the laser beam. | Indication label | 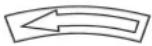 | The correct direction is indicated. | |
 | There is a risk of contact between your head and the sewing ma-chine. |  | Connection of a earth cable is indicated. |
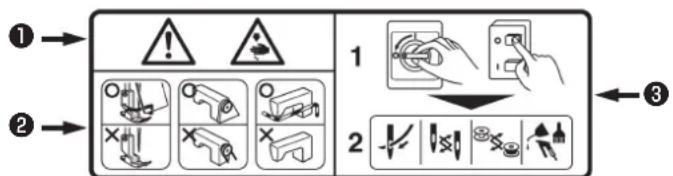
- There is the possibility that slight to serious injury or death may be caused. - There is the possibility that injury may be caused by touching moving part.
②• To perform sewing work with safety guard.
• To perform sewing work with safety cover.
• To perform sewing work with safety protection device.
③ • Be sure to turn the power OFF before carrying out "machine-head threading", "needle changing", "bobbin changing" or "oiling and cleaning".
- When it is necessary to open the control box containing electrical parts, be sure to turn the power off and wait for five minutes or more before opening the cover in order to prevent accident leading to electrical shock.

CAUTION
Basic precaution
- Be sure to read the instruction manual and other explanatory documents supplied with accessories of the machine before using the machine. Carefully keep the instruction manual and the explanatory documents at hand for quick reference.
- The content of this section includes items which are not contained in the specifications of your product.
- Be sure to wear safety goggles to protect against accident caused by needle breakage.
- Those who use a heart pacer have to use the machine after consultation with a medical specialist.
Safety devices and warning labels
- Be sure to operate the machine after verifying that safety device(s) is correctly installed in place and works normally in order to prevent accident caused by lack of the device(s).
- If any of the safety devices is removed, be sure to replace it and verify that it works normally in order to prevent accident that can result in personal injury or death.
- Be sure to keep the warning labels adhered on the machine clearly visible in order to prevent accident that can result in personal injury or death. If any of the labels has stained or come unstuck, be sure to change it with a new one.
Application and modification
- Never use the machine for any application other than its intended one and in any manner other than that prescribed in the instruction manual in order to prevent accident that can result in personal injury or death. JUKI assumes no responsibility for damages or personal injury or death resulting from the use of the machine for any application other than the intended one.
- Never modify and alter the machine in order to prevent accident that can result in personal injury or death. JUKI assumes no responsibility for damages or personal injury or death resulting from the machine which has been modified or altered.
Education and training
- In order to prevent accident resulting from unfamiliarity with the machine, the machine has to be used only by the operator who has been trained/educated by the employer with respect to the machine operation and how to operate the machine with safety to acquire adequate knowledge and operation skill. To ensure the above, the employer has to establish an education/training plan for the operators and educate/train them beforehand.
Items for which the power to the machine has to be turned off
Turning the power off: Turning the power switch off, then removing the power plug from the outlet. This applies to the following.
- Be sure to immediately turn the power off if any abnormality or failure is found or in the case of power failure in order to protect against accident that can result in personal injury or death.
- To protect against accident resulting from abrupt start of the machine, be sure to carry out the following operations after turning the power off. For the machine incorporating a clutch motor, in particular, be sure to carry out the following operations after turning the power off and verifying that the machine stops completely.
2-1. For example, threading the parts such as the needle, looper, spreader etc. which have to be threaded, or changing the bobbin.
2-2. For example, changing or adjusting all component parts of the machine.
2-3. For example, when inspecting, repairing or cleaning the machine or leaving the machine.
-
Be sure to remove the power plug by holding the plug section instead of the cord section in order to prevent electrical-shock, earth-leakage or fire accident.
-
Be sure to turn the power off whenever the machine is left unattended between works.
-
Be sure to turn the power off in the case of power failure in order to prevent accident resulting of breakage of electrical components.
PRECAUTIONS TO BE TAKEN IN VARIOUS OPERATION STAGES
Transportation
- Be sure to lift and move the machine in a safe manner taking the machine weight in consideration. Refer to the text of the instruction manual for the mass of the machine.
- Be sure to take sufficient safety measures to prevent falling or dropping before lifting or moving the machine in order to protect against accident that can result in personal injury or death.
- Once the machine has been unpacked, never re-pack it for transportation to protect the machine against breakage resulting from unexpected accident or dropping.
Unpacking
- Be sure to unpack the machine in the prescribed order in order to prevent accident that can result in personal injury or death. In the case the machine is crated, in particular, be sure to carefully check nails. The nails have to be removed.
- Be sure to check the machine for the position of its center of gravity and take it out from the package carefully in order to prevent accident that can result in personal injury or death.
Installation
(I) Table and table stand
- Be sure to use JUKI genuine table and table stand in order to prevent accident that can result in personal injury or death. If it is inevitable to use a table and table stand which are not JUKI genuine ones, select the table and table stand which are able to support the machine weight and reaction force during operation.
- If casters are fitted to the table stand, be sure to use the casters with a locking mechanism and lock them to secure the machine during the operation, maintenance, inspection and repair in order to prevent accident that can result in personal injury or death.
(II) Cable and wiring
- Be sure to prevent an extra force from being applied to the cable during the use in order to prevent electrical-shock, earth-leakage or fire accident. In addition, if it is necessary to cable near the operating section such as the V-belt, be sure to provide a space of 30 mm or more between the operating section and the cable.
- Be sure to avoid starburst connection in order to prevent electrical-shock, earth-leakage or fire accident.
- Be sure to securely connect the connectors in order to prevent electrical-shock, earth-leakage or fire accident. In addition, be sure to remove the connector while holding its connector section.
(III) Grounding
-
Be sure to have an electrical expert install an appropriate power plug in order to prevent accident caused by earth-leakage or dielectric strength voltage fault. In addition, be sure to connect the power plug to the grounded outlet without exceptions.
-
Be sure to ground the earth cable in order to prevent accident caused by earth leakage.
(IV) Motor
- Be sure to use the specified rated motor (JUKI genuine product) in order to prevent accident caused by burnout.
- If a commercially available clutch motor is used with the machine, be sure to select one with an entanglement preventive pulley cover in order to protect against being entangled by the V-belt.
Before operation
- Be sure to make sure that the connectors and cables are free from damage, dropout and looseness before turning the power on in order to prevent accident resulting in personal injury or death.
- Never put your hand into the moving sections of the machine in order to prevent accident that can result in personal injury or death.
In addition, check to be sure that the direction of rotation of the pulley agrees with the arrow shown on pulley. - If the table stand with casters is used, be sure to secure the table stand by locking the casters or with adjusters, if provided, in order to protect against accident caused by abrupt start of the machine.
During operation
- Be sure not to put your fingers, hair or clothing close to the moving sections such as the handwheel, hand pulley and motor or place something near those sections while the machine is in operation in order to prevent accident caused by entanglement that can result in personal injury or death.
- Be sure not to place your fingers near the surround area of the needle or inside the thread take-up lever cover when turning the power on or while the machine is in operation in order to prevent accident that can result in personal injury or death.
- The machine runs at a high speed. Never bring your hands near the moving sections such as looper, spreader, needle bar, hook and cloth trimming knife during operation in order to protect your hands against injury. In addition, be sure to turn the power off and check to be sure that the machine completely stops before changing the thread.
-
Be careful not to allow your fingers or any other parts of your body to be caught between the machine and table when removing the machine from or replacing it on the table in order to prevent accident that can result in personal injury or death.
-
Be sure to turn the power off and check to be sure that the machine and motor completely stop before removing the belt cover and V-belt in order to prevent accident caused by abrupt start of the machine or motor.
- If a servomotor is used with the machine, the motor does not produce noise while the machine is at rest. Be sure not to forget to turn the power off in order to prevent accident caused by abrupt start of the motor.
- Never use the machine with the cooling opening of the motor power box shielded in order to prevent fire accident by overheat.
Lubrication
- Be sure to use JUKI genuine oil and JUKI genuine grease to the parts to be lubricated.
- If the oil adheres on your eye or body, be sure to immediately wash it off in order to prevent inflammation or irritation.
- If the oil is swallowed unintentionally, be sure to immediately consult a medical doctor in order to prevent diarrhea or vomiting.
Maintenance
- In prevention of accident caused by unfamiliarity with the machine, repair and adjustment has to be carried out by a service technician who is thoroughly familiar with the machine within the scope defined in the instruction manual. Be sure to use JUKI genuine parts when replacing any of the machine parts. JUKI assumes no responsibility for any accident caused by improper repair or adjustment or the use of any part other than JUKI genuine one.
- In prevention of accident caused by unfamiliarity with the machine or electrical-shock accident, be sure to ask an electrical technician of your company or JUKI or distributor in your area for repair and maintenance (including wiring) of electrical components.
- When carrying out repair or maintenance of the machine which uses air-driven parts such as an air cylinder, be sure to remove the air supply pipe to expel air remaining in the machine beforehand, in order to prevent accident caused by abrupt start of the air-driven parts.
- Be sure to check that screws and nuts are free from looseness after completion of repair, adjustment and part replacement.
- Be sure to periodically clean up the machine during its duration of use. Be sure to turn the power off and verify that the machine and motor stop completely before cleaning the machine in order to prevent accident caused by abrupt start of the machine or motor.
- Be sure to turn the power off and verify that the machine and motor stop completely before carrying out maintenance, inspection or repair of the machine. (For the machine with a clutch motor, the motor will keep running for a while by inertia even after turning the power off. So, be careful.)
- If the machine cannot be normally operated after repair or adjustment, immediately stop operation and contact JUKI or the distributor in your area for repair in order to prevent accident that can result in personal injury or death.
- If the fuse has blown, be sure to turn the power off and eliminate the cause of blowing of the fuse and replace the blown fuse with a new one in order to prevent accident that can result in personal injury or death.
- Be sure to periodically clean up the air vent of the fan and inspect the area around the wiring in order to prevent fire accident of the motor.
Operating environment
- Be sure to use the machine under the environment which is not affected by strong noise source (electromagnetic waves) such as a high-frequency welder in order to prevent accident caused by malfunction of the machine.
- Never operate the machine in any place where the voltage fluctuates by more than "rated voltage ± 10% in order to prevent accident caused by malfunction of the machine.
- Be sure to verify that the air-driven device such as an air cylinder operates at the specified air pressure before using it in order to prevent accident caused by malfunction of the machine.
- To use the machine with safety, be sure to use it under the environment which satisfies the following conditions:
Ambient temperature during operation 5°C to 35°C
Relative humidity during operation 35 % to 85 %
- Dew condensation can occur if bringing the machine suddenly from a cold environment to a warm one. So, be sure to turn the power on after having waited for a sufficient period of time until there is no sign of water droplet in order to prevent accident caused by breakage or malfunction of the electrical components.
- Be sure to stop operation when lightning flashes for the sake of safety and remove the power plug in order to prevent accident caused by breakage or malfunction of the electrical components.
- Depending on the radio wave signal condition, the machine may generate noise in the TV or radio. If this occurs, use the TV or radio with kept well away from the machine.
- In order to ensure the work environment, local laws and regulations in the country where the sewing machine is installed shall be followed. In the case the noise control is necessary, an ear protector or other protective gear should be worn according to the applicable laws and regulations.
- Disposal of products and packages and treatment of used lubricating oil should be carried out properly according to the relevant laws of the country in which the sewing machine is used.
Precautions to be taken so as to use the TSH-411 and TSU-471 more safely
 | 1. Keep your hands away from needle when you turn ON the power switch or while the machine is in operation.2. Do not put your fingers into the thread take-up cover while the machine is operating.3. Turn OFF the power switch when removing the belt cover or the V belt.4. During operation, be careful not to allow your or any other person's head, hands or clothes to come close to the handwheel and the thread take-up. Also, do not place anything close to them.5. Do not operate your machine with the belt cover and finger guard removed. |
 | 1. To ensure safety, never operate the machine with the ground wire for the power supply removed.2. When inserting/removing the power plug, the power switch has to be turned OFF in advance.3. In time of thunder and lightening, stop your work and disconnect the power plug from the receptacle so as to ensure safety.4. If the machine is suddenly moved from a cold place to a warm place, dew condensation may be observed. In this case, turn ON the power to the machine after you have confirmed that there is no danger of water drops in the machine.5. To prevent fires, periodically draw out the power plug from the plug socket and clean the root of the pins and the space between pins.6. The hook rotates at a high speed while the machine is in operation.To prevent possible injury to hands, be sure to keep your hands away from the vicinity of the hook during operation. In addition, be sure to turn OFF the power to the machine when replacing the bobbin.7. To avoid possible accidents due to abrupt start of the machine, be sure to turn OFF the power to the machine.8. Be careful of handling this product so as not to pour water or oil, shock by dropping, and the like since this product is a precision instrument. |

CAUTION : Check the following so as to prevent maloperation of and damage to the machine.
- Before you put the machine into operation for the first time after the set-up, clean it thoroughly. Remove all dust gathering during transportation and oil it well.
- Confirm that voltage has been correctly set. Confirm that the power plug has been properly connected to the power supply.
- Never use the machine in the state where the voltage type is different from the designated one.
- The direction of normal rotation of the machine is counterclockwise as observed from the pulley side.
Take care not to allow the machine to rotate in the reverse direction.
- Never operate the machine unless the sewing machine have been filled with oil.
• For a test run, remove the bobbin and the needle thread. - For the first month, decrease the sewing speed and run the sewing machine at a speed of 600 sti/min or less.
- Operate the handwheel after the machine has totally stopped.

CAUTION : Note that safety devices such as “eye guard”, “finger guard”, etc. may be omitted from the illustrations in this Instruction Manual for easy explanation. When operating the machine, be sure not to remove these safety devices.
CONTENTS
SPECIFICATIONS....1
- INSTALLING THE MACHINE .... 1
- INSTALLING THE THREAD STAND....1
- INSTALLING THE HANDWHEEL....1
- INSTALLING THE BELT COVER....2
- ADJUSTING THE BELT TENSION ...... 2
- CLEANING....2
- LUBRICATION .... 3
- HOW TO INSTALL THE NEEDLE ....4
- HOW TO TAKE OUT THE BOBBIN 4
- HOW TO WIND A BOBBIN THREAD....5
- HOW TO INSTALL THE BOBBIN....5
- HOW TO THREAD THE MACHINE HEAD......6
- ADJUSTING THE STITCH LENGTH AND REVERSE STITCHING......6
- THREAD TENSION....7
- THREAD TAKE-UP SPRING 7
- ADJUSTING THE PRESSER FOOT PRESSURE....8
- ADJUSTING THE HEIGHT OF THE FEED DOG 8
- ADJUSTING THE NEEDLE-TO-SHUTTLE RELATIONSHIP....9
- ADJUSTING THE WALKING FOOT AND THE PRESSER FOOT (THIS ITEM IS ONLY APPLIED TO THE TSU-471.) 12
- THE FEED DOG-TO-NEEDLE RELATIONSHIP .... 13
- MOTOR PULLEY AND SEWING SPEED....13
- TROUBLES AND CORRECTIVE MEASURES 14
SPECIFICATIONS
| Stitch system TSH-4 | 1: 1-needle, bottom feed, long cylinder bed, lockstitch machine for extra heavy-weight materials with a semi-rotary large-capacity shuttleTSU-471: 1-needle, top & bottom feed, long cylinder bed, lockstitch machine for extra heavy-weight materials with a semi-rotary large-capacity shuttle | Thread take-up lever Cam-type thread take-up lever | |
| Needle bar stroke 56 mm | |||
| Needle to be used Schmetz 794 | |||
| Needle system Nm 130 to Nm 280 (standard: Nm 230) | |||
| Thread #00 to #8 | |||
| Stitch adjusting method Lever nut type | |||
| Usage Pouches, bags | shoes, bag handles, safety belts, etc. Lubrication method | Hand oiling | |
| Sewing speed | Max. 800 sti/min | Motor to be used | 3-phase/single phase 400W clutch motor (4P) |
| Stitch length | Max. 11 mm | Oil to be used | JUKI New defrix oil No.1 |
| Lift of presser foot | Hand lifter 12 mm, Knee lifter 20 mm | ||
| Noise | - Equivalent continuous emission sound pressure level ( L_pA ) at the workstation:A-weighted value of 76.5 dB; (Includes K_pA = 2.5 dB); according to ISO 10821-C.6.2 -ISO 11204 GR2 at 800 sti/min. | ||
1. INSTALLING THE MACHINE
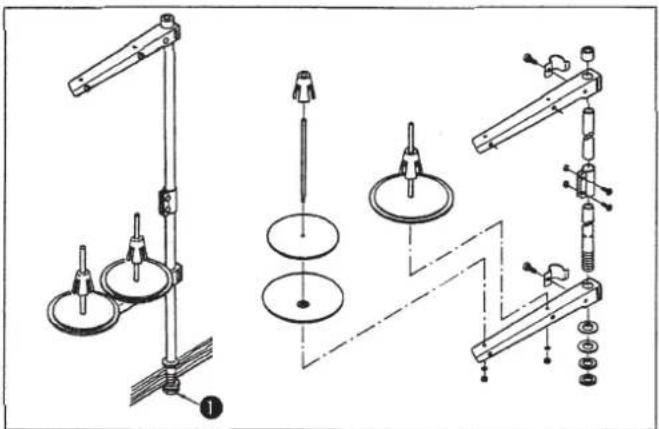
2. INSTALLING THE THREAD STAND
natural_image
Technical line drawing of mechanical tools and components (no text or symbols)- Carry the sewing machine with two persons.
(Caution) Do not hold the main shaft. - Do not put protruding articles such as the screwdriver and the like at the location where the sewing machine is placed.
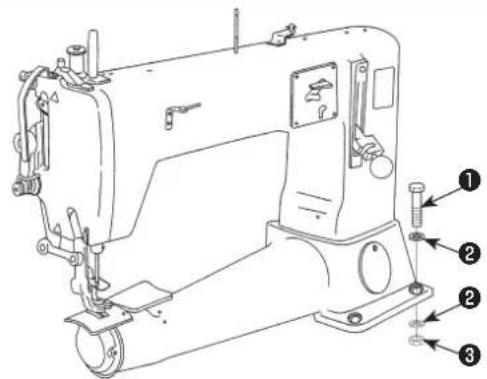
- Place the sewing machine on the table aligning the mounting holes in the former with those in the latter.
-
Pass hexagonal head bolts ① and washers 2 through four mounting holes in the sewing machine and fix them with washers ② and nuts ③ from the underside of the table.
-
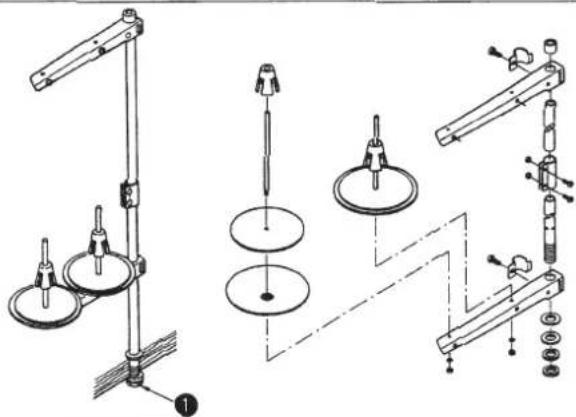
Assemble the thread stand unit, and insert it in the hole in the machine table.
- Tighten locknut ① to fix the thread stand.
3. INSTALLING THE HANDWHEEL

WARNING :
To avoid possible personal injury due to abrupt start of the machine, turn off the power to the machine and check to be sure that the motor has totally stopped rotating in prior.
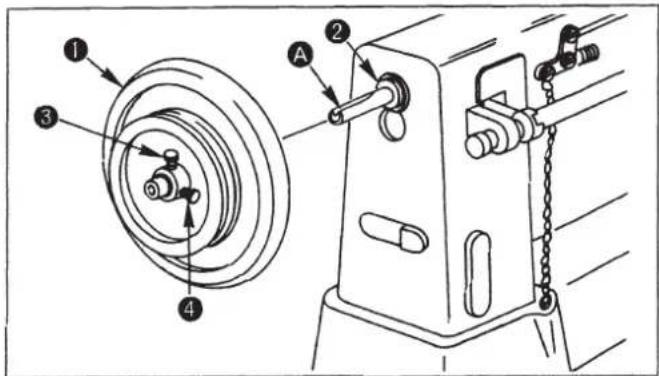
- Fit handwheel ① close to the main shaft bushing, rear ②.
- Align the handwheel with thread groove A in the main shaft. Tighten the first screw ③ of the handwheel, then tighten screw ④.
4. INSTALLING THE BELT COVER

WARNING :
To avoid possible personal injury due to abrupt start of the machine, turn off the power to the machine and check to be sure that the motor has totally stopped rotating in prior.
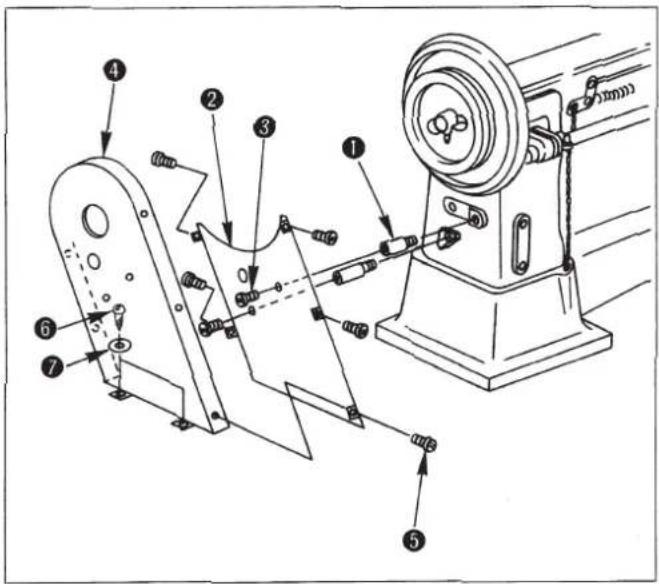
- Install two belt cover supports ① to the machine arm.
- Install belt cover B ② to belt cover supports ① using screws ③.
- Hook the V belt on the handwheel.
- Attach belt cover A ④ to belt cover B ② using screws ⑤.
- Fix belt cover A ④ on the table using wooden screw ⑥ and washer ⑦.
5. ADJUSTING THE BELT TENSION

WARNING :
To avoid possible personal injury due to abrupt start of the machine, turn off the power to the machine and check to be sure that the motor has totally stopped rotating in prior.
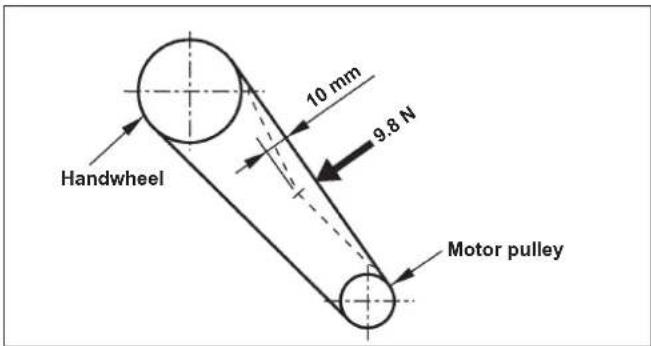
Adjust the belt tension with the height of the motor so that the belt sags 10 mm when the center of V belt is applied with a 9.8 N load.
6. CLEANING

WARNING :
To avoid possible personal injury due to abrupt start of the machine, turn off the power to the machine and check to be sure that the motor has totally stopped rotating in prior.
Waste thread, dust, dirt, etc., build-up around the feed dog or the shuttle may cause malfunction of the machine.
Clean periodically according to your frequency of use.
- Clean around the feed dog after removing the throat plate.
- Clean the inside of the shuttle race body by taking out the shuttle body after removing the cover of the shuttle race body.
7. LUBRICATION

WARNING :
To avoid possible personal injury due to abrupt start of the machine, turn off the power to the machine and check to be sure that the motor has totally stopped rotating in prior.
-
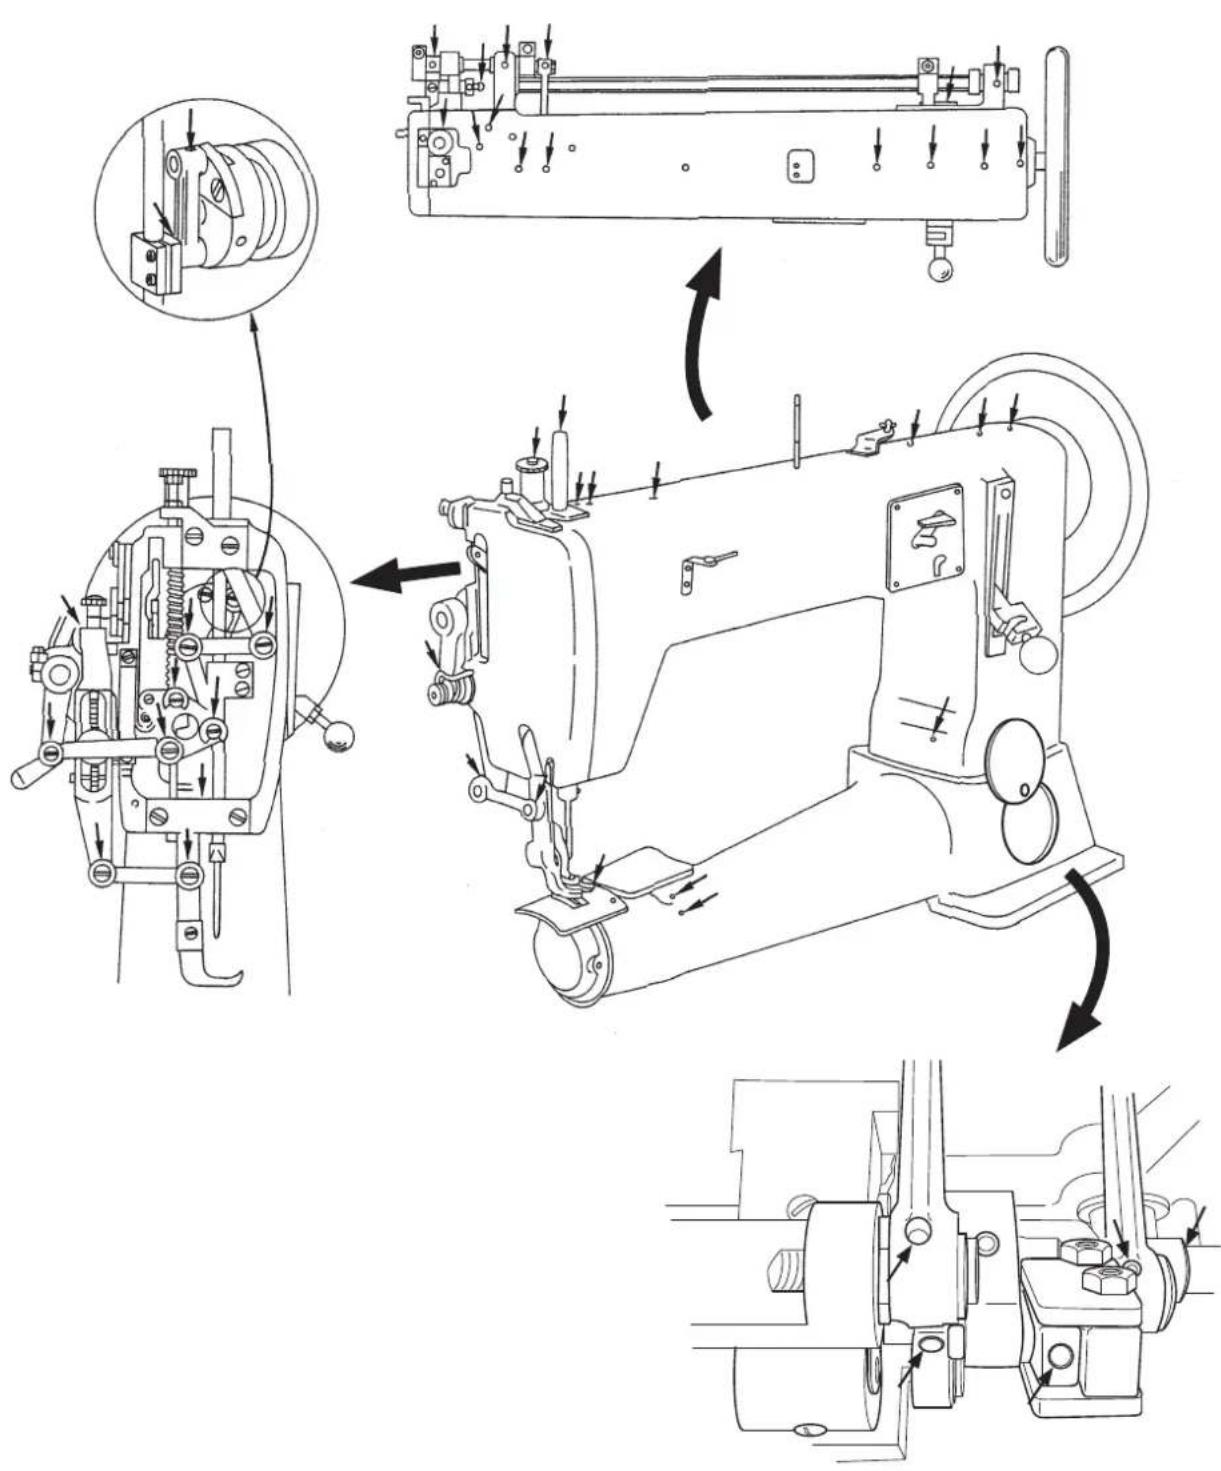
After uncrating, supply oil to the machine after cleaning it thoroughly.
-
When oiling all the sections requiring lubrication, after installation of the machine has been completed, wait for a while (approximately 10 minutes) so that oil can penetrate each section sufficiently before starting continuous operation.
-
To operate the machine continuously, apply two to three drops of oil to each section noted with an arrow mark in the figure whenever starting operation in the morning and in the afternoon.
(Caution) Use JUKI New Defrix Oil No. 1.
8. HOW TO INSTALL THE NEEDLE

WARNING :
To avoid possible personal injury due to abrupt start of the machine, turn off the power to the machine and check to be sure that the motor has totally stopped rotating in prior.
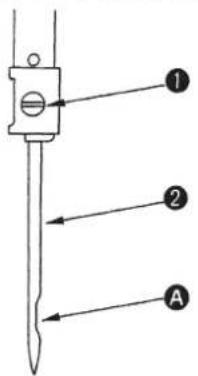
The standard needle is a Schmetz 794, however an Organ DY x 3 can be used.
- Turn the handwheel by hand and raise the needle bar to its top position.
- Loosen screw ① and insert the needle ② into the hole until it will go no further.
(Insert the needle with its recess A facing directly to the right-hand side.)
- Securely tighten the screw in the needle.
9. HOW TO TAKE OUT THE BOBBIN

WARNING :
To avoid possible personal injury due to abrupt start of the machine, turn off the power to the machine and check to be sure that the motor has totally stopped rotating in prior.
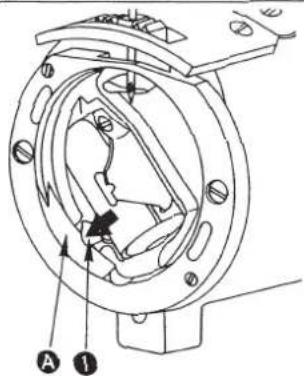
Turn the handwheel by hand until the lowest position of the needle bar is reached so that spring ① in the bobbin case stopper comes to indented section A of the shuttle race.
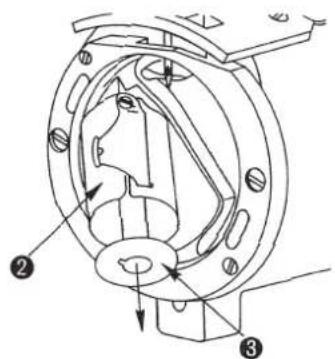
When the case retaining spring is pressed, the bobbin case ② will be opened and the bobbin ③ will pop out of the case.
10. HOW TO WIND A BOBBIN THREAD
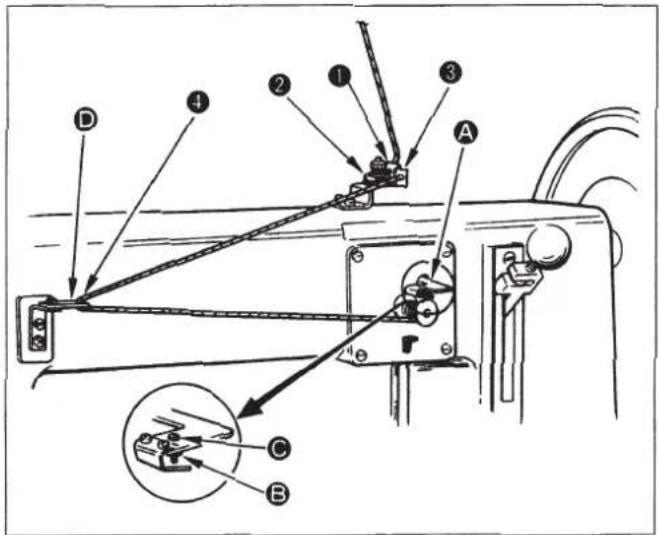
- Raise the presser foot by the hand lifter lever.
- Insert the bobbin into the bobbin winder spindle.
- Thread the winder in the order illustrated and wind the thread onto the bobbin four or five turns.
- Push the bobbin winder trip latch A down and the bobbin starts rotating to wind bobbin thread with the machine operated.
- When winding of bobbin thread has been completed, the bobbin winder trip latch will be disengaged and the bobbin will stop automatically.
★ Adjusting the amount of thread wound round the bobbin
That amount of thread has already been adjusted so that thread can be wound round approximately nine-tenths of the bobbin. If the amount is excessive or insufficient, adjust:
- by loosening the adjusting screw and nut ☑.
- by turning the adjusting screw Ⓐ. To decrease the amount, turn clockwise. To increase the amount, turn counterclockwise.
- After adjusting the amount, of thread has been completed, tighten the nut to secure firmly.
★ If bobbin thread is wound unevenly, move the bobbin winder thread guide D forward and backward so that thread can be wound evenly.
11. HOW TO INSTALL THE BOBBIN

WARNING :
To avoid possible personal injury due to abrupt start of the machine, turn off the power to the machine and check to be sure that the motor has totally stopped rotating in prior.
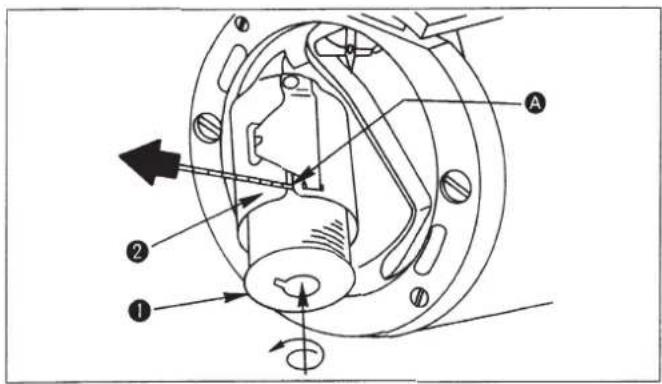
- After pulling out thread approximately 10 cm from bobbin ①, put the bobbin into bobbin case ②.
- Pass the thread through the threading groove A in the bobbin case.
(Caution) Fit the bobbin in the bobbin case so that the bobbin turns in the direction of the arrow when the bobbin thread is pulled.
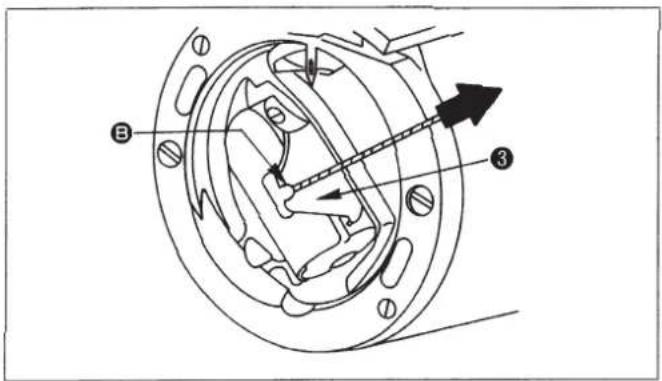
- Pass the thread through thread slit ③ and pull it up. Then the thread can be passed under the thread tension spring ③ and pulled out.
- Push the bobbin case into the original position of holding the bobbin.
12. HOW TO THREAD THE MACHINE HEAD

WARNING :
To avoid possible personal injury due to abrupt start of the machine, turn off the power to the machine and check to be sure that the motor has totally stopped rotating in prior.
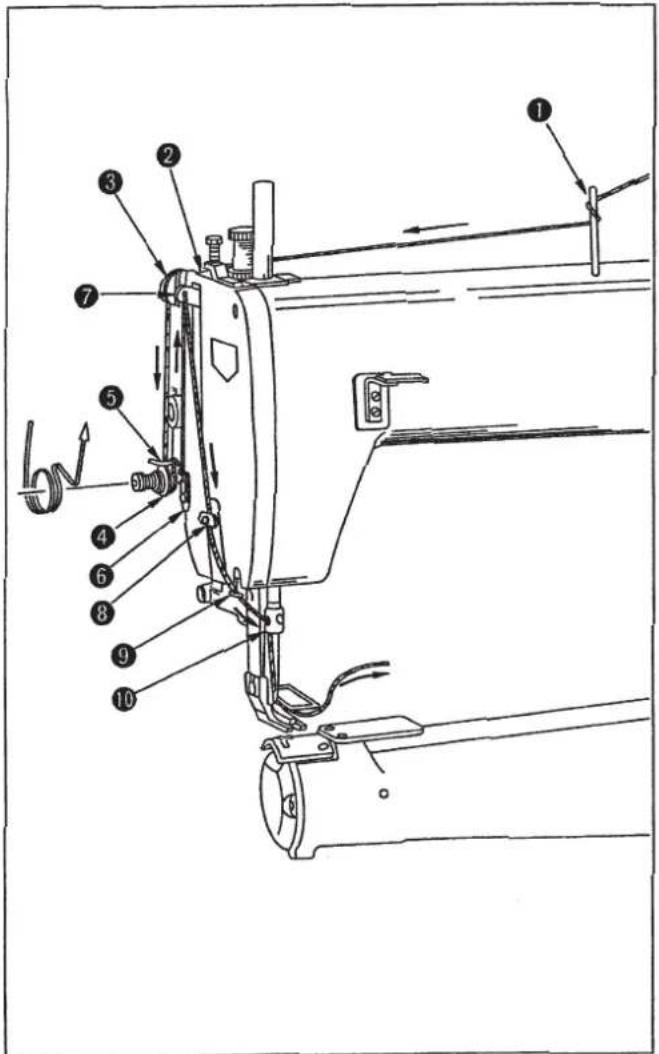
- Turn the handwheel by hand to move the thread take-up lever to its top position.
- Thread in the order illustrated and thread the needle from the left to the right.
- Pull out the thread, which has been threaded in the needle, approximately 10 cm.
(Caution) Thread the right-hand side of section ③ when viewed from the face plate.
13. ADJUSTING THE STITCH LENGTH AND REVERSE STITCHING
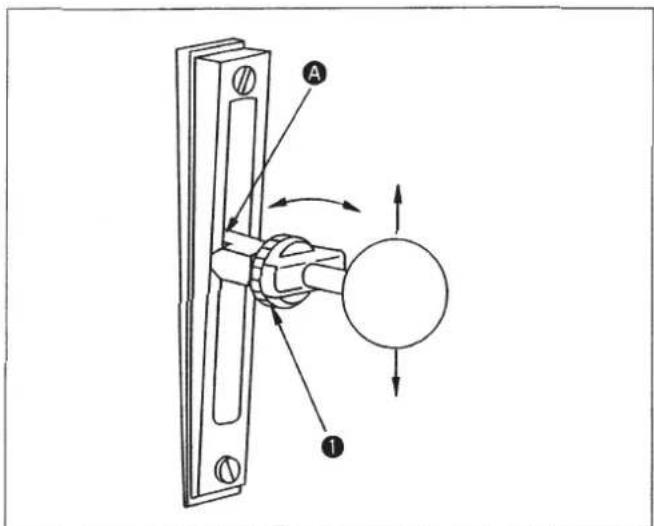
★ Adjusting the stitch length
To adjust the stitch length, use the feed regulator nut 1. Align the upper end A of the feed lever to the scale indicating the desired amount.
To increase the pitch, turn the nut counterclockwise.
To decrease the pitch, turn the nut clockwise.
(To decrease the stitch length, turn the nut while slightly pushing the feed lever down.)
★ Reverse stitching
To carry out reverse stitching, push the feed lever up by hand as far as it will go.
Reverse stitching can be done only when the feel lever is pushed up.
14. THREAD TENSION
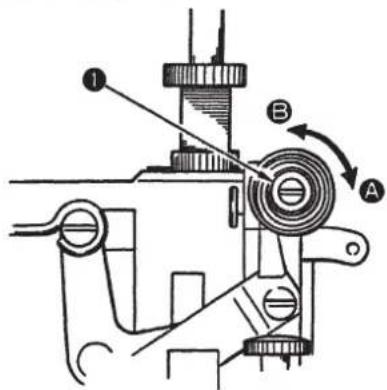
★ Adjusting the needle thread tension
Adjust the needle thread tension by thread tension nut ①. To increase the needle thread tension, turn the nut to the clockwise A. To decrease the needle thread tension, turn the nut to the counterclockwise B.

WARNING :
To avoid possible personal injury due to abrupt start of the machine, turn off the power to the machine and check to be sure that the motor has totally stopped rotating in prior.
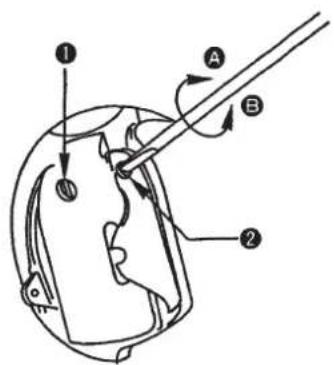
★ Adjusting the bobbin thread tension
To adjust the bobbin thread tension
-
Loosen screw ①.
-
Adjust the bobbin thread tension by turning screw ②. To increase the bobbin thread tension, turn the screw to the clockwise A. To decrease the bobbin thread tension, turn the screw to the counterclockwise B.
-
After the bobbin thread tension has been adjusted, tighten screw ① firmly.
15. THREAD TAKE-UP SPRING
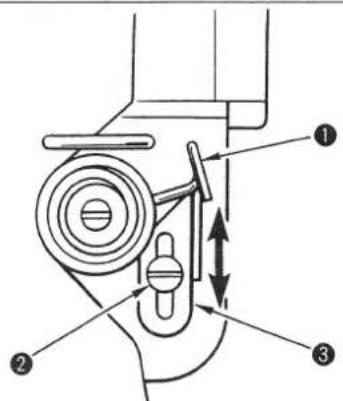
The standard stroke of thread take-up spring ① is 8 to 15 mm.
To adjust the operating range;
-
Loosen screw ②.
-
Adjust the operating range by moving thread the take-up spring adjusting plate ③ up and down.
-
After adjustment has been completed, tighten screw ② firmly.
16. ADJUSTING THE PRESSER FOOT PRESSURE
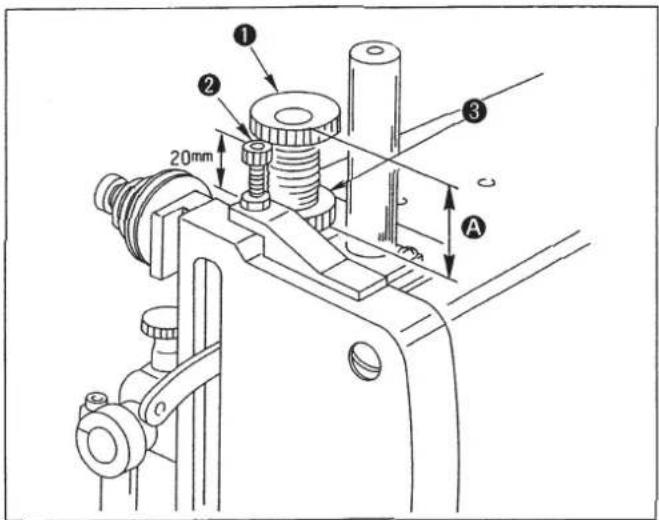
★ For the TSH-411
Standard height Ⓐ of presser spring regulator Ⓛ is 20 mm.
★ For the TSU-471
Standard height Ⓐ of presser spring regulator ① is 30 mm, and the standard height of walking foot spring regulator ② is 20 mm.
The intermediate presser foot pressure and walking foot pressure can be adjusted according to the type of material to be used.
To adjust the work pressing pressure, follow the procedure stated below.
- Loosen the nut of presser spring regulator ③.
- Turn the regulator ① clockwise to increase the pressure, or counterclockwise to decrease it.
- After the adjustment, tighten the nut ③ so that regulator is securely fixed at the proper position.
★ Operate the machine with the work pressing pressure minimized.
17. ADJUSTING THE HEIGHT OF THE FEED DOG

WARNING :
To avoid possible personal injury due to abrupt start of the machine, turn off the power to the machine and check to be sure that the motor has totally stopped rotating in prior.
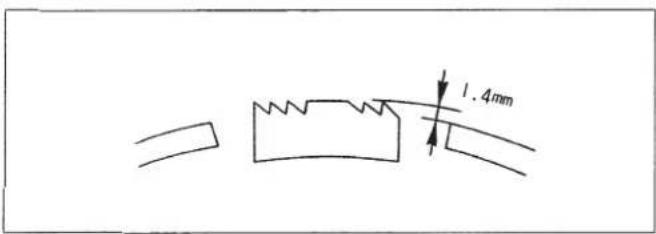
The advance amount of the feed dog from throat plate has already been adjusted to 1.4 mm.
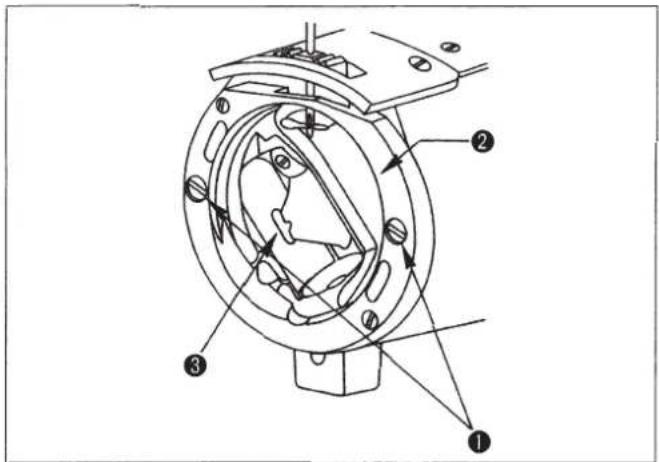
To adjust the height of the feed dog according to the sewing condition given,
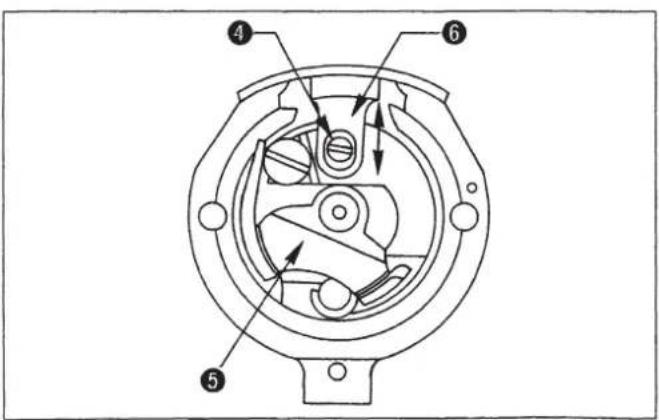
- Remove two screws ① in the shuttle race, and remove shuttle race ②. Then remove shuttle ③.
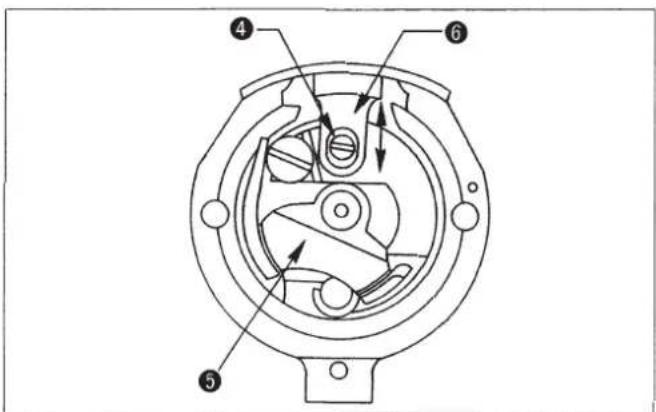
- Turn the handwheel to move shuttle driver ⑤ until screw ④ in the feed dog appears.
- Loosen screw ④ in the feed dog, and adjust the height of the feed dog by moving feed dog ⑥ up or down.
- After the adjustment, firmly tighten screw ④ in the feed dog.
18. ADJUSTING THE NEEDLE-TO-SHUTTLE RELATIONSHIP

WARNING :
To avoid possible personal injury due to abrupt start of the machine, turn off the power to the machine and check to be sure that the motor has totally stopped rotating in prior.
natural_image
Technical line drawing of a mechanical assembly with no visible text or symbols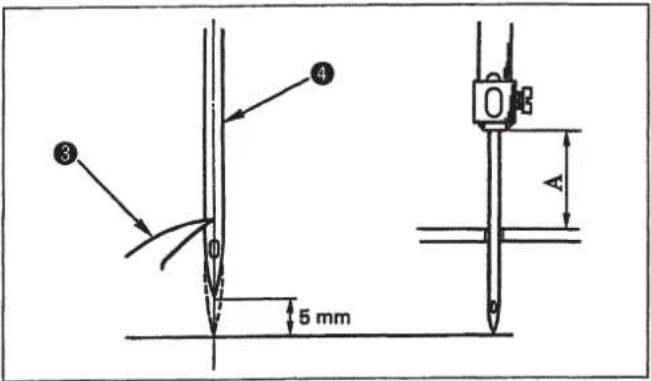
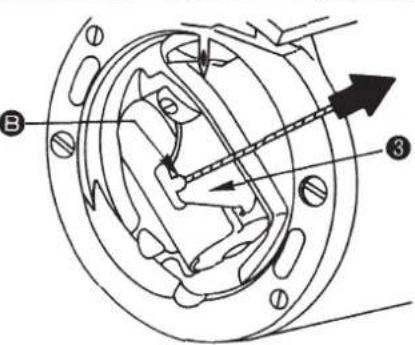
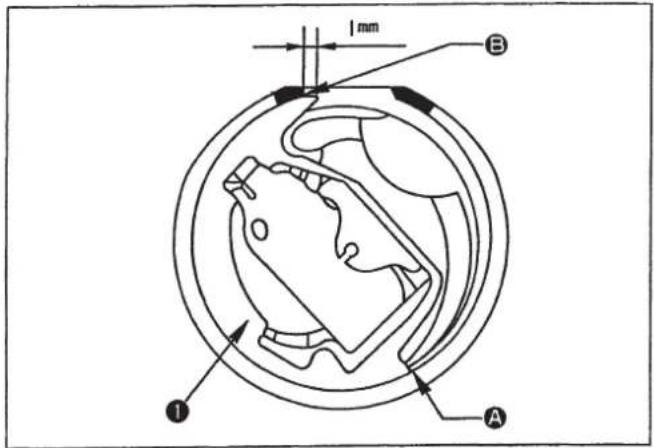
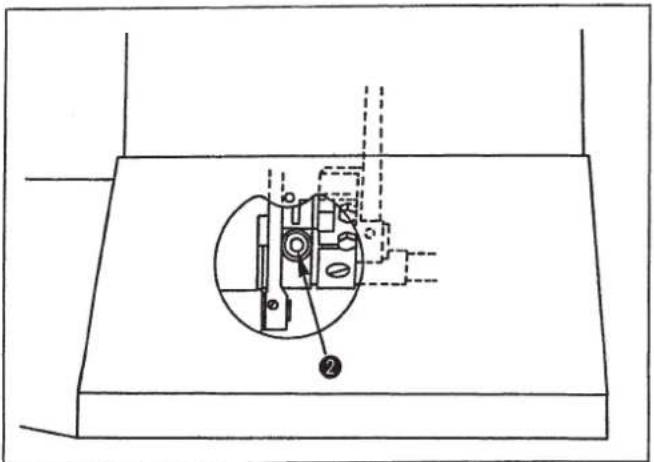
★ The position of the shuttle when it is recessed most. When shuttle ① turns counterclockwise until it will go no further and the shuttle and the shuttle race come in contact with each other at point A, a distance of 1 mm should be provided between the blade point of the shuttle and end face B of the shuttle race.
To adjust the position of the shuttle being pulled:
- Turn the handwheel and stop turning when the shuttle turns counterclockwise until it will go no further.
- Loosen screw ②.
- Align the blade point of the shuttle by turning the shuttle by hand.
- After adjustment has been completed, tighten screw firmly.
★ Positioning the needle and shuttle
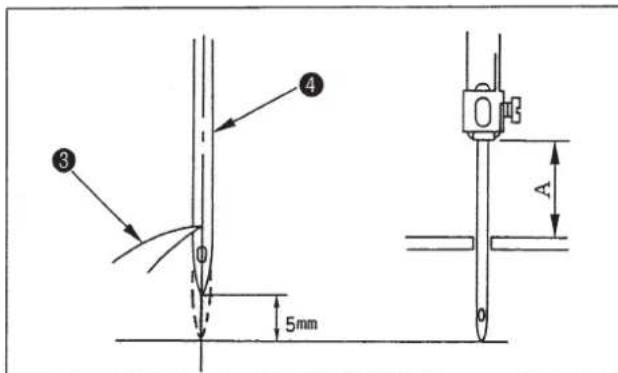
Turn the handwheel to make the needle bar ascend 5 mm from its lowest position. At this time, blade point ③ of the shuttle should be aligned with the center of needle ④. (Reference value of the lowest position of the needle bar stroke)
The distance A from the upper surface of the throat plate to the lower end of the needle bar with the feed pitch set to 0 mm;
TSH-411: 26.9 mm
TSU-471: 26.4 mm
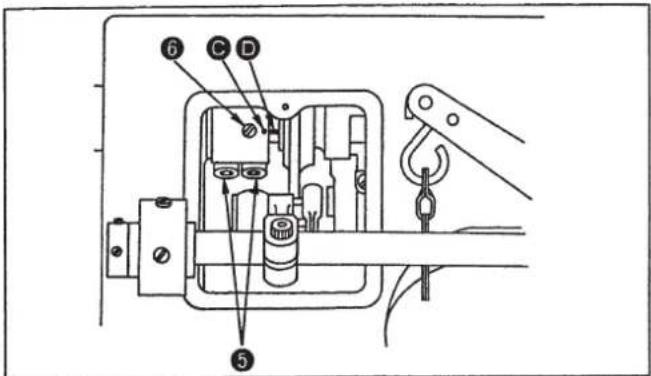
To adjust the position of the needle and shuttle
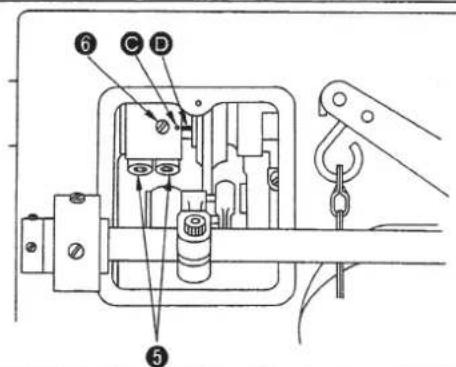
- Loosen screw (B) 5.
- Loosen screw (A) 6, and adjust so that marker dot ① engraved on the eccentric cam of the vertical rod is aligned with marker line ② engraved on the main shaft. Then, tighten screw ⑥.
- Turn the handwheel toward you, and check the lifting amount of the needle bar.
- After the adjustment, securely tighten screws ⑤ and ⑥.
★ Height of the needle bar
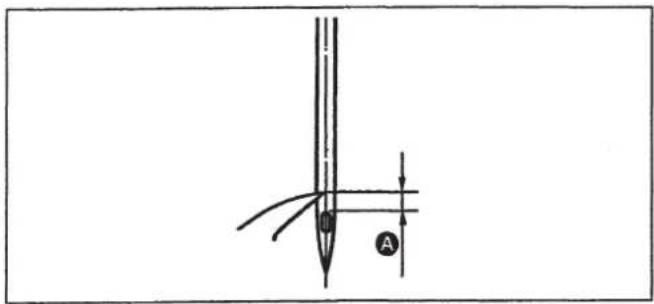
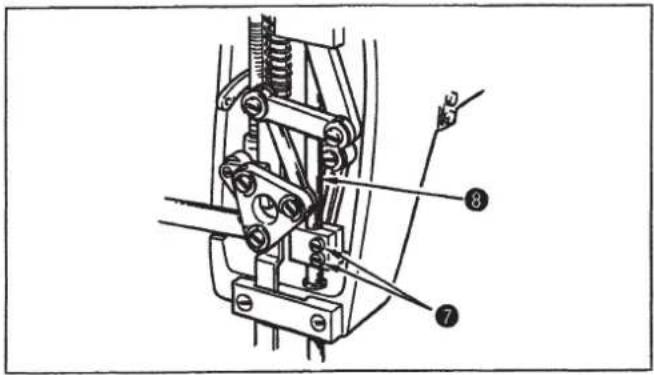
For the TSH-411, the correct height of the needle bar is provided when distance A from blade point of the shuttle and the top end of the needle eyelet is adjusted to 2 mm. For the TSU-471, the correct height of the needle bar is obtained when distance A is adjusted to 2.5 mm.
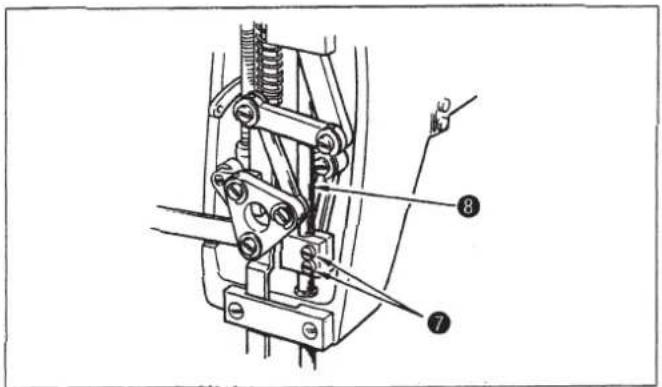
To adjust the height of the needle bar:
- Turn the handwheel and stop turning it when the blade point of the shuttle is aligned with the center of needle.
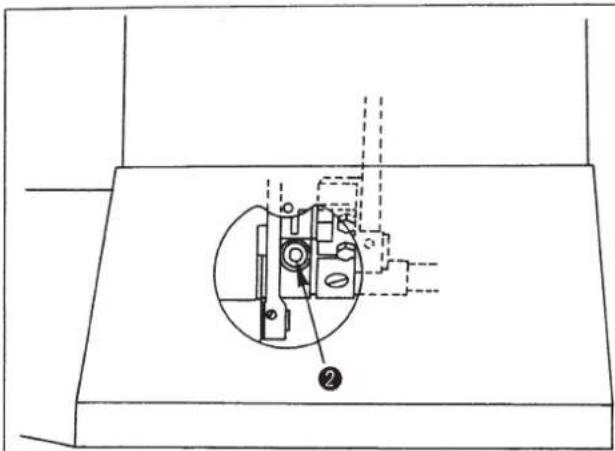
- Loosen screws 7.
- Adjust the height by moving needle bar ⑧ up and down.
- After adjustment has been completed, firmly tighten screws ⑦.
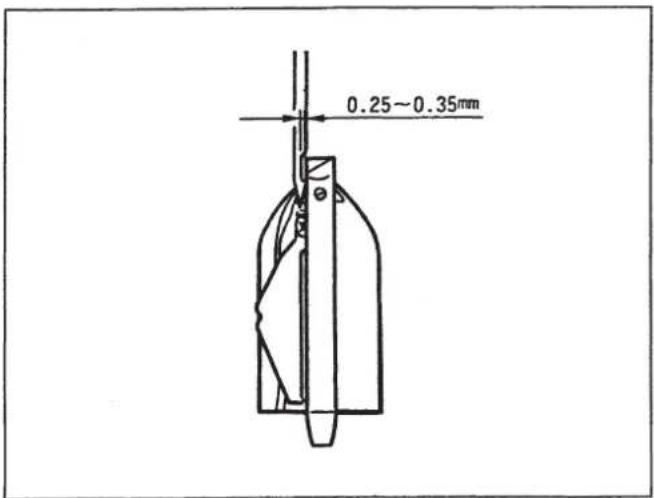
★ The needle-to-shuttle clearance
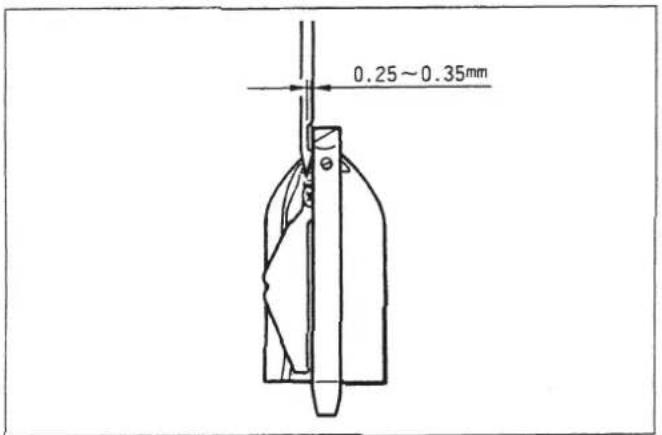
The clearance between the recess in the needle and the blade point of the shuttle has already been adjusted to 0.25 \~ 0.35 mm.
Point of the shuttle has already been adjusted to 0.35 mm. Adjust the clearance between the needle and the shuttle by replacing the shuttle race back.
(The shuttle race back comes in six different thickness in addition to the standard thickness.)
| Thickness (mm) | Part name | Part No. | Remarks |
| 2.9 | Shuttle race (1) | 21155106 | |
| 3.1 | Shuttle race (2) | 21155205 | |
| 3.3 | Shuttle race (3) | 21155304 | |
| 3.5 | Shuttle race (4) | 21155403 | Standard |
| 3.7 | Shuttle race (5) | 21155502 | |
| 3.9 | Shuttle race (6) | 21155601 | |
| 4.1 | Shuttle race (7) | 21155700 |
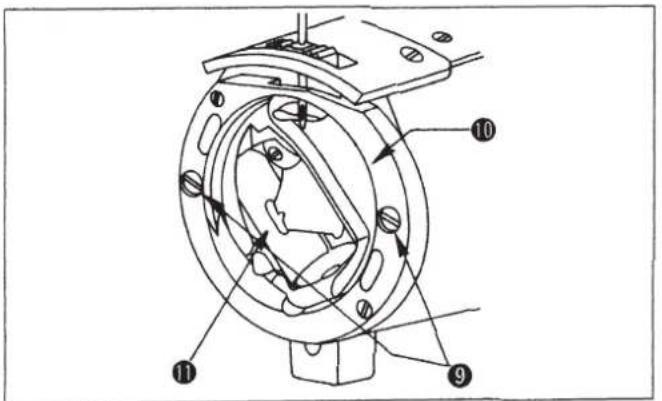
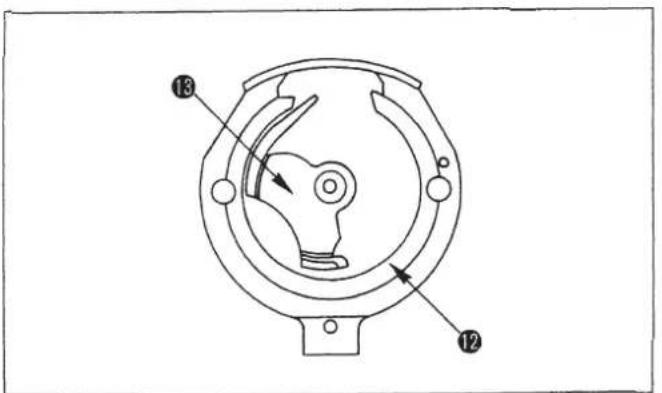
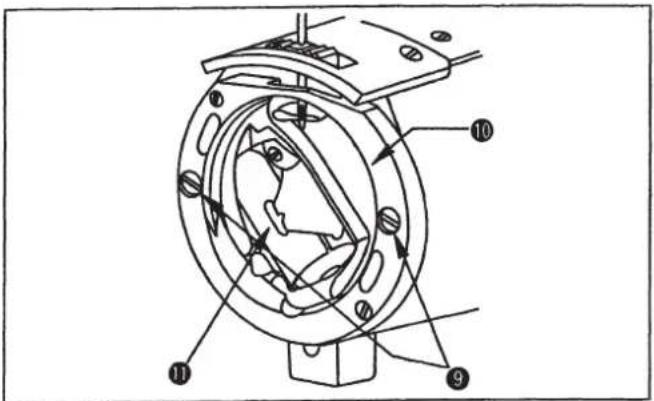
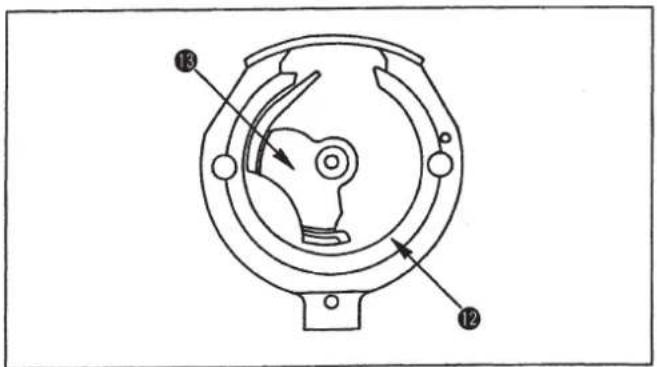
To replace the shuttle race back,
-
Remove two screws ⑨ in the shuttle race, remove shuttle race ⑩ , and remove shuttle ⑪ .
-
Turn the handwheel until shuttle driver 13 is brought to the position where shuttle race back 12 comes off. Then replace the shuttle race back.
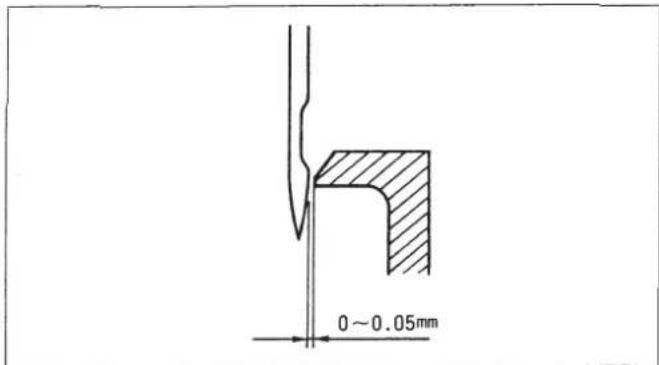
★ Clearance between the needle and the shuttle driver The clearance between the needle and the needle guide of the shuttle driver has already been adjusted to the range of 0 through 0.05 mm.
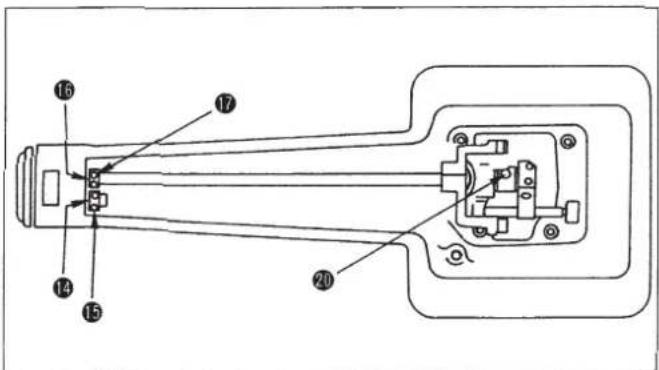
To adjust the clearance between the needle and the shuttle driver:
- Loosen two screws ⑮, and remove thrust collar ⑭ of the feed rock driving shaft on the feed bracket.
- Loosen two screws ⑰, and move thrust collar ⑱ of the feed rock shaft.
- Loosen two screws 18 in the shuttle driving shaft thrust collar, screw 19 in the shuttle driving shaft front bushing and small pendulum clamping screw 20.
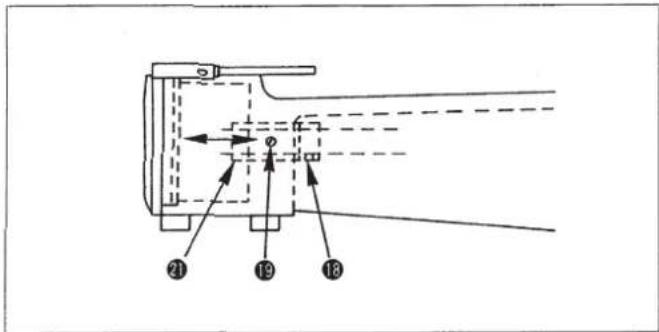
- Adjust the clearance by moving shuttle driving shaft front bushing ② to the left and right.
- After the adjustment has been completed, secure the shuttle driving shaft thrust collar and the small pendulum, making sure there is no axial play of the shuttle driving shaft.
- Finally, secure the respective thrust collars, making sure there is no play in the feed driving shaft and the feed rock shaft.
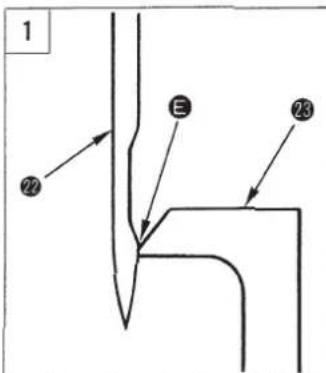
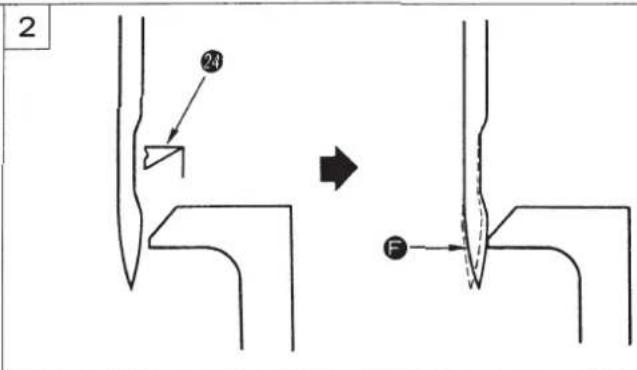
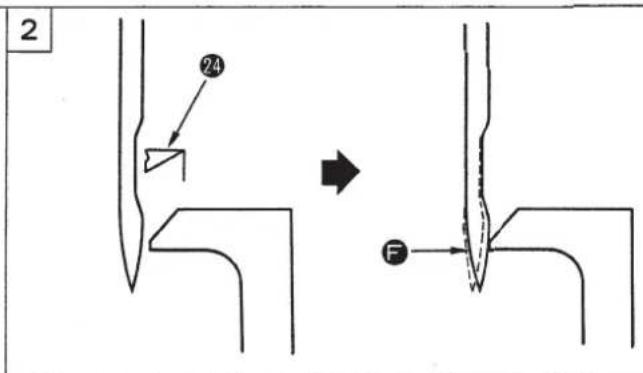
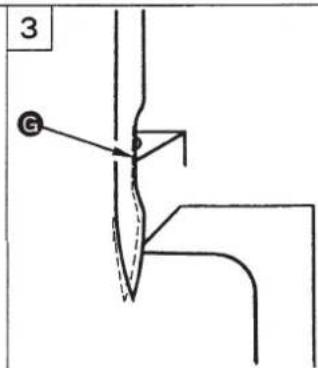
[The standard for adjusting the clearance between the needle and the blade point of the shuttle]
Use a standard Schmetz 794-Nm230 needle.
- Adjust the clearance ⑤ between the convex section of needle ⑳ and shuttle driver ⑳ to 0.
- Align the needle center with the blade point of shuttle 24 and press the F section of the needle against the shuttle driver.
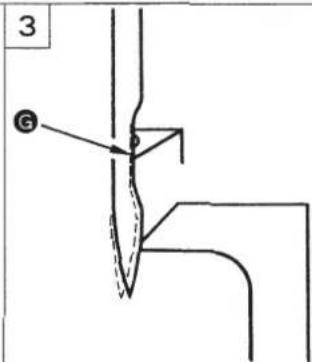
- Adjust the clearance G to a minimum, with the needle pressed against the shuttle driver, making sure that the needle does not contact the blade point of the shuttle.
* By this adjustment the needle-to-shuttle blade point clearance will be 0.25 \~ 0.35 mm.
19. ADJUSTING THE WALKING FOOT AND THE PRESSER FOOT (THIS ITEM IS ONLY APPLIED TO THE TSU-471.)

WARNING :
To avoid possible personal injury due to abrupt start of the machine, turn off the power to the machine and check to be sure that the motor has totally stopped rotating in prior.
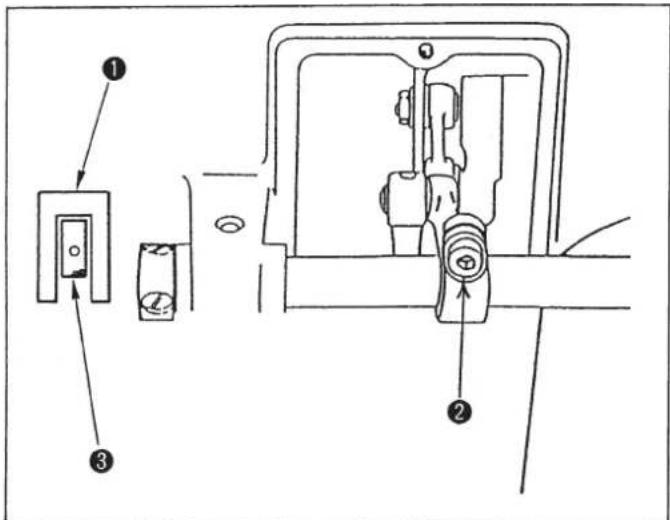
★ Adjusting the longitudinal position of the walking foot
- Maximize the stitch length. Turn the handwheel to bring walking foot ① to its forward travel end. Now, loosen screw ② in center shaft rear arm.
- Move the walking foot until the position where the walking foot does not come in contact with the rear face of presser foot ③ is reached.
- Firmly tighten screw ② in the center shaft rear arm.
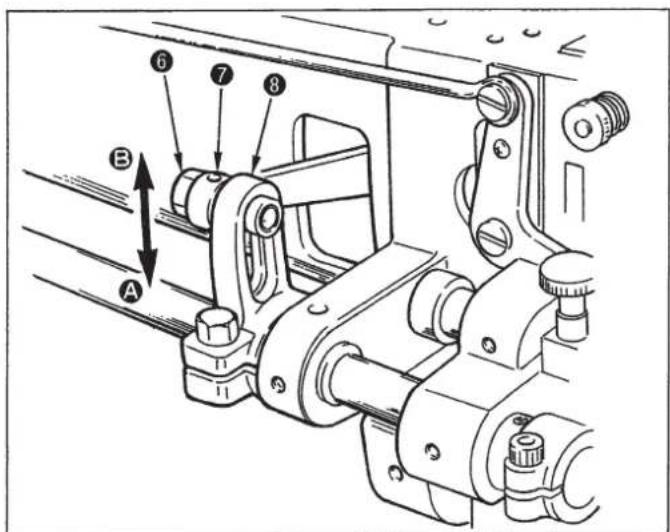
★ Operating height of the walking foot and the presser foot
The standard operating heigh has been minimized.
The operating height may be changed for better finish according to the sewing product.
- Loosen hinged screw ⑥ in the walking foot rod.
- Secure walking foot rod ⑦ to lower area A of the slot in the walking foot arm (rear) ⑧ to maximize the operating height (8 mm), or to upper area B to minimize the operating height (4 mm).
- After the adjustment, firmly tighten hinge screw ⑥ in the walking foot rod.
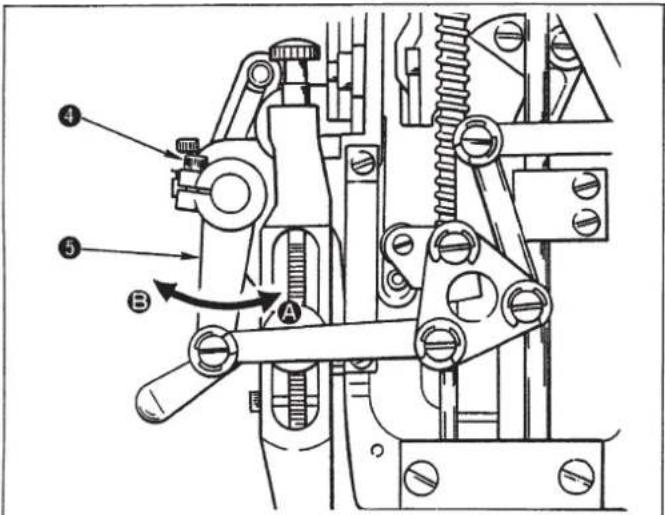
★ The amount of alternating vertical movement of the walking foot and the presser foot
For standard adjustment of the amount of vertical movement of the walking foot and that of the presser foot, they should be equal. However, the amount of vertical movement of the presser foot is desired to be slightly decreased in accordance with the type of material to be sewn. This may result in better-finished products.
- Bring the needle bar to the lowest position of its stroke. Then lower the presser foot.
- Loosen screw ④ in the walking foot arm (front).
- Move walking foot arm (front) ⑤ to right A to decrease the amount of movement of the presser foot. Move walking foot arm (front) to left B, and the amount of movement of the presser foot will be equal with that of the walking foot.
- After the adjustment, firmly tighten screw ④ in the walking foot arm (front).
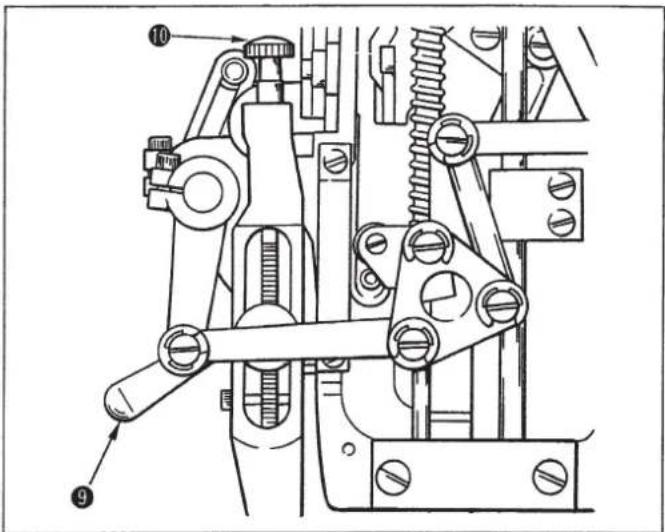
★ Adjusting the feed amount of the walking foot
The top feed amount and the bottom feed amount have been adjusted to the equal value (1:1). However, you can change the top feed amount with respect to the bottom feed amount in accordance with the sewing conditions given.
- Loosen top feed adjusting lever ⑨
- Turn top feed adjustment screw ⑩ clockwise to decrease the top feed amount.
Turn top feed amount screw ⑩ counterclockwise to increase the top feed amount.
- After the adjustment, tighten top feed adjusting lever ⑨.
20. THE FEED DOG-TO-NEEDLE RELATIONSHIP

WARNING :
To avoid possible personal injury due to abrupt start of the machine, turn off the power to the machine and check to be sure that the motor has totally stopped rotating in prior.
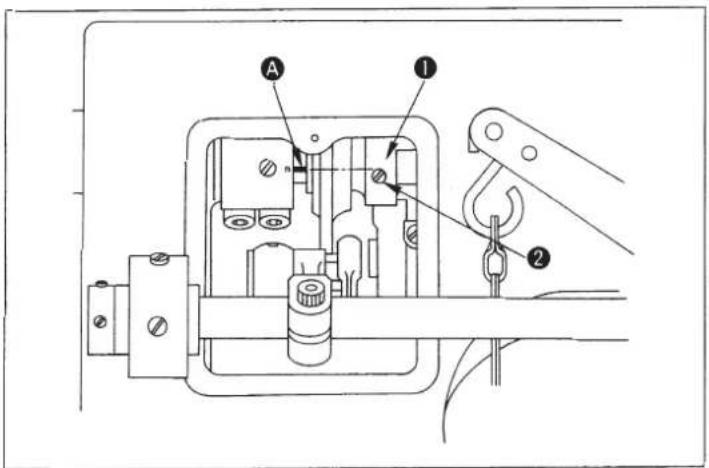
As standard timing of the feed dog, when the center of the needle aligns with the blade point of the shuttle with the feed pitch set to "0", the feed dog should move from right to left by 1 mm when observed from the face plate by moving the feed lever from the position to set the normal feed pitch to the maximum value to the position to set the reverse feed pitch to the maximum value.
★ To adjust the timing:
- Loosen the two screws for the feed eccentric cam ①.
- Adjust the timing to the standard one by aligning the top end of screw No. 1 ② in the feed eccentric cam with marker line A engraved on the main shaft.
- After adjusting the timing has been completed, firmly tighten the two screws for the feed eccentric cam.
21. MOTOR PULLEY AND SEWING SPEED
1) Use an M type V belt.
2) The following table shows the relationship among the motor pulley and the sewing speed.
| Model Sewing speed | Effective diameter of handwheel | Number of poles | Frequency | Rotational speed of motor | Effective diameter of motor pulley | |
| TSH-411TSU-471 | 600 sti/min | ∅ 154 4 | 50 Hz 1,430 rpm | ∅ 65 | ||
| 60 Hz 1,715 rpm | ∅ 50 | |||||
| 800 sti/min | 50 Hz 1,430 rpm | ∅ 85 | ||||
| 60 Hz 1,715 rpm | ∅ 70 | |||||
(Caution) The effective diameter of the motor pulley is obtained by subtracting 5 mm from the outside diameter.
- TROUBLES AND CORRECTIVE MEASURES
| Problem | Cause | Corrective measures |
| 1. Thread often breaks or thread splits finely, correct stitch cannot be formed (half- finished stitch) | 1 Flaw is found out at thread path, needle point, shuttle blade point, or needle eyelet.2 Improper finish around the recess in the needle.3 Excessively tightened needle thread tension4 The needle interferes with the blade point of the shuttle.5 The timing of the needle and the shuttle is too early or too slow.6 Due to heat generated by the needle.7 Excessive height difference at stepped section. | ○ Remove flaw by smoothing flaw with fine paper file.○ Replace the needle with a new one.○ Adjust the needle thread tension.○ Refer to “18. Adjusting the needle-to-shuttle relationship”.○ Refer to “18. Adjusting the needle-to-shuttle relationship”.○ Decrease the sewing speed of the machine. Use silicone oil.○ Increase the amount of movement of the thread thread take-up spring. |
| 2. Stitches are frequently skipped | 1. The needle-to-shuttle blade point clearance is excessive.2. The timing of the needle and the shuttle is too early or too slow.3. The presser bar pressure is insufficient.4. The distance from the upper end of the needle eyelet to the blade point of the shuttle is not proper.5. The needle is improperly selected.6. The amount of movement of the thread take-up spring is excessive.7. Overheated needle or shuttle. Thread is not pulled smoothly.8. Reverse stitching is made at low speed on light weight material using nylon thread. | ○ Refer to “18. Adjusting the needle-to-shuttle relationship”.○ Refer to “18. Adjusting the needle-to-shuttle relationship”.○ Tighten the presser adjuster screw.○ Refer to “18. Adjusting the needle-to-shuttle relationship”.○ Replace the needle with a one-count lower needle.○ Decrease the amount of movement of the thread take-up spring.○ Use silicone oil.○ Wind the needle thread around the needle. 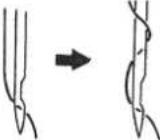 |
| 3. Improper thread tension, irregular stitch, excessive bobbin thread tension | 1 The needle hole in the walking foot, needle hole in the feed dog or thread path in the thread guides has scratches.2 The bobbin slides unsmoothly.3 Weak bobbin thread tension.4 Bobbin thread is wound too tightly.5 Needle thread flaps. (Needle thread flaps and comes out of the thread tension disc due to excessive needle thread tension or is caught in other parts.)6 Too thin bobbin thread is used to combine with needle thread. | ○ Smooth the surface with a fine paper file or using a buff.○ Replace the bobbin or the shuttle.○ Adjust the bobbin thread tension.○ Decrease the tension of the bobbin thread winder.○ Thread the tension guide bar as illustrated right. 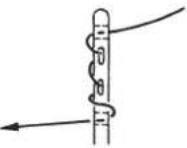 To the needle thread tensioner○ Use silicone oil. To the needle thread tensioner○ Use silicone oil. |
| 4. Poor gloss of the needle thread | ○ Excessive height difference at stepped section. | ○ Use silicone oil. |
| 5. Inconsistently finished seam (stitches are not made straight but made surch as “ ≈ ”) | ○ Needle is too thick. | ○ Replace the needle with a thinner one.Use cutting point needle  |
| 6. Bobbin thread tension cannot be increased. | ○ The bobbin thread tension spring of the shuttle has become dusty or dirty. | ○ Clean by removing the bobbin thread tension spring. |
| 7. The belt slips (Motor stoppage occurs, if an electronic-stop motor is used.) | 1 The V belt is degraded.2 The V belt tension is not enough. | ○ When degradation is found out to the V belt, such as wear, cracking, etc., replace with a new one.○ Refer to “5. Adjusting the belt tension”. |
- JUKI 株式会社
- 日本語
- 安全にご使用していただくために
- 糸立装置の取り付け
- はずみ車の取り付け
- ★縫い目長さの調節
- ★下糸張力の調節
- ★釜の引き位置
- ★針棒の高さ
- 針とトンビのすきまを調整するには、
- [針と釜剣先のすきま調整方法の目安]
- ★送り足の前後位置の調整
- ★送り足と押え中足の交互上下運動量
- ★送り足の送り量調節
- TO ENSURE SAFE USE OF YOUR SEWING MACHINE
- ( I ) Explanation of risk levels
- DANGER :
- WARNING :
- CAUTION :
- (II) Explanation of pictorial warning indications and warning labels
- CAUTION
- Basic precaution
- Safety devices and warning labels
- Application and modification
- Education and training
- Items for which the power to the machine has to be turned off
- PRECAUTIONS TO BE TAKEN IN VARIOUS OPERATION STAGES
- Transportation
- Unpacking
- Installation
- Table and table stand
- (II) Cable and wiring
- (III) Grounding
- (IV) Motor
- Before operation
- During operation
- Lubrication
- Maintenance
- Operating environment
- CONTENTS
- SPECIFICATIONS....1
- INSTALLING THE MACHINE
- INSTALLING THE THREAD STAND
- INSTALLING THE HANDWHEEL
- INSTALLING THE BELT COVER
- ADJUSTING THE BELT TENSION
- CLEANING
- LUBRICATION
- HOW TO INSTALL THE NEEDLE
- HOW TO TAKE OUT THE BOBBIN
- HOW TO WIND A BOBBIN THREAD
- HOW TO INSTALL THE BOBBIN
- HOW TO THREAD THE MACHINE HEAD
- ADJUSTING THE STITCH LENGTH AND REVERSE STITCHING
- ★ Adjusting the stitch length
- ★ Reverse stitching
- THREAD TENSION
- ★ Adjusting the needle thread tension
- ★ Adjusting the bobbin thread tension
- THREAD TAKE-UP SPRING
- ADJUSTING THE PRESSER FOOT PRESSURE
- ★ For the TSH-411
- ★ For the TSU-471
- ADJUSTING THE HEIGHT OF THE FEED DOG
- ADJUSTING THE NEEDLE-TO-SHUTTLE RELATIONSHIP
- To adjust the position of the shuttle being pulled:
- ★ Positioning the needle and shuttle
- To adjust the position of the needle and shuttle
- ★ Height of the needle bar
- To adjust the height of the needle bar:
- ★ The needle-to-shuttle clearance
- To replace the shuttle race back,
- [The standard for adjusting the clearance between the needle and the blade point of the shuttle]
- ADJUSTING THE WALKING FOOT AND THE PRESSER FOOT (THIS ITEM IS ONLY APPLIED TO THE TSU-471.)
- THE FEED DOG-TO-NEEDLE RELATIONSHIP
- ★ To adjust the timing:
- MOTOR PULLEY AND SEWING SPEED
Brand : JUKI
Model : TSU-471
Category : Sewing machine