
VC-PD510-2 - Vacuum Cleaner Hanseatic - Free user manual and instructions
Find the device manual for free VC-PD510-2 Hanseatic in PDF.


| Product Type | Battery-Operated Vacuum Cleaner (Cordless Stick) |
| Model | VC-PD510-2 |
| Manufacturer | Hanseatic |
| Rated Power | 350 W |
| Battery Type | Lithium-Ion (Li-Ion) |
| Battery Voltage | 21.6 V |
| Battery Capacity | 2000 mAh |
| Battery Model | T-DC38P (Order no. 44910236) |
| Charger Model | ZD12D250060EU or S018-1B250060HE |
| Charger Input | 100-240 V~, 50/60 Hz |
| Charger Output | 25 V, 0.6 A |
| Weight (Assembled) | Approx. 3.55 kg |
| Suction Levels | 2 (I and II) |
| Dust Bin Capacity | Not specified (empty when dust reaches "Full" mark) |
| Filter Type | Dust filter (washable) and Hygiene filter (washable) |
| Included Nozzles | Soft floor nozzle, Floor nozzle (turbo brush), Crevice nozzle, Furniture nozzle |
| Water Tank (Mop Function) | Yes, with cloth |
| Articulated Joint | Yes, on tube extension |
| Wall Mount | Yes, bracket included (drill holes required) |
| Protection Class | II |
| Charging Time (First) | 4-5 hours |
| Safety Features | Overheat protection, battery protection (deep discharge prevention), filter missing detection |
| Order Number | 98556924 |
Frequently Asked Questions - VC-PD510-2 Hanseatic
User questions about VC-PD510-2 Hanseatic
0 question about this device. Answer the ones you know or ask your own.
Ask a new question about this device
Download the instructions for your Vacuum Cleaner in PDF format for free! Find your manual VC-PD510-2 - Hanseatic and take your electronic device back in hand. On this page are published all the documents necessary for the use of your device. VC-PD510-2 by Hanseatic.
USER MANUAL VC-PD510-2 Hanseatic
natural_image
Line drawing of a handheld vacuum cleaner with articulated arm and handle (no text or symbols)Gebrauchsanleitung
natural_image
Technical line drawing of a mechanical device with a labeled component (13), no readable text or symbols present.natural_image
Technical line drawing of a mechanical component with no visible text or symbolsnatural_image
Technical line drawing of a mechanical tool or tool with no visible text or symbolsnatural_image
Technical line drawing of a mechanical component with textured ends and a central shaft (no text or symbols)natural_image
Technical line drawing of a mechanical component with two blocks and a handle, labeled (15) (no text or symbols on the diagram itself)natural_image
Simple line drawing of a circular mechanical component with two handles and a triangular base (no text or symbols)(25) (26)
natural_image
Circular diagram with a central circular component and a triangular connector at the bottom (no text or symbols)natural_image
Line drawing of a handheld device with a hand holding it, labeled with number (2) and no visible text or symbols on the device itself.natural_image
Line drawing of a handheld device with a tool inserted, labeled (2), showing no text or symbols on the device itself.natural_image
Line drawing of a handheld vacuum cleaner with articulated arm and handle (no text or symbols)User manual
Manual/version:
1901-03186 EN 20210929
Article no.: 98556924
Reproduction, even of
excerpts, is not permitted
Battery-Operated Vacuum
Cleaner
Table of contents
Explanation of terms/
symbols ..... EN-3
Safety EN-4
Safety notices ..... EN-4
Delivery ...... EN-13
Package contents ..... EN-13
Check the delivery. . . . . EN-13
Appliance parts and
nozzles ..... EN-14
Nozzles ..... EN-15
Water tank ..... EN-16
Start-up..... EN-17
Unpacking the appliance EN-17
Mounting the wall
bracket..... EN-17
Charging the battery . . . EN-18
Preparing the appliance EN-18
Operation ..... EN-20
Vacuuming floors.....EN-20
Setting the suction force EN-21
Using the nozzles ..... EN-22
Using the articulated joint EN-22
Using the water tank . . . EN-23
Finishing vacuuming . . . EN-24
Tidying away/storage . . EN-25
Care and maintenance... EN-26
Emptying the dust bin . . EN-26
Cleaning/changing the dust filter ..... EN-27
Cleaning/changing the hygiene filter ..... EN-28
Cleaning the appliance . EN-30
Cleaning the soft floor nozzle ..... EN-31
Cleaning the floor nozzle (turbo brush) . . . EN-32
Cleaning the water tank and cloth ..... EN-34
Troubleshooting table. . . . EN-36
Service ..... EN-38
Disposal and waste
prevention ..... EN-39
Our contribution to the protection of the ozone layer . . . . . . . . EN-39
Waste prevention ..... EN-39
Disposing of old electrical devices in an environmentally- friendly manner ..... EN-40
Technical specifications . . EN-42
Explanation of terms/symbols

Please read through the safety instructions and user manual carefully before using the appliance. This is the only way you can use all the functions reliably and reliably.
Be absolutely sure to also observe the national regulations in your country, which are also valid in addition to the regulations specified in this user manual.
Keep all safety notices and instructions for future reference. Pass all safety notices and instructions on to the subsequent user of the appliance.
The following terms and symbols can be found in this user manual.

WARNING
This term indicates a hazard with a medium level of risk which, if not avoided, could result in death or serious injury.

CAUTION
This term indicates a hazard with a low level of risk which, if not avoided, could result in minor or moderate injury.

NOTICE
This term warns against possible damage to property.

This symbol refers to useful additional information.
Safety
Intended use
The appliance is intended for vacuuming up loose and dry dirt, such as dust, lint and crumbs on floors and cushions around the home and car.
The appliance can be operated without switching at 100–240 V\~, 50/60 Hz.
The appliance may be used only if the motor protection filter is in place.
Do not make any technical changes.
Use the appliance exclusively as described in this user manual. Any other use is deemed improper and may result in damage to property or even personal injury.
The manufacturer accepts no liability for damage caused by improper use.
The appliance is not suitable for vacuuming up
- hazardous dust
– water and other fluids
– glowing ash, burning cigarettes or matches
– clay, plaster, cement, masonry dust or drilling dust
– sharp objects, such as glass splinters.
The appliance is not designed for commercial use or shared use (e.g. use by several parties in an apartment block).
Safety notices
In this chapter you will find general safety notices which you must always observe for your own protection and that of third parties. Please also observe the warning notices in the individual chapters on operation, cleaning, etc. on operation, cleaning, etc.
Risks to children

WARNING
Risk of suffocation!
Children can become entangled in the packaging film or swallow small parts and suffocate.
■ Do not allow children to play with the packaging film.
■ Prevent children from pulling small parts from the appliance or taking them out of the accessory bag and putting them in their mouths.
Additional precautionary measures apply to children of all ages.
- Keep batteries out of the reach of children.
Battery usage by children should be supervised. Especially keep small batteries out of reach of small children.
- Seek medical advice immediately if a cell or a battery has been swallowed.
Even with the filters, the appliance exhaust air may still contain small quantities of dirt particles. If breathed in by small children, these can lead to allergic reactions.
■ Avoid vacuuming close to children, wherever possible.
Risks for certain groups of people

CAUTION
Dangers for children and people with limited physical, sensory or mental capacity!
■ This appliance can be used by children aged 8 years and older and persons with reduced physical, sensory or mental capabilities or lack of experience and knowledge if they have been given supervision or instruction concerning the use of the appliance in a safe way and understand the hazards involved.
■ Do not allow children to play with the appliance.
■ Cleaning and user maintenance must not be performed by children without supervision.
Risks in handling household electrical appliances

WARNING!
Risk of electric shock! Touching live parts may result in severe injury or death.
■ Only use the appliance in doors. Do not use in wet rooms or in the rain.
■ Do not operate or continue to operate the appliance if
- it shows visible signs of damage, e.g. the supply cord is defective,
– it makes unfamiliar noises, - it emits smoke.
In such cases, you should pull the mains plug out of the socket or switch off/unscrew the fuse and have the appliance repaired (see chapter ‘Service’).
If this appliance's supply cord is damaged, to avoid hazards it must be replaced by the manufacturer, the manufacturer's service agent or a qualified expert.
■ Check the appliance regularly for damage.
■ We recommend using a pulse-sensitive fault current switch (residual current operated circuit-breaker).
- Keep the appliance, the mains plug and the mains cable away from open flames and hot surfaces. The insulation of the mains cord could melt.
■ Do not kink or pinch the mains cord or lay it over sharp edges.
■ Never pull the mains plug out of the socket by the mains cable, always hold the mains plug itself.
■ Never touch the mains plug with wet hands.
■ Never immerse the mains cord or plug in water or any other liquids.
■ In the event of a fault, as well as before cleaning or maintenance, disconnect the mains plug from the socket and/or switch off or unscrew the fuse.
■ Do not put any objects in or through the housing openings and also make sure that children cannot insert any objects through them.
■ Never clean the appliance with a high-pressure cleaner or steam cleaner.
■ This appliance contains electrical and mechanical parts which are essential for protection against potential sources of danger. Only parts corresponding to the original appliance specifications may be used for repairs.
■ Investigations and rep to the appliance may only be carried out by authorised specialists, such as our Service department.
■ Unauthorised repairs to the appliance can cause property damage and personal injury, and invalidate liability and warranty claims. Never try to repair a defective or suspected defective appliance yourself.
CAUTION!
Fire hazard! Improper handling of the ap- pliance can lead to fire.
■ Connect the appliance only to a properly installed and earthed electric socket. Do not connect to a multi-socket extension cable or a multi-socket plug.
NOTICE
Improper handling of the appliance may result in damage or explosions.
■ Do not use sharp objects to unpack the appliance.
When cleaning, please note:
■ Never use soap or any harsh, granular, soda-based, acid-based, solvent-based or abrasive cleaners. All-purpose cleaners with a neutral pH are recommended.
■ The door seals can be damaged by unsuitable cleaning agents. Use care products only on the outer surfaces.
■ Use only soft cloths for cleaning.
■ Ensure that water does no fire hazard!
enter the electrical components.
Risks when handling the vacuum cleaner

CAUTION!
Risk of injury!
Improper handling of the appliance may result in injury.
■ Never touch moving partbazards.
of the appliance and accessories, for example, turbo brushes. There is a risk of fingers becoming trapped.
■ Always remove the turbo brush from the telescopic tube or suction hose before cleaning.
■ Hold on to the mains cord when winding it up. By forcefully retracting the mains cord this can cause a “whipping effect” (on account of the mains cord swinging uncontrollably).
■ Lay the mains cord in such a way that no one trips over it.
Vacuuming glowing ash, burning cigarettes, etc. will set the filter on fire.
■ Do not vacuum glowing ash, burning cigarettes or matches.
Health hazard!
Improper handling of the appliance may result in health
■ Do not use the appliance if the hygiene or motor protection filter is missing or damaged.
Otherwise, vacuumed dust can penetrate the appliance and escape into the ambient air.
Even with the filters, the appliance exhaust air may still contain small quantities of dirt particles. If breathed in by small children, these can lead to allergic reactions.
■ Avoid vacuuming close to children, wherever possible.

NOTICE
Risk of damage!
Improper handling of the appliance can lead to property damage.
■ Do not use sharp objects to unpack the appliance.
■ Never sit or stand on the appliance.
■ Use the appliance only if the motor protection filter is in place. The motor protection filter must not be damaged.
■ Only the original supplied accessories and the specified dust bag, motor protec-
tion filter and hygiene filter may be used.
■ Never vacuum clay, plaster, cement, masonry dust or drilling dust. Vacuuming these materials blocks the filter.
■ Never vacuum water and other liquids.
■ Never vacuum sharp - objects, such as glass splinters.
■ On freshly shampooed-car pets, always wait until the detergent is completely dry before vacuuming.
■ When using the vacuum cleaner, always pull out the mains cord completely to the yellow marker.
■ Never pull the mains cord out beyond the red marker. Pulling the cord out further can damage the cable reel.
■ Never place the vacuum cleaner directly next to a heater or oven.
■ Never dry the hygiene filter on a heater or with a hair-dryer or tumble dryer. The hygiene filter is porous and can be damaged.
■ Never wash the filter in a washing machine or dish-washer.
■ The filter must be air-dried only.
■ Do not use any abrasive cleaners (scouring or thinning agents) to clean the appliance and accessories. They could damage the surface of the appliance.
Risks when handling the battery pack

CAUTION
Risk of injury!
Improper handling of the lithium-ion battery may lead to injuries.
If the battery pack is opened or dismantled, or if a damaged battery pack or a battery pack other than the one delivered is used, electrolyte may leak out. This can cause chemical burns and damage to the appliance and battery pack.
■ Use only the battery pack provided. Replace it only with an equivalent battery pack.
■ To charge it, use only the type ZD12D250060EU or S018-1B250060HE mains adapter which has been provided.
- Keep cells and batteries clean and dry.
■ Wipe the cell or battery terminals with a clean dry cloth if they become dirty.
■ Never open or dismantle the battery pack.
■ Do not heat, short-circuit or expose the battery to direct sunlight, and do not dispose of it by burning it.
■ Remove any damaged battery packs or ones that have leaked from the appliance immediately. Do not allow electrolyte to come into contact with skin, eyes or mucus membranes.
■ In the event of a cell leaking, do not allow the liquid to come in contact with the skin or eyes. If contact has been made, wash the affected area with copious amounts of water and seek medical advice.
■ Do not dismantle, open or shred secondary cells or batteries.
■ Do not subject cells or batteries to mechanical shock.
■ If the battery pack is faulty, replace it with a new, original battery pack immediately.
■ If you wish to return the Battery-Operated Vacuum Cleaner to us, always make sure to send it back with the battery pack inserted in the vacuum. The battery pack must not be packed or shipped separately.
There is a high risk of fire with old lithium batteries.
■ Do not expose cells or batteries to heat or fire. Avoid storage in direct sunlight.
■ Do not short-circuit a cell or a battery. Do not store cells or batteries haphazardly in a box or drawer where they may short-circuit each other or be short-circuited by other metal objects.
■ Do not remove a cell or-battery from its original packaging until required for use.
■ Secondary cells and -batteries need to be charged before use. Always use the correct charger and refer to the manufacturer's instructions or equipment manual for proper charging instructions.
■ Do not use any charger other than that specifically provided for use with the equipment.
■ Do not leave a battery on prolonged charge when not in use.
■ After extended periods of storage, it may be necessary to charge and discharge the cells or batteries several times to obtain maximum performance.
- Observe the plus (+) and minus (-) marks on the cell, battery and equipment and ensure correct use.
■ Before disposing of these batteries, tape off the
poles to prevent an external short circuit.
■ Do not use any cell or battery which is not designed for use with the equipment.
■ Use the cell or battery only in the application for which it was intended.
■ Do not mix cells of different manufacture, capacity, size or type within a device.
■ Always purchase the -battery recommended by the device manufacturer for the equipment.
■ When possible, remove the battery from the equipment when not in use.
■ Before disposing of the appliance, remove and separately dispose of single-use and rechargeable batteries that are not permanently built into the appliance, in accordance with regulations.
■ Only dispose of single-use and rechargeable batteries in a discharged state!
■ If possible, use rechargeable batteries instead of disposable batteries.
Delivery
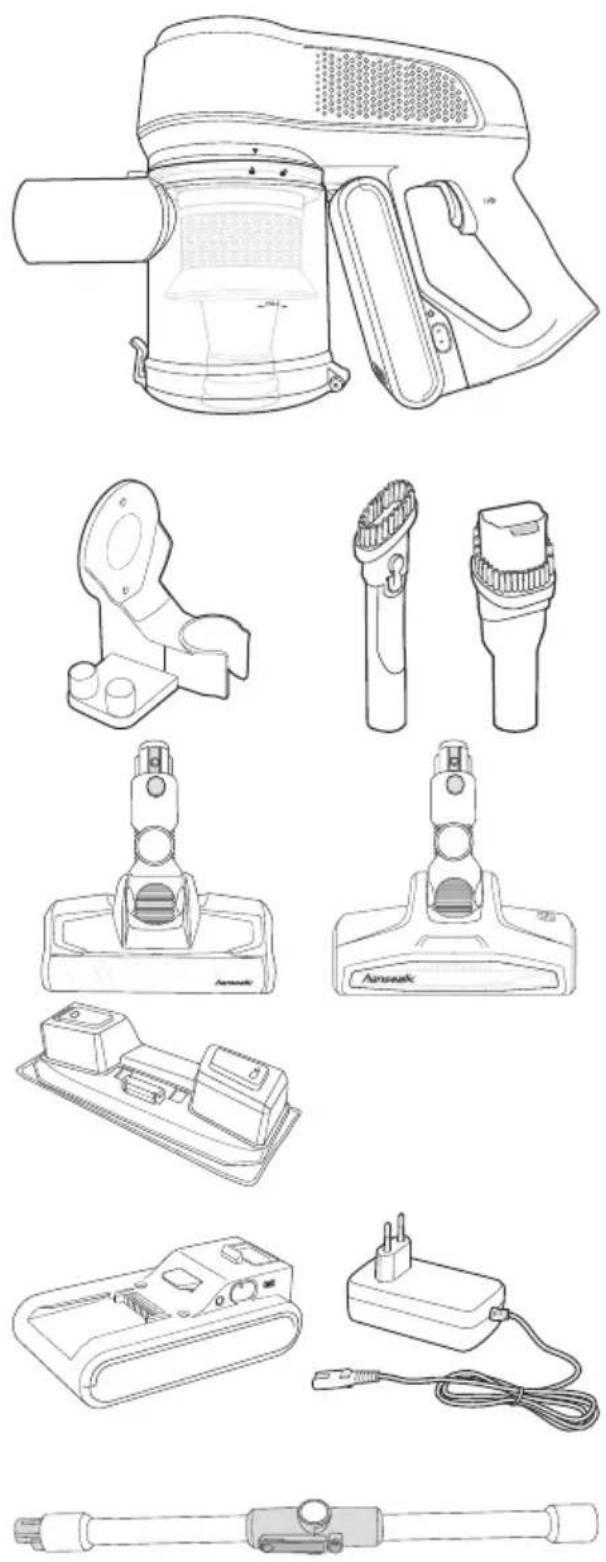
Package contents
- Battery-OperatedVacuumCleaner
- Wall bracket
- Tube extension
- Soft floor nozzle
– Floor nozzle (turbo brush) - Water tank with cloth
- Furniture nozzle
- Crevice nozzle
- Battery
- Battery charger
- 2× Screw
- 2× Wall plug
- User manual
Check the delivery
- Move the appliance to a suitable place and unpack it.
- Check that the delivery is complete.
- Check whether the appliance was damaged during transit.
- If the delivery is incomplete or the appliance has been damaged during transport, please contact our Service Centre (see "Service" on page EN-38).
WARNING!
Do not operate the appliance if it has visible damage.
Appliance parts and nozzles
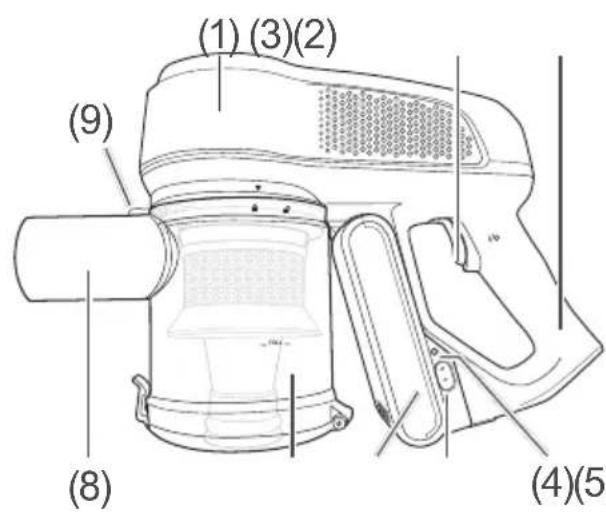
(4)(5)(6)(7)
(1) Motor housing
(2) On/Off switch
(3) Handle
(4) Battery operating light
(5) Charging port
(6) Battery
(7) Dust bin
(8) Suction tube
(9) Release button for dust bin
(10) Release button for tube
(11) Tube extension
(12) Power adapter with mains cord
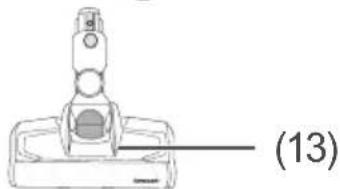
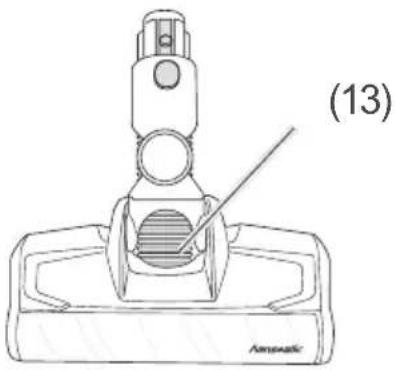
(13) Soft floor nozzle
(14) Floor nozzle (turbo brush)
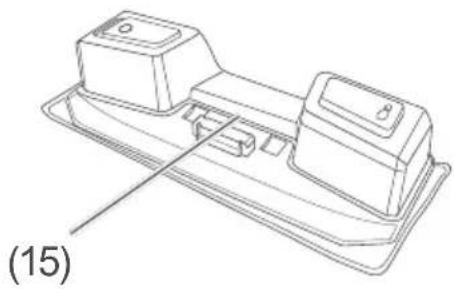
(15) Water tank
(16) Cloth
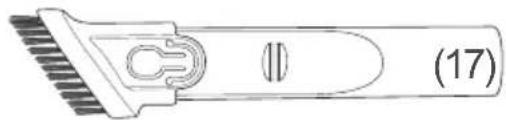
(17) Crevice nozzle
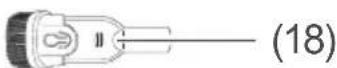
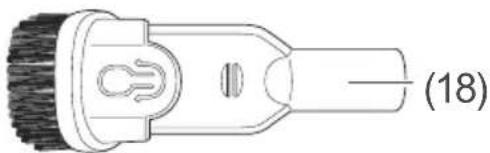
(18) Furniture nozzle
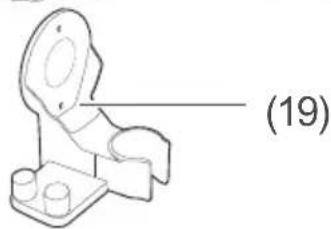
(19) Wall bracket

natural_image
Technical line drawing of a mechanical component with no visible text or symbols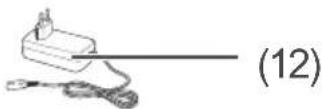
natural_image
Technical line drawing of a mechanical component with a labeled section (13), no readable text or symbols present.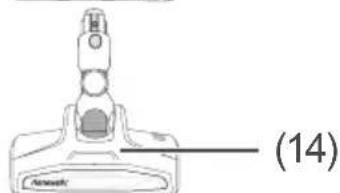
natural_image
Technical line drawing of a Baser key with a labeled component (14), no text or symbols present.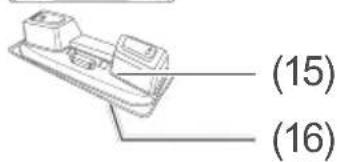

natural_image
Technical line drawing of a mechanical bracket component (no text or symbols)Nozzles
The vacuum cleaner comes with various nozzles designed for a range of uses. Where required, each nozzle can be attached to the suction tube (8) or the tube extension (11) before or during vacuuming.
Soft floor nozzle
natural_image
Technical line drawing of a mechanical component with a labeled part (13), no readable text or symbols present.You will work mostly with the soft floor nozzle (13), which is designed for large, flat surfaces and smooth floors.
Floor nozzle (turbo brush)
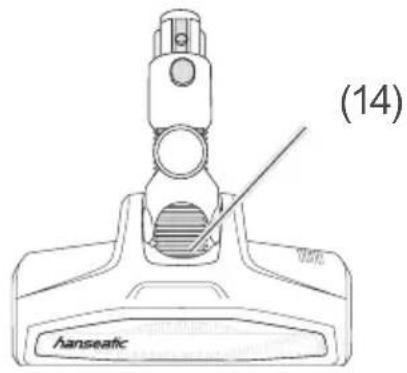
The floor nozzle (turbo brush) (14) is well suited for vacuuming hair and thread from rugs and carpeted floors.
natural_image
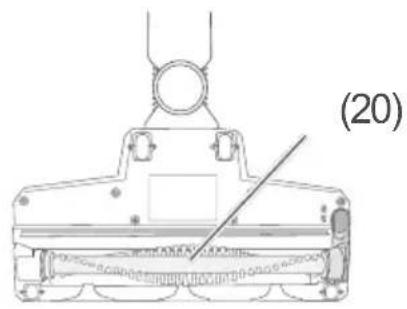
Technical line drawing of a mechanical component with no visible text or symbolsThe rotating brush (20) is powered electrically.
Crevice nozzle
natural_image
Line drawing of a mechanical tool with a handle and screw base (no text or symbols)The crevice nozzle (17) is suitable for vacuuming material folds, joints, corners and niches that cannot be reached with the floor nozzle.
Furniture nozzle
natural_image
Technical line drawing of a mechanical component with textured ends and a labeled section (18), no readable text or symbols beyond the label.With the furniture nozzle (18) you can vacuum dust from up-holstered furniture, mattresses, sofas or small surfaces.
Water tank
natural_image
Line drawing of a mechanical component with two blocks and a handle, labeled (15) at bottom (no text or symbols on the diagram itself)Use the water tank to wipe down freshly cleaned hard floors (e.g. laminate, linoleum) with a moist cloth.
Start-up
Unpacking the appliance

NOTICE
Risk of damage!
Improper handling of the appliance may result in damage.
■ Do not use sharp objects to unpack the appliance.
- Unpack the appliance.
- Carefully remove all parts of the packaging, plastic profiles, tape and foam padding.
Mounting the wall bracket

WARNING
Risk of injury!
Improper installation of the appliance can lead to injury.
■ Before drilling the holes, ensure that no wires or cables (power, gas, water etc.) will be damaged (check with a line locator).

NOTICE
Risk of damage!
Improper handling of the appliance may result in damage.
■ Check the condition of the wall before mounting the wall bracket.
You should mount the wall bracket before setting up the appliance.
Screws and wall plugs
You will need:
- 2 round-headed screws
- 2 suitable dowels
Tools and aids
You will need:
- Screwdriver
- Drill with drill bit suited to the nature of the wall
- Measuring tape / ruler
- Level
- Pencil

The upper drill hole must be at least 102 cm above the ground.
- Start by drawing a vertical guide line on the wall using a pencil. It is best to use a spirit level for this.
- Mark out the drill holes.
The upper drill hole must be at least 102 cm above the ground; the distance between the drill holes should be 10.2 cm. - Drill holes at the marked points, using a diameter that can accommodate the wall plugs.
- Place the wall plugs into the holes.
- Attach the wall bracket to the wall using the two screws.
Charging the battery
Completely charge the battery for the first time. The battery usually takes 4 to 5 hours to charge. To improve the battery's life, let it fully discharge during use. In other words, use the device until it stops running.
Charge the battery every three months to prevent deep discharging. Do this even if you do not need to use the appliance during this time.
- Insert the power adapter plug (12) into the charging port (5) for the charging cable on the battery.
- Connect the mains plug to a properly installed socket with earthing contact.
The battery operating light (4) turns red. - Once the battery is charged (when the operating light is green), remove the plug of the power adapter (12) from the charging port (5) for the charging cable.
Preparing the appliance
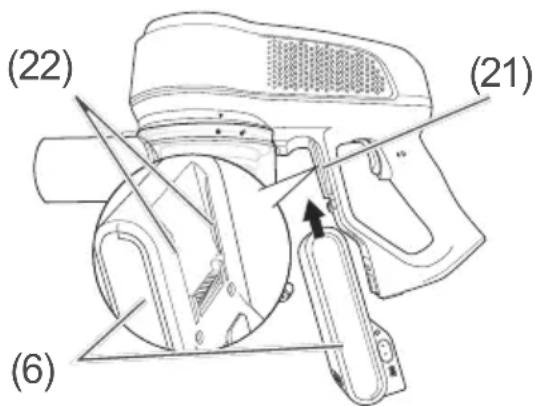
- Insert the battery (6) onto the handle of the appliance.
Make sure that the guide rails (21) on the appliance slide into the guide rails (22) on the battery (6).
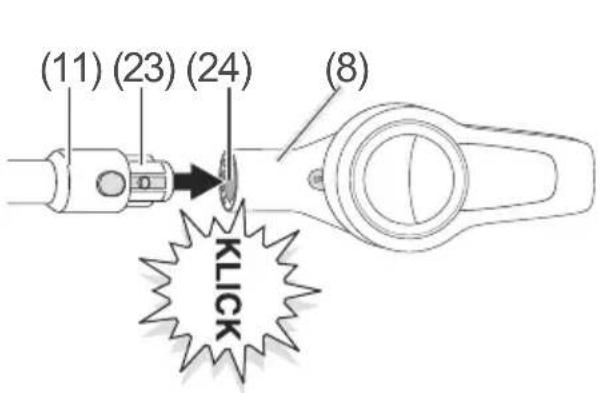
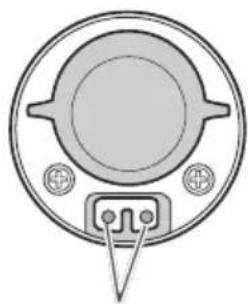
- Insert the connector (23) on the tube extension (11) into the opening (24) on the suction tube (8).
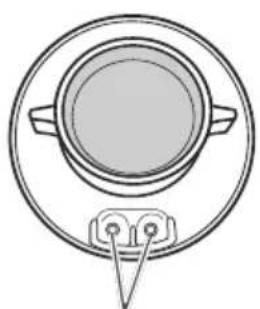
natural_image
Simple line drawing of a circular object with two handles and a triangular base, no text or symbols present.(25) (26)
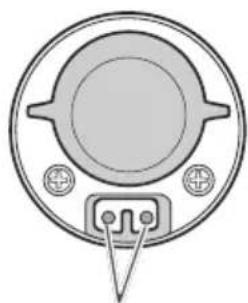
natural_image
Circular mechanical component with central hub and mounting holes (no text or symbols)Make sure that the connector pins (25) slide into the openings (26).
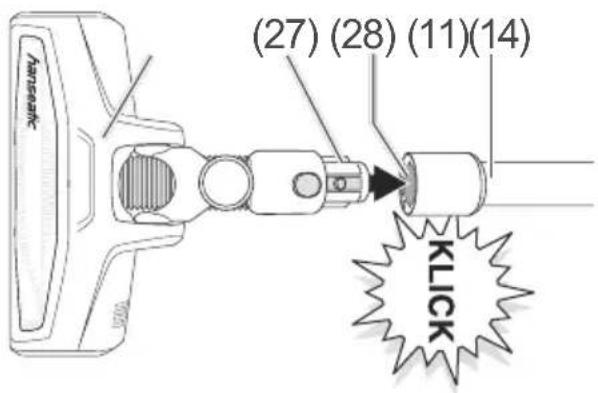
- Select a nozzle, e.g. the floor nozzle (turbo brush) (14), and insert the connector (27) of the floor nozzle (14) into the opening (28) on the tube extension (11).
Make sure that the connector pins (25) slide into the openings (26).
You can also attach all nozzles to the appliance directly.
All filters have already been inserted at the manufacturing plant. Your vacuum cleaner is now ready to use.
Operation
You can use the appliance if
– you have read the chapter "Safety", in particular the safety instructions (see page EN-4).
– the appliance has been set up as described in the chapter "Start-up" (see page EN-17).
Vacuuming floors

WARNING
Risk of electric shock!
Improper use of the appli- ance may lead to serious injury or death.
■ Do not vacuum glowing ash, burning cigarettes or matches, sharp objects, glass fragments, water or other liquids. Glowing ash, burning cigarettes, etc. set the filter on fire; moisture can cause short circuits; sharp objects damage the filter and can cause short circuits.

CAUTION
Health hazard!
Improper handling of the appliance may result in health hazards.
■ Do not use the appliance if the hygiene or motor protection filter is missing or damaged. Otherwise, vacuumed dust can penetrate the appliance and escape into the ambient air.

NOTICE
Risk of damage!
Vacuuming unsuitable materials blocks the filter and can damage the appliance.
■ Never vacuum clay, plaster, cement, masonry dust or drilling dust.
natural_image
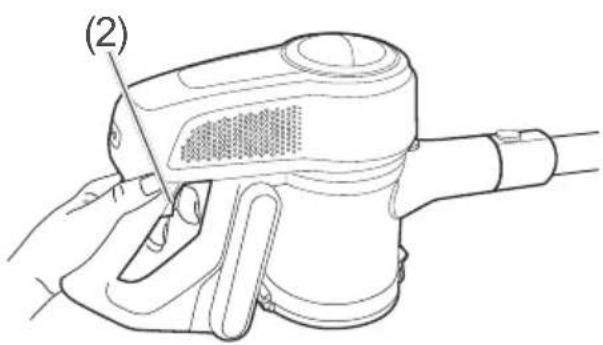
Line drawing of a handheld electric shaver with a hand holding the blade (no text or symbols)- Press the On/Off switch (2) to turn the appliance on.
The appliance will switch on at suction level I. - To vacuum, push and pull the nozzle across the surface you are vacuuming. Rotate the tube extension (11) slightly to reach corners more effectively. This positions the nozzle diagonally.

In rare cases this can make a whistling noise initially.
This is not a malfunction and stops after a while.
Setting the suction force
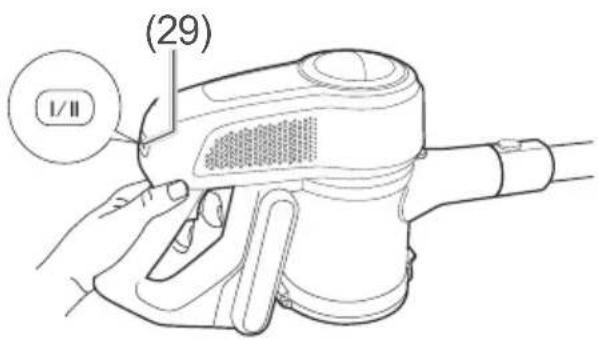
The appliance is equipped with two suction levels. Set the suction level using the suction level switch (29).
- Press the suction level switch (29)
- once to switch from suction level I to suction level II; - once more to switch from suction level II back to level I.
Using the nozzles
The crevice nozzle (17) and the furniture nozzle (18) can also be used as brush nozzles.
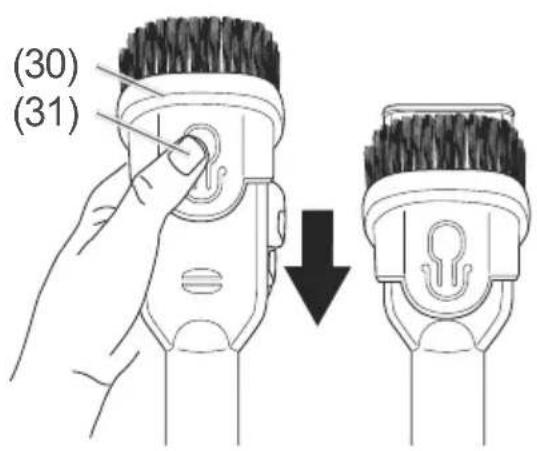
- To use the furniture nozzle (18) or the crevice nozzle (17) as a brush nozzle, press the locking mechanism (31) and slide the attachment (30) upwards.
- To use the furniture nozzle (18) or the crevice nozzle (17) for vacuuming, e.g. for upholstered furniture, press the locking mechanism (31) and slide the attachment (30) downwards.
Using the articulated joint
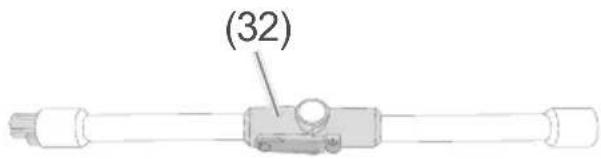
The appliance's tube extension features an articulated joint (32) to allow for easy vacuuming under furniture (e.g. cabinets, shelves, sofas).
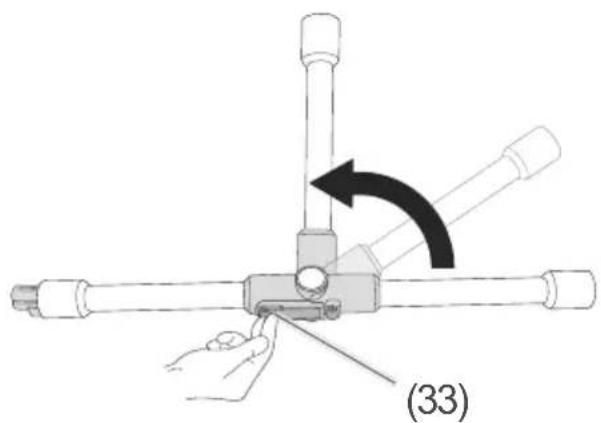
- Press the lock button (33) to release the articulated joint (32).
Using the water tank

CAUTION
Health hazard!
Improper handling of the appliance may result in health hazards.
■ Do not use the appliance if the hygiene or motor protection filter is missing or damaged. Otherwise, vacuumed dust can penetrate the appliance and escape into the ambient air.
■ If you do not plan on using the appliance for an extended period or if it has not been used for a longer period, empty the water tank.
■ Do not expose the water tank to direct sunlight or keep it stored close to a heater.
Use the water tank to wipe down freshly cleaned hard floors (e.g. laminate, linoleum) with a moist cloth.
Filling the water tank
The 'Water' button (36) must be in the — position when filling the water tank.
(34) (36)(35)
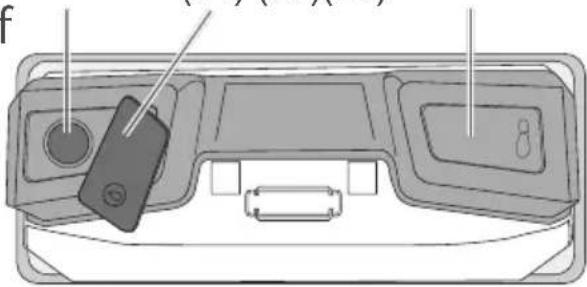
- Open the filler cap (34) and pour fresh water into the filling hole (35). Put the filler cap (34) back on.
Installing the water tank
- Place the water tank on the floor.
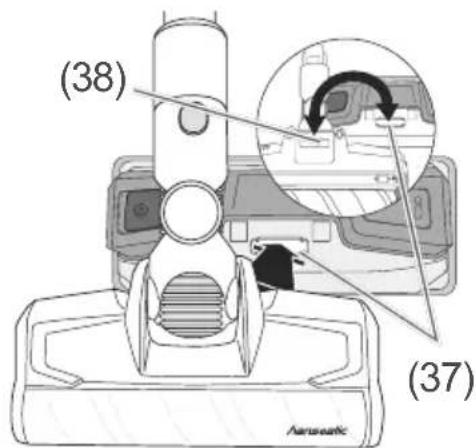
- Place the appliance with the soft floor nozzle (13) on the
water tank (15) so that the water tank (15) bracket (37) inserts into the recess (38) for the soft floor nozzle (13) and then clicks into place.
Attaching the cloth
- Flip over the water tank (15) so that the bottom is facing up.
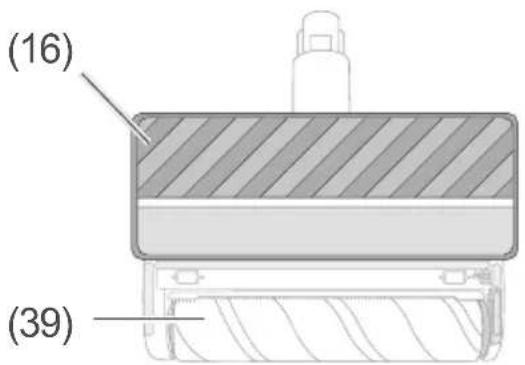
- Attach the cloth (16) to the water tank so that the blue surface faces outward and the white surface is on the roller (39).
Wiping the floor
- Start vacuuming as described in section "Vacuuming floors" on page EN-20.
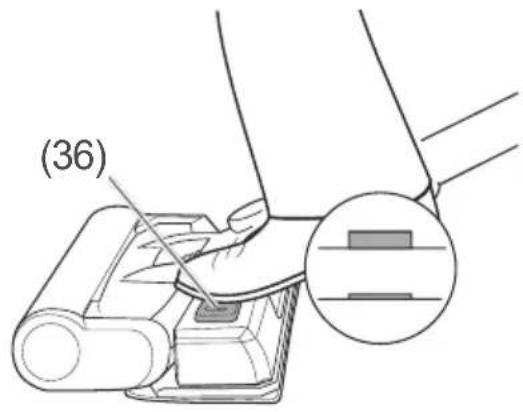
- To start dispensing water, move the 'Water' button (36) to the position.
- To stop dispensing water, return the 'Water' button (36) to the — position.
Finishing vacuuming
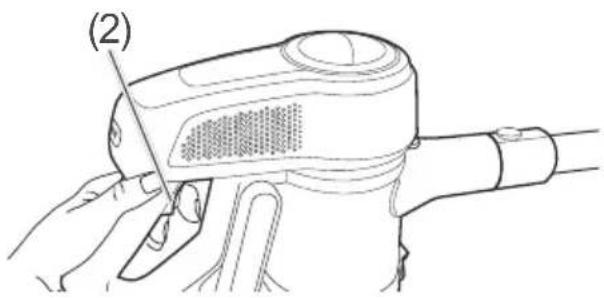
- Press the On/Off switch (2) to switch the appliance off.
Tidying away/storage
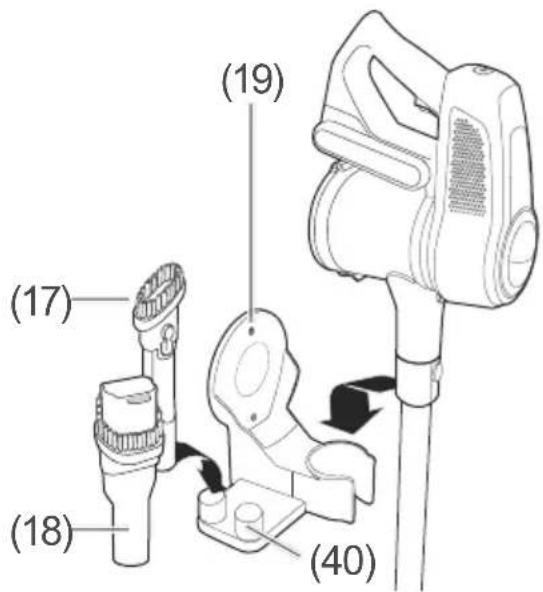
- To tidy away or store the appliance, hang it on the wall bracket (19) as illustrated. Attach the crevice nozzle (17) and the furniture nozzle (18) to the corresponding attachments (40).
Care and maintenance

CAUTION
Health hazard! Improper handling of the appliance may result in health hazards.
■ Do not empty the dust bin in enclosed spaces. Empty the dust bin on a balcony, or outdoors directly into the waste bin.
Emptying the dust bin
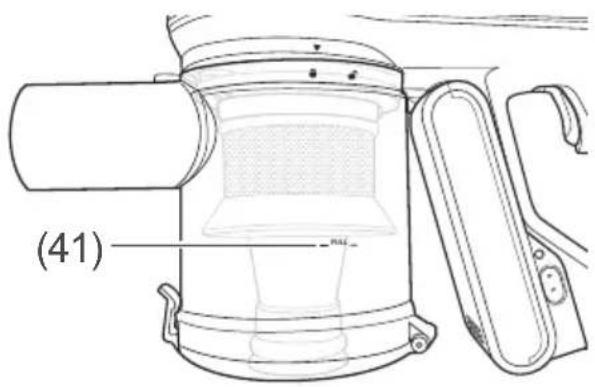
You should empty the dust bin at the latest when the dust in the dust bin reaches the "Full" mark (41).
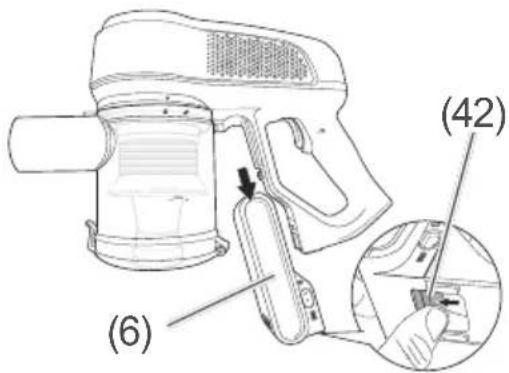
-
First remove the battery (6). To do this, press the locking mechanism (42) on the battery (6).
-
Hold the appliance and dust bin over a waste bin in such a way that the base of the dust bin is pointing towards the waste bin.
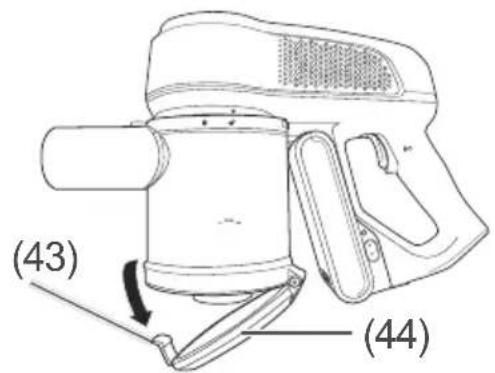
-
Press the lock button (43) on the dust bin base (44). The base of the dust bin (44) opens out downwards, and the dust falls into the waste bin.
-
Once the dust bin is empty, close the base of the dust bin (44). You will hear the lock snap into place.
Cleaning/changing the dust filter

WARNING
Risk of electric shock! Improper use of the appli- ance may lead to serious injury or death.
■ Always pull the mains plug out of the socket prior to changing or cleaning the motor protection filter.

NOTICE
Risk of damage! Improper handling of the appliance may result in dam- age.
■ Always use the correct filter for the appliance, otherwise the appliance may not function optimally.
■ Never vacuum without filters or with damaged filters. Dust which has been vacuumed up can get inside the appliance and damage the motor.
■ Do not wash the filter in a washing machine or a dish-washer.
The dust filter should be cleaned on a regular basis. Should it be damaged or is no longer sufficiently cleanable, it must be replaced with a new one.
- First remove the battery (6).
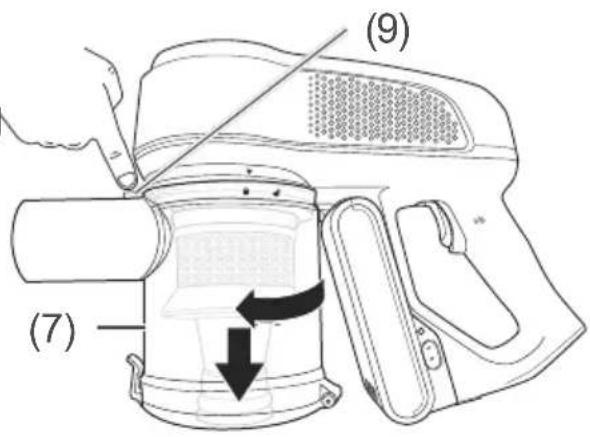
- Press the release button (9) for the dust bin (7).
- Turn the dust bin (7) clockwise until the symbol is underneath the wedge symbol and remove the dust bin (7).
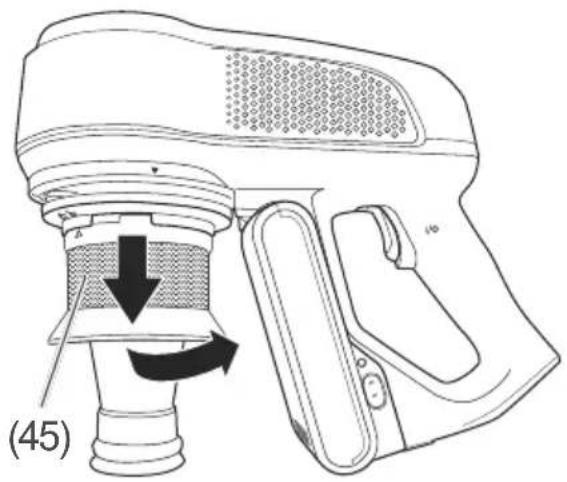
natural_image
Diagram of a handheld device with a valve and handle, showing internal components and directional arrows (no text or symbols)- Turn the dust bin (45) anti-clockwise until the 🔔 symbol is above the wedge symbol ▼ and remove the dust filter (45).
- Wash the dust filter under running water.
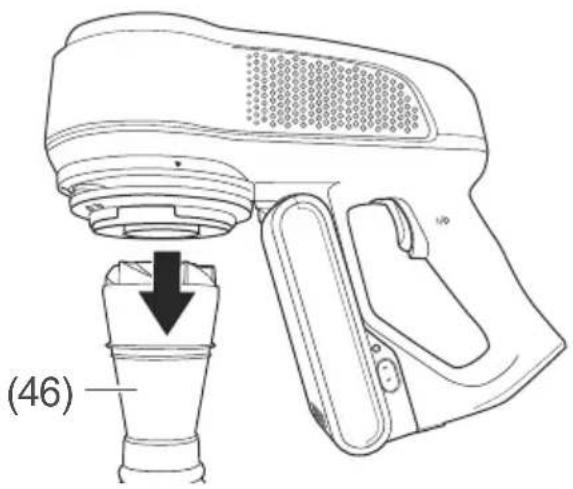
- Remove the suction piece (46) and wash it under running water.
- Allow the dust filter (45) and the suction piece (46) to dry out completely.
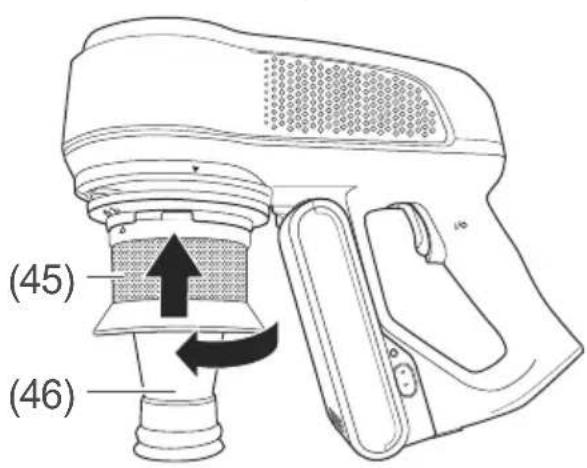
- Reinsert the suction piece (46) and dust filter (45) into the vacuum cleaner and turn the dust filter (45) clockwise until the symbol is above the wedge symbol ▼.
- Reattach the dust bin (7) and turn it anticlockwise until the symbol is underneath the wedge symbol ▼.
Cleaning/changing the hygiene filter

WARNING
Risk of electric shock! Improper use of the appli- ance may lead to serious injury or death.
■ Before changing or cleaning the hygiene filter, always pull the mains plug out of the socket.

NOTICE
Risk of damage! Improper handling of the appliance may result in dam- age.
■ Only use the appliance with the filters installed.
■ Never dry hygiene filters on a heater or with a hairdryer or tumble dryer, etc. It will become porous and can be damaged.
■ Never wash the hygiene filter in a washing machine.
■ Only let the hygiene filter air-dry.
The hygiene filter should be cleaned regularly.
If odours cannot be removed by cleaning or the filter is too heavily soiled, it must be replaced.
- First remove the battery (6).
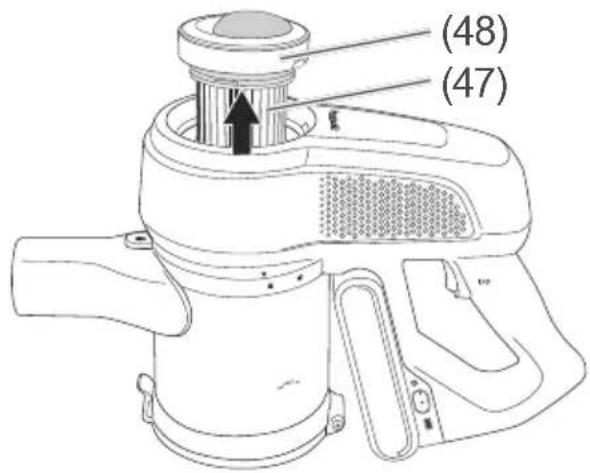
- Lift out the hygiene filter (47) on the filter cover (48).
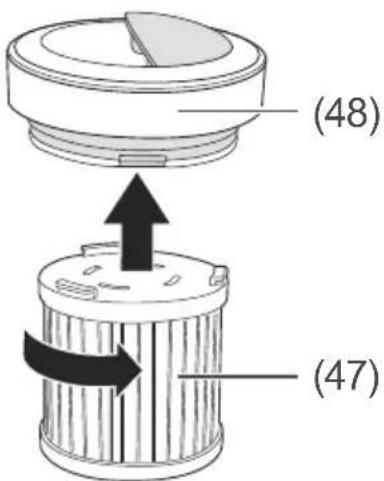
- Turn the filter cover (48) anticlockwise and pull it off the hygiene filter (47).
- Rinse the hygiene filter (47) and the filter cover (48) with clean water only, or shake it and/or clean it with compressed air. Never use detergent or washing-up liquid to clean the hygiene filter (47).
- Allow the hygiene filter (47) and the filter cover (48) to dry completely.
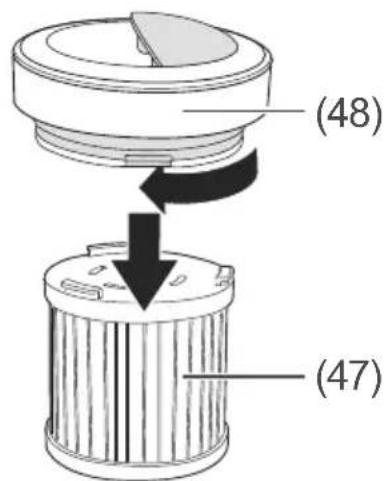
- Reattach the filter cover (48) to the hygiene filter (47) and turn it clockwise to tighten it.
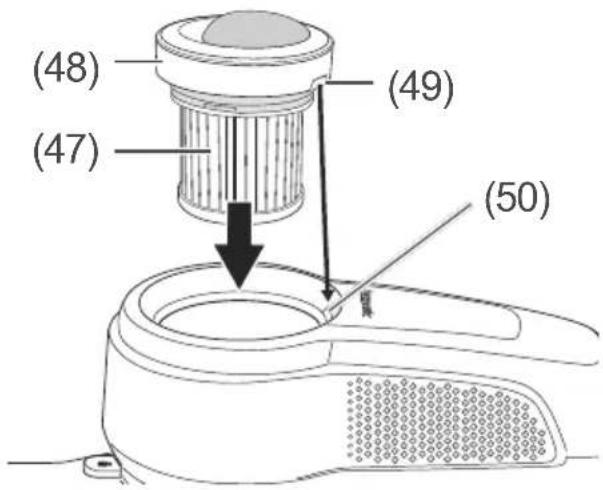
- Reinsert the hygiene filter (47) with the filter cover (48). In doing so, make sure that the recess (49) in the filter cover (48) hooks into the lug (50) on the appliance housing.
The article numbers for re-ordering dust and hygiene filters are listed in chapter "Service" on page EN-38.
Cleaning the appliance

WARNING
Risk of electric shock! Improper use of the appli- ance may lead to serious injury or death.
■ Always remove the battery before cleaning the appliance.
■ Ensure that no water seeps into the appliance.
■ Never immerse the appli
ance in water.
■ Reinsert the battery only once all parts of the appliance are completely dry.

NOTICE
Risk of damage! Improper cleaning of the appliance can impair the surface.
■ Do not use any abrasive cleaners (scouring or thinning agents) to clean the appliance.
- Wipe
– the housing and – the accessories with a damp cloth as required. Never allow liquid to penetrate the vacuum cleaner.
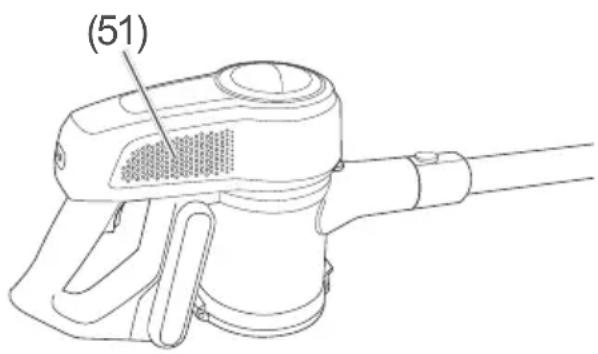
- Occasionally clean the air vent (51) on the right-hand side of the appliance with a soft brush.
Cleaning the soft floor nozzle

CAUTION
Risk of injury!
Improper handling of the appliance may result in injury.
■ Never touch moving parts of the appliance and accessories, e.g. the floor brush. There is a risk of fingers becoming trapped.
■ Always remove the floor brush from the telescopic tube or suction hose before cleaning.
- Vacuum the underside of the soft floor nozzle (13) now and then with the crevice nozzle (17).
If the soft floor nozzle (13) is no longer working properly:
- Remove the floor soft nozzle (13) from the tube extension (11) or from the suction tube (8).
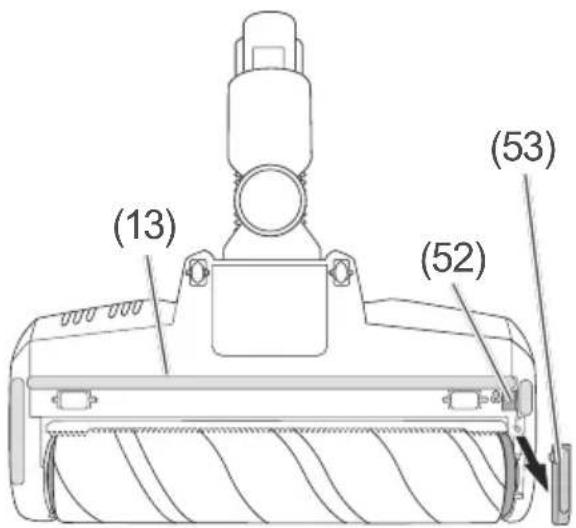
- Pull back the slider (52) on the underside of the soft floor nozzle (13).
- Remove the locking latch (53).
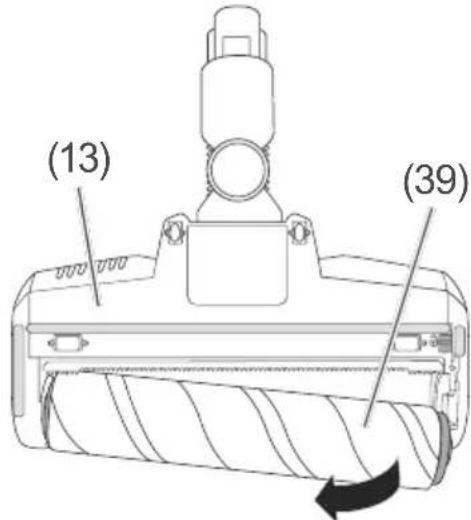
- Remove the roller (39).
- Remove any lint and hair from the roller (39).
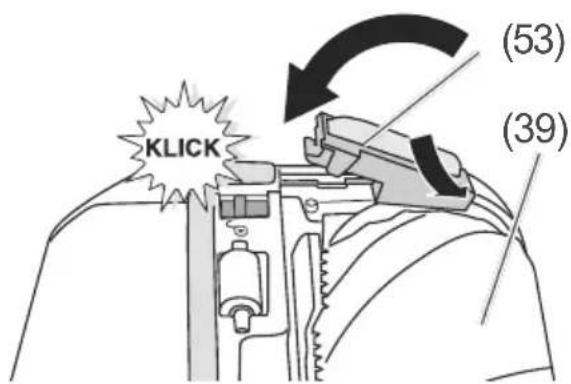
- Reinsert the roller (39) and the locking latch (53). The locking latch must 'click' into place.
Cleaning the floor nozzle (turbo brush)

CAUTION
Risk of injury!
Improper handling of the appliance may result in injury.
■ Never touch moving parts of the appliance and accessories, e.g. the floor brush. There is a risk of fingers becoming trapped.
■ Always remove the floor brush from the telescopic tube or suction hose before cleaning.
• Vacuum the underside of the floor nozzle (turbo brush) (14) now and then with the crevice nozzle (17).
If the floor nozzle (turbo brush) (14) is no longer working properly:
- Remove the floor nozzle (turbo brush) (14) from the tube extension (11) or from the suction tube (8).
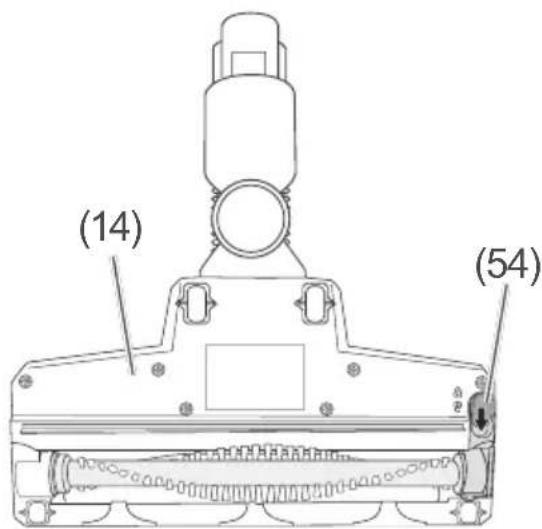
- Push the slider (54) on the underside of the floor nozzle (turbo brush) (14) to the 'Open' position (towards the symbol).
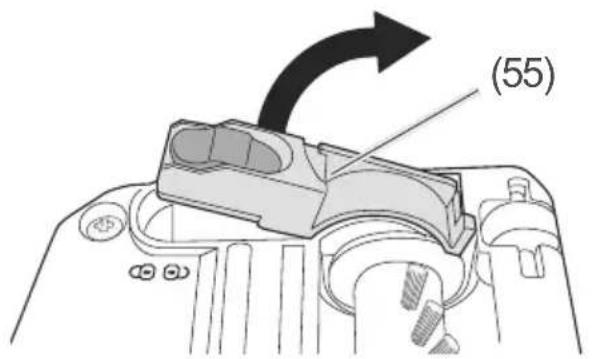
- Remove the locking latch (55).
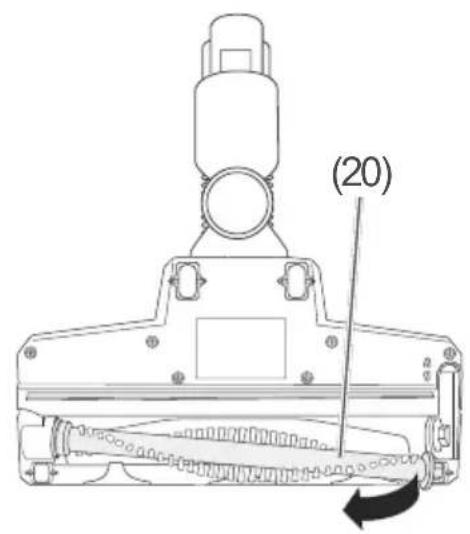
- Remove the brush (20).
- Remove any lint and hairs from the brush (20).
- Reinsert the brush (20) and the locking latch (55) and move the slider (54) to the "Closed" position (towards the symbol).
Cleaning the water tank and cloth
Cleaning the water tank
- Flip over the water tank (15) so that the bottom is facing up.
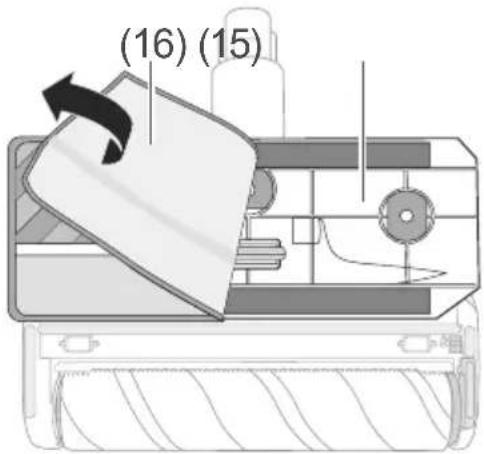
- Remove the cloth (16) from the bottom of the water tank (15).
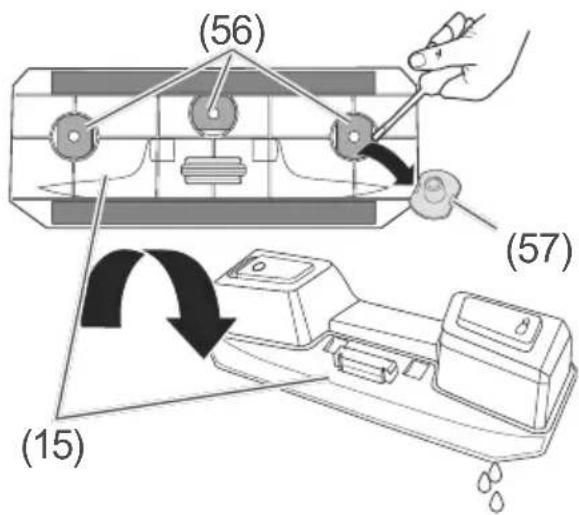
- Over a sink or drain, carefully lever off the water outlet valves (56) using a screwdriver, for example. To do this, place the screwdriver under the gaps (57). Flip the water tank (15) over again so that the water can drain.
- Drain the water and then reattach the water outlet valves (56). Flip the water tank (15) over again.
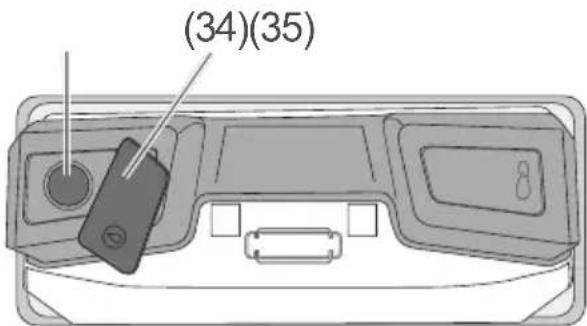
- Pour water mixed with a cleaning agent (vinegar, household cleaner) into the filling opening of the water tank (35)
- Close the filler cap (34), give the filled water tank (15) a thorough shake, and then leave it for a bit.
- Open the filler cap (34) and pour out the water mixture inside the water tank (15).
-
Repeat steps 2 and 4 with clean water.
-
Leave the filler cap (34) open so that the inside of the water tank (15) can dry.
Cleaning the cloth

NOTICE
Risk of damage! Improper cleaning of the cloth can damage it.
■ The cloth can be cleaned by hand or in the washing machine at 40°C. It is not suitable for the tumble dryer.
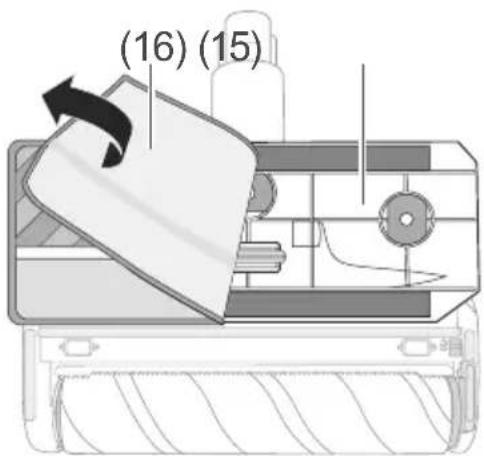
- Remove the cloth (16) from the bottom of the water tank (15).
- Wash the cloth (16).
- Affix the cloth (16) once again as described in chapter "Attaching the cloth" on page EN-24.
Troubleshooting table
Malfunctions can occur in all electrical appliances. This does not necessarily mean there is a defect in the appliance. For this reason, check the tables to see if you can correct the malfunction.

WARNING
Risk of electric shock in case of improper repair! Never try to repair a defective or suspected defective appliance yourself. You can put your own and future users' lives in danger. Only authorised specialists are allowed to carry out this repair work.
| Problem Possible cause | Solutions, tips | |
| Appliance is not working. | Appliance is switched off. | Switch the appliance on. |
| Battery performance is too low. | Charge the battery. | |
| Appliance switches itself off. | Brush/nozzle blocked. | Switch the appliance off and clean the brush/ nozzle. |
| Dust filter is blocked. Overheat protection has been activated. | Switch the appliance off, leave to cool for at least 30 minutes, and clean the motor protection filter. | |
| Tube extension is plugged. | Switch the appliance off, check the tube extension for blockages, and clean if necessary. | |
| Battery performance is too low. | Charge the battery. | |
| Suction force is weak. | Nozzle is not positioned correctly. | Position the nozzle correctly. |
| Object is plugging the nozzle. | Switch the appliance off and check the tube extension for obstructions. Remove object. | |
| Filters are inserted incorrectly or are contaminated. | Insert filters correctly and/or clean. | |
| Battery performance is too low. | Charge the battery. | |
| Dust is escaping from the appliance. | Filters are inserted incorrectly or are contaminated. | Insert filters correctly and/or clean. |

In rare cases this can make a whistling noise initially. This is not a malfunction and stops after a while.
Service
Please note!
You are responsible for the condition of the appliance and its proper use in the household.
Damage resulting from non-compliance with this manual cannot be recognised.
In order for us to help you quickly, please tell us:
| Name of appliance/accessories Order number | |
| hanseatic Battery-Operated Vacuum Cleaner VC-PD510-2 | 98556924 |
| 1× hygiene filter 25932449 | |
| 1× Li-ion battery T-DC38P 44910236 | |
| 1× cloth 15107216 |
General customer service
Please contact your mail order company's product advice centre if you have questions, complaints or accessory orders.
Spare parts
Customers in Germany
– Please contact Hermes Fulfilment GmbH:
Tel. (057 32) 99 66 00
Monday–Thursday 8 a.m.–3 p.m., Friday 8 a.m.–2 p.m.
Customers in Austria
- Please contact your mail order company's customer service centre or product advice centre.
Disposal and waste prevention
Our contribution to the protection of the ozone layer

Our packaging is made from environmentally friendly, recyclable materials:
– Outer packaging made of cardboard
– Moulded parts made of foamed, CFC-free polystyrene (PS)
– Films and bags made of poly-ethylene (PE)
– Tension bands made of polypropylene (PP).
If you have sufficient space, we recommend keeping the packaging, at least during the warranty period. If the appliance has to be sent in for repair or brought to one of the repair service points, the appliance will only be adequately protected in the original packaging.
Dispose of the packaging responsibly.
Waste prevention
According to the provisions of Directive 2008/98/EC, waste prevention measures always take priority over waste management.
For electrical and electronic devices, waste prevention measures include extending the lifespan of defective devices through repair and reselling used working appliances instead of disposing of them.
Please help us reduce waste and contact our customer service if your product is faulty.
More information can be found in the brochure “Waste Prevention Programme - of the German Government with the Involvement of the Federal Länder”.
Disposing of old electrical devices in an environmentally-friendly manner
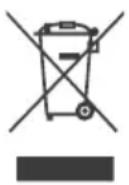
Electrical appliances contain harmful substances as well as valuable resources.
Every consumer is therefore required by law to dispose of old electrical appliances at an authorised collection or return point. They will thus be made available for environmentally-sound, resource-saving recycling.
You can dispose of old electrical appliances free of charge at your local recycling centre.
Contact your dealer directly for more information about this topic.
Batteries and rechargeable batteries
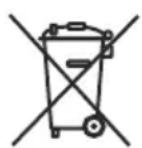
The symbol shown here means that batteries and rechargeable batteries must not be disposed of with other household waste.
Consumers are required by law to bring all batteries and rechargeable batteries, regardless of whether they contain harmful substances*) or not, to a collection point operated by their communal authority or borough or to a retailer, so that they can be disposed of in an environmentally friendly manner and so that valuable resources (e.g. cobalt, nickel or copper) can be recovered.
Batteries and rechargeable batteries can be returned free of charge.
Some of the possible contents (e.g. mercury, cadmium and lead) are toxic and, if improperly disposed of, can have adverse effects on the environment. Heavy metals, for instance, can have detrimental health effects on humans, animals and plants and accumulate in the environment and food chain, and then enter the body indirectly through the consumption of food.
There is a high risk of fire with old lithium batteries. Special care must therefore be taken to properly dispose of old lithium batteries and rechargeable batteries. Improper disposal can also lead to internal and external short circuits due to thermal effects (heat) or mechanical damage. A short circuit can lead to a fire or
an explosion and have serious consequences for people and the environment. It is therefore important to tape off the poles of lithium batteries and rechargeable batteries before disposing of them to prevent an external short circuit.
Before disposing of the appli- ance, batteries and rechargeable batteries which are not perma- nently built into the appliance must be removed and disposed of separately.
Please only dispose of batteries and rechargeable batteries in a discharged state!
If possible, use rechargeable batteries in place of disposable batteries.
*) labelled with:
Cd = Cadmium
Hg = Mercury
Pb = Lead
Technical specifications
| Manufacturer hanseatic | |
| Name of appliance Battery-Operated Vacuum Cleaner | |
| Model VC-PD510-2 | |
| Rated power 350 W | |
| Mains connection 100–240 V~, 50/60 Hz | |
| Charger +) | ZD12D250060EU/S018-1B250060HE |
| Input voltage 100–240 V~ | |
| AC input frequency 50/60 Hz | |
| Output voltage 25 V | --- |
| Output current 0.6 A | |
| Output power 15.0 W | |
| Average active efficiency 84.3 % | |
| Low load efficiency | 80.0 % |
| No-load power consumption | 0.10 W |
| Battery type+) | Lithium-Ion T-DC38P |
| Operating voltage | 21.6 V --- |
| Battery capacity | 2000 mAh |
| Protection class | II |
| Weight (assembled) approx. | 3.55 kg |
| Order number | 98556924 |
Notice: The vacuum cleaner was tested as a universal vacuum cleaner.
*) Depending on package contents, see type plate
- Table of contents
- Explanation of terms/symbols
- WARNING
- CAUTION
- NOTICE
- Safety
- Intended use
- Safety notices
- Risks to children
- Risks for certain groups of people
- Risks in handling household electrical appliances
- WARNING!
- CAUTION!
- Risks when handling the vacuum cleaner
- Risks when handling the battery pack
- Delivery
- Package contents
- Check the delivery
- Appliance parts and nozzles
- Nozzles
- Crevice nozzle
- Furniture nozzle
- Water tank
- Start-up
- Unpacking the appliance
- Mounting the wall bracket
- Screws and wall plugs
- Tools and aids
- Charging the battery
- Preparing the appliance
- Operation
- Vacuuming floors
- Setting the suction force
- Using the nozzles
- Using the articulated joint
- Using the water tank
- Filling the water tank
- Installing the water tank
- Attaching the cloth
- Wiping the floor
- Finishing vacuuming
- Care and maintenance
- Cleaning/changing the dust filter
- Cleaning/changing the hygiene filter
- Cleaning the appliance
- Cleaning the soft floor nozzle
- Cleaning the floor nozzle (turbo brush)
- Cleaning the water tank and cloth
- Cleaning the water tank
- Cleaning the cloth
- Troubleshooting table
- Service
- General customer service
- Spare parts
- Customers in Germany
- Customers in Austria
- Disposal and waste prevention
- Our contribution to the protection of the ozone layer
- Waste prevention
- Disposing of old electrical devices in an environmentally-friendly manner
- Batteries and rechargeable batteries
- Technical specifications
Brand : Hanseatic
Model : VC-PD510-2
Category : Vacuum Cleaner