
Cortex 9 - Software RAZER - Free user manual and instructions
Find the device manual for free Cortex 9 RAZER in PDF.


| Product Type | Gaming Controller |
| Brand | Razer |
| Model | Cortex 9 |
| Connectivity | Bluetooth 5.0, USB-C |
| Dimensions | 150 x 110 x 60 mm |
| Weight | 250 g |
| Battery Capacity | 800 mAh |
| Battery Life | Up to 20 hours |
| Charging Time | 2 hours |
| Compatible Platforms | PC, Android, iOS |
| Programmable Buttons | 6 buttons |
| Analog Sticks | 2 Hall Effect analog sticks |
| Trigger Buttons | Analog triggers with hair trigger mode |
| Rumble Feedback | Yes, dual vibration motors |
| Motion Controls | 6-axis gyroscope |
| Headphone Jack | 3.5 mm audio jack |
| Wireless Range | Up to 10 meters |
| Material | Ergonomic rubberized grips |
| Maintenance | Wipe with a dry, soft cloth. Avoid liquids. |
| Safety Precautions | Do not expose to moisture or extreme temperatures. |
| Spare Parts | Not user-replaceable; contact Razer support. |
| Warranty | 2 years limited warranty |
Frequently Asked Questions - Cortex 9 RAZER
User questions about Cortex 9 RAZER
0 question about this device. Answer the ones you know or ask your own.
Ask a new question about this device
Download the instructions for your Software in PDF format for free! Find your manual Cortex 9 - RAZER and take your electronic device back in hand. On this page are published all the documents necessary for the use of your device. Cortex 9 by RAZER.
USER MANUAL Cortex 9 RAZER
natural_image
Abstract black line drawing on green background, resembling a stylized snake or serpent (no text or symbols)RAZER CENTRAL
MASTER GUIDE
CONTENTS
- RAZER CENTRAL....2
- USING A GUEST ACCOUNT .... 3
- SIGNING UP FOR A RAZER ID .... 3
- LOGGING IN....4
- RETRIEVING A FORGOTTEN PASSWORD....4
- USING RAZER CENTRAL....5
1. RAZER CENTRAL
Razer Central allows you to use a single Razer ID across all Razer applications. You can now update your Razer ID profile and account settings, quickly access and update various Razer applications in one click, and stay up to date with the latest Razer promotions and software updates available.
Razer Central is automatically installed/launched whenever installing or launching any of the following Razer applications:
- Razer Cortex. The one solution for all your PC gaming needs brings enhanced gaming performance, system performance, and the ability to discover the best gaming deals on a single platform at just a click away. Learn more about Razer Cortex
- Razer Synapse. The unified hardware configuration tool that's designed to take your Razer device to the next level. Learn more about Razer Synapse
Razer Central is also capable of exiting any or all Razer applications through its system tray function, which provides quick access to some of the functions each Razer application offers.
2. USING A GUEST ACCOUNT

For those who like to keep things simple, you may now use Razer Synapse and/or Razer Cortex without creating a Razer ID account, logging in, and/or an internet connection.
Upon launching any Razer software, click CONTINUE AS GUEST on the Razer LOGIN page to proceed using a Guest account.
An internet connection is still required for software updates, Razer Synapse modules, and Razer Cortex Deals. Registering for a Razer ID account is recommended to access full features but is not required. Learn more about the Guest account
3. SIGNING UP FOR A RAZER ID

If you haven't registered for a Razer ID yet, you can also use the Razer LOGIN page to sign up for a Razer ID account.
- On the Razer LOGIN page, click SIGN UP.
- Follow the onscreen instructions and accept the Razer ID's Terms and Conditions.
- Check your email inbox for a verification link from Razer and click the provided link.
- Return to the Razer LOGIN page and click NEXT to proceed.
If you didn't receive any email, click Re-send email. You won't be allowed to proceed with the setup if you haven't verified your email address yet.
- Select whether you want to receive marketing communications from Razer, then click NEXT. You may now start using your new Razer ID for any Razer software.
4. LOGGING IN

If you already have a Razer ID, you can log in directly by doing the following:
- Launch Razer Cortex or Razer Synapse to open the Razer LOGIN page.
- Enter your Razer ID's email address and password, and click LOG IN.
If you want to have your Razer ID automatically logged in each time you launch a Razer software on your PC, select Yay! It's a safe house.
5. RETRIEVING A FORGOTTEN PASSWORD
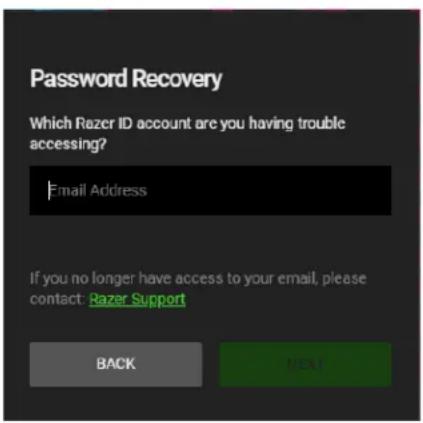
If you have forgotten your Razer ID password, you can retrieve it by doing the following:
- On the Razer LOGIN page, click Forgot Password.
- Enter your Razer ID email on the field provided, and click NEXT.
- On the email confirmation page, click OK, and then click the verification link sent by Razer to your email inbox
- On the PASSWORD RESET page, enter and retype your NEW PASSWORD and then click RESET. You'll be redirected to the login page with a confirmation that you've successfully updated your password.
- You may now login using the new password.
6. USING RAZER CENTRAL
SYSTEM TRAY ICON
The Razer Central icon ( ), found in the system tray, enables you to access Razer Central's expanded system tray, the Razer Central window, or access other secondary functions.
To access these functions, you can either do any of the following:
- Left-click on the Razer Central icon. Open the expanded system tray function. Learn more about the Expanded system tray
- Right-click on the Razer Central icon. Access the Razer Central window or its Settings, check for updates, log out, or exit any or all open Razer applications;

Left-click action
OR

Right-click action
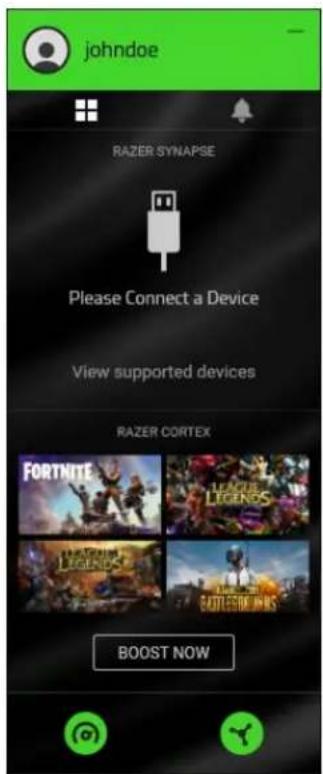
The expanded system tray enables you to access useful features from each installed Razer application. Left-click on the Razer Central icon ( ) to show the expanded system tray.

Click on your Razer ID or avatar to open the Razer Central window. You may also switch the displays of the expanded system tray using the Apps icon (☐) or the Notifications icon (♠).
With Razer Synapse installed and running, use the expanded system tray to easily switch between available profiles set on each connected Razer Synapse supported device.
All Razer Synapse-supported devices in the expanded system tray will only be accessible when Razer Synapse is running.
With Razer Cortex installed and running, the expanded system tray enables you to access Razer Cortex's recently played games with the BOOST NOW function.
The BOOST NOW / RESTORE function on the expanded system tray will only be accessible when Razer Cortex is running.
You may also use the Razer Cortex icon ( ) or the Razer Synapse icon ( ) to launch the corresponding application.
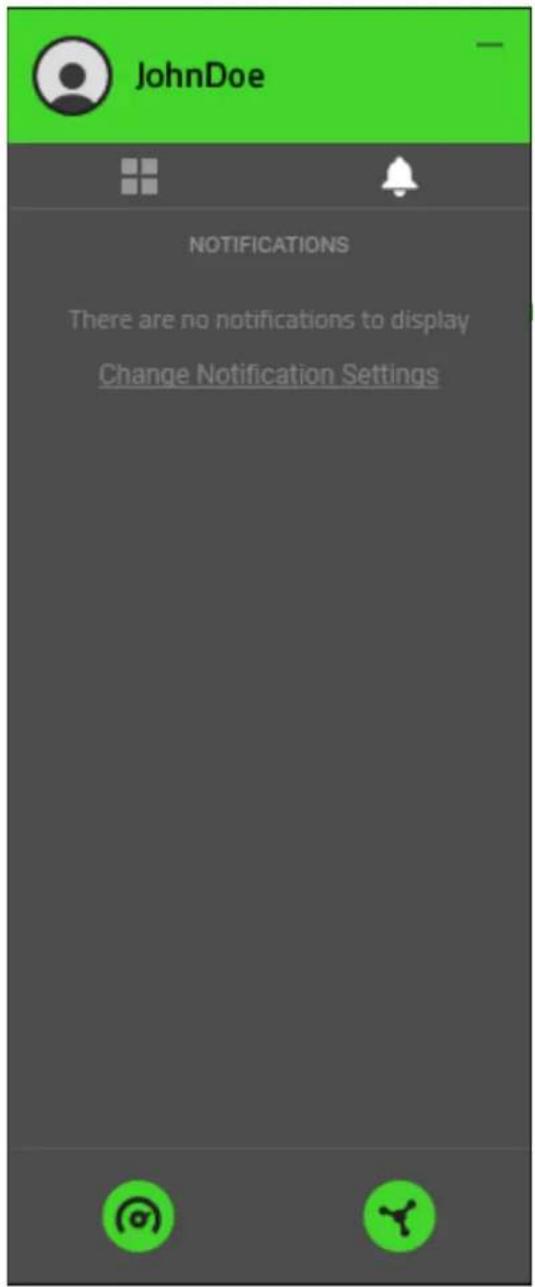
The NOTIFICATIONS tab, accessible by clicking the Notifications icon (♣) in the expanded system tray, displays the available notifications selected on Razer Central's settings.
You can change Razer Central's notifications settings under its own SETTINGS > NOTIFICATIONS.
SETTINGS
Razer Central has its settings accessible through the Settings button ( ⚙ ). These settings will help you manage Razer Central's behavior and notifications. You may scroll through the available settings or use the provided tabs to jump to specific settings.

General
Use the GENERAL tab to change Razer Central's language display, switch color themes, determine what the system tray icon ( ⚙) will launch or do once double-clicked, or if you want the splash screen to show on startup. These settings will be applied across all Razer software.

Razer Central, Razer Cortex, and Razer Synapse each have their own SETTINGS page.
Notifications
Use the NOTIFICATIONS tab to control the promotions seen on Razer Central's NOTIFICATIONS tab, its expanded system tray, and the duration of all onscreen notifications.

Software Updates
Use the SOFTWARE UPDATES tab to change Razer Central's behavior when checking for updates and/or set a bandwidth limit when downloading updates. You can have these updates automatically downloaded or set as notifications.

About
Use the ABOUT tab to view the Razer Central's version and access its Terms of Service, Privacy Policy, and software notice. You may also use this tab to access Razer's various social communities quickly.

2-STEP AUTHENTICATION
As a security feature, all vital details necessary for your account are automatically locked even after logging in and/or when the Razer Central window has been idle. By default, Razer Central will require you to enter a verification code sent to your email whenever clicking on any locked item ( 🔒) on your account page to unlock your account settings for 3 minutes.

Razer Central uses email verification as its default 2-step authentication method. You may only use different authentication methods if you have registered a mobile number and/or linked an authenticator app to your Razer ID. Learn more about 2-Step Authentication
AVATAR FUNCTIONS
From viewing the balance and accessing your Razer Gold wallet, changing your display photo and password, refreshing a page, providing software feedback, to logging out –use the drop-down menu of the avatar icon to access important account functions immediately.

YOUR RAZER ID
The ACCOUNT sub-tab is Razer Central's default window. This tab allows you to manage your contact details and your account's login and security settings.

To refresh the page, you may either use the Refresh option on your avatar's drop-down list; or press F5.
From here, you'll be able to do the following:
■ Razer ID. Change your unique Razer ID.
- Email. Change the primary email address connected to your account.
■ Mobile Phone. Set up or change the mobile number used as your Razer ID's 2-step authentication method.
- Linked. Link social accounts so you can use them when logging into any Razer service.
- Password. Create a new password for your Razer ID. You may also access this setting from your avatar.
- Logout. Log out from the current device you're using and/or from all other authenticated devices.
■ Personal Info. Change your First and Last Name and your Gender. These details are never publicly shared.
Backup codes are automatically generated upon verifying your mobile number. These codes will allow you to log in if your phone is not accessible. We recommend keeping these codes somewhere safe and accessible.
- Billing Address. Modify your billing address details which will be used as a fraud prevention measure for Razer Silver redemptions.
- Backup Email. Assign a new backup email address for your account. You'll find this useful if you have problems logging in.
The new backup email address must be verified to be valid.
■ 2-Step Authentication. Add an extra layer of security to your account. By default, this is set to use your email address. Adding your mobile number and/or linking an authenticator app will automatically disable email address authentication.
Backup codes are automatically generated upon verifying your mobile number.
- Privacy Center. Understand why and how Razer collects and uses your personal data on its services. Some Razer Services allow you to export or delete your data to see how much personal data each service is storing and provide control if you don't prefer any of these details collected.
Upon exporting and/or deleting data, your primary email address will receive the following:
a. the exported data from the selected Razer service within seven (7) days; or
b. a confirmation that the Razer service you requested for clearing has been completed.
■ App Authorizations. See and manage all third-party applications you have logged into with your Razer ID account.
- Delete Account. Permanently delete your Razer ID. Your profile, and account information, including all settings, and data related to your account, will be removed and become non-retrievable.
It usually takes 24 hours before the account becomes permanently deleted. Deleted accounts are NON-RETRIEVABLE. All account information and data connected to your profile will be deleted permanently.
- Notifications. Control which types of marketing messages you wish to receive. You may also change these messages' language and region settings as preferred.
Default region settings will be used if a selected language is not supported, while English will be used if the selected region is not supported.
NOTIFICATIONS
The NOTIFICATIONS tab allows you to see all the promotions you asked for in one single window. From the latest store promotions to the hottest hardware promotions – as long as these are set to notify you on Razer Central's Settings ( ⚙ ) > NOTIFICATIONS, you'll continue receiving the hottest and latest notifications on this page.
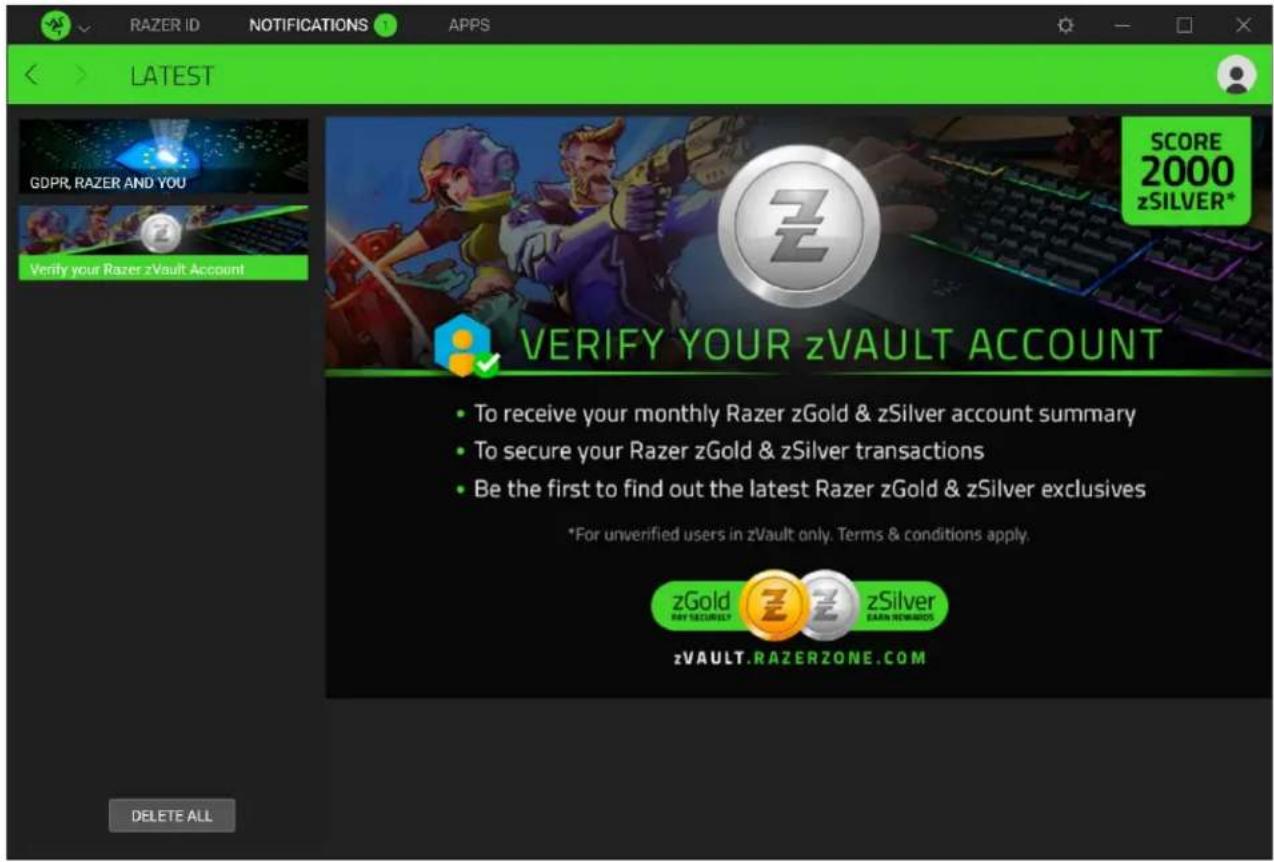
To refresh the displayed notifications, you may either use the Refresh option in your avatar's dropdown list; or press F5.
APPS
Razer Central will automatically notify you if any of your Razer applications can be updated. You may manually check for updates by clicking the CHECK FOR UPDATES link. Simply click the UPDATE button of the corresponding app to begin installing its available update.
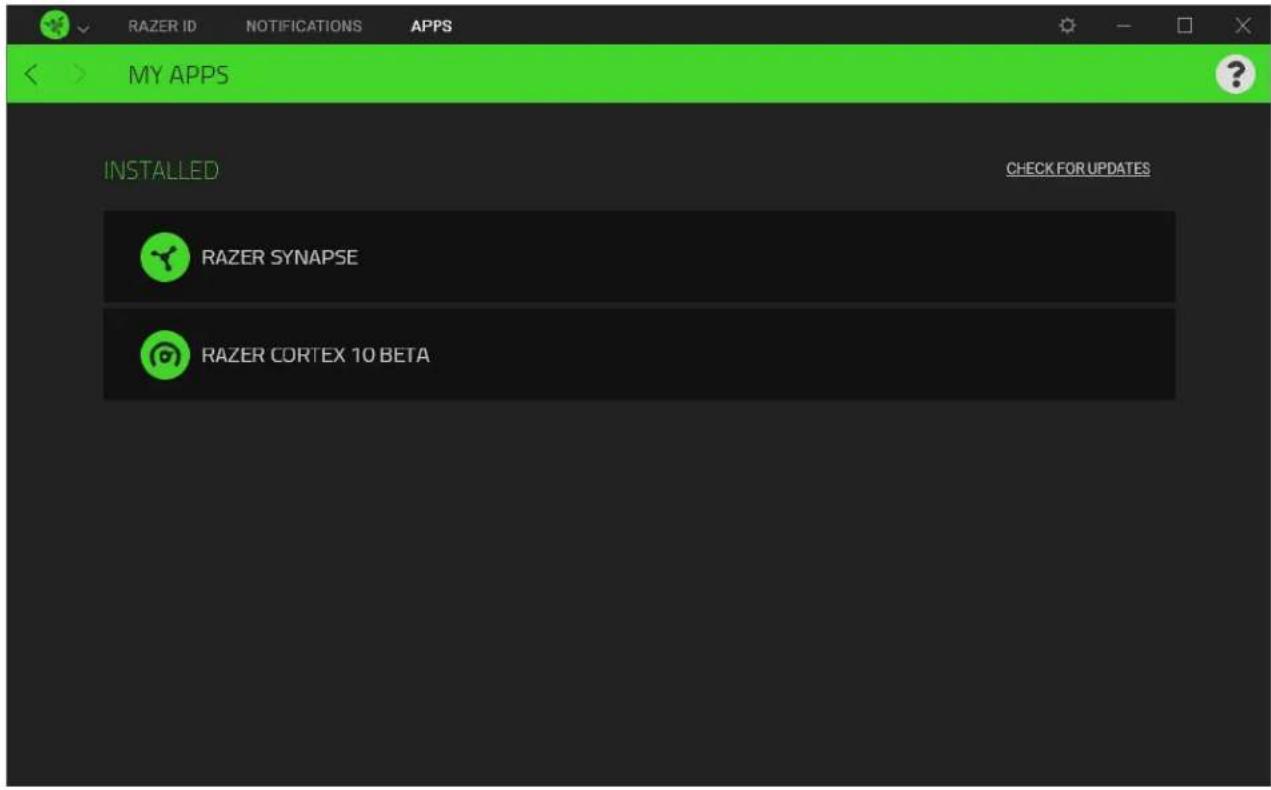

natural_image
Abstract black line drawing on green background, resembling a stylized snake or serpent (no text or symbols)RAZER CORTEX
MASTER GUIDE
From enjoying higher framerates and faster load times through Game Booster, optimizing your system's performance through System Booster, and helping you find the best game deals through Deals —Razer Cortex lets you unlock your system's full potential while enabling you to earn Razer Silver as you utilize Razer services.
CONTENTS
- WHAT'S NEEDED....3
- SETUP 3
- GENERAL SETTINGS....4
- LAUNCHER....7
- GAME BOOSTER....14
- SYSTEM BOOSTER 18
- DEALS....22
- REWARDS ......29
9.LEGALESE 30
1. WHAT'S NEEDED
■ Windows® 10 64-bit (or higher)
- Internet connection for software installation and online features
2. SETUP
INSTALLATION (FOR FIRST-TIME USERS)
Razer Cortex is a software package that can be downloaded and installed on your PC.
- Download and install the latest version of Razer Cortex.
- Click Done once the installation completes and restart when prompted.
UPDATING THE SOFTWARE (FOR EXISTING USERS)
Make sure you're using the latest version of Razer Cortex. From the Razer Cortex Settings, go to ABOUT > CHECK FOR UPDATES, click the CHECK FOR UPDATES link and INSTALL if an update is available for Razer Cortex.
UNINSTALLATION
If you want to uninstall Razer Cortex completely:
- On your PC, open the Control Panel, then go to Programs and Features.
- Right-click Razer Cortex, then select Uninstall.
- Follow the onscreen instructions to complete the uninstallation.
3. GENERAL SETTINGS
THE USER INTERFACE
Razer Cortex displays the LAUNCHER > MY LIBRARY tab when launched. Use the tabs and each tab's corresponding subtab(s) to access various functions Razer Cortex has to offer.

Use the (< ) or ( > ) buttons to navigate between visited pages. Clicking on your avatar will allow you to check your Razer Gold and Silver balance or access Razer ID account-oriented features. Alternatively, you may access the feedback page or exit Razer Cortex from the dropdown list.
i Some features may require you to log in with your Razer ID. Learn more about the Guest account
SETTINGS
The Settings window, accessible by clicking the Settings button ( 🔊), enables you to configure the software language and startup behavior, manage Wishlist and Razer-Silver-related notifications, and customize the hotkeys of Razer Cortex's Game Booster feature.
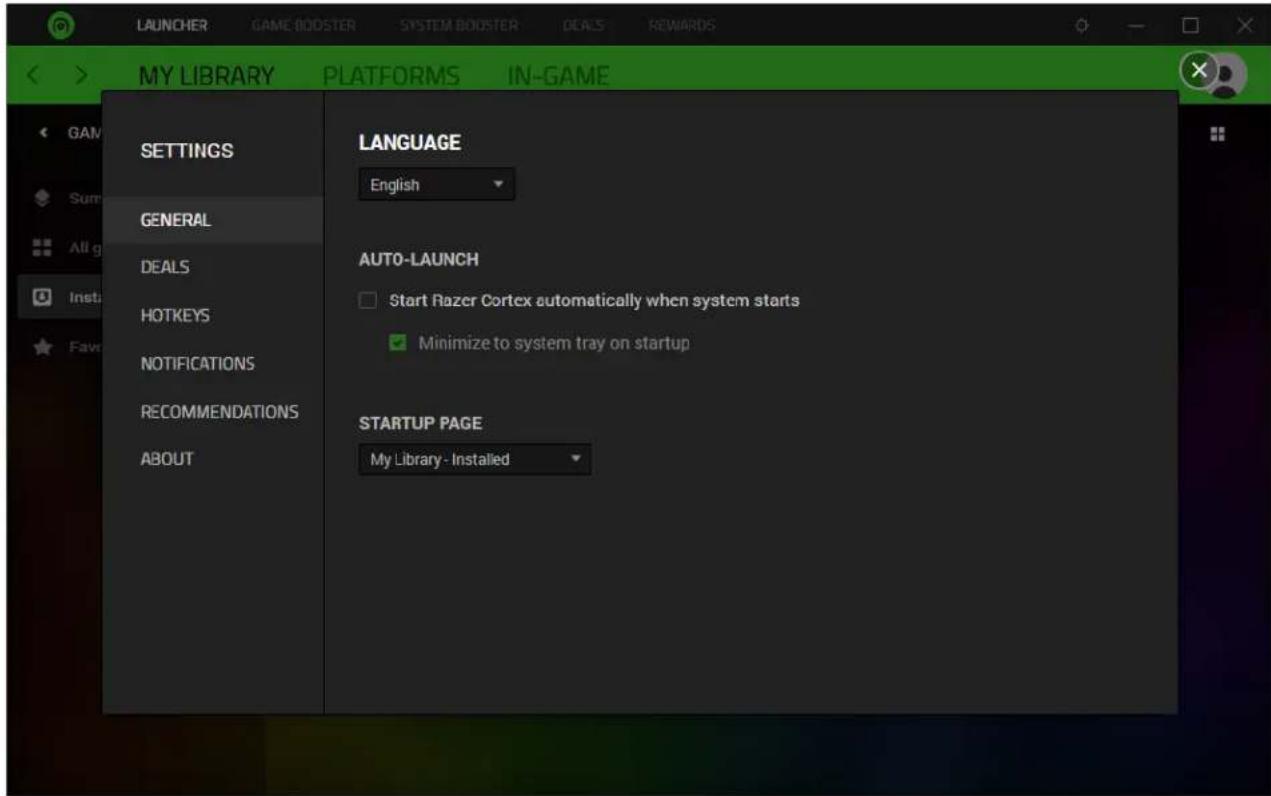
From here, you'll be able to access the following tabs:
■ General. Change the software's language and startup behavior or change its default startup page.
■ Deals. Determine which notifications you want and how often you wish to receive them, or disable notifications entirely. Learn more about Deals
- Hotkeys. Set preferred keyboard shortcuts for most of Game Booster's functions. Learn more about Game Booster
- Notifications. Set which Razer Silver-related alerts will notify you.
■ Recommendations. Enable device recommendations in the Summary and select which devices will be recommended based on the games you usually play.
- About. View the software's information and copyright statement, including links to its license terms, software notice, terms of service, and privacy policy. You may also use this tab to check for software updates, view its user guide, or visit any of Razer's social communities.
4. LAUNCHER
Manage your games from various platforms all in one place.
MY LIBRARY
When Razer Cortex is installed and launched for the first time, it will automatically scan for existing games and display all recognized games under the My Library subtab.
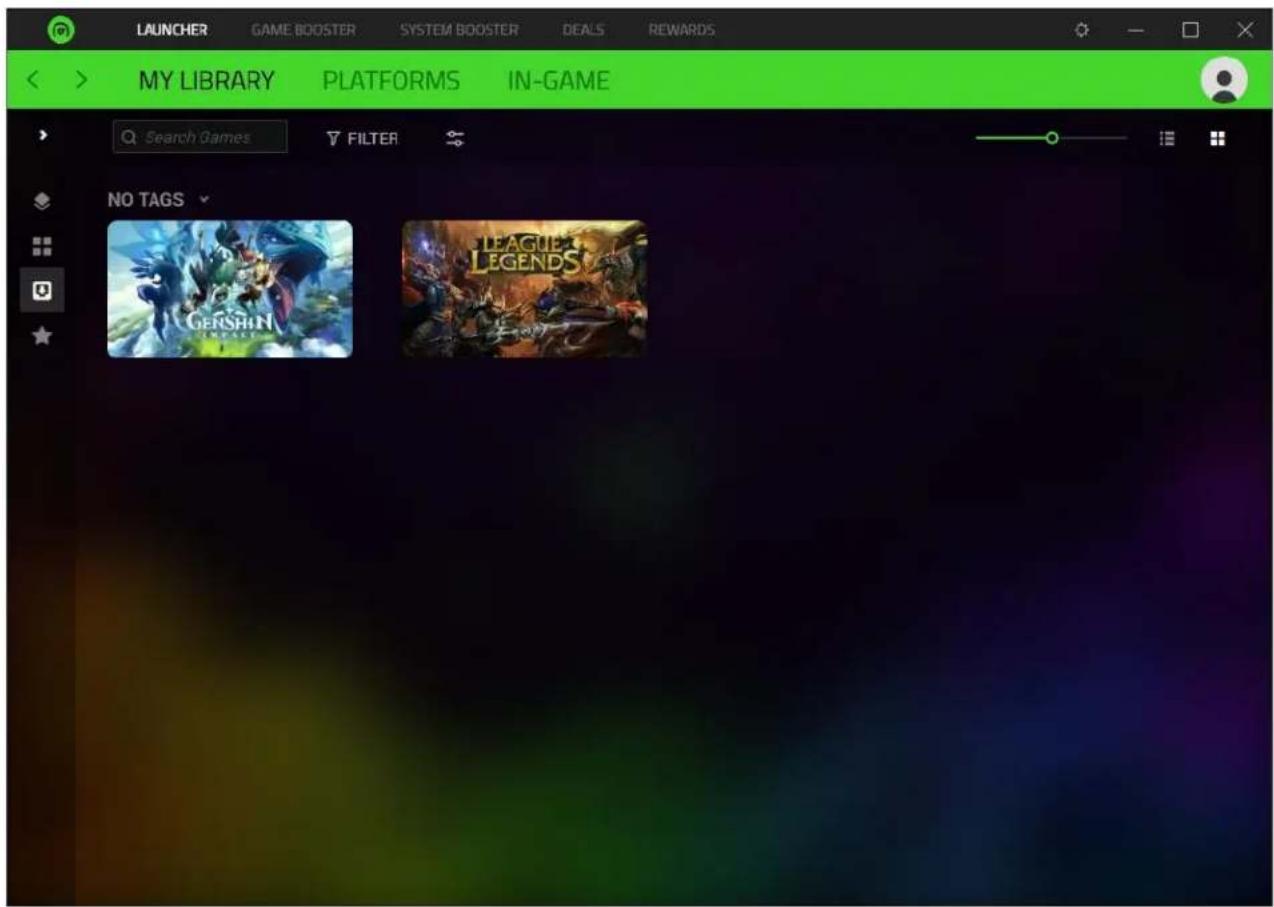
Search, Filter, and Sort games
Search for any game in your library using the Search Games field and filter or sort games and search results using the Filter ( ) and Sort ( ) buttons.
You can adjust the size of the game cover arts using the game icon slider and organize the game list using the grid thumbnail ( □ and list mode ( □ buttons.
Sidebar
Use the sidebar to view your games and gameplay summary, manage your games, see which platforms they're from, and group your favorites for easy accessibility. You can collapse or expand the sidebar by clicking on the Expand (>) and Collapse button (<).
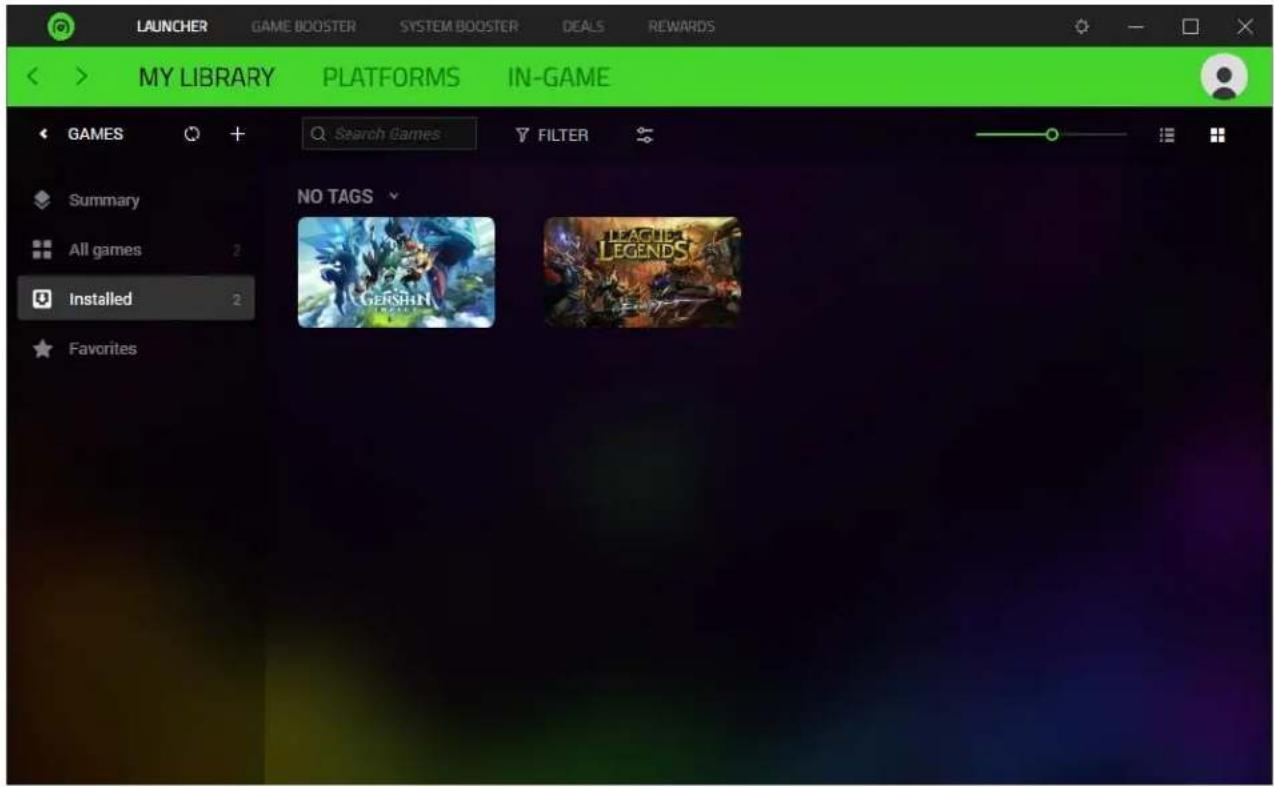
Adding installed games –Automatic System Scan
If you have newly installed games, click the Refresh button ( ) to rescan your system for recognized games and update the games listed in your game library.
The automatic system scan will only add games recognized by Razer Cortex.
Adding installed games -Manual Selection
If Razer Cortex cannot add an installed game on My Library, you could manually add it by clicking the Add button (+) > Add game.
Launching a game
Hover on any game and click on its Play button (▶) to launch your game and automatically boost its performance.
Automatic game boosting will only occur if you configure Razer Cortex to boost performance whenever launching a game on GAME BOOSTER > BOOST > Auto-Boost.
Configuring a game's settings
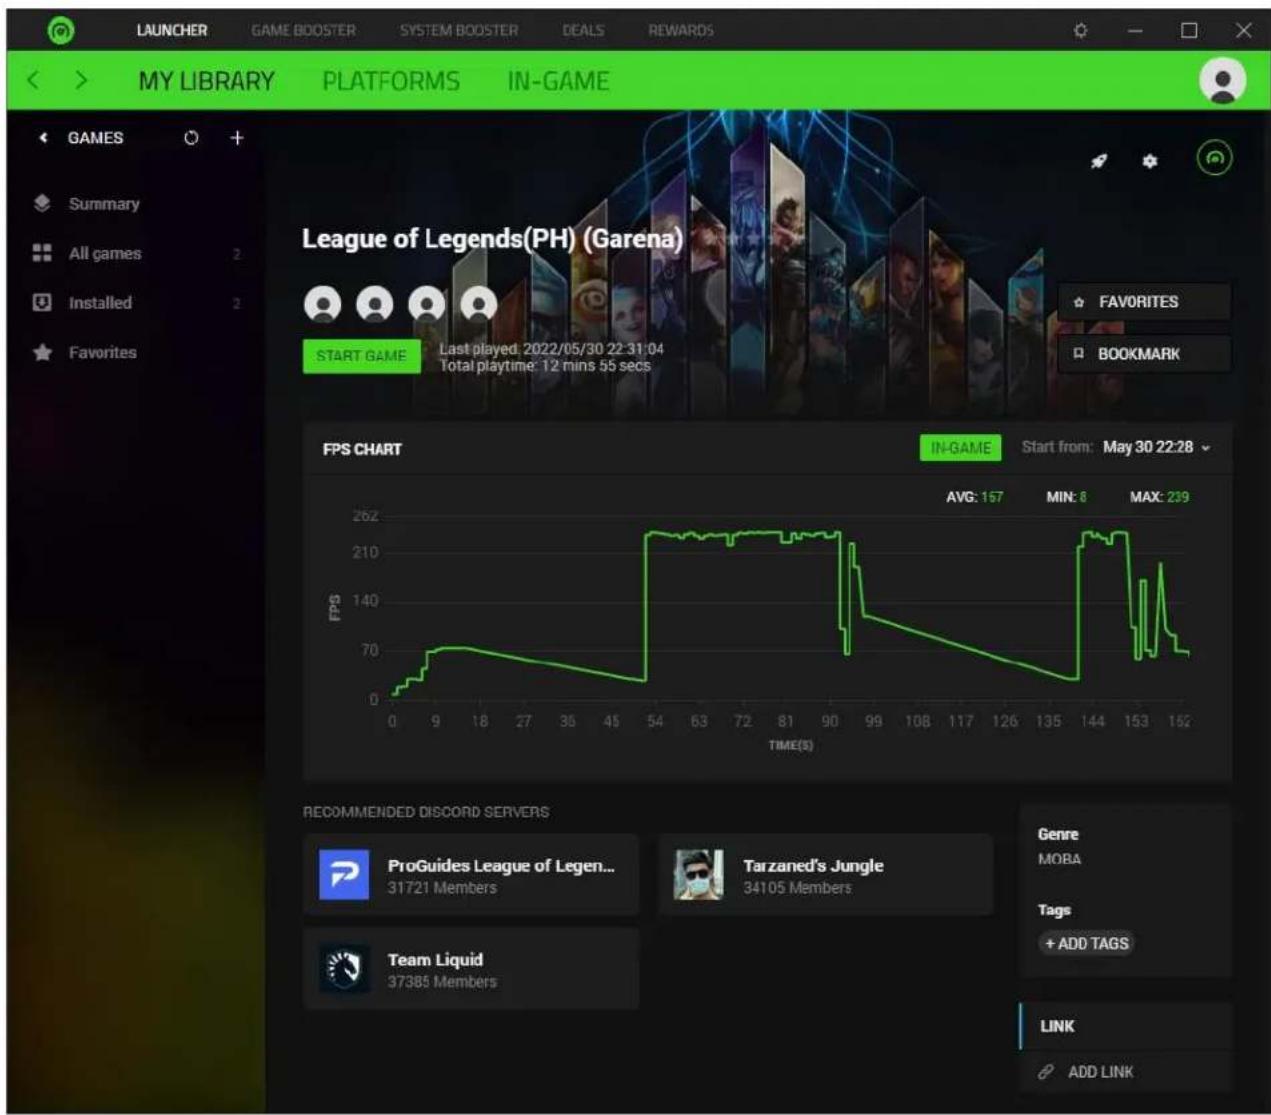
Clicking directly on a game's cover art will allow you to view its details.
line
| TIME($) | FPS | | ------- | --- | | 0 | 0 | | 9 | 70 | | 18 | 70 | | 27 | 65 | | 36 | 60 | | 45 | 55 | | 54 | 262 | | 63 | 262 | | 72 | 262 | | 81 | 262 | | 90 | 262 | | 99 | 140 | | 108 | 120 | | 117 | 100 | | 126 | 80 | | 135 | 60 | | 144 | 262 | | 153 | 140 | | 162 | 70 |You'd be able to do the following actions from any game's properties window:
■ Start a game.
- View a game's properties such as which platform it's from, its latest generated FPS chart, and genre.
- Edit a game's details, open its installation directory, uninstall it, or remove it from Razer Cortex using its Settings button ( ⚙️)
- Go directly to a selected game's Booster Prime page (if supported) on Booster Prime via the Booster Prime button ( ).
- Set a game as a Favorite to make it accessible from the Favorites subtab on the sidebar.
- Bookmark a game to make it immediately available as a subtab on the sidebar.
- Add game tags for easy searching and game links for related guides and walkthroughs.
- Access recommended Discord servers for the selected game to connect with its community quickly.
PLATFORMS
Connect your gaming platforms to manage your games and sync their wishlists with Razer Cortex.
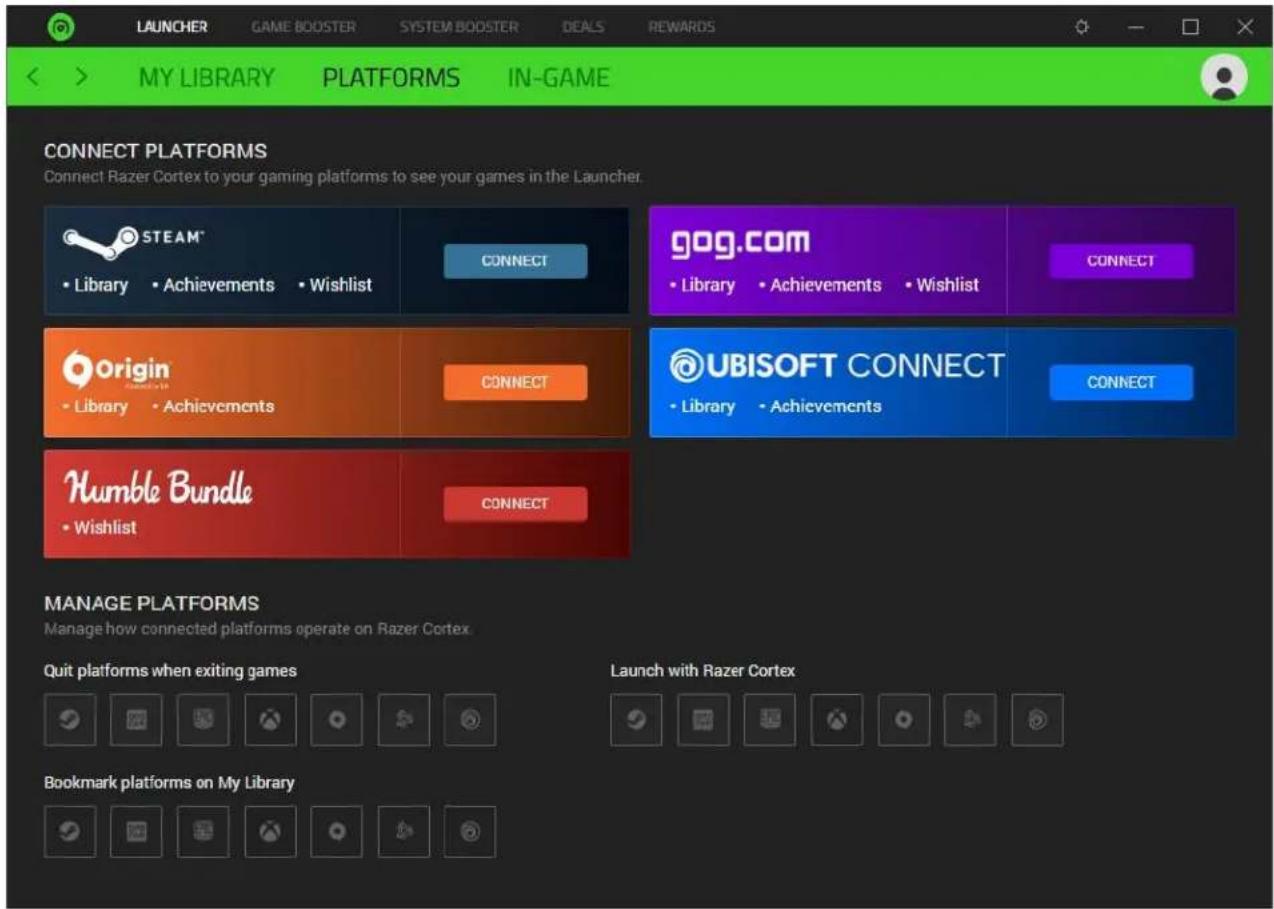
Connect platforms
Clicking on the corresponding platform's CONNECT button allows you to (if applicable) connect or sync Razer Cortex with the platform's library and/or wishlist.
For Razer Cortex to retrieve your platform's wishlist, ensure your platform's privacy setting is Public (if applicable).
Manage platforms
Set how installed platforms will operate with Razer Cortex.
- Quit platform when exiting games. Closing any game (launched through Razer Cortex) will exit its corresponding platform when enabled for a specific platform.
■ Launch with Razer Cortex. Launching Razer Cortex will also launch the enabled platforms under this setting. - Bookmark platform on My Library. Select which platforms are included in the sidebar.
IN-GAME
The In-Game subtab enables you to control, customize, and position the FPS (Frames Per Second) monitoring and overlay feature of the Game Booster.

Custom Display
Toggle to customize what will be shown on the FPS overlay or disable the feature.
■ FPS. Show the current FPS count.
■ System time. Include the current system time.
■ Playtime. Show how long the game has been running.
- Timer. Include a timer on your gameplay and set shortcut keys for enabling/disabling, resetting, and starting a new timer.
■ Countdown. Set a countdown timer to remind you when a particular event will begin.
When my Game Starts
When launching any game through Razer Cortex, you may:
- Choose to enable the FPS overlay automatically while in-game and generate an FPS chart after each game.
The generated FPS chart of your game can only be seen in its dashboard if you have played it for more than 1 minute.
■ Show a desktop message with the maximum FPS reached after a game ends.
FPS Counter
Once enabled, the FPS Counter lets you select where and how the FPS counter is displayed, how big it will be, and what color it will have onscreen.
- Display style. Change the FPS counter into a straight or layered format. The overlay preview will change as you switch between display styles.
■ Position. Determine where the FPS counter is displayed.
■ Display size. Change the font size of the FPS counter.
■ Font color. Customize the color of the FPS counter.
5. GAME BOOSTER
Use the Game Booster tab to free up valuable resources when you Boost your system or launch a game.
BOOST
The Boost tab lets you control which processes and services can be temporarily suspended to provide more system resources for your game and improve your gaming experience.

Auto-Boost
When enabled, Razer Cortex will automatically suspend the selected specials, processes, and services upon launching any game to boost its performance.
Chroma Connect
Toggle this feature to light up and integrate your compatible Razer Chroma-enabled devices with a stunning look as you boost your game's performance for a truly immersive experience.
This feature needs the Chroma Connect module on Razer Synapse.
Use the BOOST NOW button to optimize your PC's performance for any application using your preferred settings. To restore your PC to its standard settings, click RESTORE NOW.
WARNING: Suspending Windows services and/or other processes may affect the operation of your system. If unsure which processes and/or services to select, click Recommended Settings to reset all categories to their defaults.
You can also quickly access its Boost Now / Restore Now function from the Razer Central icon ( ) on the system tray when Razer Cortex is running.

BOOSTER PRIME
The Booster Prime tab lists all the games supported by our advanced machine-learning algorithms, which have pre-defined PC settings for playing top competitive games. As the AI constantly learns and caters to each game with different settings, you can let Booster Prime automatically optimize your PC settings or optimize each game as needed.
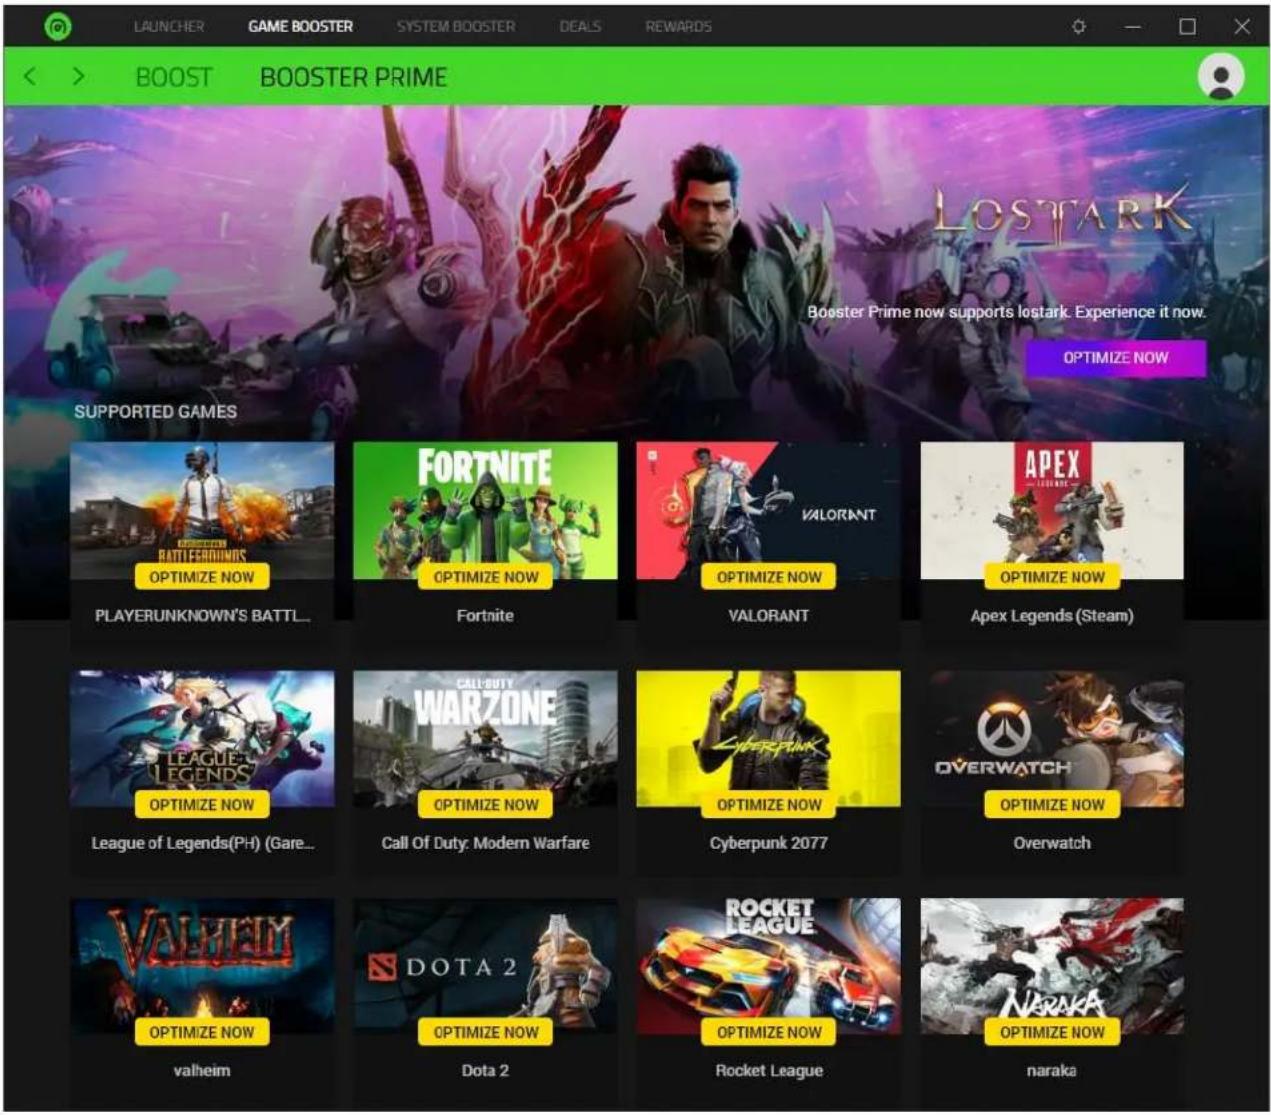
Clicking on any supported game will allow you to view its details.

From here, you'd be able to view or customize the following:
■ Make Adjustments. Fine-tune the color settings of the game, such as its hue, brightness, contrast, and digital vibrance.
- Customize Optimization Priority. Change the graphic settings of the corresponding game through various presets, which you change using the Quality / Performance slider. To apply your preferred graphic settings, click Optimize.

Check the Predicted FPS value and Settings table to see how the selected optimization priority mode will impact your system's performance. These settings will automatically take effect when you launch the corresponding game through Razer Cortex. You can revert the settings to their default properties by clicking the REVERT button.
■ Resolution and Display Mode. Change the game's display resolution and screen mode.
6. SYSTEM BOOSTER
The System Booster tab allows you to perform system tasks such as junk cleaning, boosting hard disk performance to make your system run faster, and game defragmenting. Performing these actions will speed up your PC, allowing it to run games and other functions more smoothly.
SYSTEM CLEAN
Use System Clean to scan and see how much junk you can clean from your system.

System Clean is set to scan and do weekly cleanups on Mondays at 12 am by default. You can customize when Razer Cortex will perform weekly or monthly cleanups or disable it entirely from the System Cleanup settings ( ).
SPEED UP
The Speed Up subtab lets you control which system settings will be optimized to improve overall game performance and ensure a smoother gaming experience.
DEFRAG
Defragging your games enables your system to defragment your game's files, making your games load and run faster.

The defragment function is disabled for games stored on Solid State Drives (SSDs).
MY RIG
The My Rig subtab scans and provides detailed information about your system's internal components, allowing you to quickly copy details or check whether all drivers are up to date. You may use these details to analyze the operation of your computer and pinpoint errors recently experienced.

7. DEALS
Razer Cortex is a one-of-a-kind software that allows you to search for amazing games at excellent prices from various game distributors. With Deals, you can find the best game deals flexibly, check out new releases for each region, view available bundles, browse an endless list of discounted games, and even make your game wishlist.
You can view all deals by country and change the displayed currency used for all deals through the Location and Currency dropdown lists at the bottom of the Deals subtab.
DISCOVERY
The DISCOVERY tab is the default page of Deals, where you'll be able to see the hottest and latest deals, crazy bundles, promotions, editor's picks, and even the most wished games of the year.

GIVEAWAY
Get freebies or view and/or join the latest giveaway promotions available.

i Some giveaways may require you to earn tickets before entry which can be earned by doing Daily Tasks and Bonus Task items.
BUNDLES
Search and browse for all available game bundles. You can sort these bundles according to discount, relevance, and availability; and filter according to game distributors.

GAMES
Search and browse all deals and have them sorted according to relevance, discount, price, or title. You can filter deals by genre, game release type, price, client, distributor, and availability.

Clicking on any featured game or bundle will allow you to view its full details, such as its overview, the game distributors it's available in, features, and related games.
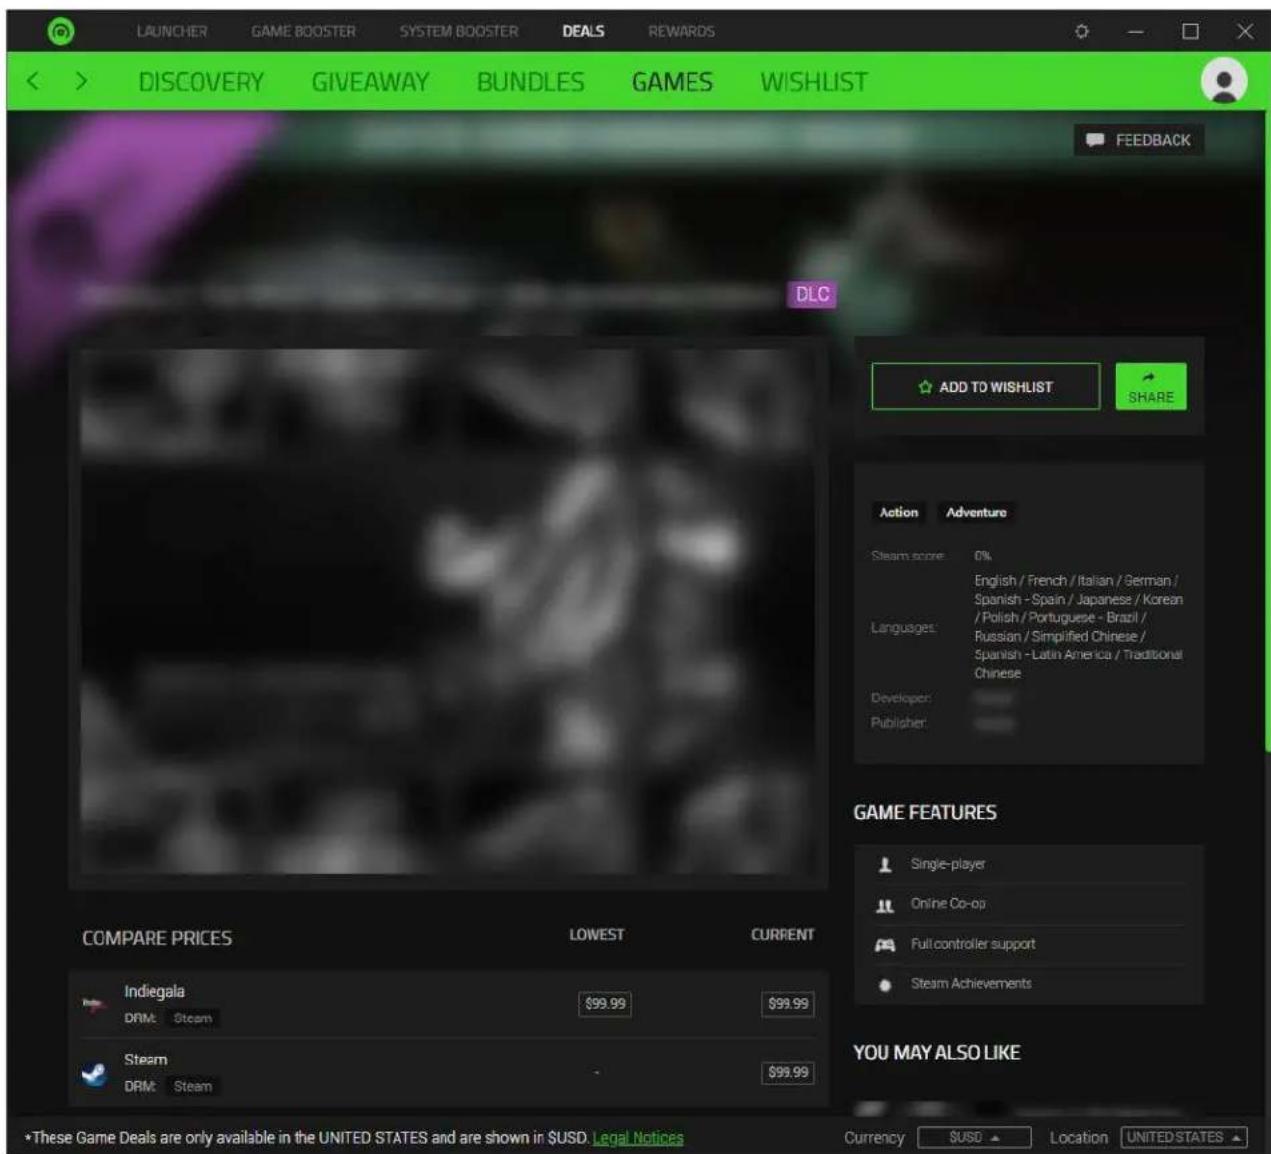
Use the FEEDBACK button ( ) if you found other game distributors offering the selected game at a lower price, had issues with the game's cover art quality or if you have additional comments regarding Deals.
WISHLIST
You must log in to use this feature.
Stay updated with your most anticipated games and receive notifications whenever the game you want goes on sale. You can filter your wishlist according to genre, distributor, type, and availability; and have it sorted according to wishlist date, discount, price, and name.

Sharing Wishlists
You may SHARE WISHLIST if you want to share it with the community of your choice. However, you will only be able to share it once you change its availability to Public using the dropdown list beside the SHARE WISHLIST button.
Adding / Removing Games to Your Wishlist
Add games to your wishlist by going to a game's profile and clicking the ADD TO WISHLIST button. If you want to remove a game from your wishlist, select the game from your wishlist and then click the REMOVE FROM WISHLIST button.

You can also go to DEALS > WISHLIST, hover the cursor on the game that you wish to remove from the list, and then click the ★button to remove it.

8. REWARDS
The Rewards tab displays Razer's ongoing campaigns and/or promotions you can participate in to earn Razer Silver – a loyalty rewards credit backed by Razer, which you can earn whenever using services from Razer and Partners.
A login is required to join any of the available promotions.
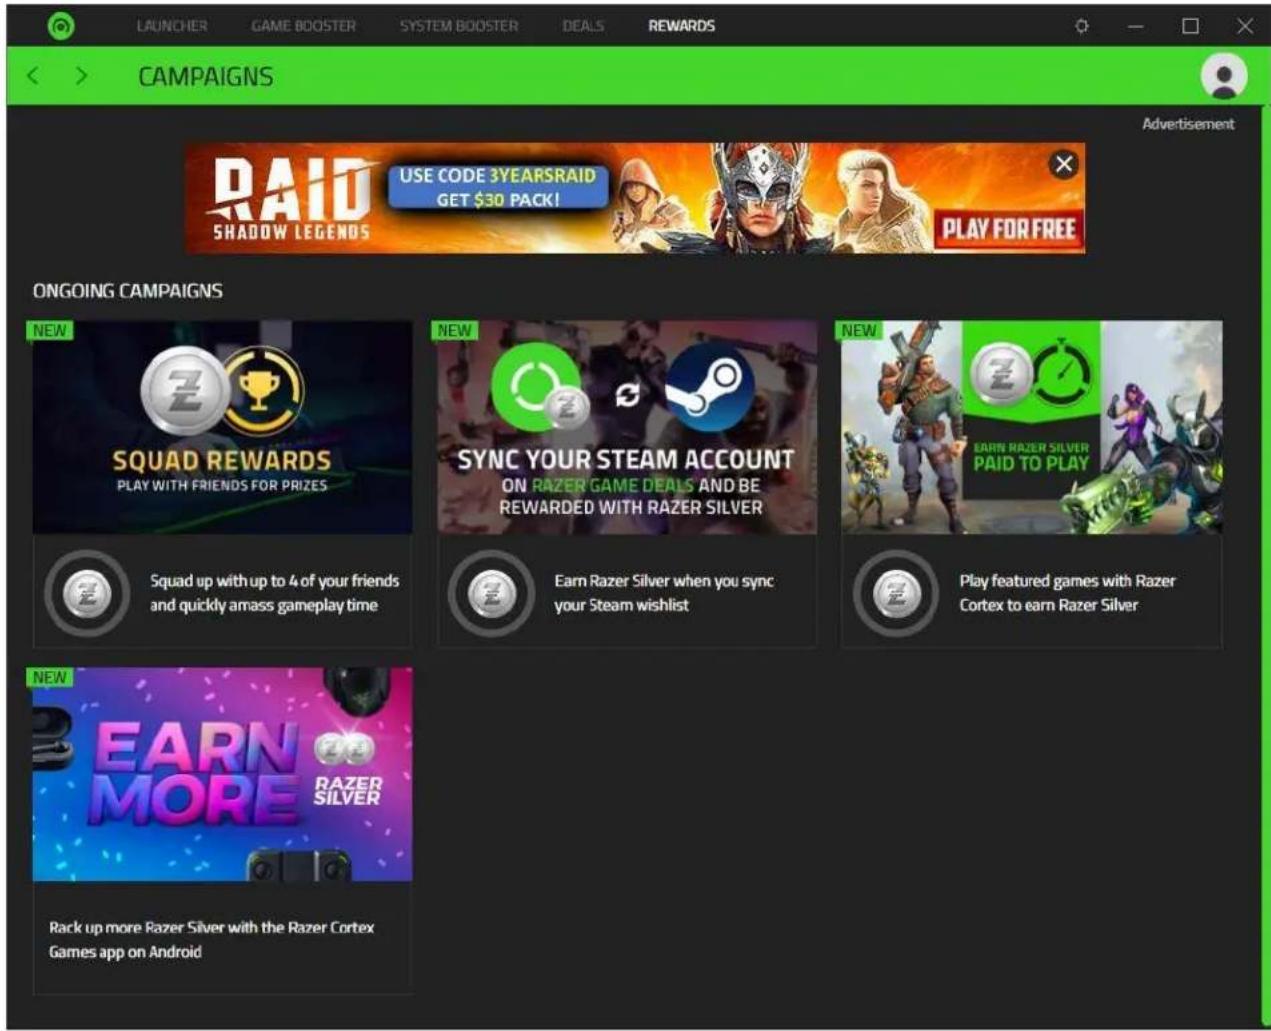
You may click on any available promotions or campaigns to view their respective dashboard and see the conditions required to participate.
9. LEGALESE
COPYRIGHT AND INTELLECTUAL PROPERTY INFORMATION
©2022 Razer Inc. All rights reserved. Razer, the triple-headed snake logo, Razer logo, "For Gamers. By Gamers.", and "Razer Chroma" logo are trademarks or registered trademarks of Razer Inc. or affiliated companies in the United States and other countries. All other trademarks are the property of their respective owners.
Windows and the Windows logo are trademarks of the Microsoft group of companies.
Razer Inc. ("Razer") may have copyright, trademarks, trade secrets, patents, patent applications, or other intellectual property rights (whether registered or unregistered) concerning the product in this guide. Furnishing of this guide does not give you a license to any such copyright, trademark, patent or other intellectual property right. The Razer Cortex (the "Products") may differ from pictures, whether on packaging or otherwise. Razer assumes no responsibility for such differences or for any errors that may appear. Information contained herein is subject to change without notice.
LIMITATION OF LIABILITY
Razer shall in no event be liable for any lost profits, loss of information or data, special, incidental, indirect, punitive or consequential or incidental damages, arising in any way out of distribution of, sale of, resale of, use of, or inability to use the Product. In no event shall Razer's liability exceed the retail purchase price of the Product.
GENERAL
These terms shall be governed by and construed under the laws of the jurisdiction in which the Product was purchased. If any term herein is held to be invalid or unenforceable, then such term (in so far as it is invalid or unenforceable) shall be given no effect and deemed to be excluded without invalidating any of the remaining terms. Razer reserves the right to amend any term at any time without notice.
- CONTENTS
- RAZER CENTRAL
- USING A GUEST ACCOUNT
- SIGNING UP FOR A RAZER ID
- LOGGING IN
- RETRIEVING A FORGOTTEN PASSWORD
- USING RAZER CENTRAL
- SYSTEM TRAY ICON
- SETTINGS
- General
- Notifications
- Software Updates
- About
- 2-STEP AUTHENTICATION
- AVATAR FUNCTIONS
- YOUR RAZER ID
- APPS
- WHAT'S NEEDED
- SETUP
- INSTALLATION (FOR FIRST-TIME USERS)
- UPDATING THE SOFTWARE (FOR EXISTING USERS)
- UNINSTALLATION
- GENERAL SETTINGS
- THE USER INTERFACE
- LAUNCHER
- MY LIBRARY
- Search, Filter, and Sort games
- Sidebar
- Launching a game
- Configuring a game's settings
- PLATFORMS
- Connect platforms
- Manage platforms
- IN-GAME
- Custom Display
- When my Game Starts
- FPS Counter
- GAME BOOSTER
- BOOST
- Auto-Boost
- Chroma Connect
- BOOSTER PRIME
- SYSTEM BOOSTER
- SYSTEM CLEAN
- SPEED UP
- DEFRAG
- MY RIG
- DEALS
- DISCOVERY
- GIVEAWAY
- BUNDLES
- GAMES
- WISHLIST
- You must log in to use this feature.
- Sharing Wishlists
- Adding / Removing Games to Your Wishlist
- REWARDS
- LEGALESE
- COPYRIGHT AND INTELLECTUAL PROPERTY INFORMATION
- LIMITATION OF LIABILITY
Brand : RAZER
Model : Cortex 9
Category : Software