
HYCH1400 - Grinder HYUNDAI - Free user manual and instructions
Find the device manual for free HYCH1400 HYUNDAI in PDF.

| Product Type | Petrol Wood Chipper / Shredder |
| Model | HYCH1400 |
| Brand | Hyundai |
| Engine Type | OHV 4-Stroke |
| Displacement | 420 cc |
| Max Power | 14 HP @ 3600 rpm |
| Starting System | Recoil |
| Chipping Capacity | 4" (102 mm) |
| Blade Speed | 2400 rpm |
| Fuel Type | Unleaded Petrol |
| Fuel Capacity | 6.5 L |
| Oil Capacity | 1.1 L |
| Chipping Knives | 2 x HSS Blade |
| Shredding Knives | 10 x Hammer |
| Dimensions (L x W x H) | 1031 x 865 x 1350 mm |
| Net Weight | 95 kg |
| Sound Power Level | 110 dB(A) |
| Warranty | 3 years (register within 30 days) |
| Safety Features | Spark plug wire disconnect, guards, emergency stop switch |
| Maintenance | Blade sharpening/replacement, oil change every 50 hours, air filter cleaning every 100 hours |
Frequently Asked Questions - HYCH1400 HYUNDAI
User questions about HYCH1400 HYUNDAI
0 question about this device. Answer the ones you know or ask your own.
Ask a new question about this device
Download the instructions for your Grinder in PDF format for free! Find your manual HYCH1400 - HYUNDAI and take your electronic device back in hand. On this page are published all the documents necessary for the use of your device. HYCH1400 by HYUNDAI.
USER MANUAL HYCH1400 HYUNDAI
natural_image
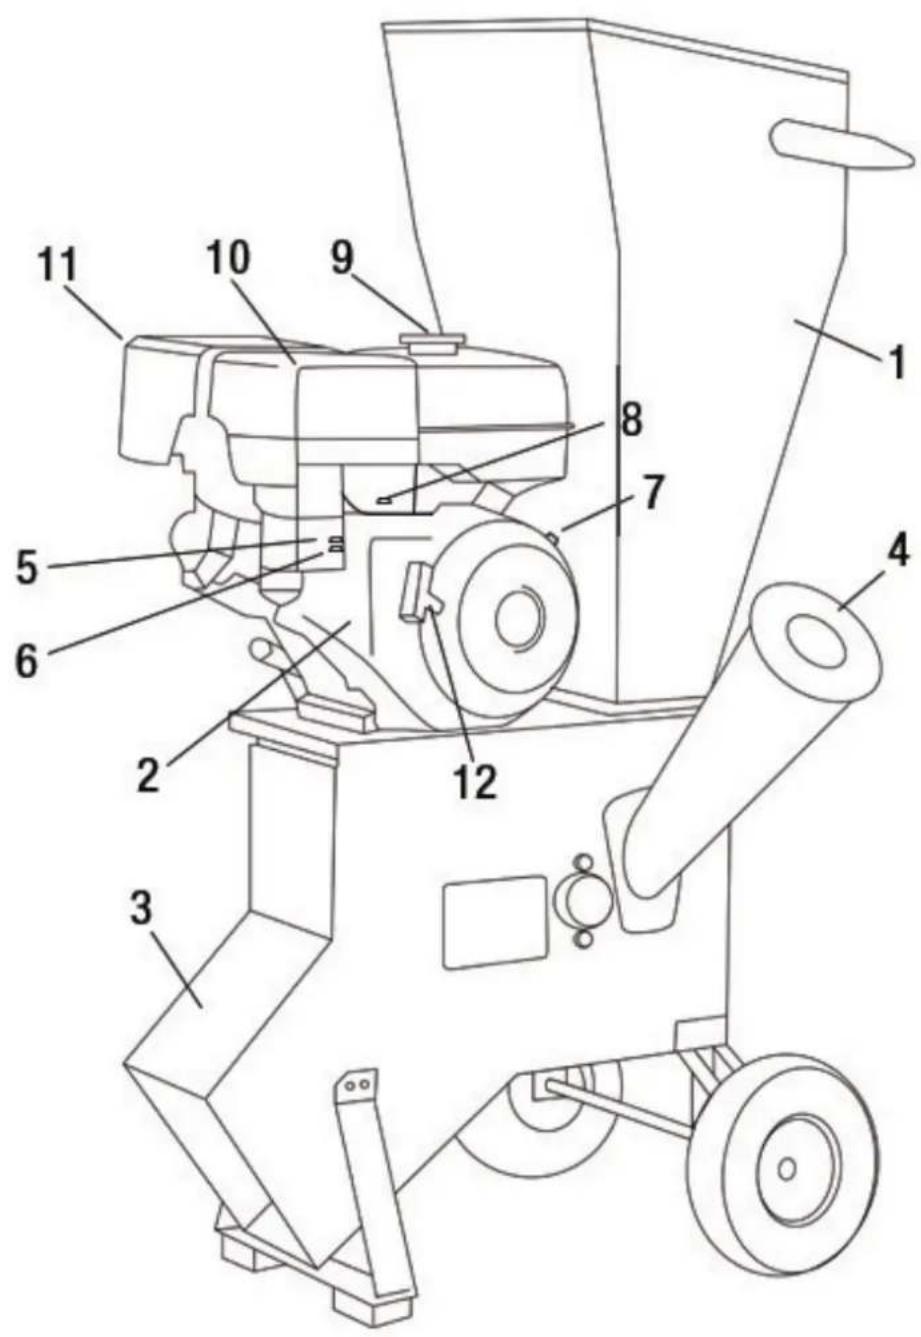
Line drawing of a mechanical device with wheels and a handle, no text or symbols presentIMPORTANT
Do not forget to register your EXTENDED 3 YEAR HYUNDAI WARRANTY within 30 days of purchase.
http://www.hyundaipowerequipment/warranty
3-6. Safety Instructions
7-8. Assembly
9-12. Operation
13-14. Maintenance
15. Storage
16. Troubleshooting
17. Technical Data
18. Declaration Of Conformity
- Hopper
- Petrol Engine
- Chipper Outlet
- Chipper Funnel
- Choke
- Fuel Tap
- ON/OFF Switch
- Throttle
- Fuel Tank Cap
- Air Cleaner
- Exhaust
- Pull Start Handle
PETROL WOOD CHIPPER
HYCH700/HYCH1400
WARNING

Read all safety warnings and instructions. Failure to follow the warnings and instructions on the machine may result in fire and/or serious injury to yourself. Save all warnings and instructions for future reference.
SAFETY WARNINGS
When using the machine, always observe the enclosed safety warnings as well as the additional safety warnings.
The following symbols are used throughout this manual:

Denotes risk of personal injury or damage to the machine

DANGER
Indicates a hazard, which if not avoided, could result in serious injury or death.

WARNING
Indicates a hazard, which if not avoided, could result in serious injury.

CAUTION
Indicates a hazard, which if not avoided, might result in minor or moderate injury.
NOTE
Indicates a situation that could easily result in equipment damage.
PACKAGE CONTENTS
2x Rear Wheel Support
2x Tyres
1x Front Support Leg
1x Discharge Chute
1x Wheel Axle
Tool Kit
SAFETY INSTRUCTIONS FOR PETROL WOOD CHIPPERS & SHREDDERS
NOTE: READ THROUGH THE ENTIRE MANUAL BEFORE STARTING ANY POWER PRODUCT.
Machinery presents serious injury hazards to untrained users.
- ALWAYS USE SAFETY GLASSES WHEN OPERATING MACHINERY: Everyday eyeglasses only have impact resistant lenses, they are NOT safety glasses.
- ALWAYS WEAR A RESPIRATOR WHEN OPERATING MACHINERY THAT PRODUCES DUST: Wood dust is a carcinogen and can cause cancer and severe respiratory illnesses.
- ALWAYS USE HEARING PROTECTION WHEN OPERATING MACHINERY: Machinery noise can cause permanent hearing damage.
- WEAR PROPER APPAREL: DO NOT wear loose clothing, gloves, neckties, rings, or jewellery which may get caught in moving parts. Wear protective hair covering to contain long hair and non-slip footwear.
- NEVER OPERATE MACHINERY WHEN TIRED, OR UNDER THE INFLUENCE OF DRUGS OR ALCOHOL: Be alert at all times when running machinery at all times.
- ONLY ALLOW TRAINED AND PROPERLY SUPERVISED PERSONNEL TO OPERATE MACHINERY: Make sure operation instructions are safe and clearly understood.
- KEEP CHILDREN AND VISITORS AWAY: Keep all children and visitors a safe distance from the work area.
- MAKE WORKSHOP CHILD PROOF: Use padlocks, master switches, and remove machinery keys.
- NEVER LEAVE WHILE THE MACHINE IS RUNNING: Turn power OFF and allow all moving parts to come to a complete stop before leaving machine unattended.
- DO NOT USE IN DANGEROUS ENVIRONMENTS: DO NOT use machinery in damp, wet locations, or where any flammable or noxious fumes may exist.
- KEEP WORK AREA CLEAN AND WELL LIT: Clutter and dark shadows may cause accidents.
- USE A GROUNDED EXTENSION CORD RATED FOR THE MACHINE AMPERAGE: Undersized cords overheat and lose power. Replace extension cords if they become damaged. DO NOT use extension cords for 220V machinery.
- ALWAYS DISCONNECT FROM POWER SOURCE BEFORE SERVICING MACHINERY: Make sure switch is in the OFF position before reconnecting.
- MAINTAIN MACHINERY WITH CARE: Keep blades sharp and clean for best and safest performance. Follow instructions for lubricating and changing accessories.
- MAKE SURE GUARDS ARE IN PLACE AND WORK CORRECTLY BEFORE USING MACHINERY.
- CHECK FOR DAMAGED PARTS BEFORE USING MACHINERY: Check for binding and alignment of parts, broken parts, part mounting, loose bolts, and any other conditions that may affect machine operation. Repair or replace damaged parts.
- DO NOT FORCE MACHINERY: Work at the speed for which the machine or accessory was designed.
- SECURE WORKPIECE: Use clamps or a vise to hold the workpiece when practical. A secured workpiece protects your hands and frees both hands to operate the machine.
- DO NOT OVERREACH: Keep proper footing and balance at all times.
- MANY MACHINES WILL EJECT THE WORKPIECE TOWARD THE OPERATOR: Know and avoid conditions that cause the workpiece to "kickback."
- ALWAYS LOCK MOBILE BASES (IF USED) BEFORE OPERATING MACHINERY.
- BE AWARE THAT CERTAIN WOODS MAY CAUSE AN ALLERGIC REACTION: In people and animals, especially when exposed to fine dust. Make sure you know what type of wood dust you will be exposed to and always wear an approved respirator.

WARNING
Like all machinery there is potential danger when operating this machine. Accidents are frequently caused by lack of familiarity or failure to pay attention. Use this machine with respect and caution to lessen the possibility of operator injury. If normal safety precautions are overlooked or ignored, serious personal injury may occur.

CAUTION
No list of safety guidelines can be complete. Every environment is different. Always consider safety first, as it applies to your individual working conditions. Use this and other machinery with caution and respect. Failure to do so could result in serious personal injury, damage to equipment, or poor work results.
ADDITIONAL SAFETY INSTRUCTIONS
NOTE: READ THROUGH THE ENTIRE MANUAL BEFORE STARTING ANY POWER PRODUCTS.
Machinery presents serious injury hazards to untrained users.
- HAND SAFETY: DO NOT put hands or other body parts into hopper, funnel, or outlet while the blades are turning. The chipper/shredder can drag you into the blade, causing
- amputation of fingers, hands or other body parts. DO NOT touch the exhaust during or immediately after operation to prevent burns.
- CLOTHING: DO NOT wear loose clothing, neckties, scarves, or jewellery which may get caught in moving parts. DO NOT wear clothing or gloves with pull ties or straps. This type of clothing could get tangled with material that is being shredded, pulling you into the chipper/shredder.
- OPERATING LOCATION: Set up the chipper/shredder on firm, level, grass or dirt. DO NOT set up the chipper/shredder on gravel, asphalt, concrete, or stone. The chips are expelled from the machine with enough force to ricochet off of hard surfaces and cause serious injury. DO NOT set up the chipper/shredder in a location where sparks or heat from the motor could cause a fire.
- SECURE FOOTING: Placing the chipper/shredder on a slope or slippery surface may cause the operator to fall into the machine, causing burns from the motor, or an amputation if an arm
- accidentally goes into the hopper. Wear non-slip, closed toed shoes or boots to maintain secure footing.
- JAMS AND CLOGGING: Turn the chipper/shredder OFF, allow all moving parts to come to a complete stop, and disconnect the spark plug wire before attempting to free a jam or clog.
- FEEDING MATERIAL: Hold branches and brush loosely, and allow the chipper/shredder to draw the material in. The machine sometimes will draw material in very quickly and your hand may be drawn in if you are holding tightly. If the blades hit a hard object, or if the machine begins to make an unusual noise or vibration, immediately shut the chipper/shredder OFF.
- TURN OFF CHIPPER/SHREDDER: Turn OFF the machine, allow all moving parts to come to a complete stop, and disconnect the spark plug wire before moving the machine, emptying the bag, unclogging the inlets or outlets, filling the fuel tank, or performing maintenance and repairs.
- STARTING THE CHIPPER/SHREDDER: Make sure the hopper and funnel are empty when starting the machine. The pull start cord may stop suddenly causing the chipper/shredder to fall over or injure your hand or arm.
- CLEANING CHIPPER/SHREDDER: Allow the engine to cool off, then brush dust and chip build-up off of the engine to prevent fire or engine overheating.
CARBON MONOXIDE SAFETY INFORMATION

WARNING
- Carbon Monoxide is a colourless and odourless gas. Inhaling this gas can cause death as well as serious long term health problems such as brain damage.
- The symptoms of carbon monoxide poisoning can include but are not limited to the following; headaches, dizziness, nausea, breathlessness, collapsing or loss of consciousness.
- Carbon Monoxide poisoning symptoms are similar to flue, food poisoning, viral infections and simply tiredness. It is quite common for people to mistake this very dangerous poisoning for something else.
- To avoid carbon monoxide poisoning DO NOT use petrol/diesel powered equipment inside any of the following; home, garage, tent, camper van, mobile home, caravan or boat. This is not exhaustive and if you are in any doubt contact your dealer.
- If you think you have or someone around you has been affected by carbon monoxide poisoning: Get them fresh air immediately, by leaving the affected area or by opening doors and windows. If safe and practical to do so make sure that the machine is turned off. DO NOT enter a room you suspect of having carbon monoxide present – instead call the emergency services. Contact a doctor immediately or go to hospital – let them know that you suspect carbon monoxide poisoning.
- DO NOT use in an enclosed area or moving vehicle.
This machine presents serious injury hazards to untrained users. Read through this entire manual to become familiar with the controls and operations before starting the machine.
LOCATION
The chipper/shredder must be placed on a firm, flat, grass or dirt surface to prevent the machine from tipping. DO NOT place the machine on concrete, asphalt, or other hard surfaces. The chips could bounce up from the hard surface and cause injury.
WORKING AREA
Consider the length of the material to be processed through the machine and make sure that there is enough height above the chipper/shredder to accommodate the material.
Make sure the unit is located close to the area where the chips are going to be used to reduce carrying.
Stay clear of the discharge area. Make sure all bystanders, children, pets, or objects that you do not want damaged or covered in chips, are clear of the discharge area.
ASSEMBLY
The major components of this chipper/shredder have been assembled at the factory. Some minor assembly is required. The assembly process will use all the parts and hardware listed in the package contents.
DO NOT attempt to start this machine until all assembly has been completed. Serious personal injury and damage to the machine could occur.
(a) Tip the chipper/shredder over and remove the bolts shown in.
NOTE: DO NOT turn the chipper/shredder over once it is full of oil and fuel. The oil and petrol will spill out.
Fixing the leg: x2 Bolt M8x20, x1 Bolt M8x200, x1 Support Tube, x4 Washer ∅8, 3pcs Lock Nut M8.
Fixing the wheel assembly: x2 Bolt M8x200, x2 Support Tube, x4 Washer ∅8, x2 Lock Nut M8.
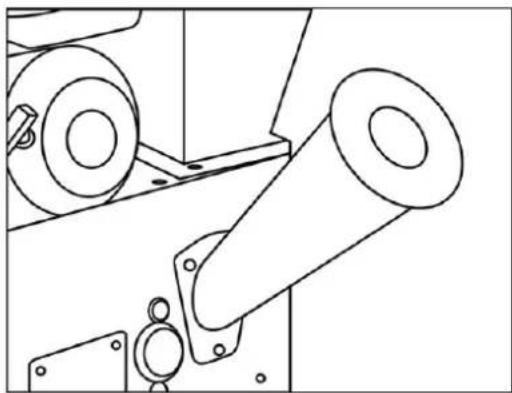
(d) Place the funnel over the studs in the side of the chipper/shredder and secure it with flat washer (∅8, 3pcs), spring washer (∅8, 3pcs) and locknut (M8, 3pcs).
natural_image
Technical line drawing of a mechanical assembly with rollers and mounting brackets (no text or symbols)NOTE: Before operating, fill the engine with oil and petrol.

(b) Attach the wheel assembly and the leg with the bolts that were removed in step (a).
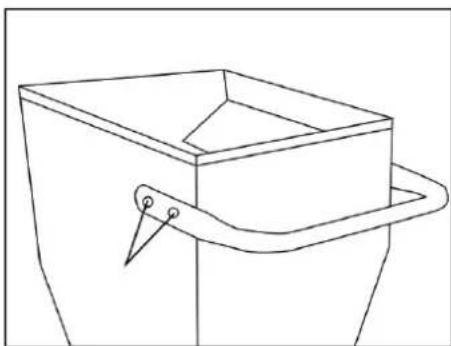
(c) Place the handle on the hopper and line up all of the holes. Secure it with flat washer (∅8, 4pcs), spring washer (∅8, 4pcs) and bolt (M8x20, 4pcs).
natural_image
Line drawing of a bucket with handle and side panel (no text or symbols)FUEL & OIL

CAUTION
All fuels are flammable, keep fuel away from all sources of ignition for example, heaters, lamps, direct sunlight and sparks from grinding or welding.
NOTE: This chipper/shredder does not have oil in the engine when shipped. Add oil before operating the chipper/shredder, or the engine will seize.
OIL
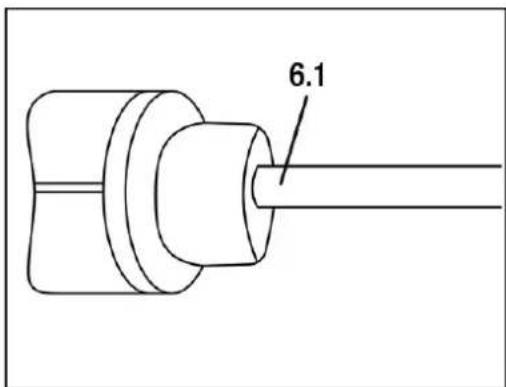
(e) Place the chipper/shredder on a level surface and remove the oil filler cap (5.1).
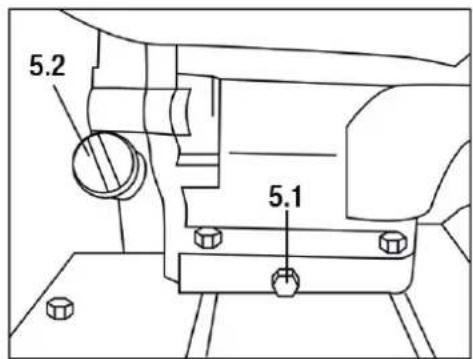
(f) Add engine oil up to the upper level of the dipstick (6.1).
FUEL
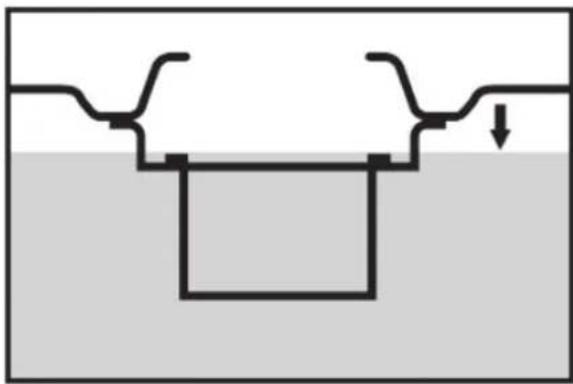
(g) The chipper/shredder is powered by a four-stroke engine, which uses unleaded petrol fuel. Use a suitable funnel to transfer the fuel to the engines fuel tank, taking care not to spill any fuel or over fill the fuel tank. The fuel tank should not be filled above the top of the fuel filter as shown in.
natural_image
Pure diagram of a mechanical or hydraulic component with no text, numbers, or symbolsOPERATION

WARNING
Damage to your eyes, hands, and ears could result from using this machine without proper protective gear. Always wear safety glasses, hearing protection, and leather gloves when operating this machine.
Loose hair and clothing could get caught in machinery and cause serious personal injury. Keep loose clothing and long hair away from moving machinery.
NOTE
If you have never used this type of machine or equipment before, we recommend that you read books, trade magazines, or get formal training before beginning any projects.
This chipper/shredder does not have oil in the engine when shipped. Add oil before operating the chipper/shredder, or the engine will seize.
Understand and follow all of the safety precautions listed in safety instructions within this manual before operation.
This chipper/shredder is intended for mulching garden and pruning waste such as green branches, twigs, brush, vines, and long grasses.
DO NOT use this chipper/shredder for chipping construction debris, plastic, paper products, rope or twine, or any material that may contain metal.
NOTE: Remove any nails, rope, twine, or rocks that may be imbedded in roots, before inserting material into the chipper/shredder.
OPERATION CHECKS
Place the chipper/shredder on a flat, firm, dirt or grass surface and point the outlet in a safe direction.
Check the oil and gas levels before starting the engine.
Place the bag over the chute and tie it securely in place.
Make sure the hopper and funnel are empty before starting the engine. If there is material in the hopper or funnel, the pull start cord may stop suddenly causing the chipper/shredder to fall over, or causing injury to your hand or arm.
Put on eye and ear protection, and gloves, start the chipper/shredder as instructed in the manual, then set the throttle to fast.
Stand to the side of the hopper and make sure you have a stable stance and firm footing.
STARTING
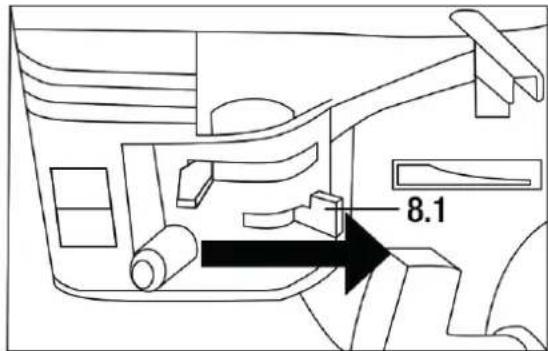
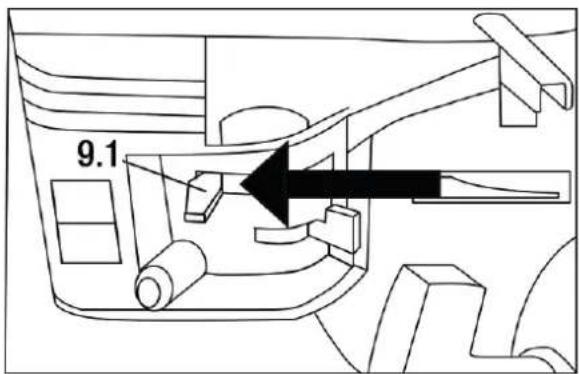
Turn the fuel lever to the ON position (8.1). Set the choke lever to the ON position (9.1).
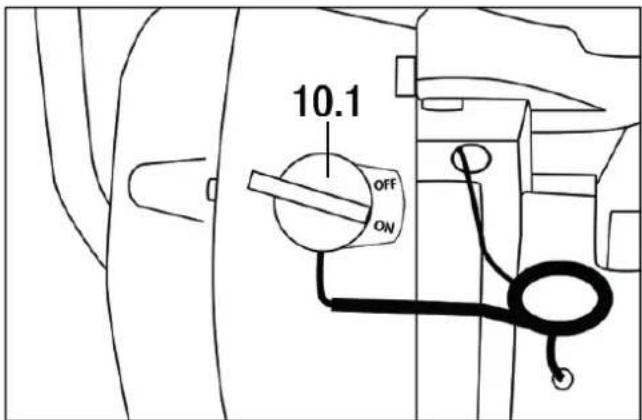
Turn the engine ON/OFF switch to the ON position (10.1).
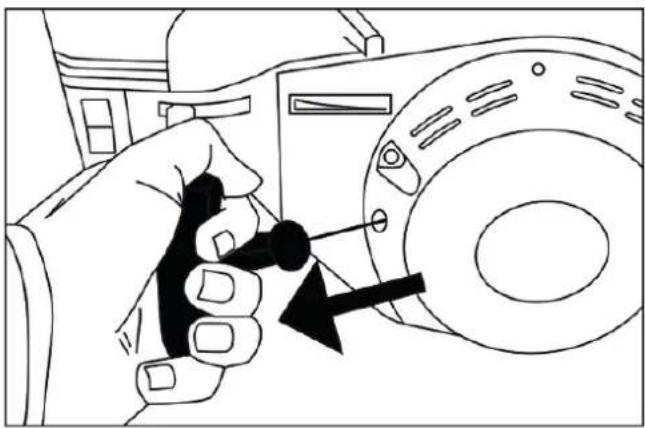
Hold down the engine firmly with one hand on the frame. With the other hand grip the recoil starter cord handle and pull slowly until resistance is felt indicating that the recoil starter is engaged. When resistance is felt pull the cord sharply. Continue this procedure until the engine starts.
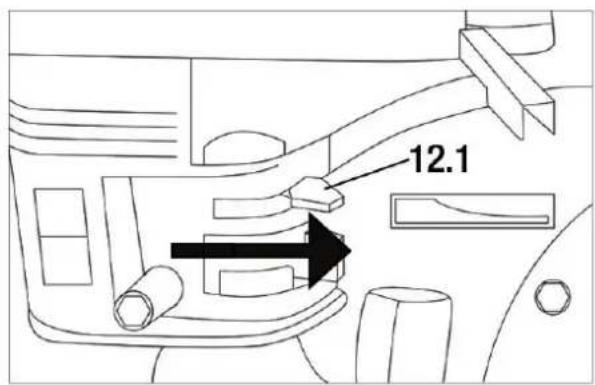
When the engine has been successfully started and is running smoothly return the choke lever to the OFF position (12.1).
natural_image
Line drawing of a hand using a tool to adjust or install a mechanical component (no text or symbols present)When the engine is running, the speed can be adjusted by moving the throttle control lever (13.1) to the high (indicated by a hare), medium or low position (indicated by a tortoise).

STOPPING
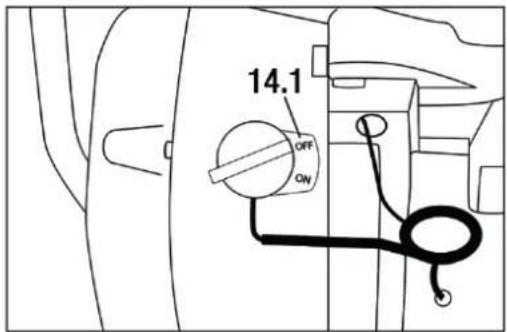
To stop the engine, turn the engine ON/OFF switch to the OFF position(14.1).
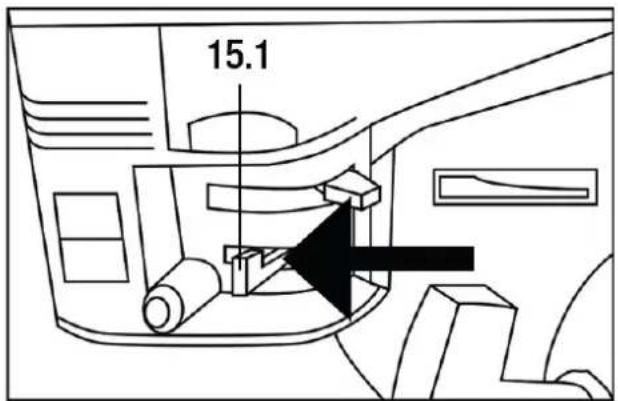
When the engine has stopped and before storage, turn the fuel lever to the OFF position as shown in (15.1).
(a) Slowly feed the material into the hopper. DO NOT try to stuff too much material in at one time or the machine will jam. (b) Use a 1" diameter branch to push the material into the hopper if necessary (fig.16). DO NOT use your hands.

natural_image
Man wearing headphones and glasses operating a tool outdoors, with a large arrow pointing downward (no text or symbols visible)NOTE: Move the throttle to the idle position, or turn the chipper/shredder OFF, when not actively shredding or chipping.
(c) Turn OFF the machine, allow all moving parts to completely stop, and disconnect the spark plug wire before moving the machine, emptying the bag, unclogging the inlets or outlets, filling the fuel tank, or performing maintenance and repairs.
SHREDDING TIPS
Feed material into the chipper/shredder slowly. If the engine begins to bog down, you are feeding too fast. Roots and dirty material will dull or damage the blades. Remove the chips often. Allowing the chips to pile up to the outlet will cause the outlet to clog. Avoid shredding wet leaves or brush to reduce clogging. If you must shred wet material, alternate wet and dry material.
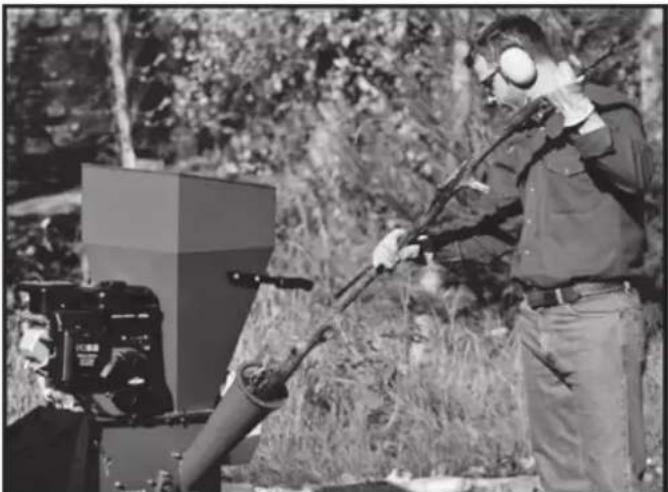
CHIPPING BRANCHES
Stand to the side of the hopper and make sure you have a stable stance and firm footing.
Remove twigs and smaller branches from the branch if they might catch on the edges of the funnel and prevent the branch from going in. Place branches into the funnel, thick end first, and allow the blades to draw the branch into the funnel.
natural_image
Person operating a field-based surveying machine outdoors, no visible text or symbolsWhen finished chipping, turn OFF the machine, allow all moving parts to come to a complete stop, and disconnect the spark plug wire before moving the machine, emptying the bag, unclogging the inlets or outlets, filling the gas tank, or performing maintenance and repairs.
CHIPPING TIPS
DO NOT feed material in excess of the diameter indicated on the funnel cover into the funnel. Large branches will cause the motor to stall. Chipping wood when it is green is easier on the machine. The blades will stay sharper longer. The chipper/shredder will work best if the blades are sharp. Rotate, sharpen, or replace the blades as soon as chipper/shredder performance begins to deteriorate.
MAINTENANCE

WARNING
Turn OFF the machine, allow all moving parts to come to a complete stop, and disconnect the spark plug wire before moving the machine, emptying the bag, unclogging the inlets or outlets, filling the fuel tank, or performing maintenance and repairs.
VISUAL INSPECTION
Before and after using the chipper/shredder, closely inspect the machine for loose parts and damage.
Check the hopper, hopper guard, and funnel for cracks, holes, and loose bolts.
Check the box frame for cracks or damage.
Check the entire machine for loose bolts or screws.
Check the blades and hammers for cracks and dings.
Check the engine oil level.
CLEANING
Clean the machine after each use. Allow the motor to cool and remove the spark plug wire. Brush off or vacuum wood chips and wipe off the remaining dust from the exterior of the machine with a dry cloth.
DO NOT rinse off the chipper/ shredder with water. Remove any chips or debris from the hopper and the discharge chute. It is much harder to clean the machine if you allow it to sit for a while after use. You may need to use an engine cleaner to remove the built up resins from the motor. Engine cleaners are available at most auto parts stores.
SPARK PLUG
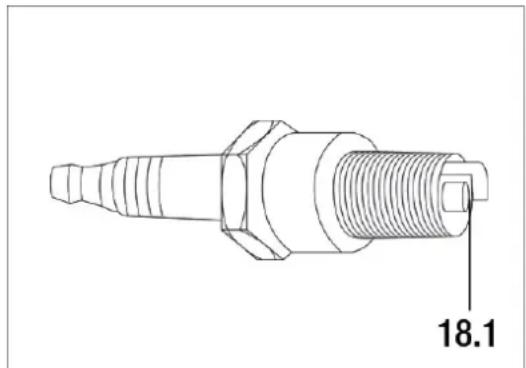
After every 50 hours of running the spark plug should be removed.
Check the colour of the deposits on the end of the spark plug it should be a "tan" colour. Remove all deposits using a stiff brush a brass wire brush is ideal. Check the spark plug gap (18.1) and adjust if required.
The correct gap should be 0.7 to 0.8mm.
ENGINE OIL
Place the machine on a level surface and warm up the engine for several minutes. Then stop the engine.
Remove the oil filler cap.
Place an oil pan under the engine. Remove the oil drain plug so that the oil can be completely drained. You will need to use a tube or other similar device to prevent the oil leaking onto the frame of the chipper/shredder.
Check the oil drain plug, gasket, oil filler cap and O-ring and if damaged replace.
Reinstall the oil drain plug.
Add engine oil up to the upper level of the dipstick.
Air Filter
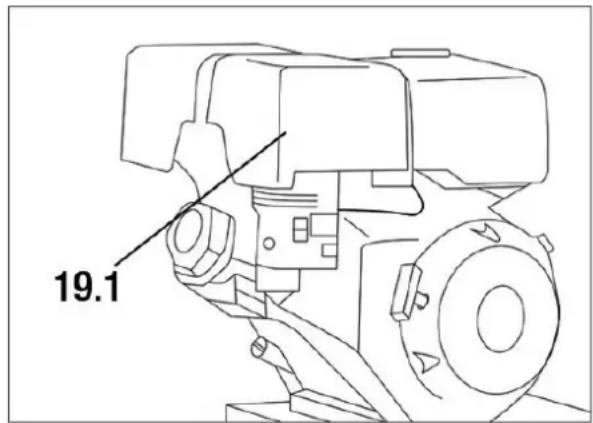
After every 100 hours of running or every month, the air filter (19.1) should be removed, examined for deterioration and cleaned. Clean the air filter thoroughly using environmentally friendly water based degreasing agent. Allow to dry fully then replace the air filter.
WARNING Never run the engine without the air filter fitted.
FILTER
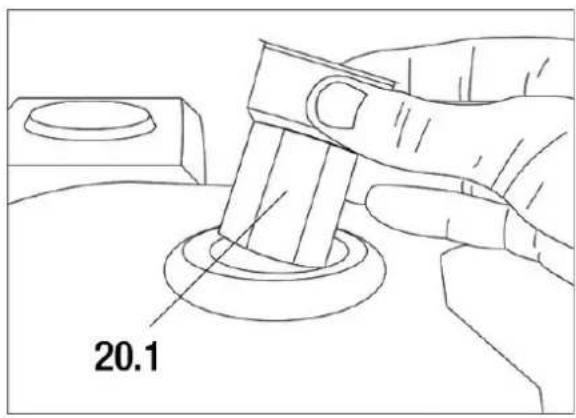
After every 150 hours of running or every three months the fuel tank filter (20.1) should be removed and cleaned. Remove the fuel tank filler cap and the filter, clean the filter thoroughly using environmentally friendly water based degreasing agent and refit.
REPLACING BLADES
Sharpen or replace the blades as soon as the chipping performance begins to deteriorate, or if you notice dings, chips, or cracks.
To perform this procedure:
TURN OFF THE MACHINE, ALLOW ALL MOVING PARTS TO COME TO A COMPLETE STOP, AND DISCONNECT THE SPARK PLUG WIRE
Remove the side cover plate to expose the blades.
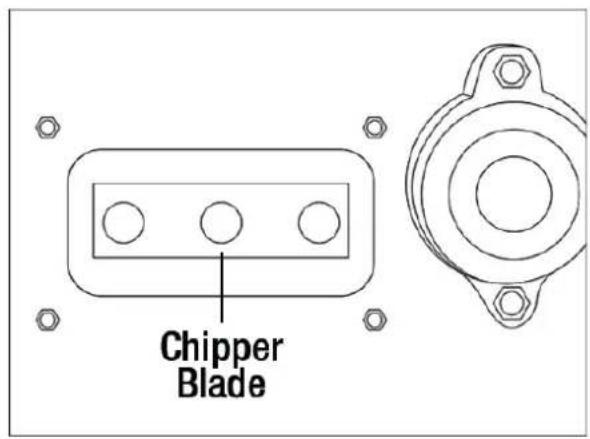
Remove one blade, rotate the impeller, and remove the second blade. Have the original blades professionally sharpened, or order a replacement set, then re-install the blades. Replace the side cover plate and re-attach the spark plug wire.
BELT
Replace or tighten the v-belt if you notice the motor running and the chipper blades are not spinning.
TURN OFF THE MACHINE, ALLOW ALL MOVING PARTS TO COME TO A COMPLETE STOP, AND DISCONNECT THE SPARK PLUG WIRE
Remove the v-belt cover as shown in.
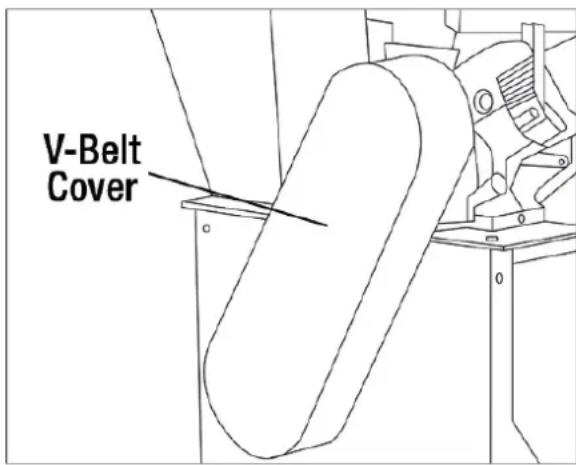
Roll the belt off of the pulleys and install the new belt.
Replace the v-belt cover and re-attach the spark plug wire.
STORAGE
Follow these guidelines when storing your chipper/shredder. Remove the spark plug wire to prevent unauthorized starting.
Place the chipper/shredder in a dry, level area. If the chipper/shredder is tipped it may leak oil and petrol.
DO NOT store the chipper/shredder near an ignition source, such as a wood stove, gas or electric heater, or an appliance or heater with a pilot light.
Store the chipper/shredder in a well ventilated area. DO NOT store the chipper/shredder in an area that will allow toxic gas fumes into areas inhabited by humans or animals.
Close the discharge chute deflector and place the covers over the hopper and the funnel to prevent objects or critters from getting into the machine.
If the engine is not to be used or is to be stored for more than one month the following storage procedure should be carried out. Drain all the fuel from the fuel tank and the carburetor ensure that all the fuel has been removed. Remove the spark plug and pour approximately one tablespoon full of clean engine oil into the spark plug hole. With the ignition turned OFF gently pull on the recoil starter cord several times. Re-fit the spark plug continue to pull the recoil starter cord until the piston is on the compression stroke (when resistance is felt) then stop pulling.
| PROBLEM POSSIBLE CAUSE POSSIBLE SOLUTION | ||
| Engine Will Not Start Co | control levers are not in correct positions for starting. | Make sure the ON/OFF switch is ON, the fuel shut-off valve is open, and the choke and throttle controls are in the start position. |
| Spark plug wire is not connected to the spark plug, or the spark plug is bad. | Connect the spark plug wire or replace the spark plug. | |
| No petrol, or petrol is old and stale. If empty, fill the tank. If full, drain the gas, then fill the tank with fresh petrol. | ||
| Air filter is dirty. Clean out the air filter. | ||
| Engine oil is low. Add oil to the engine. | ||
| Blocked fuel line. Clean out the fuel line. | ||
| Engine Does Not Run Smoothly | Engine is warm, and the choke is still in the CHOKE position. | Move the choke to the RUN position. |
| Air filter is dirty. Clean the air filter. | ||
| Stale fuel, water or dirt in fuel, blocked fuel line. | Drain the fuel tank, clean out the fuel line, and fill the tank with fresh petrol. | |
| Engine Overheats Chips | and sawdust around the engine. Clean off the engine. | |
| Dirty air filter. Clean out the air filter. | ||
| Machine Vibrates Or Makes Unusual Noises | Loose or damaged parts. Check the blades, hammers, impeller, and all connections. Tighten, repair, or replace any loose or damaged parts. | |
| Impeller or blades have woody residue or chunks stuck to them. | Clean the impeller and blades. | |
| Chipper/Shredder No Longer Chips Or Shreds Well | Dull or damaged blades and hammers. | Sharpen or replace blades and check the hammers for damage. |
| Loose, worn, or damaged V-belt. Replace or tighten V-belt. | ||
| Chips Do Not Come Out Of The Discharge Chute Or Come Out Slowly | Discharge chute or hopper is clogged. | Turn OFF the motor, disconnect the spark plug, then clean out the machine |
| Insufficient engine RPM's. | Move the throttle to FAST. | |
ENVIRONMENT
Disposal

Your product, accessories and packaging should be sorted for environmental-friendly recycling.
Electronic equipment should not be disposed of in household waste. For the proper disposal, treatment, recovery and recycling, please take these products to your local waste management centre. Disposing of this product correctly will help to save valuable resources and prevent any potential adverse effects on human health and the environment which could otherwise arise from inappropriate waste disposal and handling. Please contact your local authority for further details of your nearest designated collection point. Penalties may be applicable for incorrect disposal of this waste in accordance with national legislation.
Only For EC Countries
Do not dispose of power tools into domestic waste. Power tools that are no longer usable must be collected separately and disposed of in an environmentally friendly way.
TECHNICAL DATA
| MODEL HYCH700 HYCH1400 | ||
| Chipping Capacity 3" - 76mm 4" - 102mm | ||
| Blade Speed (rpm) 2400 2400 | ||
| Engine Type OHV 4-Stroke OHV 4-Stroke | ||
| Starting System Recoil Recoil | ||
| Displacement (cc) 208 420 | ||
| Max Power 7HP/3600rpm 14HP/3600rpm | ||
| Fuel Capacity (L) 3.6 6.5 | ||
| Oil Capacity (L) | 0.6 1.1 | |
| Fuel Type Unleaded Retrol Unleaded Retrol | ||
| Chipping Knives | x2 HSS Blade x2 HSS | Blade |
| Shredding Knives | x10 | x10 |
| Hammer | x10 | x10 |
| Dimensions (mm) | 1031x865x1350 | 1031x865x1350 |
| Net Weight (kg) | 70 | 95 |
WARRANTY
Register your 3 year warranty within 30 days of purchase at:
https://hyundaipowerequipment.co.uk/warranty
Full warranty term and conditions can be found on the HYUNDAI website:
www.hyundaipowerproducts.co.uk
GENPOWER LTD confirms that this HYUNDAI POWER PRODUCT conforms to the following CE Directives:
EN ISO 14982:2009
EN13683:2003+A2
AFPS GS 2014:01
EC DECLARATION OF CONFORMITY
The undersigned, as authorised by: Genpower Ltd
Declares that the following equipment manufactured under license by Hyundai Korea
Conforms to the Directive:
EN ISO 14982:2009
EN13683:2003+A2
AFPS GS 2014:01
Of the European Parliament and of the council on the approximation of the laws of the Member States relating to the noise emission in the environment by equipment for use outdoors.
Equipment Category: Wood Chippers
Product Name/Model: HYCH700 / HYCH1400
Type: Petrol Powered Wood Chippers
The technical documentation is kept by: Roland Llewellin, Genpower Ltd
Isaac Way, Pembroke Dock
Pembrokeshire, SA72 4RW
The conformity assessment procedure followed was in accordance with annex V or VI of the Directive.
Notified Body: TÜV Rheinland, LGA Products GmbH, TillystraBe 2, 90431 Nurnberg
Certification No: AE 50369469 0001
Measured Sound Power Level: 110dB(A)
A copy of this certificate has been submitted to the European Commission and to EU Member State United Kingdom.
Place of Declaration: Pembroke Dock, SA72 4RW
Date: Friday, 04 October 2019
Signed By: Roland Llewellin
Position in Company: Managing Director
Name and address of manufacturer or authorised representative:
RJLevelm
Genpower Ltd, Isaac Way, Pembroke Dock, Pembrokeshire, SA72 4RW.
UPDATES
Our manuals are constantly being reviewed and updated.
Should you find an error, omission or something you find unclear, please contact us for assistance.
We reserve the right to make any modifications without prior notice whenever necessary.
All our manuals can be found at:
www.hyundaipowerproducts.co.uk
HYUNDAI
POWER PRODUCTS
Imported for:
GENPOWER LTD
Isaac Way, London Road,
Pembroke Dock, UNITED KINGDOM, SA72 4RW
T: +44 (0) 1646 687 880 F: +44 (0) 1646 686 198
E: info@hyundaipowerequipment.co.uk
www.hyundaipowerproducts.co.uk
imported/Distributed by Genpower Ltd for The United Kingdom & Ireland Licensed by Hyundai Corporation, Korea
- IMPORTANT
- PETROL WOOD CHIPPER
- HYCH700/HYCH1400
- WARNING
- SAFETY WARNINGS
- DANGER
- CAUTION
- NOTE
- PACKAGE CONTENTS
- SAFETY INSTRUCTIONS FOR PETROL WOOD CHIPPERS & SHREDDERS
- ADDITIONAL SAFETY INSTRUCTIONS
- CARBON MONOXIDE SAFETY INFORMATION
- LOCATION
- WORKING AREA
- ASSEMBLY
- FUEL & OIL
- OIL
- FUEL
- OPERATION
- OPERATION CHECKS
- STARTING
- STOPPING
- SHREDDING TIPS
- CHIPPING BRANCHES
- CHIPPING TIPS
- MAINTENANCE
- VISUAL INSPECTION
- CLEANING
- SPARK PLUG
- ENGINE OIL
- FILTER
- REPLACING BLADES
- TURN OFF THE MACHINE, ALLOW ALL MOVING PARTS TO COME TO A COMPLETE STOP, AND DISCONNECT THE SPARK PLUG WIRE
- BELT
- STORAGE
- ENVIRONMENT
- Only For EC Countries
- WARRANTY
- EC DECLARATION OF CONFORMITY
- UPDATES
- HYUNDAI
- POWER PRODUCTS
Brand : HYUNDAI
Model : HYCH1400
Category : Grinder