
DC40 - Refrigerator Evakool - Free user manual and instructions
Find the device manual for free DC40 Evakool in PDF.


| Product Type | 12V DC Portable Drawer Fridge/Freezer |
| Model | DC40 |
| Brand | Evakool |
| Power Supply | 12V DC or 24V DC (compressor powered) |
| Recommended Fuse | 15A (12V), 7.5A (24V) |
| Temperature Range | -18°C to 10°C |
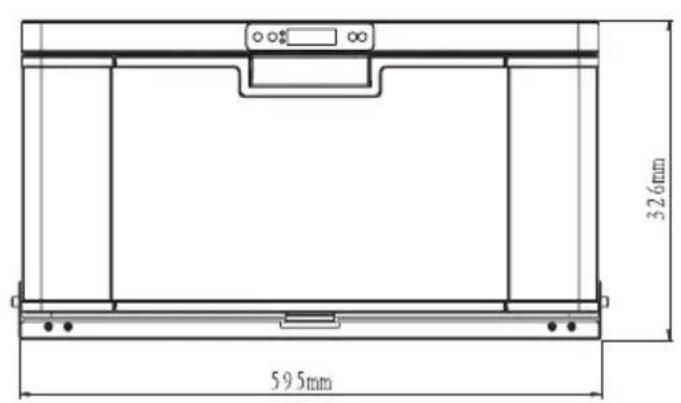
| Dimensions (W x D x H) | 595 mm x 836 mm x 326 mm |
| Weight | Not specified (estimated ~20-25 kg) |
| Compressor Type | 12V DC variable speed compressor |
| Drawer Type | Built-in drawer compartment with removable mounting frame |
| Control Panel | LED display with +/– buttons, Turbo mode, On/Off switch |
| Special Features | Turbo mode for rapid cooling, automatic restart after power loss, fault indicator lights |
| Installation | Requires mounting frame (included) and screws; allow 100 mm ventilation gap around vents |
| Max Operating Angle | Up to 30° from level |
| Cleaning & Maintenance | Clean weekly with damp cloth; use sodium bicarbonate in lukewarm water for tough stains; do not use abrasives |
| Defrosting | Turn off unit, allow frost to melt, wipe dry |
| Safety Compliance | International certification approvals (details in manual) |
| Parts Availability | Full parts list with part numbers (e.g., door, shelf, fan, compressor, display board, etc.) |
| Warranty & Support | Contact Evakool at 1300 385 665 or warranty@evakool.com |
Frequently Asked Questions - DC40 Evakool
1 flash every 4 seconds: Low voltage – try a different power source or check cable thickness.
2 flashes: Fan overload – replace fan.
3 flashes: Compressor start issue – unplug for 10 minutes and retry.
4 flashes: Low motor speed – reduce load, improve ventilation.
5 flashes: Over temperature – check ambient temperature and fan.
2. Position the frame where you want the fridge.
3. Fix the frame with the provided screws.
4. Slide the drawer fridge onto the frame, ensuring the locating lugs align with slots.
5. Secure the fridge to the frame with the 4 screws.
1. The unit is switched on (press the On/Off button).
2. The power source is functional and the plug is connected.
3. The fuse has not blown.
4. The cable and socket are in good condition. If the problem persists, try a different power source.
User questions about DC40 Evakool
0 question about this device. Answer the ones you know or ask your own.
Ask a new question about this device
Download the instructions for your Refrigerator in PDF format for free! Find your manual DC40 - Evakool and take your electronic device back in hand. On this page are published all the documents necessary for the use of your device. DC40 by Evakool.
USER MANUAL DC40 Evakool
natural_image
Outdoor scene of a smiling man in yellow apron grilling meat on a grill, with another woman nearby (no visible text or symbols)
natural_image
Black and white photo of a portable electronic device with open drawer containing cylindrical cans, set against blue background (no text or symbols visible)CHILLED FOR GOOD TIMES
Please read operating manual carefully before using your unit.
Please keep manual in a safe place.
If lost find a digital copy at Evakool.com.au or contact Evakool on (07) 5492 5495.
Contents
1 Safety Instructions 4
2 Notes On Using The Product 4
3 Operation 4
4 Cleaning & Maintenance 6
5 Troubleshooting 6
6 Installation Instructions 8
7 International Certification Approvals 9
8 Dimensions.... 10
9 Parts 11
Key Product Features
- Powered by 12 Volt DC Compressor.
- Reliable electronics, high efficiency, low energy consumption.
• Built-in drawer compartment.
1 Safety Instructions
- Warning: Do not use your unit if any cabling is damaged, frayed or exposed.
- Warning: Do not attempt or continue to operate your unit if it is wet.
- When using the unit ensure the circuit being used has a fuse or circuit breaker, recommended size for DC 12 Volt is 15 Amp, DC 24 Volt is 7.5 Amp.
- Make sure the voltage is within the correct range for socket and cable being used.
- Do not place any electrical devices inside the refrigerator as they may be damaged.
2. Notes On Using The Product
- Your unit requires good ventilation, especially around the vents of the refrigerator; allow a gap of at least 100mm around all vents.
- Do not allow a large amount of frost to build up on the inside walls as this may impair cooling. Defrost by turning the unit off, allowing the frost to melt and wiping out the water.
- The lower the ambient temperature, the lower the power usage. In order to maximise efficiency keep the unit in a cool location out of direct sunlight.
- It is recommended to operate the unit on a flat surface, but it will operate at angles up to 30^ .
3. Operation
• Power: DC (12 and 24 Volt)
• Cable Length Specification
The DC cables must have a suitable cross-section for their length (measured from the battery to the unit), according to this table:
| Cable Thickness (Area) 12V Max Cable Length 24V Max Cable Length | |||||
| (mm2) AWG (m) (ft) (m) (ft) | |||||
| 2.5 14 2.5 8 5 16 | |||||
| 4 12 4 13 8 26 | |||||
| 6 10 6 20 12 39 | |||||
| 10 8 10 33 20 66 | |||||
LED Control Panel
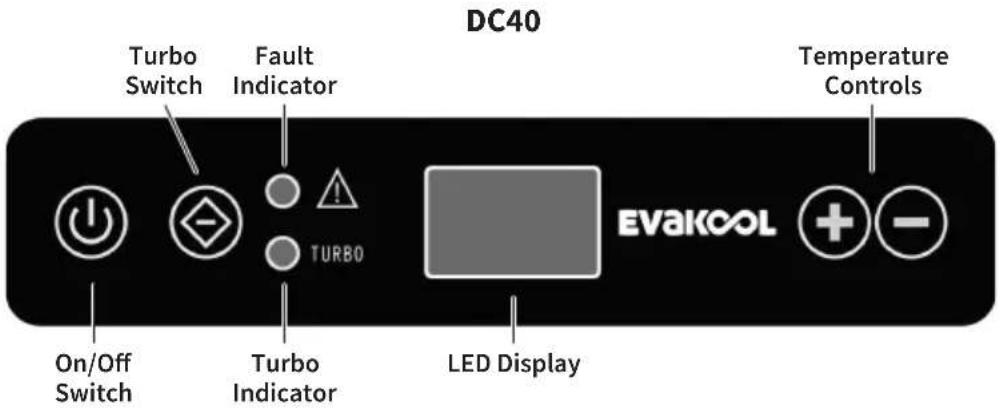
Temperature setting range: -18°C to 10°C.
- Plug in the DC power cable.
- Press button to turn on unit. The LED display on the control panel will turn on and the interior temperature is displayed.
- Press the button +or button to adjust the temperature the unit aims to achieve. Press the button +to increase or the button to decrease the temperature.
- Press the ⏻ button for Turbo mode to increase the speed of the compressor. This setting can be used when you need to cool product quicker.
- If the power supply is cut off or disconnected, the unit will switch off automatically and once the power supply is restored it will automatically switch back on.
4. Cleaning & Maintenance
- Clean the appliance inside and out with a clean damp cloth every week. If it is dirty, use sodium bicarbonate dissolved in lukewarm water to clean the unit.
- Never use abrasive products, detergents or soap. After cleaning, wipe out with a clean damp cloth and dry carefully.
- Do not store product inside unit if the unit is not on
- Do not store the unit if it is wet inside or without leaving the lid open.
- Never clean the unit under running water or in dish water. Do not use abrasive cleaning agents or hard objects during cleaning as these can damage the unit.
5. Troubleshooting
The Unit is Not Turning On
- Check whether the unit has been turned on.
- Check the power supply (try a different power source/vehicle/socket).
- Check whether the plug and the socket have a good connection.
- Check whether the fuse has been burned out or blown.
Low Refrigeration Performance
- Too much product been placed inside the unit.
• There is too much warm product inside the unit.
• The lid is unlatched / or open.
• The lid seal is broken. - Problems arising from poor ventilation (allow 100mm of space around all vents).
• The ambient temperature is too high.
• The temperature setting is too high.
Yellow Fault Light Flashing
1 Flash every 4 seconds: Low Voltage
- Try on different power source (vehicle or 240V AC power). If changing power source fixed issue, then possible issue with original power source.
- Ensure cabling between fridge and battery is at least 4mm, if the distance is more than 2 metres then use at least 6mm cable.
2 Flashes every 4 seconds: Fan Issue
• Fan is drawing too many amps (over 0.5 amps), replace fan.
3 Flash every 4 seconds: Compressor Start Issue
- Unplug cable and allow unit to rest for 10 minutes.
- Try on different power source (vehicle or 240V AC power).
• Electronic box fault. - Compressor fault.
4 Flash every 4 seconds: Low Motor Speed
- Reduce products / items inside unit.
- Move so unit is in a lower ambient temperature clean vents / ensure clear air flow over compressor.
- Fan fault.
5 Flash every 4 seconds: Over Temperature
- Ambient temperature too high.
- Clean vents / ensure clear air flow over compressor.
- Fan fault.
Can hear the sound of running water from inside the unit
• This is normal, due to the flow of refrigerant in the unit.
Unusual noise when refrigerator is working
• The refrigerator is not placed on a level surface.
If none of the above solves your issue please contact Evakool on 07 5492 7777 or warranty@evakool.com for details of your closest Evakool service centre.
6. Installation Instructions
a. Remove the mounting frame from the fridge.
b. Locate the mounting frame into the position you wish to install the fridge.
c. Use the screws provided to fix the mounting frame to the base.

d. Insert the drawer fridge onto the mounting frame. Ensure the locating lugs are securely inserted into the locating slots.

e. Using the 4 screws provided, secure the fridge to the mounting frame as shown below.

natural_image
Technical line drawing of a front view of a kitchen appliance with control panel and buttons (no text or symbols)- International Certification Approvals


- DC40 Dimensions


natural_image
Black rectangular electronic device with control panel and indicator lights (no visible text or symbols)9. DC40 Parts

| 1 40DR - 80DR - 001 Door | 15 40DR - 001 Cabinet | |||
| 2 40DR - 80DR - 002 Acrylic-Front 16 40DR - 80DR - 015 Fixed Bracket 1 | ||||
| 3 40DR - 80DR - 003 Acrylic-Rear 17 40DR - 80DR - 016 Fixed Bracket 2 | ||||
| 4 40DR - 80DR - 004 Door | Gasket 18 40DR - 80DR - 017 Compressor Base Board | |||
| 5 40DR - 80DR - 005 Cabinet Bracket 19 40DR - 80DR - 018 Fan | ||||
| 6 40DR - 80DR - 006 Cabinet 20 40DR - 002 Condenser | ||||
| 7 40DR - 80DR - 007 Shelf | 21 40DR - 80DR - 019 Compressor | |||
| 8 40DR - 80DR - 008 Track | 22 40DR - 80DR - 020 Capillary | |||
| 9 40DR - 80DR - 009 LED Light | 23 40DR - 80DR - 021 Dryer | |||
| 10 40DR - 80DR - 010 Display Sticker | 24 40DR - 80DR - 022 Left & Right Cover Board | |||
| 11 40DR - 80DR - 011 Display Board | 25 40DR - 80DR - 023 Rear Cover Board | |||
| 12 40DR - 80DR - 012 Top Plastic Cover | 26 40DR - 80DR - 024 50A Plug | |||
| 13 40DR - 80DR - 013 Door Lock Panel | 27 40DR - 80DR - 025 Circuit Breaker | |||
| 14 40DR - 80DR - 014 | Metal Bracket for Top Cover | |||
EVAKOL®
CHILLED FOR GOOD TIMES
For your nearest stockist contact EvaKool
T: 1300 385 665 (1300 EVKOOL)
E: warranty@evakool.com
or visit us at evakool.com.au
- Contents
- Key Product Features
- Safety Instructions
- Notes On Using The Product
- Operation
- LED Control Panel
- Temperature setting range: -18°C to 10°C.
- Cleaning & Maintenance
- Troubleshooting
- The Unit is Not Turning On
- Low Refrigeration Performance
- Yellow Fault Light Flashing
- Flash every 4 seconds: Low Voltage
- Flashes every 4 seconds: Fan Issue
- Flash every 4 seconds: Compressor Start Issue
- Flash every 4 seconds: Low Motor Speed
- Flash every 4 seconds: Over Temperature
- Can hear the sound of running water from inside the unit
- Unusual noise when refrigerator is working
- Installation Instructions
- DC40 Parts
- EVAKOL®
- CHILLED FOR GOOD TIMES
Brand : Evakool
Model : DC40
Category : Refrigerator