
DVB-T2 180H - Receiver Vivax - Free user manual and instructions
Find the device manual for free DVB-T2 180H Vivax in PDF.

| Product Type | Digital Terrestrial Receiver (DVB-T2) |
| Model | Vivax DVB-T2 180H |
| Dimensions (W x H x D) | 150 x 97 x 35 mm |
| Weight | 0.4 kg |
| Power Supply | 220-240V AC, 50/60 Hz |
| Power Consumption (Max) | 6 W |
| Standby Power Consumption | ≤ 1 W |
| Tuner Input Frequency | 170~230 MHz, 470~860 MHz |
| Modulation | QPSK, 16QAM, 64QAM, 256QAM |
| Video Decoding | MPEG-4 HEVC (H.265), AVC/H.264 HP@L4, MPEG-2 MP@ML/HL |
| Video Output Resolutions | 576P, 720P, 1080i, 1080P |
| Video Output Ports | HDMI v1.4, SCART |
| Audio Decoding | MPEG-1 Layer 1/2/3, Dolby Digital, Dolby Digital Plus |
| Audio Output | COAXIAL (digital), L/R RCA |
| USB Port | USB 2.0, supports up to 2TB, FAT32/NTFS |
| Supported Media Files | MP3, JPEG, BMP, AVI (MPEG-4) |
| Network Connectivity | LAN (RJ45) for network apps |
| Electronic Program Guide (EPG) | 7-day EPG with scheduling |
| Recording Function | Instant and scheduled recording via USB (PVR) |
| Time Shift | Pause and rewind live TV (requires USB) |
| Parental Control | Password-protected channel lock (default 000000) |
| Remote Control Range | Up to 7 meters, 60-degree angle |
Frequently Asked Questions - DVB-T2 180H Vivax
User questions about DVB-T2 180H Vivax
0 question about this device. Answer the ones you know or ask your own.
Ask a new question about this device
Download the instructions for your Receiver in PDF format for free! Find your manual DVB-T2 180H - Vivax and take your electronic device back in hand. On this page are published all the documents necessary for the use of your device. DVB-T2 180H by Vivax.
USER MANUAL DVB-T2 180H Vivax
natural_image
Symbolic illustration of a candle crossed with a flame, no text or labels presentnatural_image
Three technical diagrams showing a rectangular object with rotation arrows, and two curved arrows indicating motion or movement (no text or symbols)Program Edit - Uređivanje programa
Kako bi uredili preference programa (zaključavanje, preskakanje, omiljeni, premještanje ili brisanje), potrebno je pristupiti izborniku za uređivanje programa (Program Edit). Ovaj izbornik zahtijeva lozinku za pristup.
Unesite dodijeljenu lozinku '000000'. Glavna tvornička lozinka za otključavanje je '888888'
FAV - Postavljanje omiljenih kanala
Delete - Brisanje TV ili radio program
-
Odaberite program i potom pritisnite PLAVU tipku, prikazati će se poruka upozorenja za brisanje, pritisnite OK za potvrdu brisanja programa.
-
Ponovite prethodni korak kako bi odabrali više Programa za brisanje.
Skip - Preskakanje TV ili radio kanala
- Odaberite program koji želite preskočiti i pritisnite ZELENU tipku, prikazuje se simbol za preskakanje i program je označen za preskakanje.
- Ponovite prethodni korak kako bi preskočili više Programa.
3.Za pohranu postavki i izlazak iz izbornika, pritisnite tipku EXIT.
Onemogućavanje funkcije preskakanja kanala:
Odaberite preskakanje kanala (SKIP) i pritisnite ZELENU tipku na daljinskom upravljaču za otkazivanje.
Move - Premještanje TV ili radio programa
- Odaberite željeni kanal i potom pritisnite CRVENU tipku. Pojavljuje se simbol za premještanje.
- Pritisnite GORE/DOLJE da biste premjestili program.
- Pritisnite OK da biste potvrdili.
- Ponovite gore navedene korake za premještanje više Programa.
Lock - Zaključavanje TV ili radio programa:
- Odaberite željeni Program i potom pritisnite ŽUTU tipku. Prikazuje se simbol lokota. Kanal je sada označen kao zaključan.
- Ponovite prethodni korak da biste odabrali više programa.
3.Za potvrdu postavki i napuštanje izbornika, pritisnite tipku EXIT. - Pritisnite ŽUTU tipku kako bi onemogućili funkciju zaključavanja programa.
- Za gledanje zaključanih programa potrebno je unijeti ili dodijeljenu lozinku '000000' ili Vašu zadnju ugođenu lozinku. Glavna tvornička lozinka je '888888'.
EPG (elektronski programski vodič)
Ova opcija prikazuje informacije o TV programima za svaki program za narednih 7 dana. Obično, kada je EPG otvoren, prikazuju se informacije o trenutnom programu. Za pregled informacija drugih programa pritisnite strelice LIJEVO i DESNO. Zaslon prikazuje tipke koje je potrebno pritisnuti za kretanje naprijed ili natrag u prikazu.
Time - Izbornik Vremena
Za pristup izborniku, pritisnite tipku MENU i odaberite [Time], koristeći tipke DESNO/LIJEVO za kretanje izbornikom.
Sleep - Samoisključenje
OSD Language - OSD jezik (jezik prikaza na zaslonu)
Odaberite OSD jezik.
Subtitle Language - Jezik podnaslova
Odaberite željeni jezik titlova.
Audio language - Audio jezik

Photo Configure - Postavke fotografija:
-Vrijeme prikaza: Postavite interval slikokaza na 1\~8 sekundi.
-Način prikaza: Postavite efekt prikaza kao način 0-59 ili nasumično.
-Omjer: [Zadrži]: Prikazivanje slike u originalnom omjeru.
[Odbaci]: Prikazivanje slike u načinu punog zaslona.
Movie Configure - Postavke filmova:
■ Omjer širine i visine slike:
[Zadrži]: Prikazivanje filma u originalnom omjeru.
[Odbaci]: Prikazivanje filma u načinu punog zaslona.
Svojstva titlova:
[Mali]: Prikazuje podnaslove u maloj veličini.
[Normalni]: Prikazuje podnaslove u normalnoj veličini.
natural_image
Crossed black-and-white symbolic image of a candle and flame (no text or labels)Ne postavljajte uređaj u blizini otvorenog plamena, kao što je plamen sveće ili u blizini grejalica.
KADA NE UPOTREBLJAVAJTE UREĐAJ
- Postavite uređaj u STANDBY mod ili isključite kabl napajanja. Obavezno isključite kabl napajanja ukoliko uređaj nećete da koristite duže veme.
ZAŠTITA UZEMLJENJEM

Ovaj uređaj opremljen je je dvopolnim utikačem za naizmeničnu struju. Uređaj posjeduje dvostruku izolaciju (Klasa II zaštite), pa nije potrebno dodatno uzemljenje. Vaša spoljašnja antena mora da bude uzemljena prema lokalnim propisima i standardima.
Kao dodatna zaštita tekom grmljavinskog nevremena, ili kada ostavljate uređaj bez nadzora ili ako nećete uređaj da upotrebljavate duži vremenski period, isključite kabl uređaja iz zidne utičnice, te odspojite kabl antene ili kablskog sistema. To će da sačuva uređaj od oštećenja uzrokovanih udarom groma ili strujnim udarom.
SERVIS
Ne pokušavajte samostalno da otvarate i servisirate uređaj. U slučaju da se za tim ukaže potreba, servisiranje prepustite kvalifikovanom ovlašćenom servisu.
- [OSD Language - OSD jezik] pritisnite taster DESNO/LEVO za izbor jezika prikaza informacija na ekranu.
2.[Country - Zemlja] pritisnite taster DESNO/LEVO za izbor pokrajine/područja gde instalirate uređaj.
-
[Channel Search - Pretraga] pritisnite taster OK za početak pretrage kanala.
-
Kada je podešavanje kanala završeno, možete započeti sa gledanjem TV programa.
Osnovni postupci
Program
Za pristup meniju, pritisnite taster MENU i izaberite [Program], upotrebljavajući tastere DESNO/LEVO za kretanje kroz meni.
Meni omogućava podešavanja upravljanja programom. Izaberite opciju i pritisnite OK ili taster DESNO za podešavanje.
Pritisnite taster EXIT za izlazak iz menija

Program Edit - Uređivanje programa
Time - Meni vremena
Za pristup meniju, pritisnite taster MENU i izaberite [Time], upotrebljavajući tastere DESNO/LEVO za kretanje kroz meni.
Time Zone - Vremenska zona
Izaberite vremensku zonu kada je [Vreme] postavljeno ručno.
Sleep - Samoisključenje
OSD Language - OSD jezik (jezik prikaza na ekranu)
Izaberite OSD jezik.
Subtitle Language - Jezik podnaslova
Izaberite željeni jezik titlova.
Audio language - Audio jezik
Izaberite željeni audio jezik za gledanje TV kanala. Ako jezik nije dostupan, biće upotrebljen uobičajeni jezik.
Digital Audio - Digitalni zvuk
Izaberite digitalni zvuk za gledanje TV kanala. [PCM], [RAW HDMI UKLJUČEN], [RAW HDWI ISKLJUČEN], [Isključeno Odaberite digitalni zvuk za gledanje TV kanala. [PCM], [RAW HDMI UKLJUČEN], [RAW HDWI ISKLJUČEN], [Isključeno].
System – sistemska podešavanja
Za pristup meniju, pritisnite taster MENU i izaberite [System], upotrebljavajući tastere DESNO/LEVO za kretanje kroz meni. Meni omogućava podešavanja i pretrage programa. Izaberite opciju i pritisnite OK ili taster DESNO za podešavanje. Pritisnite EXIT za izlaz.
Set Password - Podešavanje lozinke
Postavite ili promenite lozinku za zaključane programe. Unesite svoju staru lozinku ili dodeljenu lozinku '000000'. Zatim ćete biti zamoljeni da unesete svoju novu lozinku. Pritisnite taster OK za potvrdu nove lozinke.
Posle potvrde lozinke, pritisnite EXIT za izlazak iz menija. Glavna fabrička lozinka za otključavanje je '888888'.
Restore Factory Default - Fabrička podešavanja
Vraćanje digitalnog prijemnika na fabrička podešavanja. U glavnom meniju izaberite [Restore Factory Default] upotrebljavajući tastere DESNO/LEVO i pritisnite OK ili DESNO za izbor opcije
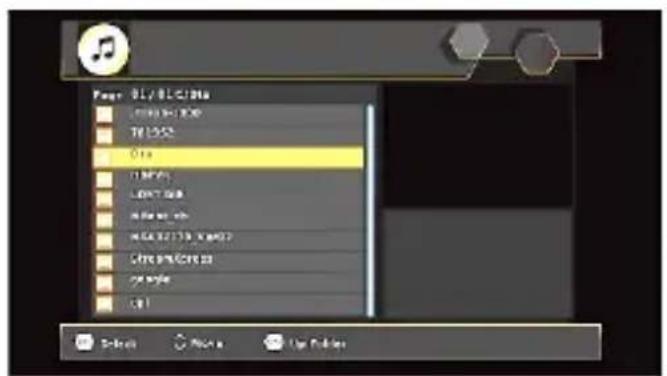
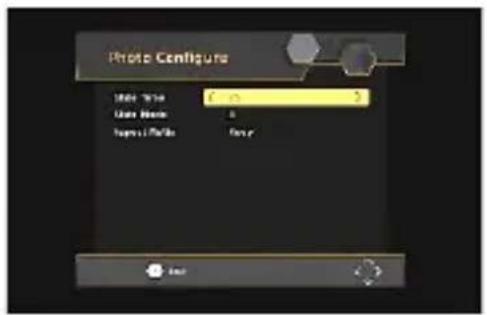
Photo Configure - Podešavanja fotografija:
-Vreme prikaza: Postavite interval prikaza na 1\~8 sekundi.
-Način prikaza: Postavite efekt prikaza kao način 0-59 ili nasumično.
natural_image
Symbolic illustration of a flame and candle crossed by two intersecting lines (no text or labels)natural_image
Simple line drawing of a rectangular object with an arrow indicating direction (no text or symbols)
natural_image
Abstract diagram with curved lines and a black arrow pointing downward (no text or symbols)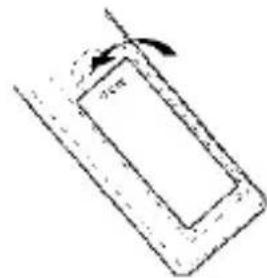
natural_image
Simple line drawing of a rectangular object with an arrow indicating rotation, no text or symbols present.Program Manage Rregullime
Program Edit
EPG (Electronic Programming Guide)
Aspect ratio - Raporti
Ndërroni raportin e Video. [Auto], [16:9 PillarBox], [16:9 Pan&Scan], [4:3 LetterBox], [4:3 Pan&Scan], [4:3 Full], [16:9 WideScreen]
Resolution - Rezolucioni
Power On/Off - Kyçje/Shkyçje
Option - Opsion
OSD (On Screen Display) Gjuhë
Mediaplayer - Multimedia:
Photo Configure - Foto konfigurim:
Safety Instructions 2
Front and Rear Panel 9
Remote Control. 10
Connecting to a Television 13
First Time Installation.. 14
Basic Operation 15
USB 27
Time Shift 31
Troubleshooting 32
Technical specifications 33
Dsiposal of the old unit 34
EU DoC 34
Caution: To avoid the danger of electric shock, do not open the cabinet.


CAUTION
RISK OF ELECTRIC SHOCK DO NOT OPEN

The flash with the symbol of arrowhead, inside an equilateral triangle alerts the user about the presence of a dangerous tension not isolated inside the product which can be sufficiently powerful to constitute a risk of electrocution.

The point of exclamation inside an equilateral triangle alerts the user about the presence of important operating instructions and maintenance in the document enclosed in the package.

Main plug is used as the disconnect device, the disconnect device shall remain ready for operating.

Incorrect replacement of the battery may lead to the risk, including the replacement of another similar or the same type. Do not expose batteries to heat such as sun or fire or something like that.

The device should not be exposed to dripping and spraying and it can not be placed under objects filled with liquids.
Please read the following safeguards for your TV and retain for future reference. Always follow all warnings and instructions marked on the television.
- Touching the internal parts of the device can cause electrical shock or damage to the device! Do not insert your fingers or other objects into the slots or remove the cover of the device.
Warning:
- To avoid the risk of fire and electric shock, do not expose the unit to rain or moisture;
To avoid the risk of fire and electrical shock, use only the recommended accessories;
- The power cord must be easily accessible to disconnected from the power supply.
- Remote control batteries should not be exposed to direct sunlight or fire.
- Power supply and other data's are located on the rating label located on the bottom of the device;
- This appliance is not intended for use by persons (including children) with reduced physical, sensory or mental capabilities, or lack of knowledge and experience to use the appliance, unless they are supervised by a person who is responsible for their safety or you're not received training on the use of appliances.
- Before using the device, please carefully read the precautions:
OVERLOADINGS:
- Do not overload wall outlets and extension cords as this can result in a risk of fire or electric shock
CLEANINGS:
- Before cleaning, disconnect the device from power. To clean, use a dry or slightly damp cloth (without strong chemicals cleaners). After cleaning, wipe the unit with a soft, dry cloth.
VENTILATION:
- Slots and openings in the cabinet are provided for ventilation and to ensure reliable operation and to protect it from overheating. Do not cover the ventilation openings in the.
CONNECTIONS:
- Before connecting or disconnecting the device from an antenna or TV unit, unplug the power cord to avoid any damage. To connect the devices, use only the recommended accessories and equipment.
POWER CABLE PROTECTION:
Power cord and Plug should be easily accessible. Do not put a device or furniture on the power cord. A damaged power cord or plug can cause fire or electric shock. Do
not bend or squeeze the power cord. Unplug your device from main supply to hold the plug and pull it from the power outlet. Never pull the power cord. Never touch a power cord / plug with wet hands, it could cause a short circuit or electric shock. Never make a knot in the cord or tie it with other cables
PLACING THE UNIT:
- Avoid installing the product on the following locations:
- Locations with direct sunlight, near devices that produce heat such as radiators and oven; Do not place the unit in the high temperatures (over 35°C), where in the air high humidity (over 90%) or where there is a lot of dust.
- Where is the strong magnetic and static electricity?
- Place exposed to vibration can affect the damage of internal parts of the device.

natural_image
Symbolic illustration of a candle crossed with a flame, representing fire or smoke (no text or numbers present)The device should not be placed near open flames and sources of intense heat, such as, electric heaters.
WHEN YOU ARE NOT USING DEVICE
- Place unit into STANDBY mode or disconnect the device from main power supply. Unplug the device when it is not used for a long time.
GROUND PROTECTION

The unit has a double insulation (Class II Protection), and no need additional grounding, but Areal TV antenna must be earthed according to your local standards and technical requirements.
SERVICING
Do not attempt to service this TV yourself as opening or removing covers may expose you to dangerous voltage or other hazards. Refer all servicing to qualified service personnel.
Damage Requiring Service
Unplug the TV from the wall outlet and refer servicing to qualified service personnel under the following conditions:
-When the power-supply cord or plug is damaged.
- If liquid has been spilled, or objects have fallen into the unit.
- If the unit has been exposed to rain or water.
- If the unit operates abnormally by following the operating instructions. Adjust only those controls that are covered by the operating instructions as an improper adjustment of other controls may result in damage and will often require extensive work by a qualified technician to restore the unit to its normal operation.
- If the unit has been dropped or the cabinet has been damaged.
For more Information, please contact the local authority or your retailer where you purchased product.
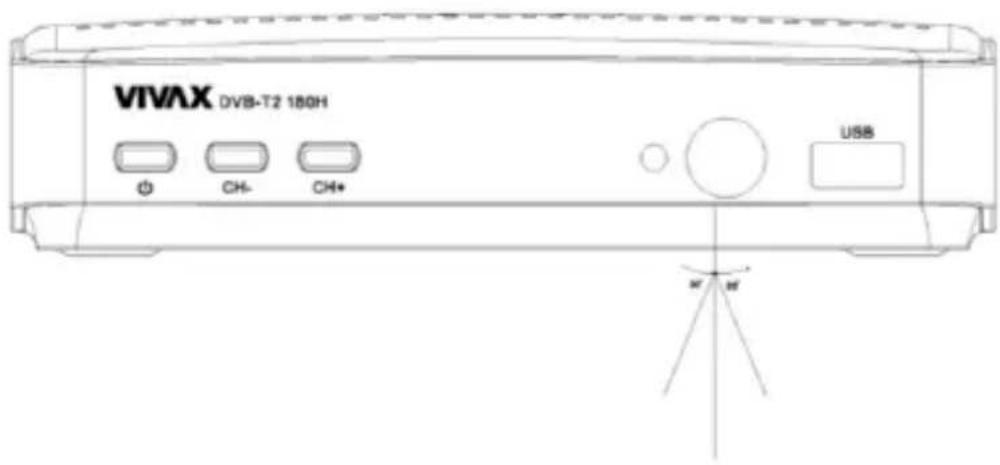
Front and Rear panel
1 Front Panel
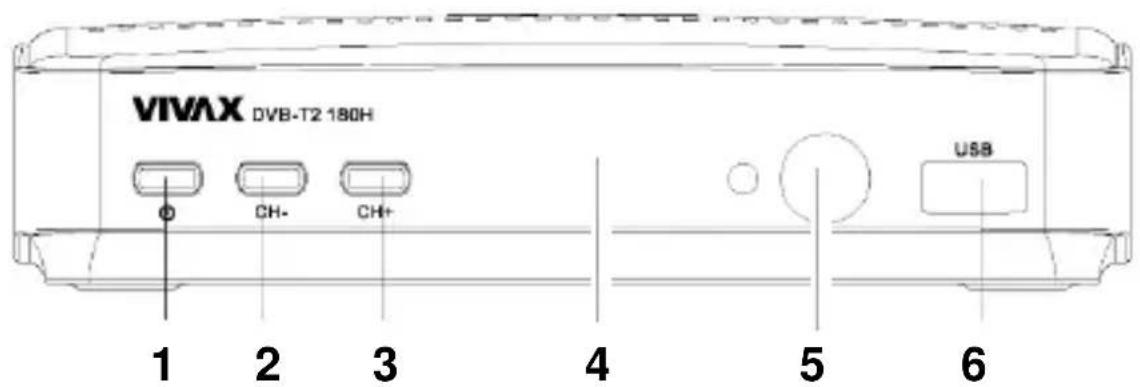
- POWER Work / Standby mode
2.CH- Channel Down
3.CH+ Channel Up
4.LED Display
5.IR IR Sensor
6.USB USB PVR slot
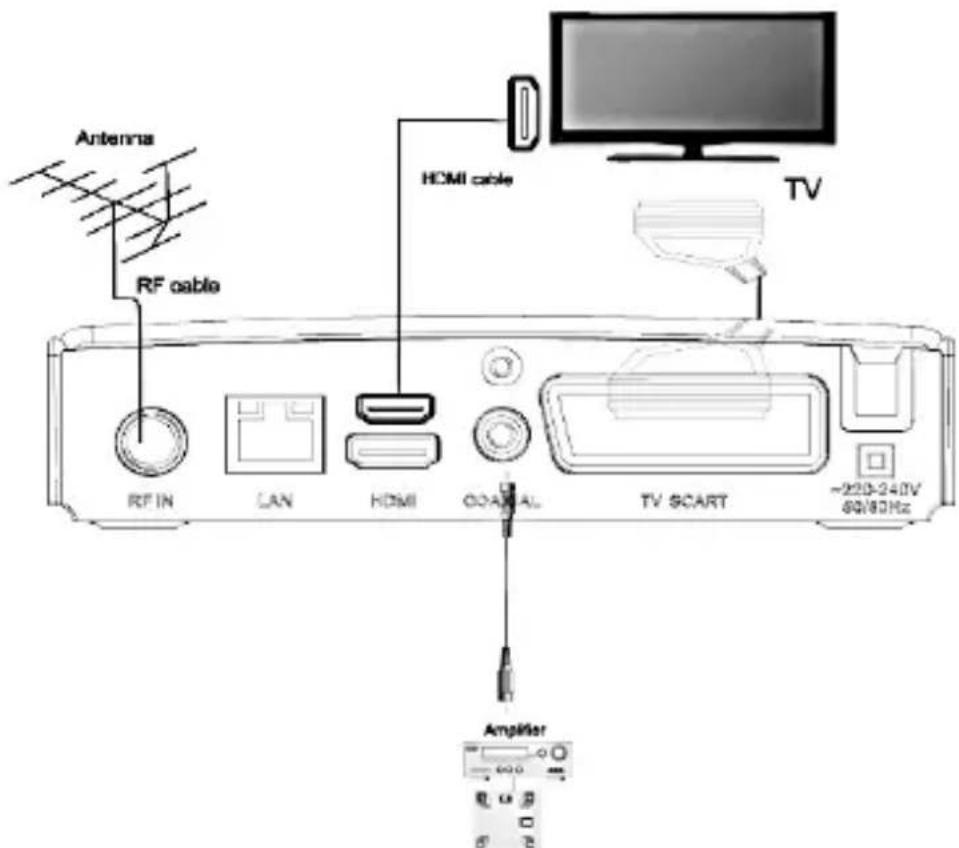
1 Rear Panel
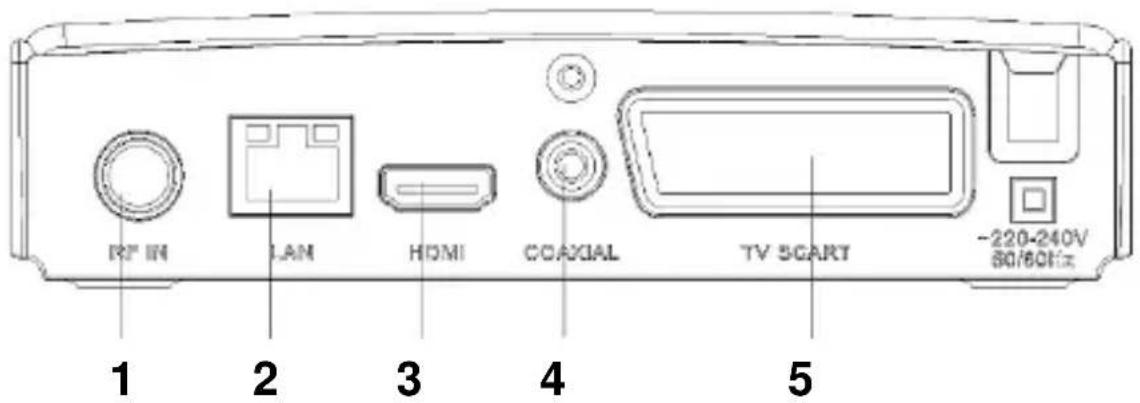
- RF IN Areal Antenna connection
- LAN LAN RJ45 connection on Local Area Network
- HDMI Digital High Definition Video/Audio output
- COAXIAL Digital Audio output
- SCART RGB or Composite Video/Audio output
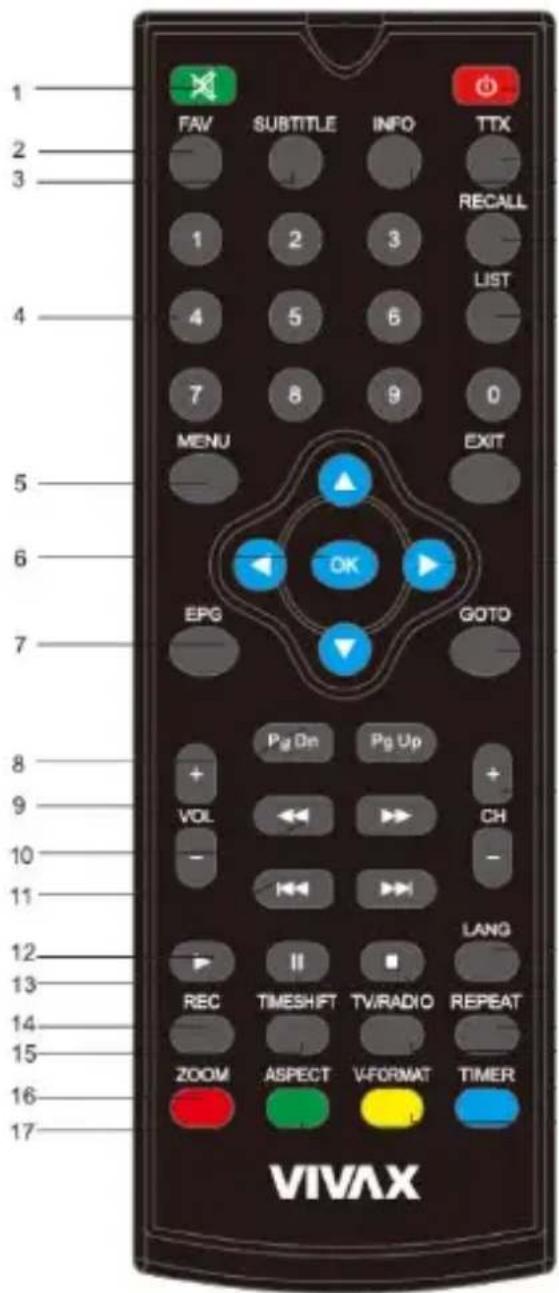
Remote control
- MUTE: Disable and Enable the sound.
- FAV: Displays your favorite channels list.
- SUBTITLE: Display subtitle options (depends on the channel service).
- <0>-<9>: Numeric keys.
- MENU: Display Main Menu, Press again to Exit
- OK: To confirm current setting, or display Prog. list in Prog. view mode.
- EPG: Shows the EPG (Electronic Program Guide).
- PAGE+/PAGE -: To navigate inside the Menus.
- VOL-/ VOL+: Sound volume adjustment
- REV/FWD: Fast backward / Fast forward.
- PREV/NEXT: Skip backward/Fast forward.
- PLAY
- PAUSE
- REC: Record button
- TIMESHIFT: Start TimeShift play (If USB is attached)
-
ASPECT: Switch 4:3/16:9 Aspect ratio
-
ZOOM: Increases the size of the image.
-
POWER: Switch On/Standby mode.
-
TTX: Show Teletext (if current channel has this option), use EXIT key to quit Teletext.
-
INFO: Display information about the current channel.
-
RECALL: Go back to the previous viewed channel.
-
LIST: PVR LIST
-
EXIT: Exit from the current menu.
-
:▲/▼/◄/► Press to move the cursor
-
GOTO: Select time.
-
CH-/CH+: Program Up/Down
-
LANG: Change the Audio language and Left/Right channel (depends on the channel).
-
STOP: Interrupt Media Play / TimeShift Play
-
REPEAT: Repeat Play.
-
TV/RADIO: Switch between Digital Radio and DVB-T modes.
-
TIMER: Access to the Timer.
-
V-FORMAT: Switch the HDMI 720P and 1080P
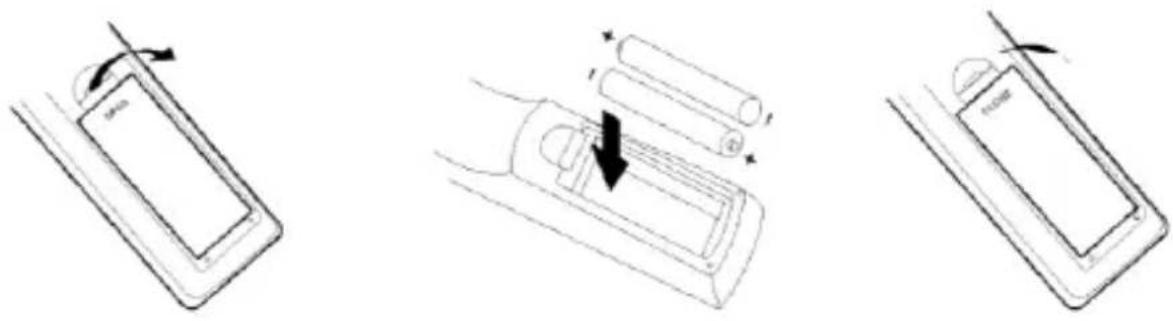
Installing the Batteries
Remove the battery cover from the rear of the Remote Control and place 2xAAA size batteries inside the compartment. Please make sure the battery polarities match the polarity markings inside the compartment
- Open the cover 2. Install batteries 3. Close the cover
natural_image
Three-step diagram showing battery charging process: moving, lifting a battery, and rotating to form a device (no text or symbols)Using the Remote Control
To use the Remote Control, point it towards the front of the Digital Set Top Box. The Remote Control has a range of up to 7 meters from the Set Top Box at an angle of up to 60 degrees.
The Remote Control will not operate if its path is blocked

Sunlight or very bright light will decrease the sensitivity of the Remote Control.
Connecting to a Television
For a basic connection from your Set Top Box to the television, use the SCART Composite connection outlined below.
For a higher quality connection, use the SCART RGB Video connection.
For the highest quality connection use Digital HDMI Video/Audio connection.
Note:
How to setup and adjust RGB/Composite or HDMI connection, please check chapter: PICTURE
For high audio quality connection on Amplifier, you can use COAXIAL Digital output. For Connection use 2x RCA Audio Cable.
Antenna Connection
Plug Antenna cable RF Plug into RF IN. If your antenna ia active and require power supply, you can switch on power 5V in Channel Search.
Note: Do not keep Antenna Power option active (On) if your antenna is regular passive type. It will cause a short circuit!
Installation Guide
After all connections have been made properly, switch on TV and make sure the units connected to the Main Power.
Press Power button to switch the unit on.
If you are using the unit for the first time or have restored the unit to factory default, the installation guide menu will appear on your TV screen.
Press 'OK' to start to do channel searching
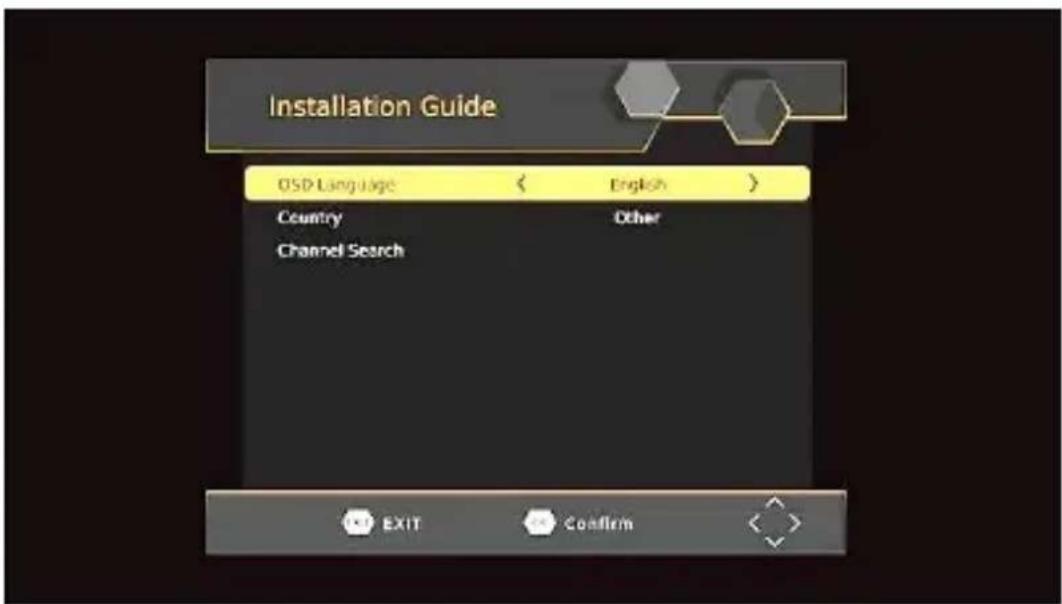
- [OSD Language] press RIGHT/LEFT key to select a language.
2.[Country] press RIGHT/LEFT key to select your province/area of residence.
3.[Channel search] press OK key to start channel search.
- Once channel tuning is complete, you can start watching TV programs.
Basic Operation
Program Manage Settings
To access the Menu, press the MENU button and select [Program], using the RIGHT/LEFT keys to navigate through the menu.
The Menu provides option to adjust the Program Manage Settings. Select an option and press OK or RIGHT to adjust that setting.
Press the EXIT button to exit the Menu
Program Edit
To edit your program preferences (lock, skip, favourite, move or delete), you will need to enter the Program Edit Menu. This Menu requires a password to access.
Enter the default password '000000'. The master unlock password is '888888'

Set Favourite Channels
You can create a short list of favorite programs that you can easily access. Set Favorite TV or Radio program:
- Select your desired channel then press the FAVOURITE button. A heart-shaped symbol will appear and the channel is marked as a favourite.
- Repeat the previous step to select more Favourite channels.
- To confirm and exit the Menu, press the EXIT key.
Disable Favourite TV or Radio channel:
Select the Favorite channel and press Favorite button on the remote control to cancel. View Favourite Channel:
-
While in normal viewing mode, press favourite button and the favourite menu will appear.
-
Press UP/DOWN to browse through your favorite channels.
-
Press OK to select your favorite channel. Delete a TV or radio program
-
Select the program and then press the BLUE button, a warning message will appear, press OK to delete the channel.
-
Repeat the previous step to select more channels to delete.
Skip TV or Radio channel
- Select the channel you would like to skip and press the green button, a skip symbol is displayed the channel is marked as s skip.
- Repeat the previous step to skip more channels.
- To save your settings and exit the menu, press EXIT key.
Disable the skip channel function:
Select the skip channel and press the Green button on the remote control to cancel.
Move a TV or Radio Program
- Select the preferred channel then press the RED button. A move symbol will appear.
- Press UP/DOWN to move the channel.
- Press OK to confirm.
- Repeat the above steps to move more channels
Lock Program
You can lock selected programs for restricted viewing.
Lock a TV or Radio channel :
- Select the preferred channel then press the YELLOW button. A lock-shaped symbol is displayed. The channel is now marked as locked.
- Repeat the previous step to select more channels.
- To confirm your settings and exit the menu, press the EXIT button.
- Press the YELLOW button to disable the locked channels function.
- To view the locked channels, you will be required to enter either the default password '000000' or your last set password. The master unlock password is '888888'.
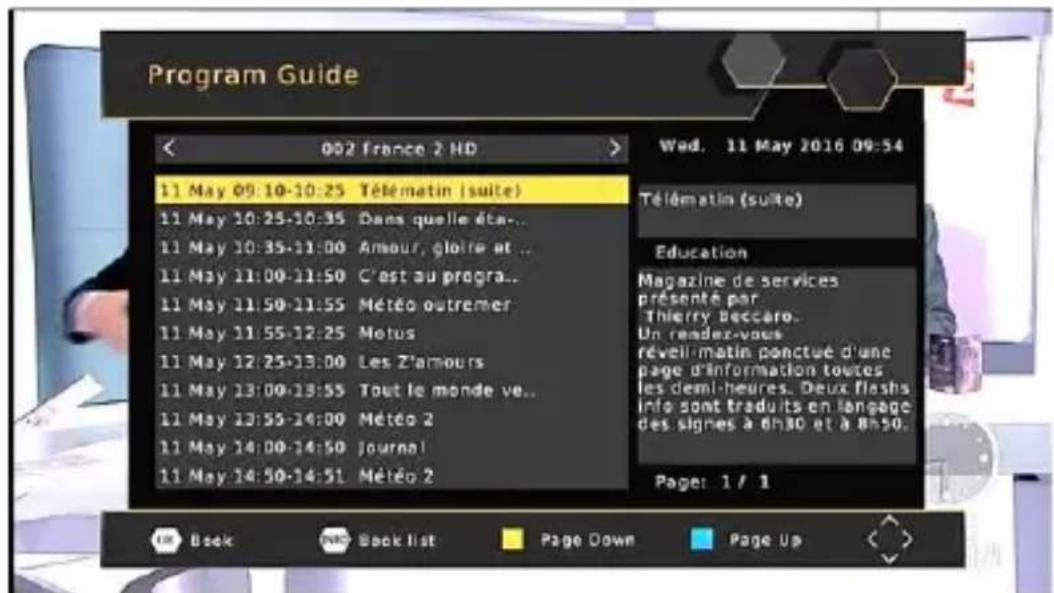
EPG (Electronic Programming Guide)
This feature shows the TV program listings for each channel for the following 7 days. By default, when the EPG is opened, the current channel's listings are shown. To view listings for other channels, press the LEFT and RIGHT arrow keys.
The display shows the buttons to press to go forward or backward in the programs listing.
Red/Green: event list Page Down/Page Up Yellow/Blue: Detail Info page Down/page Up
Note: Please see section "Scheduling" to learn how to schedule program recordings and channel preview.
To set the receiver to change to a channel at a specific time (e.g. at the start of your favorite program) while you are watching another channel, please follow these steps:
- Press EPG to open the full listings.
- Select the TV channel using the LEFT / RIGHT arrow keys.
- Select the TV program you want to watch later.
- Press OK. On the window that pops up, you are able to modify the channel, date and time, as well as optionally selecting to repeat this action on a regular basis.
- Select "View" in the "Mode" option.
- Press EXIT
A few seconds before changing channels, a warning message with a count-down is displayed on screen, which will change to the programmed channel when the count-down ends.
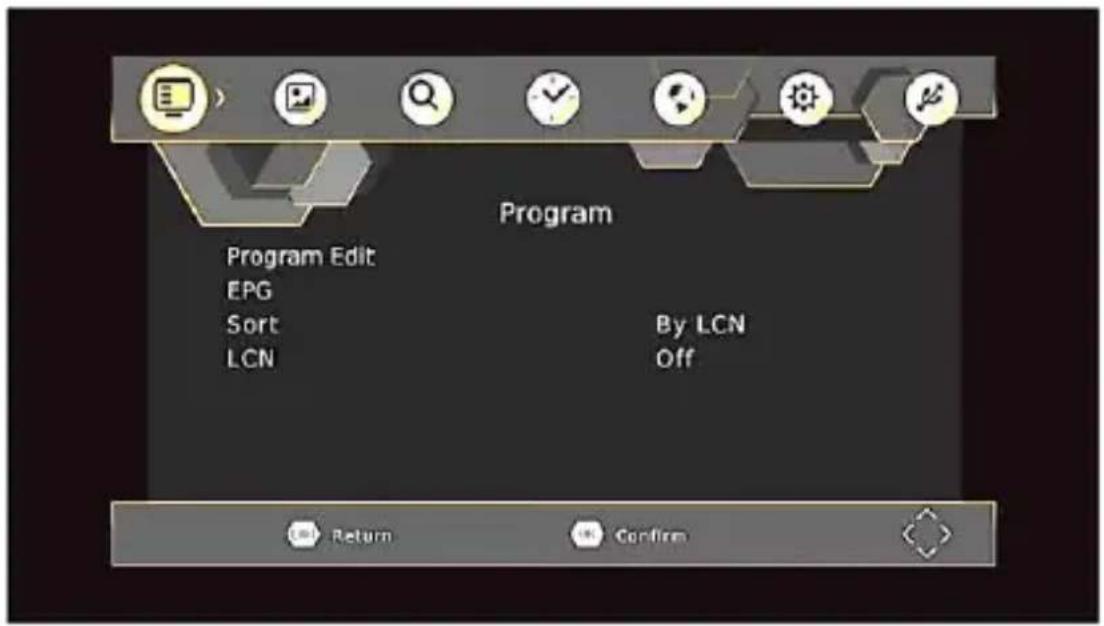
Sort
Sort your channels from the following options:
[By LCN] - Sort the channels in ascending order.
[By Service Name] - Sort the channels in alphabetical order.
[By Service ID] - Sort the channels according to the station.
[By ONID] - Sort the channels according to ONID.
LCN (Logical channel number)
Set LCN on or off.
The Yellow and Blue buttons in EPG have the function of "PAGE UP" and "PAGE Down" for Details EPG information on the right side
Picture Setting
To access the Menu, press MENU then select [Picture] using the RIGHT/LEFT key.
The Menu provides options to adjust the video settings.
Press UP/DOWN to select an option and press RIGHT/LEFT to adjust that setting. Press EXIT to exit the menu.

Aspect Ratio
Change the aspect ratio of Video. [Auto], [16:9 PillarBox], [16:9 Pan&Scan], [4:3 LetterBox], [4:3 Pan&Scan], [4:3 Full], [16:9 WideScreen]
Resolution
You can change this setting if the picture resolution does not appear to be correct. This setting is to match the most common setting for HDMI.
[480P]: for NTSC TV system.
[480i]: for NTSC TV system
[576P]: for PAL TV system.
[576i]: for PAL TV system.
[720P]: for NTSC or PAL TV system.
[1080i]: for NTSC or PAL TV system.
[1080P(50HZ)]: for NTSC or PAL TV system.
[1080P(60HZ)]: for NTSC system.
TV Format
If the picture does not appear to be correct you can change this setting. This should match the most common setting for TVs in your country.
[NTSC]: for NTSC system TV.
[PAL]: for PAL system TV.
Video Output
Change the video output. [CVBS], [RGB]
Channel Search
To access the menu, press MENU and select [Search Channel] using the RIGHT/LEFT keys.
This menu provides options to adjust the search channel settings.
Press UP/DOWN to select an option and press RIGHT/LEFT to adjust the setting.
Press EXIT to exit the menu.
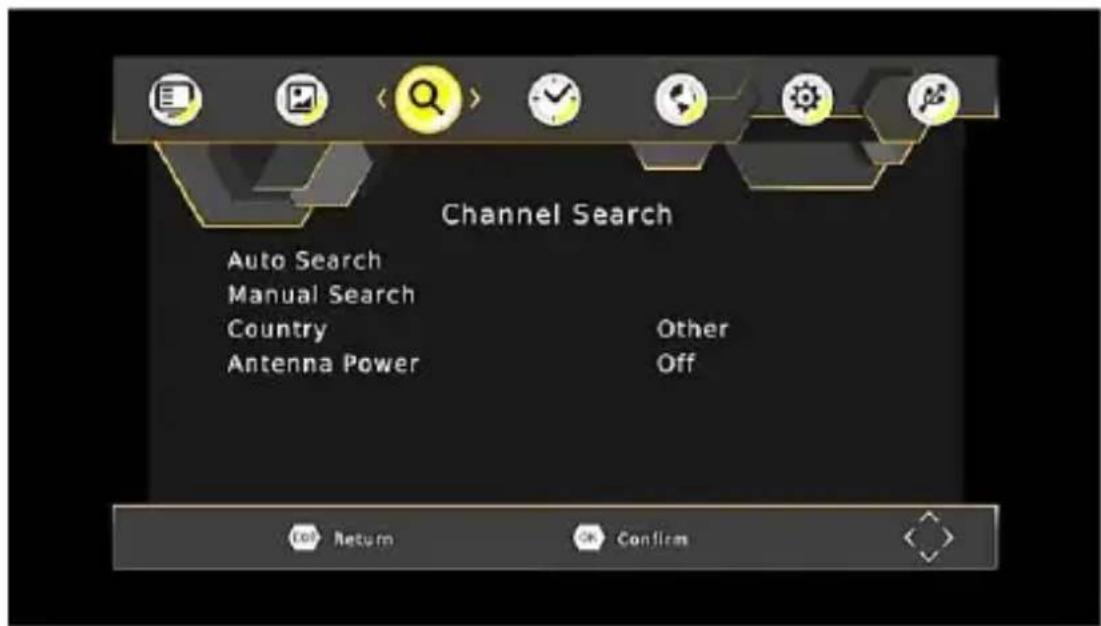
Auto Search

This option will automatically search for channels and save them once the scanning is complete. All previously saved channels and settings will be deleted.
- Select [Auto Search] and press OK or RIGHT to start channel search.
- To cancel channel search, press EXIT. Any channels that have been found will be saved
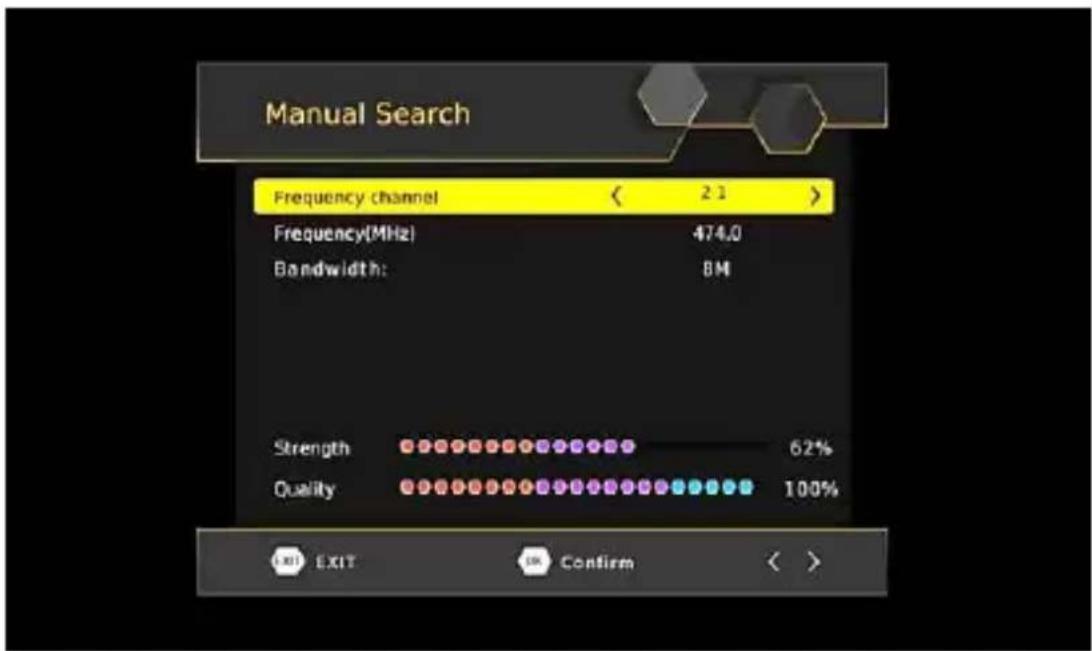
Manual Search
This option allows you to scan for new channels without deleting previously saved channels and settings.
- Select [Manual Search] then press OK or RIGHT. The channel search screen will appear.
- Press the RIGHT/LEFT key to select the channel frequency.
- Press OK to start searching channels.
If a channel is found, it is saved and added to the channels list. If channels cannot be found during searching, the unit will exit automatically.
Country
Select your country of residence.
Antenna Power
Enable Antenna Power if an external active antenna is connected.
Time Setting
To access the menu, press MENU then select [Time] using the RIGHT/LEFT keys. The menu provides options to adjust the time settings. Press UP/DOWN to select an option and press RIGHT/LEFT to adjust the settings, press EXIT to exit the menu.
Time offset
Select auto or manual for GMT offset adjustments.
Country Region
Select the Country Region when [Time Offset] is set to Auto.
Time Zone
Select the Time Zone Offset when [TimeOffset] is set to Manual
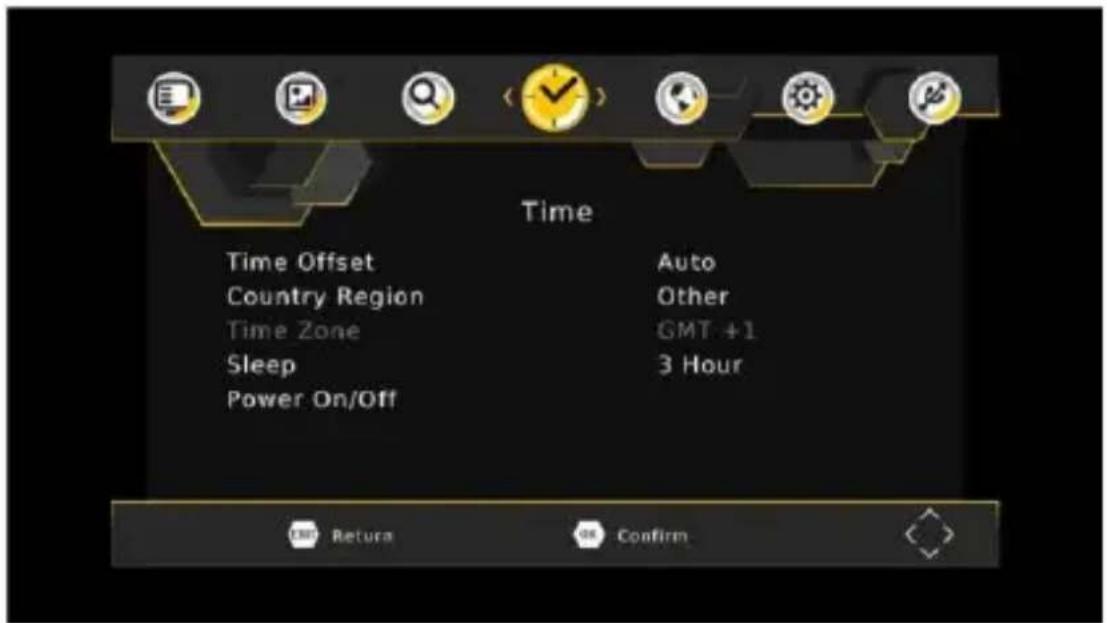
Sleep
Set Auto Stanby Timer.
[Off], [1 Hour], [2 Hour], [3 Hour], [4 Hour], [5 Hour], [6 Hour], [7 Hour], [8 Hour], [9 Hour], [10 Hour], [11 Hour], [12 Hour]
Power On/Off
Enable Power On or Off.
Option
To access the menu, press MENU select [Option] using the RIGHT/LEFT keys.
The menu provides options to adjust the OSD Language, Subtitle Language and Audio Language.
Select an option and press RIGHT/LEFT to adjust the setting. Press EXIT to exit the menu.

OSD (On Screen Display) Language
Select an OSD language.
Subtitle Language
Select the preferred subtitle language.
Audio Language
Select the preferred audio language for watching TV channels. If the language is not available, the default program language will be used.
Digital Audio
Select the digital audio for watching TV channels. [PCM], [RAW HDMI ON], [RAW HDWI OFF], [Off].
System Setting
To access the menu, press MENU and select [System] using the RIGHT/LEFT keys. The menu provides options to adjust the system settings.
Press the UP/DOWN key to select an option and press RIGHT/LEFT to adjust the setting.
Press EXIT to exit the menu.
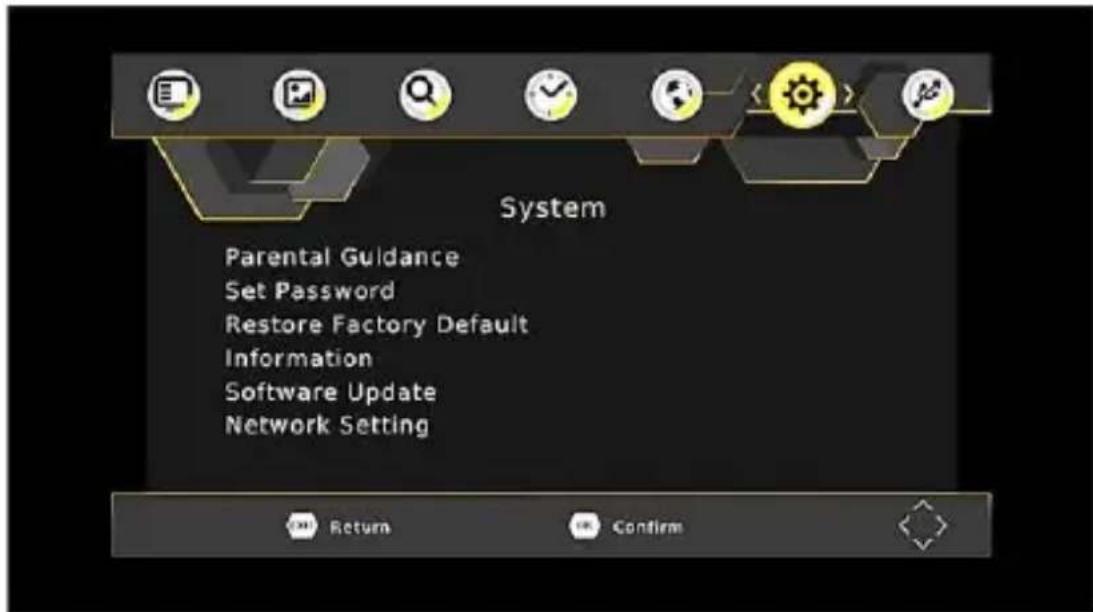
Set Password
Set or change the password for locked programs. Enter your old password or the default password '000000'. You will then be asked to enter your new password. Press OK button to confirm your new password.
Once it is confirmed, press EXIT to exit the Menu. The master unlock password is '888888'.
Reset your Set Top Box to the Default Factory Settings.
In Main Menu select [Restore Factory Default] using the RIGHT/LEFT keys and press OK or RIGHT to select.
Enter your password or the default password '000000' and press OK to confirm. This option will delete all preset channels and settings. The master unlock password is '888888'.
Information
View model, hardware and software information.
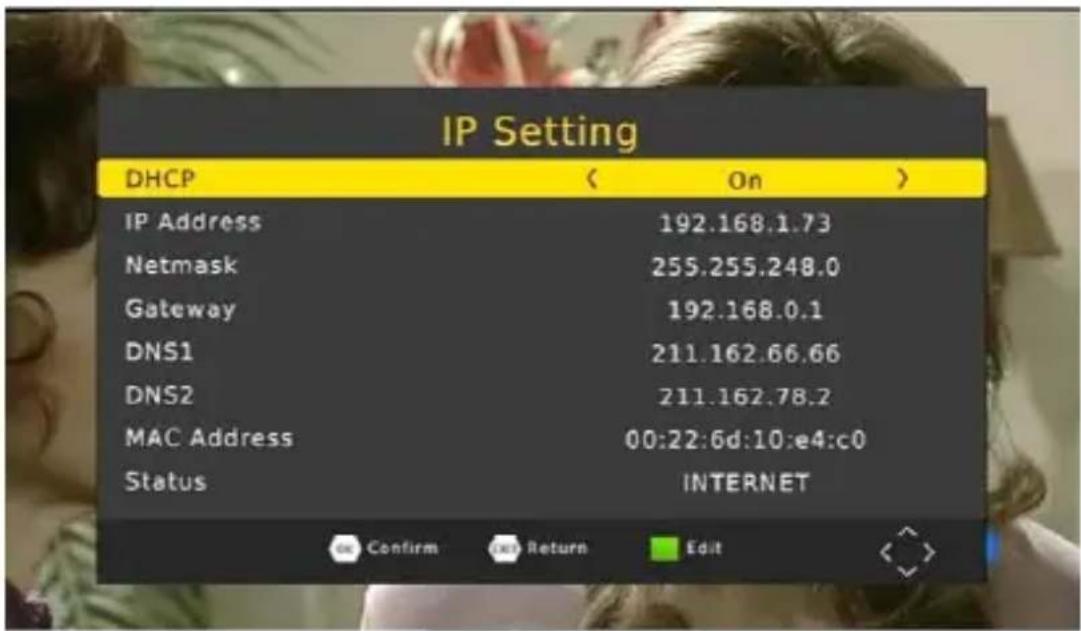
Network Setting
Set link type and IP setting
USB
To access the Menu, press the MENU button and select [USB] using the RIGHT/LEFT keys. The menu provides options to Playback Music, Photo and Multimedia files.
It can support AVI, MP3, JPEG and BMP formats.
Note: The unit will only support USB device with FAT32 / NTFS file system
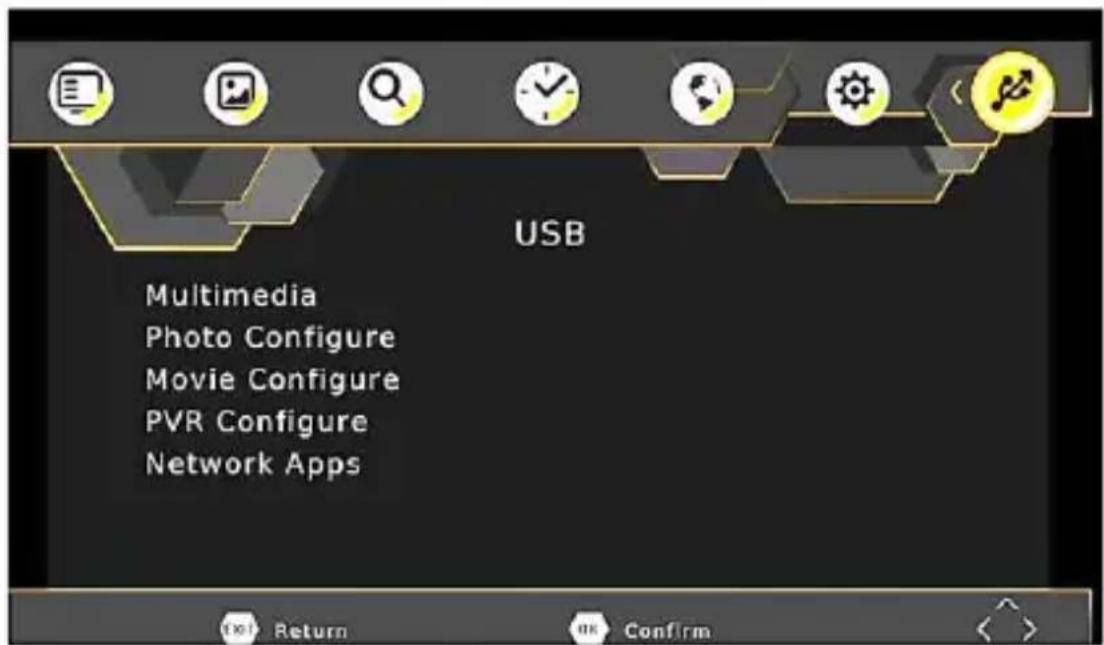
Multimedia:
When a USB device is attached you can select from the Music, Photo or Movie options in this menu using the RIGHT/LEFT keys and OK to select.
Note: If a USB device is not connected, the warning message "No USB device is Found" will appear.
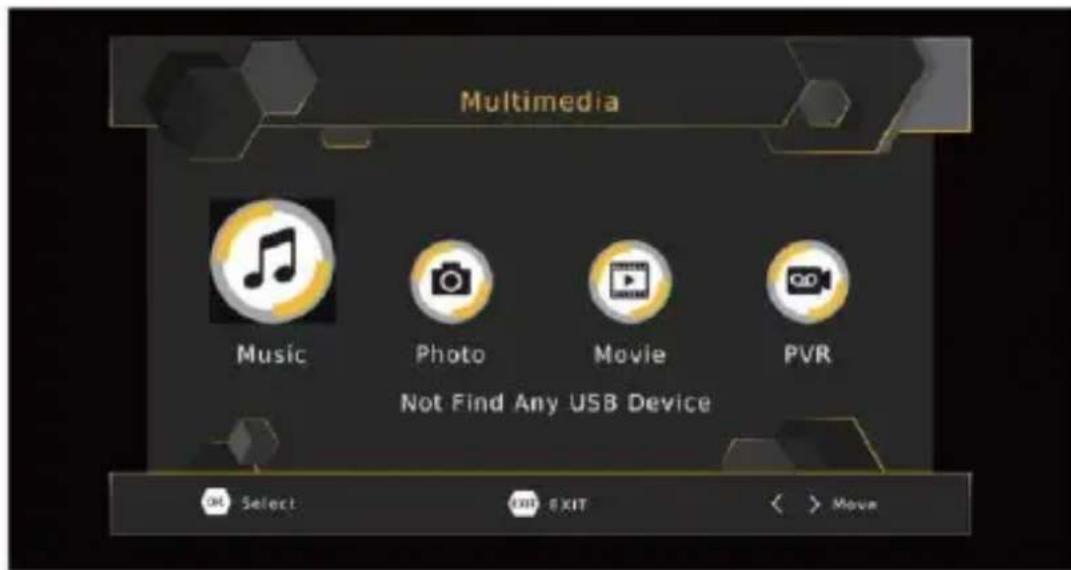
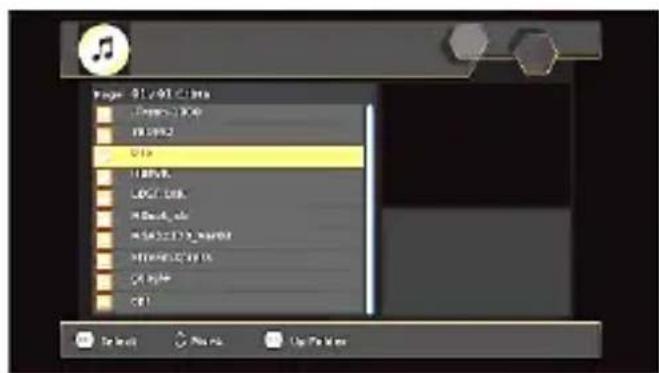
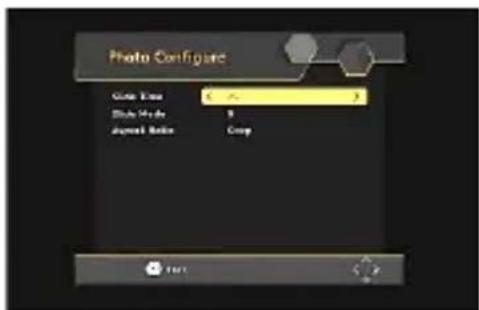
Photo configure:
- Slide Time: Adjust slide show interval to 1\~8 seconds.
- Slide Mode: Adjust slide show effect as mode 0-59 or random.
- Aspect Ratio: [Keep]: Play picture in its original aspect. [Discard]: Play picture in full screen mode.
Movie Configure:
Aspect Ratio:
[Keep]: Play movie in its original aspect.
[Discard]: Play movie in full screen mode.
Subtitle Specific:
[Small]: Displays the subtitle as small.
[Normal]: Displays the subtitle as normal
[Big]: Displays the subtitle as big size.
Subtitle BG:
[White], [Transparent], [Grey], [Yellowgreen]: Displays the subtitle in correspondent background color.
Subtitle Font Color:
[Red], [Blue], [Green]: Displays Subtitle in correspondent font color.
Network Apps
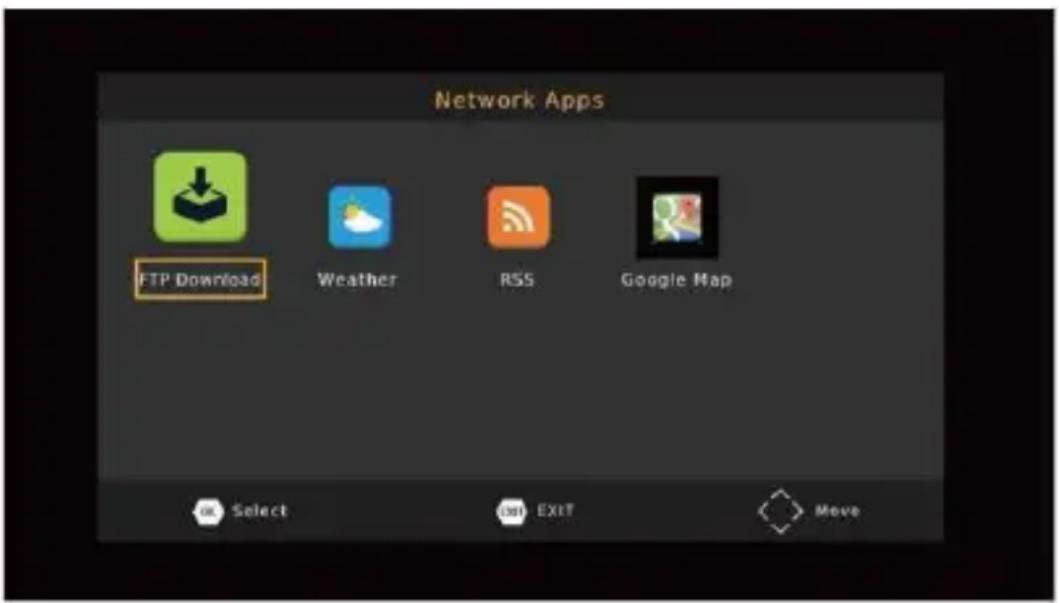
To input some network apps: Weather, Google Map, and more
Note: Available Apps depends about software version.
USB RECORDING
This function is available only when a USB storage device is connected to the receiver.
Instant recording:
If you want to start recording a live show, which is currently being broadcast, go to the desired channel and press the REC button. Press again to Stop recording.
Schedule a Recording:
To schedule a recording before broadcast (e.g. record your favorite show while you're out), follow these steps:
- Press EPG to open the full listings.
- Select the TV channel using the LEFT / RIGHT arrow keys.
- Select the TV show you want to record.
- Press OK. On the window that pops up, you are able to modify the channel, date, recording start -time and recording end-time, as well as optionally selecting to repeat this action on a regular basis

- Select "OTHER RECORDING" in the "Mode" option.
- Press EXIT.
A few seconds before starting to record, a warning message with a count-down is displayed on screen, which will change to the programmed channel when the count-down ends. Once the
recording has finished, a confirmation message appears on screen.
To View the scheduled events, press the Blue button.
To Delete a scheduled event, select the event and press the Blue button.
The recording files can be deleted on this unit, you can go to the PVR and press Yellow button to delete it.
The TV program is recorded to file at PVR format, which can be play back on this unit and PC using a suitable player, but cannot be played on DVD or PDVD.
Note: For recording the high definition TV programs, the version of USB device should be 2.0 or above, otherwise the unit may cannot record the HD programs correctly.
When recording to USB stick or external hard disc on this model, you have to wait a few seconds before pushing REC button after inserting the media. Otherwise the unit can freeze in the signal.
If that happens, then please take off power and connect again to fix this.
Scheduled recording only works when the unit power is on, it can not work when the unit is standby.
Note:
- We cannot guarantee compatibility (operation and/or bus power) with all USB mass storage devices and assume no responsibility for any loss of data that may occur when connected to this unit.
- With large amounts of data, it may take longer for the system to read the contents of a USB device.
- Some USB devices may not be properly recognized.
- Even when they are in a supported format, some files may not play or display depending on the content.
Timeshift

When you are playing the program, you can insert the USB, and at any time you can press the [Time shift] button, the frame will be paused, and you may press the [PLAY] button after a second, it will start to Timeshift now.
You may press the PLAY button to return the normal program playing, and the Timeshift is continuing, you may see from the below picture's bottom which is showing the time shift status. In this case, you may make the unit to play the recorded program from the start.
Press [Info] key to see time shift information as below:
| INFO | |
| PVR Mode | RECORD |
| Total Disk Space | 3.60 GB |
| Disk Free Space | 1.68 GB |
| File System | FAT32 |
| Cluster Size | 4 KB |
| File Name | timeshift.ts |
| Max Record Size | 1.73 GB |
| Max Record Time | 00:53.56 |
| Record Bitrate | 559 KB/S |
| Cur Play Size | 0 KB |
| Cur Record Size | 43.72 MB |
You can press [Fast forward]/[Fast back] to move the slide to left or right of the current recording.
Note: Time Shifting will only be available when USB HDD is connected to the system and read/write speed is high enough to do that.
Press [Stop] button to end the Timeshift, and it will back to the normal playing of the program
Troubleshooting
| ProblemNo picture | Potential ReasonsPower isn't connected The power switch is not on | What to doConnect the powerSwitch on the power |
| Screen shows"No Signal" | DVB-T or DVB-T2 cable not connected | Plug in the DVB-T or DVB-T2 cable |
| Aerial cable is faulty | Check aerial cable and connections | |
| No sound from speaker | No or incorrect connection with audio cable | Connect the audio cable correctly |
| Sound on mute | Turn off mute function | |
| Only sound, no image on the screen | No or incorrect connection with AV cable | Make sure cables are connected correctly |
| The program is a radio program | Presskey to shift into TV mode | |
| Remote Control is not responding | The battery is exhausted | Change battery |
| Remote Control is not facing or close enough to the Set Top Box | Adjust the position of the Remote Control and move closer to the unit | |
| Picture is breaking up | The signal is too weak | Check aerial cable and connections |
Technical Specification
| Item | Sub Item | Parameter |
| Tuner | Input Frequency | 170~230MHz 470~860MHz |
| RF Input level | -78~-20dBm | |
| 1 F Band width | 7MHz/8MHz | |
| Modulation | QPSK,16QAM,64QAM, 256QAM | |
| Video | Decoder Format | MPEG4 HEVC 265AVC/H.264 HP@L4 MPEG2MPO.ML.HL |
| Output Format | 576P.720P, 1080i, 1080P, 4:3 and 16:9 | |
| Output Port | HDMI V1.4, SCART | |
| Audio | Decoder Format | MPEG-1 (layer1&2&3 ), Dolby Digital, Dolby Digital Plus |
| Audio output | COAXIAL, L/R | |
| USB 2.0 | Supported Capacity | 2T |
| Supported Media | MP3, JPEG, BMP, AVI | |
| Power | Supply Voltage | -220-240V 50/60HZ |
| Max Power Consumption | MAX 6W | |
| Standby Power Consumption | MAX 1W | |
| Weight | 0.4 kg | |
| Size | 150 x 97 x 35 mm | |
Manufactured under license from Dolby Laboratories.
Dolby and the double-D symbol are trademarks of Dolby Laboratories

Information on Disposal for Users of Waste Electrical & Electronic Equipment (private households)

This symbol on the product(s) and / or accompanying documents means that used electrical and electronic products should not be mixed with general household waste. For proper treatment, recovery and recycling, please take this product(s) to designated collection points where it will be accepted free of charge. Alternatively, in some countries you may be able to return your products to your local retailer upon purchase of an equivalent new product. Disposing of this product correctly will help save valuable resources and prevent any potential negative effects on human health and the environment, which could otherwise arise from inappropriate waste handling. Please contact your local authority for further details of your nearest designated collection point. Penalties may be applicable for incorrect disposal of this waste, in accordance with your national legislation.
Disposal of waste batteries

Check local regulations for disposal of waste batteries or call your local customer service in order to get instructions on the disposal of old and used batteries. The batteries in this product should not be disposed of with household waste. Be sure to dispose
of old batteries in special places for disposal of used batteries that are found in all retail shops where you can buy batteries.
EU Declaration of Conformity
Hereby, M SAN Grupa d.d. declares that the radio equipment type DVB-T setup box is in compliance with Directive 2014/53/EU.
The full text of the EU declaration of conformity is available at the following internet address: www.msan.hr/dokumentacijaartikala
POŠTOVANII
Zahvaljujemo na kupnji Vivax uređaja. i nadamo se da čete biti zadovoljni odabirom. Ako u jamstvenom roku bude potreban popravak proizvoda, molimo savjelujte se sa ovlaštenim prodavaćem koji Vam je proizvod prodao ili nas kontaktirajte na dolje navedene brojeve i adrese. MOLIMO VAS DA PRIJE UPORABE PROIZVODA PAŽLJIVO PROČITATE UPUTE PRILOŽENE UZ PROIZVOD!
JAMSTVENI LIST
VIVAX
HR
MODEL UREDAJA
DVB-T2 180H
SERIJSKI BROJ
DATUM PRODAJE
BROJ RAČUNA PRODAVATELJA
POTPIS I PEČAT PRODAVATELJA
- Ovim jamstvom M SAN Grupa kao davatelj jamstva u Republici Hrvatskoj jamči besplatan popravak istog u skladu s važećim propisima i u skladu s uvjetima opisanim u ovom jamstvenom listu. Ovim jamstvom jamčimo da će predmet ovog jamstva raditi bez pogreške uzrokovane eventuainom lošom izradom ili lošim materijalom izrade. Svi, eventualno nastal, kvarovi biti će besplatno otklonjeni u ovlaštenom servisu u jamstvenom roku.
- UVJETI JAMSTVA Jamstveni rok počinje od dana kupnje proizvoda i traje 12 mjeseci, osim za Vivax Imago televizere (CRT, LCD, PDP) za koje jamstvo traje 24 mjeseca.
- U slučaju kvara na proizvodu koji je predmet ovog jamstva, obvezujemo se da čemo isti popraviti u najkračem mogučem roku, a najkasnije u roku od 45 dana. Ako se proizvod ne može popraviti ili se ne popravi u roku od 45 dana, biti će zamijenjen novim. Jamstvo će biti produženo za vrijeme trajanja popravka.
- Jamstvo se priznaje samo uz račun o kupnji, te uz ovaj jamstveni list koji mora bit ispravno popunjen odnosno mora sadržavaši datum prodaje, pečat i potpis prodavatelja.
- JAMSTVO NE OBUHVAĆA
POTPIS I PEČAT PRODAVATELJA
DVB-T2 180H
-
Ovom garancijom garantira proizvođač proizvoda, preko KIM TEC d.o.o., kao uvoznka i davatelja garancije u Republici Bosnili Hercegovini besplatan popravak istog u skladu s važećim propisima i u skladu s uvjetima opisanim u ovom garantnom listu. Ovom garancijom garantiramo da će predmet ove garancije radlo bez greške uzrokovane eventualnom lešom izradom i lošim materijalom izrade. Svi eventualno nastali kvarovi biti će besplatno otklonjeni u ovlašenom servisu u garantnom reku.
-
UVJETI GARANCIJE Garantni rok počinje teči od dana kupnje proizvoda i traje 12 mjeseci, osim za Vivax Imago televizore (CRT, LCD, PDP) za koje jamstvo traje 24 mjeseca.
-
U slučaju kvara na proizvođu koji je predmet ove garancije, obavezujemo se da ćemo isti popraviti u najkraćem mogućem roku, a najkasnije u roku od 45 dana. Ako se proizvod ne može popraviti ili se ne popraviti u roku od 45 dana, biti će zamijenjen novim. Ako popravsk proizvoda traje duže od 10 dana, garancija će se produžiti za vrijeme trajanja popravka.
-
Garancija se priznaje samo uz račun o kupnji, te uz ovaj garantri list koji mora biti ispravno popunjen odnosno mora sadržavati datum prodaje, pečat i potpis prodavatelja.
-
Davalac garancije osigurava servis i rezervne djelove 7 godina od datuma kupnje.
-
GARANCUA NE OBUHVAČA Redovnu provjeru, održavanje uz zamjenu dijelova koji se troše normalnom upotrebom. Prilagođavanje ili promjene za poboljišanje proizvoda za primjenu koji risu opisane u tehničkim uputama za korištenje, osim ako je za te preinake predočena suglasnost KIM TEG d.o.o.
-
Garancija se ne priznaje u sljedećim slučajevima: Ako kupac ne predoči ispravan garantni list i račun o kupnji. Ako se kupac nije pridržavao uputa o korištenju proizvoda. Ako je proizvod otvaran, prepravljan ili popravljan od neovlaštene osobe. Ako su kvarovi na proizvodu nastal djelovanjem više sile kao što su; udar groma, strujni udari u električnoj mreži elementame nepogode i silčno. Ako su kvarovi nastali oštećivanjem zbog nepropisane upotrebe ili nepravlinim transportiranjem. Ako je kvar nastao greškom u sustavu na koji je proizvod priključen.
-
Ovaj garantni list ne mijenja zakonska potrošačka prava važeća u Bosni i Hercegovini u odnosu na ona koja propisuje proizvođač. Naziv tvrtke davatelja jamstva : KIM TEC d.o.o., Poslovni Centar 96-2, 72250 Vitez, tel: 030/718-800, fax: 030/718-897, e-mail: servis@kimtec.ba
SERVIS
| DATUM PRIMITKAUREDAJA U SERVIS | ||
| DATUM POPRAVKA | ||
| DATUM PRIMITKAUREDAJA U SERVIS | ||
| DATUM POPRAVKA | ||
| DATUM PRIMITKAUREDAJA U SERVIS | ||
| DATUM POPRAVKA |
| Grad | Servis | Djelatnost | Adresa | Telefon |
| Banja Luka | SLOBODA SOD | Milice Stojadinović S.6 | 065 523 658, 061 438 908 | |
| Banja Luka | Kod Ivice szr rtv servis | Voždovačka 7 | 051-301-449 | |
| Bihač | Digital Durić d.o.o | Kovačevića H2/3 | 037 222-866, 061 144 077 | |
| Bihač | Elektronik d.o.o. | Trg Slobode 8 | 037 222 626, | |
| Doboj | ARIS-ELECTRONIC d.o.o. | Dobojske brigade 27 | 053 202 112, 053 203 433 | |
| Gračanica | Dinnet d.o.o. | Kamenica bb | 062 346 289 | |
| Gradiška | Perić szr s.p. Zdravko Perić | Gradiške brigade bb | 051 816 238 | |
| Kiseljak | Plazma str | J.B. Jelačića b.b. | 030 879 098 | |
| Mostar | Maj & Go Elektronik | Ante Starčevića 48A | 036 348 281 | |
| Tehno-komerc | ||||
| Prijedor | trgovačko-zanatska radnja | Voj. Step. Step. Br.17. | 052 224 444, 065 543 921 | |
| Tuzla | Spektar | Stupine 86 | 061 149 284 |
POŠTOVANI. Zahvatlujemo na kupovini Vivax uređaja i nadamo se da cete biti zadovotjni izborom. Ako u periodu u kojem imate pravo na reklamaciju bude potreban popravak proizvoda, molim savetujte se sa ovlašćenim prodavačem koji Vam je proizvod prodao ili nas kontaktirajte na dolje navedene brojeve i adrese.
MOLIMO VAS DA PRIJE UPOTREBE PROIZVODA PAŽLJIVO PROČITATE TEHNIČKU DOKUMENTACIJU I UPUTSTVA KOJI SU PRILOŽENI UZ PROIZVODI
IZJAVA O SAOBRAZNOSTI
VIVAX
CG
MODEL UREĐAJA
SERIJSKI BROJ
DATUM PRODAJE
BROJ RAĆUNA
PRODAVČA
PÓTPIS I PEČAT
PRODAVCA
- Ovom izjavom o saobraznosti proizvođač proizvoda, preko KIM TEC CG d.o.o., kao uvoznika i davaoca prava u Crnoj Gori besplatan popravak istog u skladu s vazećim propisima i u skladu s uslovima opisanim u ovoj izjavi o saobraznosti.
- Ovom izjavom o saobraznosti ističemo da će predmet ovog prava raditi bez greške uzrokovane eventualnom lošom izradom i lošim materijalom izrade. Svi eventualno nastali kvarovi biće besplatno otklonjeni u ovlaščenom servisu u predvidjenom roku za reklamaciju.
• USLOVI REKLAMACIJE: Rok za reklamaciju počinje teći od dana kupovine proizvoda i traje 24 mjeseca. - U slučaju kvara na proizvodu koji je predmet reklamacije, obavezujemo se da ćemo isti popravili u najkraćem mogućem roku, a najkasnije u roku od 15 dana. Ako se proizvod ne može popraviti ili se ne popravi u roku od 15 dana, biće zamijenjen novim.
- Pravo na reklamaciju se priznaje uz fiskalni račun o kupovini, iuz ovu izjavu o saobraznosti koja mora biti ispravno popunjena, odnosno mora sadržati datum prodaje pečati potpis prodavca.
- Davalac izjave o saobraznosti osigurava servis i rezervne djelove 7 godina od datuma kupovine.
PRAVO NA REKLAMACIJU NE OBUHVATA
Kosova Electronic Service Center
Kosova Electronic Service Center
-VIVAX Air Conditions; White Goods and Small Home Appliances