
TA 2000 - Kettle Rommelsbacher - Free user manual and instructions
Find the device manual for free TA 2000 Rommelsbacher in PDF.


| Product Type | Tea maker & Water kettle |
| Brand | Rommelsbacher |
| Model | TA 2000 |
| Rated Voltage | 220 – 240 V ~ 50/60 Hz |
| Rated Power | 1850 – 2200 W |
| Protection Class | I |
| Minimum Filling Quantity | 500 ml |
| Maximum Filling Quantity | 1200 ml |
| Keep-Warm Function Duration | 30 minutes |
| Standby Consumption | < 0.5 W |
| Programs | 6 (Herbal, Black, Oolong, White, Green, Heat up) |
| Brewing Temperature Range | 50 °C – 100 °C (adjustable in 5 °C steps) |
| Steeping Time Range | 30 sec – 10 min (adjustable in 30 sec steps) |
| Jug Material | Glass |
| Base Material | Plastic (with electrical connections) |
| Tea Infuser | Included, removable stainless steel |
| Control Type | Touch control sensors with display |
| Safety Features | Auto shut-off, boil-dry protection, overheat protection |
| Cleaning and Descaling | Clean with damp cloth; descale regularly with vinegar solution or commercial descaler |
| Scope of Supply | Glass jug, base unit, lid, lid insert, tea infuser, instruction manual |
Frequently Asked Questions - TA 2000 Rommelsbacher
User questions about TA 2000 Rommelsbacher
0 question about this device. Answer the ones you know or ask your own.
Ask a new question about this device
Download the instructions for your Kettle in PDF format for free! Find your manual TA 2000 - Rommelsbacher and take your electronic device back in hand. On this page are published all the documents necessary for the use of your device. TA 2000 by Rommelsbacher.
USER MANUAL TA 2000 Rommelsbacher
natural_image
Abstract geometric pattern with vertical lines inside a circle (no text or symbols)ROMMELSBACHER
natural_image
Black-and-white photo of a MMELSBACHER water heater with glass lid, a glass mug, and dried tea leaves on a table (no visible text or symbols)TA 2000
Tee- & Wasserkocher Tea maker & Water kettle
Produktbeschreibung – Product description
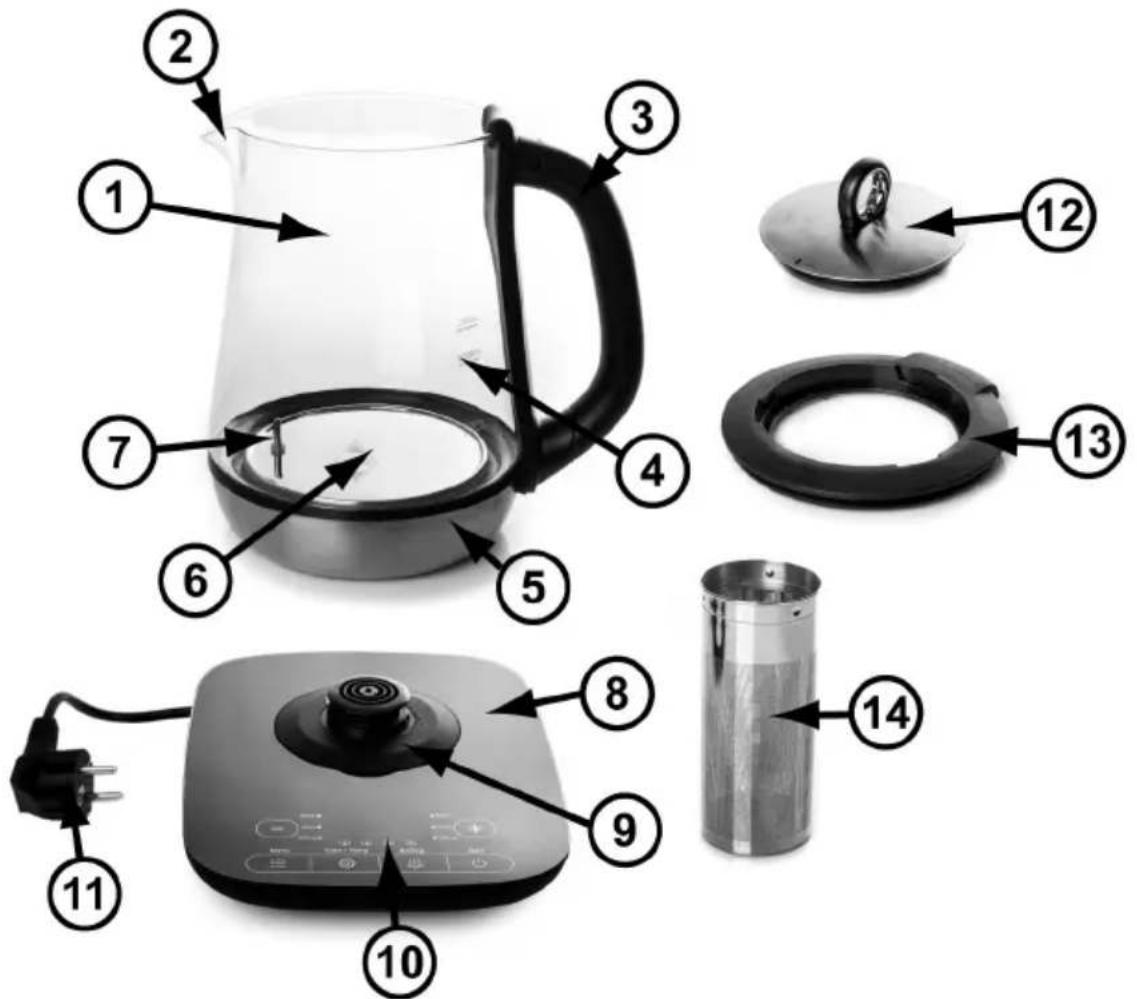
IMPORTANT: Remove the protective foil from the base unit and the sticker from the glass jug!
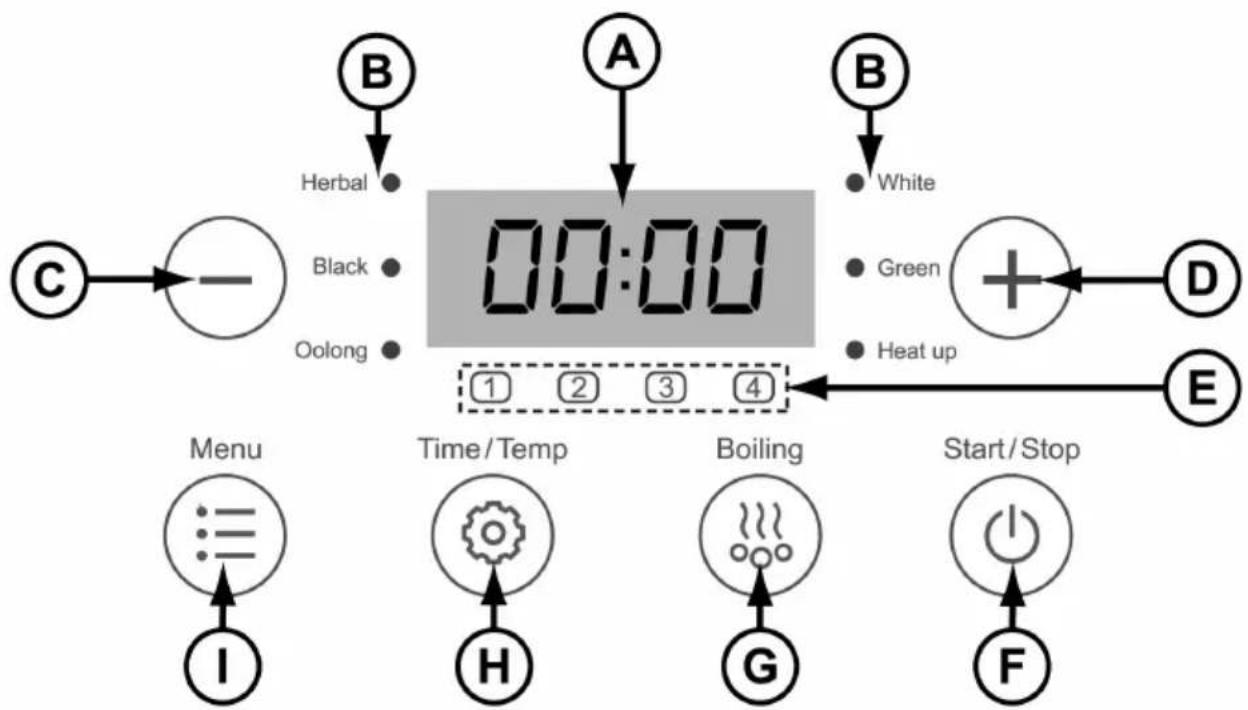
flowchart
graph TD
    A["Input C"] --> B["Input -"]
    B --> C["Herbal"]
    B --> D["Black"]
    B --> E["Oolong"]
    C --> F["00:00"]
    D --> F
    E --> F
    F --> G["Output D"]
    F --> H["Output E"]
    F --> I["Output I"]
    F --> J["Output H"]
    F --> K["Output G"]
    F --> L["Output F"]
    F --> M["Output G"]
    F --> N["Output H"]
    F --> O["Output I"]
    F --> P["Output G"]
    F --> Q["Output H"]
    F --> R["Output I"]
    F --> S["Output G"]
    F --> T["Output H"]
    F --> U["Output I"]
    F --> V["Output G"]
    F --> W["Output H"]
    F --> X["Output I"]
    F --> Y["Output G"]
    F --> Z["Output H"]
    F --> AA["Output I"]
    F --> AB["Output G"]
    F --> AC["Output H"]
    F --> AD["Output I"]
    F --> AE["Output G"]
    F --> AF["Output H"]
    F --> AG["Output I"]
    F --> AH["Output G"]
    F --> AI["Output H"]
    F --> AJ["Output I"]
    F --> AK["Output G"]
    F --> AL["Output H"]
    F --> AM["Output I"]
    F --> AN["Output G"]
    F --> AO["Output H"]
    F --> AP["Output I"]
    F --> AQ["Output G"]
    F --> AR["Output H"]
    F --> AS["Output I"]
GB instruction manual....20
Product description ......2
Control panel with display....3
Introduction......20
Intended use....20
Technical data....20
Scope of supply 20
Packing material....20
Disposal / recycling....21
For your safety 21
General safety advices....21
Safety advices for using the appliance....22
Prior to initial use....23
Touch control sensors....23
User guidance....23
Selecting programmes, brewing temperature and steeping times....24
Keep-warm function 24
Extending the keep-warm time....24
Operating the appliance ....25
Filling up with water and placing lid insert resp. lid.....25
Connecting the base unit to the mains....26
Standby mode....27
Selecting programme / function....27
Modifying brewing temperature and steeping time....28
Storage of individual brewing temperature / steeping time....28
Starting the programme and preparation....29
Programme sequence
a) Programme phase "1" – Heating-up water .....29
b) Programme phase "2" – Inserting the tea infuser ... 29 Filling and inserting the tea infuser ....30
c) Programme phase "3" – Activating the steeping time.... 30 Removing the tea infuser after expiration of steeping time.... 30
d) Programme phase "4" – Keep warm function ..... 31 Lifting the jug during keeping warm..... 31
Quick-start function "Boiling" 32
Switching off the appliance 32
Cleaning and maintenance....33
Cleaning the appliance....33
Decalcification 33
Troubleshooting....34
Einleitung

natural_image
Three-step black-and-white photo sequence showing a teapot being opened, then closed with a ring and partially filled with a small object (no text or symbols visible)We are pleased you decided in favour of this high-quality tea maker & water kettle and thank you for your confidence. Its easy operation and the variety of applications will certainly impress you as well. To make sure you can enjoy using this appliance for a long time, please read through and observe the following notes carefully. Keep this instruction manual safely. Hand out all documents to third persons when passing on the appliance. Thank you very much.
Intended use
The appliance is intended to be used in the household and similar areas, like for example:
- staff kitchens in shops, offi ces and other small commercial areas,
- agricultural holdings,
- by guests in hotels, motels and further similar living environments,
- breakfast pensions.
Other uses or modifications of the appliance are not intended and may constitute considerable risks of accident. For damage arising from any improper use, the manufacturer does not assume liability. The appliance is intended for heating up water and preparing tea. The appliance is not designed for heating up liquids like milk, coffee, soup or the like and is not intended for commercial use.
Technical data
Only connect the appliance to an isolated ground receptacle installed according to regulations. The rated voltage must comply with the details on the rating label. Only connect to alternating current.
Nominal voltage: 220 – 240 V\~ 50/60 Hz
Nominal power: 1850 – 2200 W
Protection class: I
Keep-warm function: 30 minutes
Standby consumption: < 0.5 W
Minimum fi lling quantity: 500 ml
Maximum fi lling quantity: 1200 ml
Scope of supply
Check the scope of supply for completeness as well as the perfect condition of the product and all accessory parts (see product description page 2) immediately after unpacking.
Packing material
Do not simply throw the packing material away but recycle it. Deliver paper, cardboard and corrugated cardboard packing to collecting facilities. Also put plastic packing material and foils into the intended collecting basins.

PE-HD

PE-LD

PP

PS
In the examples for the plastic marking
PE stands for polyethylene, the code figure 02 for PE-HD, 04 for PE-LD, PP for polypropylene, PS for polystyrene.
Disposal/recycling information
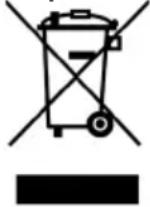
According to the Waste Electrical and Electronic Equipment Directive, this product must not be disposed of with your normal domestic waste at the end of its lifespan. Therefore, please deliver it at no charge to a municipal collection point (e.g. recycling center) for the recycling of electrical and electronic equipment.
Please approach your local authorities for all disposal options.
For your safety

WARNING: Read all safety advices and instructions carefully! Non-observance of the safety advices and instructions may cause electric shock or severe injuries and / or burns!
General safety advices
- Children from the age of 8 years and older may use the appliance if they are supervised or have been instructed by a person responsible for their safety and have understood the risks involved.
• Children must not play with the appliance.
• Always keep children under 8 years away from the product and the power cord. - Cleaning and maintenance by the user must not be performed by children, unless they are 8 years and older and are supervised.
- Persons having handicaps of physical, sensorial or mental nature or not having the knowledge or experience in operating the appliance may only use the appliance if they are supervised or have been instructed regarding the safe use of the appliance and have understood the risks involved.
- Packing material like e.g. foil bags should be kept away from children.
- Do not operate this unit with an external timer or a separate tele-control system.
- Prior to each use, check the appliance and the attachments for perfect condition. It must not be operated if it has been dropped or shows visible damage. In these cases, the power supply must be disconnected and the appliance has to be checked by a specialist.
- When laying the power cord, make sure that no one can get entangled or stumble over it in order to avoid that the appliance is pulled down accidentally.
- Keep the power cord away from hot surfaces, sharp edges and mechanical forces. Check the power cord regularly for damage and deteriorations. Damaged or entangled cords increase the risk of an electric shock.
- For unplugging the appliance, only pull the mains plug, never the power cord!
-
Never immerse the glass jug, base unit, power cord and mains plug in water or other liquids.
-
Do not use or store the appliance outside or in damp rooms. This appliance is for household use only.
- This electrical appliance complies with the relevant safety standards. In case of signs of damage to the appliance or the power cord, unplug the appliance immediately. Repairs may only be executed by authorised specialist shops. Improper repairs may result in considerable dangers for the user.
- Misuse and disregard of the instruction manual may cause potential injury.
- Improper use and disregard of the instruction manual void all warranty claims.
Safety advices for using the appliance

WARNING: Hazard of injury and burns!
- The surfaces of appliance, glass jug, tea infuser, jug lid, lid insert as well as the liquids are getting hot during operation!
- Hot surfaces firstly stay hot, even after switch-off!
- Do not overfill the jug (observe the max. filling quantity)! Spilling and overflow during operation might cause hazard of scalding!

- For a safe switch-off, pull the mains plug after each use!
Always act with caution:
- The jug is made of glass. In case of glass breakage, sharp and pointed edges may result. A damaged glass jug must not be used anymore!
- Keep in mind that hot steam may escape when removing the jug lid. If necessary, use a kitchen towel or the like for protection against scalding!
- Before connecting the appliance, mind to check the proper position of the glass jug on the base unit and that the jug is sufficiently filled with water (min. 500 ml, resp. max. 1200 ml). Never operate the appliance without water!
- To avoid overflow, the maximum filling capacity of 1200 ml must not be exceeded. In case of spilling water, switch off and unplug the appliance immediately!
- Always let the appliance / jug cool down before filling in water and only use cold water!
-
Only operate the appliance with replaced lid insert and jug lid and do not remove these during operation!
-
The central base with electrical connection must always be clean and dry. No water may be spilled on electrical connections!
- Do not use the appliance as a storing place and do not cover it during use!
- Observe the following when setting up the appliance:
- Place it beyond children's reach!
- Place the appliance on a heat-resistant, stable and even surface!
- Do not operate the appliance in the vicinity of sources of heat (oven, gas flame; etc.) or in explosive environments, where inflammable liquids or gases are located!
- Leave a ventilation distance of at least 20 cm to all sides of the appliance to avoid damage by heat or steam and to grant an unobstructed work area!
-
Do not operate the appliance below wall-mounted cupboards, protruding shelves or in the vicinity of objects sensitive to moisture. Make sure steam can draw off easily!
-
Only use original accessories such as the provided base unit!
- Do not operate the appliance with wet hands!
- Please turn off and unplug the appliance before cleaning, maintenance or relocation and whenever it is not in use.
Prior to initial use
Remove all stickers and protective foils which are attached to the appliance. Prior to the first use it is necessary to clean the appliance and all accessory parts. Please refer to point “Cleaning and maintenance” for further information.
Touch Control sensors

The appliance is equipped with Touch Control sensors, which are easy and comfortable to use. By pressing the corresponding button, the relevant function is activated.

Each activation of a button (except for the buttons "+" and "-" is confirmed with a signal tone.
User guidance
The electronic is designed to be user-friendly. The respective subsequent operation step is displayed by flashing buttons.
Selecting programmes, brewing temperatures, steeping times
The electronic control allows for choosing between 6 programmes (5 tea types with pre-defined brewing temperatures / steeping times plus water kettle function with temperature selection).
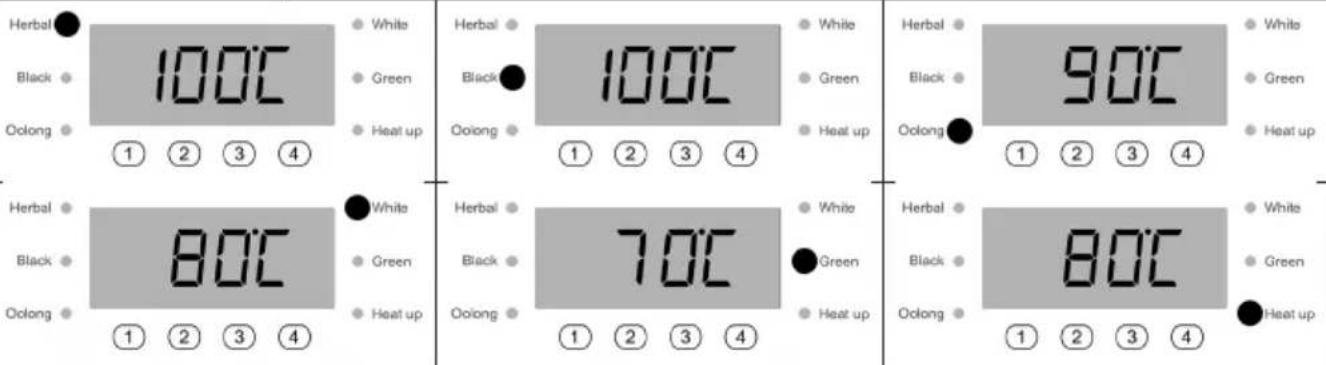
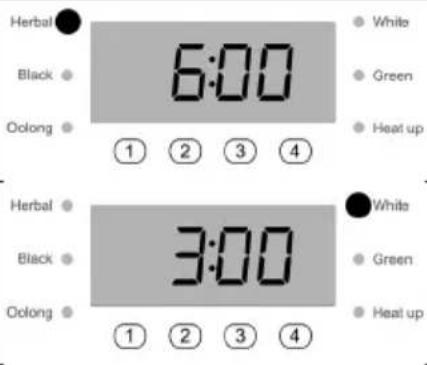
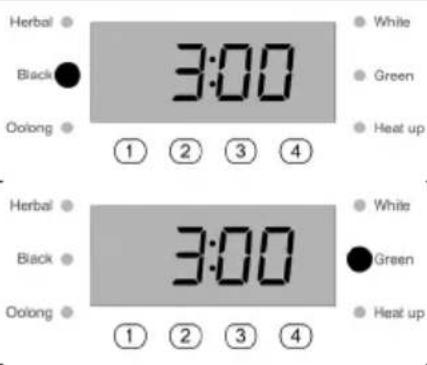
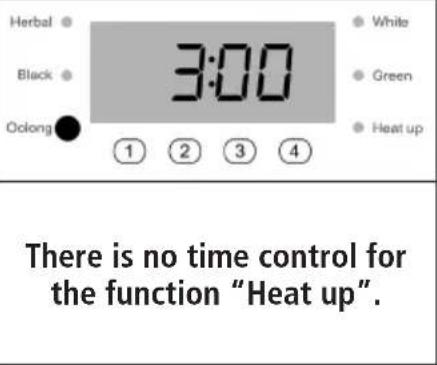
The table below shows the pre-set brewing temperatures and steeping times (default values):
| programme display | Pre-set brewing temperature (*) | Pre-set steeping time (**) |
| 1 Herbal (fruit/herbal tea) 100 °C 06:00 minutes | ||
| 2 Black (black tea) 100 °C 03:00 minutes | ||
| 3 Oolong (Asian tea type) 90 °C 03:00 minutes | ||
| 4 White (white tea) 80 °C 03:00 minutes | ||
| 5 Green (green tea) 70 °C 03:00 minutes | ||
| 6 Heat up 80 °C --- |
(*) the brewing temperature can be set and memorized from 50 °C – 100 °C in 5-°C steps.
(**) the steeping time can be set and memorized from 30 sec. - 10 min. in 30-sec. steps.
NOTE: The pre-set temperatures and steeping times can be adjusted individually to your personal taste and memorized. (See point "Storage of individual temperature / steeping time").
Keep-warm function
The appliance is equipped with a 30 minutes keep-warm function. This function is pursuant to the selected brewing temperature and is available for programmes "1" to "5". During the active phase of the keep-warm function, the appliance is re-heating regularly in order to guarantee the temperatures mentioned below. The table below shows the temperature defaults.
| brewing temperature | 50 °C | 55 °C | 60 °C | 65 °C | 70 °C | 75 °C | 80 °C | 85 °C | 90 °C | 95 °C | 100°C |
| keep-warm - temperature | approx. 50 °C | approx. 55 °C | approx. 65 °C | approx. 75 °C | approx. 80 °C | ||||||
Extending the keep-warm time

For starting a new 30 minutes keep-warm time (phase "4" of the programme sequence) press the button "Time/Temp" during the active phase of the keep-warm process and hold it for at least 2 seconds. After successful re-start of the keep-warm function, there is a signal tone.
Operating the appliance

WARNING: Hazard of injury and burns!
- The surfaces of the appliance, the glass jug, the jug lid, the lid insert, the tea infuser as well as the liquids are getting hot during operation.
• Hot surfaces firstly stay hot after switch-off. - Do not overfill the jug (respect the maximum filling quantity)! There is a risk of scalding if hot liquid might spill over!
Filling up with water and placing lid insert resp. lid
- Remove the glass jug from the base unit.
- Fill the glass jug with cold water. Observe the 'MIN' and 'MAX' marking. Take care that no water will spill on the central base or the underside of the jug.
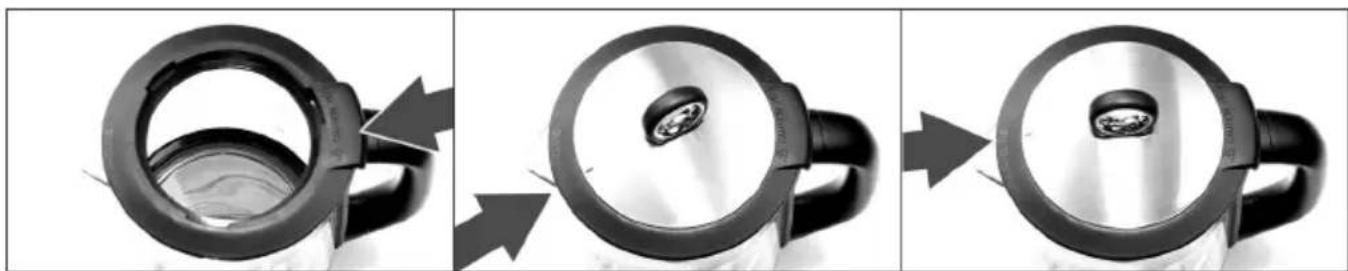
natural_image
Three-step black-and-white photo sequence showing a teapot being opened, then closed with a ring and filled with a small object (no text or symbols visible)- Place the lid insert on the glass jug. Pay attention to the correct position of the lid insert.
- Insert the lid into the lid insert with the marking at position "OPEN" and turn it to the right to position "CLOSE" for locking.
- Place the glass jug on the base unit.
Connecting the base unit to the mains

Connect the mains plug to a properly fused socket.
This is confirmed with a signal tone.
| with glass jug placed on power station without | glass jug placed on power station |
The appliances switches to selection mode.● White● Green● Heat up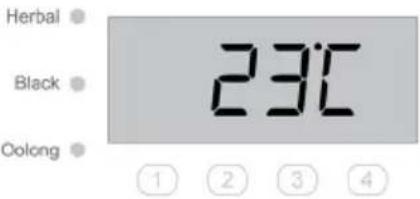 ● The display shows the current temperature of the jug content (e.g. 23 °C). ● The display shows the current temperature of the jug content (e.g. 23 °C).  ● The buttons “Menu” and “Boiling” are flashing.NOTE: If no further button is pressed within 1 minute, the appliance switches into standby mode and the display is off. ● The buttons “Menu” and “Boiling” are flashing.NOTE: If no further button is pressed within 1 minute, the appliance switches into standby mode and the display is off. | The appliance switches to waiting mode.Herbal ●Black ●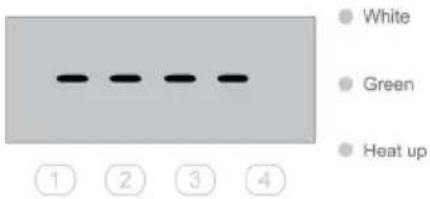 ● The display shows “----”.● If the jug is not placed on the base unit within 1 minute, the appliance switches to standby mode and the display is off.● If the jug is placed on the base unit within 1 minute, the appliance switches to selection mode. ● The display shows “----”.● If the jug is not placed on the base unit within 1 minute, the appliance switches to standby mode and the display is off.● If the jug is placed on the base unit within 1 minute, the appliance switches to selection mode.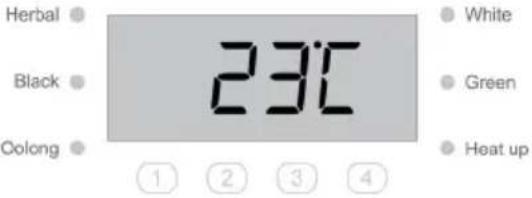 ● The display shows the current temperature of the jug content (e.g.23 °). ● The display shows the current temperature of the jug content (e.g.23 °).  ● Buttons “Menu” and “Boiling” are flashing.NOTE: If no further button is pressed within 1 minute, the appliance switches into standby mode and the display is off. ● Buttons “Menu” and “Boiling” are flashing.NOTE: If no further button is pressed within 1 minute, the appliance switches into standby mode and the display is off. |
Standby mode
The appliance is equipped with a standby mode. When the standby mode is active, the display of the appliance is off. 1 minute after the end of the preparation (incl. keep-warm function) the appliance switches to standby mode.


For activating the appliance from the standby mode, first place the glass jug on the base unit and then either press the button "Menu" or "Boiling".
Pressing the button is confirmed by a signal tone.
Selecting programme / function
NOTE: The appliance can be switched from standby mode to selection-mode by pressing the button "Menu" or "Boiling" (see point "Standby mode").

- Switch between the pre-set programmes by pressing the button "Menu". Pressing a button is confirmed by a signal tone.
- The display shows the set temperature and the pilot lamp of the selected programme is lit.
NOTE: When there have been multiple preparations one after the other (appliance has not been separated from the mains by pulling the mains plug), the recently used programme is shown.


- After selecting the programme, the buttons "Time/Temp" and "Start/Stop" are flashing.
NOTE: If within 1 minute no further button is pressed, the appliance switches to standby mode and the display is off.
 | ·By activating the button "Time/Temp", it can be alternated between the display of temperature and time. Activating the button is confirmed by a signal tone.·The display returns to the display of the temperature after approx. 5 seconds. | ||
  | ·After pressing the button "Time/Temp", both buttons "Menu" and "Start/Stop" are flashing.NOTE: If within 1 minute no further button is pressed, the appliance switches to standby mode and the display is off. | ||
 |  |  | |
Modifying brewing temperature and steeping time (if necessary)
a) Modifying brewing temperature
 | Press the button “Time/Temp” to get to the temperature setting. Pressing the button “Time/Temp” is confirmed with a signal tone and the button is lit continuously.The display shows the set brewing temperature. |
  | Press the button “+” resp. “-” until the desired temperature is shown.The temperature can be changed from 50 °C to 100 °C in 5-°C steps. |
b) Modifying steeping time
 | Press the button “Time/Temp” to get to time setting.Pressing the button “Time/Temp” is confirmed with a signal tone and the button is lit continuously.The display shows the set steeping time. |
  | Press the button “+” resp. “-” until the desired steeping time is shown.The time can be changed from 30 seconds to 10 minutes in 30-sec. steps. |
Storage of individual temperature / steeping time
 | For permanent storage of the changed parameters for a programme, press the button “Time/Temp” and hold it for at least 2 seconds.There is a longer signal tone for confirmation of a successful storage. |
Starting the programme and preparation (example "Herbal")
NOTE: The process of making tea consists of 4 phases in all ("Heat-up" only of phase 1).

- When the desired settings are done, press the button "Start/Stop" for starting the appliance. Pressing the button "Start/Stop" is confirmed by a longer signal tone and the button is lit permanently.
a) Programme phase "1" – Heating-up water
NOTE: If the glass jug is lifted during programme phase "1", the appliance stops the preparation and returns to selection mode.

- The set temperature (here 100 °C) is flashing in the display for a short time. Then the current temperature (here 23 °C) is displayed inside the jug. On the display "1" is flashing.
- The water is heated up to the set temperature. In the display the temperature is changing in 1-°C steps.
- As soon as the set temperature (here 100 °C) is reached, there is a double signal tone.
- The appliance automatically switches into programme phase "2".
b) Programme-phase "2" – Inserting the tea infuser
NOTE: If the glass jug is lifted during programme phase "2", the appliance stops the preparation and returns to selection mode.

- The display shows "10:00" and display "2" as well as the button "Start/Stop" are flashing.
There are 10 minutes left to insert the tea infuser and to activate the steeping time. - If this does not happen, the programme is quit and the appliance switches to selection mode.
- The time counts downwards in 1-sec. steps.
NOTE: As a reminder that the appliance is waiting for a further operation, there is a multiple signal tone after 2 minutes.
Filling and insertion of tea infuser

CAUTION: Risk of injury resp. burns! Mind for escaping hot steam resp. water when removing the jug lid. If necessary, use a kitchen towel or similar as protection against scalding!
- Unlock the jug lid by turning it to the left to position "OPEN". Lift the lid upwards to take it off.
- Position the filled tea infuser at the jug lid. Pay attention that the three latching lugs engage at the inside of the infuser in the provided mount. The filling quantity of the tea infuser varies according to the individual taste, the tea type and the quantity of water.
- Insert the jug lid with the fitted tea infuser in the lid insert with the marking to position "OPEN" and turn to the right in direction position "CLOSE" for locking.
c) Programme-phase "3" – Activating the steeping time
NOTE: If the glass jug is lifted during programme phase "3", the appliance stops the preparation and returns to selection mode.

- To start the programme phase "3", press the "Start/Stop" button. Pressing on the "Start/Stop" button is confirmed with a signal tone and the button is lit permanently.

- The display shows the steeping time counting downwards and the display "3" is flashing.
- When the time has expired, there is a triple signal tone.
- The appliances automatically switches to programme phase "4".
Removing the tea infuser after expiration of steeping time

CAUTION: Risk of injury resp. burns! Mind for escaping hot steam resp. water when removing the jug lid. If necessary, use a kitchen towel or similar as protection against scalding! Mind for hot liquids when removing the tea infuser – the tea infuser may drip!
- Unlock the jug lid by turning the lid to the left to position "OPEN".
- Remove the lid with the tea infuser upwards.
- Remove the tea infuser from the jug lid.
- Insert the jug lid in the lid insert with the marking to position "OPEN" and turn to the right to position "CLOSE" for locking.
d) Programme-phase "4" – Keep-warm function
NOTE: If the keep-warm function is not requested, the programme sequence can be interrupted at any time by pressing the button "Start/Stop" and holding it for at least 2 seconds or disconnecting the mains plug from the socket.

• The appliance is in the keep-warm function.
- The display shows the time of keeping warm in an ascending order and display "4" is flashing.
- When the keep-warm time is expired, a longer signal tone sounds.
Lifting the jug during keeping warm
- If the jug is lifted during the keep-warm function, the keep-warm time stops in the background.
IMPORTANT: There is no automatic continuation of the keep-warm function after placing the jug on the base unit.

- After lifting the jug, the display shows „10:00“ minutes and displays “1 to 4” are flashing. There are 10 minutes left to replace the jug and to continue the keep-warm programme.
- If this does not happen, the programme is quit and the appliance switches to selection mode.
• Time counts backwards in 1-sec. steps.
 | After replacing the jug, "Time", display of "phase 4" and the button "Start/Stop" is blinking.The keep-warm function can be continued by pressing the button "Start/Stop" again.Pressing the button is confirmed by a signal tone and the button is lit permanently. |

- At the end of the keep-warm time, there is a triple signal tone and the appliance switches to selection mode.
Quick-start function „Boiling“
NOTE: If the glass jug is lifted during the quick-start function, the appliance stops the preparation and returns to selection mode.



- For selecting the quick-start function for boiling water, press the button "Boiling". Pressing the button "Boiling" is confirmed with a signal tone and the button is lit permanently.
NOTE: If within 1 minute no further button is pressed, the appliance changes to standby mode and the display is off.
- For starting the quick-start function, press the button "Start/Stop". Pressing the button "Start/Stop" is confirmed by a signal tone and the button is lit permanently.

- The display of the set temperature is flashing for a short time. Then the current temperature inside the jug is displayed. Display "1" is flashing, the button "Boiling" is lit.
- The water is heated up to the set temperature. In the display, the temperature is changing in 1-°C steps.
- As soon as the boiling process is finished, there is a double signal tone. The appliance returns to selection mode.
Switching off the appliance
- The programme sequence respectively the function of the appliance can be interrupted at any time and the appliance can be switched to selection mode.

- To do so, press the button "Start/Stop" for 2 seconds. Pressing the button is confirmed with a signal tone.

- For a safe and permanent switch-off of the appliance, disconnect the mains plug from the socket after every use.

WARNING: Hazard of injury or burns!
• Always pull the mains plug prior to cleaning!
- Never immerse base unit, glass jug, power cord and mains plug in water nor clean under running water!
- Prior to cleaning, it is imperative to let cool down the appliance and all accessories!
Cleaning the appliance
- Clean the appliance and all accessories after each use.
- Wipe the base unit and glass jug with a moist cloth and dry it afterwards.
- Wash tea infuser, jug's lid and lid insert for the tea infuser in hot water with some detergent and dry it afterwards.
- Remove discolorations at the glass jug or the tea infuser by using a special brewer cleaner for coffee makers (obtainable in specialist shops).
- You may alternatively use a solution of water with salt, baking soda or lemon juice.
- We do not recommend cleaning the accessories in the dishwasher.
- Do not use abrasives or solvents; do not use sharp, scratchy objects!
- Do not treat the appliance or the accessories with a steam jet cleaner!
Decalcification
- A regular decalcification saves energy and grants full heating power as well as a good taste of tea and a long lifespan of the appliance.
- Heavy calcification may cause an overheating of the appliance and thus irreparable damage.
- The appliance should be descaled regularly in order to grant a proper functioning. Depending on the water hardness and the frequency of use, we recommend a decalcification every 2 - 3 weeks. This also applies if filtered water is used.
- Observe the following instructions for decalcification!
• Always remove the tea infuser before descaling the appliance.
- For decalcification, prepare 1 litre descaling agent made of vinegar water in the proportion of 1/3 vinegar essence and 2/3 water and pour it into the glass jug.
- Start operating the appliance by pressing the button "Boiling" and the button "Start/Stop" and heat up the descaling solution to about 80 °C. If the temperature is reached, stop the heating up process (press the button "Start/Stop" for 2 seconds or remove the glass jug from the base unit).
- Leave the descaling solution to take effect for some time.
- Then drain the descaling solution, rinse the glass jug and fill it with 1 litre of clear tap water.
- Start operation of the appliance with the button "Boiling" and the button "Start/Stop" and bring the water to a boil. Repeat this procedure as often as required.
• Afterwards clean the glass jug thoroughly.
- In case you use ordinary descaling agents, observe the manufacturer's instructions.
IMPORTANT: Non-observance of decalcification instructions will void all warranty rights in case of claims caused by a faulty functioning due to heavy calcification!
Troubleshooting
| Failure Cause and remedy | |
| Appliance without function. • Check if the mains plug is correctly inserted in the socket.• Check the power outlet by connecting a different appliance for a test.• Check if power cord or mains plug is damaged. If so, do not use the appliance. | |
| Appliance cannot be switched on. | • Check if the glass jug is correctly placed on the base unit. |
| The display shows error code "E1". | • The appliance is overheated. Unplug and let it cool down. Do not use cold water for cooling down!Then start the appliance again. |
| The display shows error code "E2". | • Elektronic error.• Unplug the item from the mains.• Please contact our service department. |
| The display shows error code "E4". | • Elektronic error.• Unplug the item from the mains.• Please contact our service department. |
| The display shows error code "E7". | • Elektronic error.• Unplug the item from the mains.• Please contact our service department. |
| "Phase 3" (steeping time) cannot be started after "phase 2" (inserting the infuser) has been completed. | • The current water temperature is higher than the set brewing temperature. Wait until the water has cooled down to the set brewing temperature.Then start "phase 3" again by pressing the button "Start/Stop". |
| Appliance generates loud operating noises during heating up. | • Appliance is scaled. Descale the appliance according to instructions! |
| Appliance occasionally generates small "cracking" noises during heating up. | • The temperature control of the appliance is active!If the water temperature gets close to the set temperature, this may lead to several switching operations of the temperature control in order to avoid an overshooting of the water temperature. |
| Tea making requires more time than usual. | • Appliance is scaled. Descale the appliance according to instructions! |
| Quantity of ready tea is less than quantity of filled water. | • Please mind that every type of tea absorbs and keeps a different quantity of water. This is the reason why the quantity of tea is always less than the initial quantity of water. Additionally during brewing a certain amount of water is vaporizing as well. |
| Glass jug and / or tea infuser take on the odour of the used tea type. | • The materials of glass jug and tea infuser might take on the odour of especially intense tea types (e.g. peppermint or other herbals) and get discolorations also. This is normal and no reason for complaint!Clean jug and infuser as per instructions. |
Notizen - Notes

- ROMMELSBACHER
- TA 2000
- Einleitung
- Intended use
- Technical data
- Scope of supply
- Packing material
- Disposal/recycling information
- For your safety
- WARNING: Read all safety advices and instructions carefully! Non-observance of the safety advices and instructions may cause electric shock or severe injuries and / or burns!
- General safety advices
- Safety advices for using the appliance
- WARNING: Hazard of injury and burns!
- Always act with caution:
- Prior to initial use
- Touch Control sensors
- User guidance
- Selecting programmes, brewing temperatures, steeping times
- Keep-warm function
- Extending the keep-warm time
- Operating the appliance
- Connecting the base unit to the mains
- Standby mode
- Selecting programme / function
- Modifying brewing temperature and steeping time (if necessary)
- a) Modifying brewing temperature
- b) Modifying steeping time
- Storage of individual temperature / steeping time
- Starting the programme and preparation (example "Herbal")
- a) Programme phase "1" – Heating-up water
- b) Programme-phase "2" – Inserting the tea infuser
- Filling and insertion of tea infuser
- c) Programme-phase "3" – Activating the steeping time
- Removing the tea infuser after expiration of steeping time
- d) Programme-phase "4" – Keep-warm function
- Lifting the jug during keeping warm
- IMPORTANT: There is no automatic continuation of the keep-warm function after placing the jug on the base unit.
- Quick-start function „Boiling“
- Switching off the appliance
- WARNING: Hazard of injury or burns!
- Cleaning the appliance
- Decalcification
- Notizen - Notes
Brand : Rommelsbacher
Model : TA 2000
Category : Kettle