
Pacific - Baby Scale Silver Cross - Free user manual and instructions
Find the device manual for free Pacific Silver Cross in PDF.


| Product type | Digital baby scale Silver Cross Pacific |
| Maximum capacity | 20 kg |
| Accuracy | 10 g |
| Power supply | 2 AAA batteries (not included) |
| Main functions | Tare, hold, low battery indicator, auto-off |
| Safety | Non-slip surface, use on flat dry surface, never leave child unattended |
| Maintenance and cleaning | Clean with a soft damp cloth, do not immerse, do not use abrasive products |
| Usage instructions | Place on a flat horizontal surface, always use the safety harness (if provided), do not use if parts are broken |
| Included accessories | No specific accessories mentioned |
| Dimensions (approx.) | 50 x 30 x 5 cm |
| Weight (approx.) | 1 kg |
| Warranty | 2 years (subject to manufacturer's conditions) |
| Standards | Complies with CE safety requirements |
Frequently Asked Questions - Pacific Silver Cross
User questions about Pacific Silver Cross
0 question about this device. Answer the ones you know or ask your own.
Ask a new question about this device
Download the instructions for your Baby Scale in PDF format for free! Find your manual Pacific - Silver Cross and take your electronic device back in hand. On this page are published all the documents necessary for the use of your device. Pacific by Silver Cross.
USER MANUAL Pacific Silver Cross
Pushchair and Carrycot
1.1 1.2
natural_image
Line drawing of a car seatbelt frame with no text or symbols
1.3

1.5

natural_image
Two circular mechanical components with internal rings and shafts, no visible text or symbols1.4

natural_image
Line drawing of a mechanical device frame with no visible text or symbols1.6

1.7

1.8

1.9 1.10

natural_image
Line drawing of a mechanical component with no visible text or symbols1.11

natural_image
Simple line drawing of an oval-shaped object with a horizontal seam, resembling a stylized face or tray (no text or symbols)
natural_image
Simple oval shape with no text, numbers, or symbols1.12
1.13

natural_image
Line drawing of a stylized human figure with no text or symbols1.14

natural_image
Simple line drawing of a bucket with a collar and handle (no text or symbols)1.15

IMPORTANT:
READ THE INSTRUCTIONS CAREFULLY BEFORE USE AND KEEP FOR FUTURE REFERENCE
Your child's safety may be affected if you do not follow these instructions.
Your Pacific Pushchair is a high quality Silver Cross product. It meets current safety standards and care and regular light maintenance will ensure long service.
This pushchair is suitable from birth up to 9kg with the Carrycot from 6 months, up to 22kg or 4 years whichever comes first, using the Seat Unit. If somebody unfamiliar is using your Pacific Pushchair always ensure that they read these instructions carefully so that they understand how the product works best. The Pacific Pushchair is designed and tested to be used with the Pacific Carrycot and the Simplicity Car Seat (sold separately).
THE SAFETY OF YOUR CHILD IS YOUR RESPONSIBILITY.
Contents
First check all your parts have been supplied. Your Pacific pushchair includes:
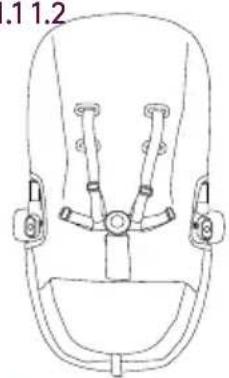
1.1 Seat unit with harness
1.2 Seat unit bumper bar
1.3 Carrycot bumper bar
1.4 Chassis including basket
1.5 Front wheels
1.6 Rain cover
1.7 Seat unit hood
1.8 Carrycot hood
1.9 Carrycot outer
1.10 Carrycot liner
1.11 Carrycot mattress
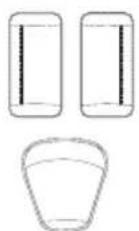
1.12 Chest pads and crotch pad
1.13 Seat unit seat liner
1.14 Carrycot apron
1.15 Cup holder
2.1
natural_image
Diagram of a car steering wheel assembly with a lever and directional arrow (no text or symbols)Preparation for use
Remove all packaging material from your Pacific pushchair. To use your Pacific pushchair from birth you must use the Pacific Carrycot (included).
Pacific chassis
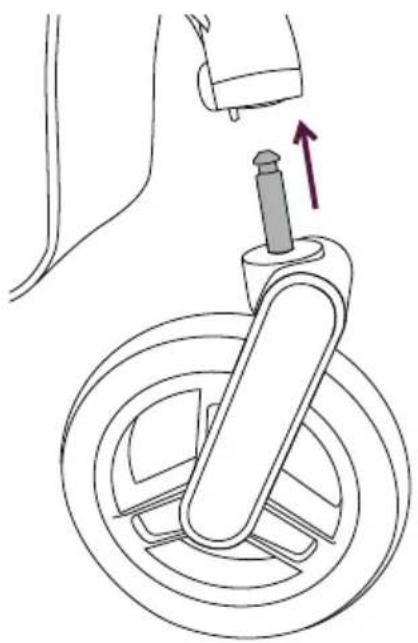
2.1 Attach the front wheels by inserting the axles into the Pacific frame until they 'click' into position.
2.2 Release the folding lock and lift the handle upwards.
WARNING: CHECK THE WHEEL IS SECURE BY PULLING GENTLY DOWNWARDS.
WARNING: CHECK THAT THE CARRYCOT OR SEAT UNIT OR CAR SEAT ATTACHMENT DEVICES ARE CORRECTLY ENGAGED BEFORE USE.

2.3

natural_image
Line drawing of a baby stroller with wheels and handle, no text or symbols present
natural_image
Line drawing of a baby stroller with two wheels and handle (no text or symbols)
Pacific chassis
2.3 Continue to lift the handle upwards until the frame 'clicks' and locks into position. Always check that the frame is secure.
Using the brake
WARNING: ALWAYS APPLY THE PARKING BRAKE WHEN YOU ARE STANDING STILL.
WARNING: ALWAYS APPLY THE BRAKE WHEN PLACING AND REMOVING THE CHILD.
3.1 To engage the brake, press down on the red brake pedal. Listen for the 'click'.
NOTE: Always check that your brake is fully engaged by gently rocking the pushchair.
To disengage the brake, gently press down on the green brake release button. Rock the pushchair backwards before moving forward.
4.1

natural_image
Diagram of a mechanical assembly with a rotating component and directional arrow (no text or symbols)5.1

natural_image
Diagram of a pipe joint with a gray component and an arrow indicating direction (no text or symbols)
Operating the swivel wheels
Your Pacific chassis has lockable front swivel wheels. We advise locking the front wheels if pushing the pushchair straight ahead for a long period.
4.1 Rotate the swivel release lever sideways to lock the wheels into the fixed position.
Always apply brake when placing and removing the child.
Operating the height adjustable handle
Your Pacific has a 4-position handle height.
5.1 Press and hold the handle height adjustment/folding button.
5.2 Slide the handle up or down to required height and release the adjustment button. The handle will lock and 'click' into place.

natural_image
Diagram of a mechanical assembly with a rotating component and directional arrow (no text or symbols)6.2

natural_image
Diagram of a mechanical device with a red highlighted section and a green dot, showing motion direction (no text or symbols)Folding your Pacific chassis
NOTE: To ensure your Pacific chassis folds correctly remove all items from the shopping basket before attempting to fold.
NOTE: If using as a travel system (with a car seat) or pram (with Pacific carrycot) please ensure each part has been removed before folding.
Your Pacific chassis can be folded with the seat unit attached and in a forward-facing, upright position. In all other positions it is recommended to remove the seat unit.
6.1 Ensure the swivel wheels are locked
6.2 Engage the brake pedal

Folding your Pacific chassis
6.3 Press and hold the fold release button. Pull the fold release triggers towards you. Push the handle downwards gently and lower the handle downwards until the fold lock engages. Lift the handle upwards gently to ensure that the chassis is folded correctly.
WARNING: TO AVOID POSSIBLE INJURY OR DAMAGE, ALWAYS ENSURE THE STORAGE LATCH HAS BEEN ENGAGED BEFORE LIFTING THE PRAM/STROLLER.
CARRY THE PRAM USING THE MAIN HANDLE, ONCE STORAGE LATCH HAS BEEN ENGAGED.
WARNING: DUE CARE SHOULD BE TAKEN WHEN FOLDING AND UNFOLDING THIS PUSHCHAIR. PLEASE ENSURE FOLDING MECHANISMS ARE KEPT CLEAR TO AVOID POSSIBLE FINGER ENTRAPMENTS OR INJURIES TO PARTS OF THE BODY.
7.1
natural_image
Line drawing of a hand holding a car seatbelt with a red arrow pointing to the seatbelt (no text or symbols present)
natural_image
Line drawing of a curved mechanical component with a hand adjusting it (no text or symbols)7.3
natural_image
Medical illustration showing a hand holding a car seatbelt with a purple arrow indicating a specific point (no text or symbols present)7.4
natural_image
Illustration of a hand holding a smooth, curved object with a directional arrow indicating rotation (no text or symbols)Using your Pacific from birth with the carrycot
Preparing the carrycot for use
Remove all packaging material from your Pacific carrycot.
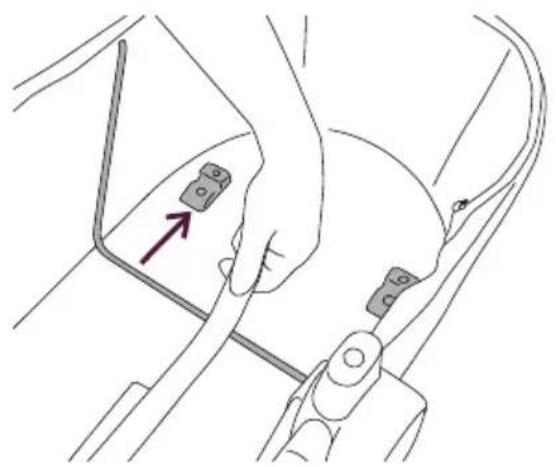
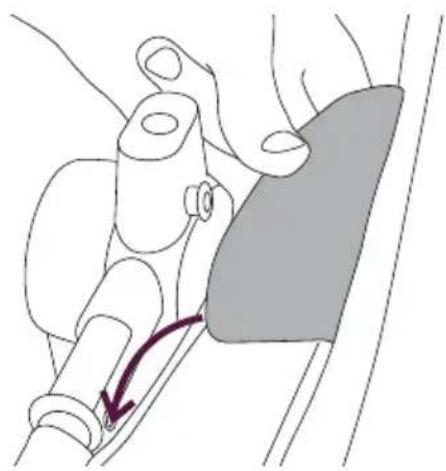
7.1 First erect the carrycot outer. Lay the carrycot outer down onto its base. Press the 2x metal bars into the locators on internal base of carrycot. A small groove in the locator holds the frame in position.
72 Attach the carrycot liner to the carrycot outer. Fasten each inner zip. There is one at each end of the liner.
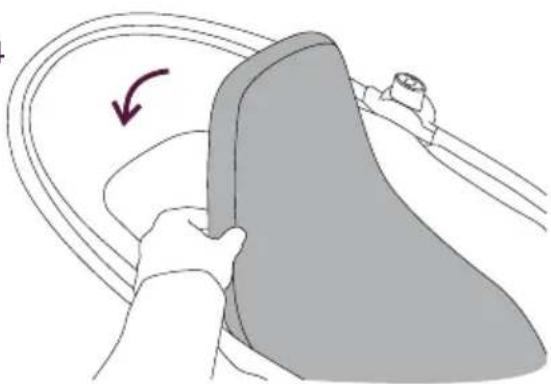
7.3 Pass the two D-shaped parts of the liner between the liner and the outer and fasten the Velcro patches to secure the liner in place.
7.4 Place the mattress into the base of the liner.
WARNING: DO NOT LEAVE YOUR CHILD UNATTENDED.
WARNING: NEVER USE THE CARRYCOT ON A STAND.
WARNING: DO NOT LET OTHER CHILDREN PLAY UNATTENDED NEAR THE CARRYCOT.
CAUTION: Do not force the zip
8.1

natural_image
Line drawing of a toilet sink with a red arrow indicating the outlet (no text or symbols present)
Attaching the apron to the carrycot
8.1 Place the apron over the top of the carrycot and secure in place using the velcro tabs.
8.2 Slide the apron flap clips over the attachment points inside the carrycot frame.
THIS CARRYCOT IS SUITABLE FOR A CHILD WHO CANNOT SIT UP UNAIDED, ROLL OVER AND CANNOT PUSH ITSELF UP ON ITS HANDS AND KNEES. MAXIMUM WEIGHT OF CHILD: 9KG
WARNING: USE A HARNESS AS SOON AS YOUR CHILD CAN SIT UNAIDED.
WARNING: ONLY USE ON A FIRM, HORIZONTAL LEVEL AND DRY SURFACE.
CAUTION: The head of the child in the carrycot should never be lower than the body of the child.
9.1
natural_image
Mechanical assembly diagram showing a lever mechanism with a highlighted component and a red arrow indicating motion (no text or symbols present)Attaching the carrycot hood to the carrycot
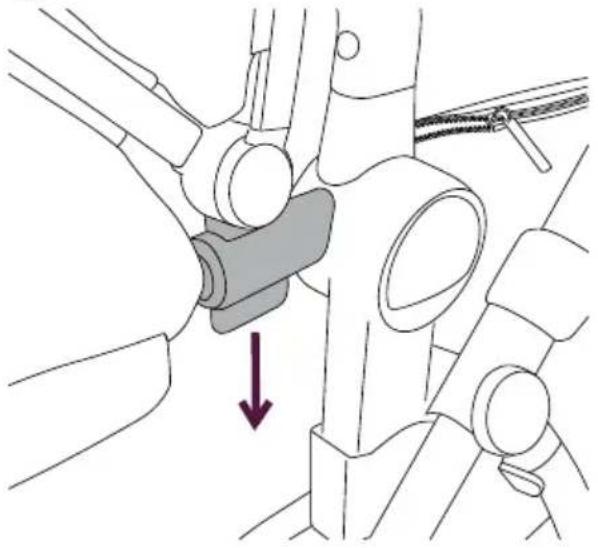
9.1 Attach the hood by pressing the hood clips onto the slots on either side of the carrycot frame.
Slide the back of the Pacific hood over the rear edge of the carrycot.
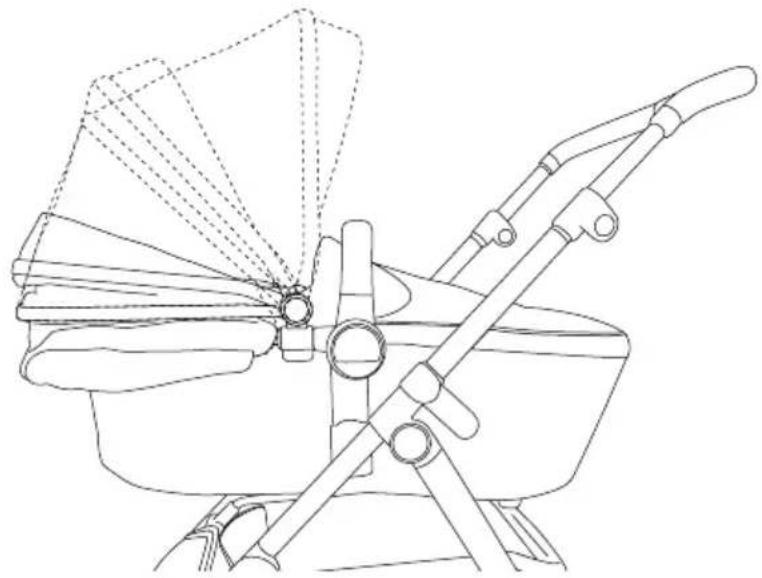
92 Your Pacific hood can be used in 3 positions. Fully open, semi-open and fully covered.
9.2
natural_image
Technical line drawing of a mechanical fan or impeller assembly (no text or symbols)10.1
natural_image
Line drawing of a car seatbelt being inserted into a seatbelt, showing two arrows indicating the insertion point (no text or symbols present)10.2

natural_image
Diagram of a car's steering wheel and dashboard with directional arrows indicating movement (no text or symbols)Attaching the bumper bar to the carrycot or seat unit
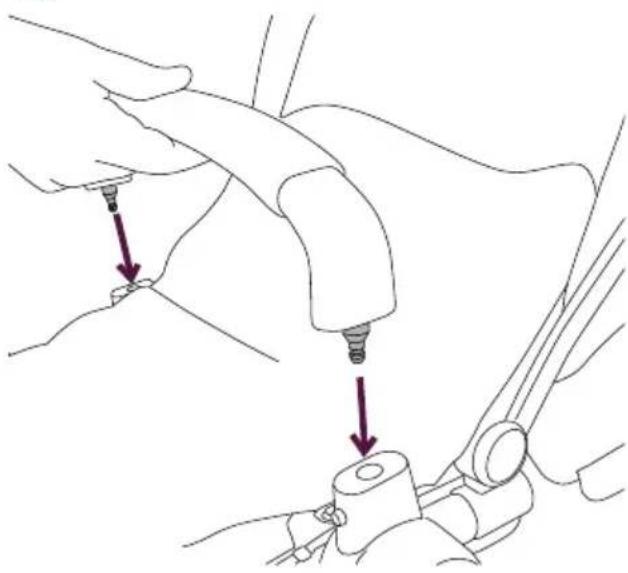
10.1 Attach the bumper bar by pressing the ends of the bumper bar into the attachment points of the carrycot/seat unit frame. Wait to hear them 'click' into place. Lift gently to ensure the bumper bar is locked in place.
10.2 To detach, press the bumper bar release button on the carrycot/seat unit frame with one hand and pull the bumper bar away from the connector point with the other hand. The bumper bar will rotate.
To detach both sides repeat point (10.2) above. With one side of the bumper bar removed the carrycot/seat unit is easily accessible.
WARNING: THE BUMPER BAR MUST BE SECURELY CONNECTED AT ALL TIMES WHEN IN USE. THE SAFETY OF YOUR CHILD IS YOUR RESPONSIBILITY.
WARNING: ALWAYS REMOVE YOUR CHILD FROM THE SEAT UNIT BEFORE ATTEMPTING TO LIFT AND REMOVE THE SEAT UNIT.
WARNING: THE BUMPER BAR IS NOT A HANDLE.
11.1
natural_image
Line drawing of a baby stroller with a baby seat and decorative wings (no text or symbols)Attaching the carrycot to your chassis
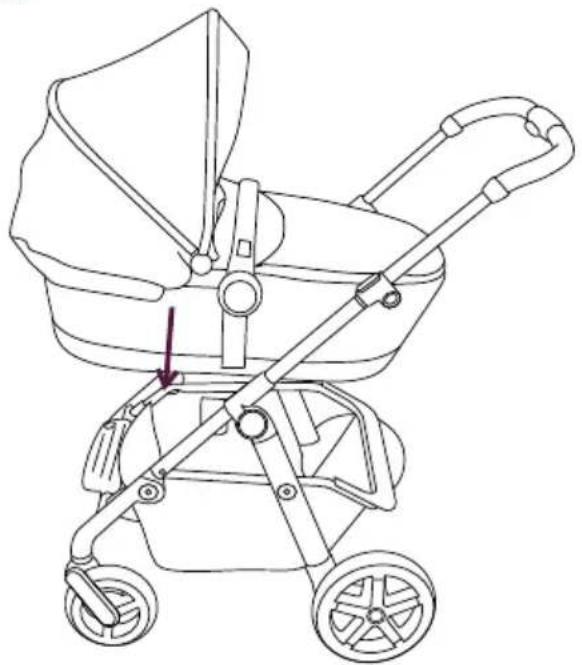
11.1 To attach your Pacific carrycot to the Pacific chassis hold the carrycot above the chassis. Locate the carrycot chassis connector posts into the attachment slots on the chassis. Ensure that the carrycot 'clicks' into place. The carrycot should be fitted rearward facing. Lift the carrycot gently by the bumper bar to check the carrycot has locked into place.
WARNING: NEVER USE THIS CARRYCOT ON A STAND.
11.2

natural_image
Technical line drawing of a mechanical device with a magnified inset showing internal components (no text or symbols)Detaching the carrycot from your chassis
11.2 With the Pacific carrycot facing you, pull both carrycot release handles outwards and lift the carrycot clear of the chassis.
Always ensure your bumper bar is attached when your child is in the carrycot.
This product is suitable for a child who cannot sit up by itself, roll over and cannot push its self up on its hands and knees. Max weight of child: 9kg.
CAUTION: Only use replacement parts supplied and approved by the manufacturer.
12.1
natural_image
Line drawing of a hand holding a small object with a red arrow indicating direction (no text or symbols)12.2

natural_image
Line drawing of a hand holding a string tied with a small object, forming a curved shape (no text or symbols)Using your liner and mattress
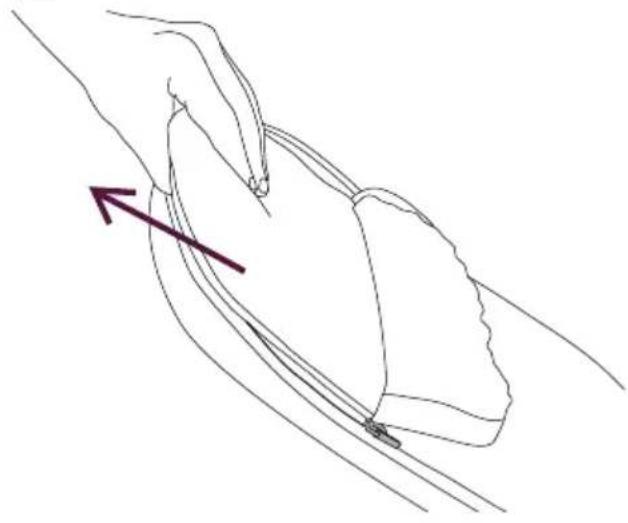
12.1 Your Pacific Carrycot mattress is removable. Simply lift it out of the liner. The mattress cover can be hand washed. Remove the foam mattress insert prior to washing by opening the flap on the back of the mattress cover and removing the foam mattress.
12.2 The Pacific Carrycot has a removable liner. Simply unzip each end and release the Velcro fastenings to remove it.
To fit the liner and mattress see preparation for use (see 7.1 -7.4)
WARNING: DO NOT ADD A MATTRESS OTHER THAN THE ONE PROVIDED.
CAUTION: Do not force the zip
Using your Pacific as a pushchair
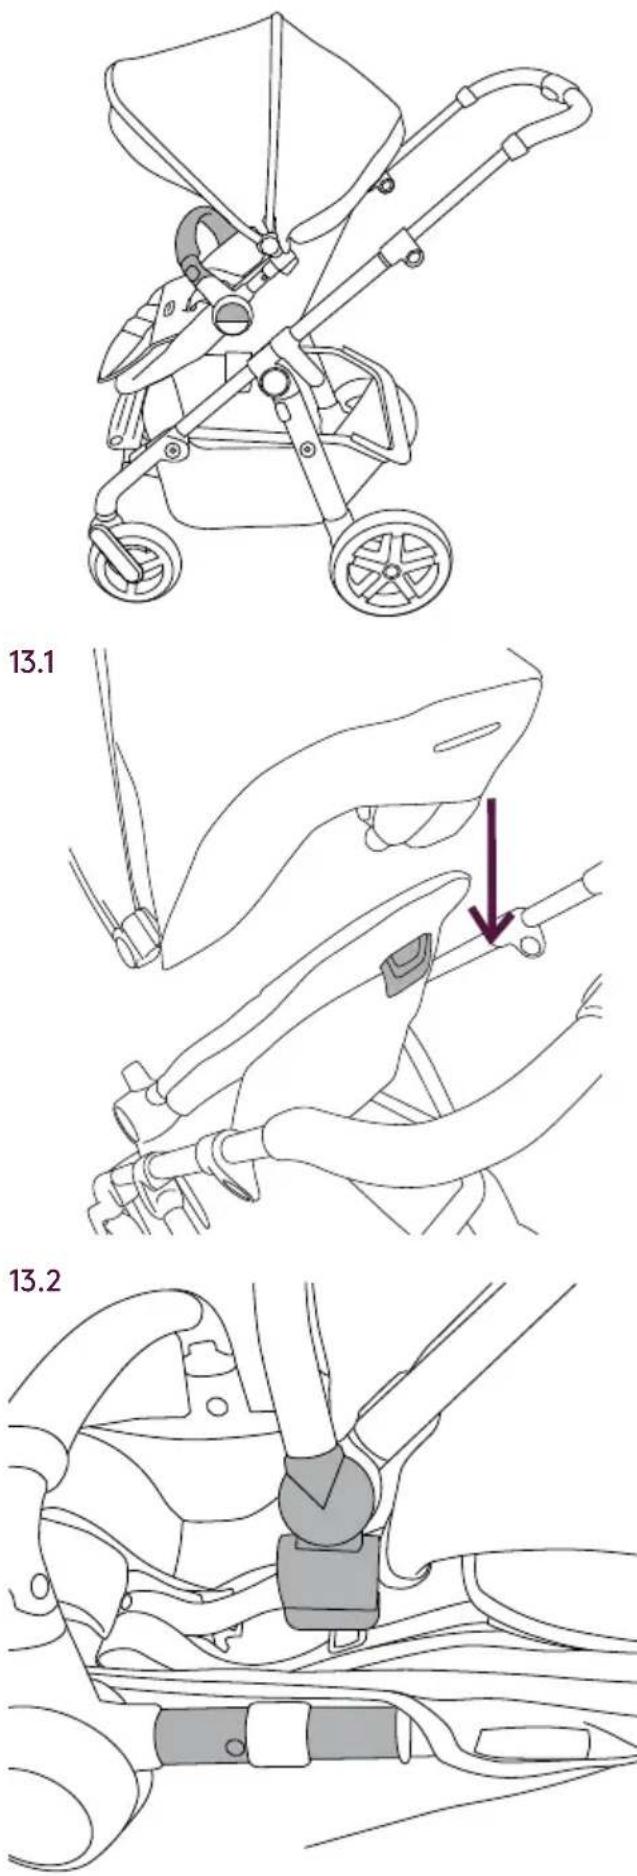
Your Pacific seat unit can be fitted to the chassis in rearward-facing position (infant facing you) or forward-facing position (infant facing away from you). Follow (17.1) to attach the seat unit to the chassis.
Attaching the seat unit hood to the seat unit
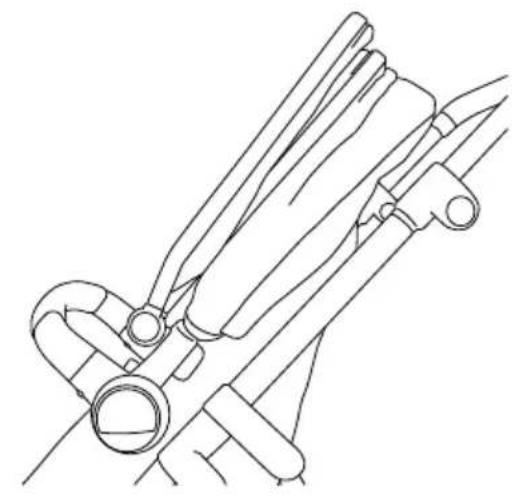
13.1 First, slide the back of the hood over the back of the seat unit. Locate the slot in the fabric at the back of the hood and slide over the seat recline adjustment lever.
13.2 Attach the hood by pressing the hood clips onto the slots on either side of the seat unit frame. Note your Pacific pushchair has a function where you have the option to raise or lower the height of the hood provided. The height position can be adjusted by connecting the hood to one of the two height locations provided. Velcro the lower front corners of the hood onto the seat unit.
14.1
natural_image
Technical line drawing of a mechanical assembly with no visible text or symbolsUsing your hood
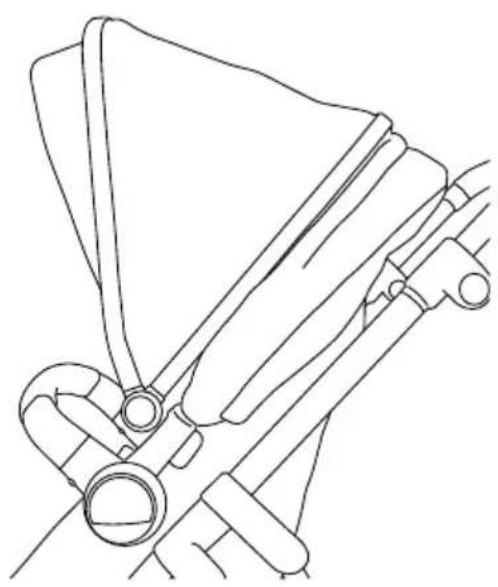
14.1 Your Pacific hood can be used in 3 positions. Fully open, semi-open and fully covered.
natural_image
Line drawing of a mechanical linkage or lever mechanism (no text or symbols)
natural_image
Line drawing of a mechanical linkage or bracket assembly (no text or symbols)14.2

natural_image
Line drawing of a mechanical component with a shaded area and directional arrow (no text or symbols)Using your hood
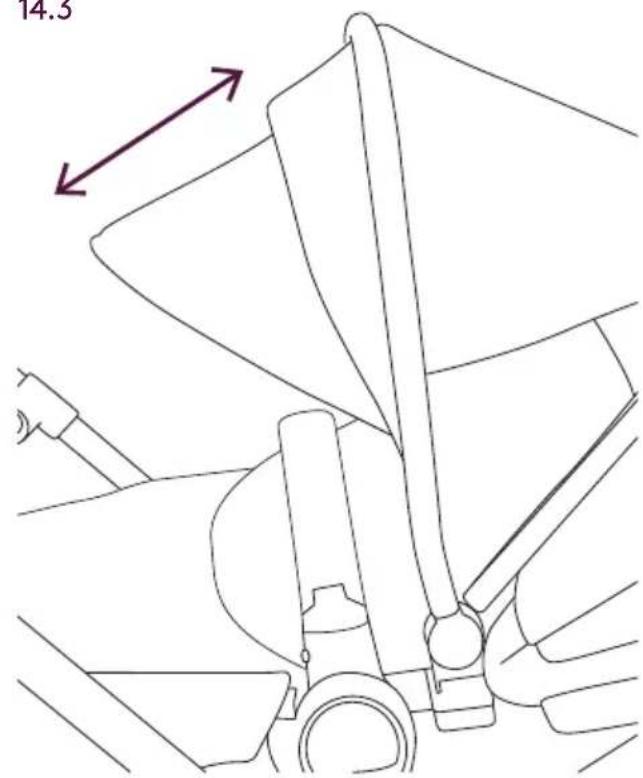
Your Pacific hood features a ventilation panel and pop-out sunvisor.
14.2 To open the ventilation panel, lift the flap and secure under the viewing window flap using the magnets either side of the hood.
14.3 To use the sunvisor, pull out of the hood. To store, push back into the hood.
14.3
natural_image
Technical line drawing of a mechanical assembly with no visible text or symbols
natural_image
Line drawing of a hand holding a tool over a car body, no text or symbols presentPreparing the harness
15.1 The shoulder straps have 3 height positions. To adjust, first lift the flap on the back of the seat unit. Thread the harness buckle from the front of the seat unit through to the back of the seat unit and allow the buckle to lay flat behind the seat securing the shoulder strap in place.
Thread the harness through the button hole in the seat unit relative to the size of your child, and secure the harness buckle. (see 16.1).
WARNING: THE HARNESS CAN FORM LOOPS WHICH MAY BE A STRANGULATION HAZARD. NEVER LEAVE THE HARNESS CONNECTED WHEN NOT FITTED TO A CHILD IN THE PUSHCHAIR.

Using the harness
WARNING: ALWAYS USE THE CROTCH STRAP IN COMBINATION WITH THE WAIST AND SHOULDER STRAPS
16.1 To fasten the harness insert both buckle clips into each side of the buckle. Listen for the 'click'.
WARNING: ALWAYS USE THE RESTRAINT SYSTEM.
16.2 To release the harness press the button at the centre of the buckle and pull apart. The shoulder straps can be unhooked from the buckle if required.
16.3 Your harness is fully adjustable by moving the slides (A), to make fitting easy. Your child should always be harnessed in and should never be left unattended, even for short periods of time.
Your Pacific harness can be adjusted for the size of your child.
'D' rings are provided for fitting a separate harness if required (B).
17.1

natural_image
Mechanical assembly diagram showing a clamping mechanism with a downward arrow indicating motion (no text or symbols present)17.2

natural_image
Line drawing of a stroller with a magnified inset showing internal anatomy (no text or symbols)Attaching the seat unit to your chassis
WARNING: ENSURE ALL LOCKING DEVICES ARE ENGAGED BEFORE USE.
17.1 To attach your Pacific seat unit to the Pacific chassis hold the seat unit above the chassis. Locate the seat unit chassis connector posts into the seat attachment slots on the chassis. Ensure that the seat unit 'clicks' into place. The seat unit can be fitted forward or rearward facing. Lift the seat unit gently by the bumper bar to check the seat unit has locked into place. To adjust the seat position (see 18.1)
Detaching the seat unit from your chassis
172 With the seat unit facing you, pull both seat release handles outwards and lift the seat unit clear of the chassis.
CAUTION: Remove the child from the seat unit before detaching from your chassis.
18.1
natural_image
Diagram of a car's steering wheel and dashboard with a directional arrow indicating motion (no text or symbols)
natural_image
Line drawing of a baby stroller with wheels and a curved arm, showing no text or symbolsAdjusting the seat position
Your Pacific has 3 forward-facing and 3 rearward-facing seat positions.
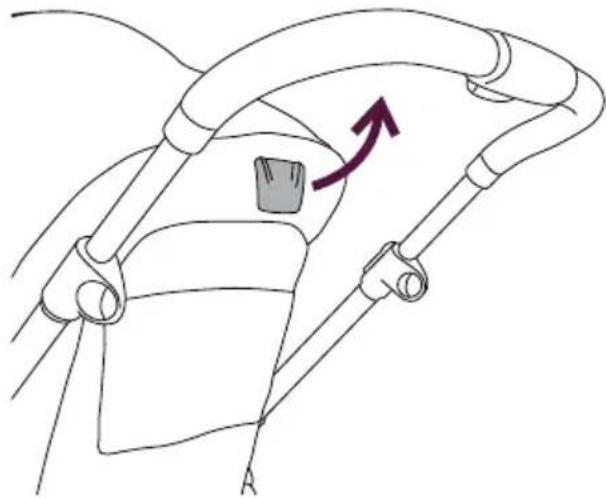
18.1 To adjust the seat position in either forward or rearward facing mode, lift and hold the seat recline adjustment lever on the back of the seat unit. Move the seat unit upwards or downwards to upright, semi-recline or full recline. Release the recline adjustment lever and wait to hear a 'click' for each position to lock into place.
18.2 Your Pacific has an adjustable multi-position footrest.
To adjust the footrest, press the adjuster buttons located on each side of the footrest. Once buttons are pressed gently adjust the footrest to its lowest position. Once in the lowest position you can gently lift the footrest up to a more desired position if required.
18.2

19.1
natural_image
Line drawing of a baby stroller with directional arrows indicating motion (no text or symbols)Using your raincover with the carrycot or seat unit
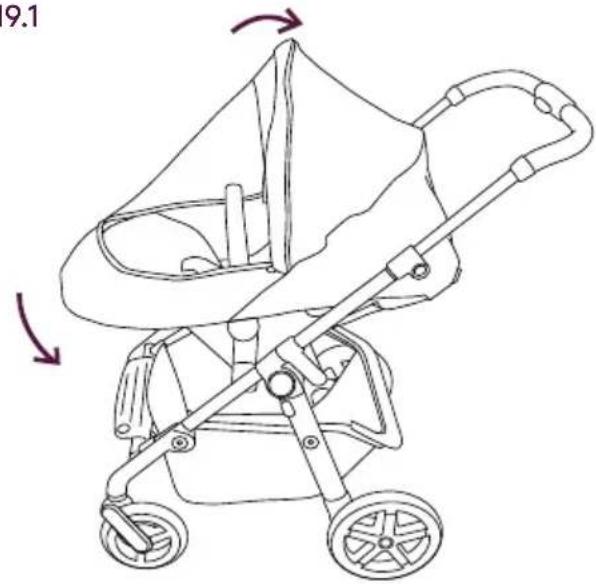
19.1 Your Pacific raincover should be used when the Pacific hood is attached to either the seat unit or carrycot. First slide over the hood and down towards the toe of the seat unit or carrycot.
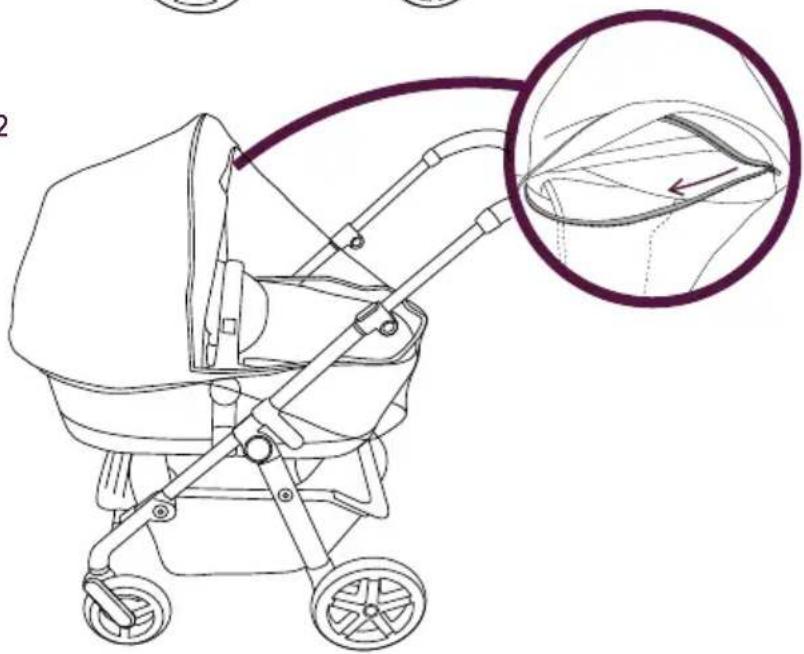
19.2 A zip gives easy access to your child.

natural_image
Line drawing of a baby stroller with directional arrows indicating motion (no text or symbols)19.2
natural_image
Line drawing of a baby stroller with an inset showing internal structure (no text or symbols)
natural_image
Line drawing of a hand holding a tool interacting with a car interior (no text or symbols)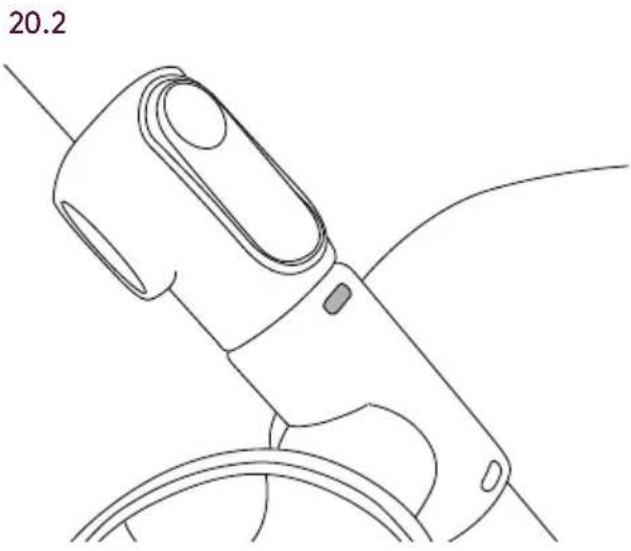
natural_image
Technical line drawing of a mechanical device with no visible text or symbols
Attaching the cup holder
20.1 The cup holder can be attached to either side of your Pacific pushchair handle. Attach the cup holder by clipping the cup holder clamp to your chassis on the lower part of the handle, ensuring your cup holder is the correct way up.
20.2 Ensure the cup holder is fastened correctly and the locating pin has been engaged.
20.3 To remove the cup holder simply unclip the cup holder clamp from the Pacific pushchair handle.
NOTE: Although the cup holder can remain attached when folding your Pacific chassis, we recommend that the cup holder be removed before folding the chassis so that it doesn't get knocked or damaged during transporting or storing your chassis.
Safety Notes
Your Pacific Pushchair is a high quality Silver Cross product. It complies with EN1888-1/2:2018 and with correct use and maintenance will give good service. If, however you should have any problems with your pushchair, please contact your Silver Cross retailer who will take appropriate action. The Pacific carrycot complies with EN: 1466:2014.
WARNING:
THIS PRODUCT IS NOT SUITABLE FOR RUNNING OR SKATING.
ENSURE THE PARKING DEVICES ARE ENGAGED WHEN PLACING AND REMOVING YOUR CHILD.
CHECK THAT THE PRAM BODY OR SEAT UNIT, OR CAR SEAT ATTACHMENT DEVICES ARE CORRECTLY ENGAGED BEFORE USE.
DO NOT LET YOUR CHILD PLAY WITH THIS PRODUCT.
DO NOT LET OTHER CHILDREN PLAY UNATTENDED NEAR THE CARRYCOT.
THIS SEAT UNIT IS NOT SUITABLE FOR CHILDREN UNDER 6 MONTHS.
DO NOT USE IF ANY PART IS BROKEN, TORN OR MISSING.
BE AWARE OF THE RISK OF OPEN FIRES, GAS FIRES ETC. IN THE NEAR VICINITY OF THE CARRYCOT.
THE HANDLES AND THE BOTTOM OF THE CARRY COT SHOULD BE CHECKED REGULARLY FOR SIGNS OF DAMAGE AND WEAR.
ONLY THE MATTRESS PROVIDED SHOULD BE USED WITH THE CARRYCOT.
CAR SEATS DO NOT REPLACE A COT OR BED. SHOULD YOUR CHILD NEED TO SLEEP, THEN IT SHOULD BE PLACED IN A SUITABLE PRAM BODY, COT OR BED.
ANY LOAD ATTACHED TO THE HANDLE AND/OR BACKREST AND/OR SIDES OF THE VEHICLE WILL AFFECT STABILITY OF THE VEHICLE. A BABY'S SAFETY IS YOUR RESPONSIBILITY.
ONLY REPLACEMENT PARTS AND ACCESSORIES APPROVED BY SILVER CROSS SHOULD BE USED.
WARNING: BEFORE FOLDING YOUR PUSHCHAIR, THE CAR SEAT ADAPTORS MUST BE REMOVED, OTHERWISE DAMAGE WILL BE CAUSED.
WARNING: YOUR SIMPLICITY INFANT CARRIER SHOULD ALWAYS BE REARWARD FACING.
WARNING: THIS CAR SEAT DOES NOT REPLACE A COT OR BED. SHOULD YOUR CHILD NEED TO SLEEP THEN IT SHOULD BE PLACED IN A SUITABLE PRAM BODY OR COT.
WARNING: ONLY USE ON A FIRM HORIZONTAL AND DRY SURFACE – IF NOT BEING USED WITH PACIFIC CHASSIS.
CAUTION: THE HANDLE AND THE BOTTOM SHOULD BE INSPECTED REGULARLY FOR SIGNS OF DAMAGE AND WEAR.
CUP HOLDER:
MAXIMUM LOAD = 340G
BASKET: MAXIMUM LOAD = 5KG
The child should always wear a safety harness complying with BS6684. 'D' rings are provided for the attachment of an additional harness. These are located on the existing harness close to where it is attached to the seat frame. Do not hang shopping bags or other objects from the handle. This may cause the pushchair to tip up. Extra shopping or luggage should only be carried in the basket and should not exceed 5kg in weight, evenly distributed.
Always hold the seat when making adjustments.
Never try to fold your Pacific when the child is seated as this may trap the child. If you have difficulty in folding or unfolding the pushchair, do not force. This will cause damage. Read the "To fold or unfold" instructions carefully in the Pacific Instructions. It may be unsafe to fit accessories or spare parts other than those supplied or recommended by Silver Cross. If anyone other than the owner is going to use the Pushchair (e.g. grandparent, child minder), please show them how to use it correctly
Care and Maintenance
Chassis
Always check your pushchair for signs of wear. Regularly lubricate all moving parts. Check for freedom of movement of all locking devices. Polish metal work with a clean, dry cloth.
Fabric items and seat unit For fabric wash care instructions please refer to the care guide included with your pram. Keep away from direct heat and strong sunlight. A certain degree of fading may occur over time through everyday use. Never machine wash, tumble dry, iron or bleach.
Never leave accessories such as the Sunshade or raincover where heat and light may discolour the fabrics or distort the plastics, e.g. on the car parcel shelf in hot weather.
- Pushchair and Carrycot
- IMPORTANT:
- READ THE INSTRUCTIONS CAREFULLY BEFORE USE AND KEEP FOR FUTURE REFERENCE
- Contents
- Preparation for use
- Pacific chassis
- Using the brake
- Operating the swivel wheels
- Operating the height adjustable handle
- Folding your Pacific chassis
- Using your Pacific from birth with the carrycot
- Preparing the carrycot for use
- Attaching the apron to the carrycot
- Attaching the carrycot hood to the carrycot
- Attaching the bumper bar to the carrycot or seat unit
- Attaching the carrycot to your chassis
- WARNING: NEVER USE THIS CARRYCOT ON A STAND.
- Detaching the carrycot from your chassis
- Using your liner and mattress
- Using your Pacific as a pushchair
- Attaching the seat unit hood to the seat unit
- Using your hood
- Preparing the harness
- Using the harness
- WARNING: ALWAYS USE THE CROTCH STRAP IN COMBINATION WITH THE WAIST AND SHOULDER STRAPS
- WARNING: ALWAYS USE THE RESTRAINT SYSTEM.
- Attaching the seat unit to your chassis
- WARNING: ENSURE ALL LOCKING DEVICES ARE ENGAGED BEFORE USE.
- Detaching the seat unit from your chassis
- Adjusting the seat position
- Using your raincover with the carrycot or seat unit
- Attaching the cup holder
- Safety Notes
- WARNING:
- Care and Maintenance
- Chassis
Brand : Silver Cross
Model : Pacific
Category : Baby Scale