
Kensington - Baby Scale Silver Cross - Free user manual and instructions
Find the device manual for free Kensington Silver Cross in PDF.


| Product Type | Pram / Stroller |
| Brand | Silver Cross |
| Model | Kensington |
| Age Range | Newborn to 6 months |
| Maximum Child Weight | 9 kg |
| Chassis Material | Metal frame with folding mechanism |
| Wheels | 2 front small (swivel) and 2 rear large, removable |
| Brake Type | Foot-operated pedal, on/off |
| Body Features | Includes pram body, liner, mattress with cover, apron |
| Hood | Adjustable, secure with levers on both sides |
| Mattress Support Board | Adjustable to flat or angled position |
| Storage Tray | Under chassis, max load 5 kg (evenly distributed) |
| Accessories (Optional) | Sun canopy, bedding set, dust cover, rain shield, changing bag |
| Changing Bag Max Load on Handle | 1 kg |
| Safety Compliance | BS EN 1888:2012 (excluding clauses 8.10.3, 8.10.4, 8.10.6) |
| Folding Method | Remove body, slide rings, release safety catch, fold handle |
| Cleaning | Refer to wash care label on fabric parts |
| Spare Parts Availability | Online at heritage-prams.co.uk |
| Warranty | 12 months manufacturing; extendable to 5 years with registration |
| Country of Manufacture | England |
Frequently Asked Questions - Kensington Silver Cross
Attach the wheels by tilting the chassis, pulling the metal tab on the wheel, and sliding onto the axles (small wheels at front).
Unfold the chassis: ensure the metal locking ring is clear, pull the handle up, engage secondary safety catch, and slide locking rings down.
Attach the pram body: apply brake, unlock body locks, lift body by handles, lower onto chassis until it clicks into locks, then lock the clips.
Fit the shopping tray by positioning between the 'C' frames and clicking into place.
Attach the hood by lifting into position and pushing down levers on both sides. Finally, secure the apron with press studs.
Release the catches on both sides of the pram, then lift the body clear.
Slide the metal rings up the handle, pull back the secondary safety catch, and allow the handle to travel forward until it rests on the chassis.
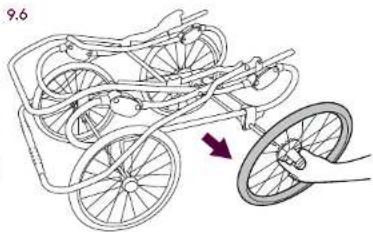
For even more compact storage, remove the wheels by pulling the tab and sliding them off.
With two people, lift the body by the lifting handles, lower it gently onto the chassis so that it locates into the metal body locks on both sides.
Then lock the metal clips by lifting them up and pushing downwards. Always check both sides are securely fastened.
Always apply the brake when the pram is stationary. Never force the brake pedal downwards; always lift to release.
User questions about Kensington Silver Cross
0 question about this device. Answer the ones you know or ask your own.
Ask a new question about this device
Download the instructions for your Baby Scale in PDF format for free! Find your manual Kensington - Silver Cross and take your electronic device back in hand. On this page are published all the documents necessary for the use of your device. Kensington by Silver Cross.
USER MANUAL Kensington Silver Cross
natural_image
Pure mechanical diagram of a structural frame with no text, numbers, or symbols

natural_image
Simple line drawing of a rectangular frame with internal compartments and corner connectors (no text or symbols)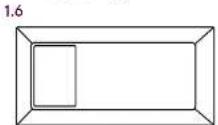


IMPORTANT: KEEP THESE INSTRUCTIONS FOR FUTURE REFERENCE
These instructions are important.
Contents
First check all your parts have been supplied. Your chassis and wheels are packaged in 1 box. Your body will be packaged in a second box.
Your Kensington chassis box includes:
1.1 Kensington chassis
1.2 2 x front wheels
1.3 2 x back wheels
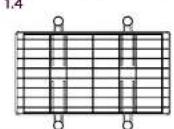
1.4 Shopping tray
Your Kensington body box includes;
1.5 Kensington body
1.6 Liner
1.7 Mattress with cover
1.8 Apron
2.1

natural_image
Pure mechanical diagram showing a lever mechanism with no text or symbols

Front wheel Rear wheel
Fitting the wheels
2.1 Ensure the brake is in the off position. Lift the brake pedal upwards to put it into the off position. Never push it downwards or force the brake as this will snap the brake.
2.2 Attach the wheels by tilting the chassis onto its side. The smaller wheel fits at the front of the chassis.
2.3 Pull the metal tab on the wheel out towards the tyre, and slide the wheel onto the axle.
2.4 Repeat the same action to attach the larger wheels onto the the rear axle, then do the same on the other side of the chassis.
2.2

natural_image
Diagram showing intersecting lines and a cylindrical object with an arrow, no text or symbols present2.3

natural_image
Diagram of a mechanical component with radial lines and a central hub, no text or symbols present2.4

natural_image
Diagram of a bicycle with wheels and a hand holding a wheel, showing no text or symbolssilvercrossbaby.com
3
3.1

natural_image
Line drawing of a two-wheeled bicycle with wheels and suspension (no text or symbols)Unfolding the chassis
3.1 Stand the chassis on its wheels.
3.2 Ensure that the metal locking ring is clear of the secondary safety catch.
3.3 Pull the handle upwards towards you.
3.4 The secondary safety catch will automatically engage. Then slide the metal locking rings down the handle to securely erect the chassis.
3.2

natural_image
Line drawing of a hand using a tool to adjust or install a mechanical component (no text or symbols visible)3.3

natural_image
Line drawing of a hand using a tool to lift a bicycle into a two-wheeled cart (no text or symbols)3.4

natural_image
Diagram of a mechanical clamp or lever mechanism with a purple arrow indicating direction (no text or symbols present)4.1

natural_image
Line drawing of a hand holding a two-wheeled cart with wheels and a purple arrow indicating motion (no text or symbols)Attaching the pram body to the chassis
Never try to attach the body of the pram to the chassis with the child inside. It is recommended that two people lift the pram into position.
4.1 Before attaching the body, apply the brake.
4.2 Check that metal body locks are in the unlocked position.
4.3 It is best for two people to fit the body. Lift the body by the lifting handles.
4.4 Lower the body gently and carefully onto the chassis, ensuring the body locates into the metal body locks on both sides.
4.5 Lock the metal clips by the lifting them up and then pushing downwards.
Note: Always check both sides are securely fastened

natural_image
Hand holding a small mechanical component with curved lines and a numbered label (4.2), no readable text or symbols present.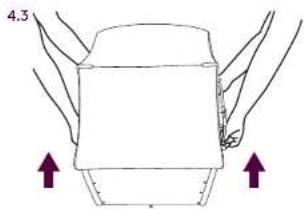
4.5
4.4

natural_image
Diagram of a seatbelt mechanism with a downward arrow indicating motion (no text or symbols present)
natural_image
Illustration of a hand holding a device with a red arrow indicating direction (no text or symbols present)5.1

natural_image
Diagram of a shopping cart with arrows indicating downward movement, no text or symbols presentAttaching the tray
5.1 To fit the tray, hold in between the two 'C' frames, evenly positioned between the 'U' brackets. Lower onto the 'C' frame and click into place.
Note: Do not place items, bags of shopping for example, in the pram unit as it will cause it to become unstable.
6.1

natural_image
Illustration of a hand holding a cable with a downward arrow indicating compression or force (no text or symbols)The hood and apron
CAUTION: The child should be clear of moving parts while making adjustments.
6.1 Lift hood into position and push down on the levers on both sides of the hood to secure in place.
6.2 Fit the apron around the contour of the pram body and fasten the press studs on either side of the pram. To hold the storm flap in place, loop the metal fastener over the nut on either side of the hood.
6.2

natural_image
Line drawing of a hand adjusting a cable or wire on a chair (no text or symbols)Note: The apron can still be used in conjunction with the liner.
Using the brake
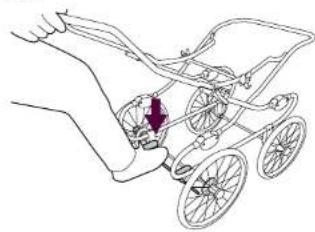
7.1 To operate the brake push down on the pedal with your foot.
7.2 To release the brake lift up the pedal with your foot.
Note: Always apply the brake when the pram is stationary.
7.17.2
natural_image
Line drawing of a hand holding a bicycle with wheels and a small inset showing the wheel (no text or symbols)
natural_image
Illustration of a hand holding a bicycle with wheels and a purple arrow pointing to the wheel (no text or symbols)8.2

natural_image
Hand holding a small object with a flower, against a striped background (no text or symbols)8.3

natural_image
Line drawing of a hand holding a small object, possibly a tool or device, against a plain background (no text or symbols)8.4

8.5

Using the liner and mattress
8.1 Ensure the hood is in the up position. Ensure the liner is the correct way up with the elasticated corners at the bottom of the pram body.
8.2 Secure the press studs which are half way up the liner to the press studs that are near the wing nut on both sides.
8.3 Secure the press studs that are attached to the elastic on the liner to the press studs that are built into the pram body on top of the back ledge.
8.4 The D-rings are accessible through the holes of the liner.
The mattress can be used with or without the liner. If using the mattress with the liner ensure the liner is in place first.
8.5 The support board "A" may be fixed in either a flat or angled position. Always check that the support board is placed firmly against the stops "B".
Note: Ensure the head rest part of the mattress is nearest the hood.
For advice on cleaning see the wash care label.
9.2

natural_image
Illustration of a hand holding a mechanical component with an upward arrow, no text or symbols present9.3

natural_image
Mechanical diagram showing a linkage mechanism with two wheels and a central shaft (no text or labels)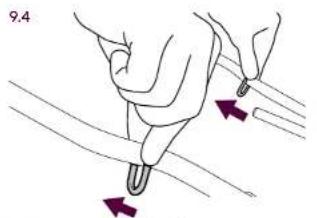
natural_image
Illustration of a hand holding a tool with directional arrows indicating movement or force (no text or symbols)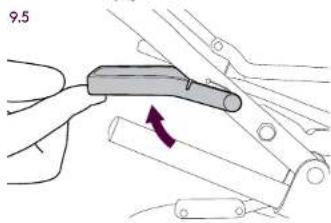
natural_image
Diagram of a mechanical tool interacting with a bracket, showing a handle and lever mechanism (no text or symbols)Folding the chassis
9.1 Firstly remove the pram body from the chassis.
Note: never attempt to do this with the child in the pram body, or on your own.
92 Release the catch on either side of the pram.
9.3 Lift the body, gently, by the lifting handles, clear of the chassis.
9.4 Slide the metal rings up the handle of the chassis.
9.5 Pull back the secondary safety catch, and allow the handle to travel forwards until it rests on the chassis.
9.6 To fold smaller the wheels can be removed by pulling the tab and sliding the wheel off the chassis.
natural_image
Line drawing of a bicycle with wheels and a hand holding the wheel (no text or symbols)silvercrossbaby.com
WARNINGS:
REMOVE ALL PACKAGING AND TIES BEFORE USE. CHECK YOUR KENSINGTON PRAM REGULARLY FOR SIGNS OF DAMAGE DURING USE AND DISCONTINUE USE IF FOUND.
KEEP AWAY FROM FIRE.
THIS PRODUCT IS NOT SUITABLE FOR RUNNING OR SKATING.
DO NOT CARRY MORE THAN ONE CHILD IN THIS PRAM. YOU SHOULD NEVER CARRY ANOTHER CHILD IN A SEAT ON TOP OF THIS PRAM.
DO NOT LET YOUR CHILD PLAY WITH THIS PRODUCT.
TO AVOID INJURY ENSURE THAT YOUR CHILD IS KEPT AWAY WHEN FOLDING AND UNFOLDING THIS PRODUCT.
CHECK THAT THE PRAM BODY ATTACHMENT DEVICES ARE CORRECTLY ENGAGED BEFORE USE.
ONLY USE THE MATTRESS PROVIDED BY SILVER CROSS. NO ADDITIONAL MATTRESS SHOULD BE USED.
DO NOT USE ANY OTHER ACCESSORIES OTHER THAN THOSE SUPPLIED BY SILVER CROSS.
THIS PRODUCT CONFORMS TO APPLICABLE SAFETY STANDARDS OF BS EN 1888:2012 (WITH THE EXEMPTION OF CLAUSES 8.10.3, 8.10.4, 8.10.6)
IT IS RECOMMENDED THAT THE MOST RECLINED POSITION IS USED FOR NEW BORN BABIES.
THE PARKING DEVICE SHOULD BE FULLY ENGAGED WHEN REPLACING AND REMOVING CHILDREN.
ANY LOAD ATTACHED TO THE HANDLE AFFECTS THE STABILITY OF THE PRAM. THE ADDITIONAL SILVER CROSS CHANGING BAG AVAILABLE FOR PURCHASE MUST NOT EXCEED A LOAD OF 1KG WHEN ATTACHED TO THE PRAM.
THE CONTENTS OF THE BASKET SHOULD NOT EXCEED 5KG IN WEIGHT AND SHOULD BE EVENLY DISTRIBUTED.
THIS PRODUCT IS SUITABLE FOR A CHILD WHO CANNOT SIT UP BY ITESLF, ROLL OVER, AND CANNOT PUSH ITSELF UP ON ITS HANDS AND KNEES.
THE KENSINGTON CHASSIS IS COMPATIBLE WITH THE KENSINGTON BODY ONLY.
MAXIMUM WEIGHT OF CHILD: 9KG
Safety Notes
Your Kensington Pram is a high quality Silver Cross product. This product conforms to applicable safety standards of BSEN1888:2012 (with the exemption of clauses 8.10.3, 8.10.4, 8.10.6) and with correct use and maintenance should give good service.
If however you should have any problems with your Kensington Pram, please contact your Silver Cross retailer who will take appropriate action.
This pram is intended to be used from birth up to 6 months.
If somebody unfamiliar is using your pram always ensure that they read these instructions carefully so that they understand how the product works best.
Always read all the instructions provided carefully and remember, the safety of your child is your responsibility.
Guarantee
All Silver Cross products are guaranteed for a period of twelve months against manufacturing faults. However please refer to the extended guarantee details included with the certificate of authenticity to register for your free 5 year guarantee.
Please read these instructions carefully before using your new Kensington Pram and keep for future reference.
Handmade in England.
Additional accessories include:
- Sun Canopy
- Bedding Set
- Dust Cover
- Rain Shield
- Changing bag
www.silvercrossbaby.com
0345 872 6900
Spares
A full range of spares for the entire Classic Collection product range by Silver Cross is available from www.heritage-prams.co.uk
Only replacement parts supplied or recommended by the manufacturer should be used.
Silver Cross®
THE BEST START IN LIFE
- IMPORTANT: KEEP THESE INSTRUCTIONS FOR FUTURE REFERENCE
- These instructions are important.
- Contents
- Fitting the wheels
- Unfolding the chassis
- Attaching the pram body to the chassis
- Attaching the tray
- The hood and apron
- Using the brake
- Using the liner and mattress
- Folding the chassis
- WARNINGS:
- Safety Notes
- Guarantee
- Additional accessories include:
- Spares
- Silver Cross®
Brand : Silver Cross
Model : Kensington
Category : Baby Scale