
BG 1050 - Oven Rommelsbacher - Free user manual and instructions
Find the device manual for free BG 1050 Rommelsbacher in PDF.


| Product Type | Mini Oven |
| Brand | Rommelsbacher |
| Model | BG 1050 |
| Capacity | 18 Liters |
| Power Consumption | 910 - 1090 W |
| Voltage | 220-240 V~ 50-60 Hz |
| Dimensions (W x D x H) | 430 x 335 x 280 mm |
| Weight | 7.4 kg |
| Cooking Functions | Defrost, Upper Heat, Upper Heat with Circulating Air, Lower Heat, Lower Heat with Circulating Air, Upper/Lower Heat, Upper/Lower Heat with Circulating Air |
| Temperature Range | Up to 230 °C |
| Timer | 0 - 120 minutes, with continuous operation (M) mode |
| Interior Light | Yes, operates while oven is on |
| Door Type | Double-glazed, demountable for cleaning |
| Crumb Tray | Removable for easy cleaning |
| Accessories Included | Grill grid, roasting/baking tray, crumb tray, handle |
| Oven Lamp Replacement | 230 V~ 15 W, E14, T 300 °C |
| Safety Features | Timer with automatic shut-off, temperature pilot lamp, cool-touch exterior |
| Cleaning | Non-stick coating, removable crumb tray, door demountable, accessories dishwasher safe |
| Standby Consumption | 0 W |
Frequently Asked Questions - BG 1050 Rommelsbacher
User questions about BG 1050 Rommelsbacher
0 question about this device. Answer the ones you know or ask your own.
Ask a new question about this device
Download the instructions for your Oven in PDF format for free! Find your manual BG 1050 - Rommelsbacher and take your electronic device back in hand. On this page are published all the documents necessary for the use of your device. BG 1050 by Rommelsbacher.
USER MANUAL BG 1050 Rommelsbacher
natural_image
Abstract geometric pattern with vertical lines inside a circle (no text or symbols)ROMMELSBACHER
natural_image
Exterior view of a modern kitchen toaster oven with open lid and control knobs (no visible text or symbols)BG 1055/E BG 1050
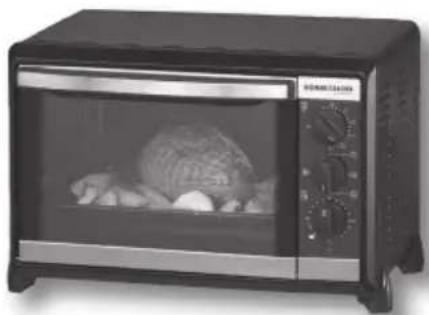
natural_image
Black and white photo of a modern kitchen toaster oven with a baked egg on the glass (no visible text or symbols)BG 1250
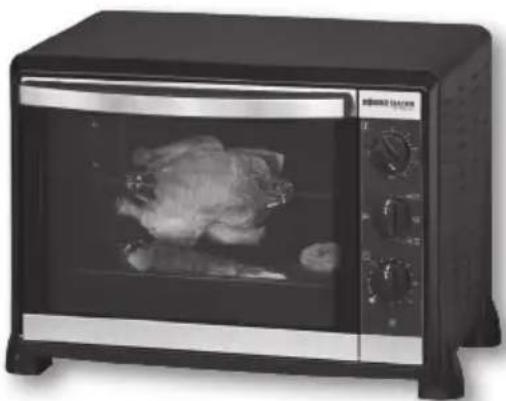
natural_image
Black and white photo of a modern kitchen toaster oven with open door and control knobs (no visible text or symbols)BG 1550 BG 1805/E
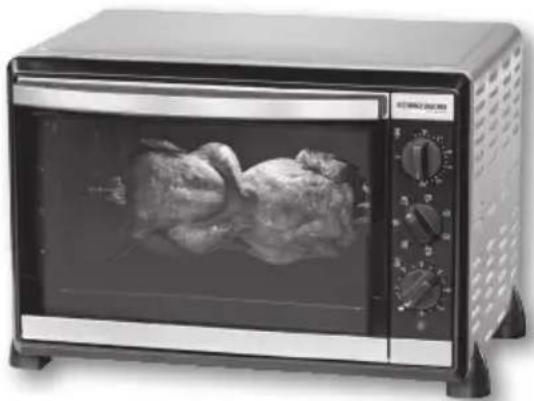
natural_image
Exterior view of a modern kitchen toaster oven with open door and control knobs (no visible text or symbols)BG 1805/EE
Produktbeschreibung - Product description
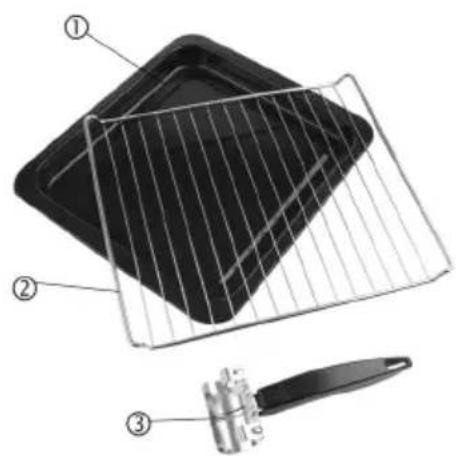
Modelle / models: BG 1550, BG 1805/E, BG 1805/EE:
Bedienfeld - Operating panel
BG 1550 & BG 1805/E
BG 1805/EE
BG 1050 & BG 1055/E
BG 1250
Before reading please unfold the page containing the illustrations and familiarize yourself with all functions of this device.
Contents
Page
Product description 2
Operating panel 3
Operating panel description 17
Introduction 17
Intended use 17
Technical data 17
For your safety 18
Prior to initial use 20
How to operate your appliance 21
- Setting the function 21
- Grilling with rotisserie function 22
- Setting the temperature 23
- Activating the appliance (with or without timer) 23
- Switching the appliance off 23
- Interior illumination 23
- Temperature pilot lamp 24
Demounting and reassembling the oven door 24
Cleaning and maintenance 24
Tips and notes 25
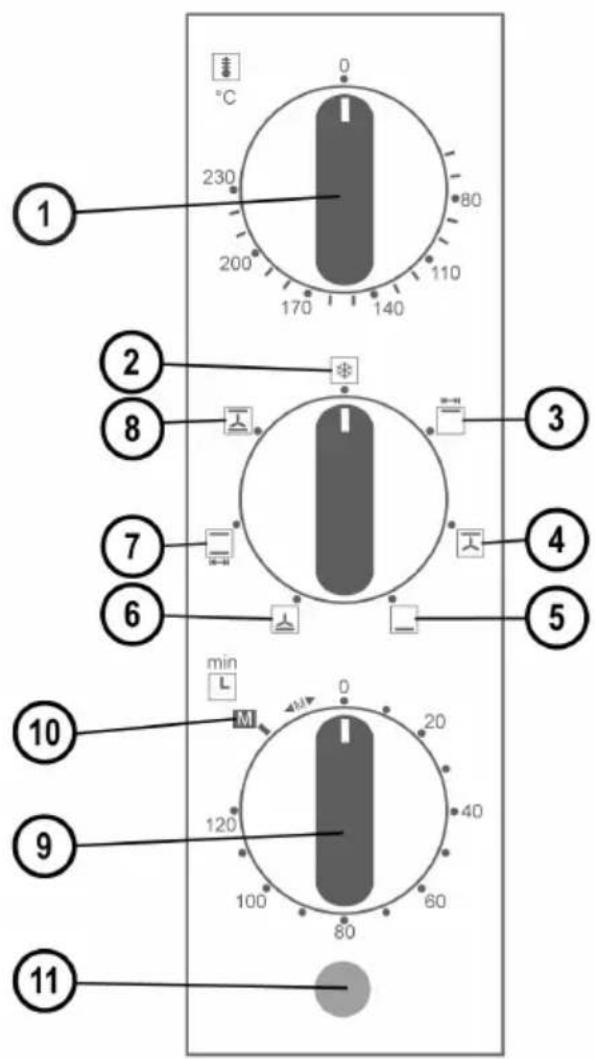
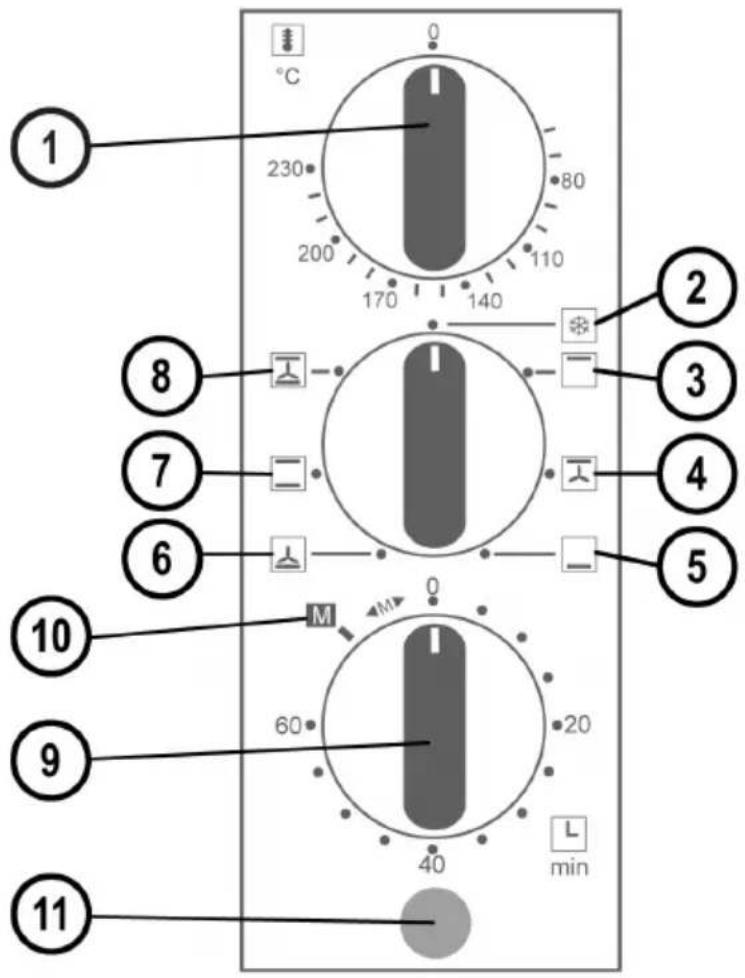
Operating panel description
Models BG 1550, BG 1805/E and BG 1805/EE
1 = Temperature setting
2 = Defrost
3 = Upper heat with rotisserie function
4 = Upper heat with circulating air
5 = Lower heat
6 = Lower heat with circulating air
7 = Upper/lower heat with rotisserie function
8 = Upper/lower heat with circulating air
9 = Time setting
10 = Continuous operation
11 = Temperature pilot lamp
Models BG 1050, BG 1055/E and BG 1250
1 = Temperature setting
2 = Defrost
3 = Upper heat
4 = Upper heat with circulating air
5 = Lower heat
6 = Lower heat with circulating air
7 = Upper/lower heat
8 = Upper/lower heat with circulating air
9 = Time setting
10 = Continuous operation
11 = Temperature pilot lamp
Introduction

We are pleased you decided in favour of this versatile mini oven and would like to thank you for your confidence. Its easy operation and wide range of applications will certainly fill you with enthusiasm as well. To make sure you can enjoy using this appliance for a long time, please read through the following notes carefully and observe them. Keep this instruction manual safely. Hand out all documents to third persons when passing on the appliance. Thank you very much.
Intended use
The appliance is designed for preparing dishes for domestic use. It is qualified for baking, roasting cooking, defrosting, crisping up, rewarming, melting, gratinating and grilling food. Other uses or modifications of the appliance are not intended and harbour considerable risks. For damage arising from not intended use, the manufacturer does not assume liability. The appliance is not designed for commercial use.
Technical data
Only connect the appliance to an isolated ground receptacle installed according to regulations. The rated voltage must comply with the details on the rating label. Only connect to alternating current.
| Type BG 1550 | Type BG 1805/E | Type BG 1050 | |
| Type BG 1805/EE Type BG 1055/E | |||
| Type BG 1250 | |||
| ninal voltage: | 220-240 V~ 50-60 Hz | 220-240 V~ 50-60 Hz | 220-240 V~ 50-60 Hz |
| ninal power, ca.: | 1450-1750 W | 1640-1960 W | 910-1090 W |
| ndby consumption: | 0 | 0 | 0 |
| ume baking chamber, ca.: | 30 litres | 42 litres | 18 litres |
| ension appliance, ca.: | 485 x 380 x 340 mm | 515 x 415 x 360 mm | 430 x 335 x 280 mm |
| ght, ca.: | 10.3 kg | 10.7 kg | 7.4 kg |

WARNING: Read all safety advices and instructions. Non-observance of the safety advices and instructions may cause electric shock, fire and/or bad injuries!
General safety advices
- Always keep children under 8 away from the product and the power cord.
- Children from the age of 8 must be supervised when cleaning or maintaining the appliance.
- Children from the age of 8 and persons not having the knowledge or experience in operating the appliance or having handicaps of physical, sensorial or mental nature must not operate the appliance without supervision or instruction by a person, responsible for their safety. Never leave the appliance unattended during operation.
- Children should be supervised in order to ensure that they do not play with the appliance.
- Packing material like e. g. foil bags should be kept away from children.
- Do not operate this unit with an external timer or a separate telecontrol system.
- Prior to each use, check the appliance and the attachments for soundness, it must not be operated if it has been dropped or shows visible damage. In these cases, the power supply must be disconnected and the appliance has to be checked by a specialist.
- When laying the power cord, make sure that no one can get entangled or stumble over it in order to avoid that the appliance is pulled down accidentally.
- Keep the power cord away from hot surfaces, sharp edges and mechanical forces. Check the power cord regularly for damage and deteriorations. Damaged or entangled cords increase the risk of an electric shock.
- Do not misuse the power cord for unplugging the appliance!
- Never immerse the appliance, power cord and power plug in water for cleaning.
- Do not store the appliance outside or in wet rooms.
- This electrical appliance complies with the relevant safety standards. In case of signs of damage to the appliance or the power cord, unplug the appliance immediately. Repairs may be affected by authorised specialist shops only. Improper repairs may result in considerable dangers for the user.
- Improper use and disregard of the instruction manual void all warranty claims.
Safety advices for using the appliance
WARNING: Hazard of injury and burns!
Casing, back wall, oven door, trays, grid and other components are getting hot during use and firstly stay hot after switch-off!
Thus, act with caution:
- We recommend using the enclosed handle as well as pot cloths and appropriate grill cutlery!
- Do not use the appliance’s upper side as depositing rack or working top as it will get hot when operating the appliance! As protection against fire, do generally not put objects made of paper, plastic, fabric or other inflammable material on hot surfaces!
- Do not cover the base of the oven chamber/heating elements with aluminium foil!
• Overheated fats and oils can inflame. Therefore, food containing fats and oils may only be prepared under supervision! - Attention! Hazard of fire! Always put food from which grease may drip on the roasting/baking tray to avoid that the fat inflames at the heating element. Bread toasted too long can also inflame!
- Only use heat-resistant containers made of metal, fireproof glass or ceramic for roasting and baking!
- Never splash cold water on the hot oven door!
- When opening the oven door, hot steam may escape!
- Appliance and accessories must have cooled completely before cleaning or moving them!
- Observe the following when setting up the appliance:
- Place the appliance with its rear to the wall. Leave a ventilation distance of 4 cm.
- Place the appliance on a heat-resistant, stable and even surface (no varnished surfaces, no table cloths etc.).
- Place it beyond children's reach.
- Leave a ventilation distance of at least 4 cm to all sides and 1 m above the appliance to avoid damage by heat or fat splatters and to grant an unobstructed work area. Unhindered air supply has to be ensured.
- Do not operate the appliance in the vicinity of sources of heat (oven, gas flame etc.) or in explosive environments, where inflammable liquids or gases are located.

· Attention! Hazard of fire! This appliance is not qualified for installation.
- Pull the power plug after each use for safe switch-off.
- Do not use the appliance as space heater.
Prior to initial use
- For a start, please clean all the removable accessory parts in warm water with some dish-washing detergent or in the dishwasher.

Prior to initial use, please heat up for about 15 minutes with setting “upper and lower heat with circulating air” at maximum temperature in order to burn in the protective coating on the heating elements.
- Please do not be bothered by the slight, harmless smoke and smell that will be generated for a short while. While doing so, make sure that the room is well-aerated. Prevent bad smell from draughting into other rooms.
• After the appliance has cooled down, please clean the interior oven with a moist cloth.
How to operate your appliance
Prior to operation, ensure that the crumb tray is inserted below the lower heating element. Pre-heat the oven to the desired temperature.
Placing food in the oven
Open the oven door (do not use the open door as storage place!). Place the prepared food on the grill grid or roasting/baking tray and insert it in the provided insertion level of the oven chamber. Close the oven door.

Make sure that the food does touch neither the upper nor the lower heating rod.
1. Setting the function
A variety of functions are available. Use the middle rotary knob for selection.

Defrost
A fan distributes the ambient temperature evenly in the oven chamber so that the frozen food is defrosted mildly and gently. A temperature setting is not necessary.

Upper heat only
For making casseroles and gratins, which shall get a cross surface. For grilling (e.g. steaks, sausages, rolled roast, chicken etc.) as well as for gratinating. We recommend filling half of the roasting tray with water and inserting it into the lowest level as collecting tray. In this way, any grease dripping down will be collected and the appliance stays clean while the rising steam makes your grill food especially tender.
Upper heat with rotisserie function (models BG 1550, BG 1805/E and BG 1805/EE) This function is suitable for grilling chicken, spit roast etc.; proceed as described under point "2. Grilling with rotisserie function" Important! Insert the roasting/baking tray into the lowest insertion level. In this way, any grease dripping down will be collected and the appliance srays clean. Furthermore, we recommend filling half of the roasting/baking tray with water, the rising steam makes your grill food especially tender.

Upper heat with circulating air
For making casseroles and gratins, which shall get a cross surface. For grilling (e.g. steaks, sausages, rolled roast, chicken etc.) as well as for gratinating. An additionally set fan distributes the heat evenly in the oven chamber. We recommend filling half of the roasting tray with water and inserting it into the lowest level as collecting tray. In this way, any grease dripping down will be collected and the appliance stays clean while the rising steam makes your grill food especially tender.

Lower heat only
This function is especially suitable for everything that shall become cross from below like e. g. pizza, tarte flambee, oven fries etc. We recommend using the function “upper and lower heat” (with or without circulating air) first and then setting this function for the last 5 minutes.

Lower heat with circulating air (pizza function)
This function is especially suitable for everything that shall become cross from below like e. g. pizza, tarte flambee, oven fries etc. We recommend using the function “upper and lower heat” (with or without circulating air) first and then setting this function for the last 5 minutes. An additionally set fan distributes the heat evenly in the oven chamber.

Upper/lower heat with rotisserie function (models BG 1550, BG 1805/E and BG 1805/EE)
This function is suitable for grilling chicken, spit roast etc.; proceed as described under point "2. Grilling with rotisserie function" Important! Insert the roasting/baking tray into the lowest insertion level. In this way, any grease dripping down will be collected and the appliance srays clean.

Upper and lower heat with circulating air
For baking and roasting at a level with even heat from above and below. It is especially suitable for baking sheet cake, cheese cake and sponge cake for making casseroles, roast, venison and fish as well as for all classic recipes. An additionally set fan distributes the heat evenly in the oven chamber.
2. Grilling with rotisserie function (models BG 1550, BG 1805/E and BG 1805/EE)
The rotisserie spit allows to prepare delicious grilled chicken and other kinds of spit-roast (e.g. pig knuckles). For this proceed as follows:
- It is important to defrost frozen chicken completely before grilling. Then wash and pat them dry.
- Depending on the recipe and your personal taste, rub the food to be grilled with oil and spices.
Tip: Always mix paprika and curry with some oil or season the meat at the end of the grilling time, as these spices burn easily and taste bitter then.
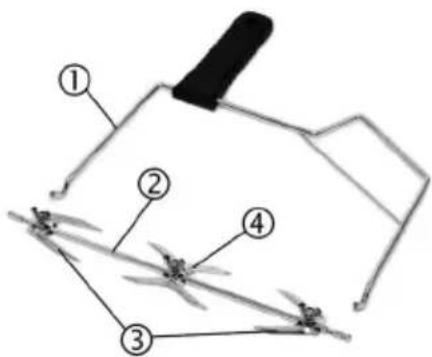
- Preparing 1 chicken or spit-roast piece: Slide one of the single fixing brackets on the spit and tighten it with the screw. Now skewer the prepared meat onto the spit centrally until it is pushed firmly into the first fixing bracket. Then slide the second single fixing bracket on the spit and push it firmly into the roast. Also tighten this screw.
• Preparing 2 chicken or spit-roast pieces (models BG 1805/E and BG 1805/EE only): Slide one of the single
fixing brackets on the spit and tighten it with a screw. Skewer the first chicken/roast onto the spit centrally until it is pushed firmly into the first fixing bracket. Then slide the double (X-shaped) fixing bracket on and press it into the first chicken. Now skewer the second chicken on the spit (staggered in position to the first one) centrally until it is pushed firmly into the double fixing bracket. At last slide the second single fixing bracket on the spit and push it firmly into the second chicken. Also tighten this screw.
Tip: When preparing two chickens on the spit, push them close together (if possible in staggered position) in order to reach an even weight distribution.
- Check that the food to be grilled is properly centred on the spit.
- To prevent protruding chicken parts from burning, the joints and wings must be bond together with a heat-proof and food safe string (e.g. natural cotton string).
Tip: To avoid a too fast browning of prominent parts, delicate areas may be wrapped with unsalted rashers.
- Important! Insert the roasting/baking tray into the lowest level. In this way, any grease dripping down will be collected and the oven's bottom stays clean.
Tip: We recommend filling half of the roasting/baking tray with water; the rising steam makes your grill food especially tender. However, should you prefer your chicken really crispy outside, do not fill any water into the roasting/baking tray.
- By means of the rotisserie handle you can now lift the rotisserie assembly into the oven. Firstly, insert the spit with one end in the hole on the right hand side of the interior oven and then place it in the support provided on the left hand side.

- Before closing the oven door, make sure the spit with the chicken/s is positioned correctly. Attention! Hazard of fire! Make sure that the meat to be grilled is rotating properly and that it does not touch the heating elements – otherwise the meat might catch fire.
- Select the function:
'Upper heat with rotisserie spit' at maximum temperature.
• Per each kilogram chicken you may reckon with a grilling time of about 60 minutes.
Tip: A spit-roast chicken is ready when piercing the drumstick with a needle (no knife!) only clear meat juice comes out, without any signs of blood.
- In case the skin of the chicken is getting blisters, reduce the temperature and paint the blisters with some oil.
- After the grilling time has been finished, it is easy to remove the rotisserie spit from the oven by lifting it out using the special handle for the spit and to place it on a large chopping board then.

Attention! Hazard of burns: Oven and food are getting hot during grilling! For handling with hot parts protect yourself by using pot cloths or oven gloves.
3. Setting the temperature

: the desired temperature by means of the upper rotary knob.
4. Activating the appliance (with or without timer)
You have two possibilities to put the oven into operation:

- Manual operation: To put the appliance into operation, turn the lower rotary knob to the left to the manual setting "M". In this case the appliance will not switch off automatically. To cut off you have to reset the rotary knob to "0" position.

- Time-controlled operation: To put the appliance into operation, turn the lower rotary knob to the right as far as it will go and then back to the requested operating time. The ck will switch the appliance off automatically after the selected time has elapsed and u will hear a short ring. The selected time can be adjusted at any time even during eration by turning the knob to the left or to the right.
5. Switching the appliance off
The appliance will switch off automatically if it is operated via the timer. At manual operation, the lower rotary knob has to be set back to "0". We recommend pulling the mains plug after each use.
• Taking ready food out
Open the oven door (do not use the open door as storage place!). Take the ready food out of the oven chamber. If you want to take the roasting/baking tray, the grill grid or the rotisserie spit out of the oven in hot condition, protect your hands by using potholders or a grill glove. Close the oven door.

Attention! Hazard of burns: Oven and food are getting hot during grilling! For handling with hot parts protect yourself by using pot cloths or oven gloves.
6. Interior illumination
The appliance features an interior illumination. The lamp glows during the whole operating time. The lamp goes off automatically when finishing the operation.
Replacing the oven lamp
- Always pull the mains plug and allow the appliance to cool down before replacing the lamp!
- Remove the lamp cover carefully and unscrew the defective lamp.
- Set the new lamp (heat-resistant – 230 V\~ 15 W, E14, T 300 °C) into the thread and screw it in hand-tight, afterwards set the lamp cover into the thread and also screw it in hand-tight.
7. Temperature pilot lamp
The appliance is equipped with a temperature pilot lamp. When the pilot lamp goes off, the set temperature is reached. Cycling on and off during operation, the pilot lamp shows the thermostatic regulation of the temperature.
ATTENTION: This means that the pilot lamp does not glow for some time, although the oven is switched on. Therefore, make sure that all the knobs have been set back to “0” once the baking procedure is finished.
Demounting and reassembling the oven door
The oven door is constructed so that there will not be any dirt between the glass plates of the double-glazed door during normal use. The oven door should only be demounted and cleaned if it is heavily dirty. Proceed as follows:
Demounting the oven door
- Pull the mains plug and let the appliance cool down!
- Open the oven door.
- Loosen the knurled screw anticlockwise and remove it.
- Loosen the glass plate with the sealing carefully by slightly swaying it and push it to the front.
- Clean the glass plates inside and outside.
Reassembling the oven door
- Place the glass plate with the sealing on the oven door and push it carefully to the oven chamber. Please make sure that the glass plate sits above the middle pressure bracket and below the two outer retaining brackets. The glass plate must be flush with the screw fixing.
- Check that the sealing is seated correctly all around and press it on again if necessary.
- Insert the knurled screw and fasten it hand-tight clockwise.
- Close the oven door.
Cleaning and maintenance
• Always unplug the appliance and allow it to cool down before cleaning!
- Due to its non-stick coating the oven is very easy to clean. Wipe the casing, the oven chamber and the oven door with a moist cloth and wipe dry.
- The crumb tray can be taken out and cleaned with hot dishwater.
- The accessories can be cleaned in warm water with some dishwashing detergent or in the dishwasher.
- Never immerse the appliance in water and make sure no steam or water may infiltrate the appliance from the underside! Never use a steam jet appliance for cleaning!
- On no account, you must use steel wool, scrubbing pads, abrasives, solvents or oven cleaners!
Tips and notes
- Always pre-heat the oven until the desired temperature has been reached before you put in the food to be cooked and place the food in the middle of the roasting/baking tray.
- The best cooking results are achieved if you turn the roasting/baking tray after about half of the cooking time, so that the food from the rear gets shifted to the front.
Notes on environmental protection
- Do not simply throw the packing material away but recycle it. Deliver paper, cardboard and corrugated cardboard packing to collecting facilities. Also plastic packing material and foils should be put into the intended collecting basins.
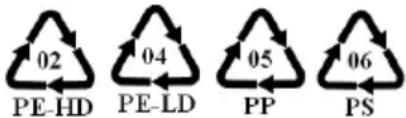
• In the examples for the plastic marking
PE stands for polyethylene, the code figure 02 for PE-HD, 04 for PE-LD, PP for polypropylene, PS for polystyrene.
- Food leftovers should be composted or put into the bio-waste container.
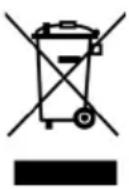
According to the Waste Electrical and Electronic Equipment Directive, this product must not be disposed of with your normal domestic waste at the end of its life-span. Therefore, please deliver it at no charge to your appropriately licensed local collecting facilities (e.g. recycling yard) concerned with the recycling of electrical and electronic equipment. Please approach your local authorities for how to dispose of the product.
ServiceundGarantie
- ROMMELSBACHER
- Produktbeschreibung - Product description
- Bedienfeld - Operating panel
- Contents
- Page
- Operating panel description
- Models BG 1550, BG 1805/E and BG 1805/EE
- Models BG 1050, BG 1055/E and BG 1250
- Introduction
- Intended use
- Technical data
- WARNING: Read all safety advices and instructions. Non-observance of the safety advices and instructions may cause electric shock, fire and/or bad injuries!
- General safety advices
- Safety advices for using the appliance
- WARNING: Hazard of injury and burns!
- Casing, back wall, oven door, trays, grid and other components are getting hot during use and firstly stay hot after switch-off!
- Thus, act with caution:
- - Observe the following when setting up the appliance:
- Prior to initial use
- How to operate your appliance
- Placing food in the oven
- Setting the function
- Defrost
- Upper heat only
- Upper heat with circulating air
- Lower heat only
- Lower heat with circulating air (pizza function)
- Upper and lower heat with circulating air
- Grilling with rotisserie function (models BG 1550, BG 1805/E and BG 1805/EE)
- Setting the temperature
- Activating the appliance (with or without timer)
- Switching the appliance off
- Interior illumination
- Replacing the oven lamp
- Temperature pilot lamp
- Demounting and reassembling the oven door
- Demounting the oven door
- Reassembling the oven door
- Cleaning and maintenance
- Tips and notes
- Notes on environmental protection
- ServiceundGarantie
Brand : Rommelsbacher
Model : BG 1050
Category : Oven