
QTFX-B3 - Light effect machine Qtx - Free user manual and instructions
Find the device manual for free QTFX-B3 Qtx in PDF.


| Product Type | Mega Bubble Machine |
| Model | QTFX-B3 |
| Brand | Qtx |
| Dimensions | 340 x 175 x 210 mm |
| Weight | 1.2 kg |
| Power Supply | 230 Vac, 50 Hz |
| Power Consumption | 40 W |
| Fuse Rating | F1A |
| Fluid Capacity | 1.8 L |
| Material | Heavy duty ABS plastic |
| Bubble Output | Very high output with barrel rolling wands |
| Fan Type | High speed, low noise fan |
| Control | Handheld remote included |
| Continuous Operation | Yes, when remote not plugged and unit switched on |
| Mounting | Any position with adequate ventilation; safety cable required when mounted at height |
| Recommended Fluid | Qtx Bubble Fluid (160.574UK 1L or 160.575UK 5L) |
| Indoor Use Only | Yes |
| Cleaning | Warm water for internal tank; soft cloth for external case |
| Safety | Must disconnect power before cleaning; do not expose to rain or extreme conditions |
Frequently Asked Questions - QTFX-B3 Qtx
User questions about QTFX-B3 Qtx
0 question about this device. Answer the ones you know or ask your own.
Ask a new question about this device
Download the instructions for your Light effect machine in PDF format for free! Find your manual QTFX-B3 - Qtx and take your electronic device back in hand. On this page are published all the documents necessary for the use of your device. QTFX-B3 by Qtx.
USER MANUAL QTFX-B3 Qtx
Order ref: 160.560UK
User Manual

INTRODUCTION:
Unique to QTX, this lightweight bubble machine features barrel rolling wands which produce an incredible amount of bubbles. It is made from heavy duty ABS plastic and features a high quality low noise fan. Ideal for events, parties and mobile discos.
• Very high bubble output
• High speed fan with low noise
• Made from Lightweight heavy duty plastic
- Easy fill and empty tank
- Includes handheld remote
• For best results use with Qtx bubble fluid 160.574UK (1L) or 160.575UK (5L)
PACKAGE CONTENTS:
Please check the contents to ensure that the product has been received in good condition.
| QTFX B2 bubble machine x 1pcs | User's Guide x 1pcs |
| Power Cord x 1pcs |
If you find any accessory is missing or the machine has arrived with any problems, please contact your local dealer at once. Do not try to fix this item yourself or you will lose the warranty. Please keep the original package and invoice for any possible replacement or returned demand.
RECOMMENDED FLUID:
For the QTFX-B2 bubble machine we strongly recommend the following fluid which has been specifically formulated for the best results.
| QTX Ref Code | Description Size Results | ||
| 160.574UK 1 | Lith Quality Bubble Fluid | Stable bubbles | |
| 160.575UK | 5 Litre | ||
SETUP:
- Unpack the bubble machine.
- Place on a flat surface.
- Pour the contents of the bubble fluid into the front tank so the bubble wands at the bottom of the wheel are completely submerged.
- Connect the IEC mains plug and power up.
- After use unplug from the mains and empty the remaining contents back in to the bubble fluid container or dispose of appropriately.
- Clean the front tank fully before the next use.
MOUNTING INSTRUCTIONS:
The fixture may be mounted in any position provided there is adequate room for ventilation and the fluid can not leak.
It is important never to obstruct the front of the machine, fan or vents pathway. Mount the fixture using a secure clamp.
Adjust the angle of the fixture loosening both knobs and tilting the fixture. After finding desired position, re-tighten both knobs.
When selecting installation location, take into consideration refilling the tank and routine maintenance. Safety cables must always be used when installed at a height.
Never mount in places where the fixture will be exposed to rain, high humidity, extreme temperatures changes or restricted ventilation.
CAUTION! TO PREVENT MORTAL ELECTRICAL RISK AND LONG LIFE OPERATION:
For your safety, please kindly pay attention to all of the warnings listed below:
■ Always plug in the power plug last and disconnect from the mains when the device is not in use or before cleaning.
■ Do not install and operate the device in rain or extreme heat, moisture or dusty environments.
■ This device is for indoor use only and in a dry environment.
■ Do not switch on immediately but wait until it reaches to room temperature if the device has been exposed to drastic temperature fluctuations.
■ Do not shake the device and avoid brute force when installing or operating.
■ Do not use the device during thunderstorms and please disconnect the power.
■ Do not use solvents or aggressive detergent to clean the device. Use a soft and clean cloth.
■ Do not modify the device or the connected power cord without authorization.
■ Use appropriate safety-rope for safety.
■ Clean the machine regularly using warm water
CONNECT WITH POWER SUPPLY – THE GROUND WIRE MUST BE CONNECTED:
Use the plug to connect to the main power supply as follows:
| Wire Connection International signal | ||
| Brown Live L | ||
| Blue Neutral N | ||
| Yellow /Cyan Earth | ||
If the unit is not functioning properly
- Check if main power is on and fuse hasn't blown
■ Check there is fluid in the tank
■ Check the correct fluid has been used.
REPLACING FUSE
Disconnect from the main power supply first, then remove the fuse holder above the IEC Socket to reveal the fuse. Replace the correct fuse rating as stated on lighting or user guide. Then, lock the fuse holder cover back into place.
GENERAL MAINTENANCE
To maintain optimum performance and minimize wear, the item should be cleaned frequently. Usage and environment are contributing factors in determining frequency. As a general rule, fixtures should be cleaned after use to avoid dust build-up and blockages.
Which can result in poor performances, overheating and breakages. Be sure to power off fixture before conducting maintenance.
Unplug fixture from power. Use a vacuum or air compressor and a soft brush to remove dust collected on external vents and internal components. Clean the external case when the fixture is cold with a dry cloth or tissue, and drag dirt and grime to the outside case.
To ensure a continuing high performance it is recommended to use warm water to clean the internal tank.
LAYOUT:

- Bubble Output / Pour Fluid in here (Max 1.8L)
- Carry Handel
- Handheld remote
REAR LAYOUT:
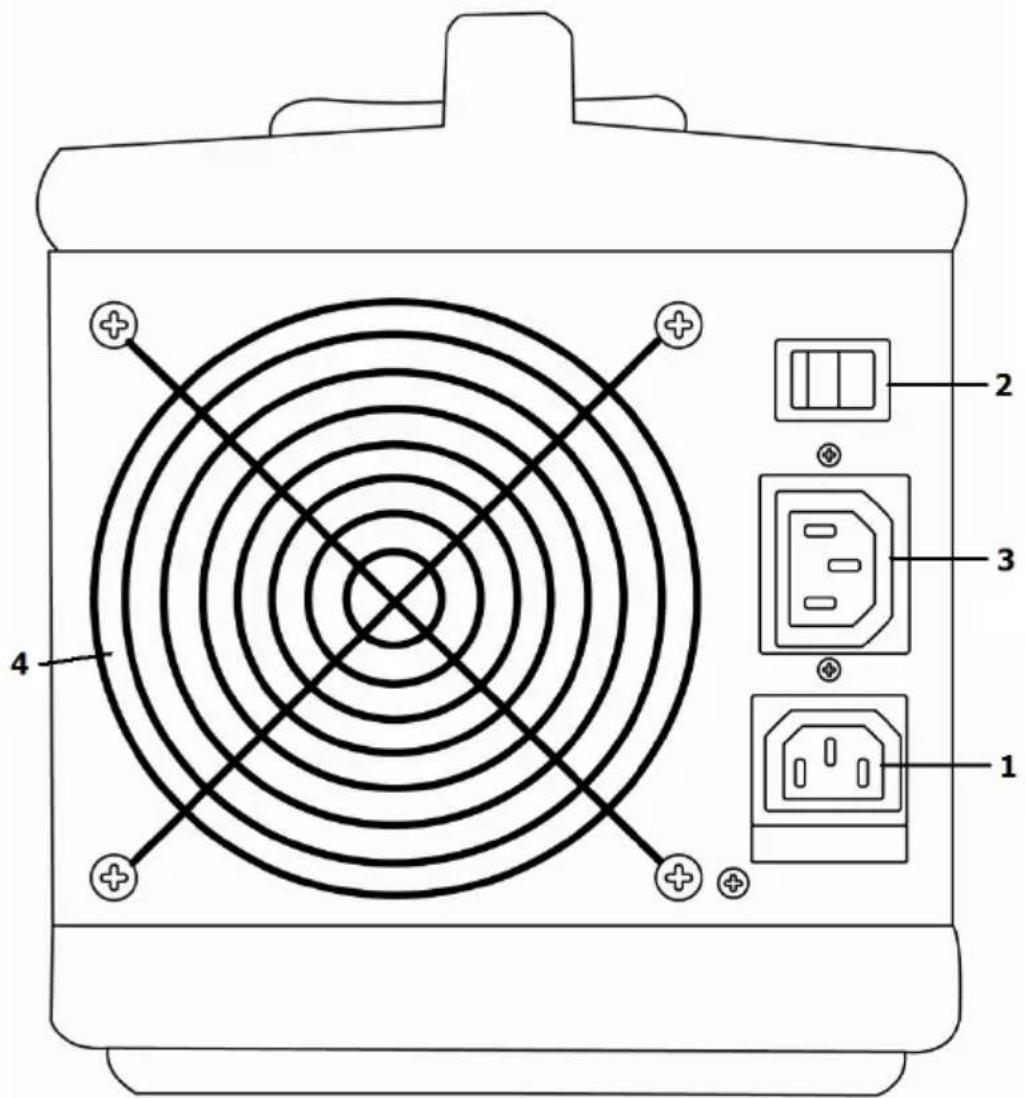
- POWER IN (Use IEC Lead provided)
- Power ON/OFF (Note when remote is not plugged in and unit is switched on the machine will operate continuously)
- Remote input
- Fan (do not cover)
TECHNICAL SPECIFICATION
| Power supply 230Vac, 50Hz | |
| Fuse F1A | |
| Power consumption 40W | |
| Fluid Capacity 1.8l | |
| Dimensions 340 x 175 x 210mm | |
| Weight 1.2kg | |
DISPOSAL:

Please disposal of the unserviceable device according to the current statutory requirements.


- INTRODUCTION:
- PACKAGE CONTENTS:
- RECOMMENDED FLUID:
- SETUP:
- MOUNTING INSTRUCTIONS:
- CAUTION! TO PREVENT MORTAL ELECTRICAL RISK AND LONG LIFE OPERATION:
- CONNECT WITH POWER SUPPLY – THE GROUND WIRE MUST BE CONNECTED:
- If the unit is not functioning properly
- REPLACING FUSE
- GENERAL MAINTENANCE
- REAR LAYOUT:
- TECHNICAL SPECIFICATION
- DISPOSAL:
Brand : Qtx
Model : QTFX-B3
Category : Light effect machine