
DriveEye - Rear Camera CLARION - Free user manual and instructions
Find the device manual for free DriveEye CLARION in PDF.


| Product Type | Drive Recorder (Rear Camera) |
| Brand | Clarion |
| Model | DriveEye |
| Dimensions (W x D x H) | 107.5 mm x 72 mm x 38.5 mm |
| Weight | 125 g |
| Power Supply Voltage | DC 12V / 24V |
| Power Consumption | Less than 500 mA (at 25°C) |
| Image Pickup Device | CMOS Color |
| Angle of View (Horizontal) | 107° |
| Angle of View (Vertical) | 79° |
| Number of Recording Pixels | 300,000 pixels |
| Effective Image Size | 640 x 400 |
| Recording Media | CF Card 128MB (included) |
| Recording Trigger | Acceleration sensor, manual switch |
| Recording Duration | 20 seconds fixed (15 sec before, 5 sec after trigger) |
| Frame Rate | 30 fps |
| Maximum Number of Recordings | Up to 12 events (depending on data volume) |
| Operating Temperature Range | -25°C to +70°C (non-condensing) |
| Storage Temperature Range | -30°C to +80°C |
| Camera Angle Adjustment | 4 levels (25°, 38°, 51°, 65°) |
| LED Indicators | Blue (normal operation) and Red (error) |
| Installation | Double-sided tape on windshield; power cable to vehicle |
| Viewer Software | Included on CF Card (no installation required) |
| PC Compatibility | Windows 2000, XP, Vista (32/64 bit); requires CF card reader (sold separately) |
| Safety Certifications | FCC Class B, Part 15 |
Frequently Asked Questions - DriveEye CLARION
User questions about DriveEye CLARION
0 question about this device. Answer the ones you know or ask your own.
Ask a new question about this device
Download the instructions for your Rear Camera in PDF format for free! Find your manual DriveEye - CLARION and take your electronic device back in hand. On this page are published all the documents necessary for the use of your device. DriveEye by CLARION.
USER MANUAL DriveEye CLARION
00DRIVE EYE.book Page 1 Friday, February 8, 2008 3:57 PM
natural_image
Pure geometric diagram with intersecting lines and circles, no text or symbols presentThis equipment has been tested and found to comply with the limits for a Class B digital device, pursuant to Part 15 of the FCC Rules.
These limits are designed to provide reasonable protection against harmful interference in a residential installation.
This equipment generates, uses, and can radiate radio frequency energy and, if not installed and used in accordance with the instructions, may cause harmful interference to radio communications. However, there is no guarantee that interference will not occur in a particular installation.
If this equipment does cause harmful interference to radio or television reception, which can be determined by turning the equipment off and on, the user is encouraged to consult the dealer or an experienced radio/TV technician for help.
INFORMATION FOR USERS:
CHANGES OR MODIFICATIONS TO THIS PRODUCT NOT APPROVED BY THE MANUFACTURER WILL VOID THE WARRANTY AND WILL VIOLATE FCC APPROVAL.
natural_image
Pure geometric diagram with intersecting lines and circles, no text or symbols present1
natural_image
Pure electrical circuit lines without any symbols
00DRIVE EYE.book Page 2 Friday, February 8, 2008 3:57 PM
natural_image
Pure geometric diagram with intersecting lines and circles, no text or symbols present- Preface .... 3
- For Your Safety....5
- Product Features 8
- Package Contents 10
- Installing the Drive Eye.... 12
Installation Process 12
Before Installation 13
Where to Install 18
Method of Installation....19
After Installing the Drive Eye....26
- Using the Drive Eye 27
Activating the Drive Eye....27
What is indicated by the LED lamps ? 28
Recording Images....29
Turning Off the Drive Eye....31
Playing Recorded Images....32
Saving the Images in Another Place such as a Computer's Hard Disc ....38
Deleting the Images from the CF Card ....41 - Other Functions 43
Changing the sensitivity level of the impact sensor .....43
Adjusting the Time 47
Formatting the CF Card 50 - Troubleshooting.... 55
- Specifications.... 57
2 CONTENTS
natural_image
Pure geometric diagram with intersecting lines and circles, no text or symbols present
natural_image
Pure geometric lines and shapes without any text, numbers, or symbols
00DRIVE EYE.book Page 3 Friday, February 8, 2008 3:57 PM
natural_image
Pure geometric diagram with intersecting lines and circles, no text or symbols present1. Preface
Thank you for purchasing the Drive Eye. The Drive Eye should be installed on the inside front windshield of your vehicle. Your vehicle must have a 12V/24V power source. Its primary purpose is to record an image for 20 seconds before, during, and after an accident occurs.
This manual was written as a users guide for the Drive Eye. Please read this manual completely before using the Drive Eye.
Also, please be advised that the specifications, as well as the appearance of the product, may be subject to change in order to improve quality.
! IMPORTANT !-- READ CAREFULLY
Drive Eye's primary function is to record images as an accident occurs. However, it is not guaranteed to record all accident images. For example, if the accident impact is too weak, the installed sensor may not catch the impact. In such a scenario, you can start the recording manually.
natural_image
Pure geometric diagram with intersecting lines and circles, no text or symbols present
00DRIVE EYE.book Page 4 Friday, February 8, 2008 3:57 PM
natural_image
Pure geometric diagram with intersecting lines and circles, no text or symbols presentTrademarks
Generally, company names and brand names are either registered trademarks or trademarks of the respective companies.
Copyright of Recorded Contents
The recorded images by the Drive Eye cannot be used without authorization of the Copyright Owner, except for private use by the person who recorded the images.
Compensation for Recorded Contents
Clarion is not responsible for images recorded, any damage to the recorded images, or any images not recorded.
Responsibility
We shall not be liable for any damages resulting from any malfunctions of the product, any erasure of data, or any other uses of the product.
natural_image
Pure geometric diagram with intersecting lines and circles, no text or symbols present2. For Your Safety
Warning messages are described in the following manner. Read the message and follow the instructions carefully.
| Meaning of warning messages | ||
 | DANGER | This indicates an imminently hazardous situation which, if not avoided, will result in death or serious injury. This signal word is to be limited to the most extreme situations. |
 | WARNING | This indicates a potentially hazardous situation which, if not avoided, could result in death or serious injury. |
 | CAUTION | This indicates a potentially hazardous situation which, if not avoided, may result in minor or moderate injury. It may also be used to alert against unsafe practices.Without safety alert indication of hazardous situation which, if not avoid, could result in property damage. |
Symbols


Description of what should be done, or what should be followed.
[REQUIRED]
[PROHIBITED]
Description of what should never be done, or what is prohibited.
natural_image
Pure geometric diagram with intersecting lines and circles, no text or symbols present
Safety Precautions
This section provides precautions to enable you to use the product sagely and correctly and to prevent injury and damage. The terms of DANGER, WARNING, and CAUTION indicate the degree of imminency and hazardous situation. Read the precautions carefully as it contains important safety messages.
| WARNING | |
| This product must be installed in the designated place correctly. When installed incorrectly, the product does not run properly and it is more likely to drop off the windshield while vehicle is in motion | |
| Power cable must be connected with DC12V or DC24V power. | |
| Please do not disassemble or revamp the product, doing so may cause fire, electric shock, starter problems, etc. | |
| If the Drive Eye smokes or you smell burning, the engine must be immediately turned off at the earliest opportunity. Immediately, remove the cable from the power source. Please be careful of heat and smoke. Do not use again. | |
| If the Drive Eye gets wet with any substance, please do not use it. There is a risk of fire or electric shock by short circuit. | |
| Please do not touch the Drive Eye with wet hands. This includes the power cable, there is a risk of electric shock | |
6 For Your Safety
natural_image
Pure geometric diagram with intersecting lines and circles, no text or symbols presentCAUTION

If you leave the vehicle for an extended time period, please make sure the engine is turned off.

When you pull out the power cable, be sure to hold the plug and connector together and pull. Do not pull on the cord by itself; you will risk heating, fire, injury and electric shock.
Points of concern
- During hot weather conditions, the temperature of the Drive Eye may rise. Use caution when touching the product it may be hot enough to cause burns.
- While inserting or removing the CF Card, please turn off the engine and confirm the LED lamp is off, then insert or remove the CF Card. If you insert or remove the CF Card while the engine is on, you may cause serious damage to the card.
- While downloading or installing data onto the CF Card, please do not insert or remove the card. This will damage the data and possibly the drive recorder.
- Please insert the CF Card gently in the correct direction. If you use force, the card/card slot may be permanently damaged.
- Please do not insert anything other than the CF Card into the slot.
- Please do not place anything on top of the Drive Eye as the weight may damage it.
- Please do not let the Power Cable rub up against anything or be sandwiched by the sheet rail.
natural_image
Pure geometric diagram with intersecting lines and circles, no text or symbols present
3. Product Features
The Drive Eye records images for 20 seconds before, during, and after an accident occurs.
Features
• Records at a smooth 30 fps for up to 20 seconds.
- Record can be activated manually too.
- Standard CF Card can record up to 12 separate events.
- Magnesium Alloy body protects the Drive Eye in case of impact.
• The Drive Eye quickly installs on the windshield.
- Recorded images are filed in a folder under three different headings, depending on type of impact.
- If power is cut off during impact, the data will remain.
- Viewer software is installed in the CF Card; therefore images can be played back without installing software in a PC.
Functions of the Drive Eye
*The column with "X" means no alteration available.
| Functions | Initial Set Up | Changes Yes/No | Remarks | |
| Recording Seconds | 20 seconds X | Before accident 15", after accident 5", Total 20" | ||
| Recording Frames 30 | Frames X | |||
| Detecting Sensitivity | Set up for vehicles | ○ Refer to P.43 for set up alteration | ||
| Recording Available Frames (Maximum) | SW | 4 | X Maybe below 12 accidents depending on data volume. | |
| GS | 6 | |||
| MO | 2 | |||
| Camera angle 25° O | ||||
8 Product Features
natural_image
Pure geometric lines and shapes without any text, numbers, or symbols
00DRIVE EYE.book Page 9 Friday, February 8, 2008 3:57 PM
natural_image
Pure geometric diagram with intersecting lines and circles, no text or symbols presentNOTE
Be sure to use the CF Card contained as the attachment. For purchasing additional Cards, you may purchase one from Instruments. If you use a CF Card purchased from another company, there is a possibility of the Drive Eye not operating correctly.
REFERENCE
The starting two letters that describes the impact will be the file name when recording an image. Refer to Page 34.
natural_image
Pure geometric diagram with intersecting lines and circles, no text or symbols present
00DRIVE EYE.book Page 10 Friday, February 8, 2008 3:57 PM
natural_image
Pure geometric diagram with intersecting lines and circles, no text or symbols present4. Package Contents
Package Contents
After unpacking, please confirm the following contents are included. Quantity is in parenthesis.
* Please note that the specifications as well as the appearance may slightly differ from the actual products.
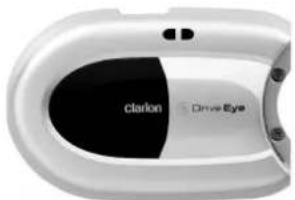
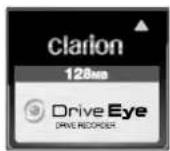
Main Body of Drive Eye (1) CF Card (128MB) (1)
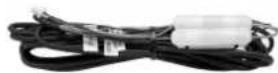
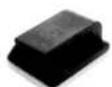
Power Cable (4.5m) (1) Cable Fasteners (10)
Owner's manual (1)
natural_image
Pure electrical circuit lines without any symbols10 Package Contents
natural_image
Pure geometric diagram with intersecting lines and shapes, no text or symbols present
00DRIVE EYE.book Page 11 Friday, February 8, 2008 3:57 PM
natural_image
Pure geometric diagram with intersecting lines and circles, no text or symbols presentILLUSTRATION OF PARTS & CONTROLS
Drive Eye MAIN BODY·FRONT VIEW
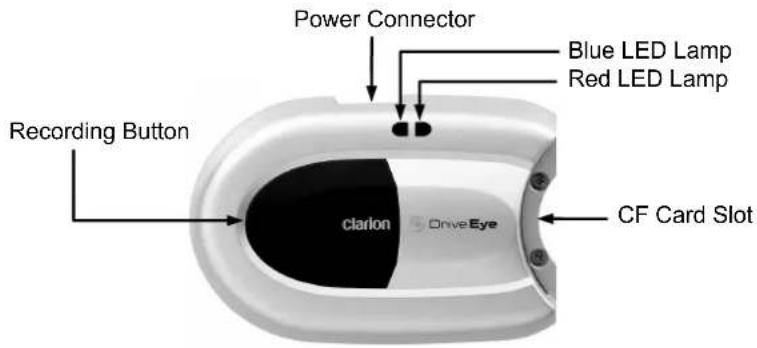
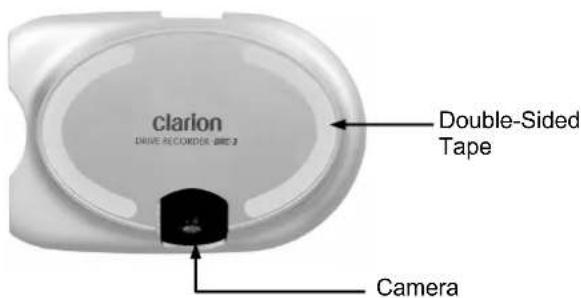
Drive Eye MAIN BODY·BACK VIEW
POWER CABLE

Connector
(connected to the Drive Eye Main Body)
natural_image
Pure geometric diagram with intersecting lines and circles, no text or symbols present
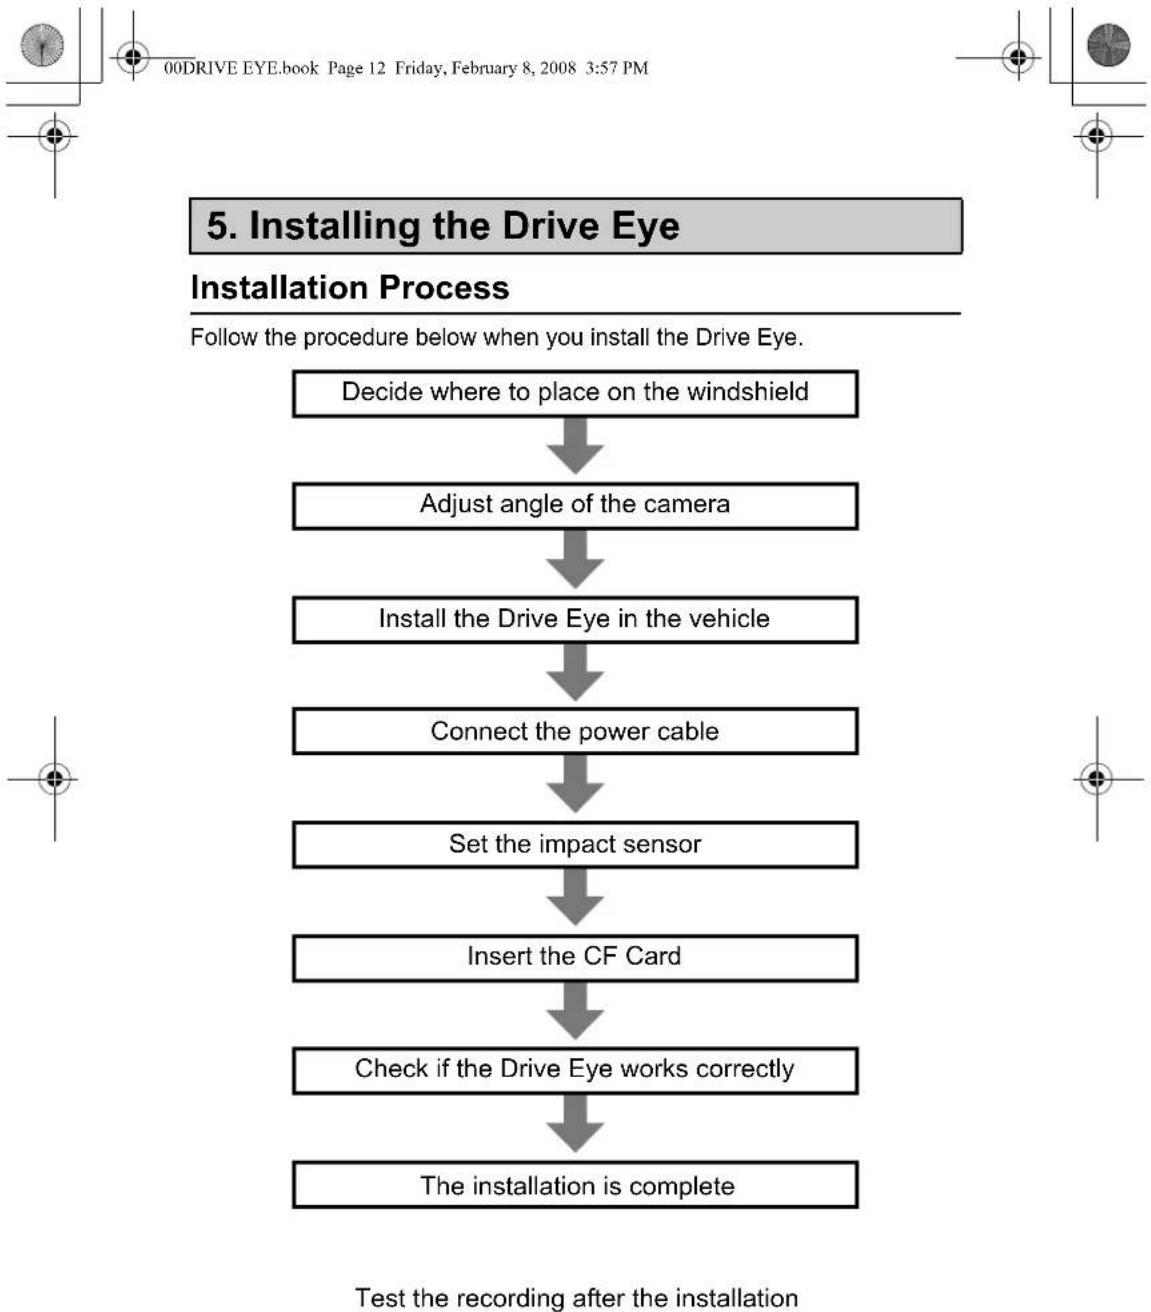
flowchart
graph TD
    A["Decide where to place on the windshield"] --> B["Adjust angle of the camera"]
    B --> C["Install the Drive Eye in the vehicle"]
    C --> D["Connect the power cable"]
    D --> E["Set the impact sensor"]
    E --> F["Insert the CF Card"]
    F --> G["Check if the Drive Eye works correctly"]
    G --> H["The installation is complete"]

Before Installation

Attention
Please carefully read the following:
- Make sure that you stop the engine and remove the key before installation.
• Install in a well-lit place where you can do so safely. - Park your vehicle on a flat surface when you install, otherwise you cannot set the impact sensor properly.
- Make sure that the power supply voltage of your vehicle is DC12V/DC24V. Otherwise, do not install.
NOTE
When setting the Drive Eye near a TV antenna or a radar detector, noise breakout may occur because of radio interference. In that case, set them away from the Drive Eye to reduce noise.
About the Drive Eye Camera Angle Adjustment
The Drive Eye camera is wide angle camera and ready to use in default setting. However, if the camera is installed on the inside of a vehicle with a steep windshield (e.g. a pickup truck), it may not aim at the right direction. You can adjust the camera for the right angle. (Adjustable in 4 levels from an angle of 25 degrees)
If the camera angle is not right in the procedure 1 (Refer to Page 19), adjust the angle as follows.
natural_image
Pure geometric diagram with intersecting lines and circles, no text or symbols present
00DRIVE EYE.book Page 14 Friday, February 8, 2008 3:57 PM
natural_image
Pure geometric diagram with intersecting lines and circles, no text or symbols presentIf the Camera Adjustment is Necessary
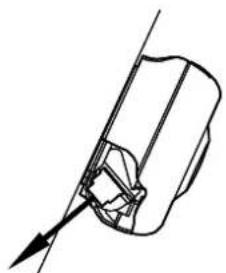
When the camera is set downward in the procedure 1 (Refer to Page 19) (a vehicle with a steep windshield falls under this category)
Example: The camera is set downward because your vehicle's windshield is steep.
natural_image
Technical line drawing of a mechanical component with an arrow indicating direction (no text or symbols)There is a possibility that the camera only takes an image of the hood.
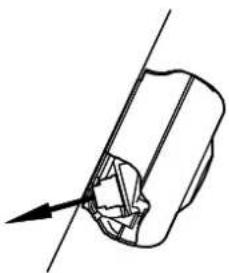
natural_image
Pure technical line drawing of a mechanical component with an arrow indicating direction (no text or symbols)Adjust angle of the camera slightly upward.
14 Installing the Drive Eye
natural_image
Pure electrical circuit lines without any symbols
natural_image
Pure geometric diagram with intersecting lines and circular shapes, no text or symbols present
00DRIVE EYE.book Page 15 Friday, February 8, 2008 3:57 PM
natural_image
Pure geometric diagram with intersecting lines and circles, no text or symbols presentAdjustable angle levels (in 4 levels)
- 25 degrees (Default: usually no change required)
• 38 degrees - 51 degrees
- 65degrees
Adjusting the Camera Angle
! IMPORTANT!-- READ CAREFULLY
Please adjust the camera carefully when necessary. If it is not adjusted properly, it may not record right images, and the Drive Eye may also be damaged. Before setting the Drive Eye, adjust the camera without removing double-stick tape.
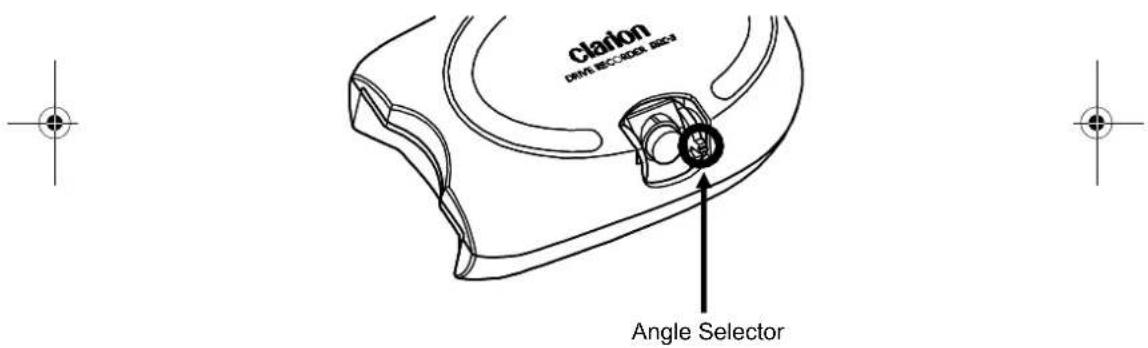
1. Hold the Drive Eye upside down (facing up double-stick tape), and place the camera in front.

00DRIVE EYE.book Page 16 Friday, February 8, 2008 3:57 PM
natural_image
Pure geometric diagram with intersecting lines and circles, no text or symbols present- Move the angle selector to the right to unlock.
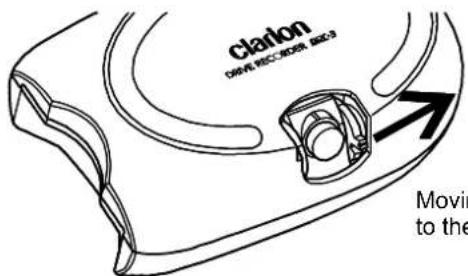
Moving the selector to the right.
- Keep holding the selector to the right and move it up slowly (to the direction of "Clarion").
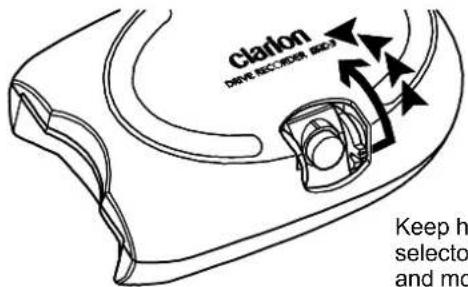
Keep holding the selector to the right and move it up.
-
Move the selector until it clicks. Release the selector to lock the camera.
-
Make sure the camera angle is fixed. If the camera is not stable, it is not set properly. In that case, hold the selector to the right again, and move the selector until it clicks. This is the end of the camera angle adjustment.
16 Installing the Drive Eye
natural_image
Pure geometric diagram with intersecting lines and circles, no text or symbols present
natural_image
Pure geometric lines and shapes without any text, numbers, or symbols
00DRIVE EYE.book Page 17 Friday, February 8, 2008 3:57 PM
natural_image
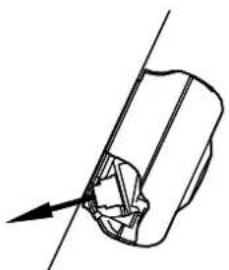
Pure geometric diagram with intersecting lines and circles, no text or symbols present- Place the Drive Eye on your windshield to check the camera angle (without removing double-stick tape). It may be easier to confirm the camera angle if someone can check it from the outside of your vehicle. The ideal camera angle is slightly downward as indicated by the arrow in the illustration below.
natural_image
Pure technical line drawing of a mechanical component with an arrow indicating direction (no text or symbols)Ideal camera angle = facing slightly downward
NOTE
- Change the camera angle only when it is necessary.
- When adjusting the camera angle, handle the Drive Eye and the camera carefully to avoid damaging.
- After the angle adjustment, we recommend connecting the power cable without removing double-stick tape, and hold the Drive Eye for test recording. After the test, check the image with your computer. If the image is properly recorded, fix the Drive Eye to the windshield by removing double-stick tape. If the camera angle is not right, it may not record signals properly. (Once the Drive Eye is set on the windshield, it will be difficult to adjust the camera angle.)
natural_image
Pure geometric diagram with intersecting lines and circles, no text or symbols present
Where to Install
Warning
Please install the Drive Eye where it does not obstruct your view while driving.
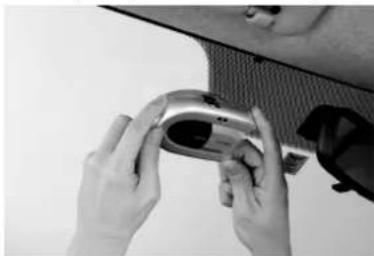
The Drive Eye should be installed with double-sided tape, on the upper, inside of the windshield behind the rearview mirror where it does not block your view.
(Sample for Installation)
natural_image
Close-up of hands adjusting a small electronic device (no visible text or symbols)NOTE
• Install where you can adjust the rearview mirror without any problems.
- Make enough of a gap between the Drive Eye and the mirror for inserting and removing the CF Card.
- Adjust the windshield wipers in order to record images even on rainy or snowy days.
- Do not install the Drive Eye on a sunshade or glass film on the windshield. Not only will the recorded images pick up the color of the sunshade or film, but also it may become detached.
18 Installing the Drive Eye
natural_image
Pure geometric lines and shapes without any text, numbers, or symbols
natural_image
Pure geometric diagram with intersecting lines and circular shapes, no text or symbols presentMethod of Installation
Warning
Make sure to fix the power cable with fasteners so the cable does not interfere with your driving. If the power cable is scratched or disconnected, fire and electric shock may be caused by a short circuit.
1. Choose a place where the Drive Eye will be installed, check carefully if the place is appropriate according to the following:
☐ Is the place behind the rearview mirror?
☐ Is it disturbing your sight when you drive?
☐ Is the gap between the windshield and the mirror big enough for adjustment of the rearview mirror?
☐ Is the gap between the windshield and the mirror big enough for inserting and removing the CF Card?
☐ Can you connect the power cable properly?
☐ Is the windshield clean and dry? (If not, clean the glass with a clean cloth.)
☐ Is the camera in a place where it can take clear pictures even if using windshield wipers on rainy days?
☐ Are you trying to install the Drive Eye on the sunshade or glass film of the windshield? (Please install the Drive Eye directly on the windshield.)
☐ Is the camera angle of the Drive Eye even with the ground? (If not, refer to Page 14 to adjust the camera angle before setup.)
Make sure that you check all the items above and go to the next stage.
NOTE
You cannot re-use the double-sided tape. If when mounting the Drive Eye on the windshield, the double-sided tape gets damaged, please replace it with new tape.
natural_image
Pure geometric diagram with intersecting lines and circles, no text or symbols present
00DRIVE EYE.book Page 20 Friday, February 8, 2008 3:57 PM
natural_image
Pure geometric diagram with intersecting lines and circles, no text or symbols present2. Installing the Drive Eye
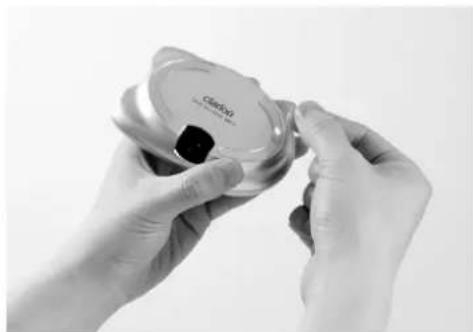
①Remove the release coated paper (2 Places) on the back of the Drive Eye.
natural_image
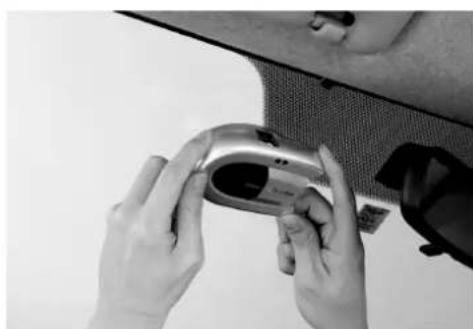
Close-up of hands holding a small container with a black lid, no visible text or symbols②Install the Drive Eye on the windshield as in the picture below, with the camera at the bottom. Be careful not to mix up the top and bottom of the Drive Eye, and set it straight not to tilt to the right or left.
natural_image
Close-up of hands holding a small electronic device with a screen, next to a textured surface (no visible text or symbols)
NOTE
- Do not get the top and bottom mixed up.
- Once you remove the Drive Eye from the windshield, its double-sided tape will lose adhesion.
- If the temperature inside the vehicle is under 50^ / 10^ , increase it to higher than 68^ / 20^ so that the tape will adhere firmly.
③Make certain that the Drive Eye is installed properly.
natural_image
Pure geometric lines and shapes without any text, numbers, or symbols20 Installing the Drive Eye
natural_image
Pure geometric lines and shapes without any text, numbers, or symbols
00DRIVE EYE.book Page 21 Friday, February 8, 2008 3:57 PM
natural_image
Pure geometric diagram with intersecting lines and circles, no text or symbols present3. Connect the Power Cable
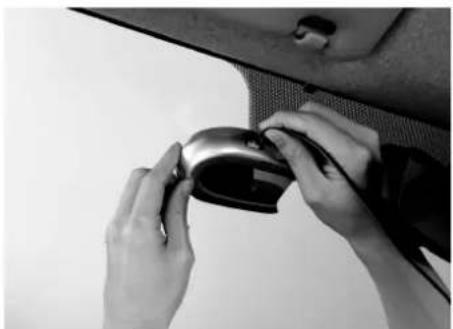
①Connect the power cable into the top of the Drive Eye. Please insert it all the way until you hear the click.
natural_image
Close-up of hands installing a small electronic device on a car door (no visible text or symbols)②Connect the Red wire (Main Power supply) of the power cable to the vehicle main power supply (or the back up power supply). Connect the Orange wire (Accessory power supply) to the vehicle accessory power. Connect the Black wire (GND) to the vehicle ground. The Broun wire is unneeded, so please seal it with tape to prevent from short out.
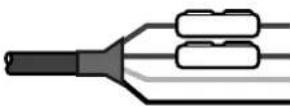
Orange wire(Accessory power supply) Red wire(Main power supply) Brown wire is unneeded Black wire(GND)
natural_image
Pure geometric diagram with intersecting lines and circles, no text or symbols present
00DRIVE EYE.book Page 22 Friday, February 8, 2008 3:57 PM
natural_image
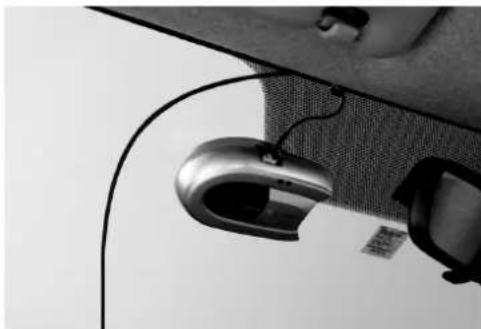
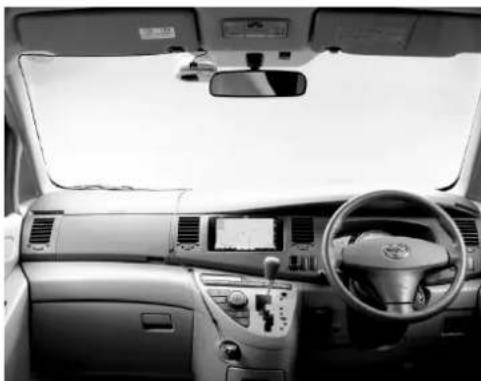
Pure geometric diagram with intersecting lines and circles, no text or symbols present③ Fix the power cable in the vehicle with the fasteners* in order not to disturb your driving.
*The fasteners pictured below are different from the ones in the Drive Eye package. Installation Sample
natural_image
Close-up of a car's rear bumper with a metallic clip and cable, no visible text or symbols
natural_image
Interior view of a car dashboard and steering wheel (no visible text or symbols)Installation Sample
natural_image
Pure geometric lines and shapes without any text, numbers, or symbols22 Installing the Drive Eye
natural_image
Pure geometric lines and shapes without any text, numbers, or symbols
00DRIVE EYE.book Page 23 Friday, February 8, 2008 3:57 PM
natural_image
Pure geometric diagram with intersecting lines and circles, no text or symbols present4. Adjusting the Impact Sensitivity Level of the Drive Eye
Make sure to adjust the impact sensitivity level of the Drive Eye for your vehicle before use.
NOTE
- Adjust the sensor when your vehicle is parked on a flat surface. If you adjust the sensor with the vehicle parked on a slope, the sensor will not operate correctly.
- Do not insert the CF Card at this stage.
①Make sure that you have not inserted the CF Card.
②Start the engine.
③The red LED lamp will light up.
④ Continue Continue pushing the "Record" button until the blue LED lamp lights up and you hear a "pi" sound then stop.
⑤The adjustment is complete when you hear the "pi" sound. The red LED lamp will light up again.
⑥Stop the engine.
▼Troubleshooting
Even if you start the engine, no lamps light up.
The lamp takes a few seconds to light up after starting the engine. However, if you wait for 30 seconds, and the lamp does not light up, stop the engine and remove the key, then, check the connection of the power cable.
When you start the engine, the blue LED lamp lights up or flashes, not the red LED lamp.
Check that the CF Card is not inserted. When you adjust the impact sensitivity sensor, the CF Card should be out.
The Drive Eye does not "beep beep" sound.
It is a quiet sound. Sometimes you cannot hear it if you are installing the Drive Eye in a loud atmosphere. Go to a quiet place and try it again.
natural_image
Pure geometric diagram with intersecting lines and circles, no text or symbols present
00DRIVE EYE.book Page 24 Friday, February 8, 2008 3:57 PM
natural_image
Pure geometric diagram with intersecting lines and circles, no text or symbols present5. Insert the CF Card in the Drive Eye
①Check that the engine is off.
NOTE
- When you insert or remove the CF Card, turn off the engine and take out the engine key beforehand. Otherwise the CF Card may be damaged.
- When you insert the CF Card, be careful with the sides of the card, and insert it all the way.
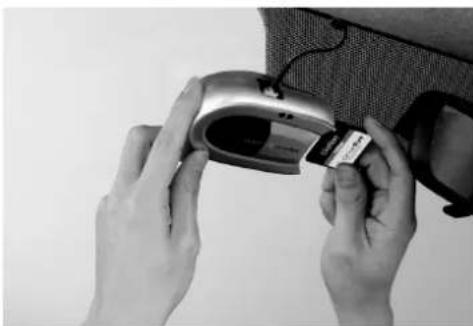
②There is an opening for the CF Card on the right side of the Drive Eye. When you insert the CF Card, please follow the illustration below.
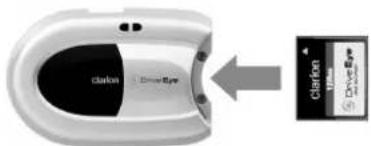
Insert the CF Card in the direction indicated by the arrow. (The side with the logo of Drive Eye should be facing you.)
natural_image
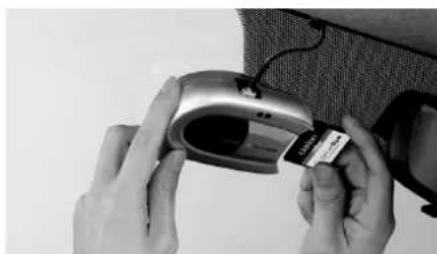
Close-up of hands installing a device on a textured surface (no visible text or symbols)Moving the rearview mirror makes it easier to set the CF Card. Please set the mirror back afterward.
24 Installing the Drive Eye
natural_image
Pure geometric lines and shapes without any text, numbers, or symbols
natural_image
Pure geometric lines and shapes without any text, numbers, or symbols
00DRIVE EYE.book Page 25 Friday, February 8, 2008 3:57 PM
natural_image
Pure geometric diagram with intersecting lines and circles, no text or symbols present6. Check if the Drive Eye Operates Properly
①When you start the engine, the Drive Eye will start automatically.
②Check the color of the LED lamp after you hear the "pi-pi" sound. It is OK if the blue LED lamp lights up or flashes. (Checking the sound and lamp takes 10 seconds)
NOTE
If you are in a loud place and are unable to hear the "beep beep" sound, it is still working if you see the blue LED lamp light up or flash.
▼Trouble shooting
If the blue lamp does not light up.
What color is the lamp? What is the condition of it?
No lamp lights up.
It is possible that the power cable is not connected properly. Stop the engine and take out the key, then, check the power cable if it is connected.
The red LED lamp lights up.
It is possible that the CF Card is not inserted properly. Stop the engine and check if the red LED lamp is out, then, insert the CF Card again. ⇒Refer to "What is indicated by the LED lamps?" on Page 28"
7. Stop the Drive Eye
①After you check if the Drive Eye is operating properly, stop the engine and take the key out. The Drive Eye will stop automatically.
②Check if all the lamp lights are out.
Installation is complete. Please read the next page and test the recording.
natural_image
Pure geometric diagram with intersecting lines and circles, no text or symbols present
00DRIVE EYE.book Page 26 Friday, February 8, 2008 3:57 PM
natural_image
Pure geometric diagram with intersecting lines and circles, no text or symbols presentAfter Installing the Drive Eye
Test the recording
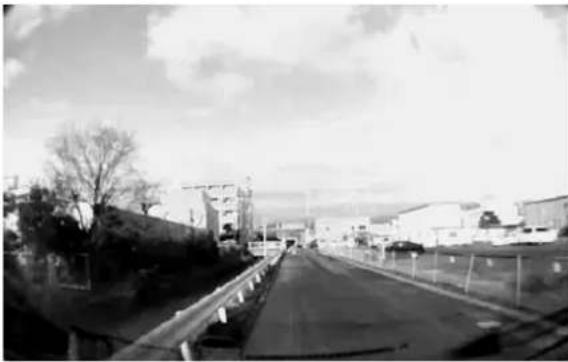
After you finish the installation of the Drive Eye, test it by pushing the recording switch and check on your computer if the images are recorded properly.
Sample of the recorded image
natural_image
Black-and-white exterior view of a long industrial road with buildings and a bridge, no visible text or signageThe way to record images correctly is explained on Page 29. The confirmation of recorded images is explained on Page 32.
26 Installing the Drive Eye
natural_image
Pure electrical circuit lines without any symbols
natural_image
Pure geometric diagram with intersecting lines and circles, no text or symbols present
00DRIVE EYE.book Page 27 Friday, February 8, 2008 3:57 PM
natural_image
Pure geometric diagram with intersecting lines and circles, no text or symbols present6. Using the Drive Eye
Activating the Drive Eye
-
Turn off the engine and check that the engine key is taken out.
-
Remember to check that the CF Card is in the Drive Eye.
If the card is not in, please insert the CF Card to the Drive Eye. Insert the card as shown below.
NOTE
- Make sure to turn off the engine and take off the key when inserting or removing the CF Card. The CF Card may be damaged if inserting the card while the engine is on.
- Check the correct orientation and the correct side of the card, and then insert the card all the way.
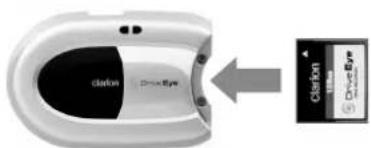
Insert the CF Card to the direction of the arrow as shown below. (The Drive Eye logo should be facing up.)
natural_image
Close-up of hands installing a device with a label, no visible text or symbolsMove the rearview mirror when inserting or removing the CF Card. Make sure to put the mirror back in place afterward.
natural_image
Pure geometric diagram with intersecting lines and circles, no text or symbols present
! IMPORTANT !
Please check every time if the CF Card is in the Drive Eye before driving. If the CF Card is not in the Drive Eye, it can't record the image in case of a car accident.
- Start the engine.
- After a few seconds you will hear a "beep beep" sound and the blue LED lamp will start flashing or light up.
- It is successfully activated.
REFERENCE
What is indicated by the LED lamps?
The Blue LED Lamp shows normal operation of the Drive Eye.
| Lit up Normal operation. (When the CF Card is in Drive Eye.) | |
| Flashing Every 2 Seconds | Normal operation.(When the CF Card isn't in Drive Eye.) |
| Short Flashes Recording on to CF Card. | |
Red LED Lamp
| Lit up Error occurred. | CF Card is not inserted.Error occurred on start up.The camera is damaged. Other. |
| Flashing CF Card is full. Even if the CF Card is full, the Drive Eye overwrites automatically, ignore this error except when you've had an accident. The light is off when you delete the data in the Card.(Refer on Page 41)If you've had an accident, please read the data in the Card immediately on your computer. Otherwise the data will be overwritten and lost. (Refer on Page 38) | |
28 Using the Drive Eye
natural_image
Pure geometric diagram with intersecting lines and circles, no text or symbols present
00DRIVE EYE.book Page 29 Friday, February 8, 2008 3:57 PM
natural_image
Pure geometric diagram with intersecting lines and circles, no text or symbols presentRecording Images
When the Drive Eye detects an impact above a certain level, it registers that an accident has happened, then, starts saving the data on the CF Card automatically. After the "beep beep", sound, the blue LED lamp will start short flashing. The lamp flashes along with the "beep beep" sound for 10 seconds. The Blue LED lamp will stop flashing when Drive Eye finishes saving the data.
NOTE
- When the blue lamp is flashing with a "beep beep", sound, the Drive Eye is saving the data. Please do not remove the CF Card at this time.(About 10 seconds) By doing this, you may damage not only the recorded images, but the Drive Eye itself.
- While the CF Card is saving the images, recording new images is not possible.
! IMPORTANT !
If an impact is not strong enough for detection please follow the instructions below for manual recording.
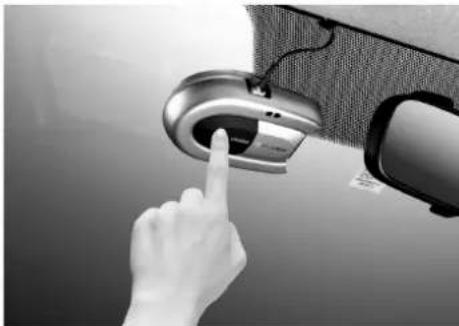
Manual Recording Instruction
Usually the Drive Eye detects impacts and starts recording automatically. However, manual recording is always possible.
NOTE
It is dangerous to push the record button while you are driving, therefore, if possible, stop your vehicle in a safe place before pushing the record button.
natural_image
Pure geometric diagram with intersecting lines and circles, no text or symbols present
00DRIVE EYE.book Page 30 Friday, February 8, 2008 3:57 PM
natural_image
Pure geometric diagram with intersecting lines and circles, no text or symbols present- When you decide that you need to start recording, push the record button.
natural_image
Close-up of a hand pointing at a car interior touchscreen device (no visible text or symbols)- A few seconds after the "beep beep" sound, the Blue LED lamp will start short flashing along with "beep beep" sound.
NOTE
While the Blue LED Lamp is flashing with "beep beep" sound (approximately for 10 seconds), do not remove the CF Card because image data is written in the card. Inserting or removing the CF Card while the data writing, may damage not only the image but the Drive Eye.
- When recording is finished, the blue LED lamp will light up.
REFERENCE
- 15 seconds before and 5 seconds after you push the recording button, total 20 seconds, the data can be recorded manually.
- If the Drive Eye is activated at anytime, you can record the data for up to 4 occasions manually. If you record more than that, you will record over the previous data. See page 8 for more information about the maximum number of recordable times.
30 Using the Drive Eye
natural_image
Pure geometric lines and shapes without any text, numbers, or symbols
00DRIVE EYE.book Page 31 Friday, February 8, 2008 3:57 PM
natural_image
Pure geometric diagram with intersecting lines and circles, no text or symbols presentTurning Off the Drive Eye
When you turn off the engine, the Drive Eye is also turned off automatically. Please follow the directions below when you take the CF Card out.
-
Turn off the engine, and take the engine key out.
-
Check that both blue and red LED lamp lights are off. If not, please wait until the lamp lights go off.
-
After checking the lights are off, take the CF Card out. There is no eject button, so just pull it to the right and remove it.
-
You can read the data on your computer.
NOTE
Please remember to re-insert the CF Card into the Drive Eye after you've read the data on your computer.
natural_image
Pure geometric diagram with intersecting lines and circles, no text or symbols present
00DRIVE EYE.book Page 32 Friday, February 8, 2008 3:57 PM
natural_image
Pure geometric diagram with intersecting lines and circles, no text or symbols presentPlaying Recorded Images
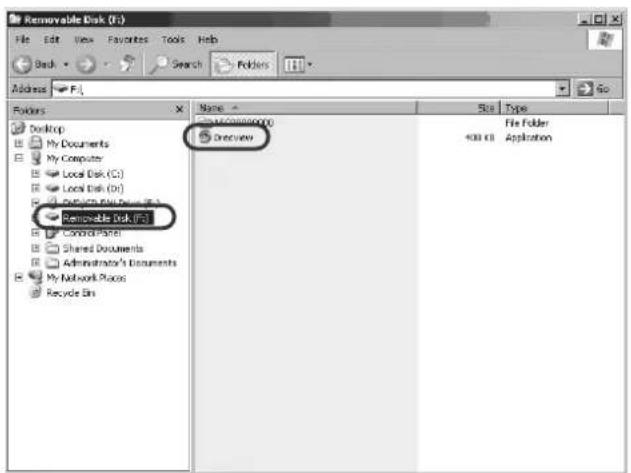
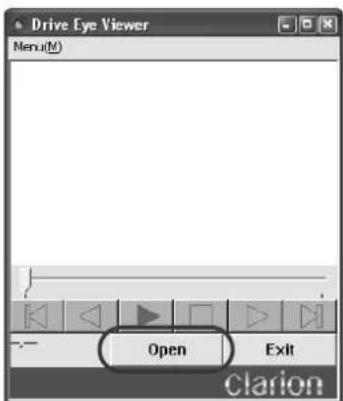
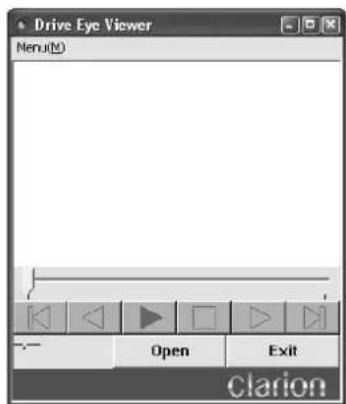
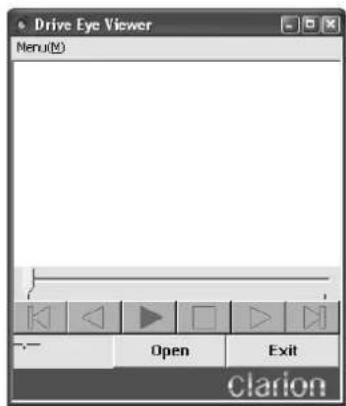
You can play images that the Drive Eye recorded on your computer by using the Drive Eye Viewer in the CF Card.
- Insert the CF Card, that you removed from the Drive Eye, into your computer by using the off-the-shelf CF Card reader adapter.
(The CF Card reader adapter is sold separately.)
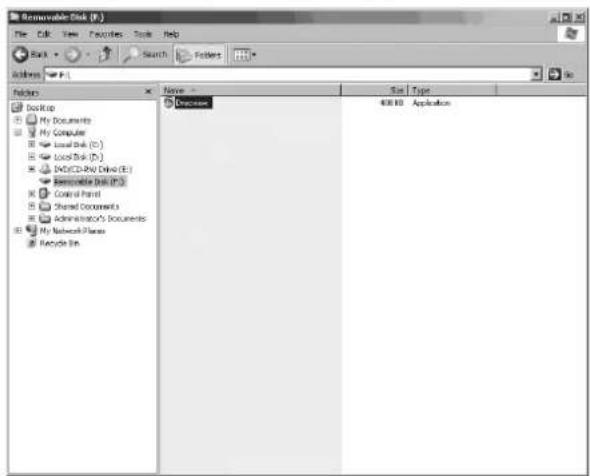
- Open the CF Card Drive with Explorer.
"Drecview.exe." is the Drive Eye Viewer. Double click the file to start.
32 Using the Drive Eye
natural_image
Pure geometric lines and symbols without any text, numbers, or symbols
natural_image
Pure geometric diagram with intersecting lines and shapes, no text or symbols present
00DRIVE EYE.book Page 33 Friday, February 8, 2008 3:57 PM
natural_image
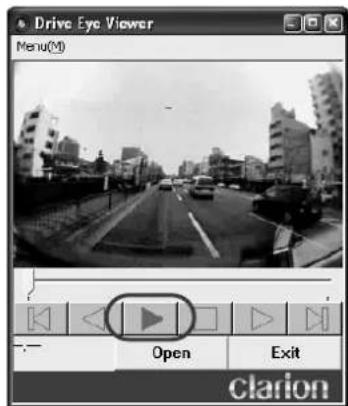
Pure geometric diagram with intersecting lines and circles, no text or symbols present3. The software will start.
(You don't need the installation, Just double click to start.)
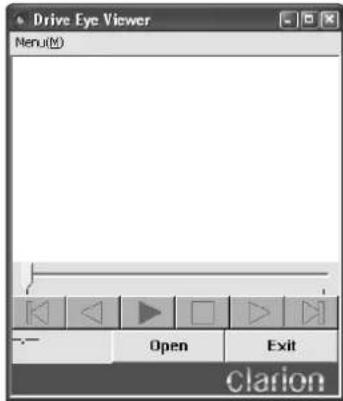
4. Click the Open button.
natural_image
Pure geometric diagram with intersecting lines and circles, no text or symbols present
00DRIVE EYE.book Page 34 Friday, February 8, 2008 3:57 PM
natural_image
Pure geometric diagram with intersecting lines and circles, no text or symbols present- There is a folder name that contains a serial number. Double-click to open it.
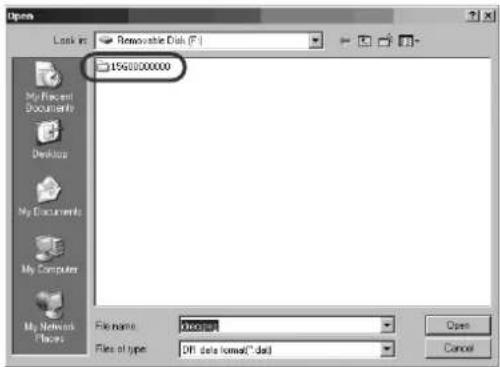
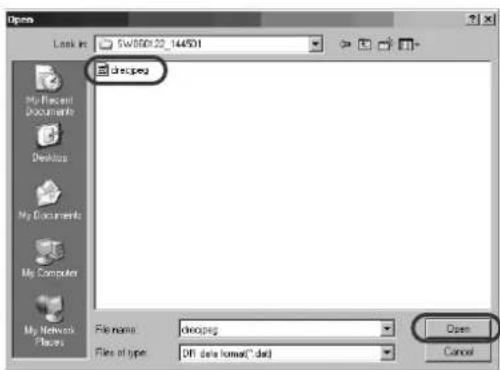
- The name of the folder shows the date and time of when impacts were detected. Choose the folder by double-clicking it. (The picture below shows a sample folder "SW60122-144501")
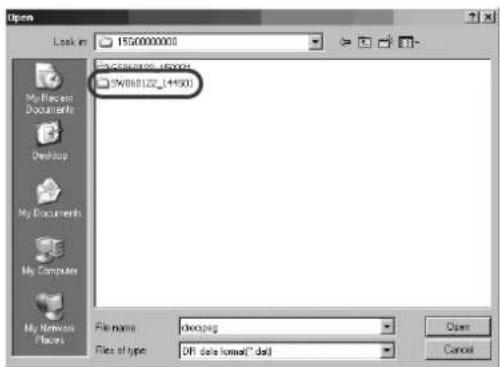
About Folder Names
Names of the folders show the dates and times of when impacts were detected.


Type of impact (Refer to the chart on Page 8)
34 Using the Drive Eye
natural_image
Pure geometric diagram with intersecting lines and circles, no text or symbols present
00DRIVE EYE.book Page 35 Friday, February 8, 2008 3:57 PM
natural_image
Pure geometric diagram with intersecting lines and circles, no text or symbols present- The name of the file of recorded images is "drecjpeg.dat". Click it and then click the Open button.
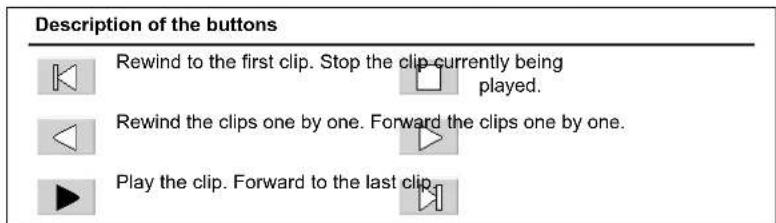
- The first image of the file will be shown on the Drive Eye Viewer. Play and check the images.
natural_image
Pure geometric diagram with intersecting lines and circles, no text or symbols present
00DRIVE EYE.book Page 36 Friday, February 8, 2008 3:57 PM
natural_image
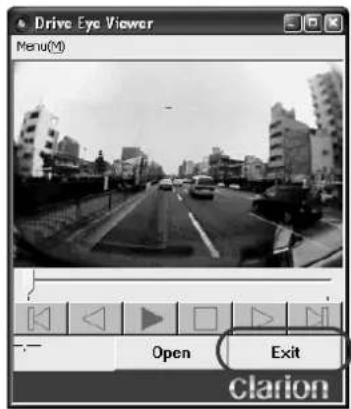
Pure geometric diagram with intersecting lines and circles, no text or symbols present9. When you close the software click the Exit button.
You can play a different file without closing the software. Click the Open button and choose another file to play.
NOTE
The number of files that you can keep in the Drive Eye is limited. If the CF Card becomes full, it will start recording over the last recorded data. Save the data in your computer's hard disk, especially if you've had a traffic accident. Saving the Images in Another Place such as a Computer's Hard Disc.. Refer to Page 38
NOTE
If an error message appears and you cannot play the data, the data is possibly damaged. Please save the data that you need to your computer's hard disc first, then format the CF Card. Formatting the CF Card. Refer to page 50
36 Using the Drive Eye
natural_image
Pure geometric lines and shapes without any text, numbers, or symbols
00DRIVE EYE.book Page 37 Friday, February 8, 2008 3:57 PM
natural_image
Pure geometric diagram with intersecting lines and circles, no text or symbols presentREFERENCE
The Drive Eye software "Drive Eye Viewer" is in the CF Card. We recommend making a back up file on your computer's hard disc.
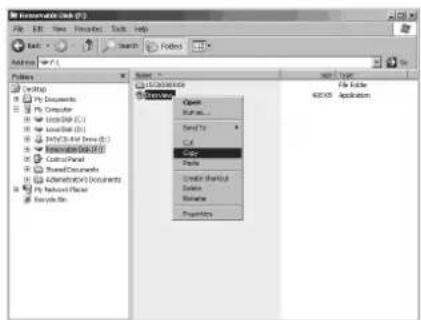
Start the Explorer and right-click "Drecview.exe" in the CF Card and choose "Copy".
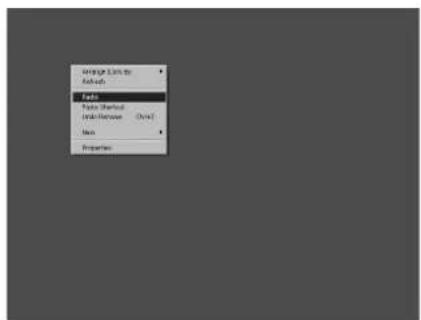
Choose a place to put the back up file and click "Paste". In this sample, desktop was chosen as the place.
The back up was completed.
natural_image
Pure geometric diagram with intersecting lines and circles, no text or symbols present
00DRIVE EYE.book Page 38 Friday, February 8, 2008 3:57 PM
natural_image
Pure geometric diagram with intersecting lines and circles, no text or symbols presentSaving the Images in Another Place such as a Computer's Hard Disc
The number of files you can keep in the Drive Eye is limited. If the CF Card is full, it will start deleting the last recorded data. If you need to, save the data on the CF Card in another place such as your computerAfs hard disc.
- Insert the CF Card that you removed from the Drive Eye into your computer by using the off-the-shelf CF Card reader adapter.
(The CF Card reader adapter is sold separately.)
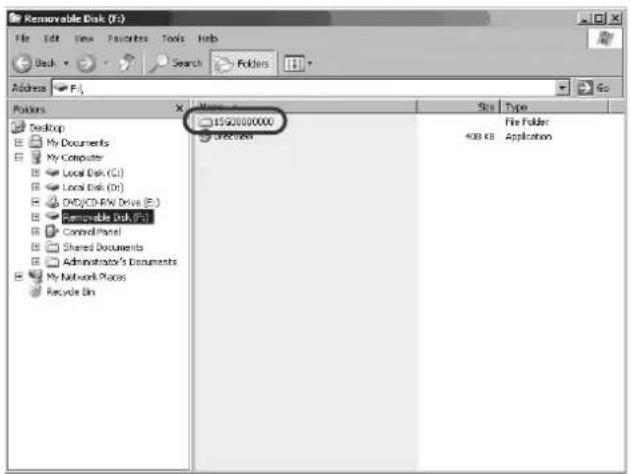
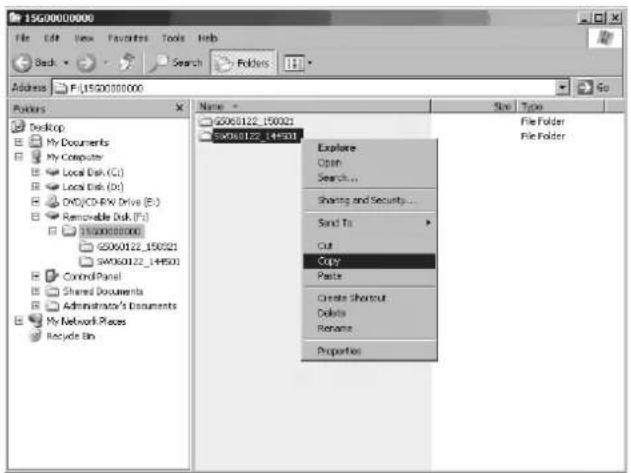
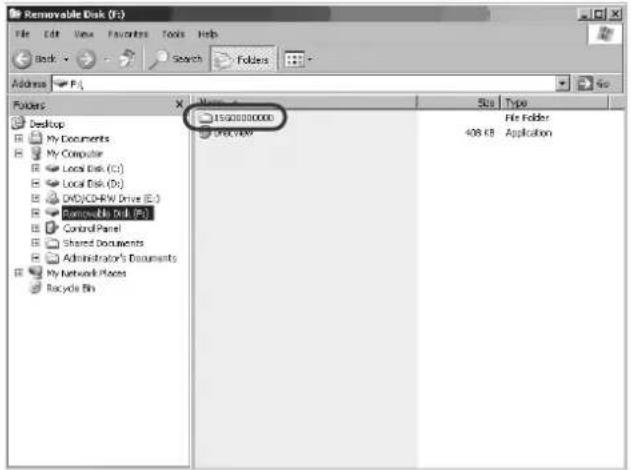
- Open the CF Card Drive with Explorer. (In this sample, Drive F is the CF Card's drive.) There is a folder name that contains a serial number under "CF Card". Double click the file to open.
38 Using the Drive Eye
natural_image
Pure geometric lines and shapes without any text, numbers, or symbols
00DRIVE EYE.book Page 39 Friday, February 8, 2008 3:57 PM
natural_image
Pure geometric diagram with intersecting lines and circles, no text or symbols present- There are file names that start with "SW", "GS" or "MO". Numbers that show the dates and times, are following them. (Refer to Page 8, Page 34) Right click a file that you want to save and click "Copy".
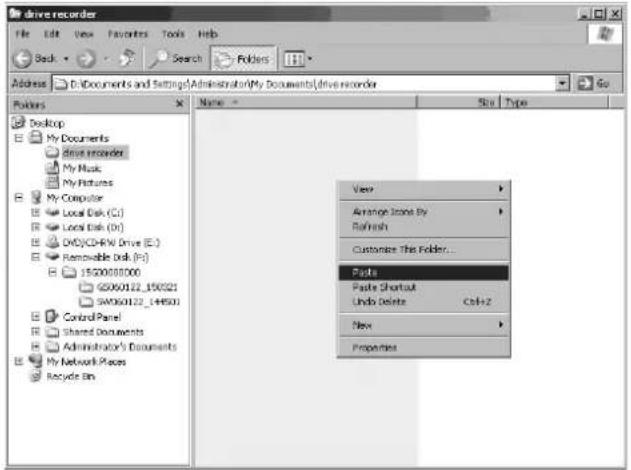
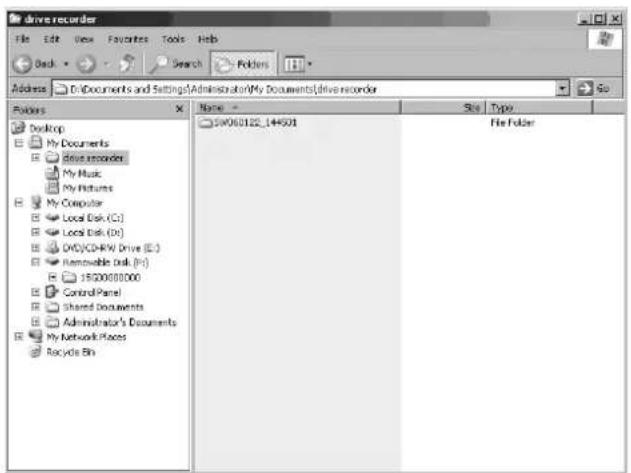
- Right-click on the place you wish to put the file and click Paste. (In this sample, save a file in "drive recorder" from "My Documents".)
00DRIVE EYE.book Page 40 Friday, February 8, 2008 3:57 PM
natural_image
Pure geometric diagram with intersecting lines and circles, no text or symbols present5. Saving the file is complete.
NOTE
Folders whose names begin with "SW", "GS" and "MO" contain 3 files as below.
- drecjpeg.dat image file
- drec_log.txt log file
- param.txt set up file
Only "drecjpeg.dat" contains image data. However, two other files also contain configuration of the data. Therefore, when you save the data, please copy the whole folder.
NOTE
If an error message appears repeatedly, the data is possibly damaged. Please save the data that you need to your computer's hard disc first, then format the CF Card.
⇒Formatting the CF Card. Refer to Page 50.
REFERENCE
You can play backed up data from your computer's hard disc by using the Drive Eye Viewer. After you click the "Reference" button from the Drive Eye Viewer, choose the place for the backed up files.
40 Using the Drive Eye
natural_image
Pure geometric diagram with intersecting lines and shapes, no text or symbols present
00DRIVE EYE.book Page 41 Friday, February 8, 2008 3:57 PM
natural_image
Pure geometric diagram with intersecting lines and circles, no text or symbols presentDeleting the Images from the CF Card
If the CF Card is full, it will start deleting the last recorded data automatically. However, you can delete unnecessary images in the CF Card using your computer.
- Insert the CF Card that you removed from the Drive Eye into your computer by using an off-the-shelf CF Card reader adapter.
The CF Card reader adapter is sold separately.
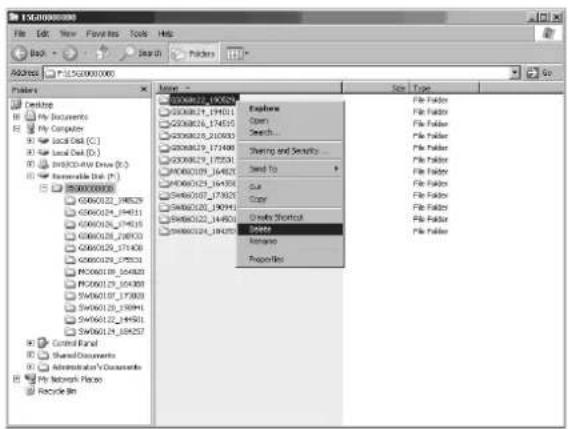
- Open the CF Card Drive with Explorer. (In this sample, Drive F is the CF Card's drive.) There is a folder name that contains a serial number under the CF Card. Double click the file to open.
natural_image
Pure geometric diagram with intersecting lines and circles, no text or symbols present
00DRIVE EYE.book Page 42 Friday, February 8, 2008 3:57 PM
natural_image
Pure geometric diagram with intersecting lines and circles, no text or symbols present- There are files whose names start with "SW", "GS" or "MO". Numbers that show the dates and times, are following them. (Refer to Page 8, Page 34) Right click a file that you want to delete and click "Delete".
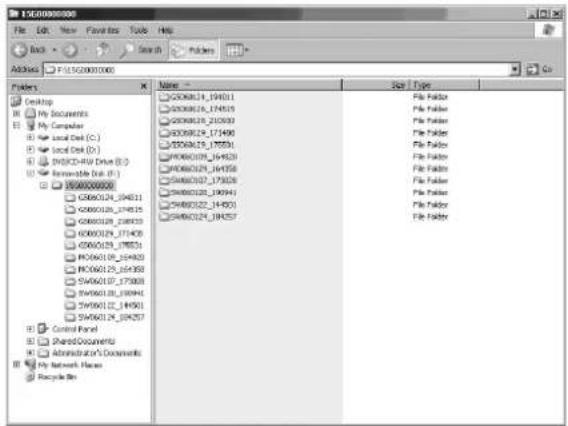
- Deleting is complete. Repeat as necessary.
REFERENCE
Even if you mistakenly delete a file whose name contains a serial number such as "15G00000000", it will be created automatically the next time you start the Drive Eye.
42 Using the Drive Eye
natural_image
Pure geometric lines and shapes without any text, numbers, or symbols
natural_image
Pure geometric lines and shapes without any text, numbers, or symbols7. Other Functions
Changing the sensitivity level of the impact sensor
! IMPORTANT!-- READ CAREFULLY
[When you change the settings, please read the following CAREFULLY.]
- Avoid any unnecessary change of the settings It may cause a recording problem.
- Check carefully, that the sensitivity level has reached the desired point, after you change the settings.
The Drive Eye detects an impact above a certain level, then, starts saving the data on the CF Card automatically. Therefore, it may record some non-accident cases. If you need to, you can change the sensitivity level of the impact sensor.
The Drive Eye is preset for normal vehicles. However, you can change the sensitivity level by following the directions below.
Setting up the Drive Eye Viewer
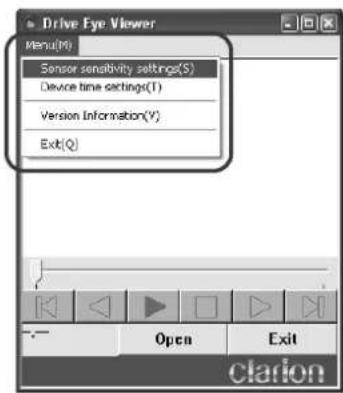
- Start the Drive Eye Viewer in the CF Card. (Refer to Playing Recorded Images on Page 32)
- Click "Menu" then, "Sensor sensitivity settings".
natural_image
Pure geometric diagram with intersecting lines and circular shapes, no text or symbols present
00DRIVE EYE.book Page 44 Friday, February 8, 2008 3:57 PM
natural_image
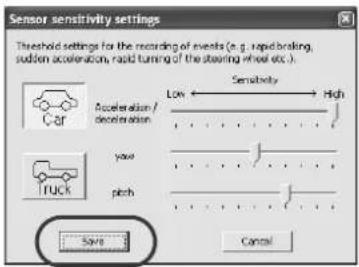
Pure geometric diagram with intersecting lines and circles, no text or symbols present3. The setting screen appears.
You can control the sensitivity slider by dragging it. If you drag it left, the sensitivity level will be lower, if right, the level will be higher.
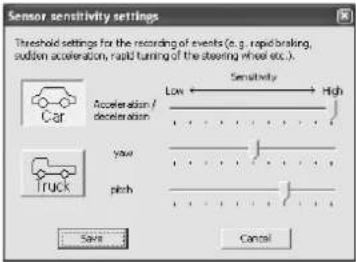
Car : You can set the sensitivity for a car to its optimum level with one click. (Initial settings)
Truck : You can set the sensitivity for a truck to its optimum level with one click.
Acceleration / : Setting the sensitivity level of impacts from forward and reverse.
Deceleration Mainly, it is for reading impacts from a sudden stop or rapid acceleration.
Yaw : Setting the sensitivity level of impacts from left and right. Mainly, it is for reading impacts from a sudden turning of the wheel.
Pitch : Setting the sensitivity level of impacts from above and below. Mainly, it is for reading impacts when a vehicle drives over an object such as a curbstone.
NOTE
When you change the settings, drag the sliders a few levels at one time. Excessive changes may cause recording problems.
44 Other Functions
natural_image
Pure geometric lines and shapes without any text, numbers, or symbols
natural_image
Pure geometric diagram with intersecting lines and shapes, no text or symbols present
00DRIVE EYE.book Page 45 Friday, February 8, 2008 3:57 PM
natural_image
Pure geometric diagram with intersecting lines and circles, no text or symbols present- Click the "Save" button, after the setting is complete.
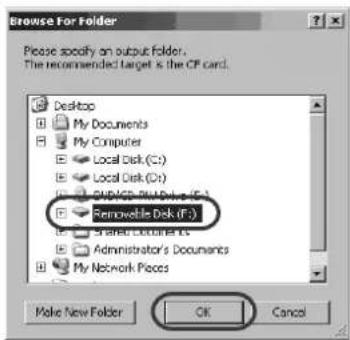
- Open the file where you wish to save the settings. Usually, choose the CF Card's drive and click the "OK" button.
NOTE
The name of the CF Card's drive is usually "TOSHIBA128M"
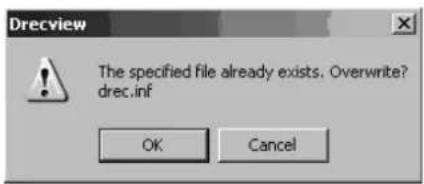
- If the setting file already exists, a dialogue box will appear and ask, "The specified file already exists. Overwrite?" Click the "OK" button.
natural_image
Pure geometric lines and shapes without any text, numbers, or symbols
00DRIVE EYE.book Page 46 Friday, February 8, 2008 3:57 PM
natural_image
Pure geometric diagram with intersecting lines and circles, no text or symbols present- The Set file will be saved in the CF Card, the first screen of the Drive Eye Viewer will appear.
- Insert the CF Card in the Drive Eye and start the engine. The Drive Eye will read the change of settings.
! IMPORTANT!
Please check the new settings to see that the Drive Eye works in the way that you wish. However, please avoid dangerous driving, such as sudden stops or sudden sharp turns to test it. The purpose of changing the impact sensitivity level is to avoid recording as many non-accident cases as possible. The strong impact from traffic accidents will be detected at any setting. It is not necessary to perform dangerous maneuvers to test it.
46 Other Functions
natural_image
Pure geometric lines and shapes without any text, numbers, or symbols
natural_image
Pure geometric diagram with intersecting lines and circles, no text or symbols present
00DRIVE EYE.book Page 47 Friday, February 8, 2008 3:57 PM
natural_image
Pure geometric diagram with intersecting lines and circles, no text or symbols presentAdjusting the Time
When the Drive Eye detects an impact, the time will be recorded in the title of the image folder (Refer to pg. 34). Usually, the clock has been set before shipping. Make sure it is displaying the correct time.
Setting the clock by using the Drive Eye Viewer
- Start the software in the CF Card. (Refer to starting the Drive Eye Viewer on Page 32)
- Click the "Menu" button and then the "Device Time Settings" button.
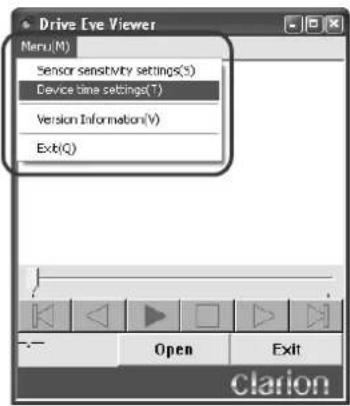
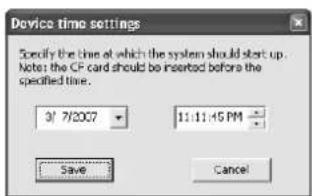
- The 'Device Time Settings' screen will appear.
natural_image
Pure geometric diagram with intersecting lines and circles, no text or symbols present
00DRIVE EYE.book Page 48 Friday, February 8, 2008 3:57 PM
natural_image
Pure geometric diagram with intersecting lines and circles, no text or symbols present- Enter the date and time when you inserted the CF Card into the Drive Eye and start the engine.
NOTE
Do not enter the present time, but the time when you will start using the Drive Eye.
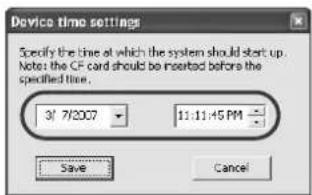
- Click the "Save" button.
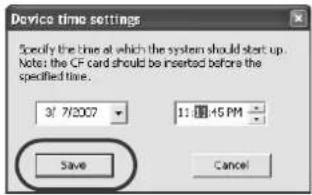
- Open the Folder where you wish to save the data. Choose the CF Card's drive and click the "OK" button.
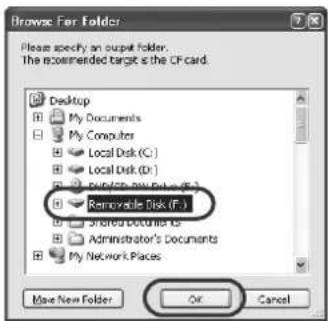
48 Other Functions
natural_image
Pure geometric lines and shapes without any text, numbers, or symbols
natural_image
Pure geometric diagram with intersecting lines and circles, no text or symbols present
00DRIVE EYE.book Page 49 Friday, February 8, 2008 3:57 PM
natural_image
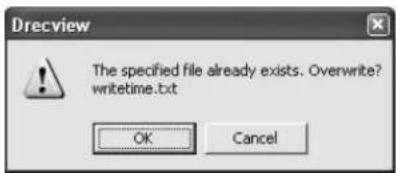
Pure geometric diagram with intersecting lines and circles, no text or symbols present- If the setting file already exists, the dialogue box will appear and ask "The specified file already exists. Overwrite?" Click the "OK" button.
- The Setting file will be saved in the CF Card, the first screen of the Drive Eye Viewer will appear.
- When you insert the CF Card into the Drive Eye and start the engine, the Drive Eye will start reading the time and automatically correct the clock.
natural_image
Pure geometric diagram with intersecting lines and circles, no text or symbols present
Formatting the CF Card
! IMPORTANT!-- READ CAREFULLY
When you format the CF Card, the data and software will be deleted completely. Therefore, do not format the CF Card, except when the following errors occur:
- If you insert the CF Card, the red LED lamp lights up and the Drive Eye does not record anything.
- If the error message appears and says, "The file or the directory is damaged and unreadable."
You may damage the CF Card and lose the data if you take the CF Card out when the Drive Eye is operating.
If the CF Card is damaged, the red LED lamp will light up and recording the image data will be impossible.
Your computer will not recognize the damaged CF Card and will be unable to read the data.
If any of the above happens, you may restore the CF Card by following the directions below for formatting (initialization).
! IMPORTANT!
If you format the CF Card, you will delete all the data in it. Therefore, please back up the data and the software in the card on your computer's hard disc.
→Refer to backing up the software on page 37.
→Refer to backing up the data on page 38.
- Back up the software from the CF Card onto your computer's hard disc. (Refer to backing up the viewer software on page 37.)
- Then, back up the data from the CF Card onto your computer's hard disc. (Refer to backing up the data on page 38.)
50 Other Functions
natural_image
Pure geometric lines and shapes without any text, numbers, or symbols
natural_image
Pure geometric diagram with intersecting lines and circles, no text or symbols present
00DRIVE EYE.book Page 51 Friday, February 8, 2008 3:57 PM
natural_image
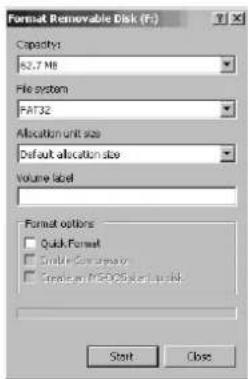
Pure geometric diagram with intersecting lines and circles, no text or symbols present- Open the drive for the CF Card with Explorer. (In this example, Drive F is the CF Card's drive.) Right-click the CF Card's drive and choose "Format".
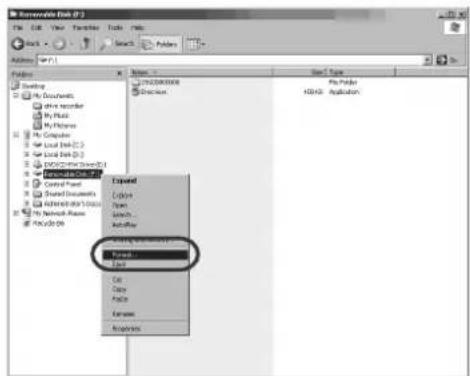
- The format screen will appear. (If the CF Card's drive is not displayed, click the "Close" button and choose the correct drive).
NOTE
In some cases, the volume label displays different text. (Example: TDK128M or blank, etc.)
natural_image
Pure geometric diagram with intersecting lines and circles, no text or symbols present
00DRIVE EYE.book Page 52 Friday, February 8, 2008 3:57 PM
natural_image
Pure geometric diagram with intersecting lines and circles, no text or symbols present- The confirmation screen will appear. Click the "OK" button to start formatting.
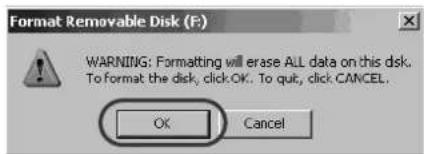
NOTE
If you choose a wrong drive for formatting, your computer will not be able to operate properly.
- When the format is complete a message "Formatting is Complete." Will appear. Click the "OK" button.
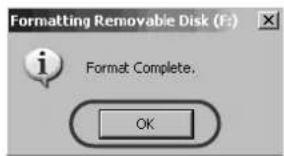
- Click the "Close" button.
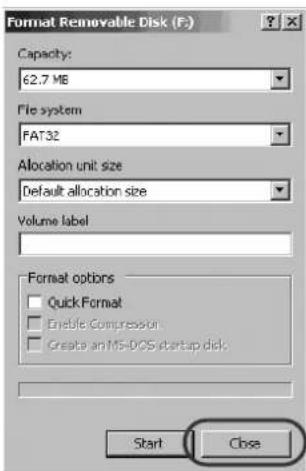
52 Other Functions
natural_image
Pure geometric lines and shapes without any text, numbers, or symbols
natural_image
Pure geometric lines and shapes without any text, numbers, or symbols
00DRIVE EYE.book Page 53 Friday, February 8, 2008 3:57 PM
natural_image
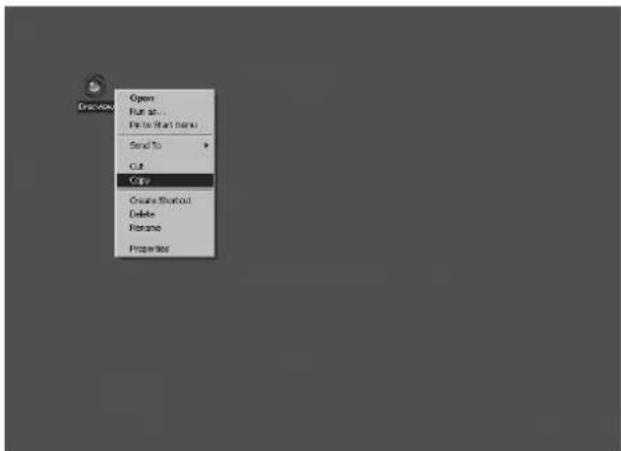
Pure geometric diagram with intersecting lines and circles, no text or symbols present- Paste the software that is on your computer's hard disc back to the CF card. Right-click the "Drecview.exe" and choose "Copy"
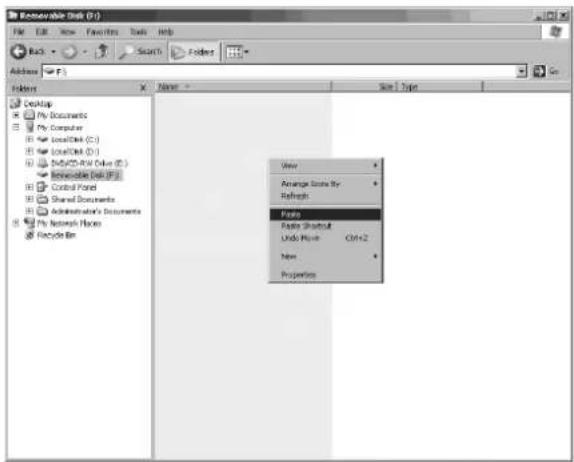
- Right-click the CF Card's drive and choose "Paste".
natural_image
Pure geometric diagram with intersecting lines and circles, no text or symbols present
00DRIVE EYE.book Page 54 Friday, February 8, 2008 3:57 PM
natural_image
Pure geometric diagram with intersecting lines and circles, no text or symbols present- The Drive Eye Viewer will be restored back to the CF Card. It is not necessary to restore the image data to the CF Card, but if you wish to, just follow the same procedure.
natural_image
Pure geometric lines and shapes without any text, numbers, or symbols54 Other Functions
natural_image
Pure geometric lines and shapes without any text, numbers, or symbols
00DRIVE EYE.book Page 55 Friday, February 8, 2008 3:57 PM
natural_image
Pure geometric diagram with intersecting lines and circles, no text or symbols present8. Troubleshooting
| If both the blue and red LED lamps do not work even after you start the engine. |
| The power cable may not be connected correctly. Stop the engine and take the key out. Then check the connections of the power cable with Drive Eye. |
| The red LED lamp lights up when you start the engine. |
| Is the CF Card in the Drive Eye? If not, insert the card. Another possibility is that you did not insert the card all the way. Stop the engine and take the key out. Then remove the card and insert it again. |
| Drive Eye picks up impacts which are too minor. |
| Probably, the sensitivity level of the impact sensor is too high for your vehicle. The sensor is preset for normal vehicles. However, if you need to, change the sensitivity of the sensor. (Refer to Page 43) |
| Is manual recording possible, if the Drive Eye does not detect impacts automatically? |
| Yes, it is. 15 seconds before and 5 seconds after you push the recording button, total 20 seconds, the data can be recorded manually |
| What does the “beep beep” sound mean? |
| This sound plays when the Drive Eye is recording the images after an impact is detected. It beeps every second for 10 seconds. While it is beeping, the Drive Eye is saving the data. Therefore, please never remove the CF Card at this time. By doing this, you may damage not only the recorded images, but the Drive Eye itself. When manual recording is on, you will hear the same sound. You cannot control the volume of the sound. |
| Is it OK if the red LED lamp is flashing? |
| The CF Card may be full. The Drive Eye can save a maximum of 12 cases on the CF Card, however, even if the CF Card is full, the Drive Eye overwrites automatically, ignoring this error. If you feel uneasy about the red LED lamp flashing, delete the data in the card by using your computer. There is a folder with a name that contains a serial number under “CF Card”. (Example: “15G00000000”) Choose the folder in it, and delete them. (Refer to Page 41) |
natural_image
Pure geometric diagram with intersecting lines and circles, no text or symbols present
| If you delete a folder that contains a serial number in the name, under “CF Card”. |
| The Drive Eye will create a new folder which name contains a serial number under “CF Card” such as “15G00000000”. |
| The recorded image cannot play and the Drive Eye Viewer says “Error”. |
| The recorded data may be damaged. Reformat the CF Card. (Refer to Page 50) |
| The length of the recorded data is shorter than 20 seconds. Is the Drive Eye broken? |
| While the Drive Eye is saving the images, recording new images is not possible If the length of the data is shorter than 20 seconds, it is possible that the Drive Eye detected another impact while it was still saving the data, or you started manually recording. |
| Is saving more data possible by using the off-the-shelf CF Card, “256MB”? |
| Unfortunately you can use only “128MB” for the Drive Eye. In addition, please note if you use the off-the-shelf CF Card for the Drive Eye, there will be no guarantee. |
| What should I do if I change vehicles? |
| Install the Drive Eye into your new vehicle. Do not forget to adjust the impact sensor level. Remove the old double-sided tape from the Drive Eye and use new. |
natural_image
Pure geometric diagram with intersecting lines and circles, no text or symbols present
natural_image
Pure geometric lines and shapes without any text, numbers, or symbols9. Specifications
Drive Eye
Dimensions 107.5mm(W) x 72mm(D) x 38.5mm(H)
Weight 125g
Image pickup device CMOS Color
Angle of the horizontal plane 107°
Angle of the vertical plane 79°
Number of recording pixels 300,000 pixels
Effective image size 640 x 400
Power supply voltage DC12/24V
Recording media CF Card 128MB
Recording trigger Acceleration sensor, Manual switch
Data of image recording 30-frames/ sec. 20seconds(fixed)
Power consumption less than 500mA (Operating temperature is 25°)
Operating temperature range -25^ +70^ (Non condensing)
Storage temperature range -30^ +80^
Drive Eye Viewer Operating Conditions
os
Windows 2000,
Windows XP (Home Edition, Professional).
Windows Vista (Home Basic, Home Premium,
Business, Ultimate) *32bit/64bit
CPU
CPU with which your OS can smoothly operate.
Memory
Memory with which your OS can smoothly operate.
Other
It should be possible to insert the CF Card.
(The CF Card reader is not included in the package.)
* Depending on your CPU or Memory, recording speed may be slower.
* About the license - This software is based in part on the work of the independent JPEG Group.
natural_image
Pure geometric diagram with intersecting lines and circular shapes, no text or symbols present


- INFORMATION FOR USERS:
- Preface
- ! IMPORTANT !-- READ CAREFULLY
- Trademarks
- Copyright of Recorded Contents
- Compensation for Recorded Contents
- Responsibility
- For Your Safety
- Symbols
- Safety Precautions
- CAUTION
- Points of concern
- Product Features
- Features
- NOTE
- REFERENCE
- Package Contents
- Package Contents
- ILLUSTRATION OF PARTS & CONTROLS
- Before Installation
- Attention
- Please carefully read the following:
- About the Drive Eye Camera Angle Adjustment
- If the Camera Adjustment is Necessary
- Adjustable angle levels (in 4 levels)
- Adjusting the Camera Angle
- ! IMPORTANT!-- READ CAREFULLY
- Hold the Drive Eye upside down (facing up double-stick tape), and place the camera in front.
- Where to Install
- Warning
- Method of Installation
- Choose a place where the Drive Eye will be installed, check carefully if the place is appropriate according to the following:
- Installing the Drive Eye
- Connect the Power Cable
- Adjusting the Impact Sensitivity Level of the Drive Eye
- ▼Troubleshooting
- Even if you start the engine, no lamps light up.
- When you start the engine, the blue LED lamp lights up or flashes, not the red LED lamp.
- The Drive Eye does not "beep beep" sound.
- Insert the CF Card in the Drive Eye
- Check if the Drive Eye Operates Properly
- ▼Trouble shooting
- Stop the Drive Eye
- After Installing the Drive Eye
- Test the recording
- Using the Drive Eye
- Activating the Drive Eye
- ! IMPORTANT !
- What is indicated by the LED lamps?
- Recording Images
- Manual Recording Instruction
- Turning Off the Drive Eye
- Playing Recorded Images
- The software will start.
- Click the Open button.
- About Folder Names
- When you close the software click the Exit button.
- Saving the Images in Another Place such as a Computer's Hard Disc
- Saving the file is complete.
- Deleting the Images from the CF Card
- Other Functions
- Changing the sensitivity level of the impact sensor
- Setting up the Drive Eye Viewer
- The setting screen appears.
- ! IMPORTANT!
- Adjusting the Time
- Formatting the CF Card
- Troubleshooting
- Specifications
- Drive Eye
- Drive Eye Viewer Operating Conditions
Brand : CLARION
Model : DriveEye
Category : Rear Camera