
StudioPro 3 - Loudspeaker M-AUDIO - Free user manual and instructions
Find the device manual for free StudioPro 3 M-AUDIO in PDF.


| Product Type | Active Studio Monitor Speaker |
| Brand | M-Audio |
| Model | StudioPro 3 |
| Woofer Size | 3 inches |
| Amplifier Power | 20W per speaker (40W total) |
| Frequency Response | 80 Hz - 20 kHz |
| Input Connectors | RCA (L/R), 1/8" stereo minijack |
| Volume Control | Front panel knob with power indicator |
| Acoustic Design | Bass reflex with front port |
| Enclosure Material | MDF with vinyl laminate |
| Dimensions (Each) | 6.7 x 5.1 x 7.5 inches (170 x 130 x 190 mm) |
| Weight (Pair) | 4.2 kg (9.2 lbs) |
| Power Supply | AC 100-240V, 50/60Hz (internal) |
| Power Consumption | 40W maximum |
| Standby Power | < 0.5W |
| Shielding | Magnetic shielding for near-field use |
| Mounting Options | Desktop placement, wall mount with optional bracket |
| Included Accessories | Power cable, RCA cable, 1/8" to dual RCA cable, user manual |
| Maintenance & Cleaning | Wipe with a soft dry cloth; do not use solvents |
| Safety Precautions | Avoid moisture, do not block vents, use only indoors |
| Spare Parts & Repairability | Contact M-Audio support for service; no user-serviceable parts |
Frequently Asked Questions - StudioPro 3 M-AUDIO
User questions about StudioPro 3 M-AUDIO
0 question about this device. Answer the ones you know or ask your own.
Ask a new question about this device
Download the instructions for your Loudspeaker in PDF format for free! Find your manual StudioPro 3 - M-AUDIO and take your electronic device back in hand. On this page are published all the documents necessary for the use of your device. StudioPro 3 by M-AUDIO.
USER MANUAL StudioPro 3 M-AUDIO
Thank you for choosing the StudioPro 3 professional desktop multimedia audio monitors. Top recording engineers and producers in studios around the world use M-Audio monitors. Now, with the StudioPro 3 monitors, you can enjoy the same professional standard of audio quality right on your desktop.
The StudioPro 3 has been designed and tested by veteran audio engineers to meet your needs in a desktop audio monitoring environment. Custom-tuned cabinets, optimized speaker design, and advanced crossover technology deliver the best sound you can get in monitors this size. Complete with magnetic shielding for desktop use, StudioPro 3 delivers great audio experiences from your music and multimedia applications. The StudioPro 3 monitor is self-powered, directly accepting a line-level signal from a variety of sources.
What's in the Box?
Your StudioPro 3 box contains:
■ Your StudioPro 3 box contains:
■ Two StudioPro 3 speakers (Left and Right)
Left: built-in amp and power supply; volume control, headphone jack, and auxiliary stereo input on front face; main RCA stereo input and right channel signal output on the back
Right: audio connection from left speaker on back
One 1/8" stereo mini jack-to-RCA audio cable for use with the main inputs
■ Two speaker stands, designed to optimize the “sweet spot” for typical listening positions
■ 2-conductor standard (keyed) power cable
1/8" stereo to 1/8" stereo audio cable (black color) for use with the "Aux" input
1/8" to 1/8" audio cable to send right channel audio to the right speaker (transparent color)
■ Acoustic/traction pads for speakers and stands
Owner's manual
StudioPro 3 Features
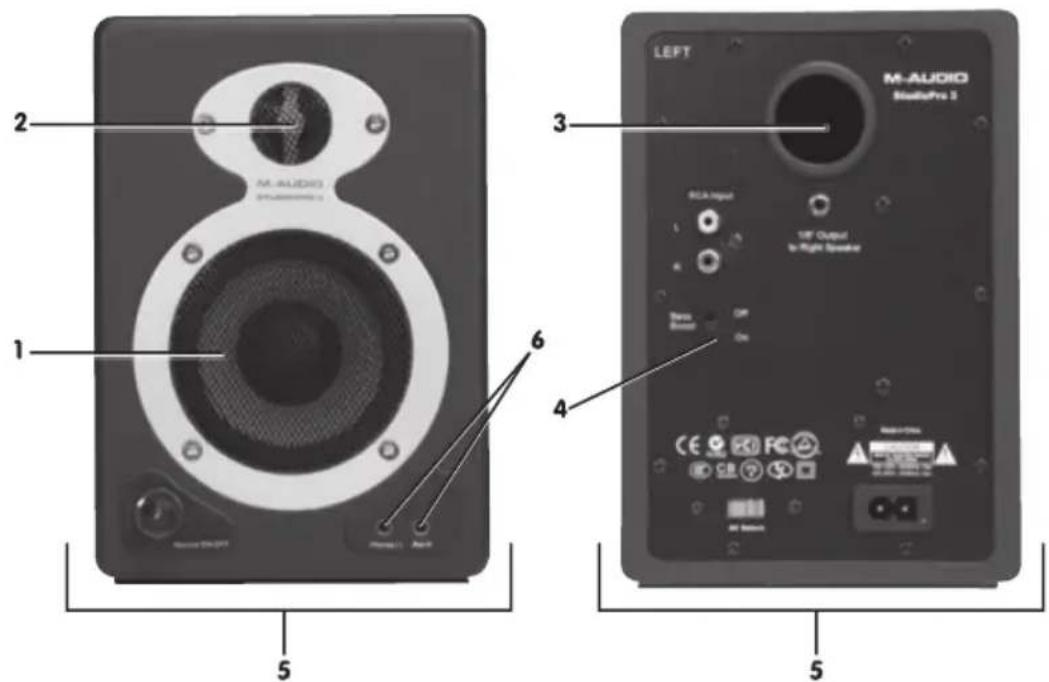
1. Woofer
The woofer unit is 3.25" in diameter with a magnetically shielded curved cone to protect your computer video monitor from interference. It includes a high-temperature voice coil and is enclosed with acoustic foam damping. The woofer delivers balanced mid- and low-frequency response.
2. Tweeter
By employing a specially developed 1" dome with protective magnetic shielding, the tweeter can deliver an extremely natural response. It minimizes resonance by adapting a unique internal damping technology.
3. Bass Reflex Port
The hole in the rear panel is a bass reflex port. It is designed to discharge very low frequency signals and enhance the overall bass response.
4. Bass-Boost Control
The back panel Bass-Boost control on the StudioPro 3 gives you additional low-frequency gain and makes the monitors versatile for different spaces and listening preferences.
5. Enclosure
Along with the other components, the StudioPro 3's enclosure plays an important role. In order to provide more stable performance, we used a special medium-density fiberboard (MDF) and unique interior reinforcement designed to absorb vibration and impact generated under extreme conditions. Additionally, our innovative speaker monitor cabinet includes carefully placed acoustic material that makes the StudioPro 3 sound much bigger than it is—resulting in a smooth, natural bass response.
6. Stereo Auxiliary Input and Headphone Output
For maximum flexibility, we have included a stereo “Aux” input which allows you to plug in a secondary audio source (such as your portable music player) in addition to the main RCA inputs in the back. The volume control works on both inputs simultaneously. Additionally, there is a stereo headphone output next to the “Aux” jack that mutes the sound coming out of the speakers and redirects it to your headphones.
7. Network & Power Amplifiers
The active equalization, crossover networks, and power amplifiers for the StudioPro 3 are specially designed for this woofer and tweeter. The network distributes low-, mid-, and high-frequency audio signals to the proper components in order to minimize distortion and to achieve a balanced sound.
8. (Optional) Speaker Stands
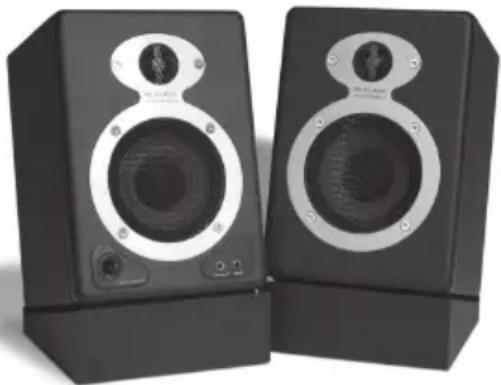
We have included a pair of desktop/bookshelf speaker monitor stands with your StudioPro 3 system. They help point the StudioPro 3 monitors directly at the listener, optimizing the “sweet spot” for listening. High-frequency audio signals radiating from the tweeters tend to be fairly directional, so by using the stands you can help focus those signals for exceptional audio imaging.
Installation
For optimal performance of the StudioPro 3, please read the following directions carefully before installation.
Precautions
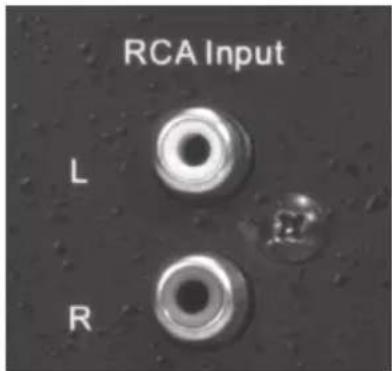
Connections: Connect the RCA outputs of your StudioPro 3 to the corresponding computer sound card, portable music player, or other audio device. We recommend that you use the supplied cables (or cables of equal or higher quality) for all connections. Be sure that the StudioPro 3 monitors are powered off before making any connections.
If you need to connect the StudioPro 3 speakers to a device with 1/4" outputs, like the M-Audio MobilePre USB, you can purchase an adapter cable that will have the 1/4" connection on one end and the RCA connection on the other end.
Correct Power Operation: Since the StudioPro 3 contains amplifiers, it must be connected to a power outlet using the detachable AC cable that is provided. Before connecting power, please make sure that the On/Off/Volume switch of the StudioPro 3 is rotated all the way counterclockwise to the off position.
WARNING! - Use of improper Voltage may result in hazardous conditions and/or damage to speaker components not covered by speaker warranty.
Acoustic/Traction Pads
In order to minimize vibrations and maximize physical stability, we recommend you use the provided acoustic/traction pads on the bottoms of the StudioPro 3 monitors and on the bottoms of the speaker stands (if you choose to use the stands).
Speaker Wire Connections
Use the transparent 1/8" mini cable included in the StudioPro 3 package to connect the Left and Right speakers via the 1/8" mini jacks on the back of each speaker.

Connecting to a Computer Sound Card or Other Audio Output Device
Before connecting the StudioPro 3 monitors, make sure the power from the computer or other output device has been turned off and the StudioPro 3 system is also turned off.
Plug the RCA cable to the corresponding output connectors of a computer sound card, portable music player, etc. You can also use the black 1/8" stereo mini cable to connect a secondary audio device to the "Aux" input on the front of the StudioPro 3.
Setting the "Bass Boost" EQ Switch
This 2-position switch provides a subtle increase in bass response. The On mode increases the low-frequency gain slightly via the woofer and bass-reflex port. The Off mode produces a natural, even response for most listening conditions.

Please see Appendix C for the "Bass Boost" frequency response curve.
Placing the StudioPro 3
The way you position your speaker monitors can greatly affect the way they sound. Please refer to the following description for correct StudioPro 3 placement.
- The two speaker monitors and the listener should align to form an equilateral triangle.
![graph TD A["Left Unit"] --> C["Human Figure"] B["Right Unit"] --> C["Human Figure"] C --> D["Left Unit"]](/content/2026/05/824877/images/a4a5c7e3994d5a8071c2cef11d4d037acfe494110441d35deff2a019c769b732.jpg)
- Ideally, the tops of the woofers should be level with the listener's ears. Given the compact size of the StudioPro 3 monitors and typical desk heights, achieving this alignment may be difficult. Fortunately, we have provided speaker stands that can help point the StudioPro 3's directly at the listener.
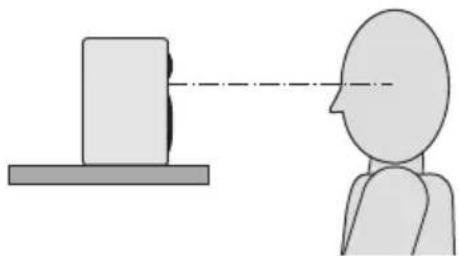
Figure 1: StudioPro 3 monitor at ear-level (no stand).

Figure 2: StudioPro 3 monitor above ear-level (with stand directing sound).
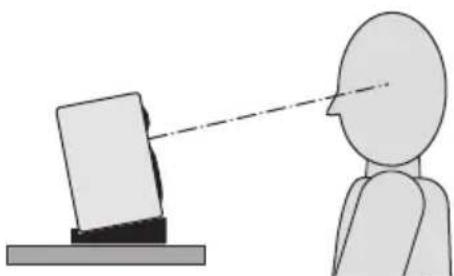
Figure 3: StudioPro 3 monitor below ear-level (with stand directing sound).
Your StudioPro 3 Warranty
Warranty Terms
M-Audio warrants products to be free from defects in materials and workmanship, under normal use and provided that the product is owned by the original, registered user. Visit www.m-audio.com/warranty for terms and limitations applying to your specific product.
Warranty Registration
Thank you for registering your new M-Audio product. Doing so immediately both entitles you to full warranty coverage and helps M-Audio develop and manufacture the finest quality products available.
Register online at www.m-audio.com/register to receive FREE product updates.
Appendices
Appendix A - Technical Specifications
| Type: | Two-way desktop reference monitor |
| LF Driver: | 3" diameter, magnetically shielded with curved cone with high-temperature voice coil |
| HF Driver: | 1" diameter, magnetically shielded silk dome |
| Frequency Response: | 100 Hz - 20 kHz ±3 dB |
| Crossover Frequency: | 2.3 kHz |
| RMS SPL: | 101.5dB @ 1 meter |
| Dynamic Range:(Maximum Signal-to-Noise Ratio): | >80 dB (typical A-weighted) |
| S/N Ratio: | >90dB (typical, A-weighted) |
| Input Connectors: | left and right RCA Line input connectors |
| Polarity: | positive signal at “+” input produces outward low-frequency cone displacement |
| Dynamic Power: | 10 watts RMS into 4 Ω per channel @ 0.5% THD |
| Input Impedance: | 10 k Ω unbalanced |
| Input Sensitivity: | 100 mV pink noise input produces 90 dBA output SPL at 1 meter with volume control at maximum |
| Protection: | RF interference, output current limiting, over temperature, turn on/off transient, subsonic filter |
| Indicator: | Blue power LED ring around “on/off/volume” knob on front panel |
| Power Requirements: | 100-120V/~60Hz, 220~240V/~50Hz; powered via detachable 2-conductor line cord |
| Cabinet: | vinyl-laminated MDF |
| Dimensions: | 7.9" (H) x 5.5" (W) x 5.9" (D) |
| Weight: | 8.8 lbs./pair (approx., without packing) |
Specifications subject to change without notice
Appendix B - Block Diagram
![graph LR A["LEFT IN"] --> B["Non-Inverting Amplifier"] C["AUX INPUT"] --> D["Non-Inverting Amplifier"] E["RIGHT IN"] --> F["Non-Inverting Amplifier"] B --> G["VOLUME"] D --> H["VOLUME"] G --> I["BASS BOOST SWITCH"] H --> J["BASS BOOST SWITCH"] I --> K["+"] J --> L["+"] K --> M["+"] L --> N["+"] M --…](/content/2026/05/824877/images/30fce02178f7d47a846eadef69480b33f8a67f2ff3941404c528794aff465ce6.jpg)
Appendix C - "Bass Boost" Frequency Response Curve

© 2006 Avid Technology, Inc. All rights reserved. Product features, specifications, system requirements and availability are subject to change without notice. Avid, M-Audio and StudioPro 3 are either trademarks or registered trademarks of Avid Technology, Inc. All other trademarks contained herein are the property of their respective owners.

CAUTION: TO REDUCE THE RISK OF ELECTRIC SHOCK, DO NOT REMOVE COVER (OR BACK). NO USER-SERVICEABLE PARTS INSIDE. REFER SERVICING TO QUALIFIED SERVICE PERSONNEL.

AFIN DEVITER UN CHOC ELECTRIQUE ET LES CONSEQUENCES GRAVES QUI POURRAIENT EN RESULTER, TENTEZ PAS D'OUVRIR L'APPAREIL ET DE TOUCHER AUX COMPOSANTS INTERNES SANS LA PRESENCE D'UNE PERSONNE QUALIFIEE.

PARA REDUCIR EL RIESGO DE SACUDIDAS ELECTRICAS, NO D EBERA QUITARSE LA TAPA (NI PARTE POSTERIOR). CONSULTESE AL PERSONAL CAPACITADO PARA LAS RE PARACIONES INTERNAS.
WARNING: TO PREVENT FIRE OR ELECTRIC SHOCK, DO NOT EXPOSE THIS APPLIANCE TO RAIN OR MOISTURE. ADVERTENICIA: PARA EVITAR EL RIESGO DE INCENDIO O SACUDIDA ELECTRICA, NO DEBERA EXPONERSE ESTE APARATO A LA LLUVIA O HUMEDAD.
CAUTION: TO PREVENT ELECTRIC SHOCK DO NOTUSETHIS (POLARISED) PLUGWITHAN EXTENSION CORD, RECEPTACLE OR OTHER OUTLET UNLESS THE BLADES CAN BE FULLY INSERTED TO PREVENTBLADE EXPOSURE.
ATTENTION: POUR PREVENIR LES CHOCS ELECTRIQUES NE PAS UTILISER CETTE FICHE POLARISI AVEC UN PROLONGATEUR. UNE PRISE DE COURANT OU UNE AUTRE SORTIE DE COURANT, SA SILES LAMES PEUVENT ETRE INSEREES A FOND SANS EN LAISSER AUCUNE PARTIE FOND SA LAISSERAUCUNE PARTIEADECOUVERT.
PRECAUCION: PARA EVITAR SACUDIDAS ELECTRICAS, NO DEBERA UTILIZARSE ESTA CLAVIJA POLARIZADA CON UN CORDON DE PROLONGACION, RECEPTACULO U OTRO TIPO DE SALIDA A MENOS QUE SE HAYAN INSERTASO COMPLETAMENTE LAS LENIG ETAS PARA EVITAR SU EXPOSICION.
NOTE: Some products are equipped with dual or multi-voltage transformers (which is indicated on the panel). If you wish to change the voltage, please bring your unit to an authorised service technician conversion. ATTENTION: Quelques pièces sont munies de transformateurs á double ou á multi-voltage (indiqué au panneau aré re). Si vous voulez changer le voltage, veuillez apporter votre appareil au fournisseur de le transformer. ZUR BEACHTUNGEinige Geä te sind mit Umschältern für unterschiedliche Netzspannungern ausger stet (Ein Vermerk auf über Rückseiteweist darauf hin). Die Anpassung, wenn notwendig, mb von einem qualifizieren Techniker in einer Servicestation vorgenommenwerden. NOTA:Ciertos componentes de áest n dotados de transformadores de doble tensi n o de varias tensi que se indica en el panel posterior). Si se desea cómbiar la tensi n, s rvanse évar el aparato a autorizado por para su conversi n interna.
NOTE TO CATV systems installer: reminder is provided to call the CATV system installer's attention 1 Article 820-22 of the NEC that provides guidelines for proper grounding and, in particular, specifies that ground shall be connected to the grounding system of the building, as close to the point of cable entrance. NOTA PARA EL INSTALADOR DE ANTENAS DE TELEVISION COLEQTRAS de advertencia se provee para llamar la óatenci n del instalador al Art culo 820-22 de NEC (C rdigo El ctrico Nacionn facilitan las directrices para la pertinente puesta a tierra y que especifica en particular que el conduf cable debe connectarse al sistema de conexi n a tierra ádel edificio, lo m s proximo posible al pur del cable.

The lightning flash with arrowhead, within an e triangle, is intended to alert the user of th of uninsulated" dangerous voltage" within the product's enclosure; that may be of sufficient magnitude to constitute a risk of electric to persons.
The exclamation point within an equilateral triangle is the presence intended to alert the user of the presence of important operating and maintenance (servicing) instructions in the literature accompanying the appliance.
Warning: This speaker shall not be placed in the close area during the oper so that the mains switch can be easily accessed by the user.
1. READ INSTRUCTIONS
All the safety and operating instructions should be read before the appliance is operated.
2. RETAIN INSTRUCTIONS
The safety and operating instructions should be retained for future reference.
3. HEED WARNINGS
All warnings on the appliance and in the operating instructions should be adhered to.
4. FOLLOW INSTRUCTIONS
All operating and use instructions should be followed
5. WATER AND MOISTURE
The appliance should not be used near water - for example, near a bathtub, washbowl, kitchen sink, laundry tub, in a wet basement, or near a swimming pool, etc.
6. CARTS AND STANDS
The appliance should be used only with a cart or stand that is recommended by the manufacturer.
6A. An appliance and cart combination should be moved with care. Quickstops, excessive force, and uneven surfaces may cause the appliance and cart combination to overturn.

7. WALL OR CEILING MOUNTING
This equipment is not designed for use mounted on a wall or a ceiling.
8. VENTILATION
The appliance should be situated so that its location or position does not interfere with its proper ventilation. For example, the appliance should not be situated on a bed, sofa, rug, or similar surface that may block the ventilation openings, or placed in a built-in installation, such as bookcase or cabinet that may impede the flow of air through the ventilation openings.
At least 30cm free space around the unit for normal ventilation is required.
9. HEAT
Do not install near any heat sources such as radiators, heat registers, stoves, or other apparatus (including amplifiers) that produce heat.
10. CLEANING
The appliance should be cleaned only with dry cloth.
11. POWER SOURCES
The appliance should be connected to a power supply only of the type described in the operating instructions or as marked on the appliance.
12. POWER CORD PROTECTION
Power-supply cords should be routed so that they are not likely to be walked on or pinched by items placed upon or against them, paying particular attention to cords at plugs, convenience receptacles, and the point where they exit from the appliance
13. POLARIZED PLUG
Do not defeat the safety purpose of the polarized or grounding-type plug. A polarized plug has two blades with one wider than the other. A grounding type plug has two blades and a third grounding prong. The wide blade or the third prong are provided for your safety. When the provided plug does not fit into your outlet, consult an electrician for replacement of the obsolete outlet.
14. UNPLUG POWER CORD
Unplug this apparatus during lightning storms or when unused for long periods of time.
15. OBJECT AND LIQUID ENTRY
No object filled with liquids, such as vases, etc. shall be placed on the apparatus.
16. ACCESSORIES
Only use attachments/accessories specified by the manufacturer.
17. SERVICING
The user should not attempt to service the appliance beyond that described in the operating instructions. All other servicing should be referred to qualified service personnel.
18. DAMAGE REQUIRING SERVICE
The appliance should be serviced by qualified service personnel when:
a) The power-supply cord or the plug has been damaged; or
b) Objects have fallen, or liquid has been spilled into the appliance; or
c) The appliance has been exposed to rain; or
d) The appliance does not appear to operate normally or exhibits a marked change in performance; or
e) The appliance has been dropped, or the enclosure is damaged.
M-AUDIO ® StudioPro 3

Tested to comply with FCC standards
5795 Martin Rd., Irwindale, CA 91706
Technical Support
web: www.m-audio.com/tech
tel (pro products): (626) 633-9055
tel (consumer products): (626) 633-9066
fax (shipping): (626) 633-9032
Sales
e-mail: sales@m-audio.com
tel: 1-866-657-6434
fax: (626) 633-9070
Web
www.m-audio.com
M-Audio U.K.
Floor 6, Gresham House, 53 Clarenden Road, Watford
WD17 ILA, United Kingdom
Technical Support
e-mail: support@maudio.co.uk
tel:(Mac support): +44 (0)1765 650072
tel: (PC support): +44 (0)1309 671301
Sales
tel: +44 (0)1923 204010
fax: +44 (0)1923 204039
Web
www.maudio.co.uk
M-Audio France
Floor 6, Gresham House, 53 Clarenden Road, Watford WD17 ILA, United Kingdom
Assistance Technique
PC: 0 0820 000 731
Assistance Technique
e-mail : support@m-audio.fr
mac@m-audio.fr
fax : +33 (0)01 72 72 90 52
Site Web
www.m-audio.fr
M-Audio Germany
Kuhallmand 34, D-74613 Ohringen, Germany
Technical Support
e-mail: support@m-audio.de
tel: +49 (0)7941 - 9870030
fax: +49 (0)7941 98 70070
Sales
e-mail: info@m-audio.de
tel: +49 (0)7941 98 7000
fax: +49 (0)7941 98 70070
Web www.m-audio.de
M-Audio Canada
1400 St-Jean Baptiste Ave. #150, Quebec City, Quebec G2E 5B7, Canada
Technical Support
email: techcanada@m-audio.com
phone: (418) 872-0444
fax: (418) 872-0034
Sales
e-mail: infocanada@m-audio.com
phone: (866) 872-0444
fax: (418) 872-0034
Web www.m-audio.ca
M-Audio Japan
- WHAT'S IN THE BOX
- STUDIOPRO 3 FEATURES
- WOOFER
- TWEETER
- BASS REFLEX PORT
- BASS-BOOST CONTROL
- ENCLOSURE
- STEREO AUXILIARY INPUT AND HEADPHONE OUTPUT
- NETWORK & POWER AMPLIFIERS
- (OPTIONAL) SPEAKER STANDS
- INSTALLATION
- PRECAUTIONS
- ACOUSTIC/TRACTION PADS
- SPEAKER WIRE CONNECTIONS
- CONNECTING TO A COMPUTER SOUND CARD OR OTHER AUDIO OUTPUT DEVICE
- SETTING THE "BASS BOOST" EQ SWITCH
- PLACING THE STUDIOPRO 3
- YOUR STUDIOPRO 3 WARRANTY
- WARRANTY TERMS
- WARRANTY REGISTRATION
- APPENDICES
- APPENDIX B - BLOCK DIAGRAM
- READ INSTRUCTIONS
- RETAIN INSTRUCTIONS
- HEED WARNINGS
- FOLLOW INSTRUCTIONS
- WATER AND MOISTURE
- CARTS AND STANDS
- WALL OR CEILING MOUNTING
- VENTILATION
- HEAT
- CLEANING
- POWER SOURCES
- POWER CORD PROTECTION
- POLARIZED PLUG
- UNPLUG POWER CORD
- OBJECT AND LIQUID ENTRY
- ACCESSORIES
- SERVICING
- DAMAGE REQUIRING SERVICE
- TECHNICAL SUPPORT
- SALES
- WEB
- M-AUDIO U.K
- M-AUDIO FRANCE
- ASSISTANCE TECHNIQUE
- SITE WEB
- M-AUDIO GERMANY
- M-AUDIO CANADA
- M-AUDIO JAPAN
Brand : M-AUDIO
Model : StudioPro 3
Category : Loudspeaker