
G 80/31 - Contact grill STEBA - Free user manual and instructions
Find the device manual for free G 80/31 STEBA in PDF.


| Product Type | Contact Grill |
| Brand | Steba |
| Model | G 80/31 |
| Dimensions (L x W x H) | Approx. 40 x 30 x 15 cm |
| Weight | Approx. 3.5 kg |
| Power Supply | 220-240 V, 50/60 Hz |
| Power Consumption | 2000 W |
| Cooking Surface | Non-stick coated, approx. 31 x 25 cm per side |
| Temperature Control | Adjustable thermostat with indicator light |
| Functions | Grilling, toasting, panini, vertical storage |
| Safety Features | Auto shut-off, cool-touch handles, non-slip feet |
| Cleaning | Removable drip tray, non-stick surface for easy wipe |
| Spare Parts | Available: drip tray, handles (contact Steba service) |
| Reparability | User-replaceable parts: power cord, thermostat; professional repair recommended |
| Included Accessories | Drip tray, user manual |
| Certifications | CE, RoHS |
Frequently Asked Questions - G 80/31 STEBA
User questions about G 80/31 STEBA
0 question about this device. Answer the ones you know or ask your own.
Ask a new question about this device
Download the instructions for your Contact grill in PDF format for free! Find your manual G 80/31 - STEBA and take your electronic device back in hand. On this page are published all the documents necessary for the use of your device. G 80/31 by STEBA.
USER MANUAL G 80/31 STEBA
220-240V, 50/60Hz, 1.800 Watt
Grillpfanne
Fettpfanne
Rost
Pfannengriff
Grillspieß
Schaschlik-Garnitur:
Grillguthalter
Betriebsart wählen
Grillen am Spieß
This appliance is for private and indoor use only and must not be used commercially. Please read the instruction manual carefully and keep it at a safe place. When the appliance is given to another person the instruction manual should be passed to that person, too. Only use the appliance as described in the instruction manual and pay attention to the safety information. No liability for damages or accidents will be accepted, which are caused by not paying attention to the instruction manual. Remove all packaging and sticker. Wash up all parts carefully (see cleaning).
Safety instructions
- The appliance must only be plugged in at a socket with the same specifications shown on the rating label. The appliance is not suitable for build in use and must not be used in such a way.
- Only use the appliance when there is no damage at the appliance or the power cord. Please check before each use.
This appliance is not intended for use by persons (including children) with reduced physical, sensory, or mental capacities, or lack of experience and knowledge, unless they have been given supervision or instruction concerning use of the appliance by a person responsible for their safety - Children should be supervised to ensure that they do not play with the appliance.
- The appliance is not intended to be operated by means of an external timer or separate remote control system.
- Unplug the appliance after each use or in the case of a malfunction.
- Never pull at the power cord. Never scour the power cord over edges and do not squeeze the power cord.
- Keep the power cord away from hot parts.
- Never leave the appliances unattended during usage.
-
Never place anything on the top of the appliance or cover any ventilation wholes.
-
Never keep the appliance outdoor or in a damp area.
- Never immerse the appliance into water.
- The appliance must not be used after a malfunction, e.g. when it fell down or was damaged in any other different way.
- The supplier is not liable for wrong use which occurs by ignoring the instruction manual.

Attention! Appliance gets hot! Danger of burns! During the use the temperature of touchable surfaces can get very high. Place the appliance on a plane and stable surface. The surface should not be on a sensitive surface and there should be at least 70cm distance from any burnable surfaces (e.g. curtains).
- The appliance must be placed at a wall with the back side.
· Always remove the wire grill and pans with the handle. - The appliance may not be operated unless the hot plates are in place. Be sure that the hot plates are firmly engaged.
- Before turning the plates, let the appliance cool off, pull out mains plug.
- Do not bend the connection cable or bring it into contact with hot parts of the appliance.
- After use, pull out the plug immediately, open the appliance and let it cool off.
- Let appliance cool off before transport.
- Carefully lock top and bottom plate before transport. Never immerse appliance in water for cleaning.
- This product satisfies the pertinent safety regulations for electrical appliances for example defective connection wires. Repairs on electrical appliances must be performed by trained personnel only. Considerable dangers can arise for the user from improper repairs.
- This appliance is intended to be used in household and similar applications such as:
o staff kitchen areas in shops, offices and others working environments
o by clients in hotels, motels and other residential type environments
o bed and breakfast type environments.
Cleaning and maintenance
- Before cleaning always pul the plug from the socket and let the appliance cool down. Never immerse the appliance in water.
- The accessories can be washed in hot water with an ordinary household cleanser. Never uns scouring lipquids, pastes or powders nor hard or sharp utensils.
- Clean the housing and the glass door with a damp cloth, if necessary use some cleanser, then dry it up. Never use scouring lipuids or solvents.
- If there are any dirt residues between the two glass doors the front glass door can be easily removed by unfastening the screws at the inside of the inner glass door.
- Please clean after each use also the upper grilling pan, especially the lower side of the drip pan can get dirty with oil.
- Never touch the inner coated walls with metal parts. The grill elements can be cleaned with a damp cloth.
- Hints for catalytic cleaning of grease impurifications
- The inner walls of the appliance are coated with a special layer. They are self-cleaning, when they are beated up to more than 200°C.
- Harder impurifications and remainders of meat pieces can be cleaned with a damp cloth and then rubbed dry. After cleaning heat up the appliance for a short time to dry it completely.
- When the appliance is frequently used, it is recommended to heat it up at highest grill capacity for about 15 minutes after grilling in order to activate the self-cleaning capacity..
- Remainders at the bottom of the grill can be removed with a cloth or a brush.
- This special layer has no influence on the quality and taste of the prepared dishes. Even if frequently used, the catalytic layer is guaranteed for several years.
- Impurities in fat can leave visible spots on the coated parts. This is however of no influence to the self-cleaning effect of the appliance.
- The catalytic slides can be easily detached. They can ordered at any time, if a new layer should be needed..
- Important hint: Please take care that no sugary food, e.g. juice of fruit tarts, get an the coated tins. Sugar will destroy the self-cleaning characteristics of the tins.
Appliance Description
The rotisserie type G 80/31 B is equipped as follows:
- Glass door and removable appliance cover.
- One rotary button for operation (programme), one for temperature regulator and one for timer.
- Heating elements for lower heating, upper heating / grilling
- Interior with 3 ledges, inside lighting and integrated spit drive.
Side walls and rear of the appliance with catalytic cover
Accessories: Drip tray, grilling pan grid, handle for grid and Pan, rotary spit with 2 meat hooks, handle for rotary spit, set for mixed skewer disches (consisting 2 supporting disks and 4 skewers)
Use
The appliance is suited for grilling, frying, stewing, baking, warming food, defrosting frozen food and cooking fast food disches.
On the driven rotary spit you can easily grill crunchy chicken, duck and roast meat.
The appliance is also excellently suited for „barbecue“: On the open grid on top of the appliance you can grill to your's heart content, for example steaks, chops, sausages, fisch, tomatoes, onions, fruit etc.
The timer will switch off the appliance automatically when the adjusted time has passed.
Before using
Before using the appliance for the first time, please clean all accessories thoroughly:
- For opening the glass door seize the handle at the upper left hand side and pull the door open. After you have passed the notch, the door can be put down completely.
The double glass door is heavy. Please open carefully and place it on the table top. Do not drop it!

• Take out drip tray, grid and the other accessories.
- After you have pulled forward the dust cover slightly, it can be liftet up and the grilling pan can be teken out.
When the cover is half way closed, it can be removed
- The dust cover must be kept open during the whole food preparation time.
Please clean all accessories in hot water with some cleanser and dry them, or wash them in the dischwasher.
Then slide the grid and the drip tray into the appliance. The larger grilling pan must be inserted from the top onto the holding angles above the upper heating elements.
During grilling food can be prepared on the larger grilling pan at the same time.
The dust cover stays open all the time during food preparation.
Installation of the appliance
When the oven is installed, ensure that at the left and the right side of the appliance there will be free space of 10 cm, the free space over the top edge of the appliance must be at least 20 cm. The oven must be placed with its black at a wall.
Heat up the empty rotisserie in order to eliminate the smell of new material:
- Switch on the appliance
- Close the glass door
- Set lower rotary butten (operation switch) to position
- Set medium rotary button (temperature regulator) to position
- Set upper rotary butten (timer) to 10 minutes. The inside lighting goes on. the heating procedure starts.
Some smoke and smell may be produced when heating up the appliance for the first time. This is normal and stops after a short while.

Attention! Cusing and glass door of the appliance become hot.
nger of burning!
Use of the accessories

Grilling pan
During each heating procedure the grilling pan must be inserted as heat protection on the top of the oven.
Only for „barbecue“ the grilling pan is inserted as drip tray directly beneath the grill element.

Drip tray
When grilling on the grid or on the rotary spit, the drip tray must be always inserted below. It can, however, also be used as frying pan or baking pan.

Grid
When baking, the baking forms are put onto the grid. When grilling in the interior the grid is used as support for the food to be grilled. For „barbecue“ the grid is placed above the upper heating elements in a way that it lies upon both pins on the rear of the appliance.
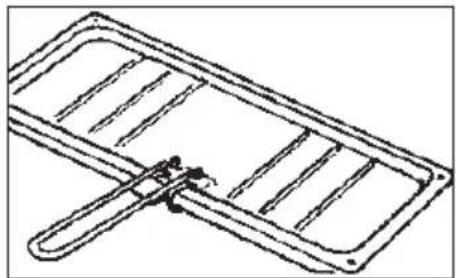
Handle for pan
Always use the handle to insert and to take out the drip tray and the grilling pan
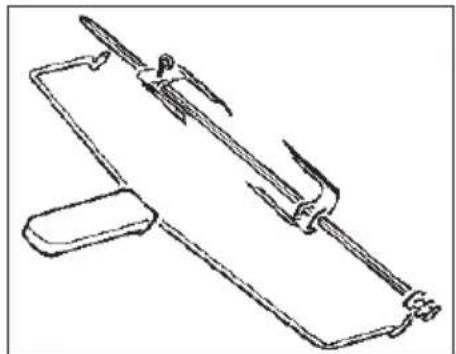
Rotary spit
On the driven spit you can grill excellently for example chicken (up to 2 pcs), ducks, roast meat. The food on the spit will be fixed with both meat hooks. With the handle for the spit it is possible to insert the spit with the food into the hot rotisserie without danger.

Set for mixed skewer disches
(Special equipment - not delivered with the rotisserie) With this set it is possible to grill 4 skewer dishes together on the rotating spit. Both supporting disks are slid onto the spit and fixed wirh the setscrews in the correct distance. The top of the skewers filled with meat is put into the boring of one disk. The other end of the skewers is layed into the notch of the second disk. The bow must be turned in a way that the elastic end also snappes into the notch.

Meat holder
(Special equipment - not delivered with the rotisserie) With this accessory it is possible to grill each type of meat from trout to roast meat, rotating like on a spit. The meat has not to be speared. It is easily put onto the open holder. When closed, the elastic wire bows keep the meat in each position. The meat holder is inserted in the rotisserie exactly like the rotary spit.
Operation
Baking, frying, grilling
From the programm selector at the appliance or from the adjustment table on the last side of the operating manual you will learn the values to be selected for different food.
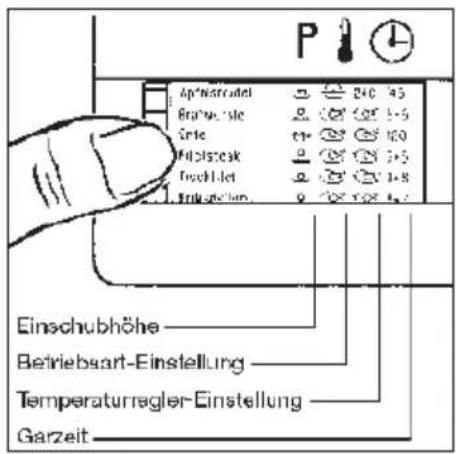
It contains data for 21 dishes. You will find indications for:
- Slide-in height of the grid or the drip tray, use of rotary spit or skewers
- Operating mode
·Cooking temperature
·Cooking time
When turning the programme selector the data for the different dishes become visible.

Selection of operating mode
Select the operating mode (control of the heating elements) with the lower rotary button:
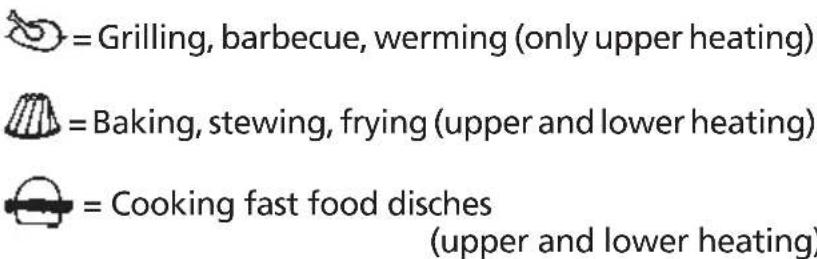

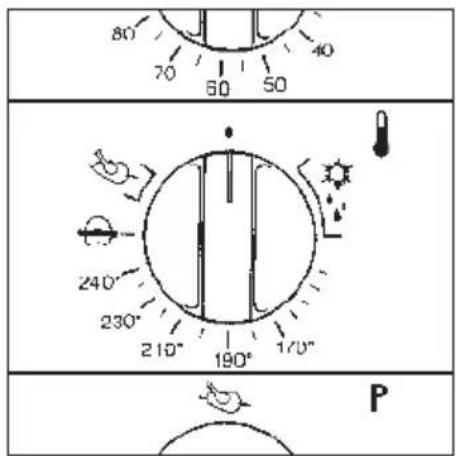
Setting of temperature
Preselect the temperature inside the rotisserie with the medium rotary button:
☀️ = Range for defrosting frozend food
170° - 240° = Cooking temperatures which can be selected
= Position for fast food dishes
= Position for grilling

Setting and switching on the operating time
Pass upper rotary button clockwise over the foreseen time, then return it to the required time.
When the timer is set, the appliance is switched on, the inside lighting goes on, the spit drive turns automatically. At the programs 🍒 baking and 🍽 fast food the rotisserie spit is not turning.

The set operating time can be easily changed by turning the rotary button to the right or to the left side.
When the set time has passed, the timer switches off automatically in two steps: when the last longer minute line is reached, the heating is switched off, the spit turns for further 5 minutes. When the button is in position „0“, the spit drive an the inside lighting are switched off.
After the adjusted time has run out the rotisserie spit works for further 5 min that the food does not get burned. After finishing the food preparation please unplug the appliance.
How to use
According to the knowledge of the food industry breaded food, potato products or other starch containing products shall not be baked to dark due to the danger of producing Acrylamid.
Baking
- When baking on the grid remove the drip tray from the oven.
- Always insert the grilling pan upon the upper heating elements and close the glass door.
- Set operation switch an temperature regulator according to programme selector or adjustment table.
- Before baking the appliance should be preheated for around 10 minutes. Set it with the timer.
- Insert baking forms onto the grid in the respective height.
- Close glass door completely when baking.
Hint:
During the baking procedure the heating elements do not heat to redness.
The dust cover must be kept open during the whole food preparation time.
Baking in the drip tray
Line the drip tray with grease-proof paper / aluminium foil and let overlap an edge of approx. 4 cm.
Place the rolled out dough on the drip tray and press it slightly. After filling the dough with fruit or similar, the papier edge is set upright to avoid the dough sticking to the catalytic coated parts..
Grilling on the grid
- When grilling always put the drip tray in the lowest position of the applianceThe meat to be grillend must be dried.
- Avoid to flatten or cut-in the meat, this means loss of meat juice and drying up.
- Set operation switch to 📋 an temperature regulator to 🌐
- The rotisserie should be preheated in each case for around 10 minutes. Thus the pores of the meat will close quickly when putting it into the grill and the meat juice is saved..
- The appliance has not to be switched off when the meat on the grid is inserted into the grill. Attention, the appliance is hot!

Attention:
The food must not touch the heating elements. Risk of flashing.
The distance to the heating elements must be increased when the food is very cold and thick.
When the food is rather fat, do not put it too close to the heating elements.

Grilling an the rotary spit
Chicken, breast of veal, loins etc. are most suitable for grilling on the spit.
- Insert drip tray in the lowest position (bottom) of the appliance.
- Set operation switch to and temperation regulator to.
- Preheat the rotisserie for around 10 minutes.
- Season the meat, but salt it only after grilling.
- Salt chicken only inside, when head, heck and feet are removed.
- Put one of the meat hooks on the spit, then put the spit lengthwise through the meat and put second meat hook on the spit. Move the meat hooks together till the meat is fastened, then fix the setscrews.
- Fasten che chicken with one meat hook in the tighs the other in the breast and neck.
- Wings and tighs should eventually be tied together with thread.
- For taking the spit with the spit handle, insert the right carrying bow into the inner groove of the spit
- Insert the top of the spit into the inlet at the left hand side of the inner wall. On the right hand side insert the spit with the outer groove into the angle-shaped guide. Then remove the spit handle.
- Close the glass door up to the notch, so that a slit stays open.
- Lean meat should be oiled now and then during grilling..

Barbecuing, grilling on the open grid
- Lift up the cover of the appliance: it serves as heat and spattering protection.
- Insert the grilling pan beneath the heating elements onto the canted side plates.
Fill the grilling pan with a half litre of water. The water avoids that the dripping grease will inflame and that the meat will get a charrd crust. - Refill the water if necessary, but do not pur it over the heating elements.
- Place the grid in a way that it hangs in both pins
in the rear and that it lies upon the cross brar in the front.
- Keep the glass door closed.
- Set the operation switch to ⚙ and switch it on together with the timer. temp. regulator also to ⚙.
- the indicated grilling periods are meant for grilling iside the rotisserie. They are longer when grilling on the open grid..
Preparation of fast food dishes
These dishes are pre-baked partly or completely bay the manufacturers (e.v French fries, croquettes, deep-freeze pizza etc.)
Croissant (French rolls) and puff pastry are not pre-baked and should be baked.
- Slide-in the drip tray with the fast food dish into the middle position.
- Set the operation switch to position ⏻ and the temperature regulator to
- Set the timer to the time indicated on the packing of the food.
- Keep the glass door closed.

Defrosting
- Insert the grid into the middle of the grill and put the frozen meat onto it.
- Insert the drip tray in the lowest position.
- Close the glass door up to the notch, so that a slit stays open.
- Set the operation switch to defrosting ⚙️ and switch it on together with the timer.
- The defrosting period depends on thickness and temperature of the food. Correct times will be found out by experience..
When the appliance does not work correctly
Please check:
- Is the appliance plugged in correctly?
- Is the program switch (lowest switch) turned to a function?
- Is the Timer (upper switch) on? (The Timer must always turned on to max (115min) and then turned back to the intended time plus 10min preheating time.)
Correct Disposal of this product

This marking indicates that this product should not be disposed with other household wastes throughout the EU. To prevent possible harm to the environment or human health from uncontrolled waste disposal, recycle it responsibly to promote the sustainable reuse of material resources. To return your used device, please use the return and collection systems or contact the retailer where the product was purchased. They can take this product for environmental safe recycling.
Packaging disposal: Do not throw away the package materials. Please put it in the recycling bin.



Gift box: Paper, should be put to the old paper collection point. Plastic packaging material and foils should be collected in the special collection containers.
Service and Repair:
If the appliance must be repaired, please get in touch with your trader or with the manufacturer:
| Slide-in height (1) | Position of operation switch (2) | |||
| Position of temperature regulator | ||||
| Cooking time (3) | ||||
| Apple cake | m | 240 | 45 | |
| Fried sausages | o | 5+5 | ||
| Duck | ←→ | 120 | ||
| Fillet steak | o | 6+5 | ||
| Fillet of fish | o | 9+8 | Descriptions for table | |
| Hamburger | o | 8+7 | (1) This column shows heights and if it shall be the grid, in the drip tra or on the set for mixed s | |
| Chicken | ←→ | 60 | ||
| Calves liver | o | 6+4 | ||
| Veal cutlet | o | 4+3 | ||
| Pastry | m | 230 | 15 | Slide-in geights |
| Mixed grill | o | 10 | o top = | |
| Large cake | u | 190 | 60 | m = middle |
| Fruit tart | u | 230 | 50 | u = below |
| Deep-freeze pizza | u | 15 | = grid | |
| Rolled roast | ←→ | 90 | drip ±ray | |
| Mixed skewer dishes | ←→ | 20 | ←→ = spit | |
| Pork chop | o | 6+6 | set for mixed skewer d | |
| Pork loins | o | 8+8 | ||
| Toast Hawaii | o | 5 | 2) = grilling | |
Descriptions for table
(1) This column shows the slide-in heights and if it shall be cooked on the grid, in the drip tray, on the spit or on the set for mixed skewer dishes
Slide-in geights
| o top = |
| m = middle |
| u = below |
| ... = grid |
| drip ±ray |
| { } = spit |
| set for mixed skewer dishes |
| 2) | = | grilling |
| fast food dishes | ||
| = | baking | |
| = | defrosting | |
(3) indicated times e.g. „5+6“: turn the food after 5 minutes and grill the other side for further 6 minutes



- GRILLPFANNE
- FETTPFANNE
- ROST
- PFANNENGRIFF
- GRILLSPIESS
- SCHASCHLIK-GARNITUR
- GRILLGUTHALTER
- BETRIEBSART WÄHLEN
- GRILLEN AM SPIESS
- SAFETY INSTRUCTIONS
- CLEANING AND MAINTENANCE
- APPLIANCE DESCRIPTION
- USE
- BEFORE USING
- INSTALLATION OF THE APPLIANCE
- USE OF THE ACCESSORIES
- GRILLING PAN
- DRIP TRAY
- GRID
- HANDLE FOR PAN
- ROTARY SPIT
- SET FOR MIXED SKEWER DISCHES
- MEAT HOLDER
- OPERATION
- BAKING, FRYING, GRILLING
- SELECTION OF OPERATING MODE
- SETTING OF TEMPERATURE
- SETTING AND SWITCHING ON THE OPERATING TIME
- HOW TO USE
- BAKING
- HINT
- BAKING IN THE DRIP TRAY
- GRILLING ON THE GRID
- ATTENTION
- GRILLING AN THE ROTARY SPIT
- BARBECUING, GRILLING ON THE OPEN GRID
- PREPARATION OF FAST FOOD DISHES
- DEFROSTING
- WHEN THE APPLIANCE DOES NOT WORK CORRECTLY
- PLEASE CHECK
- CORRECT DISPOSAL OF THIS PRODUCT
- SERVICE AND REPAIR
- DESCRIPTIONS FOR TABLE
- SLIDE-IN GEIGHTS
Brand : STEBA
Model : G 80/31
Category : Contact grill