
EQAXF01BXSI - Water dispenser ELECTROLUX - Free user manual and instructions
Find the device manual for free EQAXF01BXSI ELECTROLUX in PDF.


| Product Type | Countertop Water Dispenser |
| Brand | Electrolux |
| Model | EQAXF01BXSI |
| Dimensions (H x W x D) | Approx. 41 x 30 x 30 cm |
| Weight | Approx. 6.5 kg |
| Power Supply | 220-240V ~ 50/60 Hz |
| Power Consumption (Heating) | 550 W |
| Power Consumption (Cooling) | 100 W |
| Water Temperature (Hot) | ≥ 85 °C |
| Water Temperature (Cold) | ≤ 10 °C |
| Water Tank Capacity | 2.5 L (upper) / 0.8 L (lower) |
| Drip Tray Capacity | 0.3 L |
| Functions | Hot & cold water dispensing |
| Child Safety Lock | Yes (hot water button) |
| Cleaning | Descale every 3 months; wipe exterior with damp cloth |
| Filter | Replaceable carbon filter (approx. every 6 months) |
| Repairability Index | 8.5/10 (spare parts available for 10+ years) |
| Included Accessories | Drip tray, user manual |
Frequently Asked Questions - EQAXF01BXSI ELECTROLUX
User questions about EQAXF01BXSI ELECTROLUX
0 question about this device. Answer the ones you know or ask your own.
Ask a new question about this device
Download the instructions for your Water dispenser in PDF format for free! Find your manual EQAXF01BXSI - ELECTROLUX and take your electronic device back in hand. On this page are published all the documents necessary for the use of your device. EQAXF01BXSI by ELECTROLUX.
USER MANUAL EQAXF01BXSI ELECTROLUX
natural_image
Stylized globe illustration of a panda, showing continents and oceans (no text or symbols)
natural_image
Symbol of a trash bin crossed out by two diagonal lines (no text or numbers present)
Daftar Isi
natural_image
Illustration of a plug and switch inside a circle, with a prohibition symbol overlay (no text or symbols present)Gbr. 2
natural_image
Hand holding a wall socket connected to a plug, with a prohibition symbol overlay (no text or symbols present)Gbr. 3
natural_image
Warning sign showing a refrigerator with a sunburst symbol and a prohibition symbol (no text present)Gbr. 4
Gbr. 5
Ilustrasi
1 tombol air panas
2 tombol air biasa
3 tombol air dingin
4 panel
5 cerat
6 tempurung depan
7 baki tetesan
Gbr. 6
Memasang botol air
Gbr. 7
Menyediakan listrik
natural_image
Illustration of an electric shock plug inserted into a wall socket, enclosed in a circle (no text or symbols)Gbr. 8
Instruksi Operasi
natural_image
Two glass icons showing water symbols: a cross with a star and a wavy line inside, both without any text or labels.Gbr. 9
Dispensing air
Dispensing air normal
natural_image
Simple black-and-white line drawing of a container with wavy lines inside (no text or symbols)Gbr.12
natural_image
Simple line drawing of a mechanical setup with a cylinder and a spring-like structure, enclosed in a circle (no text or symbols)Gbr. 13
Sanitasi
natural_image
Illustration of a plastic bottle and a rectangular object inside a circular frame (no text or symbols)Gbr. 14
14th Floor 1910 New Petchburi Road,
Bangkapi,Huay Kwang, Bangkok 10310
Office Tel : (+66 2) 7259100
Office Fax : (+66 2) 7259299
Email: customercarethai@electrolux.com
Indonesia
Call Center 08041119999 (semi tollfree)
Floor 9th, A&B Tower
76 Le Lai street - Ben Thanh Ward - District 1
Ho Chi Minh City dVietnam
Office Tel : (+84 8) 3910 5465
Office Fax : (+84 8) 3910 5470
Email : vncare@electrolux.com
Malaysia
Domestic Toll Free : 1300-88-11-22
Electrolux Home Appliances Sdn. Bhd.
Unit T2-7, 7th Floor, Tower 2, Jaya33 Hyperoffice,
No. 3, Jalan Semangat, Seksyen 13,
46100 Petaling Jaya, Selangor
Office Tel : (+60 3) 7843 5999
Office Fax : (+60 3) 7955 5511
Email: malaysia.customercare@electrolux.com
Philippines
Domestic Toll Free : 1-800-10-845-care 2273
Customer Care Hotline : (+63 2) 845 care 2273
Electrolux Philippines, Inc.
10th Floor. W5th Avenue Building
5th Avenue Corner 32nd Street
Bonifacio Global City,
Taguig Philippines 1634
Trunkline: +63 2 737- 4756
Website : www.electrolux.com.ph
Email : wecare@electrolux.com
Singapore
CUSTOMER CARE HOTLINE : (+65) 6507 8699
Electrolux S.E.A. Pte Ltd.
11 Lorong 3 Toa Payoh
Jackson Square, Block B, #01-13/14/15
Singapore 319579
Office Tel : (+65) 6507 8900
Office Fax : (+65) 6356 5489
Email : customer-care.sin@electrolux.com

natural_image
Repeating pattern of gray geometric shapes on white background, no text or symbols presentUSER MANUAL 1EN
Welcome
Thank you for choosing ELECTROLUX. This manual contains all the information you need to safely and correctly use your water dispenser. Please read all the instructions prior to using the appliance, and keep this manual in a secure place for future reference. Do not remove the rating plate label which attached adhesive identification label containing the code, model number, manufacturer and other information. This label will be used by an ELECTROLUX authorized service representative in the event that your water dispenser needs service.
Environmental Notice
The packaging material used is recyclable. We recommend that you separate plastic, paper and cardboard and give them to recycling agents. To help preserve the environment, the refrigerant used in this product is R134a (Hydrofluorocarbon - HFC), which does not affect the ozone layer and has little impact on the greenhouse effect. According to WEEE (Waste of Electrical and Electronic Equipment) guidelines, waste from electrical and electronic devices should be collected separately. If you need to remove of this appliance in the future, do not throw it away with the rest of your domestic garbage. Instead, please take the appliance to the nearest WEEE collecting agents, where available.

natural_image
Two symbolic icons: a globe with a panda and a trash bin crossed out by a diagonal line, both without any text or labels.Contents
Water dispenser information 3
Precautions 4
Illustration 6
Using your water dispenser 7
Operation instructions 8
Cleaning and maintenance 10
Trouble Shooting 12
Circuit diagram 13
Technical Information 13
Customer Care 14
Attention
Do not try to install or turn on the unit without having read the indicated safety precautions in this manual.
The dispenser heats water to a temperature of 90^ C. It can cause severe scalding. Please operate it carefully.
In case of damage, please contact an authorized technical service agent.
Do not disassemble the electrical parts of this appliance. Any repairs done by an unauthorized person may cause serious injuries or properties incident.
The adult should supervise the children in order to make sure the children can not play with the appliance.
The appliance is not intended for use by persons(including children) with reduced physical, sensory or mental capabilities, or lack of experience and knowledge, unless they have been given supervision or instruction concerning use of the appliance by a person responsible for their safety.
This appliance is intended to be household used only.
If the power cord is damaged, it must be replaced by a special cord or assembly available from the manufacturer or its service agent.
To avoid danger of suffocation, keep plastic bag away from babies and children.
Keep ventilation openings, in the appliance enclosure or in the built-in structure, clear of obstruction.
Do not use mechanical devices or other means to accelerate the defrosting process, other than those recommended by the manufacturer.
Water dispenser information
- This unit is designed for drinkable water only. Put bottles as specified inside the cabinet before using.
- This unit should be used in an environment with temperatures ranging from 10^ C to 43^ C with a relative humidity not higher than 90%.
- The dispenser can satisfy the need for hot water, cold water, room temperature water and water as a mixture of the cold water and room temperature water.
- With the adoption of distinctive thermal isolation technology, this unit can minimize thermal exchange between hot, room temperature and cold water.
- Do not store explosive substances such as aerosol cans with a flammable propellant in this appliance.
- Regional restrictions
The heating method of machine can be only used in the lower than 1500m elevations.
Precautions
For children
- Destroy the carton, plastic bag and other packing materials after the dispenser is unpacked. Children might use them for play.
- Children require supervision when using the dispenser.
- Recommend to install the anti-tilt bracket at the back side of this water dispenser to prevent the dispenser from falling down which could cause injury.(Fig. 6)
For the user/installer
- Plug the water dispenser directly into the socket. The unit requires proper grounding and the correct voltage (as technical information specified on page 13 of this manual).(Fig. 1)
- An appropriate length of power-supply cord is provided to reduce the risks of becoming entangled in, or tripping over a longer cord.
- Connect the plug firmly.
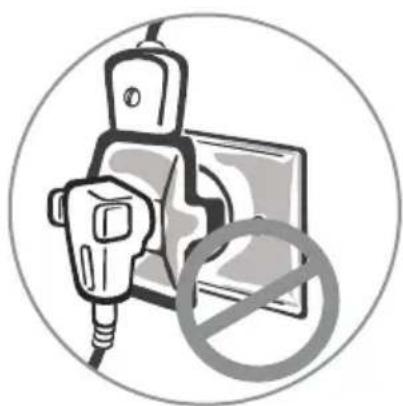
- Do not use an extension cord or plug adaptor.(Fig.2)
- Choose a place that is near a grounded electrical socket. Keep the dispenser at least 20cm away from walls and other appliances and furniture on all 4 sides.
- Do not place the water dispenser sitting over the power cord.
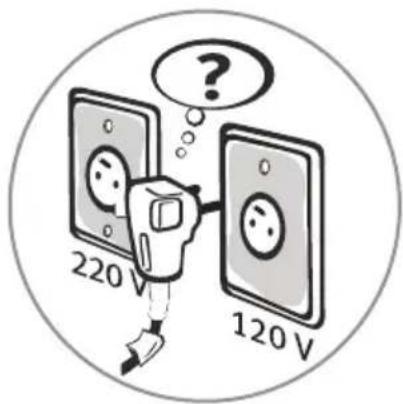
Fig. 1
natural_image
Illustration of a plug and switch inside a circle, with a prohibition symbol (no text or labels)Fig. 2
-
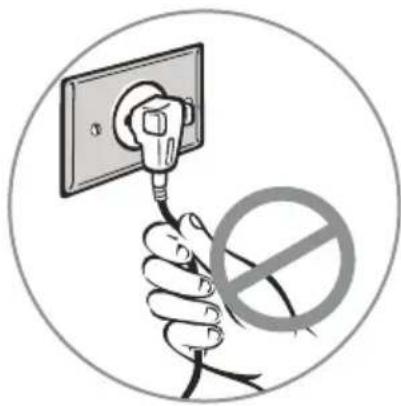
Do not pull out or insert the plug with wet hands to avoid electric shock.(Fig. 3)
-
Use the switch when turning the heating/ cooling On/Off. Locate on the left back side of water dispenser.(page 6)
-
Do not fasten, twist or tie the power cord. if the power cord is damaged, it should be replaced by the manufacturer, service technician or a qualified person to prevent any risk.
-
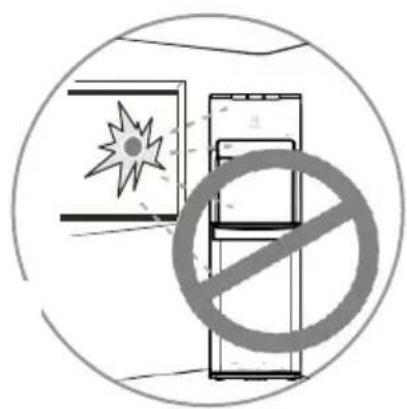
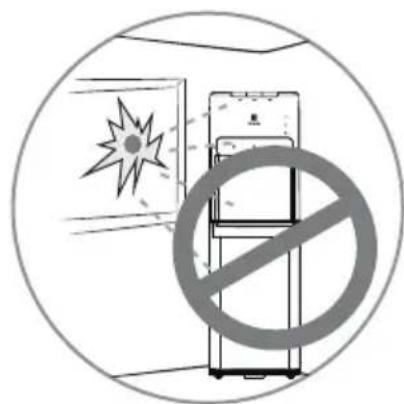
Keep the unit in a dry place and away from direct sunlight. Do not place the machine on paper or foam. Do not place anything flammable beside this machine.(Fig. 4)
-
To avoid damage to the unit, do not plug the power cord or turn on the heating switch until the water can flow out from the hot water spout when the hot water button be activated.
-
Unplug the unit when the unit will not be used for a long period for the reason of saving electricity.
-
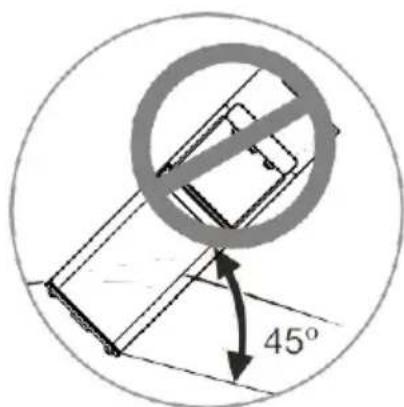
Never turn the unit upside down or tilt it more than 45^ .(Fig. 5)
-
Never use organic liquids polishing chemical to clean the machine.
-
The thermostat to control temperature has been set up by There is no manufacturer. need to adjust it yourself.
natural_image
Hand holding an electrical outlet with a no-smoking symbol overlay (no text or symbols present)Fig. 3
natural_image
Illustration of a refrigerator with a large 'no' symbol overlay, no text or symbols presentFig. 4
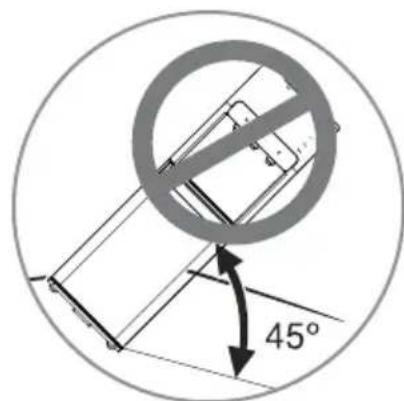
Fig. 5
Illustration
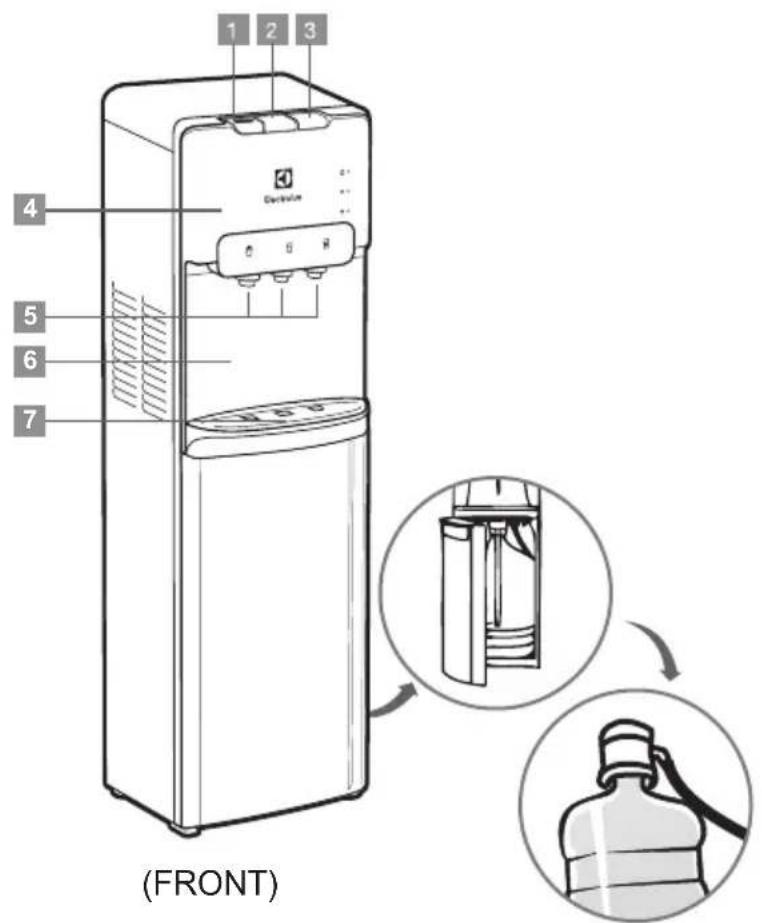
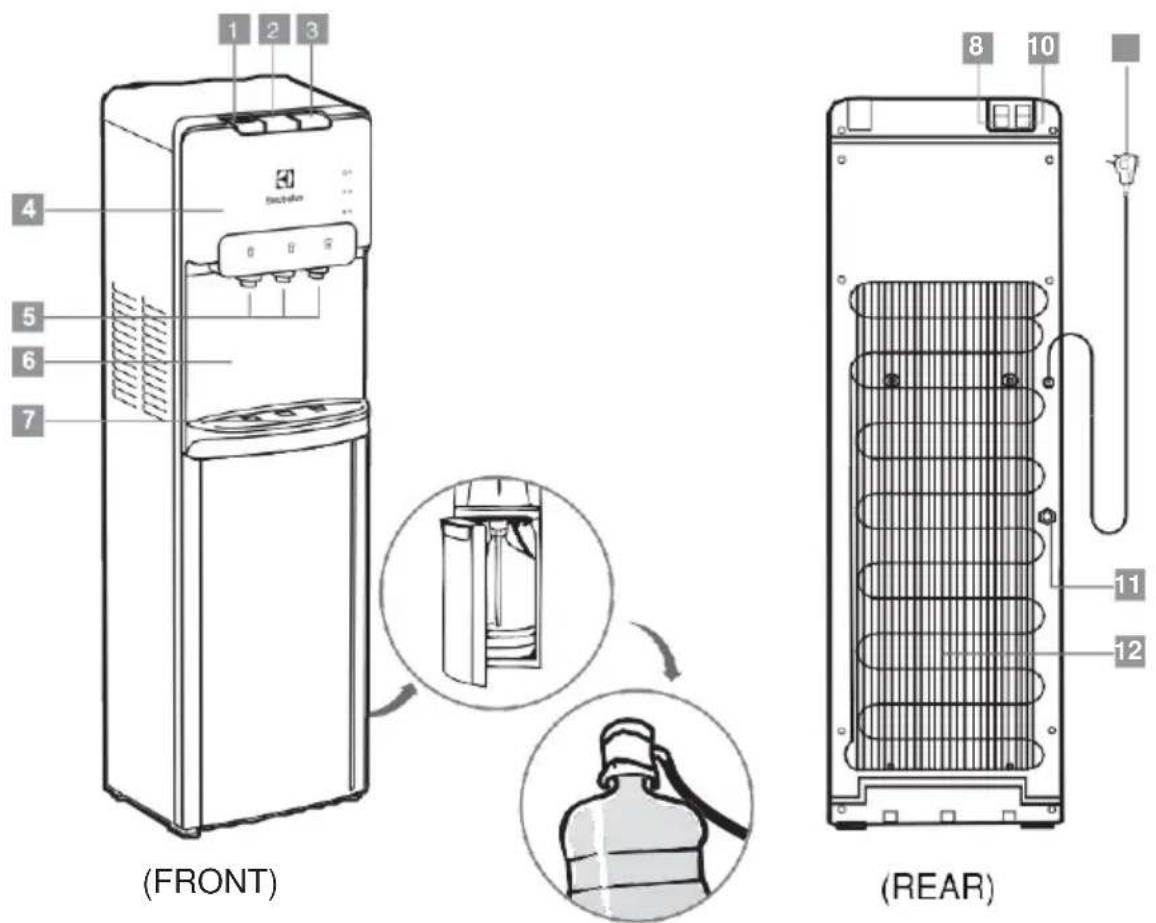
1 button of hot water
2 button of normal water
3 button of cold water
4 panel
5 spout
6 front carapace
7 drip tray
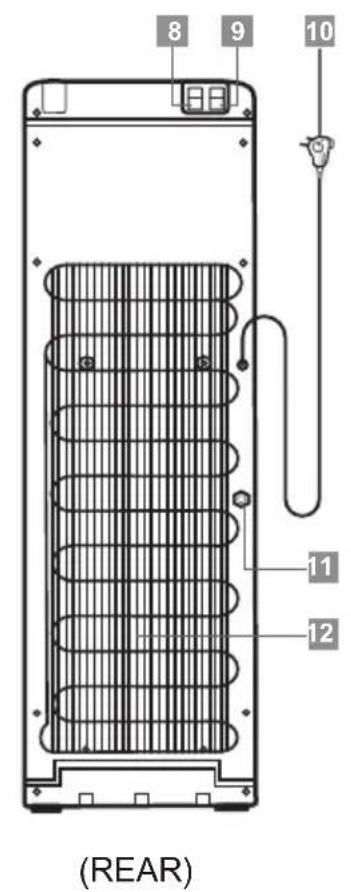
8 cooling switch
9 heating switch
10 power cord
11 drain hole
12 condenser
Using your water dispenser
Locate dispenser
- Place dispenser upright.
- Locate dispenser on a hard and level surface in a cool shaded location near a grounded socket. Do not plug in power cord yet.
- Position dispenser so the back is at least 20 cm from wall and there are at least 20 cm of clearance on both sides.
Assemble
- Snap drip tray and grid assembly into front carapace.
Machine Installation
Installing the floor Bracket kit(Fig.6)
- Use 13 mm screw to fix the fixing bracket on the side of base pan.
- Drill out a screw hole(6 mm) on the floor.
- Insert a screw anchor (wall plug) into the drilled hole.
- Move water dispenser, Align fixing bracket hole with screw hole of the floor.
- Put the 25mm screw into the screw hole of fixing bracket.
- Tighten the screw.

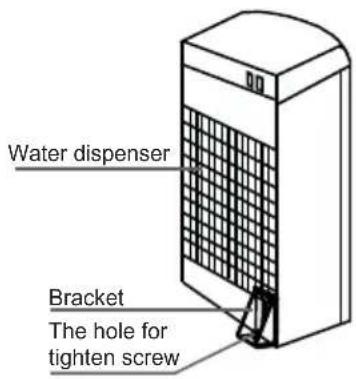
Fig. 6
Install water bottle
- Open cabinet door.
- Place fresh bottle outside of cabinet.
- Remove the entire plastic cap from top of bottle.
- Clean outside of new bottle with a cloth.
- Place probe assembly into bottle.
- Slide collar with head down until it clicks in place.
- Slide bottle into cabinet and close door.
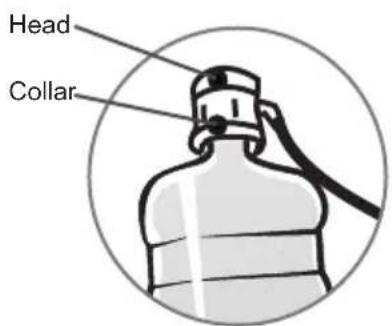
Fig. 7
Provide electricity
Plug cord into a properly grounded socket.
At this time the pump will begin to move water from the bottle to the hot and cold tanks. It will take up to approximate 12 minutes to fill the tanks for the first time. During this period the pump will run continuously. This is normal.
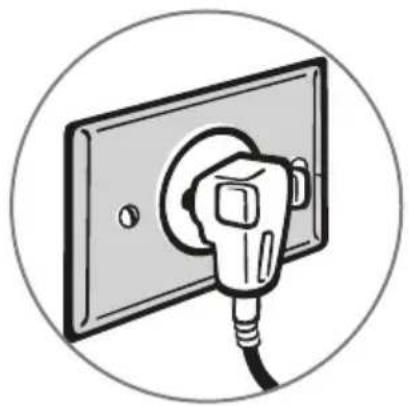
natural_image
Illustration of a fuel plug inserted into an electrical outlet (no text or symbols)Fig. 8
Operation Instructions
Activate heating and cooling
This unit will not dispense hot or cold water until the switches are activated.
To activate, push top side of power switches in to start heating and cooling water.
- If you do not want to heat water, push bottom side of red switch in.
- If you do not want to cool water, push bottom side of green switch in;
Dispensing water
This unit has been tested and sanitized prior to packing and shipping. During transit dust and odors can accumulate in the tank and lines. Dispense and dispose at least one liter of water to prior to drinking any water.
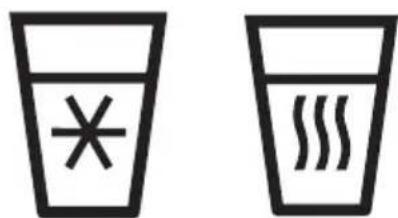
natural_image
Two identical line drawings of glasses with symbols: a yen symbol and wavy lines, both without any text or labels.Fig. 9
Dispensing cold water
After setup, it will take up to approximate
1 hour get water to maximum cold temperature. During this time the compressor could run continuously. This is normal.
- Position bottle, glass, pitcher or cooking pot below spout.
- Press cold water button downward to start cold water flow.
- Release button once desired fill level is achieved.

Fig.10
Dispensing normal water
- Position bottle, glass, pitcher or cooking pot below spout.
- Press normal water button downward to start normal water flow.
- Release button once desired fill level is achieved.
Dispensing hot water
After setup, hot water will be available in 15-20 minutes.
- Position bottle, glass, pitcher or cooking pot below spout.
- Push the red child lock button from right to left and press hot water button downward to start hot water flow.
- Release button once desired fill level is achieved.

Fig.11
Changing bottles
A flashing orange light on your function lights alerts you when your bottle is empty. Replace the bottle as soon as possible.
Do not dispense hot, cool or cold water if the orange light is flashing as you could empty the tanks and cause the dispenser to overheat.

natural_image
Simple black-and-white diagram of a container with wavy lines inside (no text or symbols)Fig.12
- Open the cabinet door.
- Slide empty bottle out of cabinet.
- Remove probe assembly from empty bottle.
- Set empty bottle aside.
- Place fresh bottle outside of cabinet. Remove entire plastic cap from top of bottle. Clean outside of new bottle with a cloth.
- Place probe assembly into bottle. Slide collar with head down until it clicks in place.
- Slide bottle into cabinet and close door.
Cleaning and maintenance
- The unit has been factory disinfected, however, it is advisable to clean the dispenser prior to initial use.
- Follow the step of "using your water dispenser" on page 7
- Make sure unplug the water dispenser before cleaning.
- Dispense water from each spout till no water flow out from spout.
- Place a large bucket beneath the drain hole which is on the back of water dispenser, then remove the drain cap and drain out water.
- Once draining finished, close the drain hole with drain cap.
- Follow "using your water dispenser" on page 7 to use the water dispenser normally.
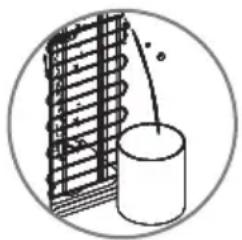
natural_image
Simple line drawing of a cylindrical object with a string attached to a grid-like structure, enclosed in a circle (no text or symbols)Fig.13
Sanitizing
The machine should be disinfected with disinfectant separately bought from drugstore or marketplace according to the instruction manual of the disinfectant and then clean it with water (see cleaning and draining instructions).
Generally this should be done every three months.
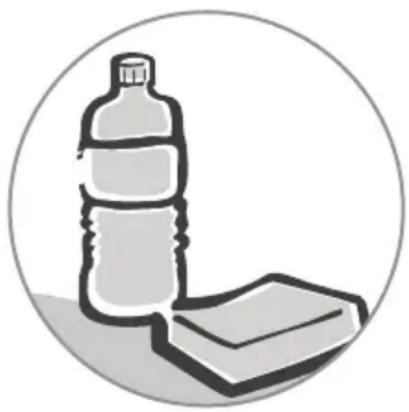
natural_image
Illustration of a plastic bottle and a rectangular object inside a circle (no text or symbols)Fig. 14
To remove mineral deposits
Mix 1 gallon of water with half pound of citric acid crystals, inject into the machine and make sure the water can flow out from the hot water spout when the hot water button be activated. Switch on the power and heat water, 30 minutes later, drain off the liquid and clean it with water two or three times. Generally this should be done every six months.
Never disassemble this machine by yourself to avoid risk of damaging machine.
CAUTION
Scald Hazard
Be careful on the hot water coming out when tapping hot water and drain water from drain hole.
CAUTION
Water Leakage
Drain cap loose may cause water leakage and cause floor damage. Please make sure it is tighten enough before long term using.
WARNING
Electrical Shock Hazard
Unplug the water dispenser before cleaning and wiping up spilled water on unit.
WARNING
Scald Hazard
Dispenser heats water to a temperature of 194^ F ( 90^ C). Water temperatures above 125^ F ( 52^ C) can cause severe burns or scalding. Children, the disabled and the elderly are at highest risk of being scalded. Children should be supervised by an adult when using this product.
Before calling your service representative check the following items:
Water dispenser does not work
- Make sure the water dispenser is properly connected to a working socket and the heating/cooling switches are set ON.
Water is leaking
- Unplug the water dispenser, remove bottle and replace with new one.
- Make sure the drain cap at the back side of water dispenser is tighten enough.
No water is coming from the spout
- Make sure the bottle is not empty, if empty, replace it with new one.
- Make sure to completely depress the pushbutton controls.
- Make sure the connection tube inside the unit is not loose.
Cold water is not cold
- Make sure the water dispenser is properly connected to a working socket
- Make sure the green cooling switch is set ON.
- Wait until the COOLING indicator turns off, it takes up to approximate 1 hour to cool the water in general.
- Make sure the back of the water dispenser is at least 20 cm away from a wall and there is free airflow on all sides of the water dispenser.
Hot water is not hot
- Make sure the water dispenser is properly connected to a working socket.
- Make sure the red heating switch is set ON.
- Wait until the HEATING indicator turns off, it takes 15\~20 minutes to heat the water in general.
Dispenser is noisy
- Make sure water dispenser is placed on placid and solid surface.
- Compressor on and off operation will happen to control the cold water as specification, it is normal.
- Pump will working to pump water into the tank when tap water, it is normal.
Water tastes
- Dust and odor be accumulated in the tank, dispose the reservoir water and replace bottle with a new one.
- Sanitize water dispenser or descale according to “Cleaning and maintenance”.

To avoid accident, cut off the power supply before operation according to the following instruction.
Sometimes when water is dispensed for more than 2 minutes, the pump fails to take the necessary amount of water, in this case the lack of water indicator light on control panel will turn on. If this happens, just open the cabinet door, then close it, and wait for 2 minutes, then the dispenser will return to dispense water.
Circuit diagram
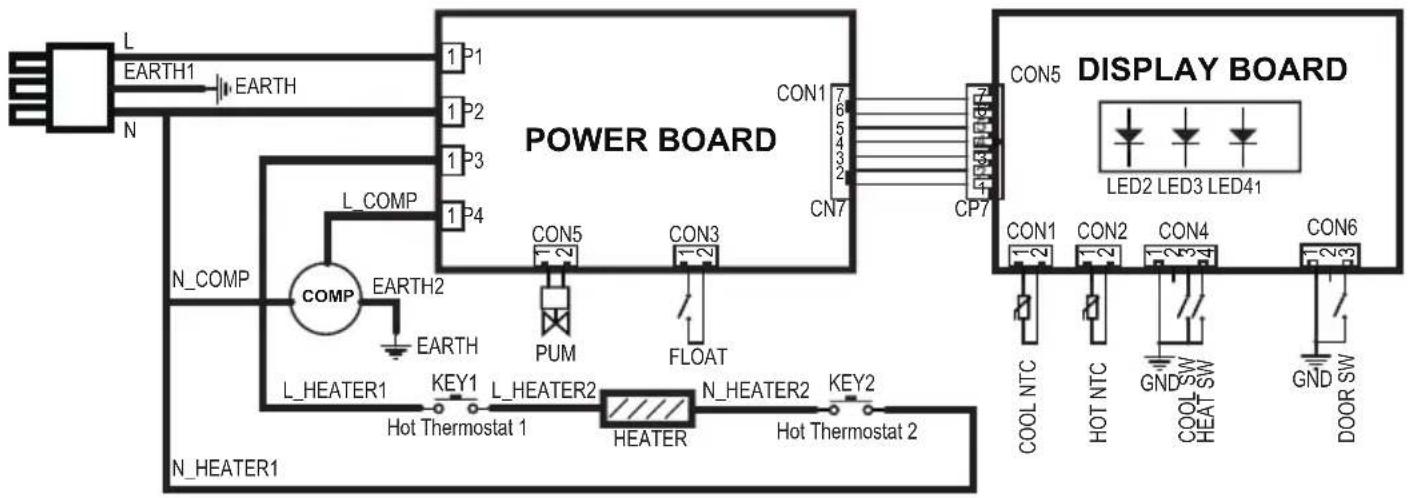
flowchart
graph TD
    A["Power Board"] --> B["CON1"]
    A --> C["CON3"]
    A --> D["CON5"]
    A --> E["CON6"]
    A --> F["CON7"]
    A --> G["CON8"]
    A --> H["CON9"]
    A --> I["CON10"]
    A --> J["CON11"]
    A --> K["CON12"]
    A --> L["CON13"]
    A --> M["CON14"]
    A --> N["CON15"]
    A --> O["CON16"]
    A --> P["CON17"]
    A --> Q["CON18"]
    A --> R["CON19"]
    A --> S["CON20"]
    A --> T["CON21"]
    A --> U["CON22"]
    A --> V["CON23"]
    A --> W["CON24"]
    A --> X["CON25"]
    A --> Y["CON26"]
    A --> Z["CON27"]
    A --> AA["CON28"]
    A --> AB["CON29"]
    A --> AC["CON30"]
    A --> AD["CON31"]
    A --> AE["CON32"]
    A --> AF["CON33"]
    A --> AG["CON34"]
    A --> AH["CON35"]
    A --> AI["CON36"]
    A --> AJ["CON37"]
    A --> AK["CON38"]
    A --> AL["CON39"]
    A --> AM["CON40"]
    A --> AN["CON41"]
    A --> AO["CON42"]
    A --> AP["CON43"]
    A --> AQ["CON44"]
    A --> AR["CON45"]
    A --> AS["CON46"]
    A --> AT["CON47"]
    A --> AU["CON48"]
    A --> AV["CON49"]
    A --> AW["CON50"]
    A --> AX["CON51"]
    A --> AY["CON52"]
    A --> AZ["CON53"]
    A --> BA["CON54"]
    A --> BB["CON55"]
    A --> BC["CON56"]
    A --> BD["CON57"]
    A --> BE["CON58"]
    A --> BF["CON59"]
    A --> BG["CON60"]
Technical Information
| Model | EQAXF01BXSI | EQAXF01BXWI |
| Power supply | 220V-240V~ 50/60Hz | 220V-240V~ 50/60Hz |
| Cooling Power | 100W | 100W |
| Heating Power | 420W | 420W |
| Hot Water | 4L/h(≥90°C) | 4L/h(≥90°C) |
| Cold Water | 2L/h(≤10°C) | 2L/h(≤10°C) |
| Room Temperature Operation | 10-43°C | 10-43°C |
| Relative Humidity | ≤90% | ≤90% |
| Cooling Current | 1.0A | 1.0A |
| Refrigerant | R134a/32g | R134a/32g |
| Climate Class | ST,T | ST,T |
| Cooling Cabinet Temperature | N/A | N/A |
| Product Dimension | L310mmxW374mmxH1040mm L310mmxW374mmxH1040mm | |
| Net Weight 14.7kg | 14.7kg | |
Remarks: Above technical data is based on standard testing method, refer to GB/T 22090-2008
Customer Care
Thailand
Call Center Tel : (+66 2) 725 9000
Electrolux Thailand Co., Ltd.
Electrolux Building
14th Floor 1910 New Petchburi Road,
Bangkapi, Huay Kwang, Bangkok 10310
Office Tel : (+66 2) 7259100
Office Fax : (+66 2) 7259299
Email: customercarethai@electrolux.com
Indonesia
Call Center 08041119999 (semi tollfree)
Domestic Toll Free:1800-58-88-99
Floor 9th, A&B Tower
76 Le Lai street - Ben Thanh Ward - District 1
Unit T2-7, 7th Floor, Tower 2, Jaya33 Hyperoffice,
No. 3, Jalan Semangat, Seksyen 13,
46100 Petaling Jaya, Selangor
Office Tel : (+60 3) 7843 5999
Office Fax : (+60 3) 7955 5511
Email: malaysia.customercare@electrolux.com
Philippines
Domestic Toll Free : 1-800-10-845-care 2273
Customer Care Hotline : (+63 2) 845 care 2273
Electrolux Philippines, Inc.
10th Floor. W5th Avenue Building
5th Avenue Corner 32nd Street
Bonifacio Global City,
Taguig Philippines 1634
Trunkline: +63 2 737- 4756
Website : www.electrolux.com.ph
Email : wecare@electrolux.com
Singapore
CUSTOMER CARE HOTLINE : (+65) 6507 8699
Electrolux S.E.A. Pte Ltd.
11 Lorong 3 Toa Payoh
Jackson Square, Block B, #01-13/14/15
Singapore 319579
Office Tel : (+65) 6507 8900
Office Fax : (+65) 6356 5489
Email : customer-care.sin@electrolux.com

natural_image
Repeating pattern of gray geometric shapes on white background, no text or symbols present
- Daftar Isi
- Ilustrasi
- Memasang botol air
- Menyediakan listrik
- Instruksi Operasi
- Dispensing air
- Dispensing air normal
- Sanitasi
- Welcome
- Environmental Notice
- Contents
- Attention
- Water dispenser information
- Precautions
- For children
- For the user/installer
- Illustration
- Using your water dispenser
- Locate dispenser
- Assemble
- Machine Installation
- Install water bottle
- Provide electricity
- Operation Instructions
- Activate heating and cooling
- Dispensing water
- Dispensing cold water
- Dispensing normal water
- Dispensing hot water
- Changing bottles
- Cleaning and maintenance
- Sanitizing
- To remove mineral deposits
- CAUTION
- Scald Hazard
- Water Leakage
- WARNING
- Electrical Shock Hazard
- Water dispenser does not work
- Water is leaking
- No water is coming from the spout
- Cold water is not cold
- Hot water is not hot
- Dispenser is noisy
- Water tastes
- Circuit diagram
- Customer Care
Brand : ELECTROLUX
Model : EQAXF01BXSI
Category : Water dispenser