
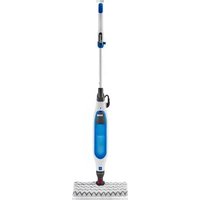
Klik n’ Flip Automatic S6003UKDB - Steam cleaner SHARK - Free user manual and instructions
Find the device manual for free Klik n’ Flip Automatic S6003UKDB SHARK in PDF.


| Product Type | Steam cleaner (steam mop) |
| Brand | Shark |
| Model | Klik n’ Flip Automatic S6003UKDB |
| Color | Blue/Black (typical) |
| Dimensions (L x W x H) | Approx. 30 x 20 x 115 cm |
| Weight | Approx. 2.5 kg |
| Power Supply | 220-240 V ~ 50/60 Hz |
| Power Consumption | 1500 W |
| Water Tank Capacity | 500 ml |
| Heating Time | Approx. 30 seconds |
| Steam Control | Adjustable steam settings |
| Mop Pad Type | Reusable microfiber pads (2 included) |
| Klik n’ Flip Technology | Flip and lock head for easy pad removal |
| Automatic Function | Self-cleaning mode |
| Suitable Floor Types | Sealed hardwood, tile, vinyl, laminate, marble |
| Swivel Head | 180° swivel for maneuverability |
| Cord Length | 7 m |
| Safety Features | Auto shut-off, lock-on steam trigger, cool-touch base |
| Included Accessories | 2 washable microfiber pads, measuring cup |
| Warranty | 2 years limited |
| Maintenance | Wash pads after each use; descale monthly |
| Repairability | Shark supports spare parts availability |
Frequently Asked Questions - Klik n’ Flip Automatic S6003UKDB SHARK
User questions about Klik n’ Flip Automatic S6003UKDB SHARK
0 question about this device. Answer the ones you know or ask your own.
Ask a new question about this device
Download the instructions for your Steam cleaner in PDF format for free! Find your manual Klik n’ Flip Automatic S6003UKDB - SHARK and take your electronic device back in hand. On this page are published all the documents necessary for the use of your device. Klik n’ Flip Automatic S6003UKDB by SHARK.
USER MANUAL Klik n’ Flip Automatic S6003UKDB SHARK
natural_image
Exterior view of a Shark vacuum cleaner on a textured base (no text or symbols visible)THANK YOU
for purchasing the Shark automatic steam mop with Kllk n' Fllp*.

Thank you for purchasing the Shark® automatic steam mop with Klik n' Flip*.

TIP: You can find the model and serial numbers on the QR code label located on the back of your unit.

TIP: You can locate the date code on one of the prongs of the power cord plug.


IPX4
REGISTER YOUR PURCHASE

sharkclean.eu/uk/register-guarantee

00 862 0453

an QR code using mobile device
RECORD THIS INFORMATION
Model Number:
Serial Number
Date Code:
Date of Purchase (Keep receipt):
Store of Purchase:
TECHNICAL SPECIFICATIONS
Voltage: 220-240V-, 50-60Hz
Watts:
1200W
Water Capacity: 350ml (11.8 oz)
PLEASE READ CAREFULLY AND KEEP FOR FUTURE REFERENCE.
These instructions are designed to help you get a complete understanding of your new Shark® automatic steam mop with Klik n' Flip®.
If you have any questions, please call the customer service line at 0800 862 0453.
CONTENTS
Getting to know your Steam mop ....5
Assembling your Steam mop 7
Using your Steam mop....9
Intelligent steam control 11
Caring for your carpet 12
Caring for your Steam mop....13
Ordering additional accessories....15
Troubleshooting guide....16
Frequently asked questions 17
Warranty 18

This appliance complies with the WEEE-Directive 2012/19/EU on the disposal of electrical and electronic equipment (WEEE).
This marking indicates that this product should not be disposed with other household wastes throughout the EU. To prevent possible harm to the environment or human health from uncontrolled waste
disposal, recycle it to promote the sustainable reuse of material sources. To return your used device, please use the return and collection systems or contact the retailer where this product was purchased. They can take this product for environmental safe recycling.
This appliance complies with the European directives for electromagnetic compatibility (EMC) 2014/30/EU and its revisions, as well as Low Voltage Directive (LVD) 2014/35/EU and its revisions.
Thank you for purchasing the Shark ^® automatic steam mop with Klik n' Flip ^® .
These instructions are designed to help you get a complete understanding of your new Shark Automatic Steam Mop with Klik n' Flip". Please read them carefully and keep for future reference.
If you should have a question about your Shark automatic steam mop with Klik n' Flip*, please call Shark Customer Service at 0800 862 0453.
The Shark Automatic steam mop with Klik n' Flip® is a complete solution for both deep steam cleaning and quick everyday cleaning. Whether you need to clean up tough stains with the Steam Blaster™ or need to quickly handle a spill, our next-generation Klik n' Flip® Mop Head and Dirt Grip™ Pads work with the Steam Mop to offer the ultimate in versatility and efficiency, making cleaning simple, quick and easy.
IMPORTANT SAFETY INSTRUCTIONS
WARNING This appliance is not intended for use by persons with reduced physical, sensory or mental capacities, or lack of experience and knowledge, unless they have been given supervision or Instruction concerning use of the appliance by a person responsible for the safety. Children shall not use or play with this appliance. Close supervision is necessary to keep appliance out of reach of children during use.
When using your Shark, Automatic Steam Mop with Kilk n' Flip*, basic safety precautions should always be followed, including the following:
Read all instructions before using your Shark, Automatic Steam Mop with Klik n' Flip ^® .
WARNING: Danger of scalding. The steam emitted from the steam mop is very hot and may cause scalding. Please use caution when using the steam mop.
WARNING: Keep steam mop away from children.
WARNING: Children should be supervised to ensure that they do not play with the appliance.
WARNING: TO REDUCE THE RISK OF FIRE, ELECTRIC SHOCK OR INJURY:
1 When in use never turn the steam mop over on its side or direct steam toward people, pets or plants.
2 Use the system only for its intended use.
3 DO NOT use for space-heating purposes.
4 DO NOT use outdoors.
5 DO NOT leave the appliance unattended when plugged in. Always unplug the power cord from the electrical outlet after use and before servicing.
6 DO NOT allow the steam mop to be used by children. Close attention is necessary when used near children, pets, or plants.
7 Use only as described in this owner's guide.
8 Use only manufacturer's recommended accessories.
9 DO NOT use with damaged cord or plug. If steam mop is not working as it should or has been dropped, damaged, leaking, left outdoors, or dropped into water, return it to Euro-Pro Europe Limited for examination and repair. Incorrect reassembly or repair can cause a risk of electrical shock or injury when the steam mop is used.
10 To protect against a risk of electric shock, DO NOT immerse the steam mop in water or any other liquids.
11 DO NOT handle the plug or steam mop with wet hands or operate it without wearing shoes.
12 DO NOT pull or carry by cord, use cord as a handle, close a door on cord, or pull cord around sharp edges or corners. Do not run steam mop over cord. Keep cord away from heated surfaces.
13 DO NOT unplug by pulling on power cord. To unplug, grasp the plug not the power cord. Do not use extension cords or outlets with inadequate current-carrying capacity.
SAVE THESE INSTRUCTIONS
PLEASE READ CAREFULLY BEFORE USE
14 DO NOT put any objects into the steam nozzle openings. Discontinue use if the steam nozzle is blocked.
15 DO NOT put hands or feet under the steam mop. It gets very hot.
16 Use ONLY on flat, horizontal surfaces. DO NOT use on walls, counters, or windows.
17 DO NOT use on leather, wax-polished furniture, synthetic fabrics, velvet, or other delicate, steam-sensitive materials.
18 DO NOT add cleaning solutions, scented perfumes, oils, or any other chemicals to the water used in the steam mop as this may damage it or make it unsafe for use. If you live in a hard-water area, we recommend using distilled water in your steam mop.
19 Never leave any Dirt Grip™ pad in one spot while using or storing for any period of time, as this may damage your surfaces.
20 The liquid or steam must not be directed towards equipment containing electrical components, such as the interior of ovens.
21 You can release the Dirt Grip pad after you have unplugged the steam mop and allowed it to cool.
22 When cleaning the exterior of the steam mop, unplug the power cord from the electrical outlet and clean the steam mop with a dry or damp cloth. Do not pour water or use alcohol, benzene, or paint thinner on the steam mop.
23 Extreme caution should be exercised when using the steam mop to clean stairs.
24 Never use steam mop without the Dirt Grip pad attached.
25 Keep your work area well lit.
26 Store steam mop indoors in a cool, dry place.
27 To avoid circuit overload, do not operate another appliance on the same socket (circuit) as the steam mop.
28 To avoid scalding injuries, always unplug and allow the steam mop to cool before removing or changing mop heads, accessories, or Dirt Grip pads.
WARNING: Your steam mop is designed to clean hard-floor surfaces that will withstand high heat. Do not use on unsealed wood or unglazed ceramic floors. On surfaces that have been treated with wax and on some no-wax floors, the sheen may be removed by the heat and steam action. It is always recommended to test an isolated area of the surface to be cleaned before proceeding. We also recommend that you check the use and care instructions from the floor care and use.
GETTING TO KNOW YOUR STEAM MOP
WELCOME!
Congratulations on your purchase. Use this instruction manual to learn about your new steam mop great features. From assembly to use to maintenance, you will find it all in here.
When assembling your steam mop there may be a little water in or around the water tank. This is because we test all our steam mops before you buy them, so you get a quality Shark ^® automatic steam mop with Klik n' Flip ^® .
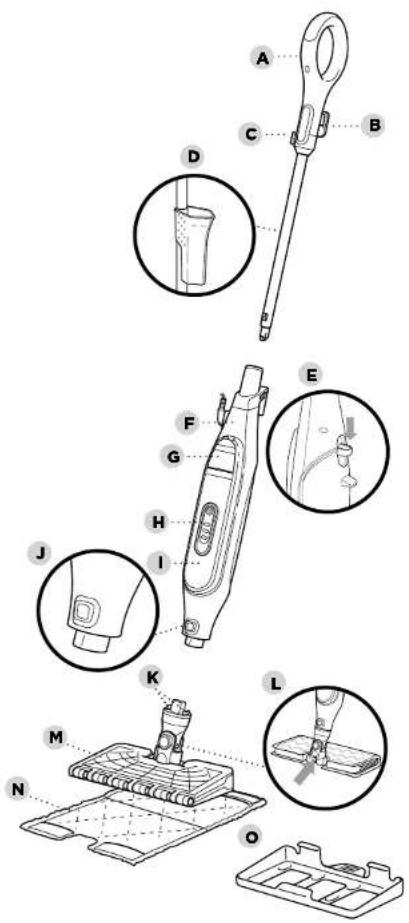
MAIN UNIT
A Steam mop Handle
B Quick-Release Cord Holder
C Cord Management Clip
D Filling Flask (clips to steam mop pole)
E Steam mop Pad Release Button
F Steam mop Body
G Water Tank Lid
H Steam Control Button
Water Tank
J Mop Head Release Button
K Secondary Release Buttons
L Steam Blaster * Nozzle
M Klik n' Flip® Mop Head
N Dirt Grip Pad
- Carpet Glider
ASSEMBLING YOUR STEAM MOP
WARNING: Always make sure the steam mop is UNPLUGGED when not in use. Never fill the steam mop or attach the mop head when the steam mop is plugged into an electrical outlet. Unplug from the electrical outlet and allow to cool before you fill the steam mop, or attach or remove the head. To prolong the life of your steam mop, we recommend using distilled water. Make sure you add only water to the tank. Chemicals or cleaning solutions (including vinegar) may damage the steam mop and could be unsafe for you and your family.
natural_image
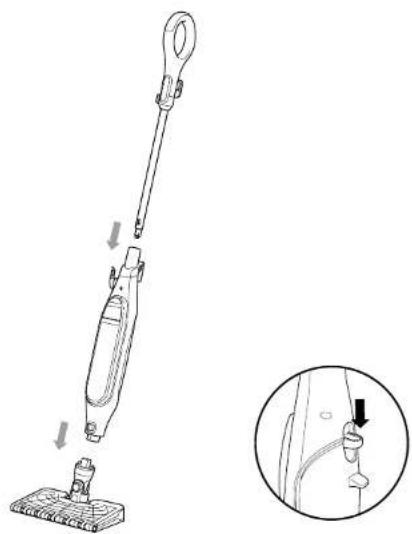
Line drawing of a vacuum cleaner with a magnified inset showing the cable connection detail (no text or symbols)1 Insert the steam mop handle into the steam mop body. Push the handle in until you hear it click into place.
2 Slide the Klik n' Flip® Mop Head into the steam mop body. Push until you hear it click securely into place. To detach the Klik n' Flip® Mop Head, press the release button and slide off.
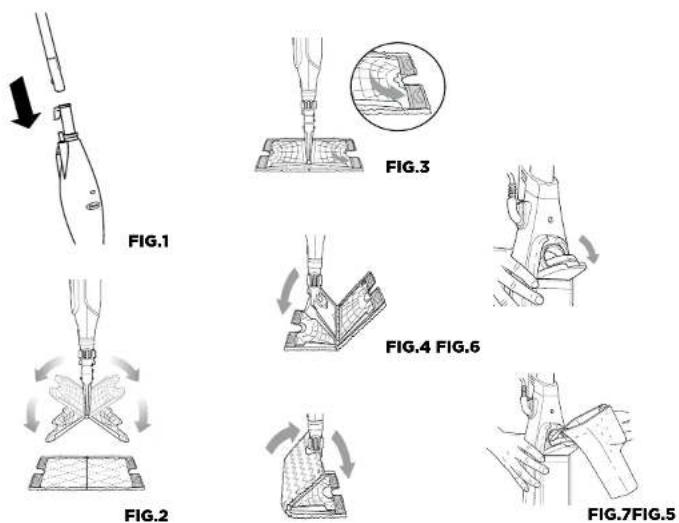
3 To attach the Dirt Grip™ pad, spread the pad on the floor with the pocket side up. Center the Klik n' Flip® Mop Head above the pad (FIG. 1), then press the pad release button on the back of the steam mop body. (FIG. 2) Both sides of the Klik n' Flip® Mop Head will drop open. (FIG. 3) Slip the Klik n' Flip® Mop Head's four
corner tabs into the four corner pockets of the pad (FIG. 3) Gently press one side of the Klik n' Flip® Mop Head to the floor until that side clicks into place. (FIG. 4) Repeat on the other side.
4 Pull down on the water tank lid to open.
5 Use the filling flask to pour water into the water tank. Water can be poured into the tank directly. Do not overfill past the water line on the fill flask. Press the water tank lid firmly to close it.
(FIG. 5)
USING YOUR STEAM MOP
IMPORTANT: Make sure you do not use the steam mop without attaching a Dirt Grip™ pad and adding water to the water tank first. When you are using the steam mop for the first time, it might take longer than the normal 30 seconds to start steaming.
IMPORTANT: Do not use on unsealed wood or unglazed ceramic floors. On surfaces that have been treated with wax and on some no-wax floors, the sheen may be removed by the heat and steam action. Test an isolated area of the surface to be cleaned before proceeding. Check the care and use instructions from the floor manufacturer.

TIP: To prolong the life of your steam mop, we recommend using distilled water.

TIP: Sweep or vacuum your floors prior to cleaning with your steam mop.
CAUTION: While in Steam Blaster mode, do not leave stationary for more than one minute.
CAUTION: Do not scrub any one area for an extended period of time.
natural_image
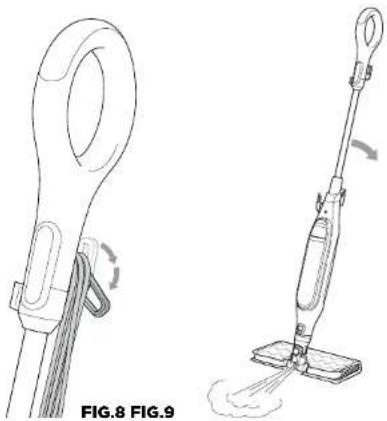
Line drawings of a hand pump and its motion control device (no text or symbols)1 Twist the Quick-Release Cord Holder to unwrap the power cord completely. (fig. 9) Plug into an electrical outlet.
2 When it's first plugged in, the unit will be in Standby mode. The 3 lights below the Steam Control Button will blink to indicate Standby mode.
3 To select the steam mode, press the Steam Control Button once for LOW (1 blue light) twice for MED (2 blue lights) or three times for HI (3 blue lights).
4 Clean your floors with a forward and backward motion.
5 When you need an extra burst of steam to clean a stuck-on stain, you can use the Steam Blaster™ feature. Flip the head over so that it is behind the mop body, then tilt the mop handle down. This will cause the Steam Blaster (fig. 10) to emit a concentrated blast of steam onto the stain.
6 To stop the Steam Blaster spray, simply raise the handle. You can then flip the mop head back into its original position and continue cleaning.
7 When you have finished mopping, press the Steam Control Button. The three blue lights will plink, indicating that the unit is in Standby mode. Once in Standby mode, unplug the unit.
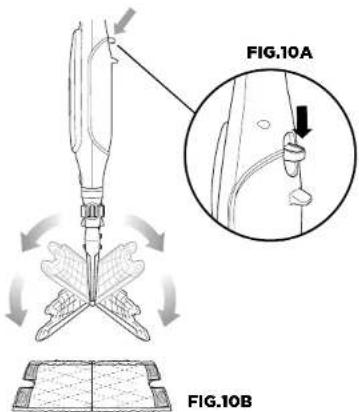
8 To remove the Dirt Grip™ pad, simply lift the steam mop straight up by the handle until the Klik n' Flip® Mop Head is hanging straight down. Press the Release button on the back of the steam mop body (fig 10a), and both sides of the head will drop open releasing the pad. (fig 10b)
9 Once the Dirt Grip pad has been released, close the Klik n' Flip® Mop Head. To close, gently press one side of the Klik n' Flip® Mop Head to the floor until that side clicks into place. Repeat on the other side.
10 When the water tank is empty, the steam mop will stop producing steam. You can refill the water tank at any time as long as the steam mop is unplugged. Follow the water tank filling instructions on page 8.
NOTE: Please wait 2 to 3 minutes for the steam mop to cool off before switching the mop head. Never leave the steam mop with a damp/wet Dirt Grip pad on any floor for an extended period of time.
INTELLIGENT STEAM CONTROL
The Shark® automatic steam mop with Klik n' Flip®, has 3 unique Intelligent Steam Control settings so you can use the right amount of steam for the cleaning task at hand. See below for tips on when to use each setting.
* Sanitisation studies were conducted under controlled test conditions. Household conditions and results may vary. With Klk n' Flip® Mop in HI mode only when used with steam mop. Not in Steam Blaster mode.
| SETTING IDEAL FOR THESE SEALED SURFACES | RECOMMENDED USAGE | |
LOW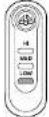 | LaminateHardwoodMarble | Cleaning delicate surfacesLight cleaning and dustingLoose ring and lifting light dirt |
MED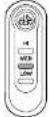 | HardwoodMarbleTileStone | Cleaning sea ed surfaces and large areasBasic, everyday cleaningRemoving spots and smaller messesCleaning moderate and heavy traffic areas |
...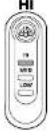 | HardwoodMarbleTileStone | Deep cleaning and cleaning hard to clean surfacesTough cleaning and removing stuck-on messes and stainsDeep cleaning heavy traffic areasCutting through heavy dirt and grime |
| Steam Blaster* | For an extra burst of steam, you can use the Steam Blaster feature in LOW, MED and HI.Follow the instructions found on the "Using your Steam mop" page. | |
TO SANITIZE® WITH THE STEAM MOP USING THE KLIK N' FLIP MOP HEAD AND THE DIRT GRIP™ PAD:
1 Attach a clean Dirt Grip pad to the Klk n' Flip® Mop Head.
2 Plug in the unit and press the Steam Control Button to select the HI Setting.
3 Wait 30 seconds for the unit to begin producing steam.
4 Start mopping on an appropriate sealed hard-floor surface with a forward and backward motion. After three minutes, your unit is ready to be used to sanitize.
5 Using a forward and backward motion, move the unit over the area you seek to sanitize. Repeat at least 5 times.
CARING FOR YOUR CARPETS
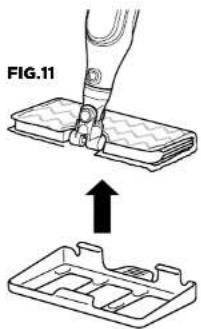
1 Start by brushing your carpet with a thick-bristle brush or deck scrub. This will loosen larger particles of dirt. You should then vacuum the entire area.
2 Attach a dirt pad to the mop head following the instructions on page 8. Once attached simply clip on the carpet glider to the floorhead (fig.11).
3 We recommend that you first test an isolated area of the floor surface to be cleaned as well as review the care and use instructions from your carpet manufacturer.
5 You will quickly find that stains and ground-in dirt are loosened by the sheer power of steam alone. However, some debris may be left behind. As Shark steam mops use the optimum amount of water for the job, your carpets won't be saturated after cleaning. You should be able to vacuum the loosened dirt immediately, leaving your carpet looking like new.
6 In order to ensure your carpet is given the opportunity to dry completely, you should ventilate the room and prevent people from walking over the area you've just cleaned for between two and three hours.
TIP: Transform your Shark Steam Mop into an effective carpet cleaner. Quickly freshen up and deodorise carpets. The carpet glider easily clips over the top of the Dirt Grip Pad head, letting your steam mop glide over carpets and rugs.
CARING FOR YOUR Steam mop
AFTER USE AND STORAGE
1 Press the Steam Control Button until the three lights below start to blink, indicating that you are in Standby mode. Unplug the cord from the outlet and place the steam mop into the upright position. Let it cool.
2 To remove the Dirt Grip* pad, lift the steam mop straight up by the handle until the Klk n' Flip® Mop Head is hanging straight down. Press the Release button on the back of the steam mop body, and both sides of the Klk n' Flip® Mop Head will drop open, releasing the pad. Once the pad has been released, close the Klk n' Flip® Mop Head.
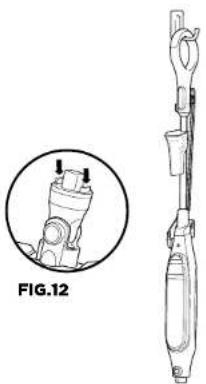
3 If the Klik n' Flip® Mop Head is not attached to the mop, the pad can still be removed. Press the two red secondary pad release buttons located on the sides of the Klik n' Flip® Mop Head post to release the pad. (fig. 12)
4 Empty the water tank before storing. To empty the tank, hold the steam mop beside a sink. Open the water tank lid, then can the unit over the sink. Let the water drain out, then close the lid.
5 To store the steam mop, wait until after it has cooled and the steam has been released. Then remove the Klik n' Flip® Mop. Head and hang the steam mop by its handle on a large hook (not included). (fig. 13)
6 Store the filling flask by attaching it to the top handle pole of the steam mop.
natural_image
Technical line drawing of a mechanical device with an inset circular detail showing internal components (no text or symbols)FIG.13
CARING FOR YOUR Steam mop CONTINUED
DIRT GRIP PAD CARE INSTRUCTIONS
Care
Machine-wash the Dirt Grip pads separately with warm water using liquid detergent.
NEVER USE BLEACH, POWDERED DETERGENT, OR FABRIC SOFTENERS
as they may damage or leave a coating on the Dirt Grip pads that will reduce their cleaning performance and absorbency. Dirt Grip pads should be line-dried or tumble-dried on a low setting, as this will extend the life of the microfiber fabric, (fig. 14)
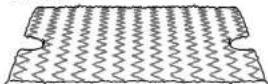
FIG.14
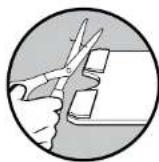
Loose fibers can indicate wearing of the microfiber fabric. Do not pull the loose fibers, as this can cause the weave to come undone. Simply trim the loose fibers with scissors. (fig. 15)
FIG.15

Replacement Dirt Grip pads
For best cleaning results, we recommend replacing your Dirt Grip pads every 3 to 4 months following normal use. As with any fabric, dirt particles, grease, friction, and repeated washing can cause the fibers to break down, and you may notice an increase in the effort needed to push or pull the steam mop.
You can purchase replacement Dirt Grip pads and other accessories by visiting sharkclean.eu or calling 0800 862 0453.
STEAM NOZZLE CARE
If you believe the main steam nozzle or the Steam Blaster™ nozzle is clogged, please contact Customer Service on 0800 862 0453 or www.snarkclean.eu/uk
REPLACEMENT PARTS
To replace accessories please contact Shark Customer Service on 0800 862 0453 or www.sharkclean.eu/uk.
ORDERING
ADDITIONAL ACCESSORIES
| ACCESSORY | |
| Klik n' Flip* Mop HeadGreat for all-purpose cleaning. Get an extra boost for tough stains from the Steam Blaster", and cut your cleaning time in half with the hands-free two-sided pad. | 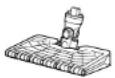 |
| Dirt GrlpTM PadDouble-sided pad. Easy, hands-free installation and removal. Washable and reusable. | 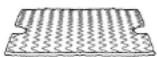 |
| Triangle Scrubber HeadTriangle shape is perfect for cleaning corners and hard-to-reach areas. Equipped with a Steam Blaster to help loosen stains and a deployable scrubber to tackle stuck-on spots. | 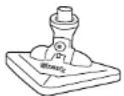 |
| Triangle Scrubber PadIdeal for cleaning corners and other hard-to-reach spaces. Easy to install and remove. | 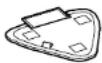 |
| Filling FlaskFilling line makes it simple and convenient to fill the water tank. Flask attaches to the handle for easy storage. |  |
TROUBLESHOOTING GUIDE
| PROBLEM POSSIBLE REASONS & SOLUTIONS | |
| The steam mop isn't producing any steam. | The steam mop should be securely plugged into an electrical outlet. Check your fuse or circuit breaker or try a different outlet.Make sure the water tank is full, the unit is plugged in, and the light around the Steam Control Button is solid.If the lights below the Steam Control Button are not illuminated, try a different electrical outlet.If the lights below the Steam Control Button are blinking, press the Steam Control Button to select a Steam setting.If the lights below the Steam Control Button are solid, wait 30 seconds for the unit to warm up.If after following the above steps the steam mop still does not produce any steam, contact Customer Service at 0800 862 0453 or www.sharkclean.eu/uk. |
| The steam mop is producing intermittent steam. | This is normal—for more consistent steam select the HI setting.Also make sure the water tank is full. |
| I can't select a Steam Setting. | Make sure the steam mop is plugged in and the lights below the Steam Control Button are solid.If your steam mop is producing steam but the lights below the Steam Control Button are not lit, call customer service at 0800 862 0453. |
| I am getting streaky/cloudy floors. | The Dirt Grip" pad might be dirty. If it is, flip it over to the clean side or change it entirely. If you washed the Dirt Grip pad with powdered detergent, then it could be damaged and require replacement.This could also be an indication of soap or grease residue that has accumulated on the floor. As the steam mop uses only a small amount of water, it may not be enough to rinse off the accumulation of residue that the steam is bringing to the surface. We suggest rinsing the floor with nothing but water, letting it dry, and then steam mopping again with a clean Dirt Grip pad. One or more rinses will generally remove the residue.A more stubborn case may require you to rinse the floor with a mix of one part vinegar and two parts water* (but DO NOT put any cleaning solutions or chemicals into the steam mop's water tank.)*Please consult your flooring manufacturer's care and maintenance instructions before applying any cleaning products or solutions. |
| It's really hard for me to push/pull the steam mop. | The steam mop might be hard to push/pull if the Dirt Grip pad isn't wet enough. It should get easier to push/pull the steam mop after it's been running for a few minutes.An overly dirty pad could also result in a harder push/pull experience. We recommend flipping the pad over or using a clean pad. |
FREQUENTLY ASKED QUESTIONS
| QUESTION ANSWER | |
| What surfaces can I use the Steam Mop on? | The steam mop is designed for use on all sealed hard-floor surfaces. We recommend that you first test an isolated area of the floor surface to be cleaned as well as review the use and care instructions from your floor manufacturer.WARNING: Do not use on leather, wax-polished furniture, synthetic fabrics, velvet, or other delicate, steam-sensitive materials.NOTE: On surfaces treated with wax and on some no-wax floors, the sheen may be removed by the heat or steam action of the unit. Test an isolated area of flooring first to see if sheen is affected. |
| Can I use the steam mop on carpets? | Yes, but only when attaching the carper slider to ensure it slides across fabric. |
| Can I put something other than water in the water tank of the steam mop? | DO NOT add cleaning solutions, scented perfumes, oils, or any other chemicals to the water used in this appliance, as this may damage the unit or make it unsafe for use. We recommend using distilled water in your steam mop. |
Shark|NINJA WARRANTY TERMS AND CONDITIONS
When a consumer buys a product in the UK, they get the benefit of legal rights relating to the quality of the product (your "statutory rights"). You can enforce those rights against your retailer. However, at Shark we are so confident about the quality of our products that we give you an additional manufacturer's warranty of up to two years. These terms and conditions relate to our manufacturer's warranty only - your statutory rights are unaffected. The conditions below describe the prerequisites and scope of our warranty. They do not affect your statutory rights or the obligations of your retailer and your contract with them.
Shark Guarantees
A household appliance like a steam mop constitutes a sizeable investment. Your new machine needs to work properly for as long as possible. The guarantee it comes with is an important consideration - and reflects how much confidence the manufacturer has in its product and manufacturing quality.
Every Shark' machine comes with a free parts and labour guarantee. Our customer service hotline (0800 862 0453) is open from 9:00am to 6:00pm Monday - Friday. It's free to call, and you'll be put straight through to a Shark representative. You'll also find online support at www.sharkclean.eu/uk.
How do I register my extended Shark guarantee?
You can register your guarantee online within 28 days of purchase. To save time, you'll need the following information about your machine:
• Serial number (on the machine rating label)
• Date you purchased the machine (receipt or delivery note)
• To register online, please visit www.sharkclean.eu/uk/register-guarantee
IMPORTANT
- Both the 1 year and the extended further 1 year guarantee will only cover your product from the date of purchase. - Please keep your receipt at all times. Should you need to use your extended guarantee we will need your
receipt to verify the information you have supplied to us is correct. The inability to produce a valid receipt may invalidate your guarantee.
What are the benefits of registering my free Shark guarantee?
When you register your guarantee we'll have your details to hand if we ever need to get in touch. You can also receive tips and advice on how to get the best out of your Shark steam mop and hear the latest news about new Shark technology and launches.
If you register your guarantee online, you'll get instant confirmation that we've received your details.
How long are new Shark' machines guaranteed for?
Our confidence in our design and quality control means that your new Shark's steam mop is guaranteed for a total of two years. ('year and the extended further warranty of 1 year).
What is covered by the free Shark guarantee?
Repair or replacement of your Shark machine (at Shark's discretion), including all parts and labour. A Shark guarantee is in addition to your legal rights as a consumer.
What is not covered by the free Shark guarantee?
• Normal wear and tear.
- Accidental damage, faults caused by negligent use or care, misuse, neglect, careless operation or handling of the steam mop which is not in accordance with the Shark Operating Manual supplied with your machine.
• Use of the steam mop for anything other than normal domestic household purposes.
- Use of parts not assembled or installed in accordance with the operating instructions.
• Use of parts and accessories which are not Shark. * Genuine Components
- Faulty installation (except where installed by Shark)
• Repairs or alterations carried out by parties other than Shark or its agents.
What happens when my guarantee runs out?
Shark does not design products to last for a limited time. We do appreciate that there may be a desire for our customers to want to repair their steam mops after the warranty has elapsed. In this case please contact our free phone customer service help line and ask about our out warranty program, on 0800 862 0453.
Where can I buy genuine Shark spares and accessories?
Shark' spares and accessories are developed by the same engineers who developed your Shark steam mop. You'll find a full range of Shark' spares and replacement parts for all Shark machines at www.sharkclean.eu/uk/parts. Accessories are at
www.sharkclean.eu/uk/accessories.
Please remember that using non-Shark' spares invalidates your guarantee.
Euro-Pro Europe Limited,
3150 Century Way,
Thorpe Park, Leeds,
LS15 8ZB, UK
0800 862 0453
www.sharkclean.co.uk
Illustrations may differ from actual product. We are constantly striving to improve our products, therefore the specifications contained herein are subject to change without notice.
©2020 Euro-Pro Europe LTD.
KLIK N' FLIP and SHARK are registered trademarks of SharkNinja Operating LLC.
DIRT GRIP and STEAM BLASTER are trademarks of SharkNinja Operating LLC.
© 2020 Euro-Pro Europe Ltd
S6003UKDB_12_IB_MP_200630_Mv1
PRINTED IN CHINA
- THANK YOU
- REGISTER YOUR PURCHASE
- RECORD THIS INFORMATION
- TECHNICAL SPECIFICATIONS
- PLEASE READ CAREFULLY AND KEEP FOR FUTURE REFERENCE.
- CONTENTS
- IMPORTANT SAFETY INSTRUCTIONS
- SAVE THESE INSTRUCTIONS
- GETTING TO KNOW YOUR STEAM MOP
- WELCOME!
- MAIN UNIT
- ASSEMBLING YOUR STEAM MOP
- USING YOUR STEAM MOP
- INTELLIGENT STEAM CONTROL
- TO SANITIZE® WITH THE STEAM MOP USING THE KLIK N' FLIP MOP HEAD AND THE DIRT GRIP™ PAD:
- CARING FOR YOUR CARPETS
- CARING FOR YOUR Steam mop
- AFTER USE AND STORAGE
- CARING FOR YOUR Steam mop CONTINUED
- DIRT GRIP PAD CARE INSTRUCTIONS
- Care
- NEVER USE BLEACH, POWDERED DETERGENT, OR FABRIC SOFTENERS
- FIG.15
- Replacement Dirt Grip pads
- STEAM NOZZLE CARE
- REPLACEMENT PARTS
- ORDERING
- ADDITIONAL ACCESSORIES
- TROUBLESHOOTING GUIDE
- FREQUENTLY ASKED QUESTIONS
- Shark|NINJA WARRANTY TERMS AND CONDITIONS
- Shark Guarantees
- How do I register my extended Shark guarantee?
- IMPORTANT
- What are the benefits of registering my free Shark guarantee?
- How long are new Shark' machines guaranteed for?
- What is not covered by the free Shark guarantee?
- What happens when my guarantee runs out?
Brand : SHARK
Model : Klik n’ Flip Automatic S6003UKDB
Category : Steam cleaner