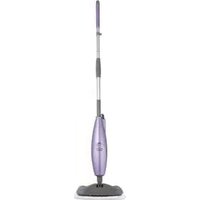
S3455 - Steam cleaner SHARK - Free user manual and instructions
Find the device manual for free S3455 SHARK in PDF.


| Product Type | Steam cleaner |
| Brand | Shark |
| Model | S3455 |
| Dimensions (LxWxH) | 12.6 x 8.3 x 10.2 inches |
| Weight | 4.5 lbs |
| Water Tank Capacity | 15 oz |
| Power Supply | 120 V, 60 Hz |
| Power Consumption | 1500 W |
| Heating Time | 30 seconds |
| Steam Output | Up to 24 g/min |
| Steam Temperature | 212°F (100°C) |
| Continuous Steam Time | Up to 15 minutes |
| Features | Removable water tank, trigger control, ready indicator light |
| Included Accessories | Microfiber pad, detail brush, scrubber, squeegee |
| Maintenance | Descale regularly with vinegar solution |
| Safety | Auto shut-off when water level low, pressure relief valve |
| Warranty | 1 year limited |
Frequently Asked Questions - S3455 SHARK
User questions about S3455 SHARK
0 question about this device. Answer the ones you know or ask your own.
Ask a new question about this device
Download the instructions for your Steam cleaner in PDF format for free! Find your manual S3455 - SHARK and take your electronic device back in hand. On this page are published all the documents necessary for the use of your device. S3455 by SHARK.
USER MANUAL S3455 SHARK
natural_image
Close-up of a textured rectangular object with a purple-tinted tool inserted, no visible text or symbols.IMPORTANT SAFETY INSTRUCTIONS
For Household Use Only
WHEN USING YOUR SHARK® STEAM MOP, BASIC SAFETY PRECAUTIONS SHOULD ALWAYS BE FOLLOWED, INCLUDING THE FOLLOWING:
READ ALL INSTRUCTIONS BEFORE USING YOUR STEAM MOP.
DANGER OF SCALDING.
Please use caution when using the steam mop. The steam emitted from the steam mop is very hot.
IMPORTANT:
This appliance is not intended for use by persons (including children) with reduced physical, sensory or mental capabilities or lack of experience and knowledge unless they have been given supervision or instruction concerning use of the appliance by a person responsible for their safety. Children should be supervised to ensure that they do not play with the appliance.
WARNING:
TO REDUCE THE RISK OF FIRE,
ELECTRIC SHOCK OR INJURY:
-
Use the system only for its intended use.
-
DO NOT use outdoors.
-
DO NOT leave the appliance unattended when plugged in. Always unplug the power cord from the electrical outlet when not in use and before servicing.
-
DO NOT allow the appliance to be used by children. Close attention is necessary when used by or near children, pets or plants.
-
Children should be supervised to ensure that they do not play with the appliance.
-
Use only as described in this manual.
-
Use only manufacturer's recommended accessories.
-
DO NOT operate the appliance with a damaged plug or cord, or if the unit has been dropped or damaged. To avoid the risk of electric shock, do not disassemble or attempt to repair the appliance on your own. If the supply cord is damaged, it must be replaced by a qualified electrician in order to avoid a hazard. Incorrect re-assembly or repair can cause a risk of electrical shock or injury to persons when the appliance is used.
-
To protect against a risk of electric shock, DO NOT immerse the steam mop into water or any other liquids.
-
DO NOT handle plug or steam mop with wet hands or operate appliance without shoes.
-
DO NOT pull or carry by power cord, use power cord as handle, close a door on the power cord, or pull the power cord around sharp edges or corners. Keep power cord away from heated surfaces.
-
DO NOT unplug by pulling on power cord. To unplug, grasp the plug not the power cord. Do not use extension cords or outlets with inadequate current carrying capacity.
-
DO NOT put any objects into openings. Do not use with any opening that is blocked.
-
DO NOT put hands or feet under the steam mop. Unit gets very hot.
-
Use O NLY on flat, horizontal surfaces. Do not use on walls, counters or windows.
-
DO NOT use on leather, wax polished furniture or floors, synthetic fabrics, velvet or other delicate, steam sensitive materials.
-
Liquid or steam must not be directed towards equipment containing electrical components, such as the interior of ovens.
-
DO NOT add cleaning solutions, scented perfumes, oils or any other chemicals to the water used in this appliance as this may damage the unit or make it unsafe for use. If you live in a hard water area, we recommend using distilled water in your steam mop.
-
When in use, NEVER turn the appliance over or on its side. NEVER DIRECT STEAM TOWARDS PEOPLE, ANIMALS OR PLANTS.
-
NEVER LEAVE THE STEAM MOP IN ONE SPOT ON ANY SURFACE FOR ANY PERIOD OF TIME WITH THE CLEANING POCKET ATTACHED AS THIS WILL DAMAGE YOUR FLOORS.
-
Carefully remove the cleaning pocket immediately after you have unplugged and allowed the steam mop to cool.
-
When cleaning the steam mop, unplug the power cord from the electrical outlet and clean with a dry or damp cloth. Do not pour water or use alcohol, benzene or paint thinner on the unit.
-
Extreme caution should be exercised when using this appliance to clean stairs.
-
Never use steam mop without a cleaning pocket attached.
- Keep your work area well lit.
- Store steam mop indoors in a cool, dry place.
- To avoid circuit overload, do not operate another appliance on the same socket (circuit) as the steam cleaner.
- If an extension cord is absolutely necessary, an extension cord rated a minimum of 15 ampere, 14 gage cord should be used. Cords rated for less amperage may overheat. Care should be taken to arrange cord so that it cannot be pulled or tripped over.
- DO NOT leave unattended when the system is connected to a power supply or electrical outlet. Turn off all controls before unplugging the unit.
- DO NOT store unit with damp or wet cleaning pocket attached. Never leave the steam mop in one spot on any surface for any period of time with a damp or wet cleaning pocket attached as this will damage your floors
- Always unplug and allow the steam mop to cool before removing or changing mop heads.
- Make sure that the water tank door closed when using the appliance.
WARNING: Your steam mop is designed to clean hard floor surfaces that will withstand high heat. Do not use on unsealed wood or unglazed ceramic floors. On surfaces that have been treated with wax or some no wax floors, the sheen may be removed by the heat and steam action. It is always recommended to test an isolated area of the surface to be cleaned before proceeding. We also recommend that you check the use and care instructions from the floor manufacturer.
SAVE THESE INSTRUCTIONS
This appliance complies with the WEEE-Directive 2002/96/EC on the disposal of electrical and electronic equipment (WEEE).
This appliance complies with the European directives for electromagnetic compatibility (EMC) 2004/108/EC and its revisions, as well as Low Voltage Directive (LVD) 2006/95/EC and its revisions.
natural_image
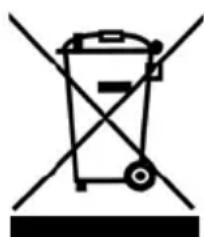
Symbol of a trash bin with crossed lines indicating no waste or discharge (no text or labels)This marking indicates that this product should not be disposed with other household wastes throughout the EU. To prevent possible harm to the environment or human health from uncontrolled waste disposal, recycle it responsibly to promote the sustainable reuse of material sources. To return your used device, please use the return and collection systems or contact the retailer where this product was purchased. They can take this product for environmental safe recycling.
This product has no on/off switch and operates when plugged into the main supply source. Disconnect the plug from mains after use.
Although the product is not provided with standby mode or off mode, it still fulfills the requirements of 1275/2008/EC - the directive for Eco-Design requirements since according to technical justification, it is considered as inappropriate to provide standby and off modes when connecting to mains. To reduce energy consumption be sure to unplug the unit after use.
Guarantee: This product is unconditionally guaranteed for one year against all defects of workmanship and materials. This guarantee does not affect your statutory rights. If this product proves unsatisfactory please contact our customer service department on freephone 0800 781 7831.
This manual covers model:
S3455UKJR 11
TECHNICAL SPECIFICATIONS
Voltage: 220-240V\~, 50/60Hz.
Power: 1550 Watts
Water Capacity: 300 ml
Contents
Thank you for purchasing the Shark® Professional SLIM Steam Pocket® Mop.
Getting Started ....2 Using Your Steam Mop ....5 Care of Your Steam Mop ....8 Troubleshooting Guide ....10
Getting Started
When assembling your steam mop there may be a little water in or around the water tank. This is because we test all our steam mops 100% before you buy them, so you get a quality Shark® Professional SLIM Steam Pocket® Mop.
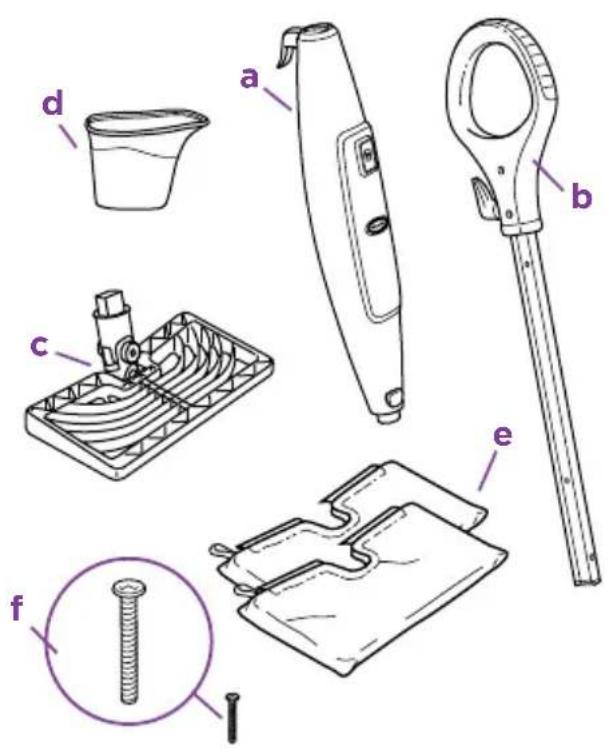
a Steam Mop Body
b Mop Handle
c All-Purpose Mop Head (1)
d Filling Flask
e Two-Sided All Purpose Cleaning Pockets for the All-Purpose Mop Head (2)
f (1) 6mm x 52mm Large Screw*
*Phillips or flat head screwdriver can be used. Screwdriver not included.
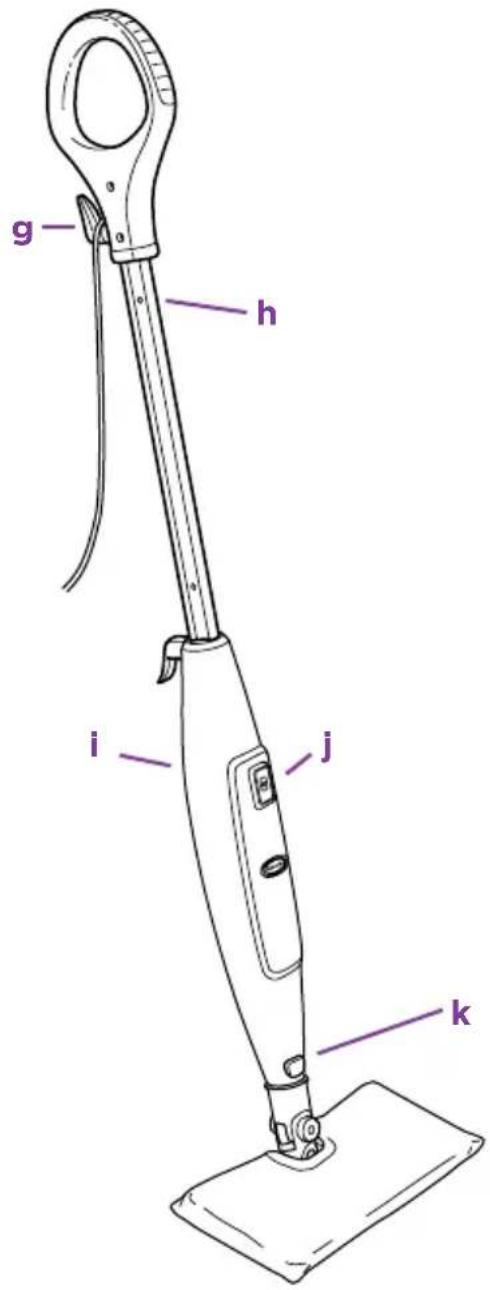
g Quick Release Swivel Cord Wrap
h Cord Clip
i Water Tank
j STEAM CONTROL Button
k Mop Head Release Button
IMPORTANT: Always make sure the mop is UNPLUGGED from the wall when not in use. Never fill the mop, attach the mop head, change or remove the cleaning pocket when the mop is plugged into the wall. To prolong the life of your Shark® Professional SLIM Steam Pocket® Mop, we recommend using distilled water. Make sure you only add water to the tank. Chemicals or cleaning solution may damage the appliance and could be unsafe for you and your family.
ASSEMBLE
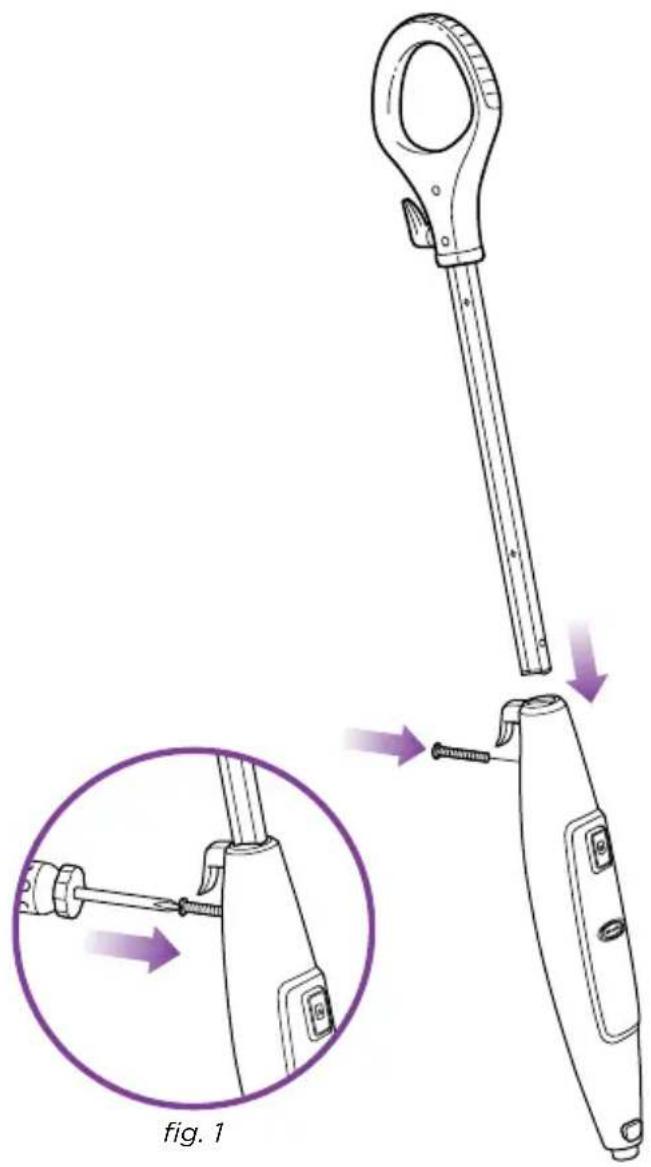
1 Insert the Mop handle end labeled "Front" into the steam mop body. Make sure it is inserted past the line printed on the pole. Secure the assembled handle and pole by using the large screw and a Phillips or a flat head screwdriver (screwdriver not included). (fig. 1)
Getting Started - cont'd
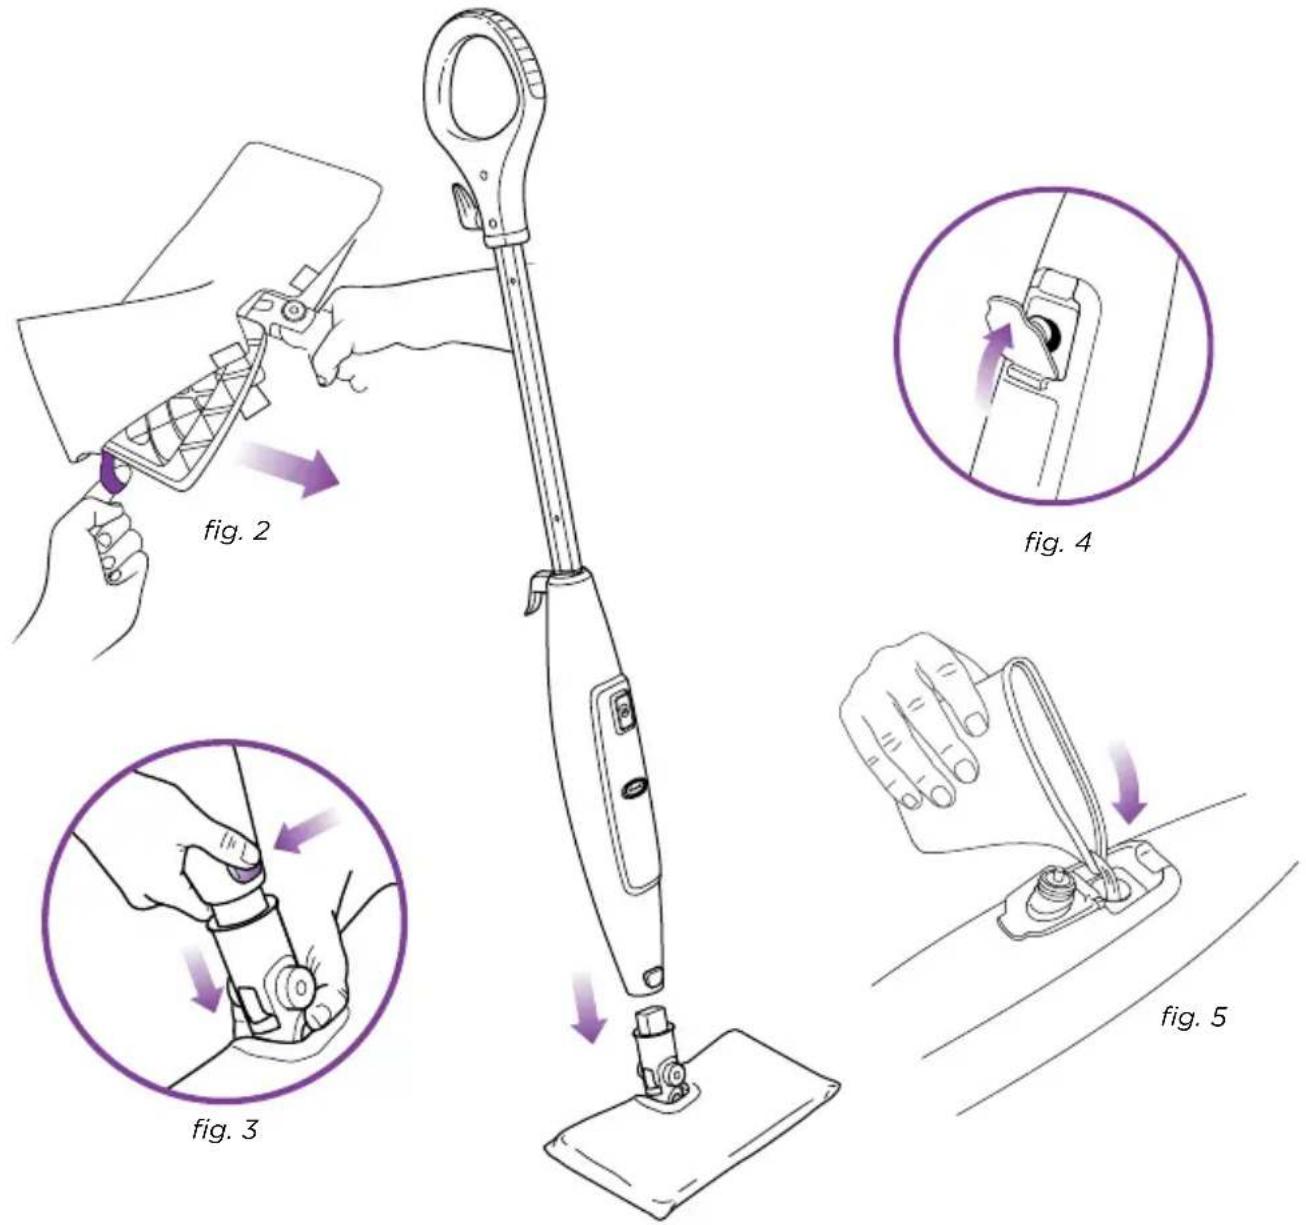
2 Use the lavender loop on the side of the cleaning pocket to slide the mop head into the cleaning pocket. Then secure the quick fasteners on the top of the pocket to lock in place. (fig. 2)
3 Snap the mop head into the base to secure it. (fig. 3)
4 Open the water tank door. (fig. 4)
Use the filling flask and pour water into the tank. Do not overfill. Press the water tank door firmly to close. (fig. 5)
IMPORTANT: Do not use on unsealed wood or unglazed ceramic floors. On surfaces that have been treated with wax or some no wax floors, the sheen may be removed by the heat and steam action. It is always recommended to test an isolated area of the surface to be cleaned before proceeding. We recommend that you check the use and care instructions from the floor manufacturer.
Using Your Steam Mop
IMPORTANT: Do not use the mop without attaching a cleaning pocket and adding water to the tank first. When you are using the mop for the first time, it might take longer than the normal 30 seconds to start steaming.
natural_image
Diagram of a hand holding a rope with purple arrows indicating force or movement (no text or symbols)fig. 6
natural_image
Line drawing of a hand holding a device with a purple warning label and directional arrows (no text or symbols)fig. 7
IMPORTANT: Sweep or vacuum your floors prior to cleaning with your Steam Mop.
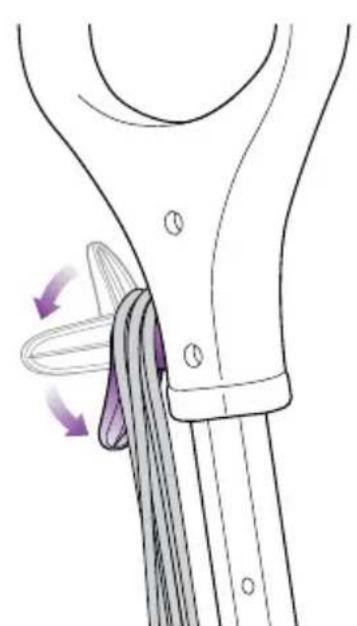
1 Pull and twist the quick release cord holder to unwrap the power cord completely. Plug into an electrical outlet. (fig. 6)
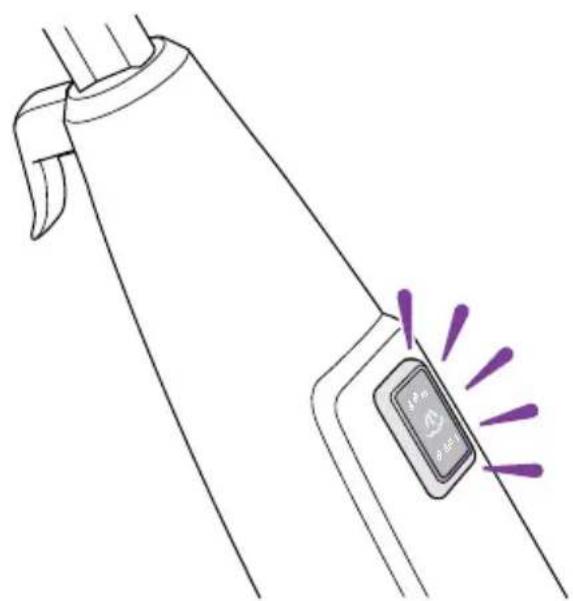
2 The STEAM CONTROL button will flash blue. If the light does not turn on, reference the troubleshooting section on page 10. (fig. 7)
Using Your Steam Mop - cont'd
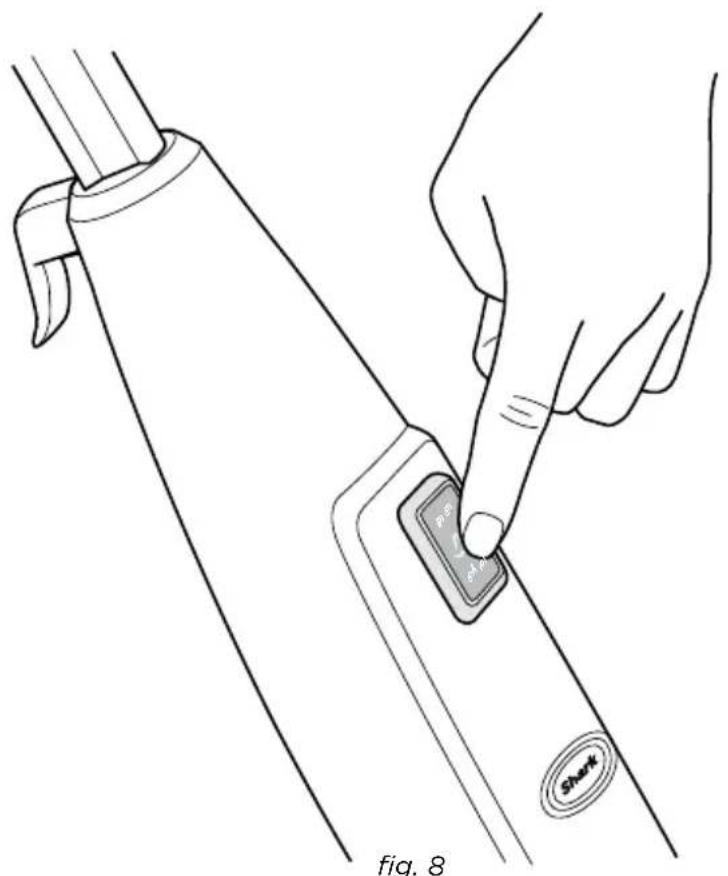
3 Press the STEAM CONTROL button once to activate the LOW steam setting.
Press the STEAM CONTROL button twice to activate the HIGH steam setting.(fig. 8)
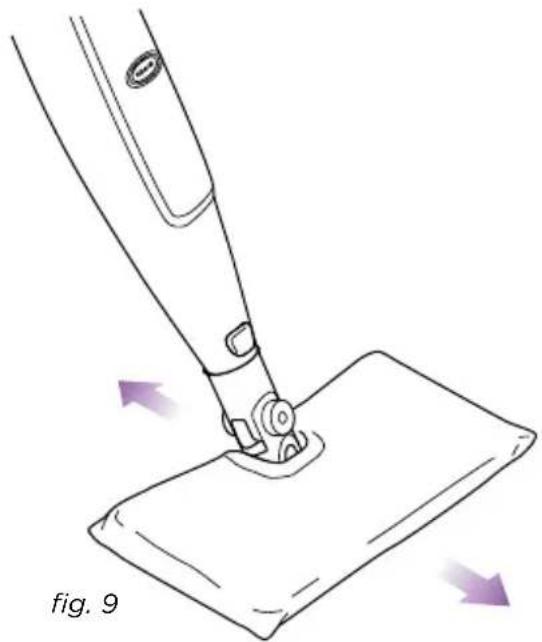
4 Clean your floors with a forward and backward motion. (fig. 9)
To stop the steam, press the STEAM CONTROL button a third time.
The STEAM CONTROL button will flash blue to indicate the mop is in STANDBY mode.
natural_image
Line drawing of a sewing machine needle stitching fabric, showing purple arrows indicating direction (no text or symbols)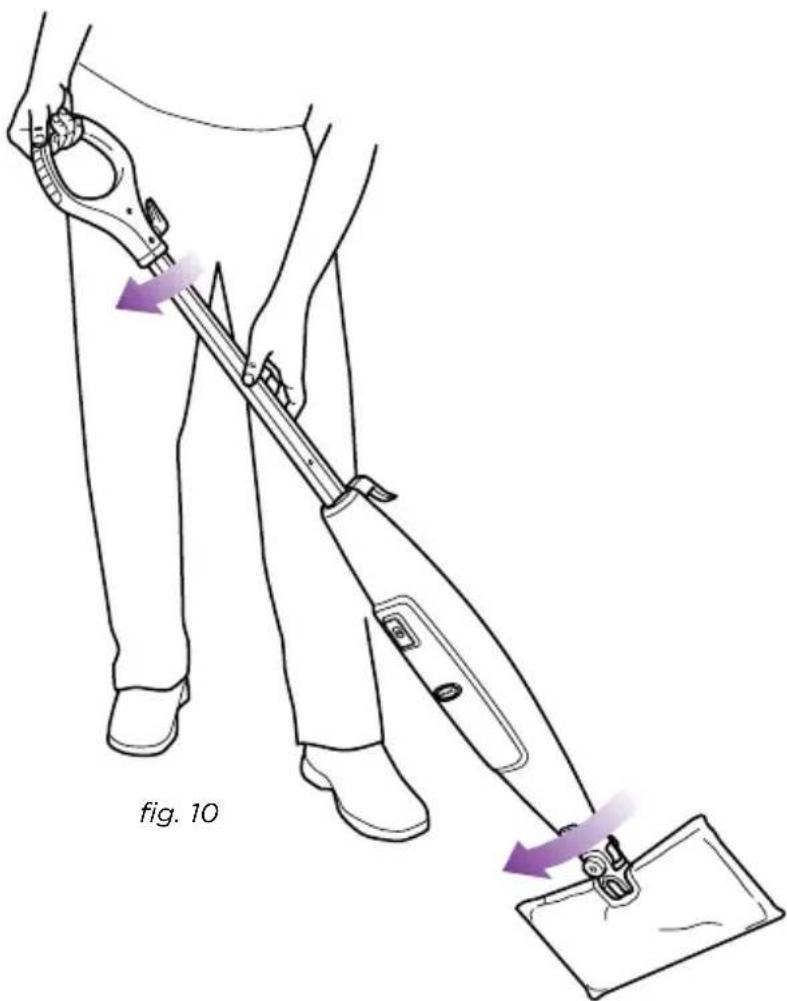
natural_image
Illustration of a person using a handheld tool to lift a device, labeled 'fig. 10' (no text or symbols on the diagram itself)5 When one side of the cleaning pocket gets dirty, just flip the mop over and you can quickly start using the other side. (fig. 10)
6 When the water tank is empty, the steam mop will stop producing steam. You can refill the water tank at any time as long as the mop is unplugged from the outlet. Reference the filling instructions from page 4.
NOTE: Please wait 2-3 minutes for the Steam Mop to cool off before removing the mop head or the cleaning pocket. Never leave the steam mop with a damp/wet cleaning pocket on any floor.
Care of Your Steam Mop
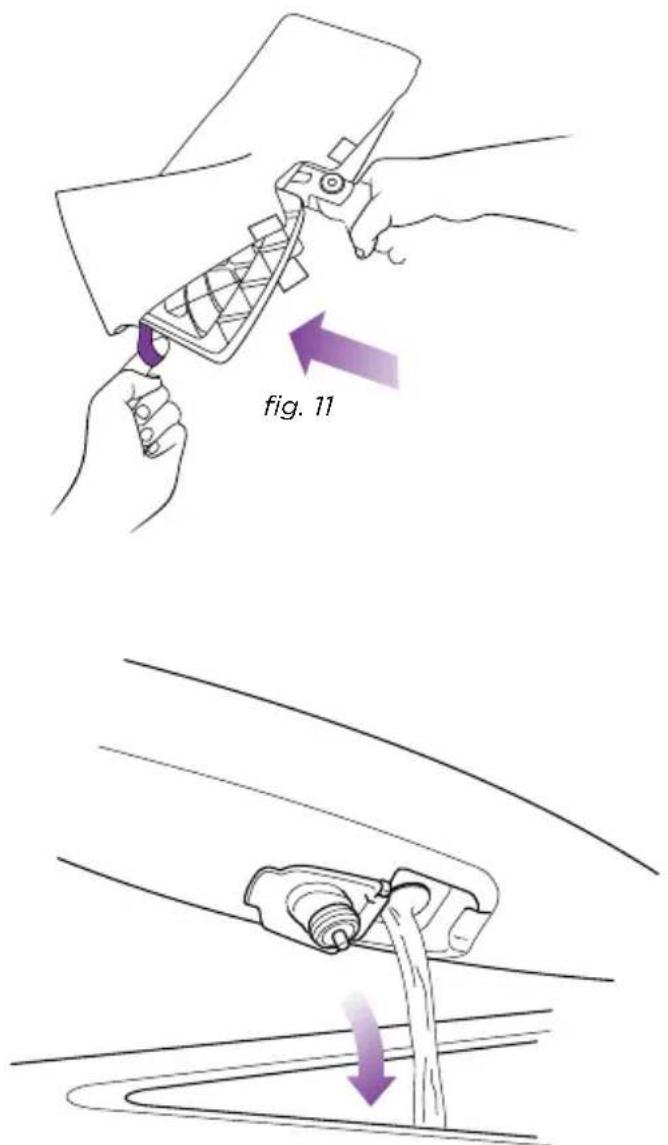
fig. 12

natural_image
Line drawing of a handheld laboratory instrument with handle and grip (no text or symbols)fig. 13
AFTER USE AND STORAGE
1 When you have finished using the steam mop, press the STEAM CONTROL button until the LED light turns flashing BLUE. This stops the unit from steaming. Unplug the cord from the outlet and place the mop into the upright position. Let the unit cool for 2-3 minutes.
Remove the cleaning pocket by releasing the quick fasteners and using the lavender loop on the side of the pocket, avoiding contact with the hot pad or dirt. (fig. 11)
2 Empty the water tank before storage. Open the water tank door and empty the tank over a sink. Close the water cap. (fig. 12)
3 To store the Shark® Professional SLIM Steam Pocket® Mop hanging up, first remove the head (after it has cooled and the steam has been released) then hang on a large hook. (fig. 13)
natural_image
Pure electrical circuit lines without any symbols
fig. 14

natural_image
Illustration of a hand using scissors to cut a piece of paper (no text or symbols present)fig. 15
CARE OF YOUR ALL PURPOSE CLEANING POCKET
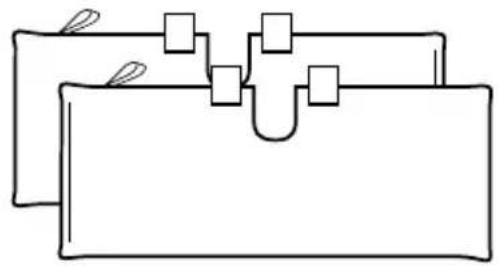
1 We recommend washing your cleaning pocket separately from other fabrics to avoid picking up lint. Only use liquid detergent (no powder detergent). Do not use any fabric softeners or bleach. Line dry. Do not tumble dry. (fig. 14)
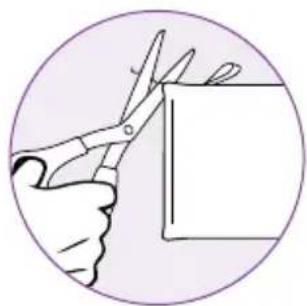
2 If there are loose threads on the cleaning pocket carefully cut the thread with scissors. Do not pull on them or cut at the base. (fig. 15)
natural_image
Illustration of a hand holding a mechanical component with a purple arrow indicating direction (no text or symbols)DECALCIFYING YOUR STEAM MOP
Calcium and mineral deposits can build up and impact the performance of your steam mop over time.
CLEANING THE NOZZLE
Your steam mop should not normally require cleaning, however, should you notice a decrease in the steam output, it may be necessary to remove mineral deposits built up around the nozzle.
1 Unplug the steam mop from the electrical outlet.
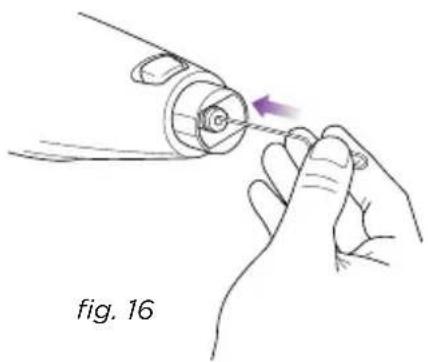
2 Use a small diameter stiff metal wire, such as a straightened metal paperclip, and carefully insert the end of the wire into the nozzle orifice. (fig. 16)
3 Move the wire back and forth several times to remove any deposits.
4 Plug the steam mop in to the power outlet and test steam output.
ORDERING REPLACEMENT PARTS
To order additional parts and accessories, feel free to contact us at
JML, Unit 1 Eastside
Port of Tyne
South Shields
NE33 5SP
info@JMLgroup.co.uk
Freephone 0800 781 7831
PART PART NO.
1 2 All Purpose Pockets XT3901UKJR
2 Carpet Glider XCG3450UKJR
Troubleshooting Guide
PROBLEM POSSIBLE REASONS & SOLUTIONS
| The Professional SLIMSteam Pocket® Mop will not turn-on. | Your steam mop should be securely plugged into an electrical outlet only.Check your fuse or breaker.If your unit still does not work, give us a call at:Freephone 0800 781 7831. |
| The unit will not make steam. | Is there water in the water tank? If not, add water to your steam mop following instructions on page 4.If the unit still doesn't make steam, follow the decalcification instructions on page 9. |
| Cannot select steam setting/flashing blue light remains on. | If you have already plugged in your unit, unplug and try a different outlet. This may reset the Standby mode.Add water to the tank and press theSTEAM CONTROLbutton to select a steam setting.If your unit still does not work, call0800 781 7831. |
| The Professional SLIMSteam Pocket® Mop leaves water on the floor. | Check to see if your cleaning pocket is soaked through. We recommend you unplug the steam mop and change the cleaning pocket.Make sure the cleaning pocket is attached correctly. |
| The Professional SLIMSteam Pocket® Mop left a white spot on the floor. | Do not leave your steam mop on the floor with a damp or wet cleaning pad.If you're using tap water we recommend switching to distilled water.Make sure the cap is securely on the water tank. |
| Floors are cloudy, streaky or spotty after steaming. | The pad might be dirty, change the pad.If you washed the cleaning pad with powder detergent, then it might be ruined.You might have left the mop in the same spot for too long. Do you have hard water? If you do, you might want to switch to distilled water.This might be leftover from past cleaners used on the floor surface. Use the steam mop a few more times and see if the leftover cloudiness is removed. If this does not work, we suggest rinsing the floor with water, letting it dry, and then steam mopping again with a clean pad. One or more rinses generally removes the residue. A more stubborn case may require you to rinse the floor with a mix of one part vinegar and two parts water. |
| The Professional SLIMSteam Pocket® Mop is hard to push. | Make sure the cleaning pocket is attached correctly.Check to see if the cleaning pad is excessively dirty. Replace if the cleaning pad is too dirty or wet. |
Notes
JML, Unit 1 Eastside
Port of Tyne
South Shields
NE33 5SP
info@JMLgroup.co.uk
Freephone 0800 781 7831
www.sharkclean.co.uk
Registered address: JML House, NW5 3EG
Technical Details
Model number: S3455UKJR 11
Input: 1550 Watts
Main unit voltage: 220-240V\~, 50/60Hz
Printed in China
Illustrations may differ from actual product.
S3455UKJR.E.130212.4


Not to be disposed of with other
IPX4
- IMPORTANT SAFETY INSTRUCTIONS
- For Household Use Only
- DANGER OF SCALDING.
- IMPORTANT:
- WARNING:
- TO REDUCE THE RISK OF FIRE,
- ELECTRIC SHOCK OR INJURY:
- SAVE THESE INSTRUCTIONS
- Contents
- Getting Started
- ASSEMBLE
- Getting Started - cont'd
- Using Your Steam Mop
- Using Your Steam Mop - cont'd
- Care of Your Steam Mop
- AFTER USE AND STORAGE
- CARE OF YOUR ALL PURPOSE CLEANING POCKET
- DECALCIFYING YOUR STEAM MOP
- CLEANING THE NOZZLE
- ORDERING REPLACEMENT PARTS
- PART PART NO.
- Troubleshooting Guide
- Notes
Brand : SHARK
Model : S3455
Category : Steam cleaner