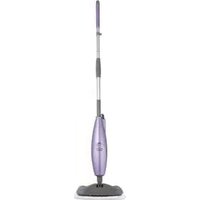
S3251 - Steam cleaner SHARK - Free user manual and instructions
Find the device manual for free S3251 SHARK in PDF.


| Product Type | Steam Cleaner |
| Brand | Shark |
| Model | S3251 |
| Form Factor | Handheld Steam Cleaner |
| Dimensions (L x W x H) | 12.6 x 8.3 x 10.2 inches |
| Weight | 4.2 lbs |
| Power Supply | 120V, 60Hz |
| Wattage | 1500W |
| Water Tank Capacity | 8.5 oz |
| Heat-up Time | 30 seconds |
| Steam Output | Continuous steam up to 15 minutes |
| Included Accessories | Detail brush, scraper, grout brush, fabric steamer, measuring cup |
| Usage | Countertops, grout, upholstery, car interiors |
| Safety Features | Auto shut-off, child safety lock |
| Maintenance | Descale every 10-15 uses; clean nozzle regularly |
| Repairability | Replaceable water tank and nozzle; customer support available |
| Certifications | ETL listed |
| Warranty | Limited 2-year warranty |
| Color | White/Blue |
Frequently Asked Questions - S3251 SHARK
User questions about S3251 SHARK
0 question about this device. Answer the ones you know or ask your own.
Ask a new question about this device
Download the instructions for your Steam cleaner in PDF format for free! Find your manual S3251 - SHARK and take your electronic device back in hand. On this page are published all the documents necessary for the use of your device. S3251 by SHARK.
USER MANUAL S3251 SHARK
IMPORTANT SAFETY INSTRUCTIONS SAVE THESE INSTRUCTIONS
For Household Use Only
WHEN USING YOUR SHARK® STEAM MOP, BASIC SAFETY PRECAUTIONS SHOULD ALWAYS BE FOLLOWED, INCLUDING THE FOLLOWING:
WARNING: TO REDUCE
THE RISK OF FIRE, ELECTRIC SHOCK OR INJURY READ ALL INSTRUCTIONS BEFORE USING YOUR LIGHT & EASY™.

DANGER OF SCALDING.
Please use caution when
using the steam mop. The steam emitted from the openings is very hot.
POLARIZED PLUG:
TO REDUCE THE RISK OF ELECTRIC
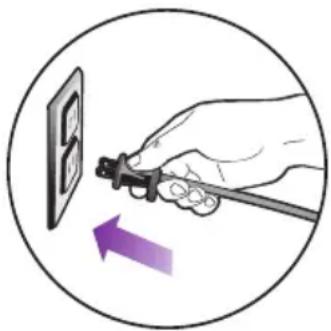
SHOCK, this appliance has a polarized plug (one blade is wider than the other). As a safety feature, this plug will fit into a polarized outlet only one way. If the plug does not fit fully into the outlet, reverse the plug. If it still does not fit, contact a qualified electrician. Do not attempt to defeat this safety feature.
natural_image
Hand holding a screwdriver next to a wall-mounted panel, with a purple arrow indicating direction (no text or symbols)-
Use the system only for its intended use.
-
DO NOT use outdoors.
-
DO NOT leave the appliance unattended when plugged in. Always unplug the power cord from the electrical outlet when not in use and before servicing.
-
DO NOT allow the appliance to be used as a toy. Close attention is necessary when used by or near children, pets or plants.
-
Use only as described in this manual.
-
Use only manufacturer's recommended accessories.
-
DO NOT operate the appliance with a damaged plug or cord, or if the unit has been dropped, damaged left outdoors or dropped into water. To avoid the risk of electric shock, do not disassemble or attempt to repair the appliance on your own. Return the appliance to EURO-PRO Operating LLC (see warranty) for examination and repair. Incorrect re-assembly or repair can cause a risk of electrical shock or injury to persons when the appliance is used.
-
To protect against a risk of electric shock, DO NOT immerse the steam mop into water or any other liquids.
-
DO NOT handle plug or steam mop with wet hands or operate appliance without shoes.
-
DO NOT pull or carry by power cord, use power cord as handle, close a door on the power cord, or pull the power cord around sharp edges or corners. Keep power cord away from heated surfaces.
-
DO NOT unplug by pulling on power cord. To unplug, grasp the plug not the power cord. Do not use extension cords or outlets with inadequate current carrying capacity.
-
DO NOT put any objects into openings. Do not use with any opening blocked.
-
DO NOT put hands or feet under the steam mop. Unit gets very hot.
-
Use ONLY on flat, stable horizontal surfaces. Do not use on walls, counters, windows, chairs or tables.
-
DO NOT use on leather, wax polished furniture or floors, synthetic fabrics, velvet or other delicate, steam sensitive materials.
-
DO NOT add cleaning solutions, scented perfumes, oils or any other chemicals to the water used in this appliance as this may damage the unit or make it unsafe for use. If you live in a hard water area, we recommend using distilled water in your steam mop.
-
When in use, NEVER turn the appliance over or on its side. NEVER DIRECT STEAM TOWARDS PEOPLE, ANIMALS OR PLANTS.
-
Carefully remove the micro-fiber pad immediately after you have unplugged and allowed the product to cool.
-
When cleaning the steam mop, unplug the power cord from the electrical outlet and clean with a dry or damp cloth. Do not pour water or use alcohol, benzene or paint thinner on the unit.
20 To reduce the risk of fire, DO NOT use a flammable or combustible liquid to clean a floor.
-
Extreme caution should be exercised when using this appliance to clean stairs.
-
Never use steam mop without micro-fiber pad attached.
-
Keep your work area well lit.
-
Store steam mop indoors in a cool, dry place.
-
To avoid circuit overload, do not operate another appliance on the same socket (circuit) as the steam cleaner.
-
If an extension cord is absolutely necessary, an extension cord rated a minimum of 15 ampere, 14 gage cord should be used. Cords rated for less amperage may overheat. Care should be taken to arrange cord so that it cannot be pulled or tripped over.
-
DO NOT leave unattended when the system is connected to a power supply or electrical outlet. Turn off all controls before unplugging the unit.
28 DO NOT store unit with damp or wet micro-fiber cleaning pad attached. Never leave the steam mop in one spot on any surface for any period of time with a damp or wet micro-fiber cleaning pad attached as this will damage your floors
WARNING: Your steam mop is designed to clean hard floor surfaces that will withstand high heat. Do not use on unsealed wood or unglazed ceramic floors. On surfaces that have been treated with wax or some no wax floors, the sheen may be removed by the heat and steam action. It is always recommended to test an isolated area of the surface to be cleaned before proceeding. We also recommend that you check the use and care instructions from the floor manufacturer.
Quick Start
natural_image
Line drawing of a vacuum cleaner with a handle and two arrows indicating downward motion (no text or symbols)fig. 1
natural_image
Line drawing of a hand operating a vacuum cleaner with a rotary knob, accompanied by a close-up view of the device (no text or symbols)fig. 3
ASSEMBLE
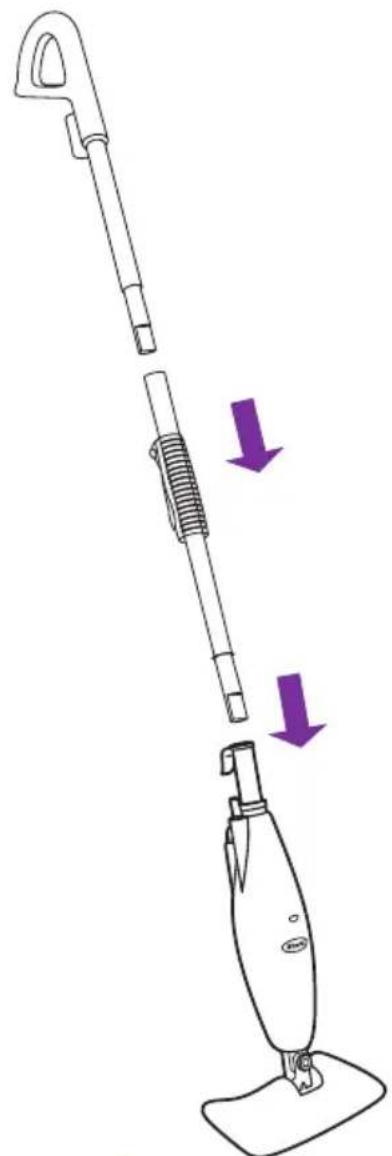
1 Fit together the extension tubes as shown in the illustration. (fig. 1)
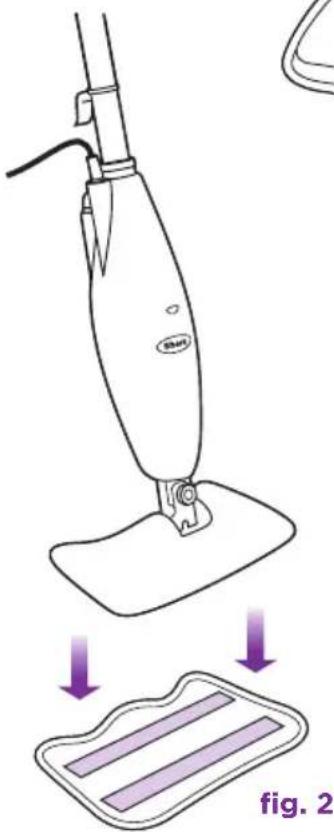
2 Place the micro-fiber cleaning pad underneath the mop head, with quick fastener strips facing up. Simply press the mop to the pad to attach it. (fig. 2)
FILL
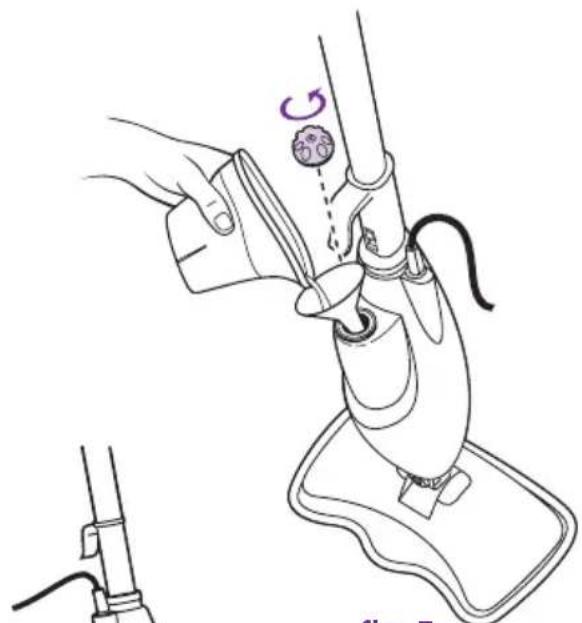
3 Remove the cap to fill the water tank. Use the filling flask and funnel to fill the tank with water to the "MAX" fill line. Replace the water tank cap.
(fig. 3)

QUICK TIP:
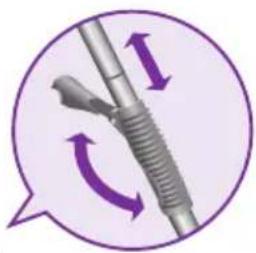
For easier pushing and pulling, extend the handle length.
natural_image
Illustration of a mechanical tool inside a speech bubble, showing rotational motion with no text or symbols.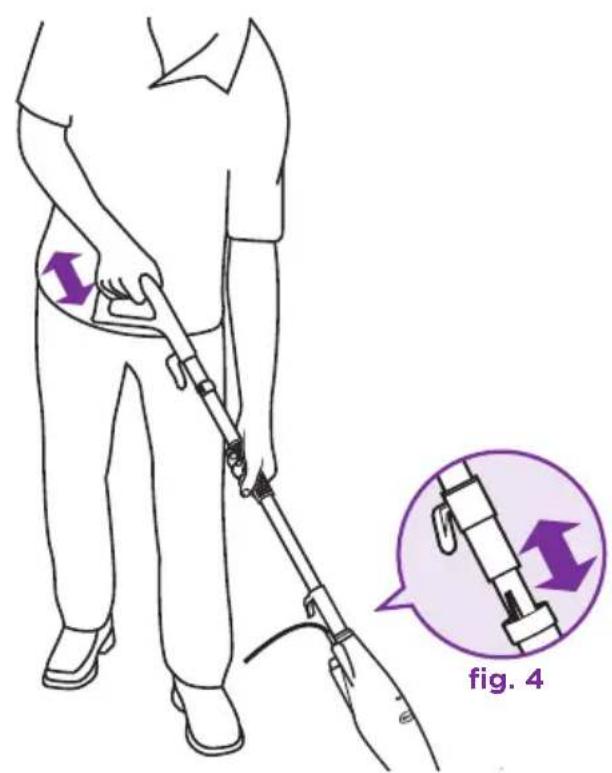
STEAM CLEANING
4 For your comfort, you can adjust the height of the mop. Just lift the latch on the tube 90 degrees to the open position. Holding the handle, extend the tube to the desired height and then close the latch to the locked position.
5 Plug in the mop. Wait 30 seconds for the unit to heat up and the steam to be ready.
Push the handle toward the mop head in a pumping motion. Customize steam output by slow or fast mopping with a forward and backward motion. (fig. 4)

OTE: Do not leave your Steam Mop unattended during use.

IMPORTANT: Never leave the steam mop in one spot for any period of time with a damp or wet micro-fiber pocket attached as this will damage your floors.
This manual covers model number:
S3251 11
TECHNICAL SPECIFICATIONS
Voltage: 120V., 60Hz.
Power: 1550 Watts
Water
Capacity: 250 ml (8 oz.)

TOLL FREE: 1-800-798-7398
Contents
English
Thank you for purchasing the Shark® Light & Easy™ Steam Mop.
GETTING STARTED 2
USING YOUR STEAM MOP 6
STORAGE AND CARE OF YOUR STEAM MOP ...... 8
TROUBLESHOOTING 10
WARRANTY AND REGISTRATION ....13
Getting Started
When assembling your steam mop there may be a little water in or around the water tank. This is because we test all our steam mops 100% before you buy them, so you get a quality Shark® Light & Easy™ Steam Mop.
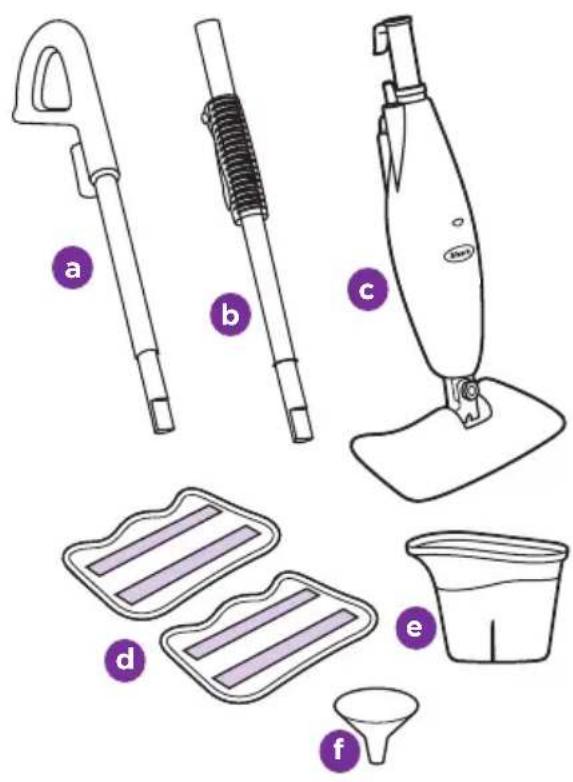
FIRST THINGS FIRST, YOU NEED TO KNOW WHAT'S IN THE BOX YOU JUST OPENED:
a Upper Extension Tube
b Lower Extension Tube (Telescopic)
c Steam Mop Base
d 2 All-Purpose Cleaning Pads
e Filling Flask
f Funnel
natural_image
Diagram of a hand tool with a spring-loaded handle, showing a change from left to right (no text or symbols present)ASSEMBLY
1 Remove all the parts from the package. Verify all the listed parts are included.
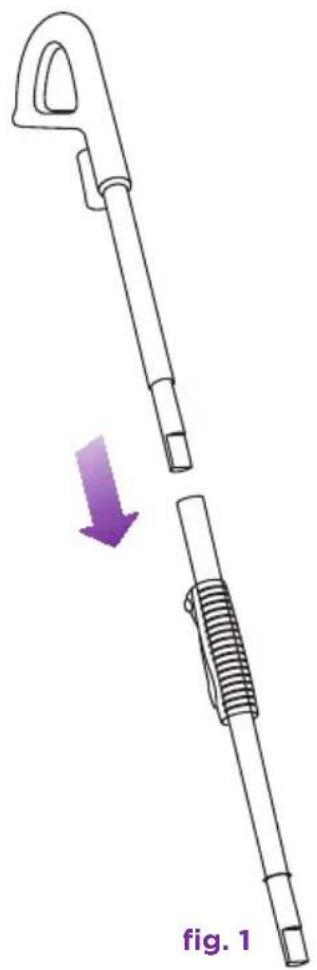
2 Slide the upper extension tube (the tube with the handle) into the lower extension tube (the short tube). Push the two extension tubes together in until you hear it click into place. (fig. 1)
natural_image
Illustration of a mechanical tool with purple directional arrows indicating rotation or movement (no text or symbols)fig. 3
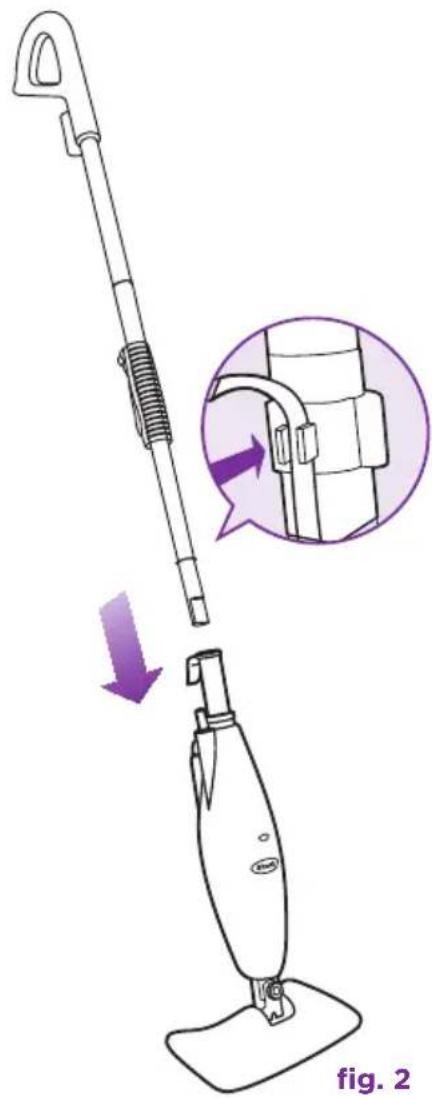
3 Insert the assembled handle piece into the steam mop base. Push the tube base together until you hear a click. (fig. 2)
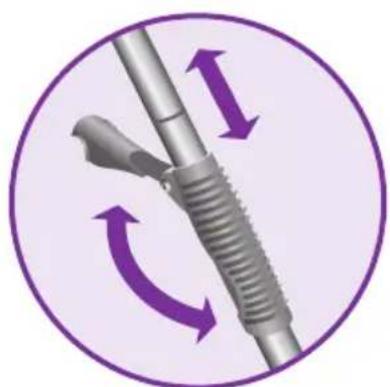
4 For your comfort, you can adjust the height of the mop. Just lift the latch on the tube 90 degrees to the open position. Holding the handle, extend the tube to the desired height and then close the latch to the locked position. (fig. 3)
!QUICK TIP: For easier pushing and pulling, extend the handle length.
IMPORTANT: Never use the Light & Easy™ Steam Mop without attaching a micro-fiber cleaning pad to avoid damage to your floor and mop.
IMPORTANT: Do not use on unsealed wood or unglazed ceramic floors. On surfaces that have been treated with wax or some no wax floors, the sheen may be removed by the heat and steam action. It is always recommended to test an isolated area of the surface to be cleaned before proceeding. We recommend that you check the use and care instructions from the floor manufacturer.
Getting Started
ATTACHING THE MICRO-FIBER PAD
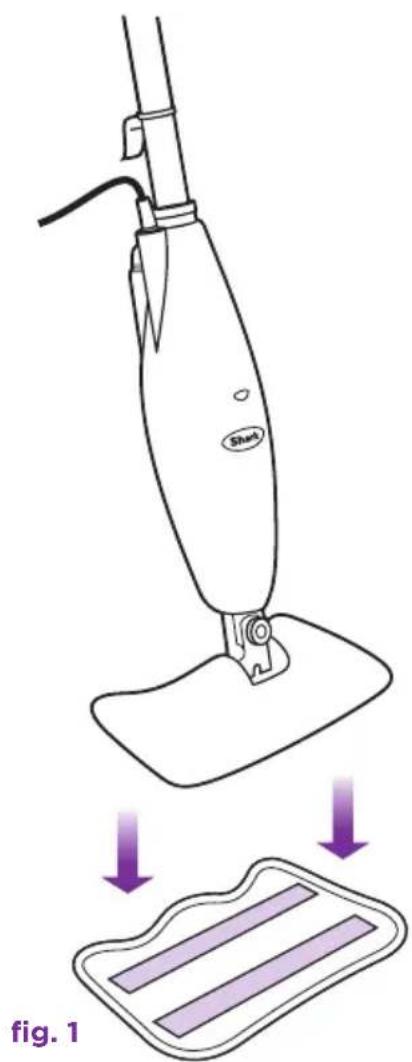
1 Place the micro-fiber cleaning pad on the floor with the quick fastener strips facing up. Place the Light & Easy™ Steam Mop on the top of the pad to attach. (fig. 1)
IMPORTANT: Only add water to the tank. Chemicals or cleaning solutions may be unsafe or cause damage.
IMPORTANT: Please wait 3-5 minutes for your Light & Easy™ Steam Mop to cool off before removing the micro-fiber pad.
Your micro-fiber cleaning pads should be replaced every 3 months to maximize cleaning performance.
Replacement micro-fiber pads are available at www.sharkclean.com or by calling 1-800-798-7398.

Calcium and mineral deposits can build up and impact the performance of your steam mop over time. To extend the life of your product we recommend that you use distilled water or Shark®'s Water Filtration Bottle. Visit www.sharkclean.com to order.
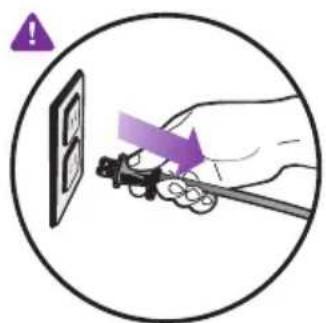
fig. 2
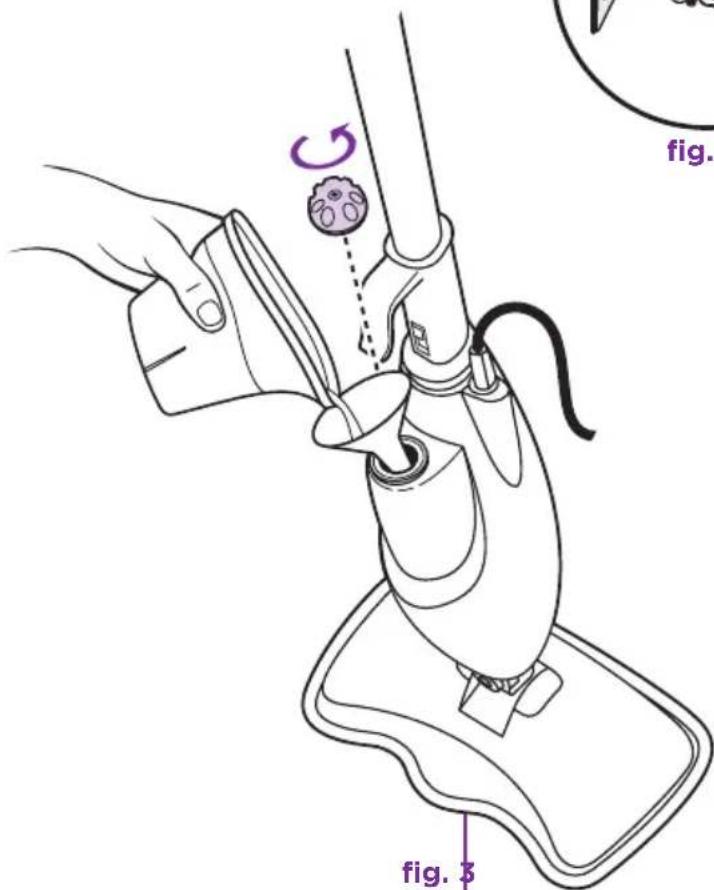
FILLING THE WATER TANK

IMPORTANT: Unplug the Light & Easy™ Steam Mop before filling the water tank with water. (fig. 2)
1 Remove the water tank cap by turning it counter-clockwise to the unlocked position. (fig. 3)
2 A filling flask and funnel are included with your Light & Easy™ Steam Mop to make filling the water tank easy. Fill the flask with water and use the funnel to pour it into the tank. Keep the water level under the MAX' fill line.
3 Replace the water tank cap and turn it clockwise to the locked position.
Using Your Light & Easy™ Steam Mop
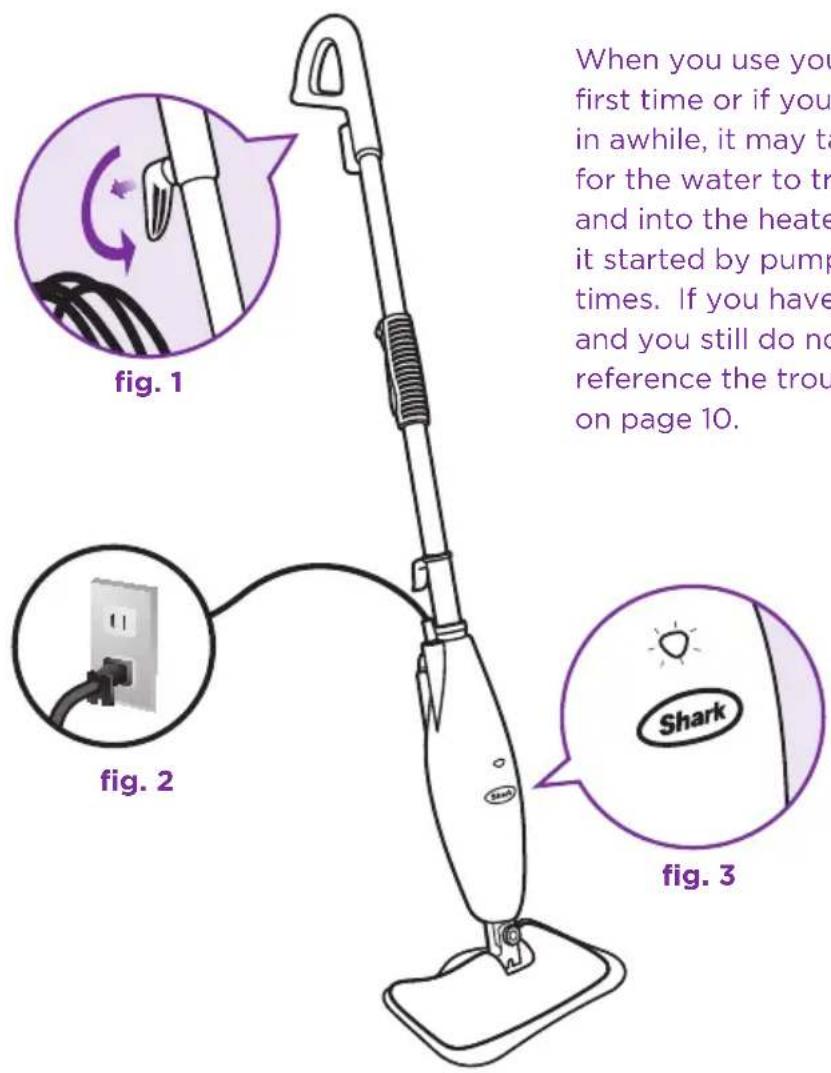
When you use your steam mop for the first time or if you have not used the unit in awhile, it may take a minute or two for the water to travel through the pump and into the heater to create steam. Get it started by pumping the handle a few times. If you have waited a few minutes and you still do not see any steam, reference the troubleshooting section on page 10.
IMPORTANT: Your steam mop needs water to make steam! Never use your steam mop without water in the tank.
Sweep or vacuum your floors prior to cleaning with your Light & Easy™ Steam Mop.
Visit www.sharkclean.com for other great quick cleaning products to complement your Light & Easy™ Steam Mop, such as the Shark® Navigator.
1 Pull and twist the quick release cord holder to unwrap the power cord completely. (fig. 1) Plug into a 120-volt electrical outlet. (fig. 2) The "On" light will turn blue. If the light does not turn on, reference the troubleshooting section on page 10. (fig. 3)
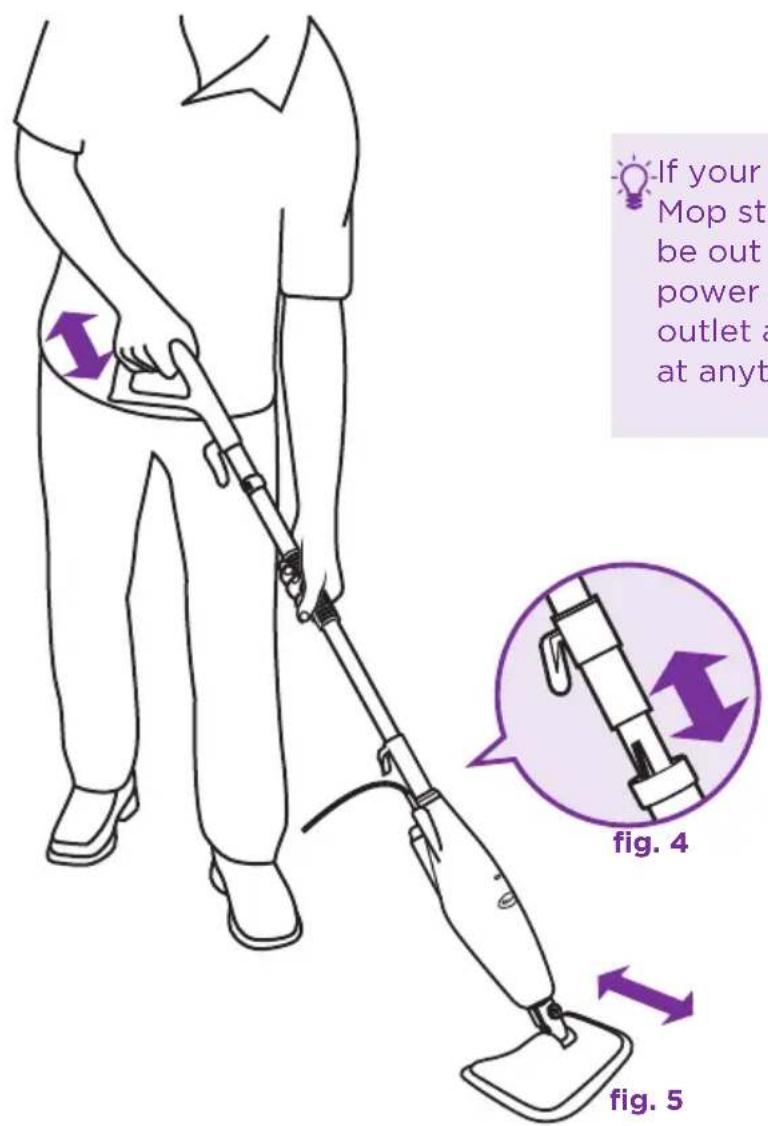
If your Light & Easy™ Steam Mop stops steaming, it could be out of water. Unplug the power cord from the electrical outlet and refill the water tank at anytime.
2 Wait 30 seconds for the boiler to heat the water. Pump the handle a few times to prime the pump, activate steam and moisten the micro-fiber pad. (fig. 4)
3 Mop with a forward and backward motion to customize steam output automatically. (fig. 5)
IMPORTANT: Never leave the Light & Easy™ Steam Mop with a damp/wet micro-fiber pad on any floor surface for any amount of time as this may damage the floor.
Care of Your Light & Easy™ Steam Mop
AFTER USE AND STORAGE
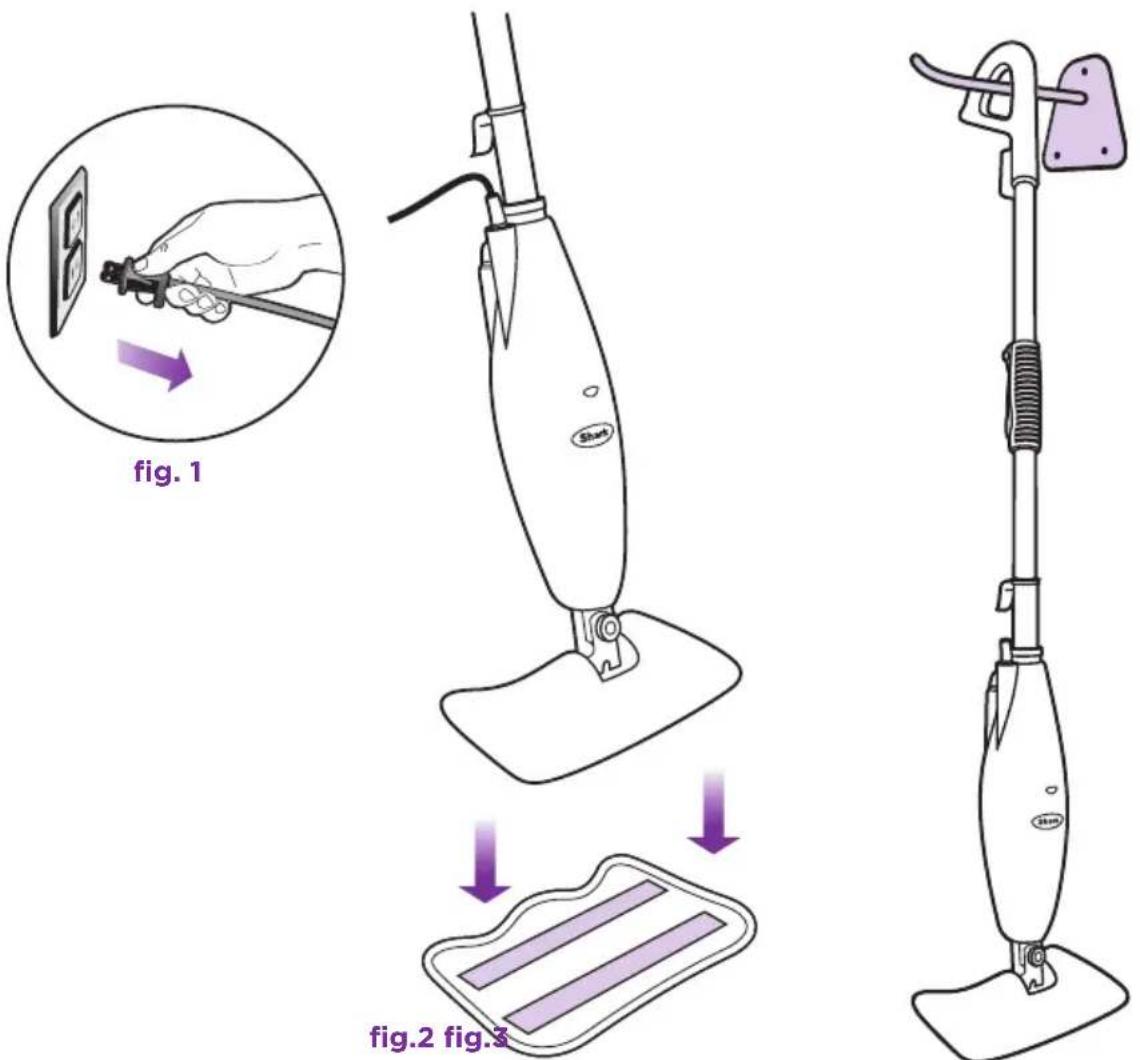
1 When you have finished using the Light & Easy™ Steam Mop, unplug the cord from the outlet and place the mop into the upright position (fig. 1) and let the unit cool 3-5 minutes. Release steam by pumping the handle several times.
2 Carefully separate micro-fiber cleaning pad from steam mop, avoiding contact with the hot pad or dirt. (fig. 2)
3 Empty the water tank before storage. Remove the water tank cap and empty the tank over a sink. Replace the water cap.
4 To store the cooled Shark® Light & Easy™ Steam Mop, hang on a large hook. (fig. 3)
NOTE: If you want to store the Light & Easy™ Steam Mop standing upright, make sure it is leaning against a wall for added support and safety. Always store your Shark® Light & Easy™ Steam Mop with the micro-fiber cleaning pad removed. Store away from children and high traffic areas.
natural_image
Simple line drawing of a tray with two horizontal bands inside, enclosed in a wavy border (no text or symbols)
natural_image
Five black-and-white icons representing different objects or symbols: a shower, starburst, target, and rectangle (no text or labels)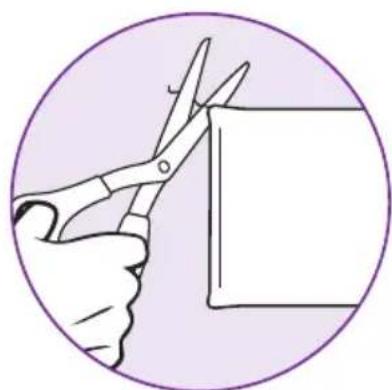
natural_image
Illustration of a hand using scissors to cut a piece of paper (no text or symbols present)fig. 5
CARE OF YOUR MICRO-FIBER CLEANING PAD
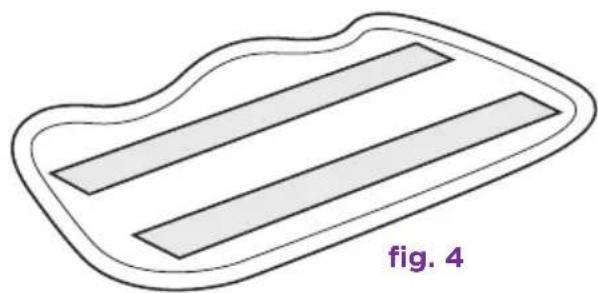
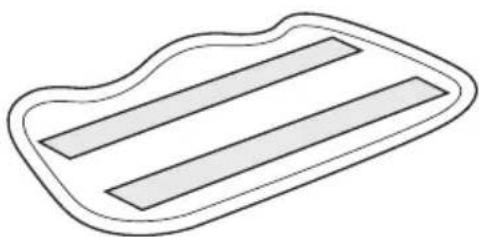
1 Wash pads in warm water. Wash separately from other laundry. Only use liquid detergent (no powder detergent). Do not use fabric softeners. Line dry or dry on a low dryer setting. (fig. 4)
2 If there are loose threads on the pad carefully cut the threads with scissors. Do not pull on them or cut at the base. (fig. 5)
IMPORTANT: The micro-fiber cleaning pad may be very hot from the steam. Use caution when removing. Let the unit cool for 3-5 minutes first before removing.
natural_image
Simple line drawing of a tray with three horizontal stripes inside an oval frame (no text or symbols)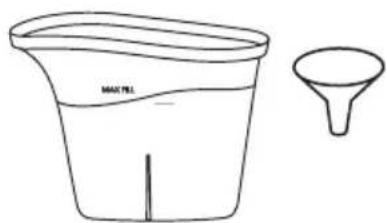
ORDERING REPLACEMENT PARTS
To order additional parts and accessories, feel free to contact us at www.sharkclean.com or call 1-800-798-7398.
NOTE: Some parts may be available at your local retailer. Contact customer service for any other servicing.
Trouble Shooting
| PROBLEM POSSIBLE REASONS & SOLUTIONS | |
| The Light & EasyTMSteam Mop will not turn-on. | Your steam-mop should be securely plugged into a 120V AC electrical outlet only.Check your fuse or breaker.If your unit still does not work, call 1-800-798-7398. |
| Light & EasyTMSteam Mop will not make steam. | Is there water in the water tank? If not, add water to your steam mop following instructions on page 5. |
| Light & EasyTMSteam Mop leaves water on the floor. | Is your micro-fiber cleaning pad too wet? Unplug your steam mop and change the micro-fiber cleaning pad. |
| Light & EasyTMSteam Mop left white spot on the floor. | Do not leave your steam-mop on the floor with a damp or wet cleaning pad.Do you have hard water? If you do, you might want to switch to distilled water.Make sure the water is securely on the water tank. |
| Floors are cloudy, streaky or spotty after steaming. | The pad might be dirty, change the pad.If you washed the pocket with powder detergent, then the pad may have residual detergent left on it. Wash it again with liquid detergent.If you are cleaning in a kitchen area where there might be a build-up of grease, use a de-greasing agent such as an all-purpose cleaner or dish soap and paper towels to clean the area first.You might have left the mop in the same spot for too long.Do you have hard water? If you do, you might want to switch to distilled water.This might be leftover from past cleaners used on the floor surface. Use the steam mop a few more times and see if the leftover cloudiness is removed. |
| Light & EasyTMSteam Mop is hard to push. | Make sure the steam pad is attached correctly.Check to see if the cleaning pad is excessively dirty.Replace if the pad is too dirty or wet. |
PROBLEM POSSIBLE REASONS & SOLUTIONS
Notes
English
www.sharkclean.com
Notes
ONE (1) YEAR LIMITED WARRANTY
EURO-PRO Operating LLC warrants this product to be free from defects in material and workmanship for a period of one (1) year from the date of the original purchase, when utilized for normal household use, subject to the following conditions, exclusions and exceptions.
If your appliance fails to operate properly while in use under normal household conditions within the warranty period, return the complete appliance and accessories, freight prepaid. For Customer Service support, call 1 (800) 798-7398 or visit our website www.sharkclean.com.
If the appliance is found to be defective in material or workmanship, EURO-PRO Operating LLC will repair or replace it free of charge. Proof of purchase date and a check payable to EURO-PRO Operating LLC in the amount of \$ 9.95 to cover the cost of return shipping and handling must be included. *
The liability of EURO-PRO Operating LLC is limited solely to the cost of the repair or replacement of the unit at our option. This warranty does not cover normal wear of parts and does not apply to any unit that has been tampered with or used for commercial purposes. This limited warranty does not cover damage caused by misuse, abuse, negligent handling or damage due to faulty packaging or mishandling in transit. This warranty does not cover damage or defects caused by or resulting from damages from shipping or repairs, service or alterations to the product or any of its parts, which have been performed by a repair person not authorized by EURO-PRO Operating LLC.
This warranty is extended to the original purchaser of the unit and excludes all other legal and/or conventional warranties. The responsibility of EURO-PRO Operating LLC warranty if any, is limited to the specific obligations expressly assumed by it under the terms of the limited warranty. In no event is EURO-PRO Operating LLC liable for incidental or consequential damages of any nature whatsoever. Some states/provinces do not permit the exclusion or limitation of incidental or consequential damages, so the above may not apply to you.
This warranty gives you specific legal rights, and you may also have other rights which vary from state to state or province to province.
*Important: Carefully pack item to avoid damage in shipping. Be sure to include proof of purchase date and to attach tag to item before packing with your name, complete address and phone number with a note giving purchase information, model number and what you believe is the problem with the item. We recommend you insure the package (as damage in shipping is not covered by your warranty). Mark the outside of your package “ATTENTION CUSTOMER SERVICE”. We are constantly striving to improve our products, therefore the specifications contained herein are subject to change without notice.
Please complete and return within ten (10) days of purchase. The registration will enable us to contact you in the event a product defect is discovered. By returning this card you acknowledge to have read and understood the instructions for use, and warnings set forth in the accompanying instructions.
RETURN TO: EURO-PRO Operating LLC, 4400 Bois Franc, St. Laurent, Quebec H4S 1A7
PURCHASER:
ADDRESS:
DATE OF PURCHASE: ...... MODEL: S3251 11
NAME AND ADDRESS OF STORE: ....
U.S.: EURO-PRO Operating LLC Newton, MA 02459
Canada: EURO-PRO Operating LLC 4400 Bois Franc Ville St. Laurent, Québec H4S 1A7
1-800-798-7398
www.sharkclean.com
COPYRIGHT© EURO-PRO OPER ATING LLC 2010
PRINTED IN CHINA
\$3251.E.101117
Illustrations may differ from actual product.
- IMPORTANT SAFETY INSTRUCTIONS SAVE THESE INSTRUCTIONS
- For Household Use Only
- WARNING: TO REDUCE
- DANGER OF SCALDING.
- POLARIZED PLUG:
- TO REDUCE THE RISK OF ELECTRIC
- ASSEMBLE
- FILL
- QUICK TIP:
- STEAM CLEANING
- TECHNICAL SPECIFICATIONS
- Contents
- Getting Started
- FIRST THINGS FIRST, YOU NEED TO KNOW WHAT'S IN THE BOX YOU JUST OPENED:
- ASSEMBLY
- ATTACHING THE MICRO-FIBER PAD
- FILLING THE WATER TANK
- Using Your Light & Easy™ Steam Mop
- Care of Your Light & Easy™ Steam Mop
- AFTER USE AND STORAGE
- CARE OF YOUR MICRO-FIBER CLEANING PAD
- ORDERING REPLACEMENT PARTS
- Trouble Shooting
- Notes
- ONE (1) YEAR LIMITED WARRANTY
Brand : SHARK
Model : S3251
Category : Steam cleaner