
UD 4 - Drill HILTI - Free user manual and instructions
Find the device manual for free UD 4 HILTI in PDF.


| Brand | Hilti |
| Model | UD 4 |
| Product Type | Drill |
| Weight | 1.4 kg |
| Protection Class | II |
| Sound Power Level | 96.5 dB |
| Sound Pressure Level | 85.5 dB |
| Vibration Emission (Drilling) | 3.5 m/s² (K = 1.5 m/s²) |
| Chuck Type | Key chuck (standard); Quick-release chuck (optional) |
| Belt Hook | Yes |
| Lockbutton for Continuous Operation | Yes |
| Forward/Reverse Switch | Yes |
| Speed Control | Stepless, variable by trigger pressure |
| Intended Materials | Steel, wood, plastic |
| Spindle Torque | 11–18 Nm |
| Chuck Screw Torque | 8–13 Nm |
| Casing Screw Torque | 1.35–1.75 Nm |
| Clamp Torque | 1.35–1.75 Nm |
| Recommended Extension Cord (120 V) | AWG 16 up to 25 m; AWG 14 up to 30 m; AWG 12 up to 50 m |
| Carbon Brush Replacement | Yes (part no. 2167718) |
| Rotor Replacement | Yes (voltage-specific variants) |
| Control Switch Replacement | Yes (voltage-specific variants) |
| Supply Cord Replacement | Yes (voltage-specific variants) |
| Manufacturer's Warranty | Contact local Hilti representative |
Frequently Asked Questions - UD 4 HILTI
User questions about UD 4 HILTI
0 question about this device. Answer the ones you know or ask your own.
Ask a new question about this device
Download the instructions for your Drill in PDF format for free! Find your manual UD 4 - HILTI and take your electronic device back in hand. On this page are published all the documents necessary for the use of your device. UD 4 by HILTI.
USER MANUAL UD 4 HILTI
Original operating instructions
1 Information about the documentation
1.1 About this documentation
- Read this documentation before initial operation or use. This is a prerequisite for safe, trouble-free handling and use of the product.
- Observe the safety instructions and warnings in this documentation and on the product.
- Always keep the operating instructions with the product and make sure that the operating instructions are with the product when it is given to other persons.
1.2 Explanation of symbols used
1.2.1 Warnings
Warnings alert persons to hazards that occur when handling or using the product. The following signal are used:

DANGER
DANGER !
- Draws attention to imminent danger that will lead to serious personal injury or fatality.

WARNING
WARNING !
- Draws attention to a potential threat of danger that can lead to serious injury or fatality.

CAUTION
CAUTION !
- Draws attention to a potentially dangerous situation that could lead to slight personal injury or damage to the equipment or other property.
1.2.2 Symbols in the documentation
The following symbols are used in this document:

Read the operating instructions before use.

Instructions for use and other useful information

Dealing with recyclable materials

Do not dispose of electric equipment and batteries as household waste
1.2.3 Symbols in the illustrations
The following symbols are used in illustrations:
| 2 | These numbers refer to the corresponding illustrations found at the beginning of these operating instructions |
| 3 | The numbering reflects the sequence of operations shown in the illustrations and may deviate from the steps described in the text |
| 11 | Item reference numbers are used in the overview illustrations and refer to the numbers used the product overview section |
| [7c6w] | This symbol is intended to draw special attention to certain points when handling the product. |
1.3 Symbols on the product
1.3.1 Symbols on the product
The following symbols are used on the product:
1.4 Product information
Hilti products are designed for professional use and may be operated, serviced and maintained only by trained, authorized personnel. This personnel must be specifically informed about the possible hazards. The product and its ancillary equipment can present hazards if used incorrectly by untrained personnel or if us not in accordance with the intended use.
The type designation and serial number are printed on the rating plate.
Write down the serial number in the table below. You will be required to state the product details when contacting Hilti Service or your local Hilti organization to inquire about the product.
Product information
| Drill UD 4 | |
| Generation: 01 | |
| Serial no.: |
1.5 Declaration of conformity
We declare, on our sole responsibility, that the product described here complies with the applicable directive and standards. A copy of the declaration of conformity can be found at the end of this documentation.
The technical documentation is filed here:
Hilti Entwicklungsgesellschaft mbH | Tool Certification | Hiltistrasse 6 | 86916 Kaufering, Germany
2 Safety
2.1 General power tool safety warnings
WARNING Read all safety warnings, instructions, illustrations and specifications provided with the power tool. Failure to follow all instructions listed below may result in electric shock, fire and/or serious injury.
Save all warnings and instructions for future reference.
The term "power tool" in the warnings refers to your mains-operated (corded) power tool or battery-operated (cordless) power tool.
Work area safety
- Keep work area clean and well lit. Cluttered or dark areas invite accidents.
- Do not operate power tools in explosive atmospheres, such as in the presence of flammable liquids, gases or dust. Power tools create sparks which may ignite the dust or fumes.
- Keep children and bystanders away while operating a power tool. Distractions can cause you to lose control.
Electrical safety
Power tool plugs must match the outlet. Never modify the plug in any way. Do not use any adapter plugs with earthed (grounded) power tools. Unmodified plugs and matching outlets will reduce risk of electric shock.
- Avoid body contact with earthed or grounded surfaces, such as pipes, radiators, ranges and refrigerators. There is an increased risk of electric shock if your body is earthed or grounded.
- Do not expose power tools to rain or wet conditions. Water entering a power tool will increase the risk of electric shock.
- Do not abuse the cord. Never use the cord for carrying, pulling or unplugging the power tool. Keep cord away from heat, oil, sharp edges or moving parts. Damaged or entangled cords increase the risk of electric shock.
- When operating a power tool outdoors, use an extension cord suitable for outdoor use. Use of a cord suitable for outdoor use reduces the risk of electric shock.
If operating a power tool in a damp location is unavoidable, use a residual current device (RCD) protected supply. Use of an RCD reduces the risk of electric shock.
Personal safety
- Stay alert, watch what you are doing and use common sense when operating a power tool. Do not use a power tool while you are tired or under the influence of drugs, alcohol or medication. A moment of inattention while operating power tools may result in serious personal injury.
2 English
▶ Use personal protective equipment. Always wear eye protection. Protective equipment such as a dust mask, non-skid safety shoes, hard hat or hearing protection used for appropriate conditions will reduce personal injuries.
▶ Prevent unintentional starting. Ensure the switch is in the off-position before connecting to power source and/or battery pack, picking up or carrying the tool. Carrying power tools with your finger on the switch or energising power tools that have the switch on invites accidents.
Remove any adjusting key or wrench before turning the power tool on. A wrench or a key left attached to a rotating part of the power tool may result in personal injury.
Do not overreach. Keep proper footing and balance at all times. This enables better control of the power tool in unexpected situations.
- Dress properly. Do not wear loose clothing or jewellery. Keep your hair, clothing and gloves away from moving parts. Loose clothes, jewellery or long hair can be caught in moving parts.
If devices are provided for the connection of dust extraction and collection facilities, ensure these are connected and properly used. Use of dust collection can reduce dust-related hazards.
Do not let familiarity gained from frequent use of tools allow you to become complacent and ignore tool safety principles. A careless action can cause severe injury within a fraction of a second.
Power tool use and care
Do not force the power tool. Use the correct power tool for your application. The correct power tool will do the job better and safer at the rate for which it was designed.
- Do not use the power tool if the switch does not turn it on and off. Any power tool that cannot be controlled with the switch is dangerous and must be repaired.
- Disconnect the plug from the power source and/or remove the battery pack, if detachable, from the power tool before making any adjustments, changing accessories, or storing power tool. Such preventive safety measures reduce the risk of starting the power tool accidentally.
- Store idle power tools out of the reach of children and do not allow persons unfamiliar with the power tool or these instructions to operate the power tool. Power tools are dangerous in the hands of untrained users.
- Maintain power tools and accessories. Check for misalignment or binding of moving parts, breakage of parts and any other condition that may affect the power tool's operation. If have the power tool repaired before use. Many accidents are caused by poorly maintained power tools.
- Keep cutting tools sharp and clean. Properly maintained cutting tools with sharp cutting edges are less likely to bind and are easier to control.
▶ Use the power tool, accessories and tool bits etc. in accordance with these instructions, taking into account the working conditions and the work to be performed. Use of the power tool operations different from those intended could result in a hazardous situation.
- Keep handles and grasping surfaces dry, clean and free from oil and grease. Slippery handles and grasping surfaces do not allow for safe handling and control of the tool in unexpected situations.
Service
▶ Have your power tool serviced by a qualified repair person using only identical replacement parts. This will ensure that the safety of the power tool is maintained.
2.2 Drill safety warnings
Safety instructions for all operations
- Brace the tool properly before use. This tool produces a high output torque and without properly bracing the tool during operation, loss of control may occur resulting in personal injury.
- Hold the power tool by insulated gripping surfaces, when performing an operation where the cutting accessory or fasteners may contact hidden wiring or its own cord. Cutting accessor contacting a "live" wire may make exposed metal parts of the power tool "live" and could give the operator an electric shock.
Safety instructions when using long drill bits
▶ Never operate at higher speed than the maximum speed rating of the drill bit. At higher speeds, the bit is likely to bend if allowed to rotate freely without contacting the workpiece, resulting in per injury.
▶ Always start drilling at low speed and with the bit tip in contact with the workpiece. At higher speeds, the bit is likely to bend if allowed to rotate freely without contacting the workpiece, result in personal injury.
▶ Apply pressure only in direct line with the bit and do not apply excessive pressure. Bits can bend causing breakage or loss of control, resulting in personal injury.
2.3 Additional safety instructions for torquing threaded fasteners
Personal safety
▶ Use the product only when it is in perfect working order.
▶ Never tamper with or modify the tool in any way.
▶ Always hold the tool firmly with both hands on the grips provided. Keep the grips clean and dry.
- Do not touch rotating parts - risk of injury!
- Wear suitable protective glasses, a hard hat, ear protection, protective gloves and light respiratory protection while using the power tool.
- Wear protective gloves also when changing the tool. Touching the accessory tool can result in cuts and burns.
▶ Wear eye protection. Flying fragments can injure the body and eyes.
Before starting work, check the hazard class of the dust that will be produced when working. Use an industrial vacuum cleaner with an officially approved protection class in compliance with the locally applicable dust protection regulations. Dust from materials such as lead-based paint, certain types of wood and concrete/masonry/stone containing quartz, minerals or metal can be harmful to health.
▶ Make sure that the workplace is well ventilated and, where necessary, wear a respirator appropriate for the type of dust generated. Contact with or inhalation of the dust may cause allergic reactions and/or respiratory or other diseases among operators or bystanders. Certain kinds of dust are classified as carcinogenic such as oak and beech dust, especially in conjunction with additives for wood conditioning (chromate, wood preservative). Only specialists are permitted to handle material containing asbestos.
Take breaks and do physical exercises to improve the blood circulation in your fingers. Exposure to vibration during long periods of work can lead to disorders of the blood vessels and nervous system in the fingers, hands and wrists.
Electrical safety
Before beginning work, check the working area for concealed electric cables or gas and water pipes. External metal parts of the power tool can become live, presenting a risk of electric shock, if you accidentally damage an electric cable.
▶ Check the condition of the supply cord and the plug. Have the power cord or the plug checked, and if necessary replaced, by a trained electrical specialist.
Power tool use and care
▶ Immediately switch off the power tool if the accessory tool jams. The power tool might twist off-line.
▶ Wait until the power tool stops completely before you lay it down.
3 Description
3.1 Product overview

① Key chuck
② Quick-release chuck (alternatively)
③ Belt hook
④ Grip
⑤ Lockbutton for sustained operation
⑥ Supply cord
⑦ Control switch
⑧ Forward/reverse switch
3.2 Intended use
The product described is an electric drill. It is designed for drilling in steel, wood and plastic.
3.3 Items supplied
Electric drill, operating instructions.
Other system products approved for use with this product can be found at your local Hilti Store or at: www.hilti.group | USA: www.hilti.com
4 Technical data
4.1 Drill

For details of the rated voltage, frequency, current and input power, please refer to the power tool's country-specific type identification plate.
When powered by a generator or transformer, the generator or transformer's power output must be twice the rated power shown on the rating plate of the power tool. The operating voltage of the transformer or generator must always be within +5% and -15% of the rated voltage of the power tool.
| UD 4 | |
| Weight | 1.4 kg |
| Protection class | II |
4.1.1 Noise information and vibration values in accordance with EN 60745
The sound pressure and vibration values given in these instructions were measured in accordance with a standardized test and can be used to compare one power tool with another. They can also be used for preliminary assessment of exposure. The data given represents the main applications of the power tool. However, if the power tool is used for different applications, with different accessory tools, or is poorly maintained, the data can vary. This can significantly increase exposure over the total working period. An accurate estimation of exposure should also take into account the times when the tool is switched off, or when it is running but not actually being used for a job. This can significantly reduce exposure over the total working period. Identify additional safety measures to protect the operator from the effects of noise and/or vibration, for example: Maintaining the power tool and accessory tools, keeping the hands warm, organization of work patterns.
Noise information
| UD 4 | |
| Sound (power) level | 96.5 dB |
| Sound pressure level | 85.5 dB |
| Uncertainty | 3 dB |
Information about vibration
| UD 4 | |
| Drilling (Å) | 3.5 m/s2 |
| Uncertainty (K) | 1.5 m/s2 |
4.1.2 Using extension cords

WARNING
A damaged supply cord presents a hazard! Do not touch the supply cord or extension cord if damaged while working. Disconnect the supply cord plug from the power outlet.
- Check the appliance's supply cord at regular intervals and have it replaced by a qualified specialist if found to be damaged.
- Use only extension cords of a type approved for the application and with conductors of adequate gaug (cross section). The power tool may otherwise suffer a drop in performance and the extension cord ma overheat.
- Check the extension cord for damage at regular intervals.
- Replace damaged extension cords.
- When working outdoors, use only extension cords that are approved and correspondingly marked for this application.
Recommended minimum conductor cross-section and maximum power-cord length for 120V supply voltage
| Cord AWG 16 AWG 14 AWG 12 AWG 10 | ||||||||||
| Conductor cross-section | 1,31 mm2 | 2,08 mm2 | 3,31 mm2 | |||||||
| Conductor cross-section | 2,58 kcmil | 4,11 kcmil | 6,53 kcmil | |||||||
| Cord length | 25 m | 30 m | 50 m | |||||||
| Cord length 75 ft 100 ft 150 ft 250 ft | ||||||||||
5 Preparations at the workplace

CAUTION
Risk of injury! Inadvertent starting of the product.
▶ Unplug the supply cord before making adjustments to the power tool or before changing accessories.
Observe the safety instructions and warnings in this documentation and on the product.
5.1 Fitting an accessory tool


CAUTION
Risk of injury! Inadvertent starting of the product.
▶ Unplug the supply cord before making adjustments to the power tool or before changing accessories.
- Use the chuck key to open the chuck.
← alternatively: Open the keyless chuck.
-
Check that the connection end of the accessory tool is clean and then insert it in the keyed chuck or, respectively, pull the accessory tool out of the keyed chuck.
-
Use the chuck key to close the keyed chuck.
← alternatively: Close the keyless chuck.
- Remove the key from the chuck and insert it in the chuck key holder.
5.2 Removing the accessory tool


CAUTION
Risk of injury! Inadvertent starting of the product.
▶ Unplug the supply cord before making adjustments to the power tool or before changing accessories.
- Use the chuck key to open the chuck.
← alternatively: Open the keyless chuck. - Remove the accessory tool.
- Remove the chuck key and secure the chuck key to the key strap.
6 Types of work

WARNING
A damaged supply cord presents a hazard! Do not touch the supply cord or extension cord if damaged while working. Disconnect the supply cord plug from the power outlet.
- Check the appliance's supply cord at regular intervals and have it replaced by a qualified specialist if found to be damaged.
Check extension cords at regular intervals and replace them if found to be damaged.
6.1 Switching on
▶ Press the control switch.

Speed is controlled steplessly up to maximum speed by varying how far the control switch is pressed in.
6.2 Switching off
▶ Release the control switch.
6.3 Activating / deactivating continuous operation

When the tool is in operation, the control switch can be locked in the "on" position.
- Press the control switch.
- Press the lockbutton for continuous operation.
The product is now in continuous operation mode. - To switch off continuous operation, press the control switch.
- Release the control switch.
The product switches off.
8
English
6.4 Direction of rotation
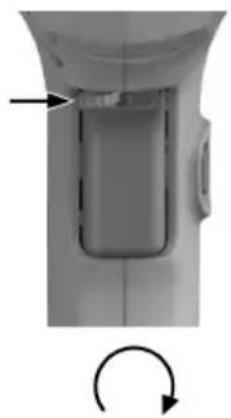

▶ Set the direction of rotation.
The selector switch engages in this position.
7 Repair

Only trained and qualified specialists are permitted to carry out maintenance and repair work!
Shoddy repair work can lead to severe accidents or damage to the device. Cases of this nature the manufacturer's warranty.
Parts can vary depending on the version.
7.1 Replacing the chuck

- You require the following items:
| Materials |
| Chuck2179576 |
| Open-ended wrench |
| Chuck key2167774 |
| Quick-release chuck2234183 |
- Disconnect the electric drill from the electric supply.
- Use the chuck key to open the chuck.
- To release the screw in the chuck, insert a hexagon steel rod in the head of the screw in the chuck.
HILTI
-
Use the chuck key to close the chuck.
-
Grip the drive spindle under the chuck with an open-end wrench and hold the wrench securely.
-
Grip the hexagon steel rod with a correctly-sized open-end wrench and turn the wrench in a counterclockwise direction.
The chuck is released.
-
Use the chuck key to open the chuck.
-
Remove the hexagon rod from the chuck and insert it in the head of the screw in the new chuck.
-
Use the chuck key to close the chuck.
-
Grip the drive spindle under the chuck with an open-end wrench and hold the wrench securely.
-
Grip the hexagon steel rod with a correctly-sized open-end wrench and turn the wrench in a clockwise direction.
| Technical data | |
| Torque (Spindle) 11 Nm ... 18 Nm | (8 ftllp... 13 ftllb |
-
Use the chuck key to open the chuck.
-
Tighten the screw in the chuck.
| Technical data | |
| Torque (Chuck screw) 8 Nm ... 13 Nm | (6 ftlb... 10 ftlb |
7.2 Replacing the supply cord

DANGER
Risk of injury! Risk of electric shock.
The power tool may be operated, serviced and repaired only by trained, authorized personnel. This personnel must be specially informed of any possible hazards.
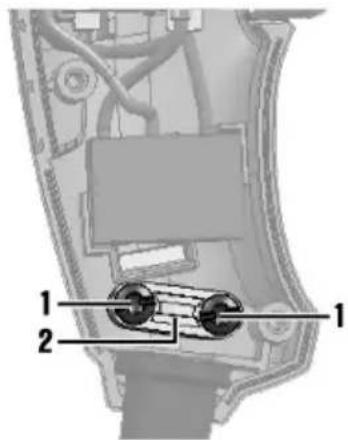
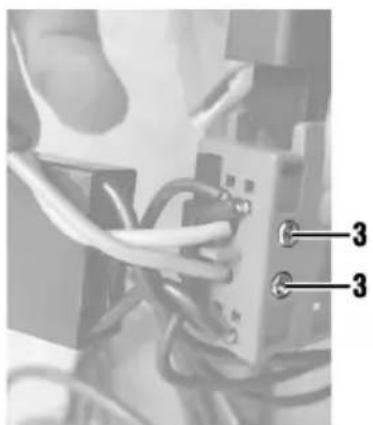
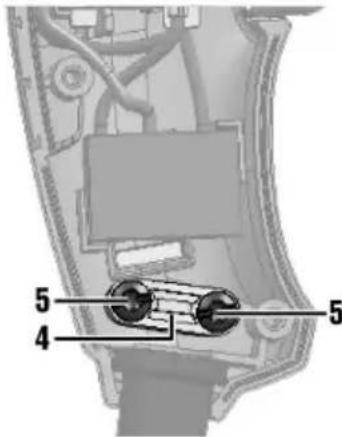
- You will need the following items:
| Materials |
| Supply cord |
| 2167712 (110 V GB) |
| 2167713 (230 V GB) |
| 2167714 (230 V CH) |
| 2167715 (120 V US) |
| 2167717 (230 V CN) |
| 2188143 (230 V EU) |
| Screwdriver (combi Torx) |
-
Disconnect the electric drill from the electricity supply.
-
Unscrew the casing screws and remove the casing.
-
Unscrew the clamp screws and remove the clamp.
- Release the two screws on the switch unit, so that the two conductors can be pulled out of the switch unit.

Depending on the version, the switch unit has a capacitor connected.
- Remove the supply cord.
- Push the new supply cord through the protective sleeve.
- Insert the ends of the flexible conductors in the switch unit and tighten both screws on the switch unit.
Both flexible conductors should be firmly secured in the switch unit.
- Place the supply cord in the clamp.
- Fit the upper part of the clamp over the supply cord and tighten the clamp screws.
Technical data
| Torque (Clamp) 1.35 Nm ... 1.75 Nm | (1.00 ft|b... 1.29 ft|b |

Take care to ensure that the insulation on the supply cord still extends 5 mm beyond the cl
- Fit the protective sleeve into the retaining groove provided in the casing.
- Place the casing in position and insert and tighten the casing screws.
Technical data
| Torque (Casing) 1.35 Nm ... 1.75 Nm | (1.00 ftlb... 1.29 ftlb |
7.3 Replacing the carbon brushes

DANGER
Risk of injury! Risk of electric shock.
The power tool may be operated, serviced and repaired only by trained, authorized personnel. This personnel must be specially informed of any possible hazards.

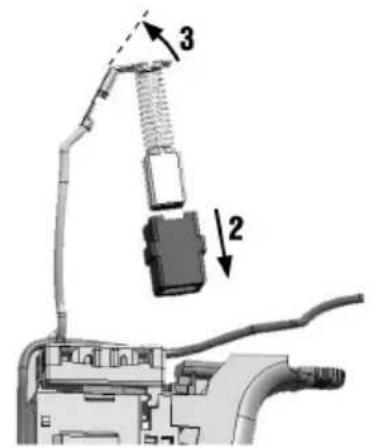
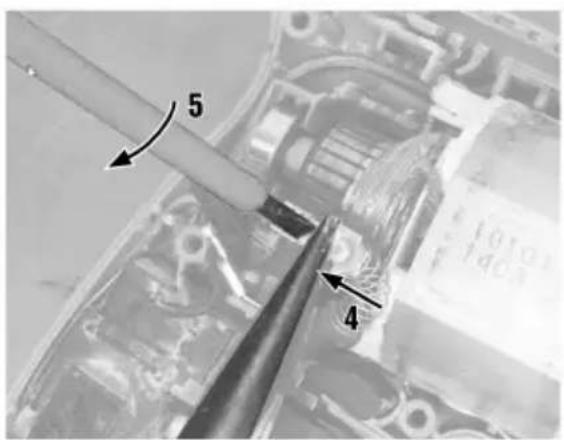
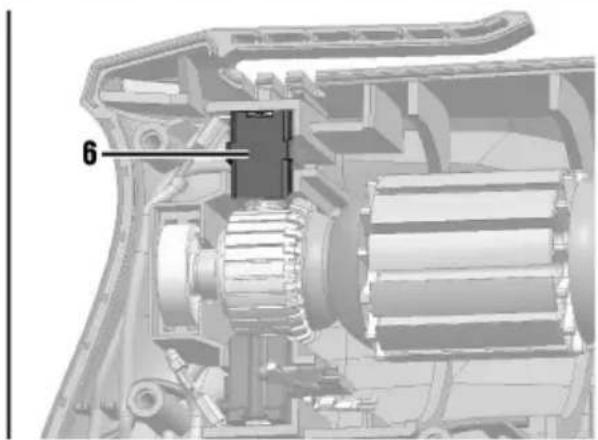
- You will need the following items:
| Materials |
| Carbon brushes2167718 |
| Long-nose pliers |
| Screwdriver (flat) |
| Screwdriver (combi Torx) |
- Disconnect the electric drill from the electricity supply.
- Unscrew the casing screws and remove the casing.
- Note how the wires and the carbon brushes are fitted.
- Remove the top carbon brush from the cage.
- Disconnect the top carbon brush from the socket.
- Straighten the connector.
- Grip the connector of the bottom carbon brush with long-nose pliers.
- Insert the tip of a flat screwdriver between the long-nose pliers and the connector socket.
- Ease the connector out of the connector socket by turning the flat screwdriver.
- Remove the bottom carbon brush.
- Straighten the connector.
- Connect the top connector to the connector socket of the top carbon brush.
- Push the top carbon brush into the socket.
- Place the top carbon brush in the top cage.
- Connect the bottom connector to the connector socket of the bottom carbon brush.
12 English
- Place the bottom carbon brush in the bottom cage.

Make sure that no wires are trapped. The carbon brushes and the wires have to be fitted ex as they were before replacement.
- Place the casing in position and insert and tighten the casing screws.
| Technical data | |
| Torque (Casing) 1.35 Nm ... 1.75 Nm | (1.00 ftlb... 1.29 ft)b |
7.4 Replacing the control switch

DANGER
Risk of injury! Risk of electric shock.
The power tool may be operated, serviced and repaired only by trained, authorized personnel. This personnel must be specially informed of any possible hazards.
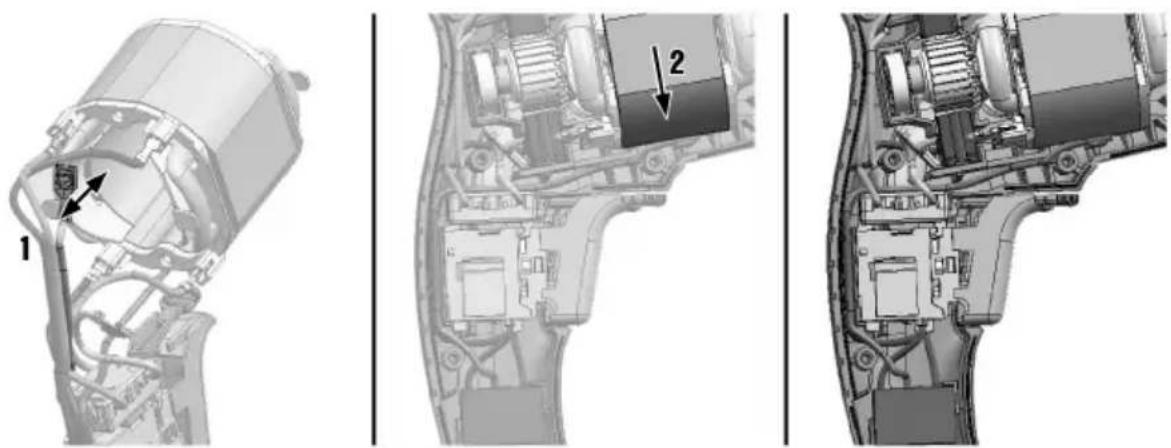
- You will need the following items:
| Materials |
| Control switch2167705 (230 V)2173716 (110 V)2197122 (120~127 V) |
| Screwdriver (flat) |
| Screwdriver (combi Torx) |
- Disconnect the electric drill from the electricity supply.
- Unscrew the casing screws and remove the casing.
- Make a note of the positions of the plug connections.
- Remove the supply cord. → page 10
- Remove the carbon brushes. → page 11
- Lift the motor out of the casing.
- Use long-nose pliers to disconnect the 4 connectors from the stator.
- Connect the 4 connectors of the new control switch to the stator.
- Connect the cable from the capacitor to the stator (see illustration).
- Position the motor and the control switch in the casing.
- Insert the carbon brushes.
- Fit the supply cord.
-
Position the wires as shown in the illustration.
-
Place the casing in position and insert and tighten the casing screws.
| Technical data | |
| Torque (Casing) 1.35 Nm ... 1.75 Nm | (1.00 ftlp... 1.29 ftlb |
7.5 Exchange rotor

DANGER
Risk of injury! Risk of electric shock.
The power tool may be operated, serviced and repaired only by trained, authorized personnel. This personnel must be specially informed of any possible hazards.
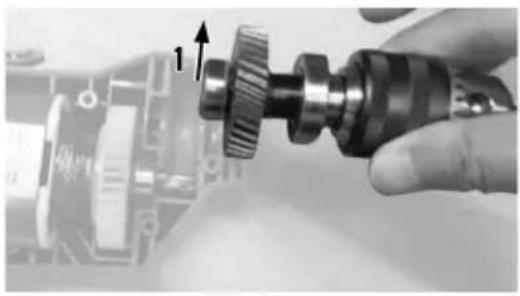
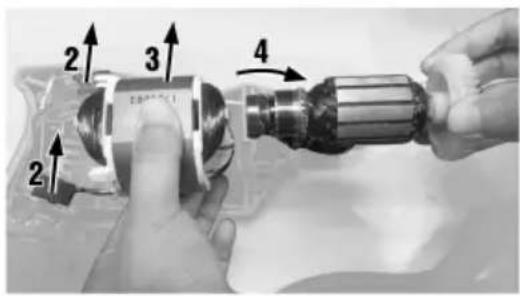
- You will need the following items:
| Materials |
| Rotor2197108 (110 V)2197109 (120-127 V)2197120 (220-230 V)2197121 (240 V) |
| Screwdriver (flat) |
| Screwdriver (combi Torx) |
-
Disconnect the electric drill from the electricity supply.
-
Unscrew the casing screws and remove the casing.
-
Remove the carbon brushes. → page 11
-
Remove the chuck from the casing.
-
Remove the motor from the casing.
-
Remove the rotor from the motor and replace it with a new rotor.
-
Insert the motor in the casing.
-
Insert the chuck in the casing.
-
Insert the carbon brushes.
-
Place the casing in position and insert and tighten the casing screws.
| Technical data | |
| Torque (Casing) 1.35 Nm ... 1.75 Nm | (1.00 ftlb... 1.29 ftlb |

WARNING
Electric shock hazard! Attempting care and maintenance with the supply cord connected to a power outlet can lead to severe injury and burns.
▶ Always unplug the supply cord before carrying out care and maintenance tasks.
Care
- Carefully remove any dirt that may be adhering to parts.
- Clean the air vents carefully with a dry brush.
- Use only a slightly damp cloth to clean the casing. Do not use cleaning agents containing silicone, these may attack the plastic parts.
Maintenance

WARNING
Danger of electric shock! Improper repairs to electrical components may lead to serious injuries including burns.
- Repairs to the electrical section of the tool or appliance may be carried out only by trained electrical specialists.
- Check all visible parts and controls for signs of damage at regular intervals and make sure that the function correctly.
- Do not operate the product if signs of damage are found or if parts malfunction. Have it repaired immediately by Hilti Service.
• After cleaning and maintenance, fit all guards or protective devices and check that they function corr

To help ensure safe and reliable operation, use only genuine Hilti spare parts and consumables. 9 parts, consumables and accessories approved by Hilti for use with the product can be found at local Hilti Store or online at: www.hilti.group.
9 Transport and storage
- Do not transport electric tools with accessory tools fitted.
• Always unplug the supply cord before storing an electric tool or appliance. - Store tools and appliances in a dry place where they cannot be accessed by children or unauthorized persons.
- Check electric tools or appliances for damage after long periods of transport or storage.
10 Disposal

Most of the materials from which Hilti tools and appliances are manufactured can be recycled. The materials must be correctly separated before they can be recycled. In many countries, your old tools, chines or appliances can be returned to Hilti for recycling. Ask Hilti Service or your Hilti representative further information.

- Do not dispose of power tools, electronic equipment or batteries as household waste!
11 China RoHS (Restriction of Hazardous Substances)
Click on the link to go to the table of hazardous substances: qr.hilti.com/r7490568.
There is a link to the RoHS table, in the form of a QR code, at the end of this document.
12 Manufacturer's warranty
▶ Please contact your local Hilti representative if you have questions about the warranty conditions.

Head of BA Quality and
Executive Vice President
Process-Management
BU Electric Tools & Accessories
BA Electric Tools & Accessories

Hilti Corporation
LI-9494 Schaan
Tel.:+423 234 21 11
Fax:+423 234 29 65
www.hilti.group
- 1 INFORMATION ABOUT THE DOCUMENTATION
- 1.1 ABOUT THIS DOCUMENTATION
- 1.2 EXPLANATION OF SYMBOLS USED
- 1.2.1 WARNINGS
- DANGER
- WARNING
- CAUTION
- 1.2.2 SYMBOLS IN THE DOCUMENTATION
- 1.2.3 SYMBOLS IN THE ILLUSTRATIONS
- 1.3 SYMBOLS ON THE PRODUCT
- 1.3.1 SYMBOLS ON THE PRODUCT
- 1.4 PRODUCT INFORMATION
- 1.5 DECLARATION OF CONFORMITY
- 2 SAFETY
- 2.1 GENERAL POWER TOOL SAFETY WARNINGS
- WORK AREA SAFETY
- ELECTRICAL SAFETY
- PERSONAL SAFETY
- 2 ENGLISH
- POWER TOOL USE AND CARE
- SERVICE
- 2.2 DRILL SAFETY WARNINGS
- SAFETY INSTRUCTIONS FOR ALL OPERATIONS
- SAFETY INSTRUCTIONS WHEN USING LONG DRILL BITS
- 2.3 ADDITIONAL SAFETY INSTRUCTIONS FOR TORQUING THREADED FASTENERS
- 3 DESCRIPTION
- 3.1 PRODUCT OVERVIEW
- 3.2 INTENDED USE
- 3.3 ITEMS SUPPLIED
- 4 TECHNICAL DATA
- 4.1 DRILL
- 4.1.1 NOISE INFORMATION AND VIBRATION VALUES IN ACCORDANCE WITH EN 60745
- 4.1.2 USING EXTENSION CORDS
- 5 PREPARATIONS AT THE WORKPLACE
- 5.1 FITTING AN ACCESSORY TOOL
- 5.2 REMOVING THE ACCESSORY TOOL
- 6 TYPES OF WORK
- 6.1 SWITCHING ON
- 6.2 SWITCHING OFF
- 6.3 ACTIVATING / DEACTIVATING CONTINUOUS OPERATION
- 8
- ENGLISH
- 6.4 DIRECTION OF ROTATION
- 7 REPAIR
- 7.1 REPLACING THE CHUCK
- HILTI
- 7.2 REPLACING THE SUPPLY CORD
- 7.3 REPLACING THE CARBON BRUSHES
- 12 ENGLISH
- 7.4 REPLACING THE CONTROL SWITCH
- 7.5 EXCHANGE ROTOR
- CARE
- MAINTENANCE
- 9 TRANSPORT AND STORAGE
- 10 DISPOSAL
- 11 CHINA ROHS (RESTRICTION OF HAZARDOUS SUBSTANCES)
- 12 MANUFACTURER'S WARRANTY
Brand : HILTI
Model : UD 4
Category : Drill