
RoboStar iQ100 r - Vacuum Cleaner TESLA - Free user manual and instructions
Find the device manual for free RoboStar iQ100 r TESLA in PDF.


| Product Type | Robotic Vacuum Cleaner |
| Brand | Tesla |
| Model | RoboStar iQ100 r |
| Dimensions (Diameter x Height) | 330 mm x 80 mm |
| Weight | 3.2 kg |
| Power Supply | Rechargeable Li-Ion battery, 14.8 V, 2600 mAh |
| Charging Time | Approx. 4-5 hours |
| Running Time | Up to 120 minutes (eco mode) |
| Suction Power | 2000 Pa (max) |
| Dustbin Capacity | 0.4 L |
| Navigation System | Gyroscope + infrared cliff sensors |
| Cleaning Modes | Auto, Edge, Spot, Random, Schedule |
| App Control | Yes (Wi-Fi, compatible with iOS and Android) |
| Voice Control | Compatible with Amazon Alexa, Google Assistant |
| Filtration System | HEPA filter (washable) |
| Brushes | Main roller brush + side brush |
| Cliff Sensors | Yes (3 sensors) |
| Anti-Drop Protection | Yes |
| Remote Control | Included |
| Noise Level | < 60 dB |
| Maintenance | Empty dustbin, clean filter and brushes weekly |
| Replacement Parts | Filter, side brush, main brush, battery available from Tesla service |
| Reparability | User-replaceable battery and brushes; other repairs by authorized service |
Frequently Asked Questions - RoboStar iQ100 r TESLA
User questions about RoboStar iQ100 r TESLA
0 question about this device. Answer the ones you know or ask your own.
Ask a new question about this device
Download the instructions for your Vacuum Cleaner in PDF format for free! Find your manual RoboStar iQ100 r - TESLA and take your electronic device back in hand. On this page are published all the documents necessary for the use of your device. RoboStar iQ100 r by TESLA.
USER MANUAL RoboStar iQ100 r TESLA
natural_image
Line drawing of a robotic vacuum cleaner inside a circular device (no text or symbols)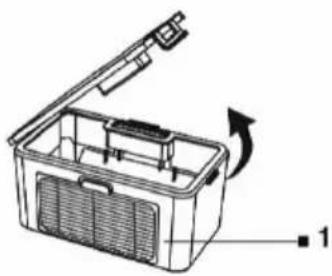
natural_image
Line drawing of a fishcater with open lid and internal compartments, showing a rotation arrow (no text or symbols)1 HEPA filtr
Nabíjecí základna
natural_image
Top-down schematic of a vehicle dashboard with labeled components (L, R) and circular annotations highlighting specific parts (no text or symbols beyond labels)natural_image
Technical line drawings of a vacuum cleaner and its internal components, showing internal structure and mounting mechanism (no text or symbols)1 filter HEPA
Nabíjacia základňa
1 Indikátor pripojenia napájania
2 Vstup pre nabíjanie
3 Nabíjacie konektory
Dial'kové ovládanie
natural_image
Technical diagram of a vehicle interior showing front and side views with labeled components (L and R), no readable text or symbols present.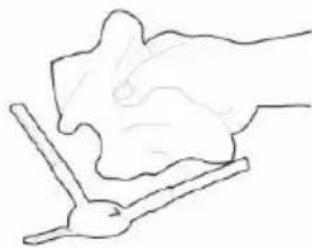
natural_image
Simple line drawing of a hand holding a small object (no text or symbols)natural_image
Top-down schematic of a vehicle dashboard with labeled components (L, R) and three circular insets showing internal compartments or fixtures.ROZWIĄZYWANIE PROBLEMÓW Z APLIKACJĄ
natural_image
Top-down schematic of a vehicle dashboard with two labeled rotors (L and R) showing structural components, enclosed in concentric circles (no text or symbols beyond labels)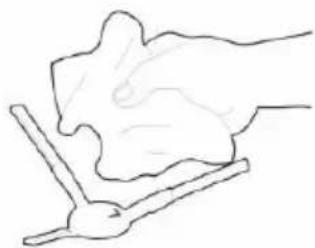
natural_image
Simple line drawing of a hand holding a piece of bread or spoon (no text or symbols)natural_image
Line drawing of a robotic vacuum cleaner inside a circular device (no text or symbols)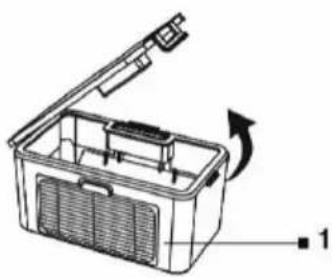
natural_image
Line drawing of a fishcater with open lid and internal compartments, showing a rotation arrow (no text or symbols)1 HEPA filter
Polnilna postaja
natural_image
Technical diagram of a vehicle interior showing front and side views with labeled components (L and R), no readable text or symbols present.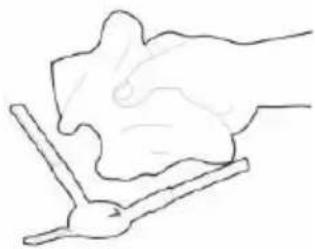
natural_image
Simple line drawing of a hand holding a small object, possibly a tool or tool, with no text or symbols present.SPREDNJE POMIČNO KOLESCE - čistite enkrat tedensko
Vedno mora biti brez las in prahu. Sredinsko vodilno kolesce odstranite s sesalnika tako, da ga izvlečete iz telesa sesalnika. Prav tako očistite os kolesca in ga nato namestite nazaj v robotski sesalnik.
REŠEVANJE TEŽAV
VAŽNA SIGURNOSNA UPOZORENJA
natural_image
Technical line drawing of a vacuum cleaner with open lid and internal components, showing assembly and mounting (no text or symbols)natural_image
Diagram showing front and side views of a vehicle dashboard with labeled parts (L, R) and a hand holding a tool, no text or symbols present.natural_image
Line drawing of a robotic vacuum cleaner with attached fan (no text or symbols)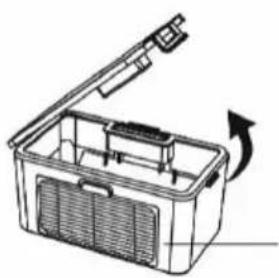
natural_image
Line drawing of a container with an open lid and internal compartments, showing a curved arrow indicating rotation (no text or symbols)1 Filtru HEPA
Stația de încărcare
Thank you for choosing the TESLA RoboStar iQ100.
Please, read the safety rules carefully before using the robot vacuum cleaner and follow all common safety rules.
- Read the whole user manual carefully before use.
- Keep this user manual for future reference.
- Follow the rules stated in this manual to reduce the risk of damage to the robot vacuum cleaner and possible injury.
IMPORTANT SAFETY WARNINGS
This appliance is a complex electromechanical device, please note the following instructions:
• The appliance is intended for indoor use only at room temperature (max. 40°C).
- Use the vacuum cleaner as often as possible for the maximum cleaning effect.
• Before using the appliance, make sure that the dust bin and filter are installed correctly.
- Use only original accessories which are designed for this model.
- Use only the accessories provided by the manufacturer of the robot vacuum cleaner to charge it. Use of non-original accessories could cause damage to the robot vacuum cleaner, electric shock or fire.
- Do not touch parts which are plugged into the mains if you have wet hands.
- Do not leave the appliance unattended in the presence of children, do not use it in a rooms where small children sleep.
- Do not allow children to use the robot vacuum cleaner even under the supervision of an adult.
- Do not sit on the robot vacuum cleaner or place other objects on it.
- Do not use the appliance if the power cord is damaged.
- Do not open or repair the appliance. You run the risk of electric shock and loss of the warranty.
- Do not use the appliance if you have wet hands or feet.
- Keep out of the reach of flammable and volatile substances.
- Do not use the appliance in an excessively warm, dusty or damp environment.
- Avoid heat radiation on the plastic surface of the appliance.
- Do not use the appliance near objects with water which could damage it, for example by a container with the water being knocked over.
- Avoid splashing the vacuum cleaner or its interior with liquid which could damage it.
- Do not clean the vacuum cleaner with water.
- The vacuum cleaner is not waterproof.
- Do not use the vacuum cleaner on a wet floor.
- Do not use to vacuum liquids, burning cigarettes, matches, combustible substances, shards, sharp objects, flour, cement, plaster, loose materials, larger pieces of paper, plastic bags or other items which could damage the vacuum cleaner.
• An electrostatic charge may occur when vacuuming which could be dangerous for the user.
• Inform members of your household about use of the vacuum cleaner to avoid injury.
- Do not use the robot vacuum cleaner if its dust bin is full.
- The robot vacuum cleaner is not designed for use on elevated, barrier free areas – raised floors,
staircases, balconies and furniture, etc. The appliance is equipped with cliff sensors, but there may be circumstances where the control system evaluates the situation incorrectly (dirty sensor, current sensor failure, light reflection, trapped dirt, etc.) and does not prevent the fall (does not stop the appliance). In such cases, the seller cannot acknowledge the buyer's claims for damage caused to the robot vacuum cleaner in this manner.
- The manufacturer and the importer to the European Union is not liable for any damage caused by operation of the appliance such as injury, scalding, fire or damage to other items, etc.
PACK CONTENTS
Carefully check that you have unpacked all of the accessories supplied. We recommend keeping the original cardboard box, user manual and packaging materials for the duration of the warranty period.
DESCRIPTION
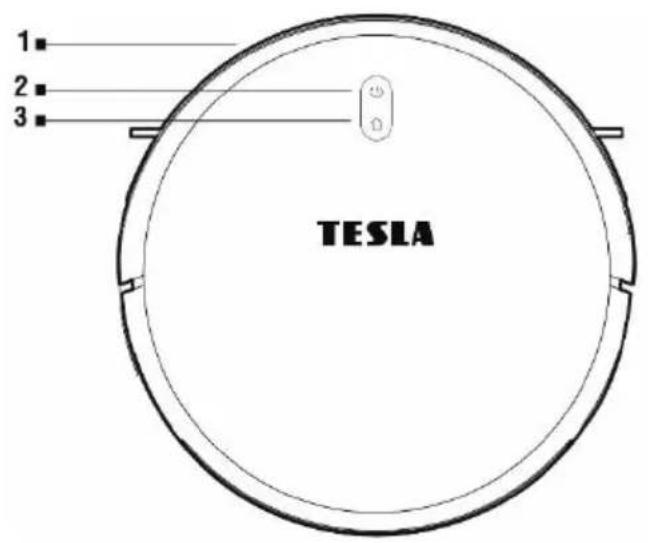
1 Front bumper
2 On/Off
3 Return to charging station
4 Front castor wheel
5 Charging connectors
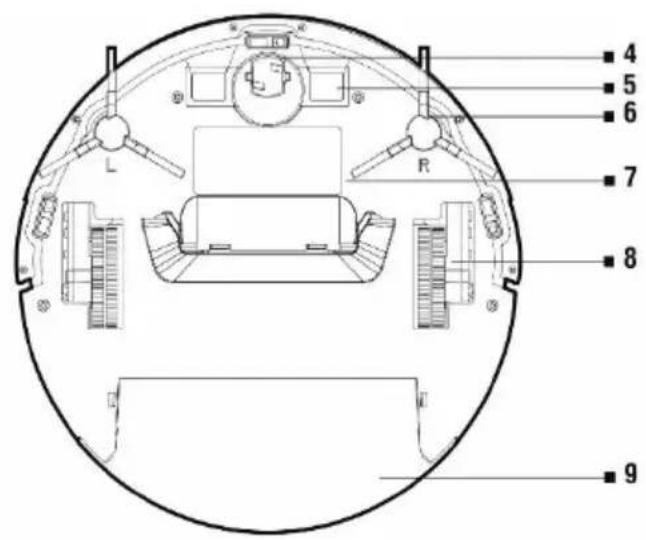
6 Side cleaning brush
7 Battery cover
8 Drive wheel
9 Water reservoir
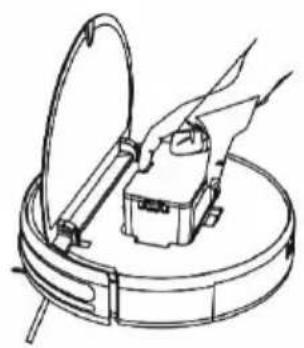
Dust bin
natural_image
Line drawing of a robotic vacuum cleaner inside a circular device (no text or symbols)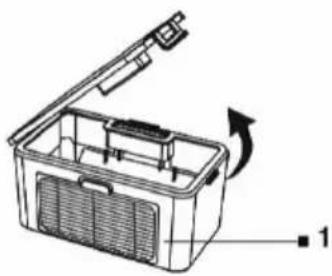
natural_image
Line drawing of a fishcater with open lid and internal compartments, showing a rotation arrow (no text or symbols)1 HEPA filter
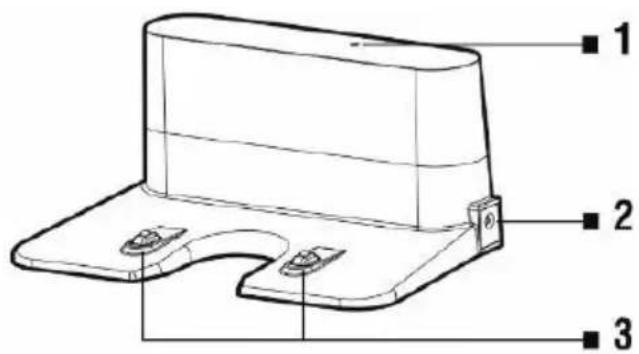
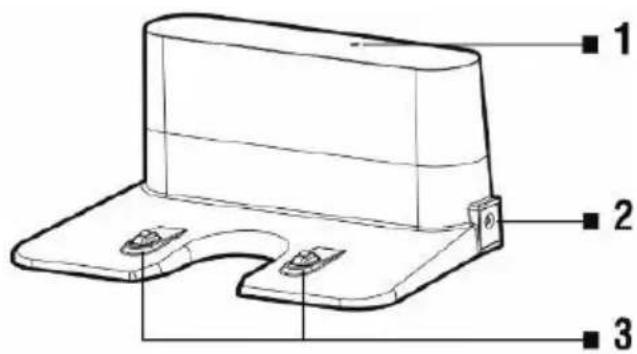
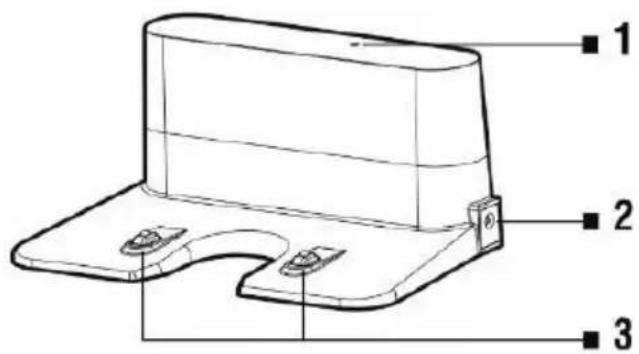
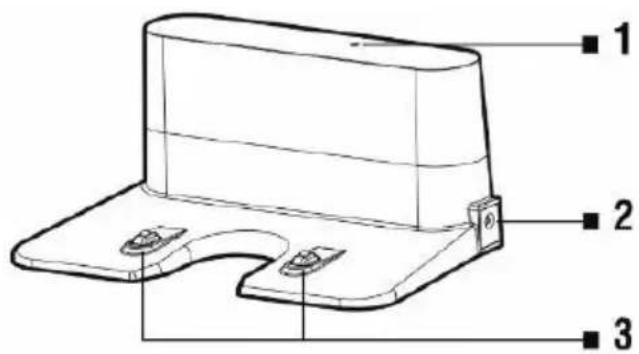
Charging station
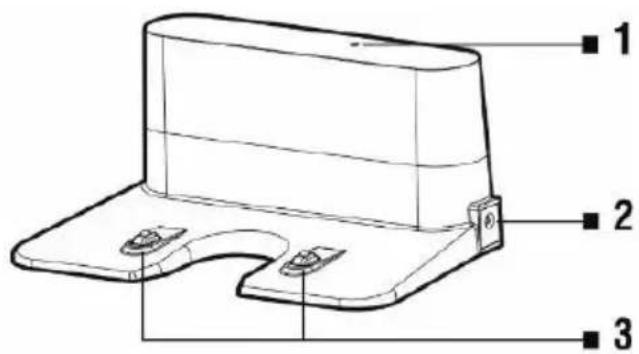
1 Charging indicator
2 Power input
3 Charging connectors
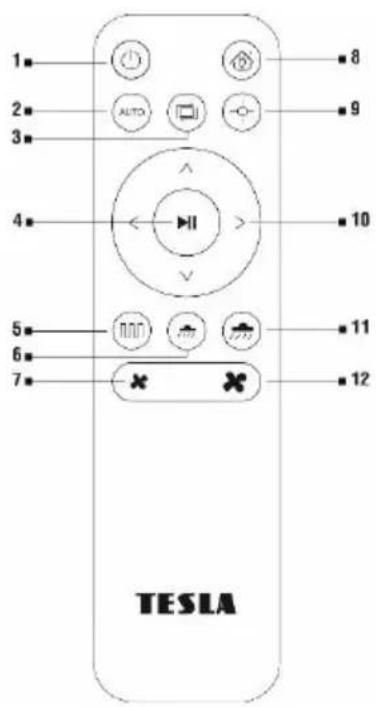
Remote control
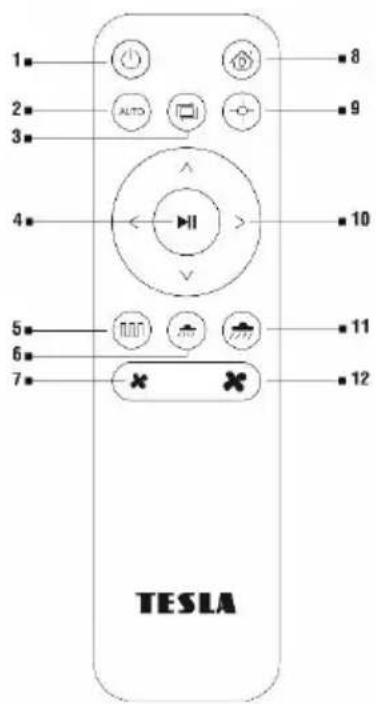
1 On/Off (energy-saving mode)
2 Automatic cleaning
3 Cleaning along the walls
4 Start/Stop cleaning
5 Optimised cleaning
6 Mopping intensity (low)
7 Suction power (low)
8 Return to charging station
9 Clean specific location
10 Direction buttons
11 Mopping intensity (high)
12 Suction power (high)
BEFORE THE FIRST CLEAN
- Before you start cleaning, prepare the room in such a way that no items are left on the floor which could prevent operation of the vacuum cleaner (heavy soiling, cables, inappropriately positioned carpet, etc.). Move chairs and other larger items out of the way so that the robot vacuum cleaner can reach even hard-to-reach places.
- Also move items which could damage the robot vacuum cleaner.
- The carpet must be secured in such a way that the robot cannot get on it when mopping. If a mopping module with a water reservoir is installed in the vacuum cleaner, this may interrupt the cleaning process or cause unwanted soaking of the carpet.
- Direct sunlight may cause reduced sensitivity of the sensors of the vacuum cleaner, please avoid direct sunlight light.
- Black furniture may not be properly detected due to the physical nature of the infra-red sensors. This may cause a slight impact, which will be reduced by the front bumper.
- The top cover of the vacuum cleaner is made of tempered glass. Although tempered glass is
safer and stronger than standard glass, please handle it carefully to avoid it being scratched or broken.
Ideal positioning of the charging station
The area 2 metres in front of the charging station and 1 metre to each side must be free from obstacles. The charging station must be placed on a level surface. We recommend you stick the charging station to the wall using double-sided adhesive tape to keep it firmly in place. Position the power cord in such a way that it does not get tangled in the cleaning brushes. No mirrors or other items with a strong reflection may be located in the area of the charging station within 15 cm of the floor. The charging station should not be exposed to direct sunlight.
- Place the batteries in the remote control and make sure the polarity is correct.
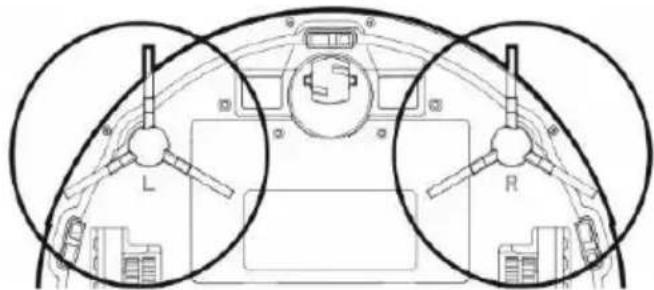
- Fit the cleaning brushes, left (L) and right (R) as marked.
- Plug the charging station into the mains using a 230 V power adapter.
- Place the vacuum cleaning in the charging station and the vacuum cleaner battery will automatically start to charge.
- While charging, the "2" button will flash slowly. This will stop flashing once the battery is fully charged.
FIRST START
Switch the robot vacuum cleaner on and off with a long press of the "2" button on the robot vacuum cleaner.
Automatic cleaning
- Select "ON/OFF" or "Random mode" in the smartphone application, press the "2" button on the robot vacuum cleaner or press the "4" button on the remote control. When starting cleaning, the vacuum cleaner should always be located in the charging station.
- To interrupt cleaning/stop the robot vacuum cleaner, press the "2" button or press the "4" button on the remote control.
Cleaning along the walls
Select “Cleaning along the walls” in the smartphone application or press the “3” button on the remote control.
Clean specific location
Place the robot vacuum cleaner in the location you want to clean and select "Clean specific location" in the smartphone application or press the "9" button on the remote control.
Optimised cleaning
Select “Optimised cleaning” in the smartphone application or press the “5” button on the remote control. When starting cleaning, the vacuum cleaner should always be located in the charging station. In this mode, the vacuum cleaner will operate in the programmed mode for efficient cleaning.
Planning cleaning
The robot vacuum cleaner can be programmed to clean automatically once a day, always at the determined time, even if nobody is home. Plan cleaning in the smartphone application. You can set a one-off timer or individual plans for any day or days of the week. You can switch off a set timer or
delete it completely. Hold down the selected timer with your finger. After a while, you will be prompted to delete it, which you then confirm using the OK button.
RETURN TO THE CHARGING STATION
After pressing the “8” button on the remote control, the robot vacuum cleaner will search for the charging station and start to charge automatically.
WATER MOPPING
- Switch off the robot vacuum cleaner using the "2" button and place it away from the charging station.
- Install the blue mopping cloth in the mopping module and fit the module to the robot vacuum cleaner. Dampen the mopping cloth lightly with water to ensure faster and more fluent mopping. When removing the mop from the holder, do so carefully to avoid damaging the velcro on the holder if it is removed too fast. If the mop is dirty after cleaning, you can wash it carefully in lukewarm water.
- Remove the water reservoir from the vacuum cleaner, open the plastic cover and fill the reservoir with water. Only refill the water reservoir after removing the reservoir from the vacuum cleaner. Some residual water may leak when handling the mopping container. In this case, wipe the spilled area with a dry cloth immediately.
- We recommend that you mop the floor with clean water, detergent can cause frothing and make it more difficult for water to drip onto the mop or cause streaks on the floor after it has dried.
- Carefully insert the water reservoir into the body of the robot vacuum cleaner. Do not pour water onto the vacuum cleaner or its internal parts, the vacuum cleaner is not waterproof.
- For the best results of mopping, we recommend that you use this function in one room and then move to the next room.
To mop, press the "6" or "11" button on the remote control. Do not allow the vacuum cleaner to remain needlessly in one place without moving or with water residue in the water reservoir.
- Do not mop carpets.
- Keep a sufficient amount of water for mopping in the mopping module.
- Once cleaning has finished, always pour away the remaining water from the water reservoir, rinse and dry the mopping cloth.
- Do not charge the battery with the water reservoir filled with water to ensure your safety.
CONTROLLING THE ROBOT VACUUM CLEANER USING A SMARTPHONE
- Switch on the robot vacuum cleaner using the "2" button.
- Install the application for controlling the robot vacuum cleaner in your smartphone and follow the guide for connection of your smartphone and the robot vacuum cleaner.
- Android: search for "Tuya Smart" in Google Play
Apple: search for "Tuya Smart" in Apple Store - Connect your mobile phone to your 2.4 GHz WiFi network and switch on GPS.
- Create an account in the application.
- Click on the “+” button in the application.
- Select "Small home appliances" in the application on the left, select "Vacuum cleaner (WiFi)" on
the right
- Select your WiFi network (your WiFi router) and enter the password for connection to this WiFi network.
- Change "EZ mode" to "AP Mode" in the application in the top right.
- Hold down the "3" button on the vacuum cleaner until it starts to beep repeatedly, the On button indicator will start to flash. Confirm this step on your phone screen and select "Next".
- Press the “CONNECT” button to confirm access to WiFi network settings for the mobile phone and connect it to the WiFi Hotspot created by the vacuum cleaner called SmartLife. After connection, go back to the “Tuya Smart” application and wait for connection of the vacuum cleaner. If automatic connection does not begin, confirm the option with the “RETRY” button and again confirm the WiFi network SmartLife.
- Once the vacuum cleaner has been paired, confirmation of successful connection will be displayed in the mobile application. Confirm this using the "CLOSE" button.
APPLICATION TROUBLESHOOTING
- Make sure that the quality and strength of the WiFi signal coverage for your smartphone and the robot vacuum cleaner is sufficient. Perform first setup of the robot vacuum cleaner close to your WiFi router.
- Make sure that you have GPS switched on in your smartphone.
- Make sure that third-party applications (VPN, anti-virus, firewall, etc.) are not blocking access to your mobile phone.
- Try to connect to a different WiFi router or WiFi Hotspot in a different telephone in order to rule out an internet connection error.
- You have too many devices connected to your WiFi router or the option of connecting a new device to it is blocked.
- Reset the WiFi router.
Note: Make sure that the charging station is in range of a high-quality and strong WiFi signal from your WiFi router to ensure that the robot vacuum cleaner is connected to the WiFi network while charging. The robot vacuum cleaner also needs this WiFi connection while charging to get its bearings properly and to ensure that it is available to start cleaning. WiFi networks operating on a frequency of 2.4 GHz are supported.
UPDATING THE FIRMWARE IN THE ROBOT VACUUM CLEANER
The firmware in the robot vacuum cleaner is updated continuously. If a new version of the firmware is available, the TESLA application will offer you the option of downloading the update and installing it in the robot vacuum cleaner.
MAINTENANCE
PLEASE NOTE! We recommend that you perform regular maintenance to ensure the most efficient cleaning.
LACK OF MAINTENANCE MAY CAUSE DAMAGE TO THE robot vacuum CLEANER AND LOSS OF THE WARRANTY.
Turn off the vacuum cleaner before cleaning and maintenance using the "2" button. Wipe the top cover of the vacuum cleaner with a soft, dry or slightly damp cloth. Do not use cleaning agents to clean the surface of the robot vacuum cleaner, as this may damage the surface.
DUST BIN - clean every time the vacuum cleaner is used
• Regularly empty the dust bin.
- If the dust bin is full, this significantly affects the suction power of the robot vacuum cleaner and the quality of cleaning.
• Empty the contents of the dust bin into your household bin after cleaning.
- If you use water to clean the dust bin, dry it carefully before reinstalling it into the body of the robot vacuum cleaner.
- Dust can be removed from the dust bin using clean water.
Press the release button to remove the dust bin and tip the dirt into your household bin.
HEPA FILTER
In order to preserve the filtration parameters of the HEPA filter, we recommend that you clean it without using water. If you decide to wash the HEPA filter with water, this will reduce its filtration ability. Clean the HEPA filter regularly according to how dirty it is, at least once a week, using the dust brush provided or clean it using a conventional vacuum cleaner.
- Do not clean the HEPA filter with your fingers or brush, only with clean running water (do not use cleaning agents).
- Allow the HEPA filter to dry thoroughly. Never install a wet HEPA filter in the robot vacuum cleaner!
- Vacuuming with a dirty HEPA filter or with no HEPA filter inserted may damage the robot vacuum cleaner.
• We recommend that you replace the HEPA filter after 6 months of use.
SIDE CLEANING BRUSHES - clean once a week
natural_image
Technical diagram of a vehicle dashboard with two circular insets showing front and side views (no text or labels)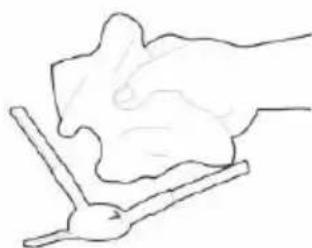
natural_image
Simple line drawing of a hand holding a tool, no text or symbols presentCheck both side cleaning brushes according to intensity of soiling, at least once a week, together with the air intake opening and remove any tangled hair and other debris from them.
SENSORS, CHARGING CONTACTS AND CHARGING STATION - clean once a week
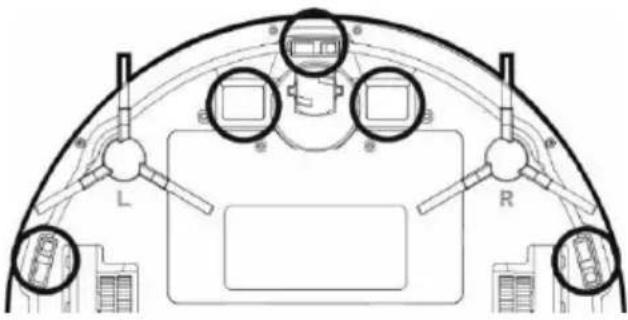
Clean the sensors (see figure) on the bottom of the robot vacuum cleaner once a week with a soft dry cloth. Check that the front bumper below which the impact sensor is located is not blocked.
Clean the contacts on the bottom (see figure) of the robot vacuum cleaner and the contacts on the charging station with a soft cloth.
FRONT CASTOR WHEEL - clean once a week
Keep free of hair and dust. Remove the central guide wheel from the vacuum cleaner by pulling it out from the body of the vacuum cleaner, also clean the wheel axle and then reinstall it in the robot vacuum cleaner.
TROUBLESHOOTING
| Problem | Solution |
| The robot vacuum cleaner is acting “erratically”. | Switch the vacuum cleaner off and on again, place it in the charging station and then start cleaning. |
| The vacuum cleaner is “Not connected” after installation of the application and pairing a mobile phone with the robot vacuum cleaner. | 1. Switch your WiFi router on and off, remove your robot vacuum cleaner in the “Tuya Smart” application and try to pair it again. We recommend you always being close to the WiFi router during pairing.2. Try connecting to a different WiFi network, ideally to a mobile WiFi hotspot.3. Make sure that your WiFi network is correctly set up and fully functional. The robot vacuum cleaner should always be in range of a high-quality and strong WiFi signal from your WiFi router. |
| The robot vacuum cleaner does not start cleaning. | 1. The robot vacuum cleaner has a weak battery. Charge the battery to full capacity before cleaning.2. 2. The battery is too hot. Use the robot vacuum cleaner at temperatures of 0°C ~ 40°C. |
| The robot vacuum cleaner is not charging. | 1. The charging station is not connected to the mains. Make sure the power cord is properly connected.2. The charging contacts have a poor contact with the robot vacuum cleaner. Clean the contacts on the robot vacuum cleaner and on the charging station. |
| The robot vacuum cleaner does not return to the charging station. | Make sure there is enough space around the charging station and the charging station's detection zone is clear. |
| Vacuuming is very loud. | Clean the main centre brush, side brushes, drive wheels, castor wheel, bottom of the robot vacuum cleaner and front bumper. |
| There is a screeching sound while vacuuming. | Remove the front castor wheel and clean the centreline from hair and dust. If necessary, you can lubricate the wheel axle. |
| Poor cleaning quality. | Empty the dust bin. Clean or replace the HEPA filter and clean the centre cleaning brush. |
| The robot vacuum cleaner does not start the planned cleaning. | 1. Cleaning will not start if the battery of the robot vacuum cleaner is not charged enough.Please charge the battery to full capacity.2. Planned cleaning will not be correctly synchronised between the robot vacuum cleaner and your mobile phone if the robot vacuum cleaner is disconnected from the WiFi network. Therefore, always keep the robot vacuum cleaner within reach of a high-quality and strong WiFi signal from your WiFi router. |
| Problem | Cause | Solution |
| The vacuum cleaner got stuck during cleaning. | The vacuum cleaner got stuck in a small space, loose items such as curtains or a carpet got caught up in the cleaning brush, etc. | The vacuum cleaner will automatically attempt to free itself. If it is unable to do so, please clear away the obstacle yourself. |
| The vacuum cleaner interrupts cleaning and returns to the charging station early. | If the battery status gets low, the vacuum cleaner will automatically switch to a mode that returns it to the charging station and return there. | This is normal. Allow the vacuum cleaner to charge to full battery capacity and start cleaning again. |
| The remote control is not working (range of UP TO 5 metres) | Weak batteries in the remote control. | Change the batteries and check that the polarity is correct when you insert them. |
| The vacuum cleaner is not switched on or does not have enough battery charge to start cleaning. | Make sure that the vacuum cleaner is switched on and charge the vacuum cleaner battery again. | |
| The infra-red sensor on the remote control is dirty or the infra-red signal sensor on the vacuum cleaner is dirty. | Clean the remote control and the vacuum cleaner. | |
| There is signal interference between the remote control and the vacuum cleaner. | Avoid use in the vicinity of other infra-red devices. |
BATTERY CARE
• We recommend that you use the charging station to charge the battery.
- If you transport the robot vacuum cleaner or will not be using for a long period of time, switch it off using the main ON/OFF switch.
- If you will not be using the appliance for a long period of time, remove the batteries from the remote control.
- The robot vacuum cleaner features a state-of-the-art high-capacity Li-Ion battery, with no memory effect, so there is no need to worry about multiple recharging and discharging of the battery.
- The vacuum cleaner is equipped with special protection which cuts off the power supply once the battery is charged, thus preventing the battery from being overcharged. This means that the battery will not require frequent replacement. This ensures its longevity and also that the vacuum cleaner is always ready to start cleaning again.
- In standby mode, the robot vacuum cleaner has very low power consumption, so we recommend that you do not turn off the power supply. If you do not use the robot vacuum cleaner for a long time, turn it off and disconnect the charging station from the power supply. However, you should fully charge the vacuum cleaner every three months to prevent the battery from being completely discharged.
WARRANTY REPAIR
For warranty repair, please contact the vendor you purchased the TESLA product from.
The warranty DOES NOT APPLY to:
- use of the appliance for purposes other than those it was designed for
- regular wear and tear
- failure to observe the safety instructions stated in the user manual
• electrical or mechanical damage caused by improper use - damage caused by natural elements such as water, fire, static electricity or power surges, etc.
• damage caused by unauthorised repair
• appliances with an illegible serial number - the battery, if the battery capacity drops after more than 6 months of use (warranty on the battery capacity is six months)
DECLARATION OF CONFORMITY
We, INTER-SAT LTD, org. složka, declare that this appliance complies with Directive 2014/53/EU. The full wording of the EU Declaration of Conformity is available at www.tesla-electronics.eu.

This product meets the requirements of the European Union.
When this crossed-out wheeled bin symbol is attached to a product it means that the product is covered by European Directive 2002/96/EC. Please obtain information about the local separate collection system for electrical and electronic products. Please act in accordance with your local regulations and do not dispose of your old products together with your regular household waste. Correct disposal of your old product helps to prevent potential negative consequences for the environment and human health.
Due to the fact that the product is subject to development and improvement, we reserve the right to alter the user manual. The current version of this user manual can always be found at www.tesla-electronics.eu. Design and specifications may be subject to change without prior notice, printing errors reserved.
- Nabíjecí základna
- Nabíjacia základňa
- Dial'kové ovládanie
- ROZWIĄZYWANIE PROBLEMÓW Z APLIKACJĄ
- Polnilna postaja
- SPREDNJE POMIČNO KOLESCE - čistite enkrat tedensko
- REŠEVANJE TEŽAV
- VAŽNA SIGURNOSNA UPOZORENJA
- Stația de încărcare
- IMPORTANT SAFETY WARNINGS
- PACK CONTENTS
- Charging station
- Remote control
- BEFORE THE FIRST CLEAN
- Ideal positioning of the charging station
- FIRST START
- Automatic cleaning
- Cleaning along the walls
- Clean specific location
- Optimised cleaning
- Planning cleaning
- RETURN TO THE CHARGING STATION
- WATER MOPPING
- CONTROLLING THE ROBOT VACUUM CLEANER USING A SMARTPHONE
- APPLICATION TROUBLESHOOTING
- UPDATING THE FIRMWARE IN THE ROBOT VACUUM CLEANER
- MAINTENANCE
- DUST BIN - clean every time the vacuum cleaner is used
- HEPA FILTER
- SIDE CLEANING BRUSHES - clean once a week
- SENSORS, CHARGING CONTACTS AND CHARGING STATION - clean once a week
- FRONT CASTOR WHEEL - clean once a week
- BATTERY CARE
- WARRANTY REPAIR
- The warranty DOES NOT APPLY to:
- DECLARATION OF CONFORMITY
Brand : TESLA
Model : RoboStar iQ100 r
Category : Vacuum Cleaner