
Electribe M - DJ Equipment KORG - Free user manual and instructions
Find the device manual for free Electribe M KORG in PDF.


| Product Type | DJ Equipment / Production Station |
| Brand | Korg |
| Model | Electribe M (EM-1) |
| Dimensions | 300 (W) x 222.5 (D) x 55.4 (H) mm |
| Weight | 1.25 kg |
| Power Supply | DC 9V (AC adapter included) |
| Power Consumption | 5 W |
| Number of Parts | 12 parts (8 drum, 2 synth, 2 accent) |
| Memory Capacity | 256 patterns, 16 songs |
| Master Effects | Tempo Delay with Motion Sequence |
| Insert Effects | 11 types: Reverb, Flanger/Chorus, Phaser, Ring Modulator, Pitch Shifter, Compressor, Distortion, Decimator, Resonator, Filter, Modulation Delay |
| Sequencer | Pattern: max 64 steps per part; Song: max 256 patterns per song, approx. 35,700 events |
| Connectors | PHONES (stereo plug), OUTPUT L/MONO, R (phone jacks), MIDI IN/OUT/THRU |
| Output Level | -10 dBu nominal, 1 k-ohms impedance |
| Headphone Output | 35 mW, load impedance 33 ohms |
| Waves | 144 drum waves, 50 synth waves |
| Recording Methods | Realtime, Step, and Note Editing |
| Motion Sequence | Records knob movements for each part (Smooth or Trig Hold) |
| Synchronization | MIDI Clock (internal/external), Tap Tempo |
| Cleaning Instructions | Wipe with clean dry cloth; do not use benzene, thinner, or flammable polishes |
| Safety Warnings | Keep away from liquids and metal objects; avoid direct sunlight, extreme temperature/humidity |
Frequently Asked Questions - Electribe M KORG
User questions about Electribe M KORG
0 question about this device. Answer the ones you know or ask your own.
Ask a new question about this device
Download the instructions for your DJ Equipment in PDF format for free! Find your manual Electribe M - KORG and take your electronic device back in hand. On this page are published all the documents necessary for the use of your device. Electribe M by KORG.
USER MANUAL Electribe M KORG
Thank you purchasing the Korg ELECTRIBE·M EM-1. In order to enjoy long and trouble-free use, please read this manual carefully and use the instrument correctly.
To ensure long, trouble-free operation, please read this manual carefully. Precautions
Location
Using the unit in the following locations can result in a malfunction.
- In direct sunlight
- Locations of extreme temperature or humidity
• Excessively dusty or dirty locations - Locations where excessive vibration exists
Power supply ⊕-⊖
Please connect the designated AC adaptor to an AC outlet of the correct voltage. Do not connect it to an AC outlet of voltage other than that for which your unit is intended.
Interference with other electrical devices
This product contains a microcomputer. Radios and televisions placed nearby may cause reception interference. Operate this unit at a suitable distance from radios and televisions.
Handling
To avoid breakage, do not apply excessive force to the switches or controls.
Care
If the exterior becomes dirty, wipe it with a clean, dry cloth. Do not use liquid cleaners such as benzene or thinner, cleaning compounds or flammable polishes.
Keep this manual
After reading this manual, please keep it for later reference.
Keeping foreign matter out of your equipment
- Never set any container with liquid in it near this equipment. If liquid gets into the equipment, it could cause a breakdown, fire, or electrical shock.
- Be careful not to let metal objects get into the equipment. If something does slip into the equipment, unplug the AC adaptor from the wall outlet. Then contact your nearest Korg dealer or the store where the equipment was purchased.
THE FCC REGULATION WARNING (for U.S.A.)
This equipment has been tested and found to comply with the limits for a Class B digital device, pursuant to Part 15 of the FCC Rules. These limits are designed to provide reasonable protection against harmful interference in a residential installation. This equipment generates, uses, and can radiate radio frequency energy and, if not installed and used in accordance with the instructions, may cause harmful interference to radio communications. However, there is no guarantee that interference will not occur in a particular installation. If this equipment does cause harmful interference to radio or television reception, which can be determined by turning the equipment off and on, the user is encouraged to try to correct the interference by one or more of the following measures:
- Reorient or relocate the receiving antenna.
- Increase the separation between the equipment and receiver.
- Connect the equipment into an outlet on a circuit different from that to which the receiver is connected.
- Consult the dealer or an experienced radio/TV technician for help.
Unauthorized changes or modification to this system can void the user's authority to operate this equipment.
CE mark for European Harmonized Standards
CE mark which is attached to our company's products of AC mains operated apparatus until December 31, 1996 means it conforms to EMC Directive (89/336/EEC) and CE mark Directive (93/68/EEC). And, CE mark which is attached after January 1, 1997 means it conforms to EMC Directive (89/336/EEC), CE mark Directive (93/68/EEC) and Low Voltage Directive (73/23/EEC).
Also, CE mark which is attached to our company's products of Battery operated apparatus means it conforms to EMC Directive (89/336/EEC) and CE mark Directive (93/68/EEC).
Concerning data
In rare cases, incorrect operation may cause the contents of memory to be lost. Please save important data on a system that can record System Exclusive data, like a sequencer or a data filer (storage device). Korg Corporation can accept no responsibility for any damages resulting from loss of data.
Contents
1. Introduction ...... 6
Main features 6
The data you create on the EM-1 6
Make connections and play! ....7
Example connections....7
Preparing to play 7
2. Front and rear panel 8
Common section 8
Effect/Delay section 9
Part common section....9
Synth filter section 10
Part Select section 10
Sequence Control section 10
Step Key section 11
Connector section 12
3. Basic operation (Quick Start)....13
Conceptual diagram of the EM-1 13
Listening to a Song 13
Listening to Patterns.... 14
Trying out the functions 14
Changing the tempo of a song or pattern 14
- Using the dial to change the tempo 14
- Using the Tap Tempo key to change the tempo 14
Pressing keys to play the sound of a Part.... 15
Playing the sound of a drum part 15
Playing the sound of a synth part (the Keyboard function) 15
Modifying (editing) the sound of a part 16
Editing the sound of a drum part 16
Editing the sound of a synth part 16
Editing the effect or delay 17
Playing the sound of a part along with a song or pattern 17
Editing the sound of a part, effect, or delay while hearing a song or pattern 18
Modifying (editing) a rhythm or phrase pattern.... 18
Realtime recording 19
Step Recording 20
Saving a pattern that you create 21
Using a Motion Sequence 22
Playing with Pattern Set 23
Using the EM-1 as a tone generator module 23
Synchronizing the playback with other ELECTRIBE models 24
4. Pattern mode .....25
Selecting a pattern 25
Setting the playback tempo 25
- Using the dial to change the tempo 25
- Using the Tap Tempo key to change the tempo 25
Playing a pattern (Pattern Play) 25
The timing at which patterns will change 25
Playing from the beginning of a pattern (Reset & Play) 25
About the tempo when you switch patterns (Tempo Lock) 26
Selecting a part 26
Drum parts 26
Synth parts 26
Accent parts 26
The Part Mute function 26
The Part Solo function 26
Creating a pattern 27
Assigning a wave 27
Editing the sound of a part 27
Drum part 27
Synth part 28
Accent parts 28
Editing the effect or delay 29
EFFECT 29
DELAY 30
Length, Scale/Beat settings 31
Setting the Length 31
Setting the Scale/Beat 31
Swing settings 32
Setting the Roll Type 32
Creating a Pattern 32
Realtime recording 32
Step recording 32
Note editing 32
Adding accents to the pattern (Accent) 34
Motion sequence 34
Playing a motion sequence 34
Recording a motion sequence 35
Checking motion sequence data 35
Convenient functions for editing patterns.... 35
Transposing a phrase (Transpose) 35
Moving data within a part (Move Data) 36
Copying a part (Copy Part) 37
Data Copy within a pattern 37
Copying the sound of a part (Copy Sound) 37
Erasing motion sequence data from the part, effect, or delay (Clear Motion) 38
Erasing pattern data from a part 38
Erasing data during playback or recording (Erase) 38
Erasing all data from a part (Clear Part) 38
Exchanging data between parts (Swap Part) 39
Editing motion sequence data 39
Selecting a motion sequence 39
Editing the parameter values of a motion sequence 40
Pattern Set.... 40
Using Pattern Set to perform (Pattern Set Play) 40
Chain Play of pattern sets 40
Assigning a pattern to a Pattern Set 41
Saving a pattern (WRITE) 41
5. Song mode ....42
Selecting a song 42
Setting the playback tempo 42
- Using the dial to set the tempo 42
- Using the tap tempo key to set the tempo 42
- Using the Tempo Lock key to fix the song tempo 42
Playing a song (Song Play) 42
Fast-forward or rewind a song 42
Switching songs 42
Playing from the beginning of a position or song (Reset & Play) 42
Creating a song 43
Creating a song from scratch 43
Erasing song data (Clear Song) 43
Specifying a pattern for each position 43
Specifying the Note of each pattern 43
Editing a song 44
Inserting a pattern at a specified position (Insert Pattern) 44
Deleting a pattern from a specified position (Delete Pattern) 44
Changing the pattern for a specific position 44
Recording knob movements or your performance in a song (Event Recording).... 45
Deleting event data from a song 45
Checking for song event data 45
ving a song (WRITE) 45
6. Global mode ....46
Metronome settings 46
Synchronizing the EM-1 with external MIDI devices (MIDI Clock) 46
Synchronizing the EM-1 to a master external MIDI device (Ext).... 46
Synchronizing an external MIDI device to the EM-1 as master (int).... 46
Setting the MIDI channel of each part (MIDI ch) 47
Setting the MIDI note number of a drum part.... 47
MIDI filter settings 47
Adjusting the pitch bend range 47
Transmit/receive dump data.... 48
Memory Protect (Protect) 48
Saving your changes in Global mode (WRITE) 48
7. Appendices......49
About MIDI 49
Troubleshooting 50
Error messages 51
Restoring the factory set data 51
Specifications 51
Index 52
Pattern Name List 54
Song Name List 54
MIDI Implementation Chart 55
Wave Name List 56
1. Introduction
Thank you for purchasing the ELECTRIBE·M(subsequently referred to as the EM-1).
The EM-1 is a production station designed for dance music that makes it easy for anyone from beginner to enthusiast to create original music.
You can edit sounds intuitively by using the front panel knobs and keys, and easily create complete rhythms and phrase patterns without requiring any additional equipment.
The EM-1 is the ideal tool for any musician, DJ, sound creator, or DTM user who wants an easy way to add originality to their music.
Main features
- The EM-1 has eight drum parts and two synth parts, and you can assign sounds to each part and edit them.
- By combining rhythm patterns created for each drum part together with phrase patterns created for each synth part, you can easily create a song using no additional equipment.
- Internal memory contains numerous drum waves (144 types) and synth waves (50 types), giving you access to a wide range of sonic expression.
- Up to 256 patterns (maximum of 64 steps each) can be created using the Sample data and stored in internal memory.
- The EM-1 provides a Motion Sequence function that can record and loop knob movements, and can be recorded for each part of each pattern.
- By combining multiple patterns and adding event data such as knob movements, you can create and save up to sixteen songs.
- You can choose from realtime recording, step recording, and note editing.
- Since sounds and rhythm or phrase patterns can be modified instantly, you can use these changes as part of your live performance expression.
- Eleven types of effect plus tempo delay are provided, and an Effect/Delay Motion Sequence function allows knob movements to be recorded.
- A Keyboard function lets you use the sixteen step keys as a keyboard on which to perform.
- The Pattern Set play function lets you assign 64 different patterns to the 16 step keys, and successively select and play them.
- Tap Tempo and MIDI Clock can be used to synchronize the performance with an external sequencer, turntable, etc.
- The EM-1 can be controlled from an external sequencer or keyboard as a MIDI sound module.
- The MIDI Dump function lets you save data on a computer or external sequencer etc.
The data you create on the EM-1
Patterns and songs that you create on the EM-1 by editing will return to their un-edited state if you select a different pattern or song, or turn off the power before performing the Write operation. If you wish to save an edited pattern, song, or global data, be sure to perform the Write operation. Even after Writing the edited data, it is still possible to restore all songs and patterns etc. to the factory settings. (Refer to p.51 "Restoring the factory set data.")
Make connections and play!
Example connections

Preparing to play
Be sure to turn off the power before making connections. Careless operation may damage your speaker system or cause malfunctions.
As shown in the above diagram, hook the AC adapter cable around the adapter cable holder. When removing the cable from the holder, do not use excessive force.
- Connect the included AC adapter to the DC 9V jack, and plug the adapter into an AC outlet.
- Connect one end of your audio cables to the line out jacks of the EM-1 (L/MONO, R), and connect the other end to your mixer or powered monitor speakers (amplified speakers) etc. If you will be listening in mono, use the L/MONO jack. To take full advantage of the EM-1's sound quality, we recommend that you listen in stereo.
- If you will be using headphones, connect them to the headphone jack.
The output from the line out jacks will not be switched off even if headphones are plugged in.
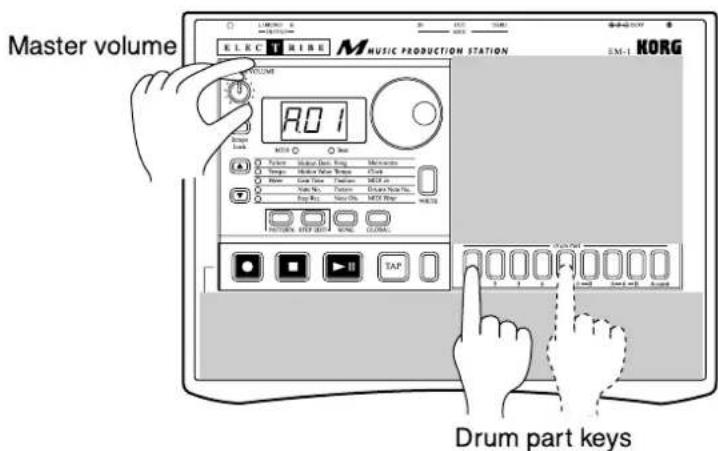
- When you have finished making connections, turn on the power. Slightly raise the master volume of the EM-1, and strike the Drum part keys (1...6B) to check whether connections have been made correctly. Use the master volume of the EM-1 and the gain and fader controls of your mixer or powered monitor system to adjust the volume to an appropriate level.
2. Front and rear panel
The controls and other parts of the EM-1 can be broadly grouped as shown in the diagram.

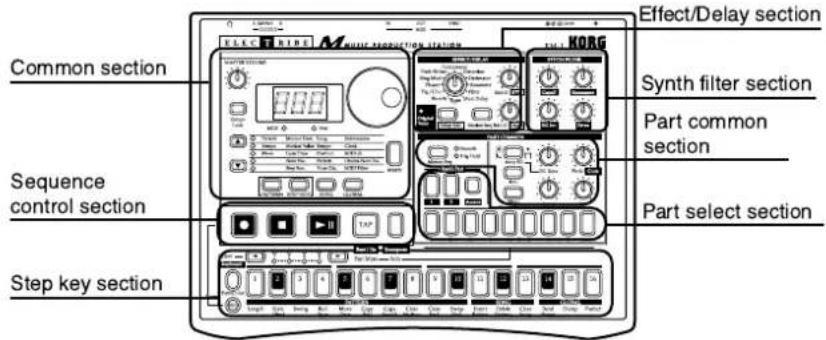
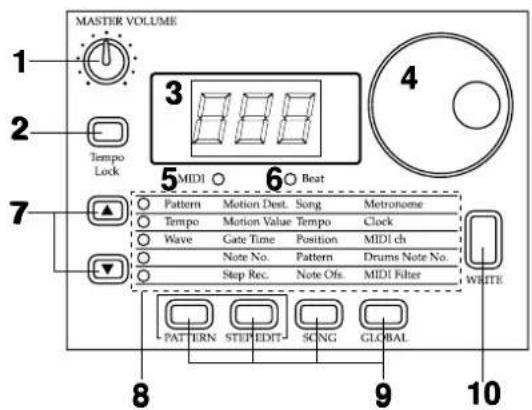
Common section
1. MASTER VOLUME
This knob adjusts the volume that is output from the line out jacks and the headphone jacks.
2. Tempo Lock
When this key is on, the tempo will not change when you select different patterns.
3. Display
This shows the value of the currently selected parameter, and various messages.
4. Dial
Use this to modify the value shown in the display.
5. MIDI (LED)
This will light when valid MIDI messages are received.
6. Beat (LED)
This will blink at quarter-note intervals to indicate the tempo.
7. [▲][▼] (cursor keys)
In each mode, use these keys to select parameters from the matrix shown in the display.
8. Matrix
The parameters that will appear in the display are listed here for each mode. Use the cursor keys to make the desired parameter select LED light.
9. Mode keys
These keys are used to select PATTERN, STEP EDIT, SONG, or GLOBAL modes.
10. WRITE key
Use this key when you wish to save settings that you modified in Pattern, Song, or Global mode, or to save Pattern Set data.
Effect/Delay section
1. Type
Selects the effect type.
2. Original Value (LED)
This will light when the knob etc. that you are currently moving arrives at the same position as originally programmed in the pattern.
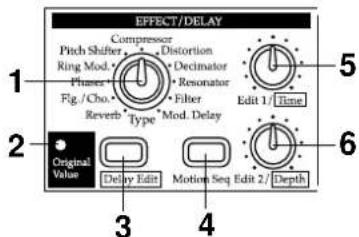
3. Delay Edit key
Each time you press this key, Delay Edit will be turned on (lit) or off (dark). When this is on, you can use the Edit 1 and 2 knobs to control the delay. When you use the Type knob to switch effects, this will be forced off.
4. Motion Seq (motion sequence) key
Each time you press this key, it will be turned on (lit) or off (dark). When this is on, movements of the Edit 1 and 2 knobs will be recorded and played back. When Delay Edit is on, Delay motion sequence will be selected. When Delay Edit is off, the motion sequence of the effect selected by Type will be selected.
5. Edit 1/Time
This knob adjusts the character of the effect. The result will differ according to the effect type. When the Delay Edit key is on, this knob adjusts the length of the delay time.
6. Edit2/Depth
This knob adjusts the character of the effect. The result will differ according to the effect type. When the Delay Edit key is on, this knob adjusts the depth of the delay.
Part common section
1. Motion Seq (motion sequence)
This key lets you record and play back knob movements for each part. Each time you press this key, the setting will alternate between on (Smooth lit), on (Trig Hold lit), and off (dark)

2. Amp EG
Select the amp envelope for each part. Each time you press this key, the envelope will switch between a decaying envelope “ ^1 ”(key lit) and a sustaining envelope “ ^2 ”(key dark).
3. Roll
For each part, this key switches the roll effect (successive strikes) on (lit) or off (dark).
4. Effect
For each part, this key switches the effect send on (lit) or off (dark).
5. EG Time
This knob adjusts the envelope time (the time until the sound disappears) for each part.
6. Pitch/Glide
This knob sets the pitch of the drum part. For a synth part, it sets the time over which the pitch will change smoothly between two notes.
7. Level
This knob adjusts the level. For the Accent part, it adjusts the accent level.
8. Pan (panpot)
This knob sets the stereo location of the sound.
Synth filter section
These controls let you adjust the brightness of the sound or add a distinctive tonal character.
- Cutoff
Adjust the cutoff frequency of the filter.
- Resonance
Adjust the resonance of the filter.
- EG Int (EG intensity)
Adjust the depth of the filter envelope.
- Drive
Adjust the degree of distortion for the sound of the filter. Driver makes between warmly Analog Overdrive and Hard Distortion.

Part Select section
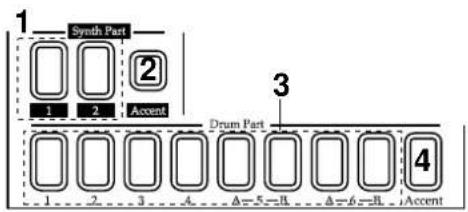
- (Synth Part) 1, 2 keys
These keys select a synth part
- (Synth Part) Accent key
This key selects the synth accent part.
- (Drum Part) 1—4, 5A-5B, 6A-6B keys
These keys select a drum part. By pressing a key, you can hear the sound that is assigned to the corresponding part.
- (Drum Part) Accent key
This key selects the drum accent part.
Sequence Control section
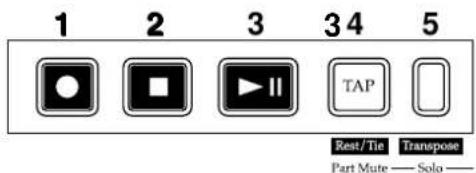
- Rec key
Use this key to record rhythms, phrases and movements of the knobs etc. If you press this key during recording, recording will end, and playback will continue.
4 5
- Stop/Cancel key
This key stops playback of a pattern or song, or cancels an operation.
- Play/Pause key
This key begins/pauses playback of a pattern or song.
- TAP, Rest/Tie, Part Mute key
Tap on this key to enter a new tempo. During step recording, use this key to input a rest or a tie. During playback, you can hold down this key and press a Part key to mute the specified part.
- Transpose, Solo key
Use this key to transpose a phrase. During playback, you can hold down this key and press one or more Part keys to playback the specified part(s).
Step Key section

flowchart
graph LR
    A["1 Select"] --> B["2 Keyboard"]
    B --> C["3 Pattern Set"]
    C --> D["4 Pattern Set"]
    D --> E["5 Start"]
    E --> F["6 Pattern"]
    F --> G["7 Copy Part"]
    G --> H["8 Copy Sound"]
    H --> I["9 Clear Motion"]
    I --> J["10 Swap Part"]
    J --> K["11 Insert Pattern"]
    K --> L["12 SONG Delete Pattern"]
    L --> M["13 Clear Song"]
    M --> N["14 Bend Range"]
    N --> O["15 Dump"]
    O --> P["16 Protect"]
1. Select keys
By pressing these keys to turn the Select LEDs on or off, you can use the sixteen step keys below as up to 64 step keys.
When the Keyboard function is on, these keys are used to switch the octave.
In Song mode, these keys function as rewind and fast-forward keys. When the Pattern Set function is on, they are used to switch Pattern Set groups.
2. Select LEDs
The upper row of LEDs (green) indicates the location (length 1...4) within the pattern of the currently-playing pattern.
The lower row of LEDs (red) indicates the location (length 1...4) of the pattern indicated by the step keys. When the Pattern Set function is on, these LEDs indicate the pattern set group. When the Keyboard function is on, these LEDs indicate the octave position.
3. Step keys 1...16
Use these keys to modify and audition the rhythm or phrase pattern of each part.
When the Keyboard function key is on, these keys function as a keyboard, allowing you to play sounds. When the Pattern Set function is on, use these keys to select patterns that you have assigned.
4. Keyboard, Pattern Set key
This makes the sixteen step keys function as a keyboard. Each time you press this key, the setting will alternate on/off. By holding down this key and pressing one of the step keys, you can switch to the pattern that you assigned to that key (Pattern Set function).
5. Shift key
This key is used in conjunction with other keys. When held down, it gives an additional function to another key.
Shift + Play/Pause key:Playback from the beginning of the pattern.
Shift + Rec key: During playback, erase triggers from the pattern.
Shift + Step keys: Execute the function shown below each step key.
For other Shift key combinations, refer to the explanation of each parameter.
Connector section

1. Power switch
This switch turns the power on/off. Each time you press it, the power will alternate on or off.
2. DC 9V
Connect the included AC adapter here.
3. Adapter cable holder
Hook the adapter cable around this so that it will not be disconnected accidentally.
4. MIDI connectors
IN MIDI data is received at this connector to control the EM-1 from an external MIDI device or to receive a data dump.
OUT MIDI data is transmitted from this connector to control an external MIDI device or to transmit a data dump.
THRU MIDI data received at the MIDI INconnector is re-transmitted without change from this connector. This is used to "daisy-chain" multiple MIDI devices.
5. L/MONO, R (line output) jacks
Connect your audio cables from these jacks to your mixer or powered monitor system (powered speakers) etc. If you wish to make monaural connections, connect the L/MONO jack.
6. (headphone jack)
A set of stereo headphones fitted with a stereo jack plug can be connected here.
3. Basic operation (Quick Start)
Conceptual diagram of the EM-1
On the EM-1, a song contains both Patterns (which consist of Parts, and effect and delay settings) and event data (refer to p.45 "Recording knob movements or your performance in a song (Event Recording)").

flowchart
graph TD
    A["Structure of Song"] --> B["Songs: S.01...S.16"]
    B --> C["Pattern order"]
    B --> D["Event data"]
    B --> E["Patterns: A.01...d.64"]
    B --> F["Effect"]
    B --> G["Motion sequence"]
    H["Synth Part"] --> I["Parameter"]
    H --> J["Phrase pattern"]
    H --> K["Motion sequence"]
    L["Drum Part"] --> M["Parameter"]
    L --> N["Rhythm pattern"]
    L --> O["Motion sequence"]
    P["Delay"] --> Q["Parameter"]
    P --> R["Motion sequence"]
    S["Effect"] --> T["Type"]
    S --> U["Parameter"]
    S --> V["Motion sequence"]
    W["Effort"] --> X["Type"]
    W --> Y["Parameter"]
    W --> Z["Motion sequence"]
Listening to a Song
- Press the Song Mode key to enter Song mode (the key will light).
- Use the cursor [▲][▼] keys to select Song (the top LED will light).
- Rotate the dial to select the desired song (S01L-S116).
- Press the Play/Pause key to playback the song (the key will light). When the song ends, playback will stop automatically (the key will go dark).
To pause during playback, press the Play/Pause key (the key will blink). To resume playback, press the Play/Pause key once again (the key will light). To stop playback, press the Stop/Cancel key.


It is not possible to change songs during playback.
What is a Song?
On the EM-1, a song is musical data consisting of Patterns arranged in the desired playback order. The EM-1 lets you create and store up to sixteen songs. In each song you can arrange up to 256 patterns, and rhythm, phrase and knob movements can also be recorded in addition to the playback. (Refer to p.42 "Song mode.")
Song
| Pattern(A.03) | Pattern(b.01) | Pattern(A.01) | Pattern(A.02) |
Listening to Patterns
- Press the Pattern mode key to enter Pattern mode (the key will light).
- Use the cursor [▲][▼] keys to select Pattern (the corresponding LED will light).
- Rotatethedial to select the desired pattern (A.01_A.64, b.01_b.64, C.01...C.64, d.01...d.64).
- Press the Play/Pause key to playback the pattern (the key will light). When pattern playback ends, the pattern will return to the beginning, and continue playing repeatedly.
To pause during playback, press the Play/Pause key (the key will blink). To resume playback, press the Play/Pause key once again (the key will light). To stop playback, press the Stop/Cancel key.
You can rotate the dial to select patterns when playback is stopped or even during playback.
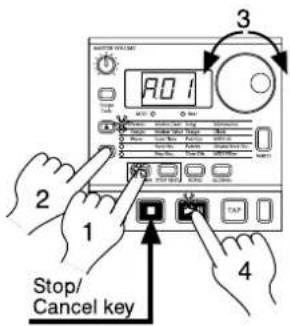

When you change patterns during playback, the change will actually occur at the end of each pattern. (Refer to p.25 "The timing at which patterns will change.")

Depending on the effect and delay settings, slight noise or unwanted sound may occur at the transition between patterns if they are changed during playback.
What is a Pattern?
A pattern is a performance of a specific length that consists of drum sounds played as a rhythm, together with synth sounds played as a phrase. The EM-1 lets you create and store 256 patterns. Each pattern consists of 12 parts (see p.15). In addition to the sounds of each part, you can also record phrases and knob movements (see p.25 "Pattern mode").
Pattern

flowchart
graph TD
    A["Drum Part"] --> B["Part1"]
    B --> C["Edit"]
    B --> D["Wave (101)"]
    D --> E["Motion sequence data"]
    F["Synth Part"] --> G["Part2"]
    G --> H["Edit"]
    G --> I["Wave (21)"]
    I --> J["Motion sequence data"]
    K["+"] --> L["+"]
    style A fill:#f9f,stroke:#333
    style F fill:#f9f,stroke:#333
Trying out the functions
Changing the tempo of a song or pattern
There are two ways to change the tempo. When the Tempo Lock key is off (key dark), switching patterns or songs will cause the tempo you set here to return to the tempo of the selected pattern or song.
• Using the dial to change the tempo
- Press the Mode key to enter Song mode or Pattern mode.
- Use the cursor [▲][▼] keys to select Tempo (the corresponding LED will light).
- Rotate the dial to change the tempo.
If you wish to adjust the tempo in more detail, you can hold down the Shift key and rotate the dial to modify the decimal portion of the value.

• Using the Tap Tempo key to change the tempo
While a song or pattern is playing, press the Tap key three times or more at the desired tempo. The EM-1 will detect the interval at which you pressed the Tap key, and will set the tempo accordingly. The tempo can also be changed in this way even if the EM-1 is not currently playing a song or pattern.
Use the cursor [▲][▼] keys to select Tempo (the corresponding LED will light), and the tempo you modified will appear in the display.

Pressing keys to play the sound of a Part
When you strike the drum part keys, or select a synth part, turn on the keyboard function and press the step keys, the sound of the corresponding part will be heard.
The sound of a part will differ depending on the pattern. Turn the dial to select various parts, and listen to the wide variety of sounds.

When you press a drum part key, the keyboard function of the step keys will be cancelled, but when you select a synth part once again, the keyboard function will automatically return to the previous setting.

Parts for which Wave (see p.16 "What is a wave?") is turned "oFF" cannot produce sound.
What is a Part?
A part is the smallest unit of which a pattern is made, and consists of a sound and rhythm or phrase, effect on/off settings, and motion sequences etc. Parts can be one of the following types, and there are a total of 12 parts. (See p.25 "Pattern mode")
- Drum parts (1—4, 5A-B, 6A-B)
A drum sound and rhythm pattern (timing of sounds), effect on/off, motion sequence etc.
- Synth parts (1, 2)
A synth sound and phrase pattern (trigger, note number, gate time), effect on/off, motion sequence etc.
- Accent part (drum, synth)
Points at which to emphasize the volume of the pattern (i.e., accent), motion sequence.
Drum Part

Synth Part

The sound can also be edited for each part, and you can also store the rhythm, phrase pattern, effect on/off, and motion sequence etc. for each part. (See p.27 "Editing the sound of a part")
Playing the sound of a drum part
When you press drum part keys 1 through 6B, the sound assigned to each key will be heard. (For each pattern, a different drum sound is assigned to each key.)

Pressing the drum accent part key will not produce sound. It is not possible to simultaneous play drum parts 5A and 5B or 6A and 6B - these parts are intended for sounds which you want to cut each other off, like open and closed hi-hat etc..
Playing the sound of a synth part (the Keyboard function)
- Turn on either synth part key 1 or 2 (the key will light).
- Press the Keyboard key to turn on the Keyboard function (the key will light).
- The step keys will function as a keyboard, and can be played.
To change the octave, use the Select keys. The select LEDs (lower row, red) will light to indicate the octave as follows.

| LED(s) lit | ||||||
| Pitch range | A0...C2 | A1...C3 | A2...C4 | A3...C5 | A4...C6 | A5...C7 |

Pressing the synth accent part key will not produce sound.

The Keyboard function cannot be turned on/off unless either synth part key 1 or 2 is selected.

Each synth part is a monophonic synthesizer, and cannot play multiple notes simultaneously; i.e., it is not polyphonic.
Modifying (editing) the sound of a part
For a drum part you can select the wave of the drum sound, and for a synth part you can select the wave of the synth sound.
Use the Level and Pan knobs and the Effect and Amp EG keys to edit the sound of each part.
The sound of each part in the pattern that you edit in this way can be saved by the Write operation. (See p.21 "Saving a pattern that you create.")

When you press a drum part key, the keyboard function of the step keys will be defeated, but will return to the previous setting when you once again select a synth part.

The knobs that are valid will differ depending on the part. (See p.27 "Editing the sound of a part.")
If a motion sequence is operating for a knob and you have difficulty editing the sound as you wish, turn off the motion sequence before editing the sound. (See p.34 "Motion sequence.")
What is a Wave?
"Waves" are the pieces of waveform data inside the EM-1 that are the basis for the sound of each part. There are 144 waves for use by drum parts, and 50 waves for use by synth parts, making a total of 194 waves. You can freely assign these waves to each part. (See p.27 "Assigning a wave")
Editing the sound of a drum part
-
Press the PATTERN mode key to enter Pattern Mode.
-
Use the cursor keys [▲][▼] to select Wave (the corresponding LED wil light).
-
Press a Drum Part key to select the part that you wish to edit.
-
Turn the dial to select a wave while you press the key you selected in step 3 to hear the sound.
-
Operate the knobs and keys of the Part Common section to modify the sound. When a knob position or key setting is the same as the original sound, the Original Value LED will light to indicate this.

Editing the sound of a synth part
-
Press the PATTERN mode key to enter Pattern mode.
-
Use the cursor keys [▲][▼] to select Wave (the corresponding LED wil light).
-
Use the Synth Part keys to select the part (1 or 2) whose sound you wish to edit.
-
Turn on the Keyboard function (the key will be lit), and then press a step key to play the sound.
-
While pressing the step keys to hear the sound, turn the dial to select a wave.
-
Operate the knobs and keys of the Synth Filter section or the Part Common section to modify the sound. When a knob position or key setting is the same as the original sound, the Original Value LED will light to indicate this.

Editing the effect or delay
-
Press a drum part key to select a part for which it will be easy to hear the changes you make to the effect.
-
To use a synth part while editing the effect, turn on the Keyboard key, and press the step keys to play the sound.
-
To edit the effect, turn on the Effect key in the Part Common section (the key will light).
-
To edit the global delay, turn on the Delay Edit key in the Effect/Delay section.
-
Operate the knobs and keys of the Effect/Delay section to modify the effect or delay. When a knob position or key setting is the same as the original effect or delay setting, the Original Value LED will light to indicate this.
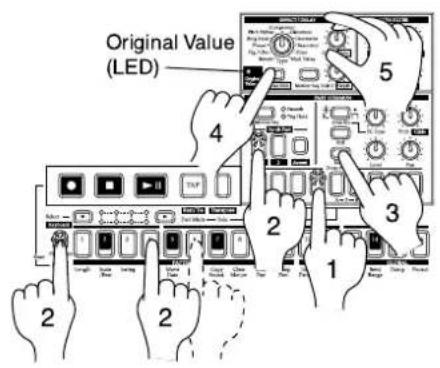
The pattern that you edit in this way can be saved by the Write operation (see p.21 "Saving a pattern that you create").
When you press a drum part key, the keyboard function of the step keys will be defeated, but will return to the previous setting when you once again select a synth part.
The delay is a global effect, so it will always be on, regardless of the on/off status of the Effect key.
The function of the knobs will differ depending on the type of effect. (See p.29 "EFFECT.")
If a motion sequence is operating for a knob and you have difficulty editing the sound as you wish, turn off the motion sequence before editing the sound. (See p.34 "Motion sequence.")
Playing the sound of a part along with a song or pattern
-
Select the synth part (1 or 2) that you wish to play, and turn on the keyboard function.
-
In Song mode or Pattern mode, press the Play/Pause key to begin playback.
-
Press the drum part keys or the step keys to play along with the song or pattern.
When you press a drum part key, the keyboard function of the step keys will be defeated, but will return to the previous setting when you once again select a synth part.
The synth parts are monophonic synthesizers. One part cannot sound multiple notes simultaneously.

Editing the sound of a part, effect, or delay while hearing a song or pattern
-
In either Song mode or Pattern mode, press the Play/Pause key to begin playback.
-
Press a part key (the key will light) to select the part that you wish to edit.
-
Operate the knobs and keys of the Synth Filter section or Part Common section to modify the sound. Operate the knobs and keys of the Effect/Delay section to modify the effect or delay.
Operating the knobs or keys will modify the sound that is used by the performance.
If you wish to save the pattern sound settings that you edit here, use the Write procedure (see p.21 "Saving a pattern that you create")

If you re-select the pattern or turn off the power without performing the Write procedure, the sound will return to its un-edited state.

When you press a drum part key, the keyboard function of the step keys will be defeated, but will return to the previous setting when you once again select a synth part.

While a Song is playing, it is not possible to write edits made to the part sound, effect, or delay. It is only possible to write edits made to the part sound while a Pattern is playing.
Modifying (editing) a rhythm or phrase pattern
Rhythm patterns and phrase patterns
Each pattern of the EM-1 contains a rhythm pattern created using the drum parts, and phrase patterns created using the synth parts. The rhythm pattern consists of sequence patterns (note timing data) for each step of each part.
Phrase patterns consist of trigger (note location), note number (pitch), and gate time (note length) data at each step for each part. You can use the sixteen step keys to modify the rhythm and phrase patterns for the various parts. Rhythm and phrase patterns can also be recorded (by realtime recording) as you play. (See p.25 "Pattern mode")
As described below, there are two ways to edit a rhythm pattern, and three ways to edit a phrase.
Rhythm pattern

Phrase pattern

• Realtime recording
While playing back a pattern, you can use the part keys or the keyboard function (for synth parts only) to record a new phrase along with the playback.
- Step recording
You can use the step keys to create a sequence pattern, or individually input the pitch and length of each note to record a new phrase.
• Note editing (only for phrase patterns)
You can edit the data (trigger, note number, gate time) of the selected step to create a phrase.
In the following pages we will explain how to perform Realtime Recording and Step Recording. For details on Note Editing, refer to Note Editing (p.32) in "Pattern mode."
Realtime recording
This method allows you to record while listening to the performance.
To record a rhythm pattern, press the rhythm part keys at the desired timing. To record a phrase pattern, use the keyboard function and press the step keys at the desired timing.

When you press a drum part key, the keyboard function of the step keys will be defeated, but will return to the previous setting when you once again select a synth part.
If you wish to listen to the metronome as you record, refer to p.46 "Metronome settings."
-
Press the Pattern mode key (the key will light). Use the cursor [▲][▼] keys to select Pattern (the corresponding LED will light).
-
Turn the dial to select the pattern that you wish to record.
-
To record a synth part, select either synth part 1 or 2, and turn the Keyboard key on (the key will light).
-
Press the Rec key to enter record-ready mode. (The Rec key will light, and the Play/Pause key will blink.)
-
Press the Play/Pause key to start the pattern. (The Play/Pause key will light.)

-
To record a drum part, press the drum part key at the timing at which you want it to sound.
-
To record a synth part, press the step key for the desired pitch at the timing at which you want it to sound.
-
The pattern will playback repeatedly, and you can continue recording additional notes as long as the Rec key is lit.
Press the Stop/Cancel key to stop recorded. (The Rec key and the Play/Pause key will go dark.) Alternatively, you can press the Rec key (instead of pressing the Stop/Cancel key) to stop recording but continue playback. (The Rec key will go dark, and the Play/Pause key will light.)
If you wish to save the completed pattern, press the Write key. (Refer to p.21 "Saving a pattern that you create.")
Erase
If you input a note by mistake, hold down the Shift key while the pattern continues to play, and then hold down the Rec key. Note triggers will be erased from the selected part (whose key is lit) while you hold down these keys.
Step Recording
The method will differ, depending on whether you are creating a synth part phrase or a drum part rhythm.

When you press a drum part key, the keyboard function of the step keys will be defeated, but will return to the previous setting when you once again select a synth part.
Using the step keys to create a drum part rhythm
- Press the Pattern mode key (the key will light).
Use the cursor [▲][▼] keys to select Pattern (the corresponding LED will light). - Rotate the dial to select the pattern that you wish to record into.
- Press a part key (the key will light) to select the part that you wish to use.
- The step keys will light to indicate the rhythm of the selected part. You can press the step keys to modify the rhythm pattern. Each time you press a key, it will alternate between on (lit) and off (dark).
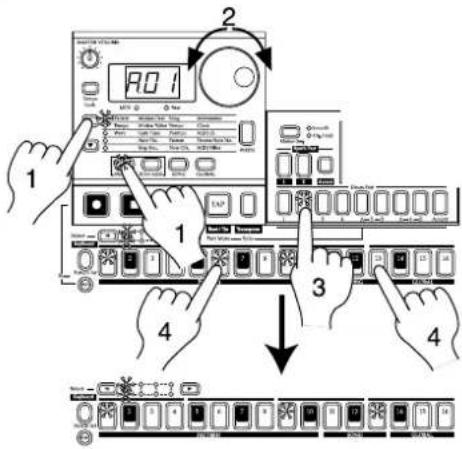
Using the step keys to create a synth part phrase
If the EM-1 is playing, press the Stop/Cancel key to stop playback.
- Press the Pattern mode key (the key will light). Use the cursor [▲][▼] keys to select Pattern (the corresponding LED will light).
- Rotate the dial to select the pattern that you wish to record into.
- Turn on the Keyboard function (the key will light).
- Use the Part Select key to select the part that you wish to use.
- Press the Pattern mode STEP EDIT key, and then use the cursor keys [▲][▼] to make the parameter select Step Rec (the corresponding LED will light). The display will indicate the target step (see p.33).
- Press the Rec key to enter recording mode. At this time, pressing the Play/Pause key will not start playback.
- Use the step keys to input the pitch for each note of the phrase. (The target step will automatically advance by one step each time you do so.)
- Recording will end when you input the last step or press the Stop/Cancel key (the Rec key will go dark).
To input a rest, press the Rest/Tie key. To enter a tie, continue holding down the step key (the sound will continue) and press the Rest/Tie key.
During recording, you can rotate the dial to move the target step forward or backward. You can jump to a specific step by holding down the Shift key and pressing the desired step key.
In step recording, the trigger and note number are recorded simultaneously, but it is not possible to make detailed settings for the gate time. Use Note Edit (refer to p.32 "Note editing") to re-adjust the trigger and note number, or to adjust the gate time.
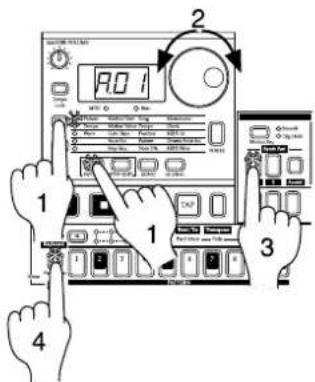

In the case of a pattern with a length of 2 measures or greater, you can use the Select keys to move the select LED in the lower line (red) in order to change the step location that is shown by the step keys.
| Length | SelectLED display | Area shown by the step keys | |
| For 16(λx16), 32(λx16) | For tri(λx12), tr2(λx12) | ||
| 1 | Steps 1...16 | Steps 1...12 | |
| 2 | Steps 17...32 | Steps 13...24 | |
| 3 | Steps 33...48 | Steps 25...36 | |
| 4 | Steps 49...64 | Steps 37...48 | |
If you wish to save the completed pattern, press the WRITE key. (Refer to p.21 "Saving a pattern that you create.")
What is Length?
In this context, "Length" refers to the length of the rhythm pattern. The "Length" of the pattern will be either 16 steps or 12 steps, depending on the Scale and Beat settings of the pattern. A rhythm pattern in triple meter will be shown in triplets. Depending on the Length and Beat settings, a single pattern can have up to 64 steps. (Refer to p.31 "Length, Scale/Beat settings.")
| Scale/Beat display | Note value of each step key | Pattern Length (number of steps) | |||
| =1 | =2 | =3 | =4 | ||
| 16 ( Å × 16 ) | 16th note | 16 | 32 | 48 | 64 |
| 32 ( Å × 16 ) | 32nd note | 16 | 32 | 48 | 64 |
| tri ( Å_3 × 12 ) | 8th note (triplet) | 12 | 24 | 36 | 48 |
| tr2 ( Å_9 × 12 ) | 16th note (triplet) | 12 | 24 | 36 | 48 |
Saving a pattern that you create

With the factory settings, memory protect will be on, and it will not be possible to save data. Before you save data, you must turn off the Memory Protect settings in Global mode. (Refer to p.48 "Memory Protect (Protect).")

Please be aware that when you save data, the pattern in the save destination will be overwritten.
- Edit a pattern as described in "Modifying (editing) the sound of a part" or "Modifying (editing) a rhythm or phrase pattern."
- Press the Write key once (the key will blink). The display will blink to indicate the pattern number.
- Rotate the dial to select the pattern number in which the data will be saved (i.e., the "save destination").
- Press the Write key once again to begin saving the data. While the data is being saved, the key will blink. When saving is complete, the key will go dark.
If you decide to cancel, press the Stop/Cancel key. If you do not wish to save the pattern you created, simply select a different pattern without performing the Write operation.


Never turn off the power while data is being saved to memory (i.e., while the Write key is lit). Doing so may damage the data.

It is not possible to Write data during playback or recording.
Using a Motion Sequence
What is a Motion Sequence?
The EM-1 has three types of motion sequence that let you record and loop tonal changes created by the knobs and keys. (See p.35 "Recording a motion sequence")
The knobs and keys that are valid for each of the three types of motion sequence (effect, delay, part) will differ depending on the type of part.
Effect Edit 1, Edit 2 (valid only for parts for which the effect is on)
Delay Time, Depth (Applies to the entire pattern. Cannot be applied to an individual part.)
Drum part A total of two: either EG Time, Pitch, Level, or Pan; plus either Effect, Roll, or Amp EG
Synth part A total of three: either EG Time, Glide, Level, or Pan; plus either Cutoff, Resonance, EG Int, or Drive; plus either Effect, Roll, or Amp EG
Accent part Level
As an example, here's how to record the Pitch parameter in a motion sequence.
-
In Pattern mode, select the pattern that you wish to edit.
-
Press the Drum Part key to select the part that you wish to edit.
-
Press the Motion Sequence key to select either Smooth or Trig Hold
-
Press the Rec key to enter record-ready mode (the Rec key will light, and the Play/Pause key will blink).
-
Press the Play/Pause key to start the pattern (the Rec key and Play/Pause key will light).
-
Move the Pitch knob to create various changes while the pattern makes one cycle (16 steps x length, or 12 steps x length).
-
When the pattern has completed one cycle after you began moving the knob, the Rec key will automatically go dark and you will return to Play mode so that you can listen to the motion sequence that you just recorded.

After pressing the Stop/Cancel key to stop playback, perform step numbers 2 and following for "Saving a pattern that you create" to save the pattern that contains the motion sequence you just recorded.
There are two types of motion sequence (Smooth and Trig Hold). During playback, switch between these to hear the difference. (Refer to p.34 "Playing a motion sequence.")

After recording a motion sequence, you can edit it using the Pattern mode STEP EDIT functions Motion Dest. and Motion Value. (See p.39 "Editing motion sequence data")

The number of valid knobs and keys for motion sequences are limited, depending on the part. If you record more than the valid number of motion sequences for the same part, the effect for the previous knob or key will be erased.
Playing with Pattern Set
What is Pattern Set?
Pattern Set is a function that lets you assign favorite patterns to the 16 step keys, and switch between them as desired. While playing, you can successively select favorite patterns, or play combinations of patterns as a loop (see p.40 "Chain playing pattern sets").
When you hold down the Keyboard key (the key will blink) and press one of the sixteen step keys, the pattern assigned to that key will be selected. At this time you can use the Select keys to change the pattern set group indicated by the red select LEDs (lower line) 1-4, to use 16 x 4 (total of 64) pattern sets.
If during playback you hold down the Keyboard key and press another step key, the pattern assigned to that key will begin playing when the currently-playing pattern finishes playing. (Refer to p.40 "Pattern Set.")
Pattern Set 1

Pattern Set 3

Hold down the Shift key and press the Keyboard function key to hold the Pattern Set function.

While the Keyboard key is blinking, it will control the Pattern Set function.
If you hold down the Shift key and press the Keyboard key, the Pattern Set function will be held. (The Keyboard key will blink.)
To defeat this "hold" condition, press the Keyboard key once again.
You can assign new pattern sets. (Refer to p.41, "Assigning a pattern to a Pattern Set.")

Pattern sets cannot be used in Song mode.

If you switch patterns during playback, the change will occur when each pattern finishes playing. (Refer to p.25 "The timing at which patterns will change.")
Using the EM-1 as a tone generator module
Read this section when you wish to use the EM-1 with other connected MIDI equipment. Use a MIDI cable to connect the MIDI OUT connector of your MIDI keyboard etc. to the MIDI IN connector of the EM-1.
- Press the Global mode key to enter Global mode.
- Use the cursor [▲][▼] keys to select MIDI ch (the corresponding LED will light).
- Press the part key for synth part 1 of the EM-1, and then turn the dial to select the same channel as the connected MIDI keyboard (or other device) (see p.47 "Setting the MIDI channel of each part (MIDI ch)").
- When you play the connected MIDI keyboard (or other device), you will hear the sound of synth part 1.
If you have connected a multi-track MIDI sequencer, set the MIDI channel of synth parts 1 and 2, and the drum part (see p.47 "Setting the MIDI channel of each part (MIDI ch)"). Set each part to the MIDI channel of the track that you want it to play, and start your external sequencer to play the parts.
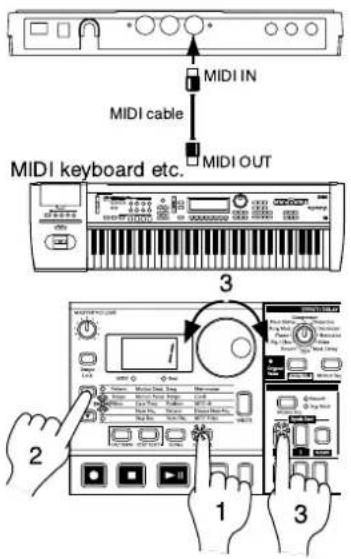

For details on the EM-1's MIDI functionality, refer to p.49 "About MIDI."

If you wish to save Global mode settings, you must perform the Write operation (Refer to p.48 "Saving your changes in Global mode (WRITE)").
Synchronizing the playback with other ELECTRIBE models
For an even broader range of possibilities, the playback of the EM-1 can be synchronized with other models of the series: the ELECTRIBE·S (ES-1), R (ER-1), and A (EA-
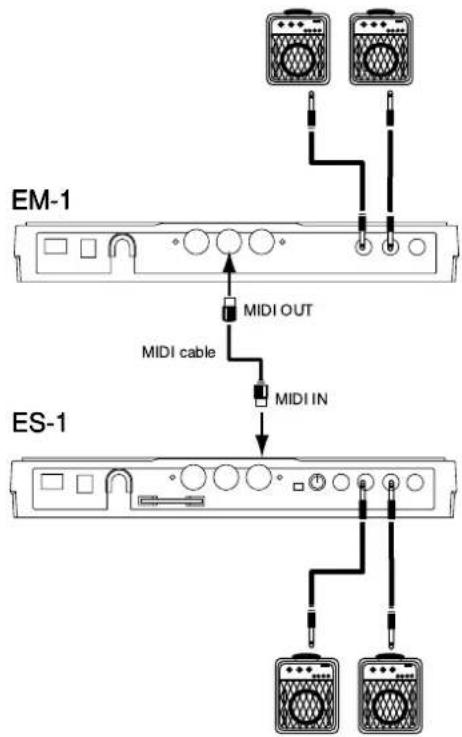
1). Here's how you can make the ES-1 playback in synchronization with the tempo of the EM-1.
Use a MIDI cable to connect the MIDI OUT connector of the EM-1 to the MIDI IN connector of the ES-1. Connect the part output jacks of the EM-1 and the line output jacks of the ES-1 to your mixer or powered monitor system (amplified speakers).
- Press the Global mode key to move to Global mode.
- Use the cursor [▲][▼] keys to select Clock (the corresponding LED will light).
- Set the EM-1 to "int," and the ES-1 to "E≡t." (Refer to p.46 "Synchronizing the EM-1 with external MIDI devices (MIDI Clock).")
- Press the Play/Pause key of the EM-1 to start a pattern or song. (The Play/Pause key will light.) The ES-1 will play the pattern in synchronization with the tempo of the EM-1.
If you want the EM-1 and ES-1 to play the identically-numbered pattern in synchronization, make the following settings.
- Synchronizing the ES-1 to the EM-1 as master.(Set the EM-1 to "int," and the ES-1 to "E≡t.")
- Set the EM-1 and ES-1 to the same MIDI channel (for example, set both to "01").
- On the EM-1 and ES-1, set the MIDI filter setting "P" to "O" (refer to p.47 "MIDI filter settings").
- On the ES-1 ,set the MIDI note number setting toC1.A-1 orA#8.G9 .(This will prevent the ES-
1 from being sounded unintentionally when note-on messages are received.
It is also easy to make the EM-1 playback in synchronization by connecting it to a sequencer or synthesizer that can transmit and receive MIDI Clock messages.
flowchart
graph TD
    A["EM-1"] -->|MIDI OUT| B["ES-1"]
    B -->|MIDI IN| A
    A -->|MIDI cable| B
    B -->|MIDI cable| A


4. Pattern mode
In this mode you can play patterns, edit patterns, or create new patterns. To edit individual steps of a pattern, use the Pattern mode Step Edit function. Press the PATTERN mode key to enter Pattern mode. Although you can also enter Pattern mode by pressing the STEP EDIT key, you should press the PATTERN mode key if you wish to edit the Pattern, Tempo, and Wave parameters.

Selecting a pattern
Pattern A.01...d.64
Make sure that the Pattern mode key is lit.
Use the cursor keys to select Pattern (the corresponding LED will light).
Rotate the dial to select one of the 256 patterns: A.01...A.64, b.01...b.64, C.01...C.64, and d.01...d.64.
Setting the playback tempo
Tempo 20.0...300.0 20.0...300.0
• Using the dial to change the tempo
Make sure that the Pattern mode key is lit.
Use the cursor keys to select Tempo (the corresponding LED will light).
If you wish to change the tempo units to the right of the decimal place, hold down the Shift key and rotate the dial.
• Using the Tap Tempo key to change the tempo
While the pattern is playing, press the Tap key three times or more at the desired tempo. The EM-1 will calculate the interval at which you pressed the Tap key, and will change the tempo accordingly. You can change the tempoin the same way even when playback is stopped.
When you use the cursor keys to LEDs indicate select Tempo, and the tempo you modified will appear in the display.
If you switch to a different pattern without writing the pattern whose tempo you modified, the pattern tempo will return to the previous value. If you wish to keep the modified tempo, you must perform the Write operation (refer to p.41 "Saving a pattern (WRITE)").
Playing a pattern (Pattern Play)
Press the Play/Pause key to start pattern playback. When the pattern finishes playing, it will return to the beginning and continue playing.
To check the pattern that is playing, make sure that the PAI-TERN mode key is lit, and use the cursor keys to select Pattern (the corresponding LED will light).
You can use the keyboard function to play on the step keys along with the pattern, press the drum part keys, or operate the knobs and keys to modify the sound.
By taking advantage of the various functions of Pattern mode as part of your performance technique, you can enjoy even wider possibilities.
The timing at which patterns will change
When you switch patterns during playback, the change will occur when the currently playing pattern finishes its last step. Until the pattern actually changes, the pattern number selected in the display will blink.
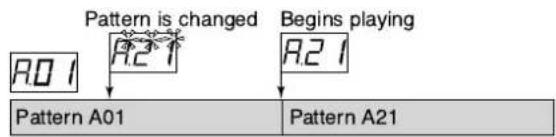
flowchart
graph TD
    A["Pattern A01"] --> B["Pattern is changed"]
    B --> C["Pattern A21"]
    D["Begin's playing"] --> E["Begins playing"]
If you change patterns during playback, some slight noise may be heard due to the change in delay time etc.
If the same effect is used with different settings in the previous pattern and the newly-selected pattern, the sound you hear will be the same as if those knobs were turned.
Playing from the beginning of a pattern (Reset & Play)
If you hold down the Shift key when pressing the Play/Pause key, the playback will be forced to playback from the beginning. By using this function in conjunction with setting the tempo by the Tap key, you can synchronize the playback without using MIDI.
In order to ensure that the phrase always matches, you will need to perform this adjustment each time.
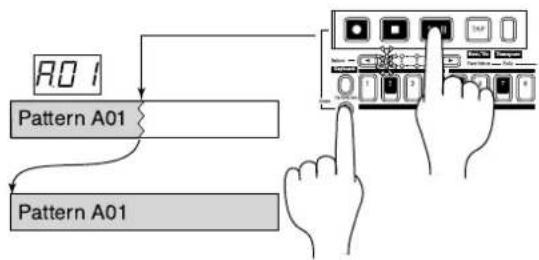
flowchart
graph TD
    A["Digital Display"] --> B["Pattern A01"]
    B --> C["Pattern A01"]
    C --> D["Device Interface"]
About the tempo when you switch patterns (Tempo Lock)
When the Tempo Lock key is off (key unlit), switching patterns even during playback will cause the tempo to change to the tempo of the newly selected pattern. If you want to keep the same tempo, turn the Tempo Lock key on (key lit).

If the Tempo Lock key is on, the tempo will be held even if you stop playback. To return to the tempo that is stored for each pattern, turn the Tempo Lock key off (key dark), and then re-select the pattern.

The state of the Tempo Lock key cannot be saved as pattern data.
Selecting a part
Use the Part keys to select the part that you will edit or play using the keyboard function.
The EM-1 has the following 12 parts.
• Eight drum parts to which you can assign a drum wave
- Two synth parts to which you can assign a synth wave
- Two accent parts that contain dynamics data for each step
Drum parts
When you press a drum part key, the accented sound will be heard, and that part will be selected (the part key will light).
At this time, the step keys will light for the trigger locations in the rhythm pattern of that part. During playback, the step that is playing will also light simultaneously.

If you want to select a part during playback without causing the sound to be heard, hold down the Shift key and press a drum part key.

When you press a drum part key to sound it, the sound will be heard at the volume of when accent is on.
Synth parts
When you press a synth part key the key will light, and that part will be selected. At this time, the step key indications will depend on whether the Keyboard function is on or off.
On (lit): During playback, keys of the corresponding pitch will light consecutively at the timing at which the selected part plays.
Off (dark): The phrase pattern trigger locations for the part will light. During playback, the currently-playing step will also light simultaneously.
Accent parts
When you press an accent part key, the key will light, and that part will be selected. At this time, the step keys will light to indicate the accent-on locations for that accent pattern. During playback, the currently-playing step will also light simultaneously.
The Part Mute function
By holding down the Part Mute key (Tap key) while you press a part key, you can mute (temporarily silence) that part. While you hold down the Part Mute key (Tap key), the mute status of each part will be displayed. The part key of unmuted parts will light, and muted part keys will be dark.
You can also mute two or more parts.
To cancel the mute setting, press the Solo key. To cancel muting for an individual part, press the key of that part.
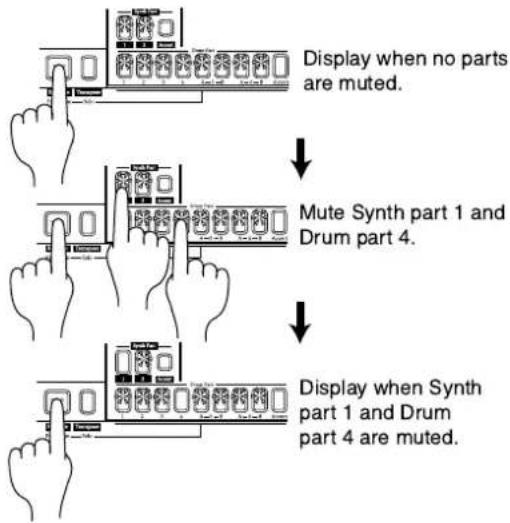

When you hold down the Part Mute key (Tap key) to select the Mute function, pressing a part key will not sound that part.
The Part Solo function
By pressing the Solo key (the key will light) and pressing a part key, you can hear only that part.
To solo two or more parts, hold down the Solo key and select the desired parts. While the Solo key is lit, you can hold down the Solo key (or Mute key) and press other part keys to add more solo parts. If you press and then release the Solo key, the Solo function will be canceled (the key will go dark).
Display when no parts are soloed

flowchart
graph TD
    A["Solo one part"] --> B["Select Slice sample part"]
    B --> C["Display when Slice sample part is soloed"]
    C --> D["Add Drum part 6A to the soloed parts Drum 1 and 4"]
    D --> E["Select Drum parts 1 and 4"]
    E --> F["Solo more than one part"]
Creating a pattern
There are two ways to create a pattern. You can start with a pattern that is similar to the desired result and then edit it, or you can create a sound and rhythm-, phrase pattern for each part from scratch. Either way, the EM-1 makes it easy for you to create your own original patterns.

If you wish to save a pattern you create, you must perform the Write operation before you select a different pattern or turn off the power.
Assigning a wave
Wave (Drum parts) off, 1...144
(Synth parts) off, 1...50
The EM-1 has 194 waves (144 for drum, 50 for synth) that you can assign to each part.

A wave cannot be specified for an accent part. (The display will indicate “- - -.”)
Make sure that the PATTERN mode key is lit.
- Use the cursor keys to select Wave (the corresponding LED will light).
- Press the key of the drum or synth part to which you wish to assign a wave (the key will light). The number of the wave assigned to that key will appear in the display.
- For a drum part, turn the dial and press the part key to hear the wave as you make your selection.
- For a synth part, turn on the keyboard function, turn the dial, and press the step keys to hear the wave as you make your selection.
If you do not wish to specify a wave, select "oFF."
Chord splits
Several of the synth part waves sound as a chord. In some of these, different chords are arranged across the keyboard within the single wave. These are referred to as "chord splits." Synth part waves 43, 45, 46, and 47 are chord splits.
In some cases, the pitch may be discontinuous at the point where chords change within a chord split. Be aware that if you change the Transpose (p.35) or Song mode Note Ofs. (p.43) settings, the chord or octave may be different from when you created the pattern.
Editing the sound of a part
Select the pattern whose sound you wish to edit. While striking the part keys or pressing the step keys (with the Keyboard function turned on) to hear the sound, turn the knobs or switch the keys to edit the sound. At this time, the Original Value LED will light when the knob etc. that you are currently moving reaches the same value as the original sound of the pattern.
You can also edit while playing back a pattern. It is also possible to use an external MIDI device to control the value of each knob (refer to p.49 "About MIDI").
The parameters that are valid will depend on the type of part, as listed below.
Drum part
EG Time, Pitch, Level Pan, Effect, Roll, Amp EG
Synth part
EG Time, Glide, Level, Pan, Effect, Roll, Amp EG, Cutoff, Resonance, EG Int, Drive
Accent part
Level

If the sound does not change when you rotate a knob or switch the setting of a key, either another knob or key has been set so that the parameter you are attempting to adjust has no effect, or the Motion Sequence function (p.34 "Motion sequence") is operating.

Although drum parts 5A and 5B, and 6A and 6B can be edited independently, they cannot be played simultaneously. If triggers for both exist at the same step, the 5B or 6B part will sound.
Drum part
Part common section
EG Time 0...127
This sets the time over which the EG will decay. The way in which the volume decays will depend on the Amp EG setting.
Pitch -64...63
This specifies the playback pitch of the wave. Raising the pitch will speed up the playback, and lowering it will slow down the playback. The pitch can be adjusted over a range of +/-2 octaves, and will change in the following way.
Pitch Offset Values
| Value | Step | Value | Step | Value | Step |
| 63 | -12 (2 oct. up) | 24 | -3 1/2 | -34 | -5 |
| 61 | -11 1/2 | 21 | -3 | -37 | -5 1/2 |
| 59 | -11 | 18 | -2 1/2 | -40 | -6 (1 oct. down) |
| 57 | -10 1/2 | 15 | -2 | -42 | -5 1/2 |
| 55 | -10 | 12 | -1 1/2 | -44 | -7 |
| 53 | -9 1/2 | 09 | -1 | -46 | -7 1/2 |
| 51 | -9 | 06 | -1/2 | -48 | -8 |
| 49 | -8 1/2 | 00 | actual pitch | -50 | -8 1/2 |
| 47 | -8 | -07 | 1/2 | -52 | -9 |
| 45 | -7 1/2 | -10 | 1 | -54 | -9 1/2 |
| 43 | -7 | -13 | 1 1/2 | -56 | -10 |
| 41 | -6 1/2 | -16 | 2 | -58 | -10 1/2 |
| 39 | -6 (1 oct. up) | -19 | 2 1/2 | -60 | -11 |
| 36 | -5 1/2 | -22 | 3 | -62 | -11 1/2 |
| 33 | -5 | -25 | 3 1/2 | -64 | -12 (2 oct. down) |
| 30 | -4 1/2 | -28 | 4 | ||
| 27 | -4 | -31 | 4 1/2 |

Noise may occur when you raise the pitch.
Level 0...127
Adjusts the output level. Rotating the knob toward the right will increase the level.
Pan L64...r63
Adjusts the stereo position (panpot) of the sound. When the knob is located at the center, the sound is panned to the center. Rotating the knob toward the left will move the sound toward the left, and rotating it toward the right will move the sound toward the right.
Amp EG
This switches the operation of the Amp EG. Pressing the key will switch between an envelope that decays (key lit) and an envelope that does not decay (key dark).
Roll
This turns the Roll (successive strike) effect on (lit) or off (dark) for each part. The roll interval is determined by the tempo of the pattern and by the roll type (see p.32 "Setting the roll type"). If you press and hold a part key when Roll is on, roll playback will continue as long as you continue holding the part key.
Effect
This turns the effect on (lit) or off (dark) for each part.
Motion Seq (motion sequence)
This records and plays back knob movements. Each time you press this key, it will alternate between on (Smooth lit), on (Trig Hold lit), and off (dark). (see p.34 "Playing motion sequences")
Synth part
Synth Filter section
The filter processes the sound produced by the oscillator to make it less bright, etc.

line
| Trigger on | Cutoff frequency (EG Int > 0) | Cutoff frequency (EG Int < 0) | |---|---|---| | Trigger on | EG Time | EG Time | | Time | EG Time | EG Time | | Cutoff frequency (Top Chart) | Cutoff frequency (Top Chart) | Cutoff frequency (Top Chart) | | Trigger on | Cutoff frequency (Top Chart) | Cutoff frequency (Top Chart) | | Time | Cutoff frequency (Top Chart) | Cutoff frequency (Top Chart) |Cutoff 0...127
Set the cutoff frequency of the low-pass filter. Overtones higher than the cutoff frequency will be cut, making the sound more mellow.

Depending on the settings of this parameter, the sound may be distorted or you may hear virtually no sound.
Resonance 0...127
This parameter adds character to the sound by boosting the region around the cutoff frequency. If you raise the resonance and turn the Cutoff knob (or adjust EG Int and EG Time), you will hear the typical "meow-ing" sound typical of analog synthesizers.

If the resonance is raised, the sound may be distorted depending on the cutoff frequency or on the pitch that you play.
EG Int (EG intensity) -64...63
Specify the depth and direction of the effect that the EG (envelope generator) will have on the cutoff frequency. The EG will start when trigger-on occurs (the instant you play the keyboard). If this knob is in the center position, the EG will have no effect.

If the gate time length of a step extends beyond the point at which the next step is sounded, the EG will not be re-triggered for the next step.
Drive 0 ... 127
This adjusts the degree of distortion for the sound of the filter. By using this parameter in conjunction with the synth filter Cutoff and Resonance to make the sound distort, you can generate overtones that were not present in the original waveform.
Part Common section
EG Time 0...127
This has the same function as for a drum part (see p.27). By setting EG Int in the negative direction, this can be used as the attack time.
Glide 0...127
"Glide" (also called portamento) is a function that, when the gate time length extends beyond the timing of the next note, smoothly changes the pitch from the previous note to the next note without re-triggering.
The time from when the next note is played until that pitch is reached can be specified as a multiple of steps (0, 1/4, 1/2, 1, 2, 4, 8, 16, 32, 64, 128 times) relative to the pattern tempo. As this value increases, a longer time will be required before the target pitch is reached. Conversely if this value is set to 0, the target pitch will be reached immediately, and since the note is not retriggered, this is suitable when you wish to simulate a legato performance on a bass, etc.

For some settings, slight noise may occur.

The Glide effect will be defeated when the Roll key is on (lit).
Level 0...127
This has the same function as for a drum part (see p.27).
Pan L64...r63
This has the same function as for a drum part (see p.27).
Amp EG
This has the same function as for a drum part (see p.27).
Roll
This has the same function as for a drum part (see p.28). When Roll is on, the sound will be played as a roll as long as you hold down the step key (if the keyboard function is on).
Effect
This has the same function as for a drum part (see p.28).
Motion Seq (motion sequence)
This lets you record and play back knob movements of the Part Common section and Synthesizer section. Each time you press this, it will alternate between on (Smooth lit), off (Trig Hold lit), and off (dark). (See p.34 "Playing a motion sequence")
Accent parts
Part Common section
Level 0...127
This adjusts the accent level (the amount of volume emphasis when accent is on). (See p.34 "Adding accents to the pattern(Accent)") Effect or delay edit.
Editing the effect or delay
EFFECT
On the EM-1, you can select and use one of eleven types of effect for each pattern. The effect can be turned on/off for each part by using the Effect key in the Part Edit section. Use the two knobs (Edit 1, Edit 2) to adjust the parameters, which will differ depending on the selected effect.

Although the effect can be turned on/off independently for each part, the type and parameter values cannot be changed independently.

Some time may be required for the effect to begin applying when you switch patterns.
Effect types and parameters
Motion Seq (motion sequence)
This is the motion sequence for the effect (see p.34 "Motion sequence"). Each time you press the key, this will alternate between on (lit) and off (dark).

When Delay Editing is on, this will be the delay motion sequence key.
Reverb
This simulates the reverberation and acoustics of a plate reverb unit.
Edit 1 _ Time 0...127
The reverb time will lengthen as the knob is rotated toward the right.
Edit 2 _ Level 0...127
The level of the reverberation will increase as the knob is rotated toward the right.
Flg./Cho. (flanger/chorus)
Flanger and chorus are effects that modulate the pitch of a slightly time-delayed copy of the sound and add it to the original sound to create a sense of spaciousness, modulation, and vibrato.
Edit 1 _ LFO Rate 0...127
Adjusts the LFO speed of the flanger/chorus.
The LFO speed will become faster as the knob is rotated toward the right.
Edit 2 _ Depth 0...127
Adjusts the depth of the flanger/chorus effect. The effect will change from chorus to flanger as the knob is rotated toward the right.

Raising the depth excessively may cause the sound to distort.
Phaser
This effect adds modulation to the sound by mixing a cyclically phase-shifted sound with the original sound.
Edit 1 _ LFO Rate 0...127
Adjusts the LFO speed of the phaser. The LFO speed will become faster as the knob is rotated toward the right.
Edit 2 _ Depth 0...127
Adjusts the depth of the phaser. The modulation will become greater as the knob is rotated toward the right.
Ring Mod. (ring modulation)
This effect applies modulation to the sound in order to create metallic resonances or unusual sound effects.
Edit 1 _ Frequency 0...127
Specifies the frequency of the modulation that will be applied. The frequency will rise as the knob is rotated toward the right.
Edit 2 _ Balance 0...127
Specifies the balance of the effect sound and direct sound. As the knob is rotated toward the right, the effect sound will increase and the direct sound will decrease.
Pitch Shifter
This effect shifts the pitch.
Edit 1 _ Pitch 0...127
Specifies the amount of pitch shift. When the knob is in the center position, the output pitch will be the same as the input pitch. As the knob is rotated toward the left the pitch will become lower, and as the knob is rotated toward the right the pitch will become higher. The available range of pitch shift is +/-2 octaves, and will change as shown below.
Pitch Offset Values
| Value | Step | Value | Step | Value | Step |
| 127 | +12 (2 oct. up) | 88 +3 | 1/2 | 30 -5 | |
| 125 | +11 1/2 | 85 +3 | 27 -5 | 1/2 | |
| 123 | +11 | 82 +2 | 1/2 | 24 -6 | (1 oct. down) |
| 121 | +10 1/2 | 79 +2 | 22 -6 | 1/2 | |
| 119 | +10 | 76 +1 | 1/2 | 20 -7 | |
| 117 | +9 1/2 | 73 +1 | 18 -7 | 1/2 | |
| 115 | +9 | 70 +1 | 1/2 | 16 -8 | |
| 113 | +8 1/2 | 64 actual pitch | 14 -8 | 1/2 | |
| 111 | +8 | 57 -1 | 1/2 | 12 -9 | |
| 109 | +7 1/2 | 54 -1 | 10 -9 | 1/2 | |
| 107 | +7 | 51 -1 | 1/2 | 8 | -10 |
| 105 | +6 1/2 | 48 -2 | 6 -10 | 1/2 | |
| 103 | +6 (1 oct. up) | 45 -2 | 1/2 | 4 | -11 |
| 100 | +5 1/2 | 42 -3 | 2 -11 | 1/2 | |
| 97 | +5 | 39 -3 | 1/2 | 0 -12 | (2 oct. down) |
| 94 | +4 1/2 | 36 -4 | |||
| 91 | +4 | 33 -4 | 1/2 | ||
Edit 2 _ Dry level 0...127
This adds the original sound to the pitch-shifted sound. As the knob is rotated toward the right, increasing amounts of the original sound will be added to the effect sound.
Compressor
A compressor boosts low level sounds and reduces high level sounds in order to minimize differences in volume and make the sound more consistent.
Edit 1 _ Sensitivity 0...127
Specifies the sensitivity of the compressor. When the knob is in the far left position, there will be no effect. As the knob is rotated toward the right, the effect will apply more strongly.
Edit 2 _Attack
0...127
Specifies the attack speed until the compressor begins to take effect. The attack will become slower as the knob is rotated toward the right.
Distortion
By boosting the volume appropriately, this effect causes the sound to distort and produces a rich overtone structure.
Edit 1 _ Gain 0...127
Specifies the degree of distortion. The sound will be distorted more greatly as the knob is rotated toward the right.
Edit 2 _ Level 0...127
Adjusts the output level. The output level will increase as the knob is rotated toward the right.
Decimator
This effect lowers the sampling frequency and the number of sampling bits, producing a grainy sound characteristic of cheap samplers.
Edit 1 \_ Sampling frequency 0...127
Rotating the knob toward the right produces a more lo-fi sound, and rotating it toward the left produces a more hi-fi sound.
Edit 2 \_ Number of sampling bits 0...127
Rotating the knob toward the right will produce a sound typical of fewer bits (lo-fi), and rotating it toward the left will produce a sound typical of more bits (hi-fi).

If the input volume is extremely low, there may be no output. If there is a high noise level during silent times, noise may be generated.
Resonator
This adds a specific frequency region to the original waveform that has been boosted by a band pass filter.
Edit 1 \_ Cutoff frequency 0...127
This adjusts the cutoff frequency of the band pass filter. The cutoff frequency will rise as you turn the knob toward the right.
Edit 2 \_ Resonance 0...127
This boosts the sound in the region of the cutoff frequency, adding a distinctive character to the sound. The resonance will increase as you turn the knob toward the right.

Depending on the cutoff frequency or input sound, high resonance settings may cause the sound to distort.
Filter
This is a low pass filter with resonance. It cuts the overtones that are above the cutoff frequency, producing a milder tone.
Edit 1 \_ Cutoff Frequency 0...127
Adjusts the cutoff frequency of the low pass filter. The cutoff frequency will rise as the knob is rotated toward the right.
Edit 2 \_ Resonance 0...127
This emphasizes the sound in the region of the cutoff frequency, adding a distinctive character to the sound.

Depending on the cutoff frequency or input sound, high resonance settings may cause the sound to distort.
Mod. Delay (modulation delay)
This is a delay with an added chorus effect produced by using an LFO to sweep the delay time. It produces an effect in which the sound is spread to left and right. This delay is a tempo delay in which the delay time is automatically synchronized to the tempo of the pattern.
Edit 1 \_ Time 0...127
This sets the delay time. The available settings are multiples of tempo-synchronized steps: 1/4, 1/3, 1/2, 2/3, 3/4, 1, 4/3, 1.5, 2, 2.5, 3, 4, 5, 6, 7, and 8 times.
If the MIDI Clock setting is Ext (external), you can synchronize the delay time to the clock of an external device. (Refer to p.46 "Synchronizing the EM-1 and an external MIDI devices (MIDI Clock)")
Edit 2 \_ Depth 0...127
This adjusts the LFO depth and the feedback amount of the delay. Turning the knob toward the right will deepen the LFO and increase the amount of feedback.
DELAY
Delay is an effect that adds one or more delayed “echoes” to the sound. The delay effect of the EM-1 is a “cross-feedback delay.” This feeds the delayed L and R signal back into the opposite side to produce a greater feeling of spaciousness from left to right.
This delay is a tempo delay in which the delay time is automatically synchronized to the tempo of the pattern, and movements of the delay knob can also be recorded as a motion sequence.
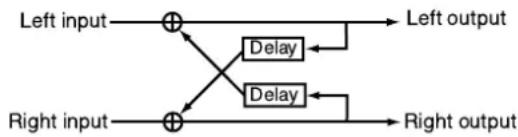
flowchart
graph LR
    A["Left input"] --> B["+"]
    C["Right input"] --> D["+"]
    B --> E["Left output"]
    D --> F["Right output"]
    B --> G["Delay"]
    D --> H["Delay"]
    G --> I["Left output"]
    H --> J["Right output"]
Press the delay edit key (the key will light) to enter Delay Edit. Use the two knobs (Time, Depth) to edit.

The delay effect will apply to the entire pattern, and it is not possible to change the effect independently for each part.

To edit the delay, you must make sure that the Delay Edit key is lit. If you move the effect type knob, you will return to effect edit.

Slight noise may be heard when you change patterns, due to the change in delay time.
Motion Seq (motion sequence)
This is the delay motion sequence (see p.34 "Motion sequence"). Each time you press the key, the setting will alternate between on (lit) and off (dark).
Time (delay time) 0...127
Set the delay time in synchronization with the tempo. Relative to the step, you can set this in the range of 1/1500...1/4, 1/3, 1/2, 2/3, 3/4, 1, 1.5, 2, 2.5, 3, 4, 5, 6, 7, or 8 times. Turning the knob toward the left will shorten the delay time, producing a doubling effect (a sound similar to multiple instruments playing together).
If the MIDI Clock setting is Ext (external), you can synchronize the delay time to the clock of an external device. (Refer to p.46 "Synchronizing the EM-1 and an external MIDI devices (MIDI Clock)")

If the Time value is lowered excessively, the sound may distort (clip).

If you change the delay time during playback, the pitch of the delayed sound will change.

If the tempo settings cause the delay time to exceed 1.5 seconds, the delay time will automatically be halved to stay within 1.5 seconds.
Depth 0...127
Adjusts the level of the delay sound and the amount of feedback (the number of delay repeats).
Rotating the knob toward the right will increase the level of the delay sound, and will also increase the amount of feedback.
The further left or right the Pan of each part is set, the more the sound will be spread to left and right.

Raising the Depth excessively may cause the sound to distort (clip).
Length, Scale/Beat settings
You can set the length (the length of the entire pattern) and the basic beat (time signature).
The Length and Scale/Beat you specify here will affect the correspondence between step keys and note values, and the maximum number of steps as shown in the following diagram. If Scale/Beat is set to "tri" ( ♣3 x 12) or "tr2" ( ♣3 x 12), step keys 13—16 will have no effect.
While the Shift key is held down, the upper line of select LEDs (green) will indicate the length of the current pattern, and the lower line of select LEDs (red) will indicate the beat.
| Length | Maximum number of steps | |
| 16 (J×16) or32 (J×16) | tri(J3×12)ortr2(J3×12) | |
| 1 Select LED1 (green) lit | 16 | 12 |
| 2 Select LEDs1, 2 (green) lit | 32 | 24 |
| 3 Select LEDs1 to 3 (green) lit | 48 | 36 |
| 4 Select LEDs1 to 4 (green) lit | 64 | 48 |
| Scale/Beat | Correspondence between step keys and note values |
| 16 (♂×16)SelectLED 1(red) lit | |
| 32 (♂×16)SelectLED 2(red) lit | |
| tri (♂3×12)SelectLED 3(red) lit | |
| tr2 (♂3×12)SelectLED 4(red) lit |

It is not possible to view or change the Length or Beat/Scale during playback or recording, or during Pattern Set Play.
Setting the Length
1, 2, 3, 4
- If a pattern is playing, press the Stop/Cancel key to stop playback.
- Use the dial to select the pattern whose length you wish to set.
- Hold down the Shift key and press step key 1 (Length). (Key 1 will blink.)
- The value will blink in the display. Use the dial to specify the length.
- Press step key 1 once again to finalize the value. (Key 1 will go dark.)
If you wish to cancel without changing the setting, press the Stop/Cancel key.
Setting the Scale/Beat
16, 32, tri, tr2
- If a pattern is playing, press the Stop/Cancel key to stop playback.
- Use the dial to select the pattern whose scale/beat you wish to set.
- Hold down the Shift key and press step key 2 (Scale/Beat). (Key 2 will blink.)
- The value will blink in the display. Use the dial to specify the scale/beat.
- Press step key 2 once again to finalize the value. (Key 2 will go dark.)
If you wish to cancel without changing the setting, press the Stop/Cancel key.
Swing settings
50...75
By adjusting the Swing settings you can offset the note timing of the steps. For example, you can change a straight 16-beat by adding a slight "bounce" or shuffle. The Swing value can be adjusted from 50 to 75 (%), and will affect the note timing of even-numbered steps. A setting of 50 will produce a perfect 16-beat, and a setting of 66 will produce a shuffle.
- If a pattern is playing back, press the Stop/Cancel key to stop playback.
- Rotate the dial to select the pattern for which you wish to make Swing settings.
- Hold down the Shift key, and press step key 3 (Swing). Key 3 will light.
- A value will blink in the display. Rotate the dial to set the Swing value.
- Once again press step key 3 to execute the Swing setting (key 3 will go dark).
If you decide to cancel without making the setting, press the Stop/Cancel key.

The Swing setting has no effect if Length or Scale/Beat is set to "tri" ( J_3 × 12 ) or "tr2" ( J_3 × 12 ).

It is not possible to view or adjust the Swing parameter during playback or recording, or during Pattern Set Play.
Setting the Roll Type
2, 3, 4
If you specify the Roll Type, the part steps for which Roll is "on" will be subdivided. You can select a subdivision of either 2, 3, or 4.
1. If a pattern is playing, press the Stop/Cancel key to stop playback.
2. Use the dial to select the pattern whose roll type you wish to set.
3. Hold down the Shift key and press step key 4 (Roll Type). (Key 4 will blink.)
4. The value will blink in the display. Use the dial to specify the number of subdivisions for the roll type.
5. Press step key 4 once again to finalize the value. (Key 4 will go dark.)
If you wish to cancel without changing the setting, press the Stop/Cancel key.

It is not possible to change the Roll Type during play-back, recording, or sampling, nor during Pattern Set Play.

It is not possible to apply a roll to note-on messages from an external MIDI device.
Creating a Pattern
The patterns of the EM-1 consist of a rhythm pattern created by the drum parts, and a phrase pattern created by the synth parts.
The rhythm pattern consists of a sequence pattern (note timing data) for each step of each part.
The phrase pattern consists of trigger (note timing data), note number (pitch), and gate time (note length) data for each step of each part.
As listed below, there are two ways to create a rhythm pattern and three ways to create a phrase pattern.
• Realtime recording
Use the rhythm part keys and step keys (keyboard function: on) to record the rhythm or phrase by playing it just as you want it to sound.
- Step recording
With pattern playback stopped, use the step keys to create a sequence pattern, or input pitch and note length for individual notes at each step to create the pattern.
• Note edit (only for a phrase pattern)
Create a phrase by editing the data (trigger, note number, gate time) of the selected step.
If you wish to erase the rhythm and phrase data of each part before you create a pattern, refer to p.38 "Erasing pattern data from a part."
Realtime recording
Please refer to "Realtime recording" (p.19) in chapter 3. Basic operation (Quick Start).
Step recording
Please refer to "Step recording" (p.20) in chapter 3. Basic operation (Quick Start).
Note editing
A phrase pattern consists of the following three data items for each step. For each step, you can set these three items.
- Trigger: Whether or not a note will sound
• Note number: The pitch that will be sounded - Gate time: The duration of the sound
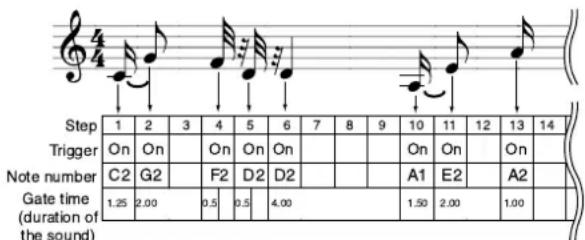
Scale/Beat : 32
Selecting the step (Target Step)
Step Rec 1.01...4.16
When the Pattern mode STEP EDIT key is on (key lit) and the parameter select LEDs indicate Step Rec, the value shown in the display is called the "target step." The value in the display indicates the location of the step within the phrase pattern. If the keyboard function is off, the step key for the target step will blink.

When the Keyboard key is on, the step keys will not indicate the target step.
Example display

To change the target step, you can use the dial or press one of the sixteen step keys. Alternatively, you can hold down the Shift key and use the Select keys to move forward or backward in single steps.
In the case of a pattern with a length of 2 measures or greater, you can use the Select keys to move the select LED in the lower line (red) in order to change the length that is shown by the step keys, and verify or modify the trigger locations.
| Length | Select LED display | Area shown by the step keys | |
| For 16, 32 | For tri, tr2 | ||
| 1 | Steps 1...16 | Steps 1...12 | |
| 2 | Steps 17...32 | Steps 13...24 | |
| 3 | Steps 33...48 | Steps 25...36 | |
| 4 | Steps 49...64 | Steps 37...48 | |

The maximum number of steps will depend on the length and scale/beat settings.
Changing the trigger settings
Make sure that the PATTERN mode key is hit.
- Turn off the Keyboard key (the key will be dark).
- Use the Synth part key to select the part that you wish to edit.
- For a pattern with a pattern length of 2 measures or more, you can use the Select keys to move the red select LEDs to left or right to change the length location that you will edit.
- The step keys will light to indicate the trigger locations of the pattern for that part. You can press each key to switch the trigger on/off for that step. Each time you press a step key, the trigger will alternate on (lit) and off (dark).
Changing the note number (pitch)
Note.No C1...G9
- Press the STEP EDIT key.
- Use the cursor keys to select Note No. (the corresponding LED will light).
- Press the key of the synth part that you wish to edit (the key will light).
- Turn off the keyboard function (the keyboard key will go dark).
- The step keys will light to indicate the trigger locations of the pattern for that part. Press the step key for the step whose note number you wish to edit (the key will blink). By pressing a step key where a trigger exists, you can audition its pitch.
- Rotate the dial to modify the note number of that step.
When the display is showing the Note. No, pressing a step key will not switch its trigger on/off. Changing the note number of a step whose trigger is off will have no effect.
If you turn that trigger on, the specified pitch will be used. To transpose an individual part, refer to Shift Note in p.36 "Moving data within a part (Move Data)." To transpose the entire pattern, refer to p.35 "Transposing a pattern (Transpose)."

The pitch will be shown in the display as follows.

Changing the gate time
Gate Time 0.25...64.0
- Press the STEP EDIT key.
- Use the cursor keys to select Gate Time (the corresponding LED will light).
- Press the key of the synth part that you wish to edit (the key will light).
- Turn off the keyboard function (the keyboard key will go dark).
- The step keys will light to indicate the trigger locations of the pattern for that part. Press the step key for the step whose gate time you wish to edit (the key will blink). By pressing a step key where a trigger exists, you can audition its pitch.
- Rotate the dial to modify the gate time of that step.
The value shown in the display is the gate time length in units of a step. For example if the gate time is set to 1.0, the gate time will be exactly as long as one step.

If the gate time length extends into the timing of the next note, the filter EG of the next note will not be retriggered.
When the display is showing the Gate Time, pressing a step key will not switch its trigger on/off.
Changing the gate time of a step whose trigger is off will have no effect. If you turn that trigger on, the specified gate time will be used.
Adding accents to the pattern (Accent)
Accents (volume emphasis) can be added individually to the drum part and synth part. When the accent is on, notes at the same location (step) of each part will be emphasized.
- When you press the part key for the desired accent, the step keys will indicate the accent pattern.
- Each time you press a step key it will alternate on/off, allowing you to specify the desired accent pattern. You can playback the pattern to hear the results as you create the accent part.
- The amount of the accent is adjusted by the Level knob in the part common section. Rotating the knob toward the right will increase the difference between on and off. If the knob is rotated all the way toward the left, there will be no effect. Play back the pattern to hear the results as you make this setting.

Pressing the Accent part key by itself will not produce sound. Also, if a part key is struck to play the sound, it will be sounded with Accent on (i.e., the emphasized sound). If you wish to hear the results of Accent, you need to play back the pattern.
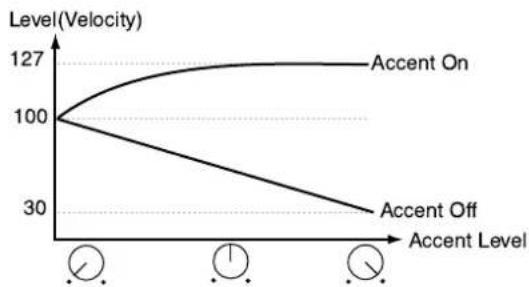
line
| Level (Velocity) | Accent On | Accent Off | |---|---|---| | 100 | 100 | 100 | | 30 | 127 | 30 |Motion sequence
There are three types of motion sequence: part, effect, and delay. The knobs and keys that are valid for each part, for effect, and for delay are listed below.
Drum part total 2: one knob and one key one from EG Time, Pitch, Level, and Pan one from Effect, Roll, and Amp EG
Synth part total 3: two knobs and one key one from EG Time, Glide, Level, and Pan one from Cutoff, Resonance, EG Int, and Drive one from Effect, Roll, and Amp EG
Accent part Level
Effect Edit1, Edit2 Valid only for the part whose Effect key is on.
Delay Time, Depth Applies to the entire pattern. The delay cannot be applied to an individual part.
Playing a motion sequence
A motion sequence can be played back in one of the following two ways, and you can select the playback method independently for each part.
For effect and delay motion sequences, the motion sequence of the part will be only Smooth. The motion sequence of the accent part will be only Trig Hold.

Amp EG, Roll, and Effect will be played as Trig Hold even if Smooth is selected as the type.
Smooth:
Knob values will be connected smoothly, and the sound will change smoothly.
Trig Hold (trigger hold):
The value of the motion sequence knob will be held at the note timing of that part.


There will be no effect when the Motion Sequence LED is dark (off).
Recording a motion sequence
Knob and key movements (motion sequences) for each part, effect, and delay can be recorded.
To record a motion sequence for a part, select the part, and then turn on the Motion Sequence key of the Part Common section.

When you newly record a motion sequence for a part, the motion sequence for the previous knob or key will be erased.
To record an effect motion sequence, turn on the Motion Sequence key of the Effect/Delay section (turn the Delay Edit key off).

To enable the effect motion sequence, turn the effect on (lit) for each part to which you want the effect to apply.
To record a delay motion sequence, turn on both the Delay Edit key and the Motion Sequence key of the Effect/Delay section.

The delay motion sequence will apply to the entire pattern. It cannot be set for individual parts.
For the recording procedure, refer to p.22 "Using a motion sequence" in section 3. Basic operation (Quick Start).
Checking motion sequence data
If motion sequence data has been recorded, you can hold down the Shift key and press the Motion Sequence key to view the status in the step keys.
- If motion sequence data for the knobs of the Part Common section is included Step keys 1 and 2 will light
- If motion sequence data for the knobs of the Synth Filter section is included Step key 3 will light
- If motion sequence data for the knobs of the Part Common section is included Step key 4 will light
- If effect motion sequence (Edit 1 data) is included Step keys 5 and 6 will light
- If effect motion sequence (Edit 2 data) is included Step keys 7 and 8 will light
- If delay motion sequence (delay time data) is included Step keys 9 and 10 will light
- If delay motion sequence (delay depth data) is included Step keys 11 and 12 will light

It is not possible to check motion sequence data during playback, or recording, nor during Pattern Set Play.
Convenient functions for editing patterns

If you wish to save the pattern you edit using these functions, you must perform the Write operation before selecting a different pattern or turning off the power.
Transposing a phrase (Transpose)
Transpose -24...24
This transposes the phrase of synth parts 1 and 2.
- While you continue pressing the Transpose key, the display will indicate the current transposition status.
- While holding down the Transpose key, rotate the dial to transpose the phrase in semitone steps. +/-1 transposes the pitch by a semitone, +/-2 by a whole tone, +/-7 by a fifth, and +/-12 by one octave.
While holding down the Transpose key you can also use the step keys or Select keys to transpose.
When you hold down the Transpose key and use the step keys to specify the transposition, step key 4 will correspond to the C pitch.


To transpose an individual part, use the Shift note operation described below.

If solo has been specified, the key will remain lit when you specify a transposition, and will not change to blinking. When you defeat the solo setting, the key will begin blinking.

The Transpose value is not saved. The next time that the power is turned on, the value will be 0.

If a chord split (see p.27) is selected as the wave for the synth part, the chord or octave may change when you specify a transposition.
Moving data within a part (Move Data)
By executing the Move Data operation you can move the location of the pattern and motion sequence data for the selected part (Shift Data), or transpose the notes of the entire part (Shift Note).
Shift Data -16...16
Use this when you want to change the starting location of a pattern.
- If the pattern is playing, press the Stop/Cancel key to stop playback.
- Hold down the Shift key and press step key 5 (Move Data). (Key 5 will blink.)
- All part keys and the effect/delay motion sequence key will blink. If you do not want to shift the data of a specific part or of the motion sequence, press that key to make it go dark. You will be able to audition the sound each time you press a part key.
- A number will blink in the display. Rotate the dial to select the number of steps and the direction (positive or negative) in which the data will be moved.
- Press the blinking step key 5 to execute the Move Data operation.
To cancel without executing, press the Stop/Cancel key.
The Shift Data operation applied to all steps of the selected part. Data that is moved beyond the last step of the pattern will "wrap around" to the first step. For example if 64-step data is moved for "5" steps, the data that was in steps 60 through 64 will be moved to steps 1 through 5. Likewise, data that is moved earlier than the first step of the pattern will "wrap around" to the last step. For example if 48-step data is moved for "-3" steps, the data that was in steps 1 through 3 will be moved to steps 46 through 48.
With a setting of 3
The data of each step will be moved three steps toward the end of the pattern.
Example: 2 5 , 6 9 , 10 13 , 14 1

flowchart
graph TD
    A["Step 1 Step 2 Step 3 Step 4 Step 5 Step 6 Step 7 Step 8 Step 9 Step 10 Step 11 Step 12 Step 13 Step 14 Step 15 Step 16"] --> B["Step 1 Step 2 Step 3 Step 4 Step 5 Step 6 Step 7 Step 8 Step 9 Step 10 Step 11 Step 12 Step 13 Step 14 Step 15 Step 16"]
    B -.-> C["Step 1 Step 2 Step 3 Step 4 Step 5 Step 6 Step 7 Step 8 Step 9 Step 10 Step 11 Step 12 Step 13 Step 14 Step 15 Step 16"]
With a setting of -2
The data of each step will be moved two steps toward the beginning of the pattern.
Example: 1→15, 3→1, 6→4, 10→8, 14→12

flowchart
graph TD
    A["Step 1"] --> B["Step 2"]
    B --> C["Step 3"]
    C --> D["Step 4"]
    D --> E["Step 5"]
    E --> F["Step 6"]
    F --> G["Step 7"]
    G --> H["Step 8"]
    H --> I["Step 9"]
    I --> J["Step 10"]
    J --> K["Step 11"]
    K --> L["Step 12"]
    L --> M["Step 13"]
    M --> N["Step 14"]
    N --> O["Step 15"]
    O --> P["Step 16"]
    P --> Q["Feedback Loop"]
    Q --> R["Step 1"]
    R --> S["Step 2"]
    S --> T["Step 3"]
    T --> U["Step 4"]
    U --> V["Step 5"]
    V --> W["Step 6"]
    W --> X["Step 7"]
    X --> Y["Step 8"]
    Y --> Z["Step 9"]
    Z --> AA["Step 10"]
    AA --> AB["Step 11"]
    AB --> AC["Step 12"]
    AC --> AD["Step 13"]
    AD --> AE["Step 14"]
    AE --> AF["Step 15"]
    AF --> AG["Step 16"]

Shift Note -24...24
This function simultaneously shifts the note data of all steps in the selected synth part.
- If the pattern is playing, press the Stop/Cancel key to stop playback.
- Hold down the Shift key and press step key 5 (Move Data). (Key 5 will blink.)
- Turn on the Transpose key (the LED will blink).
- Synth part keys 1 and 2 will blink. If you do not want to shift the data of a specific part, press that key to make it go dark. (The part will sound at C4.)
- A number will blink in the display. Rotate the dial to select the amount of pitch shift. +/-1 transposes the pitch by a semitone, +/-2 by a whole tone, +/-7 by a fifth, and +/-12 by one octave.
- Press the blinking step key 5 to execute the Move Data operation.
To cancel without executing, press the Stop/Cancel key.

Copying a part (Copy Part)
You can copy the sound settings and pattern data (including motion sequence) from a selected part to another part.
- If the pattern is playing, press the Stop/Cancel key to stop playback.
- Press the Part key to select the copy destination part (the LED will light).
- Hold down the Shift key and press step key 6 (Copy Part). (Key 6 will blink.) The display will begin blinking.
-
Rotate the dial to select the copy source pattern number.
-
Press a part key to select the copy source part. (The copy source key will blink, and the copy destination key will be dark.) At this time, you will be able to audition the sound each time you press the copy source part key. (Synth parts will sound at C4.)
-
Press step key 6 once again to execute the Copy Part operation.
To cancel, press the Stop/Cancel key.

When copying between a synth part and a drum part, only the trigger data will be copied.

For details on data copy within the same part, refer to the following section "Data Copy within a part."

flowchart
graph TD
    A["Example"] --> B["C.20"]
    B --> C["A.01"]
    C --> D["Copy source"]
    D --> E["Synth part 1 (sound, phrase pattern)"]
    D --> F["Synth part 2 (sound, phrase pattern)"]
    D --> G["Drum part 1 (sound, rhythm pattern)"]
    E --> H["..."]
    F --> I["..."]
    G --> J["..."]
    K["d.01"] --> L["Copy destination"]
    L --> M["Synth part 1 (copy of C.20 Synth part 2)"]
    L --> N["Synth part 2 (copy of A.01 Synth part 1)"]
    L --> O["Drum part 1 (sound, rhythm pattern)"]
    O --> P["..."]

Data Copy within a pattern
Phrase pattern data (including motion sequence data) that you create for a pattern of length 1 can be copied to the steps of lengths 2...4. This function is a convenient way to create a pattern that uses similar phrases repeatedly.
- Create a pattern with a length of 1, and Write it into memory. (Refer to p.41 "Saving a pattern.")
- At this point, the same data as in length 1 will automatically be copied to the steps of lengths 2...4.
- Change the pattern length to the desired length. (Refer to p.31, "Length, Scale/Beat settings.")
- The steps of lengths 2...4 will contain the same data as length 1. Now you can edit the data of lengths 2...4 to complete the pattern.
The data will be copied in a similar way when the pattern length is 2 or 3 (refer to the table below). If you shorten a pattern you create, the data will be copied according to the shortened length.
Copy Pattern data
| Pattern length | Pattern data before writing | Pattern data after writing |
| 1 | ||
| 2 | ||
| 3 |

The data that is copied automatically when you Write a pattern does not force the pattern length (1...4) to change. If the length is 4, data will not be copied within the pattern.
Copying the sound of a part (Copy Sound)
You can copy the sound of another part to the selected part. (Step data and motion sequence data will not be included.)
- If the pattern is playing, press the Stop/Cancel key to stop playback.
- Press a part key to select the copy destination part. (The key will light.)
- Hold down the Shift key and press step key 7 (Copy Sound) (key 7 will light). The display will begin blinking.
- Use the dial to select the copy source pattern number.
- Press a part key to select the copy source part. (The copy source key will blink, and the copy destination key will be dark.) At this time, you can audition the sound by pressing the copy source key. (Synth parts will sound at C4.)
- Press step key 7 once again to execute the Copy Sound operation.
To cancel, press the Stop/Cancel key.

It is not possible to copy sounds between a synth part and a drum part.
Erasing motion sequence data from the part, effect, or delay (Clear Motion)
This operation simultaneously erases the part, effect, or delay motion sequence data.
- If the pattern is playing, press the Stop/Cancel key to stop playback.
- Hold down the Shift key and press step key 8 (Clear Motion). (Key 8 will blink.)
- Press the key of the part (drum, synth, accent) whose motion sequence you wish to erase, or the motion sequence key of the effect/delay section (you may select more than one). The selected key(s) will blink.
- Press step key 8 once again to clear the motion sequence data.
To cancel, press the Stop/Cancel key.

The entire motion sequence of the selected part, effect, or delay will be erased at once. (If you select delay, both time and depth data will be erased.)

Erasing pattern data from a part
To erase the pattern data for the selected part, you can use one of the following two methods in addition to turning each of the sixteen step keys off.
Erasing data during playback or recording (Erase)
- Press the Part key to select the part from which you wish to erase data.
- During playback or recording, hold down the Shift key and press the Rec key. As long as you continue holding these keys, trigger data will be automatically be erased from the selected part.

If you execute Erase on a synth part, only the trigger data will be erased, and the note number and gate time data of each step will remain.

Erasing all data from a part (Clear Part)
This operation simultaneous erases a rhythm or phrase pattern (trigger, note number, gate time) and motion sequence data.
- If the pattern is playing, press the Stop/Cancel key to stop playback.
- Press the Part key to select the part whose data you wish to erase.
- Hold down the Shift key and press step key 9 (Clear Part). (Key 9 will blink.)
- Once again press step key 9 to clear the data.
To cancel without clearing the data, press the Stop/Cancel key.

When you execute Clear Part for a synth part, all steps of the phrase pattern will be set to a pitch of "C4" and a gate time of "1.00".
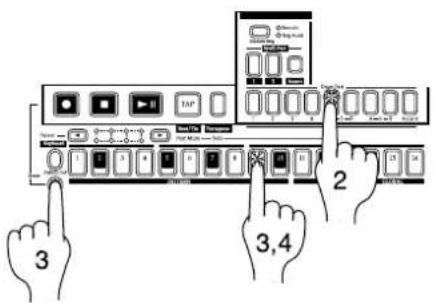
Exchanging data between parts (Swap Part)
All data of the selected part can be exchanged with a part of same pattern.
- If the pattern is playing, press the Stop/Cancel key to stop playback.
- Press a part key to select the parts that you wish to swap (the key will light).
- Hold down the Shift key and press step key 10 (Swap Part) (key 10 will blink).
- If you selected a synth part in step 2, both keys will blink automatically. If you selected a drum part in step 2, select the other drum part that you wish to swap (both of the two keys being swapped will blink). At this time, you can audition the sound by pressing the respective part key. (Synth parts will sound at C4.)
- Press step key 10 once again to execute the Swap Part operation.
To cancel the operation, press the Stop/Cancel key.

It is not possible to swap between a synth part and a drum part.

flowchart
graph TD
    A["Before swapping"] --> B["Synth part 1 (sound, phrase pattern)"]
    A --> C["Synth part 2 (sound, phrase pattern)"]
    A --> D["Drum part 1 (sound, rhythm pattern)"]
    A --> E["Drum part 2 (sound, rhythm pattern)"]
    A --> F["Drum part 3 (sound, rhythm pattern)"]
    G["After swapping"] --> H["Synth part 1 (sound and phrase pattern of part 2)"]
    G --> I["Synth part 2 (sound and phrase pattern of part 1)"]
    G --> J["Drum part 1 (sound and rhythm pattern of part 3)"]
    G --> K["Drum part 2 (sound, rhythm pattern)"]
    G --> L["Drum part 3 (sound and rhythm pattern of part 1)"]
    M["Final device"] --> N["3,5"]
    N --> O["4"]
    O --> P["2"]
Editing motion sequence data
You can edit the motion sequence of each part or the effect and delay motion sequence. The data can be edited in units of individual steps.
Selecting a motion sequence
Motion Dest. EGt(EG Time)...ti n(Time)
- Select the pattern that contains the motion sequence data you wish to edit.
- Press the STEP EDIT key (the key will light).
- Use the cursor keys [▲][▼] to select Motion Dest (the corresponding LED will light).
- By turning the dial you can select parameters from the motion sequence which is currently recorded for that part.

If you wish to select a parameter for which no motion sequence is recorded for the part, hold down the Shift key while you turn the dial.

For motion sequences which have been recorded using the EG Time, Pitch/Glide, Level, Pan, Cutoff, Resonance, EG Int, and Drive parameters, their values will be initialized to "diS" when you hold down the Shift key and select a parameter for which no motion sequence is recorded.
The parameters and valid number of parameters for each part are given below.
Only one of the following parameters is valid for each part: EGt (EG Time), PCh/GLd (Pitch/Glide), LEU (Level), PAN (Pan).
Only one of the following parameters is valid for each synth part: Cut (Cutoff), rES (Resonance), EGi (EG Int), drU (Drive).
Only one of the following parameters is valid for each part: ANP (Amp EG), roL (Roll), EFF (Effect).
Ed1 (Edit 1) and Ed2 (Edit 2) are valid for parts for which the effect is turned on.
tin (Time) and dPt (Depth) are valid for the pattern (all parts).
Editing the parameter values of a motion sequence
Motion Value
*Only synth part
| EGt (EG time) | dis, -64...63 |
| PCh/GLd (Pitch/Glide*) | dis, -64...63 |
| LEU (Level) | dis, 0...127 |
| Pan (Pan) | dis, L.64...r.63 |
| Cut (Cutoff) | dis, 0...127 |
| rES (Resonance*) | dis, 0...127 |
| EGi (EG Int*) | dis, 0...127 |
| ANP (EG Int*) | dis, 0...127 |
| EFF (Effect) | dis, oFF...on |
| roL (Roll) | dis, oFF...on |
| rEU (Reverse) | dis, oFF...on |
| Ed1 (Edit 1) | dis, 0...127 |
| Ed2 (Edit 2) | dis, 0...127 |
| TiN (Time) | dis, 0...127 |
| dPt (Depth) | dis, 0...127 |
- Press the STEP EDIT key (the key will light).
- Use the cursor keys [▲][▼] to select Motion Value (the corresponding LED will light).
- The display will alternately show the parameter name you selected in the preceding "Selecting a motion sequence," and the value of the parameter.
- Press a part key to select the part that you wish to edit.
- Press a step key to select the step that you wish to edit. The steps of a pattern whose length is two measures or greater can be selected successively by pressing the Select key.
- Rotate the dial to edit the parameter value at that step. If the display indicates "diS," the motion sequence does not apply to that step.


When you select a parameter in Motion Dest for which no motion sequence is recorded, and then change a Motion Value, all Motion Values in same section will be initialized to "diS."

If you move to another pattern without writing the edited motion sequence, it will revert to the state of the original motion sequence. If you wish to keep the edited motion sequence, you must perform the Write operation (see p.41 "Saving a pattern (WRITE)").

While editing a motion sequence, it is not possible to use the step keys to switch steps on/off.

ending on the part, some parameters cannot be selected.

While editing a motion sequence, the Rec key has no effect.

If you modify the motion sequence values for Edit1, Edit2, Time, and Depth in a single part, the change will apply to all parts.
Pattern Set
Pattern Set is a function that lets you assign favorite patterns to the 16 step keys, and switch between them as desired. While playing, you can successively select favorite patterns, or play combinations of patterns as a loop.
By using the Select key in conjunction with this to switch pattern set groups, you can register and select 16 x 4 (total of 64) patterns.
Using Pattern Set to perform (Pattern Set Play)
Press the Play/Pause key to begin playback.
Hold down the Pattern Set key and press a step key to switch to the pattern that was assigned to that step key.
By holding down the Pattern Set key and pressing a Select key, you can switch to a different group of assigned pattern sets. The pattern set group will be indicated by the lower line of the Select LEDs (red).
By holding down the Shift key and pressing the Pattern Set key, you can hold the Pattern Set function (the key will light). To defeat the Hold condition, press the Pattern Set key once again (the key will go dark).
Tempo adjustment, and functions such as Reset & Play etc. are the same as for Pattern Play.

Pattern Set cannot be used during recording. When you enter recording (ready) mode, Pattern Set will be cancelled.

When the Pattern Set key is blinking, it will operate as the Pattern Set function.
Chain Play of pattern sets
This function lets you select the starting and ending pattern sets, and play them as a loop. While the Pattern Set function is held, press the two step keys to which the patterns you wish to play are assigned.
For example if patterns are assigned to the step keys as shown in the table below, the operation described below will cause playback to loop in the order of A.01, A.20, b.03, b.04, and A.51. (A.01 is step key 1 of group 1, and A.51 is step key 5.)
| Step keySelect LED | 1 | 2 | 3 | 4 | 5 | 14 | 15 | 16 | |
| 1 | A.01 | A.20 | b.03 | b.04 | A.51 | A.20 | b.43 | b.61 | |
| 2 | C.21 | C.23 | C.56 | C.64 | C.28 | C.21 | A.07 | A.08 | |
| 3 | b.01 | b.02 | b.04 | b.62 | A.01 | A.05 | A.45 | A.64 | |
| 4 | d.01 | d.02 | d.03 | d.04 | d.05 | d.07 | d.08 | d.09 |
- Press the group 1 (select LED1 is lit) step key 1.
- Continue holding down step key 1, and press step key 5.
The indicators from step key 1 through step key 5 (chosen for chain play) will light.
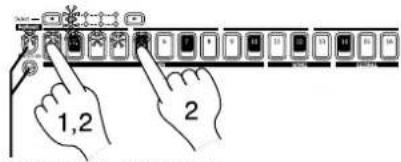
Hold down the Shift key and press the Pattern Set key to hold the function
You can also use the Select key to create chain play that extends across groups.
If you want chain playback to occur in the order of A.20, b.43, b.61, C.21, C.23, C.56, C.64, and C.28, perform the following operation. (A.20 is step key 14 of group 1, and A.28 is step key 5 of group 2.)
- Press group 1 (select LED 1 lit) step key 14.
- Continue holding down step key 14, and press the Select key to select group 2 (select LED 2 lit). At this time, the selection extends to group 2 step key 14.

If you release step key 14 at this point, the selection will extend to group 2 step key 14.
- Continue holding down step key 14, and press group 2 step key 5.
The step keys selected for chain play will light from 1 through 5 when select LED 2 is lit, and from 14 through 16 when select LED 1 is lit.
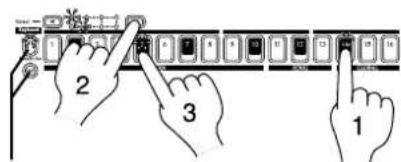
Hold down the Shift key and press the Pattern Set key to hold the function
While chain play is playing, you can hold down the Shift key and press the Play/Stop key to play back from the beginning of the currently-playing pattern.
To stop chain play, you can either select a different pattern set, or defeat the pattern select Hold function.
Assigning a pattern to a Pattern Set
- With playback stopped, press and hold the Pattern Set key and press the step key for the location that you wish to assign a pattern.
- While continuing to press the Pattern Set key (or while Hold is still in effect), rotate the dial to select the pattern number that you wish to assign. Release the Pattern Set key (or defeat Hold) to complete the assignment process.
- To save the pattern set assignments, press the Stop/Cancel key to stop playback. Continue pressing the Pattern Set key, and press the Write key (the Write key will blink).
- The display will blink "PSt." Press the Write key once again to save the data.
To cancel, press the Stop/Cancel key.

If the Global mode Memory Protect setting is on, it will not be possible to write the data. In this case, turn off the Global mode Memory Protect setting before you execute the Write operation.

Never turn the power off during the Write operation. This may damage the data.

Saving a pattern (WRITE)
If you wish to keep the pattern data that you create, you must perform this Write operation. When you perform the Write operation, "Data Copy within a pattern" (p.37) will occur automatically, depending on the pattern length.
If you intentionally want to discard your edits and revert to the original pattern data, simply select a different pattern without Writing.
- If the pattern is playing, press the Stop/Cancel key to stop playback.
- Press the Write key once (the key will blink). The pattern number will blink in the display.
- Rotate the dial to select the writing destination pattern number.
- Press the Write key once again to write the data.
To cancel, press the Stop/Cancel key.

If the Global mode Memory Protect setting is on, it will not be possible to Write. In this case, you must turn off the Global mode Memory Protect setting before you execute the Write operation.

Never turn off the power during the Write operation. This can damage the data.
5. Song mode
A song consists of patterns arranged in the desired order of playback.
You can create and save up to sixteen songs in the internal memory of the EM-1. In addition to pattern playback, songs can also record overdubbed phrases and knob movements. Press the Song mode key to enter Song mode.

bar
Song (S.01) S.01...S.16 16 songs | Position | Event Data | Count | |---|---|---| | 1 | Pattern d.01 (32 Steps) | 1 | | 2 | Pattern A.10 (64 Steps) | 2 | | 3 | Pattern b.01 (365 Steps) | 3 | | 4 | Pattern b.20 (24 Steps) | 4 | | 5 | Pattern A.01 (16 Steps) | 5 | | 6 | Pattern b.01 (36Steps) | 6 | | ... | ... | ... | | 7 | Pattern A.01 (16Steps) | 9 | | 8 | End: Position 50 | 1 | + Event dataSelecting a song
Song S.01...S.16
Use the cursor keys to select Song (the corresponding LED will light)
Rotate the dial to select one of the sixteen songs S.01 to S.16.
Setting the playback tempo
Tempo 20.0...300.0 20.0...300.0
• Using the dial to set the tempo
Use the cursor keys to select Tempo (the corresponding LED will light). Rotate the dial to set the tempo.
If you wish to change the tempo units to the right of the decimal place, hold down the Shift key and rotate the dial.
• Using the tap tempo key to set the tempo
While the song is playing, strike the Tap key three times or more in succession at the desired tempo. The EM-1 will calculate the interval at which the Tap key was pressed, and will set the tempo accordingly. The tempo can be set in the same way even when playback is stopped.
When you use the cursor keys to make the parameter select LEDs indicate Tempo, the current tempo will appear in the display.

If you modify the tempo of a song but then switch to another song without Writing, the first song will return to its original tempo. If you wish to keep the tempo setting you modified, you must perform the Write operation (refer to p.45 "Saving a song (WRITE)").
• Using the Tempo Lock key to fix the song tempo
If the Tempo Lock key is turned on (lit), the playback will maintain the current tempo even when the song moves to the pattern at the next position.
If the Tempo Lock key is turned off (dark), the tempo will change to the tempo of the pattern at that position when the song moves to the next position.
You can use the dial or the TAP key to change the tempo regardless of the on/off state of the Tempo Lock key.
The on/off state of the Tempo Lock key can be saved as part of each song. To save the modified tempo, perform the Write operation (see p.45 "Saving a song (WRITE)").
Playing a song (Song Play)
Press the Play/Pause key to begin playing the song. The song will begin playing from the pattern of the currently selected position. When the song ends, playback will automatically stop.
It is not possible to save edited sounds in a song. Please use Pattern mode to edit sounds.
What is Position?
"Position" refers to the playback or recording order of the patterns within the song, and is the unit by which you edit a song.

Fast-forward or rewind a song
During song playback, you can use the select keys to fast-forward or rewind. To fast-forward, press the [▶] select key. To rewind, press the [▶] select key.

Switching songs
It is not possible to switch songs during playback, but it is possible to select the song number beforehand. If you select a song number during playback, the display will blink to indicate the selected number. When the currently playing song ends, playback will stop, and the newly selected number will now be steadily lit. Press the Play/Pause key to playback the selected song.
Playing from the beginning of a position or song (Reset & Play)
While a song is playing, you can hold down the Shift key and press the Play/Pause key to start playback from the beginning of the pattern specified for the currently-playing position. In addition, you can press the Play/Pause key while a song is playing to pause the playback, and then hold down the Shift key and press the Play/Pause key to playback from the beginning of the song.
Creating a song
Creating a song from scratch
Here's how to create a song by placing patterns in the desired order.

If you switch to a different song while editing a song, your edited data will be lost. If you wish to keep the edited song, you must perform the Write operation to save the song data.
Erasing song data (Clear Song)
- If a song is playing, press the Stop/Cancel key to stop play-back. Then select the song that you wish to erase.
- Hold down the Shift key and press step key 13 (Clear Song). (Key 13 will blink.)
- Press step key 13 once again to erase the song data.
To cancel, press the Stop/Cancel key.
If you erase the song data by mistake, rotate the dial to re-select the song before you save it. This will restore the data to its original condition.

Specifying a pattern for each position
Position 001...256
0
Pattern A.01...d.64
Specify a pattern for each position. When doing this, please turn the Keyboard function key off (the key will go dark).
- Use the cursor keys to make the parameter select LEDs indicate Position. Notice that the display indicates "001."
- Use the cursor keys to make the parameter select LEDs indicate Pattern.
- Rotate the dial to select the pattern that you wish to assign to position "001."
- Press the select [▶] key to advance to the next position. The display will indicate "End."
- Rotate the dial to select the pattern. The pattern you select here will be the pattern for position "002."
- When you select a pattern for the "End" position, the "End" will move to the next position. Repeat steps 4 and 5 to assign as many patterns as you wish.
To play back the completed song from the beginning, press the Play/Pause key once, and then press the Stop/Cancel key. Alternatively, use the cursor keys to select Position, and rotate the dial or use the select keys to set the position to "001." Then press the Play/Pause key. If you wish to view the order of patterns in the song, or to re-select the pattern for a specific position, use the cursor keys to select Pattern. Each time you press a select key, you will move to the next or previous position. You can use the dial to change the pattern number that is displayed.

Alternatively, you can use the cursor keys to select Position, and use the dial or select key to select the position you wish to check. Then use the cursor keys to select Pattern, and view or change the pattern.

Specifying the Note of each pattern
Note Ofs. -24...24
This function offsets the Note of the pattern at the specified position within the song.

Note Of: simply offsets the pitch within the song. It does not affect the pitch data of the pattern itself.
- If the song is playing, press the Stop/Cancel key to stop playback.
- Use the cursor keys to select Position (the corresponding LED will light).
- Use the dial or Select keys to select the position whose pitch you wish to offset.
- Use the cursor keys to make the parameter select LEDs indicate Note Ofs..
- Use the dial to specify the desired pitch offset. +/-1 offsets the pitch by a semitone, +/-2 by a whole tone, +/-7 by a fifth, and +/-12 by one octave.
Even when the parameter select LEDs indicate Note Ofs., you can use the Select keys to move the position forward or backward in single steps.

If a chord split wave (see p.27) is selected for the part, changing the Note Offset may change the chord or octave.
Editing a song
You can insert a new pattern into a song, or delete an existing pattern. You can also add knob movements or your own performance to a song.

If you wish to keep the edited song, you must perform the Write operation. If you select a different song or turn off the power without performing the Write operation, the song will return to the state in which it was before you edited it.
Inserting a pattern at a specified position (Insert Pattern)
You can insert a pattern at a specified position, and subsequent patterns will be moved backward (toward the end of the song).
Insert a new pattern at position 3

flowchart
graph TD
    A["Pattern A.01 (16 Steps) Position 1"] --> B["Pattern b.01 (365 Steps) Position 2"]
    B --> C["Pattern d.01 (325 Steps) Position 3"]
    C --> D["Pattern A.01 (165 Steps) Position 4"]
    D --> E["Pattern b.20 (24 Steps) Position 5"]
    E --> F["Pattern b.01 (36 Steps) Position 6"]
    F --> G["End"]

    H["Pattern A.01 (16 Steps) Position 1"] --> I["Pattern b.01 (36 Steps) Position 2"]
    I --> J["Pattern d.01 (325 Steps) Position 3"]
    J --> K["Pattern d.01 (32 Steps) Position 4"]
    K --> L["Pattern A.01 (16 Steps) Position 5"]
    L --> M["Pattern b.20 (245 Steps) Position 6"]
    M --> N["Pattern b.01 (36 Steps) Position 7"]
    N --> O["End"]

    P["After inserting"] --> Q["Pattern A.01 (16 Steps) Position 1"]
    Q --> R["Pattern b.01 (36 Steps) Position 2"]
    R --> S["Pattern d.01 (325 Steps) Position 3"]
    S --> T["Pattern d.01 (32 Steps) Position 4"]
    T --> U["Pattern A.01 (16 Steps) Position 5"]
    U --> V["Pattern b.20 (245 Steps) Position 6"]
    V --> W["Pattern b.01 (36 Steps) Position 7"]
    W --> X["End"]
- If the song is playing, press the Stop/Cancel key to stop playback.
- Hold down the Shift key and press step key 11 (Insert Pattern). (The 11 key will blink.)
- The position indication in the display will blink. Rotate the dial to select the position at which you wish to insert a pattern. (For example if you wish to insert a pattern into position 3. make the display blink "003.")
- Press step key 11 once again, and a pattern will be inserted in front of that position. (The key will go dark.)
To cancel, press the Stop/Cancel key.
The pattern that is inserted will be the pattern which had previously been at that position. Now you can specify the desired pattern for the position that was inserted.
Data following the inserted pattern will be moved backward.

Deleting a pattern from a specified position (Delete Pattern)
You can delete a pattern from a specified position, and subsequent patterns will be moved forward (toward the beginning of the song).

flowchart
graph TD
    A["Before deleting"] --> B["Pattern A.01 (16Steps) Position 1"]
    A --> C["Pattern d.01 (325Steps) Position 2"]
    A --> D["Pattern b.01 (36Steps) Position 3"]
    A --> E["Pattern b.20 (24Steps) Position 4"]
    A --> F["Pattern A.10 (64Steps) Position 5"]
    A --> G["Pattern b.01 (36Steps) Position 6"]
    A --> H["Pattern A.01 (16Steps) Position 7"]
    A --> I["End"]

    J["After deleting"] --> K["Pattern A.01 (16Steps) Position 1"]
    J --> L["Pattern d.01 (325Steps) Position 2"]
    J --> M["Pattern b.01 (36Steps) Position 3"]
    J --> N["Pattern b.20 (24Steps) Position 4"]
    J --> O["Pattern b.01 (36Steps) Position 5"]
    J --> P["Pattern A.01 (16Steps) Position 6"]
    J --> Q["End"]
- If the song is playing, press the Stop/Cancel key to stop playback.
- Hold down the Shift key and press step key 12 (Delete Pattern). (The 12 key will blink.)
- The position indication in the display will blink. Rotate the dial to select the position from which you wish to delete the pattern. (For example if you wish to delete the pattern from position 5. make the display blink "005.")
- Press step key 12 once again, and the pattern will be deleted.
To cancel, press the Stop/Cancel key.
When you delete a pattern, the event data (refer to the following page) at that position will also be deleted.
Data following the inserted pattern will be moved forward.

Changing the pattern for a specific position
- If you are playing back, press the Stop/Cancel key to stop playback.
- Use the cursor keys to select Position (the corresponding LED will light).
- Use the dial to select the position that you wish to modify.
- Use the cursor keys to make the parameter select LEDs indicate Pattern.
- Use the dial to select the pattern that you wish to assign to the selected position.

If you wish to audition the patterns as you select one, press the Pattern mode key to enter Pattern mode, and listen to the playback. To return to Song mode, press the Stop/Cancel key to stop playback, and then press the Song mode key.
Recording knob movements or your performance in a song (Event Recording)
In Song mode you can create a performance not only by combining patterns, but also recording a realtime performance that you play on the drum part keys and step keys (using the keyboard function), and by turning the knobs.
Recording such a performance in Song mode is referred to as "event recording."
The following four types of performance data (event data) can be recorded by event recording.
• Performances using the drum part keys
• Performances using the keyboard function
- Knob and key operations (only for the selected part)
- Tempo
Event recording allows you to record two or more types of events in the same area, as long as the events are played at the same time.
Event recording always rewrites the previous data ("replace recording"), and when you record your performance, any event recording data previously in that area will be erased. (It is not possible to layer event recording over the same area.)
- Select the song on which you wish to record events.
- Use the cursor keys to select Position (the corresponding LED will light).
- Use the dial or the Select keys to move to the position at which you wish to begin recording.
-
Press the Rec key, and then press the Play/Pause key to begin event recording.
-
Use the part keys and/or the knobs to perform.
-
Press the Stop/Cancel key to stop event recording.
If the musical data of the song coincides with the event-recorded data, the event data will be given priority during play-back.

Knob movements that are event-recorded in Song mode will always playback in a way that corresponds to the Smooth type motion sequence setting (and not the Trig Hold type).
If you wish to save the event recording, you must perform the Write operation. If you switch songs or turn off the power without performing the Write operation, the data that was recorded will be lost.
After rewinding a song, it may not be possible to play-back exactly according to the event data.
If during playback you operate a knob that had been event-recorded, playback of the events of that knob will be cancelled until it reaches the next position.
Deleting event data from a song
To delete event data from a song, you can perform event recording over the area that you wish to delete (without operating any knobs or keys).
Checking for song event data
If event data is recorded in a song, step keys 13 through 16 will light if you hold down the Shift key and press the Motion Sequence key of the Part Common section.
It is not possible to check for event data during playback or recording.
Saving a song (WRITE)
If you wish to save a song that you create, you must perform this Write operation.
If you decide not to save the song data you create, simply switch songs without performing the Write operation.
- If the song is playing, press the Stop/Cancel key to stop playback. Use the cursor keys to select Song (the corresponding LED will light).
- Press the Write key once (the key will blink). The song number will blink in the display.
- Rotate the dial to select the desired destination song number.
- Press the Write key once again to save the data. (The key will light, and then go dark.)
To cancel, press the Stop/Cancel key.
If the Global mode Memory Protect setting is on, it will not be possible to write the data. In this case, turn off the Global mode Memory Protect setting before you execute the Write operation.
Never turn the power off during the Write operation. This may damage the data.
6. Global mode
In Global mode you can set parameters such as Metronome or Protect. Press the Global mode key to enter Global mode. To exit Global mode, press a different mode key.

The settings you make in Global mode will be cancelled if you turn off the power without Writing. If you wish to save the settings you make, you must perform the Write operation (refer to p.48 "Saving your changes in Global mode").
Metronome settings
Metronome oFF, r-0, r-1, r-2, on
Specify how the metronome will function. If you will be using realtime recording to create a pattern from scratch, it is convenient to use the metronome. The metronome will sound at quarter-note timing.
oFF: The metronome will not sound.
r-0: The metronome will sound only during recording (when the Rec and Play/Cancel keys are lit).
r-1: When recording, a one-measure count will be sounded before recording begins. The metronome will sound only during recording.
r-2: When recording, a two-measure count will be sounded before recording begins. The metronome will sound only during recording.
on: The metronome will sound during playback and recording. There will be no count before recording begins.
- Use the cursor keys to select Metronome (the corresponding LED will light).
- Rotate the dial to make the metronome setting.
- Press the PATTERN, STEP EDIT, or SONG key to return to the previous mode.

The metronome setting cannot be written. When you turn on the power, it will always be "oFF."
Synchronizing the EM-1 with external MIDI devices (MIDI Clock)
Clock int, Ext
The Global mode Clock setting allows the tempo of the EM-1 to be synchronized with the tempo of an external MIDI device that is able to send or receive MIDI Clock messages. For details on synchronization settings of your external MIDI device, refer to the owner's manual for your device.

Even if you set Clock to Ext, the EM-1 will operate with its own internal clock if no MIDI Clock messages are being received at its MIDI IN connector.
Synchronizing the EM-1 to a master external MIDI device (Ext)
- Use a MIDI cable to connect the MIDI IN connector of the EM-1 to the MIDI OUT connector of the external MIDI device (sequencer or synthesizer etc.).
- Use the cursor keys to select Clock (the corresponding LED will light).
- Rotate the dial to select "E" (external clock).
- Make settings on the external MIDI device (master) so that it will transmit MIDI Clock messages.
- Return to Pattern mode or Song mode.
- When you start the sequencer of the external MIDI device, the EM-1 will simultaneously begin playback.
- If MIDI Clock data is being received at the MIDI IN connector, you can make the EM-1 playback in synchronization with the external MIDI device by pressing the EM-1's Play/Pause key.


If the MIDI Clock parameter is set to "Ext" and the EM-1 is synchronized to the external MIDI clock, it will synchronize to the tempo of the external sequencer, and it will not be possible to change the tempo on the EM-1.

If a MIDI Start message is received while the EM-1 is already playing in synchronization with MIDI Clock, the EM-1 will begin playback from the beginning of the currently playing pattern (or in the case of a song, from the beginning of the pattern that was playing when the Start message was received).
Synchronizing an external MIDI device to the EM-1 as master (int)
- Use a MIDI cable to connect the MIDI OUT connector of the EM-1 to the MIDI IN connector of the external MIDI device (sequencer or synthesizer etc.).
- Use the cursor keys to select Clock (the corresponding LED will light).
- Rotate the dial to select "Int" (internal clock).
- Make settings on the external MIDI device (slave) so that it will receive MIDI Clock messages.
- When you start playback on the EM-1, the external MIDI device will begin playback in synchronization.

When you perform the Reset & Play operation to begin playback from the beginning of the pattern, the EM-1 will transmit only a MIDI Start message.

Setting the MIDI channel of each part (MIDI ch)
MIDI ch 1...16 1...16
You can set the MIDI channel of synth part 1, synth part 2, and the drum part. The same MIDI channel will be used for transmission and reception. The factory settings are listed below.
Part Channel
| Synth part 1 (global) 1 |
| Synth part 2 2 |
| Drum part (1—6B) 10 |
- Use the cursor keys to select MIDI ch (the corresponding LED will light).
- Press the part key for which you wish to change the MIDI channel (the key will light). For the drum part, press any one of the eight part keys (all of the drum part keys will light).
- Turn the dial to select the channel.

Program changes and exclusive data will be transmitted and received on the MIDI channel you specify here for synth part 1 (i.e., this will be the global MIDI channel).
Setting the MIDI note number of a drum part
Drums Note No. C-1...G9
For each drum part, you can specify the MIDI note number as a note name.
If you specify the same note number for two or more parts, the sounds of those parts will be played simultaneously when that note is received from an external MIDI device.
- Use the cursor keys to select Drums Note No (the corresponding LED will light).
- Press the part key whose note number you wish to change (the key will light).
- Rotate the dial to select the note number.
The factory settings are as follows.
| Part | Name | Note No. | Part | Name | Note No. |
| 1 | C2 | 36 | 5A | C4 | 60 |
| 2 | D2 | 38 | 5B | C#4 | 61 |
| 3 | E2 | 40 | 6A | F#2 | 42 |
| 4 | F2 | 41 | 6B | A#2 | 46 |

The correspondence between note names and note numbers will differ by manufacturer. Please refer to the owner's manual for the device you have connected.
MIDI filter settings
Here you can select the types of MIDI message that will be transmitted and received.
For each character "PCE" in the display, select "O" if you want that type of message to be transmitted and received, or select "-" if you do not want that type of message to be transmitted or received.
- Use the cursor keys to select MIDI Filter (the corresponding LED will light).
- Rotate the dial to select the combination of message types that will be transmitted and received; "O" allows transmission and reception, and "-" disables it.
P: Transmission/reception of Program Change, Bank Select, and Song Select messages.
C: Transmission/reception of Control Change messages.
E: Transmit/receive exclusive data. However while you are operating the Dump settings, this data will be transmitted and received regardless of the setting here.

Adjusting the pitch bend range
Bend Range -12...12
You can adjust the range of the pitch bend that will occur when MIDI Pitch Bend messages are received.
- Hold down the Shift key and press step key 14 (Bend Range) (key 14 will blink).
- Turn the dial to select the pitch range. +/-1 is a semitone, +/-2 is a whole step, +/-7 is a fifth, and +/-12 is an octave.
- Press step key 14 once again to finalize the pitch range (key 14 will go dark).
To cancel without making the setting, press the Stop/Cancel key.

For some sounds, the pitch may not rise all the way to the specified range.
Transmit/receive dump data
Dump Pt. Rt. At. Bt Pt. C, Pt. d, SnG, ALL
Transmission
Here's how system exclusive data (pattern data, song data, or Global mode settings) can be transmitted from the EM-1 to an external MIDI data filer or computer connected to the MIDI OUT connector.
- Connect the MIDI OUT connector of the EM-1 to the MIDI IN connector of an external MIDI device that is able to receive MIDI data dumps (another EM-1, or a computer that is running a MIDI data filer program or editing program, etc.).
- Set the MIDI channel of the external MIDI device and the EM-1 to match. However when transmitting to a data filer, it is not normally necessary to match the MIDI channel.
- Hold down the Shift key and press step key 15 (key 15 will light).
- Turn the dial to select the data that you wish to transmit.
Pt.A: pattern bank A data (A.01—A.64)
Pt.b: pattern bank b data (b.01—b.64)
Pt.C: pattern bank C data (C.01—C.64)
Pt.d: pattern bank d data (d.01—d.64)
SnG: all song data
GLb: global data
- Press step key 15 once again to finalize the data that will be transmitted. (The Play/Pause key will blink.)
- Press the Play/Pause key to transmit the data.
If you wish to cancel before transmitting the data dump, press the Stop/Cancel key.
Reception
Here's how EM-1 system exclusive data can be received from an external MIDI data filer or computer connected to the MIDI IN connector.

When the Global mode Protect setting is "on," it is not possible to receive MIDI dump data outside of Global mode.
- Connect the MIDI IN connector of the EM-1 to the MIDI OUT connector of the external MIDI device that will transmit the MIDI data dump (another EM-1, or a computer that is running a MIDI data filer program or editing program, etc.).
- Set the MIDI channel (Synth part 1) of the external MIDI device and the EM-1 to match. However when transmitting from a data filer, it is not normally necessary to match the MIDI channel.
- Hold down the Shift key and press step key 15 (key 15 will light).
- Transmit the data dump from the external MIDI device.
Details on data dumps are provided in the MIDI implementation chart of the EM-1.
Consult your local Korg distributor for more information on MIDI implementation

Do not touch the keys of the EM-1 while a data dump is in progress.

When the parameter select LEDs indicate Dump, system exclusive data can be transmitted or received even if the MIDI Filter parameter "E" is set to "-."

When the EM-1 receives a data dump, it will take up to ten seconds to write the data into memory (the Write key will light). Never turn off the power of the EM-1 during this time. Doing so may damage the data. Also, new MIDI data cannot be received during this time. If you want the EM-1 to receive multiple data dumps in succession, you must leave an interval between each of the transmitted data dumps.
Memory Protect (Protect)
This is the protect setting for Pattern mode and Song mode. When protect is "on," the Write key will not function, and it will not be possible to rewrite data or receive a MIDI data dump. When you wish to save edited data or receive a data dump, turn protect "oFF."
- Press the Stop/Cancel key to stop playback.
- Hold down the Shift key and press step key 16 (Protect). (Key 16 will blink.)
- Rotate the dial to change the blinking display to either "on" or "oFF."
- Press step key 16 once again to finalize the protect on/off setting (key 16 will go dark).
If you decide to cancel without changing the setting, press the Stop/Cancel key.
If you wish to save the protect setting, perform the Global mode Write operation (described below).

With the factory settings, this is turned on.

This setting is valid in Pattern mode and Song mode. In Global mode, it is always possible to execute Write regardless of the Memory Protect setting.
Saving your changes in Global mode (WRITE)
Here's how you can save the changes you made in Global mode.
If you wish to save the changes you made, you must perform this Write operation. The settings will take effect whenever the power is turned on. Conversely, if you do not want to save the changes you made, simply turn off the power without Writing.
- Press the Stop/Cancel key to stop playback.
- Press the Global mode key.
- Press the Write key once (the key will blink). The display will indicate “---.”
- Press the Write key once again to complete the operation.
If you decide to cancel, press the Stop/Cancel key.
In Global mode it is always possible to write, regardless of the Memory Protect setting (preceding section).

Never turn off the power while data is being written into memory. Doing so may destroy the data.
7. Appendices
About MIDI
1. MIDI channels
Similarly to a television, data can be received when the channel of the receiving device matches the channel on which the data is being transmitted.
On the EM-1, the transmit/receive channels for synth part 1, synth part 2, and all drum parts are set by the MIDI ch parameter of Global mode.
2. Note-on/off
When you strike a drum part key, the note number assigned to that drum part key will be transmitted on the specified MIDI channel. When you play the step keys using the keyboard function, a note-on message [9n, kk, vv] (n: channel, kk: note number, vv: velocity) will be transmitted on the MIDI channel specified for the part, with the note number assigned to each step key, and a velocity corresponding to the force with which you pressed the step key.
On the EM-1, the vv: velocity value is determined by the Accent level. When you release a pad, a note-off message [8n, kk, vv] is transmitted. However, most devices do not transmit note-off velocity, and neither does the EM-1. When note-on/off messages for a note number assigned to a part are received, that part will sound.
3. Switching patterns
When you switch patterns, Program Change and Bank Select messages [Bn, 00, mm] (control change #00), [Bn, 20, bb] (control change #32) (mm: bank number upper byte, bb: bank number lower byte, together allowing 16,384 banks to be selected) will be transmitted.
If a Program Change is received on the MIDI channel of the EM-1, patterns will be switched within the same group (e.g., from A.01 to b.64). After a Bank Select has been received, the next-received Program Change will be able to switch to a pattern of a different group (e.g., from A.01 to C.01).
Transmission and reception of Program Change messages can be controlled by the Global mode MIDI Filter setting.
Bank Select
| MSB LSB | Program Change Pattern number |
| 00 00 0...127 | A.01...b.64 |
| 00 01 0...127 | C.01...d.64 |
4 Applying pitch bend
The EM-1 does not transmit pitch bend messages [En, vv, vv] (vv, vv: lower and upper places of the value, together expressing a range of 16384 steps where 8192 [vv, vv=00H, 40H] is the center value). However when the EM-1 receives pitch bend messages, a pitch bend effect will be applied to the synth parts. The range of the pitch bend can be specified by editing the Global mode Pitch Bend Range parameter.
5. Using NRPN messages to edit
NRPN (Non-Registered Parameter Number) is a category of messages for which each manufacturer is free to assign a function to a parameter number and use it as desired. NRPN messages are assigned to each knob and key of the EM-1's
Effect/Delay section (except for Delay Edit). To edit, first use NRPN (LSB) [Bn, 62, rr] and NRPN (MSB) [Bn, 63, mm] (control change #98 and 99) (rr, mm: lower and upper bytes of the parameter no.) to select the parameter. Then transmit Data Entry (MSB) [Bn, 06, mm] and Data Entry (LSB) [Bn, 26, vv] (control change #06 and 38) (mm, vv: upper and lower bytes of the value, together expressing 16,384 steps) to set the value. The EM-1 uses only the MSB value (128 steps) of the Data Entry message.
6. If "stuck notes" occur
If for some reason a note fails to stop sounding, you can usually switch modes to stop the sound. If a note played via MIDI fails to stop, you can simultaneously press the Shift key and the Stop/Cancel key to perform a MIDI Reset.
7. About synchronization
Two or more sequencers can be connected via MIDI and made to playback in synchronization. Messages used for synchronization (realtime messages) include Timing Clock [F8], Start [FA], Continue [FB], and Stop [FC]. In a synchronized system, one synthesizer (the master) will transmit these messages, and the other sequencer(s) (the slave(s)) will receive these messages. The slave devices will playback according to the tempo specified by the Timing Clock messages transmitted by the master. Twenty-four Timing Clock messages are transmitted for each quarter note. When the EM-1's Global mode parameter Clock is set to INT, it will be the master device, and will transmit these realtime messages. When Clock is set to EXT, it will be the slave device, and will receive these realtime messages. However even when Clock is set to EXT, the EM-1 will operate according to its own internal clock if no Timing Clock messages are being received. The Start message specifies when playback will begin. When the Start/Pause key is pressed on the master device, it will transmit a Start message. Slave devices that receive this Start message will synchronize to the Timing Clock messages subsequently received, and will begin playback from the beginning. If the Start/Pause key is pressed on the master devices when it is paused, the master will transmit a Continue message. When a slave device receives the Continue message, it will resume playback from the point where it is currently stopped. If the Stop key is pressed during playback, the master will transmit a Stop message. Slave devices will stop playback when they receive a Stop message.
8. Synchronization in Song mode
In Song mode, the EM-1 can transmit and receive Song Select and Song Position Pointer messages. When you switch songs, a Song Select [F3 ss] message will be transmitted (ss: song number, where one of 128 songs can be selected. On the EM-1 you can select 16 songs.) If the EM-1 receives a Song Select message in Song mode, it will switch songs. Transmission and reception of Song Select messages can be restricted by the MIDI Filter settings of Global mode. If you change the current position on the master device (i.e., the device whose Clock is set to INT) when the song is stopped, a Song Position Pointer message [F2 pp pp] will be transmitted. (pp: the number of MIDI beats from the beginning of the song; i.e., the number of Timing Clocks divided by six.)
Song Position Pointer indicates the location at which the sequencer is currently stopped. When Song Position Pointer is received in Song mode by a slave device (i.e., a device whose Clock is set to EXT), it will change the location at which its song is currently stopped to match the location of the master. However on the EM-1, the length of each pattern may be different, so the master and slave will not necessarily be in the same location. When the Start/Pause key is pressed on the master device, a Continue message is transmitted, and the song will begin playback from the currently selected position. When the slave device receives the Continue message, it will synchronize to the Timing Clock messages and begin playback from the current point in the song. In the same way as synchronizing the playback from the beginning of the song, you can specify the location at which playback will start, and then playback in synchronization. If you use the dial or Select keys to fast-forward or rewind while the song is playing, Song Position Pointer messages will not be transmitted. Be aware that if you perform these operations during synchronized playback, the synchronization will be lost. Also, even if Song Position Pointer messages are received during playback, the playback location will not change.
9. About system exclusive messages
Manufacturers are free to use system exclusive messages in any way they choose, and these messages are used mainly to transmit and receive parameters that are specific to particular devices, such as sound data and editing data.
The system exclusive message format of the EM-1 is [F0, 42, 3n, 61, ... F7] (n: exclusive channel).
However, some system exclusive messages have been defined for use in a specific way, and these are called "universal system exclusive messages."
Of the various types of universal system exclusive message, the EM-1 supports the following two.
- When an Inquiry Message Request [F0, 7E, nn, 06, 01, F7] is received, the EM-1 will transmit an Inquiry Message [F0, 7E, nn, 06, 02, (9 bytes), F7] that means "I am a Korg EM-1, my system version is ..."
- When a Master Volume [F0, 7F, nn, 04, 01, vv, vv, F7] message is received, the volume of the entire system will change.
The exclusive channel is the same as the MIDI channel of synth part 1
10. Transmitting sound setting data (Data Dump)
Song, Pattern, or Global data can be transmitted as MIDI exclusive data, and stored on an external device. This data is transmitted by the Global mode Dump command. The channel used for transmission and reception of this data is set by the Global mode MIDI ch setting. Data dumps are also transmitted when a Data Dump Request message is received.
11. Editing sounds etc.
By sending MIDI exclusive data dumps, you can rewrite all patterns or individual programs. By using NRPN messages in Pattern mode, you can edit the knobs that are active for each part.
Troubleshooting
The display does not light up when I press the Power switch!
• Is the AC adapter connected?
- Is the AC adapter plugged into an AC outlet?
No sound!
- Is your amp, mixer, or headphones connected to the correct jack? (Can you playback a pattern? If so, the connections are correct.)
- Are your amp or mixer powered-on and set correctly?
- Is the master volume knob of the EM-1 raised?
Sound does not stop!
- When a pattern is played back, it will continue playing repeatedly. When you are finished listening to a pattern, press the Stop/Cancel key (p.14).
Sounds or operations are different than when I edited!
- Did you perform the Write operation after editing? (p.41, 45) After you have edited, you must perform the Write operation before switching songs or patterns, or turning off the power.
• Did you edit the selected pattern or song after writing it?
Can't control via MIDI!
- Is the MIDI cable connected correctly?
When playing the EM-1 from an external device
- Has the EM-1 been set to receive MIDI data on the channel on which the data is being transmitted? (p.47)
- Is the Global mode MIDI Channel parameter set to the desired channel? (p.47)
- Are the Global mode MIDI Filter settings set appropriately? (p.47)
When playing an external device from the EM-1
- Does the MIDI channel of the EM-1 match the MIDI channel of the receiving device? (p.47)
Cannot write a pattern or song!
- Is the Global mode Protect setting turned "on"? (p.48)
Playing the step keys does not sound the specified sound!
- After editing the sound of a part, did you perform the Write operation? (p.41)
- Is the Keyboard function turned on?
- Is a motion sequence being used? (p.34)
Error messages
Er.1
Er.2
Data could not be written.
When writing a song to a song of a different number, the maximum number of recordable events was exceeded. Please erase event data to free up memory (p.45).
Er.9
Protect was turned "on" for the memory into which you attempted to write data. In Global mode, turn the Protect setting "oFF" (p.48).
Full
When event-recording on a song, event data memory has filled up. If you attempt to record additional events, the "memory full" message will appear immediately. Please erase event data to free up memory (p.45).
Restoring the factory set data
The pattern and song data with which the EM-1 is shipped from the factory is referred to as the "preloaded data," and you can restore this preloaded data back into the memory of the EM-1.
When you do this, the patterns you created and the songs which use these patterns will be erased, and replaced by the preloaded data. If you wish to keep the patterns and songs you created, you must save the data on a data filer etc. before you load the preloaded data.
- While simultaneously pressing the Transpose key and the Write key, turn on the power.
- The display will indicate "PLd," and the Play/Pause key will blink.
- To load the factory preloaded data, press the blinking Play/Pause key.
This will require approximately 30 seconds.
To cancel, press the Stop/Cancel key.
When loading is complete, the EM-1 will return to its initial state. After several seconds the display will indicate pattern number "A.01," and the EM-1 will be in Pattern mode.

Never turn off the power during the Load process. The data may be damaged.

Cancel
Specifications
Number of parts:
12 parts
Synth parts x 2
Drum parts x 8
Synth Accent part
Drum Accent part
Memory capacity:
256 patterns, 16 songs
Master effects: Tempo Delay,
Normal, Motion Sequence
Insert effects: 11 Type
Reverb, Flanger/Chorus, Phaser, Ring Modulator, Pitch Shifter, Compressor, Distortion, Decimator, Resonator, Filter, Modulation Delay
Sequencer: Pattern
Maximum 64 steps for each part, Motion sequence,
Synth part: 3 parameters,
Drum part: 2 parameters,
Accent part: 1 parameter,
64 events
Song
Maximum 256 patterns per song
Maximum approximately 35,700 events
for event recording
Connectors: PHONES
Stereo phone plug
Nominal level: 35 mW
Load impedance: 33 ohms
OUTPUT (L/MONO, R)
Phone jacks: mono x 2
Nominal output level: -10 dBu
Output impedance: 1 k-ohms
MIDI (IN, OUT, THRU)
Power supply: DC 9 V (AC adapter included)
Power consumption:
5 W
Dimensions: 300 (W) x 222.5 (D) x 55.4 (H) mm
(with rubber feet)
Weight: 1.25 kg
* Specifications and appearance are subject to change with out notice for improvement.
Index
A
Accent 34
Accent key---- 10
Accent part ----15, 26
AMP EG----27
Amp EG 9,28
Assign
Pattern Set---- 41
Wave 27
B
Bank Select message ---- 49
Beat 31
Beat LED 8
Bend Range---- 47
C
Check
Motion sequence data ---- 35
Song event data 45
Chord split 27
Clear
Motion 38
Part 38
Song 43
Common section---- 8
Compressor 29
Connection 7
Connector section ---- 12
Copy
Data 37
Part 37
Sound 37
Cursor key 8
Cutoff 10,28
D
Data
Copy----37
Dump 50
Decimator---- 30
Delay
Edit 17
Edit Key 9
Time 30
Delete
Event data 45
Pattern 44
Depth 30
Diagram 13
Distortion 29
Drive 10,28
Drum part----15, 26
Dump data---- 48
E
Edit
Delay 17,30
drum part 16
Effect 17,29
Motion sequence data ---- 39
Note 32
Part 16
Phrase pattern 18
Rhythm pattern 18
Song 44
Sound of a part ---- 18, 27
Synth part 16
Effect----28, 29
Effect Edit---- 17
Effect Key 9
Effect/Delay section 9
EG Intensity ----10, 28
EG Time----9, 27, 28
Erase 19,38
Error message---- 51
Event Recording 45
F
Factory set data 51
Fast-forward---- 42
Filter---- 30
Flanger/Chorus 29
G
Gate time 33
Glide 9,28
Global mode 46
H
Headphone 12
|
Insert Pattern 44
K
Keyboard function 15
Keyboard Key---- 11
L
Length 21,31
Level 9, 27, 28
Listen
Pattern 14
Song 13
M
MASTER VOLUME 8
Metronome 46
MIDI
Channel 47, 49
Clock 46
Connector 12
Filter 47
Implementation Chart ---- 55
LED 8
Note number 47
MIDI Implementation Chart -- 55
Mode
Global 46
Pattern 25
Song 42
Mode key 8
Modulation Delay 30
Motion Dest. 39
Motion Sequence 22
Motion sequence ---- 28, 30, 34
Motion sequence Key ---- 9
Motion Value 40
Move Data 36
Mute----26
N
Name
Pattern 54
Song 54
Wave 56
Note editing 18
Note number ----33, 47
Note-on/off 49
NRPN---- 49
0
Offset Note 43
Original Value LED 9
P
Pan 9,277,288
Part 15
Accent 15,26
Clear 38
Copy----37
Drum 15,26
Edit 16
Swap 39
Synth 15,26
Part common section ---- 9
Part Mute 26
Part Mute Key 10
Part Select section ---- 10
Pattern
Change 25
Creating 27,32
Delete 44
Insert 44
Listening 14
Name List 54
Play 25
Reset & Play 25
Selecting 25
Pattern mode 25
Pattern Name List ---- 54
Pattern Set 23
Chain Play 40
Play 40
Register 41
Pattern Set key 11
Phaser----29
Pitch----9, 27, 33
Pitch bend 47
pitch bend 49
Pitch Shifter 29
Play
Motion sequence---- 34
Pattern 25
Pattern Set---- 23, 40
Song 42
Position---- 43
Power switch 12
Program Change 49
Protect 48
R
Realtime recording -- 18, 19, 32
Reception---- 48
Recording
Event 45
Motion sequence---- 35
Realtime ----18, 19, 32
Step 18, 20, 32
Reset & Play 25,42
Resonance 10,28
Resonator 30
Rest/Tie Key 10
Reverb----29
Rewind 42
Ring Modulation---- 29
Roll----9,28,32
S
Save
Global 48
Pattern 21,41
Song 45
Scale---- 31
Section
Common 8
Connector 12
Effect/Delay 9
Part common----9
Part Select 10
Sequence Control 10
Step Key 11
Synth filter 10
Select
Part 26
Select LED 11
Sequence Control section ---- 10
Shift Data 36
Shift key 11
Shift Note 36
Smooth 34
Solo 26
Solo key 10
Song 13
Creating 43
Deleting event data 45
Editing 44
Erasing 43
Fast-forward 42
Listening 13
Name List 54
Reset & Play 42
Rewind----42
Select 42
Switching 42
Write 45
Song mode 42
Song Name List 54
Song Play---- 42
Specification 51
Step key---- 11
Step Key section 11
Step Recording ---- 20
Step recording----18, 32
Swap Part 39
Swing 32
Synchronization ---- 24, 46, 49
Synth filter section---- 10
Synth part ----15, 26
System exclusive ---- 50
T
TAP----10
Tap Tempo----14, 25
Tap tempo 42
Target Step 33
Tempo 14, 25, 42
Tempo Lock 26,42
Tempo Lock key----8
Transmission---- 48
Transpose 35
Transpose key 10
Trigger hold 34
Trigger setting 33
Troubleshooting 50
Type 9
W
Wave 27
Wave Name List ---- 56
WRITE
Global 48
Pattern 21,41
Song 45
WRITE key 8

7.Data
Pattern Name List
Style - A.01\~A.32 : Best Selection
A.33\~b.50 : House/Techno
A Bank
* Patterns and initial data for the demo song are assigned to bank d.
* The first pattern of each style is assigned to step keys 1...16 of the Pattern Set function.
b.51\~C.09 : Drum'n'Bass
C.10\~C.38 : R&B/Hip Hop/Trip Hop
b Bank
No. Pattern Name Tempo
| b.01 | 2 Step/UK Garage 11 | 135 |
| b.02 | 2 Step/UK Garage 12 | 138 |
| b.03 | 2 Step/UK Garage 13 | 133 |
| b.04 | 2 Step/UK Garage 14 | 135 |
| b.05 | House 3 124 | |
| b.06 | House 4 122 | |
| b.07 | House 5 132 | |
| b.08 | House 6 125 | |
| b.09 | House 7 129 | |
| b.10 | House 8 130 | |
| b.11 | House 9 124 | |
| b.12 | Chicago House | 124 |
| b.13 | NY Hard House 2 132 | |
| b.14 | NY Hard House 3 136 | |
| b.15 | Minimal 3 139 | |
| b.16 | Minimal 4 139 | |
| b.17 | Minimal 5 135 | |
| b.18 | Minimal 6 137 | |
| b.19 | Minimal 7 136 | |
| b.20 | Minimal 8 130 | |
| b.21 | Minimal 9 132 | |
| b.22 | Techno 1 | 134 |
| b.23 | Techno 2 | 130 |
| b.24 | Techno 3 | 128 |
| b.25 | Techno 4 | 140 |
| b.26 | Techno 5 | 137 |
| b.27 | Techno 6 | 132 |
| b.28 | Techno 7 | 119 |
| b.29 | Electro 1 | 128 |
| b.30 | Electro 2 | 131 |
| b.31 | Tek House 1 | 125 |
| b.32 | Tek House 2 | 135 |
| b.33 | Tek House 3 | 130 |
| b.34 | Tek House 4 | 130 |
| b.35 | Tek House 5 | 140 |
| b.36 | Tek House 6 | 126 |
| b.37 | Tek House 7 | 130 |
| b.38 | Progressive House 1 127 | |
| b.39 | Progressive House 2 129 | |
| b.40 | Progressive House 3 124 | |
| b.41 | Progressive House 4 129 | |
| b.42 | Euro Hard House 1 | 140 |
| b.43 | Euro Hard House 2 | 136 |
| b.44 | Euro Hard House 3 | 135 |
| b.45 | Euro Hard House 4 | 142 |
| b.46 | Euro Hard House 5 | 137 |
| b.47 | Hardcore 1 | 135 |
| b.48 | Hardcore 2 | 151 |
| b.49 | Happy Hardcore 2 164 | |
| b.50 | Gabba 2 | 170 |
| b.51 | Drum'n'Bass 1 | 172 |
| b.52 | Drum'n'Bass 2 | 172 |
| b.53 | Drum'n'Bass 3 | 172 |
| b.54 | Drum'n'Bass 4 | 173 |
| b.55 | Drum'n'Bass 5 | 175 |
| b.56 | Jazzstep 1 | 178 |
| b.57 | Jazzstep 2 | 168 |
| b.58 | Jazzstep 3 | 170 |
| b.59 | Cyber/Tech Step 5 | 175 |
| b.60 | Cyber/Tech Step 6 | 170 |
| b.61 | Cyber/Tech Step 7 | 170 |
| b.62 | Cyber/Tech Step 8 | 170 |
| b.63 | Cyber/Tech Step 9 | 170 |
| b.64 | Cyber/Tech Step 10 | 175 |
C.39\~C.56 : Nu Skool Breaks/Big Beat
C.57\~C.64 : Other
C Bank
No. Pattern Name Tempo
| C.01 Cyber/Tech Step 11 | 170 |
| C.02 Cyber/Tech Step 12 | 165 |
| C.03 Digital D'n'B 3 | 190 |
| C.04 Artcore 1 | 175 |
| C.05 Artcore 2 | 164 |
| C.06 Artcore 3 | 177 |
| C.07 Jump Up 1 | 178 |
| C.08 Jump Up 2 | 174 |
| C.09 Breaks | 147 |
| C.10 R&B 3 | 76 |
| C.11 R&B 4 | 109 |
| C.12 R&B 5 | 90 |
| C.13 R&B 6 | 96 |
| C.14 R&B 7 | 77 |
| C.15 R&B 8 | 96 |
| C.16 R&B 9 | 89 |
| C.17 R&B 10 | 92 |
| C.18 R&B 11 | 103 |
| C.19 Hip Hop 4 | 92 |
| C.20 Hip Hop 5 | 88 |
| C.21 Hip Hop 6 | 93 |
| C.22 Hip Hop 7 | 83 |
| C.23 Hip Hop 8 | 82 |
| C.24 Hip Hop 9 | 89 |
| C.25 Hip Hop 10 | 80 |
| C.26 Hip Hop 11 | 91 |
| C.27 Hip Hop 12 | 113 |
| C.28 Hip Hop 13 | 86 |
| C.29 Hip Hop 14 | 91 |
| C.30 Hip Hop 15 | 96 |
| C.31 Trip Hop 1 | 75 |
| C.32 Trip Hop 2 | 87 |
| C.33 Trip Hop 3 | 90 |
| C.34 Trip Hop 4 | 81 |
| C.35 Trip Hop 5 | 82 |
| C.36 Trip Hop 6 | 88 |
| C.37 Trip Hop 7 | 95 |
| C.38 Trip Hop 8 | 90 |
| C.39 Nu Skool Breaks 3 | 133 |
| C.40 Nu Skool Breaks 4 | 132 |
| C.41 Nu Skool Breaks 5 | 130 |
| C.42 Nu Skool Breaks 6 | 134 |
| C.43 Nu Skool Breaks 7 | 122 |
| C.44 Nu Skool Breaks 8 | 138 |
| C.45 Nu Skool Breaks 9 | 133 |
| C.46 Nu Electro 1 | 122 |
| C.47 Nu Electro 2 | 129 |
| C.48 Nu Electro 3 | 130 |
| C.49 Nu Electro 4 | 135 |
| C.50 Nu Electro 5 | 120 |
| C.51 Big Beat 2 | 138 |
| C.52 Big Beat 3 | 129 |
| C.53 Big Beat 4 | 141 |
| C.54 Big Beat 5 | 140 |
| C.55 Hardcore Breakbeat | 130 |
| C.56 Industrial | 81 |
| C.57 Disco 1 | 110 |
| C.58 Disco 2 | 107 |
| C.59 Disco 3 | 120 |
| C.60 Funk 1 | 90 |
| C.61 Funk 2 | 91 |
| C.62 Latin House 1 | 132 |
| C.63 Latin House 2 | 128 |
| C.64 Reggae | 90 |
S.03: Nu Skool Breaks Demo
S.04: 2 Step/UK Garage Demo
S.05: R&B/Hip Hop Demo
S.06...S.16: Blank
All Patterns and All Songs - ©2001 KORG Inc. All rights reserved.
| Function ... | Transmitted Recognized Remarks | |||
| Basic Default 1 – 16 1 – 16 channel Changed 1 – 16 1 – 16 | Memorized | |||
| Mode Messages : Altered | Default 3Altered | .······ | ||
| Notenumber : True voice | 0–127······ | 0–1270–127 | ||
| Velocity Note ONNote OFF | O 9n, v=30–127. | O 9n, v=1–127. | ||
| After PolyphonicTouch Channel | . | . | ||
| Pitch Bender | . | O | *C | |
| Control Change | 0,3298, 998121 | OOOO | OOOO | Bank Select(MSB,LSB) *PNRPN(LSB,MSB) *CData Entry(MSB) *CReset All Controllers |
Mode 1: OMNI ON, POLY Mode 2: OMNI ON, MONO O : Yes
Mode 3: OMNI OFF, POLY Mode 4: OMNI OFF, MONO · : No
Wave Name List
| Drum Wave NameNo. Name | Drum Wave NameNo. Name | Drum Wave NameNo. Name | Synth Wave NameNo. Name |
| 1 BD-Dark | 51 Clap-Hardhouse | 101 Agogo | 1 Saw-ProSynth |
| 2 BD-99 1 | 52 Clap-R&B | 102 Triangle | 2 Boost Saw |
| 3 BD-99 2 | 53 HH-99 CI | 103 Tambourine-Acc | 3 Pulse 15%-MG |
| 4 BD-Analog | 54 HH-99 Op | 104 Sleigh Bell | 4 Pulse 25%-MG |
| 5 BD-ZAP | 55 HH-88 CI | 105 Cabasa-Normal | 5 Square |
| 6 BD-99 Dist 1 | 56 HH-88 Op | 106 Cabasa-Dist Up | 6 Triangle-MG |
| 7 BD-99 Dist 2 | 57 HH-R&B CI | 107 Cabasa-Dist Down | 7 Sine |
| 8 BD-99 Dist 3 | 58 HH-R&B Op | 108 Shaker | 8 Sine Kick Bass |
| 9 BD-Squash | 59 HH-Std 1 CI | 109 Guiro-Short | 9 Dark Bass |
| 10 BD-88 1 | 60 HH-Std 1 Op | 110 Guiro-Long | 10 Xmod Bass |
| 11 BD-88 2 | 61 HH-Std 2 CI | 111 Samba Whistle | 11 Additive Sine |
| 12 BD-Dry 1 | 62 HH-Std 2 Op | 112 Tabla-Baya Ghe | 12 DWGS Bell |
| 13 BD-Dry 2 | 63 HH-Crisp CI | 113 Tabla-Baya Mute 1 | 13 DWGS FM Bass |
| 14 BD-Dry 3 | 64 HH-Crisp Op | 114 Tabla-Baya Mute 2 | 14 HPF Saw-MS2k |
| 15 BD-Dry 4 | 65 HH-Old CI | 115 Tabla-Na | 15 SynthBass Oct |
| 16 BD-Hip | 66 HH-Old Op | 116 Tabla-Tin | 16 Square Oct Mix |
| 17 BD-R&B | 67 HH-Big Chunk CI | 117 Tabla-Mute 1 | 17 Saw Oct Mix |
| 18 BD-Ambi | 68 HH-Big Chunk Op | 118 Tabla-Mute 2 | 18 DWGS Wire |
| 19 BD-Defness | 69 Ride-99 | 119 Djembe-Open | 19 DWGS Digital |
| 20 BD-Defness/OHH | 70 Ride-Edge 1 | 120 Djembe-Mute | 20 5th Sine |
| 21 BD-Jungle | 71 Ride-Edge 2 | 121 Djembe-Slap | 21 5th Square |
| 22 BD-Jungle/Crash | 72 Crash-99 | 122 Udu | 22 5th Saw |
| 23 SD-99 1 | 73 Crash-Normal | 123 Taiko-Open | 23 5th Stab Saw |
| 24 SD-99 2 | 74 Tom-99 | 124 Taiko-Rim | 24 Detuned Saw-A26k |
| 25 SD-88 1 | 75 Tom-88 | 125 Tsuzumi | 25 Unison Saw-MS2k |
| 26 SD-88 2 | 76 Tom-Std Hi | 126 Zap-ER | 26 Sync Triangle-MS2k |
| 27 SD-Analog R&B | 77 Tom-Std Lo | 127 Zap-MG | 27 Sync Saw-MS2k |
| 28 SD-77 | 78 Tom-Std Floor | 128 Synth SE-MG | 28 HPF Sweep-MS2k |
| 29 SD-Disco | 79 Tom-Jazz Hi Rim | 129 Synth SE-MS 1 | 29 Cyber Bass-Z1 |
| 30 SD-Dry 1 | 80 Tom-Jazz Hi | 130 Synth SE-MS 2 | 30 Ring Bass-MS2k |
| 31 SD-Dry 2 | 81 Tom-Jazz Floor | 131 Filtered Perc | 31 Vibrato Sine |
| 32 SD-Dry 3 | 82 Bongo-Hi Op | 132 Synth Perc-ER 1 | 32 Reso Noise |
| 33 SD-Dry 4 | 83 Bongo-Slap | 133 Synth Perc-ER 2 | 33 NRG Hit |
| 34 SD-Ambi 1 | 84 Bongo-Lo 1 | 134 Synth Perc-MG 1 | 34 Ac.Bass |
| 35 SD-Ambi 2 | 85 Bongo-Lo 2 | 135 Synth Perc-MG 2 | 35 Finger Bass |
| 36 SD-Piccolo 1 | 86 Conga-Hi Slap 1 | 136 Synth Perc-MG 3 | 36 Pick Bass-M1 |
| 37 SD-Piccolo 2 | 87 Conga-Hi Slap 2 | 137 Filtered Noise | 37 Slap Bass Mix |
| 38 SD-Hip | 88 Conga-Hi MtSlap | 138 Reverse-BD | 38 Organ-M1 |
| 39 SD-Brash Dist | 89 Conga-Lo Slap 1 | 139 Reverse-SD 1 | 39 Combo Organ |
| 40 SD-Crackle | 90 Conga-Lo Slap 2 | 140 Reverse-SD 2 | 40 DWGS Clav |
| 41 SD-Jungle | 91 Conga-Lo MtSlap | 141 Reverse-Crash | 41 Voice-VS |
| 42 SD-R&B 1 | 92 Timbales-Hi Rim | 142 Scratch-1 | 42 DWGS Voice |
| 43 SD-R&B 2 | 93 Timbales-Hi Edge | 143 Scratch-2 | 43 Synth Chord Set |
| 44 SD-R&B 3 | 94 Timbales-Lo Rim | 144 Scratch-3 | 44 Pad Chord |
| 45 SD-R&B 4 | 95 Timbales-Lo Open | 45 M1 Piano Chord Set | |
| 46 SD-Rim 1 | 96 Timbales-Paila | 46 E.Piano Chord Set | |
| 47 SD-Rim 2 | 97 Claves | 47 Guitar Chord Set | |
| 48 SD-88 Rim | 98 Cowbell | 48 Organ Chord | |
| 49 Clap-99 | 99 Cha Cha Bell | 49 Vibe Chord | |
| 50 Clap-88 | 100 Mambo BellDrum | 50 Noise |
NOTICE
KORG products are manufactured under strict specifications and voltages required by each country. These products are warranted by the KORG distributor only in each country. Any KORG product not sold with a warranty card or carrying a serial number disqualifies the product sold from the manufacturer's/distributor's warranty and liability. This requirement is for your own protection and safety.
- To ensure long, trouble-free operation, please read this manual carefully. Precautions
- Location
- Power supply ⊕-⊖
- Interference with other electrical devices
- Handling
- Care
- Keep this manual
- Keeping foreign matter out of your equipment
- THE FCC REGULATION WARNING (for U.S.A.)
- CE mark for European Harmonized Standards
- Concerning data
- Contents
- Introduction ...... 6
- Front and rear panel 8
- Basic operation (Quick Start)....13
- Pattern mode .....25
- Playing a pattern (Pattern Play) 25
- Creating a pattern 27
- Motion sequence 34
- Convenient functions for editing patterns.... 35
- Editing motion sequence data 39
- Pattern Set.... 40
- Saving a pattern (WRITE) 41
- Song mode ....42
- Global mode ....46
- Appendices......49
- Introduction
- Main features
- The data you create on the EM-1
- Make connections and play!
- Example connections
- Preparing to play
- Front and rear panel
- Common section
- MASTER VOLUME
- Tempo Lock
- Display
- Dial
- MIDI (LED)
- Beat (LED)
- [▲][▼] (cursor keys)
- Matrix
- Mode keys
- WRITE key
- Effect/Delay section
- Type
- Original Value (LED)
- Delay Edit key
- Motion Seq (motion sequence) key
- Edit 1/Time
- Edit2/Depth
- Part common section
- Motion Seq (motion sequence)
- Amp EG
- Roll
- Effect
- EG Time
- Pitch/Glide
- Level
- Pan (panpot)
- Synth filter section
- Part Select section
- Sequence Control section
- Step Key section
- Select keys
- Select LEDs
- Step keys 1...16
- Keyboard, Pattern Set key
- Shift key
- Connector section
- Power switch
- DC 9V
- Adapter cable holder
- MIDI connectors
- L/MONO, R (line output) jacks
- (headphone jack)
- Basic operation (Quick Start)
- Conceptual diagram of the EM-1
- Listening to a Song
- What is a Song?
- Listening to Patterns
- What is a Pattern?
- Trying out the functions
- Changing the tempo of a song or pattern
- • Using the dial to change the tempo
- • Using the Tap Tempo key to change the tempo
- Pressing keys to play the sound of a Part
- What is a Part?
- Playing the sound of a drum part
- Playing the sound of a synth part (the Keyboard function)
- Modifying (editing) the sound of a part
- What is a Wave?
- Editing the sound of a drum part
- Editing the sound of a synth part
- Editing the effect or delay
- Playing the sound of a part along with a song or pattern
- Editing the sound of a part, effect, or delay while hearing a song or pattern
- Modifying (editing) a rhythm or phrase pattern
- Rhythm patterns and phrase patterns
- Realtime recording
- Erase
- Step Recording
- Using the step keys to create a drum part rhythm
- Using the step keys to create a synth part phrase
- What is Length?
- Saving a pattern that you create
- Using a Motion Sequence
- What is a Motion Sequence?
- Playing with Pattern Set
- What is Pattern Set?
- Using the EM-1 as a tone generator module
- Synchronizing the playback with other ELECTRIBE models
- Pattern mode
- Selecting a pattern
- Pattern A.01...d.64
- Setting the playback tempo
- Playing a pattern (Pattern Play)
- The timing at which patterns will change
- Playing from the beginning of a pattern (Reset & Play)
- About the tempo when you switch patterns (Tempo Lock)
- Selecting a part
- Drum parts
- Synth parts
- Accent parts
- The Part Mute function
- The Part Solo function
- Creating a pattern
- Assigning a wave
- Wave (Drum parts) off, 1...144
- (Synth parts) off, 1...50
- Chord splits
- Editing the sound of a part
- Drum part
- Synth part
- Accent part
- EG Time 0...127
- Pitch -64...63
- Level 0...127
- Pan L64...r63
- Amp EG
- Roll
- Effect
- Motion Seq (motion sequence)
- Cutoff 0...127
- Resonance 0...127
- EG Int (EG intensity) -64...63
- Drive 0 ... 127
- Glide 0...127
- Effect types and parameters
- Reverb
- Flg./Cho. (flanger/chorus)
- Phaser
- Ring Mod. (ring modulation)
- Pitch Shifter
- Compressor
- Distortion
- Decimator
- Edit 1 \_ Sampling frequency 0...127
- Edit 2 \_ Number of sampling bits 0...127
- Resonator
- Edit 1 \_ Cutoff frequency 0...127
- Edit 2 \_ Resonance 0...127
- Filter
- Mod. Delay (modulation delay)
- Edit 1 \_ Time 0...127
- Edit 2 \_ Depth 0...127
- DELAY
- Time (delay time) 0...127
- Depth 0...127
- Length, Scale/Beat settings
- Setting the Length
- Setting the Scale/Beat
- Swing settings
- 50...75
- Setting the Roll Type
- 2, 3, 4
- • Realtime recording
- - Step recording
- • Note edit (only for a phrase pattern)
- Note editing
- Selecting the step (Target Step)
- Step Rec 1.01...4.16
- Changing the trigger settings
- Changing the note number (pitch)
- Note.No C1...G9
- Changing the gate time
- Adding accents to the pattern (Accent)
- Motion sequence
- Playing a motion sequence
- Smooth:
- Trig Hold (trigger hold):
- Recording a motion sequence
- Checking motion sequence data
- Convenient functions for editing patterns
- Transposing a phrase (Transpose)
- Moving data within a part (Move Data)
- Shift Data -16...16
- With a setting of 3
- With a setting of -2
- Shift Note -24...24
- Copying a part (Copy Part)
- Data Copy within a pattern
- Copying the sound of a part (Copy Sound)
- Erasing motion sequence data from the part, effect, or delay (Clear Motion)
- Erasing pattern data from a part
- Erasing data during playback or recording (Erase)
- Erasing all data from a part (Clear Part)
- Exchanging data between parts (Swap Part)
- Editing motion sequence data
- Selecting a motion sequence
- Motion Dest. EGt(EG Time)...ti n(Time)
- Editing the parameter values of a motion sequence
- Pattern Set
- Using Pattern Set to perform (Pattern Set Play)
- Chain Play of pattern sets
- Assigning a pattern to a Pattern Set
- Saving a pattern (WRITE)
- Song mode
- Selecting a song
- • Using the dial to set the tempo
- • Using the tap tempo key to set the tempo
- • Using the Tempo Lock key to fix the song tempo
- Playing a song (Song Play)
- What is Position?
- Fast-forward or rewind a song
- Switching songs
- Playing from the beginning of a position or song (Reset & Play)
- Creating a song
- Creating a song from scratch
- Erasing song data (Clear Song)
- Specifying a pattern for each position
- Specifying the Note of each pattern
- Note Ofs. -24...24
- Editing a song
- Inserting a pattern at a specified position (Insert Pattern)
- Deleting a pattern from a specified position (Delete Pattern)
- Changing the pattern for a specific position
- Recording knob movements or your performance in a song (Event Recording)
- Deleting event data from a song
- Checking for song event data
- Saving a song (WRITE)
- Global mode
- Metronome settings
- Metronome oFF, r-0, r-1, r-2, on
- Synchronizing the EM-1 with external MIDI devices (MIDI Clock)
- Clock int, Ext
- Synchronizing the EM-1 to a master external MIDI device (Ext)
- Synchronizing an external MIDI device to the EM-1 as master (int)
- Setting the MIDI channel of each part (MIDI ch)
- Setting the MIDI note number of a drum part
- Drums Note No. C-1...G9
- MIDI filter settings
- Adjusting the pitch bend range
- Transmit/receive dump data
- Dump Pt. Rt. At. Bt Pt. C, Pt. d, SnG, ALL
- Transmission
- Reception
- Memory Protect (Protect)
- Saving your changes in Global mode (WRITE)
- Appendices
- About MIDI
- MIDI channels
- Note-on/off
- Switching patterns
- Applying pitch bend
- Using NRPN messages to edit
- If "stuck notes" occur
- About synchronization
- Synchronization in Song mode
- About system exclusive messages
- Transmitting sound setting data (Data Dump)
- Editing sounds etc.
- Troubleshooting
- The display does not light up when I press the Power switch!
- No sound!
- Sound does not stop!
- Sounds or operations are different than when I edited!
- Can't control via MIDI!
- When playing the EM-1 from an external device
- When playing an external device from the EM-1
- Cannot write a pattern or song!
- Playing the step keys does not sound the specified sound!
- Error messages
- Er.1
- Er.2
- Er.9
- Full
- Restoring the factory set data
- Specifications
- Index
- A
- B
- C
- D
- E
- F
- G
- H
- |
- K
- L
- M
- N
- 0
- P
- R
- S
- T
- W
- Pattern Name List
- NOTICE
Brand : KORG
Model : Electribe M
Category : DJ Equipment