
KW - Sweeper STIHL - Free user manual and instructions
Find the device manual for free KW STIHL in PDF.


| Type | PowerSweep attachment |
| Model | KW |
| Weight (attachment only) | 10.5 lbs (4.8 kg) |
| Weight (with interchangeable attachment) | 11.9 lbs (5.4 kg) |
| Sweeper drum width | 22 in (57 cm) |
| Number of rubber paddles per drum | 12 |
| Number of drums | 2 |
| Compatible power tools | STIHL FC 95, FC 110, FH 75, FS 65-4, FS 83, FS 85, FS 90, FS 100, FS 110, HL 73, HL 75, HL 100, KW 85 |
| Gearbox function | Reduces engine RPM to lower sweeper drum speed |
| Drive tube protection | Rubber sleeve |
| Loop handle position | Approx. 8 in (20 cm) forward of control handle |
| Carrying harness | Adjustable shoulder strap with spring hook |
| Intended use | Sweeping sand, stones, gravel, leaves, snow on grass, concrete, asphalt; removing standing water |
| Fuel type | Oil-gasoline mixture (see power tool manual) |
| Required personal protective equipment | Safety glasses, hearing protection, sturdy boots, gloves, long pants |
| Starting procedure | Follow powerhead manual; sweeper drums may rotate at start |
| Operating speed | Push at walking pace; do not run at full throttle off load |
| Maintenance intervals | Check sweeper belts condition; replace in pairs; inspect rubber sleeve; tighten all fasteners after each use |
| Storage | Empty fuel tank; store dry, high, locked location; out of reach of children |
| Special accessories | Deflector (4602 007 1001), safety glasses, harness, combination wrench |
Frequently Asked Questions - KW STIHL
User questions about KW STIHL
0 question about this device. Answer the ones you know or ask your own.
Ask a new question about this device
Download the instructions for your Sweeper in PDF format for free! Find your manual KW - STIHL and take your electronic device back in hand. On this page are published all the documents necessary for the use of your device. KW by STIHL.
USER MANUAL KW STIHL
natural_image
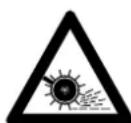
Close-up of a black industrial fan or turbine component with a circular dial labeled 'STHL' and 'STHL', no visible text or symbols beyond the label.Warning!
For safe operation follow all safety precautions in Instruction Manual - improper use can cause serious injury.
Advertencia!
Safety Precautions and
Working Techniques 3
Using the PowerSweep 10
Approved Basic Power Tools 11
Installing the Gearbox 11
Mounting Sweeper Drums 12
Mounting the Loop Handle 13
Fitting Carrying Eye (Clamp) 14
Fitting the Harness 15
Balancing the Machine 15
Starting / Stopping the Engine ..... 16
Operating Instructions 17
Storing the Machine 17
Replacing Sweeper Drum 17
Replacing the Rubber Sleeve ..... 18
Removing the Gearbox 18
Main Parts 19
Specifications 19
Special Accessories 20
Maintenance and Repairs ...... 20
STIHL®
English / USA
Allow only persons who understand this Manual to operate your PowerSweep attachment.
To receive maximum performance and satisfaction from your STIHL
PowerSweep attachment, it is important that you read and understand the maintenance and safety precautions, starting on page 3, before using your PowerSweep attachment.
Contact your STIHL dealer or the STIHL distributor for your area if you do not understand any of the instructions in this Manual.
Warning!
Because a PowerSweep is a power tool, some special safety precautions must be observed to reduce the risk of personal injury.
Careless or improper use may cause serious or even fatal injury.
Always wear proper eye protection.
STIHL's philosophy is to continually improve all of its products. As a result, engineering changes and improvements are made from time to time. If the operating characteristics or the appearance of your PowerSweep attachment differs from those described in this Manual, please contact your STIHL dealer for information and assistance.
Guide to Using this Manual
Important Information
This STIHL attachment may be mounted to different STIHL basic power tools (powerhead with shaft and handle system).
The approved basic power tool models are listed in chapter "Approved Basic Power Tools".

Other combinations of the attachment and non-approved power tools are not permitted since they may result in accidents or serious personal injury.
This instruction manual contains only descriptions of procedures and conditions in which the attachment and power tool combination differs from the basic power tool.
For correct operation of your attachment and power tool combination, also read and observe the appropriate chapters in the instruction manual of the basic power tool you are using.
Pictograms
All the pictograms attached to the machine are shown and explained in this manual.
The operating and handling instructions are supported by illustrations.
Symbols in text
The individual steps or procedures described in the manual may be marked in different ways:
●A bullet marks a step or procedure without direct reference to an illustration.
A description of a step or procedure that refers directly to an illustration may contain item numbers that appear in the illustration.
Example:
Loosen the screw (1)
Lever (2) ...
In addition to the operating instructions, this manual may contain paragraphs that require your special attention. Such paragraphs are marked with the symbols described below:

Warning where there is a risk of an accident or personal injury or serious damage to property.

Caution where there is a risk of damaging the machine or its individual components.

Note or hint which is not essential for using the machine, but may improve the operator's understanding of the situation and result in better use of the machine.

Note or hint on correct procedure in order to avoid damage to the environment.
Safety Precautions and Working Techniques
\* Equipment and features
This instruction manual may refer to several models with different features. Components that are not installed on all models and related applications are marked with an asterisk (*). Such components may be available as special accessories from your STIHL dealer.
Engineering improvements
STIHL's philosophy is to continually improve all of its products. As a result, engineering changes and improvements are made from time to time. If the operating characteristics or the appearance of your machine differ from those described in this manual, please contact your STIHL dealer for assistance.
Therefore some changes, modifications and improvements may not be covered in this manual.

Warning!
Because a power tool equipped with a PowerSweep attachment is a high-speed power tool, special safety
precautions must be observed to reduce the risk of personal injury.

It is important that you read, fully understand and observe the following safety precautions and warnings. Read the owner's manuals and the
safety instructions of your power tool and PowerSweep attachment periodically. Careless or improper use of any power tool may cause serious or fatal injury. Have your STIHL dealer show you how to operate your power tool. Observe all applicable local safety regulations, standards and ordinances.
Warning!
Minors should never be allowed to use a power tool. Bystanders, especially children, and animals should not be allowed in the area where a power tool is in use!
Never let the PowerSweep run unattended.
Warning!
Do not lend or rent your power tool without the owner's manuals. Be sure that anyone using your power tool understands the information contained in these manuals.
Most of these safety precautions and warnings apply to the use of all STIHL PowerSweeps. Different models may have different parts and controls. See the appropriate section of your power tool and PowerSweep attachment owner's manual for a description of the controls and function of the parts of your power tool model.
Safe use of a power tool involves
-
the operator
-
the power tool
-
the use of the power tool.
THE OPERATOR!
Physical Condition
You must be in good physical condition and mental health and not under the influence of any substance (drugs, alcohol, etc.) which might impair vision, dexterity or judgment. Do not operate a power tool when you are fatigued.
Be alert - if you get tired while operating your power tool, take a break. Tiredness may result in loss of control. Working with any power tool can be strenuous. If you have any condition that might be aggravated by strenuous work, check with your doctor before operating a PowerSweep.
Warning!
Prolonged use of a power tool (or other machines) exposing the operator to vibrations may produce whitefinger disease (Raynaud's phenomenon) or carpal tunnel syndrome. These conditions reduce the hand's ability to feel and regulate temperature, produce numbness and burning sensations and may cause nerve and circulation damage and tissue necrosis.
All factors which contribute to white-finger disease are not known, but cold weather, smoking and diseases or physical conditions that affect blood vessels and blood transport, as well as high vibration levels and long periods of exposure to vibration are mentioned as factors in the development of whitefinger disease.
In order to reduce the risk of whitefinger disease and carpal tunnel syndrome, please note the following:
- Most STIHL power tools are equipped with an anti-vibration ("AV") system designed to reduce the transmission of vibrations created by the engine to the operator's hands. An AV system is recommended for those persons using power tools on a regular or sustained basis.
– Wear gloves and keep your hands warm.
- Keep the AV system well maintained. A power tool with loose components or with damaged or worn AV buffers will tend to have higher vibration levels.
- Maintain a firm grip at all times, but do not squeeze the handles with constant, excessive pressure, take frequent breaks.
All the above mentioned precautions do not guarantee that you will not sustain whitefinger disease or carpal tunnel syndrome. Therefore, continual and regular users should monitor closely the condition of their hands and fingers. If any of the above symptoms appear, seek medical advice immediately.
Proper Clothing
Warning!
To reduce the risk of injury, the operator should wear proper protective apparel.
Warning!

Never operate a PowerSweep unless wearing goggles or properly fitted safety glasses with adequate top and side protection
complying with your National Standard.
Warning!

Power tool noise may damage your hearing. Wear sound barriers (ear plugs or ear mufflers) to protect your hearing. Continual and regular
users should have their hearing checked regularly.

Protect your hands with gloves when handling the power tool. Heavy-duty, nonslip gloves improve your grip and protect your hands.

Clothing must be sturdy and snug-fitting, but allow complete freedom of movement.

Avoid loose-fitting jackets, scarfs, neckties, jewelry, flared or cuffed pants, unconfined longhair or moving parts of the unit.
Wear long pants made of heavy material to protect your legs. Do not wear shorts, sandals or go bare foot. Secure hair so it is above shoulder level.

Good footing is important in PowerSweep work. Wear sturdy boots with nonslip soles.

Wear an approved safety hard hat to reduce the risk of injury to your head when there is a danger of head injuries.
For illustrations and definitions of the PowerSweep attachment parts see the chapter on "Parts and Controls"
Warning!
Never modify a PowerSweep attachment in any way. Only attachments supplied by STIHL or expressly approved by STIHL for use with the specific STIHL power tool models are authorized. Although certain unauthorized attachments may be useable for the STIHL power tool, their use may, in fact, be extremely dangerous.
Transporting the PowerSweep
Warning!
Always turn off the engine and make sure the attachment has stopped before putting a PowerSweep down. When transporting your PowerSweep in a vehicle, properly secure it to prevent turnover, fuel spillage and damage to the PowerSweep.
Preparation for the use of the PowerSweep
Adjust carrying harness and hand grip to suit your size before starting work. The machine should be properly balanced as specified in your owner's manual for proper control and less fatigue in operation.
Always check your PowerSweep for proper condition and operation before starting, particularly the throttle trigger, throttle trigger interlock (if applicable), stop switch, sweeper drums, rubber sleeve and harness.
The sweeper must be properly tightened and in safe operating condition. Both sweeper belts must be mounted. The rubber sleeve on the end of the drive tube must be in good condition. Do not operate your PowerSweep with damaged sweeper drums or rubber sleeve. Inspect for loose parts (nuts, screws, etc) and for worn or damaged parts. Replace worn or damaged parts.
Fueling
Your STIHL PowerSweep uses an oil-gasoline mixture for fuel. For further instructions see the safety precautions and the chapter on "Fuel" of the owner's manual of the power tool.
Warning!
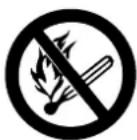
Gasoline is an extremely flammable fuel. If spilled and ignited by a spark or other ignition source, it can cause fire and serious burn injury or property
damage. Use extreme caution when handling gasoline or fuel mix.
Do not smoke or bring any fire or flame near the fuel or PowerSweep.
OPERATING INSTRUCTIONS
The PowerSweep is designed only for sweeping sand, stones, gravel, leaves and snow on grass, concrete or asphalt and removing puddles of water from flat surfaces. To reduce the risk of injury, do not use your PowerSweep for any other purpose.
Starting
Warning!
Your PowerSweep is a one-person machine.
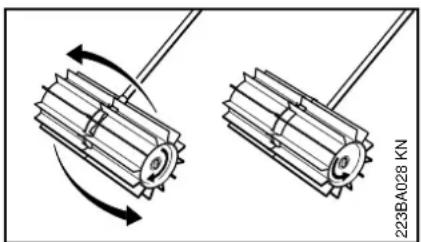
If you start the engine in the "start position" the sweeper belts will rotate when the engine starts - this may set the PowerSweep in motion back towards the operator.
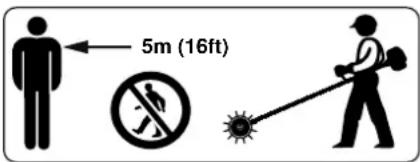
To reduce the risk of injury from thrown objects or contact with the sweeper belts, do not allow any other person within a radius of 5 m (16 ft) of your own position.
Stop the engine immediately if you are approached. Start and operate your PowerSweep without assistance. For specific starting instructions, see the appropriate section of the owner's manual of the power tool. Place the power tool on firm ground or other solid surface in an open area. Maintain a good balance and secure footing.
Working Conditions
Operate and start your power tool only outdoors in a well ventilated area.
Operate the PowerSweep under good visibility and daylight conditions only. Work carefully.
natural_image
Two mechanical components with rotational arrows indicating motion, no text or symbols present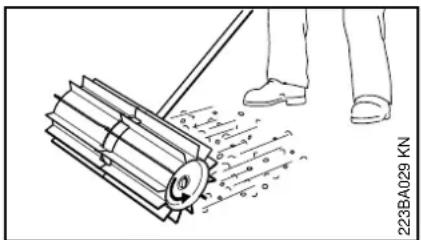
natural_image
Technical line drawing of a broom with motion arrows indicating movement, no text or symbols presentWarning!
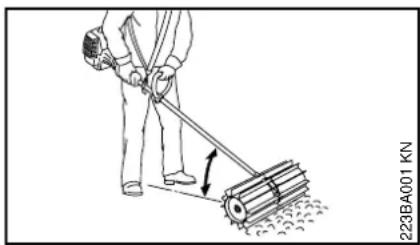
Reversing the PowerSweep will cause debris to be thrown back towards the operator. When reversing the PowerSweep, use lower throttle settings and be aware that thrown debris may also affect your footing.
natural_image
Illustration of a person sweeping debris with a broom, showing motion direction (no text or symbols)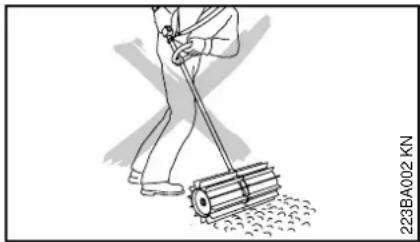
natural_image
Illustration of a person sweeping a surface with a broom (no text or symbols)Warning!
To reduce the risk of injury from loss of control, maintain a low angle to the work surface. A high angle of operation tends to propel the PowerSweep toward you.
Warning!
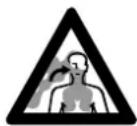
Your PowerSweep produces toxic exhaust fumes as soon as the engine is running. These gases (e.g. carbon monoxide) may be
colorless and odorless. To reduce the risk of serious or fatal injury from inhaling toxic fumes, never run the PowerSweep indoors or in poorly ventilated locations.
Warning!
Use of this product can generate dust and fumes containing chemicals known to cause respiratory disease, cancer, birth defects, or other reproductive harm. If you are unfamiliar with the risks associated with the particular dust or fume at issue, consult your employer, governmental agencies such as OSHA and NIOSH and other sources on hazardous materials. California and some other authorities, for instance, have published lists of substances known to cause cancer, reproductive toxicity, etc.
Control dust and fumes at the source where possible. In this regard use good work practices and follow the recommendations of OSHA/NIOSH and occupational and trade associations. When the inhalation of toxic dust and fumes cannot be eliminated, the operator and any bystanders should always wear a respirator approved by NIOSH/MSHA for the type of dust and / or fumes encountered.
natural_image
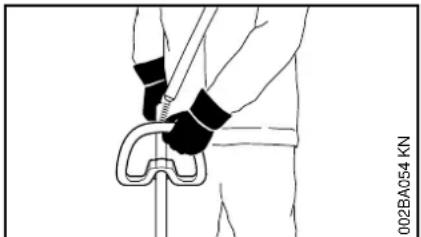
Illustration of a person performing a knose or grip technique (no text or symbols present)Always hold the PowerSweep firmly with both hands. Wrap your fingers tightly around the handles, keeping the handles cradled between your thumb and fore-finger. Keep your hands in this position, to have your PowerSweep under control at all times. Make sure your PowerSweep handles and grip are in good condition and free of moisture, pitch, oil or grease.

Warning!
Never attempt to operate any PowerSweep with one hand. Loss of control of the PowerSweep may result in personal injury.
Special care must be taken in slippery conditions (wet ground, snow).
Examine work area and check for solid objects (such as stones, pieces of metal, etc.) which could be thrown and cause injury or damage the
sweeper flaps or other property (e.g. parked vehicles, windows, etc.).

Warning!
This PowerSweep is to be used at ground level with the sweeper belts parallel to the ground. Use of a PowerSweep above ground level may increase the risk of injury, since the brooming attachment is more fully exposed and the PowerSweep may be more difficult to control.
Do not operate the PowerSweep using the starting throttle lock as you do not have control of the engine speed. See section of your owner's manual on the proper use of the slide control.
If the sweeper belts become clogged or stuck, always turn off the engine and make sure the sweeper belts have stopped, before cleaning.
Important adjustments
Warning!
To reduce the risk of personal injury from loss of control or contact with the running sweeper drums, do not use your PowerSweep with incorrect idle adjustment. At correct idle speed, the sweeper drums should not move. For directions on how to adjust idle speed, see the appropriate section of the owner's manual of the power tool.
If you cannot set the correct idle speed, have your STIHL dealer check your PowerSweep and make proper adjustments and repairs.
MAINTENANCE, REPAIR AND STORING
Use only identical STIHL replacement parts for maintenance and repair. Use of non-STIHL parts may cause serious or fatal injury.
Follow the maintenance and repair instructions in the appropriate section of your owner's manual. Please refer to the maintenance chart at the last pages of this manual.
Warning!
Always stop the engine and make sure that the sweeper belts have stopped before doing any maintenance or repair work or cleaning the PowerSweep. Do not attempt any maintenance or repair work not described in your owner's manual. Have such work performed at your STIHL dealer shop only.
Warning!
Check condition of sweeper belts at regular intervals. Loose particles or pieces of the belts could be thrown and injure the operator or bystanders. To reduce risk of injury from broken parts replace damaged sweeper belts immediately and always in pairs. Do not reuse or attempt to repair damaged or worn sweeper belts.

Warning!
To reduce the risk of fire and burn injuries, check fuel filler cap for leaks at regular intervals. Use the specified spark plug and make sure it and the ignition lead are always in good condition.

Warning!
Never test the ignition system with ignition wire boot removed from spark plug or with unseated spark plug, since uncontained sparking may cause a fire.

Warning!
To reduce the risk of fire and burn injury, use only spark plugs authorized by STIHL. Always press spark plug boot snugly onto spark plug boot of the proper size. (Note: If boot has detachable SAE adapter nut, it must be attached.) A loose connection between spark plug boot and ignition wire connector in the boot may create arcing that could ignite combustible fumes and cause a fire. Keep spark plug clean, and make sure ignition lead is in good condition.

Warning!
Do not operate your PowerSweep if the muffler is damaged, missing or modified. An improperly maintained muffler will increase the risk of fire and hearing loss. Never touch a hot muffler or burn will result. If your muffler was equipped with a spark-arresting screen to reduce the risk of fire (e.g. in the USA, Canada and Australia), never operate your PowerSweep if the screen is missing or damaged. Do not modify or remove any part of the muffler or spark arresting screen. Remember that the risk of forest fires is greater in hot or dry weather.
Tighten all nuts, bolts and screws, except the carburetor adjustment screws, after each use.
Additionally, the daily maintenance schedule for your PowerSweep set forth in your STIHL Owner's Manual should be strictly followed.
Store PowerSweep in a dry, high or locked location out of reach of children.
Before storing for longer than a few days, always empty the fuel tank.
English / USA
Using the PowerSweep
Use the PowerSweep for sweeping sand, stones, gravel, leaves and snow on grass, concrete or asphalt and removing standing water from solid surfaces.
●To reduce risk of accidents or injury, remove all obstacles and objects from the work area.
- If the work area is very dry, spray it with water if necessary to reduce the amount of dust created.
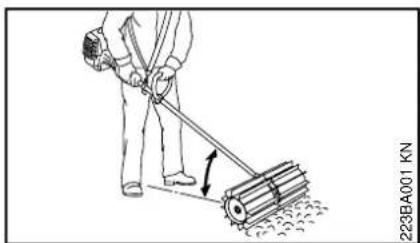
●Push the PowerSweep steadily at walking pace.
natural_image
Illustration of a person using a manual sweep tool to clean or push a surface (no text or symbols visible)●Always keep the drive tube at a shallow angle (see illustration).
The steeper the angle between the drive tube and the ground, the more difficult it is to control the PowerSweep.
natural_image
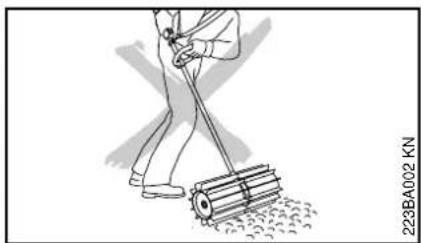
Illustration of a person sweeping a circular object with a stick (no text or symbols)●Do not push the PowerSweep into the ground.
Sweeping narrow areas
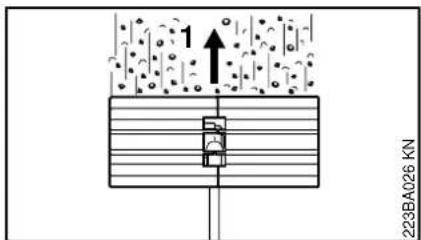
●Guide the sweeper drum at right angles to the direction of travel (1). Sweepings are thrown forwards, ahead of the operator.
The PowerSweep pushes back toward the operator.
Sweeping wide areas
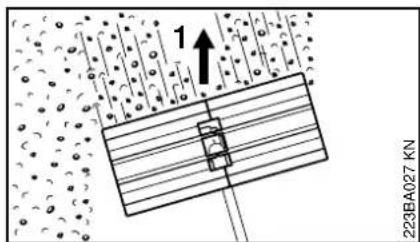
●Guide the sweeper drum at an angle to the direction of travel (1). Sweepings are thrown forwards to one side.
The PowerSweep pushes back toward the operator.
Approved Basic Power Tools
Installing the Gearbox
Sweeping corners
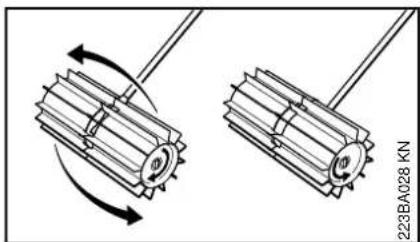
natural_image
Diagram showing two mechanical components with rotational arrows, no text or symbols present●Turn the PowerSweep over.
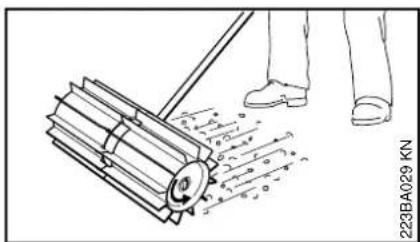
natural_image
Illustration of a person sweeping a broom with motion lines indicating movement (no text or symbols)Sweepings are thrown back toward the operator. For this reason:
●Run the PowerSweep at a low throttle setting only.
The PowerSweep pulls the operator forward. Debris thrown back toward the operator may affect footing.
Operation of STIHL KW PowerSweep attachment is permitted only with the following basic power tools:
STIHL FC 95, STIHL FC 110, STIHL FH 75, STIHL FS 65-4 ^1) , STIHL FS 83 ^1) , STIHL FS 85 ^1) , STIHL FS 90 ^1) , STIHL FS 100 ^1) , STIHL FS 110 ^1) , STIHL HL 73 ^1) , S T I H L H L ^1) , S T I H L HL 100 ^1) and STIHL KW 85
Other combinations of the attachment and non-approved basic power tools are not permitted since they may result in accidents or serious personal injury.
Retrofitting the Loop Handle\*
This attachment may be operated only with a basic power tool equipped with a loop handle.
The loop handle does not need to be equipped with a barrier bar*.
The following machines must be retrofitted with a loop handle: 0° versions of the HL 73, HL 75 and HL 100
●To retrofit the loop handle see "Mounting the Loop Handle".
1) Not approved for units with a bike handle or models FS 85 X, FS 110 X, HL 73 K, HL 73-0°, HL 75 K, HL 75-0°, HL 100 K and HL 100-0°
* see "Guide to Using this Manual"
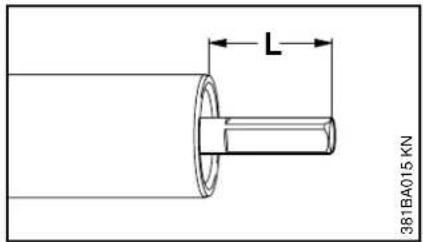
Preparations
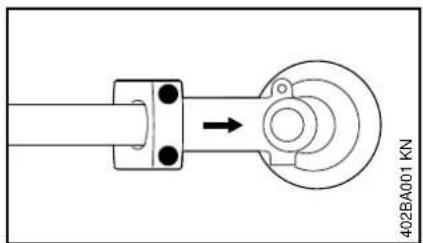
●Loosen the clamp screws on the gearhead of the power tool and pull the gearhead off the drive tube.
The drive shaft may slip out of the tube when you pull off the gearhead. If this happens push the drive shaft back into the tube.
The drive shaft must not project from the tube any more than L (7/8" or 22 mm). If necessary, apply slight pressure to the drive shaft and rotate it slowly at the same time until it can be pushed in to the required length.
Mounting Sweeper Drums
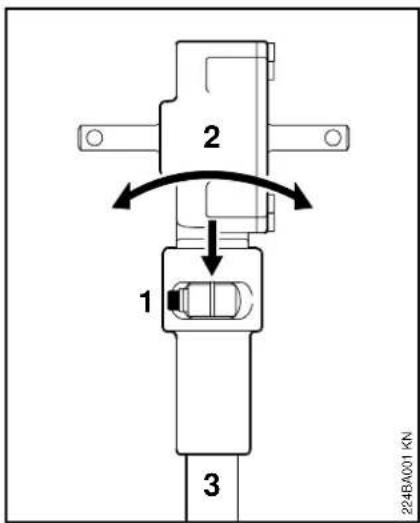
Mounting the gearbox
●Release the clamp screw (1).
- Slide the gearbox (2) onto the drive tube (3), turning the gearbox back and forth at the same time.
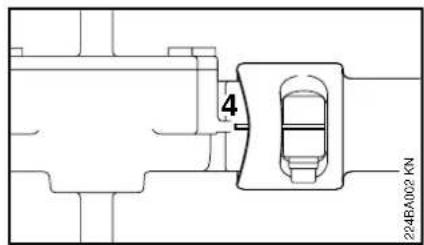
- Once the end of the drive tube is inserted beyond the slot in the clamp (4) – ease the rubber sleeve to one side to check this – push the gearbox right up to the stop.
●Fit clamp screw and tighten as far as stop.
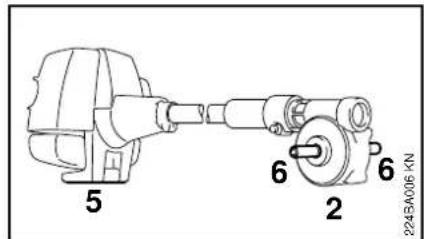
● Line up the gearbox (2) on the drive tube so that the machine support (5) on the powerhead points downward and the output shafts (6) are horizontals.
● Tighten the clamp screws firmly.
●Go to "Mounting Sweeper Drums".
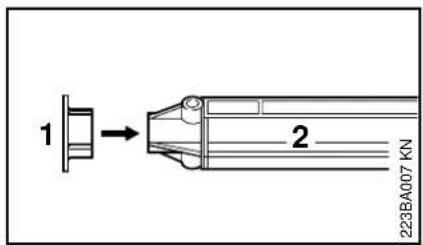
● Fit grass shield (1) on end of axle (2) and press home as far as stop.
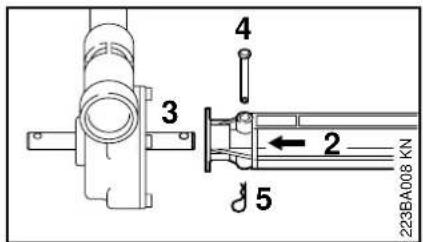
● Push axle (2) onto the output shaft (3).
- Insert pin (4) through axle and output shaft. Secure pin with cotter pin (5).
Mounting the Loop Handle\*
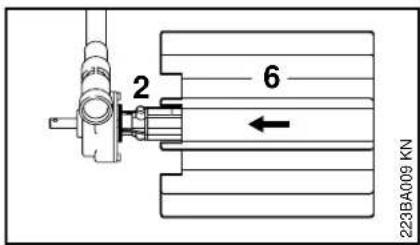
- Push sweeper drum assembly (6) onto the axle (2) – note the installed position (see illustration)!
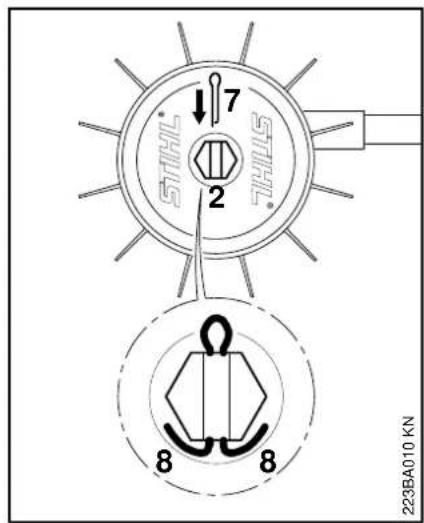
● Fit new cotter pin (7) in end of axle (2) and bend over the ends (8) of the cotter pin as shown.
- Repeat the procedure on the other side.
Always mount both sweeper drum assemblies!
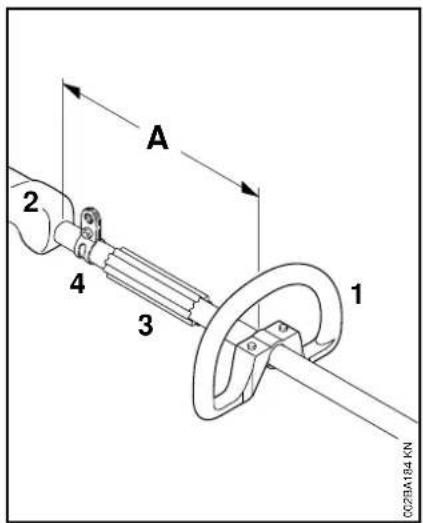
Position of Loop Handle
● Fit the loop handle (1) on the drive tube approx. 8" / (20 cm) (A) forward of the control handle (2).
●Make sure that any parts that are already fitted, ie. the spacer sleeve* (3) and carrying eye* (4), are between the loop handle and control handle.
* see "Guide to Using this Manual"
Fitting Carrying Eye\* (Clamp)
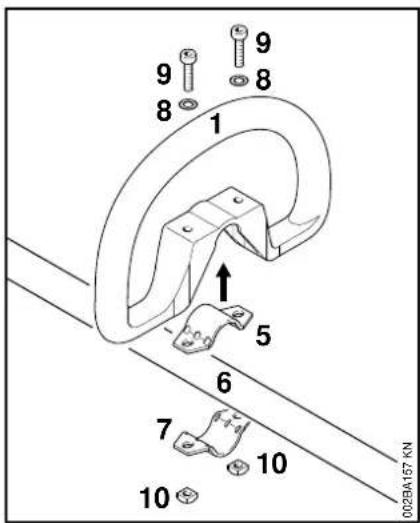
Mounting the Loop Handle
- Place the clamp (5) in the loop handle (1) and fit handle in position on the drive tube (6).
●Fit the clamp (7).
●Line up the holes.
● Fit washers (8) on the screws (9) and insert screws through the holes. - Screw on the square nuts (10) as far as stop.
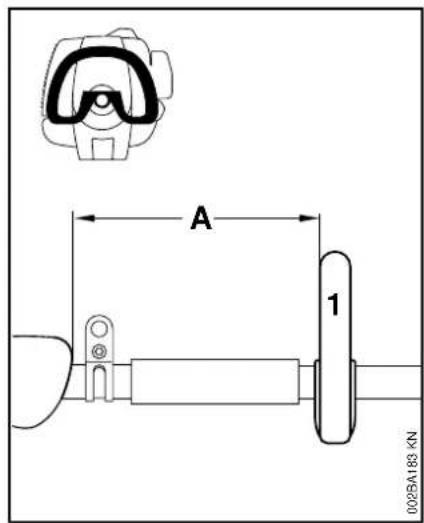
Aligning the Loop Handle
- Adjust the loop handle (1) to the most comfortable position for the user and application.
Distance A must not be more than 22" (55 cm). About 14" (35 cm) is recommended.
●Tighten down screws on loop handle firmly.
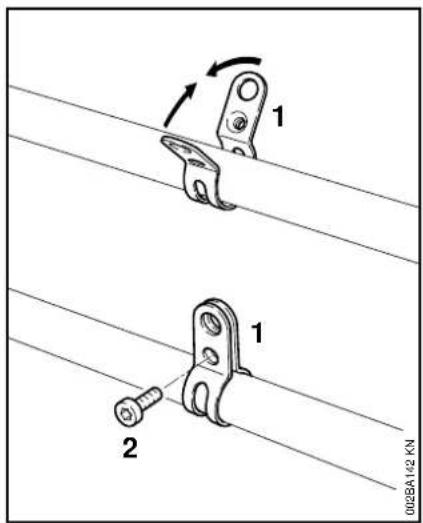
- For position of carrying eye (clamp)* see "Mounting the Loop Handle".
- Position the clamp (1) so that the tapped hole is on the left-hand side of the drive tube (viewed from powerhead).
●Squeeze the ends of the clamp together and hold it that position.
●Insert M 6 x 14 screw (2).
●Line up the carrying eye.
●Tighten down the screw.
Fitting the Harness\* Balancing the Machine
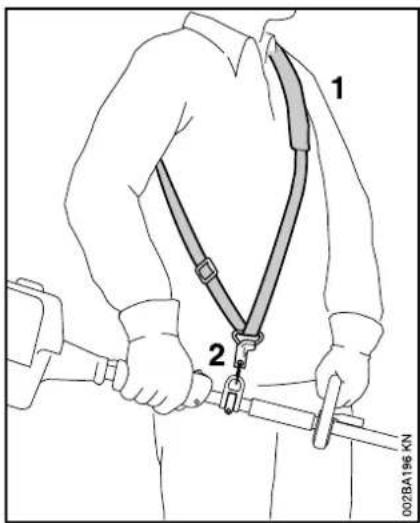
Shoulder Strap
● Put on the shoulder strap (1).
- Adjust length of strap until the spring hook (2) is about a hand's width below your right hip.
●Balance the PowerSweep – see "Balancing the Machine".
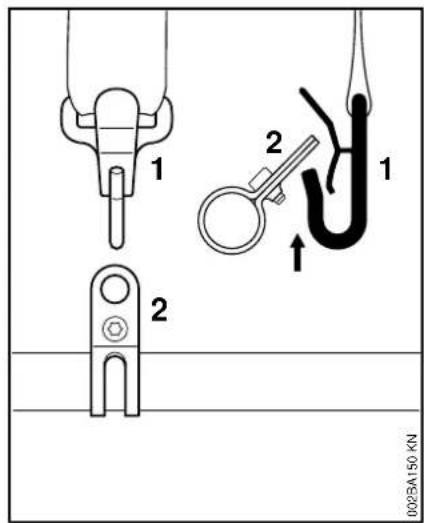
Attaching Machine to Harness\*
- Attach the spring hook (1) to the clamp* (2).
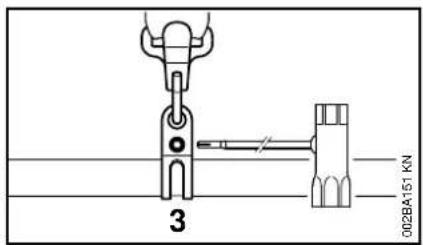
natural_image
Line drawing of a person using a tool to lift a wheel, no text or symbols present●Loosen the screw (3).
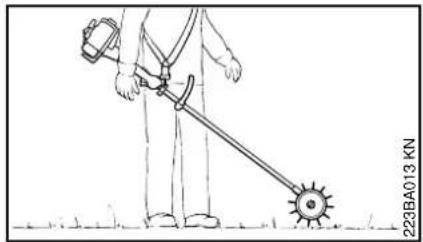
Balancing the Machine
- Slide the clamp up or down the drive tube so that the sweeper belts touch the ground.
●Tighten the screw firmly.
Starting / Stopping the Engine
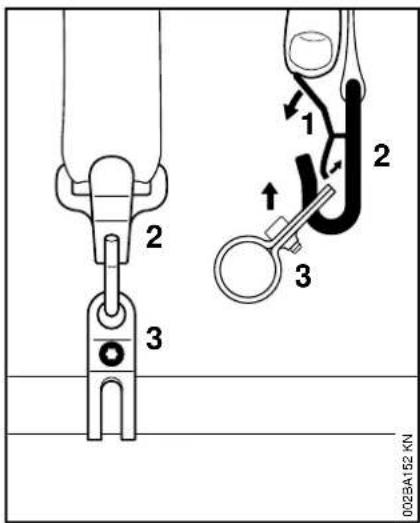
Disconnecting Machine from Harness
- Press down bar (1) on spring hook (2).
● Pull the clamp (3) out of the spring hook.
natural_image
Illustration of a person using a tool on a flat surface, no text or symbols present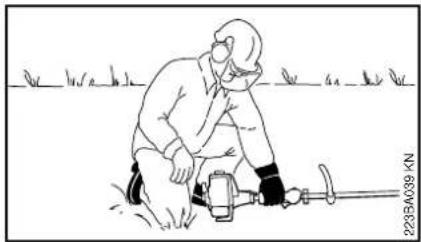
natural_image
Illustration of a person using a power tool in a field (no text or symbols)Starting
Always follow the starting instructions given in the owner's manual of the powerhead you are using.
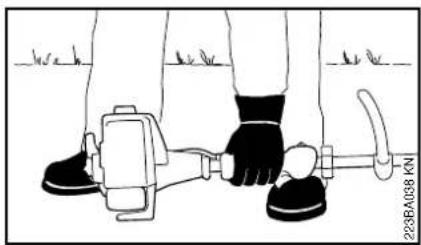
●Make sure you have a secure footing – the sweeper drums may touch the ground, but not any other obstacles.
●Hold the unit securely with your left hand on the control handle and press it down firmly.
If you crank the engine in the START position, the sweeper drums may rotate when the engine starts and this may set the PowerSweep in motion. For this reason, do not run the unit for any longer than necessary in the starting throttle position.
To shut down the engine
- Move the slide control in the direction of the arrow ( ☐ ) to STOP - ☐ or move the stop switch to ☐.
Operating Instructions Storing the Machine
Replacing Sweeper Drum
During Operation
Do not run the engine at full throttle off load. When run off load, the engine reaches very high revs, which can cause the temperature of the gearbox to rise unnecessarily.
After Finishing Work
Storing machine for a short period: Wait for the engine to cool down. Store the machine with an empty tank in a dry place, well away from sources of ignition, until you need it again. Check the tightness of all accessible screws and nuts at regular intervals and retighten as necessary.
Storing for longer period: See chapter "Storing the Machine".
For periods of about 3 months or longer:
- Remove and clean the sweeping attachments, inspect for damage or wear.
- Store the machine in a dry, high or locked location – out of the reach of children and other unauthorized persons.
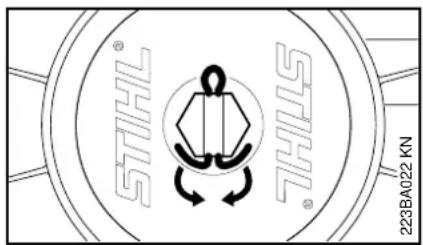
●Straighten the ends of the cotter pin, remove the cotter pin.
●Pull the sweeper drum off the axle.
- Repeat the procedure on the other side.
●Examine gear housing for signs of oil. If leaks are found, have your STIHL dealer check the gearbox.
●Install new sweeper drums – see "Mounting Sweeper Drums".
English / USA
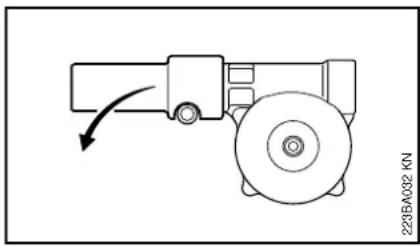
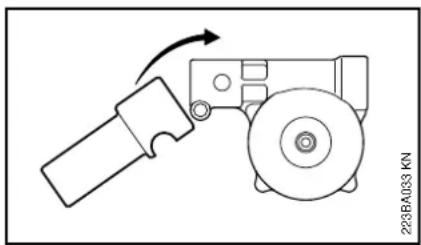
Replacing the Rubber Sleeve
The rubber sleeve protects the drive tube from wear caused by contact with the sweeper belts.
A worn sleeve must be replaced as follows:
- Remove the sweeper drums –
- see "Replacing Sweeper Drum".
- Remove the gearbox – see "Removing the Gearbox".
natural_image
Diagram of a truck with a circular wheel and arrow indicating motion (no text or symbols)●Pull the worn sleeve off the gearbox.
natural_image
Diagram of a mechanical device with a tool and rotating component (no text or symbols)- Push a new sleeve onto the gearbox.
- Mount the gearbox – see "Installing the Gearbox".
●Fit the sweeper drums – see "Mounting Sweeper Drums".
Removing the Gearbox
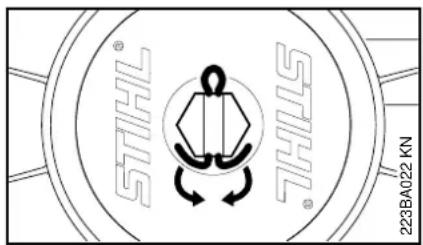
● Straighten the ends of the cotter pin, remove the cotter pin.
●Pull the sweeper drum off the shaft.
●Examine gear housing for signs of oil. If leaks are found, have your STIHL dealer check the gearbox.
- Repeat the above procedure on the other side.
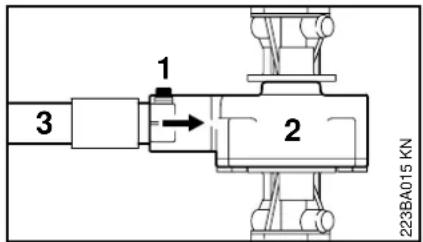
●Release the clamp screw (1).
- Pull the gearbox (2) off the drive tube (3).
Main Parts
Specifications
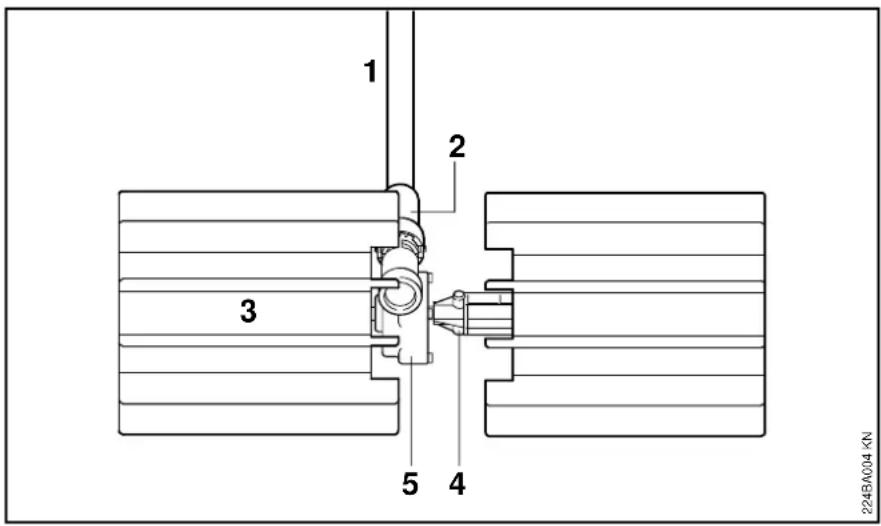
Engine
See instruction manual of the basic power tool you are using.
Weight
PowerSweep attachment 10.5 lbs (4.8 kg) Interchangeable attachment 11.9 lbs (5.4 kg)
Sweeper Drum
Quantity 2 Width 22 in (57 cm) No. of rubber paddles 12
1 = Shaft
2 = Sleeve
3 = Sweeper drum assembly
4 = Axle
5 = Gearbox
Definitions
1. Shaft.
Device to connect the engine with the gearbox.
2. Sleeve (shaft protector).
Designed to protect the shaft against abrasion from the sweeper flaps.
3. Sweeper drum assembly.
Tool for sweeping and cleaning.
4. Axle.
Connects sweeper drum assembly with the drive shaft.
5. Gearbox.
To transform the engine speed down to lower RPM of the sweeper drums.
English / USA
Special Accessories
Maintenance and Repairs
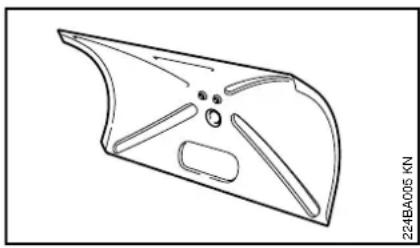
natural_image
Technical line drawing of a mechanical component with cutouts and mounting holes (no text or symbols)Deflector 4602 007 1001
Sweeper belts
Safety glasses
Harness
Combination wrench
Users of this unit should carry out only the maintenance operations described in this manual. Other repair work may be performed only by authorized STIHL service shops.
Warranty claims following repairs can be accepted only if the repair has been performed by an authorized STIHL servicing dealer using original STIHL replacement parts.
Original STIHL parts can be identified by the STIHL part number, the STIHL ^ logo and, in some cases, by the STIHL parts symbol G_ . This symbol may appear alone on small parts.
Contact your STIHL dealer for the latest information on these and other special accessories.
Contenido
natural_image
Diagram showing two mechanical components with rotational arrows, no text or symbols present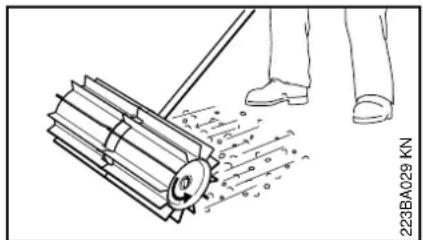
natural_image
Technical line drawing of a broom with motion arrows indicating movement (no text or symbols)Advertencia!
natural_image
Illustration of a person using a power tool to clean or move a cylindrical object (no text or symbols visible)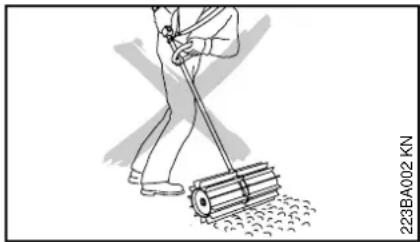
natural_image
Illustration of a person sweeping a circular object with a brush (no text or symbols)Advertencial
natural_image
Illustration of a person using a grip device (no text or symbols visible)natural_image
Illustration of a person using a power tool to clean or move a moving cart (no text or symbols visible)natural_image
Illustration of a person sweeping a broom with a roller, no text or symbols presentnatural_image
Mechanical diagram showing two rotating components with arrows indicating rotation direction (no text or symbols)natural_image
Illustration of a person sweeping or cleaning a roller with motion lines indicating movement (no text or symbols)natural_image
Line drawing of a person using a tool to spread a circular object, labeled '223BA013 KN' (no other text or symbols)natural_image
Illustration of a person using a mechanical device with hands and legs (no text or symbols)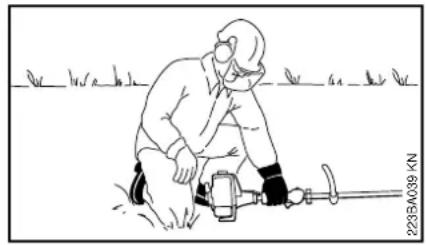
natural_image
Line drawing of a worker operating a power tool in a field (no text or symbols)Arranque
natural_image
Diagram of a mechanical device with a rotating wheel and arrow indicating motion (no text or symbols)natural_image
Diagram of a mechanical device with a tool and rotating component (no text or symbols)natural_image
Technical line drawing of a mechanical component with cutouts and mounting holes (no text or symbols)Deflector 4602 007 1001
Correas de barredora
- Warning!
- Advertencia!
- Guide to Using this Manual
- Important Information
- Pictograms
- Symbols in text
- Safety Precautions and Working Techniques
- \* Equipment and features
- Engineering improvements
- THE OPERATOR!
- Physical Condition
- Proper Clothing
- Transporting the PowerSweep
- Preparation for the use of the PowerSweep
- Fueling
- OPERATING INSTRUCTIONS
- Starting
- Working Conditions
- Important adjustments
- MAINTENANCE, REPAIR AND STORING
- Using the PowerSweep
- Approved Basic Power Tools
- Installing the Gearbox
- Retrofitting the Loop Handle\*
- Preparations
- Mounting Sweeper Drums
- Mounting the gearbox
- Mounting the Loop Handle\*
- Position of Loop Handle
- Fitting Carrying Eye\* (Clamp)
- Mounting the Loop Handle
- Aligning the Loop Handle
- Fitting the Harness\* Balancing the Machine
- Shoulder Strap
- Attaching Machine to Harness\*
- Balancing the Machine
- Starting / Stopping the Engine
- Disconnecting Machine from Harness
- To shut down the engine
- Operating Instructions Storing the Machine
- Replacing Sweeper Drum
- During Operation
- After Finishing Work
- Replacing the Rubber Sleeve
- Removing the Gearbox
- Main Parts
- Specifications
- Engine
- Weight
- Sweeper Drum
- Definitions
- Shaft.
- Sleeve (shaft protector).
- Sweeper drum assembly.
- Axle.
- Gearbox.
- Special Accessories
- Maintenance and Repairs
- Contenido
- Advertencial
- Arranque
Brand : STIHL
Model : KW
Category : Sweeper