
XBOOK L10 - Laptop Xplore - Free user manual and instructions
Find the device manual for free XBOOK L10 Xplore in PDF.


| Product Type | Laptop |
| Brand | Xplore |
| Model | XBOOK L10 |
| Display Size | 10.1 inches |
| Processor | Intel Celeron or similar |
| RAM | 4 GB DDR4 |
| Storage | 64 GB eMMC |
| Operating System | Windows 10 Pro |
| Battery | Lithium-ion, 7.6 V, 5000 mAh |
| Power Supply | DC 19V, 2.1A |
| Dimensions (W x D x H) | 260 x 180 x 20 mm |
| Weight | 1.2 kg |
| Ports | 1x USB 3.0, 1x USB 2.0, 1x HDMI, 1x audio jack, 1x microSD card slot |
| Wireless Connectivity | Wi-Fi 802.11ac, Bluetooth 4.2 |
| Camera | Front-facing 2 MP |
| Main Functions | Office productivity, web browsing, media playback, lightweight computing |
| Cleaning and Care | Wipe the exterior with a soft, dry cloth. Do not use liquid or abrasive cleaners. |
| Safety Instructions | Do not disassemble the device. Avoid exposure to water and extreme temperatures. |
| Spare Parts and Repairability | Contact Xplore customer support for genuine spare parts and repair services. |
| General Information | Designed for everyday use. Includes user manual with warranty details. |
Frequently Asked Questions - XBOOK L10 Xplore
User questions about XBOOK L10 Xplore
0 question about this device. Answer the ones you know or ask your own.
Ask a new question about this device
Download the instructions for your Laptop in PDF format for free! Find your manual XBOOK L10 - Xplore and take your electronic device back in hand. On this page are published all the documents necessary for the use of your device. XBOOK L10 by Xplore.
USER MANUAL XBOOK L10 Xplore
L10 Platform for the XSLATE™ and XPAD™ Tablets
Models iX101L1 and iX10101L2
User Guide
© 2003–2018 Xplore Technologies Corporation of America. All rights reserved.
This document contains information protected by copyright. No part of this document may be reproduced in any form without written consent from Xplore Technologies® corporation.
The information in this document is provided "as is" and is subject to change without notice. Xplore Technologies is not liable for errors or omissions in this document.
Xplore, Motion by Xplore, View Anywhere, and QuickNav are trademarks or registered trademarks of Xplore Technologies Corporation of America in the U.S.A. and other countries.
Acrobat is a registered trademark of Adobe Systems Incorporated.
Bluetooth is a registered trademark owned by the Bluetooth SIG, Inc., U.S.A. and licensed to Xplore Technologies Corporation of America.
Intel, Intel Atom, Core, vPro, and Centrino are trademarks or registered trademarks of Intel Corporation or its subsidiaries in the United States and other countries.
Android, Google, Google Play, and other marks are trademarks or registered trademarks of Google Inc. in the United States and/or other countries.
Windows, Windows Journal, and Skype and other marks are trademarks or registered trademarks of Microsoft Corporation.
Corning and Gorilla Glass are registered trademarks of Corning Incorporated.
Qualcomm, Gobi, and Gobi 5000 are trademarks or registered trademarks of Qualcomm Incorporated.
Wi-Fi is a registered trademark of the Wi-Fi Alliance.
Kensington and MicroSaver are registered trademarks of the Kensington Technology Group.
HDMI, the HDMI logo, and High-Definition Multimedia Interface are trademarks of HDMI Licensing LLC in the United States and other countries.
This product incorporates copy protection technology that is protected by U.S. and foreign patents, including patent numbers 5,315,448 and 6,836,549, and other intellectual property rights. The use of the Macrovision copy protection technology in the product must be authorized by Rovi Corporation. Reverse engineering or disassembly is prohibited.
Xplore Technologies Corporation of America has made every effort to identify trademarked properties and owners on this page. All brands and product names used in this document are for identification purposes only and may be trademarks or registered trademarks of their respective companies.
The warranties for Xplore and Motion by Xplore products are set forth in the express limited warranty statements accompanying such products. Nothing in this document constitutes an additional warranty.
The Xplore and Motion by Xplore products and services may be covered by one or more patent-protected inventions. Additional patents may also be pending. For more information, see this site: https://www.xploretech.com/us/patents.
The end user may access only one language version of the operating system.
Chapter 1 Getting Started .... 1
L10 Platform.... 1
Key Features Overview.... 1
Optional Features....2
Overview of the XSLATE L10 Tablet PC.... 3
Front of the XSLATE L10 3
Back of the XSLATE L10 4
Right Side of the XSLATE L10 5
Left Side of the XSLATE L10....5
Bottom Side of XSLATE and XPAD Tablets 6
Pens for the L10 Tablets 6
Capacitive Pens 6
Active Digitizer Pens 6
Overview of the XPAD L10 Tablet 7
Front of the XPAD L10....7
Back of the XPAD L10....8
Left Side of the XPAD L10....8
Top Side of the XPAD L10....9
Preparing the L10 Tablet for First Use 9
Inserting a SIM Card 9
Powering Up the Tablet 10
Optional Setup Tasks.... 11
Backing Up Files and Creating a Recovery Drive....11
Attaching the Pen Tether....11
Connecting the Tablet to an External Monitor 11
For More Information 12
Chapter 2 Using Your L10 Tablet 13
Using the Battery 14
Checking Battery Power 14
In Windows 14
On the Battery 15
Optimizing Battery Life or Performance 15
Removing and Replacing the Battery....16
Removing the Battery 16
Replacing the Battery....16
Hot Swapping the Battery 16
Long-term Battery Storage 17
Battery and Power Management Tips....17
Tips for Saving Battery Power....17
Conditioning the Battery 17
Disposing of Used Batteries....17
Managing Wireless Connections 18
Temporarily Switching Off Wireless Devices 18
Connecting to a Wi-Fi Network 19
Connecting to Bluetooth Devices....21
Connecting to a Mobile Broadband Network .....22
Inserting a SIM Card 22
Setting Up Mobile Broadband....23
Switching to a Second Broadband Provider....24
Managing Cellular Connections....24
Using Global Navigation Satellite System (GNSS) .....25
Enabling Location Services....25
Know Your Tablet....26
PC Information 26
Documentation (online) 26
Support (online)....26
Accessories (online)....26
Using Sleep Mode ....27
Using the XPAD Function Buttons .....28
Configuring the Function Buttons....28
Using the Cameras....30
Front Camera....30
Rear Camera....30
Putting the Camera Icon on Your Taskbar 30
Using the Built-in Microphones....31
Using Integrated Optional Features....32
Using the Barcode Scanner (XPAD Only)....32
Using the RFID/NFC Reader 33
Using the Fingerprint Reader ....35
Setting Up a PIN 35
Setting Up the Fingerprint Reader....35
Logging In with Your Fingerprint....36
Using the SD Card Reader ....37
Inserting an SD Card....37
Removing an SD card....37
Locating Your Serial Number ....37
Backing Up Your Files 38
Scheduling Backups with File History....38
Restoring Backups with File History 39
Restoring Your System ....39
Chapter 3 Caring for the L10 Tablet 4
General Care 41
Caring for the Display ....41
Caring for the Pen ....42
Cleaning the Fingerprint Reader ....42
Conditioning the Battery....42
Traveling with Your L10 Tablet PC....43
Chapter 4 Troubleshooting and FAQs ..... 45
Battery and Power Issues 45
Shutting Down Issues 46
Display Issues.... 47
Pen Issues 48
Keyboard Issues 49
Network Issues.... 49
Ethernet Issues....50
Wi-Fi Issues 50
Bluetooth Issues....50
Bluetooth Tips 50
Mobile Broadband Issues 50
Audio Issues 51
System Issues....51
Frequently Asked Questions 52
Getting Started 1
L10 Platform
There are three models in the L10 Platform. Each is different from the other two as follows:
- XPAD™ L10 is distinguished by its integrated hard handle. The handle has space for an integrated barcode reader option, two programmable buttons and a front facing speaker.
- XSLATE™ L10 has no handle but is otherwise like the XPAD.
- XBOOK™ L10 is the same as the XSLATE, but includes a companion keyboard and a kickstrap (combination of a kickstand and a hand strap).
Important: All Windows features that are documented in this user guide are based on the interface of the Windows 10 release, version 1803.
For important information about care of the tablet and its components, see the Safety and Regulatory Guide.
Key Features Overview
The L10 platform by Xplore™ Technologies is a rugged tablet that provides a range of computing power and a variety of integrated features to support any mobile work flow.
The L10 Platform supports these features:
• Available with one of these processors: Intel Pentium ® , Intel ® Core ™ 8th Gen i5 or i7.
• 4, 8, or 16 GB of system memory (RAM) depending on CPU
- Intel® HD 505 Graphics or UHD 605 Graphics, depending on CPU
- 10.1" wide viewing angle display with WUXGA resolution (1920 x 1200); 500 Nit brightness standard, option for 1000 Nit View Anywhere® display for viewing in bright sunlight.
- Capacitive display with 10-point touch input standard
- Corning® Gorilla® Glass 3 for increased display damage resistance
- Integrated 13 MP rear camera and 2 MP front camera
• Solid-state drive with capacities from 64 GB up to 1 TB
- Two USB 3.0 ports, one USB Type-C port and a micro-SDHC card slot
• Dual Nano SIM (4FF) port
• 9-Axis MEMS sensor (Accelerometer, eCompass, Gyroscope) and ambient light sensor
• Hot-swappable battery, 36 Whr standard battery or 98 Whr long-life battery packs
- Integrated 802.11a/g/n/ac Wi-Fi® and Bluetooth® 4.2 and NFC
• TCG Trusted Platform Module (TPM) 2.0 for hardware-based security
- Area fingerprint reader is standard for added security
- Windows® 10, Pro 64-bit operating system
Optional Features
The following features are optional and must be ordered with the tablet at the time of purchase:
- Integrated Sierra Wireless EM7565 WWAN+GNSS module or u-blox GNSS+SBAS only module
- A high-performance barcode scanner is available and is integrated into the handle of the XPAD L10 tablet'. See Using the Barcode Scanner (XPAD Only) on page 32.
- Integrated, active Wacom-digitizer display that provides precision pen input and hover features
- Integrated pass-through antenna with five ports for MIMO WLAN, MIMO WWAN, and GNSS (GPS)
- Integrated HDMI Input through a full-sized HDMI connector interface
- RS232 true serial port with DB9 serial port interface adapter
- External Smart Card reader Common Access Card (CAC)
- Integrated high-frequency (HF) RFID/NFC
- External module for long-range UHF RFID Reader (AEI)
Overview of the XSLATE L10 Tablet PC
The photos show the location of the external features on the XSLATE™ L10 Tablet PC. Most of these features are on the XPAD™ Tablet PC in the same place, except where noted in the photos of the XPAD tablet.
Front of the XSLATE L10
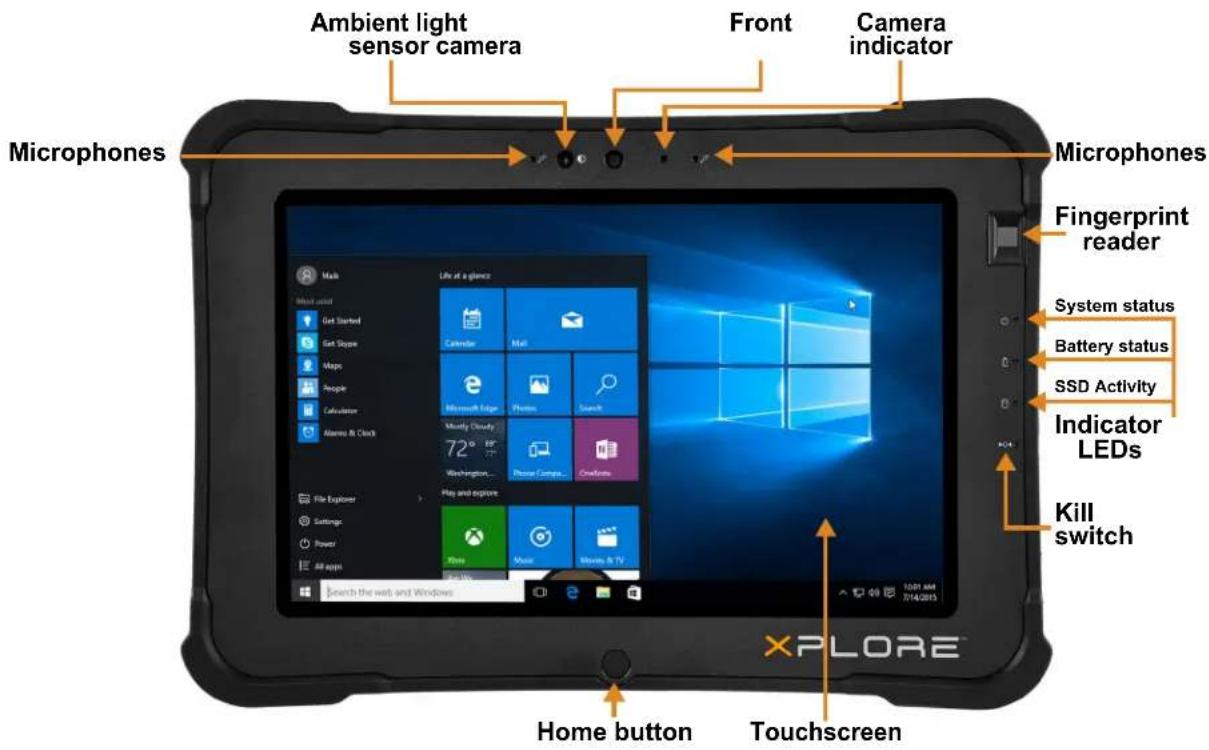
| Microphones | Two digital microphones make up the microphone array facing forward |
| Ambient Light Sensor (ALS) | Detects the amount of ambient light, and Windows adjusts the screen brightness |
| Front camera | An FHD resolution camera primarily for taking pictures or video of the tablet user |
| Camera indicator | Is illuminated when either the front- or rear-facing camera is active |
| Fingerprint reader | Can read your fingerprint to let you log in |
| System status LED | Indicates the current power state of the tablet |
| Battery status LED | Indicates the charging status of the battery and also lets you know when your battery is getting very low |
| SSD activity LED | Indicates when the solid state drive (SSD) is accessed to read or write data |
| Kill switch | Immediately powers off the device if it becomes unresponsive. Any unsaved data will be lost. Insert a stylus tip or straighten a paper clip and insert the protruding end into the hole to press the recessed button. |
| Touchscreen | The standard means for interacting with the operating system and software |
| Home Button | A physical button that performs the same function as the Start button; displays start screen or wakes up your tablet from sleep |
Back of the XSLATE L10

| Pen holder and pen Holds the short pen when pen is not in use | |
| Battery latch Releases the battery latch when you slide the latch to the left | |
| Camera light Functions as both a flash for the rear camera as well as a torch light | |
| Rear camera | 13 megapixel camera |
| Kensington lock slot | Provides a metal-reinforced hole for use with a cable and lock to secure the tablet |
| Fan intake | Where ambient air is pulled in by the fan; Do not block or cover |
| Fan exhaust | Where heated air is exhausted by the fan; Do not block or cover |
| Expansion port cover | Door that is removed when connecting certain Xplore accessories to the tablet |
| Speaker | Outputs sound when no headset or external speakers are in use |
| Battery | Hot-swappable battery that powers the tablet when it is not plugged in or docked |
| Pass-through antenna ports (optional) | These integrated ports connect to the vehicle antenna to provide MIMO WLAN, MIMO WWAN, and GNSS (GPS) access. This feature must be ordered when purchased. It is factory installed. |
Right Side of the XSLATE L10

| Power input Connection for the external power adapter | |
| Ethernet jack RJ45 port for LAN connectivity | |
| Volume control | Turns sound volume up and down |
| Power button | Turns on the tablet; press to enter and exit sleep mode when tablet is on. |
| SAS button | Round button; equivalent to pressing Ctrl+Alt+Del in Windows; also wakes up the tablet from sleep mode |
| Multifunction port | Optional factory configurable port that can function as a serial port or HDMI-in |
Left Side of the XSLATE L10
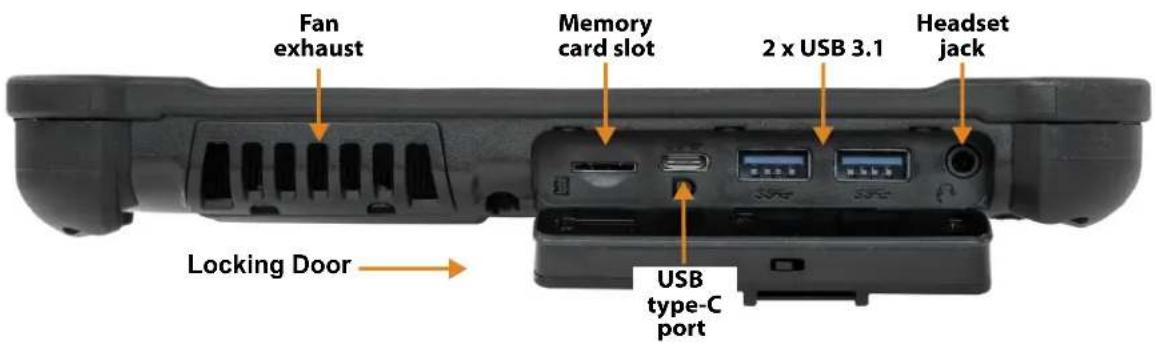
| Fan exhaust | Allows air flow |
| Memory card slot | Reads and writes micro-SD cards |
| USB type-C port | Provides access to USB 3.1 and DisplayPort output through a USB type-C connector |
| USB 3.1 Gen1 ports | Two USB type-A connectors for devices, such as a mouse, keyboard or external storage; compatible with USB 2.0 |
| Headset jack | 3.5 mm audio connector supports stereo output and mono microphone input |
| Locking door | When the locking door that covers the ports on the L10 is shipped, it is locked and shows green. Slide the lock to reveal red and it opens. |
Bottom Side of XSLATE and XPAD Tablets

Docking connectors Connectors that interface to Xplore docks
Pens for the L10 Tablets
All L10 tablets support touch input with your finger. In addition, a pen or stylus is provided with your tablet, and is compatible with the screen configuration that you order. Many people use a pen for more convenience or precision. The pen is particularly effective for precise data entry and navigation.
The XSLATE and XBOOK come with short pens that fit into the pen holder on these devices. The XPAD includes a longer, thicker pen. If you want a longer pen for the XSLATE or XBOOK, a handle accessory can be ordered with the longer pen.
Capacitive Pens
Capacitive pens work with the tablet's touchscreen and are sometimes called passive pens. The short capacitive pen does not need a battery. The long capacitive pen uses a AAAA battery. These two pens do not require a pen digitizer in the tablet. They work with the tablet's touchscreen directly.
Short Capacitive Pen Long Capacitive ePen w/battery

Active Digitizer Pens
If the L10 tablet is ordered with an active Wacom digitizer built in to the screen, you will receive one of the two pens pictured below. These Wacom-compatible pens allow for a large range of pressure sensitivity, tilt detection and hover capability. Hover lets you see where the pen is pointing before the tip touches the display. These pens are frequently called active pens.
Short Active Digitizer Pen Long Active Digitizer Pen

You can order additional active or capacitive pens from the L10 Accessories web page. Scroll down and tap to open the Input Devices section. You can order the Stylus Tip Kit for active pens from the Input section of the Accessories site.
Overview of the XPAD L10 Tablet
The following photos show the locations the external features on the XPAD® L10 Tablet PC.
Note: In these photos, the light gray text indicates a feature that is described for the XSLATE L10 and is the same on the XPAD L10. See page 3 to page 5 for the XSLATE overview. The blue text indicates that the feature is available only on the XPAD or is located in a different place on the XPAD tablet.
Front of the XPAD L10

| Function button P1 | Default setup: Tap to open the Know Your Tablet application. Press and hold to open the Microsoft OneNote |
| Function button P2 | Default setup: Tap to display the Pictures folder. Press and hold to open Tablet PC Settings |
| Pen holder Holds the long pen when not in use | |
| Speaker | Provides sound when no headset or external speakers are in use |
Back of the XPAD L10
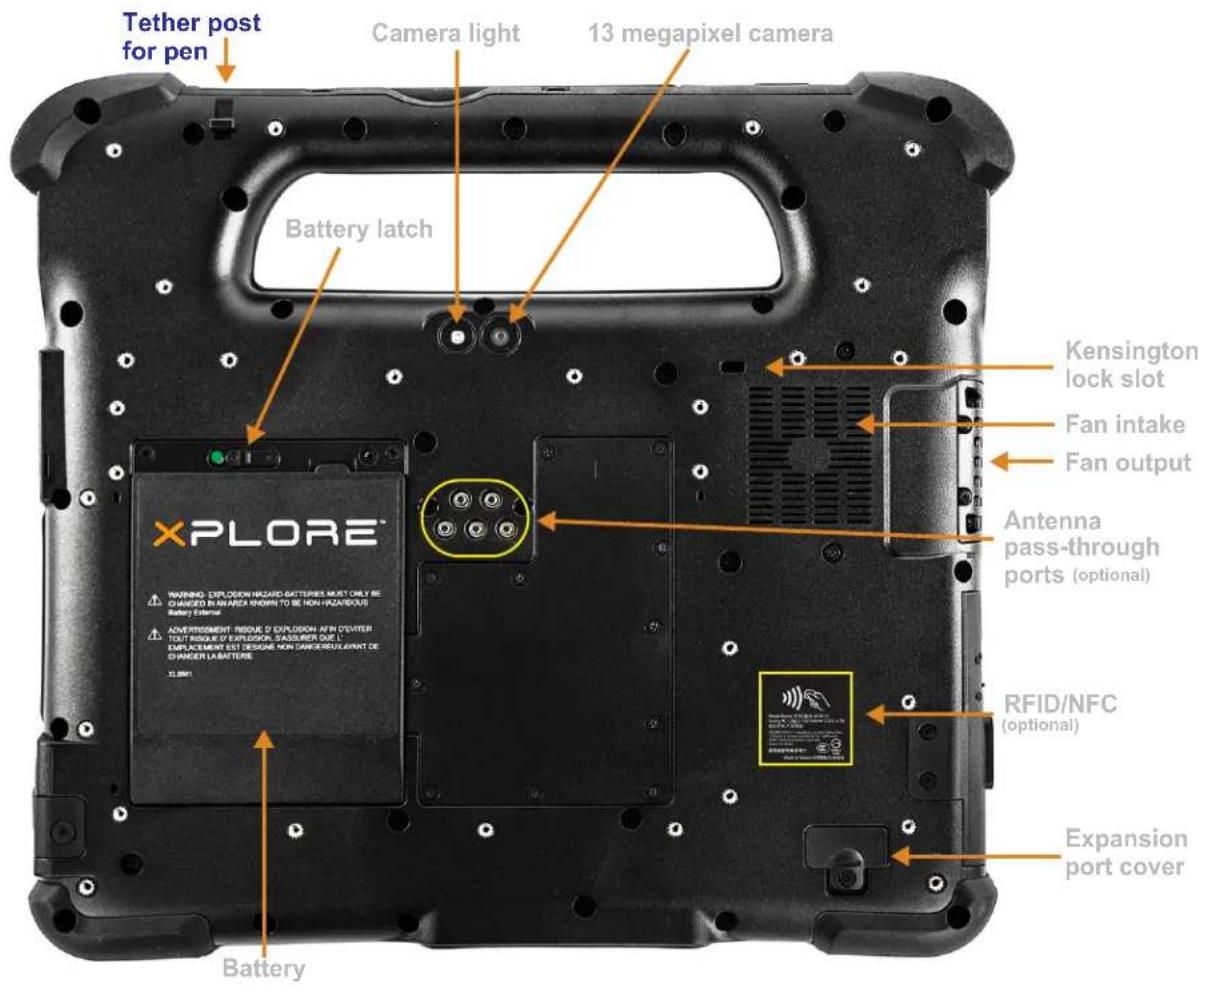
Tether post for pen Secures the pen to the tablet via tether
Left Side of the XPAD L10
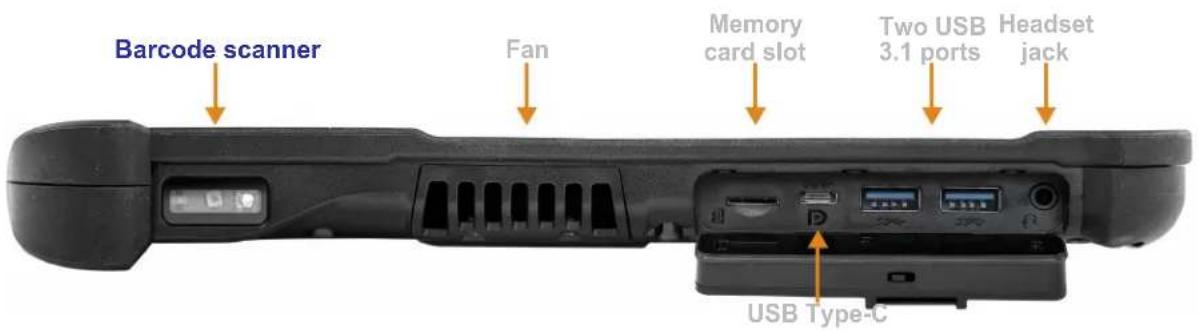
Barcode scanner Optical interface for reading barcodes
Top Side of the XPAD L10

Barcode scanner button
Press to activate the barcode scanner (if installed)
Pen Holder Holds the long pen when not in use
Preparing the L10 Tablet for First Use
This section has steps for setting up the L10 platform for the first use.
Inserting a SIM Card
If your L10 tablet is enabled with Wireless Wide Area Networking (WWAN), you need an activated SIM card in the SIM card holder to access the cellular data network. The SIM holder is located in the battery bay of the L10 and can hold one or two Nano SIMs (4FF).
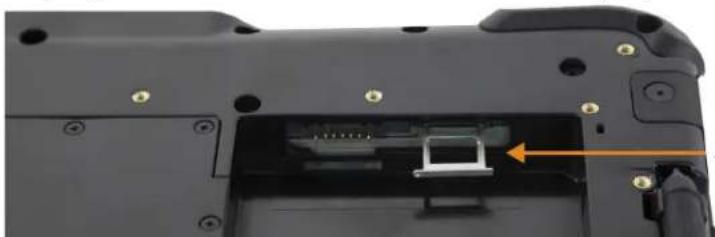
SIM card holder
The L10 supports two SIM cards and switching between SIMs is done within Windows. Most people will need only one SIM. To add or change a SIM, follow these instructions:
- Shut down and turn off the tablet.
- Remove the battery if it is in the tablet.
- Pull out the SIM holder shown above.
- Put your SIM card into the slot with the contacts facing down ensuring the notched edge on the card aligns with the notched edge in the holder.
- Then put the frame back into its port and return the battery to its bay.
See also Inserting a SIM Card on page 22
Powering Up the Tablet
- Remove the battery from the packaging and insert the battery into the back of the tablet until it clicks securely into place.
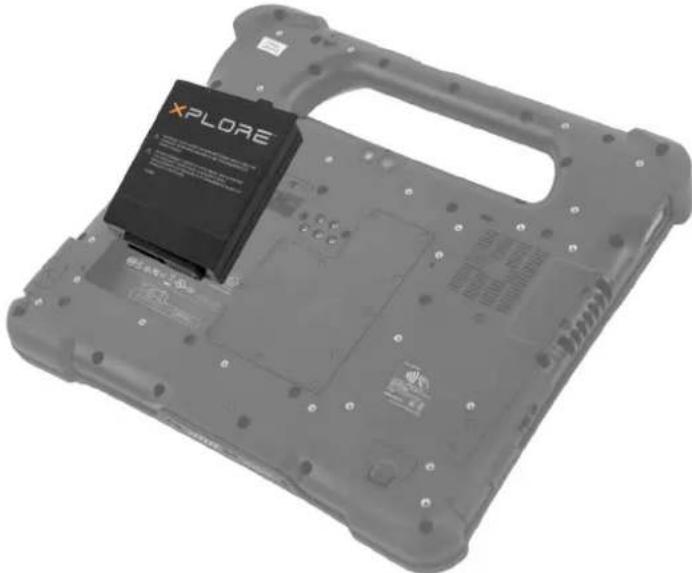
- Apply external power by opening the port door located at the bottom of the right side of the L10 to expose the power adapter port. Plug in the AC adapter.

- Plug the power cord into an outlet.
The battery charging indicator on the front of the L10 tablet blinks green to indicate that the battery is charging. It is solid green when fully charged
- Press and release the oval Power button in the center of the right side of the tablet to turn it on.
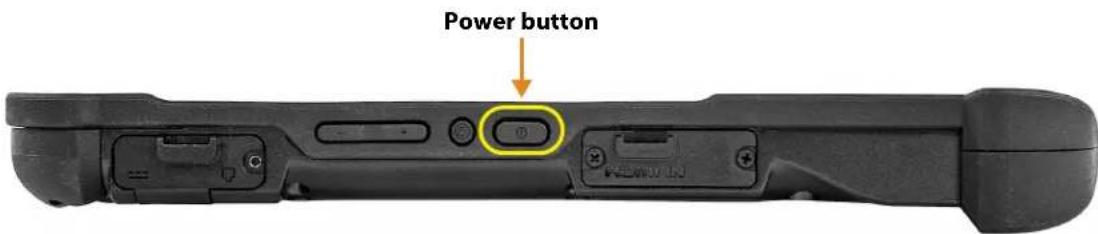
- Keep the tablet on AC power until the battery is fully charged. However, you don't have to wait until the tablet is fully charged to turn it on. The L10 will charge while you use it.
Optional Setup Tasks
Backing Up Files and Creating a Recovery Drive
After setting up the L10 the way you like it and installing applications, create a recovery drive on an external USB drive. A recovery drive lets you start your tablet and access recovery and troubleshooting tools if you encounter any issues with your Windows installation.
For more information, see Backing Up Your Files on page 38 and Restoring Your System on page 39.
Attaching the Pen Tether
The pen comes with a tether so that you can attach it to your tablet to avoid misplacing it.
- Slip one end of the tether through the hole at the end of the pen, and pull the pen through the loop until it is tight.
- Slip the other end of the tether through the attach point on the tablet, then pull the pen through the loop until it is tight.
Connecting the Tablet to an External Monitor
There is no dedicated port for an external monitor on the L10 tablet. The tablet has a USB Type-C connector which includes a DisplayPort output capability. You need a dongle that supports USB Type-C DisplayPort and converts it to the port necessary to attach the external monitor, which can have one or more of the following ports: HDMI, DVI, DisplayPort, or VGA.
For instance, to connect a monitor with an HDMI port to your tablet, you need a USB Type-C DisplayPort to HDMI output dongle.
Note: Some dongles use USB to Video conversion and these use software to enable the external display over USB interface. Care must be taken to ensure the USB Type-C dongle specifically supports USB Type-C DisplayPort input. Look for a dongle that states it is plug-n-play and that no software or drivers are required.
For More Information
The Know Your Tablet application is on the desktop and the Windows Start screen of the tablet.
Note: If you don't have access to a particular feature or setting on your Tablet PC, contact your system administrator for additional information.
This user guide describes the full set of features and provides instructions for common tasks. The following three chapters of this user guide includes:
• Chapter 2, Using Your L10 Tablet on page 13:
Provides instructions for basic tasks including how to customize your tablet to fit the way you work.
• Chapter 3, Caring for the L10 Tablet on page 41:
Provides suggestions for the care and maintenance of your Tablet PC.
• Chapter 4, Troubleshooting and FAQs on page 45:
Provides answers for common issues you might encounter as you use your tablet.
You can find other useful information on the Xplore Technologies web site:
- Support
• Documentation (Available in several languages)
• L10 Overview
• Free Training Videos
- Knowledge Base
- Accessories
Using Your L10 Tablet 2
This chapter highlights critical and some advanced features of the Xplore® L10 Tablet PC. These links below let you click and go to that part of this chapter.
• Using the Battery on page 14
- Checking Battery Power on page 14
- Removing and Replacing the Battery on page 16
• Hot Swapping the Battery on page 16
• Long-term Battery Storage on page 17
• Battery and Power Management Tips on page 17
• Managing Wireless Connections on page 18
• Temporarily Switching Off Wireless Devices on page 18
- Connecting to a Wi-Fi Network on page 19
- Connecting to Bluetooth Devices on page 21
- Connecting to a Mobile Broadband Network on page 22
- Inserting a SIM Card on page 22
- Setting Up Mobile Broadband on page 23
• Switching to a Second Broadband Provider on page 24
• Managing Cellular Connections on page 24
• Using Global Navigation Satellite System (GNSS) on page 25
- Know Your Tablet on page 26
• Using Sleep Mode on page 27
• Using the XPAD Function Buttons on page 28
• Using the Cameras on page 30
• Using the Built-in Microphones on page 31
• Using Integrated Optional Features on page 32
• Using the Barcode Scanner (XPAD Only) on page 32
• Using the RFID/NFC Reader on page 33
• Using the Fingerprint Reader on page 35
• Using the SD Card Reader on page 37
- Locating Your Serial Number on page 37
- Backing Up Your Files on page 38
• Restoring Your System on page 39
Using the Battery
The Xplore ® L10 tablet includes a high-capacity Lithium-ion battery that fits into the back of the unit. Battery life varies by configuration, applications in use, which features are used, and the operating conditions. The maximum battery capacity decreases with time and use.

Danger: To avoid personal injury, handle the battery with care. Don't open, puncture, short, or expose it to fire or water. For example, don't leave the battery in a closed car in hot weather for an extended time. For more information, see the Safety and Regulatory Guide.
Checking Battery Power
In Windows
The battery icon changes appearance on the taskbar to show the status of the battery: by displaying the approximate charge remaining, by indicating the battery saver mode (green flame), and by showing whether the battery is charging (plug).


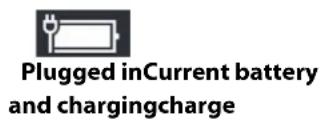
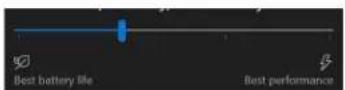
- In the notification area of the taskbar, tap the Battery icon to display the remaining charge. The power mode slider shows the trade off between battery life and tablet performance.

This power menu lets you access other battery settings and set brightness options.
- Tap Battery Settings to display the Battery Overview menu and set the battery saver options, other battery options, and access to other menus, including the Settings > System > Display menu.
- Tap the Brightness tile on the bottom left of this menu to set the brightness levels.
- Press and hold this brightness tile until you see an option for more settings. This option brings up the Display menu.
On the Battery
Important: If you remove the battery, you only have one minute to replace it and keep the tablet running. If you need to remove it for a longer period, be sure to save your files. Then shut down or plug in to a power source.
If you have a battery out of the tablet, you can check the charge by looking at the back side of the battery and pressing the button to the left of the lights to view the charge level.
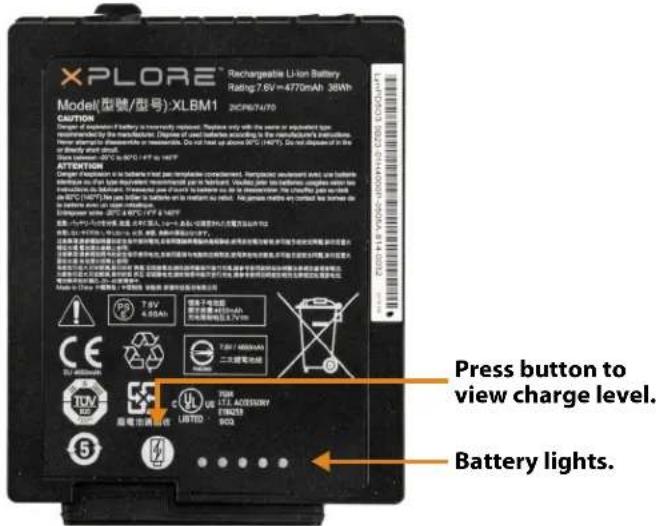
The five lights on the back of the battery indicate the current level of charge—from one light (20% charged) to five lights (100% charged).
Optimizing Battery Life or Performance
You can optimize the battery life or the performance of your tablet in a few different ways. If the tablet is plugged in, then you can optimize for performance instead of battery. If you are on battery, you can use these settings to extend the charge.
Using the Battery Icon
- Tap the Battery icon on the taskbar.
- Tap the slider to adjust for battery life or performance.
- Tap the Brightness tile in the lower left corner to adjust the brightness.
- Tap Battery Settings to display the Battery menu.


Using the Battery Menu in Settings
-
Tap Start > Settings > System > Battery to display the Battery menu.
-
In the Battery saver section, there are two check boxes. Tap the first to set the battery saver to turn on automatically and tap the second to lower screen brightness.
- This menu includes a web link on saving battery. Scroll down and tap Battery saving tips.
Removing and Replacing the Battery
Before you remove the battery, save your files and shut down the tablet, or plug in the AC adapter and continue working while the battery charges. However, if you are hot swapping the battery, you can do so while the tablet is on and running only on battery power. See Hot Swapping the Battery on page 16 (below).
Removing the Battery
- Save your files and shut down the tablet.
- With the back of the tablet facing you, slide the battery latch to the left until the latch stays open and the battery pops out slightly.
- Insert your finger under the finger tab and pull to remove the battery from the battery compartment.
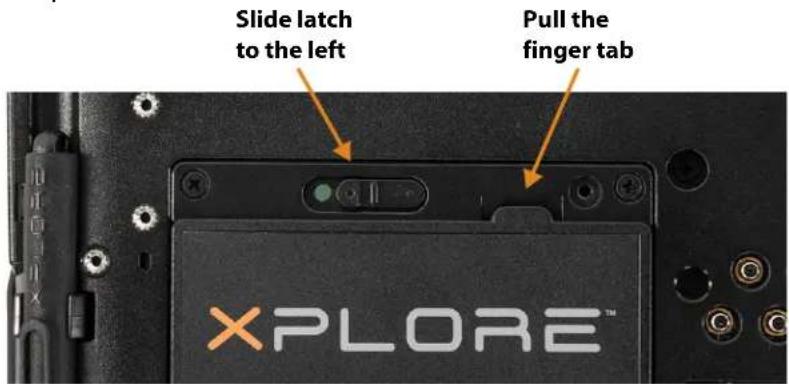
Replacing the Battery
- Place the tabbed end of the battery into the battery compartment as shown here.
- Press the battery down until it snaps into place.

Hot Swapping the Battery
Changing a battery while the tablet is on is called hot swapping. You can hot swap a battery only if you have a second, charged battery to replace it with.
Important: You have approximately one minute to hot swap the battery. If you haven't replaced the battery within one minute, the tablet goes into Sleep mode.
- Remove the battery.
- Insert the new battery.
While hot swapping the battery, notice the following behaviors:
- The tablet display gets dimmer. When the charged battery is in the tablet, the display brightens again.
- The battery status LED turns blue when the system is on and no main battery is present. When you put a charged battery in the tablet, the LED lights turn green again.
- The power button is disabled. (The power button is disabled at any time the tablet has no battery and is not running on AC power through the power adapter.)
Long-term Battery Storage
Don't store any batteries with a full charge, because this can cause a permanent loss of charging capacity. For long-term storage, ensure that the charge level is between 20% and 40% (two LEDs illuminated), and remove the battery from the tablet. Store the battery in a cool, dry environment in the temperature range 0°C to 30°C (32°F to 86°F).
Check stored batteries every 90 days to determine the charge status. If only one LED or no LED is illuminated, recharge the batteries to a level between 20% and 40%. In storage, the batteries will discharge at a rate of 10% of the total capacity per month.
Battery and Power Management Tips
To lengthen the usable life of the battery, use AC power when you can. The battery charges automatically when the tablet runs on AC power.
Tips for Saving Battery Power
- When on battery power, place the tablet in sleep mode if you are going to leave it unattended for more than a few minutes.
- You can also set the sleep mode to automatically save power by turning off the screen by tapping Start > Settings > System > Power & Sleep. Adjust the battery power under the Sleep section to just a few minutes.
Note: Remember that the screen, processor, wireless cards, and accessories all consume power from the battery, so adjust properties and disable unused accessories while on battery power. Sleep mode is very effective for saving energy.
- Close applications when you are not using them.
- Turn off wireless devices when they are not being used. See Temporarily Switching Off Wireless Devices on page 18
Conditioning the Battery
See Conditioning the Battery on page 42
Disposing of Used Batteries
A Lithium-ion (Li-ion) battery should be disposed of at a hazardous materials recycling center when it is no longer serviceable. Don't throw it away, because the battery might be put into landfill.
Managing Wireless Connections
Temporarily Switching Off Wireless Devices
Check with your airline for exact rules on using your tablet connections while traveling.
- To turn off the wireless devices in your tablet, tap the Start,

The Windows Settings menu opens.
- Tap the Network & Internet icon.

Network & Internet
Wi-Fi, airplane mode, VPN
- In the left pane, tap Airplane mode.

Airplane mode
The right pane displays the Airplane mode menu shown here.
Airplane mode
Turn this on to stop all wireless communication, such as Wi-Fi, cellular, and Bluetooth

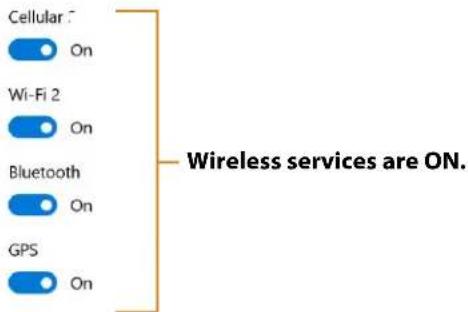
Because airplane mode is off, the menu shows which wireless devices your tablet is connected to.
Wireless devices
- In the right pane, turn Airplane mode on.
Airplane mode
Turn this on to stop all wireless communication, such as Wi-Fi, cellular, and Bluetooth

On

Airplane mode is on.
Wireless devices
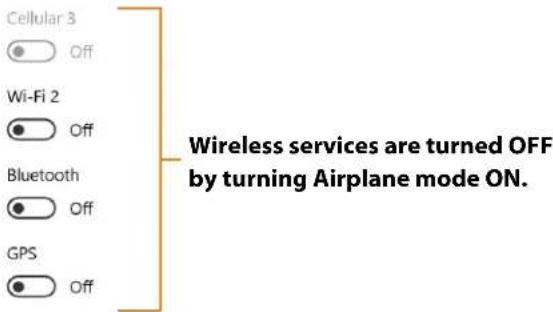
When airplane mode is on, the wireless connections are turned off.
- Turn Airplane mode off to resume the use of wireless devices on your tablet.
Connecting to a Wi-Fi Network
-
Tap the Windows Start icon, 📋, and tap the Settings icon, 🌐, above the Start icon.
-
Tap the Network & Internet icon.
Network & Internet Wi-Fi, airplane mode, VPN
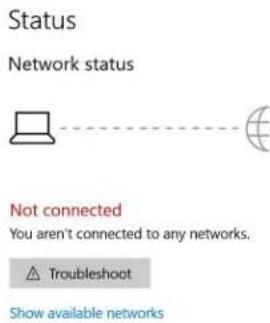
The Network & Internet menu opens and displays the network status as shown here.
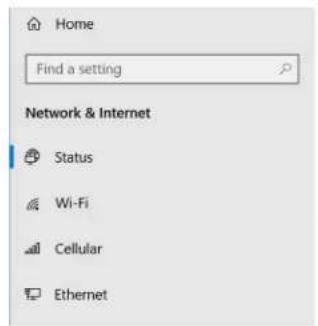
- In the left pane, tap Wi-Fi to display the Wi-Fi status.

- In the right pane, if the Wi-Fi is off, tap the Wi-Fi button to turn it on.


Note: Wi-Fi is turned on as shown here.

- Tap Show available networks.
A list of available networks pops up from the taskbar.
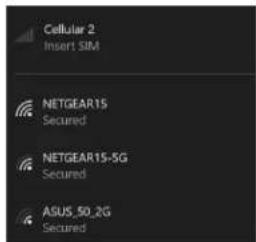
- Connect to a network as shown in this procedure.
a. Choose the network by tapping it.
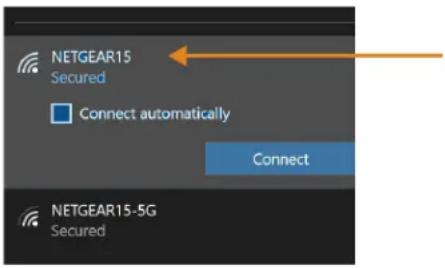
b. To use this network on a regular basis, tap Connect automatically.
The box is checked.
c. Tap the Connect button.
d. If prompted, enter the network security key. Tap Next to verify the key.
e. If you are asked to make your tablet discoverable, tap Yes if you want your tablet to be visible by other devices on the network or tap No if you do not want it to be visible on the network.
The Wi-Fi menu shows your established connection as in this example.
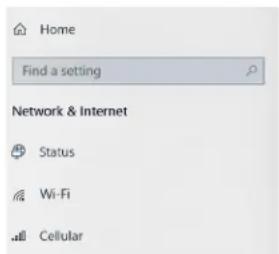
Status
Network status

You're connected to the Internet
If you have a limited data plan, you can make this network a metered connection or change other properties.
Connecting to Bluetooth Devices
You can use Bluetooth® technology to connect to accessory devices or other computers. These devices can communicate with each other when they are in range.
- Tap the Windows Start button, and the Settings icon, above it.
The Settings menu appears.
-
Tap the Devices icon. The Devices menu appears. Devices Bluetooth, printers, mouse
-
Tap Bluetooth in the left pane.
The right pane displays a slider button and nearby Bluetooth devices.


-
Tap the Bluetooth slider button to turn it On.
-
As your tablet discovers the Bluetooth devices that are turned on, you can tap them and tap Pair to begin the pairing process.
-
To make sure that your tablet is visible to other devices, find the Related Settings section.
a. To find it, you need to scroll down or look on the right side of the screen. b. Under the Related Settings section, tap More Bluetooth options.
The Bluetooth Setting form appears.
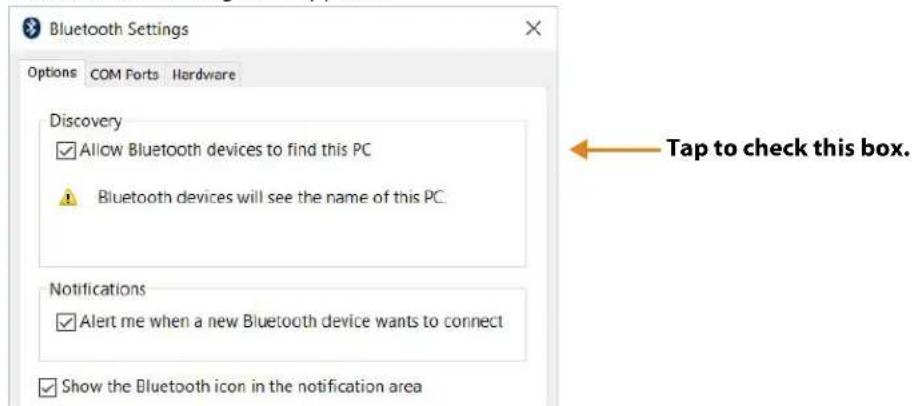
- Tap to check the box called Allow Bluetooth devices to find this PC. You might want to check the other boxes as well.
The last check box puts the Bluetooth icon in the notification area of the taskbar.
- Tap OK to close this form.
TIP: Keep the Bluetooth icon in the taskbar notification area. Tap this icon to see a pop-up menu and you can quickly access the Bluetooth and other devices menu by tapping Open Settings.
Connecting to a Mobile Broadband Network
Important: Before you can connect to a mobile broadband network, you must have your L10 tablet configured with a WWAN card, an active account with a cellular network provider and a SIM card in your tablet for mobile broadband access. This SIM card works like the SIM card in your cell phone that connects you to a network provider.
Inserting a SIM Card
The SIM card holder accommodates two Nano SIM (4FF) cards, for use with the mobile broadband option. If inserting only one SIM card, place it in the holder labeled SIM1. If inserting two SIM cards, put the card for the primary carrier in SIM1 and the card for the secondary carrier in the other SIM slot.
- Turn off the tablet.
- Remove the battery.
- Find and gently remove the SIM holder tray so the slot is empty.
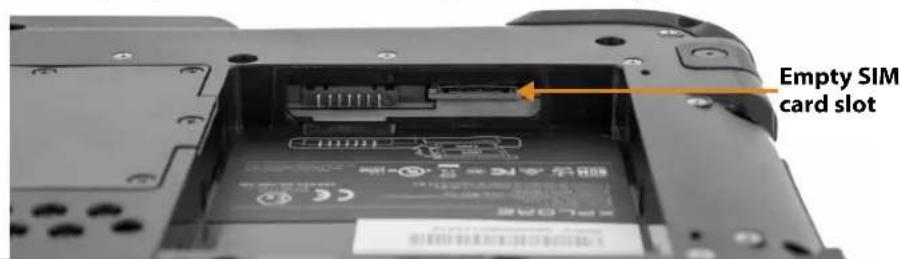

- Place the SIM card into the holder so that it is close to flush with the holder. Make sure that the SIM contacts (gold) are facing down and the notched corner is on the right side as shown in this drawing and in the graphic inside the battery bay of the tablet.

The holder can hold two SIM cards. If you have two SIM cards, insert the second one into the holder in the same way.
- Carefully take the SIM holder and align it with the opening of the SIM holder connector. Gently slide the SIM holder tray into the connector until it stops.
- Put the battery back in the tablet. See Replacing the Battery on page 16.
Setting Up Mobile Broadband
With the SIM card inserted properly and an active account with a cellular network provider, you can connect to a mobile broadband network.
- Tap the Start icon.


- Tap the Network & Internet icon.

Network & Internet Wi-Fi, airplane mode, VPN
The Network & Internet menu opens and shows the Status pane.
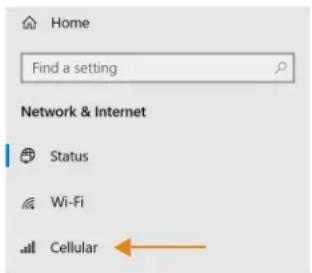
- Tap Cellular in the left pane.
Status
Network status

You're connected to the Internet
If you have a limited data plan, you can make this network a metered connection or change other properties.
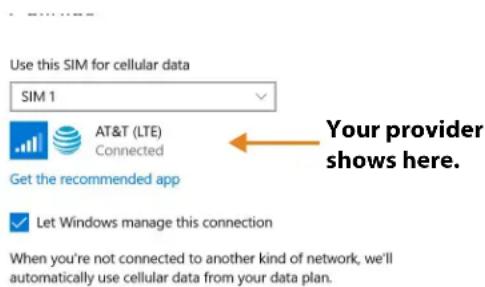
The Cellular menu is displayed.
- The mobile broadband detects the SIM from your provider and automatically connects. This might take a few minutes the first time the SIM is used in a new or in a different tablet.

Switching to a Second Broadband Provider
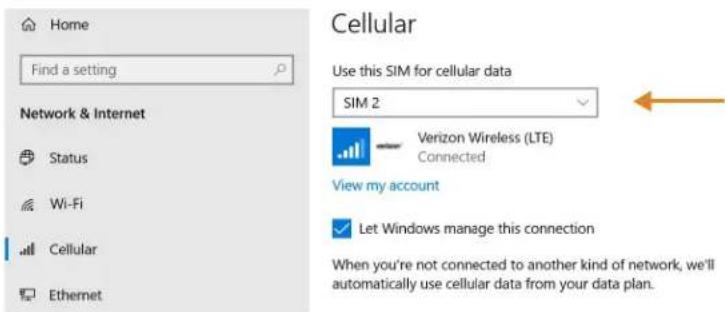
If you have two SIM cards or two broadband providers, you can switch between the SIM cards.
- Tap the Start icon and tap the Settings icon, .

-
Tap the Network & Internet icon.
-
In the left pane, tap Cellular.
-
In the Cellular menu, tap the card field and switch to the second SIM card.
-
Wait for it to connect. This can take a few minutes.
Managing Cellular Connections
You can let Windows manage your cellular connections by default as shown in the previous procedure or you can manage the connection manually.
Letting Windows Manage Connections
If you let Windows manage your connections, it will automatically connect you to your cellular network. When you are NOT connected to another kind of network, Windows will automatically use cellular data from your data plan. This can be very convenient.
Note: Letting Windows manage the connections might use excessive data if you do not monitor the usage.
Managing Cellular Connections Yourself
-
Tap to uncheck Let Windows manage this connection and connect manually each time you want to use your cellular data.
-
To choose a cellular network, you need to tap the Start icon and then the Settings icon.
-
Tap the Network & Internet icon.
-
Tap the Cellular icon to display the Cellular menu.
-
Tap Connect to access the cellular provider manually.
-
To disconnect from a cellular connection, return to the Cellular menu and tap Disconnect.
Using Global Navigation Satellite System (GNSS)
Your L10 tablet might be equipped with an optional, embedded mobile broadband with GNSS or embedded GNSS with Standard-Based Augmentation System (SBAS). See Optional Features on page 2.
Use the information in this section to enable location services. To use location services, you do not need a network connection or an account with a mobile broadband network carrier.
Enabling Location Services
-
Tap Start icon and tap the Settings icon above it.
-
Tap the Privacy icon. Privacy Location, camera
-
In the left pane, under App permissions tap Location. Location
-
Tap the Location service switch to turn it on.
Note: The virtual communications port, which is assigned to the location services receiver by Windows, can be viewed in the Device Manager.
Know Your Tablet
You can access information about your L10 tablet by tapping the Know Your Tablet application on the desktop. This icon has 4 icons that provide access to information, support, and accessories.
PC Information
The System Information window displays information about the BIOS, the battery, the network adapters, the hard disk. This information is stored on the solid-state drive (SSD) in your tablet.
Documentation (online)
Tap this tile to access the web site for the user documentation. You can view, bookmark, print, and download the documentation for of Xplore® tablets and accessories.
The PDF files are best viewed with Adobe Acrobat Reader DC.
Support (online)
Tap this tile to open the Xplore web site, where you can access these sites and pages:
- Product support
- User documentation
- Software downloads
- Knowledge base
• Repair status and RMA status - Warranty information
- Registration
- TPM notification for security advisory
Accessories (online)
Tap this tile to open the Xplore web site for accessories.
Here you can find information on many products that go with your tablet, including:
- Docking stations
- Power devices, including batteries, chargers, and power adapters
- Input devices, such as pens, keyboards, and dongles
- Carrying cases and straps
- Apparatus for travel and use in vehicles
Using Sleep Mode
Use Sleep mode when you go away for a short period of time. This mode conserves battery power while you're away and when you return, your desktop is the same as you left it.
Putting the Tablet into Sleep Mode
There are several ways to turn on sleep mode.
Using the Power Button on Your L10 Tablet
-
Save your files. (This step is not required, but it is a good precaution.)
-
Press and release the oval Power button on the right side of the tablet.
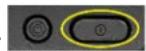
The screen goes dark and the computer enters sleep mode. The system status indicator will start to blink when the system has entered sleep mode.
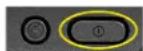
- You can wake the tablet up by pressing the Power button again.
Using the Power Icon Menu
- Tap the Start icon, 📋, and tap the Power icon, Ⓧ, just above it.
A small menu pops up.
- Tap Sleep.
The screen goes dark and the computer enters sleep mode.
- You can wake the tablet up by pressing the Power button, button.
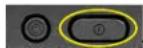
or the Home
Using the Settings > System > Power & Sleep Menu
-
Tap the Start icon, 📋, and tap the Settings icon, Ⓧ, above it.
-
Tap the System icon, 📄 System Display, sound, notifications, power
-
In the left pane, tap Power & Sleep.
-
Use the Power & Sleep menu to set the timing for sleep mode.
Waking the Tablet from Sleep Mode
- Press and release the oval power button the right side of the tablet.
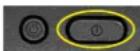
The screen lights up.
- If you have security enabled on your tablet, you need to unlock your tablet.
Using the XPAD Function Buttons
You can use the programmable function buttons on the front of the XPAD L10 tablet to open files and to perform many functions without having to use the pen. You can also customize the buttons by modifying their functions.

Default Button Functions
| Action you take to activate the button functions | ||
| Button | Press | Press and hold |
| Button 1 | Opens Know Your Tablet application | Windows® OneNote |
| Button 2 | Opens the Pictures folder | Opens Tablet PC Setting |
Configuring the Function Buttons
As you become more familiar with your tablet, you can customize the programmable function buttons. You can configure the buttons to start your favorite program, run a command, or enter a keystroke combination.
- Put your cursor in the Windows Settings search field.
Windows Settings

- Type buttons into the search bar.
The search displays a topic titled Set tablet buttons to perform certain tasks.
Note: If you do not see this choice, scroll down through the resulting list, or enter tablet buttons in the search bar.
- Tap Set tablet buttons to perform certain tasks.
The Tablet PC Settings window appears and the Buttons tab is displayed.
Close or minimize the Windows Settings menu if it covers too much of the screen.
- Tap the tablet button that you want to change.

- Tap the Change button.
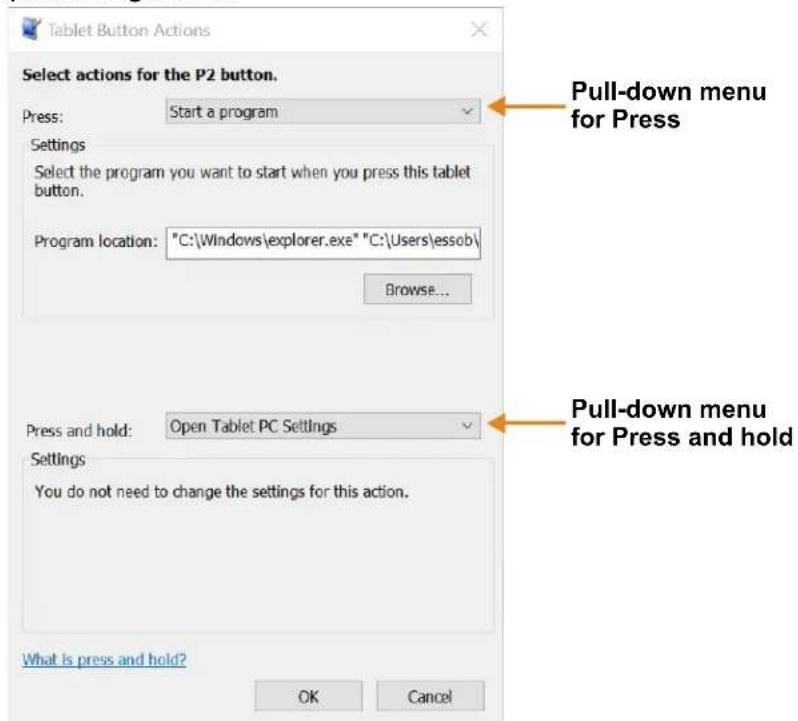
- You can select an action for Press and another action for Press and hold.
a. For example, next to Press, tap the pull-down menu and select an action for the button when you press it.
b. Next to Press and hold, tap the pull-down menu and select an action for the button when you press and hold it for a bit longer.
For some actions, you must enter more information, such as the location of a program to start.
- Tap OK to confirm the changes.
- To change the functions of the other tablet button, repeat steps 4 to 6 in this procedure.
- Test the button changes to verify the new functions.
Note: To reset the buttons to their default values, tap the Reset button.
Using the Cameras
Your L10 tablet includes front and back cameras. It is necessary to use an application to enable either of the cameras. Applications that record video or perform video conferencing will recognize these cameras and enable them as required.
The white indicator LED will turn on when either the front or back camera is active.
Front Camera
The front camera is a 2 megapixel camera that supports color images and streaming video. It's on the front of your tablet so it can be used for web-based audio/video communication, such as the Skype® application. The camera software is part of Windows 10.
Rear Camera
You can use the back camera to take pictures or videos and save them to your hard drive. The rear camera is a 13-megapixel, autofocus camera. The camera lens is on the back of the tablet and includes a light to illuminate the subject. The camera software is part of Windows 10.
Rear Camera Tips
- Hold the camera steady and give it a few seconds to focus.
- If your pen is tethered, ensure that the tether is not in front of the camera lens.
- If a soft handle is attached, ensure it is being held away from the camera lens.
- Make sure you have adequate lighting to take your photo. If not, use the flash.
Putting the Camera Icon on Your Taskbar
- Tap the Start icon to view the Desktop tiles.
- When you tap the Windows Start icon, the camera tile (or icon) might be among the larger pinned tiles on the desktop. If it is displayed, you can press and hold it and drag it to the taskbar. Go to step 8 below.
or
For a more complete listing, view the smaller tiles under All apps to find the Camera tile as in the next step. - Tap the All apps icon in the upper left corner.
- Locate the Camera tile.
- Press and hold the Camera tile until you see a pop-up menu.
- Release the tile and tap More to view another pop-up menu.
- Tap Pin to taskbar to put the icon on the taskbar.
Note: You can add any tile/icon to the taskbar by following steps 5 to 7 in this procedure.
-
Tap the Camera icon on the taskbar to start the camera application.
-
Tap the Settings icon in the upper right of the application to adjust the camera.

- To remove the icon from the taskbar, press and hold the icon when the application is NOT in use. Release the icon and tap Unpin from taskbar to remove the icon.
Note: You can remove any icon from the taskbar by following this last step.
Using the Built-in Microphones
You can use the built-in array microphones to record audio, dictate notes, and use voice commands. The two microphones work together to optimize sound detection for speech recognition and voice recording. It is necessary to use an application to enable the microphones. Applications that record video, sound or perform video conferencing recognize these microphones and enable them.
By default, windows will route audio through the 3.5 mm jack when an audio device is plugged in to the audio jack on the left side of the tablet.
Using Integrated Optional Features
Using the Barcode Scanner (XPAD Only)
The optional XPAD L10 scanner is a factory-installed device consisting of a barcode optical image reader and hardware decoder. The scanner is built in to the handle of the XPAD L10 tablet
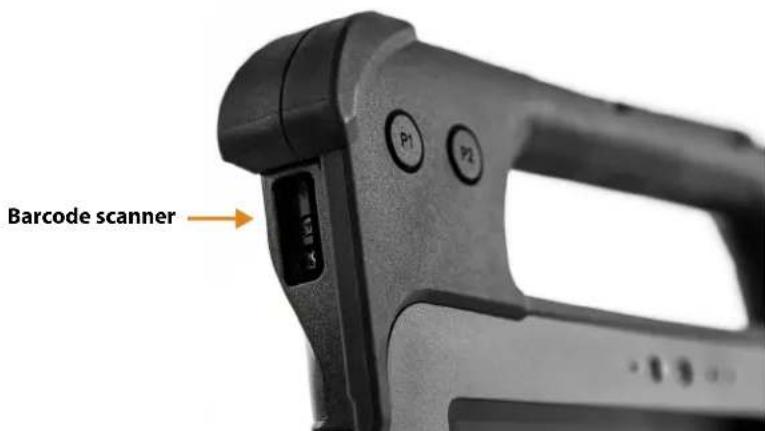
-
On the tablet, open the application software that is going to receive the barcode data and put the active cursor in the appropriate field of that software.
-
Aim the scanner lens at the barcode.
-
Press and hold the Barcode Scanning button on top of the handle. Ensure that the red scan beam covers the entire barcode.

- If the scan is successful, there is a confirmation beep and the data appears in the application.
The L10 barcode scanner supports several different types of barcodes—a minimum set of barcodes is enabled at the factory.
The following barcode symbologies are enabled by default:
| Aztec Code Datam | matrix Macro PDF417 | |
| Code 128 EAN/Jan-8 | Micro PDF417 | |
| Code 39 | EAN/Jan-13 | PDF417 |
| Code 93 | GS1-128 | QR Code |
| Code128 | GS1-Databar | UPC-A |
| Codeabar | Interleaved 2 of 5 | UPC-E |
Other barcode types can be enabled by using the EZConfig application, which can be found in this directory:
C:\DRIVERS\barcode_reader\
This software is already on your disk if you have the barcode scanner.
Barcode Scanning Tips
- You typically get the best scans if the lens is six to seven inches from the barcode.
- Make sure that the barcode fits completely inside the boundaries of the scan beam.
- If you have trouble scanning a barcode, then use two hands to steady the tablet while you scan.
Using the RFID/NFC Reader
If your L10 Tablet PC includes the factory-installed integrated RFID reader option, you can use it to retrieve information from RFID tags.
The L10 RFID/NFC reader supports the following formats:
• ISO/IEC 14443A/B
• ISO/IEC 15693
• MIFARE 1K/4K
• MIFARE DESFire
• Sony FeliCa (ISO/IEC 180982 (Ecma 340) standard
• NFCIP-1 and NFCIP-2
Accessing a Sample RFID Reader Application
To test that your RFID/NFC reader is working follow these steps.
- Open the Microsoft Store application by tapping the icon on the task bar.

- When the web site opens, tap the Search icon to the right, type TagWriter in the search bar, and press Enter or tap the Looking glass icon.
The TagWriter Icon is displayed.

-
Tap the TagWriter icon to display a description of it. This software is free.
-
To download this application, tap Get.
The download begins and installs the software.
-
From the Microsoft Store on screen, tap Pin to Start, to put the icon on your Start menu.
-
Tap the Start icon. 📋, and tap the TagWriter icon to start the software.

The TagWriter software appears.
- Tap the Read icon.

The tablet is in read mode.
- Read mode is ready.

- If the scanner reads the object, the screen displays this message.
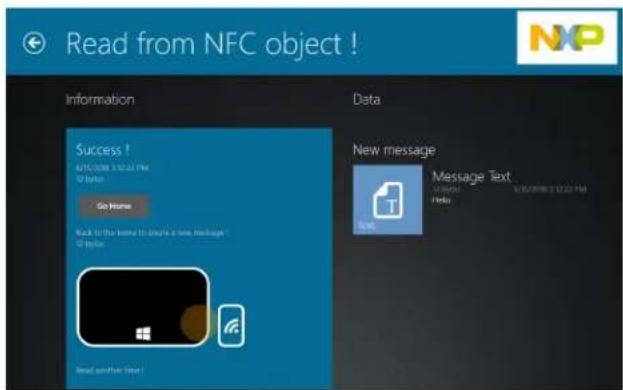
Note: RFID tags are typically used with specialized applications. See your system administrator for more information.
Using the Fingerprint Reader
You can use the fingerprint reader to log on to the Tablet PC by scanning your fingerprint instead of entering a password. This feature provides an additional level of security for the tablet.
Note: These instructions assume that you have a password for logging into your tablet.
Setting Up a PIN
Important: To use the fingerprint reader, you need to set up a PIN. If you already have a PIN, then you can skip these steps and go to Setting Up the Fingerprint Reader on page 35. below.
- Tap the Windows Start icon, and tap the Settings icon, .

The Settings window appears.
- Tap the Accounts icon.

Accounts
The Accounts window appears.
Your accounts, email, sync,
-
In the left pane, tap Sign-in options.
-
In the right pane of the Sign-in options, under Pin, tap Add.
-
Enter your PIN and tap OK.
Now you can set up the fingerprint reader.
Setting Up the Fingerprint Reader
After you have a PIN, the Windows Hello section of the Sign-in Options is enabled and you can set up your fingerprint.
- Tap the Windows Start icon, and tap the Settings icon above it.
The Windows Settings menu appears.
- Tap the Accounts icon.

Accounts
Your accounts, email, sync,
-
Tap Sign-in options in the left pane.
-
In the Windows Hello section under Fingerprint, tap Set up.
A welcome window appears.
-
In this window, tap Get started.
-
Enter your PIN.
-
Decide which finger to use.
-
The setup asks you to place your finger on the fingerprint reader a few times for it to map your finger
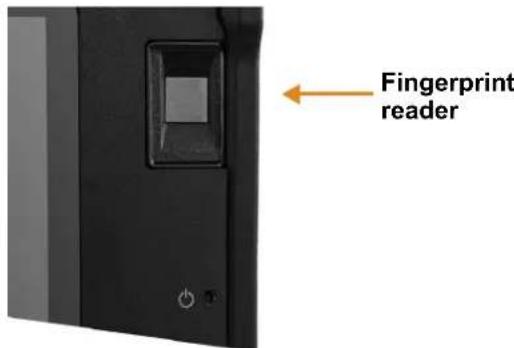
It prompts you to touch the sensor multiple times and from different angles. Follow the instructions as you are registering your fingerprint.
- When successful, tap Close.
Next time you log in, you can use your PIN or you can use your finger on the fingerprint reader.
Note: You can register more than one finger to use with this reader. Keep in mind which fingers you have established with the reader and use only those fingers.
Logging In with Your Fingerprint
- When you start the tablet or wake it up from sleep mode, put your finger on the fingerprint scanner and press it for a brief time.
It will either recognize your print and open up Windows or it will ask you to try again.
Fingerprint Reader Tips
- Be consistent. Press the finger to the scanner and hold it there for a moment and scan at the same angle each time. For example, if you register your finger with your hand open, hold your hand the same way each time you scan.
- Read the prompts carefully and ensure that you wait for the prompt before you swipe.
- When scanning, press hard enough to fully contact the sensor.
- Wipe dirt or debris off your finger before scanning it so nothing interferes with the scan. Rub your fingers together to stimulate the natural skin oils so your fingerprint is easier to detect.
- If you are having trouble registering a specific finger, try to register a different finger.
- If you are repeatedly having trouble getting a good scan, you might need to clean the sensor. See Cleaning the Fingerprint Reader on page 42.
Note: Be sure to press your finger to the scanner in the same way each time.
Using the SD Card Reader
The L10 tablet includes an SD card slot for adding an SD memory card. The memory card provides extra storage for media files from your camera, videos, downloaded files, and data from other devices.

Inserting an SD Card
- Turn off the tablet.
- Open the port cover of the left side of the tablet and locate the SD card slot.
- Push the SD card with the contacts facing down into the slot until it clicks into place.
- Resume using the tablet.
Removing an SD card
- Turn off the tablet.
- Open the port cover.
- Push the card in slightly until it pops out.
- Resume using the tablet.
Locating Your Serial Number
You can locate the serial number for your L10 tablet in these places:
- White label underneath the battery, which is located on the back of the tablet. The number begins with "S/N." To remove the battery, see Removing and Replacing the Battery on page 16.
- Tap the Start > Settings icons to display the Windows Settings menu. Tap the System icon and scroll to the bottom of the left pane and tap About. Under Device specifications, the serial number is designated by Product ID.
Backing Up Your Files
To protect against loss or accidental deletion, schedule backups to occur automatically on a regular basis. Windows 10 has a backup tool called File History that you can use to configure what you want to back up and to schedule backups on a regular basis. You can use File History to make automatic backup copies of your files onto an external hard disk or network drive. It works with folders and files stored in your Windows libraries, which include your Documents, Music, Photos, and Videos folders as well your Favorites, Contacts, and files on your desktop.
File History performs continuous incremental backups that allow you to save multiple versions of a file or document. If you accidentally delete a file or need to revert to a previous version of that file, you can easily step back through the various saved versions of that file in order to locate the version that you need.
By default, File History makes hourly back-ups, but you can specify the frequency yourself, choosing anything from 10 minutes to a single daily back-up. You can also specify how long you want File History to keep old versions of your files.
Scheduling Backups with File History
-
On the taskbar, tap the Start icon, and tap the Settings icon, above it.
-
Tap the Update & Security icon. Update & Security Windows Update, recovery.
-
Tap Backup in the left pane to display the Backup menu in the right pane.
-
Tap the Add a Drive icon.
-
Tap to pick a device for storing your backup, such as a USB memory device or a network drive. Be sure the drive is connected.
-
Under the Add a Drive command, tap More Options.
The Backup options Overview menu is displayed.
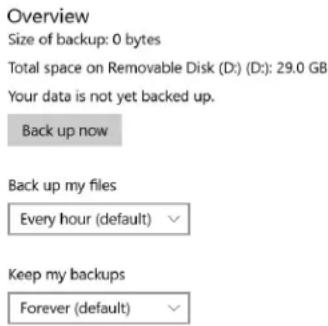
Back up these folders

Add a folder
- In the Backup Overview menu, choose your options and folders to backup.
a. Specify how often to back up your files, such as every hour or every day.
b. Specify how long to keep your backup files.
c. Choose the folders to back up by tapping Add a Folder. To exclude folders already listed, tap the folders and tap Remove.
- To start backing up immediately, tap the Back up now button, or let your backup settings run automatically.
Restoring Backups with File History
- On the taskbar, tap the Start icon, and tap the Settings icon, above it.
- Tap the Update & Security icon.
- Tap Backup in the left pane to display the Backup menu in the right pane.
- Tap More options to display the Backup options menu.
- Scroll down to Related settings.
- To restore files, tap Restore Files from a current backup.
A window displays the data to back up.
- Tap the data you want to back up.
- Tap the green circle on the bottom of the window.
The backup begins.

Restoring Your System
If your PC isn't running well, resetting it might help.
This action lets you choose to keep your personal files or to remove them and then reinstalls Windows.
Important: If you choose to remove your files, make sure they are backed up on an external drive or memory device.
- On the taskbar, tap the Start button.

and tap the Settings icon,

- Tap the Update & Security icon.

Update & Security
Windows Update, recovery, backup
- Tap Recovery in the left pane to display the Recovery menu in the right pane.
- Under Reset This PC, tap the Get Started button and follow the directions.
Note: If you have created a full system recovery image, including Windows, applications, and your files, then follow the instructions under Advanced startup instead of Reset this PC on the Recovery menu.
Caring for the L10 Tablet 3
Proper care and maintenance will keep your Xplore™ L10 Tablet PC working and in good condition. For general information about care of the tablet and its components and accessories, see the Safety and Regulatory Guide.

Warning: Follow the guidelines listed below when caring for your L10 tablet and its components. Improper use can damage the tablet and its components and void the warranty.
General Care
- Protect the L10 tablet from exposure to extreme temperatures, shock, liquids, and strong magnetic fields.
- Don't place heavy objects on top of the tablet.
- If you're storing the tablet for a long time, unplug the power adapter and remove the battery after partially discharging it.
- Don't open the housing that encloses the tablet. There are no user-serviceable components inside. Opening the housing will void your warranty.
Caring for the Display
Follow these suggestions to keep your display clean:
- Clean fingerprints and smudges from the display surface by wiping it with the cloth provided.
- If liquid is spilled on the display, wipe it up immediately with a soft cloth like the one provided with the tablet.
- Use only the L10 pen or your finger to write on the display. Any other object could damage the display surface.
- Protect the display surface from unnecessary contact by using a carry case when transporting the tablet.
- Avoid exposing the display to direct sunlight for long periods of time.
- Every L10 ships from factory with a protective display film.
- You can purchase additional protective display films as well as protective carrying cases from your local Xplore Authorized Reseller.
You can view a range of products specifically for your L10 tablet on the Accessories page. The display films and cleaning cloths are in the Other section.
Caring for the Pen
If you use an active (digitizer) pen with your tablet:
- Store the active (digitizer) pen in the pen holder when not in use.
- Avoid storing the pen vertically on its tip. It can damage the pen-to-digitizer function.
- Keep the pen away from any liquid, because the pen contains electronic components that can be damaged when wet.
- In certain environments, particles or debris can stick to the pen tip or the tablet display. Make sure you wipe off the pen with a soft cloth to avoid scratching the display.
- If you need a new active pen or a stylus tip kit, check the Accessories page for the L10 tablet on the Xplore web site. Open the Input Devices section to see the pens and the Stylus Tip Kit for tip replacement. There art two passive pens as well. Check with your authorized reseller to order.
If you use a capacitive pen with your tablet, the pens are listed on the Accessories page in the Input Devices section.
Cleaning the Fingerprint Reader
Under normal circumstances, you should clean the fingerprint reader once a month, or whenever necessary.
To clean the fingerprint reader, gently rub the sensor surface with the cloth that is included with the tablet or any microfiber cloth.
You can use a small amount of alcohol or warm soapy water from time to time to clean the reader surface. Dry it off after cleaning.

Warning: Don't use bleach, solvents, or abrasives.
Conditioning the Battery
To maximize the performance of the battery, condition the battery once a month. To condition it, run the tablet on battery power until the battery's charge level drops below 20%. Then use AC power until it is fully charged.
For more information about batteries, see Using the Battery on page 14.
Traveling with Your L10 Tablet PC
Use the following tips when you travel with your L10 Tablet PC:
- Put the L10 tablet in a case to protect the display. Xplore Technologies® sells a variety of cases for the L10 tablet. You can see the case on the Accessories web page. can You can purchase one from an Xplore Authorized Reseller.
- Store the pen in the pen bay located on the tablet.
- Pack the L10 tablet securely in a briefcase or hand-carried luggage and keep it separate from toiletries, liquids, and food. Don't pack it in checked luggage.
- Before extended use in the field or long trips away from AC power, adjust the power properties to maximize battery conservation.
- For international travel, you need either a travel plug adapter or the AC power cord that is appropriate for the country that you are visiting. The travel plug adapter can be found in most airports and travel stores. The regional AC power cord can be purchased from an Xplore Authorized Reseller.
- You don't need to buy a voltage converter; the AC adapter will automatically adjust to different voltages.
- You might want to carry proof of ownership or a merchandise passport when traveling internationally.
- Consult your insurance and credit card companies to learn about emergency travel assistance in case your tablet becomes lost or disabled.
- IMPORTANT: Don't carry your tablet through a metal detector.
- Turn off the tablet or place it in airplane mode for takeoff and landing. Check with the airline for rules on using your tablet and Wi-Fi while traveling. You can turn off all of your wireless devices temporarily with airplane mode. See Temporarily Switching Off Wireless Devices on page 18.

Danger: Don't transport Li-ion batteries in checked baggage. The baggage hold can get very hot, which can cause the Li-ion battery to overheat and result in a possible explosion.
Troubleshooting and FAQs
4
Xplore® Tablet PCs are thoroughly tested for performance and quality, but occasionally issues can still occur. If you don't find the information you're looking for in this section, go to Xplore Support. You can tap the country site, where it says USA, to change to another region and language.
Note: Enterprise users should contact their support organization for assistance with resolving tablet, application, or connectivity issues.
Use the information in this section to identify and resolve common issues. If an issue has more than one potential cause, the most common cause is listed first. u
Battery and Power Issues
The tablet does not power on.
Before powering up the L10 tablet for the first time, you need to connect the tablet to AC Power to charge it up. The system will ship with all batteries in Ship Mode to prevent discharging.
For best performance, verify that you are using the AC adapter that shipped with the L10 tablet.
The tablet does not return from Hibernate mode while on battery power.
The battery might be depleted. Plug the power adapter into an AC outlet and into the tablet.
The power button is blinking but nothing is happening.
The tablet is in Sleep mode. Press the Power button to wake up the tablet.
Extending Battery Power
The L10 tablet comes with a power plan to extend battery life.
However, you might want to adjust some features manually with the Battery icon.
- Tap the Battery icon in the notification area of the taskbar.

- Tap the slider menu to adjust between better performance and battery life.

- Tap the brightness tile in the lower left corner to adjust the brightness.

- You can also tap Battery Settings on this menu to make adjustments to the Battery saver. See also Optimizing Battery Life or Performance on page 15 and Battery and Power Management Tips on page 17.
Shutting Down Issues
The tablet is unresponsive.
An application might have stopped responding. If this is the case, follow these steps.
- Press the round button on the right side of the tablet frame.
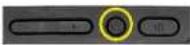
-
Tap Task Manager.
-
Select the application that isn't responding.
-
Tap the End task button in the lower right corner.
-
When it stops, you can try using the tablet or shutting down.
-
To shut down the tablet, tap the Start icon and the Power icon above it.

- Tap Restart or Shut down.
The tablet does not shut down.
If you have tried to close or stop all applications and the tablet will not shut down, then follow this procedure.
Shutting down the tablet
Use these measures only if absolutely necessary.
- Press and hold the Power button on the right side of the tablet for five seconds to force the tablet to shut down. Then release the button.
If the tablet will NOT shut down after holding the power button for five seconds, use the kill switch to force it as explained in the next step. Use this switch only when all else fails.
- In extreme cases when the tablet will NOT shut down, insert the tip of the tablet pen, or open up a paper clip and insert the protruding straightened end into the kill switch on the front of the tablet.

Display Issues
The display is too dim.
The display brightness might be set too low. Use the power mode menu to adjust the brightness.
Use the battery icon Power mode menu.
- Tap the Battery icon in the Notification area of the taskbar.

The Power mode menu pops up.
- Tap the Brightness tile in the lower left corner. Tap it until you get the brightness you want.
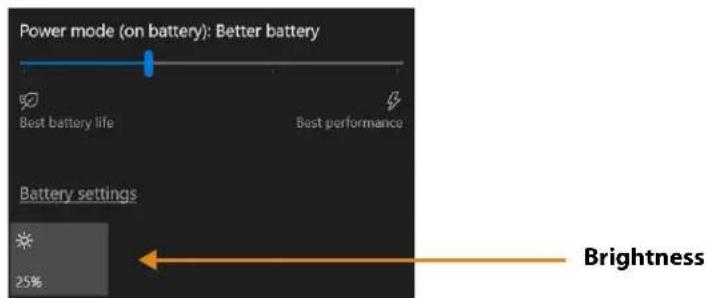
Use the Display menu to make adjustments.
-
You can also access the Settings menu, tap the System icon and use the Display menu to adjust the brightness.
-
Move the brightness slider to the desired level.
-
You can also let the tablet adjust brightness automatically by turning on Change brightness automatically when lighting changes.
The display is unreadable or distorted.
The screen resolution and color quality might not be set correctly.
Use the Display menu to reset the display settings.
- Tap the Windows Start button and tap the Settings icon.
- Tap the System icon.
The default menu is Display.
- Tap the resolution field on the Display menu.
- Set the resolution until the display appears normal.
a. The preferred resolution setting for the L10 tablet is 1920 by 1200.
b. You might also want to adjust the sizing of the items on the screen. In the Scale and layout section, the recommended size is 150%.
The display goes black while the Tablet PC is still turned on.
The possibilities include:
- The tablet might have turned off the display to save power. To restore the display, tap the screen with your finger or the pen.
- The tablet might have gone into Sleep mode. Press and hold the oval Power button for about one second.
- The tablet might have gone into low-battery Hibernation mode. In Hibernation mode, the power status light is off. Plug the tablet in to AC power, then press and hold the power button for about one second.
Pen Issues
The tablet doesn't respond to the pen I am using.
- Use only the L10 pens with the L10 tablet as seen on the Accessories section under Input Devices on the Xplore web site. The tablet might not respond to other digitizer pens. See Pens for the L10 Tablets on page 6.
- If you have a long capacitive ePen with a battery, check the battery.
Keyboard Issues
On-screen instructions require me to press Enter or Esc, but I don't have a keyboard.
You can use the touch keyboard on screen. Tap to open it in the lower right corner of the taskbar.
Choosing Keyboards
In the upper left corner of the touch keyboards, there is a Touch keyboard icon. This icon gives you choices of other keyboards. The most complete keyboard is the one in the upper right corner of the pop-up keyboard choices. Another good keyboard is the one in the upper left corner.
- Tap the Keyboard icon on the taskbar.
- When it opens, tap the Keyboard icon in the upper left corner above the
keyboard.
You'll see a pop-up menu of keyboards to choose from.


- Tap the one on the left for the default.

- Tap the icon in the upper right for the most complete keyboard, which has traditional
Enter and Esc keys.

- Close the keyboard by tapping the X in the upper right.
The next time you open the keyboard, it will display your choice.
Network Issues
The wireless adapter keeps connecting even when I don't want it to.
Turn off the wireless connection from the Windows Settings menu.
-
Tap the Windows Start icon,
, and tap the Settings icon, , above it. -
Tap the Network & Internet icon.

The Windows Network & Internet menu opens.
- Tap the Wi-Fi button in the left pane.
The Wi-Fi menu appears in the right pane.
-
Tap Show available networks.
-
Tap Disconnect to turn off the connection.
Note: You can also turn off Wi-Fi completely by tapping the Wi-Fi button on the menu.
Wi-Fi

Show available networks
Ethernet Issues
- The connection might be loose. Remove the Ethernet cable and reconnect it.
- The Ethernet network might be experiencing problems. Check with someone near you to determine if he or she has network access.
- Replace the Ethernet cable.
Wi-Fi Issues
Here are possible reasons your tablet is not connecting to a Wi-Fi network:
- Make sure that your Wi-Fi is turned on.
• See Connecting to a Wi-Fi Network on page 19 for how to connect to a Wi-Fi network. - You might not have access to the network. Obtain a user name and password from a network administrator.
- The security settings in your tablet might prevent a connection. For example, the network might not be broadcasting the network name (SSID) or encryption might be required. Check with your network administrator.
Bluetooth Issues
If you are having trouble with connecting with Bluetooth, see Connecting to Bluetooth Devices on page 21.
Bluetooth Tips
Xplore Technologies® and its Bluetooth® partners have worked to ensure a positive experience with this technology and to ensure Bluetooth interoperability. In doing so, we have found the following issues:
- Interference
If you're running Bluetooth and Wi-Fi® at the same time, interference can affect the Bluetooth performance. This is most noticeable if:
- You try to transfer large amounts of data, such as with file transfers.
- Several Bluetooth devices are operating in an office simultaneously.
- Speech Recognition
Bluetooth audio has not been fully developed for speech recognition. Therefore, for speech recognition, we recommend that you not use a Bluetooth wireless headset.
- Disconnection
Some Bluetooth devices disconnect when they go into power-saving mode. Most devices automatically reconnect when they become active again.
- Interoperability
If you are having issues with interoperability of Bluetooth devices, contact the manufacturer of your Bluetooth device and check its compatibility with the Bluetooth software installed on your Tablet PC.
Mobile Broadband Issues
• See Connecting to a Mobile Broadband Network on page 22.
Audio Issues
No sound is coming from the built-in or external speakers.
- Ensure that nothing is connected to the audio in/out port. Connecting headphones or external speakers disables the built-in speaker by default.
- The volume might be set too low or muted.
a. In the Notification area on the taskbar, tap the Speaker icon, and adjust the volume.
or
b. Turn up the volume with the long oval button on the right side of the tablet.

- The integrated audio components might have been overwritten. If you install a third-party audio device (such as a USB or Bluetooth device), the integrated audio might stop working. If this happens, reinstall the audio drivers. After you install these, if you still have issues with audio, contact your system administrator or service provider.
System Issues
I forgot my BIOS password and cannot access my tablet.
- You can enter several incorrect passwords before the BIOS temporarily locks the system. You can try again by restarting the system. If you still can't log on, contact your system administrator.
The tablet seems to be operating slower than usual.
- Reboot the tablet.
- The hard drive might be full or nearly full. You can free up space on your drive. Type disk cleanup in the search field and then select Free up disk space on this PC from the search results.
Frequently Asked Questions
How can I make the battery charge last longer?
- You can tap the Battery icon on the taskbar and make adjustments to the power use with the slider bar and adjust the screen brightness by tapping in the lower left corner. See Checking Battery Power on page 14 for details.
- Turn off unused devices, such as Wi-Fi and mobile broadband networks. See Temporarily Switching Off Wireless Devices on page 18.
How do I clean the display screen?
To clean the display screen, wipe it with a soft cloth (like the microfiber cloth supplied). Don't spray cleaners, pour abrasive liquids, or wipe any abrasive cleaner on the screen or any surface of the L10 tablet. Don't use tissues or paper towels to clean the screen. They contain wood fibers that might scratch the surface.
Tip: You can use a small amount of alcohol or warm soapy water from time to time. Do not pour the liquids on the screen. Apply either liquid to the microfiber cloth and clean the screen surface with it. Dry the screen after cleaning.
Will scratches affect the performance of the display or digitizer?
Our testing has not found appreciable loss of performance on a scratched display.
How sensitive is the screen to various elements?
As with any computer or electronic device, you should protect the tablet from liquids, dirt and sand, other contaminants, and extreme heat.
Will any monitor, USB device, keyboard, or mouse work with the L10 tablet?
If the device has a driver for Windows, it will work with the tablet. For a list of products that have been tested for Windows, search for the "Windows Marketplace Tested Products" page on the Microsoft web site.
The Xplore keyboards compatible with the L10 tablet, are in the Accessories section under Input Devices on the Xplore web site.
How do I adjust the L10 tablet for left-handed use?
- In the Start > Settings menu, tap the Devices icon.
- In the left pane, tap Pen & Windows Ink.
- In the Pen field at the top, tap to choose which hand you use.
How can I stop the display screen from rotating automatically?
- Tap the Start icon,

and the Settings icon,

, above it.
- Tap System. The System menu appears.
- Make sure that Display is selected in the left pane.
- Turn on the Rotation lock button under Orientation.
The screen will not rotate the display until you turn this button off.
What do I need to use the L10 tablet in another country?
- You need either a travel plug adapter or the AC power cord that is appropriate for the country that you are visiting. The travel plug adapter can be found in most airports and travel stores. The regional AC power cord can be purchased from Xplore™ resellers.
- You don't need a voltage converter. The AC adapter automatically adjusts to different voltages.
Where can I learn more about my tablet?
- To learn more about the L10 tablet, see our Training tutorials and Knowledge base articles.
- Check out our SUPPORT site for everything from phone support to training.
- Xplore Technologies also offers Corporate training classes. Use the CONTACT Us page to get information on classes. Scroll down and tap the Contact Us button or call the telephone number.
Can I recycle my old tablet PC?
- Yes. Xplore has a recycling program that allows free return of all Xplore and Motion-branded products and non-Xplore/Motion-branded electronics with the purchase of a similar Xplore tablet for processing and disposal in an environmentally safe manner. For details, go to the Xplore Environment and Recycling program.
Index
A
active pen
short digitizer, long digitizer
airplane mode
on, off 18
turn off all wireless, turn off cellular, Bluetooth, GPS 18
ambient light sensor 3
antenna pass-through 2
antenna ports
pass-through 4
audio
drivers 51
troubleshooting, volume
audio connector 5
B
backup
file history, scheduling, how often, which folders 38
whole system, files 38
barcode scanner 2
button (XPAD) 9
using, scan beam, function button
barcode scanner (XPAD) 8,
barcode types
for the scanner, application 33
battery 4
changing 16
charge level, indicator lights on back 15
conditioning 42
disposing 17
hot swapping 16
menu, icon, charge, slider, screen brightness 14
optimization 17
optimizing, extend charge, saving power 52
removing, replacing 16
saving power, turning off wireless 17
status, LED 3
storage, charge level for storage, disposing of 17
swapping 16
tips 17
turning off Bluetooth, using sleep mode 17
battery charging indicator
blinking green 10
battery power
extending, slider menu 45
battery settings 46
battery, hot swappable 4
battery, inserting 10
battery, latch 4
BIOS password
forgot 51
blinking power button 45
Bluetooth
interference, speech recognition, interoperability, security, disconnection 50
settings, adding a device, finding a device, pairing, 21
Bluetooth icon
in notification area, on taskbar. 21
brightness
Display menu, slider, automatic 47
display, adjusting 46, 47
display, adjusting, tile 47, 48
sensor 3
C
camera
indicator 3
light 4
pin icon to taskbar, unpin from taskbar 30
Windows software and settings 30
camera (front)
2 megapixels 3
Skype, video, photo mode 30
camera (rear)
13 megapixels 4
tips, video, photo mode 30
capacitive pens 6
care and maintenance
active digitizer pen, ePen 42
cleaning fingerprint reader, microfiber cloth 42
general care 41
cellular connections
managing by Windows 24
managing by yourself 24
cellular menu 23, 24
changing the battery 16
cleaning
avoid abrasive cleaners 52
display 52
fingerprint reader 42
screen 52
conditioning
battery 42
connecting
external monitor to tablet 11
mobile broadband 23, 24
Wi-Fi 19
Corning Gorilla glass 1
customizing
function buttons (XPAD)
28
D
damage resistance 1
desktop
view all applications (All apps)
display
cleaning, microfiber cloth
damage resistance 1
resolution, distortion 48
stop rotating 52
turn off automatic rotation
display (external)
connecting 11
disposing of battery 17
docking connectors
XSLATE, XPAD 6
dongle
for external monitor, for USB type-C to HDMI
E
enabling
location services 25
ePen
long capacitive 6
Ethernet
port 5
troubleshooting 50
external monitor
connecting 11
external power
adapter port, charging battery 10
external smart card and CAC reader 2
F
fan
exhaust 4, 5
intake 4
features
optional 2
overview 1
file history
backup 38
fingerprint reader 3
setting up, set up a PIN, Windows Hello, sign-in op-
tions, log in 35
tips, scanning your finger 36
function buttons (XPAD)
button 1 and 2, defaults 28
configuring, changing 28
description 7
P1, P2, defaults 7
using, customizing 28
30
G
52 GNSS+SBAS module 2
Gorilla glass 1
52H
HDMI input 2
HDMI-in port 5
headset
jack 5
holder
pen 4
home button 3 11
hot swapping the battery 16
|
inserting
SD card, memory card 37
SIM card, two SIM cards 22
inserting a SIM card 9
J
jack
Ethernet 5
headset 5
K
Kensington lock slot 4
keyboard
choosing, default keyboard, full keyboard 49
for L10 52
icon on taskbar 49
touch (on screen) 49
kill switch
powers off immediately 3
knowledge base 53
L
L10
features overview 1
models 1
L10 platform
XPAD, XSLATE, XBOOK 1
left hand use for writing 52
light sensor 3
location services 25 turning on 25
locking Kensington lock slot 4
locking door USB cover, left side 5
M
managing mobile broadband automatically (Windows), manually cellular connections, other wireless connections 24
manually stop the application, Task Manager
memory micro-SD card slot 5
memory card inserting, removing 37
microphone input 5 microphones 3
mobile broadband connecting 23, 24 connecting, SIM card, WWAN card, cellular location services 25 troubleshooting 50
monitor (external) connecting 11
multifunction port 5
N
Network & Internet connecting to Wi-Fi 19 show available networks 19
0
optimization battery 17
optional features barcode scanner, serial port, RFID/NFC reader, WWAN+GNSS module, GNSS+SBAS module, Wa- com-based digitizer, antenna pass-through, HDMI input, external smart card and CAC reader, RS232 serial port, external UHF RFID reader 2
optional mobile broadband, with GNSS/GPS, GNSS with SBAS 25
overview of XPAD 7
back side 8
bottom side, docking connectors 6
front side 7
left side 8
top side 9
overview of XSLATE
back side 4
bottom side, docking connectors 6
front side 3
left side 5
right side 5
24
P
P1 and P2 (XPAD)
function buttons description 7
pass-through antenna ports 4
pen
active Stylus Tip Kit 42
attaching to tether 11
care and maintenance 42
holder 4
holder (XPAD) 9
holder (XPAD), long pen 7
long active/digitizer, Wa20m compatible 6
short active/digitizer, Wacom compatible 6
short capacitive, long capacitive ePen, battery
(AAAA) 6
tether 11
tether post (XPAD) 8
troubleshooting, tablet unresponsive 48
platform L10
XPAD, XSLATE, XBOOK 1
plug adapter
travel 43, 53
port
Ethernet 5
for AC adapter, external power 10
HDMI-in, RS232 serial 5
power connector 5
USB 3.1 5
port cover
expansion 4
power button 5, 10
blinking, wake up 45
sleep mode 27
power cord
travel 43, 53
power input (port)
external power adapter 5
R
recovery image 11
recycling tablet products 53
removing the battery 16
replacing the battery 16
restoring files
restoring system, resetting the PC
restoring system 39
RFID/NFC reader 2
formats supported, sample application
RS232 serial port 2
S
SAS button
Secure Attention Sequence (SAS) button. right
side of tablet 5
saving power
turn off wireless, turn off Bluetooth, sleep mode 17
scaling
percentage, display, size of text
screen
caring for, protective film
cleaning 52
resolution, distortion 48
stop rotating 52
turn off automatic rotation
SD card
inserting, removing 37
SD card reader
adding memory card, storage
Secure Attention Sequence (SAS) button 5
security
Kensington lock slot 4
serial number 37
serial port 2, 5
setting up
optional setup tasks 11
shut down
tablet not responding, force shut down 46
SIM card
for broadband 23, 24
inserting, two cards 22
SIMs
SIM card port, inserting, SIM card holder 9
sleep mode
power button 27
saving power 17
speaker 4, 51
speaker (XPAD) 7
SSD activity
LED 3
status
system, LED indicator 3
stop an application 46
storage
battery 17
support 53
swapping batteries 16
switching
broadband provider 24
system image 11 33
system status 3
T
tablet
recycling 53
tablet not responding
manually stop an application, Task Manager 46
tablet PC
training tutorials 53
tablet unresponsive
to pen 48
Task Manager
stop an application 46
tether post
for pen (XPAD) 8
tips
52 active digitizer pens 42
touchscreen 3
caring for 41
training classes
3corporate 53
training tutorials 53
travel
plug adapter, power cord, voltage converter 43, 53
troubleshooting
audio 51
ePen battery 48
mobile broadband 50
pen 48
tablet unresponsive to pen 48
Wi-Fi 50
turn off
Wi-Fi, all wireless devices 18
U
UHF RFID reader 2
USB
3.1 port 5
display port output 5
type-C, USB 3.1 5
V
voltage converter
travel 43, 53
volume
control button 5
W
Wacom-based digitizer display
web links to Xplore
accessories 12
documentation 12
knowledge base 12
L10 overview 12
support 12
videos 12
Wi-Fi
| connecting | 19 | |
| show available networks | 19 | |
| troubleshooting | 50 | |
| turn off | 18, | 49 |
wireless network
| show available networks | 19 |
| turn off, unwanted connection | 49 |
writing
left hand, right hand 52
WWAN+GNSS module 2
X
XPAD
| barcode scanner 8, 32 |
| function buttons 7, 28 |
| overview 7 |
| pen holder, barcode scanner button 9 |
| speaker 7 |
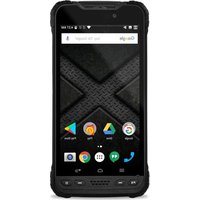

- L10 PLATFORM FOR THE XSLATE™ AND XPAD™ TABLETS
- CHAPTER 1 GETTING STARTED .... 1
- CHAPTER 2 USING YOUR L10 TABLET 13
- CONNECTING TO BLUETOOTH DEVICES....21
- CONNECTING TO A MOBILE BROADBAND NETWORK .....22
- USING GLOBAL NAVIGATION SATELLITE SYSTEM (GNSS) .....25
- KNOW YOUR TABLET....26
- USING SLEEP MODE ....27
- USING THE XPAD FUNCTION BUTTONS .....28
- USING THE CAMERAS....30
- USING THE BUILT-IN MICROPHONES....31
- USING INTEGRATED OPTIONAL FEATURES....32
- USING THE FINGERPRINT READER ....35
- USING THE SD CARD READER ....37
- LOCATING YOUR SERIAL NUMBER ....37
- BACKING UP YOUR FILES 38
- RESTORING YOUR SYSTEM ....39
- CHAPTER 3 CARING FOR THE L10 TABLET 4
- CHAPTER 4 TROUBLESHOOTING AND FAQS ..... 45
- GETTING STARTED 1
- L10 PLATFORM
- KEY FEATURES OVERVIEW
- OPTIONAL FEATURES
- OVERVIEW OF THE XSLATE L10 TABLET PC
- BOTTOM SIDE OF XSLATE AND XPAD TABLETS
- PENS FOR THE L10 TABLETS
- CAPACITIVE PENS
- ACTIVE DIGITIZER PENS
- OVERVIEW OF THE XPAD L10 TABLET
- PREPARING THE L10 TABLET FOR FIRST USE
- INSERTING A SIM CARD
- POWERING UP THE TABLET
- OPTIONAL SETUP TASKS
- BACKING UP FILES AND CREATING A RECOVERY DRIVE
- ATTACHING THE PEN TETHER
- CONNECTING THE TABLET TO AN EXTERNAL MONITOR
- FOR MORE INFORMATION
- USING YOUR L10 TABLET 2
- USING THE BATTERY
- CHECKING BATTERY POWER
- IN WINDOWS
- ON THE BATTERY
- OPTIMIZING BATTERY LIFE OR PERFORMANCE
- USING THE BATTERY ICON
- USING THE BATTERY MENU IN SETTINGS
- REMOVING AND REPLACING THE BATTERY
- REMOVING THE BATTERY
- REPLACING THE BATTERY
- HOT SWAPPING THE BATTERY
- LONG-TERM BATTERY STORAGE
- BATTERY AND POWER MANAGEMENT TIPS
- TIPS FOR SAVING BATTERY POWER
- CONDITIONING THE BATTERY
- DISPOSING OF USED BATTERIES
- MANAGING WIRELESS CONNECTIONS
- TEMPORARILY SWITCHING OFF WIRELESS DEVICES
- CONNECTING TO A WI-FI NETWORK
- CONNECTING TO BLUETOOTH DEVICES
- CONNECTING TO A MOBILE BROADBAND NETWORK
- SETTING UP MOBILE BROADBAND
- SWITCHING TO A SECOND BROADBAND PROVIDER
- MANAGING CELLULAR CONNECTIONS
- LETTING WINDOWS MANAGE CONNECTIONS
- MANAGING CELLULAR CONNECTIONS YOURSELF
- USING GLOBAL NAVIGATION SATELLITE SYSTEM (GNSS)
- ENABLING LOCATION SERVICES
- KNOW YOUR TABLET
- PC INFORMATION
- DOCUMENTATION (ONLINE)
- SUPPORT (ONLINE)
- ACCESSORIES (ONLINE)
- USING SLEEP MODE
- PUTTING THE TABLET INTO SLEEP MODE
- USING THE POWER BUTTON ON YOUR L10 TABLET
- USING THE POWER ICON MENU
- USING THE SETTINGS > SYSTEM > POWER & SLEEP MENU
- WAKING THE TABLET FROM SLEEP MODE
- USING THE XPAD FUNCTION BUTTONS
- CONFIGURING THE FUNCTION BUTTONS
- USING THE CAMERAS
- FRONT CAMERA
- REAR CAMERA
- REAR CAMERA TIPS
- PUTTING THE CAMERA ICON ON YOUR TASKBAR
- USING THE BUILT-IN MICROPHONES
- USING INTEGRATED OPTIONAL FEATURES
- USING THE BARCODE SCANNER (XPAD ONLY)
- BARCODE SCANNING TIPS
- USING THE RFID/NFC READER
- ACCESSING A SAMPLE RFID READER APPLICATION
- USING THE FINGERPRINT READER
- SETTING UP A PIN
- SETTING UP THE FINGERPRINT READER
- LOGGING IN WITH YOUR FINGERPRINT
- FINGERPRINT READER TIPS
- USING THE SD CARD READER
- INSERTING AN SD CARD
- REMOVING AN SD CARD
- LOCATING YOUR SERIAL NUMBER
- BACKING UP YOUR FILES
- SCHEDULING BACKUPS WITH FILE HISTORY
- RESTORING BACKUPS WITH FILE HISTORY
- RESTORING YOUR SYSTEM
- CARING FOR THE L10 TABLET 3
- GENERAL CARE
- CARING FOR THE DISPLAY
- CARING FOR THE PEN
- CLEANING THE FINGERPRINT READER
- TRAVELING WITH YOUR L10 TABLET PC
- TROUBLESHOOTING AND FAQS
- BATTERY AND POWER ISSUES
- THE TABLET DOES NOT POWER ON
- THE TABLET DOES NOT RETURN FROM HIBERNATE MODE WHILE ON BATTERY POWER
- THE POWER BUTTON IS BLINKING BUT NOTHING IS HAPPENING
- EXTENDING BATTERY POWER
- SHUTTING DOWN ISSUES
- THE TABLET IS UNRESPONSIVE
- THE TABLET DOES NOT SHUT DOWN
- SHUTTING DOWN THE TABLET
- DISPLAY ISSUES
- USE THE BATTERY ICON POWER MODE MENU
- USE THE DISPLAY MENU TO MAKE ADJUSTMENTS
- THE DISPLAY IS UNREADABLE OR DISTORTED
- THE DISPLAY GOES BLACK WHILE THE TABLET PC IS STILL TURNED ON
- PEN ISSUES
- THE TABLET DOESN'T RESPOND TO THE PEN I AM USING
- KEYBOARD ISSUES
- CHOOSING KEYBOARDS
- NETWORK ISSUES
- ETHERNET ISSUES
- WI-FI ISSUES
- BLUETOOTH ISSUES
- BLUETOOTH TIPS
- INTERFERENCE
- SPEECH RECOGNITION
- DISCONNECTION
- INTEROPERABILITY
- MOBILE BROADBAND ISSUES
- AUDIO ISSUES
- SYSTEM ISSUES
- FREQUENTLY ASKED QUESTIONS
- HOW CAN I MAKE THE BATTERY CHARGE LAST LONGER
- HOW DO I CLEAN THE DISPLAY SCREEN
- WILL SCRATCHES AFFECT THE PERFORMANCE OF THE DISPLAY OR DIGITIZER
- HOW SENSITIVE IS THE SCREEN TO VARIOUS ELEMENTS
- WILL ANY MONITOR, USB DEVICE, KEYBOARD, OR MOUSE WORK WITH THE L10 TABLET
- HOW DO I ADJUST THE L10 TABLET FOR LEFT-HANDED USE
- HOW CAN I STOP THE DISPLAY SCREEN FROM ROTATING AUTOMATICALLY
- WHAT DO I NEED TO USE THE L10 TABLET IN ANOTHER COUNTRY
- WHERE CAN I LEARN MORE ABOUT MY TABLET
- CAN I RECYCLE MY OLD TABLET PC
- INDEX
- A
- B
- C
- D
- E
- F
- G
- 52H
- J
- K
- L
- M
- N
- 0
- P
- R
- S
- T
- U
- V
- W
- X
Brand : Xplore
Model : XBOOK L10
Category : Laptop