
AT-HD500 - Audio/video converter Atlona - Free user manual and instructions
Find the device manual for free AT-HD500 Atlona in PDF.


| Product Type | PC to HDMI Scaler Converter |
| Model | AT-HD500 |
| Brand | Atlona |
| Input Ports | 1 x VGA (D-Sub 15-pin), 1 x 3.5mm Audio Jack, 1 x TOSLink Optical |
| Output Ports | 1 x HDMI, 1 x 3.5mm Audio Jack, 1 x TOSLink Optical |
| Video Input Resolutions | PC: VGA to WUXGA; SD/HD: 480i to 1080p |
| Video Output Resolutions | Native, VGA, SVGA, XGA, SXGA, UXGA, 480i/p, 576i/p, 720p, 1080i/p, WXGA, WSXGA, WUXGA |
| Audio Support | Stereo LPCM analog/digital input and output; simultaneous output to HDMI, TOSLink, and 3.5mm jack |
| Compliance | HDMI 1.2, HDCP 1.1, DVI 1.0 |
| Power Supply | 5V DC, 2.6A (US/EU standards, CE/FCC/UL certified) |
| Dimensions (D x W x H) | 154 x 100 x 25 mm |
| Weight | 340 g |
| Chassis Material | Aluminum |
| Color | Black |
| Operating Temperature | 0°C to 48°C |
| OSD Features | Adjust contrast, brightness, hue, saturation, sharpness, RGB levels, aspect ratio, output resolution, audio source, OSD position/timer/transparency |
| Reset Method | Press and hold Menu button for 5 seconds, disconnect power, reconnect, hold Menu again |
| Included Accessories | 5V power supply, user manual |
| Warranty | 3 years limited |
Frequently Asked Questions - AT-HD500 Atlona
User questions about AT-HD500 Atlona
0 question about this device. Answer the ones you know or ask your own.
Ask a new question about this device
Download the instructions for your Audio/video converter in PDF format for free! Find your manual AT-HD500 - Atlona and take your electronic device back in hand. On this page are published all the documents necessary for the use of your device. AT-HD500 by Atlona.
USER MANUAL AT-HD500 Atlona
User Manual
ATLONA
PC / LAPTOP TO HDMI CONVERTER
WITH BUILT-IN SCALER UP TO 1080P
AT-HD500
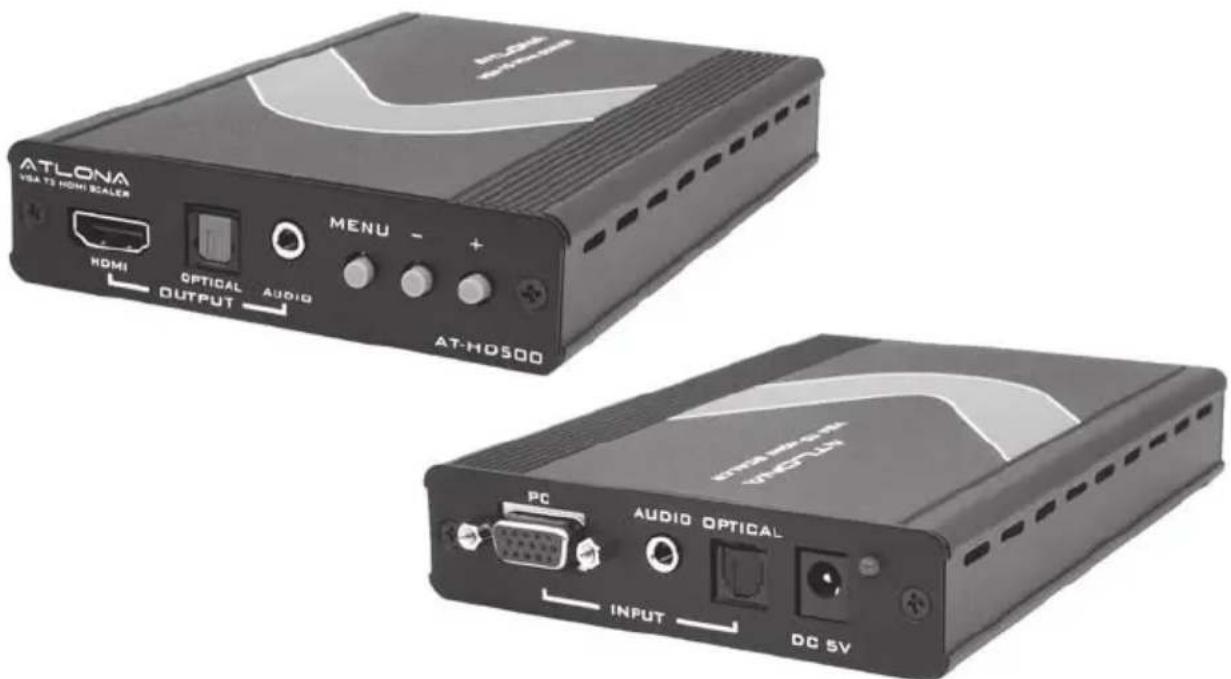
TABLE OF CONTENTS
- Introduction 3
- Package Contents 3
- Features 3
- Specification 3
- Panel Descriptions 4
5.1 Front Panel 4
5.2 Rear Panel 4 - OSD Operation 5
- Activating a VGA output on a Laptop 5
- Connection Diagram 8
- Support Resolution 8
- Resetting the Unit 8
- Safety Information 9
- Warranty 10
- Atlona Product Registration 11
INTRODUCTION
This Scaler Box is designed to upscale analog video signal from PC input source to digital HDMI output of wide-range HDTV and PC resolutions, up to 1080p/WUXGA. Besides video upscaling, the scaler box also converts digital/analog audio signal to digital/analog format, then output to HDMI combining with the video, TOSLink (optical fiber), and phone jack (L/R audio) simultaneously. This unit has a comprehensive OSD menu that allows user to select a variety of output resolutions and adjust for best picture quality.
PACKAGE CONTENTS:
• AT-HD500 (PC to HDTV Scaler)
- 5v power supply
- User manual
FEATURES:
• HDMI 1.2, HDCP 1.1 and DVI 1.0 compliant.
- Scales any PC resolutions to PC (VGA \~ WUXGA)/ HD (480i \~ 1080p) resolutions.
- Automatically detect the factory setting of the connected display and output the corresponding resolution and refresh rate, when the NATIVE output is selected.
- Provides output picture adjustment on contrast, brightness, hue, saturation, sharpness, RGB (color tone) level and aspect ratio size.
- Supports high resolution output (See section "9. Support Resolution" for reference.):
PC: VGA, SVGA, XGA, SXGA, UXGA, WXGA, WSXGA, WUXGA.
SD/HD: 480i, 576i, 480p, 576p, 720p, 1080i and 1080p
• Supports stereo LPCM analog/digital audio input and stereo LPCM analog/digital output. Simply select among the audio input sources in the OSD menu, then output the audio to HDMI, TOSLink and phone jack simultaneously.
• Image of the color bar:
"If user is seeing a color bar, it means that there is no input signal present. The color bar will be active for 15min and after the Atlona device will go to the stand-by mode and disconnect from the display. As soon as incoming video signal will resume, the Atlona device will establish a new connection with the display"
SPECIFICATIONS:
| Input ports | 1 x PC, 1 x 3.5mm Phone Jack, 1 x TOSLink (optical fiber) |
| Output ports | 1 x HDMI, 1 x 3.5mm Phone Jack, 1 x TOSLink (optical fiber) |
| Power Supply | 5V/2.6A DC (US/EU standards, CE/FCC/UL certified) |
| Dimensions (mm) 154(D) x 100(W) x 25(H) | |
| Weight(g) 340 | |
| Chassis Material Aluminum | |
| Silk Skin Color Black | |
| Operating Temperature Operating from 0°C ~ 48°C | |
PANEL DESCRIPTION
1. Front Panel
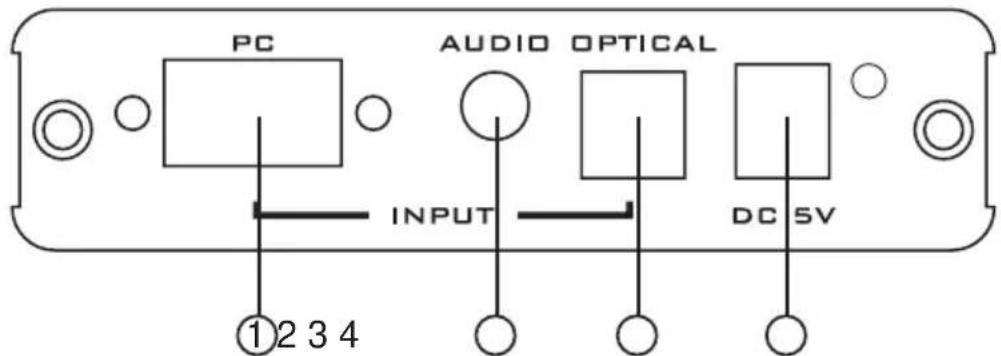
- PC Input: Connect the PC input D-Sub (15-pin) port to the D-Sub output port of your source equipment such like PC.
- Audio Input: Connect the PC 3.5mm phone jack input port to the analog audio output port of your source equipment.
- TOSLink (optical fiber) Input: Connect the optical input port to the digital audio output port of your source equipment.
- Power: Plug the 5VDC power supply into the unit and connect the adaptor to AC wall outlet.
2. Rear Panel
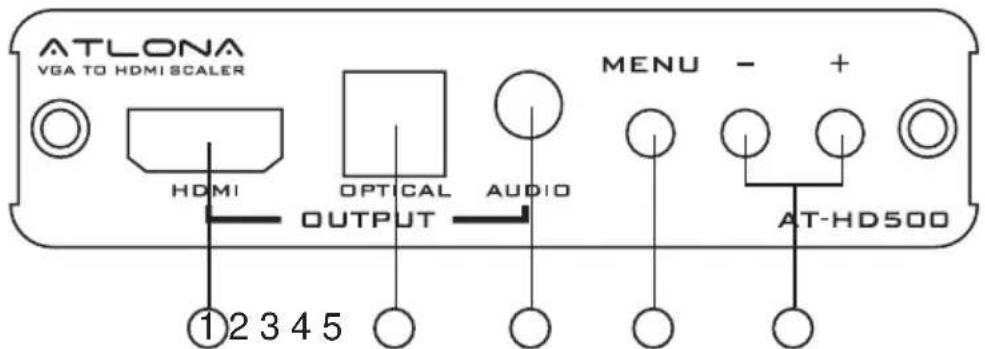
- HDMI Output: Connect the HDMI output port to the HDMI input port of your display such like HDTV.
- TOSLink (optical fiber) Output: Connect the optical output port to the digital audio input port of your amplifier.
- Audio Output: Connect the PC 3.5mm phone jack output port to the analog audio input port of your equipment.
- Menu Button: Press the MENU button to bring up OSD operation menu.
(See section "6. OSD Operation" for reference.)
- +/- Button:
a. On the first tier of OSD menu, use + and - buttons to move up/down the highlight item for selection.
b. Once the desired option is selected, use + and - buttons to toggle between setting values.
OSD OPERATION
| 1 st Tier Option 2 nd Tier Option Adjustment | ||
| CONTRAST - 0 ~ 100 of Contrast Level | ||
| BRIGHTNESS - 0 ~ 100 of Contrast Level | ||
| FINETUNE | - HUE | 0 ~ 100 of Hue Level |
| - SATURATION | 0 ~ 100 of Saturation Level | |
| - SHARPNESS | 0 ~ 100 of Sharpness Level | |
| - EXIT | Back to 1st Tier | |
| COLOR - RED | - GREEN | 0 ~ 100 of Red Color Level |
| - BLUE | 0 ~ 100 of Green Color Level | |
| - EXIT | 0 ~ 100 of Blue Color Level | |
| Back to 1st Tier | ||
| SIZE - FULL / OVERSCAN / UNDERSCAN / LETTERBOX / PANS-CAN | ||
| OUTPUT | - NATIVE / VGA / SVGA / XGA / SXGA /UXGA / 480i / 480p/720p@60Hz /1080i@60Hz / 1080p@60Hz / 576i /576p /720p@50Hz / 1080i@50Hz /1080p@50Hz / WXGA / WSXGA /WUXGA | |
| AUDIO - HDMI / EAR PHONE / OPTICAL | ||
| OSD | - HPOSITION | 0 ~ 100 of OSD Horizontal Position |
| - VPOSITION | 0 ~ 100 of OSD Vertical Position | |
| - TIMER | 0 ~ 100 of OSD Existing Time (sec.) | |
| - BACKGROUND | 0 ~ 100 of OSD Transparent Level | |
| - EXIT | Back to 1st Tier | |
| INFORMATION - SOURCE (Input Interface) | ||
| INPUT (Input Resolution) | ||
| OUTPUT (Output Resolution) | ||
| VERSION (Firmware Version) | ||
| EXIT - Close OSD Menu | ||
ACTIVATING A VGA OUTPUT ON A LAPTOP
Most laptops have the VGA output disabled by default. In order to use Atlona converter user would have to enable it.
There are 2 x configurations:
A) Mirror mode. In this mode, your desktop (or screen) is duplicated on the second display, so your audience sees what's on your screen. For example, use Mirrored mode if you're recording ideas as people mention them during a brainstorming session and you want participants to see what's being recorded. The main downside of this mode is that instant message pop-ups, e-mail notifications, and other potentially annoying messages appear on the screen. Also, if you browse for a file or switch between programs, your audience will see these actions on the second display.
Note: Most laptops have the VGA output disabled by default. User would have to press a combination of buttons to enable it.
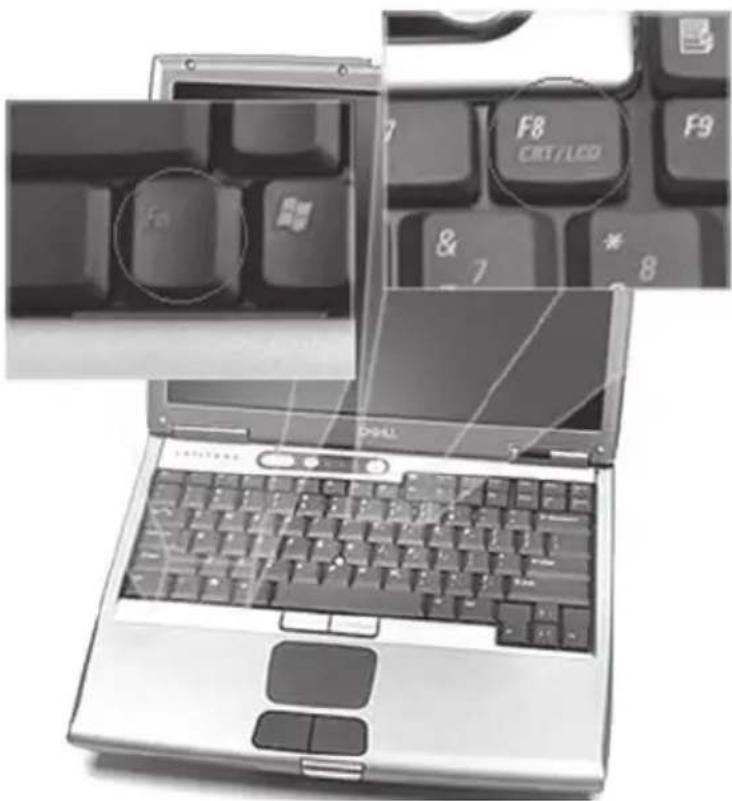
- On your laptop's keyboard, find the key marked "FUNCTION" or "Fn" (usually on the lower left corner of the keyboard).
- Then, search for a key that has either the letters "CRT/LCD" or a little monitor icon. Most often, it will be in the top row of keys marked F1 through F12, but not always.
- When you have keys located, press the FUNCTION key and then the LCD/CRT key that you located before at the same time. It might take a couple of seconds for the computer to react.
- This should toggle the screen image through a cycle like this: Image on Laptop Screen → Image on Projector → Image on Both (to go from one mode to another, you would have to simultaneously press Function key and LCD/CRT at the same time)
B). Extended mode.
In this mode, you extend your mobile PC screen space by using an additional display (whether a monitor or a projector screen). You can then use each screen independently. This mode is well suited for presentations because you can display the slides on one screen (usually the projector), and then hide notifications and other miscellaneous messages, and complete other tasks, such as taking notes, on your mobile PC screen. This mode is also very useful when you want to extend your workspace while using your mobile PC at your desk.
Note: Most laptops have the VGA output disabled by default. User would have to make a few adjustments in the video settings to enable the mode.
1.Right-click the desktop of your mobile PC, and then click Properties on the shortcut menu.
2. In the Display Properties dialog box, on the Settings tab, click the blue rectangle with the number 2 (which represents the external monitor), and then select the Extend my Windows desktop onto this monitor check box.
3. Under Screen resolution, drag the slider to the right to change the screen resolution of Monitor 2 to 1024 by 768 pixels, and then click OK.
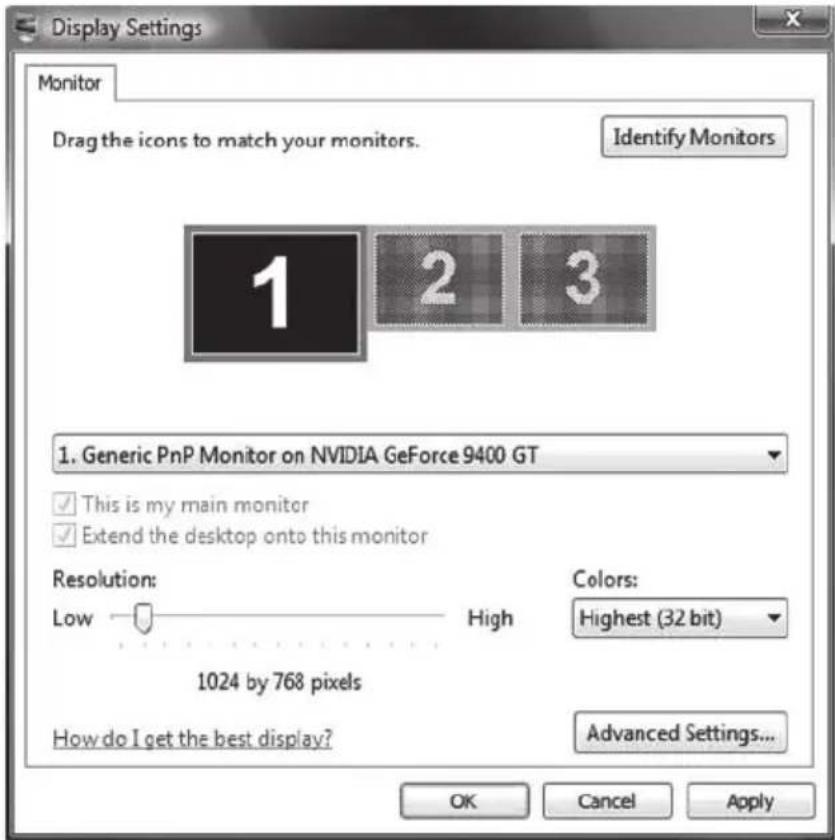
- When prompted, click Yes.
Note: If your desktop background does not appear on the external monitor, click No, and then repeat step 3 to decrease the screen resolution.
Adjust the position of the monitors
By default, Windows places the second screen to the right of the first (or primary) one. You can change the position of the monitors to reflect their physical position.
- Right-click the desktop of your mobile PC, and then click Properties on the shortcut menu.
- In the Display Properties dialog box, on the Settings tab, drag the graphical representation of Monitor 2 (the blue box with the number 2 in it) to the left of Monitor 1, and then click OK.
- When prompted, click Yes.
Adjust your screen settings
When you first enable Extended Desktop mode, your taskbar and any icons on your desktop appear on the mobile PC screen; desktop space without icons appears on the external monitor. You may find it easier to show the taskbar on the external monitor since it is usually the larger of the two screens.
- On your mobile PC screen, right-click an empty area of the taskbar, and then click Lock the Taskbar.
- Drag the taskbar to the external desktop and drop it where you want it to appear.
You can now take advantage of the extra screen space by dragging program windows to the external monitor.
You can also resize windows to stretch across the two screens.
By taking advantage of additional monitors, you can share information with others more effectively when you're giving a presentation and also improve your productivity by extending your workspace when you're using your mobile PC at your desk.
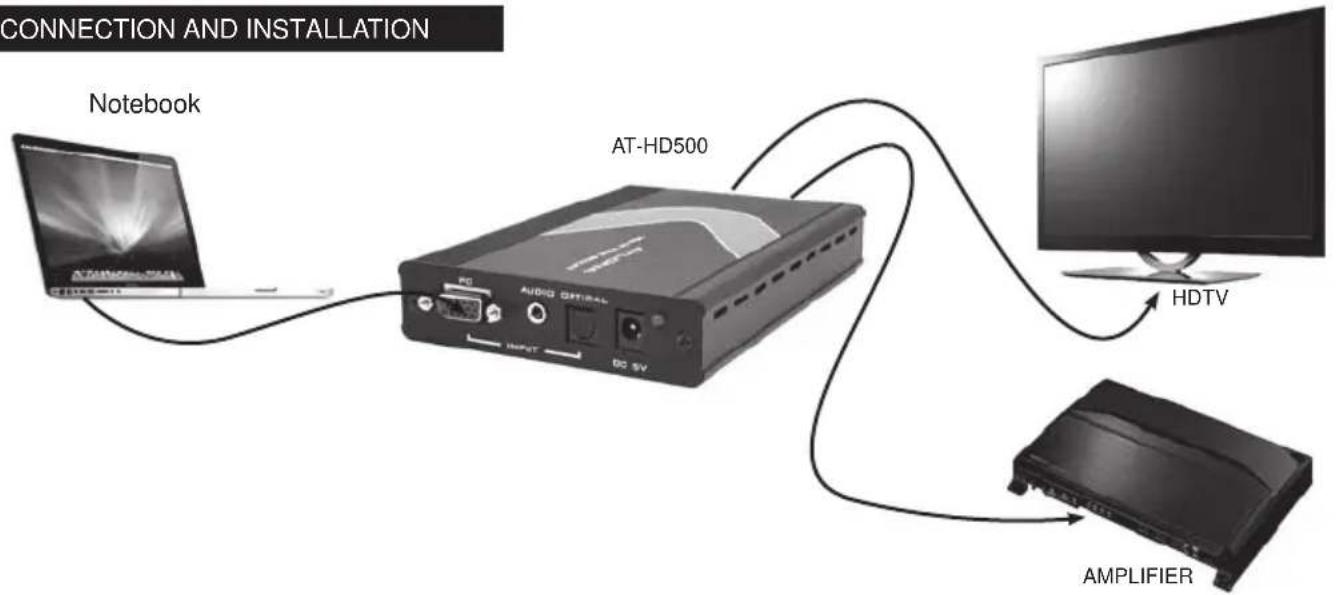
flowchart
graph TD
    A[" notebook "] -->|USB| B["AT-HD500"]
    B -->|USB| C["Amplifier"]
    C -->|USB| D["HD TV"]
    D -->|USB| B
    style A fill:#f9f,stroke:#333
    style B fill:#ccf,stroke:#333
    style C fill:#cfc,stroke:#333
    style D fill:#fcc,stroke:#333
SUPPORT RESOLUTION
| PC INPUT HDMI OUTPUT | |||
| PC SD/HD PC | |||
| 480I/576I (NTSC/PAL) v | |||
| 480P/576P v | |||
| 720P@(50/60) v | |||
| 1080I@(25/30) v | |||
| 1080P@(50/60) v | |||
| VGA@(60/72/75/85) v v | |||
| SVGA@(56/60/72/75/85) v v | |||
| XGA@(60/70/75/85) v v | |||
| SXGA@(60/75/85) v v | |||
| UXGA@60 v v | |||
| WXGA@60(1280x800) v v | |||
| WSXGA@60(1680x1050) v v | |||
| WUXGA@60(1920x1200) v v | |||
RESETTING THE UNIT
- Press and hold "Menu" button for 5 seconds
- Disconnect power plug from the unit while holding the "Menu" and wait for 5 seconds
- Connect the power plug back in and continue holding the "Menu" for another 5 seconds
- Release the "Menu" and allow up to 10 seconds for the unit to connect to the display
SAFETY INFORMATION
Safeguards
To reduce the risk of electric shock, do not expose this product to rain or moisture.
If the wall plug does not fit into your local power socket, hire an electrician to replace your obsolete socket.
Do not modify the wall plug. Doing so will void the warranty and safety features.
This equipment should be installed near the socket outlet and the device should be easily accessible in case it requires disconnection.
Precautions
FCC Regulations state that any unauthorized changes or modifications to this equipment not expressly approved by the manufacturer could void the user's authority to operate this equipment.
Operate this product using only the included external power supply. Use of other power supplies could impair performance, damage the product or cause fires.
In the event of an electrostatic discharge, this device may automatically turn off. If this occurs, unplug the device, and plug it back in.
Protect and route power cords so they will not be stepped on or pinched by anything placed on or against them. Be especially careful of plug-ins, or cord exit points from this product.
Avoid excessive humidity, sudden temperature changes or temperature extremes.
Keep this product away from wet locations such as bathtubs, sinks, laundries, wet basements and swimming pools.
Use only accessories recommended by ATLONA to avoid fire, shock or other hazards.
Unplug the product before cleaning. Use a damp cloth for cleaning. Do not use cleaning fluid or aerosols, which could enter the unit and cause damage, fire or electrical shock. Some substances may also mar the finish of the product.
Never open or remove unit panels or make any adjustments not described in this manual. Attempting to do so could expose you to dangerous electrical shock or other hazards. It may also cause damage to your AT-HD500. Opening the product will void the warranty.
Do not attempt to service the unit. Instead disconnect it and contact your Authorized ATLONA reseller or contact ATLONA directly.
1. LIMITED WARRANTY
Atlona Technologies warrants that (a) its products (the "Product") will perform substantially in accordance with the accompanying written materials for a period of 3 YEARS from the date of receipt and (b) that the Product will be free from defects in materials and workmanship under normal use and service for a period of 3 years. In the event applicable law imposes any implied warranties, the implied warranty period is limited to 3 years from the date of receipt. Some jurisdictions do not allow such limitations on duration of an implied warranty, so the above limitation may not apply to Customer.
2. CUSTOMER REMEDIES
Atlona Technologies and its suppliers' entire liability and Customer's exclusive remedy shall be, at Atlona Technologies' option, either return of the price paid for the Product, or repair or replacement of the Product that does not meet this Limited Warranty and which is returned to Atlona Technologies with a copy of Customer's receipt. This Limited Warranty is void if failure of the Product has resulted from accident, abuse, or misapplication. Any replacement Product will be warranted for the remainder of the original warranty period or 3 year, whichever is longer.
3. NO OTHER WARRANTIES
TO THE MAXIMUM EXTENT PERMITTED BY APPLICABLE LAW, ATLONA TECHNOLOGIES AND ITS SUPPLIERS DISCLAIM ALL OTHER WARRANTIES, EITHER EXPRESS OR IMPLIED, INCLUDING, BUT NOT LIMITED TO IMPLIED WARRANTIES OF MERCHANTABILITY AND FITNESS FOR A PARTICULAR PURPOSE, WITH REGARD TO THE PRODUCT AND ANY RELATED WRITTEN MATERIALS. THIS LIMITED WARRANTY GIVES CUSTOMER SPECIFIC LEGAL RIGHTS. CUSTOMER MAY HAVE OTHER RIGHTS DEPENDING ON THE JURISDICTION.
4. NO LIABILITY FOR DAMAGES
TO THE MAXIMUM EXTENT PERMITTED BY APPLICABLE LAW, IN NO EVENT SHALL ATLONA TECHNOLOGIES OR ITS SUPPLIERS BE LIABLE FOR ANY DAMAGES WHATSOEVER (INCLUDING WITHOUT LIMITATION, SPECIAL, INCIDENTAL, CONSEQUENTIAL, OR INDIRECT DAMAGES FOR PERSONAL INJURY, LOSS OF BUSINESS PROFITS, BUSINESS INTERRUPTION, LOSS OF BUSINESS INFORMATION, OR ANY OTHER PECUNIARY LOSS) ARISING OUT OF THE USE OF OR INABILITY TO USE THIS PRODUCT, EVEN IF ATLONA TECHNOLOGIES HAS BEEN ADVISED OF THE POSSIBILITY OF SUCH DAMAGES. IN ANY CASE, ATLONA TECHNOLOGIES' AND ITS SUPPLIERS' ENTIRE LIABILITY UNDER ANY PROVISION OF THIS AGREEMENT SHALL BE LIMITED TO THE AMOUNT ACTUALLY PAID BY YOU FOR THE PRODUCT. BECAUSE SOME JURISDICTIONS DO NOT ALLOW THE EXCLUSION OR LIMITATION OF LIABILITY FOR CONSEQUENTIAL OR INCIDENTAL DAMAGES, THE ABOVE LIMITATION MAY NOT APPLY TO YOU.
ATLONA PRODUCT REGISTRATION
Thank you for purchasing this Atlona product — we hope you'll enjoy it.
We also hope that you'll take a few moments to register your new purchase. Registration creates an ownership record if your product is lost or stolen and helps ensure you'll receive notification of performance issues and firmware updates.
At Atlona, we respect and protect your privacy and assure you that your registration information is completely secure. Of course, Atlona product registration is totally voluntary and failure to register will not diminish your limited warranty rights.
To register go to www.atlona.com/registration
- ATLONA
- TABLE OF CONTENTS
- INTRODUCTION
- PACKAGE CONTENTS:
- FEATURES:
- PANEL DESCRIPTION
- Front Panel
- Rear Panel
- OSD OPERATION
- ACTIVATING A VGA OUTPUT ON A LAPTOP
- B). Extended mode.
- Adjust the position of the monitors
- Adjust your screen settings
- RESETTING THE UNIT
- SAFETY INFORMATION
- Safeguards
- Precautions
- LIMITED WARRANTY
- CUSTOMER REMEDIES
- NO OTHER WARRANTIES
- NO LIABILITY FOR DAMAGES
- ATLONA PRODUCT REGISTRATION
Brand : Atlona
Model : AT-HD500
Category : Audio/video converter