
ZM-SH721 - Security Camera Zmodo - Free user manual and instructions
Find the device manual for free ZM-SH721 Zmodo in PDF.


| Product Type | IP Security Camera |
| Model | ZM-SH721 |
| Brand | Zmodo |
| Video Compression | H.264 Main Profile |
| Main Stream Resolution | 640x480 (VGA) |
| Sub Stream Resolution | 320x240 (QVGA) |
| Frame Rate | Up to 30 fps (main), 20 fps (sub) |
| Lens | Fixed focal length (typical 3.6mm) |
| Night Vision | IR LEDs, up to 30ft (estimated) |
| Network Interface | 10/100 Ethernet, Wi-Fi 802.11 b/g/n |
| Audio | Two-way audio (with external speaker/mic) |
| Storage | MicroSD card (up to 128GB, estimated) or NVR |
| Power Supply | DC 12V, 1A (adapter included) |
| Power Consumption | Less than 6W |
| Dimensions | Approx. 110 x 60 x 60 mm |
| Weight | Approx. 200 g (without bracket) |
| Operating Temperature | -10°C to 50°C |
| Mounting | Ceiling or wall mount with included bracket |
| Motion Detection | Yes, configurable sensitivity and zones |
| Alarm Output | Email, FTP, audio alert, recording |
| Software | PC-ZViewer (Windows), mobile app (Zmodo) |
| Protocols | TCP/IP, HTTP, DHCP, DDNS, UPnP, PPPoE |
Frequently Asked Questions - ZM-SH721 Zmodo
User questions about ZM-SH721 Zmodo
0 question about this device. Answer the ones you know or ask your own.
Ask a new question about this device
Download the instructions for your Security Camera in PDF format for free! Find your manual ZM-SH721 - Zmodo and take your electronic device back in hand. On this page are published all the documents necessary for the use of your device. ZM-SH721 by Zmodo.
USER MANUAL ZM-SH721 Zmodo
PC-ZViewer User Manual

Contents
Preface....2
Statement......4
Intended Reader.... 4
Terms in this manual.... 4
Software Introduction......4
Zviewer Installation.... 5
Login Interface.... 6
Main Interface of Zviewer....7
Logout Interface.... 7
Device Management.... 7
Manually Adding a Device.... 8
Delete a Device.... 9
Edit a Device.... 9
Auto Search for Adding a Device.... 10
Searching for device....10
Edit the Device.... 11
Batch Editing Devices....11
Add Device....11
User management....11
Add a User.... 11
Delete a User....12
Edit a User....13
Video Browsing....13
Video Display Screen.... 13
Open the video.... 14
Close the video.... 15
Screen display parameters.... 15
Recording Plan.... 16
Video playback.... 18
PTZ Control....20
Device Configuration Parameters 21
Device Information Display.... 21
System Information Setting.... 22
Network Settings.... 24
Video Settings....31
Storage Management....33
Alarm setting....34
System Settings.... 35
Uninstall Zviewer....36
Preface
Thank you for using ZMODO network camera product and client software. The client software applies to integrated network cameras developed by ZMODO Company for network video monitoring, including network bullet camera, network IR bullet camera, network dome camera and spherical camera etc. High performance, monolithic SOC chip is utilized as media processor integrates video capture, compress and transmission. Standard H.264 main profile encoding algorithm ensures more clear and smooth video transmission. This series of IP camera is well suited for home and minor business, as well as any situation which needs to apply remote network transmission and remote network control. It's easy to install and operate, and can conveniently realize the real-time monitoring and remote control of the front cameras combining with the use of the Windows desktop software.
Statement:
The content in this manual may be different from the product version you are using. If you met any problem which can't be solved according to this manual, please contact with our tech-support or product supplier.
The content will be updated time to time. Our company reserves the right of without notice.
Intended Reader:
This manual is mainly suitable for below kinds of engineers:
System planners
Onsite tech-support and maintenance personnel
Administrators for system installation, configuration and maintenance
Users for business operation on product functions
Terms in this manual:
IP Camera or IPC in this manual means network camera including network bullet camera, network dome camera, network PT camera, and network IR camera and spherical camera etc.
- Click: Refers to left-click with your mouse
- Double click: Refers to left-double-click with your mouse
- Right Click: Refers to right-click with your mouse
- Square brackets "【】" indicates the window name, menu name and data sheet, such as "【Download】"
Software Introduction
As IP Camera, DVR, NVR are popular in security monitoring industry,
more and more users need a network video surveillance software to meet their daily work needs. In such a background, ZMODO launches its PC-ZViewer software. PC-ZViewer is the windows client software of the general users' front-end equipment and it can satisfy the users' daily management needs of IP camera, DVR and NVR.
Operating Environment
| Operating Environment | Subitem Description | |
| Software Operating system Windows XP/ Vista/Win7/Win8 | ||
| Hardware | Basic configuration | 1.6 GHz CPU, 1G memor 1024x768 display resolution 100G HD |
| Recommended configuration | 2.2 GHz or faster CPU, 2G more memory, 1280x1024 display resolution, 500G or larger HD | |
Zviewer Installation
Double click "Setup" for the Zviewer installation:

Select the installation path:
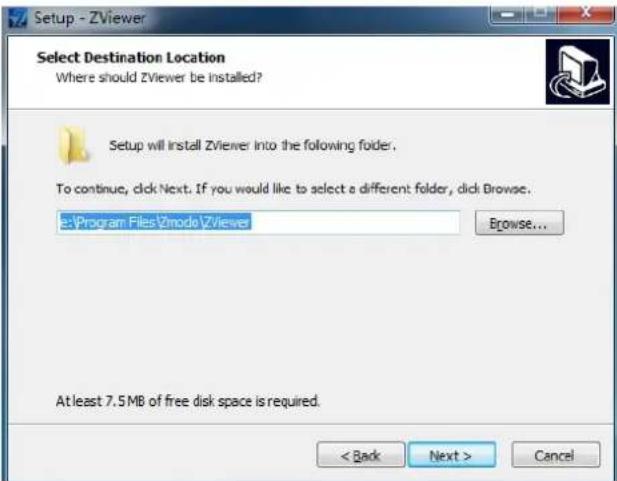
Choose whether to create shortcut on your desktop:
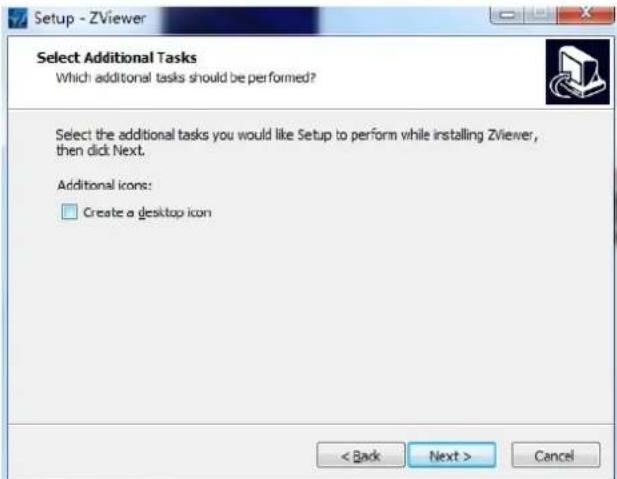
Finish the installation
Login Interface
Fill in 【User Name】 and 【Password】, then click 【Login】. The initial
User Name is admin, password is 111111.
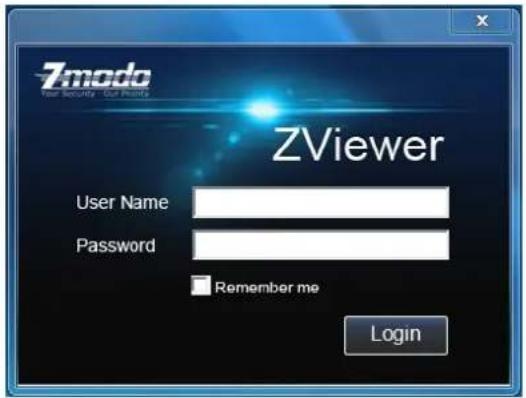
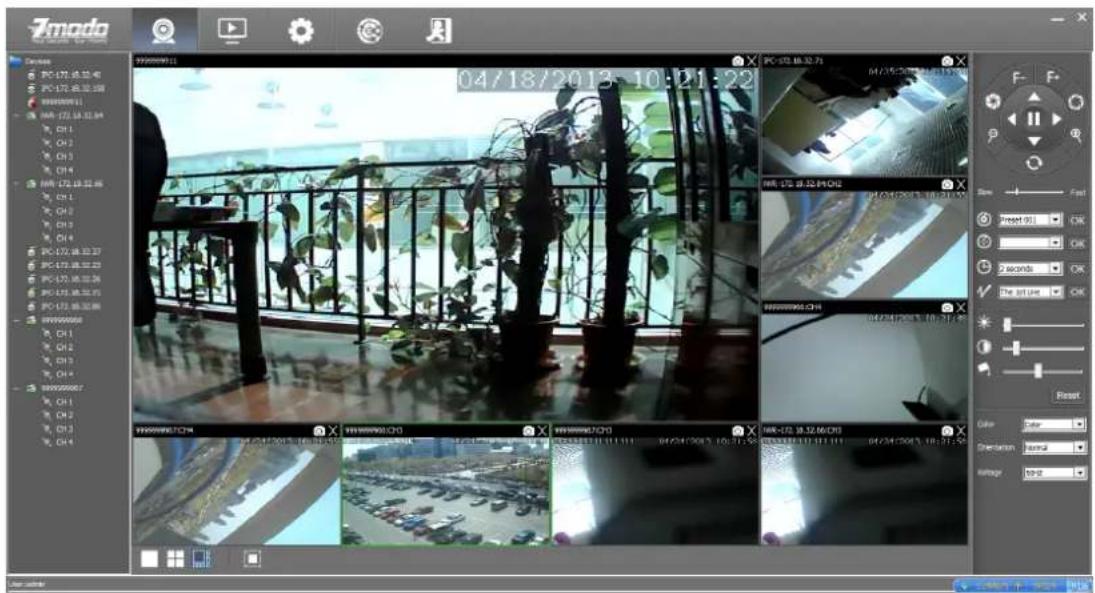
Main Interface of Zviewer
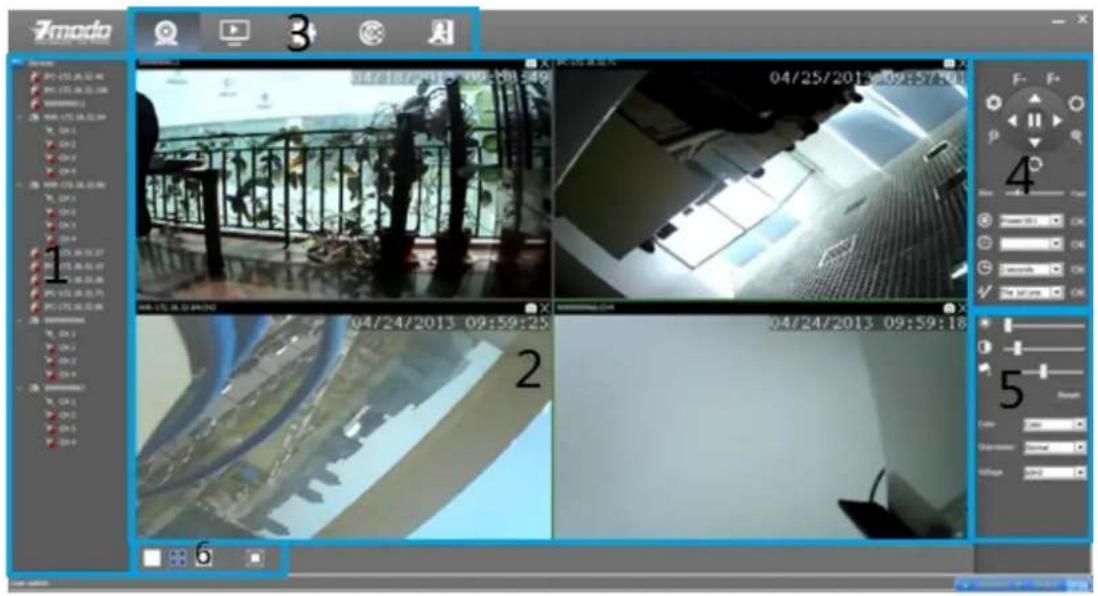
Area No. Area No.
| 1 | Device tree list | 4 | PTZ control panel |
| 2 | Video on-demand interface | 5 | Image quality control panel |
| 3 | Function module options | 6 | Video display interface layout |
Logout
Single click to log out and the interface will jump back to the login interface.
Device Management
Click the 【Setting】into the settings page, click the left 【Device Management】 to add, delete or edit the device etc.
Manually Adding a Device
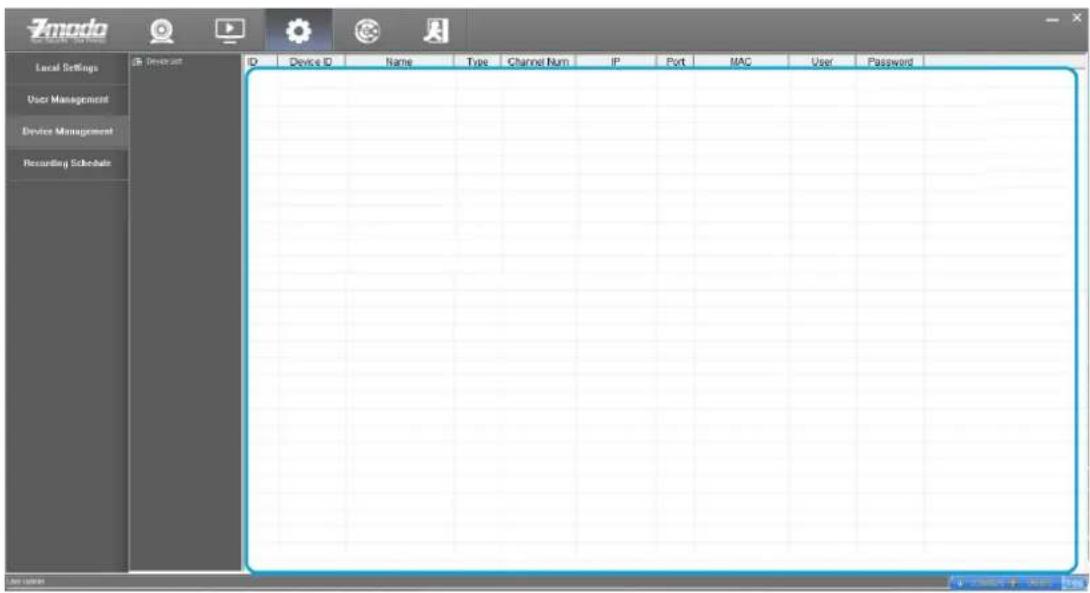
On the right information display area, right click 【Add】 to pop up
"New Camera Wizard" interface.
Name: Fill in device name (User defined)
Type: Choose device type (IPC or NVR)
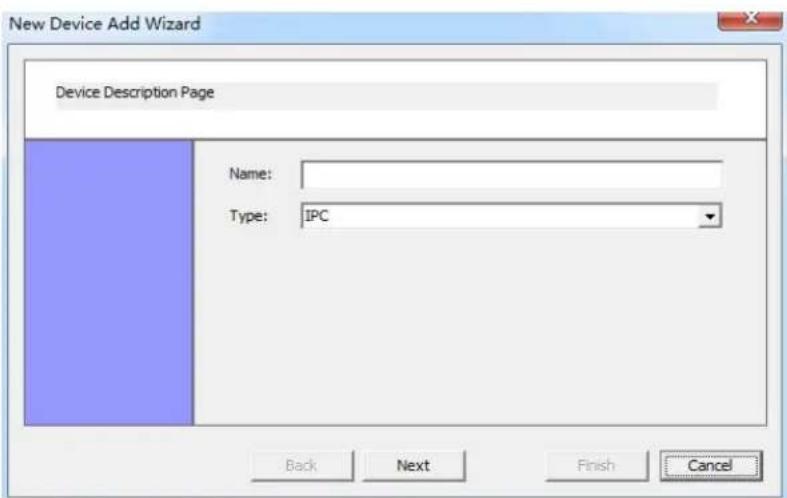
Fill in the necessary information and click 【Next】 to go to camera setting interface.
IP: Fill in the IP address of the device
Port: Fill in the device port number
Max Channel: Fill in the quantity of channels of the device
Login: Fill in the user name of the device
Password: Input the login password

After inputting all the necessary information, click 【Finish】to finish the step.
Delete a Device
If want to delete a camera, select the IPC and right clickce and
click 【Delete】, the following window will be popped out:
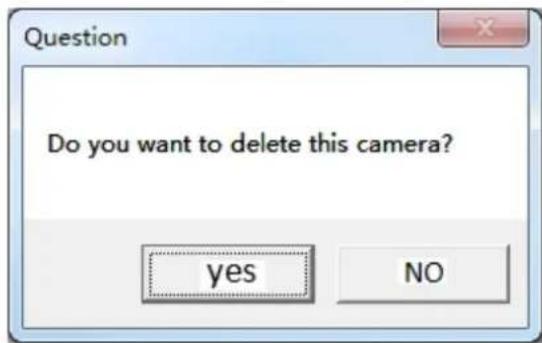
Click 【Yes】to confirm the selection of delete.
Click 【No】to cancel your selection of delete.
Edit a Device
Select one of the devices, right clickce and select 【Edit】 to revise the corresponding settings of the device.
Auto Search for Adding a Device Searching for device
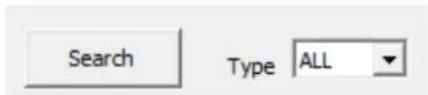
Click 【Discovery】 to go to the auto searching interface.
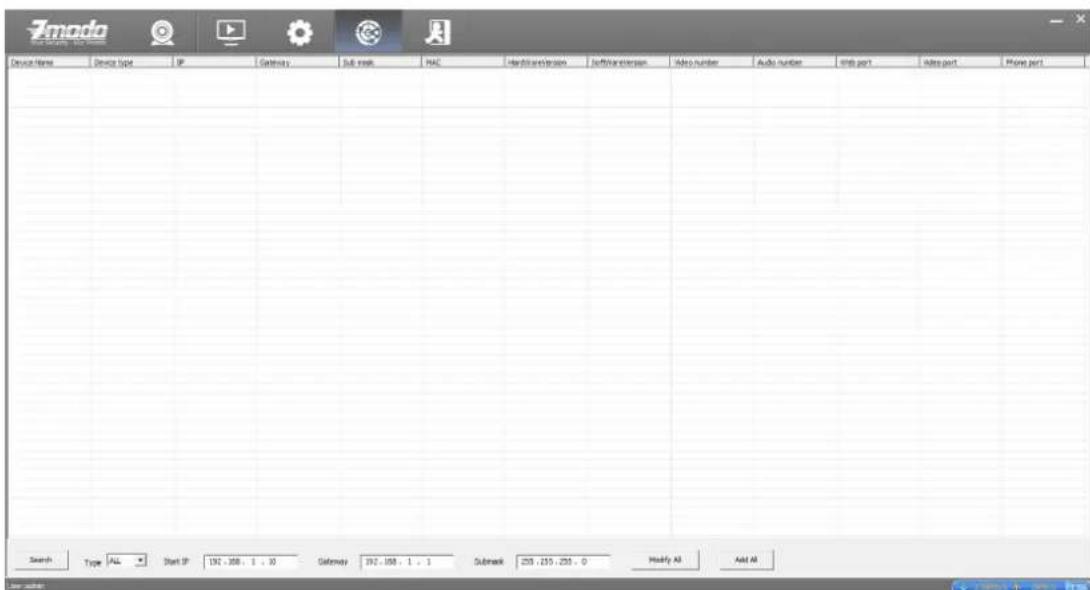
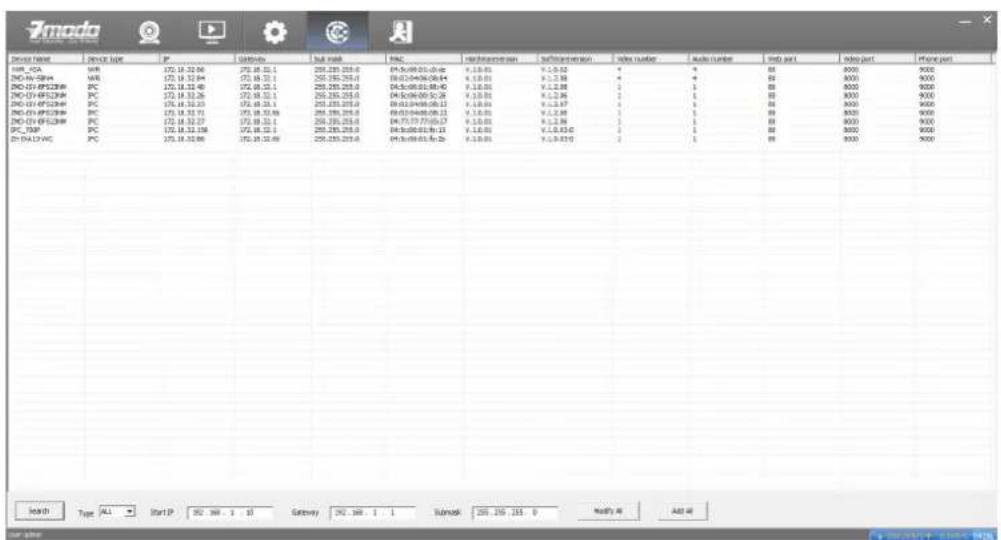
In 【Type】 drop-down list, select the device type (IPC, NVR or All) and click 【Search】 to search, the search results are as shown in
the below figure. It can show the network parameter configurations of all the devices.
Edit the Device
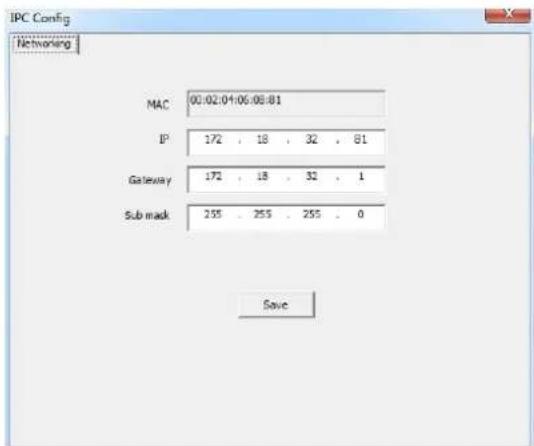
Double-click any one searched out device can pop up dialog box of network parameters. You can modify the parameters of the network such as IP, gateway and subnet mask, then click【save】.
Batch Editing Devices
Set up an IP Start address, subnet mask and gateway, then click the 【Modify All】button.

Distribute the network parameters to all the searched devices within the network segment.
Add Device
Click 【Add All】button to add all searched-out devices automatically.
User management
Click 【Setting】 into the settings page, click the left【User Management】for adding, deleting, editing users.
Add a User
Enter configuration page, select 【User Management】:
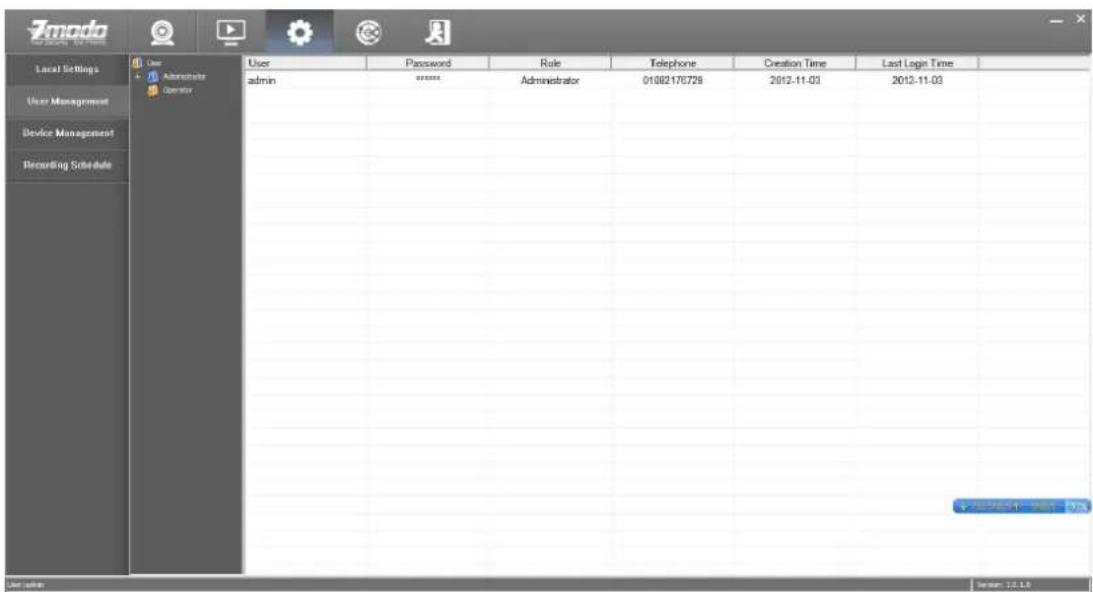
In the user information display area, click 【 Add】 to pop-up a dialog box, as the figure shown below:
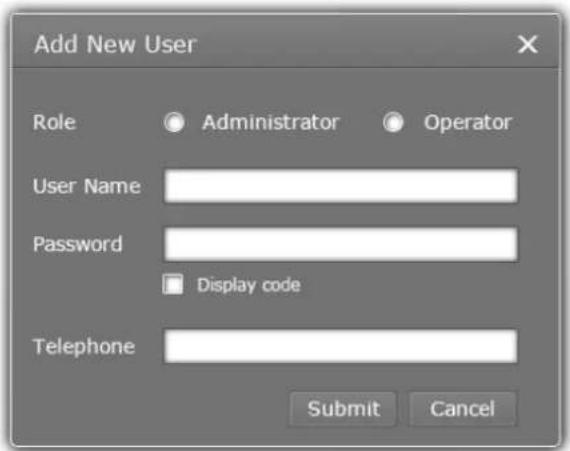
【Role】: Administrator and Operator.
【User Name】: User name of logging in the client.
【Password】: Password of logging in the client.
【Telephone】: Contact number of user
Delete a User
Super administrator can delete users: select a user and click the 【Delete】, you can delete the user.
* Admin user is the system default super administrator user and can not be deleted, but its password can be changed.
Edit a User
Right click the user need to be modified, select 【Edit】 to modify the user information.
Video Browsing
Click the 【Live】into the main video interface for VOD operation.
Video Display Screen
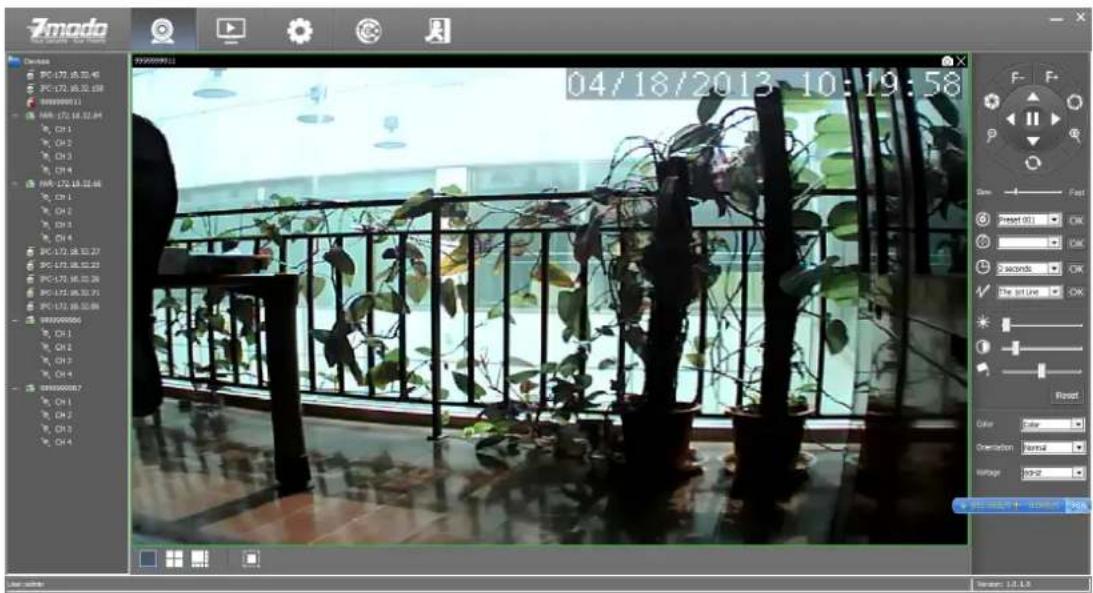
Click for one channel video display layout.
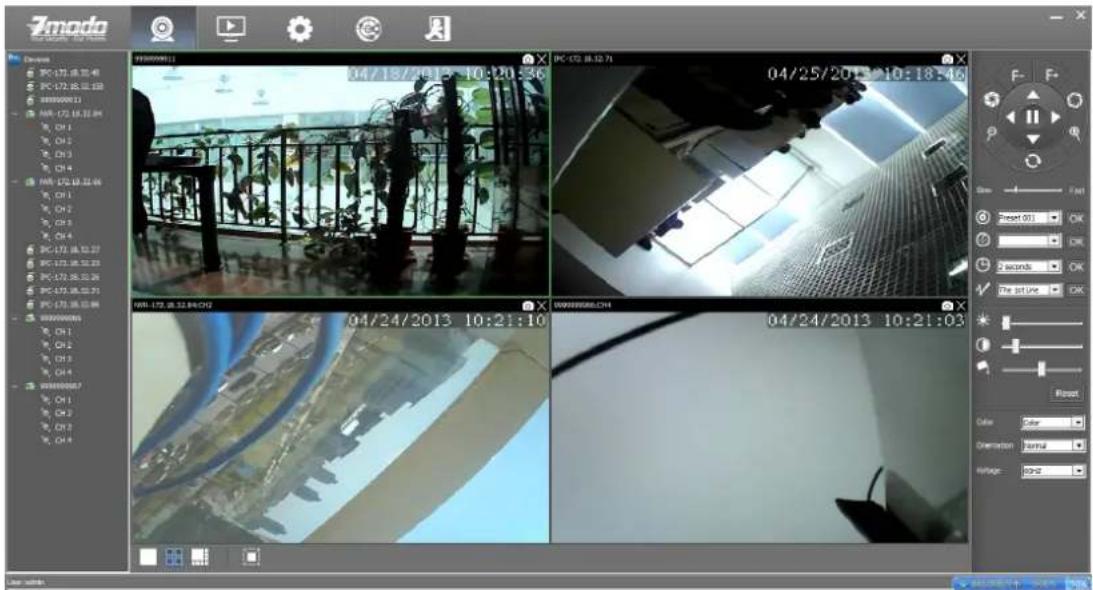
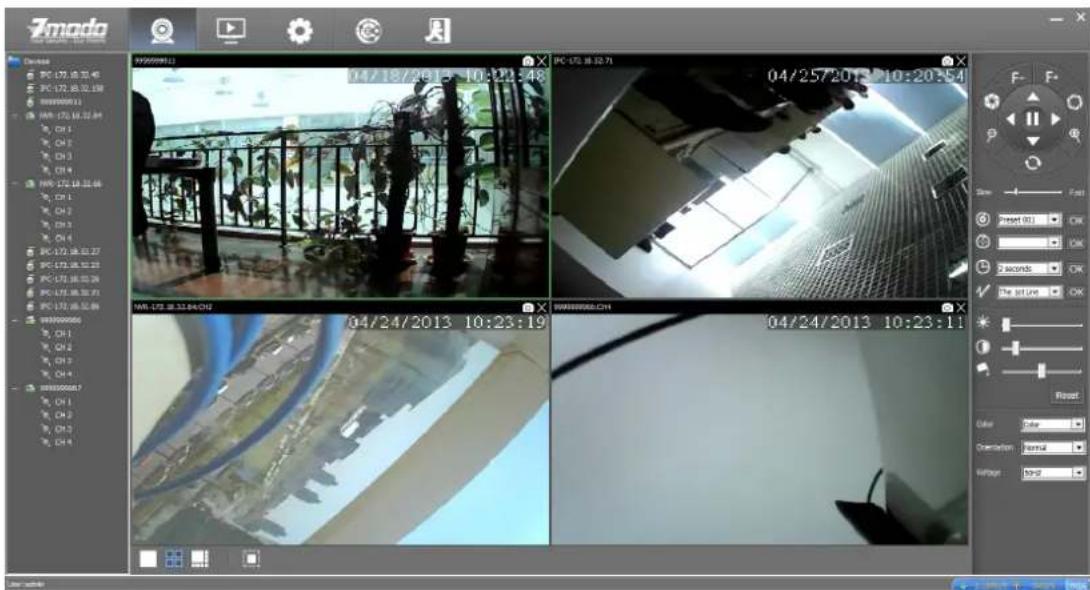
Click for 4-channel video display layout.
Click for 8-channel video display layout.
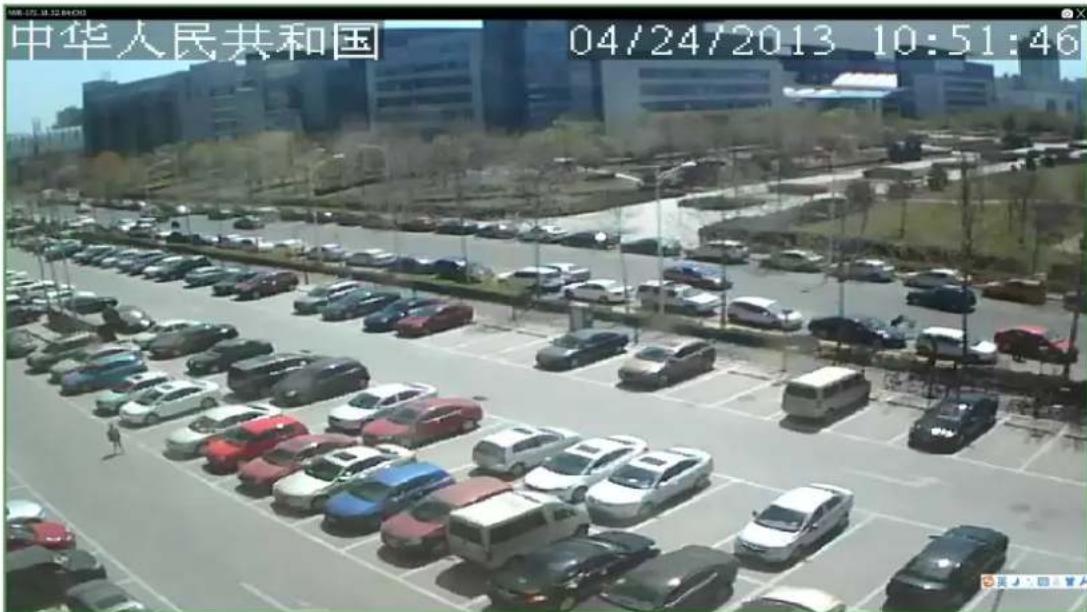
Click☐for full-screen display at any layout
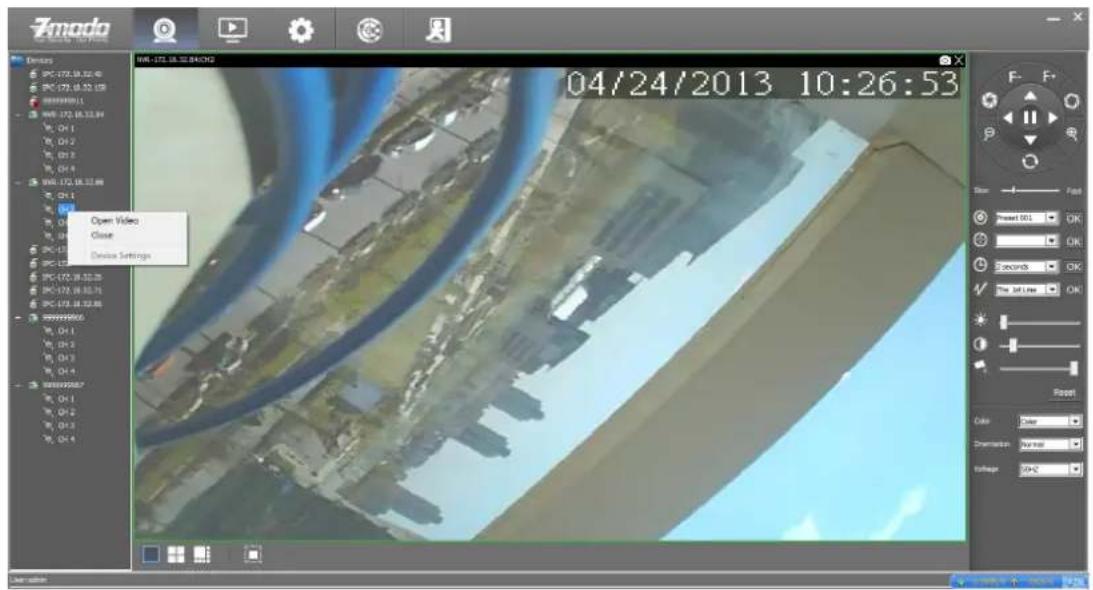
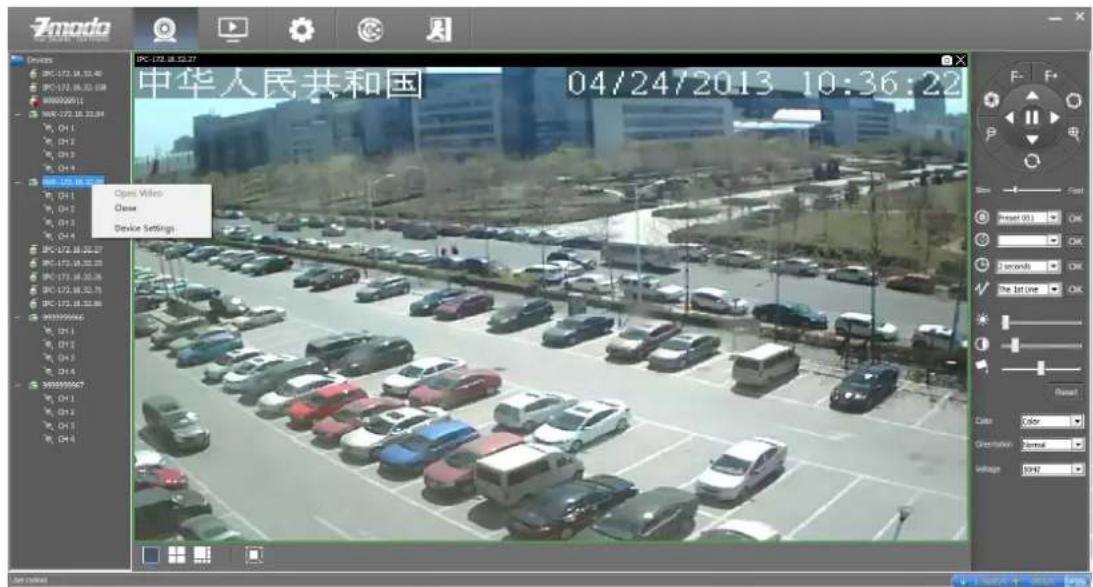
Drag the on-demand device to the right side of the window area to display the surveillance video. Right click and select"Open Video" to open this channel video.
Close the video
Click the × at the top right corner of the open video window to close the video
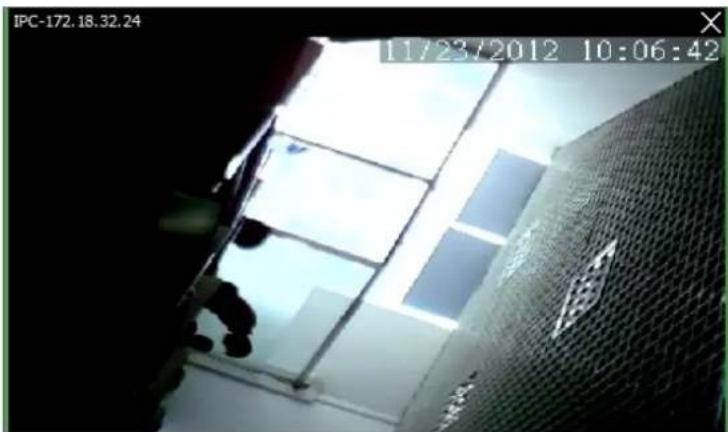
Select any one of the device on the left side, right click and select" close" to close the videos. Refer to below figure
Screen display parameters
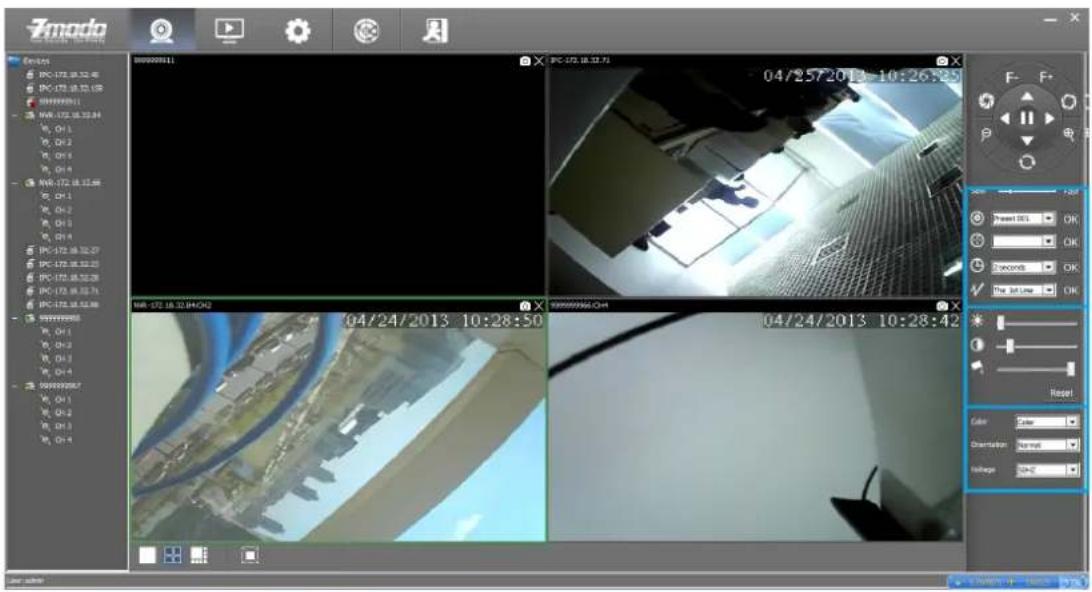
Icons Description

Brightness
Adjust the brightness

Contrast
Adjust the contrast

Saturation
Adjust the saturation
Color Adjust the color(black and white)
Orientation
Adjust the orientation(normal, flip, mirror, flip plus mirror)
Voltage Adjust the voltage
Reset Restore default settings
Recording Plan
Set the local manual recording plan, the selected device will begin recording at the set time period. The video files will be stored in the local PC. The file path can be modified at the 【local setting】 and the stored video can play back locally.
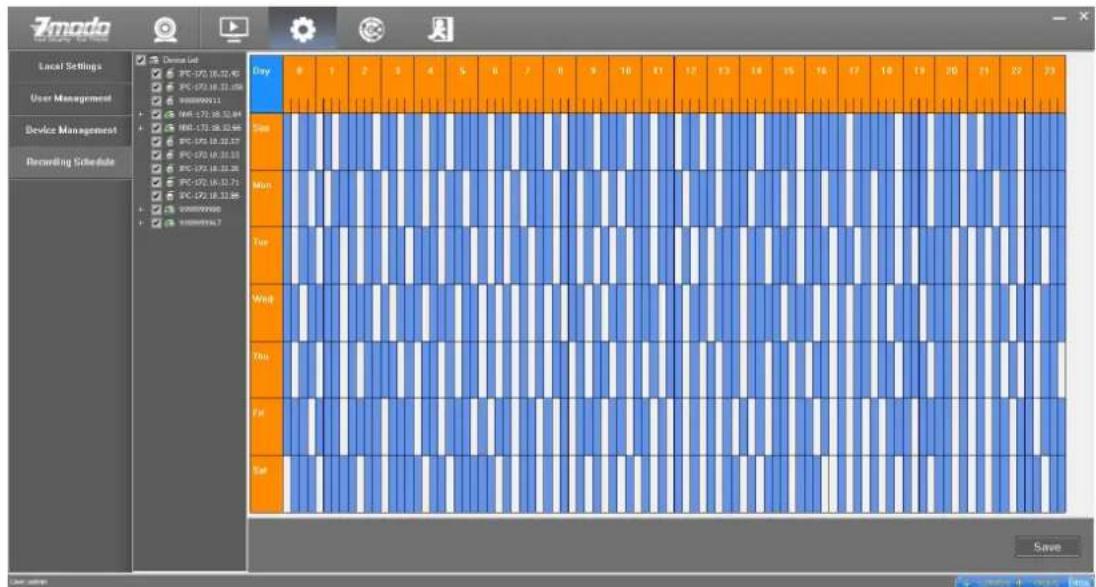
Steps for setting the local recording plan:
- Set the time period for recording, left click to select the time period, the selected area will be changed into blue color (click the blue area again can cancel the time period)
Note: Left click the to set the recording plan for the week
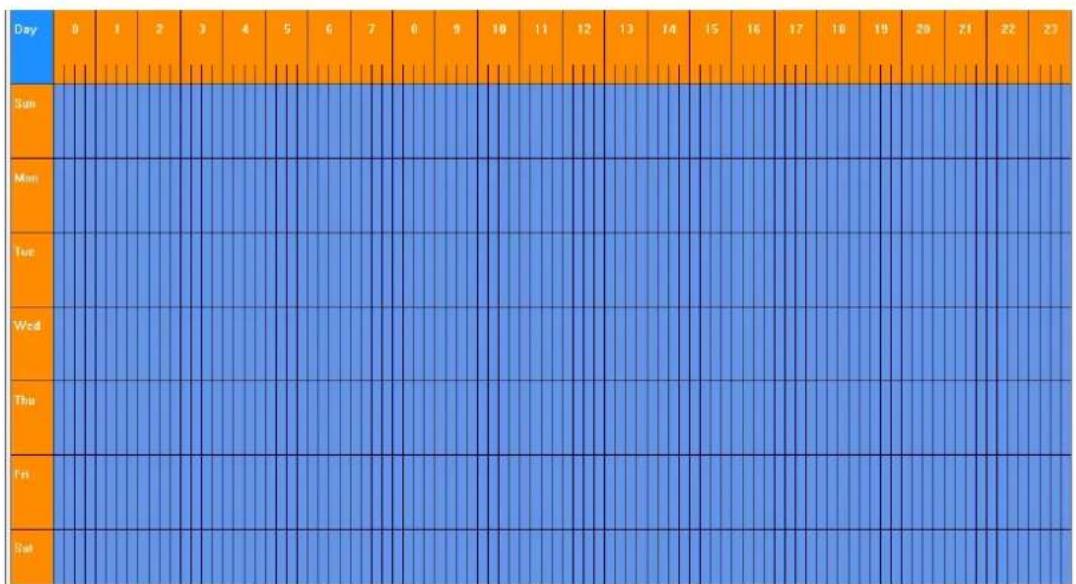
Left click the weekday(i.e.) to set the recording plan for the whole day
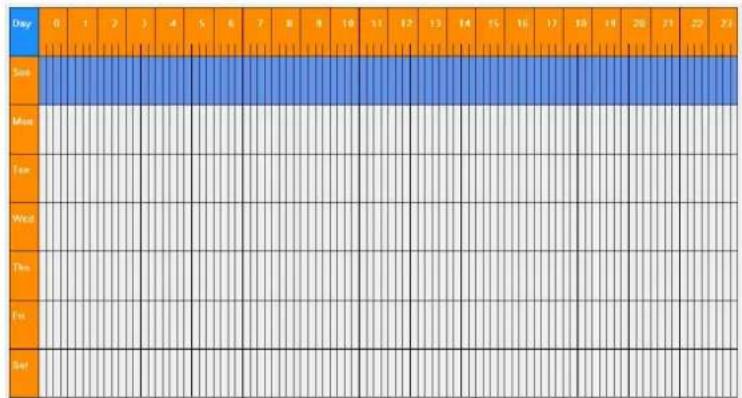
Left click 0 to 24 area of the timeline to set the recording plan for the same time period of the whole week
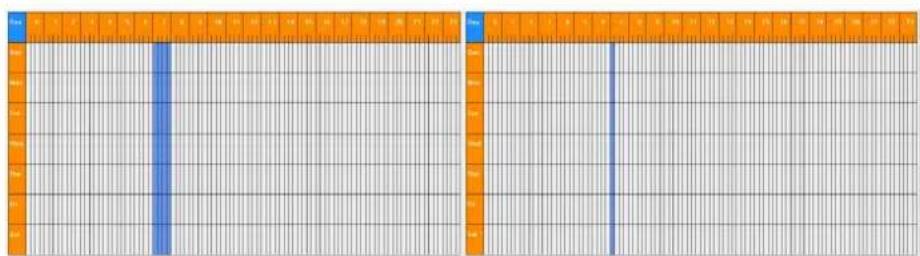
- Click the device allocated for the recording plan to select, one or more devices can be selected and then click the【Save】 button.
Double click any device to check its recording plan.
Video playback
Click the Playback button to enter into the video playback interface
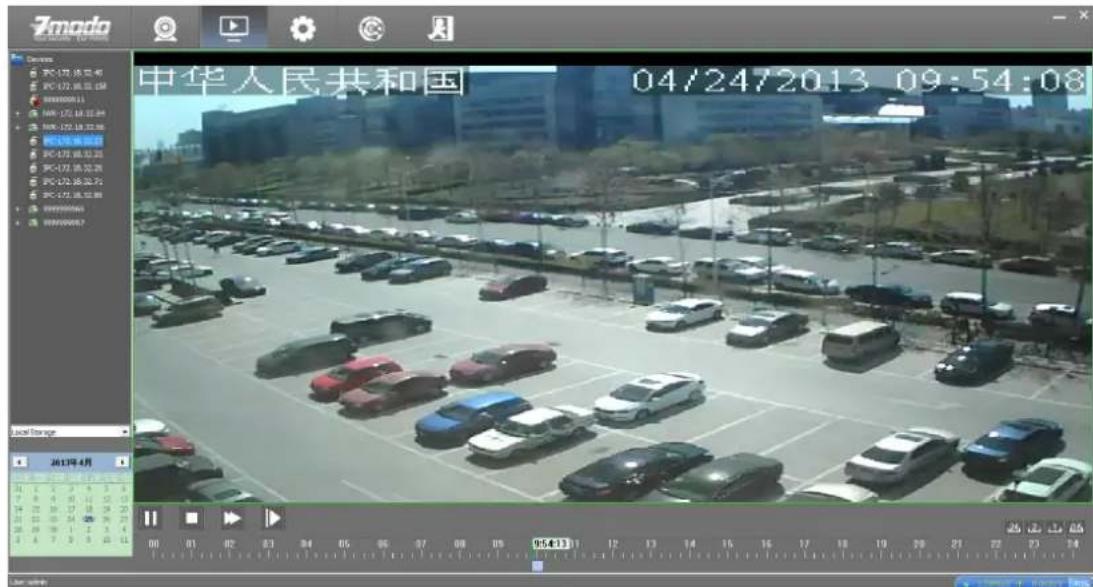
Select the device from the list on the left side to playback
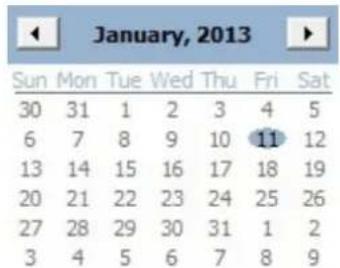
Select the playback date from the calendar
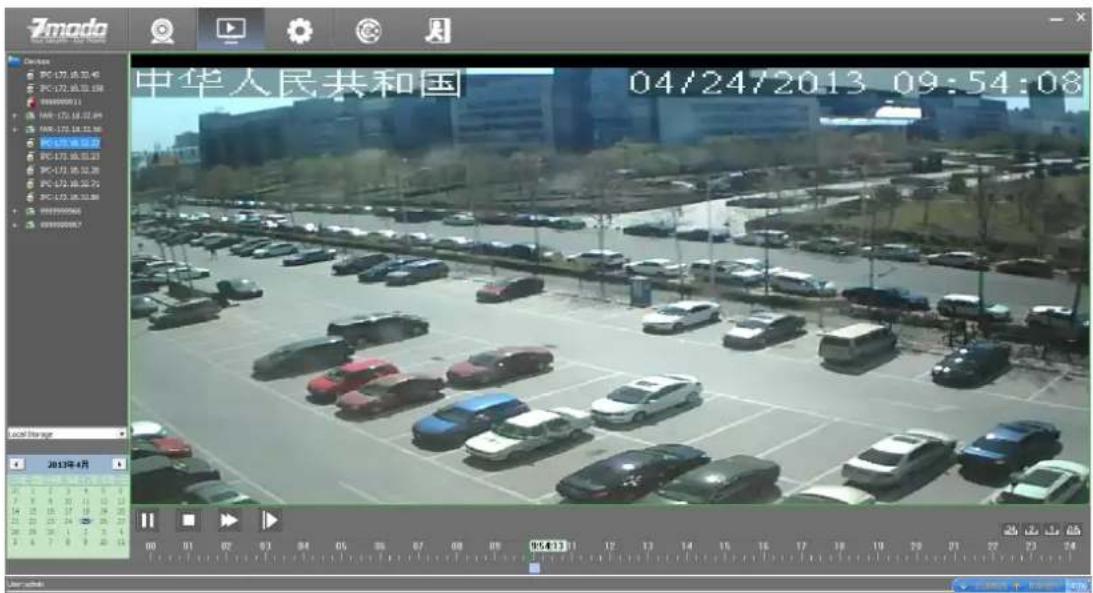
Click the button to play the video, click to stop the video Click the button for fast forward playback and click the for slow playback.
Drag on the time bar for playback of the video, the blue bar means there is a time period while the gray area means there isn't.
24 2 1 05 Control the display accuracy of the play scale 24-hour display accuracy

2-hour display accuracy

1 hour display accuracy

0.5-hour display accuracy

PTZ Control
PTZ control is realized through PTZ panel.
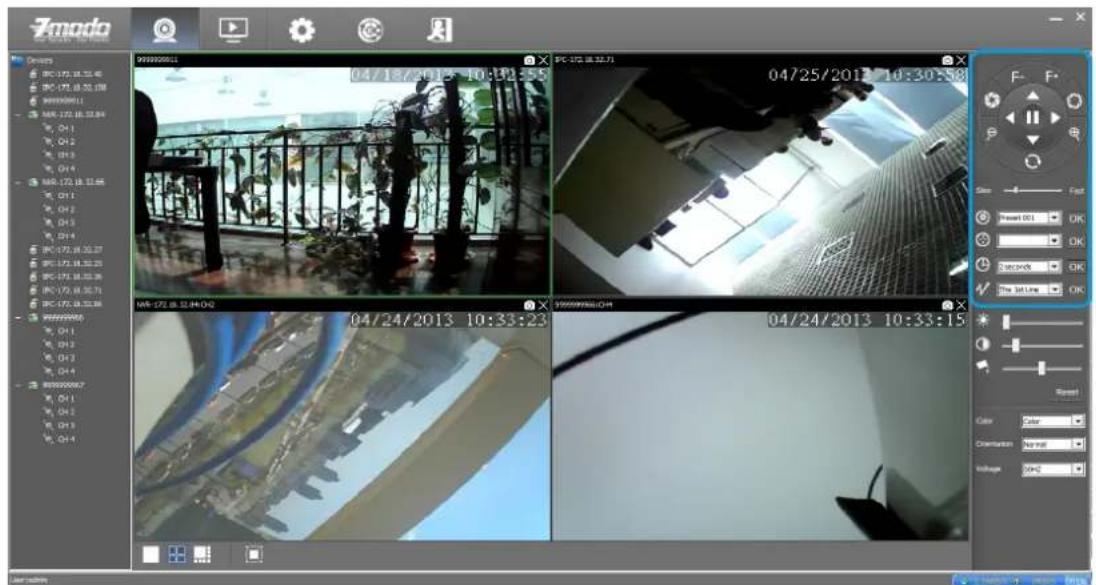
| Icon | Description |
| Reset | |
| Zoom in/out | |
| Brightness adjustment | |
| Focal length adjustment | |
| Direction adjustment | |
| Set preset | |
| Move to preset position | |
| Set interval time | |
| Patrol route |
Device Configuration Parameters
Select the device need to modify parameters, right click 【 Device Settings】to set.
Set the relevant parameters on the popped out interface.
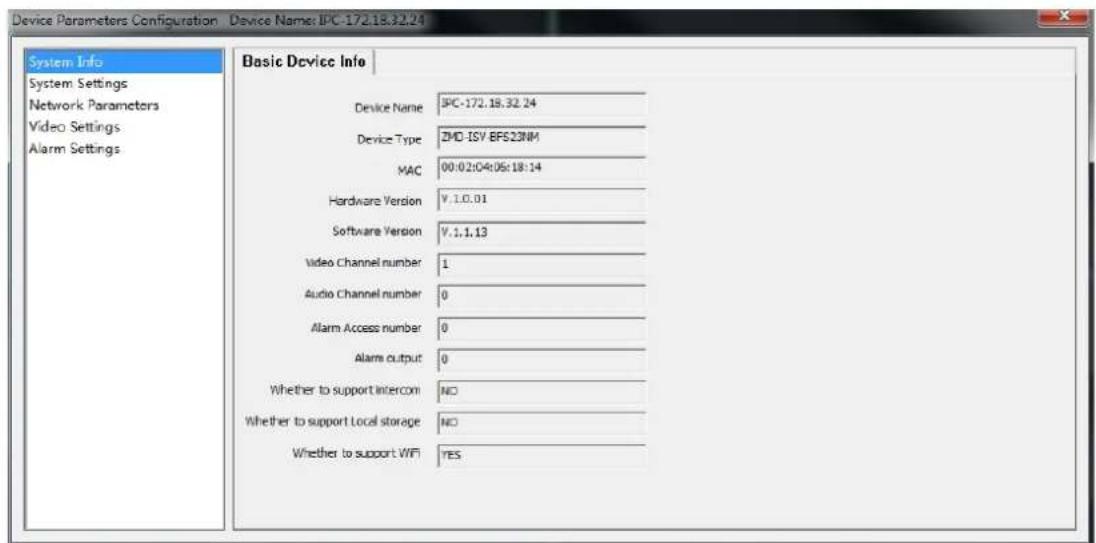
Device Information Display
Such information as ID, software and hardware version information, header information and network connection status will be displayed on the interface.
System Information Setting
Date Time Settings:
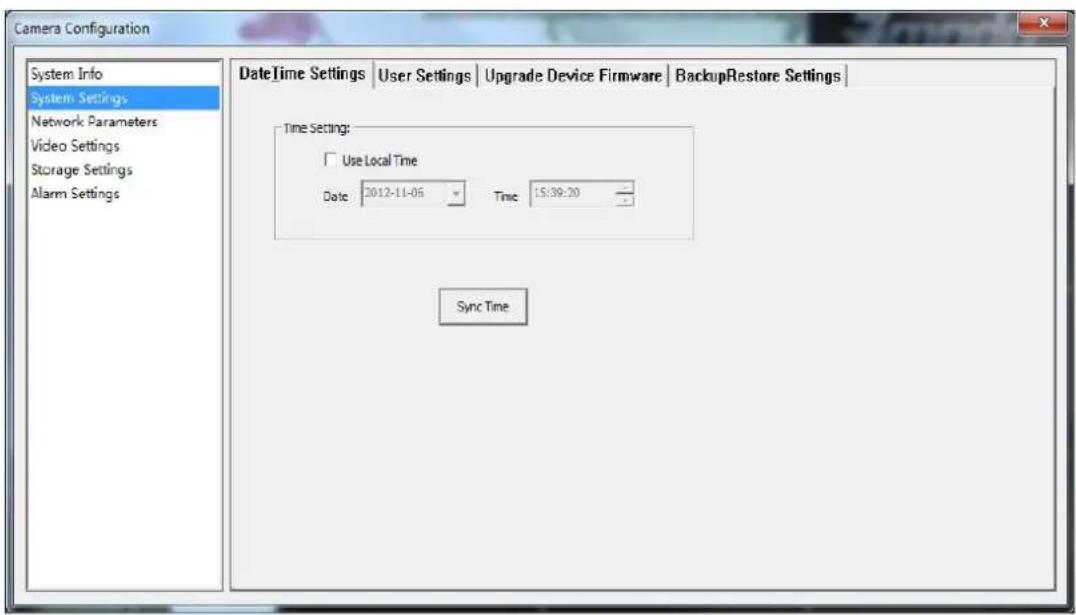
Figure 220 System Sync Time
【Time Synchronization】: Select to synchronize the local time.
【Synchronization Method】: Select 【Use Local Time】 and click
【Sync Time】can realize the PC system time synchronization.
User Settings:
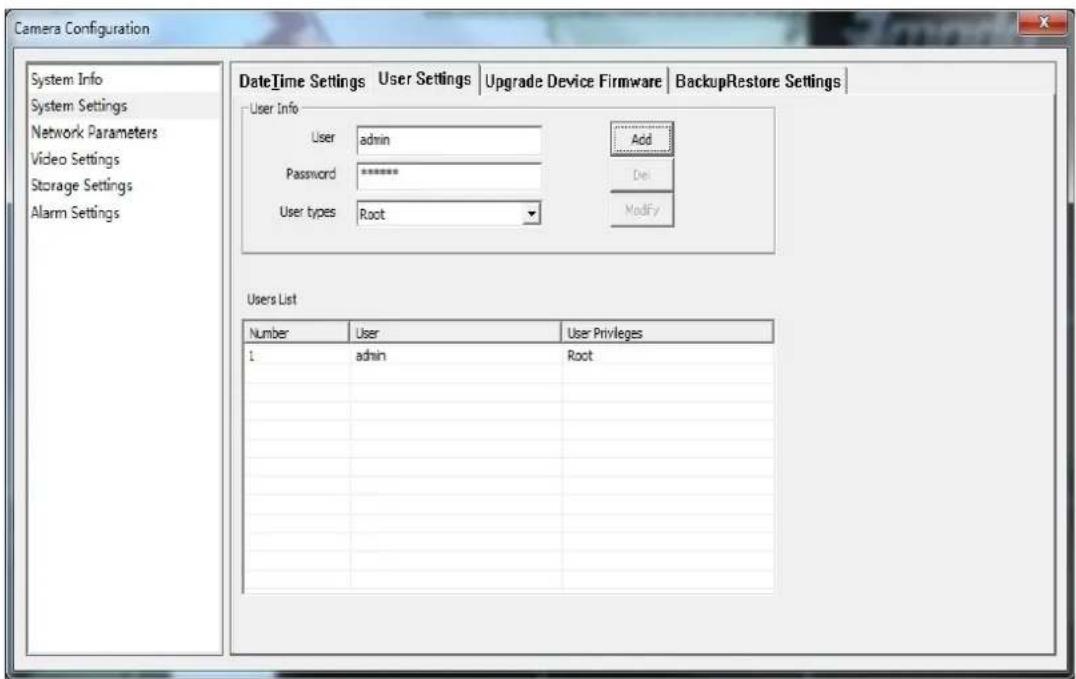
-
Each IPC can be set to be used by multiple users.
-
User privilege: Administrator: Root
Ordinary users: Ordinary
-
Modify password: in the password input box directly enter the new password, click the 【modify】to modify the password.
-
Modification of user: select one of the users, select another user and click 【modify】.
Upgrade Device Firmware:
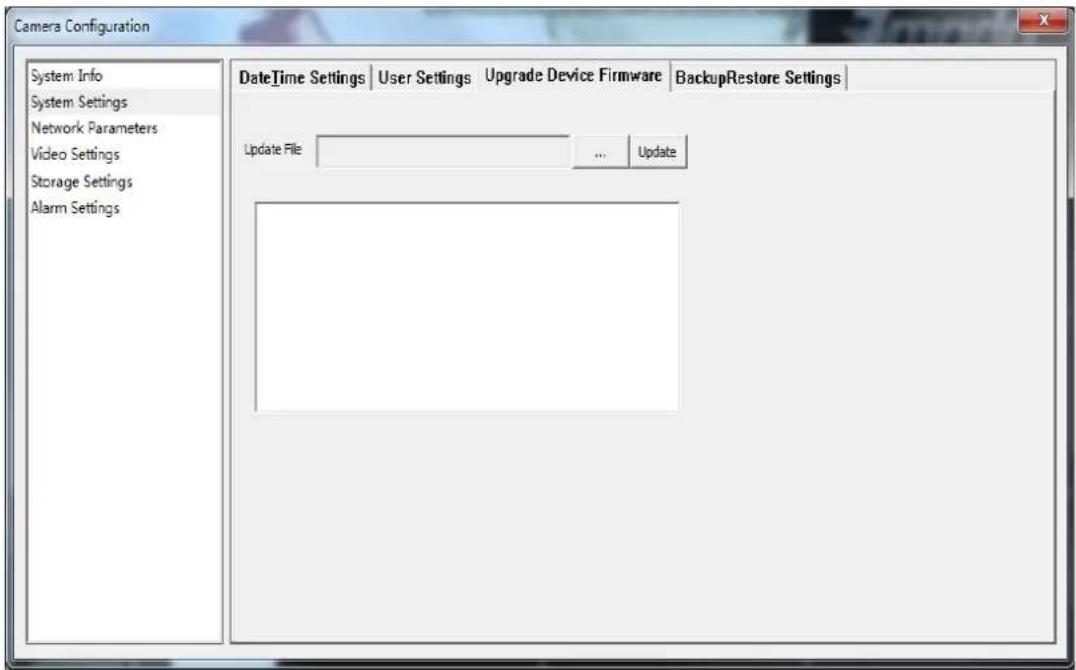
Upgrade the equipment in the upgrade interface.
Click the Browse button, select the upgrade file, and click the 【Update】 button to upgrade.
Backup Restore Settings:
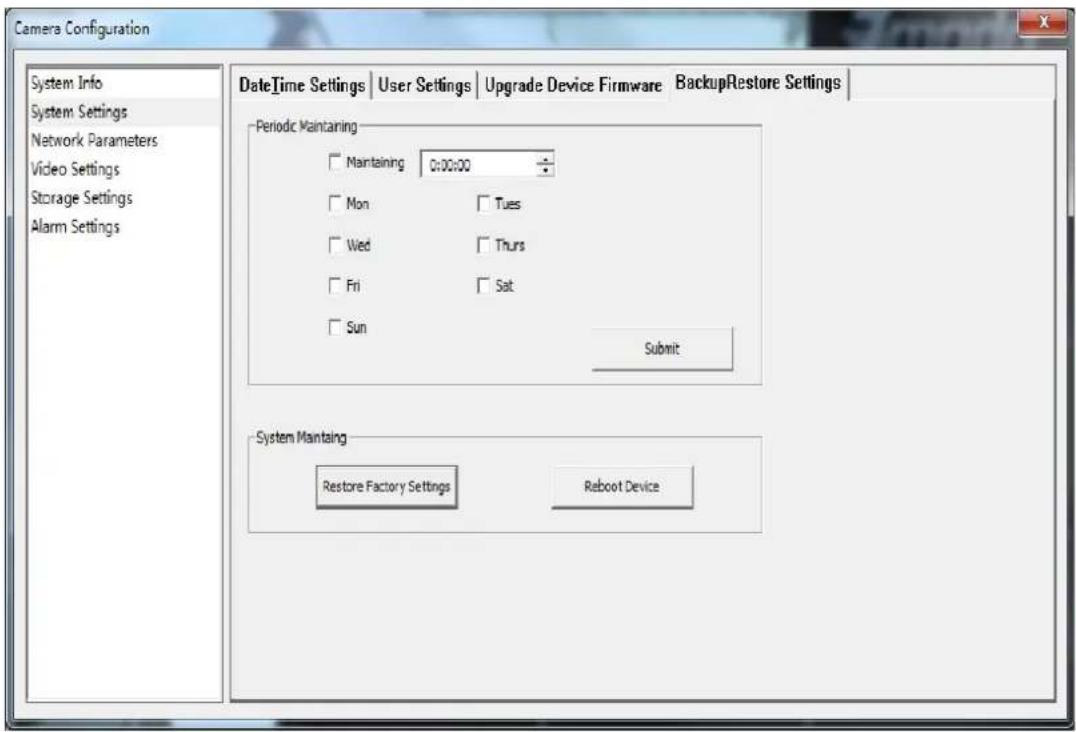
Periodic Maintaining: Choose any time of any day and set the time for auto reboot.
Restore Factory setting: Click this button to make all settings of the equipment restore to factory condition.
Reboot: Click this button to reset device.
Backup & Restore: Equipment backup and recovery
Network Settings
Basic Network Settings:
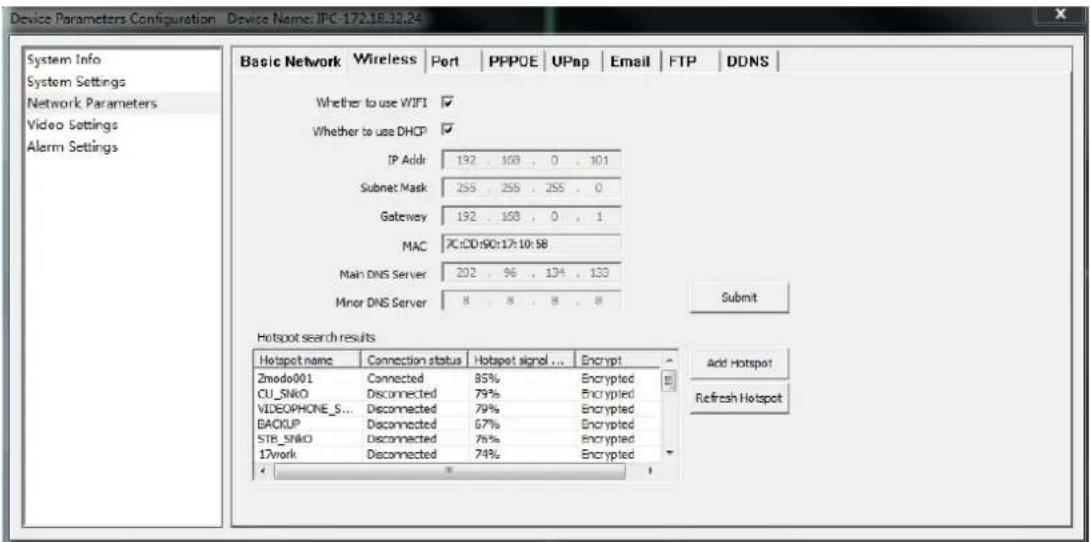
【DHCP】Start the DHCP function of the route, then IP camera will obtain address automatically from the router.
【IP Address】Set the IP address of IP camera device.
【Subnet mask】Default is 255.255.255.0 (Suggest user not to change this)
【Gateway】Set gateway IP of IPC, for example if IPC access public network through router, the gateway IP need to be set as the router IP which has accessed the public network.
【DNS address】if to use DDNS function, the DNS address need to be set as DNS address of the place where the device is belonging to.
Wireless Lan Settings:
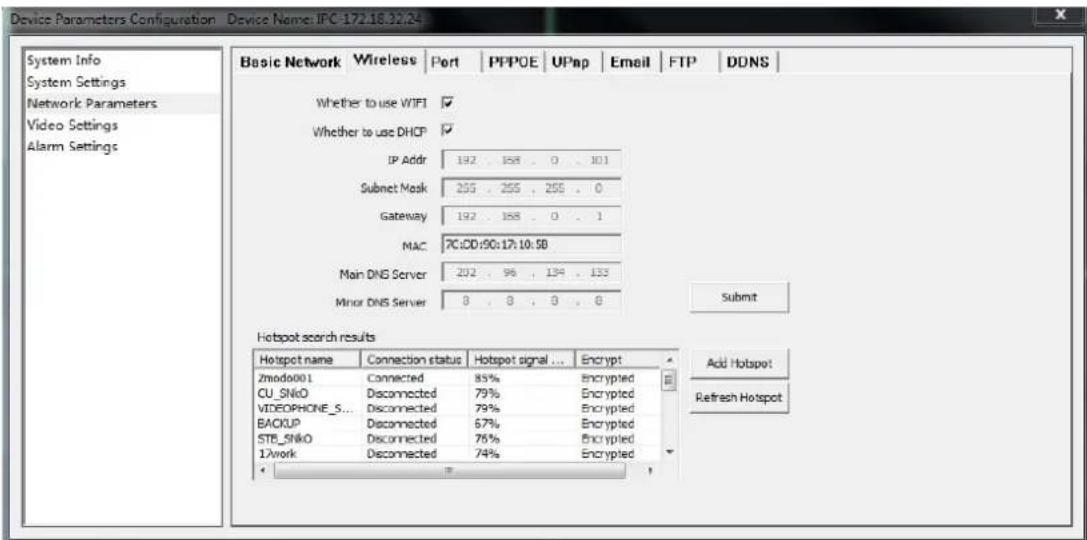
【 Whether to use WIFI 】 Select this to start the IPC wireless network function.
【Whether to use DHCP】If the route enables DHCP function, select it and the IP camera will obtain address automatically from router.
【IP Address】Set wireless IP address of IP camera device.
【Gateway】Set the IP address of the current wireless gateway (Route/AP), such as 192.168.1.1.
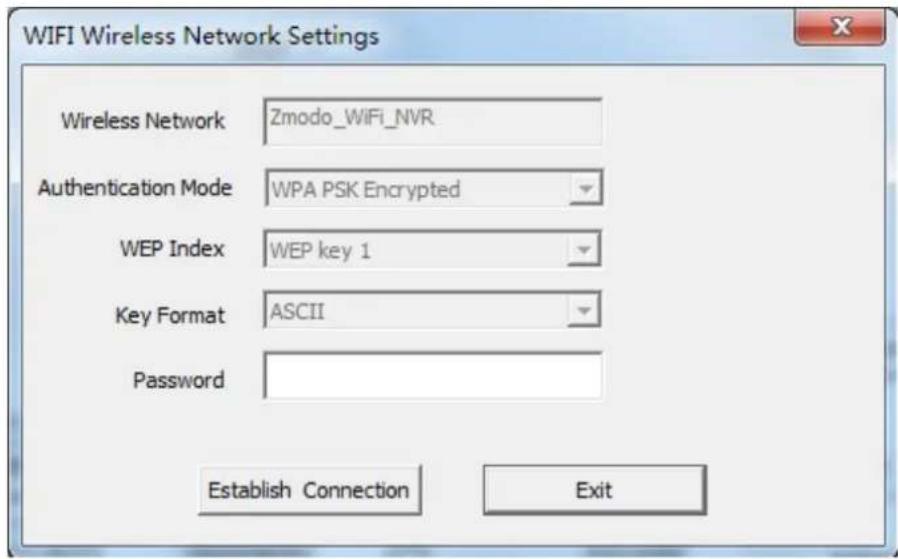
You can select a wireless network from the auto search list or manually add one.
【Wireless Network】is SSID, is the login name of wireless network for authentication, it must be consistent with the SSID of the wireless gateway (router/AP). (Such as: TP-LINK_4A2DDC).
【Authentication Mode】can choose WEP, WPA, WPA2 three encryption methods, this setting must be consistent with the security type of wireless gateway (router /AP).
【Password】is a authentication password of wireless network, this setting must be consistent with the security type of wireless gateway (router /AP).
Save parameters after all settings are done. Now unplug cable can realize the IPC wireless access through wireless IP, such as 172.183.230.
Port Settings:
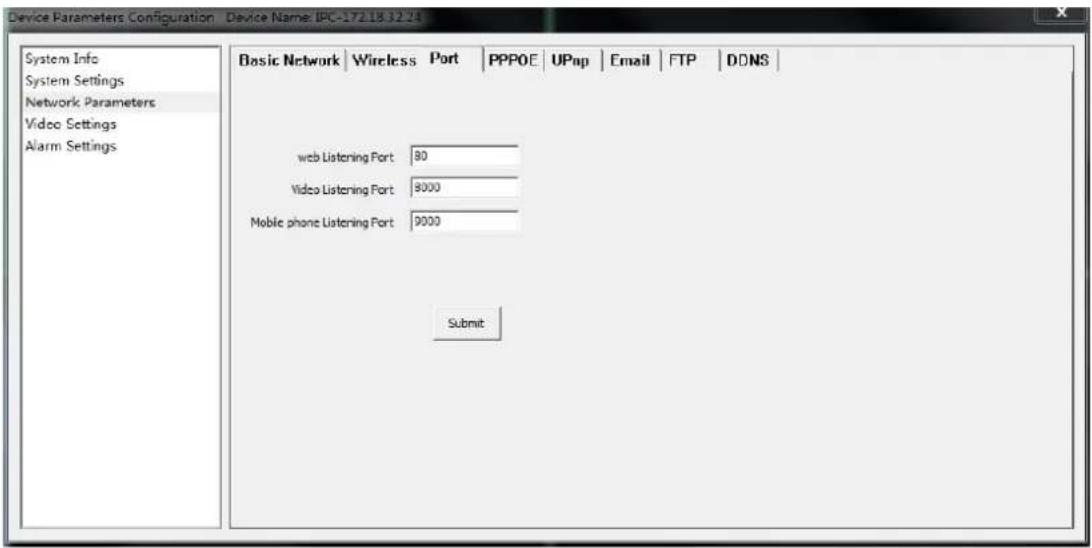
【web Listening Port】The default value is 80.
【Video Listening Port】The default value is 8000.
【Mobile Phone Listening Port】The default value is 9000.
PPPOE Settings:
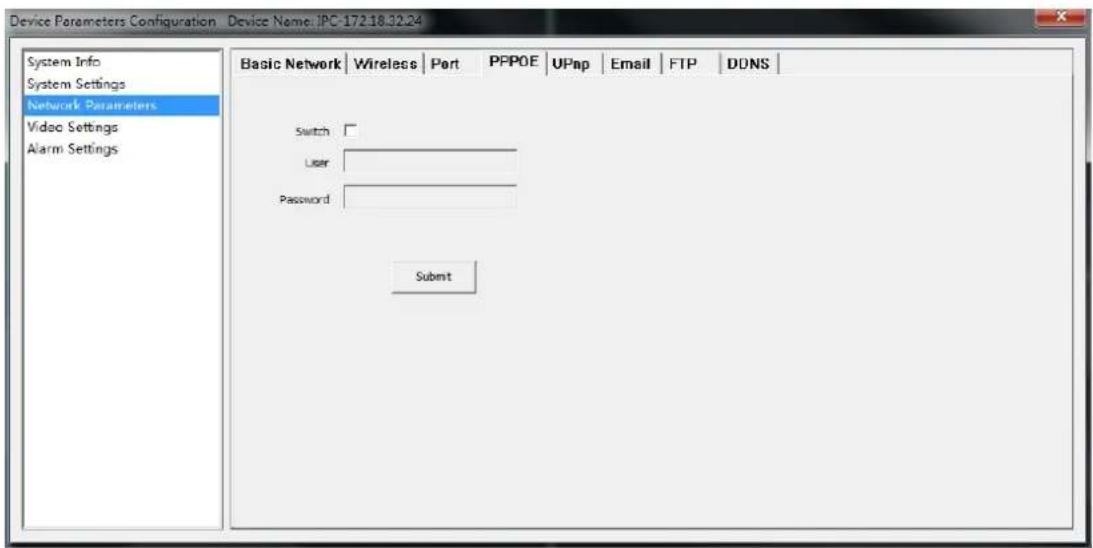
【Switch】: Tick 【Switch】to select the PPPOE dial-up mode.
【User】: The user name can be obtained from Internet service providers.
【 Password】: Password can be obtained from Internet service providers.
UPnP Settings:
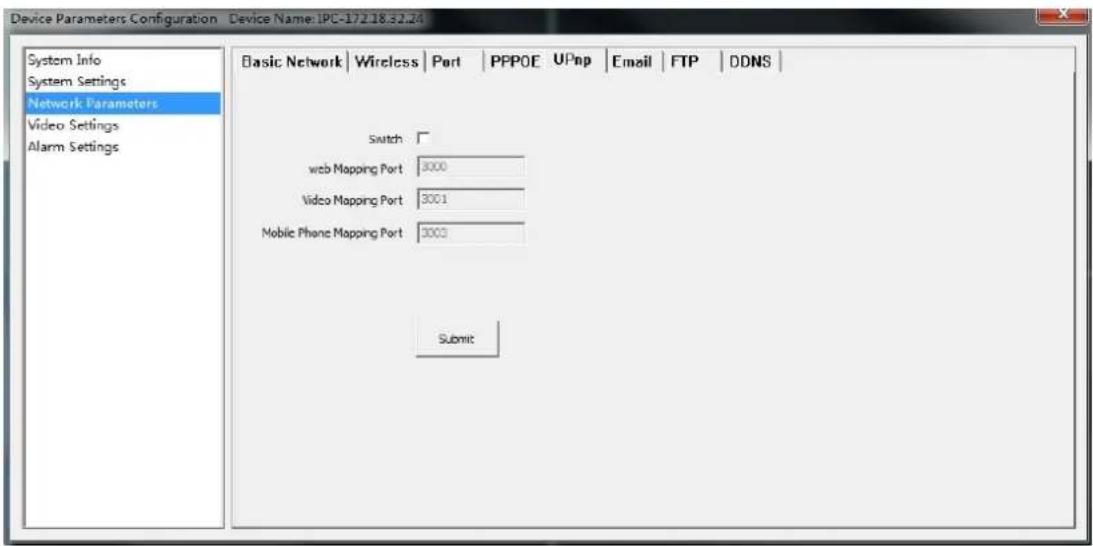
【Switch】If in LAN it has server with UPNP function, enable this function, the server will automatically forward the set port to public network.
【web mapping port】set the web port which will be mapping to the server.
【digital mapping port】set the digital port which will be mapping to the server.
【Mobile phone mapping port】set the mobile phone port which will be mapping to the server.
DDNS Service Settings:
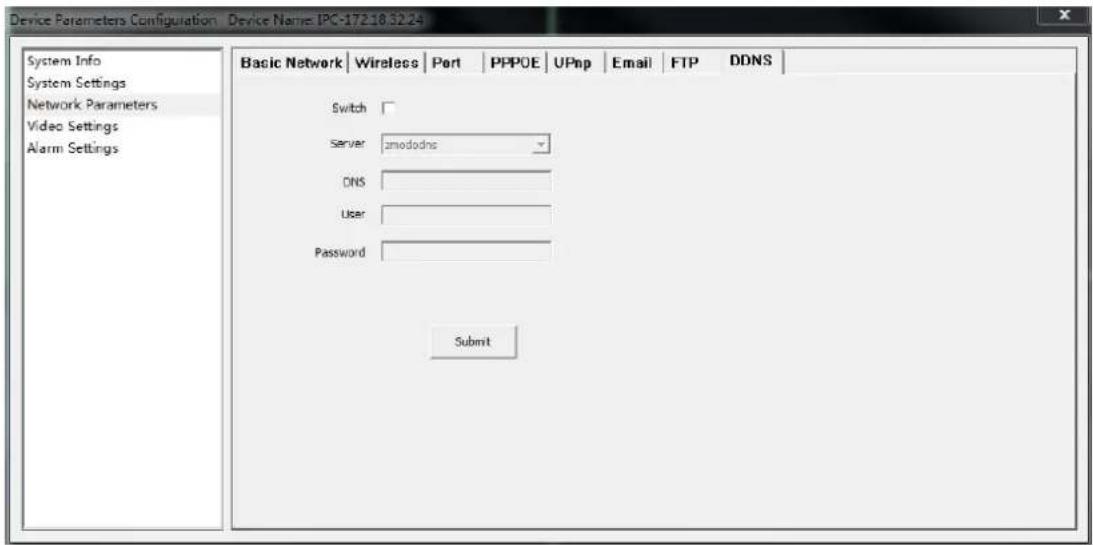
【Service provider】3322.org or dynDDNS.org selectable
【 Domain 】 the device domain which is set by user, such as golinwei.3322.org.
【 Register name】 The user name which you registered on DDNS server.
【Password】The password which you registered on DDNS server.
Mail Service Settings:
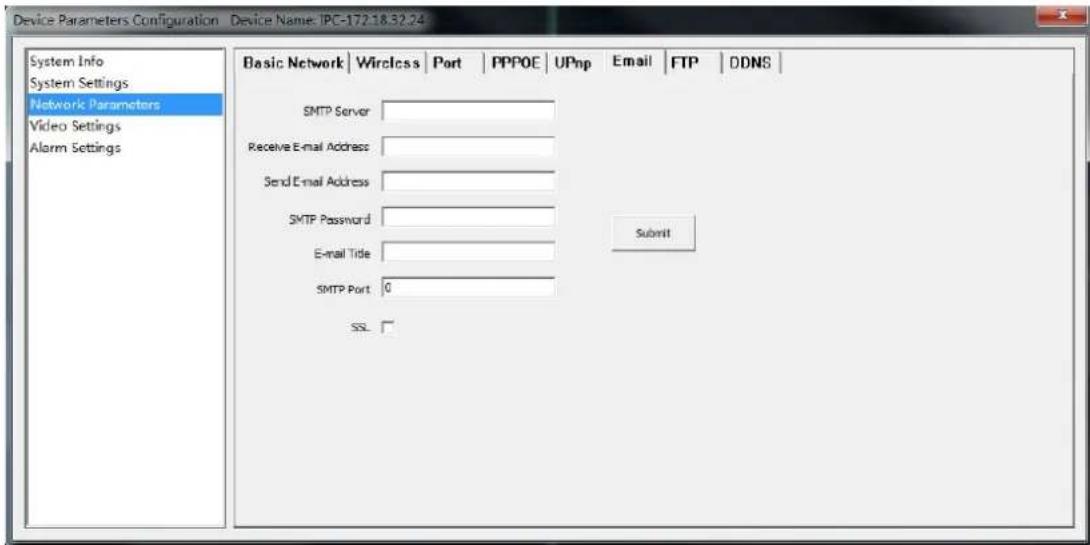
【SMTP Server】Send email server address, different email service provider provides different email server address.
【Email receiving address】 Email address to receive the email, 4 addresses can be added.
【Email sending address】Email address to send email.
【SMTP password】Log in password for the email box.
【 SMTP Port 】 Port of SMTP Server, different email server has different port.
【Email Title】: The title of sending email
Ftp Service Settings:
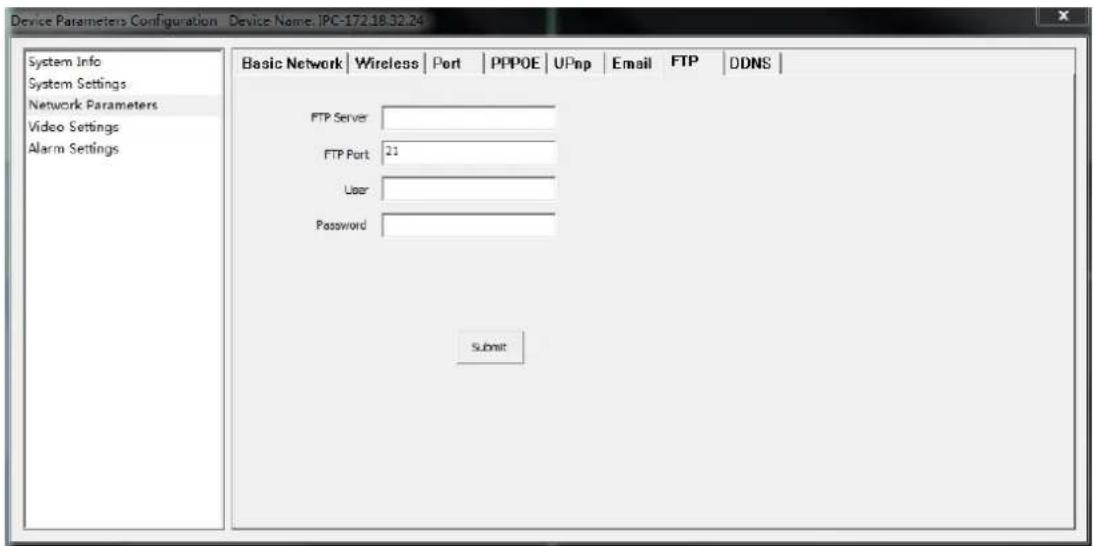
FTP services will send the alarm triggered recording file or captured photo via FTP to certain FTP server.
【FTP server】IP address or HTTP network address of FTP server.
【FTP port】Port of FTP server, default port is 21.
【FTP user name and password】User name and password of FTP Server.
Video Settings
Encoder Settings:
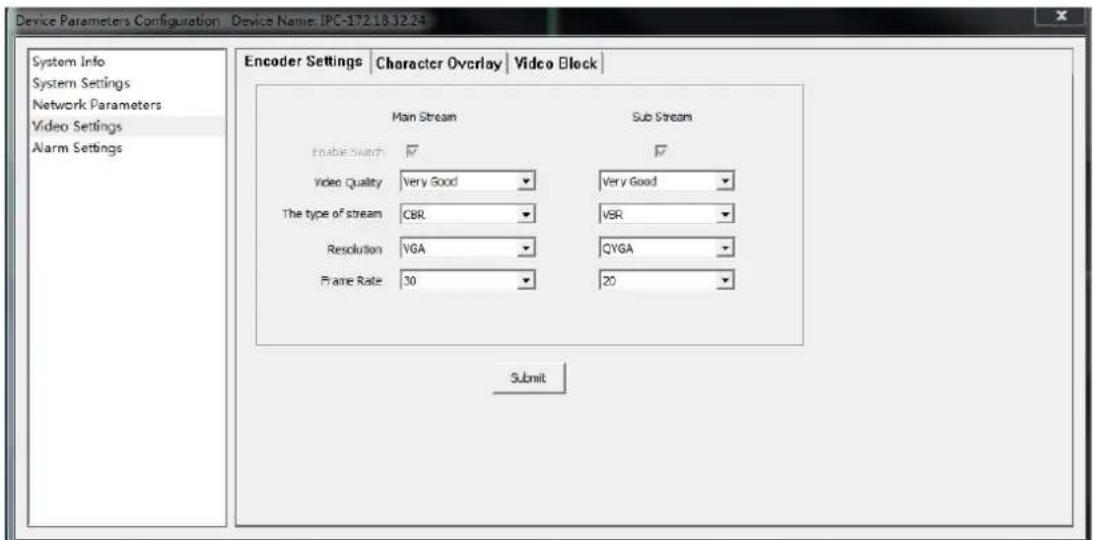
【Video Quality】User can choose suitable image quality per need: best, very good, good, common, or poor.
【 Stream Type 】 Two types: CBR(Constant bit rate)and VBR(Variable bit rate) to choose, CBR applies constant bit rate coding, VBR applies variable bit rate coding.
【 Resolution 】 Set image resolution, main stream VGA(640×480=307200 pixel), sub stream QVGA(320×240=76800 pixels).
【 Frame rate 】 Set coding frame rate per second. Under not satisfying network situation, you can reduce the frame rate to control the coding bit rate, to ensure the smooth of the moving footage
Character Overlay:
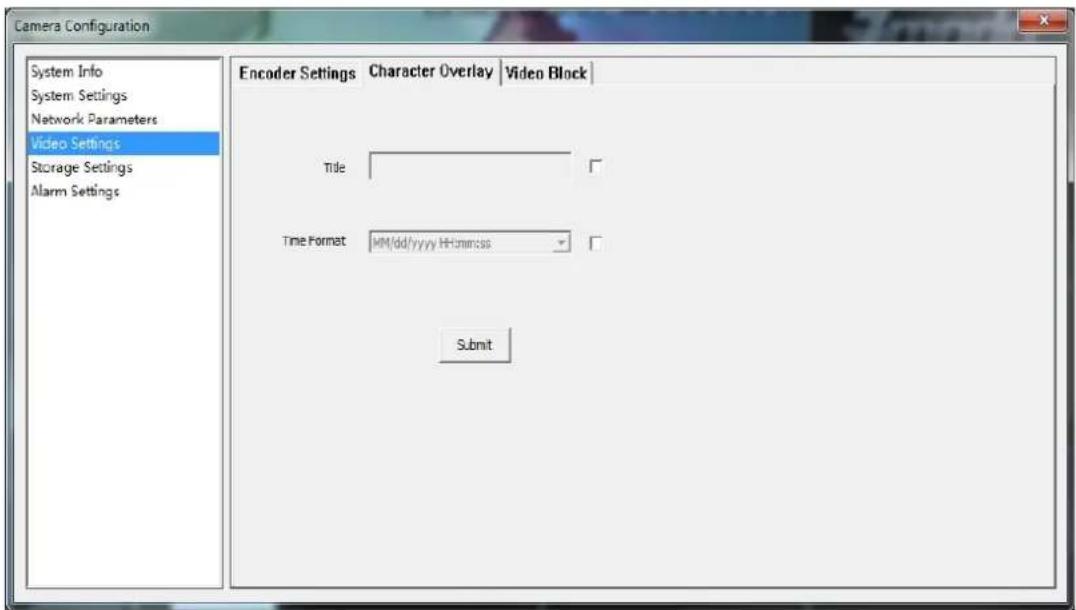
【Title】Name of video channel will be shown on the up left of the image, max supports 16 characters.
【Time format】You can choose whether to display title, date and time, and also you can choose the time format.
Video Block:
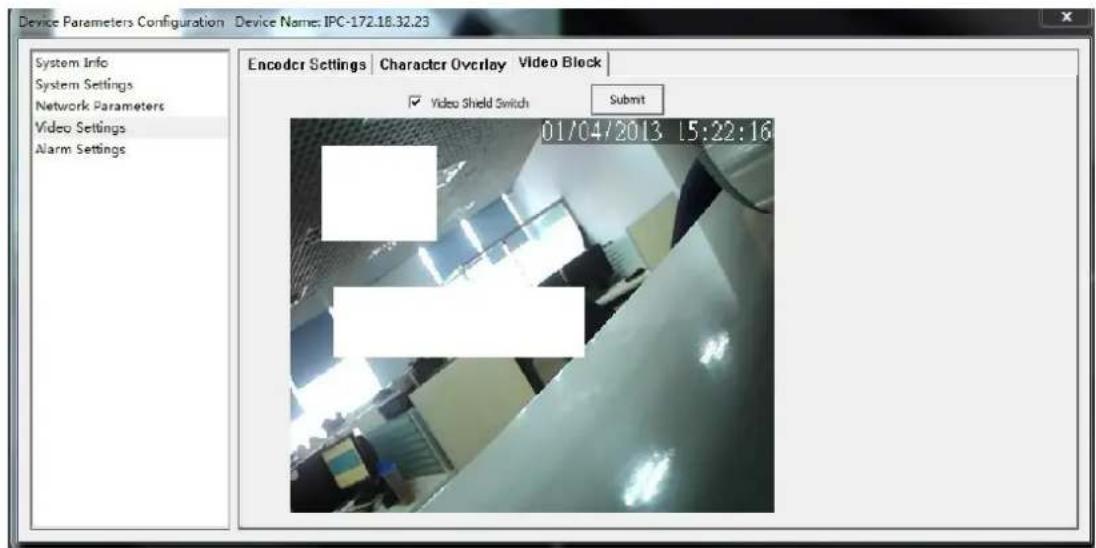
User can set the image mask area by clicking and dragging the cusor or cancel the shield area by right clicking the mouse. You can choose to shield the entire image, or only shield the part of
the image. It can mask up to four areas.
Storage Management
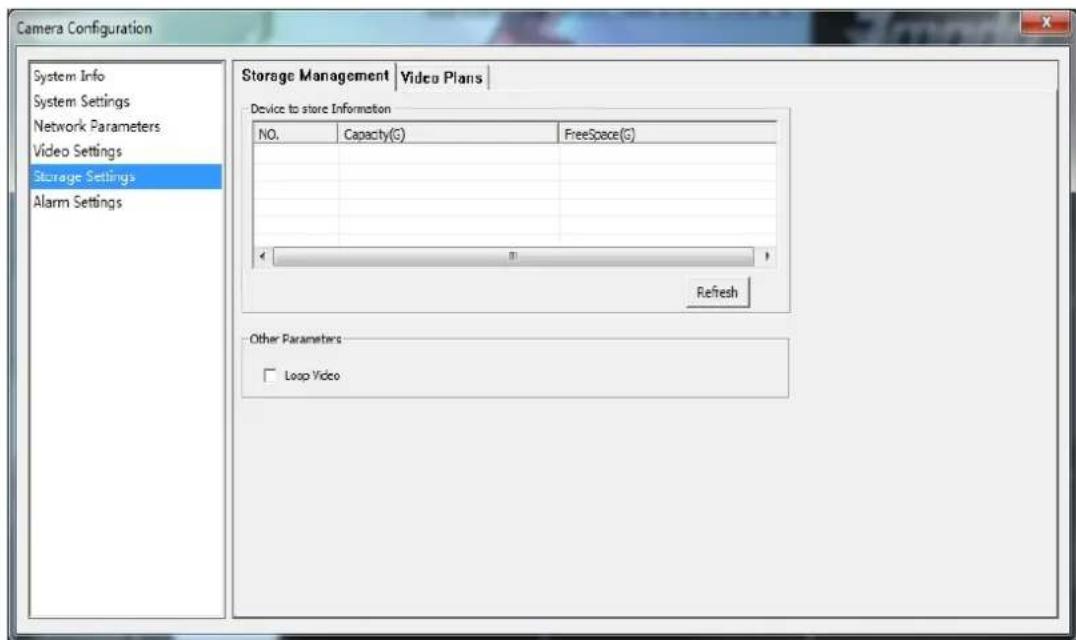
You can view the total disk capacity and the remaining space and set loop video
Video Plans
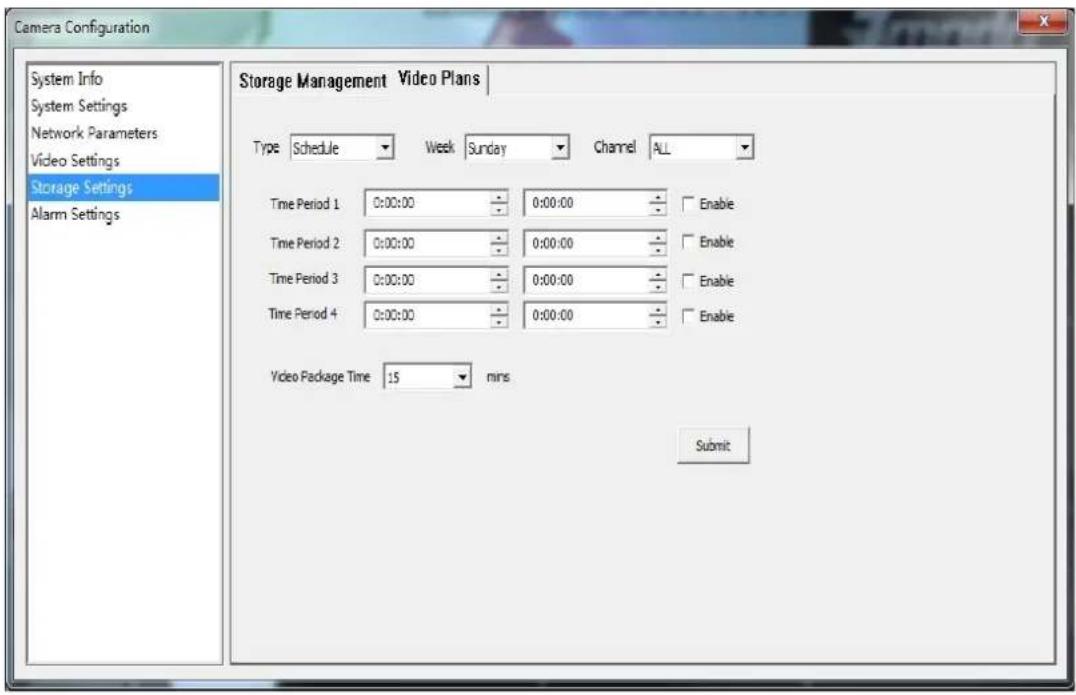
【 Appointment Setting】: Set reservation time of timing video recording, can set everyday specific video time, up to 4 time period.
【Set recording time】: Can set a single file recording time as 15,30,45 or 60 minutes
【Other settings】: Before recording, can choose video types as timing recording or alarm recording; can choose record any day of a week or record everyday of the week; can choose a single channel or all the channels.
Alarm setting
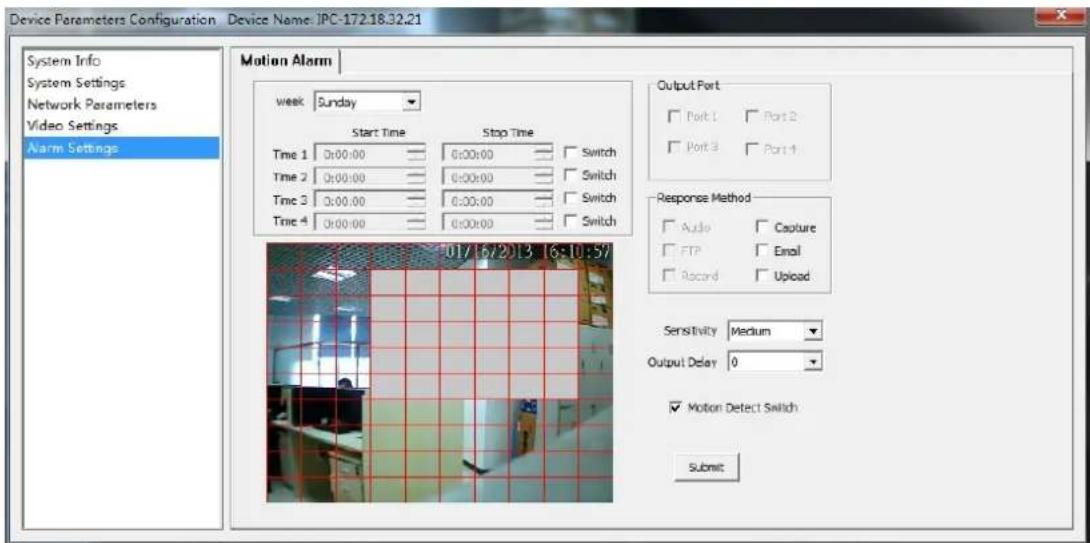
【 Protection time setting 】 Set the protection time of motion detection. It can set detail time period of everyday, up to four time period.
【Motion detection switch】Set whether to edit the mobile area or open the motion detection.
【Motion detection setting】After enable motion detection switch, the setting interface will appear grid line. User only needs to click the little cube on the image to set the motion detection area. Right click the little cube to cancel related area detection.
【Alarm action mode】Set linkage output format after triggered alarm. Sound alarm or sending email can be selected. Sending email is sending motion detection alarm information via email to user.
【 Sensitivity 】 The sensitivity of motion detection includes four levels: high, little high, mid, and low.
【Output delay】Set delay time of alarm linkage, time range is limited between 0\~30.
System Settings
Click the【Setting】into the settings page, then click the 【Local
Settings】on the left.
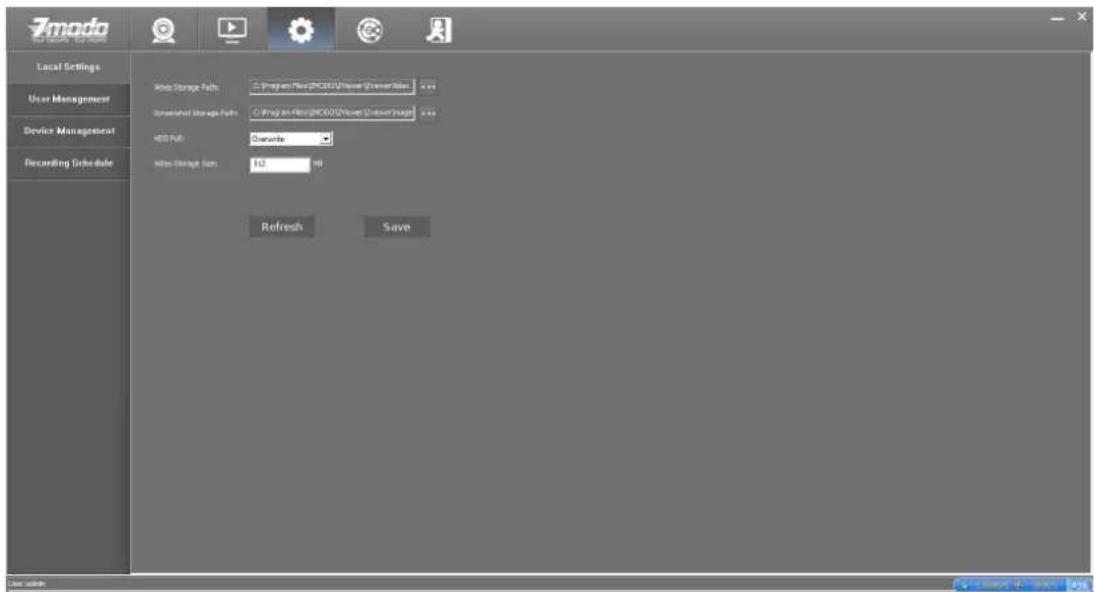
【Video Storage Path】: Set local video, as the default installation directory: \Zmodo\Zviewer\ZviewerVideo.
【Screenshot Storage Path】: Set capture image storage path. The default installation directory is \Zmodo\ZViewer\ ZviewerImage.
【HDD Full】: Operate after the hard disk is full, can choose to 【Overwrite】 or 【Stop Record】.
【Video Storage Size】: Default is 512M, minimum is 100M.
Uninstall Zviewer
Find the Uninstall ZViewer at the Start

ZMODO

ZViewer

Uninstall ZViewer

ZViewer on the Web

ZViewer
Double click Uninstall ZViewer for Zviewer uninstall
- PC-ZViewer User Manual
- Contents
- Preface
- Statement:
- Intended Reader:
- Terms in this manual:
- Software Introduction
- Zviewer Installation
- Login Interface
- Main Interface of Zviewer
- Logout
- Device Management
- Delete a Device
- Edit a Device
- Auto Search for Adding a Device Searching for device
- Edit the Device
- Batch Editing Devices
- Add Device
- User management
- Add a User
- Delete a User
- Edit a User
- Video Browsing
- Video Display Screen
- Close the video
- Icons Description
- Voltage Adjust the voltage
- Reset Restore default settings
- Recording Plan
- Video playback
- PTZ Control
- Device Configuration Parameters
- Device Information Display
- System Information Setting
- Upgrade Device Firmware:
- Backup Restore Settings:
- Network Settings
- Wireless Lan Settings:
- Port Settings:
- DDNS Service Settings:
- Mail Service Settings:
- Ftp Service Settings:
- Video Settings
- Character Overlay:
- Video Block:
- Storage Management
- Video Plans
- Alarm setting
- System Settings
- Uninstall Zviewer
Brand : Zmodo
Model : ZM-SH721
Category : Security Camera