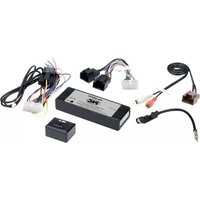
OnStar OS-3BOSE - Car audio accessory PAC - Free user manual and instructions
Find the device manual for free OnStar OS-3BOSE PAC in PDF.


| Product Type | GMLAN Radio Replacement Interface |
| Compatible Vehicles | 2006-2007 Buick Lucerne, 2007 Cadillac Escalade (incl. ESV/EXT), 2007 Chevrolet Avalanche/Impala/Monte Carlo/Silverado/Suburban/Tahoe, 2007 GMC Acadia/Sierra/Yukon (incl. Denali) |
| Retained Features | OnStar system, Bose amplifier & speakers, warning chimes, turn signal indicators, Rear Parking Assist, Rear Seat Audio jacks (dual zone radios) |
| Power Output | Provides +12V switched accessory output (1A max) |
| Steering Wheel Control Retention | Yes (requires SWI-X, JACK, ECL2 or PS interface; program for version #2) |
| OnStar Audio Routing | Automatically mutes rear speakers, plays OnStar through front speakers; Rear Seat Audio continues playing rear zone source |
| OnStar Volume Control | Via adjustment screw on interface; on Premium Bose (Denali/ Escalade) also via steering wheel buttons |
| Chime Module (CM-X) | Retains warning chimes and turn signal sounds (not needed with Premium Bose amplifier) |
| RAP (Retained Accessory Power) | Aftermarket radio stays on for 10 minutes after ignition off or until driver door opens |
| Harnesses Included | RAD-18 (aftermarket radio harness) and OS-GM14 (vehicle harness) |
| Dimensions (Interface Box) | Approx. 3.5 x 2.5 x 1 inches |
| Weight | Approx. 0.2 lbs (90 g) |
| Construction Material | ABS plastic casing |
| Installation | Plug-and-play; requires soldering or crimping to aftermarket radio harness (see manual) |
| Operating Voltage | 12V DC (vehicle electrical system) |
| LED Indicators | Red OnStar active LED, green ignition-on LED |
| Special Notes | Does not retain factory XM receiver; for vehicles without OnStar use if Bose amp retention needed; for non-Bose use OS-3 interface |
Frequently Asked Questions - OnStar OS-3BOSE PAC
User questions about OnStar OS-3BOSE PAC
0 question about this device. Answer the ones you know or ask your own.
Ask a new question about this device
Download the instructions for your Car audio accessory in PDF format for free! Find your manual OnStar OS-3BOSE - PAC and take your electronic device back in hand. On this page are published all the documents necessary for the use of your device. OnStar OS-3BOSE by PAC.
USER MANUAL OnStar OS-3BOSE PAC
The OS-3BOSE is a plug and play interface that allows replacement of a General Motors GMLAN factory radio. It will maintain operation of the OnStar® system, Bose® amplifier and speakers. The OS-3BOSE has on board switching to allow audio from the OnStar® system to play through the two front factory speakers when OnStar® is active. This interface retains all warning chimes, the audible turn signal indicators, and the Vehicle Rear Parking Assist System (if equipped). Rear Seat Audio headphone jacks will also remain active and are designed for use with dual zone radios.
- OnStar® active LED and Ignition on LED.
- Provides +12v switched accessory output. No more searching for switched +12v in fuse box or kick panel.
- OnStar® Volume control via factory steering wheel audio controls on Premium Bose® vehicles. Steering wheel radio controls can be retained to control new radio by using the SWI - X, JACK, ECL2 or PS.
- New radio will operate with the vehicle RAP (Retained Accessory Power) system. The radio stays on after the key is turned off and stays on for approximately 10 minutes or until the drivers door is opened.
Notes
- The OS-3BOSE does not retain the factory XM receiver. You will lose the XM option when the factory radio is replaced with an aftermarket radio.
- You may use this interface if the vehicle does not have OnStar® but you need to interface with the Bose® amplifier.
- If you are not retaining the Bose® amplifier, use the OS-3 interface instead of this OS-3BOSE interface.
- This interface retains the 5.1 audio system in the Cadillac Escalade.
- Built in Smart Mute Circuitry will play OnStar® through the front speakers and allow the Rear Seat Audio jacks to continue playing the source selected at the radio.
Supported Vehicles
The Following General Motors Vehicles using the GMLAN Data Bus
Chevrolet: Suburban (2007) Tahoe (2007) Avalanche (2007) Monte Carlo (2006-2007) Silverado - not classic (2007) Impala (2006-2007)
GMC: Acadia (2007) Yukon Denali (2007) Yukon (2007) Sierra - not classic (2007)
Cadillac: Escalade - including ESV and EXT (2007)
Buick: Lucerne (2006-2007)
Installation
Step 1- Pre wire the RAD-18 wire harness to the aftermarket stereo wire harness. Refer to installation notes on page 3 for special instructions
Step 2- After connecting the RAD-18 and OS-GM14 wire harness to the OS-3BOSE main interface, connect the OS-GM14 connector to the factory harness.
Note: The Blue/White remote wire must be connected to the new radios amp remote turn on wire.
The Lt. Green wire is a SWC output wire. Do not connect this wire to anything other than the green interface wire of a SWI - X, ALP, ECL, or PS. Program the SWC interface for version #2 and do not cut the Brown SWI interface loop. When pushing the steering wheel buttons during programming, a simple press and release of the button will do just fine, no need to hold. The rear controls (if equipped) will perform the same functions as the steering wheel buttons without any additional programming necessary. If steering wheel controls are not retained or present, isolate this wire and do not use!
Wire locations and Description
WIRECOLORCIRCUITCIRCUITWIRECOLOR PINNUMBER
RAD - 18
| White/Black | Left Front(-) | 9 | 18 | Not Used | N/A |
| Grey/Black | Right Front (-) | 8 | 17 | Left Front (+) | White |
| Green/Black | Left Rear (-) | 7 | 16 | Not Used | N/A |
| Purple/Black | Right Rear(-) | 6 | 15 | Right Front (+) | Grey |
| Black | Ground | 5 | 14 | Chime Module | To CM - X |
| Lt. Green | SWC Output | 4 | 13 | Left Rear (+) | Green |
| Orange | Illumination | 3 | 12 | Chime Module | To CM - X |
| Blue/White | Amp Turn On | 2 | 11 | Right Rear (+) | Purple |
| Red | +12v Accessory Output | 1 | 10 | +12v Constant | Yellow |
OS-GM14
| WIRE COLOR | CIRCUIT | PIN NUMBER | CIRCUIT | WIRE COLOR | |
| Orange | Illumination | 8 | 16 | Amp Control | Black |
| Purple/White | GMLan | 7 | 15 | +12v Constant | Yellow |
| Black | Ground | 6 | 14 | Amplifier Turn On | Blue |
| Purple/Black | Right Rear (-) | 5 | 13 | Right Rear (+) | Purple |
| Green/Black | Left Rear (-) | 4 | 12 | Left Rear (+) | Green |
| White/Brown | OnStar Mono(-) | 3 | 11 | OnStar Mono(+) | Purple/White |
| Grey/Black | Right Front (-) | 2 | 10 | Right Front (+) | Grey |
| White/Black | Left Front (-) | 1 | 9 | Left Front (+) | White |
Standard Bose®: Connecting to the vehicle's Bose® amplifier (All Other Listed Vehicles)
Step 3- The CM-X should be plugged into the white 2-pin connector and permanently mounted. This module will retain all warning chimes and audible turn signal indications. There is no volume adjustment for this feature so keep that in mind when choosing a mounting location.
Step 4- This amplifier will allow the fader to work correctly.
Step 5- The OnStar® volume is only able to be controlled from the adjustment screw on the interface. Make sure this is set to the desired level before mounting the interface and reassembling the dash.

flowchart
graph TD
    A["Aftermarket stereo"] --> B["102.7 FM"]
    B --> C["RAD-18"]
    C --> D["Redwiretoaccessory inputofradio"]
    D --> E["OS - 3 BOSE PAC General Motors GM/Lan OnStart® Interface Factory Radio Replacement Retention of Bose® Amplifier and OnStart® Option Pacific Accessory Corporation @ Santa Ana, Ca 92705"]
    E --> F["OS - GM14 Harness"]
    F --> G["c2"]
    F --> H["c1"]
    I["SWC output wire Connect to SWR - X green wire Program for Version # 2"] --> E
    J["CM-X"] --> E
    K["Chime Module"] --> E
Premium Bose®: Connecting to the vehicle's Bose® amplifier (Denali Only)
Step 3- The CM-X is not needed when the Premium Amplifier is retained. The door chimes and audible turn signal indicators are generated from the Bose® amplifier.
Step 4- OnStar® volume can be adjusted from the steering wheel buttons when OnStar® is activated (with premium Bose® amplifier ONLY). Turn the OnStar® volume adjustment on the interface all the way up.
Note - Due to the design of this Premium Bose® amplifier system, there is currently no way of fading from front to rear with an aftermarket radio.

flowchart
graph TD
    A["Aftermarket stereo"] --> B["102.7 FM"]
    B --> C["SWC output wire"]
    C --> D["Connect to SWI-X green wire"]
    D --> E["Program for Version #2"]
    F["RAD 18"] --> G["Red wire to accessory input of radio"]
    G --> H["OS-3 BOSE PAC"]
    H --> I["General Motors GM/Lan On(Start) Interface"]
    H --> J["Factory Radio Replacement"]
    H --> K["Retention of Box66 Amplifier and OnStar® Option"]
    H --> L["Pacific Accessory Corporating Santa Ana, Ca 92705"]
    M["OS-GM14 Harness"] --> N["c2"]
    M --> O["c1"]
    P["The CM-X is not needed when a Premium Amplifier is retained"] --> Q["Output @ Red Line"]
    P --> R["Output @ Orange Line"]
Premium Bose®: Connecting to the vehicle's Bose® amplifier (Escalade Only)
Step 3- The CM-X is not needed when the Premium Amplifier is retained. The door chimes and audible turn signal indicators are generated from the Bose® amplifier.
Step 4- OnStar® volume can be adjusted from the steering wheel buttons when OnStar® is activated (with premium Bose® amplifier ONLY). Turn the OnStar® volume adjustment on the interface all the way up.
Step 5- This amplifier will allow the fader and balance to work correctly. You can also use the supplied brown connector, c4, for subwoofer control and center channel operation. These are low level mono inputs. We recommend using the center channel only if a 5.1 channel audio processor (or a dedicated center channel output) is present.

flowchart
graph TD
    A["Aftermarket stereo"] --> B["102.7 FM"]
    B --> C["SWC output wire"]
    C --> D["Connect to SWI - X green wire"]
    D --> E["Program for Version # 2"]
    F["RAD 18"] --> G["Red wire to accessory input of radio"]
    G --> H["OS-3 BOSE PAC"]
    H --> I["General Motors GM/Lan On/Start/Interface"]
    H --> J["Factory Radio Replacement"]
    H --> K["Retention of Bose8 Amplifier and On/Start/Option"]
    H --> L["Pacific Accessory Corporation + Santa Ana, Ca 92705"]
    M["c4 (Brown)"] --> N["OS-GM14 Harness"]
    O["c2"] --> P["Center channel sepaker (RED)"]
    Q["c1"] --> R["Subwoofer (WHITE)"]
Instructions for using the Rear Seat Audio jacks with a Dual Source head unit

The headphone jacks will play the rear zone source selected by the head unit (refer to the new radios instruction manual for details on this feature if equipped). Maximize the rear zone volume level (this will reduce unwanted noise). During an Onstar call the front speakers play OnStar, the rear speakers are muted and the headphones will continue to play the rear zone audio source.
Notes: When the Rear Seat Audio jacks are activated in any vehicle OTHER than the Cadillac Escalade or GMC Yukon Denali the rear speakers will mute.
Installation Notes
- When the interface is connected to the vehicle for the first time the car must be started so all vehicle features are recognized by our interface.
- If using a Navigation radio or other high current DVD LCD radio, do not connect the +12 volt constant and ground wires from the RAD-18 to your new radio. Jump these wires from the OS-GM14 to the new radio (refer to pin description on page 1 for wire locations).
- DO NOT cut the Brown loop on the SWI interface connector. Program the Interface for version # 2.
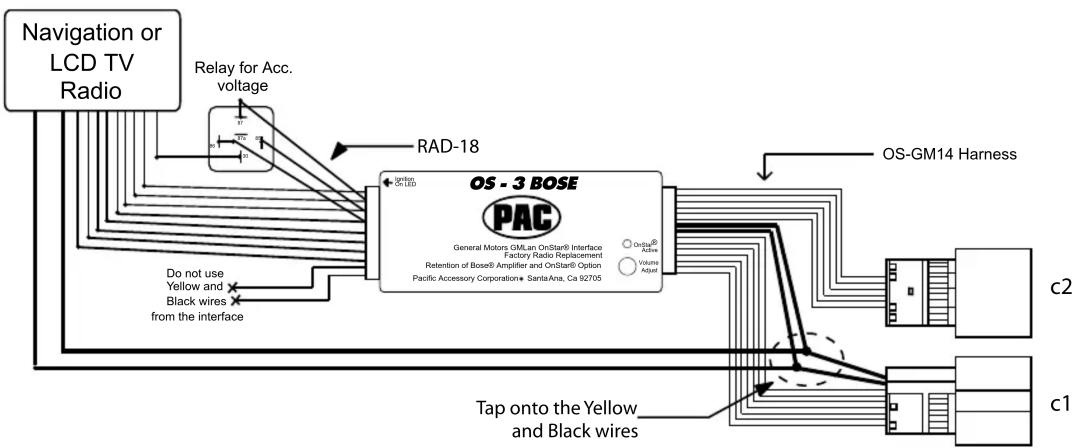
flowchart
graph TD
    A["Navigation or LCD TV Radio"] --> B["Relay for Acc. voltage"]
    B --> C["OS - 3 BOSE PAC"]
    C --> D["General Motors GMLan OnStar® Interface Factory Radio Replacement Retention of Bose® Amplifier and OnStar® Option Pacific Accessory Corporation + SantaAna, Ca 92705"]
    C --> E["Os-GM14 Harness"]
    C --> F["Tap onto the Yellow and Black wires"]
    C --> G["c2"]
    C --> H["c1"]
Testing and Verifying Operation
- Turn ignition on. The red ignition On LED inside the interface will turn on and the +12v accessory wire will turn on.
- Turn on the radio and check balancing and fading. Note: The Denali Premium Bose® amplifier will not fade as the rear outputs of aftermarket radio do not adjust the amplifier.
- Pressing the OnStar® button will turn off the rear speakers and allow the OnStar® audio to be heard in the two front speakers. The OnStar® active red LED will also turn on. When OnStar® disconnects, the radio will un-mute or turn back on and the OnStar® LED will turn off.
- Turn off vehicle and remove key. RAP will be active and keep the radio on for 10 minutes or until the drivers door is opened.
- The green LED and radio will turn off when RAP turns off or the drivers door is opened.
- Pressing the Mute/OnStar® button on the steering wheel for 1.5 seconds will activate Onstar®.
DISCLAIMER: Under no circumstances shall the manufacturer or the distributors of the OS-3BOSE parts be held liable for consequential damages sustained in connection with the OS-3BOSE. The manufacture and its distributors will not, nor will they authorize any representative or any other individual to assume obligation or liability in relation to the OS-3BOSE other than its replacement.
OnStar® is a registered trademark of OnStar® Corporation.
Bose® is a registered trademark of Bose®
Brand : PAC
Model : OnStar OS-3BOSE
Category : Car audio accessory