PowerEdge C4130 - Server DELL - Free user manual and instructions
Find the device manual for free PowerEdge C4130 DELL in PDF.


User questions about PowerEdge C4130 DELL
0 question about this device. Answer the ones you know or ask your own.
Ask a new question about this device
Download the instructions for your Server in PDF format for free! Find your manual PowerEdge C4130 - DELL and take your electronic device back in hand. On this page are published all the documents necessary for the use of your device. PowerEdge C4130 by DELL.
USER MANUAL PowerEdge C4130 DELL
Notes, cautions, and warnings
NOTE: A NOTE indicates important information that helps you make better use of your product.
CAUTION: A CAUTION indicates either potential damage to hardware or loss of data and tells you how to avoid the problem.
WARNING: A WARNING indicates a potential for property damage, personal injury, or death.
© 2018 - 2019 Dell Inc. or its subsidiaries. All rights reserved. Dell, EMC, and other trademarks are trademarks of Dell Inc. or its subsidiaries. Other trademarks may be trademarks of their respective owners.
Contents
1 Dell PowerEdge C4130 overview....8
Supported GPU configurations on PowerEdge C4140 systems....8
Front panel 8
Back panel 9
System diagnostics and indicator codes....11
uSATA SSD indicator codes....12
NIC indicator codes....13
Power supply unit indicator codes....13
Customer and field replaceable units....15
Locating service tag of your system....16
2 Documentation resources....17
3 Technical specifications.... 19
Chassis dimensions....19
Chassis weight....19
Processor specifications....19
PSU specifications....20
System battery specifications.... 20
Expansion bus specifications.... 20
Memory specifications....20
Drive specifications....21
Ports and connectors specifications....21
Video specifications....21
Environmental specifications....21
4 Initial system setup and configuration....24
Setting up your system....24
iDRAC configuration....24
Options to set up iDRAC IP address....24
Options to install the operating system....25
Methods to download firmware and drivers....25
5 Pre-operating system management applications....26
Options to manage the pre-operating system applications....26
System Setup....26
Viewing System Setup....27
System Setup details....27
System BIOS....27
iDRAC Settings utility....48
Device Settings....49
Dell Lifecycle Controller....49
Embedded systems management....49
Boot Manager....50
Viewing Boot Manager....50
Boot Manager main menu....50
PXE boot....51
6 Installing and removing system components....52
Safety instructions....52
Before working inside your system....53
After working inside your system....53
Recommended tools....53
System covers....54
Removing the system top cover (front)....54
Installing the system top cover (front)....55
Removing the system top cover (back)....56
Installing the system top cover (back)....56
Inside the system - PowerEdge C4130....58
Chassis intrusion switch....60
Removing the intrusion switch....60
Installing the intrusion switch....61
IDSDM 62
Removing an internal SD card....63
Installing an internal SD card....63
Removing the internal dual SD module 64
Installing the internal dual SD module 66
Cooling shroud....67
Removing the cooling shroud....67
Installing the cooling shroud....68
Processor blank....69
Removing a processor blank 70
Installing a processor blank....71
System memory....72
General memory module installation guidelines....74
Mode-specific guidelines....74
Sample memory configurations....75
Removing memory modules....78
Installing memory modules....79
Processors and heat sinks....80
Removing a heat sink....80
Removing a processor....82
Installing a processor....84
Installing a heat sink....87
System battery 88
Replacing the system battery....88
PCIe shroud....90
Removing the PCIe shroud....90
Installing the PCIe shroud....91
Expansion card riser and expansion cards....92
Expansion card installation guidelines....92
Removing the expansion card riser cage....94
Removing the expansion card riser....95
Installing the expansion card riser....96
Installing the expansion card riser cage....97
Removing expansion cards....99
Installing expansion cards....100
Expansion card cabling diagrams....102
Power supply units....104
Hot spare feature....105
Removing the power supply unit blank....105
Installing the power supply unit blank....106
Removing an AC power supply unit....107
Installing an AC power supply unit....108
Hard drives....109
Removing the optional 2.5 inch hard drive cage....110
Installing the optional 2.5 inch hard drive cage....111
Removing the optional 2.5 inch hard drive cage cover....112
Installing the optional 2.5 inch hard drive cage cover....113
Removing 2.5 inch cabled hard drives from the hard drive cage....114
Installing a 2.5 inch cabled hard drive into the hard drive cage....116
Hard drive cabling diagrams.... 119
uSATA SSDs....120
Removing a 1.8 inch uSATA SSD blank....121
Installing a 1.8 inch uSATA SSD blank.... 121
Removing a 1.8 inch uSATA SSD carrier....122
Installing a 1.8 inch uSATA SSD carrier....123
Removing a 1.8 inch uSATA SSD from a SSD carrier....124
Installing a 1.8 inch uSATA SSD into a SSD carrier....125
Removing the 1.8 inch uSATA SSD cage....126
Installing the 1.8 inch uSATA SSD cage....126
Removing the 1.8 inch uSATA SSD backplane....127
Installing the 1.8 inch uSATA SSD backplane....128
Internal USB memory key (optional)....129
Replacing the optional internal USB memory key....130
Cable routing clip....131
Removing the cable routing clip....131
Installing the cable routing clip....132
System board....133
Removing the system board....133
Installing the system board....137
Trusted Platform Module....141
Installing the Trusted Platform Module....141
Initializing the TPM for BitLocker users....142
Initializing the TPM for TXT users....142
Cooling fans....142
Removing a cooling fan....142
Installing a cooling fan....143
Graphics processing unit....144
PCIe Graphics processing unit....145
GPU installation guidelines....145
Removing a GPU blank ....145
Removing a GPU riser cable from the system board....146
Removing a GPU....147
Removing a GPU riser cable board....149
Removing the custom GPU brackets from the GPUs removed from your system....150
Removing the GPU brackets from the replacement GPUs....152
Removing the optional GPU switch board ....154
Installing the optional GPU switch board ....155
Installing the GPU brackets on the GPUs removed from your system.... 156
Installing the custom GPU brackets on the replacement GPUs....158
Installing a GPU riser cable board....160
Installing a GPU blank....162
Installing a GPU....163
Installing a GPU riser cable on the system board.... 165
GPU cabling diagrams....166
SXM2 Graphics processing unit....179
Removing the NVLink Air Shroud....180
Removing a SXM2-GPU Heat Sink....181
Removing an SXM2 GPU....182
Removing the NVLink Board....183
Installing the NVLink Board....185
Installing an SXM2 GPU....186
Installing a SXM2-GPU Heat Sink....187
Installing the NVLink Air Shroud....189
SXM2 GPU cabling diagrams....191
Control panel module....192
Removing the control panel module....192
Installing the control panel module....194
7 Using system diagnostics....196
Dell Embedded System Diagnostics....196
When to use the Embedded System Diagnostics....196
Running the Embedded System Diagnostics from Boot Manager....196
Running the Embedded System Diagnostics from the Dell Lifecycle Controller....196
System diagnostic controls....197
8 Jumpers and connectors ....198
System board jumper settings....198
Disabling forgotten password....198
System board connectors....199
9 Troubleshooting your system....201
Troubleshooting system startup failure....201
Troubleshooting external connections....201
Troubleshooting the video subsystem....202
Troubleshooting a USB device....202
Troubleshooting a serial input and output device.... 203
Troubleshooting a NIC....203
Troubleshooting a wet system....204
Troubleshooting a damaged system....205
Troubleshooting the system battery....205
Troubleshooting power supply units....206
Troubleshooting power source problems....206
Power supply unit problems....206
Troubleshooting cooling problems.... 207
Troubleshooting cooling fans....207
Troubleshooting system memory....208
Troubleshooting an internal USB key....209
Troubleshooting a micro SD card....210
Troubleshooting a drive or SSD....211
Troubleshooting a storage controller....211
Troubleshooting expansion cards....212
Troubleshooting processors....213
Troubleshooting a GPU....214
System messages.... 214
Warning messages....214
Diagnostic messages....214
Alert messages....214
10 Getting help....215
Contacting Dell EMC....215
Documentation feedback......216
Accessing system information by using QRL 216
Quick Resource Locator for C4130....216
Dell PowerEdge C4130 overview
The Dell PowerEdge C4130 rack servers support up to:
- Two Intel Xeon E5-2600 v4 processors
· 16 DIMMs - Two 1.8-inch uSATA solid state drives (SSDs)
• Four 2.5-inch hard drives (optional) - Two power supply units (PSUs)
• Four graphics processing units (GPUs)
NOTE: All GPU cards must be of the same type and model. Mixing GPUs is not supported.
NOTE: The PSU 2 slot also functions as an optional 2.5 inch hard drive cage slot. If you install the optional 2.5 inch hard drives, your system does not support the PSU redundancy feature.
NOTE: Systems with NVLink board configuration do not support the optional 2.5 inch hard drive cage. Both the PSUs work simultaneously, and your system does not support the PSU redundancy feature.
Topics:
• Supported GPU configurations on PowerEdge C4140 systems
- Front panel
- Back panel
• System diagnostics and indicator codes
- Customer and field replaceable units
- Locating service tag of your system
Supported GPU configurations on PowerEdge C4140 systems
NOTE: Incorrect removal and installation of the GPUs will cause operational issues to your system.
Front panel
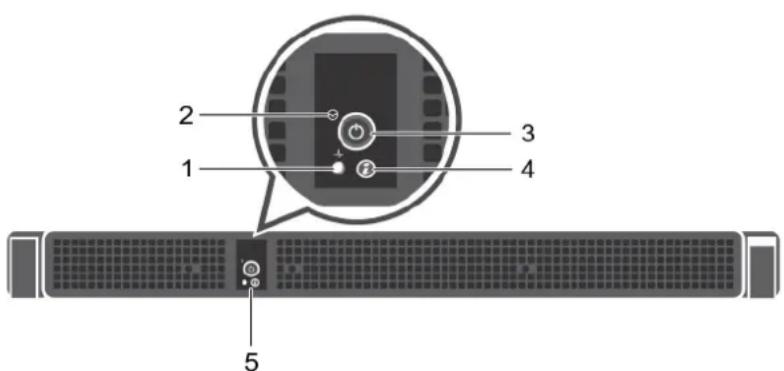
text_image
1 2 3 4 5Figure 1. Front panel - PowerEdge C4130
- System-health indicator 2. Ambient air temperature sensor
- Power-on indicator/power button 4. System identification button
Table 1. Front panel features and indicators description of the PowerEdge C4130 system.
| Item Indicator, button, or connector | Icon Description | |
| 1 Health indicator |  | Indicates the health of the system.If the system is on and in good health, the indicator lights solid blue. No corrective action is required.The indicator blinks amber if the system is on or in standby, and if any error exists (for example, a failed fan). See the System Event Log or system messages for the specific issue. For more information on error messages, see the Dell Event and Error Messages Reference Guide at Dell.com/esmmanuals. Invalid memory configurations can cause the system to halt at startup without any video output. See the Getting help section. |
| 2 Ambient air temperature sensor | Measures the ambient air temperature. | |
| 3 Power-on indicator, power button |  | The power-on indicator lights when the system power is on. The power button controls the power supply output to the system.  |
| 4 System identification button | [XY72] | The identification button on the front and back panels can be used to locate a particular system within a rack. When one of these buttons is pressed, the corresponding system identification button on the back flashes until one of the buttons is pressed again.Press the system identification button to turn the system ID on or off.If the system stops responding during POST, press and hold the system ID button for more than five seconds to enter BIOS progress mode.To reset iDRAC (if not disabled in F2 iDRAC setup), press and hold the button for more than 15 seconds. |
| 5 Control panel Consists of the health indicator, ambient air temperature sensor, power-on indicator, power button, and the system identification button. | ||
Related reference
Getting help
Back panel
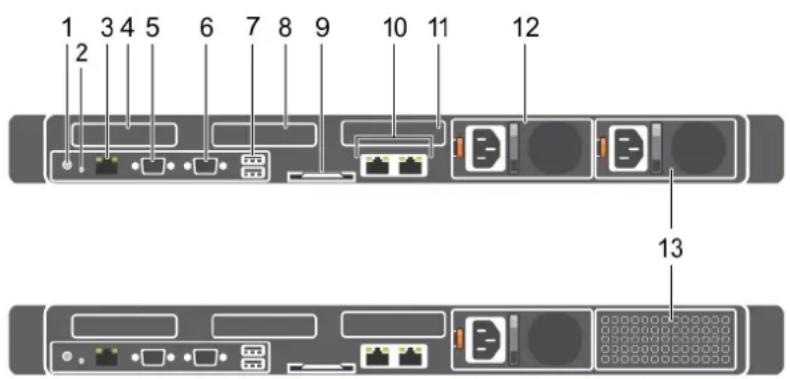
text_image
1 2 3 4 5 6 7 8 9 10 11 12 13Figure 2. Back panel– PowerEdge C4130
- System identification button
- NMI button
- iDRAC8 Enterprise port
- Half-height PCIe expansion card slot 1
- Serial connector
- Video connector
- USB connector (2)
- Half-height PCIe expansion card slot 2
- Information tag
- Ethernet connector (2)
- Hard drive (2)
-
Power supply unit (PSU1)
-
Power supply unit (PSU2)/2.5-inch hard drive cage slot
Table 2. Back panel features and indicators description of the PowerEdge C4130 system
| Item Indicator, button or connector | Icon Description | ||
| 1 System | identification button | ➊ | The identification button on the front and back panels can be used to locate a particular system within a rack. When one of these buttons is pressed, the corresponding system identification button on the back flashes until one of the buttons is pressed again.Press the system identification button to turn the system ID on or off.If the system stops responding during POST, press and hold the system ID button for more than five seconds to enter BIOS progress mode.To reset iDRAC (if not disabled in F2 iDRAC setup), press and hold the button for more than 15 seconds. |
| 2 NMI button | ➎ | Used to troubleshoot software and device driver errors when running certain operating systems. This button can be pressed using the end of a paper clip.Use this button only if directed to do so by qualified support personnel or by the operating system documentation. | |
| 3 iDRAC8 | Enterprise port | Dedicated management port. | |
| 4 Half-height PCIe expansion card slot 1 | Allows you to connect half-height, half-length, low profile PCI Express expansion cards. | ||
| 5 Serial connector Allows you to connect a serial device to the system. | |||
| 6 Video connector Allows you to connect a VGA display to the system. | |||
| 7 USB connector(2) | ➌ | Allows you to connect USB devices to the system. The ports are USB 3.0-compliant. | |
| 8 Half-height PCIe expansion card slot 2 | Allows you to connect half-height, half-length, low profile PCI Express expansion cards. | ||
| 9 Information tag A slide-out label panel which allows you to record system information such as Service Tag, NIC, MAC address and so on as per your need. | |||
| 10 | Ethernet connector (2) | ➌ | Two integrated 10/100/1000/Mbps NIC connectors. |
| 11 Hard drive (2) | Up to two 1.8-inch uSATA SSDs. | ||
| 12 | Power supply unit (PSU1) | One 2000 W, 1600 W or 1100 W PSU. | |
| Item Indicator, | Icon Description | |
| button or connector | ||
| 13 Power supply | One 2000 W, 1600 W or 1100 W PSU, or up to four 2.5 inches cabled hard drives. | |
| unit (PSU2)/2.5-inch hard drive cage slot | ||
| i|NOTE: Systems with NVLink configurations support either 2000 W or 1600 W dual PSUs. | ||
| i|NOTE: Systems with NVLink configurations do not support the (PSU2)/2.5-inch hard drive cage slot. | ||
System diagnostics and indicator codes
Table 3. System diagnostics and indicator codes
| Icon Indicator, | button, or connector | Description |
| Health indicator Indicates the health of the system. | ||
| Power-on indicator, power button | The power-on indicator lights when the system powered on. The power button controls the power supply output to the system. | |
| NOTE: On ACPI-compliant operating systems, turning off the system using the power button causes the system to perform a graceful shutdown before power to the system is turned off. | ||
| The identification button on the front and back panels can be used to locate a particular system within a rack. When one of these buttons is pressed, the corresponding system identification button on the back flashes until one of the buttons is pressed again. | ||
| Press the system identification button to turn the system ID on or off. | ||
| If the system stops responding during POST, press and hold the system ID button for more than five seconds to enter BIOS progress mode. | ||
| To reset iDRAC (if not disabled in F2 iDRAC setup), press and hold the button for more than 15 seconds. | ||
| System identification button | Used to troubleshoot software and device driver errors when running certain operating systems. Use a paper clip to press this button. | |
| Use this button only if directed to do so by qualified support personnel or by the operating system documentation. | ||
Related reference
Getting help
uSATA SSD indicator codes
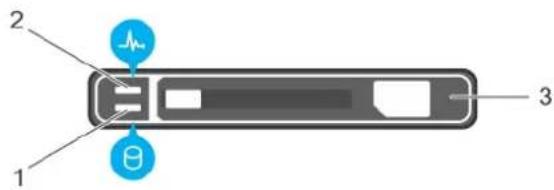
text_image
1 2 3Figure 3. uSATA SSD indicators
- uSATA SSD activity indicator
- uSATA SSD status indicator
- uSATA SSD
Table 4. Drive status indicator codes
Drive-status indicator pattern Condition
Flashes green twice per second Identifying drive or preparing for removal.
Off Drive ready for insertion or removal.

NOTE: The drive status indicator remains off until all hard drives are initialized after the system is turned on. Drives are not ready for insertion or removal during this time.
Flashes green, amber, and turns off Predicted drive failure
Flashes amber four times per second Drive failed
Steady green Drive online
Flashes green for three seconds, amber for three seconds, and Rebuild aborted turns off after six seconds
NIC indicator codes
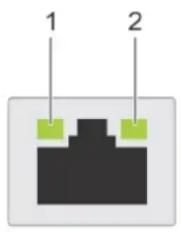
The NIC on the back panel has an indicator that provides information about the network activity and link status. The activity LED indicates whether the NIC is currently connected or not. The link LED indicates the speed of the connected network.
text_image
1 2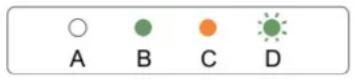
Figure 4. NIC indicators
- link indicator
- activity indicator
Table 5. NIC indicators
Convention Status Condition
A Link and activity indicators are off The NIC is not connected to the network.
B Link indicator is green The NIC is connected to a valid network at its maximum
port speed (1 Gbps or 10 Gbps).
C Link indicator is amber The NIC is connected to a valid network at less than its
maximum port speed.
D Activity indicator is flashing green Network data is being sent or received.
Power supply unit indicator codes
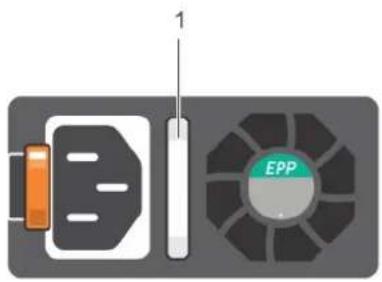
AC power supply units (PSUs) have an illuminated translucent handle that serves as an indicator. The indicator shows whether power is present or a power fault has occurred.
text_image
1 EPP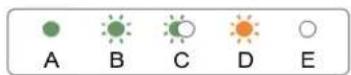
Figure 5. AC PSU status indicator
- AC PSU status indicator/handle
Table 6. AC PSU status indicators
| Convention Power indicator pattern | Condition |
| A Green A valid power source is connected to the PSU and the PSU is operational. | |
| B Flashing green When the firmware of the PSU is being updated, the PSU handle flashes green. | |
| C Flashing green and turns off | When hot-adding a PSU, the PSU handle flashes green five times at 4 Hz rate and turns off. This indicates a PSU mismatch with respect to efficiency, feature set, health status, and supported voltage. |
| NOTE: Ensure that both the PSUs are of the same capacity. | |
| CAUTION: For AC PSUs, use only PSUs with the Extended Power Performance (EPP) label on the back. | |
| NOTE: Mixing PSUs from previous generations of Dell PowerEdge servers can result in a PSU mismatch condition or failure to turn the system on. | |
| D Flashing amber Indicates a problem with the PSU. | |
| CAUTION: When correcting a PSU mismatch, replace only the PSU with the flashing indicator. Swapping the PSU to make a matched pair can result in an error condition and unexpected system shutdown. To change from a high output configuration to a low output configuration or vice versa, you must turn off the system. | |
| CAUTION: AC PSUs support both 220 V and 110 V input voltages with the exception of Titanium PSUs, which support only 220 V. When two identical PSUs receive different input voltages, they can output different wattages, and trigger a mismatch. | |
| CAUTION: If two PSUs are used, they must be of the same type and have the same maximum output power. | |
| CAUTION: Combining AC and DC PSUs is not supported and triggers a mismatch. | |
E Not lit Power is not connected.
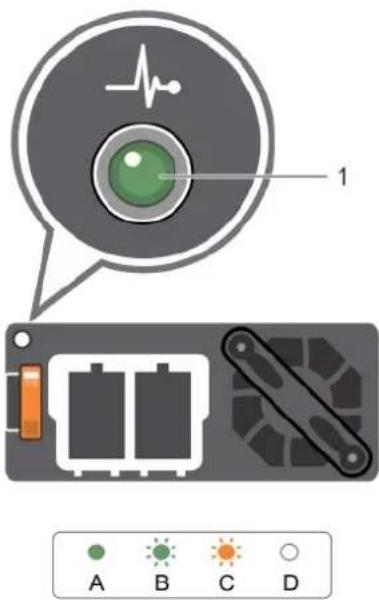
text_image
1 A B C DFigure 6. DC PSU status indicator
- DC PSU status indicator
Customer and field replaceable units
The following components are Customer Replaceable Units (CRUs):
- Cooling fans
- Expansion card riser
- Expansion cards
- Internal dual SD module (IDSDM)
- SD cards
- Internal USB keys
• Power supply units (PSUs) - 1.8 inch uSATA SSDs
- 1.8 inch uSATA SSD cage
- 1.8 inch uSATA SSD backplane
- 2.5 inch hard drives
- 2.5 inch hard drive cage
- Memory modules
- PCI shroud
- Cooling shroud
- Cable routing clip
- Heat sinks and processors
The following components are Field Replaceable Units (FRUs). Removal and installation procedures should be performed only by Dell certified service technicians.
- PCIe Graphics processing units (GPUs)/ SXM2 GPUs
- GPU switch board/ NVLink board
- GPU riser cable board
- GPU brackets
- GPU blanks
- Intrusion switch
- System board
• Trusted Platform Module (TPM) - System battery
- Control panel module
Locating service tag of your system
Your system is identified by a unique Express Service Code and Service Tag number. The Express Service Code is and Service Tag are found on the back of the system by pulling out the information tag. Alternatively, the information may be on a sticker on the chassis of the system. This information is used by Dell to route support calls to the appropriate personnel.
Documentation resources
This section provides information about the documentation resources for your system.
To view the document that is listed in the documentation resources table:
- From the Dell EMC support site:
-
Click the documentation link that is provided in the Location column in the table.
-
Click the required product or product version.

NOTE: To locate the product name and model, see the front of your system.
- On the Product Support page, click Manuals & documents.
- Using search engines:
- Type the name and version of the document in the search box.
Table 7. Additional documentation resources for your system
| Task Document Location | ||
| Setting up your system | For more information about installing and securing the system into a rack, see the Rail Installation Guide included with your rack solution.For information about setting up your system, see the Getting Started Guide document that is shipped with your system. | Dell.com/poweredgemanuals |
| Configuring your system For information about the iDRAC features, configuring and logging in to iDRAC, and managing your system remotely, see the Integrated Dell Remote Access Controller User's Guide.For information about understanding Remote Access Controller Admin (RACADM) subcommands and supported RACADM interfaces, see the RACADM CLI Guide for iDRAC.For information about Redfish and its protocol, supported schema, and Redfish Eventing implemented in iDRAC, see the Redfish API Guide.For information about iDRAC property database group and object descriptions, see the Attribute Registry Guide. | Dell.com/poweredgemanuals | |
| For information about earlier versions of the iDRAC documents.To identify the version of iDRAC available on your system, on the iDRAC web interface, click ? >About. | Dell.com/idracmanuals | |
| For information about installing the operating system, see the operating system documentation. | Dell.com/operatingsystemmanuals | |
| For information about updating drivers and firmware, see the Methods to download firmware and drivers section in this document. | Dell.com/support/drivers | |
| Managing your system For information about systems management software offered by Dell, see the Dell | Dell.com/poweredgemanuals | |
| OpenManage Systems Management Overview Guide. | ||
| For information about setting up, using, and troubleshooting OpenManage, see the Dell OpenManage Server Administrator User's Guide. | Dell.com/openmanagemanuals > OpenManage Server Administrator | |
| For information about installing, using, and troubleshooting Dell OpenManage Essentials, see the Dell OpenManage Essentials User's Guide. | Dell.com/openmanagemanuals > OpenManage Essentials | |
| For information about installing and using Dell SupportAssist, see the Dell EMC SupportAssist Enterprise User's Guide. | Dell.com/serviceabilitytools | |
| For information about partner programs enterprise systems management, see the OpenManage Connections Enterprise Systems Management documents. | Dell.com/openmanagemanuals | |
| Working with the Dell PowerEdge RAID controllers | For information about understanding the features of the Dell PowerEdge RAID controllers (PERC), Software RAID controllers, or BOSS card and deploying the cards, see the Storage controller documentation. | Dell.com/storagecontrollermanuals |
| Understanding event and error messages | For information about the event and error messages generated by the system firmware and agents that monitor system components, see the Error Code Lookup. | Dell.com/qrl |
| Troubleshooting your system For | information about identifying and troubleshooting the PowerEdge server issues, see the Server Troubleshooting Guide. | Dell.com/poweredgemanuals |
Technical specifications
Chassis dimensions
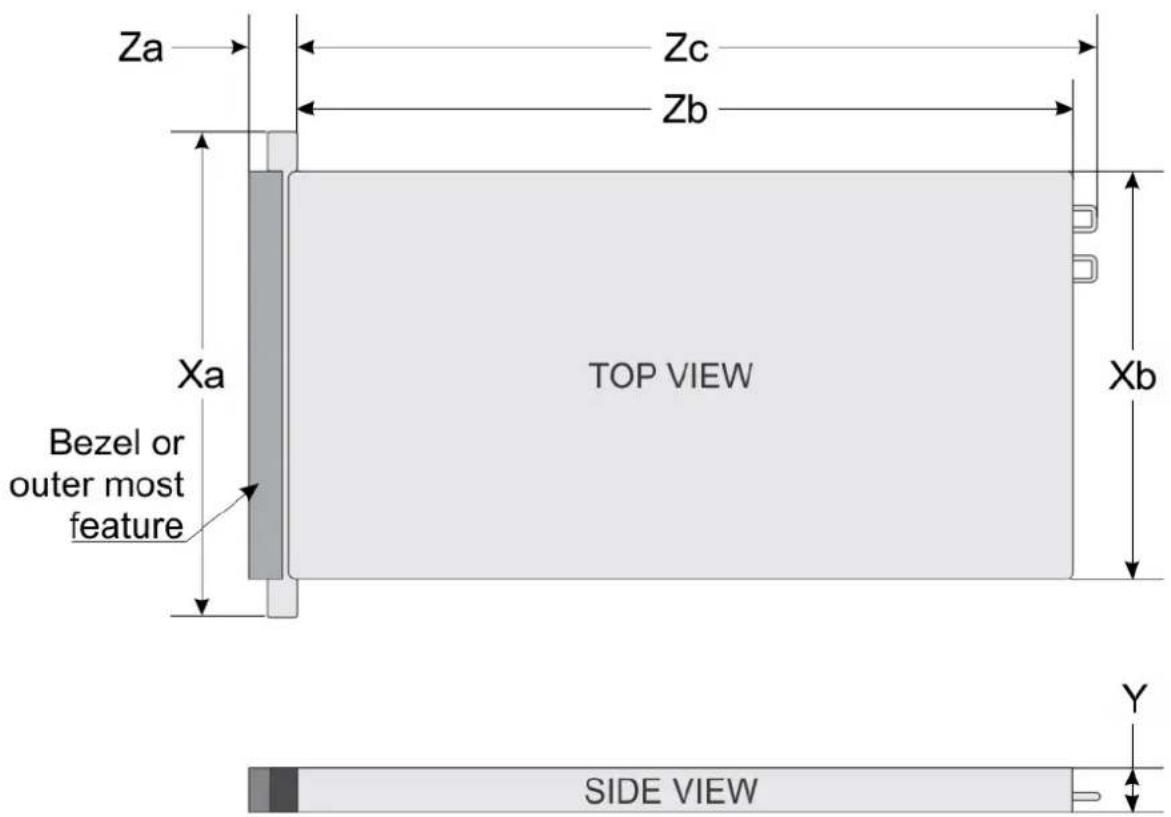
text_image
Za Zc Zb Xa Bezel or outer most feature TOP VIEW Xb Y SIDE VIEWFigure 7. Details the dimensions of Dell PowerEdge C4130 system
Table 8. The dimensions of Dell PowerEdge C4130 system
Xa Xb Y Za Zb Zc
482.4 mm 434 mm 43.1 mm 18.0 mm 885.8 mm 924.8 mm
Chassis weight
Table 9. Chassis weight
System Maximum weight
PowerEdge C4130 (with PCIe GPUs) 22.13 kg (48.79 lb)
PowerEdge C4130 (with SXM2 GPUs) 22.73 kg (50.11 lb)
Processor specifications
The PowerEdge C4130 system supports up to two Intel Xeon E5-2600 v4 product family processors.
PSU specifications
Table 10. PSU specifications
| PSU Class Heat dissipation (maximum) | Frequency Voltage |
| 1100 W AC Platinum 4100 BTU/hr 50/60 Hz 100–240 V AC, | autoranging |
| 1600 W AC Platinum 6000 BTU/hr 50/60 Hz 200–240 V AC, | autoranging |
| 2000 W AC Platinum 7500 BTU/hr 50/60 Hz 200–240 V AC, | autoranging |
NOTE: Heat dissipation is calculated by using the PSU wattage rating.
NOTE: This system is also designed to connect to the IT power systems with a phase to phase voltage not exceeding 230 V.
NOTE: PSUs rated for 1600 W and higher require high-line voltage (200-240 V) to supply their rated capacity.
System battery specifications
The PowerEdge C4130 system supports CR 2032 3.0-V lithium coin cell system battery.
Expansion bus specifications
The PowerEdge C4130 system supports PCI express (PCIe) generation 3 expansion cards, which need to be installed on the system board by using expansion card risers. This system supports four expansion card riser configurations. The following table provides detailed information about the expansion card riser configurations:
Table 11. Expansion card riser configurations
Expansion card riser PCIe slots on the riser Height Length Link
| Configuration 1 (System Config: D and G) | Slot 1 half height | half Length | x16 | |
| Slot 2 | half height | half Length | x16 | |
| Configuration 2 (System Config: A, B, and K) | Slot 1 half height | half Length | x8 | |
| Slot 2 | half height | half Length | x16 | |
| Configuration 3 (System Config: C, F, and H) | Slot 1 half height | half Length | x8 | |
| Slot 2 | half height | half Length | x8 | |
| Configuration 4 (System Config: E and I) | Slot 1 half height | half Length | x8 | |
| Slot 2 | NA | NA | NA |
Memory specifications
Table 12. Memory specifications
| Memory module sockets | Memory capacity | Minimum RAM | Maximum RAM |
| Sixteen 288-pin | 4 GB single rank, 8 GB, 16 GB, 32 GB dual rank, and 64 GB quad rank | 4 GB with a single processor8 GB with two processors | Up to 512 GB with a single processorUp to 1024 GB with dual processors |
Drive specifications
The PowerEdge C4130 system supports up to two 1.8 inch uSATA SSDs, and up to four 2.5 inch SAS/SATA cabled hard drives.
NOTE: Systems with NVLink configurations do not support the 2.5-inch SAS/SATA cabled hard drives.
NOTE: Initial status LED of PCIe SSDs may vary based on the actual drive status and server components populated.
Ports and connectors specifications
Table 13. Ports and connectors specifications
Connectors
Back
| NIC Two 1 Gbps |
| Serial 9-pin, DTE, 16550-compatible |
| USB Two 4-pin, USB 3.0-compliant |
| Video 15-pin VGA |
Internal
| USB One 4-pin, USB 3.0-compliant |
| Internal dual SD module Two optional flash memory card slots with the internal dual SD |
module
NOTE: One card slot is dedicated for redundancy.
Video specifications
The PowerEdge C4130 system supports Matrox G200eR2 Integrated VGA controller with 16 MB capacity.
Table 14. Resolution information for Video modes
Resolution Refresh rate (Hz) Color depth (bit)
| 640 × 480 60, 70 8, 16, 32 |
| 800 × 600 60, 75, 85 8, 16, 32 |
| 1024 × 768 60, 75, 85 8, 16, 32 |
| 1152 × 864 60, 75, 85 8, 16, 32 |
| 1280 × 1024 60, 75 8, 16, 32 |
| 1440 × 900 60 8, 16, 32 |
Environmental specifications
NOTE: For additional information about environmental certifications, please refer to the Product Environmental Datasheet located with the Manuals & Documents on Dell.com/poweredgemanuals.
Table 15. Temperature specifications
| Temperature | Specifications |
| Storage | -40^ to 65^ ( -40^ to 149^ ) |
| Continuous operation (for altitude less than 950 m or 3117 ft) | 10^ to 25^ ( 50^ to 77^ ) with no direct sunlight on the equipment. |
| Temperature Specifications | |
| i NOTE: Certain system configurations may require reductions in the upper temperature limits. i NOTE: The performance of the system may be impacted when operating above the upper temperature limit or with a faulty fan. | |
| Maximum temperature gradient (operating and storage) 20°C/h (36°F/h) | |
Table 16. Relative humidity specifications
| Relative humidity Specifications | |
| Storage 5% to 95% RH with 33°C (91°F) maximum dew point. | Atmosphere must be non-condensing at all times. |
| Operating 10% to 80% relative humidity with 29°C (84.2°F) maximum dew point. |
Table 17. Maximum vibration specifications
| Maximum vibration Specifications | |
| Operating 0.26 G | r_ms at 5 Hz to 350 Hz (all operation orientations). |
| Storage 1.88 G | r_ms at 10 Hz to 500 Hz for 15 min (all six sides tested). |
Table 18. Maximum shock specifications
| Maximum vibration Specifications | |
| Operating Six consecutively executed shock pulses in the positive and storage Six consecutively executed shock pulses in the positive and | negative x, y, and z axes of 40 G for up to 2.3 ms. |
| negative x, y, and z axes (one pulse on each side of the system) of 71 G for up to 2 ms. |
Table 19. Maximum altitude specifications
| Maximum altitude Specifications | |
| Operating | 30482000 m (10,0006560 ft) |
| Storage 12,000 m (39,370 ft) |
Table 20. Operating temperature de-rating specifications
| Operating temperature de-rating Specifications | |
| Up to 25°C (77°F) Maximum temperature is reduced by 1°C/300 m | (1°F/547 ft)above 950 m (3,117 ft). |
Table 21. Particulate contamination specifications
| Particulate contamination specifications | |
| iNOTE: The following table defines the limitations that help avoid any equipment damage or failure from particulates and gaseous contamination. If it is determined that levels of particulates or gaseous pollution are beyond the limits specified below and are the reason for the damage and/or failures to your equipment, it may be necessary for you to re-mediate the environmental conditions that are causing the damage and/or failures. Re-mediation of environmental conditions will be the responsibility of the customer. | |
| Air filtrationiNOTE: Applies to data center environments only. Air filtration requirements do not apply to IT equipment | Data center air filtration as defined by ISO Class 8 per ISO 14644-1 with a 95% upper confidence limit.designed to be used outside a data center, in environments such as an office or factory floor. |
| Conductive dusti | NOTE:Applies to data center and non-data center environments. |
| Corrosive dusti | NOTE:Applies to data center and non-data center environments. |
Table 22. Gaseous contamination specifications
| Gaseous contamination specifications | ||
| i|NOTE: Maximum corrosive contaminant levels measured at ≤50% relative humidity. | ||
| Copper coupon corrosion rate <300 Å/month per Class G1 as defined by ANSI/ISA71.04-1985. | ||
| Silver coupon corrosion rate <200 Å/month as defined by AHSRAE TC9.9. | ||
Initial system setup and configuration
Setting up your system
Complete the following steps to set up your system:
Steps
- Unpack the system.
- Install the system into the rack. For more information about installing the system into the rack, see your system Rack Installation Placemat at Dell.com/poweredgemanuals.
- Connect the peripherals to the system.
- Connect the system to its electrical outlet.
- Turn the system on by pressing the power button or by using iDRAC.
- Turn on the attached peripherals.
iDRAC configuration
The Integrated Dell Remote Access Controller (iDRAC) is designed to make system administrators more productive and improve the overall availability of Dell EMC systems. iDRAC alerts administrators to system issues, helps them perform remote system management, and reduces the need for physical access to the system.
Options to set up iDRAC IP address
You must configure the initial network settings based on your network infrastructure to enable the communication to and from iDRAC. You can set up the IP address by using one of the following interfaces:
| Interfaces | Document/Section |
| iDRAC Settings utility | See Dell Integrated Dell Remote Access Controller User's Guide at Dell.com/idracmanuals |
| Dell Deployment Toolkit | See Dell Deployment Toolkit User's Guide at Dell.com/openmanagemanuals |
| Dell Lifecycle Controller | See Dell Lifecycle Controller User's Guide at Dell.com/idracmanuals |
You must use the default iDRAC IP address 192.168.0.120 to configure the initial network settings, including setting up DHCP or a static IP for iDRAC.
NOTE: To access iDRAC connect the network cable to the Ethernet connector on the system board.
NOTE: Ensure that you change the default user name and password after setting up the iDRAC IP address.
Log in to iDRAC
You can log in to iDRAC as:
- iDRAC user
- Microsoft Active Directory user
• Lightweight Directory Access Protocol (LDAP) user
The default user name and password are root and calvin. You can also log in by using Single Sign-On or Smart Card.

NOTE: You must have iDRAC credentials to log in to iDRAC.
For more information about logging in to iDRAC and iDRAC licenses, see the latest Integrated Dell Remote Access Controller User's Guide at Dell.com/idracmanuals.
Options to install the operating system
If the system is shipped without an operating system, install the supported operating system by using one of the following resources:
Table 23. Resources to install the operating system
Resources Location
| Dell Systems Management Tools and Documentation media Dell.com/operatingsystemmanuals |
| Dell Lifecycle Controller Dell.com/idracmanuals |
| Dell OpenManage Deployment Toolkit Dell.com/openmanagemanuals |
| Dell certified VMware ESXi Dell.com/virtualizationsolutions |
| Supported operating systems on Dell PowerEdge systems Dell.com/ossupport |
| Installation and How-to videos for supported operating systems on Supported Operating Systems for Dell PowerEdge Systems Dell PowerEdge systems |
Methods to download firmware and drivers
You can download the firmware and drivers by using any of the following methods:
Table 24. Firmware and drivers
Methods Location
| From the Dell Support site Global Technical Support | |
| Using Dell Remote Access Controller Lifecycle Controller (iDRAC with LC) | Dell.com/idracmanuals |
| Using Dell Repository Manager (DRM) | Dell.com/openmanagemanuals > OpenManage Deployment Toolkit |
| Using Dell OpenManage Essentials (OME) | Dell.com/openmanagemanuals > OpenManage Deployment Toolkit |
| Using Dell Server Update Utility (SUU) | Dell.com/openmanagemanuals > OpenManage Deployment Toolkit |
| Using Dell OpenManage Deployment Toolkit (DTK) | Dell.com/openmanagemanuals > OpenManage Deployment Toolkit |
Downloading the drivers and firmware
Dell EMC recommends that you download and install the latest BIOS, drivers, and systems management firmware on your system.
Prerequisites
Ensure that you clear the web browser cache before downloading the drivers and firmware.
Steps
- Go to Dell.com/support/drivers.
- In the Drivers & Downloads section, type the Service Tag of your system in the Service Tag or Express Service Code box, and then click Submit.
NOTE: If you do not have the Service Tag, select Detect My Product to allow the system to automatically detect your Service Tag, or in General support, navigate to your product.

- Click Drivers & Downloads
The drivers that are applicable to your selection are displayed.
- Download the drivers to a USB drive, CD, or DVD.
Pre-operating system management applications
You can manage basic settings and features of a system without booting to the operating system by using the system firmware.
Topics:
- Options to manage the pre-operating system applications
- System Setup
- Dell Lifecycle Controller
- Boot Manager
- PXE boot
Options to manage the pre-operating system applications
Your system has the following options to manage the pre-operating system applications:
- System Setup
- Boot Manager
- Dell Lifecycle Controller
- Preboot Execution Environment (PXE)
Related concepts
System Setup
Boot Manager
Dell Lifecycle Controller
PXE boot
System Setup
By using the System Setup screen, you can configure the BIOS settings, iDRAC settings, and device settings of your system.
NOTE: Help text for the selected field is displayed in the graphical browser by default. To view the help text in the text browser, press F1.
You can access system setup by using two methods:
- Standard graphical browser — The browser is enabled by default.
- Text browser — The browser is enabled by using Console Redirection.
Related tasks
Viewing System Setup
Related reference
System Setup details
Viewing System Setup
To view the System Setup screen, perform the following steps:
Steps
- Turn on, or restart your system.
- Press F2 immediately after you see the following message:
F2 = System Setup

NOTE: If your operating system begins to load before you press F2, wait for the system to finish booting, and then restart your system and try again.
Related concepts
System Setup
Related reference
System Setup details
System Setup details
The System Setup Main Menu screen details are explained as follows:
Option
Description
System BIOS Enables you to configure BIOS settings.
iDRAC Settings Enables you to configure iDRAC settings.
The iDRAC settings utility is an interface to set up and configure the iDRAC parameters by using UEFI (Unified Extensible Firmware Interface). You can enable or disable various iDRAC parameters by using the iDRAC settings utility. For more information about this utility, see Integrated Dell Remote Access Controller User's Guide at Dell.com/idracmanuals.
Device Settings Enables you to configure device settings.
Related concepts
System Setup
Related tasks
Viewing System Setup
System BIOS
You can use the System BIOS screen to edit specific functions such as boot order, system password, setup password, set the RAID mode, and enable or disable USB ports.
Related tasks
Viewing System BIOS
Related reference
System BIOS Settings details
Boot Settings
Network Settings
System Information
Memory Settings
Processor Settings SATA Settings Integrated Devices Serial Communication System Profile Settings Miscellaneous Settings iDRAC Settings utility Device Settings
Viewing System BIOS
To view the System BIOS screen, perform the following steps:
Steps
- Turn on, or restart your system.
- Press F2 immediately after you see the following message:
F2 = System Setup

NOTE: If your operating system begins to load before you press F2, wait for the system to finish booting, and then restart your system and try again.
- On the System Setup Main Menu screen, click System BIOS.
Related reference
System BIOS
System BIOS Settings details
System BIOS Settings details
About this task
The System BIOS Settings screen details are explained as follows:
| Option | Description |
| System Information | Specifies information about the system such as the system model name, BIOS version, and Service Tag. |
| Memory Settings | Specifies information and options related to the installed memory. |
| Processor Settings | Specifies information and options related to the processor such as speed and cache size. |
| SATA Settings | Specifies options to enable or disable the integrated SATA controller and ports. |
| Boot Settings | Specifies options to specify the boot mode (BIOS or UEFI). Enables you to modify UEFI and BIOS boot settings. |
| Network Settings | Specifies options to change the network settings. |
| Integrated Devices | Specifies options to manage integrated device controllers and ports and specify related features and options. |
| Serial Communication | Specifies options to manage the serial ports and specify related features and options. |
| System Profile Settings | Specifies options to change the processor power management settings, memory frequency, and so on. |
| System Security | Specifies options to configure the system security settings, such as system password, setup password, Trusted Platform Module (TPM) security. It also manages the power and NMI buttons on the system. |
| Miscellaneous Settings | Specifies options to change the system date, time, and so on. |
Related tasks
Viewing System BIOS
Related reference
System BIOS
Boot Settings
You can use the Boot Settings screen to set the boot mode to either BIOS or UEFI. It also enables you to specify the boot order.
Related tasks
Boot Settings details
Viewing Boot Settings
Changing the boot order
Related reference
System BIOS
Choosing the system boot mode
Viewing Boot Settings
To view the Boot Settings screen, perform the following steps:
Steps
- Turn on, or restart your system.
- Press F2 immediately after you see the following message:
F2 = System Setup

NOTE: If your operating system begins to load before you press F2, wait for the system to finish booting, and then restart your system and try again.
- On the System Setup Main Menu screen, click System BIOS.
- On the System BIOS screen, click Boot Settings.
Related tasks
Boot Settings details
Changing the boot order
Related reference
Boot Settings
Choosing the system boot mode
Boot Settings details
About this task
The Boot Settings screen details are explained as follows:
Option
Description
Boot Mode Enables you to set the boot mode of the system.
CAUTION: Switching the boot mode may prevent the system from booting if the operating system is not installed in the same boot mode.
If the operating system supports UEFI, you can set this option to UEFI. Setting this field to BIOS allows compatibility with non-UEFI operating systems. This option is set to BIOS by default.
Option Description
NOTE: Setting this field to UEFI disables the BIOS Boot Settings menu. Setting this field to BIOS disables the UEFI Boot Settings menu.
Boot Sequence Retry Enables or disables the Boot Sequence Retry feature. If this option is set to Enabled and the system fails to boot, the system reattempts the boot sequence after 30 seconds. This option is set to Enabled by default.
Hard-Disk Failover Specifies the hard drive that is booted in the event of a hard drive failure. The devices are selected in the Hard-Disk Drive Sequence on the Boot Option Setting menu. When this option is set to Disabled, only the first hard drive in the list is attempted to boot. When this option is set to Enabled, all hard drives are attempted to boot in the order selected in the Hard-Disk Drive Sequence. This option is not enabled for UEFI Boot Mode.
Boot Option Settings Configures the boot sequence and the boot devices.
BIOS Boot Enables or disables BIOS boot options.
Settings
NOTE: This option is enabled only if the boot mode is BIOS.
UEFI Boot Settings Enables or disables UEFI Boot options. The Boot options include IPv4 PXE and IPv6 PXE. This option is set to IPv4 by default.
NOTE: This option is enabled only if the boot mode is UEFI.
Related tasks
Viewing Boot Settings
Changing the boot order
Related reference
Boot Settings
Choosing the system boot mode
Choosing the system boot mode
System Setup enables you to specify one of the following boot modes for installing your operating system:
- BIOS boot mode (the default) is the standard BIOS-level boot interface.
-
Unified Extensible Firmware Interface (UEFI) (the default) boot mode is an enhanced 64-bit boot interface. If you have configured your system to boot to UEFI mode, it replaces the system BIOS.
-
From the System Setup Main Menu, click Boot Settings, and select Boot Mode.
-
Select the boot mode you want the system to boot into.

CAUTION: Switching the boot mode may prevent the system from booting if the operating system is not installed in the same boot mode.
- After the system boots in the specified boot mode, proceed to install your operating system from that mode.
NOTE:
- Operating systems must be UEFI-compatible to be installed from the UEFI boot mode. DOS and 32-bit operating systems do not support UEFI and can only be installed from the BIOS boot mode.
- For the latest information about supported operating systems, go to Dell.com/ossupport.
Related tasks
Boot Settings details
Viewing Boot Settings
Related reference
Boot Settings
Changing the boot order
About this task
You may have to change the boot order if you want to boot from a USB key or an optical drive. The following instructions may vary if you have selected BIOS for Boot Mode.
Steps
- On the System Setup Main Menu screen, click System BIOS > Boot Settings.
- Click Boot Option Settings > Boot Sequence.
- Use the arrow keys to select a boot device, and use the plus (+) and minus (-) sign keys to move the device down or up in the order.
- Click Exit, and then click Yes to save the settings on exit.
Related tasks
Boot Settings details
Viewing Boot Settings
Related reference
Boot Settings
Network Settings
You can use the Network Settings screen to modify PXE device settings. The network settings option is available only in the UEFI mode.
NOTE: The BIOS does not control network settings in the BIOS mode. For the BIOS boot mode, the optional Boot ROM of the network controllers handles the network settings.
Related concepts
Network Settings screen details
System BIOS
Related reference
Viewing Network Settings
Viewing Network Settings
To view the Network Settings screen, perform the following steps:
Steps
- Turn on, or restart your system.
- Press F2 immediately after you see the following message:
F2 = System Setup

NOTE: If your operating system begins to load before you press F2, wait for the system to finish booting, and then restart your system and try again.
- On the System Setup Main Menu screen, click System BIOS.
- On the System BIOS screen, click Network Settings.
Related reference
Network Settings
Network Settings screen details
Network Settings screen details
The Network Settings screen details are explained as follows:
About this task
Option Description
| PXE Device n (n = 1 to 4) | Enables or disables the device. When enabled, a UEFI boot option is created for the device. |
| PXE Device n Settings(n = 1 to 4) | Enables you to control the configuration of the PXE device. |
Related tasks
Viewing Network Settings
Related reference
Network Settings
System Security
You can use the System Security screen to perform specific functions such as setting the system password, setup password and disabling the power button.
Related tasks
System Security Settings details
Viewing System Security
Creating a system and setup password
Using your system password to secure your system
Deleting or changing system and setup password
Related reference
Operating with a setup password enabled
System BIOS
Viewing System Security
To view the System Security screen, perform the following steps:
Steps
- Turn on, or restart your system.
- Press F2 immediately after you see the following message:
F2 = System Setup

NOTE: If your operating system begins to load before you press F2, wait for the system to finish booting, and then restart your system and try again.
- On the System Setup Main Menu screen, click System BIOS.
- On the System BIOS screen, click System Security.
Related tasks
System Security Settings details
Related reference
System Security
System Security Settings details
About this task
The System Security Settings screen details are explained as follows:
Option Description
| Intel AES-NI | Improves the speed of applications by performing encryption and decryption by using the Advanced Encryption Standard Instruction Set (AES-NI). This option is set toEnabledby default. |
| System Password | Sets the system password. This option is set toEnabledby default and is read-only if the password jumper is not installed in the system. |
| Setup Password | Sets the setup password. This option is read-only if the password jumper is not installed in the system. |
| Password Status | Locks the system password. This option is set toUnlockedby default. |
| TPM Security | NOTE: The TPM menu is available only when the TPM module is installed.Enables you to control the reporting mode of the TPM. TheTPMSecurityoption is set toOffby default. You can only modify the TPM Status, TPM Activation, and Intel TXT fields if theTPM Statusfield is set to eitherOn with Pre-boot Measurements or On without Pre-boot Measurements. |
| TPM Information | Changes the operational state of the TPM. This option is set toNo Changeby default. |
TPM Status Specifies the TPM status.
| TPM Command | CAUTION: Clearing the TPM results in the loss of all keys in the TPM. The loss of TPM keys may affect booting to the operating system.Clears all the contents of the TPM. The TPM Clear option is set to No by default. |
| Intel TXT | Enables or disables the Intel Trusted Execution Technology (TXT) option. To enable the Intel TXT option, virtualization technology and TPM Security must be enabled with Pre-boot measurements. This option is set to Off by default. |
| Power Button | Enables or disables the power button on the front of the system. This option is set to Enabled by default. |
| NMI Button | Enables or disables the NMI button on the front of the system. This option is set to Disabled by default. |
| AC Power Recovery | Sets how the system behaves after AC power is restored to the system. This option is set to Last by default. |
| AC Power Recovery Delay | Sets the time delay for the system to power up after AC power is restored to the system. This option is set to Immediate by default. |
| User Defined Delay (60s to 240s) | Sets the User Defined Delay option when the User Defined option for AC Power Recovery Delay is selected. |
| UEFI Variable Access | Provides varying degrees of securing UEFI variables. When set to Standard (the default), UEFI variables are accessible in the operating system per the UEFI specification. When set to Controlled, selected UEFI variables are protected in the environment and new UEFI boot entries are forced to be at the end of the current boot order. |
| Secure Boot Policy | When Secure Boot policy is set to Standard, the BIOS uses the system manufacturer's key and certificates to authenticate pre-boot images. When Secure Boot policy is set to Custom, the BIOS uses the user-defined key and certificates. Secure Boot policy is set to Standard by default. |
| Secure Boot Policy Summary | Specifies the list of certificates and hashes that secure boot uses to authenticate images. |
Related tasks
Viewing System Security
Related reference
System Security
Secure Boot Custom Policy Settings
Secure Boot Custom Policy Settings is displayed only when Secure Boot Policy is set to Custom.
Viewing Secure Boot Custom Policy Settings
To view the Secure Boot Custom Policy Settings screen, perform the following steps:
Steps
-
Turn on, or restart your system.
-
Press F2 immediately after you see the following message:
F2 = System Setup

NOTE: If your operating system begins to load before you press F2, wait for the system to finish booting, and then restart your system and try again.
- On the System Setup Main Menu screen, click System BIOS.
- On the System BIOS screen, click System Security.
- On the System Security screen, click Secure Boot Custom Policy Settings.
Secure Boot Custom Policy Settings details
The Secure Boot Custom Policy Settings screen details are explained as follows:
Option
Description
Platform Key Imports, exports, deletes, or restores the platform key (PK).
Key Exchange Key Enables you to import, export, delete, or restore entries in the Key Exchange Key (KEK) Database.
Database
Authorized
Signature
Database
Forbidden
Signature
Database
Enables you to import, export, delete, or restore entries in the Key Exchange Key (KEK) Database.
Imports, exports, deletes, or restores entries in the Authorized Signature Database (db).
Imports, exports, deletes, or restores entries in the Forbidden Signature Database (dbx).
Creating a system and setup password
Prerequisites
Ensure that the password jumper is enabled. The password jumper enables or disables the system password and setup password features. For more information, see the System board jumper settings section.

NOTE: If the password jumper setting is disabled, the existing system password and setup password are deleted and you need not provide the system password to boot the system.
Steps
- To enter System Setup, press F2 immediately after turning on or rebooting your system.
- On the System Setup Main Menu screen, click System BIOS > System Security.
- On the System Security screen, verify that Password Status is set to Unlocked.
- In the System Password field, type your system password, and press Enter or Tab.
Use the following guidelines to assign the system password:
- A password can have up to 32 characters.
- The password can contain the numbers 0 through 9.
- Only the following special characters are allowed: space, ("), (+), (.), (-), (.), (/), (:), ([], (), (]), (^).
A message prompts you to reenter the system password.
- Reenter the system password, and click OK.
- In the Setup Password field, type your setup password and press Enter or Tab.
A message prompts you to reenter the setup password.
-
Reenter the setup password, and click OK.
-
Press Esc to return to the System BIOS screen. Press Esc again.
A message prompts you to save the changes.

NOTE: Password protection does not take effect until the system reboots.
Related reference
System Security
Using your system password to secure your system
About this task
If you have assigned a setup password, the system accepts your setup password as an alternate system password.
Steps
-
Turn on or reboot your system.
-
Type the system password and press Enter.
Next steps
When Password Status is set to Locked, type the system password and press Enter when prompted at reboot.

NOTE: If an incorrect system password is typed, the system displays a message and prompts you to reenter your password. You have three attempts to type the correct password. After the third unsuccessful attempt, the system displays an error message that the system has stopped functioning and must be turned off. Even after you turn off and restart the system, the error message is displayed until the correct password is entered.
Related reference
System Security
Deleting or changing system and setup password
Prerequisites

NOTE: You cannot delete or change an existing system or setup password if the Password Status is set to Locked.
Steps
- To enter System Setup, press F2 immediately after turning on or restarting your system.
- On the System Setup Main Menu screen, click System BIOS > System Security.
- On the System Security screen, ensure that Password Status is set to Unlocked.
- In the System Password field, alter or delete the existing system password, and then press Enter or Tab.
- In the Setup Password field, alter or delete the existing setup password, and then press Enter or Tab.
If you change the system and setup password, a message prompts you to reenter the new password. If you delete the system and setup password, a message prompts you to confirm the deletion.
- Press Esc to return to the System BIOS screen. Press Esc again, and a message prompts you to save the changes.
Related reference
System Security
Operating with a setup password enabled
If Setup Password is set to Enabled, type the correct setup password before modifying the system setup options.
If you do not type the correct password in three attempts, the system displays the following message:
Invalid Password! Number of unsuccessful password attempts:
Even after you turn off and restart the system, the error message is displayed until the correct password is typed. The following options are exceptions:
- If System Password is not set to Enabled and is not locked through the Password Status option, you can assign a system password. For more information, see the System Security Settings screen section.
- You cannot disable or change an existing system password.

NOTE: You can use the password status option with the setup password option to protect the system password from unauthorized changes.
Related reference
System Security
System Information
You can use the System Information screen to view system properties such as Service Tag, system model name, and the BIOS version.
Related tasks
Viewing System Information
Related reference
System Information details
System BIOS
Viewing System Information
To view the System Information screen, perform the following steps:
Steps
- Turn on, or restart your system.
- Press F2 immediately after you see the following message:
$$ F 2 = \text { System Setup } $$

NOTE: If your operating system begins to load before you press F2, wait for the system to finish booting, and then restart your system and try again.
- On the System Setup Main Menu screen, click System BIOS.
- On the System BIOS screen, click System Information.
Related reference
System Information
System Information details
About this task
The System Information screen details are explained as follows:
Option
Description
System Model Name
Specifies the system model name.
System BIOS Version
Specifies the BIOS version installed on the system.
Option Description
| System Management Engine Version | Specifies the current version of the Management Engine firmware. |
| System Service Tag | Specifies the system Service Tag. |
| System Manufacturer | Specifies the name of the system manufacturer. |
| System Manufacturer Contact Information | Specifies the contact information of the system manufacturer. |
| System CPLD Version | Specifies the current version of the system complex programmable logic device (CPLD) firmware. |
| UEFI Compliance Version | Specifies the UEFI compliance level of the system firmware. |
Related tasks
Viewing System Information
Related reference
System Information
System Information details
Memory Settings
You can use the Memory Settings screen to view all the memory settings and enable or disable specific memory functions, such as memory testing and node interleaving.
Related tasks
Viewing Memory Settings
Related reference
Memory Settings details
System BIOS
Viewing Memory Settings
To view the Memory Settings screen, perform the following steps:
Steps
- Turn on, or restart your system.
- Press F2 immediately after you see the following message:
F2 = System Setup

NOTE: If your operating system begins to load before you press F2, wait for the system to finish booting, and then restart your system and try again.
- On the System Setup Main Menu screen, click System BIOS.
- On the System BIOS screen, click Memory Settings.
Related reference
Memory Settings
Memory Settings details
Memory Settings details
About this task
The Memory Settings screen details are explained as follows:
Option Description
| System Memory Size | Specifies the memory size in the system. |
| System Memory Type | Specifies the type of memory installed in the system. |
| System Memory Speed | Specifies the memory speed. |
| System Memory Voltage | Specifies the memory voltage. |
| Video Memory Specifies the amount of video memory. | |
| System Memory Testing | Specifies whether the memory tests are run during system boot. Options are Enabled and Disabled. This option is set to Disabled by default. |
| Memory Operating Mode | Specifies the memory operating mode. The options available are Optimizer Mode, Advanced ECC Mode, Mirror Mode, Spare Mode, Spare with Advanced ECC Mode, Dell Fault Resilient Mode and Dell NUMA Fault Resilient Mode. This option is set to Optimizer Mode by default. i NOTE: The Memory Operating Mode option can have different default and available options based on the memory configuration of your system. i NOTE: The Dell Fault Resilient Mode option establishes an area of memory that is fault resilient. This mode can be used by an operating system that supports the feature to load critical applications or enables the operating system kernel to maximize system availability. |
| Node Interleaving | Specifies if the Non-Uniform Memory Architecture (NUMA) is supported. If this field is set to Enabled, memory interleaving is supported if a symmetric memory configuration is installed. If the field is set to Disabled, the system supports NUMA (asymmetric) memory configurations. This option is set to Disabled by default. |
| Snoop Mode | Specifies the Snoop Mode options. The Snoop Mode options available are Home Snoop, Early Snoop, and Cluster on Die. This option is set to Early Snoop by default. This field is available only when the Node Interleaving is set to Disabled. |
Related tasks
Viewing Memory Settings
Related reference
Memory Settings
Processor Settings
You can use the Processor Settings screen to view the processor settings, and perform specific functions such as enabling virtualization technology, hardware prefetcher, and logical processor idling.
Related tasks
Viewing Processor Settings
Related reference
Processor Settings details
System BIOS
Viewing Processor Settings
To view the Processor Settings screen, perform the following steps:
Steps
- Turn on, or restart your system.
- Press F2 immediately after you see the following message:
F2 = System Setup

NOTE: If your operating system begins to load before you press F2, wait for the system to finish booting, and then restart your system and try again.
- On the System Setup Main Menu screen, click System BIOS.
- On the System BIOS screen, click Processor Settings.
Related reference
Processor Settings
Processor Settings details
Processor Settings details
About this task
The Processor Settings screen details are explained as follows:
Option
Description
Logical Processor
Enables or disables the logical processors and displays the number of logical processors. If this option is set to Enabled, the BIOS displays all the logical processors. If this option is set to Disabled, the BIOS displays only one logical processor per core. This option is set to Enabled by default.
QPI Speed Enables you to control QuickPath Interconnect data rate settings.
Alternate RTID (Requestor Transaction ID) Setting
Modifies Requestor Transaction IDs, which are QPI resources. This option is set to Disabled by default.
NOTE: Enabling this option may negatively impact the overall system performance.
Virtualization Technology
Address Translation Service (ATS)
Enables or disables the additional hardware capabilities provided for virtualization. This option is set to Enabled by default.
Adjacent Cache Line Prefetch
Defines the Address Translation Cache (ATC) for devices to cache the DMA transactions. This option provides an interface between CPU and DMA Memory Management to a chipset's Address Translation and Protection Table to translate DMA addresses to host addresses. This option is set to Enabled by default.
Hardware Prefetcher
Optimizes the system for applications that need high utilization of sequential memory access. This option is set to Enabled by default. You can disable this option for applications that need high utilization of random memory access.
DCU Streamer Prefetcher
Enables or disables the hardware prefetcher. This option is set to Enabled by default.
DCU IP Prefetcher
Enables or disables the Data Cache Unit (DCU) streamer prefetcher. This option is set to Enabled by default.
Execute Disable
Enables you to run the disable memory protection technology. This option is set to Enabled by default.
Logical Processor Idling
Enables you to improve the energy efficiency of a system. It uses the operating system core parking algorithm and parks some of the logical processors in the system which in turn allows the corresponding processor cores to transition into a lower power idle state. This option can only be enabled if the operating system supports it. It is set to Disabled by default.
Option Description
Configurable TDP
Enables you to reconfigure the processor Thermal Design Power (TDP) levels during POST based on the power and thermal delivery capabilities of the system. TDP verifies the maximum heat the cooling system is needed to dissipate. This option is set to Nominal by default.
NOTE: This option is only available on certain stock keeping units (SKUs) of the processors.
X2Apic Mode Enables or disables the X2Apic mode.
Number of Cores per Processor
Controls the number of enabled cores in each processor. This option is set to All by default.
Processor 64-bit Support
Specifies if the processor(s) support 64-bit extensions.
Processor Core Speed
Specifies the maximum core frequency of the processor.
Processor 1
NOTE: Depending on the number of CPUs, there may be up to four processors listed.
The following settings are displayed for each processor installed in the system:
Option Description
Family-Model-Stepping Specifies the family, model, and stepping of the processor as defined by Intel.
Brand Specifies the brand name.
Level 2 Cache Specifies the total L2 cache.
Level 3 Cache Specifies the total L3 cache.
Number of Cores Specifies the number of cores per processor.
Related tasks
Viewing Processor Settings
Related reference
Processor Settings
SATA Settings
You can use the SATA Settings screen to view the SATA settings of SATA devices and enable RAID on your system.
Related tasks
SATA Settings details
Viewing SATA Settings
Related reference
System BIOS
Viewing SATA Settings
To view the SATA Settings screen, perform the following steps:
Steps
- Turn on, or restart your system.
- Press F2 immediately after you see the following message:
F2 = System Setup

NOTE: If your operating system begins to load before you press F2, wait for the system to finish booting, and then restart your system and try again.
- On the System Setup Main Menu screen, click System BIOS.
- On the System BIOS screen, click SATA Settings.
Related tasks
SATA Settings details
Related reference
SATA Settings
SATA Settings details
About this task
The SATA Settings screen details are explained as follows:
| Option | Description |
| Embedded SATA | Enables the embedded SATA option to be set to Off, ATA, AHCI, or RAID modes. This option is set to AHCI by default. |
| Security Freeze Lock | Sends Security Freeze Lock command to the Embedded SATA drives during POST. This option is applicable only for ATA and AHCI modes. |
Write Cache Enables or disables the command for Embedded SATA drives during POST.
Port A Sets the drive type of the selected device. For Embedded SATA settings in ATA mode, set this field to Auto to enable BIOS support. Set it to OFF to turn off BIOS support.
For AHCI or RAID mode, BIOS support is always enabled.
Option Description
Model Specifies the drive model of the selected device.
Drive Type Specifies the type of drive attached to the SATA port.
Capacity Specifies the total capacity of the hard drive. This field is undefined for removable media devices such as optical drives.
Port B Sets the drive type of the selected device. For Embedded SATA settings in ATA mode, set this field to Auto to enable BIOS support. Set it to OFF to turn off BIOS support.
For AHCI or RAID mode, BIOS support is always enabled.
Option Description
Model Specifies the drive model of the selected device.
Drive Type Specifies the type of drive attached to the SATA port.
Capacity Specifies the total capacity of the hard drive. This field is undefined for removable media devices such as optical drives.
Port C Sets the drive type of the selected device. For Embedded SATA settings in ATA mode, set this field to Auto to enable BIOS support. Set it to OFF to turn off BIOS support.
For AHCI or RAID mode, BIOS support is always enabled.
Option Description
Model Specifies the drive model of the selected device.
Drive Type Specifies the type of drive attached to the SATA port.
Capacity Specifies the total capacity of the hard drive. This field is undefined for removable media devices such as optical drives.
Option Description
| Port D | Sets the drive type of the selected device. ForEmbedded SATA settingsin ATAmode, set this field toAutoto enable BIOS support. Set it toOFFto turn off BIOS support.For AHCI orRAIDmode, BIOS support is always enabled.Option DescriptionModelSpecifies the drive model of the selected device.Drive TypeSpecifies the type of drive attached to the SATA port.Capacity Specifies the total capacity of the hard drive. This field is undefined for removable media devices such as optical drives. | |
| Port E | Sets the drive type of the selected device. ForEmbedded SATA settingsin ATAmode, set this field toAutoto enable BIOS support. Set it toOFFto turn off BIOS support.For AHCI orRAIDmode, BIOS support is always enabled.Option DescriptionModelSpecifies the drive model of the selected device.Drive TypeSpecifies the type of drive attached to the SATA port.Capacity Specifies the total capacity of the hard drive. This field is undefined for removable media devices such as optical drives. | |
| Port F | Sets the drive type of the selected device. ForEmbedded SATA settingsin ATAmode, set this field toAutoto enable BIOS support. Set it toOFFto turn off BIOS support.For AHCI orRAIDmode, BIOS support is always enabled.Option DescriptionModelSpecifies the drive model of the selected device.Drive TypeSpecifies the type of drive attached to the SATA port.Capacity Specifies the total capacity of the hard drive. This field is undefined for removable media devices such as optical drives. |
Related tasks
Viewing SATA Settings
Related reference
SATA Settings
Integrated Devices
You can use the Integrated Devices screen to view and configure the settings of all integrated devices including the video controller, integrated RAID controller, and the USB ports.
Related tasks
Integrated Devices details
Viewing Integrated Devices
Related reference
System BIOS
Viewing Integrated Devices
To view the Integrated Devices screen, perform the following steps:
Steps
- Turn on, or restart your system.
- Press F2 immediately after you see the following message:
F2 = System Setup

NOTE: If your operating system begins to load before you press F2, wait for the system to finish booting, and then restart your system and try again.
- On the System Setup Main Menu screen, click System BIOS.
- On the System BIOS screen, click Integrated Devices.
Related tasks
Integrated Devices details
Related reference
Integrated Devices
Integrated Devices details
About this task
The Integrated Devices screen details are explained as follows:
| Option | Description |
| USB 3.0 Setting | Enables or disables the USB 3.0 support. Enable this option only if your operating system supports USB 3.0. If you disable this option, devices operate at USB 2.0 speed. USB 3.0 is enabled by default. |
| User Accessible USB Ports | Enables or disables the USB ports. Selecting Only Back Ports On disables the front USB ports, selecting All Ports Off disables all USB ports. The USB keyboard and mouse operate during boot process in certain operating systems. After the boot process is complete, the USB keyboard and mouse do not work if the ports are disabled. i NOTE: Selecting Only Back Ports On and All Ports Off disables the USB management port and also restricts access to iDRAC features. |
| Internal USB Port | Enables or disables the internal USB port. This option is set to Enabled by default. |
| Integrated RAID Controller | Enables or disables the integrated RAID controller. This option is set to Enabled by default. |
| Integrated Network Card 1 | Enables or disables the integrated network card. |
| Embedded NIC1 and NIC2 | i NOTE: The Embedded NIC1 and NIC2 options are only available on systems that do not have Integrated Network Card 1. Enables or disables the Embedded NIC1 and NIC2 options. If set to Disabled, the NIC may still be available for shared network access by the embedded management controller. The embedded NIC1 and NIC2 options are only available on systems that do not have Network Daughter Cards (NDCs). The Embedded NIC1 and NIC2 option is mutually exclusive with the Integrated Network Card 1 option. Configure the Embedded NIC1 and NIC2 option by using the NIC management utilities of the system. |
| I/OAT DMA Engine | Enables or disables the I/OAT option. Enable only if the hardware and software support the feature. |
| I/O Snoop Holdoff Response | Selects the number of cycles PCI I/O can withhold snoop requests from the CPU, to allow time to complete its own write to LLC. This setting can help improve performance on workloads where throughput and latency are critical. |
| Embedded Video Controller | Enables or disables the Embedded Video Controller option. This option is set to Enabled by default. |
Option Description
| Current State of Embedded Video Controller | Displays the current state of the embedded video controller. The Current State of Embedded Video Controller option is a read-only field. If the Embedded Video Controller is the only display capability in the system (that is, no add-in graphics card is installed), then the Embedded Video Controller is automatically used as the primary display even if the Embedded Video Controller setting is set to Disabled. |
| SR-IOV Global Enable | Enables or disables the BIOS configuration of Single Root I/O Virtualization (SR-IOV) devices. This option is set to Disabled by default. |
| OS Watchdog Timer | If your system stops responding, this watchdog timer aids in the recovery of your operating system. When this option is set to Enabled, the operating system initializes the timer. When this option is set to Disabled (the default), the timer does not have any effect on the system. |
| Memory Mapped I/O above 4 GB | Enables or disables the support for PCIe devices that need large amounts of memory. This option is set to Enabled by default. |
| Slot Disablement | Enables or disables the available PCIe slots on your system. The slot disablement feature controls the configuration of PCIe cards installed in the specified slot. Slots must be disabled only when the installed peripheral card prevents booting into the operating system or causes delays in system startup. If the slot is disabled, both the Option ROM and UEFI drivers are disabled. |
Related tasks
Viewing Integrated Devices
Related reference
Integrated Devices
Serial Communication
You can use the Serial Communication screen to view the properties of the serial communication port.
Related tasks
Serial Communication details
Viewing Serial Communication
Related reference
System BIOS
Viewing Serial Communication
To view the Serial Communication screen, perform the following steps:
Steps
- Turn on, or restart your system.
- Press F2 immediately after you see the following message:
F2 = System Setup

NOTE: If your operating system begins to load before you press F2, wait for the system to finish booting, and then restart your system and try again.
- On the System Setup Main Menu screen, click System BIOS.
- On the System BIOS screen, click Serial Communication.
Related tasks
Serial Communication details
Related reference
Serial Communication
Serial Communication details
About this task
The Serial Communication screen details are explained as follows:
Option Description
| Serial Communication | Selects serial communication devices (Serial Device 1 and Serial Device 2) in BIOS. BIOS console redirection can also be enabled and the port address can be specified. This option is set toAutoby default. |
| Serial Port Address | Enables you to set the port address for serial devices. This option is set toSerial Device 1=COM2, Serial Device 2=COM1by default. iNOTE: You can use only Serial Device 2 for the Serial Over LAN (SOL) feature. To use console redirection by SOL, configure the same port address for console redirection and the serial device. iNOTE: Every time the system boots, the BIOS syncs the serial MUX setting saved in iDRAC. The serial MUX setting can independently be changed in iDRAC. Loading the BIOS default settings from within the BIOS setup utility may not always revert the serial MUX setting to the default setting of Serial Device 1. |
| External Serial Connector | Enables you to associate the External Serial Connector to Serial Device 1, Serial Device 2, or the Remote Access Device by using this option. iNOTE: Only Serial Device 2 can be used for Serial Over LAN (SOL). To use console redirection by SOL, configure the same port address for console redirection and the serial device. iNOTE: Every time the system boots, the BIOS syncs the serial MUX setting saved in iDRAC. The serial MUX setting can independently be changed in iDRAC. Loading the BIOS default settings from within the BIOS setup utility may not always revert this setting to the default setting of Serial Device 1. |
| Failsafe Baud Rate | Specifies the failsafe baud rate for console redirection. The BIOS attempts to determine the baud rate automatically. This failsafe baud rate is used only if the attempt fails, and the value must not be changed. This option is set to 115200 by default. |
| Remote Terminal Type | Sets the remote console terminal type. This option is set to VT 100/VT 220 by default. |
| Redirection After Boot | Enables or disables the BIOS console redirection when the operating system is loaded. This option is set toEnabledby default. |
Related tasks
Viewing Serial Communication
Related reference
Serial Communication
System Profile Settings
You can use the System Profile Settings screen to enable specific system performance settings such as power management.
Related tasks
System Profile Settings details
Viewing System Profile Settings
Related reference
System BIOS
Viewing System Profile Settings
To view the System Profile Settings screen, perform the following steps:
Steps
- Turn on, or restart your system.
- Press F2 immediately after you see the following message:
F2 = System Setup

NOTE: If your operating system begins to load before you press F2, wait for the system to finish booting, and then restart your system and try again.
- On the System Setup Main Menu screen, click System BIOS.
- On the System BIOS screen, click System Profile Settings.
Related tasks
System Profile Settings details
Related reference
System Profile Settings
System Profile Settings details
About this task
The System Profile Settings screen details are explained as follows:
| Option | Description |
| System Profile | Sets the system profile. If you set the System Profile option to a mode other than Custom, the BIOS automatically sets the rest of the options. You can only change the rest of the options if the mode is set to Custom. This option is set to Performance Per Watt Optimized (DAPC) by default. DAPC is Dell Active Power Controller. |
| NOTE: All the parameters on the system profile setting screen are available only when the System Profile option is set to Custom. | |
| CPU Power Management | Sets the CPU power management. This option is set to System DBPM (DAPC) by default. |
| Memory Frequency | Sets the speed of the memory. You can select Maximum Performance, Maximum Reliability, or a specific speed. |
| Turbo Boost | Enables or disables the processor to operate in the turbo boost mode. This option is set to Enabled by default. |
| Energy Efficient Turbo | Enables or disables the Energy Efficient Turbo option. |
| Energy Efficient Turbo (EET) is a mode of operation where a processor's core frequency is adjusted to be within the turbo range based on workload. | |
| C1E | Enables or disables the processor to switch to a minimum performance state when it is idle. This option is set to Enabled by default. |
| C States | Enables or disables the processor to operate in all available power states. This option is set to Enabled by default. |
| Collaborative CPU Performance Control | Enables or disables the CPU power management option. When set to Enabled, the CPU power management is controlled by the OS DBPM and the System DBPM (DAPC). This option is set to Disabled by default. |
| Memory Patrol Scrub | Sets the memory patrol scrub frequency. This option is set to Standard by default. |
| Memory Refresh Rate | Sets the memory refresh rate to either 1x or 2x. This option is set to 1x by default. |
| Uncore Frequency | Enables you to select the Processor Uncore Frequency option. |
Option Description
| Dynamic mode enables the processor to optimize power resources across the cores and uncore during runtime. The optimization of the uncore frequency to either save power or optimize performance is influenced by the setting of the Energy Efficiency Policy option. | |
| Energy Efficient Policy | Enables you to select the Energy Efficient Policy option.The CPU uses the setting to manipulate the internal behavior of the processor and determines whether to target higher performance or better power savings. |
| Number of Turbo Boot Enabled Cores for Processor 1 | NOTE: If there are two processors installed in the system, you see an entry for Number of Turbo Boost Enabled Cores for Processor 2.Controls the number of turbo boost enabled cores for processor 1. The maximum number of cores is enabled by default. |
| Monitor/Mwait | Enables the Monitor/Mwait instructions in the processor. This option is set to Enabled for all system profiles, except Custom by default.NOTE: This option can be disabled only if the C States option in the Custom mode is set to disabled.NOTE: When C States is set to Enabled in the Custom mode, changing the Monitor/Mwait setting does not impact the system power or performance. |
Related tasks
Viewing System Profile Settings
Related reference
System Profile Settings
Miscellaneous Settings
You can use the Miscellaneous Settings screen to perform specific functions such as updating the asset tag and changing the system date and time.
Related tasks
Miscellaneous Settings details
Viewing Miscellaneous Settings
Related reference
System BIOS
Viewing Miscellaneous Settings
To view the Miscellaneous Settings screen, perform the following steps:
Steps
- Turn on, or restart your system.
- Press F2 immediately after you see the following message:
$$ F 2 = \text { System Setup } $$

NOTE: If your operating system begins to load before you press F2, wait for the system to finish booting, and then restart your system and try again.
- On the System Setup Main Menu screen, click System BIOS.
- On the System BIOS screen, click Miscellaneous Settings.
Related tasks
Miscellaneous Settings details
Related reference
Miscellaneous Settings
Miscellaneous Settings details
About this task
The Miscellaneous Settings screen details are explained as follows:
Option Description
System Time Enables you to set the time on the system.
System Date Enables you to set the date on the system.
Asset Tag
Specifies the asset tag and enables you to modify it for security and tracking purposes.
Keyboard NumLock
Enables you to set whether the system boots with the NumLock enabled or disabled. This option is set to On by default.
NOTE: This option does not apply to 84-key keyboards.
Enables or disables the F1/F2 prompt on error. This option is set to Enabled by default. The F1/F2 prompt also includes keyboard errors.
Load Legacy Video Option ROM
Enables you to determine whether the system BIOS loads the legacy video (INT 10H) option ROM from the video controller. Selecting Enabled in the operating system does not support UEFI video output standards. This field is available only for UEFI boot mode. You cannot set the option to Enabled if UEFI Secure Boot mode is enabled.
In-System Characterization
Enables or disables In-System Characterization. This option is set to Disabled by default. The two other options are Enabled and Enabled - No Reboot.
NOTE: The default setting for In-System Characterization is subject to change in future BIOS releases.
When enabled, In-System Characterization (ISC) executes during POST upon detecting relevant changes in system configuration to optimize system power and performance. ISC takes about 20 seconds to execute, and system reset is needed for ISC results to be applied. The Enabled - No Reboot option executes ISC and continues without applying ISC results until the next time system reset occurs. The Enabled option executes ISC and forces an immediate system reset so that ISC results can be applied. It takes the system longer to be ready due to the forced system reset. When disabled, ISC does not execute.
Related tasks
Viewing Miscellaneous Settings
Related reference
Miscellaneous Settings
iDRAC Settings utility
The iDRAC settings utility is an interface to set up and configure the iDRAC parameters by using UEFI. You can enable or disable various iDRAC parameters by using the iDRAC settings utility.

NOTE: Accessing some of the features on the iDRAC settings utility needs the iDRAC Enterprise License upgrade.
For more information about using iDRAC, see Dell Integrated Dell Remote Access Controller User's Guide at Dell.com/idracmanuals.
Related concepts
Device Settings
Related tasks
Entering the iDRAC Settings utility
Changing the thermal settings
Related reference
System BIOS
Entering the iDRAC Settings utility
Steps
- Turn on or restart the managed system.
- Press F2 during Power-on Self-test (POST).
- On the System Setup Main Menu page, click iDRAC Settings.
The iDRAC Settings screen is displayed.
Related reference
iDRAC Settings utility
Changing the thermal settings
The iDRAC settings utility enables you to select and customize the thermal control settings for your system.
- Click iDRAC Settings > Thermal.
- Under SYSTEM THERMAL PROFILE > Thermal Profile, select one of the following options:
- Default Thermal Profile Settings
• Maximum Performance (Performance Optimized)
• Minimum Power (Performance per Watt Optimized)
- Under USER COOLING OPTIONS, set the Fan Speed Offset, Minimum Fan Speed, and Custom Minimum Fan Speed.
- Click Back > Finish > Yes.
Related reference
iDRAC Settings utility
Device Settings
Device Settings enables you to configure device parameters.
Related reference
System BIOS
Dell Lifecycle Controller
Dell Lifecycle Controller (LC) provides advanced embedded system management capabilities including system deployment, configuration, update, maintenance, and diagnosis. LC is delivered as part of the iDRAC out-of-band solution and Dell EMC system embedded Unified Extensible Firmware Interface (UEFI) applications.
Related reference
Embedded systems management
Embedded systems management
The Dell Lifecycle Controller provides advanced embedded systems management throughout the lifecycle of the system. The Dell Lifecycle Controller can be started during the boot sequence and can function independently of the operating system.

NOTE: Certain platform configurations may not support the full set of features provided by the Dell Lifecycle Controller.
For more information about setting up the Dell Lifecycle Controller, configuring hardware and firmware, and deploying the operating system, see the Dell Lifecycle Controller documentation at Dell.com/idracmanuals.
Related reference
Dell Lifecycle Controller
Boot Manager
The Boot Manager screen enables you to select boot options and diagnostic utilities.
Related tasks
Viewing Boot Manager
Related reference
Boot Manager main menu
System BIOS
Viewing Boot Manager
To enter Boot Manager:
Steps
- Turn on, or restart your system.
- Press F11 when you see the following message:
F11 = Boot Manager
If your operating system begins to load before you press F11, allow the system to complete the booting, and then restart your system and try again.
Related reference
Boot Manager
Boot Manager main menu
Boot Manager main menu
| Menu item | Description |
| Continue Normal Boot | The system attempts to boot to devices starting with the first item in the boot order. If the boot attempt fails, the system continues with the next item in the boot order until the boot is successful or no more boot options are found. |
| One-shot Boot Menu | Enables you to access boot menu, where you can select a one-time boot device to boot from. |
| Launch System Setup | Enables you to access System Setup. |
| Launch Lifecycle Controller | Exits the Boot Manager and invokes the Dell Lifecycle Controller program. |
| System Utilities | Enables you to launch System Utilities menu such as System Diagnostics and UEFI shell. |
Related tasks
Viewing Boot Manager
Related reference
Boot Manager
One-shot BIOS boot menu
One-shot BIOS boot menu enables you to select a boot device to boot from.
Related reference
Boot Manager
System Utilities
System Utilities contains the following utilities that can be launched:
- Launch Diagnostics
• BIOS/UEFI Update File Explorer - Reboot System
NOTE: Depending on the boot mode selected, you might have BIOS or UEFI Update File Explorer.
Related reference
Boot Manager
PXE boot
You can use the Preboot Execution Environment (PXE) option to boot and configure the networked systems, remotely.
NOTE: To access the PXE boot option, boot the system and then press F12. The system scans and displays the active networked systems.
Installing and removing system components
This section provides information about installing and removing the system components.
- Safety instructions
• Before working inside your system
• After working inside your system
- Recommended tools
- System covers
• Inside the system - PowerEdge C4130
• Chassis intrusion switch
• IDSDM
- Cooling shroud
- Processor blank
- System memory
- Processors and heat sinks
- System battery
- PCIe shroud
- Expansion card riser and expansion cards
• Power supply units
- Hard drives
- uSATA SSDs
- Internal USB memory key (optional)
- Cable routing clip
- System board
• Trusted Platform Module
- Cooling fans
- Graphics processing unit
- PCIe Graphics processing unit
• SXM2 Graphics processing unit
• Control panel module
Topics:
Safety instructions
NOTE: Whenever you need to lift the system, get others to assist you. To avoid injury, do not attempt to lift the system by yourself.
WARNING: Opening or removing the system cover while the system is powered on may expose you to a risk of electric shock.
CAUTION: Do not operate the system without the cover for a duration exceeding five minutes.
CAUTION: Many repairs may only be done by a certified service technician. You should only perform troubleshooting and simple repairs as authorized in your product documentation, or as directed by the online or telephone service and support team. Damage due to servicing that is not authorized by Dell is not covered by your warranty. Read and follow the safety instructions that are shipped with your product.
NOTE: It is recommended that you always use an antistatic mat and antistatic strap while working on components inside the system.
NOTE: To ensure proper operation and cooling, the system must be populated always with air shrouds and with either a component or with a blank.

CAUTION: To ensure proper operation and cooling, all GPU bays in the system must be populated always with either a GPU or with a blank.
Before working inside your system
Prerequisites
Follow the safety guidelines listed in the Safety instructions section.
Steps
- Turn off the system, including any attached peripherals.
- Disconnect the system from the electrical outlet and disconnect the peripherals.
- If applicable, remove the system from the rack.
For more information, see the Rack Installation placemat at Dell.com/poweredgemanuals. - Remove the system cover.
Related tasks
Removing the system top cover (front)
Removing the system top cover (back)
After working inside your system
Prerequisites
Follow the safety guidelines listed in the Safety instructions section.
Steps
- Install the system cover.
- If applicable, install the system into the rack.
For more information, see the Rack Installation placemat at Dell.com/poweredgemanuals. - Reconnect the peripherals and connect the system to the electrical outlet.
- Turn on the system, including any attached peripherals.
Related tasks
Installing the system top cover (front)
Installing the system top cover (back)
Recommended tools
You need the following tools to perform the removal and installation procedures:
- Phillips #1 screwdriver
- Phillips #2 screwdriver
- Torx #T6 and #T10 screwdrivers
- Wrist grounding strap
System covers
The system cover protects the innards of the server and helps in maintaining air flow inside the server. Removing the system cover actuates the intrusion switch and aids in maintaining system security.
Related tasks
Removing the system top cover (front) Installing the system top cover (front) Removing the system top cover (back) Installing the system top cover (back)
Removing the system top cover (front)
Prerequisites

CAUTION: Do not operate the system without the system cover. This can result in overheating and cause component damage.
- Follow the safety guidelines listed in the Safety instructions section.
- Turn off the system, including any attached peripherals.
- Disconnect the system from the electrical outlet and disconnect the peripherals.
Steps
- Turn the system cover lock to the unlocked position.
- Press the release tabs on the system top cover, and slide the cover toward the front of the system.
- Hold the cover on both sides, and lift the cover away from the system.
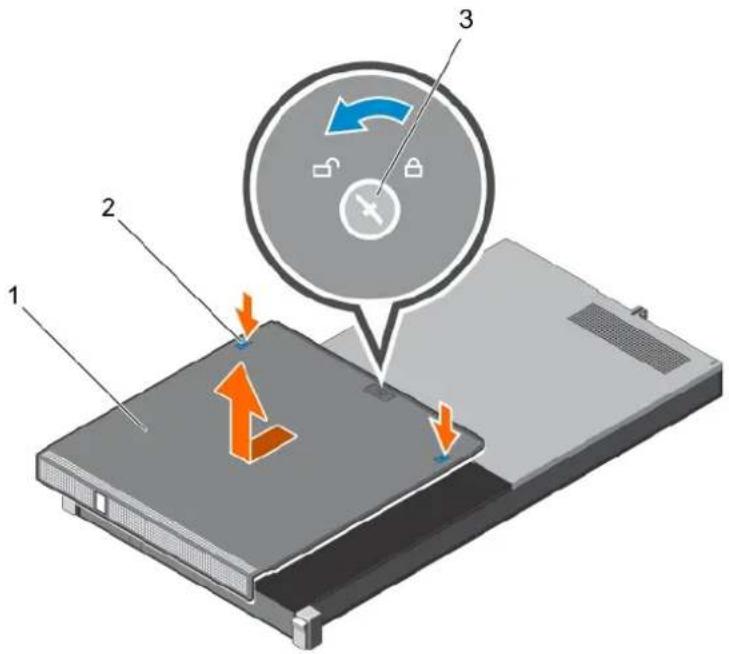
text_image
Diagram illustrating a device's internal processing steps with labeled components and directional arrows indicating movement.Figure 8. Removing the system top cover (front)
a. system top cover (front)
b. release tab (2)
c. system cover lock
Related tasks
Installing the system top cover (front)
Related reference
Safety instructions
Installing the system top cover (front)
Prerequisites

CAUTION: Do not operate the system without the system cover. This can result in overheating and cause component damage.
-
Follow the safety guidelines listed in the safety instructions section.
-
Ensure that all internal cables are connected and routed correctly.

NOTE: Closing the system cover with incorrect cable routing can damage the cables.
Steps
- Align the slots of the system top cover with the tabs on the chassis.
- Slide the cover toward the back of the chassis until it locks into place.
- Rotate the system cover lock to the locked position.
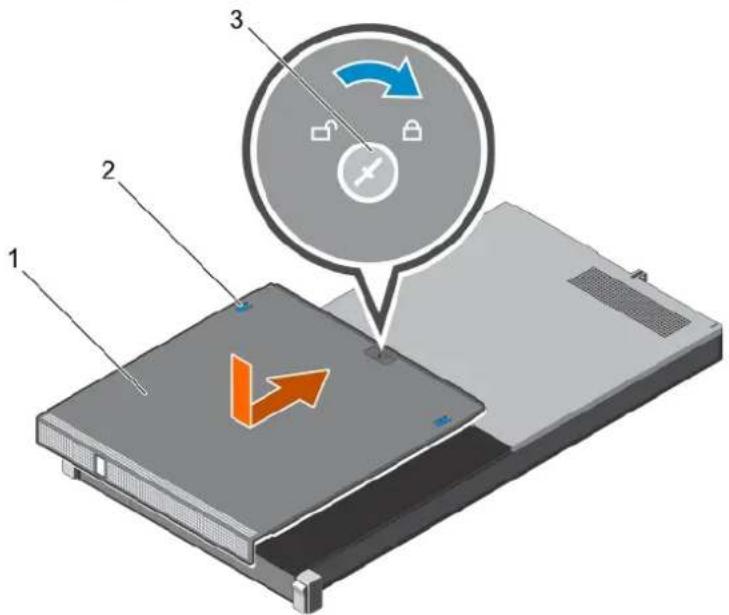
text_image
Diagram of a floppy disk with labeled components and directional arrows indicating movement or navigation.Figure 9. Installing the system top cover (front)
a. system top cover (front)
b. release tab (2)
c. system cover lock
Next steps
- Install the system into the rack.
- Reconnect the system to its electrical outlet and turn the system on, including any attached peripherals.
Related tasks
Removing the system top cover (front)
Related reference
Safety instructions
Removing the system top cover (back)
Prerequisites

CAUTION: Do not operate the system without the system cover. This can result in overheating and cause component damage.
- Follow the safety guidelines listed in the Safety instructions section.
- Turn off the system, including any attached peripherals.
- Disconnect the system from the electrical outlet and disconnect the peripherals.
- Remove the system from the rack.
- Keep the Phillips #1 screwdriver ready.
Steps
- Remove the screws securing the system top cover to the chassis.
- Slide the system top cover toward the back of the system.
- Hold the cover on both sides, and lift the cover away from the system.
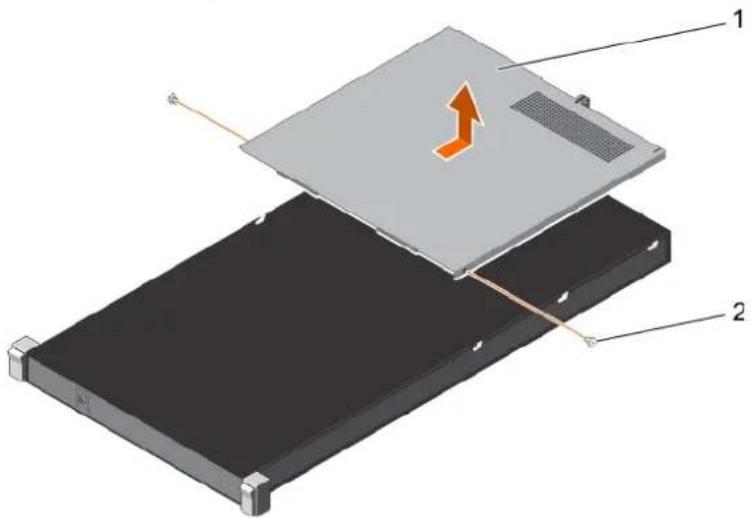
text_image
Technical diagram of a device with labeled components, showing a component with an orange arrow indicating motion or force.Figure 10. Removing the system top cover (back)
a. system top cover (back)
b. screw (2)
Related tasks
Before working inside your system Installing the system top cover (back)
Related reference
Safety instructions
Installing the system top cover (back)
Prerequisites
- Follow the safety guidelines listed in the safety instructions section.
- Ensure that all internal cables are connected and routed correctly.
- Keep the Phillips #1 screwdriver ready.

CAUTION: Closing the system cover with incorrect cable routing can damage the cables.
Steps
- Align the slots of the system top cover with the tabs on the chassis.
- Align the guide pin on the back of the chassis with the guide slot on the back of the cover.
- Slide the cover towards the front of the chassis until the guide pin on the back of the chassis locks on the back of the cover.
- Secure the system top cover to the chassis by using the screws.
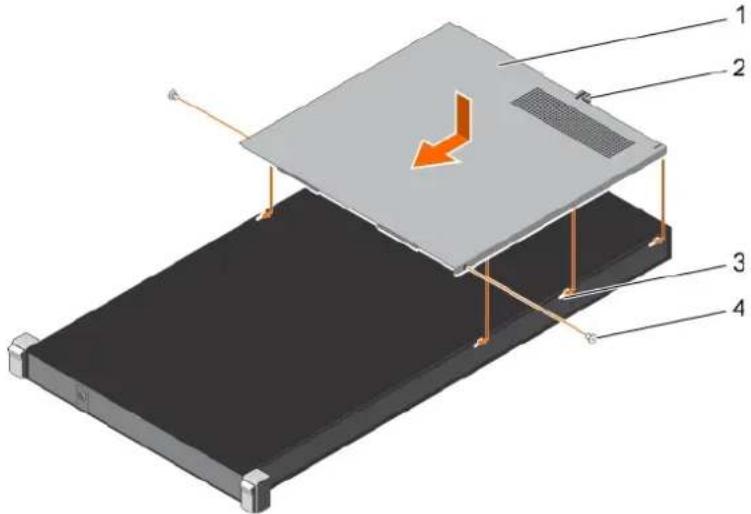
text_image
Technical diagram of a device with labeled components and directional arrow indicating motion or forceFigure 11. Installing the system top cover (back)
- system top cover (back) 2. guide slot on the system cover
- tab on the chassis (6) 4. screw (2)
Next steps

CAUTION: Turn on the system only when both the system top covers are installed.
- Install the system into the rack.
- Reconnect the system to its electrical outlet and turn the system on, including any attached peripherals.
Related tasks
Removing the system top cover (back)
Related reference
Safety instructions
Inside the system - PowerEdge C4130
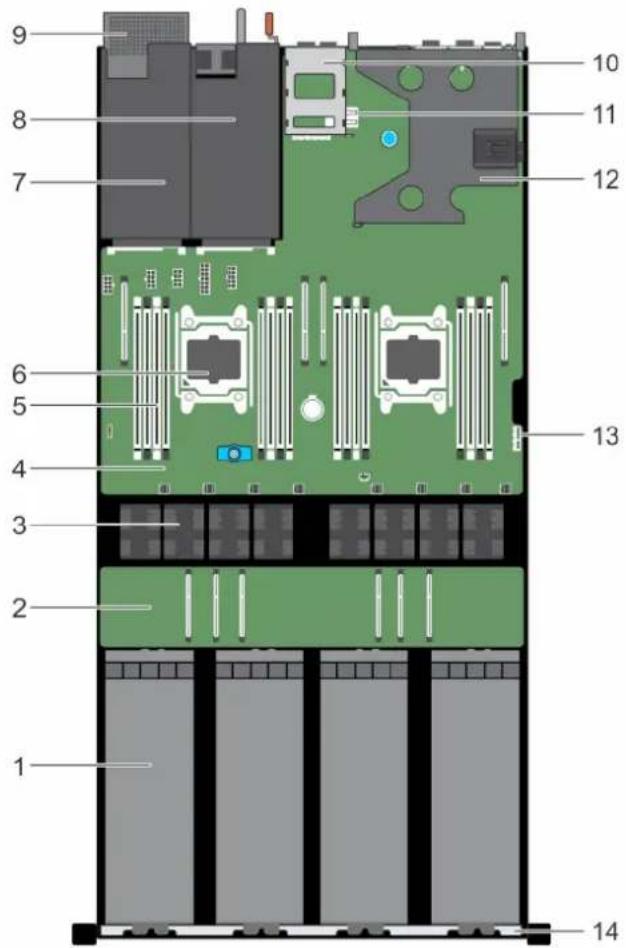
text_image
Technical diagram of a server rack with numbered components for identificationFigure 12. Inside the system - PowerEdge C4130
- GPU (4) 2. GPU switch board (optional)
- cooling fan (8) 4. system board
- DIMM (16) 6. processor (2)
- power supply unit 2 slot/2.5 inch hard drive slot 8. power supply unit 1 slot
- 2.5 inch hard drive cage (optional) 10. 1.8 inch uSATA SSD cage
- internal USB key connector 12. expansion card riser
- IDSDM connector 14. front inner wall of the chassis
Inside the system - PowerEdge C4130 with SXM2 GPU

text_image
8 7 6 5 4 3 2 1 13 9 10 11 12Figure 13. Inside the system - PowerEdge C4130 with SXM2 GPU
- GPU (4)
- NVLink board
- Cooling fan (8)
- System board
- DIMM (16)
- Processor (2)
- Power supply unit
- 2.5 inch hard drive cage (optional)
- 1.8 inch uSATA SSD cage
- Internal USB key connector
- Expansion card riser
- IDSDM connector
- Front inner wall of the chassis
Chassis intrusion switch
The Chassis Intrusion Switch detects any intrusion into the interior of your system and provides an indication of the same in the system event logs. This switch is activated as soon as the cover of your system chassis is removed.

NOTE: If the intrusion cable is missing or not connected, a notification is received in the ESM and intrusion status is not logged in the system event log.
The chassis intrusion switch detects any unauthorized access into the interior of your system and provides an indication of the same. This switch is activated as soon as the system cover is removed and access is made to the interior of your system.
Related tasks
Removing the intrusion switch
Installing an internal SD card
Removing the intrusion switch
Prerequisites

CAUTION: Many repairs may only be done by a certified service technician. You should only perform troubleshooting and simple repairs as authorized in your product documentation, or as directed by the online or telephone service and support team. Damage due to servicing that is not authorized by Dell is not covered by your warranty. Read and follow the safety instructions that are shipped with your product.

NOTE: This is a Field Replaceable Unit (FRU). Removal and installation procedures should be performed only by Dell certified service technicians.
- Follow the safety guidelines listed in safety instructions section.
- Follow the procedure listed in the Before working inside your system section.
- Ensure that the GPU power and signal cables do not interfere with the intrusion switch cable.
Steps
- Disconnect the intrusion switch cable from the connector on the system board.
- Slide the intrusion switch out of the intrusion switch slot.

text_image
Technical diagram of a mechanical component with numbered parts and an orange arrow indicating a specific feature.Figure 14. Removing the intrusion switch
a. intrusion switch slot
b. intrusion switch
c. intrusion switch cable
Next steps
- Install the intrusion switch.
- Follow the procedure listed in the After working inside your system section.
Related tasks
Before working inside your system After working inside your system Installing the intrusion switch
Related reference
Safety instructions
Installing the intrusion switch
Prerequisites

CAUTION: Many repairs may only be done by a certified service technician. You should only perform troubleshooting and simple repairs as authorized in your product documentation, or as directed by the online or telephone service and support team. Damage due to servicing that is not authorized by Dell is not covered by your warranty. Read and follow the safety instructions that are shipped with your product.

NOTE: This is a Field Replaceable Unit (FRU). Removal and installation procedures should be performed only by Dell certified service technicians.
- Follow the safety guidelines listed in the Safety instructions section.
- Follow the procedure listed in the Before working inside your system section.
Steps
- Insert the intrusion switch into the intrusion switch slot.
-
Slide the intrusion switch until it locks into position.
-
Route the intrusion switch cable through the cable routing tab.
-
Connect the intrusion switch cable to the connector on the system board.
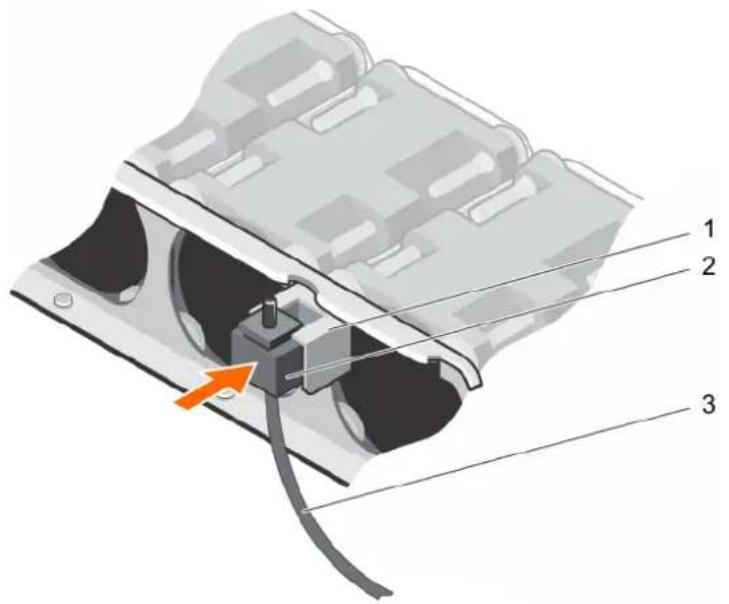
text_image
Technical diagram of a mechanical component with numbered parts and an orange arrow indicating a specific feature.Figure 15. Installing the intrusion switch
a. intrusion switch slot
b. intrusion switch
c. intrusion switch cable
Next steps
- Follow the procedure listed in After working inside your system section.
Related tasks
Before working inside your system
After working inside your system
Removing the intrusion switch
Related reference
Safety instructions
IDSDM
The Internal Dual SD module (IDSDM) provides you with a redundant SD card solution. You can configure the IDSDM for storage or as the OS boot partition. The IDSDM card offers the following features:
- Dual card operation — maintains a mirrored configuration by using SD cards in both the slots and provides redundancy.

NOTE: When the Redundancy option is set to Mirror Mode in the Integrated Devices screen of System Setup, the information is replicated from one SD card to another.
- Single card operation — single card operation is supported, but without redundancy.
Related tasks
Removing an internal SD card
Installing an internal SD card
Removing the internal dual SD module
Installing the internal dual SD module
Removing an internal SD card
Prerequisites

CAUTION: Many repairs may only be done by a certified service technician. You should only perform troubleshooting and simple repairs as authorized in your product documentation, or as directed by the online or telephone service and support team. Damage due to servicing that is not authorized by Dell is not covered by your warranty. Read and follow the safety instructions that are shipped with your product.

NOTE: When the Redundancy option is set to Mirror Mode in the Integrated Devices screen of System Setup, the information is replicated from one SD card to another.
- Follow the safety guidelines listed in safety instructions section.
- Follow the procedure listed in Before working inside your system section..
Steps
- Locate the SD card slot on the internal dual SD module
- Press the card to release it from the slot.
- Temporarily label each SD card with its corresponding slot before removal.
Next steps
Install the SD card(s).
Related tasks
Before working inside your system
Installing an internal SD card
Related reference
Safety instructions
Installing an internal SD card
Prerequisites

CAUTION: Many repairs may only be done by a certified service technician. You should only perform troubleshooting and simple repairs as authorized in your product documentation, or as directed by the online or telephone service and support team. Damage due to servicing that is not authorized by Dell is not covered by your warranty. Read and follow the safety instructions that are shipped with your product.
- Follow the safety guidelines listed in the Safety instructions section.
- Follow the procedure listed in the Before working inside your system section.
- Ensure that the Internal SD Card Port option is enabled in System setup.
Steps
- Locate the SD card slot on the internal dual SD module.

NOTE: The slot is keyed to ensure correct insertion of the card.
- Orient the SD card appropriately and insert the contact-pin end of the card into the slot.
- Press the card into the card slot until it locks into place.
Next steps
Follow the procedure listed in the After working inside your system section.
Related tasks
Before working inside your system
After working inside your system
Removing an internal SD card
Related reference
Safety instructions
Removing the internal dual SD module
Prerequisites

CAUTION: Many repairs may only be done by a certified service technician. You should only perform troubleshooting and simple repairs as authorized in your product documentation, or as directed by the online or telephone service and support team. Damage due to servicing that is not authorized by Dell is not covered by your warranty. Read and follow the safety instructions that are shipped with your product.
- Follow the safety guidelines listed in the Safety instructions section.
- Follow the procedure listed in the Before working inside your system section.
Steps
- Locate the internal dual SD module (IDSDM) on the system board.
- If installed, remove the SD card(s).
Temporarily label each SD card with its corresponding slot before removal. Install the SD card(s) into the same slots.
- Hold the pull tab and pull the dual SD module out of the system board.
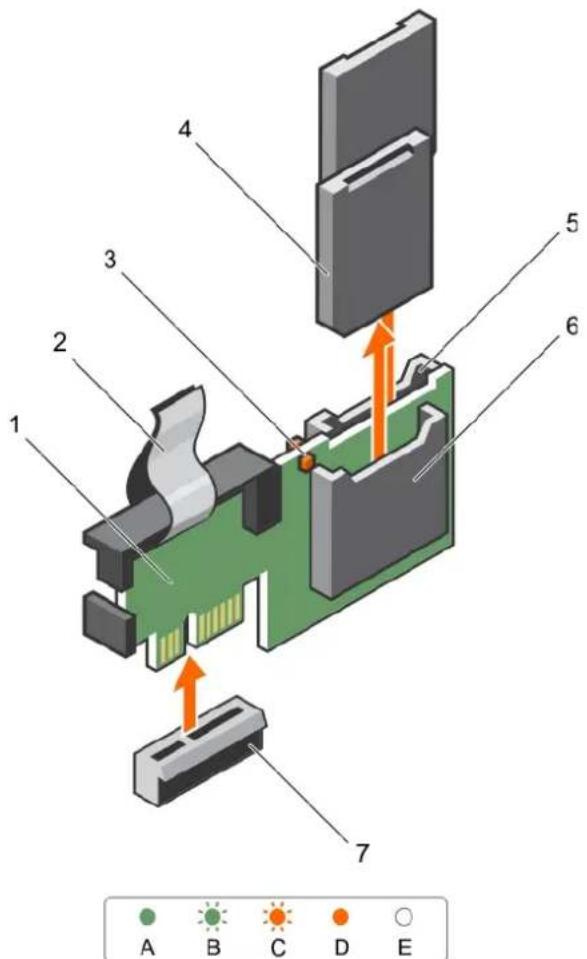
text_image
1 2 3 4 5 6 7 A B C D EFigure 16. Removing the internal dual SD module (IDSDM)
- IDSDM 2. pull tab
- LED status indicator (2) 4. SD card (2)
- SD card slot 2 6. SD card slot 1
- IDSDM connector
The following table describes the IDSDM indicator codes:
Table 25. IDSDM indicator codes
Convention IDSDM indicator code Condition
| A Green Indicates that the card is online |
| B Flashing green Indicates rebuild or activity |
| C Flashing amber Indicates card mismatch or that the card has failed |
| D Amber Indicates that the card is offline, has failed, or is write protected |
| E Not lit Indicates that the card is missing or is booting |
Next steps
Follow the procedure listed in the After working inside your system section.
Related tasks
Before working inside your system
After working inside your system
Installing the internal dual SD module
Related reference
Safety instructions
System board connectors
Installing the internal dual SD module
Prerequisites

CAUTION: Many repairs may only be done by a certified service technician. You should only perform troubleshooting and simple repairs as authorized in your product documentation, or as directed by the online or telephone service and support team. Damage due to servicing that is not authorized by Dell is not covered by your warranty. Read and follow the safety instructions that are shipped with your product.
- Follow the safety guidelines listed in the Safety instructions section.
- Follow the procedure listed in the Before working inside your system section.
Steps
- Locate the internal dual SD module (IDSDM) connector on the system board.
- Align the connectors on the system board and the IDSDM.
- Push the IDSDM until it is firmly seated on the system board.
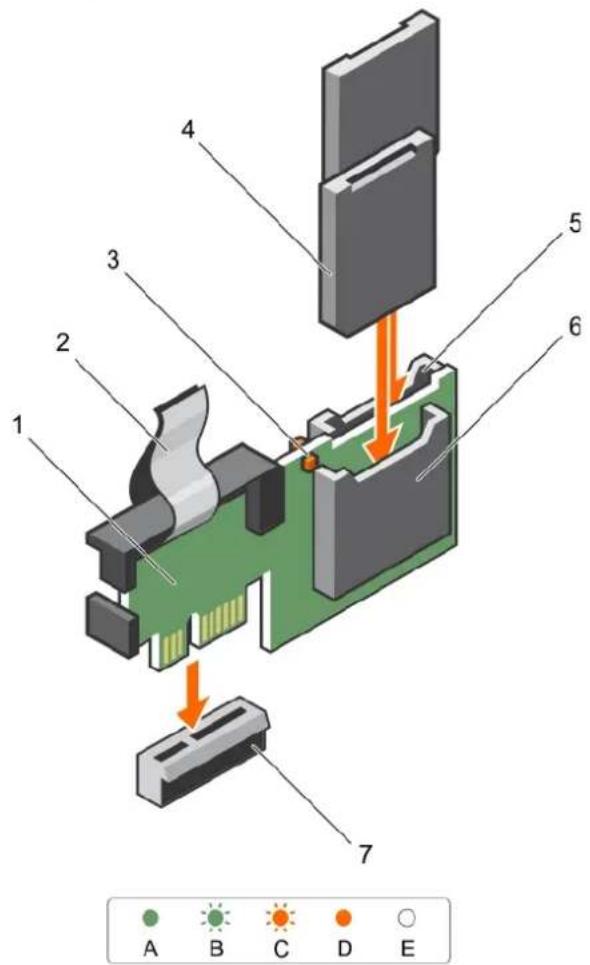
text_image
Diagram of a device internal structure with numbered components and color-coded indicators (A–E) for labeling.Figure 17. Installing the optional internal dual SD module
- IDSDM 2. pull tab
- LED status indicator (2) 4. SD card (2)
-
SD card slot 2 6. SD card slot 1
-
IDSDM connector
Next steps
- Install the SD card(s), if applicable.
- Follow the procedure listed in the After working inside your system section.
Related tasks
Before working inside your system After working inside your system Removing the internal dual SD module
Related reference
Safety instructions System board connectors
Cooling shroud
The cooling shroud aerodynamically directs the airflow across the entire system. The airflow passes through all the critical parts of the system, where the vacuum pulls air across the entire surface area of the heat sink, thus allowing increased cooling.
Related tasks
Removing the cooling shroud Installing the cooling shroud
Removing the cooling shroud
Prerequisites

CAUTION: Many repairs may only be done by a certified service technician. You should only perform troubleshooting and simple repairs as authorized in your product documentation, or as directed by the online or telephone service and support team. Damage due to servicing that is not authorized by Dell is not covered by your warranty. Read and follow the safety instructions that are shipped with your product.

CAUTION: Never operate your system with the air shroud removed. The system may get overheated quickly, resulting in shutdown of the system and loss of data.
- Follow the safety guidelines listed in the Safety instructions section.
- Follow the procedure listed in the Before working inside your system section.
Steps
Lift the cooling shroud away from the chassis.
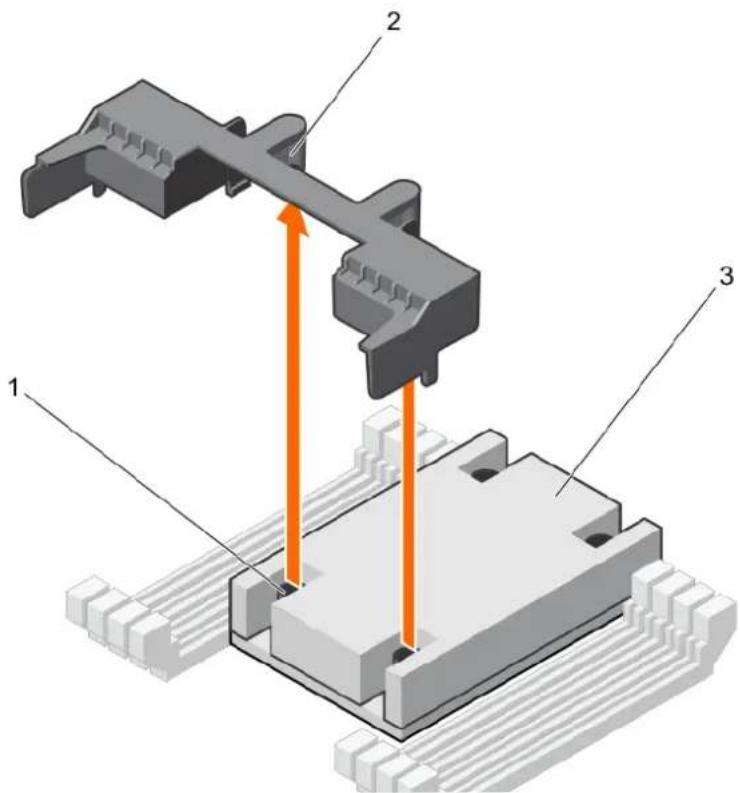
text_image
Technical diagram of a mechanical assembly with labeled components and directional arrows indicating motion or force.Figure 18. Removing the cooling shroud
a. screw on the heat sink (2)
b. guide slot on the cooling shroud (2)
c. heat sink
Next steps
- Install the cooling shroud.
Related tasks
Before working inside your system Installing the cooling shroud
Related reference
Safety instructions
Installing the cooling shroud
Prerequisites

CAUTION: Many repairs may only be done by a certified service technician. You should only perform troubleshooting and simple repairs as authorized in your product documentation, or as directed by the online or telephone service and support team. Damage due to servicing that is not authorized by Dell is not covered by your warranty. Read and follow the safety instructions that are shipped with your product.
- Follow the safety guidelines listed in the Safety instructions section.
- Follow the procedure listed in the Before working inside your system section.
- Ensure that the memory module ejectors are closed.
Steps
- Align the guide slots on the cooling shroud with the screws on the heat sink.
- Lower the cooling shroud into the chassis until it is firmly seated.
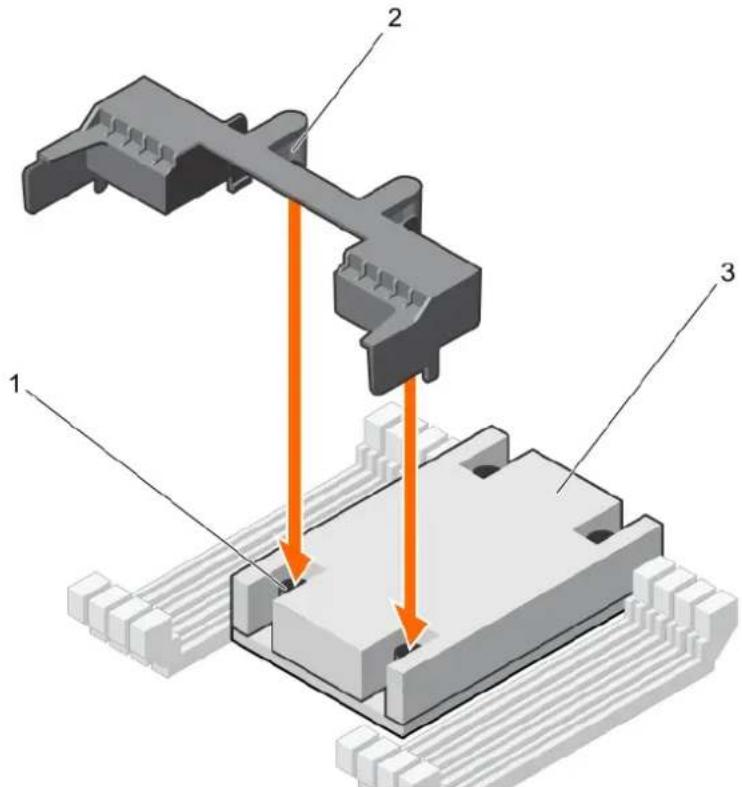
text_image
Technical diagram of a mechanical assembly with labeled components and directional arrows indicating movement or force.Figure 19. Installing the cooling shroud
a. screw on the heat sink (2)
b. guide slot on the cooling shroud (2)
c. heat sink
Next steps
- Follow the procedure listed in the After working inside your system section.
Related tasks
Before working inside your system
After working inside your system
Removing the cooling shroud
Related reference
Safety instructions
Processor blank
Related tasks
Removing a processor blank
Installing a processor blank
Removing a processor blank
Prerequisites

CAUTION: Many repairs may only be done by a certified service technician. You should only perform troubleshooting and simple repairs as authorized in your product documentation, or as directed by the online or telephone service and support team. Damage due to servicing that is not authorized by Dell is not covered by your warranty. Read and follow the safety instructions that came with the product.
- Follow the safety guidelines listed in the Safety instructions section.
- Follow the procedure listed in the Before working inside your system section.
Steps
- Press the ejectors on both ends of the memory module sockets to open processor blank.
- Hold the processor blank by its edges and lift it away from the system.
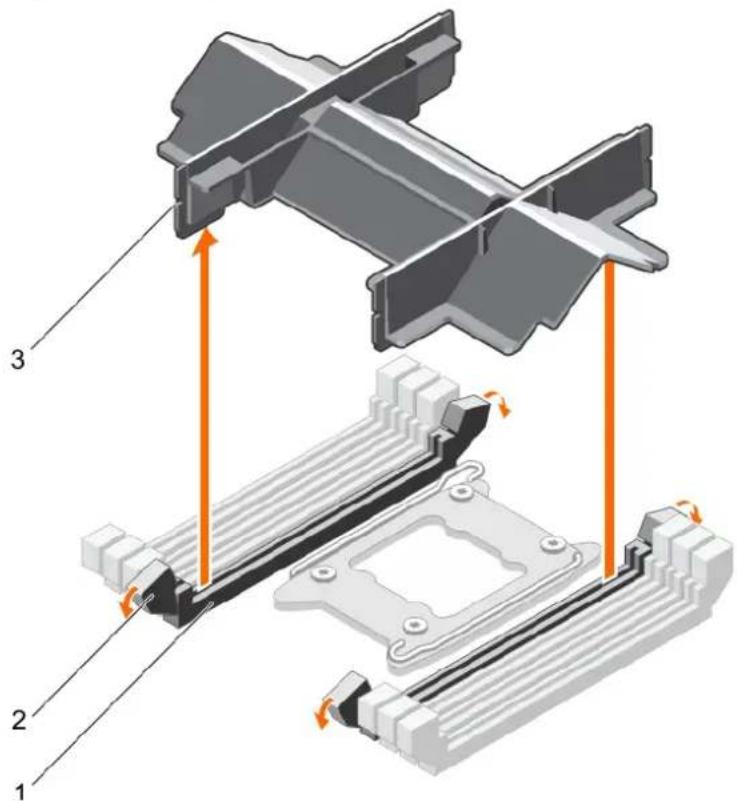
text_image
Technical diagram of a mechanical assembly with numbered components and directional arrows indicating motion or force.Figure 20. Removing a processor blank
a. memory module socket (2)
b. memory module socket ejector (2)
c. processor blank
Next steps
- Install the processor and the heat sink.
- Install the memory module(s).
- If you are removing a processor permanently, install the processor blank.
- Follow the procedure listed in the After working inside your system section
Related tasks
Before working inside your system
After working inside your system
Installing a processor
Installing a heat sink
Installing memory modules
Installing a processor blank
Related reference
Safety instructions
Installing a processor blank
If you are converting a dual processor system to a single processor system, install the processor blank.
Prerequisites

CAUTION: Many repairs may only be done by a certified service technician. You should only perform troubleshooting and simple repairs as authorized in your product documentation, or as directed by the online or telephone service and support team. Damage due to servicing that is not authorized by Dell is not covered by your warranty. Read and follow the safety instructions that are shipped with your product.
- Follow the safety guidelines listed in the Safety instructions section.
- Follow the procedure listed in the Before working inside your system section.
- Ensure that the memory module socket ejectors are in the unlocked position.
Steps
- Align the processor blank with the memory module socket on the system board.
- Lower the processor blank into the memory module socket, and press the blank firmly until the memory module socket ejectors click into place.
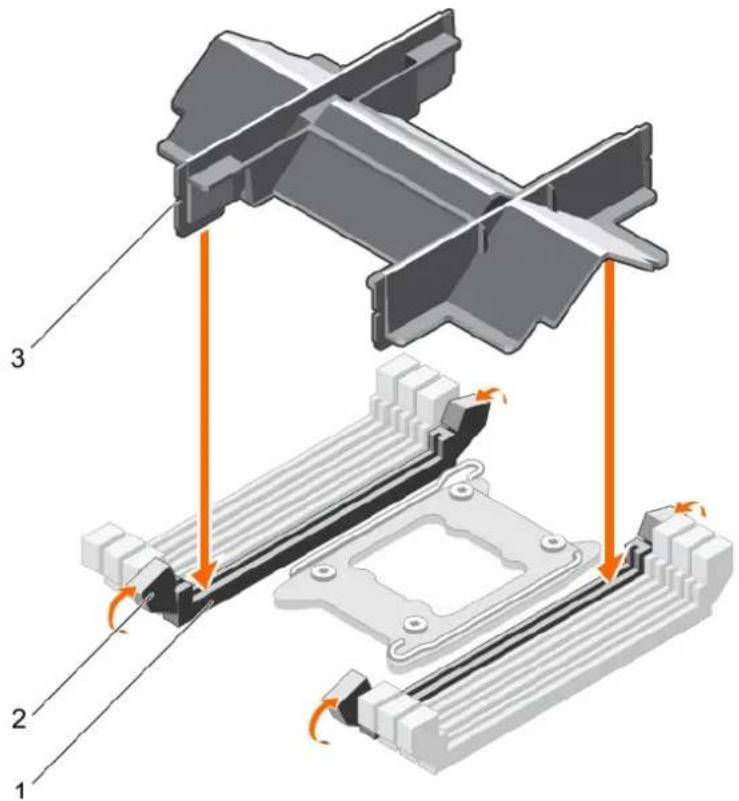
text_image
Technical diagram of a mechanical assembly with numbered components and directional arrows indicating motion or force.Figure 21. Installing a processor blank
a. memory module socket (2)
b. memory module socket ejector (2)
c. processor blank
Next steps
Follow the procedure listed in the After working inside your system section.
Related tasks
Before working inside your system
After working inside your system
Removing a processor blank
Related reference
Safety instructions
System memory
Your system supports DDR4 registered DIMMs (RDIMMs) and load registered DIMMs (LRDIMMs).

NOTE: MT/s indicates DIMM speed in MegaTransfers per second.
Memory bus operating frequency can be 1333 MT/s, 1600 MT/s, 1866 MT/s, 2133 MT/s, or 2400 MT/s depending on the following factors:
• DIMM type (RDIMMs or LRDIMMs)
• Number of DIMMs populated per channel
- System profile selected (for example, Performance Optimized, Custom, or Dense Configuration Optimized)
• Maximum supported DIMM frequency of the processors
The system contains 16 memory sockets split into two sets of 8 sockets, one set per processor. Each 8-socket set is organized into four channels. In each channel, the release levers of the first socket are marked white and the second socket black.

NOTE: DIMMs in sockets A1 to A8 are assigned to processor 1 and DIMMs in sockets B1 to B8 are assigned to processor 2.
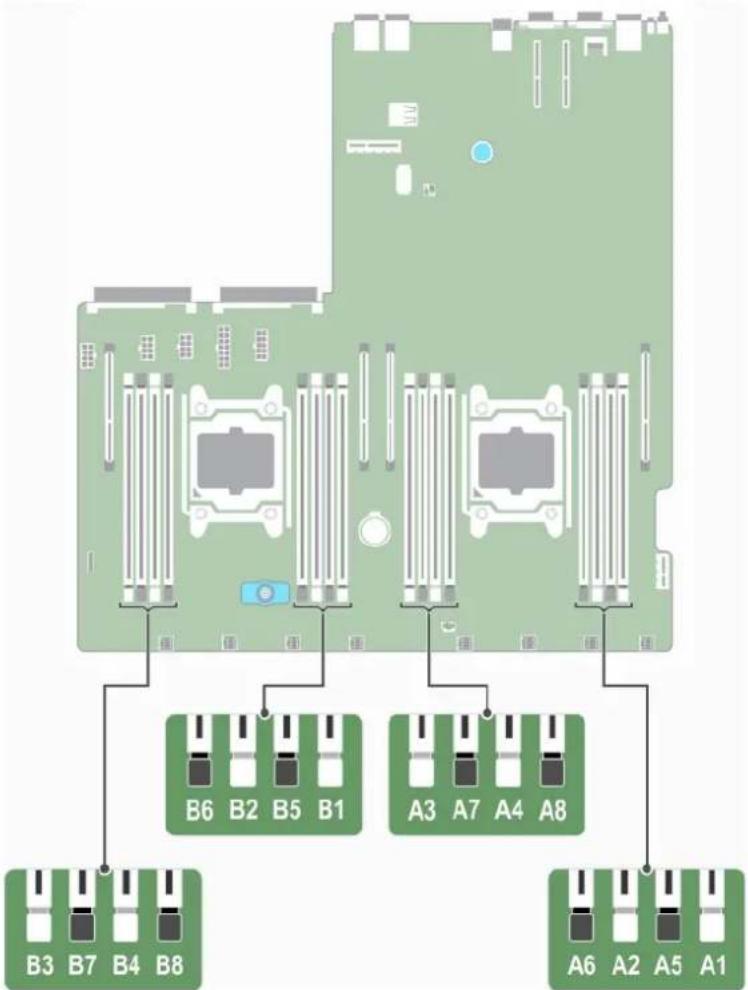
text_image
B6 B2 B5 B1 A3 A7 A4 A8 B3 B7 B4 B8 A6 A2 A5 A1Figure 22. Memory socket locations
Table 26. Memory channels
Processors Memory channel Memory channel Memory channel Memory channel
| Processor 1 | channel 0: slots A1, A5 | channel 1: slots A2, A6 | channel 2: slots A3, A7 | channel 3: slots A4, A8 |
| Processor 2 | channel 0: slots B1, B5 | channel 1: slots B2, B6 | channel 2: slots B3, B7 | channel 3: slots B4, B8 |
The following table shows the memory populations and operating frequencies for the supported configurations:
Table 27. Memory population
| DIMM Type DIM | MMs Populated/ Channel | Voltage Operating Frequency | (in MT/s) | Maximum DIMM Rank/ Channel |
| RDIMM | 1 | 1.2 V | 2400, 2133, 1866, 1600, 1333 | Dual rank or single rank |
| 2 2400, 2135, 1866, 1600, | 1333 | Dual rank or single rank | ||
| LRDIMM | 1 | 1.2 V | 2400, 2133, 1866, 1600, 1333 | Quad rank |
| 2 2400, 2135, 1866, 1600, | 1333 | Quad rank |
General memory module installation guidelines

NOTE: Memory configurations that fail to observe these guidelines can prevent your system from booting, stopped responding during memory configuration, or operating with reduced memory.
The system supports Flexible Memory Configuration, enabling the system to be configured and run in any valid chipset architectural configuration. The following are the recommended guidelines for installing memory modules:
- x4 and x8 DRAM based memory modules can be mixed. For more information, see the Mode-specific guidelines section.
- Up to two dual or single-rank RDIMMs can be populated per channel.
- Populate memory module sockets only if a processor is installed. For single-processor systems, sockets A1 to A8 are available. For dual-processor systems, sockets A1 to A8 and sockets B1 to B8 are available.
- Populate all the sockets with white release tabs first and then the black release tabs.
- Populate the sockets by the highest rank count, in the following order—first in sockets with white release tabs and then with the black release tabs. For example, if you want to mix single-rank and dual-rank memory modules, populate dual-rank memory modules in the sockets with white release tabs and single-rank memory modules in the sockets with black release tabs.
- When mixing memory modules with different capacities, populate the sockets with memory modules with highest capacity first. For example, if you want to mix 4 GB and 8 GB memory modules, populate 8 GB memory modules in the sockets with white release tabs and 4 GB memory modules in the sockets with black release tabs.
- In a dual-processor configuration, the memory configuration for each processor should be identical. For example, if you populate socket A1 for processor 1, then populate socket B1 for processor 2, and so on.
- Memory modules of different capacities can be mixed provided other memory population rules are followed (for example, 4 GB and 8 GB memory modules can be mixed).
- Mixing of more than two memory module capacities in a system is not supported.
- Mixing LRDIMMs and RDIMMs is not supported.
- Populate four memory modules per processor (one DIMM per channel) at a time to maximize performance.
Related tasks
Installing memory modules
Installing the cooling shroud
Sample memory configurations
Related reference
Mode-specific guidelines
Mode-specific guidelines
Four memory channels are allocated to each processor. The allowable configurations depend on the memory mode selected.
Advanced Error Correction Code
Advanced Error Correction Code (ECC) mode extends SDDC from x4 DRAM based DIMMs to both x4 and x8 DRAMs. This protects against single DRAM chip failures during normal operation.
The installation guidelines for memory modules are as follows:
- Memory modules must be identical in size, speed, and technology.
- DIMMs installed in memory sockets with white release levers must be identical and the same rule applies for sockets with black release levers. This ensures that identical DIMMs are installed in matched pair —for example, A1 with A2, A3 with A4, A5 with A6, and so on.
Memory optimized independent channel mode
This mode supports Single Device Data Correction (SDDC) only for memory modules that use x4 device width. It does not impose any specific slot population requirements.
Memory sparing

NOTE: To use memory sparing, this feature must be enabled in System Setup.
In this mode, one rank per channel is reserved as a spare. If persistent correctable errors are detected on a rank, the data from this rank is copied to the spare rank, and the failed rank is disabled.
With memory sparing enabled, the system memory available to the operating system is reduced by one rank per channel. For example, in a dual-processor configuration with sixteen 4 GB single-rank memory modules, the available system memory is: 3/4 (ranks/channel) × 16 (memory modules) × 4 GB = 48 GB, and not 16 (memory modules) × 4 GB = 64 GB.
NOTE: Memory sparing does not offer protection against a multi-bit uncorrectable error.
NOTE: Both Advanced ECC/Lockstep and Optimizer modes support memory sparing.
Memory mirroring
Memory mirroring offers the strongest memory module reliability mode compared to all other modes, providing improved uncorrectable multi-bit failure protection. In a mirrored configuration, the total available system memory is one half of the total installed physical memory. Half of the installed memory is used to mirror the active memory modules. In the event of an uncorrectable error, the system switches over to the mirrored copy. This ensures SDDC and multi-bit protection.
The installation guidelines for memory modules are as follows:
- Memory modules must be identical in size, speed, and technology.
- Memory modules installed in memory module sockets with white release levers must be identical and the same rule applies for sockets with black and green release tabs. This ensures that identical memory modules are installed in matched pairs—for example, A1 with A2, A3 with A4, A5 with A6, and so on.
Table 28. Processor configuration
Processor Configuration Memory population rules Memory population information
Single CPU Memory population order 1,2 , 3,4 See Memory mirroring note
Sample memory configurations
The following tables show sample memory configurations for single and dual processor configurations that follow the appropriate memory guidelines.
NOTE: 1R, 2R, and 4R in the following tables indicate single-rank, dual-rank, and quad-rank memory modules respectively.
Table 29. Memory configurations—single processor
| System capacity (in GB) | Memory modules size (in GB) | Number of memory modules | Memory module rank, organization, and frequency | Memory module slot population |
| 4 4 1 | 1R, x8, 2133 MT/s, 1R, x8, 1866 MT/s | A1 | ||
| 8 4 2 | 1R, x8, 2133 MT/s, 1R, x8, 1866 MT/s | A1, A2 | ||
| 16 4 4 | 1R, x8, 2133 MT/s, 1R, x8, 1866 MT/s | A1, A2, A3, A4 | ||
| 8 | 2 | 2R, x8, 2133 MT/s, 2R, x8, 1866 MT/s | A1, A2 | |
| 24 4 6 | 1R, x8, 2133 MT/s, 1R, x8, 1866 MT/s | A1, A2, A3, A4, A5, A6 | ||
| 32 8 4 | 2R, x8, 2133 MT/s, 2R, x8, 1866 MT/s | A1, A2, A3, A4 | ||
| 16 | 2 | 2R, x8, 2133 MT/s, 2R, x8, 1866 MT/s | A1, A2 | |
| 32 | 1 | 2R, x8, 2133 MT/s, 2R, x8, 1866 MT/s | A1 | |
| 48 8 6 | 2R, x8, 2133 MT/s, 2R, x8, 1866 MT/s | A1, A2, A3, A4, A5, A6 | ||
| 64 8 8 | 2R, x8, 2133 MT/s, 2R, x8, 1866 MT/s | A1, A2, A3, A4, A5, A6, A7, A8 | ||
| 16 | 4 | 2R, x8, 2133 MT/s, 2R, x8, 1866 MT/s | A1, A2, A3, A4 | |
| 32 | 2 | 2R, x8, 2133 MT/s, 2R, x8, 1866 MT/s | A1, A2 | |
| 96 16 6 | 2R, x4, 2133 MT/s, 2R, x4, 1866 MT/s | A1, A2, A3, A4, A5, A6 | ||
| 128 16 8 | 2R, x4, 2133 MT/s, 2R, x4, 1866 MT/s, | A1, A2, A3, A4, A5, A6, A7, A8 | ||
| 32 | 4 | 2R, x4, 2133 MT/s, 2R, x4, 1866 MT/s, | A1, A2, A3, A4 | |
| 192 32 6 | 2R, x4, 2133 MT/s, 2R, x4, 1866 MT/s | A1, A2, A3, A4, A5, A6 | ||
| 256 32 8 | 2R, x4, 2133 MT/s, 2R, x4, 1866 MT/s | A1, A2, A3, A4, A5, A6, A7, A8 | ||
| 512 64 8 | 4R, x4, 2400 MT/s A1, A2, A3, A4, A5, A6, A7, A8 |
Table 30. Memory configurations—dual processors
| System capacity (in GB) | Memory modules size (in GB) | Number of memory modules | Memory module rank, organization, and frequency | Memory module slot population |
| 8 4 2 | 1R, x8, 2133 MT/s,1R, x8, 1866 MT/s | A1, B1 | ||
| 16 4 4 | 1R, x8, 2133 MT/s,1R, x8, 1866 MT/s | A1, A2, B1, B2 | ||
| 32 4 8 | 1R, x8, 2133 MT/s,1R, x8, 1866 MT/s | A1, A2, A3, A4, B1, B2, B3, B4 | ||
| 64 4 16 | 1R, x8, 2133 MT/s1R, x8, 1866 MT/s | A1, A2, A3, A4, A5, A6, A7, A8, B1, B2, B3,B4, B5, B6, B7, B8 | ||
| 8 | 8 | 2R, x8, 2133 MT/s,2R, x8, 1866 MT/s | A1, A2, A3, A4, B1, B2, B3, B4 | |
| 16 | 4 | 1R, x8, 2133 MT/s,1R, x8, 1866 MT/s | A1, A2, B1, B2 | |
| 32 | 2 | 1R, x8, 2133 MT/s,1R, x8, 1866 MT/s | A1, B1 | |
| 96 8 12 | 2R, x8, 2133 MT/s,2R, x8, 1866 MT/s | A1, A2, A3, A4, A5, A6, B1, B2, B3, B4, B5, B6 | ||
| 128 8 16 | 2R, x8, 2133 MT/s2R, x8, 1866 MT/s | A1, A2, A3, A4, A5, A6, A7, A8, B1, B2, B3, B4, B5, B6, B7, B8 | ||
| 16 | 8 | 2R, x4, 2133 MT/s,2R, x4, 1866 MT/s | A1, A2, A3, A4, B1, B2, B3, B4 | |
| 32 | 4 | 1R, x8, 2133 MT/s,1R, x8, 1866 MT/s | A1, A2, B1, B2 | |
| 160 16 and 8 12 | 2R, x4, 2133 MT/s,2R, x8, 2133 MT/s,2R, x4, 1866 MT/s2R, x8, 1866 MT/s | A1, A2, A3, A4, A5, A6, B1, B2, B3, B4, B5, B6NOTE: 16 GB memory modules must be installed in slots numbered A1, A2, A3, A4, B1, B2, B3, and B4 and 8 GB memory modules must be installed in slots A5, A6, B5, and B6. | ||
| 192 16 12 | 2R, x4, 2133 MT/s,2R, x4, 1866 MT/s | A1, A2, A3, A4, A5, A6, B1, B2, B3, B4, B5, B6 | ||
| 256 16 16 | 2R, x4, 2133 MT/s,2R, x4, 1866 MT/s, | A1, A2, A3, A4, A5, A6, A7, A8, B1, B2, B3, B4, B5, B6, B7, B8 | ||
| 32 | 8 | 2R, x4, 2133 MT/s,2R, x4, 1866 MT/s | A1, A2, A3, A4, B1, B2, B3, B4 | |
| 384 32 12 | 2R, x4, 2133 MT/s A1, A2, A3, A4, A5, A6, B1, B2, B3, B4, B5, B6 | |||
| 512 32 16 | 2R, x4, 2133 MT/s A1, A2, A3, A4, A5, A6, A7, A8, B1, B2, B3, B4, B5, B6, B7, B8 | |||
| 1024 64 16 | 4R, x4, 2400 MT/s A1, A2, A3, A4, A5, A6, A7, A8, B1, B2, B3, B4, B5, B6, B7, B8 |
Removing memory modules
Prerequisites

CAUTION: Many repairs may only be done by a certified service technician. You should only perform troubleshooting and simple repairs as authorized in your product documentation, or as directed by the online or telephone service and support team. Damage due to servicing that is not authorized by Dell is not covered by your warranty. Read and follow the safety instructions that are shipped with your product.
-
Follow the safety guidelines listed in the Safety instructions section.
-
Follow the procedure listed in the Before working inside your system section.
-
Remove the cooling shroud.

NOTE: The memory modules are hot to touch for some time after the system has been powered down. Allow the memory modules to cool before handling them. Handle the memory modules by the card edges and avoid touching the components or metallic contacts on the memory module.

CAUTION: To ensure proper system cooling, memory module blanks must be installed in any memory socket that is not occupied. Remove memory module blanks only if you intend to install memory modules in those sockets.
Steps
- Locate the appropriate memory module socket.

CAUTION: Handle each memory module only by the card edges, ensuring not to touch the middle of the memory module or metallic contacts.
-
To release the memory module from the socket, simultaneously press the ejectors on both ends of the memory module socket.
-
Lift and remove the memory module from the system.
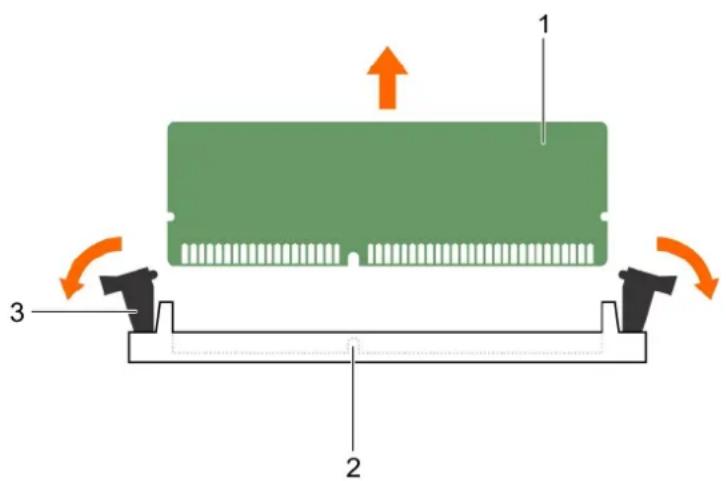
text_image
1 2 3Figure 23. Removing the memory module
a. memory module
b. memory module socket
c. memory module socket ejector (2)
Next steps
- Install the memory module.

NOTE: If you are removing the memory module permanently, install a memory module blank.
-
Install the cooling shroud.
-
Follow the procedure listed in the After working inside your system section.
Related tasks
Before working inside your system
After working inside your system
Installing memory modules
Installing the cooling shroud
Removing the cooling shroud
Related reference
Safety instructions
Installing memory modules
Prerequisites
NOTE: The memory modules are hot to touch for some time after the system has been powered down. Allow the memory modules to cool before handling them. Handle the memory modules by the card edges and avoid touching the components or metallic contacts on the memory module.
CAUTION: Many repairs may only be done by a certified service technician. You should only perform troubleshooting and simple repairs as authorized in your product documentation, or as directed by the online or telephone service and support team. Damage due to servicing that is not authorized by Dell is not covered by your warranty. Read and follow the safety instructions that are shipped with your product.
CAUTION: To ensure proper system cooling, processor blanks must be installed. Remove processor blanks only if you intend to install memory modules and a processor.
- Follow the safety guidelines listed in the Safety instructions section.
- Follow the procedure listed in the Before working inside your system section.
Steps
- Locate the appropriate memory module socket.
CAUTION: Handle each memory module only by the card edges, ensuring not to touch the middle of the memory module or metallic contacts.
-
Open the ejectors on the memory module socket outward to allow the memory module to be inserted into the socket.
-
Align the edge connector of the memory module with the alignment key of the memory module socket, and insert the memory module in the socket.
CAUTION: Do not apply pressure at the center of the memory module; apply pressure at both ends of the memory module evenly.
NOTE: The memory module socket has an alignment key that enables you to install the memory module in the socket in only one orientation.
- Press the memory module with your thumbs until the socket levers firmly click into place.
When the memory module is properly seated in the socket, the levers on the memory module socket align with the levers on the other sockets that have memory modules installed.
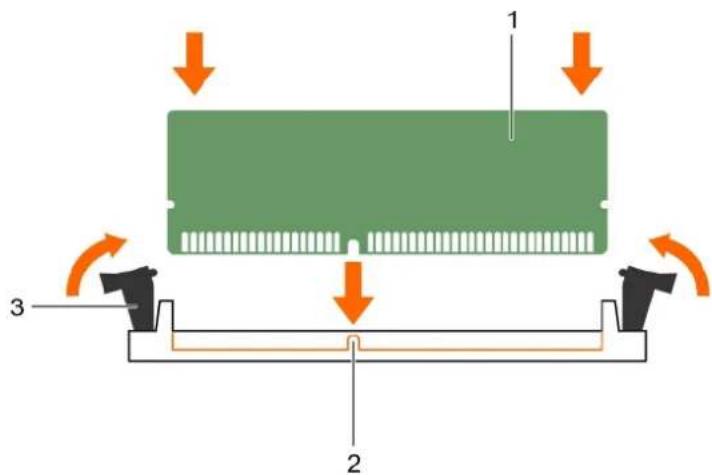
text_image
1 2 3Figure 24. Installing the memory module
a. memory module
b. alignment key
c. memory module socket ejector (2)
Next steps
- Install the cooling shroud.
- Follow the procedure listed in the After working inside your system section.
- Press F2 to enter System Setup, and check the System Memory setting.
The system should have already changed the value to reflect the installed memory.
- If the value is incorrect, one or more of the memory modules may not be installed properly. Ensure that the memory module is firmly seated in the memory module socket.
- Run the system memory test in system diagnostics.
Processors and heat sinks
Use the following procedures when:
- Removing and installing a heat sink
• Installing an additional processor - Replacing a processor
NOTE: To ensure proper cooling, you must install a processor blank in any empty processor socket.
Removing a heat sink
Prerequisites

CAUTION: Many repairs may only be done by a certified service technician. You should only perform troubleshooting and simple repairs as authorized in your product documentation, or as directed by the online or telephone service and support team. Damage due to servicing that is not authorized by Dell is not covered by your warranty. Read and follow the safety instructions that came with the product.

CAUTION: Never remove the heat sink from a processor unless you intend to remove the processor. The heat sink is necessary to maintain proper thermal conditions.

NOTE: To ensure proper system cooling, you must install a processor blank and heat sink blank in any empty processor socket.
- Follow the safety guidelines listed in the Safety instructions section.
- Follow the procedure listed in the Before working inside your system.
- Keep the Phillips #2 screwdriver ready.
- Remove the cooling shroud.
- Remove the PCIe shroud, if removing processor 1 heat sink.

WARNING: The heat sink is hot to touch for some time after the system has been powered down. Allow the heat sink to cool before removing it.
Steps
- Loosen one of the screws that secure the heat sink to the system board.
Allow some time (approximately 30 seconds) for the heat sink to loosen from the processor. - Remove the screw diagonally opposite the screw you first removed.
- Repeat the procedure for the remaining two screws.
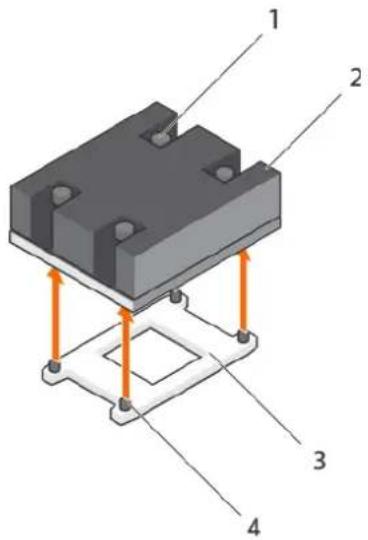
text_image
Technical diagram of a mechanical component with numbered parts and directional arrows indicating assembly or movement.Figure 25. Removing the heat sink
- retention screw (4) 2. heat sink
- processor socket 4. heat sink retention socket (4)
Next steps
- Remove the processor.
- Install the heat sink.
- Follow the procedure listed in the After working inside your system section.
Related tasks
Removing the cooling shroud
Removing the PCIe shroud
Removing a processor
Installing a heat sink
Before working inside your system
After working inside your system
Related reference
Safety instructions
Removing a processor
Prerequisites
CAUTION: Many repairs may only be done by a certified service technician. You should only perform troubleshooting and simple repairs as authorized in your product documentation, or as directed by the online or telephone service and support team. Damage due to servicing that is not authorized by Dell is not covered by your warranty. Read and follow the safety instructions that are shipped with your product.
NOTE: If you are upgrading your system, download the latest system BIOS version from Dell.com/support and follow the instructions included in the compressed download file to install the update on your system.
NOTE: You can update the system BIOS by using the Dell Lifecycle Controller.
NOTE: To ensure proper system cooling, you must install a processor blank in any empty processor socket.
-
Follow the safety guidelines listed in the Safety instructions section.
-
Follow the procedure listed in the Before working inside your system section.
-
Keep the Phillips #2 screwdriver ready.
-
Remove the cooling shroud.
-
Remove the PCIe shroud, if removing processor 1.
-
Remove the heat sink.
WARNING: The processor is hot to touch for some time after the system has been powered down. Allow the processor to cool before removing it.
CAUTION: The processor is held in its socket under strong pressure. Be aware that the release lever can spring up suddenly if not firmly grasped.
Steps
-
Release the open first socket lever near the unlock icon 📊 by pushing the lever down and out from under the tab.
-
Release the close first socket release lever near the lock icon ☐ by pushing the lever down and out from under the tab. Lift the lever 90 degrees upward.
-
Lower the open first socket-release lever to lift the processor shield.
-
Hold the tab on the processor shield and lift the processor shield until the open first socket-release lever lifts up.

CAUTION: The socket pins are fragile and can be permanently damaged. Be careful not to bend the pins in the socket when removing the processor out of the socket.
- Lift the processor out of the socket and leave the open first socket-release lever up.
NOTE: If you are permanently removing the processor, you must install a socket protective cap in the vacant socket to protect the socket pins and keep the socket free of dust.
NOTE: After removing the processor, place it in an anti-static container for reuse, return, or temporary storage. Do not touch the bottom of the processor. Touch only the side edges of the processor.
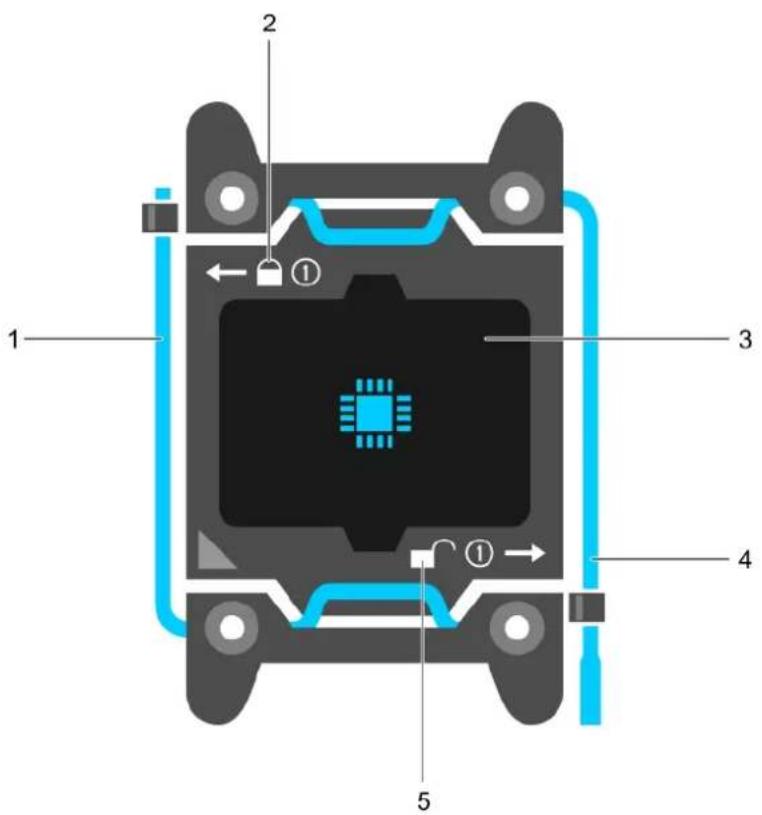
text_image
Technical diagram of a device with labeled components and internal circuit layoutFigure 26. Processor shield
- close first socket release lever 2. lock icon
- processor 4. open first socket release lever
- unlock icon
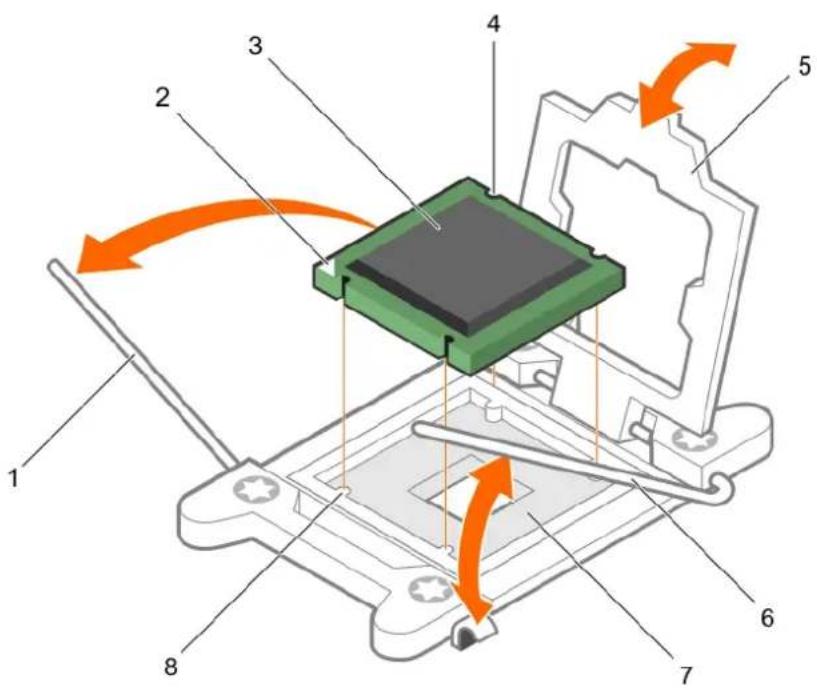
text_image
Technical diagram of a microchip assembly with numbered components and directional arrows indicating motion or movement.Figure 27. Removing a processor
- close first socket-release lever 2. pin-1 indicator of processor
- processor 4. slot (4)
- processor shield 6. open first socket-release lever
- socket 8. socket keys (4)
Next steps
- Replace the processor(s).
- Install the heat sink.
- Install the PCIe Shroud, if replacing processor 1
- Reinstall the cooling shroud.
- Follow the procedure listed in the After working inside your system section.
Related tasks
Before working inside your system
After working inside your system
Installing a processor
Installing a heat sink
Installing the cooling shroud
Installing the PCIe shroud
Installing a processor
Prerequisites

CAUTION: Many repairs may only be done by a certified service technician. You should only perform troubleshooting and simple repairs as authorized in your product documentation, or as directed by the online or telephone service and
support team. Damage due to servicing that is not authorized by Dell is not covered by your warranty. Read and follow the safety instructions that are shipped with your product.
- Follow the safety guidelines listed in the Safety instructions section.
- Follow the procedure listed in the Before working inside your system section.
- Keep the Phillips #2 screwdriver ready.
- If you are upgrading your system, download the latest system BIOS version from Dell.com/support and follow the instructions included in the compressed download file to install the update on your system.
NOTE: You can also update the system BIOS by using the Dell Lifecycle Controller.
- Remove the cooling shroud.
- Remove the PCIe shroud, if installing processor 1.
NOTE: The heat sink and processor are too hot to touch for some time after the system has been powered down. Allow the heat sink and processor to cool down before handling them.
CAUTION: Never remove the heat sink from a processor unless you intend to remove the processor. The heat sink is necessary to maintain proper thermal conditions.
NOTE: If you are installing a single processor, it must be installed in socket CPU1.
Steps
- Unpack the new processor.
NOTE: If the processor has previously been used in a system, remove any remaining thermal grease from the processor by using a lint-free cloth.
- Locate the processor socket.
- If applicable, remove the socket protective cap.
- Release the open first socket-release lever near the unlock icon by pushing the lever down and out from under the tab.
- Similarly, release the close first socket-release lever near the lock icon ☐ by pushing the lever down and out from under the tab. Lift the lever 90 degrees upward.
- Hold the tab near the lock symbol on the processor shield and lift it up and out of the way.
CAUTION: Positioning the processor incorrectly can permanently damage the system board or the processor. Be careful not to bend the pins in the socket.
CAUTION: While removing or reinstalling the processor, wipe your hands of any contaminants. Contaminants on the processor pins such as thermal grease or oil can damage the processor.
- Align the processor with the socket keys.
CAUTION: Do not use force to seat the processor. When the processor is positioned correctly, it engages easily into the socket.
- Align the pin-1 indicator of the processor with the triangle on the system board.
- Place the processor on the socket such that the slots on the processor align with the socket keys.
-
Close the processor shield.
-
Lower the close first socket-release lever near the lock icon 🔒 and push it under the tab to lock it.
-
Similarly, lower the open first socket-release lever near the unlock icon and push it under the tab to lock it.

text_image
Technical diagram of a microchip assembly with numbered components and directional arrows indicating motion or movement.Figure 28. Installing a processor
- socket-release lever 1 2. pin-1 corner of the processor
- processor 4. slot (4)
- processor shield 6. socket-release lever 2
- processor socket 8. tab (4)
Next steps

NOTE: Ensure that you install the heat sink after you install the processor. The heat sink is necessary to maintain proper thermal conditions.
- Install the heat sink.
- Install the cooling shroud.
- If applicable, install the PCIe shroud.
- Follow the procedure listed in the After working inside your system.
- While booting, press F2 to enter System Setup and verify that the processor information matches the new system configuration.
- Run the system diagnostics to verify that the new processor operates correctly.
Related tasks
Before working inside your system
After working inside your system
Removing a processor blank
Installing a heat sink
Installing the cooling shroud
Installing the PCIe shroud
Removing a processor
Related reference
Safety instructions
Installing a heat sink
Prerequisites

CAUTION: Many repairs may only be done by a certified service technician. You should only perform troubleshooting and simple repairs as authorized in your product documentation, or as directed by the online or telephone service and support team. Damage due to servicing that is not authorized by Dell is not covered by your warranty. Read and follow the safety instructions that are shipped with your product.
- Follow the safety guidelines listed in the Safety instructions section.
- Follow the procedure listed in the Before working inside your system section.
- Remove the cooling shroud.
- Remove the PCIe shroud.
- Install the processor.
- Keep the Phillips #2 screwdriver ready.
Steps
- If you are using an existing heat sink, remove the thermal grease from the heat sink by using a clean lint-free cloth.
- Use the thermal grease syringe included with your processor kit to apply the grease in a thin spiral on the top of the processor.

CAUTION: Applying too much thermal grease can result in excess grease coming in contact with and contaminating the processor socket.

NOTE: The thermal grease syringe is intended for one-time use only. Dispose of the syringe after you use it.
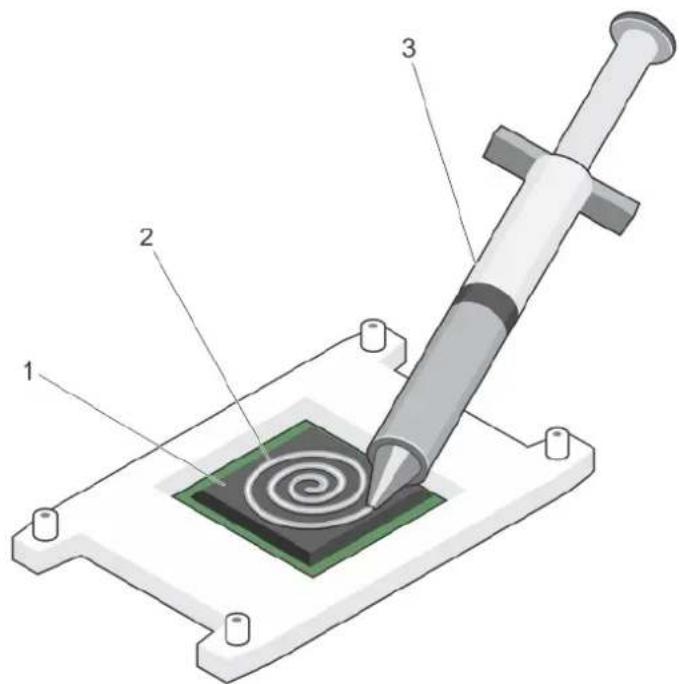
text_image
Technical diagram of a mechanical assembly with labeled parts 1, 2, and 3, showing a spiral component inserted into a substrate.Figure 29. Applying thermal grease on the top of the processor
a. processor
b. thermal grease
c. thermal grease syringe
- Place the heat sink onto the processor.
- Tighten one of the four screws to secure the heat sink to the system board.
- Repeat the procedure for the remaining two screws.
Next steps
- Install the cooling shroud.
- Install the PCIe shroud
- Follow the procedure listed in the After working inside your system section.
- While booting, press F2 to enter System Setup and verify that the processor information matches the new system configuration.
- Run the system diagnostics to verify that the new processor operates correctly.
Related tasks
Before working inside your system
After working inside your system
Installing a processor
Installing the cooling shroud
Installing the PCIe shroud
Removing a heat sink
Related reference
Safety instructions
System battery
The system battery is used to power the real-time clock and storing the BIOS settings of the system.
Related tasks
Replacing the system battery
Replacing the system battery
Prerequisites
NOTE: There is a danger of a new battery exploding if it is incorrectly installed. Replace the battery only with the same or equivalent type recommended by the manufacturer. For more information, see the safety information that shipped with your system.
CAUTION: Many repairs may only be done by a certified service technician. You should only perform troubleshooting and simple repairs as authorized in your product documentation, or as directed by the online or telephone service and support team. Damage due to servicing that is not authorized by Dell is not covered by your warranty. Read and follow the safety instructions that are shipped with your product.
NOTE: This is a Field Replaceable Unit (FRU). Removal and installation procedures should be performed only by Dell certified service technicians.
- Follow the safety guidelines listed in the Safety instructions section.
- Follow the procedure listed in the Before working inside your system section.
- Disconnect the GPU signal and power cables from the system board.
Steps
- Locate the battery socket. For more information, see the Jumpers and connectors section.

CAUTION: To avoid damage to the battery connector, you must firmly support the connector while installing or removing a battery.
- Place your finger between the securing tabs at the negative side of the battery connector, and lift the battery out of the socket.
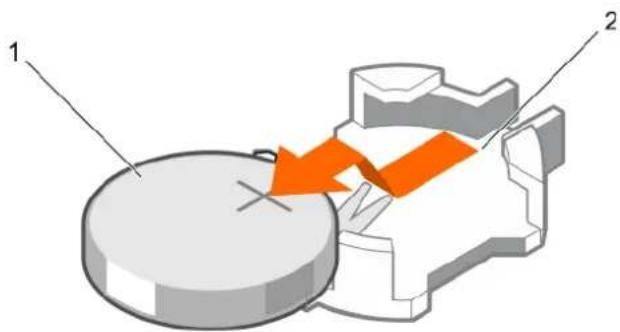
text_image
Technical diagram showing a mechanical assembly with labeled components and directional arrows indicating motion or force.Figure 30. Removing the system battery
a. system battery
b. system battery slot
-
To install a new system battery, hold the battery with the "+" facing up and slide it under the securing tabs.
-
Press the battery into the connector until it snaps into place.
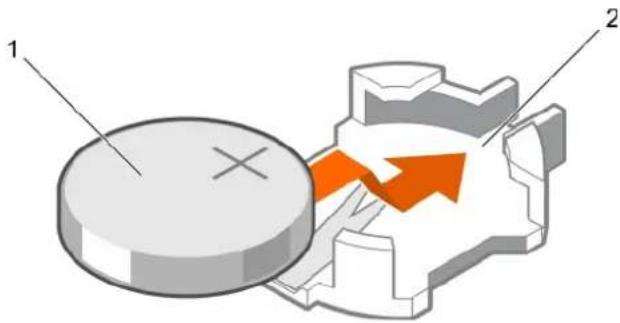
text_image
Diagram showing a mechanical component with labeled parts 1 and 2, and an orange arrow indicating direction or flow.Figure 31. Installing the system battery
a. system battery
b. system battery slot
Next steps
- Connect the GPU signal and power cables to the system board.
- Follow the procedure listed in the After working inside your system section.
- While booting, press F2 to enter System Setup and ensure the battery is operating properly.
- Enter the correct time and date in the System Setup Time and Date fields.
- Exit System Setup.
Related tasks
Before working inside your system
After working inside your system
Installing a GPU riser cable on the system board
Related reference
Safety instructions
System board connectors
PCIe shroud
Removing the PCIe shroud
Prerequisites

CAUTION: Many repairs may only be done by a certified service technician. You should only perform troubleshooting and simple repairs as authorized in your product documentation, or as directed by the online or telephone service and support team. Damage due to servicing that is not authorized by Dell is not covered by your warranty. Read and follow the safety instructions that are shipped with your product.
- Follow the safety guidelines listed in the Safety instructions section.
- Follow the procedure listed in the Before working inside your system section.
Steps
Lift the PCIe shroud away from the system.

text_image
Diagram of a device's internal structure with numbered components and directional arrows indicating flow or movement.Figure 32. Removing the PCIe shroud
- slot on the heat sink (2) 2. tab on the PCIe shroud (2)
- PCIe shroud 4. expansion card riser
Next steps
- Install the PCIe shroud.
Related tasks
Before working inside your system After working inside your system Installing the PCIe shroud
Related reference
Safety instructions
Installing the PCIe shroud
Prerequisites

CAUTION: Many repairs may only be done by a certified service technician. You should only perform troubleshooting and simple repairs as authorized in your product documentation, or as directed by the online or telephone service and support team. Damage due to servicing that is not authorized by Dell is not covered by your warranty. Read and follow the safety instructions that are shipped with your product.
Follow the safety guidelines listed in the Safety instructions section.
Steps
Insert the tabs on the PCIe shroud into the slots on the heat sink.
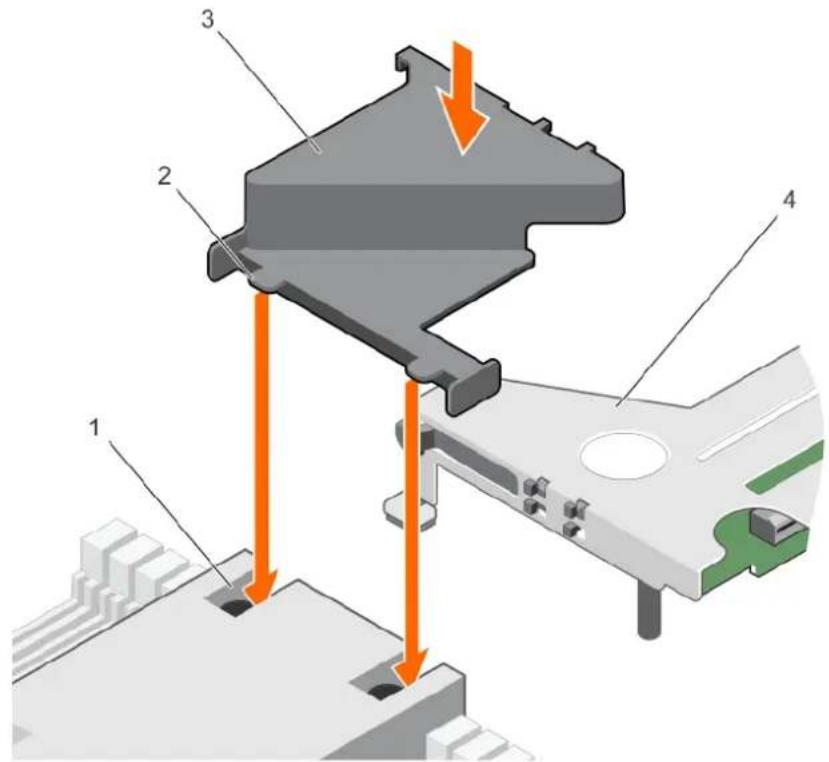
text_image
Technical diagram of a mechanical assembly with numbered components and directional arrows indicating motion or forceFigure 33. Installing the PCIe shroud
- slot on the heat sink (2) 2. tab on the PCIe shroud (2)
- PCIe shroud 4. expansion card riser
Next steps
Follow the procedure listed in after working inside your system.
Related tasks
After working inside your system Removing the PCIe shroud
Related reference
Safety instructions
Expansion card riser and expansion cards
Expansion card installation guidelines
Depending on your system configuration, the following PCI Express (PCIe) generation 3 expansion cards are supported:
Table 31. Supported expansion cards
| Configuration PCIe slot Processor connection | Height Length Link width Slot width | |
| Four PCIe GPUs with switch board and one processor (Configuration A) | 1 Processor 1 Low Profile Half Length x8 x162 Processor 1 Low Profile Half Length x16 x16 | |
| Four PCIe GPUs with switch board and two processors (Configuration B) | 1 Processor 1 Low Profile Half Length x8 x162 Processor 1 Low Profile Half Length x16 x16 | |
| Four PCIe GPUs without switch board and two processors (Configuration C) | 1 Processor 1 Low Profile Half Length x8 x162 Processor 2 Low Profile Half Length x8 x16 | |
| Two PCIe GPUs without switch board and two processors (Configuration D) | 1 Processor 1 Low Profile Half Length x16 x162 Processor 2 Low Profile Half Length x16 x16 | |
| Two PCIe GPUs without switch board and one processor (Configuration E) | 1 Processor 1 Low Profile Half Length x8 x162 NA NA NA NA NA | |
| Two PCIe GPUs without switch board and two processors (Configuration F) | 1 Processor 1 Low Profile Half Length x8 x162 Processor 2 Low Profile Half Length x8 x16 | |
| Four PCIe GPUs with switch board with dual GPU virtual mode and two processors (Configuration G) | 1 Processor 1 Low Profile Half Length x16 x162 Processor 2 Low Profile Half Length x16 x16 | |
| Three PCIe GPUs without switch board and two processors (Configuration H) | 1 Processor 1 Low Profile Half Length x8 x162 Processor 2 Low Profile Half Length x8 x16 | |
| Three PCIe GPUs without switch board and two processors (Configuration I) | 1 Processor 1 Low Profile Half Length x8 x162 NA NA NA NA NA | |
| Four SXM2 GPUs with NVLink board and two processors (Configuration K) | 1 Processor 1 Low Profile Half Length x8 x162 Processor 1 Low Profile Half Length x16 x16 | |

NOTE: Configuration G supports virtual mode. In the virtual mode, GPUs 1 and 2 are connected to processor 1 and GPUs 3 and 4 are connected to processor 2.
The following table provides guidelines for installing expansion cards to ensure proper cooling and mechanical fit. Expansion cards should be installed in the card priority and slot priority order mentioned in table.

NOTE: The x16 link width riser cards on the expansion card riser are cabled to the system board.
NOTE: For configuration K, the x16 link width riser card on the expansion card cage is cabled to the NVLink board.
NOTE: The expansion card slots are not hot swappable.
Table 32. Expansion card installation order
| Category | Card priority | Card type Configurations A and B | Configurations C, F, and H | Configurations D and G | Configurations E and I | Configuration K | |||||
| Slot priority | Max allowed | Slot priority | Max allowed | Slot priority | Max allowed | Slot priority | Max allowed | Slot priority | Max allowed | ||
| RAID | 1 H730P (low profile) | 1 1 1 1 1 1 1 - - | |||||||||
| 2 H730 (low profile) | 1 1 1 1 1 1 1 - - | ||||||||||
| 3 H330 (low profile) | 1 1 1 1 1 1 1 - - | ||||||||||
| H330 (low profile) IEC | 1 1 1 1 1 1 1 - - | ||||||||||
| 4 H830 (low profile) | 1, 2 2 1,2 2 1,2 2 1 1 1 1 | ||||||||||
| 5 H810 (low profile) | 1, 2 2 1,2 2 1,2 2 1 1 1 1 | ||||||||||
| 6 12 GB SAS HBA (low profile) | 1, 2 2 1,2 2 1,2 2 1 1 - - | ||||||||||
| Non-RAID | HBA330 adapter 1 1 1 1 1 1 1 - - | ||||||||||
| Mellanox dual port card | 2 | 1 | n/a | 0 | 1,2 | 2 | n/a | 0 | 2 | 1 | |
| Mellanox single port card | 2 | 1 | n/a | 0 | 1,2 | 2 | n/a | 0 | 2 | 1 | |
| Infiniband | Mellanox dual port adapter | 1, 2 | 2 | 1, 2 | 2 | 1, 2 | 2 | 1 | 1 | 1,2 | 2 |
| Mellanox single port adapter | 1, 2 | 2 | 1, 2 | 2 | 1, 2 | 2 | 1 | 1 | 1,2 | 2 | |
| Intel low profile card | 2 | 1 | n/a | n/a | 1, 2 | 1 | n/a | n/a | 2 | 1 | |
| Fiber channel | QLogic dual port 16 Gbps Fibre Channel adapter | 1, 2 | 2 | 1, 2 | 2 | 1, 2 | 2 | 1 | 1 | 1,2 | 2 |
| Emulex dual port 16 Gbps Fibre Channel adapter | 1, 2 | 2 | 1, 2 | 2 | 1, 2 | 2 | 1 | 1 | 1,2 | 2 | |
| QLogic single port 16 Gbps Fibre Channel adapter | 1, 2 | 2 | 1, 2 | 2 | 1, 2 | 2 | 1 | 1 | 1,2 | 2 | |
| Emulex single port 16 Gbps Fibre Channel adapter | 1, 2 | 2 | 1, 2 | 2 | 1, 2 | 2 | 1 | 1 | 1,2 | 2 | |
| Emulex FC8 low profile card | 1, 2QLogic FC8 low profile card | 21, 2 2 1, 2 2 1, 2 2 1 1 1, 2 2 | 1, 2 | 2 | 1, 2 | 2 | 1 | 1 | 1,2 | 2 | |
| 10 Gb NICs | 10 Gb NICs (low profile) | 1, 2 2 1, 2 2 1, 2 2 1 1 1, 2 2 | |||||||||
| 10 Gb SFP+ NICs (low profile) | 1, 2 2 1, 2 2 1, 2 2 1 1 1, 2 2 | ||||||||||
| PCIe SSD | NVMe half height, half length | 1, 2 2 1, 2 2 1, 2 2 1 1 1 1 | |||||||||
| PCIe half height, half length | 1, 2 2 1, 2 2 1, 2 2 1 1 1 1 | ||||||||||
Removing the expansion card riser cage
Prerequisites

CAUTION: Many repairs may only be done by a certified service technician. You should only perform troubleshooting and simple repairs as authorized in your product documentation, or as directed by the online or telephone service and support team. Damage due to servicing that is not authorized by Dell is not covered by your warranty. Read and follow the safety instructions that are shipped with your product.
- Follow the safety guidelines listed in the Safety instructions section.
- Follow the procedure listed in the Before working inside your system section.
- Remove the PCIe shroud. See removing the PCIe shroud.

CAUTION: The expansion card riser cables must be disconnected from the system board or the NVLink board before removing the expansion card riser cage, to prevent pin damage in the PCIe connectors.
- If applicable, disconnect the expansion card riser cables from the system board or the NVLink board.
Steps
Holding the touch points, lift the expansion card riser cage from the riser connector on the system board.
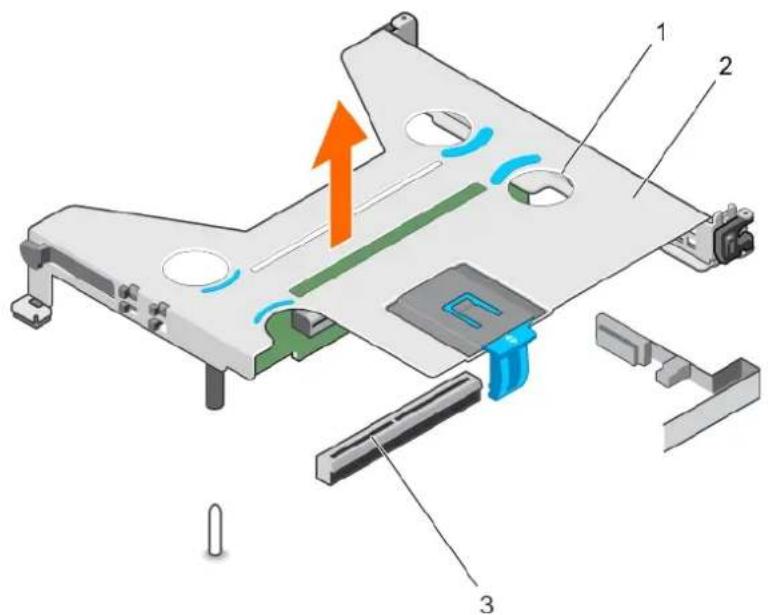
text_image
Technical diagram of a device's internal structure with labeled components and directional arrows indicating flow or movement.Figure 34. Removing the expansion card riser cage
a. touch point (4)
b. expansion card riser cage
c. riser connector on the system board
Next steps
- Install the expansion card riser, if applicable.
- Install the expansion card, if applicable.

CAUTION: The expansion card riser cables must be connected to the system board or the NVLink board only after installing the expansion card riser cage, to prevent pin damage in the PCIe connectors.
- Install the expansion card riser cage.
Related tasks
After working inside your system
Installing expansion cards
Installing the expansion card riser cage
Related reference
Safety instructions
Removing the expansion card riser
Prerequisites

CAUTION: Many repairs may only be done by a certified service technician. You should only perform troubleshooting and simple repairs as authorized in your product documentation, or as directed by the online or telephone service and support team. Damage due to servicing that is not authorized by Dell is not covered by your warranty. Read and follow the safety instructions that are shipped with your product.

NOTE: This is a Field Replaceable Unit (FRU). Removal and installation procedures should be performed only by Dell certified service technicians.
- Follow the safety guidelines listed in the Safety instructions section.
- Follow the procedure listed in the Before working inside your system section.
- Remove the PCIe shroud.
- Remove the expansion card riser cage.
Steps
- Remove the screws that secure the expansion card riser board to the expansion riser cage.
- Remove the expansion board(s) from the expansion card riser cage.
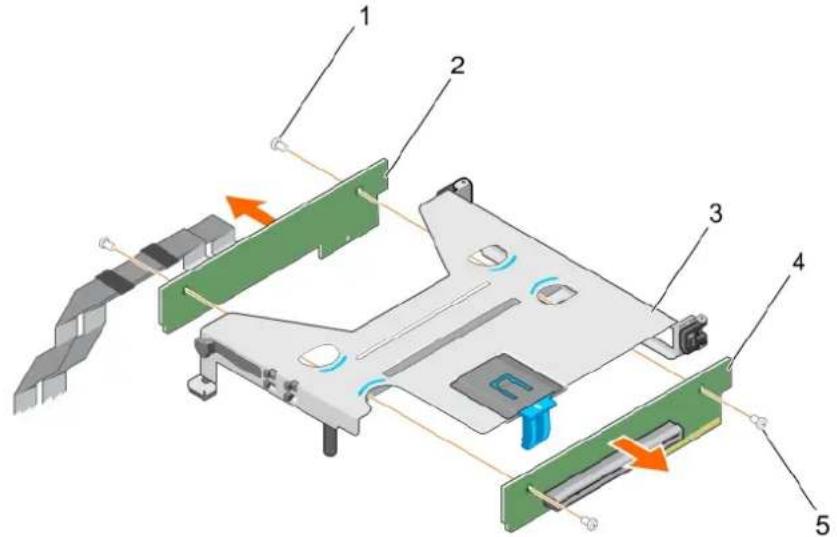
text_image
Technical diagram of a device with numbered components and directional arrows indicating motion or assembly.Figure 35. Removing expansion card riser from expansion card riser cage
- screws (2) 2. cabled expansion card riser board
- expansion card riser cage 4. expansion card riser board
- screw (2)
Next steps

CAUTION: The expansion card riser cables must be connected to the system board or the NVLink board only after installing the expansion card riser cage, to prevent pin damage in the PCIe connectors.
- Install the expansion card, if applicable.
- Install the expansion card riser cage.
Related tasks
Before working inside your system
After working inside your system
Installing the expansion card riser
Installing the expansion card riser cage
Removing the PCIe shroud
Installing expansion cards
Related reference
Safety instructions
Installing the expansion card riser
Prerequisites

CAUTION: Many repairs may only be done by a certified service technician. You should only perform troubleshooting and simple repairs as authorized in your product documentation, or as directed by the online or telephone service and support team. Damage due to servicing that is not authorized by Dell is not covered by your warranty. Read and follow the safety instructions that are shipped with your product.

NOTE: This is a Field Replaceable Unit (FRU). Removal and installation procedures should be performed only by Dell certified service technicians.
- Follow the safety guidelines listed in the Safety instructions section.
Steps
-
Align the expansion card riser board with the expansion card riser cage.
-
Tighten the screws to secure the expansion card riser board to the expansion card riser cage.
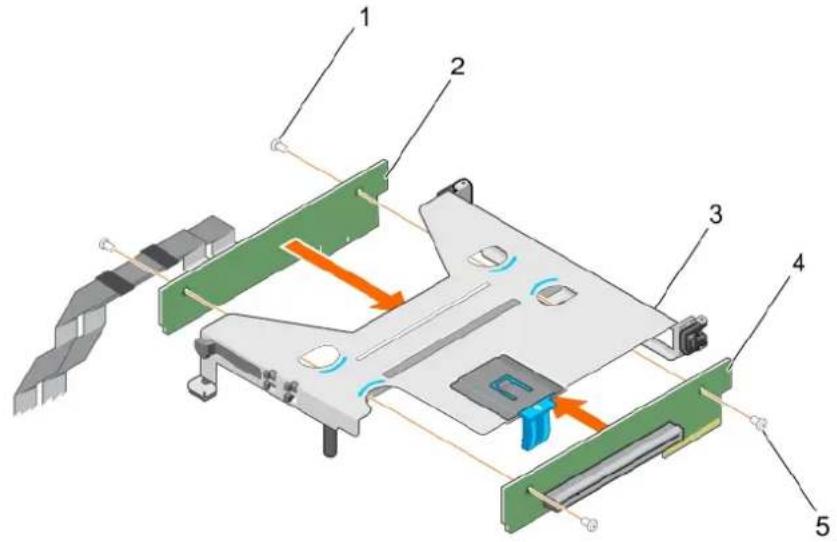
text_image
Exploded view diagram of a device with numbered components and directional arrows indicating motion or flowFigure 36. Installing the expansion card riser board
- screw (2) 2. cabled expansion riser board
- expansion card riser cage 4. expansion card riser board
- screw (2)
Next steps
- If applicable, connect the riser cables to the system board/NVLink board.
- If applicable, install the expansion card.
- Install the expansion card riser cage.
- Follow the procedure listed in the After working inside your system section.
- Install any device drivers required for the expansion card. For more information, see the documentation for the card.
Related tasks
Before working inside your system
After working inside your system
Removing the expansion card riser
Removing the expansion card riser cage
Installing the PCIe shroud
Removing expansion cards
Related reference
Safety instructions
Installing the expansion card riser cage
Prerequisites

CAUTION: Many repairs may only be done by a certified service technician. You should only perform troubleshooting and simple repairs as authorized in your product documentation, or as directed by the online or telephone service and support team. Damage due to servicing that is not authorized by Dell is not covered by your warranty. Read and follow the safety instructions that are shipped with your product.
- Follow the safety guidelines listed in the Safety instructions section.
- Follow the procedure listed in the Before working inside your system section.
- If applicable, install the expansion card(s) into the expansion card riser. For more information, see Installing expansion cards section.

CAUTION: The expansion card riser should be installed in the system before you connect the expansion card riser cables to prevent pin damage in the PCIe connectors on the system board or the NVLink board (if installed).
Steps
- Align the expansion card riser cage with the guide pin on the system board and the guide slot on the chassis.
- Lower the expansion card riser cage and press it until it clicks into place.
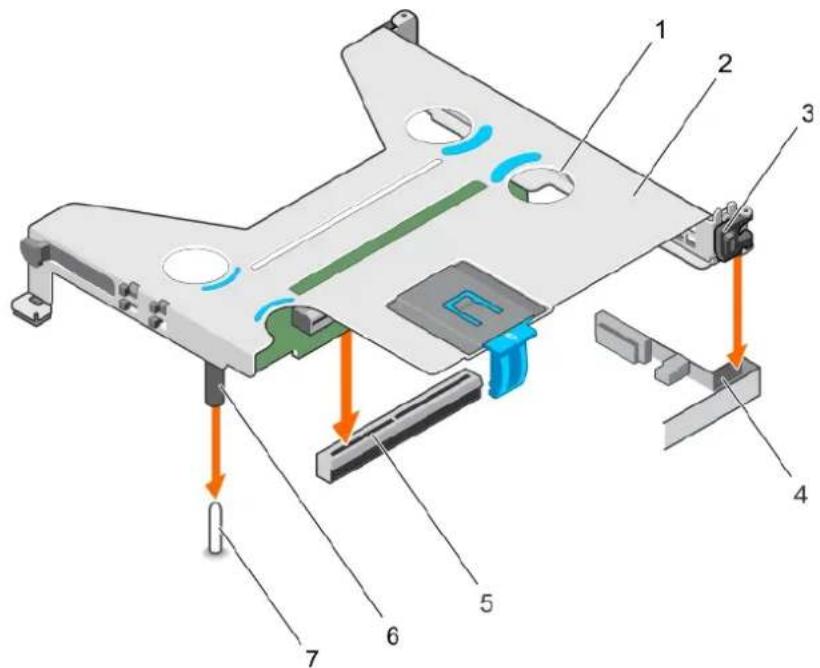
text_image
Technical diagram of a device with numbered components and directional arrows indicating assembly or movement.Figure 37. Installing expansion card riser cage
- touch point (4) 2. expansion card riser cage
- expansion card clip 4. guide slot on the chassis
- riser connector on the system board 6. guide post on the expansion card riser
- guide pin on the system board
Next steps
- If applicable, connect the riser cables to the system board or if installed, the NVLink board.
- Install the PCIe shroud.
- Follow the procedure listed in the After working inside your system section.
- Install any device drivers required for the expansion card. For more information, see the documentation for the card.
Related tasks
Before working inside your system
After working inside your system
Installing the PCIe shroud
Removing the PCIe shroud
Removing the expansion card riser cage
Related reference
Safety instructions
Removing expansion cards
Prerequisites

CAUTION: Many repairs may only be done by a certified service technician. You should only perform troubleshooting and simple repairs as authorized in your product documentation, or as directed by the online or telephone service and support team. Damage due to servicing that is not authorized by Dell is not covered by your warranty. Read and follow the safety instructions that are shipped with your product.
- Follow the safety guidelines listed in the Safety instructions section.
- Follow the procedure listed in the Before working inside your system section.

CAUTION: The expansion card riser cables must be disconnected from the system board or NVLink board before removing the expansion card riser cage to prevent pin damage in the PCIe connectors.
- Disconnect any cables connected to the expansion card and the system board.
- Remove the PCIe shroud.
- Remove the expansion card riser cage.
Steps
- Pull the expansion card latch to open it.
- Open the expansion card clip.
- Hold the expansion card by its edges, and pull it from the expansion card connector.
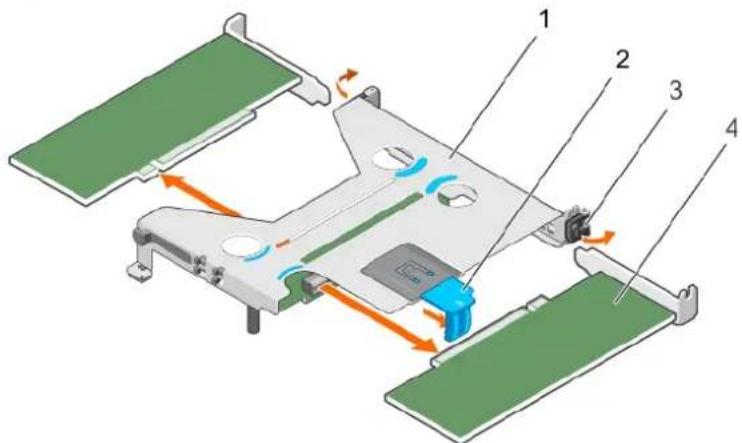
text_image
Technical diagram of a mechanical assembly with numbered components and directional arrows indicating motion or flow.Figure 38. Removing expansion card from the expansion card riser cage
- expansion card riser cage 2. expansion card latch
-
expansion card clip 4. expansion card (low-profile, half-length card)
-
If you are removing the expansion card permanently, install an expansion card blank by performing the following steps:
a) Slide the expansion card blank into the expansion card slot on the side of the expansion card riser.
b) Close the expansion card clip.
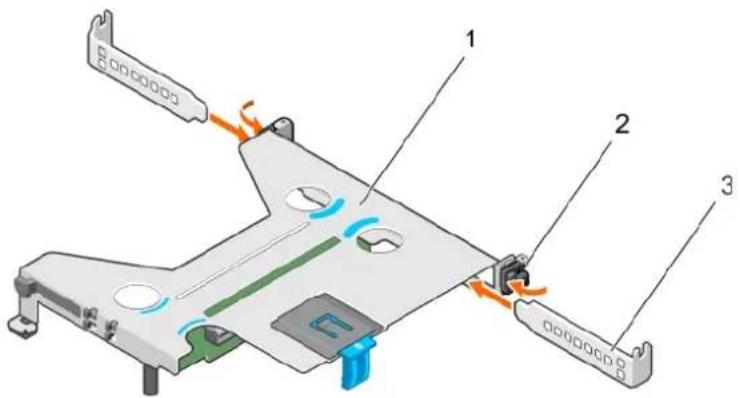
text_image
Technical diagram of a device with labeled components and airflow indicatorsFigure 39. Removing expansion card from the expansion card riser cage
- Expansion card riser cage
- Expansion card clip
- Expansion card blank

NOTE: You must install an expansion card blank to maintain Federal Communications Commission (FCC) certification of the system. The expansion card blank keeps dust and dirt out of the system and aids in proper cooling and airflow inside the system.
- Close the expansion card latch.
Next steps
- Install the expansion card riser cage.
Related tasks
Before working inside your system After working inside your system Removing the PCIe shroud Installing the expansion card riser cage Installing expansion cards
Related reference
Safety instructions
Installing expansion cards
Prerequisites

CAUTION: Many repairs may only be done by a certified service technician. You should only perform troubleshooting and simple repairs as authorized in your product documentation, or as directed by the online or telephone service and support team. Damage due to servicing that is not authorized by Dell is not covered by your warranty. Read and follow the safety instructions that are shipped with your product.
- Follow the safety guidelines listed in the Safety instructions section.
- Follow the procedure listed in before working inside your system.
- Remove the PCIe shroud.

CAUTION: The expansion card riser cables must be disconnected from the system board or NVLink board before removing the expansion card riser cage, to prevent pin damage in the PCIe connectors.
- Remove the expansion card riser cables.
- Remove the expansion card riser cage.
Steps
-
Locate the expansion card connector on the expansion card riser.
-
Open the expansion card clip.
-
If an expansion card blank is installed, open the expansion card clip and slide the expansion card blank out of the expansion card riser cage.
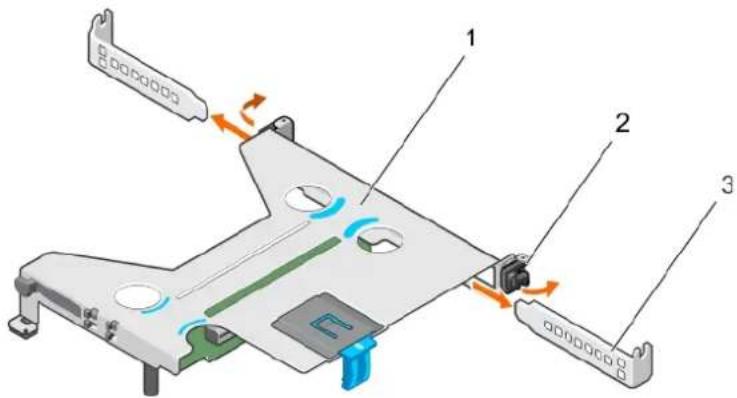
text_image
Technical diagram of a device with labeled components and directional arrows indicating motion or movement.Figure 40. Removing expansion card blank
a. Expansion card riser cage
b. Expansion card clip
c. Expansion card blank
-
Pull the expansion card latch to open it.
-
Hold the expansion card by its edges and align the expansion card with the expansion card connector on the expansion card riser cage.
-
Insert the expansion card into the expansion card connector until the expansion card is fully seated.
-
Close the expansion card latch.
-
Close the expansion card clip.
Next steps
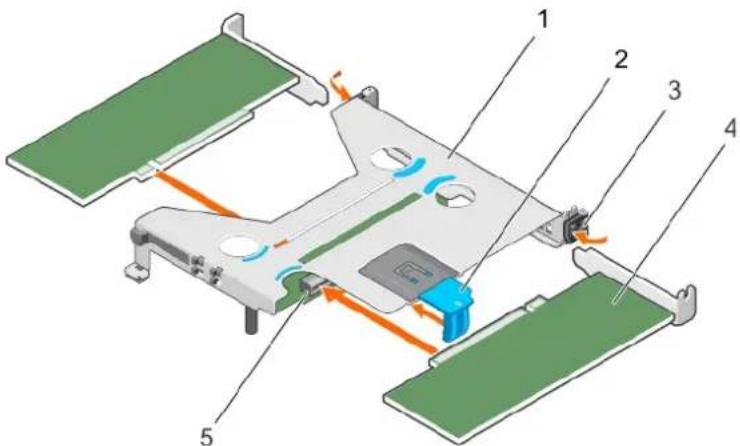
text_image
Technical diagram of a mechanical assembly with numbered components and directional arrows indicating motion or flow.Figure 41. Installing an expansion card
- expansion card riser cage 2. expansion card latch
- expansion card clip 4. expansion card (low-profile, half-length card)
- expansion card connector

CAUTION: The expansion card riser cables must be connected to the system board or the NVLink board only after installing the expansion card riser cage, to prevent pin damage in the PCIe connectors.
- Connect the cables to the expansion card and the system board.
- Install the expansion card riser.
- Install the PCIe shroud.
- Follow the procedure listed in the After working inside your system section.
Related tasks
Before working inside your system
After working inside your system
Installing the PCIe shroud
Removing expansion cards
Related reference
Safety instructions
Expansion card cabling diagrams
Cabling two expansion cards
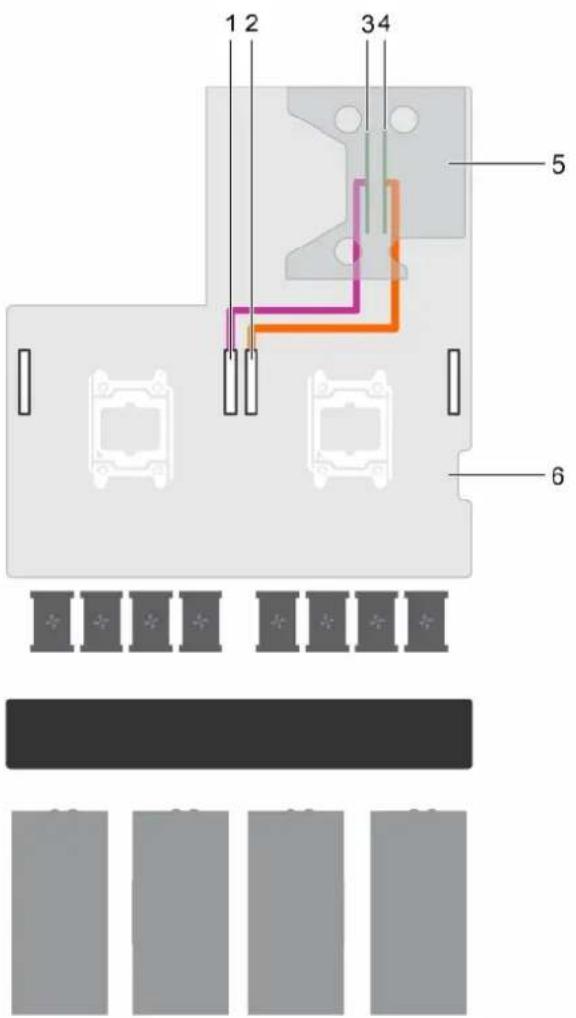
text_image
1 2 3 4 5 6Figure 42. Cabling two expansion cards
-
GPU 4 PCIe connector on the system board 2. GPU 1 PCIe connector on the system board
-
expansion slot 2 connector (x16) 4. expansion slot 1 connector (x16)
-
expansion card riser 6. system board
Cabling one expansion card
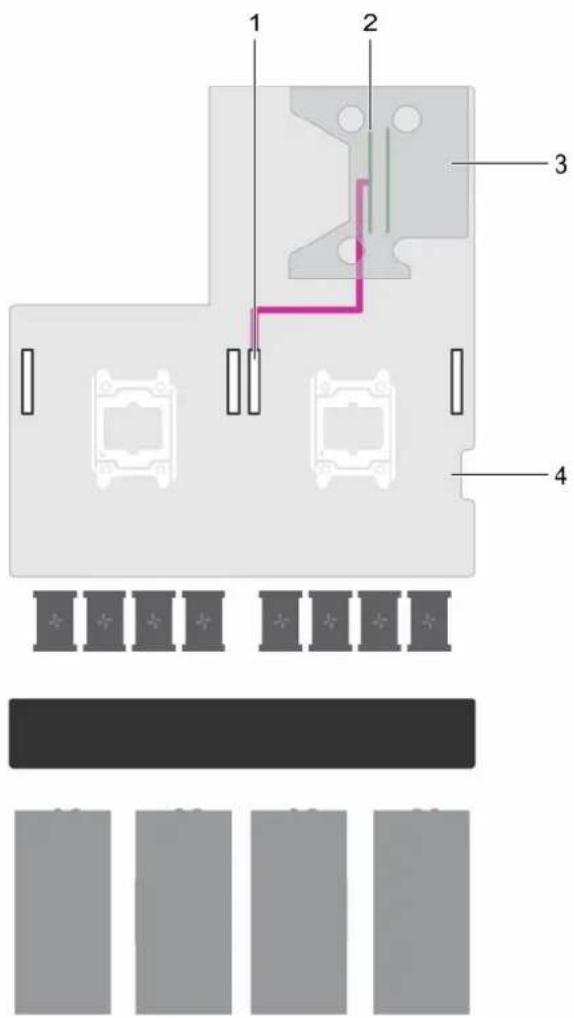
text_image
1 2 3 4Figure 43. Cabling one expansion card
-
GPU 1 PCIe connector on the system board 2. expansion slot 2 connector (x16)
-
expansion card riser 4. system board
Cabling expansion riser card with NVLink board configuration
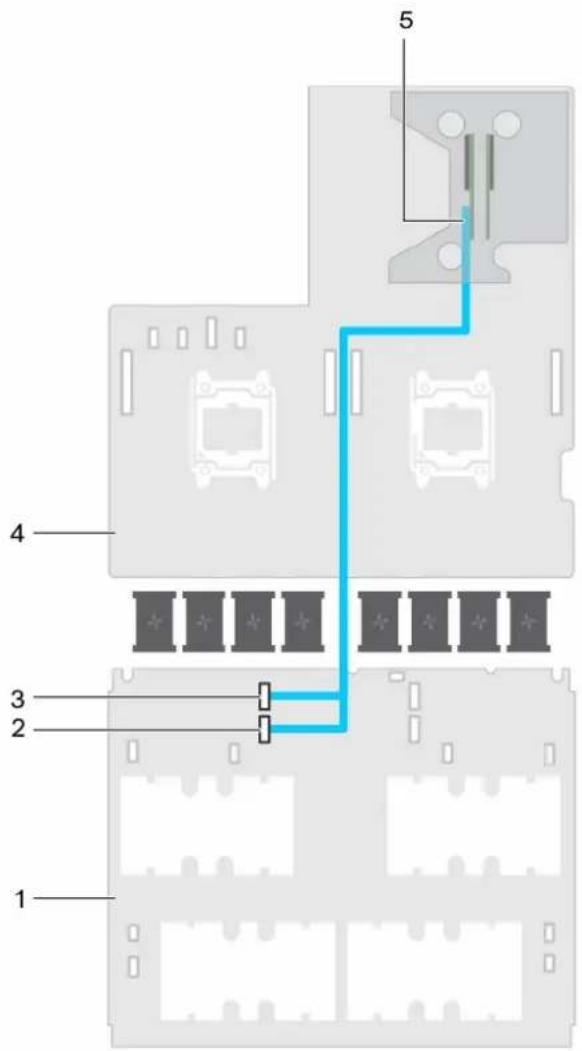
text_image
1 2 3 4 5Figure 44. Cabling expansion card with NVLink board
-
NVlink board 2. PCIe DN2 cable connector on the NVLINK board
-
PCIe DN1 cable connector on the NVLINK board 4. system board
-
expansion riser slot 2 connector (x16)
Power supply units
Your system supports one of the following:
- Up to two 2000 W AC power supply units (PSUs)
- Up to two 1600 W AC PSUs
- Up to two 1100 W AC PSUs (only for systems that support two GPUs)
NOTE: The PSU 2 slot also functions as the optional 2.5 inch hard drive cage slot. If you install the 2.5 inch hard drive cage in the PSU 2 slot, your system will not support the redundancy feature.
NOTE: The Platinum 2000 W PSUs and 1600 W PSUs are rated only for 200 V AC to 240 V AC input.
NOTE: When two identical PSUs are installed, power supply redundancy (1+1 – with redundancy or 2+0 – without redundancy) is configured in system BIOS. In redundant mode, power is supplied to the system equally from both PSUs when Hot Spare is disabled. When Hot Spare is enabled, one of the PSUs will be put into standby when system utilization is low to maximize efficiency.
NOTE: If two PSUs are used, they must be of the same maximum output power.
NOTE: For AC PSUs, use only PSUs with the Extended Power Performance (EPP) label on the back. Mixing PSUs from previous generations of servers can result in a PSU mismatch condition or failure to power on.
Related tasks
Removing the power supply unit blank Installing the power supply unit blank Removing an AC power supply unit Installing an AC power supply unit
Hot spare feature
Your system supports the hot spare feature that significantly reduces the power overhead associated with power supply unit (PSU) redundancy.
When the hot spare feature is enabled, one of the redundant PSUs is switched to the sleep state. The active PSU supports 100 percent of the load, thus operating at higher efficiency. The PSU in the sleep state monitors output voltage of the active PSU. If the output voltage of the active PSU drops, the PSU in the sleep state returns to an active output state.
If having both PSUs active is more efficient than having one PSU in the sleep state, the active PSU can also activate the sleeping PSU.
The default PSU settings are as follows:
- If the load on the active PSU is more than 50 percent, then the redundant PSU is switched to the active state.
- If the load on the active PSU falls below 20 percent, then the redundant PSU is switched to the sleep state.
You can configure the hot spare feature by using the iDRAC settings. For more information about iDRAC settings, see the Integrated Dell Remote Access Controller User's Guide available at Dell.com/idracmanuals.
Removing the power supply unit blank
Remove the power supply unit (PSU) blank when you are installing a second PSU or a 2.5 inch hard drive cage in the PSU 2 slot.
Prerequisites
CAUTION: Many repairs may only be done by a certified service technician. You should only perform troubleshooting and simple repairs as authorized in your product documentation, or as directed by the online or telephone service and support team. Damage due to servicing that is not authorized by Dell is not covered by your warranty. Read and follow the safety instructions that are shipped with your product.
CAUTION: To ensure proper system cooling, the PSU blank must be installed in the PSU 2 slot in a non-redundant configuration. Remove the PSU blank only if you are installing a second PSU or a 2.5 inch hard drive cage.
Follow the safety guidelines listed in the Safety instructions section.
Steps
Remove the PSU blank from the PSU 2 slot by pulling the blank outward.
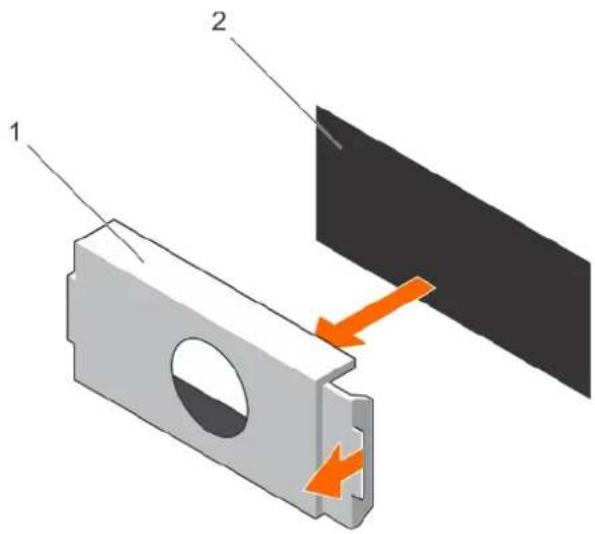
text_image
Technical diagram showing a mechanical component with labeled parts and directional arrows indicating movement or force.Figure 45. Removing the PSU blank
a. PSU blank
b. PSU bay
Next steps
Install PSU 2 or the 2.5 inch hard drive cage.
Related tasks
Installing an AC power supply unit
Installing the optional 2.5 inch hard drive cage
Installing the power supply unit blank
Related reference
Safety instructions
Installing the power supply unit blank
Install the power supply unit (PSU) blank when you remove PSU 2 or the 2.5 inch hard drive cage from the PSU 2 slot. Install the PSU blank only in the PSU 2 slot.
Prerequisites

CAUTION: Many repairs may only be done by a certified service technician. You should only perform troubleshooting and simple repairs as authorized in your product documentation, or as directed by the online or telephone service and support team. Damage due to servicing that is not authorized by Dell is not covered by your warranty. Read and follow the safety instructions that are shipped with your product.
- Follow the safety guidelines listed in the Safety instructions section.
- If applicable, remove PSU 2 or the 2.5 inch hard drive cage.
Steps
Align the power supply unit blank with the power supply unit slot and push it into the power supply unit slot until it clicks into place.
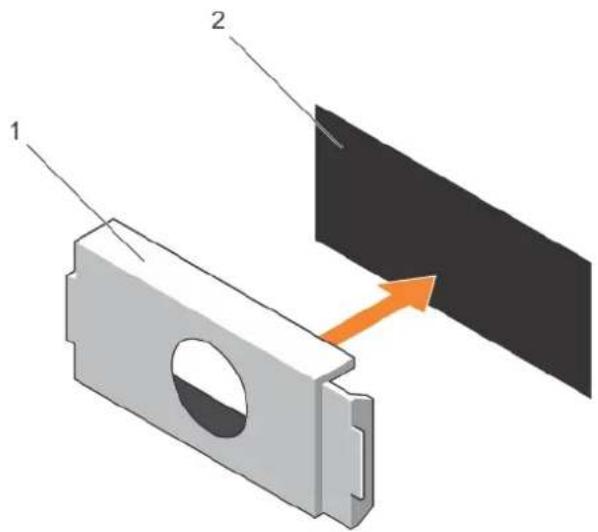
text_image
Diagram showing two labeled components (1 and 2) interacting with a black panel, with an orange arrow indicating direction.Figure 46. Installing the PSU blank
a. PSU blank
b. PSU slot
Related tasks
Removing the optional 2.5 inch hard drive cage
Removing an AC power supply unit
Removing the power supply unit blank
Related reference
Safety instructions
Removing an AC power supply unit
Prerequisites

CAUTION: Many repairs may only be done by a certified service technician. You should only perform troubleshooting and simple repairs as authorized in your product documentation, or as directed by the online or telephone service and support team. Damage due to servicing that is not authorized by Dell is not covered by your warranty. Read and follow the safety instructions that are shipped with your product.

CAUTION: The system requires one power supply unit (PSU) for normal operation. On power-redundant systems, remove and install only one PSU at a time in a system that is powered on.
- Follow the safety guidelines listed in the safety instructions section.
- Disconnect the power cable from the power source and from the PSU you intend to remove.
- Remove the cables from the strap on the PSU.
Steps
Press the release latch and slide the PSU out of the PSU slot by holding the PSU handle.
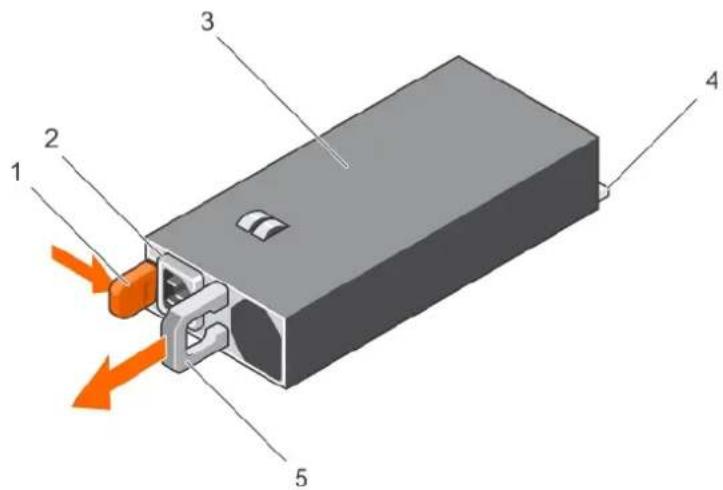
text_image
Diagram of a mechanical device with numbered components and directional arrows indicating flow or movement.Figure 47. Removing an AC PSU
- release latch 2. PSU cable connector
- PSU 4. connector
- PSU handle
Next steps
Depending on your requirement, perform one of the following steps:
- If you are not replacing PSU 2 immediately, install a PSU blank.
• Install the replacement AC PSU.
• Install the 2.5 inch hard drive cage.
Related tasks
Installing an AC power supply unit Installing the power supply unit blank Installing the optional 2.5 inch hard drive cage
Related reference
Safety instructions
Installing an AC power supply unit
Prerequisites

CAUTION: Many repairs may only be done by a certified service technician. You should only perform troubleshooting and simple repairs as authorized in your product documentation, or as directed by the online or telephone service and support team. Damage due to servicing that is not authorized by Dell is not covered by your warranty. Read and follow the safety instructions that are shipped with your product.
- Follow the safety guidelines listed in the Safety instructions section.
- For systems that support redundant power supply units (PSUs), ensure that both the PSUs are of the same type and same maximum output power.

NOTE: The maximum output power (shown in watts) is listed on the PSU label.
- If applicable, remove the PSU blank.
Steps
- Slide the replacement PSU into the PSU slot until the PSU is fully seated and the release latch snaps into place.

CAUTION: When connecting the power cable, secure the cable with the strap.
- Connect the PSU power cable to the PSU power cable connector.

NOTE: When installing, hot swapping, or hot adding a new PSU, wait for 15 seconds for the system to recognize the PSU and determine its status. The power supply redundancy may not occur until the new PSU discovery is complete. Wait until the new PSU is discovered and enabled before you remove the other PSU. The PSU status indicator turns green to signify that the PSU is functioning properly.
- Plug the power cable into a power outlet.
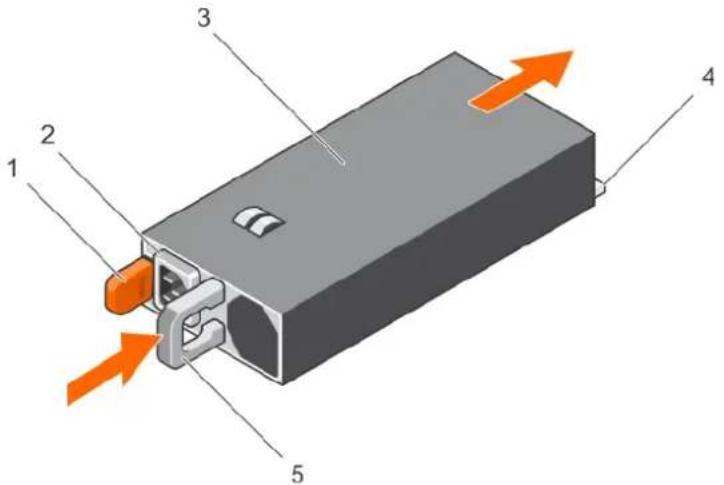
text_image
Diagram of a device with numbered components and directional arrows indicating flow or movementFigure 48. Installing an AC PSU
- release latch 2. PSU cable connector
- PSU unit 4. connector
- PSU handle
Related tasks
Removing the power supply unit blank
Removing an AC power supply unit
Related reference
Safety instructions
Hard drives
Your system supports up to four 2.5 inch SAS or SATA cabled hard drives.

CAUTION: Do not turn off or reboot your system while the hard drive is being formatted. Doing so can cause a hard drive failure.

NOTE: Systems with NVLink board configuration do not support the optional 2.5 inch hard drive cage.

NOTE: SAS and SATA hard drives cannot be mixed in a system.

NOTE: Use only SAS and SATA hard drives that have been tested and approved for your system.
When you format a hard drive, allow enough time for the formatting to be completed. High-capacity hard drives can take a number of hours to format.
Related tasks
Removing the optional 2.5 inch hard drive cage
Installing the optional 2.5 inch hard drive cage
Removing the optional 2.5 inch hard drive cage cover
Installing the optional 2.5 inch hard drive cage cover
Removing 2.5 inch cabled hard drives from the hard drive cage
Installing a 2.5 inch cabled hard drive into the hard drive cage Removing a 1.8 inch uSATA SSD blank Removing a 1.8 inch uSATA SSD carrier Installing a 1.8 inch uSATA SSD carrier Removing a 1.8 inch uSATA SSD from a SSD carrier Installing a 1.8 inch uSATA SSD into a SSD carrier Removing the 1.8 inch uSATA SSD cage Installing the 1.8 inch uSATA SSD cage Removing the 1.8 inch uSATA SSD backplane Installing the 1.8 inch uSATA SSD backplane
Removing the optional 2.5 inch hard drive cage
The PSU 2 slot also functions as the optional 2.5 inch hard drive cage slot.
Prerequisites

CAUTION: Many repairs may only be done by a certified service technician. You should only perform troubleshooting and simple repairs as authorized in your product documentation, or as directed by the online or telephone service and support team. Damage due to servicing that is not authorized by Dell is not covered by your warranty. Read and follow the safety instructions that are shipped with your product.
- Follow the safety guidelines listed in the Safety instructions section.
- Follow the procedure listed in before working inside your system.
- Disconnect the power cable from the system board.
- Disconnect the signal cable from the system board or expansion card.
- Keep the Phillips #1 screwdriver ready.
Steps
- Remove the screw securing the hard drive cage to the hard drive cage slot.

NOTE: When you slide the hard drive cage out of the hard drive cage slot, ensure that the cables disconnected from the system board do not interfere with other components on the system board.
- Slide the hard drive cage out of the hard drive cage slot.
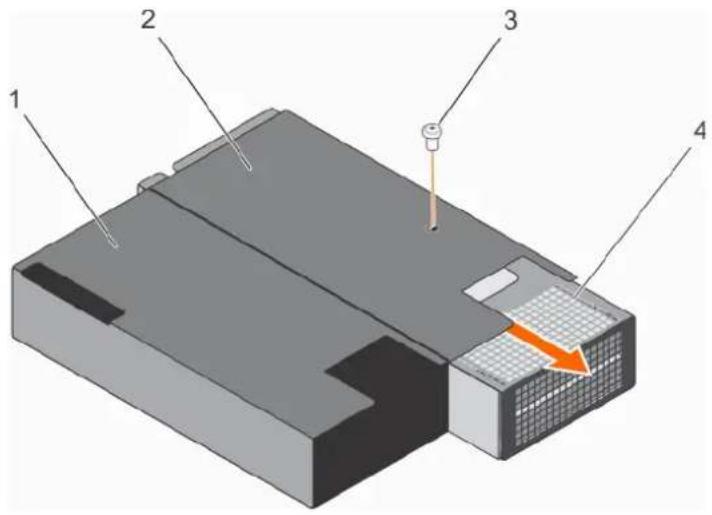
text_image
Technical diagram of a device with numbered components and an orange arrow indicating a specific area or feature.Figure 49. Removing the 2.5 inch hard drive cage
- PSU 1 slot 2. PSU 2 slot/2.5 inch hard drive cage slot
- screw 4. hard drive cage
Next steps
If you are removing the hard drive cage permanently, install any one of the following:
- PSU blank
· PSU 2 - 2.5 inch hard drive cage
Related tasks
Before working inside your system
Installing the power supply unit blank
Installing an AC power supply unit
Installing the optional 2.5 inch hard drive cage
Related reference
Safety instructions
Installing the optional 2.5 inch hard drive cage
The PSU 2 slot also functions as the optional 2.5 inch hard drive cage slot. If you install the 2.5 inch hard drive cage in the PSU 2 slot, your system will not support the redundancy feature.
Prerequisites

CAUTION: Many repairs may only be done by a certified service technician. You should only perform troubleshooting and simple repairs as authorized in your product documentation, or as directed by the online or telephone service and support team. Damage due to servicing that is not authorized by Dell is not covered by your warranty. Read and follow the safety instructions that are shipped with your product.
- Follow the safety guidelines listed in the Safety instructions section.
- Follow the procedure listed in the Before working inside your system section.
- Remove the PSU/PSU blank, if installed.
- Install the 2.5 inch hard drives in the hard drive cage.
- Route the power and signal cables through the hard drive cage slot.
- Keep the Phillips #1 screwdriver ready.
Steps
- Slide the hard drive cage into the hard drive cage slot in the chassis.
- Secure the hard drive cage to the hard drive cage slot by using the screws.
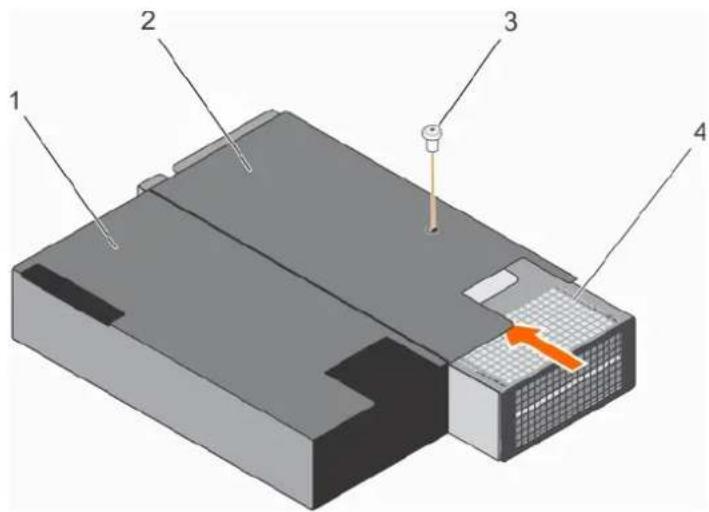
text_image
Technical diagram of a device with numbered components and an orange arrow indicating a specific area or feature.Figure 50. Installing the 2.5 inch hard drive cage
- PSU 1 slot 2. PSU 2 slot/2.5 inch hard drive cage slot
- screw 4. hard drive cage
Next steps
- Connect the power cable to the system board.
- Connect the signal cables to the system board or expansion card.
- Follow the procedure listed in the After working inside your system section.
Related tasks
Before working inside your system
Removing the optional 2.5 inch hard drive cage
Related reference
Safety instructions
Removing the optional 2.5 inch hard drive cage cover
Prerequisites
CAUTION: Many repairs may only be done by a certified service technician. You should only perform troubleshooting and simple repairs as authorized in your product documentation, or as directed by the online or telephone service and support team. Damage due to servicing that is not authorized by Dell is not covered by your warranty. Read and follow the safety instructions that are shipped with your product.
- Follow the safety guidelines listed in the Safety instructions section.
- Follow the procedure listed in the Before working inside your system section.
- Remove the 2.5 inch hard-drive cage. For more information, see removing the optional 2.5 inch hard-drive cage
- Keep the Phillips #1 screwdriver ready.
Steps
- Remove the screws securing the hard drive cage cover to the hard-drive cage.
- Slide the hard-drive cage cover toward the front of the hard-drive cage to disengage it from the slots on the hard-drive cage.
- Lift the hard-drive cage cover away from the hard drive cage.
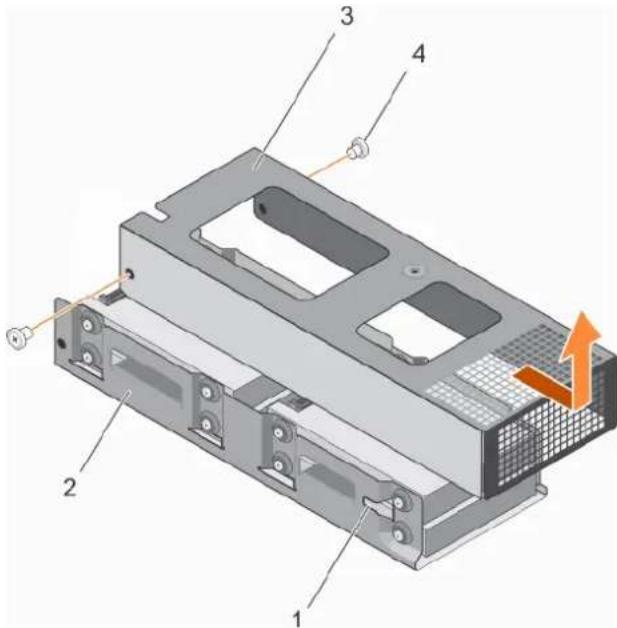
text_image
Technical diagram of a computer drive housing with numbered components and an orange arrow indicating motion or force.Figure 51. Removing the 2.5 inch hard drive cage cover
- slot on the hard-drive cage (2) 2. hard-drive cage
- hard-drive cage cover 4. screw (2)
Next steps
Depending on your requirement, install or remove the 2.5 inch hard drive(s).
Related tasks
Before working inside your system
Installing a 2.5 inch cabled hard drive into the hard drive cage
Removing 2.5 inch cabled hard drives from the hard drive cage
Installing the optional 2.5 inch hard drive cage
Installing the optional 2.5 inch hard drive cage cover
Related reference
Safety instructions
Installing the optional 2.5 inch hard drive cage cover
Prerequisites

CAUTION: Many repairs may only be done by a certified service technician. You should only perform troubleshooting and simple repairs as authorized in your product documentation, or as directed by the online or telephone service and support team. Damage due to servicing that is not authorized by Dell is not covered by your warranty. Read and follow the safety instructions that are shipped with your product.
- Follow the safety guidelines listed in the Safety instructions section.
- Follow the procedure listed in before working inside your system.
- Remove the hard drive cage.
- If applicable, install the 2.5 inch hard drive(s) into the hard drive cage.
- Connect the power and signal cable(s) to the hard drive(s) in the hard drive cage.
Steps
- Lower the hard drive cage cover onto the hard drive cage.
- Slide the hard drive cage cover toward the back of the cage to engage it with the slots on the hard drive cage.
- Use the screws to secure the hard drive cage cover to the hard drive cage.
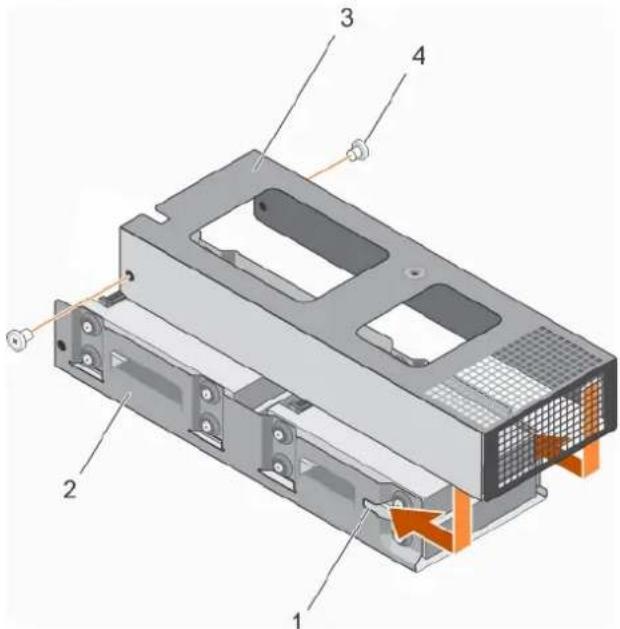
text_image
Technical diagram of a computer drive housing with numbered components and an orange arrow indicating motion direction.Figure 52. Installing the 2.5 inch hard drive cage cover
-
slot on the hard drive cage (2) 2. hard drive cage
-
hard drive cage cover 4. screw (2)
Next steps
- Install the hard drive cage into the PSU 2 slot/2.5 inch hard drive slot on the chassis.
- Follow the procedure listed in after working inside your system.
Related tasks
After working inside your system
Removing the optional 2.5 inch hard drive cage
Removing the optional 2.5 inch hard drive cage cover
Related reference
Safety instructions
Removing 2.5 inch cabled hard drives from the hard drive cage
Prerequisites

CAUTION: Many repairs may only be done by a certified service technician. You should only perform troubleshooting and simple repairs as authorized in your product documentation, or as directed by the online or telephone service and support team. Damage due to servicing that is not authorized by Dell is not covered by your warranty. Read and follow the safety instructions that are shipped with your product.
- Follow the safety guidelines listed in the Safety instructions section.
- Follow the procedure listed in before working inside your system.
- Keep the Phillips #2 screwdriver ready.
- Remove the 2.5 inch hard drive cage.
- Remove the 2.5 inch hard drive cage cover.
About this task

CAUTION: To maintain proper system cooling, a minimum of two hard drives must be installed in hard drive 0/E and 1/F slots.
Steps
- Remove the screws securing the hard drive to the hard drive cage.
- Remove hard drives 0/E and 1/F by performing the following steps:
a) Disconnect the signal/power cable from the hard drives.
b) Lift hard drive O/E out of the hard drive cage.
c) Slide hard drive 1/F out of the hard drive cage.
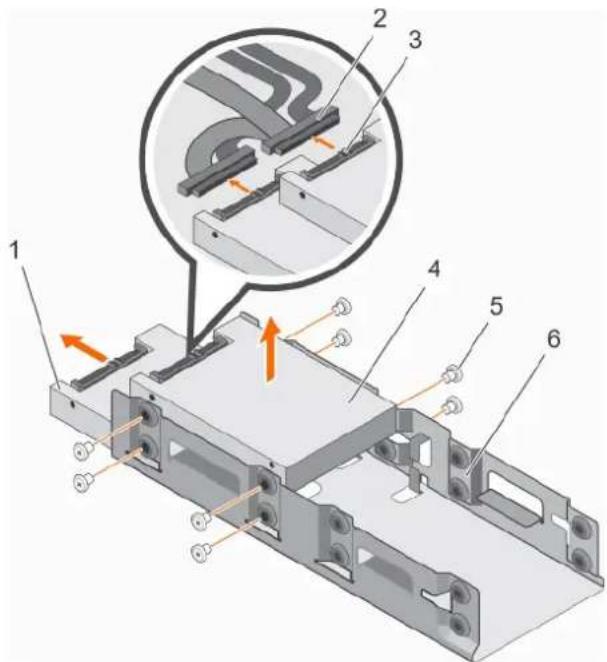
text_image
Technical diagram of a mechanical assembly with numbered components and an inset magnified view highlighting a specific component.Figure 53. Removing a 2.5 inch cabled hard drive (hard drive 0/E and hard drive 1/F) from the hard drive cage
- hard drive 1/F 2. power and signal cable connector (2)
- power and signal cable connector on hard drive 4. hard drive O/E
-
screw (8) 6. hard drive cage
-
If you want to remove hard drives 2/C and 3/D, perform the following steps:
a) Remove hard drives 0/E and 1/F.
b) Disconnect the signal/power cables from hard drive 2/C and 3/D.
c) Remove the signal/power cables routed through the cable clip on the hard drive cage.
d) Lift hard drive 2/C out of the hard drive cage.
e) Slide hard drive 3/D out of the hard drive cage.
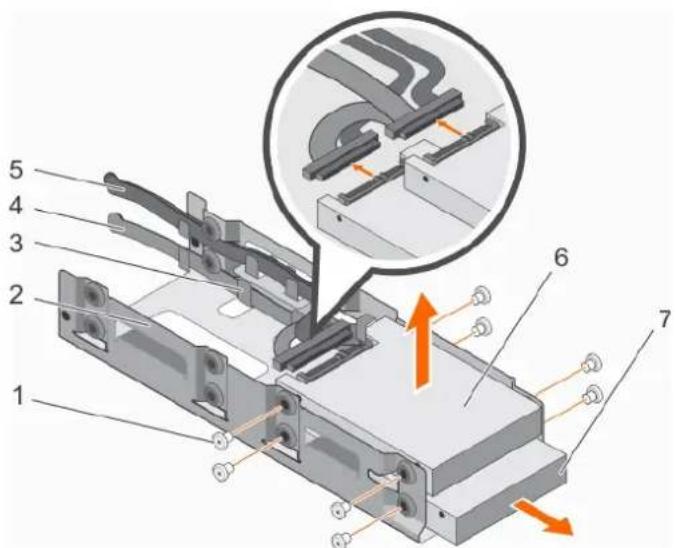
text_image
Technical diagram of a mechanical assembly with numbered components and directional arrows indicating movement or forceFigure 54. Removing a 2.5 inch cabled hard drive (hard drive 2/C and hard drive 3/D) from the hard drive cage
- screw (8) 2. hard drive cage
- cable routing clip 4. power cable
- signal cable 6. hard drive 2/C
- hard drive 3/D
Next steps
- Install the hard drives.
- Install the hard drive cage cover.
- Install the hard drive cage into the hard drive cage slot in the chassis.
Related tasks
Installing a 2.5 inch cabled hard drive into the hard drive cage
Installing the optional 2.5 inch hard drive cage cover
Installing the optional 2.5 inch hard drive cage
Related reference
Safety instructions
Installing a 2.5 inch cabled hard drive into the hard drive cage
Prerequisites

CAUTION: Many repairs may only be done by a certified service technician. You should only perform troubleshooting and simple repairs as authorized in your product documentation, or as directed by the online or telephone service and support team. Damage due to servicing that is not authorized by Dell is not covered by your warranty. Read and follow the safety instructions that are shipped with your product.
- Follow the safety guidelines listed in the Safety instructions section.
- Keep the Phillips #2 screwdriver ready.
- Remove the hard drive cage.
- Remove the hard drive cage cover.
NOTE: Systems with NVLink board configuration do not support the optional 2.5 inch hard drive cage.
NOTE: If you are installing four hard drives, ensure that you install hard drives 3/D and 2/C before you install hard drives 1/F and 0/E.
NOTE: If you are installing two hard drives, install hard drives 1/F and 0/E.
NOTE: To maintain proper system cooling, a minimum of 2 hard drives must be installed in hard drive slots 0/E and 1/F.
Steps
- To install hard drives 3/D and 2/C, perform the following steps:
a) Slide hard drive 3/D into the hard drive cage.
b) Lower hard drive 2/C into the hard drive cage.
c) Secure the hard drives to the hard drive cage by using the screws.
d) Connect the power/signal cable to the hard drives.
e) Route the cables through the cable routing clip on the hard drive cage.
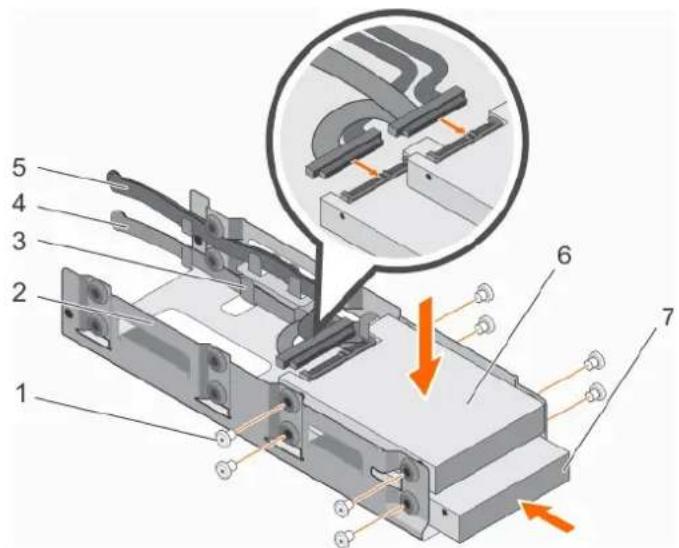
text_image
Technical diagram of a mechanical assembly with numbered components and an inset magnified view highlighting a specific component.Figure 55. Installing a 2.5 inch cabled hard drive (hard drive 2/C and hard drive 3/D) from the hard drive cage
- screw (8) 2. hard drive cage
- cable routing clip 4. power cable
- signal cable 6. hard drive 2/C
-
hard drive 3/D
-
To install hard drives 1/F and 0/E, perform the following steps:
a) Slide hard drive 1/F into the hard drive cage.
b) Lower hard drive O/E into the hard drive cage.
c) Secure the hard drives to the hard drive cage by using the screws.
d) Connect the power/signal cable to the hard drives.
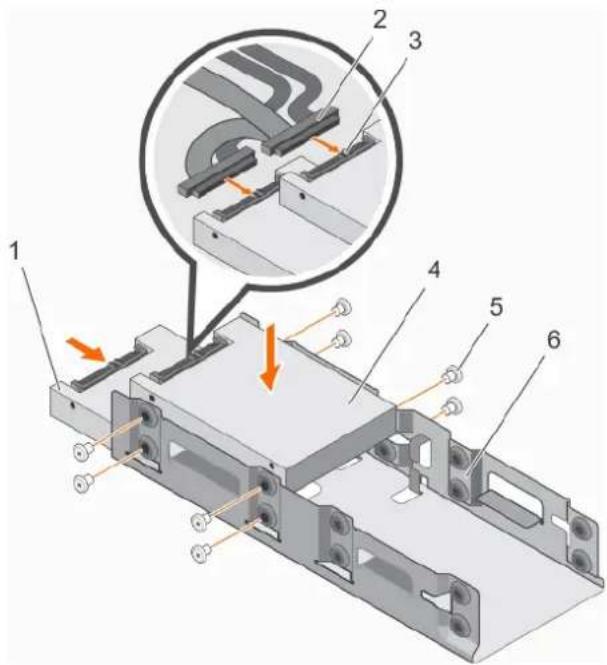
text_image
Technical diagram of a mechanical assembly with numbered components and directional arrows indicating motion or forceFigure 56. Installing a 2.5 inch cabled hard drive (hard drive 0/E and hard drive 1/F) from the hard drive cage
- hard drive 1/F 2. power and signal cable connector (2)
- power and signal cable connector on hard drive 4. hard drive 0/E
- screw (8) 6. hard drive cage
Next steps
- Install the 2.5 inch hard drive cage cover.
- Install the hard drive cage into the hard drive cage slot.
- Connect the power/signal cables to the system board.
- Follow the procedure listed in after working inside your system.
- Enter System Setup and ensure that the hard drive's controller is enabled.
- Exit the System Setup program and reboot the system.
- Install any software required for the hard drive operation as described in the documentation for the hard drive.
Related concepts
System Setup
Related tasks
Installing the optional 2.5 inch hard drive cage cover
Installing the optional 2.5 inch hard drive cage
Removing 2.5 inch cabled hard drives from the hard drive cage
Related reference
Safety instructions
Hard drive cabling diagrams
Cabling SAS and SATA hard drives to the RAID card
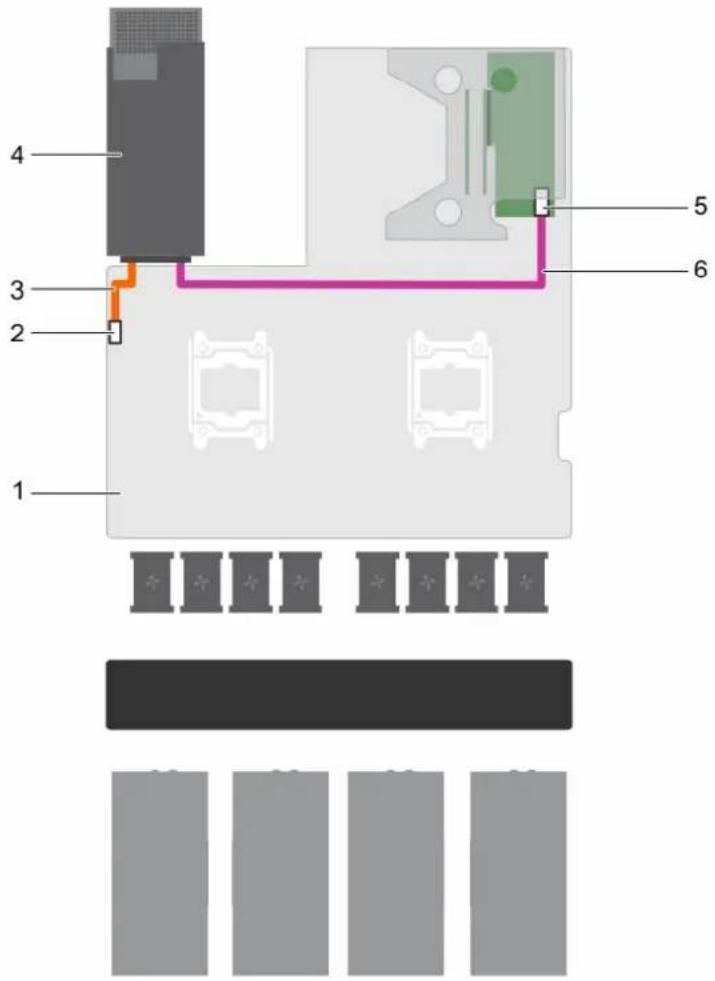
text_image
1 2 3 4 5 6Figure 57. Cabling SAS and SATA hard drives to the RAID card
-
system board 2. 2.5 inch hard drive cage power connector
-
power cable 4. 2.5 inch hard drive cage slot
-
Port A connector on the RAID card 6. signal cable
Cabling SATA hard drives to the SATA connector on the system board
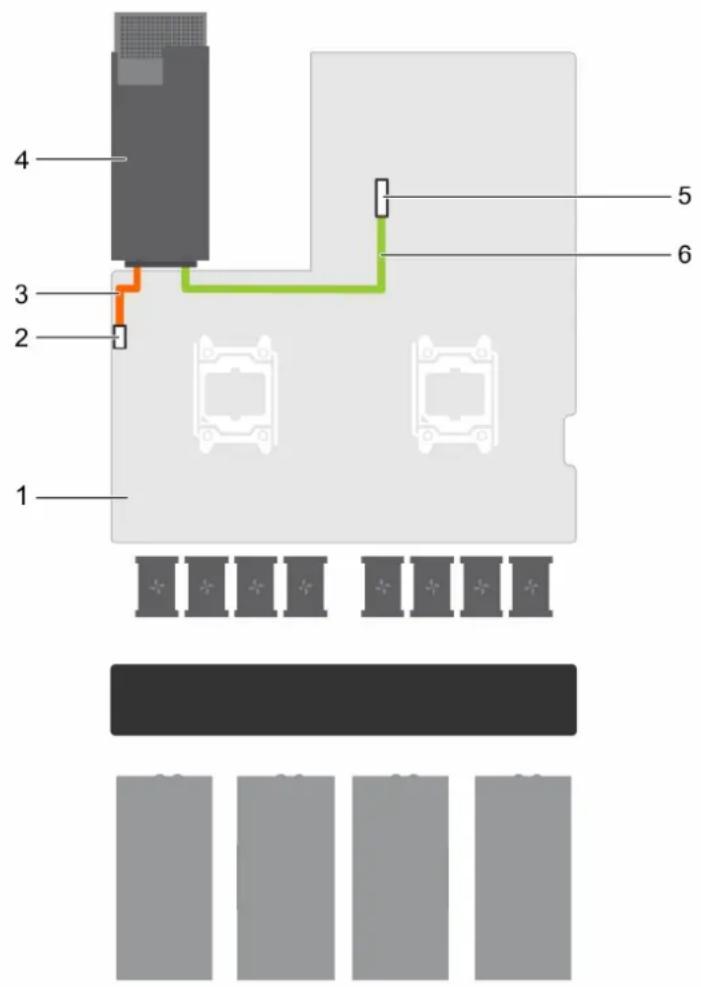
text_image
1 2 3 4 5 6Figure 58. Cabling SATA hard drives to the SATA connector on the system board
- system board 2. 2.5 inch hard drive cage power connector
- power cable 4. 2.5 inch hard drive cage slot
- SATA connector on the system board 6. signal cable
uSATA SSDs
The PowerEdge C4130 supports up to two 1.8 inch uSATA Solid State Drives (SSDs). The uSATA SSDs connect to the system board through the hard drive backplane.

NOTE: Use only SSDs that have been tested and approved for use with the hard drive backplane.
When you format an SSD, allow enough time for the formatting to be completed. High-capacity SSDs can take a number of hours to format.
Removing a 1.8 inch uSATA SSD blank
Prerequisites
- Follow the safety guidelines listed in the Safety instructions section.
CAUTION: To maintain proper system cooling, all empty SSD slots must have SSD blanks installed.
Steps
Press the release button and slide the SSD blank out of the SSD slot.
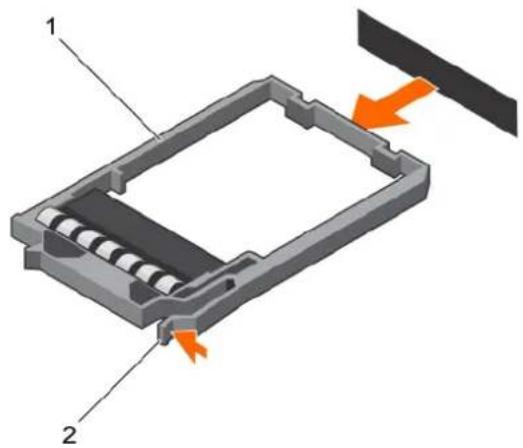
natural_image
3D diagram of a mechanical component with labeled parts and directional arrows (no text or symbols)Figure 59. Removing a 1.8 inch SSD blank
a. SSD blank
b. release tab
Next steps
Install the 1.8 inch uSATA SSD carrier or SSD blank.
Related tasks
Installing a 1.8 inch uSATA SSD carrier
Installing a 1.8 inch uSATA SSD blank
Related reference
Safety instructions
Installing a 1.8 inch uSATA SSD blank
Install the SSD blank if you are removing the SSD permanently or not replacing it immediately.
Prerequisites
Follow the safety guidelines listed in the Safety instructions section.
Steps
Insert the SSD blank into the SSD slot until the release button clicks into place.
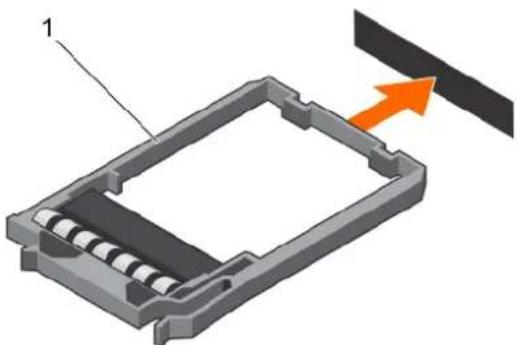
natural_image
3D diagram of a mechanical component with an orange arrow indicating direction, no text or symbols presentFigure 60. Installing a 1.8 inch SSD blank
a. SSD blank
Related tasks
Removing a 1.8 inch uSATA SSD blank
Related reference
Safety instructions
Removing a 1.8 inch uSATA SSD carrier
You need to remove the SSD carrier because the SSD is installed in the SSD carrier.
Prerequisites

CAUTION: Many repairs may only be done by a certified service technician. You should only perform troubleshooting and simple repairs as authorized in your product documentation, or as directed by the online or telephone service and support team. Damage due to servicing that is not authorized by Dell is not covered by your warranty. Read and follow the safety instructions that are shipped with your product.
- Follow the safety guidelines listed in the Safety instructions section.
- Using the management software, prepare the SSD for removal. Wait until the indicators on the SSD carrier signal that the SSD can be removed safely.
If the SSD is online, the green activity fault indicator flashes as the drive is turned off. When the SSD indicators are off, the SSD drive is ready for removal. For more information, see the documentation for the storage controller.

NOTE: The 1.8 inch uSATA SSDs are hot swappable only with software RAID S130. If your system supports software RAID S130 proceed to step 4. If not, continue with step 3.
- Turn off the system, including any attached peripherals.
- Disconnect the system from the electrical outlet and disconnect the peripherals.
Steps
- Press the release button to open the SSD carrier release handle.
- Slide the SSD carrier out of the SSD cage.
The SSD is installed in the SSD carrier.

CAUTION: To maintain proper system cooling, all empty SSD slots must have SSD blanks installed.
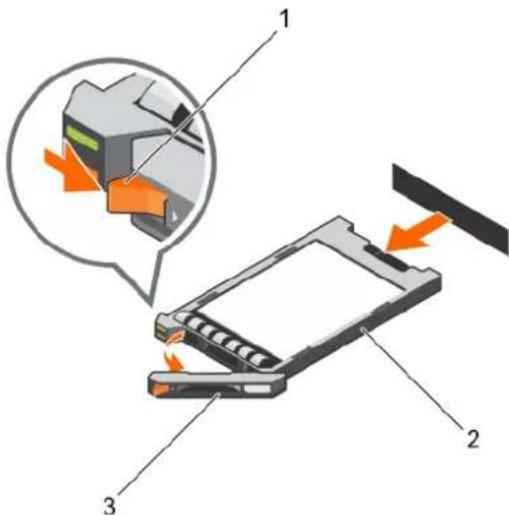
text_image
Diagram illustrating a device's internal structure with labeled components and directional arrows indicating movement or flow.Figure 61. Removing a 1.8 inch uSATA SSD carrier
a. release button
b. SSD carrier
c. SSD carrier handle
Next steps
Depending on your requirement, perform one of the following steps:
- If you are not replacing the SSD immediately, insert an SSD blank in the empty SSD slot.
- Install the 1.8 inch uSATA SSD carrier.
Related tasks
Installing a 1.8 inch uSATA SSD blank
Installing a 1.8 inch uSATA SSD carrier
Related reference
Safety instructions
Installing a 1.8 inch uSATA SSD carrier
Prerequisites

CAUTION: Many repairs may only be done by a certified service technician. You should only perform troubleshooting and simple repairs as authorized in your product documentation, or as directed by the online or telephone service and support team. Damage due to servicing that is not authorized by Dell is not covered by your warranty. Read and follow the safety instructions that are shipped with your product.

CAUTION: Use only SSDs that have been tested and approved for use with the SSD backplane.
- Follow the safety guidelines listed in the Safety instructions section.

NOTE: The 1.8 inch uSATA SSDs are hot swappable only with software RAID S130.
- If your system does not support software RAID S130, turn off your system.
Steps
- If an SSD blank is installed in the SSD slot, remove it.
- Install the SSD in the SSD carrier.
- Press the release button on the front of the SSD carrier, and open the SSD carrier handle.
-
Insert the SSD carrier into the SSD slot until the carrier connects with the backplane.
-
Close the SSD carrier handle to lock the SSD in place.
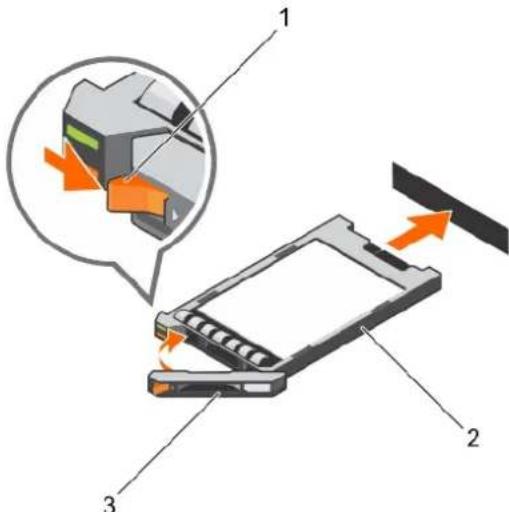
text_image
Diagram illustrating a device's internal structure with labeled components and directional arrows indicating movement or flow.Figure 62. Installing a 1.8 inch uSATA SSD carrier
a. release button
b. SSD carrier
c. SSD carrier handle
Next steps
- Connect the system to the electrical outlet and connect the peripherals
- Turn on the system, including any attached peripherals.
Related tasks
Removing a 1.8 inch uSATA SSD blank
Removing a 1.8 inch uSATA SSD carrier
Related reference
Safety instructions
Removing a 1.8 inch uSATA SSD from a SSD carrier
Prerequisites

CAUTION: Many repairs may only be done by a certified service technician. You should only perform troubleshooting and simple repairs as authorized in your product documentation, or as directed by the online or telephone service and support team. Damage due to servicing that is not authorized by Dell is not covered by your warranty. Read and follow the safety instructions that are shipped with your product.
- Follow the safety guidelines listed in the Safety instructions section.
- Turn off the system, including any attached peripherals.
- Remove the SSD carrier from the SSD cage.

NOTE: The SSD is installed in the SSD carrier.
Steps
- Turn the SSD carrier over.
- Pull the rails of the SSD carrier and lift the SSD out of the SSD carrier.
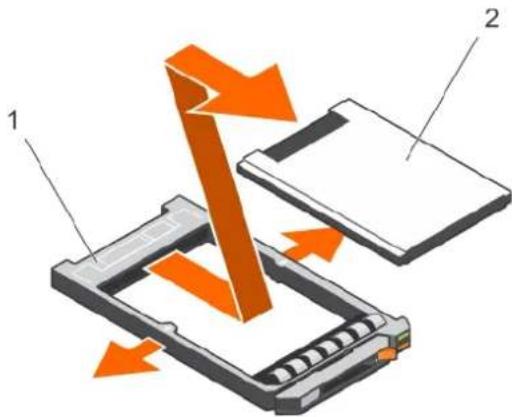
text_image
Diagram illustrating a device's internal structure with labeled components and directional arrows indicating movement or force.Figure 63. Removing a 1.8 inch SSD into a SSD carrier
a. SSD carrier
b. SSD
Next steps
Install the SSD into the SSD carrier.
Related tasks
Installing a 1.8 inch uSATA SSD into a SSD carrier
Related reference
Safety instructions
Installing a 1.8 inch uSATA SSD into a SSD carrier
Prerequisites

CAUTION: Many repairs may only be done by a certified service technician. You should only perform troubleshooting and simple repairs as authorized in your product documentation, or as directed by the online or telephone service and support team. Damage due to servicing that is not authorized by Dell is not covered by your warranty. Read and follow the safety instructions that are shipped with your product.
Steps
- Insert the SSD into the SSD carrier with the connector end of the SSD toward the back of the SSD carrier.
- Press the SSD until it is firmly seated.
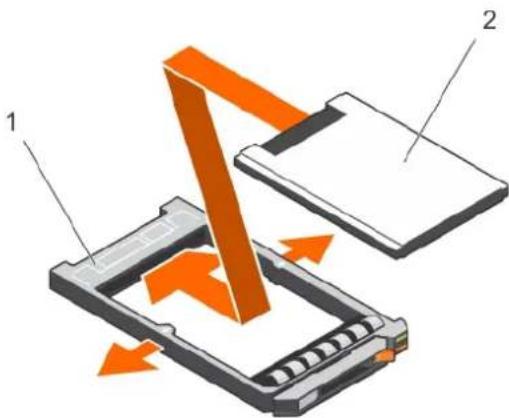
text_image
Diagram illustrating a device's internal structure with labeled components and directional arrows indicating movement or force.Figure 64. Installing a 1.8 inch SSD into a SSD carrier
a. SSD carrier
b. SSD
Removing the 1.8 inch uSATA SSD cage
Prerequisites

CAUTION: Many repairs may only be done by a certified service technician. You should only perform troubleshooting and simple repairs as authorized in your product documentation, or as directed by the online or telephone service and support team. Damage due to servicing that is not authorized by Dell is not covered by your warranty. Read and follow the safety instructions that are shipped with your product.
- Follow the safety guidelines listed in the Safety instructions section.
- Follow the procedure listed in before working inside your system.
- Remove the 1.8 inch SSD(s) from the SSD cage.
Steps
Hold the SSD cage by the edges and lift the cage out of the chassis.
The SSD backplane is attached to the SSD cage. When you lift the SSD cage, the backplane will disengage from the backplane connector on the system board.
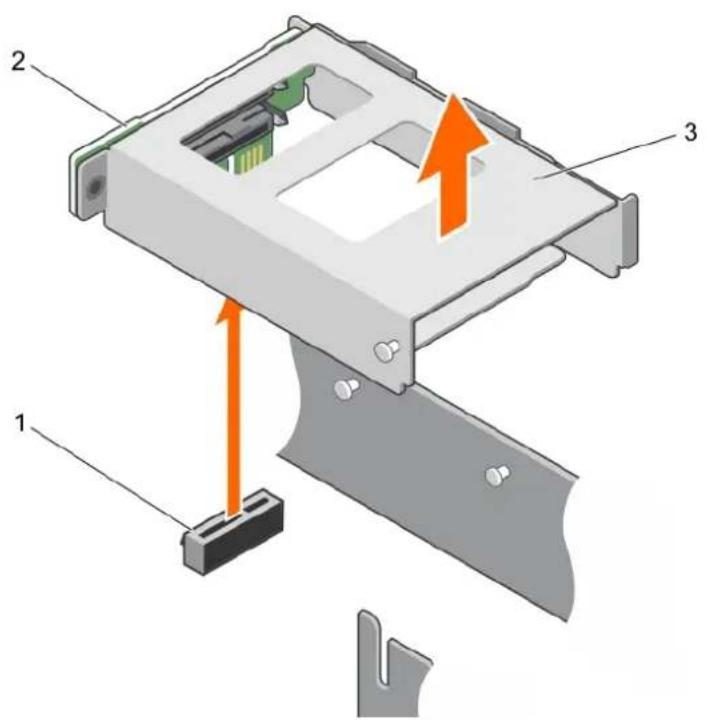
text_image
Diagram of a computer drive with labeled components and directional arrows indicating movement or assembly.Figure 65. Removing the 1.8 inch SSD cage
a. 1.8 inch SSD backplane connector
b. 1.8 inch SSD backplane
c. 1.8 inch SSD cage
Installing the 1.8 inch uSATA SSD cage
Prerequisites

CAUTION: Many repairs may only be done by a certified service technician. You should only perform troubleshooting and simple repairs as authorized in your product documentation, or as directed by the online or telephone service and support team. Damage due to servicing that is not authorized by Dell is not covered by your warranty. Read and follow the safety instructions that are shipped with your product.
- Follow the safety guidelines listed in the Safety instructions section.
- Follow the procedure listed in before working inside your system.
Steps
- Align the tabs on the SSD cage and the PSU 1 slot with the slots on the chassis and SSD cage.
- Press the SSD cage until the SSD backplane engages with the SSD backplane connector on the system board.
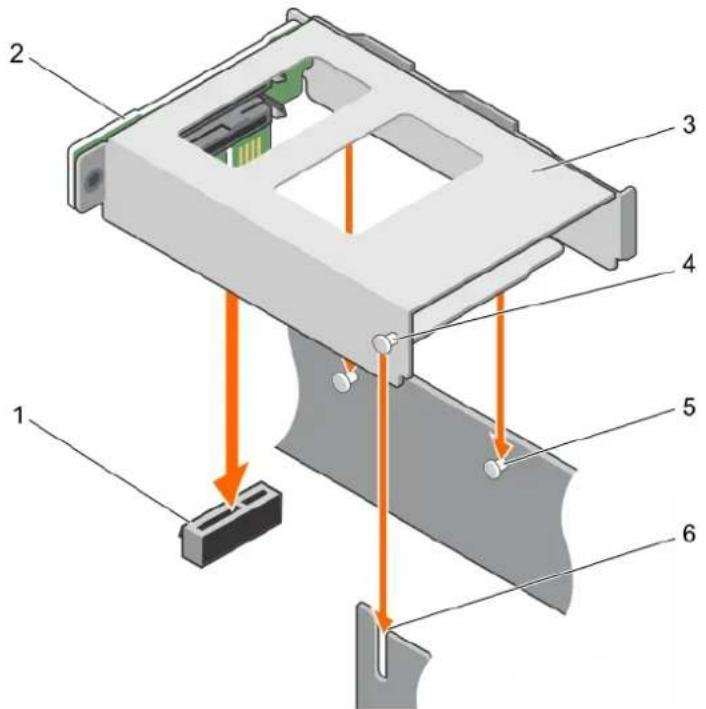
text_image
Diagram of a computer case with numbered components and directional arrows indicating assembly or movementFigure 66. Installing the 1.8 inch SSD cage
- 1.8 inch SSD backplane connector 2. 1.8 inch SSD backplane
- 1.8 inch SSD cage 4. tab on the SSD cage
- tab on the PSU 1 slot (2) 6. slot on the chassis
Next steps
- Install the 1.8 inch SSD carrier or SSD blank(s) into the SSD cage.
- Follow the procedure listed in after working inside your system.
Related tasks
Installing a 1.8 inch uSATA SSD blank Installing a 1.8 inch uSATA SSD carrier Removing the 1.8 inch uSATA SSD cage
Related reference
Safety instructions
Removing the 1.8 inch uSATA SSD backplane
Prerequisites

CAUTION: Many repairs may only be done by a certified service technician. You should only perform troubleshooting and simple repairs as authorized in your product documentation, or as directed by the online or telephone service and support team. Damage due to servicing that is not authorized by Dell is not covered by your warranty. Read and follow the safety instructions that are shipped with your product.
- Follow the safety guidelines listed in the Safety instructions section.
- Follow the procedure listed in before working inside your system.
- Keep the Torx T10 screwdriver ready.
- Remove both the SSD carriers.
- Remove the 1.8 inch SSD cage.

CAUTION: To prevent damage to the drives and backplane, you must remove the SSD carriers from the system before removing the backplane.

CAUTION: You must note the number of each SSD and temporarily label them before removal so that you can replace them in the same locations.
Steps
- Remove the screw securing the SSD backplane to the SSD cage.
- Remove the SSD backplane from the slot on the SSD cage.
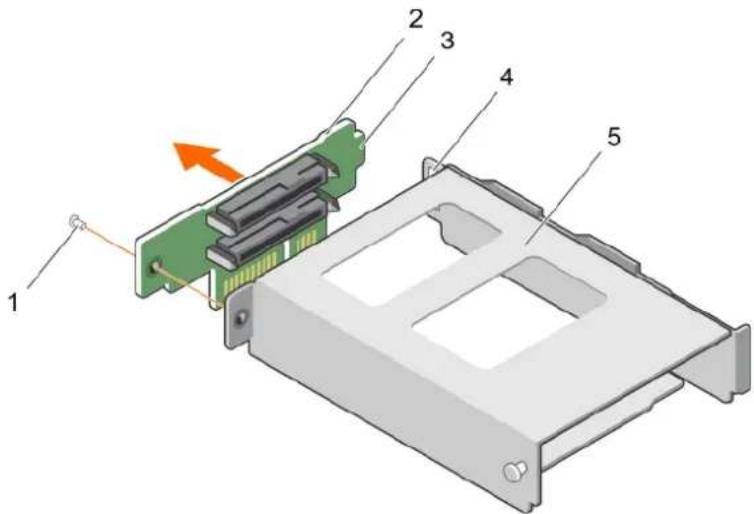
text_image
Diagram of a computer drive showing labeled components including a green internal component and a gray housing with slots.Figure 67. Removing the 1.8 inch SSD backplane
- screw 2. SSD backplane
- tab on the SSD backplane 4. slot on the SSD cage
- SSD cage
Related tasks
Before working inside your system
Installing the 1.8 inch uSATA SSD backplane
Related reference
Safety instructions
Installing the 1.8 inch uSATA SSD backplane
Prerequisites

CAUTION: Many repairs may only be done by a certified service technician. You should only perform troubleshooting and simple repairs as authorized in your product documentation, or as directed by the online or telephone service and support team. Damage due to servicing that is not authorized by Dell is not covered by your warranty. Read and follow the safety instructions that are shipped with your product.
- Follow the safety guidelines listed in the Safety instructions section.
- Follow the procedure listed in before working inside your system.
- Remove the 1.8 inch SSD cage.

NOTE: The 1.8 inch SSD backplane is installed on the back of the 1.8 inch SSD cage.
Steps
- Slide the SSD backplane tab into the slot on the SSD cage.
- Align the screw hole on the SSD backplane with the screw hole on the SSD cage.
- Secure the SSD backplane to the SSD cage by using the screw.
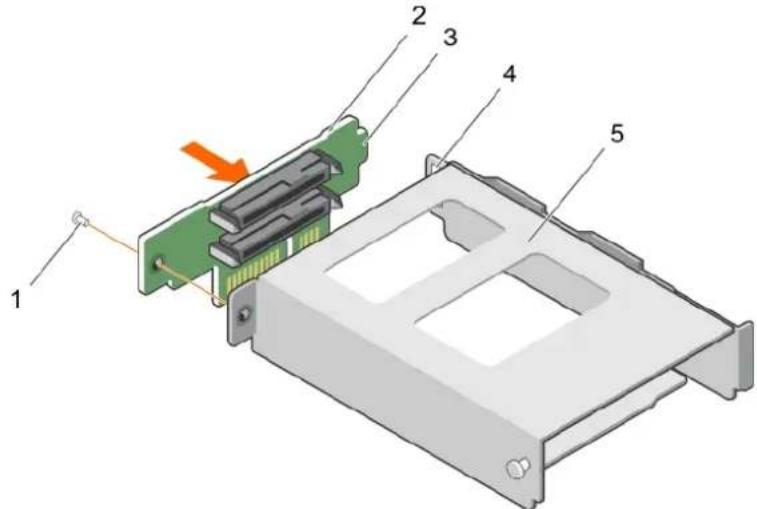
text_image
Technical diagram of a computer drive assembly with labeled components and an orange arrow indicating motion direction.Figure 68. Installing the 1.8 inch SSD backplane
- screw 2. SSD backplane
- tab on the SSD backplane 4. slot on the SSD cage
- SSD cage
Next steps
- Install the SSD cage.
- Follow the procedure listed in after working inside your system.
Related tasks
Installing the 1.8 inch uSATA SSD cage Removing the 1.8 inch uSATA SSD backplane
Related reference
Safety instructions
Internal USB memory key (optional)
An optional USB memory key installed inside your system can be used as a boot device, security key, or mass storage device.
To boot from the USB memory key, configure the USB memory key with a boot image and then specify the USB memory key in the boot sequence in System Setup.
The internal USB port must be enabled in Internal USB Port option in the Integrated Devices screen of System Setup.
The internal USB port is located on the system board.

NOTE: To locate the internal USB port (INT_USB) on the system board, see the System board jumpers and connectors section.
Replacing the optional internal USB memory key
Prerequisites

CAUTION: Many repairs may only be done by a certified service technician. You should only perform troubleshooting and simple repairs as authorized in your product documentation, or as directed by the online or telephone service and support team. Damage due to servicing that is not authorized by Dell is not covered by your warranty. Read and follow the safety instructions that are shipped with your product.
- Follow the safety guidelines listed in the Safety instructions section.
- Follow the procedure listed in the Before working inside your system section.
- Remove the PCIe shroud.
- If installed, disconnect the expansion card riser cables from the system board.
- Remove the expansion card riser.
Steps
- Locate the USB port or USB memory key on the system board.
To locate the USB port, see the System board jumpers and connectors section. - If installed, remove the USB memory key from the USB port.
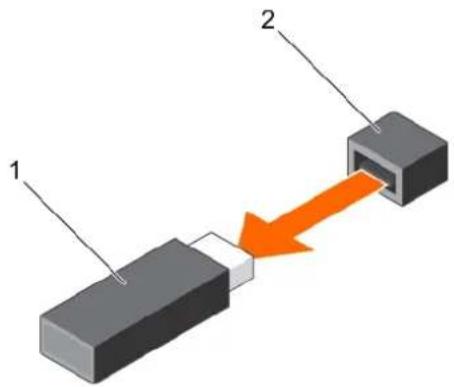
text_image
Diagram showing two connected components labeled 1 and 2 with an orange arrow indicating direction from component 1 to component 2.Figure 69. Removing the internal USB memory key
a. USB memory key
b. USB port
- Insert the replacement USB memory key into the USB port.
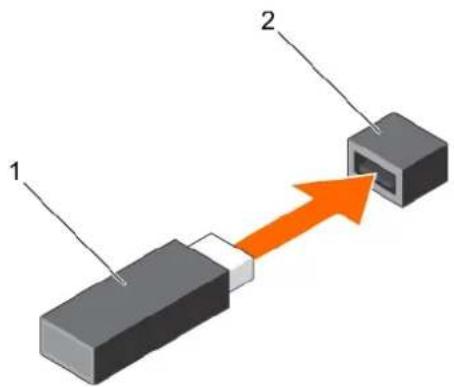
text_image
Diagram showing two connected components labeled 1 and 2 with an orange arrow indicating direction, likely illustrating a process or connection.Figure 70. Installing the internal USB memory key
a. USB memory key
b. USB port
Next steps
- Install the expansion card riser.
-
If installed, connect the expansion card riser cables to the system board.
-
Install the PCIe shroud.
- Follow the procedure listed in the After working inside your system section.
- While booting, press F2 to enter System Setup and verify that the system detects the USB memory key.
Related concepts
System Setup
Related tasks
Before working inside your system
After working inside your system
Removing the PCIe shroud
Installing the PCIe shroud
Installing the expansion card riser cage
Removing the expansion card riser cage
Related reference
Safety instructions
System board connectors
Cable routing clip
Removing the cable routing clip
Prerequisites

CAUTION: Many repairs may only be done by a certified service technician. You should only perform troubleshooting and simple repairs as authorized in your product documentation, or as directed by the online or telephone service and support team. Damage due to servicing that is not authorized by Dell is not covered by your warranty. Read and follow the safety instructions that are shipped with your product.
- Follow the safety guidelines listed in the Safety instructions section.
- Follow the procedure listed in before working inside your system.
- Disconnect and remove the cables routed through the cable routing clip.
- Keep the Phillips #2 screwdriver ready.
Steps
- Remove the screws securing the cable routing clip to the system board.
- Lift the cable routing clip away from the system board.
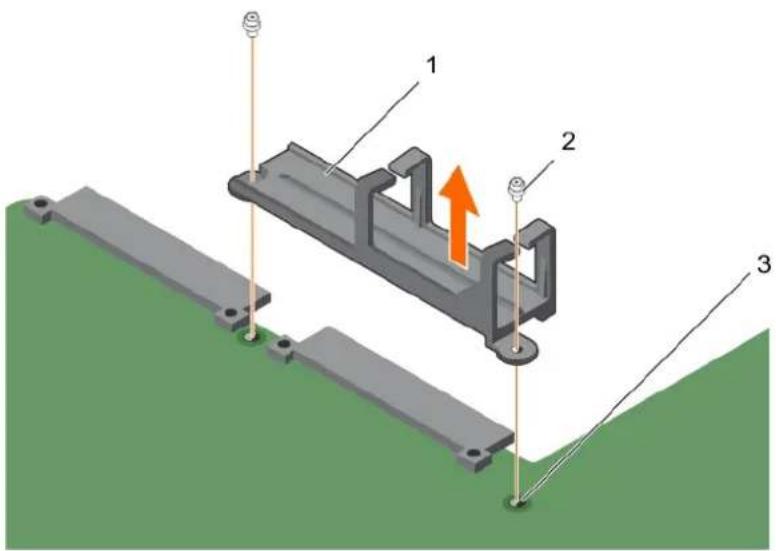
text_image
Technical diagram of a mechanical assembly with labeled components and directional arrow indicating motion or forceFigure 71. Removing the cable routing clip
a. cable routing clip
b. screw (2)
c. screw hole on the system board (2)
Related tasks
Before working inside your system
Installing the cable routing clip
Related reference
Safety instructions
Installing the cable routing clip
Prerequisites

CAUTION: Many repairs may only be done by a certified service technician. You should only perform troubleshooting and simple repairs as authorized in your product documentation, or as directed by the online or telephone service and support team. Damage due to servicing that is not authorized by Dell is not covered by your warranty. Read and follow the safety instructions that are shipped with your product.
- Follow the safety guidelines listed in the Safety instructions section.
- Follow the procedure listed in before working inside your system.
Steps
- Align the screw holes on the cable routing clip with the screw holes on the system board and lower the clip on the system board.
- Secure the cable routing clip to the system board by using the screws.
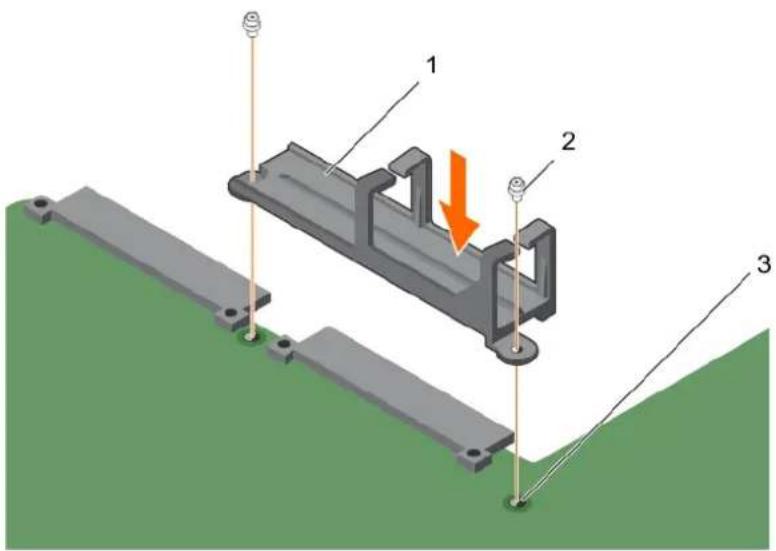
text_image
Technical diagram of a mechanical assembly with labeled components and directional arrow indicating motion or forceFigure 72. Installing the cable routing clip
a. cable routing clip
b. screw (2)
c. screw hole on the system board (2)
Next steps
- Connect and route the cables through the cable routing clip.
- Follow the procedure listed in after working inside your system.
Related tasks
Before working inside your system After working inside your system Removing the cable routing clip
Related reference
Safety instructions
System board
A system board (also known as the motherboard) is the main printed circuit board in the system with different connectors used to connect different components or peripherals of the system. A system board provides the electrical connections to the components in the system to communicate.
Removing the system board
Prerequisites
CAUTION: Many repairs may only be done by a certified service technician. You should only perform troubleshooting and simple repairs as authorized in your product documentation, or as directed by the online or telephone service and support team. Damage due to servicing that is not authorized by Dell is not covered by your warranty. Read and follow the safety instructions that are shipped with your product.
CAUTION: If you are using the Trusted Platform Module (TPM) with an encryption key, you may be prompted to create a recovery key during program or System Setup. Be sure to create and safely store this recovery key. If you replace this
system board, you must supply the recovery key when you restart your system or program before you can access the encrypted data on your hard drives.

CAUTION: Do not attempt to remove the Trusted Platform Module (TPM) from the system board. After the TPM is installed, it is cryptographically bound to that specific system board. Any attempt to remove an installed TPM breaks the cryptographic binding, and it cannot be re-installed or installed on another system board.

NOTE: This is a Field Replaceable Unit (FRU). Removal and installation procedures should be performed only by Dell certified service technicians.
- Follow the safety guidelines listed in the Safety instructions section.
- Follow the procedure listed in the Before working inside your system section.
- Keep the Philips #2 screwdriver ready.
- Remove the following components:
a. PCIe shroud
b. Expansion card riser
c. PSU(s)
d. 2.5 inch hard drive cage, if applicable
e. Internal dual SD module
f. 1.8 inch SSD cage with backplane
g. Internal USB key (if installed)
h. Cooling shroud
i. Heat sink(s)
j. Processor(s)/Processor blank

CAUTION: To prevent damage to the processor pins when replacing a faulty system board, ensure that you cover the processor socket with the processor protective cap.
k. Memory modules and memory module blanks
I. Cable routing clip
- Disconnect all cables from the system board.
Steps
- Remove the screws that secure the system board to the chassis.

CAUTION: Take care not to damage the system identification button while removing the system board from the chassis.

CAUTION: Do not lift the system board by holding a memory module, processor, or other components.
- Lift the system board by holding both the system board holders, and slide the system board toward the front of the chassis. The connectors are disengaged from the back of the chassis slots.
- Lift the system board out of the chassis.
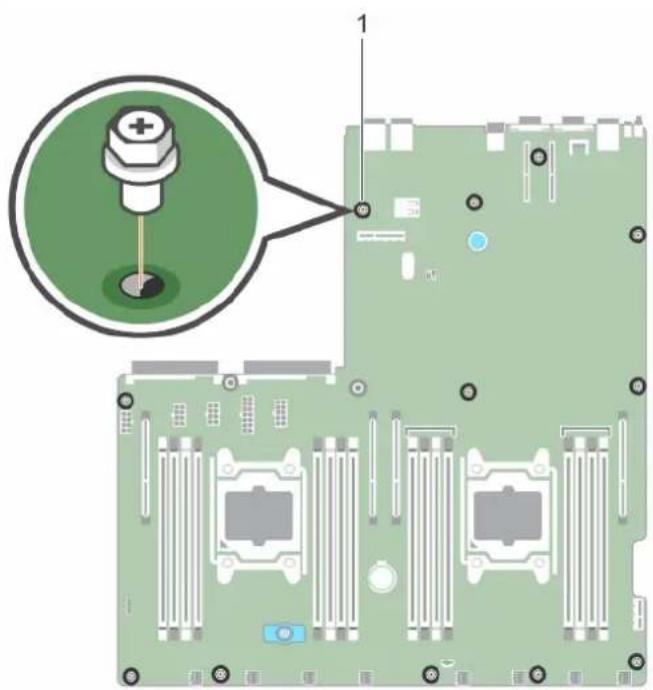
text_image
Diagram of a computer motherboard with labeled component and magnified view showing a key inserted into the top panel.Figure 73. Removing the screws on the system board a. screw (12)
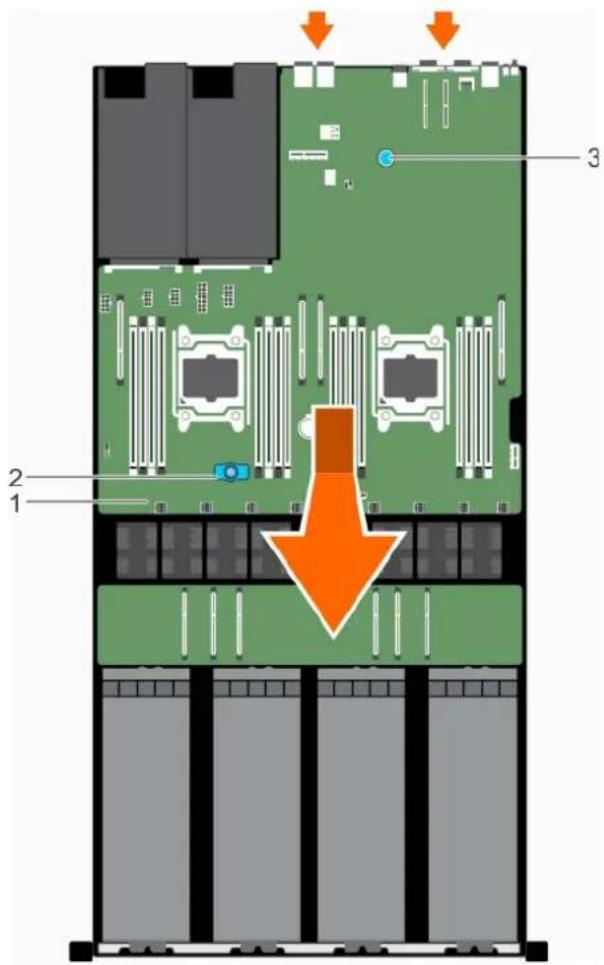
text_image
Diagram of a server rack with labeled components and an orange arrow indicating a specific area or process.Figure 74. Removing the system board
a. system board
b. system board holder (front)
c. system board holder (back)
Next steps
Install the system board.
Related tasks
Before working inside your system
Installing the system board
Removing the PCIe shroud
Removing the expansion card riser cage
Removing an AC power supply unit
Removing the optional 2.5 inch hard drive cage
Removing an internal SD card
Removing the 1.8 inch uSATA SSD cage
Replacing the optional internal USB memory key
Removing the cooling shroud
Removing a heat sink
Removing a processor
Removing memory modules
Removing the cable routing clip
Related reference
Safety instructions
Installing the system board
Prerequisites

NOTE: This is a Field Replaceable Unit (FRU). Removal and installation procedures should be performed only by Dell certified service technicians.

CAUTION: Many repairs may only be done by a certified service technician. You should only perform troubleshooting and simple repairs as authorized in your product documentation, or as directed by the online or telephone service and support team. Damage due to servicing that is not authorized by Dell is not covered by your warranty. Read and follow the safety instructions that are shipped with your product.
- Follow the safety guidelines listed in the Safety instructions section.
- Follow the procedure listed in before working inside your system.
- Keep the Phillips #2 screwdriver ready.
Steps
- Unpack the new system board.

CAUTION: Do not lift the system board by holding a memory module, processor, or other components.

CAUTION: Take care not to damage the system identification button while placing the system board into the chassis.
- Hold the system board holders and lower the system board into the chassis at an angle so that the connectors on the back of the system board engage with the slots on the back of the chassis.
- Push the system board toward the back of the chassis until the board is firmly seated.
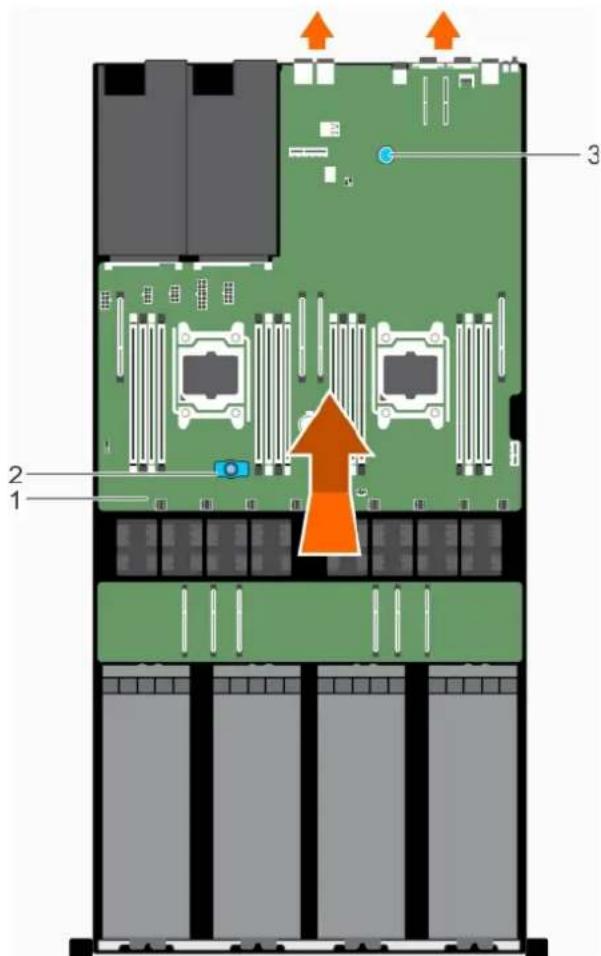
text_image
Diagram of a server rack with labeled components and an orange arrow indicating a specific area or component.Figure 75. Installing the system board
a. system board
b. system board holder (front)
c. system board holder (back)
- Secure the system board to the chassis by using the screws.
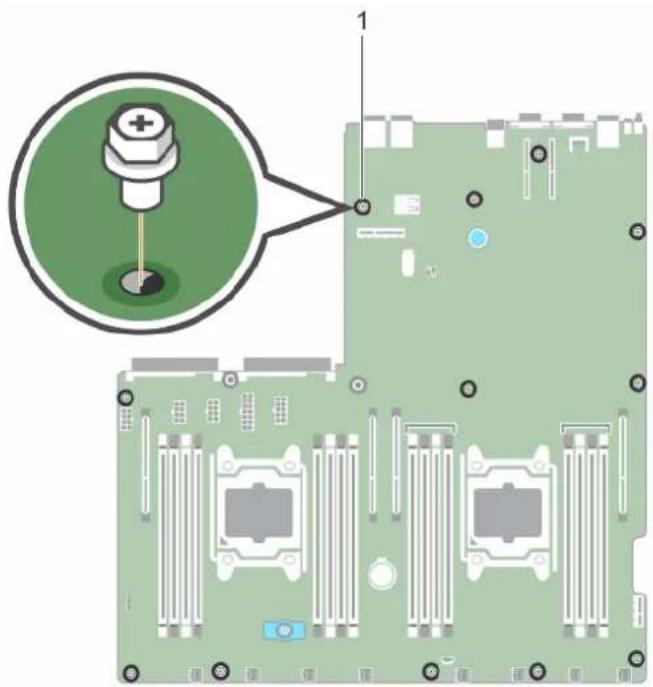
text_image
Diagram of a computer motherboard with labeled component and magnified view showing a key inserted into the top panel.Figure 76. Installing the screws on the system board
a. screw (12)
Next steps
- If applicable, install the Trusted Platform Module (TPM).
- Replace the following components:
a. Internal USB key, if applicable
b. Internal dual SD module
c. Expansion card riser
d. PSU(s)
e. 2.5 inch hard drive cage, if applicable
f. Processors(s)/processor blank(s)
g. Heat sink(s)
h. PCIe shroud
i. Memory modules and memory module blanks
j. 1.8 inch SSD cage with the backplane
k. Cooling shroud
I. Cable routing clip
- Reconnect all cables to the system board.

NOTE: Ensure that the cables inside the system are routed along the chassis wall and the GPU and hard drive cables are routed through the cable routing clip.
- Follow the procedure listed in after working inside your system.
- Ensure that you perform the following steps:
a. Use the Easy Restore feature to restore the service tag.
b. If the service tag is not backed up in the backup flash device, enter the system service tag manually.
c. Update the BIOS and iDRAC versions.
d. Re-enable the Trusted Platform Module (TPM).
Related tasks
Before working inside your system
After working inside your system
Removing the system board
Replacing the optional internal USB memory key
Installing an internal SD card Installing the expansion card riser cage Installing an AC power supply unit Installing the optional 2.5 inch hard drive cage Installing a processor Installing a heat sink Installing the PCIe shroud Installing memory modules Installing the 1.8 inch uSATA SSD backplane Installing the cooling shroud Installing the cable routing clip
Related reference
Safety instructions
Entering the system Service Tag by using System Setup
If Easy Restore fails to restore the Service Tag, use System Setup to enter the Service Tag.
Steps
- Turn on the system.
- Press F2 to enter System Setup.
- Click Service Tag Settings.
- Enter the Service Tag.

NOTE: You can enter the Service Tag only when the Service Tag field is empty. Ensure that you enter the correct Service Tag. After the Service Tag is entered, it cannot be updated or changed.
-
Click OK.
-
Import your new or existing iDRAC Enterprise license.
For more information, see the Integrated Dell Remote Access Controller User's Guide at Dell.com/poweredgemanuals.
Restoring the Service Tag by using the Easy Restore feature
By using the Easy Restore feature, you can restore your Service Tag, license, UEFI configuration, and the system configuration data after replacing the system board. All data is automatically backed up in a backup flash device. If BIOS detects a new system board and the Service Tag in the backup flash device, BIOS prompts the user to restore the backup information.
Steps
- Turn on the system.
If BIOS detects a new system board, and if the Service Tag is present in the backup flash device, BIOS displays the Service Tag, the status of the license, and the UEFI Diagnostics version.
-
Perform one of the following steps:
-
Press Y to restore the Service Tag, license, and diagnostics information.
- Press N to navigate to the Dell Lifecycle Controller based restore options.
- Press F10 to restore data from a previously created Hardware Server Profile.
After the restore process is complete, BIOS prompts to restore the system configuration data.
-
Perform one of the following steps:
-
Press Y to restore the system configuration data.
- Press N to use the default configuration settings.
After the restore process is complete, the system restarts.
Trusted Platform Module
Trusted Platform Module (TPM) is a dedicated microprocessor designed to secure hardware by integrating cryptographic keys into devices. A software can use a Trusted Platform Module to authenticate hardware devices. As each TPM chip has a unique and secret RSA key burned in as it is produced, it can perform the platform authentication.

CAUTION: Do not attempt to remove the Trusted Platform Module (TPM) from the system board. After the TPM is installed, it is cryptographically bound to that specific system board. Any attempt to remove an installed TPM breaks the cryptographic binding, and it cannot be re-installed or installed on another system board.

NOTE: This is a Field Replaceable Unit (FRU). Removal and installation procedures must be performed only by Dell certified service technicians.
Installing the Trusted Platform Module
Prerequisites

CAUTION: Many repairs may only be done by a certified service technician. You should only perform troubleshooting and simple repairs as authorized in your product documentation, or as directed by the online or telephone service and support team. Damage due to servicing that is not authorized by Dell is not covered by your warranty. Read and follow the safety instructions that are shipped with your product.
- Follow the safety guidelines listed in the Safety instructions section.
- Follow the procedure listed in the Before working inside your system section.
Steps
- Locate the TPM connector on the system board.

NOTE: To locate the TPM connector on the system board, see the System board connectors section.
- Align the edge connectors on the TPM with the slot on the TPM connector.
- Insert the TPM into the TPM connector such that the plastic rivet aligns with the slot on the system board.
- Press the plastic rivet until the rivet snaps into place.
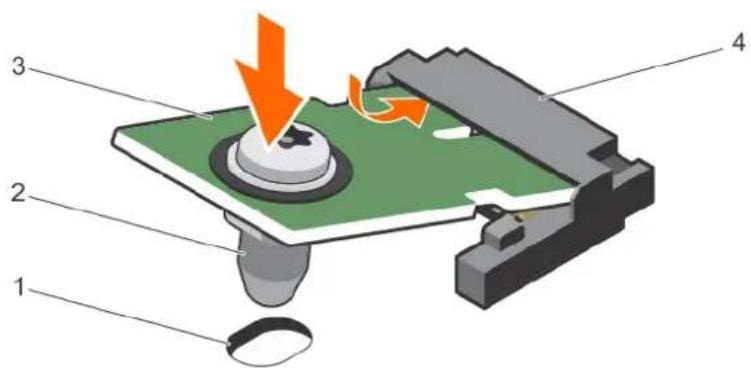
text_image
Diagram of a device with numbered parts and an orange arrow indicating motion or force, labeled 1 to 4.Figure 77. Installing the TPM
- rivet slot on the system board 2. plastic rivet
- TPM 4. TPM connector
Next steps
- Install the system board.
- Follow the procedure listed in the After working inside your system section.
Related tasks
Before working inside your system
Initializing the TPM for BitLocker users
Steps
Initialize the TPM.
For more information about initializing the TPM, see https://technet.microsoft.com/en-us/library/cc753140.aspx.
The TPM Status changes to Enabled, Activated.
Initializing the TPM for TXT users
Steps
- While booting your system, press F2 to enter System Setup.
- On the System Setup Main Menu screen, click System BIOS > System Security Settings.
- From the TPM Security option, select On with Pre-boot Measurements.
- From the TPM Command option, select Activate.
- Save the settings.
- Restart your system.
- Enter System Setup again.
- On the System Setup Main Menu screen, click System BIOS > System Security Settings.
- From the Intel TXT option, select On.
Cooling fans
Your system supports eight cabled cooling fans.
Related tasks
CAUTION: Many repairs may only be done by a certified service technician. You should only perform troubleshooting and simple repairs as authorized in your product documentation, or as directed by the online or telephone service and support team. Damage due to servicing that is not authorized by Dell is not covered by your warranty. Read and follow the safety instructions that are shipped with your product.
- Follow the safety guidelines listed in the Safety instructions section.
- Follow the procedure listed in before working inside your system.
- Remove the system top cover (front).

NOTE: The procedure for removing each fan is identical.
Steps
- Disconnect the cooling fan power cable from the system board.
- Hold the cooling fan by its edges and lift the cooling fan out of the chassis.
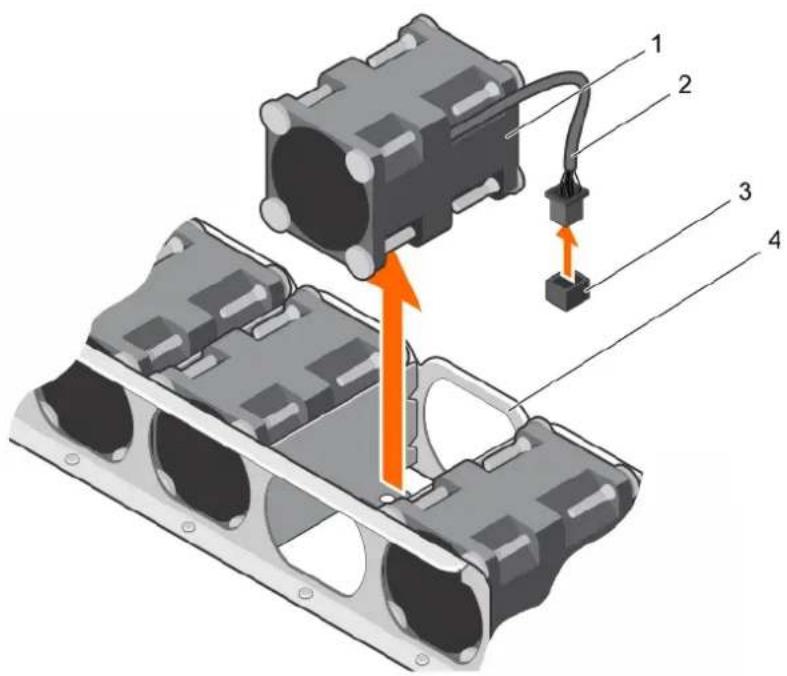
text_image
Technical diagram of an engine cylinder assembly with numbered components and orange arrows indicating motion or force direction.Figure 78. Removing cooling fan
- Install the cooling fan.
Related tasks
Before working inside your system Installing a cooling fan
Related reference
Safety instructions
CAUTION: Many repairs may only be done by a certified service technician. You should only perform troubleshooting and simple repairs as authorized in your product documentation, or as directed by the online or telephone service and support team. Damage due to servicing that is not authorized by Dell is not covered by your warranty. Read and follow the safety instructions that are shipped with your product.
- Follow the safety guidelines listed in the Safety instructions section.
- Follow the procedure listed in before working inside your system.
- Remove the system top cover (front).
Steps
- Hold the cooling fan by the sides with the cable end facing the system board.

CAUTION: Make sure the airflow arrows on the side of the fans are pointing to the rear of the chassis. If the cooling fan is installed in reverse direction the system may overheat.
-
Align the cooling fan with the slot on the chassis and slide the fan into the slot.
-
Connect the cooling fan power cable to the cooling fan connector on the system board.

text_image
Technical diagram of an engine cylinder assembly with numbered components and a highlighted connection pointFigure 79. Installing cooling fan
- Install the system top cover (front).
- Follow the procedure listed in after working inside your system.
Related tasks
Before working inside your system After working inside your system Installing the system top cover (front) Removing the system top cover (front) Removing a cooling fan
Related reference
Safety instructions
Graphics processing unit

NOTE: This is a Field Replaceable Unit (FRU). Removal and installation procedures should be performed only by Dell certified service technicians.
PowerEdge C4130 supports two form factors of GPUs:
- Up to four PCIe GPUs supported with the GPU switch board or system board.
- Four SXM2 GPUs supported with the NVLink board.
Related tasks
PCIe Graphics processing unit SXM2 Graphics processing unit
PCIe Graphics processing unit
The following are the high-level steps that you must perform to replace the PCIe GPUs:
- Remove the GPU blank.
- Remove the GPU riser cable from the system board.
- Remove the GPU.
- Remove the GPU riser cable board.
- Remove the GPU brackets from the GPU removed from your system.
- Remove the custom GPU brackets from the replacement GPU.
- Remove the optional GPU switch board.
- Install the optional GPU switch board.
- Install the custom GPU brackets on the GPU removed from your system.
- Install the GPU brackets on the replacement GPU.
- Install the GPU riser cable board.
- Install the GPU blank.
- Install the GPU.
- Install the GPU riser cable on the system board.
GPU installation guidelines
- The processor must be of 145 W or less.
- Due to the high power consumption of GPUs, the ambient system inlet temperature is restricted to 25^ to ensure adequate system cooling when one or more GPU cards are installed.
NOTE: Certain system configurations may require reduction in the maximum ambient system inlet temperature limit. The performance of the system may be impacted when operating above the maximum temperature limit or with a faulty fan. - All GPUs must be of the same type and model.
- You can install up to four GPUs.


NOTE: Incorrect removal and installation of the GPUs will cause operational issues to your system.
Removing a GPU blank
You can remove the GPU blank only in configuration D. To remove GPU 2 in configuration D, remove the GPU blank from GPU slot 1. Do not remove GPU blanks in any other configuration.
Prerequisites

CAUTION: Many repairs may only be done by a certified service technician. You should only perform troubleshooting and simple repairs as authorized in your product documentation, or as directed by the online or telephone service and support team. Damage due to servicing that is not authorized by Dell is not covered by your warranty. Read and follow the safety instructions that are shipped with your product.

NOTE: This is a Field Replaceable Unit (FRU). Removal and installation procedures should only be done by Dell certified service technicians.
- Follow the safety guidelines listed in the Safety instructions section.
- Follow the procedure listed in the Before working inside your system section.
- Remove the system top cover (front).
Steps
- Hold the back of the GPU blank and lift it at an angle to release it from the guide pins on the front inner wall of the chassis.
- Lift the GPU blank out of the chassis.
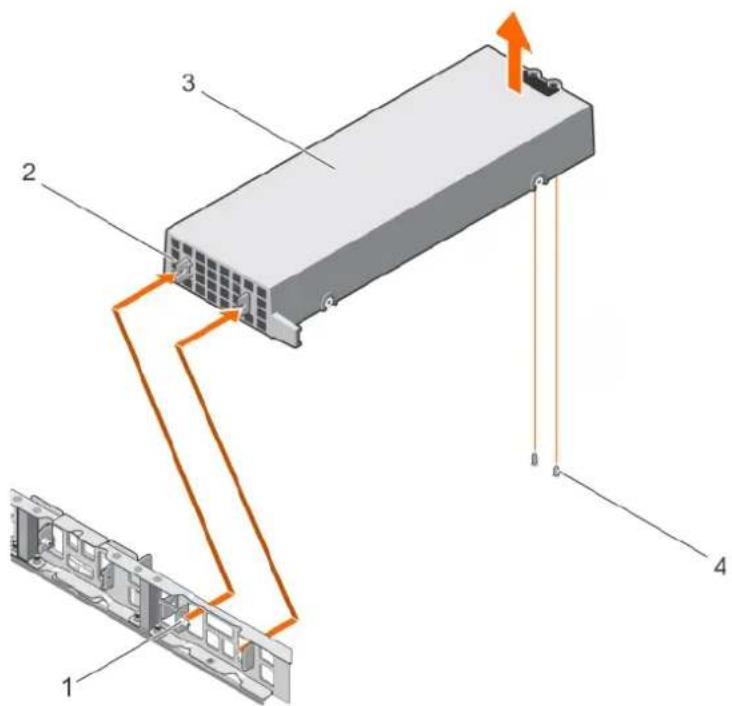
text_image
Diagram of a server rack with labeled components and orange arrows indicating connection to the rack, showing structural parts and wiring.Figure 80. Removing a GPU blank
- guide pin on the front inner wall of the chassis (2) 2. slot on the GPU blank (2)
- GPU blank 4. guide pin on the chassis (2)
Related tasks
Before working inside your system Installing the system top cover (front) Installing a GPU blank
Related reference
Safety instructions
Removing a GPU riser cable from the system board
Prerequisites
CAUTION: Many repairs may only be done by a certified service technician. You should only perform troubleshooting and simple repairs as authorized in your product documentation, or as directed by the online or telephone service and support team. Damage due to servicing that is not authorized by Dell is not covered by your warranty. Read and follow the safety instructions that are shipped with your product.
CAUTION: The GPU riser cables should be removed before removing the GPUs to prevent pin damage in the GPU connectors on the system board.
NOTE: This is a Field Replaceable Unit (FRU). Removal and installation procedures should only be done by Dell certified service technicians.
- Follow the safety guidelines listed in the Safety instructions section.
- Follow the procedure listed in the Before working inside your system section.
Steps
- Press the release latches located on the GPU riser cable connector on the system board.
NOTE: Pressing the release latches will not eject the GPU riser cable from the system board.
- Pull the GPU riser cable out of the GPU riser cable connector on the system board.
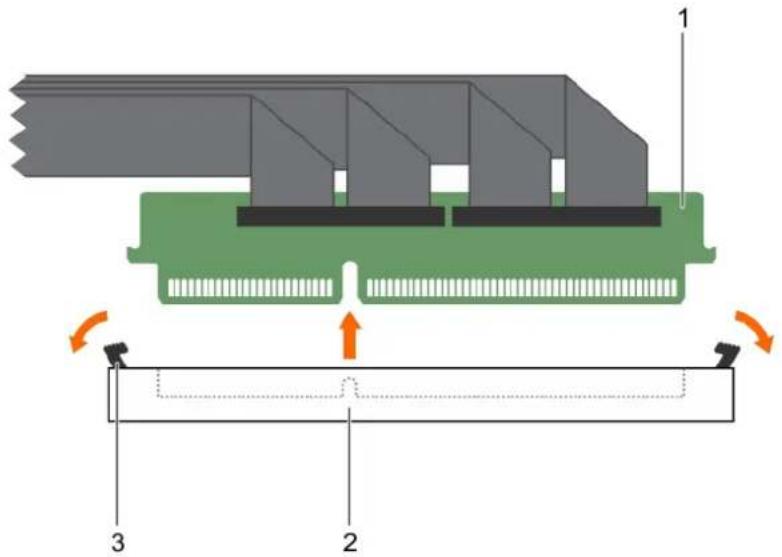
text_image
Technical diagram of a mechanical component with labeled parts and directional arrows indicating motion or assembly.Figure 81. Removing a GPU riser cable from the system board
a. riser cable connector
b. riser cable connector on the system board
c. release latch (2)
Next steps
Remove the GPU.
Related tasks
Before working inside your system
Removing a GPU
Related reference
Safety instructions
Removing a GPU
To remove GPU 2, remove GPU 1 first and to remove GPU 4, remove GPU 3 first.
Prerequisites

CAUTION: Many repairs may only be done by a certified service technician. You should only perform troubleshooting and simple repairs as authorized in your product documentation, or as directed by the online or telephone service and support team. Damage due to servicing that is not authorized by Dell is not covered by your warranty. Read and follow the safety instructions that are shipped with your product.

NOTE: This is a Field Replaceable Unit (FRU). Removal and installation procedures should be performed only by Dell certified service technicians.
- Follow the safety guidelines listed in the Safety instructions section.
- Remove the GPU riser cables connected to the switch board or system board.

CAUTION: The GPU riser cables should be removed before removing the GPUs to prevent pin damage in the GPU connectors on the system board.
- Disconnect the power cables connected to the system board.
Steps
- Hold the GPU by the support brackets, and lift the GPU at an angle to release it from the guide pins on the front inner wall of the chassis.

NOTE: Do not hold the GPU by the GPU riser cable board while removing the GPU.
- Lift the GPU out of the chassis.

CAUTION: While removing the GPU out of the chassis ensure that the guide pins on the chassis do not scrape the GPU.
- Disconnect the power cable connected to the GPU.
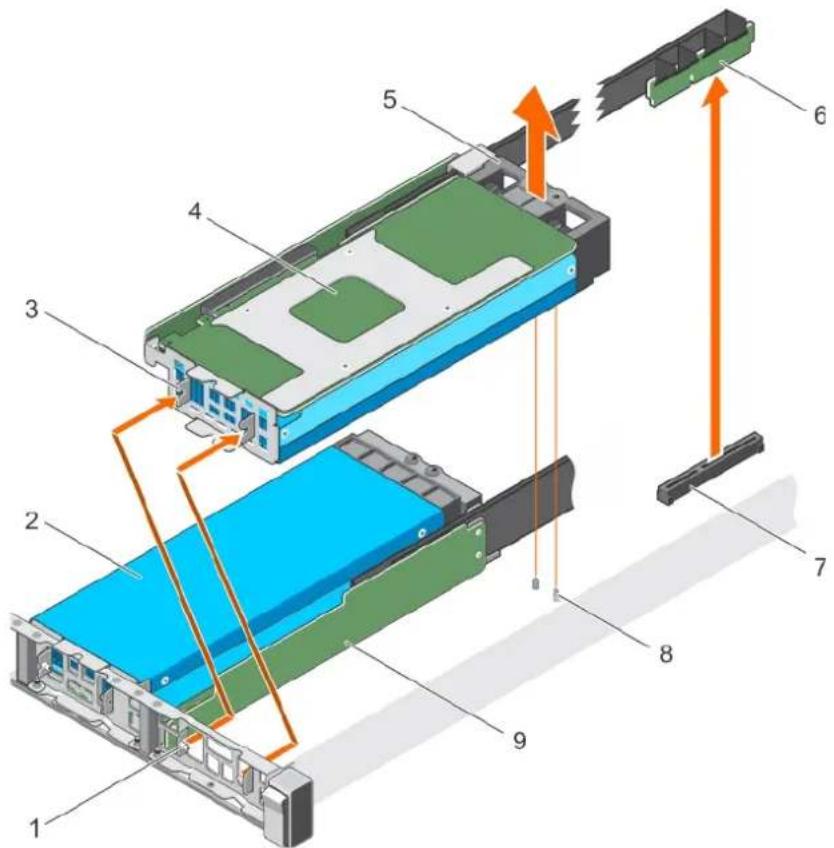
text_image
Technical diagram of a device chassis with numbered components and directional arrows indicating assembly or movement.Figure 82. Removing the GPU
- guide pin on the front inner wall of the chassis (2) 2. GPU 2
- slot on the GPU I/O bracket (2) 4. GPU 1
- GPU support bracket 6. GPU riser cable
- GPU connector on the system board or on the switch board 8. Guide pins on the chassis
- GPU riser cable board
Next steps
Remove the GPU riser cable board.
Related tasks
Removing a GPU riser cable from the system board
Installing a GPU
Removing a GPU riser cable board
Related reference
Safety instructions
Removing a GPU riser cable board
Prerequisites

CAUTION: Many repairs may only be done by a certified service technician. You should only perform troubleshooting and simple repairs as authorized in your product documentation, or as directed by the online or telephone service and support team. Damage due to servicing that is not authorized by Dell is not covered by your warranty. Read and follow the safety instructions that are shipped with your product.

NOTE: This is a Field Replaceable Unit (FRU). Removal and installation procedures should be performed only by Dell certified service technicians.
- Follow the safety guidelines listed in the Safety instructions section.
- Keep the Philips #2 screwdriver ready.
- Remove the GPU from the chassis.
- Disconnect the power cables connected to the GPU.
Steps
- Remove the screws securing the GPU riser cable board to the GPU.
- Pull the GPU riser cable board to disengage the connector on the GPU riser cable board from the GPU.
- Remove the GPU riser cable routed through the GPU riser cable clip.
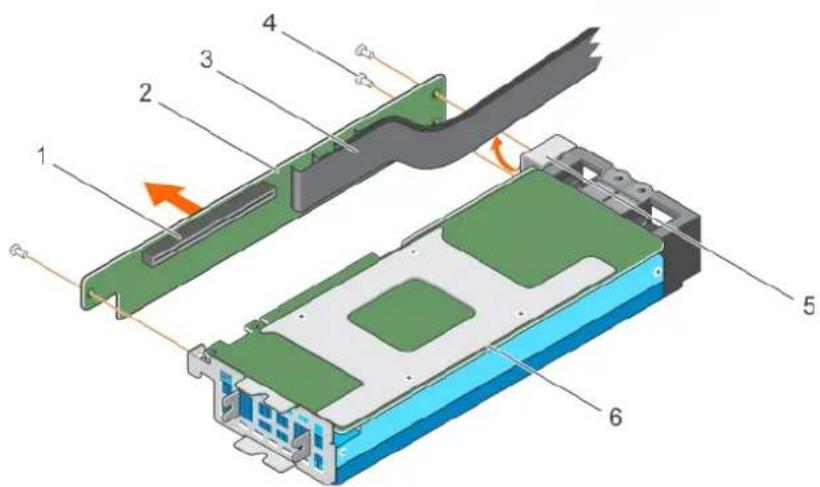
text_image
Technical diagram of a device chassis with numbered components and directional arrows indicating movement or assembly.Figure 83. Removing a GPU riser cable board
-
connector on the GPU riser cable board 2. GPU riser cable board
-
GPU riser cable 4. screw (3)
-
GPU riser cable clip 6. GPU
Next steps
Removing the custom GPU brackets from the GPUs removed from your system.
Related tasks
Removing the custom GPU brackets from the GPUs removed from your system Installing a GPU riser cable board
Related reference
Safety instructions
Removing the custom GPU brackets from the GPUs removed from your system
The Nvidia, Intel, or AMD brackets are installed on the Nvidia, Intel, or AMD GPUs shipped with your system. These brackets should be removed from the Nvidia, Intel, or AMD GPUs removed from your system and installed on the replacement GPUs.
Prerequisites

CAUTION: Many repairs may only be done by a certified service technician. You should only perform troubleshooting and simple repairs as authorized in your product documentation, or as directed by the online or telephone service and support team. Damage due to servicing that is not authorized by Dell is not covered by your warranty. Read and follow the safety instructions that are shipped with your product.

NOTE: This is a Field Replaceable Unit (FRU). Removal and installation procedures should be performed only by Dell certified service technicians.
- Follow the safety guidelines listed in the Safety instructions section.
- Keep the Philips #1 and #2 screwdrivers ready.
- Remove the GPU riser cable board.

NOTE: Depending on the type of Nvidia GPUs supported on your system, the location of the screws and type of GPU brackets will vary.
Steps
- Remove the screws securing the front I/O bracket to the GPU, and remove the I/O bracket.
- Remove the screws securing the support bracket to the GPU, and remove the support bracket.
Removing the custom Nvidia GPU I/O brackets and the support brackets:
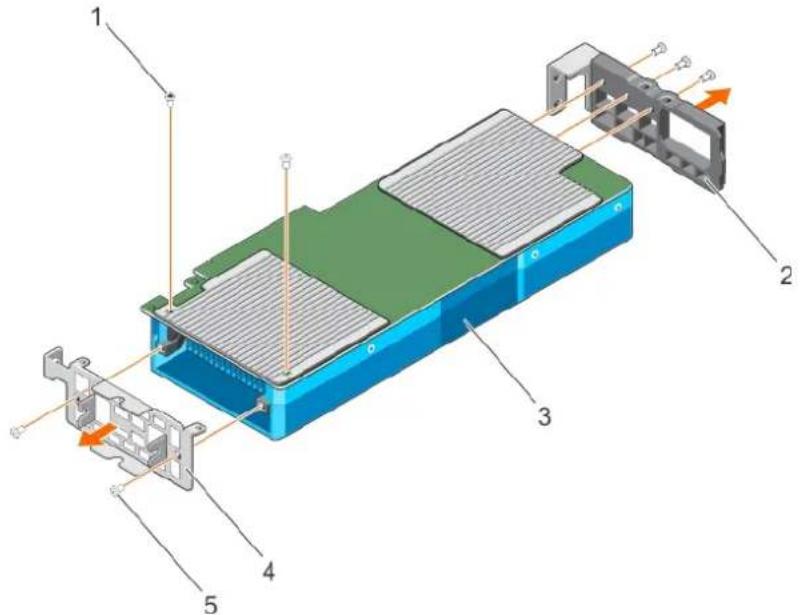
text_image
Exploded view diagram of an electronic device with numbered components and labeled partsFigure 84. Removing the custom Nvidia GPU I/O brackets and the support brackets
- Torx screw (2) 2. support bracket
- GPU 4. I/O bracket
- screw (5)
Removing the custom Intel GPU I/O brackets and the support brackets :
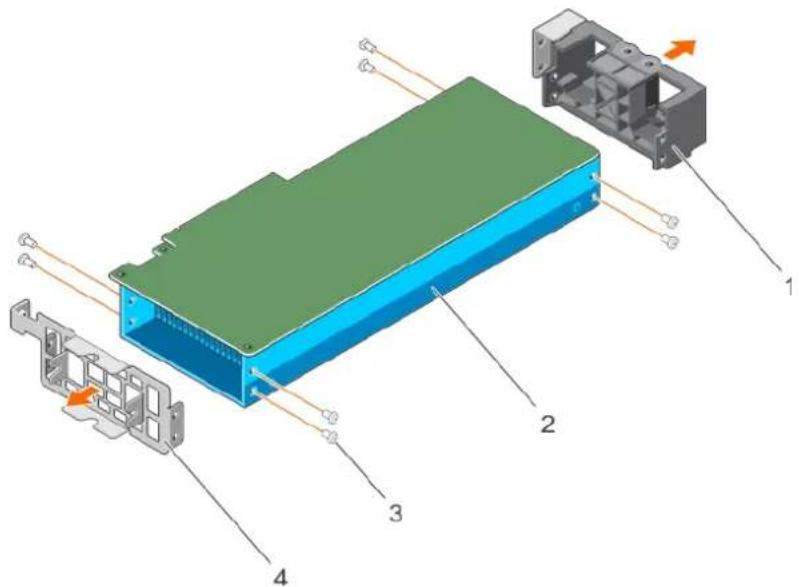
text_image
Technical diagram of an electronic device with labeled components and directional arrows indicating flow or movement.Figure 85. Removing the custom Intel GPU I/O brackets and the support brackets
- support bracket 2. GPU
- screw (8) 4. I/O bracket
Removing the custom AMD I/O brackets and the support brackets:
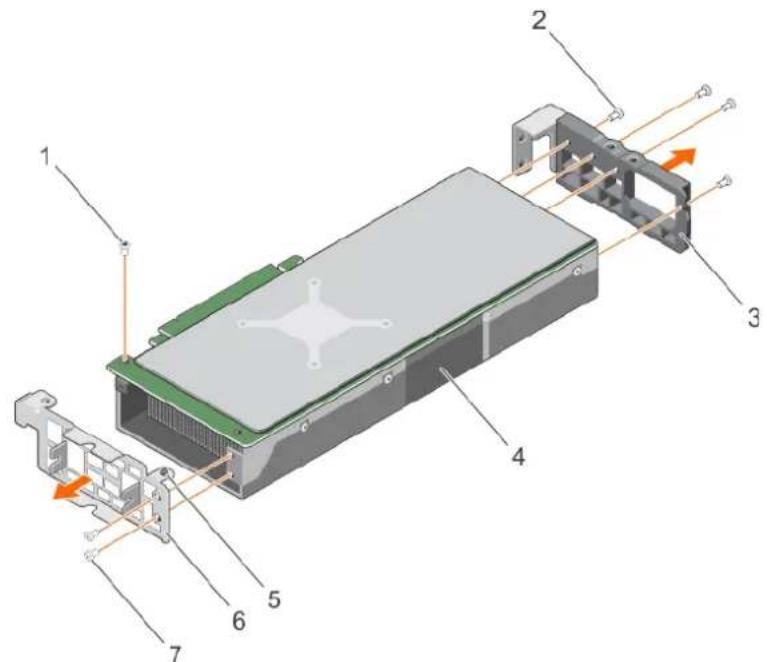
text_image
Exploded view diagram of an electronic device with numbered components and directional arrows indicating assembly or component flow.Figure 86. Removing the custom AMD I/O brackets and the support brackets
- pan head screw 2. screw (4)
- support bracket 4. GPU
- alignment guide 6. I/O bracket
- flat head screw (2)
Next steps
Remove the GPU brackets from the replacement GPUs.
NOTE: This procedure is not applicable to the AMD GPUs since the replacement AMD GPUs are shipped without brackets.
Related tasks
Removing a GPU riser cable board
Removing the GPU brackets from the replacement GPUs
Installing the custom GPU brackets on the replacement GPUs
Related reference
Safety instructions
Removing the GPU brackets from the replacement GPUs
This procedure is not applicable to the AMD replacement GPUs because they are shipped without the I/O and support brackets. The Nvidia or Intel replacement GPUs are shipped with specific Nvidia or Intel I/O and support brackets. These brackets should be removed from the replacement Nvidia or Intel GPUs and installed on the Intel or Nvidia GPUs removed from your system. The procedure to remove the Nvidia and Intel brackets from the replacement GPUs is identical.
Prerequisites
CAUTION: Many repairs may only be done by a certified service technician. You should only perform troubleshooting and simple repairs as authorized in your product documentation, or as directed by the online or telephone service and support team. Damage due to servicing that is not authorized by Dell is not covered by your warranty. Read and follow the safety instructions that are shipped with your product.
NOTE: This is a Field Replaceable Unit (FRU). Removal and installation procedures should be performed only by Dell certified service technicians.
- Follow the safety guidelines listed in the Safety instructions section.
- Keep the Philips #1, #2, and the Torx T6 screwdrivers ready.
- Remove the custom GPU brackets from the GPU removed from your system.
Steps
- Remove the screws securing the front I/O bracket to the GPU, and remove the I/O bracket.
- Remove the screws securing the support bracket to the GPU, and remove the support bracket.
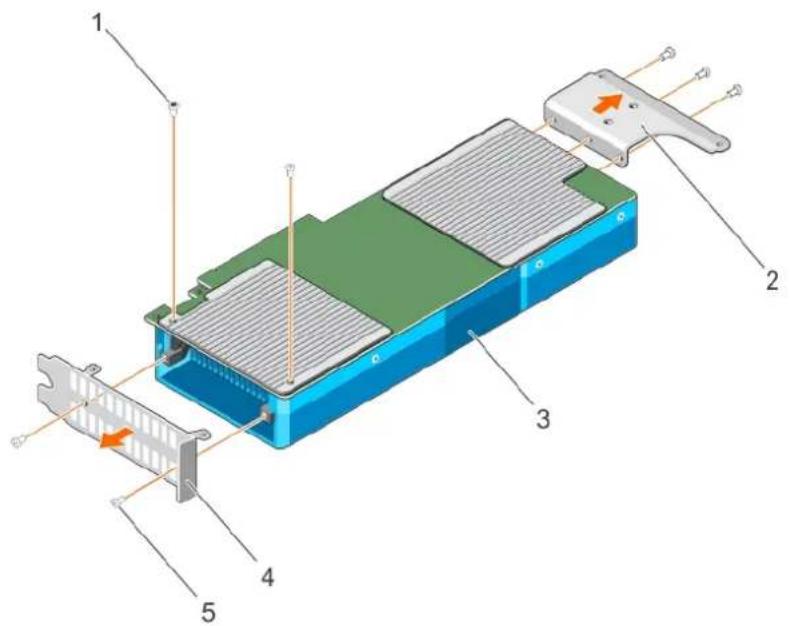
text_image
Technical diagram of an electronic device with labeled components and directional arrows indicating flow or movement.Figure 87. Removing the Nvidia GPU I/O brackets and the support brackets
- Torx screw (2) 2. support bracket
- GPU 4. I/O bracket
- screw (5)
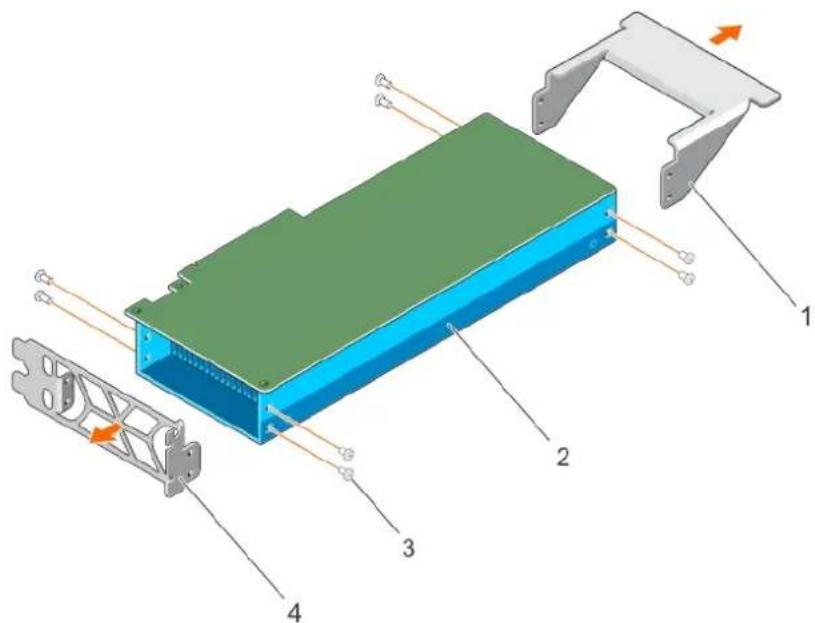
text_image
Technical diagram of an electronic device with labeled components and directional arrows indicating motion or flow.Figure 88. Removing the GPU Intel I/O brackets and the support brackets
- support bracket 2. GPU
- screw (8) 4. I/O bracket
Next steps
Install the brackets on the GPU that you removed from your system.
Related tasks
Installing the GPU brackets on the GPUs removed from your system
Installing the custom GPU brackets on the replacement GPUs
Related reference
Safety instructions
Removing the optional GPU switch board
Prerequisites

CAUTION: Many repairs may only be done by a certified service technician. You should only perform troubleshooting and simple repairs as authorized in your product documentation, or as directed by the online or telephone service and support team. Damage due to servicing that is not authorized by Dell is not covered by your warranty. Read and follow the safety instructions that are shipped with your product.

NOTE: This is a Field Replaceable Unit (FRU). Removal and installation procedures should be performed only by Dell certified service technicians.
- Follow the safety guidelines listed in the Safety instructions section.
- Follow the procedure listed in the Before working inside your system section.
- Remove the system top cover (front).
- Disconnect the GPU signal cables from the system board and then from the switch board.

NOTE: The GPU riser signal cable should be removed from the switchboard before removing the GPUs to prevent pin damage in the GPU connectors on the switch board.
- Remove all GPUs from the chassis.
- Disconnect the switch board power cable.
- Keep the Philips #2 screwdriver ready.
Steps
- Loosen the screws securing the GPU switch board to the chassis.
- Slide the GPU switch board toward the front of the chassis to disengage the slots on the GPU switch board from the tabs on the chassis.
- Lift the GPU switch board out of the chassis.
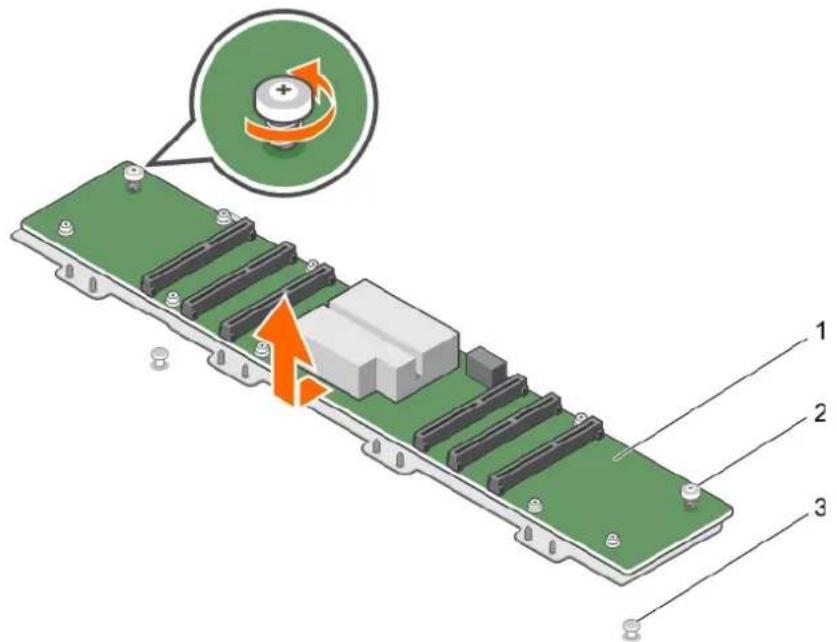
text_image
Diagram of a battery module with labeled components and an orange arrow indicating rotation directionFigure 89. Removing the GPU switch board
a. GPU switch board
b. captive screw (2)
c. tab on the chassis (2)
Next steps
- Install the system top cover (front).
- Follow the procedure listed in the After working inside your system section.
Related tasks
Before working inside your system
After working inside your system
Installing the system top cover (front)
Installing the optional GPU switch board
Related reference
Safety instructions
Installing the optional GPU switch board
Prerequisites

CAUTION: Many repairs may only be done by a certified service technician. You should only perform troubleshooting and simple repairs as authorized in your product documentation, or as directed by the online or telephone service and support team. Damage due to servicing that is not authorized by Dell is not covered by your warranty. Read and follow the safety instructions that are shipped with your product.

NOTE: This is a Field Replaceable Unit (FRU). Removal and installation procedures should be performed only by Dell certified service technicians.

NOTE: The switch board used in configurations A and B is not interchangeable with the switch board used in configuration G.
- Follow the safety guidelines listed in the Safety instructions section.
- Follow the procedure listed in the Before working inside your system section.
- Keep the Philips #2 screwdriver ready.
- Remove the GPUs.
Steps
- Align the tabs on the chassis with the slots on the GPU switch board.
- Slide the GPU switch board toward the back of the chassis to engage the slots on the GPU switch board with the tabs on the chassis.
- Tighten the screws securing the switch board to the chassis.
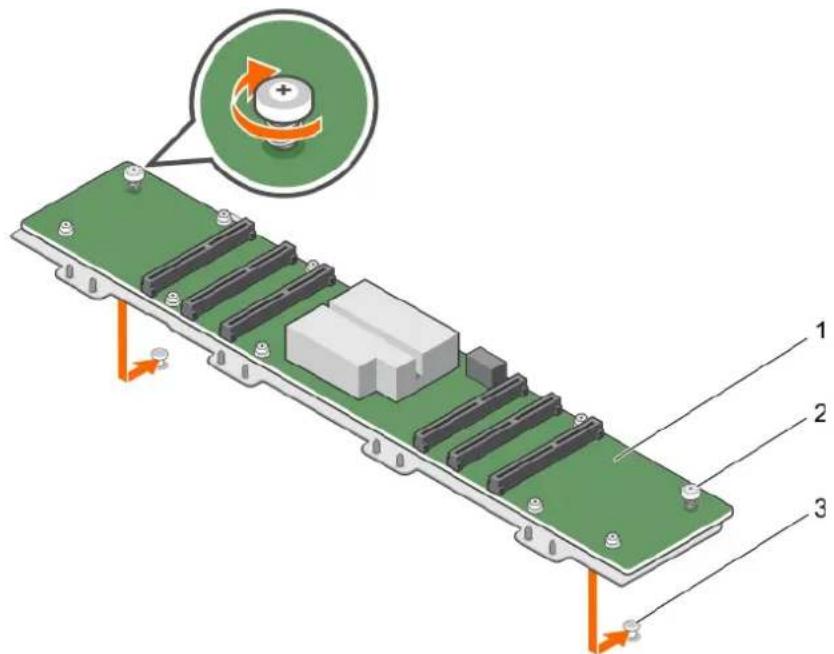
text_image
Diagram of a battery module with labeled components and a magnified view showing the internal structure.Figure 90. Installing the GPU switch board
a. GPU switch board
b. captive screw (2)
c. tab on the chassis (2)
Next steps
- Connect the GPU switch board power cable.
- Install the GPUs.
- Connect the GPU signal cables to the switch board and the system board.
- Follow the procedure listed in the After working inside your system section.
Related tasks
After working inside your system
Installing a GPU
Removing the optional GPU switch board
Related reference
GPU cabling diagrams
Installing the GPU brackets on the GPUs removed from your system
This procedure is not applicable to the AMD replacement GPUs because they are shipped without the I/O and support brackets. The Nvidia or Intel replacement GPUs are shipped with specific Nvidia or Intel I/O and support brackets. These brackets should be removed from the replacement Nvidia or Intel GPUs and installed on the Nvidia or Intel GPUs removed from your system. The procedure to install the Nvidia or Intel brackets on the GPUs removed from your system is identical.
Prerequisites

CAUTION: Many repairs may only be done by a certified service technician. You should only perform troubleshooting and simple repairs as authorized in your product documentation, or as directed by the online or telephone service and support team. Damage due to servicing that is not authorized by Dell is not covered by your warranty. Read and follow the safety instructions that are shipped with your product.

NOTE: This is a Field Replaceable Unit (FRU). Removal and installation procedures should be performed only by Dell certified service technicians.
- Follow the safety guidelines listed in the Safety instructions section.
- Keep the Phillips #1, #2, and the Torx T6 screwdrivers ready.
- Remove the GPU brackets.
Steps
- Align the screw holes on the front I/O bracket with the screw holes on the GPU.
- Secure the I/O bracket to the GPU by using the screws.
- Align the screw holes on the support bracket with the screw holes on the GPU.
- Secure the support bracket to the GPU by using the screws.
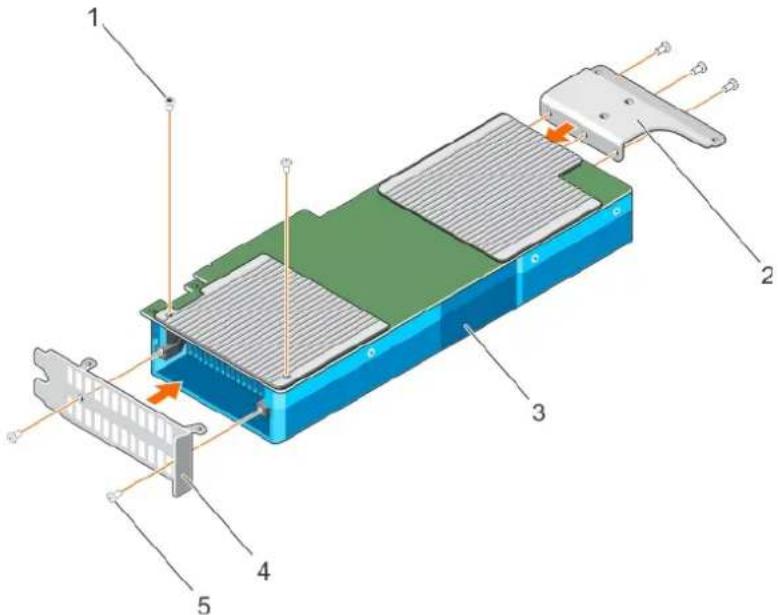
text_image
Technical diagram of an electronic device with labeled components including battery pack, motor, and wiring connectionsFigure 91. Installing the Nvidia GPU I/O brackets and the support brackets
- Torx screw (2) 2. support bracket
- GPU 4. I/O bracket
- screw (5)
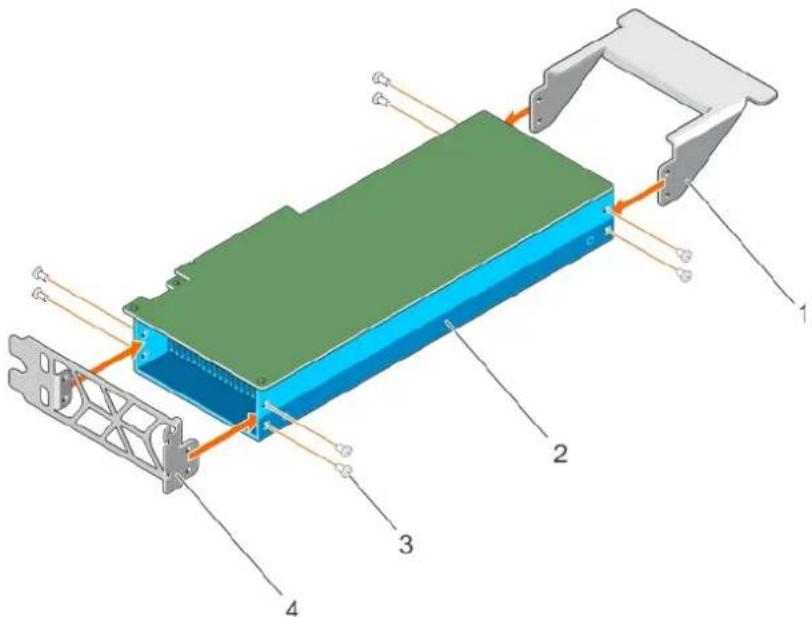
text_image
Technical diagram of a device with labeled components, showing layered structure and connectionsFigure 92. Installing the Intel GPU I/O brackets and the support brackets
- support bracket 2. GPU
- screw (8) 4. I/O bracket
Next steps
Install the custom GPU brackets on the replacement GPU.
Related tasks
Installing the custom GPU brackets on the replacement GPUs Removing the GPU brackets from the replacement GPUs
Related reference
Safety instructions
Installing the custom GPU brackets on the replacement GPUs
The AMD replacement GPUs are shipped without specific I/O and support brackets. The Nvidia and Intel replacement GPUs are shipped with specific Nvidia and Intel I/O and support brackets. These brackets should be removed from the replacement Nvidia or Intel GPUs and installed on the Nvidia or Intel GPUs removed from your system. The procedure to install the custom Nvidia, Intel or AMD brackets on the replacement GPUs is identical.
Prerequisites

CAUTION: Many repairs may only be done by a certified service technician. You should only perform troubleshooting and simple repairs as authorized in your product documentation, or as directed by the online or telephone service and support team. Damage due to servicing that is not authorized by Dell is not covered by your warranty. Read and follow the safety instructions that are shipped with your product.

NOTE: This is a Field Replaceable Unit (FRU). Removal and installation procedures should be performed only by Dell certified service technicians.
- Follow the safety guidelines listed in the Safety instructions section.
- Keep the Phillips #1 and #2 screwdrivers ready.
- Install the GPU brackets on the GPU removed from your system.

NOTE: This procedure is not applicable to AMD GPUs.
Steps
- Align the screw holes on the front I/O bracket with the screw holes on the GPU.

NOTE: For the AMD GPUs, ensure that you align the hole on the I/O bracket with the alignment guide on the GPU.
- Secure the I/O bracket to the GPU by using the screws.
- Align the screw holes on the support bracket with the screw holes on the GPU.
- Secure the support bracket to the GPU by using the screws.
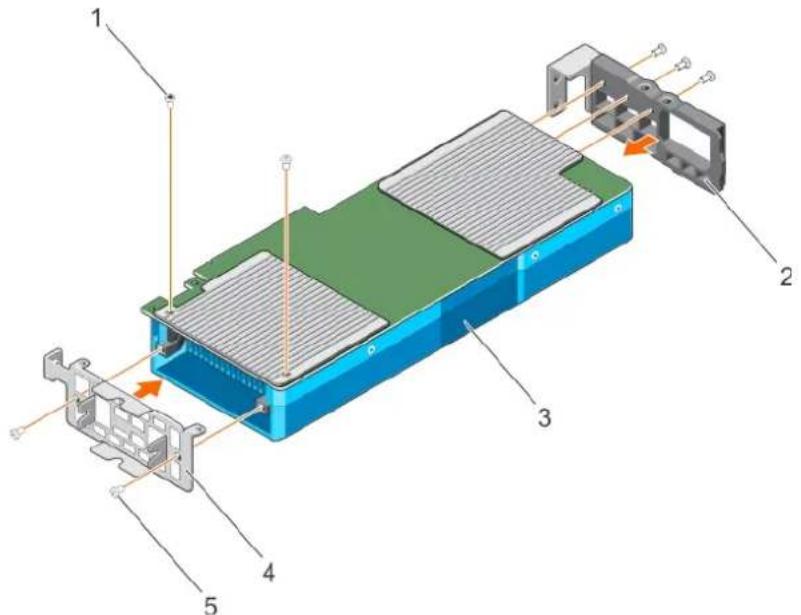
text_image
Exploded view diagram of an electronic device showing labeled components and internal structureFigure 93. Installing the custom Nvidia GPU I/O brackets and the support brackets
- Torx screw (2) 2. support bracket
- GPU 4. I/O bracket
- screw (5)
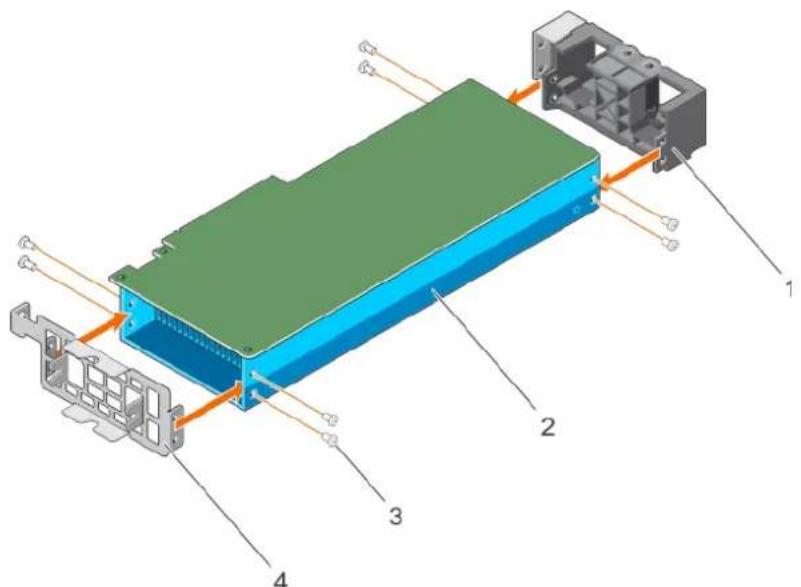
text_image
Technical diagram of an electronic device with labeled components and internal wiringFigure 94. Installing the custom Intel GPU I/O brackets and the support brackets
-
support bracket 2. GPU
-
screw (8) 4. I/O bracket
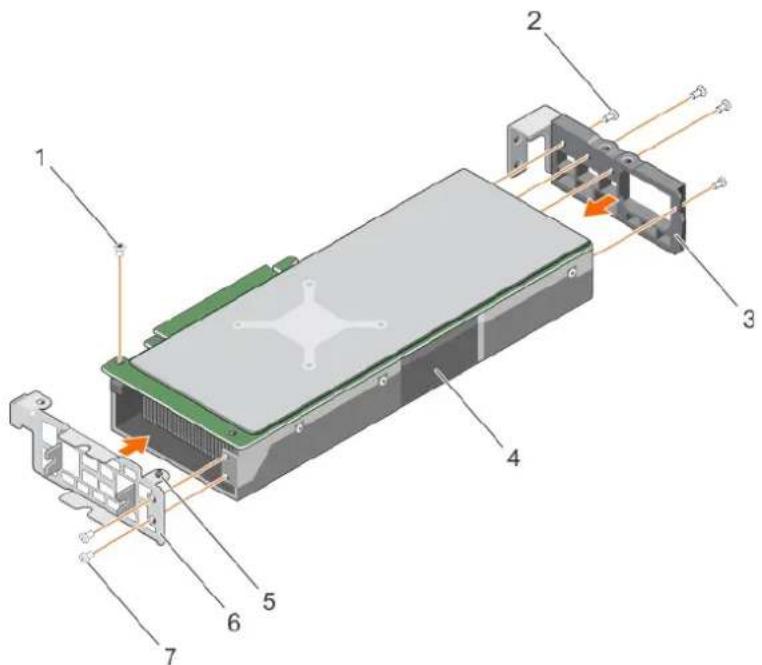
text_image
Exploded view diagram of an electronic device with numbered components and directional arrows indicating assembly or component layout.Figure 95. Installing the custom AMD GPU I/O brackets and the support brackets
- pan head screw 2. screw (4)
- support bracket 4. GPU
- alignment guide 6. I/O bracket
- flat head screw (2)

NOTE: For the AMD GPU support brackets, secure the two outer screws and then secure the two inner screws.
Next steps
Install the GPU cable riser board.
Related tasks
Installing a GPU riser cable board
Removing the GPU brackets from the replacement GPUs
Related reference
Safety instructions
Installing a GPU riser cable board
Prerequisites

CAUTION: Many repairs may only be done by a certified service technician. You should only perform troubleshooting and simple repairs as authorized in your product documentation, or as directed by the online or telephone service and support team. Damage due to servicing that is not authorized by Dell is not covered by your warranty. Read and follow the safety instructions that are shipped with your product.

NOTE: This is a Field Replaceable Unit (FRU). Removal and installation procedures should be performed only by Dell certified service technicians.
-
Follow the safety guidelines listed in the Safety instructions section.
-
Keep the Philips #2 screwdriver ready.
- Install the custom GPU brackets on the replacement GPU.
Steps
- Route the riser cable through the riser cable clip.
- Align the connector on the riser cable board with the card edge connector on the GPU and press till it clicks into place.
- Align the screw holes on the riser cable board with the screw holes on the GPU bracket.
- Secure the riser cable board to the GPU by using the screws.
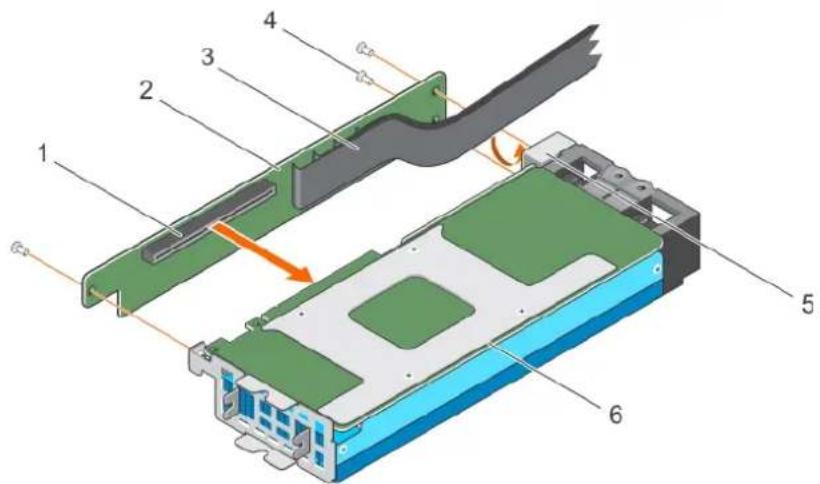
text_image
Technical diagram of a device with numbered components and directional arrows indicating flow or movementFigure 96. Installing a GPU riser cable from the system board
- connector on the GPU riser cable board 2. GPU riser cable board
- GPU riser cable 4. screw (3)
- GPU riser cable clip 6. GPU

NOTE: Do not hold the GPU by the GPU riser cable board.
Next steps
- Connect the power cables to the GPU.
- Install the GPU or GPU blank.

CAUTION: The GPU should be installed in the system before installing the GPU riser cables to prevent pin damage in the PCIe connectors on the system board or switch board.
Related tasks
Installing the custom GPU brackets on the replacement GPUs
Installing a GPU
Installing a GPU blank
Removing a GPU riser cable board
Related reference
Safety instructions
Installing a GPU blank
You can install the GPU blank only in configuration D. To install GPU 2, install the GPU blank in GPU slot 1.
Prerequisites

CAUTION: Many repairs may only be done by a certified service technician. You should only perform troubleshooting and simple repairs as authorized in your product documentation, or as directed by the online or telephone service and support team. Damage due to servicing that is not authorized by Dell is not covered by your warranty. Read and follow the safety instructions that are shipped with your product.

NOTE: This is a Field Replaceable Unit (FRU). Removal and installation procedures should be performed only by Dell certified service technicians.
Follow the safety guidelines listed in the Safety instructions section.
Steps
- Lower the front of the GPU blank at an angle and slide it to engage the slots on the GPU blank with the guide pins on the front inner wall of the chassis.
- Lower the back of the GPU blank to engage the guide holes on the GPU blank with the guide pins on the chassis.
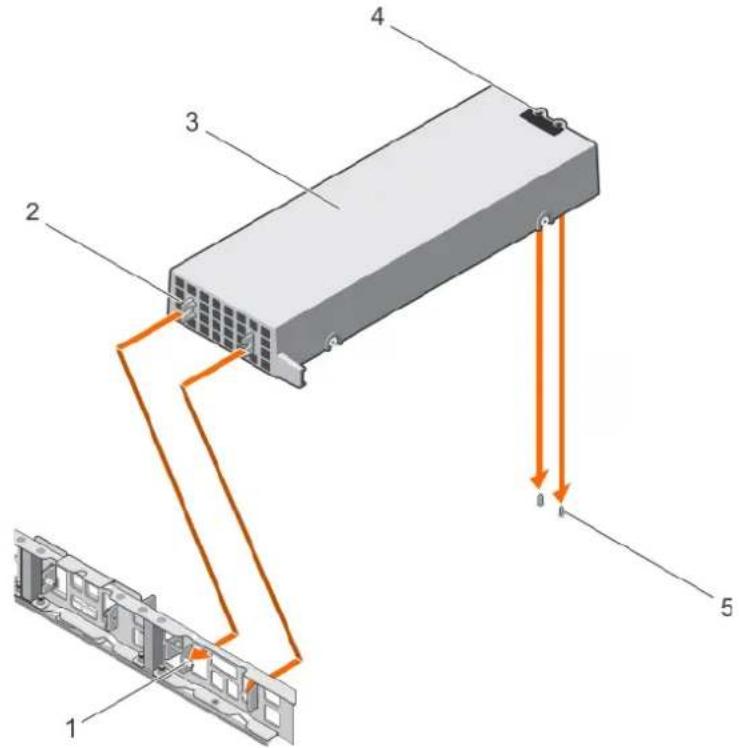
text_image
Diagram of a server rack with labeled components and orange arrows indicating connection pointsFigure 97. Installing a GPU blank
- guide pin on the front inner wall of the chassis (2) 2. slot on the GPU blank (2)
- GPU blank 4. guide holes on the back of the GPU blank (2)
- guide pin on the chassis (2)
Next steps
Install GPU 2.
Related tasks
Installing a GPU
Removing a GPU blank
Related reference
Safety instructions
Installing a GPU
Your system supports up to four GPUs.
Prerequisites

CAUTION: Many repairs may only be done by a certified service technician. You should only perform troubleshooting and simple repairs as authorized in your product documentation, or as directed by the online or telephone service and support team. Damage due to servicing that is not authorized by Dell is not covered by your warranty. Read and follow the safety instructions that are shipped with your product.

NOTE: This is a Field Replaceable Unit (FRU). Removal and installation procedures should be performed only by Dell certified service technicians.
- Follow the safety guidelines listed in the Safety instructions section.
- Follow the GPU installation guidelines.
- Install the GPU brackets.
- Install the GPU riser cable board.
Steps
- Lower the front of the GPU at an angle and slide it to engage the slots on the GPU with the guide pins on the front inner wall of the chassis.

NOTE: Do not hold the GPU by the GPU riser cable board.

CAUTION: While installing the GPU, ensure that the guide pins on the chassis do not scrape the GPU.
- Lower the back of the GPU to engage the guide holes on the GPU with the guide pins on the chassis.
- Connect the GPU power cables to the GPU and the system board or the switch board.
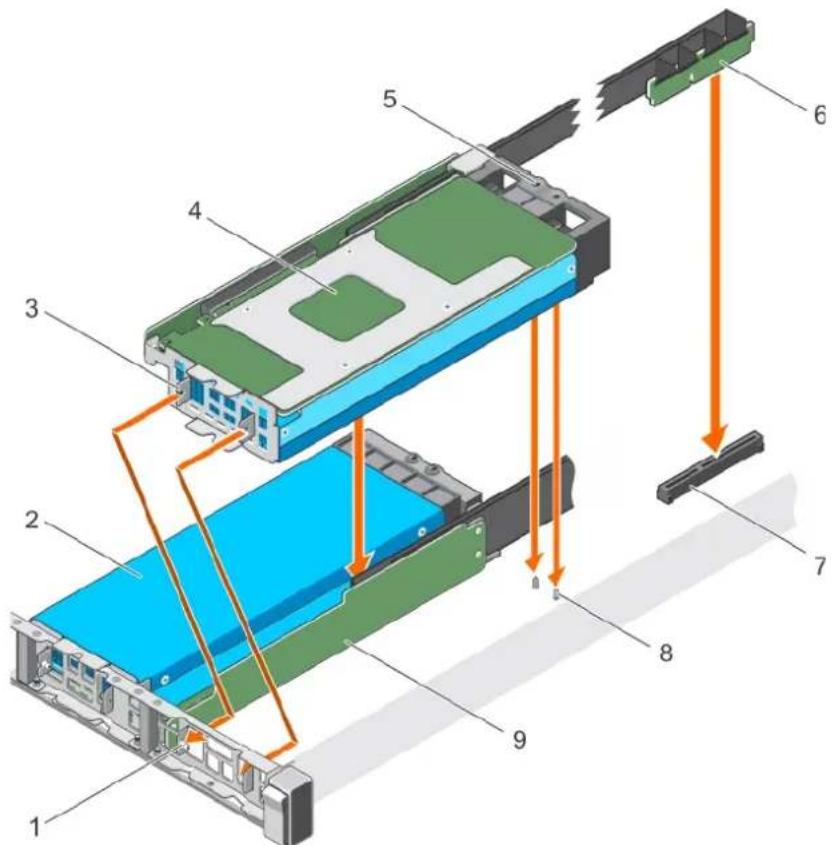
text_image
Technical diagram of a computer drive system with numbered components and orange arrows indicating assembly or movement.Figure 98. Installing the GPU
- guide pin on the front inner wall of the chassis (2) 2. GPU 2
- slot on the GPU I/O bracket (2) 4. GPU 1
- guide hole on the GPU support bracket 6. GPU riser cable
- GPU connector on the system board or on the switch board 8. guide pin on the chassis (2)
- GPU riser cable board
Next steps

CAUTION: The GPU should be installed in the system before installing the GPU riser cables to prevent pin damage in the PCIe connectors on the system board or switch board.
- If required, install the GPU blank.
- Install the GPU riser cable to the system board.
Related tasks
Installing a GPU riser cable on the system board
Installing a GPU blank
Removing a GPU
Related reference
Safety instructions
GPU installation guidelines
Installing a GPU riser cable on the system board
Prerequisites

CAUTION: Many repairs may only be done by a certified service technician. You should only perform troubleshooting and simple repairs as authorized in your product documentation, or as directed by the online or telephone service and support team. Damage due to servicing that is not authorized by Dell is not covered by your warranty. Read and follow the safety instructions that are shipped with your product.

NOTE: This is a Field Replaceable Unit (FRU). Removal and installation procedures should be performed only by Dell certified service technicians.
- Follow the safety guidelines listed in the Safety instructions section.
- Install the GPU.

CAUTION: The GPU should be installed in the system before installing the GPU riser cables to prevent pin damage in the PCIe connectors on the system board or switch board.
Steps
- Align the edge connector of the riser cable with the alignment key of the riser cable connector on the system board.
- Insert the riser cable into the riser cable connector on the system board and press till it clicks into place.
- Close the release latches.
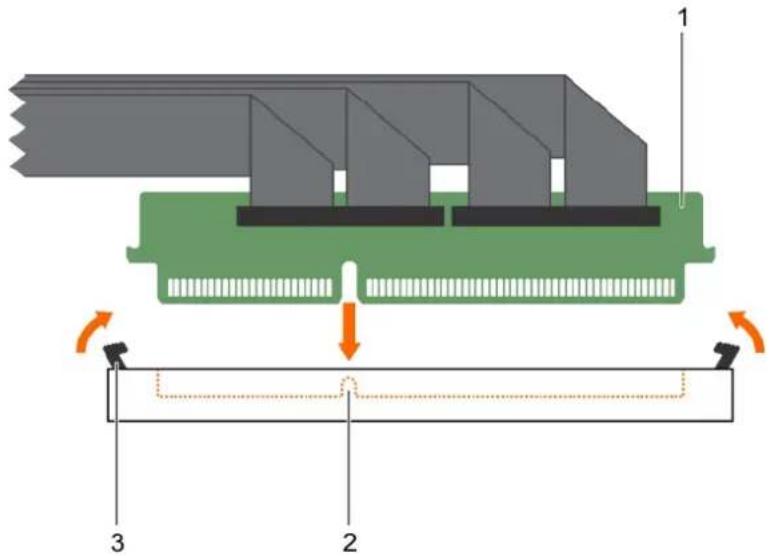
text_image
Technical diagram of a mechanical assembly with labeled components and directional arrows indicating motion or movement.Figure 99. Installing a GPU riser cable board
a. riser cable connector
b. alignment key
c. release latch (2)
Next steps
Follow the procedure listed in after working inside your system.
Related tasks
After working inside your system
Installing a GPU
Removing a GPU riser cable from the system board
Related reference
Safety instructions
GPU cabling diagrams
Cabling configuration A and B systems
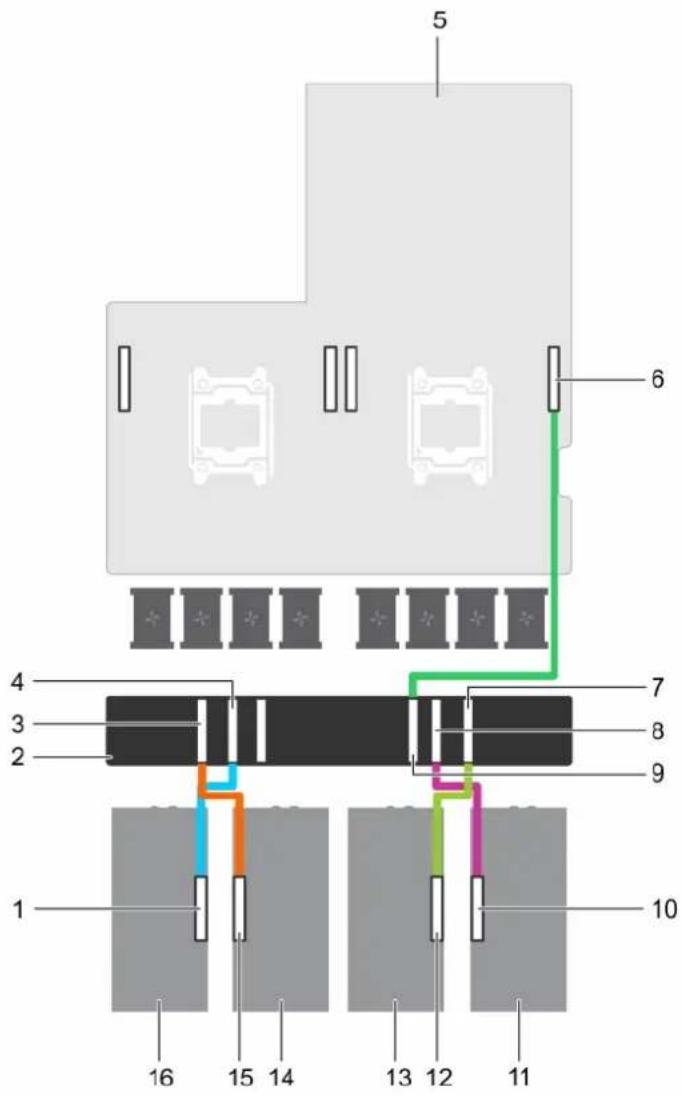
text_image
5 6 4 3 2 7 8 9 10 16 15 14 13 12 11Figure 100. Cabling single and dual processor systems with four GPUs and a GPU switch board (Configurations A and B)
- GPU 4 riser cable connector on the GPU 2. GPU switch board
- GPU 3 connector on the GPU switch board 4. GPU 4 connector on the GPU switch board
- system board 6. GPU 2 connector on the system board
- GPU 2 connector on the GPU switch board 8. GPU 1 connector on the GPU switch board
- CPU 1 connector on the GPU switch board 10. GPU 1 riser cable connector on the GPU
- GPU 1 12. GPU 2 riser cable connector on the GPU
- GPU 2 14. GPU 3
- GPU 3 riser cable connector on the GPU 16. GPU 4
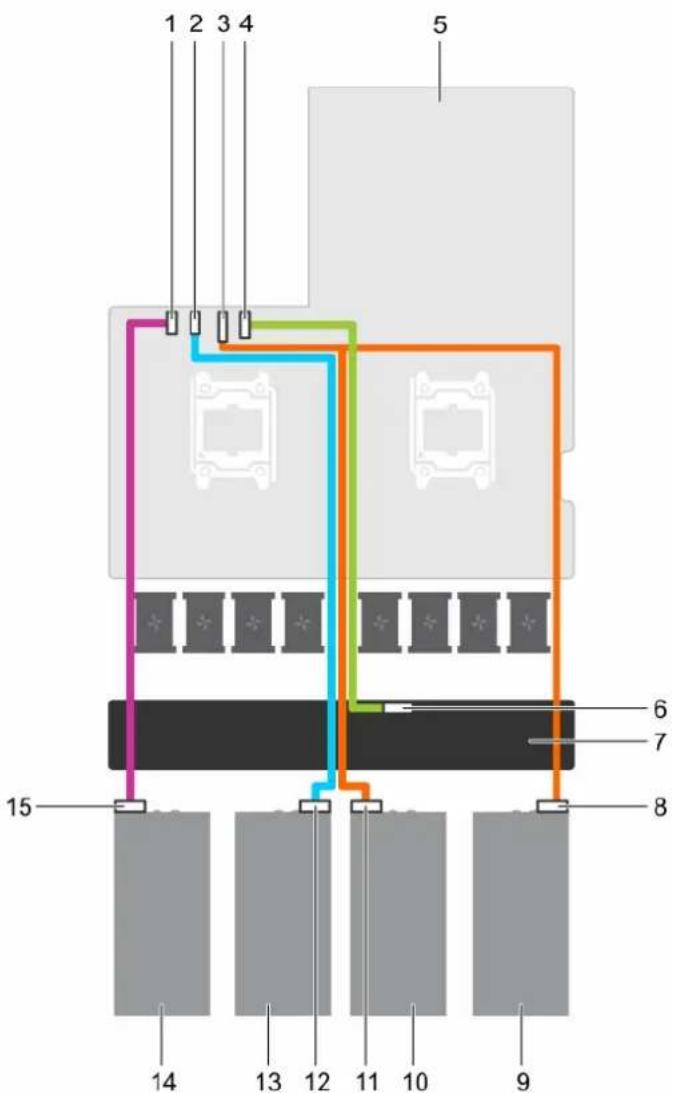
text_image
1 2 3 4 5 6 7 8 15 14 13 12 11 10 9Figure 101. Power cabling for single and dual processor systems with four GPUs and a GPU switch board (Configurations A and B)
- GPU 4 power connector on the system board 2. GPU 3 power connector on the system board
- GPU 1/2 power connector on the system board 4. GPU switch board power connector on the system board
- system board 6. GPU switch board power connector on the GPU switch board
- GPU switch board 8. power connector on GPU 1
- GPU 1 10. GPU 2
- power connector on GPU 2 12. power connector on GPU 3
- GPU 3 14. GPU 4
- power connector on GPU 4
Cabling configuration C systems
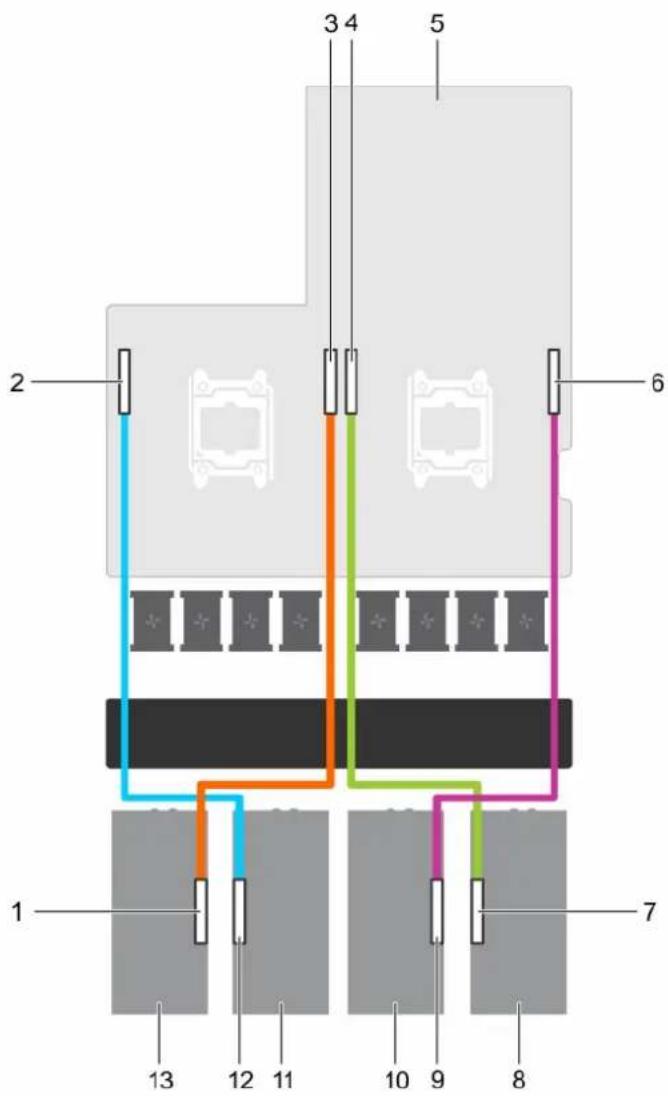
text_image
1 2 3 4 5 6 7 8 9 10 11 12 13Figure 102. Cabling a dual processor system with four GPUs (Configuration C)
-
GPU 4 riser cable connector on the GPU 2. GPU 3 connector on the system board
-
GPU 4 connector on the system board 4. GPU 1 connector on the system board
-
system board 6. GPU 2 connector on the system board
-
GPU 1 riser cable connector on the GPU 8. GPU 1
-
GPU 2 riser cable connector on the GPU 10. GPU 2
-
GPU 3 12. GPU 3 riser cable connector on the GPU
-
GPU 4
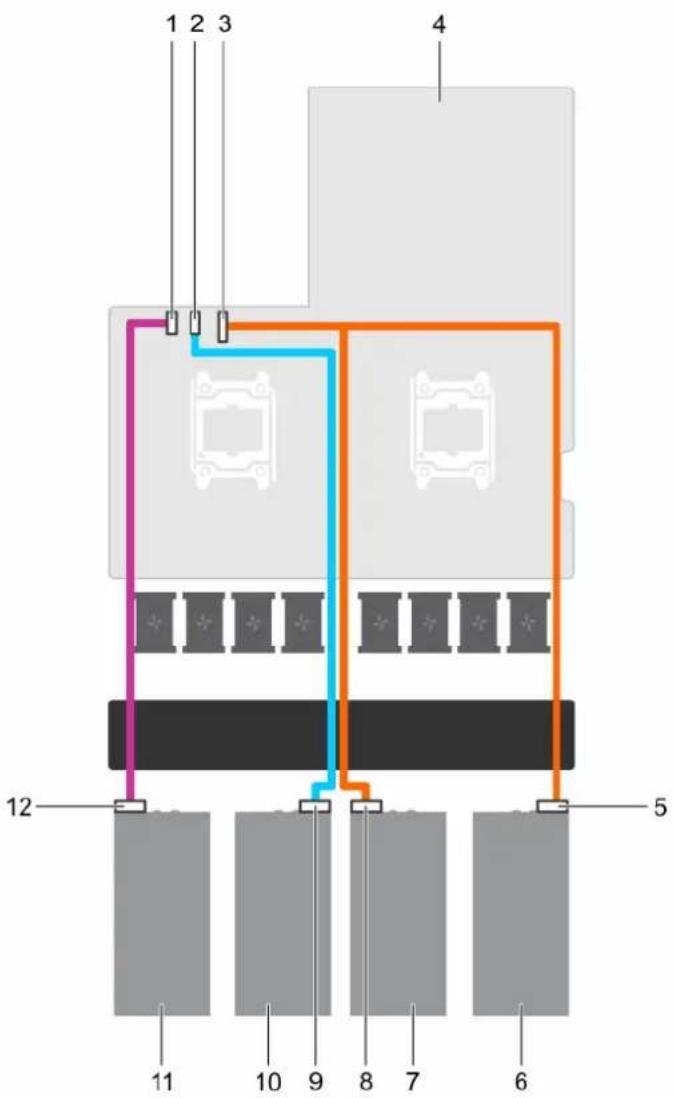
text_image
1 2 3 4 12 5 11 10 9 8 7 6Figure 103. Power cabling for a dual processor system with four GPUs (Configuration C)
- GPU 4 power connector on the system board 2. GPU 3 power connector on the system board
- GPU 1/2 power connector on the system board 4. system board
- power connector on GPU 16. GPU 1
- GPU 2 8, power connector on GPU 2
- power connector on GPU 3 10. GPU 3
- GPU 4 12. power connector on GPU 4
Cabling configuration D systems
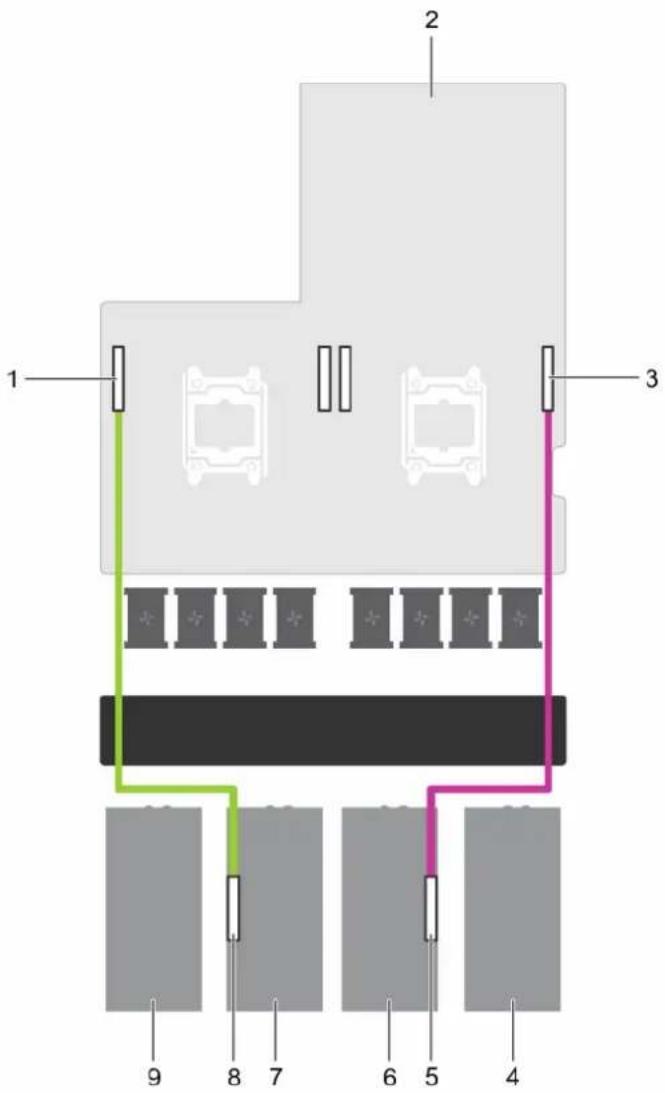
text_image
1 2 3 9 8 7 6 5 4Figure 104. Cabling a dual processor system with two GPUs (Configuration D)
- GPU 3 riser cable connector on the system board 2. system board
- GPU 2 connector on the system board 4. GPU 1 blank
- GPU 2 riser cable connector on the GPU 6. GPU 2
- GPU 3 8. GPU 3 riser cable connector on the GPU
- GPU 4 blank
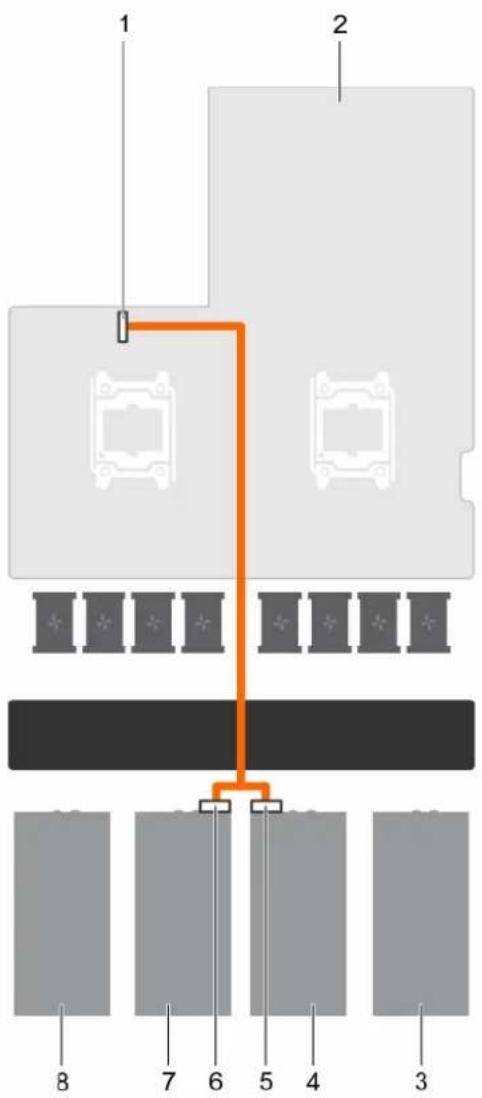
text_image
1 2 8 7 6 5 4 3Figure 105. Power cabling for a dual processor system with two GPUs (Configuration D)
- GPU 1/2 power connector on the system board 2. system board
- GPU 1 blank 4. GPU 2
- power connector on GPU 2 6. power connector on GPU 3
- GPU 3 8. GPU 4 blank
Cabling configuration E systems
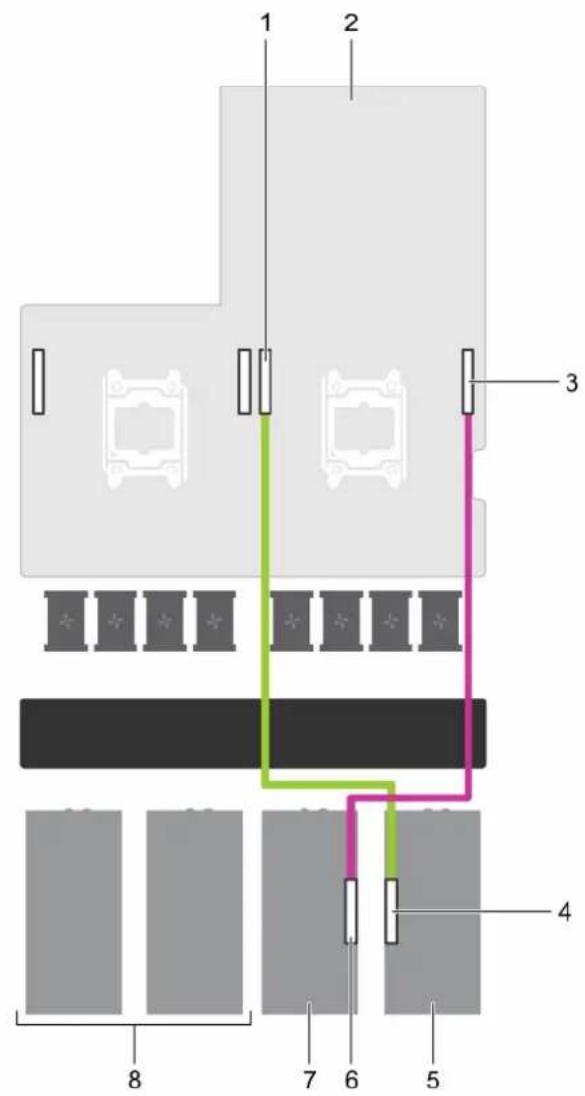
text_image
1 2 3 4 5 6 7 8Figure 106. Cabling a single processor system with two GPUs (Configuration E)
-
GPU 1 connector on the system board 2. system board
-
GPU 2 connector on the system board 4. GPU 1 connector on the GPU
-
GPU 16. GPU 2 connector on the GPU
-
GPU 2 8. GPU 3 and GPU 4 blank
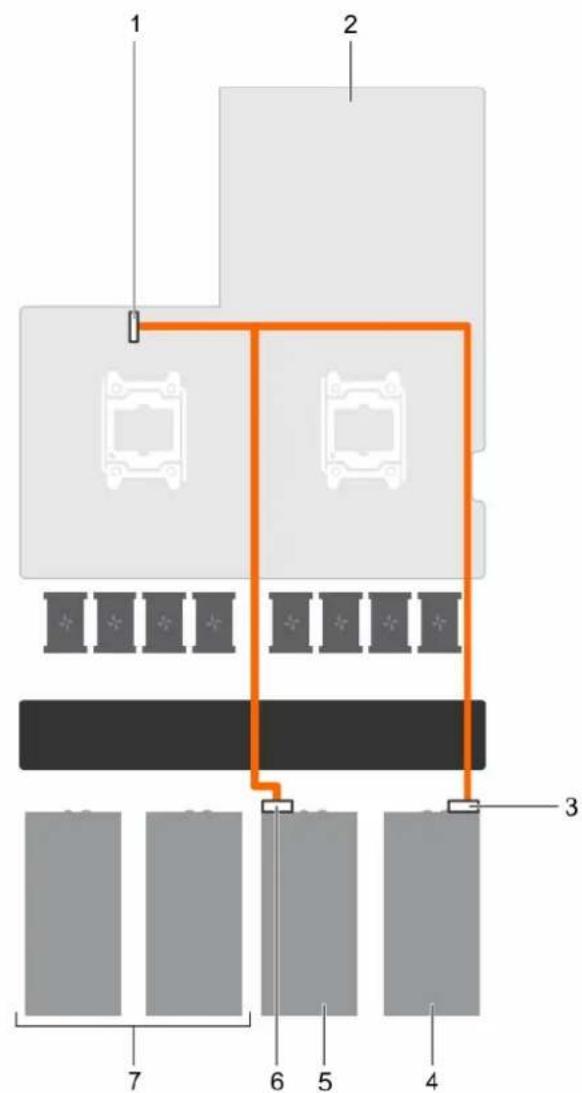
text_image
1 2 3 4 5 6 7Figure 107. Power cabling for a single processor system with two GPUs (Configuration E)
- GPU 1/2 power connector on the system board 2. system board
- power connector on GPU 14. GPU 1
- GPU 2 6. power connector on GPU 2
- GPU 3 and GPU 4 blank
Cabling Configuration F systems
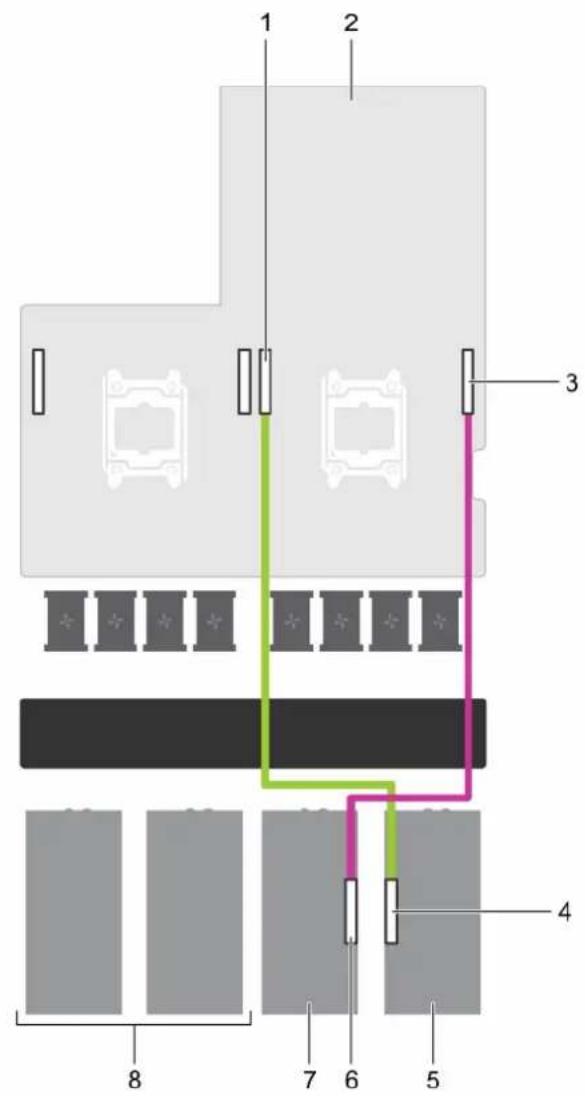
text_image
1 2 3 4 5 6 7 8Figure 108. Cabling a dual processor system with two GPUs (Configuration F)
-
GPU 1 connector on the system board 2. system board
-
GPU 2 connector on the system board 4. GPU 1 connector on the GPU
-
GPU 16. GPU 2 connector on the GPU
-
GPU 2 8. GPU 3 and GPU 4 blank

text_image
1 2 3 4 5 6 7Figure 109. Power cabling for a dual processor system with two GPUs (Configuration F)
- GPU 1/2 power connector on the system board 2. system board
- power connector on GPU 14. GPU 1
- GPU 2 6. power connector on GPU 2
- GPU 3 and GPU 4 blank
Cabling configuration G systems
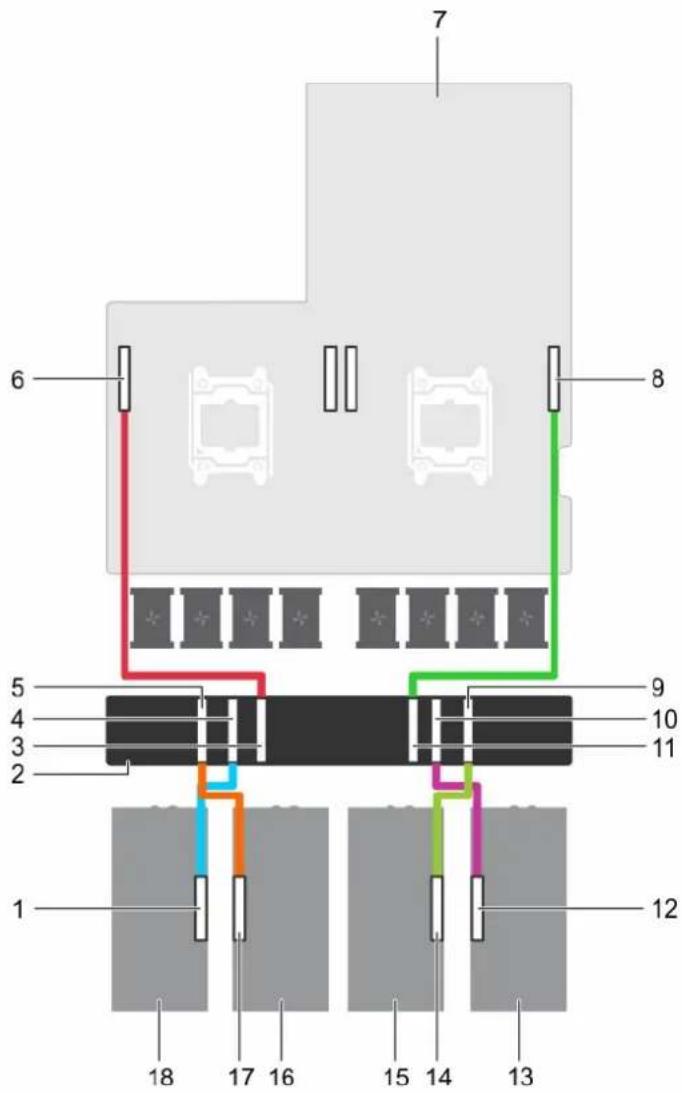
text_image
7 6 8 5 9 4 10 3 11 2 1 12 18 17 16 15 14 13Figure 110. Cabling a dual processor system with four GPUs and a GPU switch board with dual GPU virtual mode (Configuration G)
- GPU 4 riser cable connector on the GPU 2. GPU switch board
- CPU 2 connector on the GPU switch board 4. GPU 4 connector on the GPU switch board
- GPU 3 connector on the GPU switch board 6. GPU switch board connection to CPU 2 on the system board
- system board 8. GPU switch board connection to CPU 1 on the system board
- GPU 2 connector on the GPU switch board 10. GPU 1 connector on the GPU switch board
- CPU 1 connector on the GPU switch board 12. GPU 1 riser cable connector on the GPU
- GPU 1 14. GPU 2 riser cable connector on the GPU
- GPU 2 16. GPU 3
- GPU 3 riser cable connector on the GPU 18. GPU 4
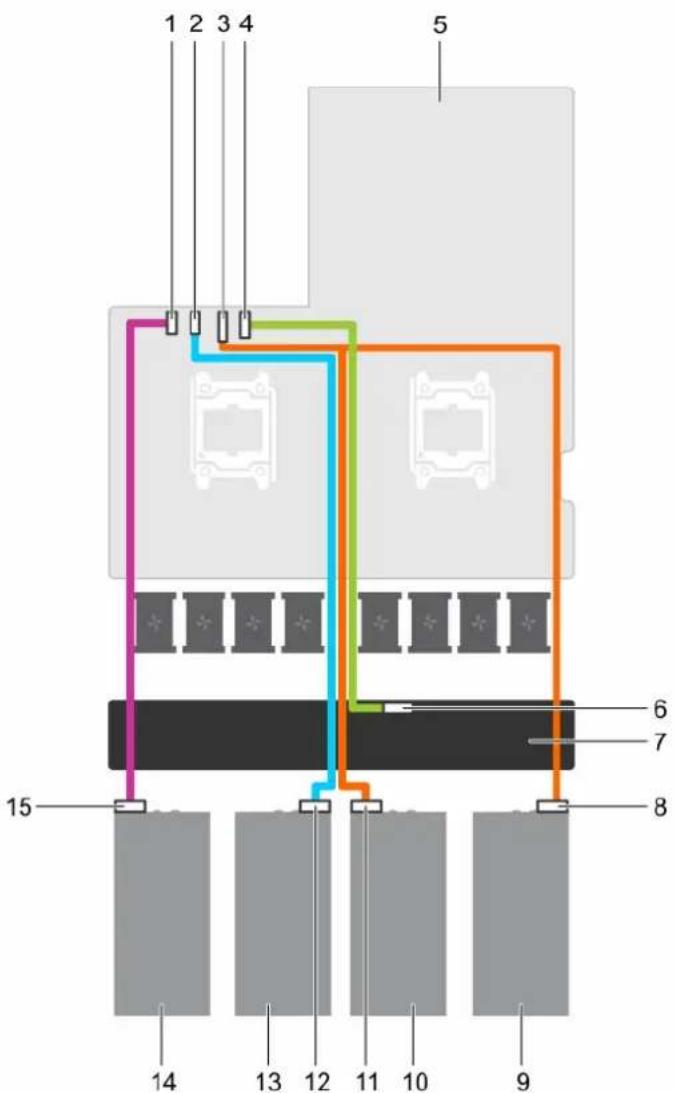
text_image
1 2 3 4 5 6 7 8 15 14 13 12 11 10 9Figure 111. Power cabling for a dual processor system with four GPUs and a GPU switch board with dual GPU virtual mode (Configuration G)
- GPU 4 power connector on the system board 2. GPU 3 power connector on the system board
- GPU 1/2 power connector on the system board 4. GPU switch board power connector on the system board
- system board 6. GPU switch board power connector on the GPU switch board
- GPU switch board 8. power connector on GPU 1
- GPU 1 10. GPU 2
- power connector on GPU 2 12. power connector on GPU 3
- GPU 3 14. GPU 4
- power connector on GPU 4
Cabling configurations H and I
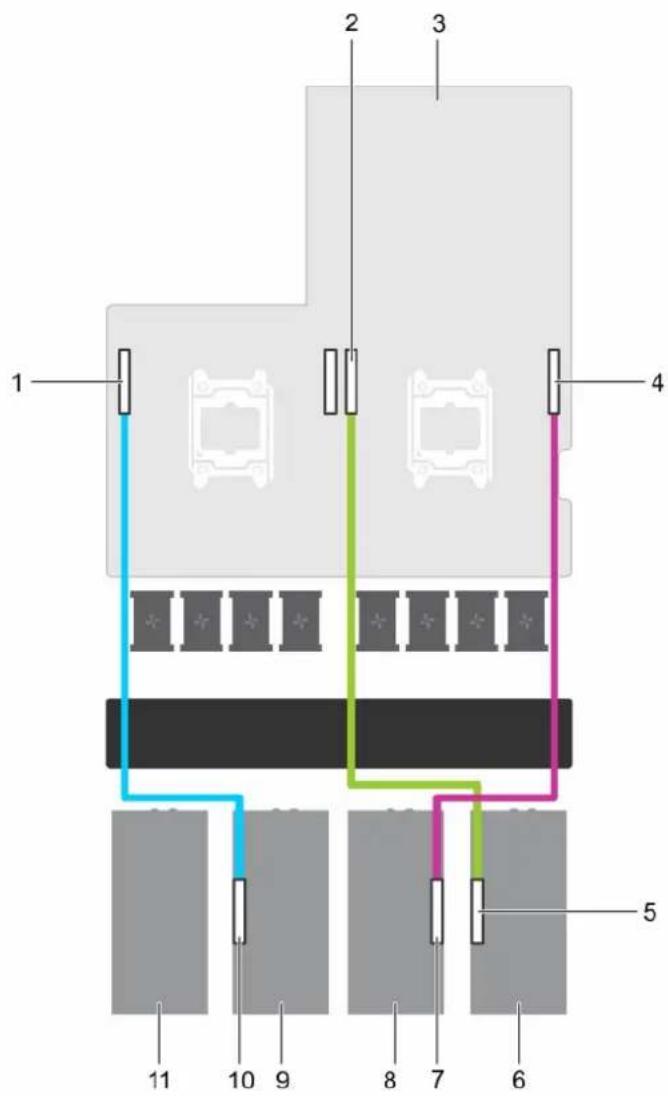
text_image
1 2 3 4 5 6 7 8 9 10 11Figure 112. Cabling a dual processor system with three GPUs (Configurations H and I)
- GPU 3 connector on the system board 2. GPU 1 connector on the system board
- system board 4. GPU 2 connector on the system board
- GPU 1 riser cable connector on GPU 1 6. GPU 1
- GPU 2 riser cable connector on GPU 2 8. GPU 2
- GPU 3 10. GPU 3 riser cable connector on GPU 3
- GPU 4 blank
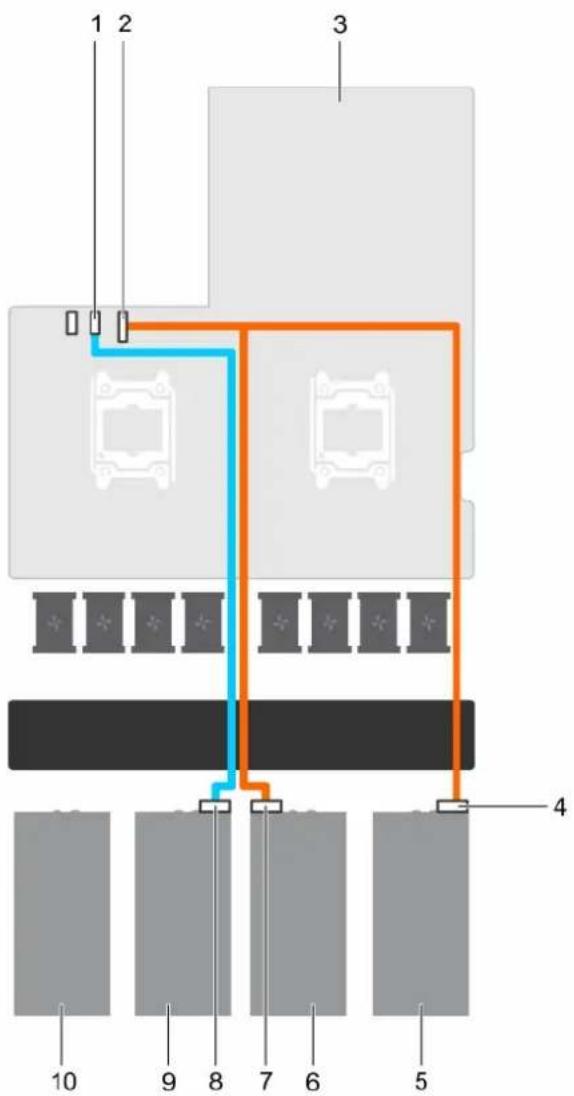
text_image
1 2 3 4 5 6 7 8 9 10Figure 113. Power cabling for a dual processor system with three GPUs (Configurations H and I)
- GPU 3 power connector on the system board 2. GPU 1/2 power connector on the system board
- system board 4. power connector on GPU 1
- GPU 16. GPU 2
- power connector on GPU 2 8. power connector on GPU 3
- GPU 3 10. GPU 4 blank
SXM2 Graphics processing unit
The following are the high-level steps that you must perform to replace the SXM2 GPUs:
- Remove the NVLink air shroud.
- Remove the SXM2 heat sink.
- Remove the SXM2 GPU.
- Remove the NVLink Board.
- Install the NVLink Board.
- Install the SXM2 GPU.
- Install the SXM2 heat sink.
- Install the NVLink air shroud.
Removing the NVLink Air Shroud
Prerequisites

CAUTION: Many repairs may only be done by a certified service technician. You should only perform troubleshooting and simple repairs as authorized in your product documentation, or as directed by the online or telephone service and support team. Damage due to servicing that is not authorized by Dell is not covered by your warranty. Read and follow the safety instructions that are shipped with your product.

NOTE: This is a Field Replaceable Unit (FRU). Removal and installation procedures should be performed only by Dell certified service technicians.
- Follow the safety guidelines listed in the Safety instructions section.
- Follow the procedure listed in the Before working inside your system section.
Steps
Lift and remove the NVLink air shroud from the NVLink board.
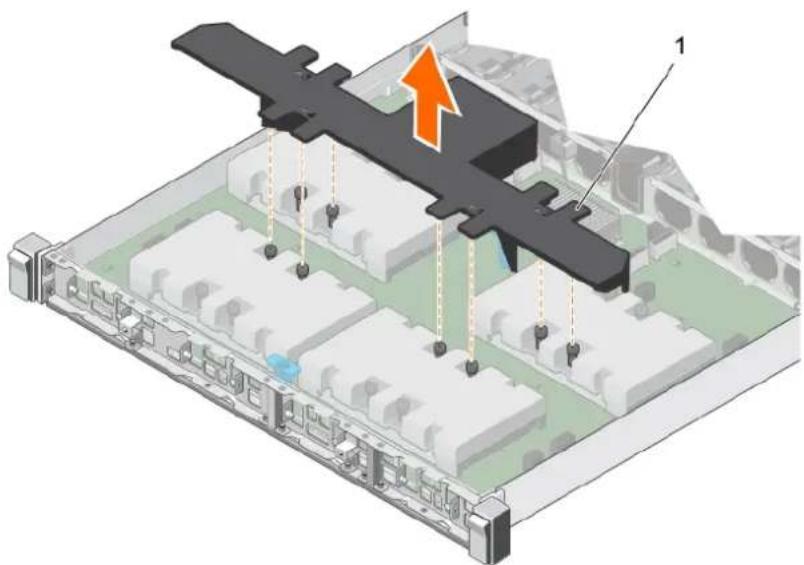
natural_image
Isometric architectural diagram of a building facade with structural elements and a highlighted orange arrow (no text or symbols)Figure 114. Removing NVLink air shroud
a. NVLink air shroud
Next steps
- Remove a SXM2-GPU heat sink.
- Remove a SXM2 GPU.
Related tasks
Before working inside your system Installing the NVLink Air Shroud Removing an SXM2-GPU Heat Sink Removing an SXM2 GPU Removing the NVLink Board
Related reference
Safety instructions
Removing a SXM2-GPU Heat Sink
Prerequisites
- Follow the safety guidelines listed in the Safety instructions section.
- Follow the procedure listed in Before working inside your system.
- Remove the NVLink air shroud.
Steps
- Using a Phillips #1 screwdriver, loosen the screws on the heat sink in the order mentioned below:
a) Loosen the first screw three turns.
b) Loosen the screw diagonally opposite to the screw you loosened.
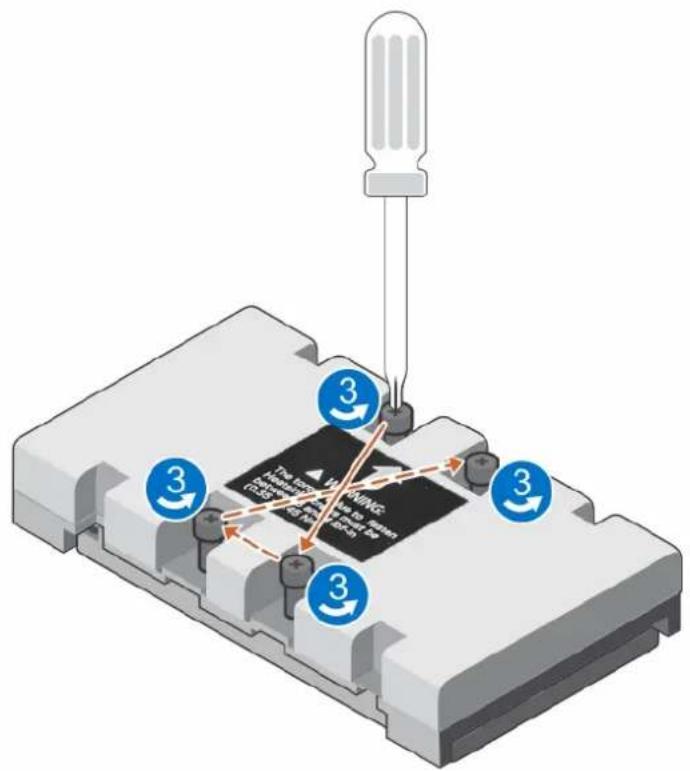
text_image
The Emitter Dissipation to the Cable 3 3 3 3 V-1000 HOLDING (2.5 - 4.0)Figure 115. Removing SXM2-GPU heat sink screws
- Repeat the procedure for the remaining two screws.
- Return to the first screw to loosen it.
- Following the same diagonal pattern, loosen the remaining screws completely.
- Lift the heat sink from the NVLink board.
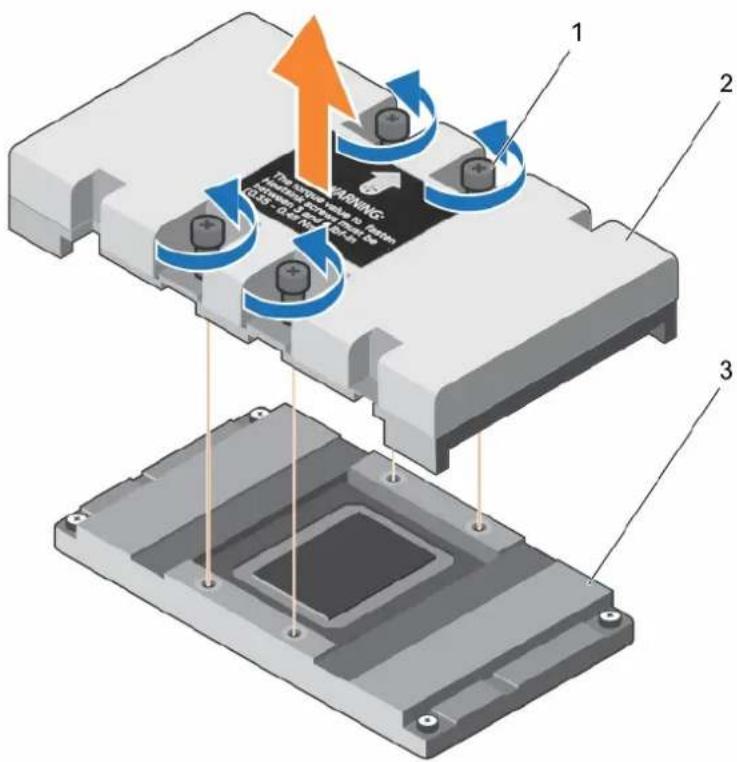
text_image
The power warning: Honeywell System to ILS (GB5-0.01-0.02-0.03-0.04-0.05-0.06-0.07-0.08-0.09-0.10-0.11-0.12-0.13-0.14-0.15-0.16-0.17-0.18-0.19-0.20-0.21-0.22-0.23-0.24-0.25-0.26-0.27-0.28-0.29-0.30-0.31-0.32-0.33-0.34-0.35-0.36-0.37-0.38-0.39-0.40-0.41-0.42-0.43-0.44-0.45-0.46-0.47-0.48-0.49-0.50-0.51-0.52-0.53-0.54-0.55-0.56-0.57-0.58-0.59-0.60-0.61-0.62-0.63-0.64-0.65-0.66-0.67-0.68-0.69-0.70-0.71-0.72-0.73-0.74-0.75-0.76-0.77-0.78-0.79-0.80-0.81-0.82-0.83-0.84-0.85-0.86-0.87-0.88-0.89-0.90-0.91-0.92-0.93-0.94-0.95-0.96-0.97-0.98-0.99-1 1 2 3Figure 116. Removing SXM2-GPU heat sink
Next steps
- Remove a SXM2 GPU.
Removing an SXM2 GPU
Prerequisites

CAUTION: Many repairs may only be done by a certified service technician. You should only perform troubleshooting and simple repairs as authorized in your product documentation, or as directed by the online or telephone service and support team. Damage due to servicing that is not authorized by Dell is not covered by your warranty. Read and follow the safety instructions that are shipped with your product.

NOTE: This is a Field Replaceable Unit (FRU). Removal and installation procedures should be performed only by Dell certified service technicians.

CAUTION: To avoid any damage to the SXM2 GPU, ensure that you loosen the screws in a descending order starting from the screw numbered 8, on the NVLink board.
- Follow the safety guidelines listed in the Safety instructions section.
- Follow the procedure listed in the Before working inside your system section.
- Remove the NVLink air shroud.
- Remove the SXM2-GPU heat sink.
Steps
- Loosen the captive screws that secure the SXM2 GPU to the NVLink board in a descending order, as labeled on the NVLink board.
- Lift and remove the SXM2 GPU out of its socket on the NVLink board.
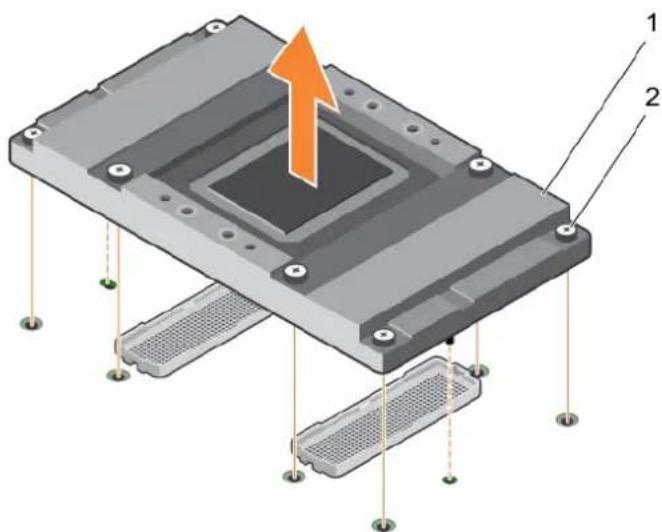
text_image
Technical diagram of a mechanical assembly with labeled components and an orange arrow indicating upward motionFigure 117. Removing SXM2 GPU
a. SXM2 GPU
b. captive screws (8)
Next steps
- Remove the NVLink board.
- Install a SXM2 GPU.
Related tasks
Before working inside your system
Installing an SXM2 GPU
Removing the NVLink Board
Related reference
Safety instructions
Removing the NVLink Board
Prerequisites

CAUTION: Many repairs may only be done by a certified service technician. You should only perform troubleshooting and simple repairs as authorized in your product documentation, or as directed by the online or telephone service and support team. Damage due to servicing that is not authorized by Dell is not covered by your warranty. Read and follow the safety instructions that are shipped with your product.

NOTE: This is a Field Replaceable Unit (FRU). Removal and installation procedures should be performed only by Dell certified service technicians.
- Follow the safety guidelines listed in the Safety instructions section.
- Follow the procedure listed in the Before working inside your system section.
- Remove the following components:
a. NVLink air shroud
b. SXM2-GPU Heat Sink
c. SXM2 GPU(s)

CAUTION: Disconnect the data cable from the system board and then the NVLink board to prevent pin damage in the PCIe connectors.
- Disconnect and remove the data and power cables from the NVLink board and the system board.

CAUTION: The expansion card riser cables must be disconnected from the NVLink board before removing the NVLink board, to prevent pin damage in the PCIe connectors.
- Disconnect the expansion card riser cable from the NVLink board.
Steps
-
Loosen the thumbscrews that secure the NVLink board to the chassis.
-
Hold the NVLink board by the board holder, and slide the NVLink board towards the system fan to release it from the chassis.
-
Lift and remove the NVLink board out of the chassis.
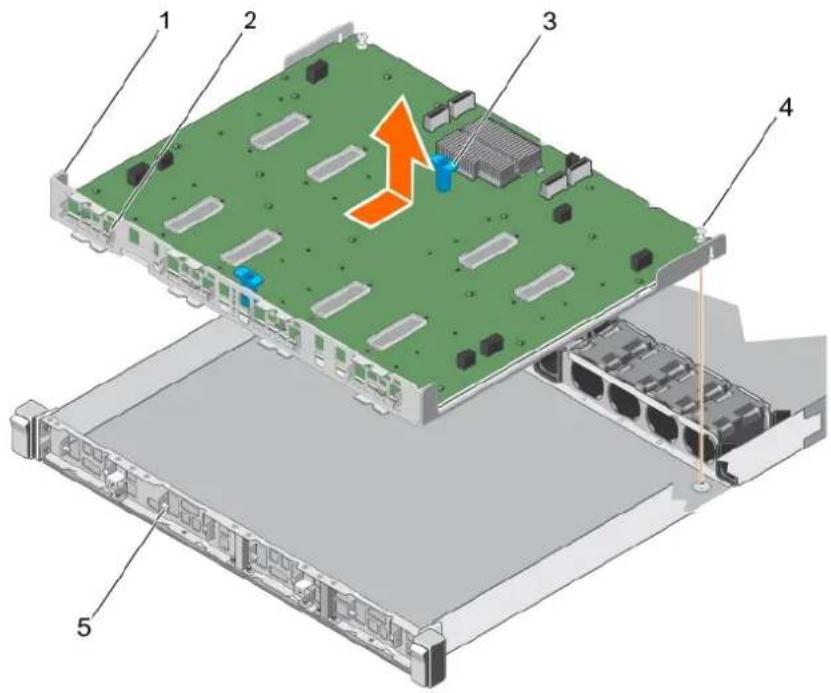
text_image
Diagram of an electronic device showing labeled components including a green circuit board and server racks with an orange arrow indicating motion or flow.Figure 118. Removing NVLink air shroud
- NVLink board tray 2. slot on the NVLink board tray (2)
- board holder (2) 4. thumbscrew (2)
- guide pin on the front inner wall of the chassis (8)
Next steps
- Install the NVLink board.
Related tasks
Before working inside your system
Installing the NVLink Board
Installing an SXM2 GPU
Installing an SXM2-GPU Heat Sink
Installing the NVLink Air Shroud
Related reference
Safety instructions
Installing the NVLink Board
Prerequisites

CAUTION: Many repairs may only be done by a certified service technician. You should only perform troubleshooting and simple repairs as authorized in your product documentation, or as directed by the online or telephone service and support team. Damage due to servicing that is not authorized by Dell is not covered by your warranty. Read and follow the safety instructions that are shipped with your product.

NOTE: This is a Field Replaceable Unit (FRU). Removal and installation procedures should be performed only by Dell certified service technicians.
- Follow the safety guidelines listed in the Safety instructions section.
Steps
-
Hold the board holders and lower the NVLink board into the chassis at an angle. Slide it to engage the slots on the NVLink board tray with the guide pins on the front inner wall of the chassis.
-
Tighten the thumbscrews to secure the NVLink board to the chassis.
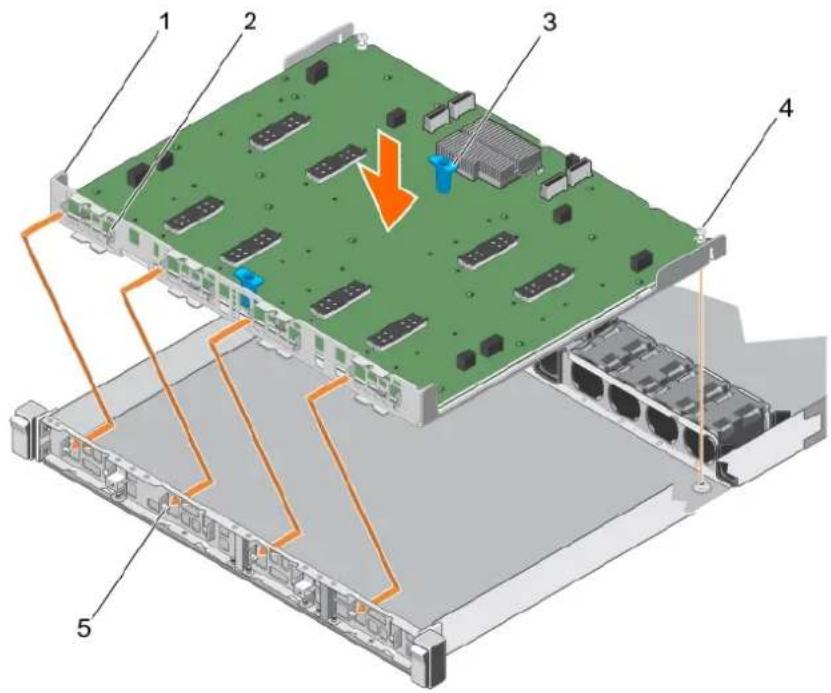
text_image
Diagram of an electronic device showing labeled components including CPU, Ethernet ports, and a highlighted cable or connector.Figure 119. Installing the NVLink board
- NVLink board tray 2. slot on the NVLink board tray (8)
- board holder (2) 4. thumbscrew (2)
- guide pin on the front inner wall of the chassis (8)

CAUTION: Connect the data cable to the NVLink board and then to the system board to prevent pin damage in the PCIe connectors.
- Connect the data and power cables to the NVLink board and then to the system board.
- Connect the expansion card riser cable to the NVLink board.
Next steps
- Install the SXM2 GPUs.
Related tasks
Before working inside your system
After working inside your system
Removing the NVLink Board
Installing an SXM2 GPU
Removing an SXM2-GPU Heat Sink
Installing the NVLink Air Shroud
Related reference
Safety instructions
Installing an SXM2 GPU
Prerequisites

CAUTION: Many repairs may only be done by a certified service technician. You should only perform troubleshooting and simple repairs as authorized in your product documentation, or as directed by the online or telephone service and support team. Damage due to servicing that is not authorized by Dell is not covered by your warranty. Read and follow the safety instructions that are shipped with your product.

NOTE: This is a Field Replaceable Unit (FRU). Removal and installation procedures should be performed only by Dell certified service technicians.

CAUTION: To avoid any damage to the SXM2 GPU, ensure that you tighten the screws in ascending order starting from the screw numbered 1, on the NVLink board.
- Follow the safety guidelines listed in the Safety instructions section.
- Follow the procedure listed in the Before working inside your system section.
Steps
- Unpack the new SXM2 GPU.
- Locate the processor socket on the NVLink board.
- If installed, remove the socket protective caps from the SXM2 GPU sockets on the NVLink board.
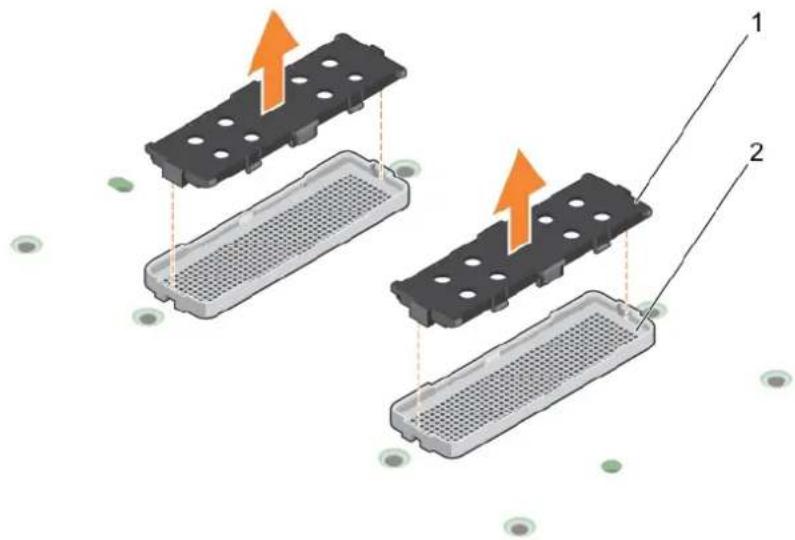
natural_image
Diagram showing two trays with heat sinks and orange arrows indicating flow or movement (no text or symbols)Figure 120. Removing the socket protective caps
a. socket protective cap (2)
b. SXM2 GPU socket (2).
-
If installed, remove the socket protective caps from the SXM2 GPU.
-
Align the guide pins with their slots on the NVLink board and gently lower SXM2 GPU on to the SXM2GPU sockets.
-
Tighten the captive screws in ascending order as labeled on the NVlink board.
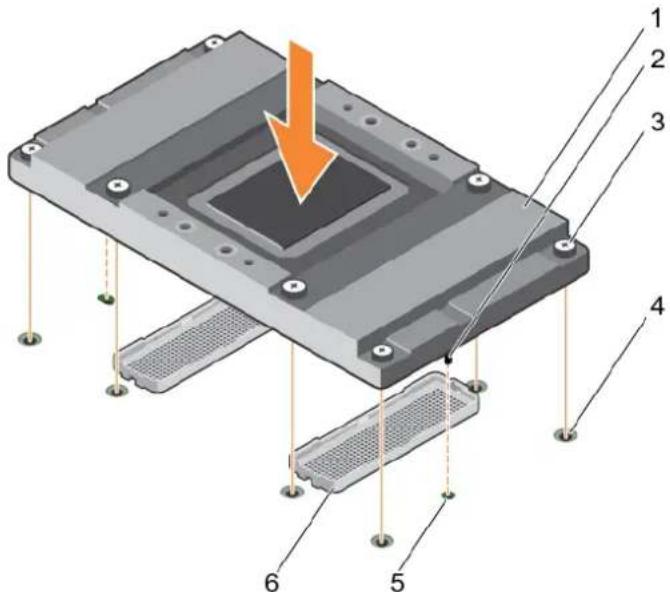
text_image
Technical diagram of a mechanical assembly with numbered components and an orange arrow indicating a downward force or force.Figure 121. Installing SXM2 GPU
-
SXM2 GPU 2. SXM2 GPU guide pin (2)
-
captive screw (8) 4. screw hole (8)
-
guide-pin slot (2) 6. SXM2 GPU socket (2)
Next steps
- Install the SXM2-GPU heat sink.
- Install the NVLink air shroud.
Related tasks
Before working inside your system
After working inside your system
Removing an SXM2 GPU
Installing an SXM2-GPU Heat Sink
Installing the NVLink Air Shroud
Related reference
Safety instructions
Installing a SXM2-GPU Heat Sink
Prerequisites
- Follow the safety guidelines listed in the Safety instructions section.
- Follow the procedure listed in Before working inside your system.
Steps
- If you are using an existing SXM2-GPU heat sink, remove the thermal grease from the heat sink by using a clean lint-free cloth.
- Using the thermal grease syringe included with your processor kit apply the grease in a thin spiral on the top of the processor.

CAUTION: Applying too much thermal grease can result in excess grease coming in contact with and contaminating the processor socket.

NOTE: The thermal grease syringe is intended for one-time use only. Dispose the syringe after you use it.
- Align the screws on the heat sink with the standoffs on the system board.
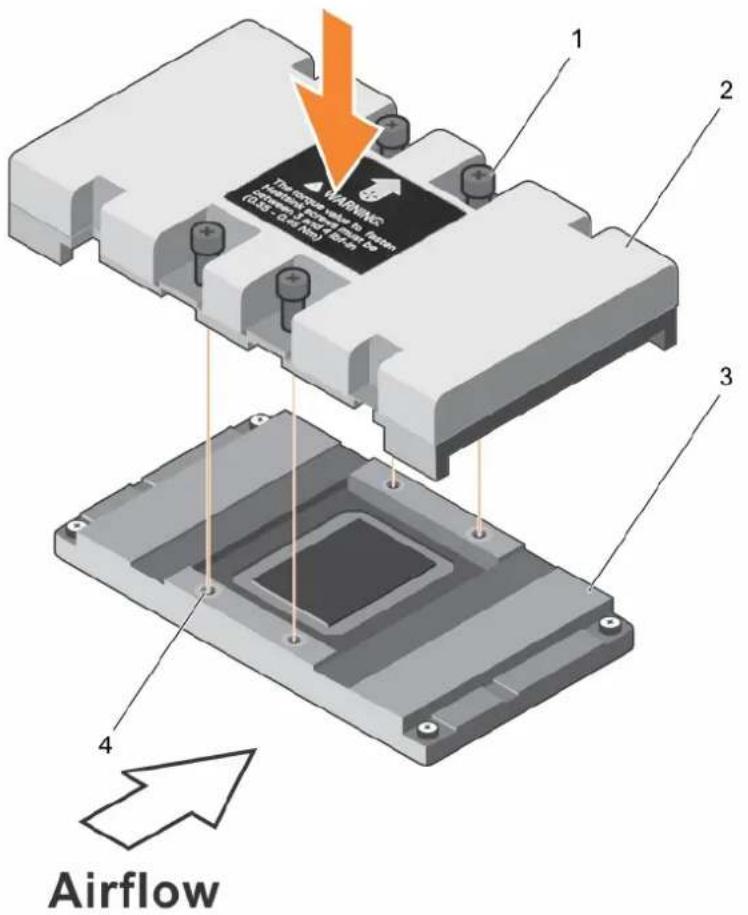
text_image
WARNING The circuit breaker is from (SEE - G-1-NE) AirflowFigure 122. Installing a SXM2-GPU heat sink
- Using a Philips #1 screwdriver tighten the screws in the following order to secure the heat sink to the system board:
a) Tighten the first screw three turns.
b) Tighten the screw diagonally opposite to the screw you tightened.
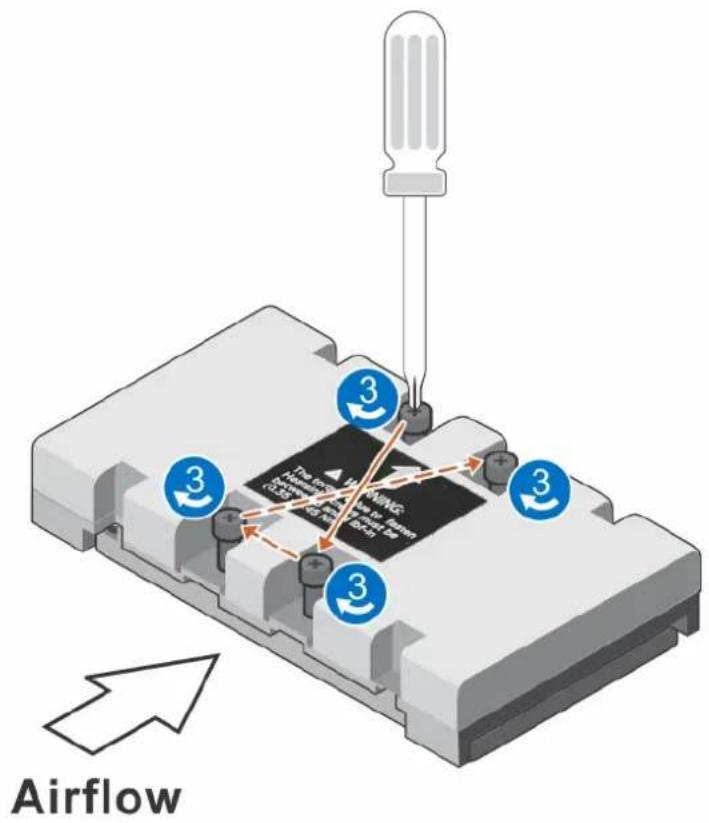
text_image
The Engine AirflowFigure 123. Installing the SXM2-GPU heat sink screws
- Repeat the procedure for the remaining two screws.
- Return to the first screw and tighten it.
- Following the same diagonal pattern, tighten the remaining screws.
Next steps
- Install the NVLink air shroud.
Installing the NVLink Air Shroud
Prerequisites

CAUTION: Many repairs may only be done by a certified service technician. You should only perform troubleshooting and simple repairs as authorized in your product documentation, or as directed by the online or telephone service and support team. Damage due to servicing that is not authorized by Dell is not covered by your warranty. Read and follow the safety instructions that are shipped with your product.

NOTE: This is a Field Replaceable Unit (FRU). Removal and installation procedures should be performed only by Dell certified service technicians.
- Follow the safety guidelines listed in the Safety instructions section.
Steps
- Align the guide slots on the NVLink air shroud with the screws on the graphics heat sink.
- Lower the NVLink air shroud into the NVLink board until it is firmly seated.
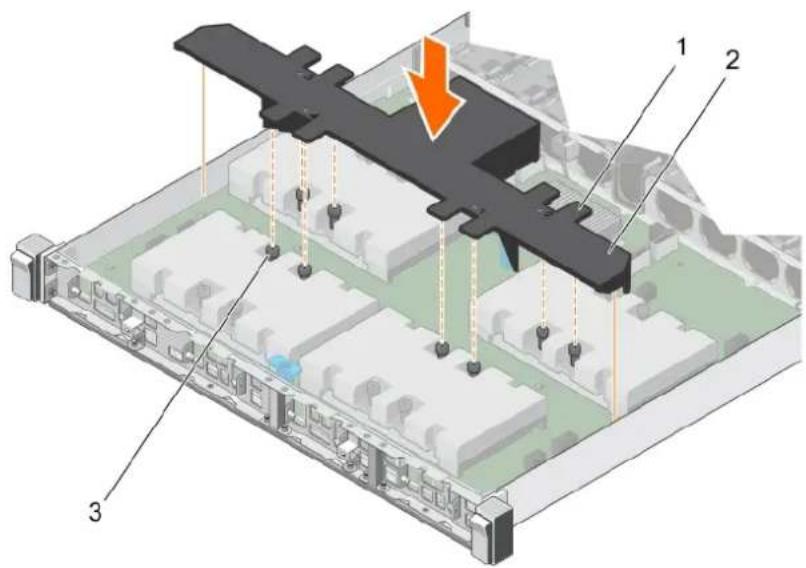
text_image
Technical diagram of a mechanical assembly with labeled components and an orange arrow indicating a downward force or motion.Figure 124. Installing a NVLink air shroud
a. guide slots on the NVLink air shroud
b. NVLink air shroud
c. retention screw (8)
SXM2 GPU cabling diagrams
Cabling configuration K systems
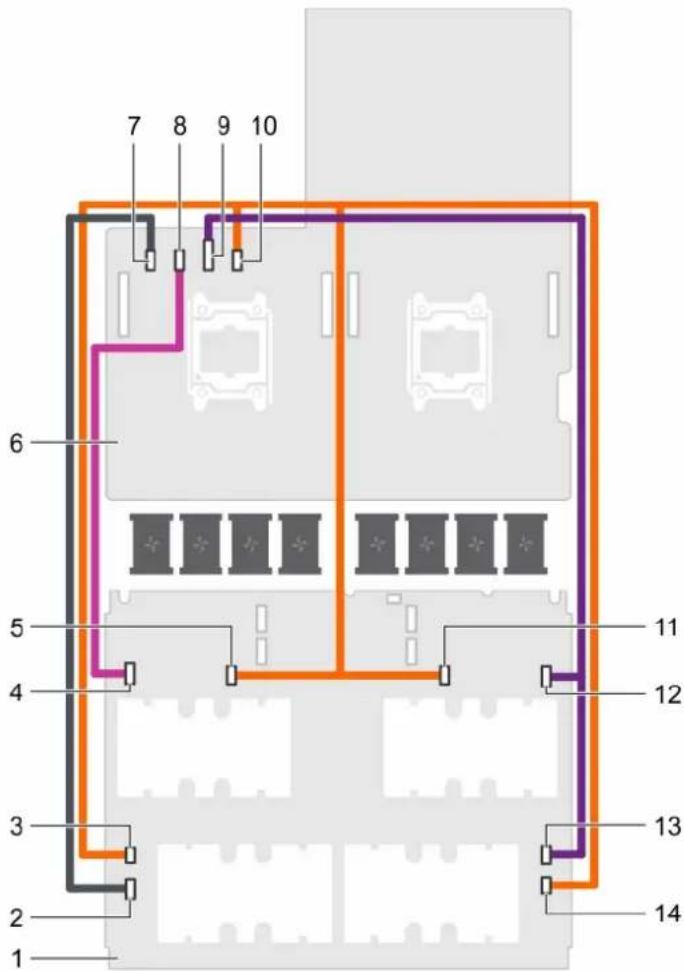
text_image
7 8 9 10 6 5 4 3 2 1 11 12 13 14Figure 125. Power cabling for a dual processor system with four SXM2 GPUs (Configurations K)
- NVLink board 2. SXM2 GPU4 power(4A) connector on the NVLink board
- SXM2 GPU4 power(4B) connector on the NVLink board 4. SXM2 GPU3 power(3A) connector on the NVLink board
- SXM2 GPU3 power(3B) connector on the NVLink board 6. system board
- SXM2 GPU4 power connector on the system board 8. SXM2 GPU3 power connector on the system board
- SXM2 GPU1/2 power connector on the system board 10. SXM2 GPU1/2/3/4 power connector on the system board
- SXM2 GPU2 power(2B) connector on the NVLink board 12. SXM2 GPU2 power(2A) connector on the NVLink board
- SXM2 GPU1 power(1A) connector on the NVLink board 14. SXM2 GPU1 power(1B) connector on the NVLink board
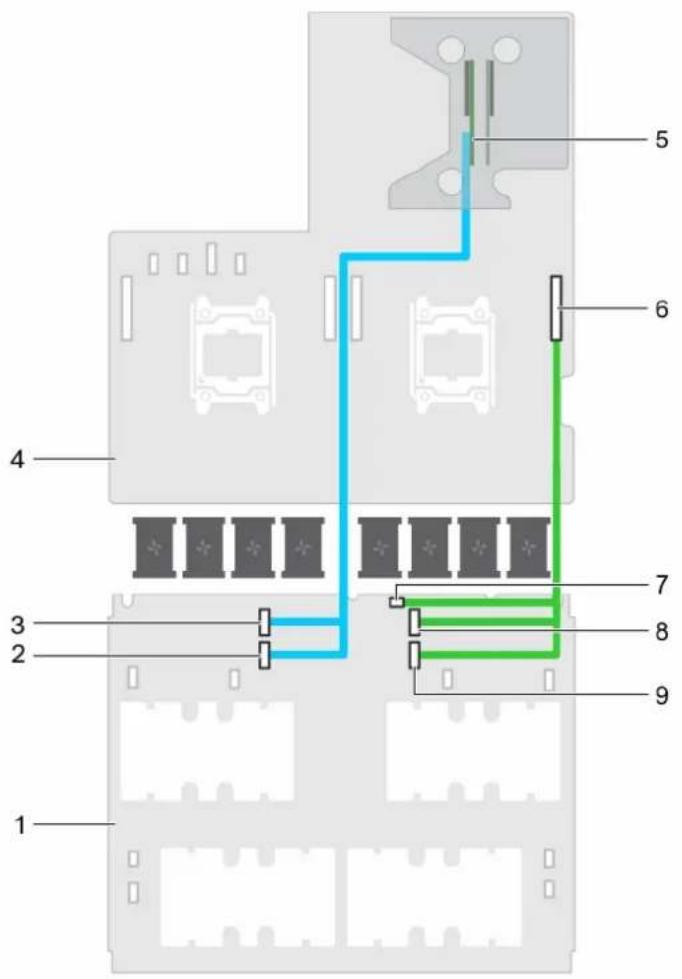
text_image
1 2 3 4 5 6 7 8 9Figure 126. Data cabling a dual processor system with four SXM2 GPUs (Configurations K)
- NVLink Board 2. PCIe DN2 cable connector on the NVLink board
- PCIe DN1 cable connector on the NVLink board 4. system board
- slot 2 riser card 6. NVLink data cable connector on the system board
- NVLink board power connector 8. PCIe UP1 cable connector on the NVLink board
- PCIe UP2 cable connector on the NVLink board
Control panel module
Removing the control panel module
Prerequisites

CAUTION: Many repairs may only be done by a certified service technician. You should only perform troubleshooting and simple repairs as authorized in your product documentation, or as directed by the online or telephone service and support team. Damage due to servicing that is not authorized by Dell is not covered by your warranty. Read and follow the safety instructions that are shipped with your product.

NOTE: This is a Field Replaceable Unit (FRU). Removal and installation procedures should be performed only by Dell certified service technicians.
- Follow the safety guidelines listed in the Safety instructions section.
- Follow the procedure listed in the Before working inside your system section.
- Keep the Phillips #1 screwdriver ready.
- Remove the system top cover (front).
Steps
- Hold and pull the plastic pull tab to disconnect the control panel cable from the control panel module.
- Remove the screws securing the control panel module to the chassis.
- Lift the control panel module away from the chassis.
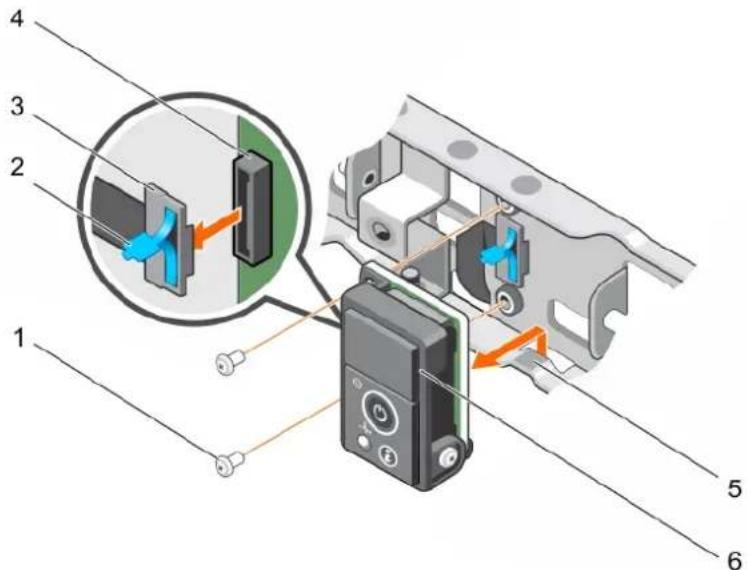
text_image
Technical diagram showing a device connected to a component with numbered parts and an inset view highlighting internal components.Figure 127. Removing the control panel module
- screw (2) 2. plastic pull tab
- control panel cable 4. control panel connector
- notch 6. control panel module
Next steps
- Install the control panel module.
- Follow the procedure listed in the After working inside your system section.
Related tasks
Before working inside your system
After working inside your system
Removing the system top cover (front)
Installing the control panel module
Related reference
Safety instructions
Installing the control panel module
Prerequisites

CAUTION: Many repairs may only be done by a certified service technician. You should only perform troubleshooting and simple repairs as authorized in your product documentation, or as directed by the online or telephone service and support team. Damage due to servicing that is not authorized by Dell is not covered by your warranty. Read and follow the safety instructions that are shipped with your product.

NOTE: This is a Field Replaceable Unit (FRU). Removal and installation procedures should be performed only by Dell certified service technicians.
- Follow the safety guidelines listed in the Safety instructions section.
- Follow the procedure listed in the Before working inside your system section.
- Keep the Phillips #1 screwdriver ready.
Steps
- Insert the control panel module behind the notch on the chassis.
- Align the screw holes on the control panel module with the screw holes on the chassis.
- Secure the control panel module to the chassis by using the screws.
- Connect the control panel cable to the control panel connector.
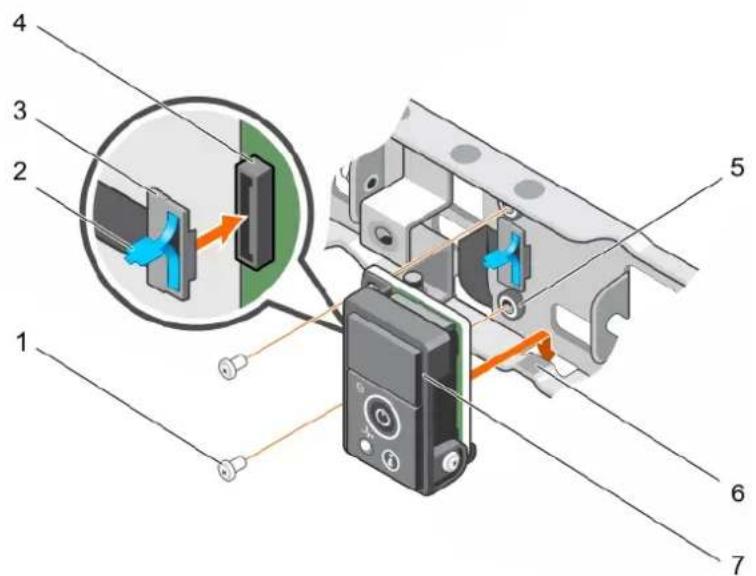
text_image
Technical diagram showing a device connected to a component with numbered parts and a magnified inset highlighting a component with blue arrows.Figure 128. Installing the control panel module
- screw (2) 2. plastic pull tab
- control panel cable 4. control panel connector
- screw hole on chassis (2) 6. notch
- control panel module
Next steps
- Install the system top cover (front).
- Follow the procedure listed in the After working inside your system section.
Related tasks
Before working inside your system After working inside your system Installing the system top cover (front)
Removing the control panel module
Related reference
Safety instructions
Using system diagnostics
If you experience a problem with your system, run the system diagnostics before contacting Dell for technical assistance. The purpose of running system diagnostics is to test your system hardware without using additional equipment or risking data loss. If you are unable to fix the problem yourself, service and support personnel can use the diagnostics results to help you solve the problem.
NOTE: For more information about OEM diagnostic event messages, see the Event and Error Message Reference Guide for 13th Generation Dell PowerEdge Servers Version 1.2
Topics:
• Dell Embedded System Diagnostics
Dell Embedded System Diagnostics
NOTE: The Dell Embedded System Diagnostics is also known as Enhanced Pre-boot System Assessment (ePSA) diagnostics.
The Embedded System Diagnostics provides a set of options for particular device groups or devices allowing you to:
- Run tests automatically or in an interactive mode
- Repeat tests
- Display or save test results
- Run thorough tests to introduce additional test options to provide extra information about the failed device(s)
- View status messages that inform you if tests are completed successfully
• View error messages that inform you of problems encountered during testing
When to use the Embedded System Diagnostics
Run the Embedded System Diagnostics (ePSA) if your system does not boot.
Running the Embedded System Diagnostics from Boot Manager
Prerequisites
Run the Embedded System Diagnostics (ePSA) if your system does not boot.
Steps
- When the system is booting, press F10.
- Use the up arrow and down arrow keys to select System Utilities > Launch Diagnostics.
The ePSA Pre-boot System Assessment window is displayed, listing all devices detected in the system. The diagnostics starts executing the tests on all the detected devices.
Running the Embedded System Diagnostics from the Dell Lifecycle Controller
Steps
- As the system boots, press F10.
2. Select Hardware Diagnostics → Run Hardware Diagnostics
The ePSA Pre-boot System Assessment window is displayed, listing all devices detected in the system. The diagnostics starts executing the tests on all the detected devices.
System diagnostic controls
Menu Description
Configuration Displays the configuration and status information of all detected devices.
Results Displays the results of all tests that are run.
Systemhealth Provides the current overview of the system performance.
Event log
Displays a time-stamped log of the results of all tests run on the system. This is displayed if at least one event description is recorded.
Jumpers and connectors
This topic provides specific information about the jumpers. It also provides some basic information about jumpers and switches and describes the connectors on the various boards in the system. Jumpers on the system board help to disable the system and setup passwords. You must know the connectors on the system board to install components and cables correctly.
Topics:
- System board jumper settings
• Disabling forgotten password - System board connectors
System board jumper settings
For information on resetting the password jumper to disable a password, see the Disabling a forgotten password section.
Table 33. System board jumper settings
| Jumper Setting Description | |
| PWRD_EN The password reset feature is enabled (pins 2–4). BIOS local | |
| access is unlocked at the next AC power cycle. | |
| The password reset feature is disabled (pins 4–6). | |
| NVRAM_CLR The configuration settings are retained at the next system boot | |
| (pins 3–5). | |
| The configuration settings are cleared at system boot (pins 1–3). |
Related tasks
Disabling forgotten password
Removing the system top cover (front)
Installing the system top cover (front)
Removing the system top cover (back)
Installing the system top cover (back)
Disabling forgotten password
The software security features of the system include a system password and a setup password. The password jumper enables or disables password features and clears any password(s) currently in use.
Prerequisites
Steps
- Turn off the system, including any attached peripherals, and disconnect the system from the electrical outlet.
- Remove the system cover.
- Move the jumper on the system board jumper from pins 4 and 6 to pins 2 and 4.
- Install the system cover.
The existing passwords are not disabled (erased) until the system boots with the jumper on pins 2 and 4. However, before you assign a new system and/or setup password, you must move the jumper back to pins 4 and 6.

NOTE: If you assign a new system and/or setup password with the jumper on pins 2 and 4, the system disables the new password(s) the next time it boots.
- Reconnect the system to its electrical outlet and turn on the system, including any attached peripherals.
- Turn off the system, including any attached peripherals, and disconnect the system from the electrical outlet.
- Remove the system cover.
- Move the jumper on the system board jumper from pins 2 and 4 to pins 4 and 6.
- Install the system cover.
- Reconnect the system to its electrical outlet and turn on the system, including any attached peripherals.
- Assign a new system and/or setup password.
Related tasks
Removing the system top cover (front)
Installing the system top cover (front)
Removing the system top cover (back)
Installing the system top cover (back)
Related reference
Safety instructions
System board jumper settings
System board connectors
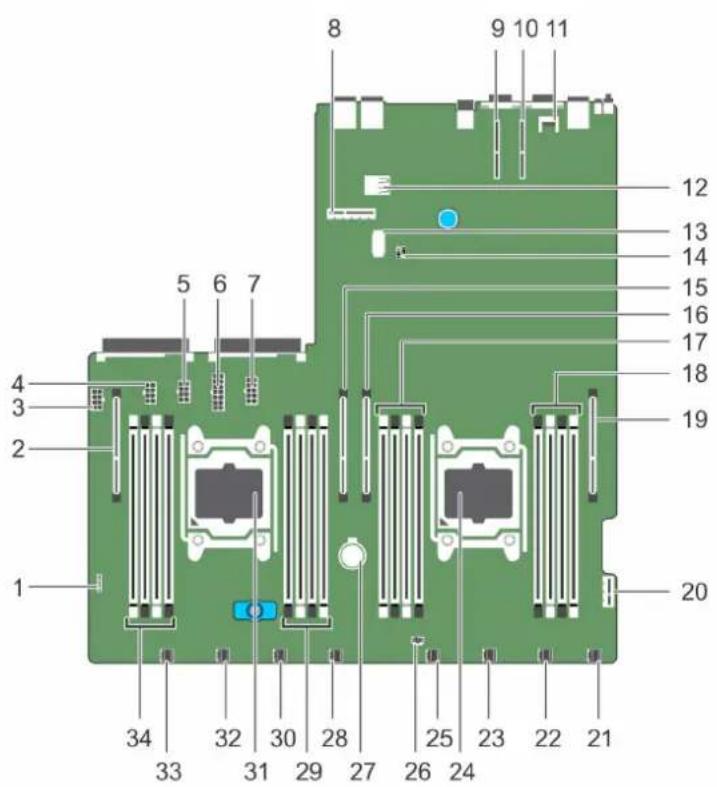
text_image
1 2 3 4 5 6 7 8 9 10 11 12 13 14 15 16 17 18 19 20 21 22 23 24 25 26 27 28 29 30 31 32 33 34Figure 129. System board jumpers and connectors
Table 34. System board connectors
Item Connector Description
1 CTRL_PNL Front panel connector
Item Connector Description
| 2 GPU3 (CPU2_PE3_ABCD) GPU 3 PCIe Connector | ||
| 3 4HDD_PWR 2.5 inch hard drive cage power connector | ||
| 4 GPU_4_PWR GPU 4 power connector | ||
| 5 GPU_3_PWR GPU 3 power connector | ||
| 6 GPU_1/2_PWR GPU 1/2 power connector | ||
| 7 PLX_PWR (PCIe_Switch_board) Switch board power connector | ||
| 8 2SSD_BP 1.8 inch SSD backplane connector | ||
| 9 RISER_SLOT2 (CPU2_PE1_AB) Expansion slot 2 x8 connector | ||
| 10 RISER_SLOT0 (CPU1_PE1_AB) Expansion slot 1 x8 connector | ||
| 11 TPM_MODULE Trusted Platform Module connector | ||
| 12 | USB_INT | Internal USB connector |
| 13 | 4HHD_SIG | SATA x4 signal connector |
| 14 | PSWD & PSWD_NVRAM | Password jumpers |
| 15 GPU4 (CPU2_PE2_ABCD) GPU 4 PCIe connector | ||
| 16 GPU1 (CPU1_PE3_ABCD) | GPU 1 PCIe connector | |
| 17 | A3, A7, A4, A8 | Memory module sockets for processor 1 |
| 18 A1, A5, A2, A6 | Memory module sockets for processor 1 | |
| 19 GPU2 (CPU1_PE2_ABCD) | GPU 2 PCIe connector | |
| 20 | IDSDM | Internal dual SD module connector |
| 21 | FAN-1 | Fan 1 connector |
| 22 | FAN-2 | Fan 2 connector |
| 23 | FAN-3 | Fan 3 connector |
| 24 | CPU1 | Processor 1 |
| 25 | FAN-4 | Fan 4 connector |
| 26 | INTRUSION_CABLE | Intrusion cable connector |
| 27 | BATTERY System battery | |
| 28 | FAN-5 | Fan 5 connector |
| 29 | B1, B5, B2, B6 | Memory module sockets for processor 2 |
| 30 | FAN-6 | Fan 6 connector |
| 31 | CPU2 | Processor 2 |
| 32 | FAN-7 | Fan 7 connector |
| 33 | FAN-8 | Fan 8 connector |
| 34 | B3, B7, B4, B8 | Memory module sockets for processor 2 |
Related tasks
Installing the system board
Troubleshooting your system
Safety first — for you and your system

CAUTION: Many repairs may only be done by a certified service technician. You should only perform troubleshooting and simple repairs as authorized in your product documentation, or as directed by the online or telephone service and support team. Damage due to servicing that is not authorized by Dell is not covered by your warranty. Read and follow the safety instructions that are shipped with your product.

NOTE: Solution validation was performed by using the factory shipped hardware configuration.
Topics:
- Troubleshooting system startup failure
- Troubleshooting external connections
- Troubleshooting the video subsystem
- Troubleshooting a USB device
- Troubleshooting a serial input and output device
- Troubleshooting a NIC
- Troubleshooting a wet system
- Troubleshooting a damaged system
- Troubleshooting the system battery
- Troubleshooting power supply units
- Troubleshooting cooling problems
- Troubleshooting cooling fans
- Troubleshooting system memory
- Troubleshooting an internal USB key
- Troubleshooting a micro SD card
- Troubleshooting a drive or SSD
- Troubleshooting a storage controller
- Troubleshooting expansion cards
- Troubleshooting processors
- Troubleshooting a GPU
- System messages
Troubleshooting system startup failure
If you boot the system to the BIOS boot mode after installing an operating system from the UEFI Boot Manager, the system stops responding. To avoid this issue, you must boot to the same boot mode in which you installed the operating system.
For all other startup issues, note the system messages that appear on the screen.
Troubleshooting external connections
Before troubleshooting any external devices, ensure that all external cables are securely attached to the external connectors on your system.
- Compare the technical specification of the system with the external device to check the compatibility.
- Check the external device functionality with some other similar system so that we are sure that the device is working fine.
- Check any other similar external device with this system so that we are sure that the system port is working fine.
For any further queries contact, Global Technical Support.
Troubleshooting the video subsystem
Prerequisites

NOTE: Ensure the Local Server Video Enabled option is selected in the iDRAC Graphical User Interface (GUI), under Virtual Console. If this option is not selected, local video is disabled.
Steps
- Check the cable connections (power and display) to the monitor.
- Check the video interface cabling from the system to the monitor.
- Run the LCD Built-in Self Test (BIST).
Results
If the tests run successfully, the problem is not related to video hardware.
Next steps
If the tests fail, see the Getting help section.
Related reference
Getting help
Troubleshooting a USB device
Prerequisites

NOTE: Follow steps 1 to 6 to troubleshoot a USB keyboard or mouse. For other USB devices, go to step 7.
Steps
- Disconnect the keyboard and/or mouse cables from the system and reconnect them.
- If the problem persists, connect the keyboard and/or mouse to another USB port on the system.
- If the problem is resolved, restart the system, enter System Setup, and check if the non-functioning USB ports are enabled.

NOTE: Older operating systems may not support USB 3.0.
- Check if USB 3.0 is enabled in System Setup. If enabled, disable it and see if the issue is resolved.
- In iDRAC Settings Utility, ensure that USB Management Port Mode is configured as Automatic or Standard OS Use.
-
If the problem is not resolved, replace the keyboard and/or mouse with a known working keyboard or mouse.
If the problem is not resolved, proceed to step 7 to troubleshoot other USB devices attached to the system.
If the problem is not resolved, proceed to troubleshoot other USB devices attached to the system. -
Turn off all attached USB devices, and disconnect them from the system.
-
Restart the system.
-
If your keyboard is functioning, enter System Setup, verify that all USB ports are enabled on the Integrated Devices screen. If your keyboard is not functioning, use remote access to enable or disable the USB options.
-
Check if USB 3.0 is enabled in System Setup. If it is enabled, disable it and restart your system.
-
If the system is not accessible, reset the NVRAM_CLR jumper inside your system and restore the BIOS to the default settings. See the System board jumper setting section
-
In the IDRAC Settings Utility, ensure that USB Management Port Mode is configured as Automatic or Standard OS Use.
-
Reconnect and turn on each USB device one at a time.
-
If a USB device causes the same problem, turn off the device, replace the USB cable with a known good cable, and turn on the device.
Next steps
If all troubleshooting fails, see the Getting help section.
Related concepts
System Setup
Related reference
System board connectors
Getting help
Troubleshooting a serial input and output device
Prerequisites
Steps
- Turn off the system and any peripheral devices connected to the serial port.
- Swap the serial interface cable with a known working cable, and turn on the system and the I/O serial device.
If the problem is resolved, replace the interface cable with a known working cable. - Turn off the system and the I/O serial device, and swap the serial device with a compatible device.
- Turn on the system and the I/O serial device.
Next steps
If the problem persists, see the Getting help section.
Related reference
Getting help
Troubleshooting a NIC
Steps
- Run the appropriate diagnostic test. For more information, see the Using system diagnostics section for the available diagnostic tests.
- Restart the system and check for any system messages pertaining to the NIC controller.
-
Check the appropriate indicator on the NIC connector:
-
If the link indicator does not glow, the cable connected might be disengaged.
- If the activity indicator does not glow, the network driver files might be damaged or missing.
Install or replace the drivers as necessary. For more information, see the NIC documentation.
- Try another known good network cable.
-
If the problem persists, use another connector on the switch or hub.
-
Ensure that the appropriate drivers are installed and the protocols are bound. For more information, see the NIC documentation.
- Enter System Setup and confirm that the NIC ports are enabled on the Integrated Devices screen.
- Ensure that all the NICs, hubs, and switches on the network are set to the same data transmission speed and duplex. For more information, see the documentation for each network device.
- Ensure that all the NICs and switches on the network are set to the same data transmission speed and duplex. For more information, see the documentation for each network device.
- Ensure that all network cables are of the proper type and do not exceed the maximum length.
Next steps
If the problem persists, see the Getting help section.
Related reference
Getting help
Troubleshooting a wet system
Prerequisites

CAUTION: Many repairs may only be done by a certified service technician. You should only perform troubleshooting and simple repairs as authorized in your product documentation, or as directed by the online or telephone service and support team. Damage due to servicing that is not authorized by Dell is not covered by your warranty. Read and follow the safety instructions that are shipped with your product.
Steps
- Turn off the system and attached peripherals, and disconnect the system from the electrical outlet.
- Remove the system cover.
- Remove the following components (if installed) from the system:
• Power supply unit(s)
- Optical drive
- Hard drives
- Hard drive backplane
- USB memory key
- Cooling shroud
- Expansion card risers (if installed)
- Expansion cards
• Cooling fan assembly (if installed)
• Cooling fan(s)
- Memory modules
- Processor(s) and heat sink(s)
- System board
- Let the system dry thoroughly for at least 24 hours.
- Reinstall the components you removed in step 3 except the expansion cards.
- Install the system cover.
- Turn on the system and attached peripherals.
If the problem persists, see the Getting help section.
- If the system starts properly, turn off the system, and reinstall all the expansion cards that you removed.
- Run the appropriate diagnostic test. For more information, see the Using system diagnostics section.
Next steps
If the tests fail, see the Getting help section.
Related tasks
Replacing the optional internal USB memory key
Removing the cooling shroud
Removing the expansion card riser cage
Removing expansion cards
Removing an AC power supply unit
Removing a heat sink
Removing a processor
Removing memory modules
Installing the system top cover (front)
Installing the system top cover (back)
Related reference
Hard drives
Troubleshooting a damaged system
Prerequisites

CAUTION: Many repairs may only be done by a certified service technician. You should only perform troubleshooting and simple repairs as authorized in your product documentation, or as directed by the online or telephone service and support team. Damage due to servicing that is not authorized by Dell is not covered by your warranty. Read and follow the safety instructions that are shipped with your product.
Steps
- Turn off the system and attached peripherals, and disconnect the system from the electrical outlet.
- Remove the system cover.
-
Ensure that the following components are properly installed:
-
cooling shroud
- expansion card risers (if installed)
- expansion cards
- power supply unit(s)
• cooling fan assembly (if installed) - cooling fan(s)
- processor(s) and heat sink(s)
- memory modules
- drive carriers or cage
-
drive backplane
-
Ensure that all cables are properly connected.
- Install the system cover.
- Run the appropriate diagnostic test. For more information, see the Using system diagnostics section.
Next steps
If the problem persists, see the Getting help section.
Related tasks
Removing the system top cover (front)
Removing the system top cover (back)
Installing the system top cover (front)
Installing the system top cover (back)
Related reference
Getting help
Troubleshooting the system battery
Prerequisites

CAUTION: Many repairs may only be done by a certified service technician. You should only perform troubleshooting and simple repairs as authorized in your product documentation, or as directed by the online or telephone service and support team. Damage due to servicing that is not authorized by Dell is not covered by your warranty. Read and follow the safety instructions that are shipped with your product.

NOTE: If the system is turned off for long periods of time (for weeks or months), the NVRAM may lose the system configuration information. This situation is caused by a defective battery.

NOTE: Some software may cause the system time to speed up or slow down. If the system seems to operate normally except for the time set in System Setup, the problem may be caused by a software, rather than by a defective battery.
Steps
- Re-enter the time and date in System Setup.
- Turn off the system, and disconnect it from the electrical outlet for at least an hour.
- Reconnect the system to the electrical outlet, and turn on the system.
- Enter System Setup.
If the date and time displayed in System Setup are not correct, check the System Error Log (SEL) for system battery messages.
Next steps
If the problem persists, see the Getting help section.
Related concepts
System Setup
Related reference
Getting help
Troubleshooting power supply units
Prerequisites

CAUTION: Many repairs may only be done by a certified service technician. You should only perform troubleshooting and simple repairs as authorized in your product documentation, or as directed by the online or telephone service and support team. Damage due to servicing that is not authorized by Dell is not covered by your warranty. Read and follow the safety instructions that are shipped with your product.
The following sections provide information on troubleshooting power source and power supply units problems.
Troubleshooting power source problems
Steps
- Press the power button to ensure that your system is turned on. If the power indicator does not glow when the power button is pressed, press the power button firmly.
- Plug in another working power supply unit to ensure that the system board is not faulty.
- Ensure that no loose connections exist.
For example, loose power cables. - Ensure that the power source meets applicable standards.
- Ensure that there are no short circuits.
- Have a qualified electrician check the line voltage to ensure that it meets the needed specifications.
Results

NOTE: Some power supply units require 200-240V AC to deliver their rated capacity. For more information, see the system Technical Specifications section in the Installation and Service Manual available at Dell.com/poweredgemanuals.
Power supply unit problems
Steps
- Ensure that no loose connections exist.
For example, loose power cables.
- Ensure that the AC power source is properly connected to the PSU.
NOTE: If the 2000 W PSU or 1600 W PSU is installed, ensure that it is connected to a 220 V AC power source.
- Ensure that the power supply unit (PSU) handle or LED indicates that the PSU is working properly.
For more information about PSU indicators, see the Power indicator codes section.
-
If you have recently upgraded your system, ensure that the PSU has enough power to support the new system.
-
If you have a redundant PSU configuration, ensure that both the PSUs are of the same type and wattage.
You may have to upgrade to a higher wattage PSU.
-
Ensure that you use only PSUs with the Extended Power Performance (EPP) label on the back.
-
Reseat the PSU.
NOTE: After installing a PSU, allow several seconds for the system to recognize the PSU and determine if it is working properly.
If the problem persists, see the Getting help section.
Related reference
Getting help
Troubleshooting cooling problems

CAUTION: Many repairs may only be done by a certified service technician. You should only perform troubleshooting and simple repairs as authorized in your product documentation, or as directed by the online or telephone service and support team. Damage due to servicing that is not authorized by Dell is not covered by your warranty. Read and follow the safety instructions that are shipped with your product.
Ensure that the following conditions exist:
- System cover, cooling shroud, PCIe shroud, GPU blanks, PSU blank in PSU slot 2 if hard drive cage is not installed, uSATA SSD blanks if uSATA SSDs are not installed, memory module blank, or back-filler bracket is not removed.
- Ambient air temperature is 25^ or less depending on the system configuration.
- External airflow is not obstructed.
- A cooling fan is not removed or has not failed.
- The expansion card installation guidelines have been followed.
Additional cooling can be added by one of the following methods:
From the iDRAC web GUI:
-
Click Hardware > Fans > Setup.
-
From the Fan Speed Offset drop-down list, select the cooling level required or set the minimum fan speed to a custom value.
From F2 System Setup:
- Select iDRAC Settings > Thermal, and set a higher fan speed from the fan speed offset or minimum fan speed.
From RACADM commands:
- Run the command racadm help system. thermalsettings
For more information, see Integrated Dell Remote Access User's Guide at Dell.com/poweredgemanuals
Related reference
Getting help
Troubleshooting cooling fans
Prerequisites

CAUTION: Many repairs may only be done by a certified service technician. You should only perform troubleshooting and simple repairs as authorized in your product documentation, or as directed by the online or telephone service and
support team. Damage due to servicing that is not authorized by Dell is not covered by your warranty. Read and follow the safety instructions that are shipped with your product.
NOTE: The fan number is referenced by the management software of the system. In the event of a problem with a particular fan, you can easily identify and replace it by noting down the fan numbers on the cooling fan assembly.
- Follow the safety guidelines listed in the Safety instructions section.
- Follow the procedure listed in the Before working inside your system section.
Steps
- Remove the system cover (front and back).
NOTE: Do not operate the system without the system cover. This can result in overheating and cause component damage.
- Reseat the fan or the fan's power cable.
- Install the system cover (front and back).
- Restart the system.
Next steps
- Follow the procedure listed in the After working inside your system section.
- If the problem persists, see the Getting help section.
Related tasks
Removing the system top cover (front)
Removing the system top cover (back)
Related reference
Getting help
Troubleshooting system memory
Prerequisites
CAUTION: Many repairs may only be done by a certified service technician. You should only perform troubleshooting and simple repairs as authorized in your product documentation, or as directed by the online or telephone service and support team. Damage due to servicing that is not authorized by Dell is not covered by your warranty. Read and follow the safety instructions that are shipped with your product.
Steps
- If the system is operational, run the appropriate diagnostic test. See the Using system diagnostics section for the available diagnostic tests.
If the diagnostic tests indicate a fault, follow the corrective actions provided by the diagnostic tests. - If the system is not operational, turn off the system and attached peripherals, and unplug the system from the power source. Wait at least for 10 seconds, and then reconnect the system to the power source.
- Turn on the system and attached peripherals, and note the messages on the screen.
If an error message is displayed indicating a fault with a specific memory module, go to step 12.
- Enter System Setup, and check the system memory setting. Make any changes to the memory settings, if needed.
If the memory settings match the installed memory but the problem still persists, go to step 12.
- Turn off the system and attached peripherals, and disconnect the system from the electrical outlet.
- Remove the system cover.
- Check the memory channels and ensure that they are populated correctly.
NOTE: See the system event log or system messages for the location of the failed memory module. Reinstall the memory device.
- Reseat the memory modules in their sockets.
- Install the system cover.
-
Enter System Setup and check the system memory setting.
If the problem is not resolved, proceed with step 11. -
Remove the system cover.
-
If a diagnostic test or error message indicates a specific memory module as faulty, swap or replace the module with a known working memory module.
-
To troubleshoot an unspecified faulty memory module, replace the memory module in the first DIMM socket with a module of the same type and capacity.
If an error message is displayed on the screen, this may indicate a problem with the installed DIMM type(s), incorrect DIMM installation, or defective DIMM(s). Follow the on-screen instructions to resolve the problem.
-
Install the system cover.
-
As the system boots, observe any error message that is displayed and the diagnostic indicators on the front of the system.
-
If the memory problem persists, repeat step 12 through step 15 for each memory module installed.
Next steps
If the problem persists, see the Getting help section.
Related concepts
System Setup
Related tasks
Removing the system top cover (front)
Removing the system top cover (back)
Installing the system top cover (front)
Installing the system top cover (back)
Removing memory modules
Related reference
Using system diagnostics
Getting help
Troubleshooting an internal USB key
Prerequisites

CAUTION: Many repairs may only be done by a certified service technician. You should only perform troubleshooting and simple repairs as authorized in your product documentation, or as directed by the online or telephone service and support team. Damage due to servicing that is not authorized by Dell is not covered by your warranty. Read and follow the safety instructions that are shipped with your product.
Steps
- Enter System Setup and ensure that the USB key port is enabled on the Integrated Devices screen.
- Turn off the system and attached peripherals, and disconnect the system from the electrical outlet.
- Remove the system cover.
- Locate the USB key and reseat it.
- Install the system cover.
- Turn on the system and attached peripherals, and check if the USB key is functioning.
- If the problem is not resolved, repeat step 2 and step 3.
- Insert a known working USB key.
- Install the system cover.
Next steps
If the problem persists, see the Getting help section.
Related tasks
Removing the system top cover (front)
Removing the system top cover (back)
Installing the system top cover (front)
Installing the system top cover (back)
Removing the expansion card riser cage
Installing the expansion card riser cage
Removing the PCIe shroud
Installing the PCIe shroud
Related reference
Getting help
Troubleshooting a micro SD card
Prerequisites

NOTE: Certain micro SD cards have a physical write-protect switch on the card. If the write-protect switch is turned on, the micro SD card is not writable.
Steps
- Enter System Setup, and ensure that the Internal SD Card Port is enabled.
-
Turn off the system, including any attached peripherals, and disconnect the system from the electrical outlet.
-
Remove the system cover.

NOTE: When an SD card failure occurs, the internal dual SD module controller notifies the system. On the next restart, the system displayed a message indicating the failure. If redundancy is enabled at the time of SD card failure, a critical alert will be logged and chassis health will degrade.
-
Replace the failed micro SD card with a new micro SD card.
-
Install the system cover.
-
Reconnect the system to its electrical outlet and turn on the system, including any attached peripherals.
-
Enter System Setup, and ensure that the Internal SD Card Port and Internal SD Card Redundancy modes are set to the needed modes.
Verify that the correct SD slot is set as Primary SD Card.
-
Check if the micro SD card is functioning properly.
-
If the Internal SD Card Redundancy option is set to Enabled at the time of the SD card failure, the system prompts you to perform a rebuild.

NOTE: The rebuild is always sourced from the primary SD card to the secondary SD card.
Related concepts
System Setup
Related tasks
Removing the system top cover (front)
Installing the system top cover (front)
Removing the system top cover (back)
Installing the system top cover (back)
Troubleshooting a drive or SSD
Prerequisites

CAUTION: This troubleshooting procedure can erase data stored on the drive. Before you proceed, back up all files on the drive.

CAUTION: Many repairs may only be done by a certified service technician. You should only perform troubleshooting and simple repairs as authorized in your product documentation, or as directed by the online or telephone service and support team. Damage due to servicing that is not authorized by Dell is not covered by your warranty. Read and follow the safety instructions that are shipped with your product.
Steps
- Run the appropriate diagnostic test. See the Using system diagnostics section.
Depending on the results of the diagnostics test, proceed as required through the following steps.
- If your system has a RAID controller and your drives are configured in a RAID array, perform the following steps:
a) Restart the system and press F10 during system startup to run the Dell Lifecycle Controller, and then run the Hardware Configuration wizard to check the RAID configuration.
See the Dell Lifecycle Controller documentation or online help for information about RAID configuration.
b) Ensure that the drives are configured correctly for the RAID array.
c) Take the drive offline and reseat the drive.
d) Exit the configuration utility and allow the system to boot to the operating system.
-
Ensure that the needed device drivers for your controller card are installed and are configured correctly. For more information, see the operating system documentation.
-
Restart the system and enter the System Setup.
-
Verify that the controller is enabled and the drives are displayed in the System Setup.
Next steps
If the problem persists, see the Getting help section.
Related concepts
System Setup
Related reference
Using system diagnostics
Getting help
Troubleshooting a storage controller

CAUTION: Many repairs may only be done by a certified service technician. You should only perform troubleshooting and simple repairs as authorized in your product documentation, or as directed by the online or telephone service and support team. Damage due to servicing that is not authorized by Dell is not covered by your warranty. Read and follow the safety instructions that are shipped with your product.

NOTE: When troubleshooting a controller, see the documentation for your operating system and the controller.
- Run the appropriate diagnostic test. See the Using system diagnostics section.
- Turn off the system and attached peripherals, and disconnect the system from the electrical outlet.
- Remove the system cover.
- Verify that the installed expansion cards are compliant with the expansion card installation guidelines.
- Ensure that each expansion card is firmly seated in its connector.
- Install the system cover.
- Reconnect the system to the electrical outlet, and turn on the system and attached peripherals.
-
If the problem is not resolved, turn off the system and attached peripherals, and disconnect the system from the electrical outlet.
-
Remove the system cover.
- Remove all expansion cards installed in the system.
- Install the system cover.
- Reconnect the system to the electrical outlet, and turn on the system and attached peripherals.
- Run the appropriate diagnostic test. See the Using system diagnostics section.
If the tests fail, see the Getting help section.
- For each expansion card you removed in step 10, perform the following steps:
a. Turn off the system and attached peripherals, and disconnect the system from the electrical outlet.
b. Remove the system cover.
c. Reinstall one of the expansion cards.
d. Install the system cover.
e. Run the appropriate diagnostic test. See the Using system diagnostics section.
If the problem persists, see the Getting help section.
Related concepts
System Setup
Related tasks
Removing the system top cover (front)
Removing the system top cover (back)
Installing the system top cover (front)
Installing the system top cover (back)
Related reference
Using system diagnostics
Getting help
Troubleshooting expansion cards
Prerequisites

CAUTION: Many repairs may only be done by a certified service technician. You should only perform troubleshooting and simple repairs as authorized in your product documentation, or as directed by the online or telephone service and support team. Damage due to servicing that is not authorized by Dell is not covered by your warranty. Read and follow the safety instructions that are shipped with your product.

NOTE: When troubleshooting an expansion card, you also have to see the documentation for your operating system and the expansion card.
Steps
- Run the appropriate diagnostic test. See the Using system diagnostics section.
- Turn off the system and attached peripherals, and disconnect the system from the electrical outlet.
- Remove the system cover.
- Ensure that each expansion card is firmly seated in its connector.
- Install the system cover.
- Turn on the system and attached peripherals.
- If the problem is not resolved, turn off the system and attached peripherals, and disconnect the system from the electrical outlet.
- Remove the system cover.
- Remove all expansion cards installed in the system.
- Install the system cover.
- Run the appropriate diagnostic test. See the Using system diagnostics section.
If the tests fail, see the Getting help section.
- For each expansion card you removed in step 8, perform the following steps:
a) Turn off the system and attached peripherals, and disconnect the system from the electrical outlet.
b) Remove the system cover.
c) Reinstall one of the expansion cards.
d) Install the system cover.
e) Run the appropriate diagnostic test. See the Using system diagnostics section.
Next steps
If the problem persists, see the Getting help section.
Related concepts
System Setup
Related tasks
Removing the system top cover (front) Removing the system top cover (back) Installing the system top cover (front) Installing the system top cover (back)
Related reference
Using system diagnostics
Getting help
Troubleshooting processors
Prerequisites

CAUTION: Many repairs may only be done by a certified service technician. You should only perform troubleshooting and simple repairs as authorized in your product documentation, or as directed by the online or telephone service and support team. Damage due to servicing that is not authorized by Dell is not covered by your warranty. Read and follow the safety instructions that are shipped with your product.
Steps
- Run the appropriate diagnostics test. See the Using system diagnostics section.
- Turn off the system and attached peripherals, and disconnect the system from the electrical outlet.
- Remove the system cover.
- Ensure that the processor and heat sink are properly installed.
- Install the system cover.
- Run the appropriate diagnostic test. See the Using system diagnostics section.
- If the problem persists, see the Getting help section.
Related concepts
System Setup
Related tasks
Removing the system top cover (front)
Removing the system top cover (back)
Installing the system top cover (front)
Installing the system top cover (back)
Related reference
Using system diagnostics
Getting help
Troubleshooting a GPU

NOTE: The GPU is a Field Replaceable Unit. Do not to troubleshoot the GPU without the assistance of a Dell certified service technician.
For more information, see the Getting help section.

CAUTION: Many repairs may only be done by a certified service technician. You should only perform troubleshooting and simple repairs as authorized in your product documentation, or as directed by the online or telephone service and support team. Damage due to servicing that is not authorized by Dell is not covered by your warranty. Read and follow the safety instructions that are shipped with your product.
Related reference
Getting help
System messages
For information about the event and error messages generated by the system firmware and agents that monitor system components, see the Error Code Lookup page at qr1.dell.com
Warning messages
A warning message alerts you to a possible problem and prompts you to respond before the system continues a task. For example, before you format a hard drive, a message warns you that you may lose all data on the hard drive. Warning messages usually interrupt the task and need you to respond by typing y (yes) or n (no).

NOTE: Warning messages are generated by either the application or the operating system. For more information, see the documentation that shipped with the operating system or application.
Diagnostic messages
The system diagnostic utility generates messages if there are errors detected when you run diagnostic tests on your system. For more information about system diagnostics, see the For information about the event and error messages generated by the system firmware and agents that monitor system components, see the Error Code Lookup page at qr1.dell.com.
Related reference
Using system diagnostics
Alert messages
The systems management software generates alert messages for your system. Alert messages include information, status, warning, and failure messages for drive, temperature, fan, and power conditions. For more information, see the systems management software documentation links listed in the Documentation resources section of this manual.
Related tasks
Contacting Dell EMC
Accessing system information by using QRL
Related reference
Quick Resource Locator for C4130
Topics:
- Contacting Dell EMC
- Documentation feedback
- Accessing system information by using QRL
- Quick Resource Locator for C4130
Contacting Dell EMC
Dell EMC provides several online and telephone based support and service options. If you do not have an active internet connection, you can find contact information about your purchase invoice, packing slip, bill, or Dell EMC product catalog. Availability varies by country and product, and some services may not be available in your area. To contact Dell EMC for sales, technical assistance, or customer service issues:
Steps
- Go to Dell.com/support/home.
-
Select your country from the drop-down menu on the lower right corner of the page.
-
For customized support:
a) Enter your system Service Tag in the Enter your Service Tag field.
b) Click Submit.
The support page that lists the various support categories is displayed.
- For general support:
a) Select your product category.
b) Select your product segment.
c) Select your product.
The support page that lists the various support categories is displayed.
- For contact details of Dell EMC Global Technical Support:
a) Click Global Technical Support.
b) The Contact Technical Support page is displayed with details to call, chat, or e-mail the Dell EMC Global Technical Support team.
Documentation feedback
You can rate the documentation or write your feedback on any of our Dell EMC documentation pages and click Send Feedback to send your feedback.
Accessing system information by using QRL
You can use the Quick Resource Locator (QRL) located on the information tag in the front of the C4130, to access the information about the Dell PowerEdge C4130.
Prerequisites
Ensure that your smartphone or tablet has the QR code scanner installed.
The QRL includes the following information about your system:
- How-to videos
- Reference materials, including the Installation and Service Manual, LCD diagnostics, and mechanical overview
- Your system service tag to quickly access your specific hardware configuration and warranty information
• A direct link to Dell to contact technical assistance and sales teams
Steps
- Go to Dell.com/qrl and navigate to your specific product or
- Use your smartphone or tablet to scan the model-specific Quick Resource (QR) code on your system or in the Quick Resource Locator section.
Quick Resource Locator for C4130
Use the Quick Resource Locator (QRL) to get immediate access to system information and how-to videos. This can be done by visiting Dell.com/QRL or by using your smartphone or tablet and a model specific Quick Resource (QR) code located on your Dell PowerEdge system. To try out the QR code, scan the following image.