
PG2000 - Contact grill KENWOOD - Free user manual and instructions
Find the device manual for free PG2000 KENWOOD in PDF.


| Product Type | Contact Grill |
| Brand | Kenwood |
| Model | PG2000 |
| Dimensions (approx.) | 32 x 28 x 15 cm |
| Weight (approx.) | 3.2 kg |
| Power Consumption | 2000 W |
| Voltage | 220-240 V, 50/60 Hz |
| Plate Material | Non-stick coated cast aluminum |
| Temperature Control | Adjustable thermostat |
| Indicator Lights | Power and ready lights |
| Functions | Grill, toast, and panini press |
| Floating Hinge | Yes, accommodates thick foods |
| Drip Tray | Removable and dishwasher safe |
| Safety Features | Auto shut-off after 30 minutes of inactivity |
| Cleaning | Wipe with damp cloth; plates are non-stick |
| Replacement Parts | Contact Kenwood service for plates and drip tray |
Frequently Asked Questions - PG2000 KENWOOD
User questions about PG2000 KENWOOD
0 question about this device. Answer the ones you know or ask your own.
Ask a new question about this device
Download the instructions for your Contact grill in PDF format for free! Find your manual PG2000 - KENWOOD and take your electronic device back in hand. On this page are published all the documents necessary for the use of your device. PG2000 by KENWOOD.
USER MANUAL PG2000 KENWOOD
natural_image
Exterior view of a Kenwood electric grill with open lid and control panel (no visible text or symbols)
1
2
3
4
5
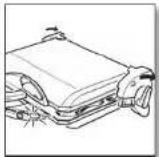
6
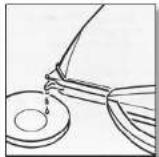
7
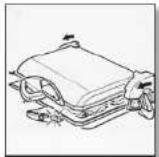
8
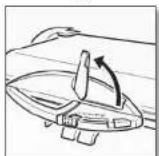
9
10
11
Allgemein
Read these instructions carefully and retain for future reference.
Remove all packaging and any labels. Wash all parts - see "cleaning".
Description
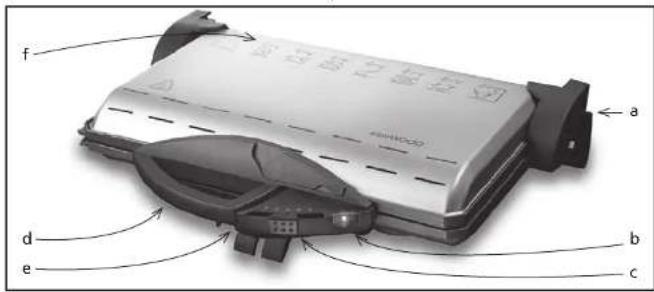
Fig. 1
a Hinge lever
b Control lamp
c Temperature selector
d Handle with positioning yoke
e Closing slide
f Grill guide
top line = average cooking time in minutes
middle line = type of food
bottom line = rated setting of the temperature selector
Safety Instructions!
Connect only to the AC voltage (e.g. 230 V) given on the nameplate.
This appliance satisfies the EC guideline No. 89/336 EEC for radio screening.
Please note that children are not allowed to use the health grill without supervision of parents. This appliance is not intended for usage by persons with lack of required physical or mental capacities.
Children should be supervised to ensure that they do not play with the appliance.
The appliance is not intended to be operated by means of an external timer or separate remote control system.
The appliance must not be operated unless the hot plates are in place.
Be sure that the hot plates are firmly engaged.
Before turning the plates, let the appliance cool off, pull out mains plug.
Do not bend the connection cable or bring it into contact with hot parts of the appliance.
Functioning of the appliance makes the housing and the grill plates hot during operation - danger of burns!
After use, pull out the plug immediately, open the appliance and let it cool off.
Let appliance cool off before transport.
Carefully lock top and bottom plate before transport.
Never immerse appliance in water for cleaning.
This product satisfies the pertinent safety regulations for electrical appliances.
Repairs on electrical appliances must be performed by trained personnel only. Considerable dangers can arise for the user from improper repairs.
Attention! Housing get hot. Danger of burns!
On not place the appliance on a sensitive surface (e.g. painted furniture) and keep a distance of at least 70cm to burnable materials.
Only use the appliance for its intended domestic use. Kenwood will not accept any liability if the appliance is subject to improper use, or failure to comply with these instructions.
Never use a damaged appliance. Get it checked or repaired: see 'Service and Repair'.
Application possibilities
Contact grilling:
The plates lies directly on the food to be grilled
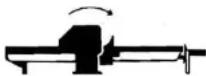
Party grilling:
Both hot plates lies horizontally with double grilling surface.
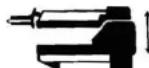

Grill toasting:
Hot plate placed above the food to be grilled.
Baking waffles:
Turn plates, plates in the same position as with contact grilling.
Preparation
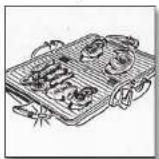
- The appliance is delivered in closed condition (Fig. 1).
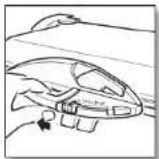
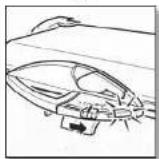
To open pull the closing slide to the left side and raise (Fig. 2).
2. Turning and removing the hot plates
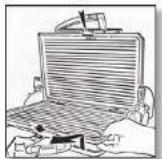
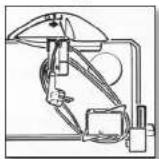
To do this bring the item in the party position (Fig. 9), pull the respective hot plate lock forward (Fig. 3) and lift up the plate slightly diagonal.
Re-insert the plate in the same way slightly diagonal.
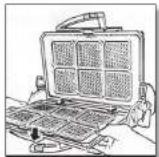
The same figures on the top and bottom plate can be read from the front (Fig. 4). Hot plate 1 (marking on the front) belongs in the bottom shell, hot plate 2 in the top shell.
Before using for the first time, rinse the hot plates, dry them and grease slightly.
Application
1. Grilling
The hot plates are used with the grooved side for grilling. The hot plates have a grease outlet for excessive fat. Please place a small plate beneath (Fig. 5 + 6).
2. Browning
The hot plates are used with the grooved side for browning. The top grill plate may not touch the food. To assure this, the appliance is opened and the hinge levers to the right and left outside on the hinges are tilted forward simultaneously (Fig. 7). When the top part is closed, an interval of 4cm appears. To replace, lift up the top part, tilt the hinge lever back again and close the lid. Do not put the hinge levers back on one side or during operation of the appliance.
3. Party grilling
The grooved grill plates are used. Open up the top shell on the handle, lift up slightly and place to the rear (Fig. 8 + 9). Place a small plate under each of the fat outlets (Fig. 6). Be absolutely sure when grilling that hot plate 1 is covered first. Under no circumstances may plate 2 be used alone for party grilling, only in combination with plate 1 will perfect temperature control be achieved (Fig. 9).
4. Baking waffles
The appliance can be turned into a waffle iron by turning over the grill plates. For turning over the plates, see section „Preparation“.
In all cases
Close the appliance (Fig. 10) and heat up. To do this, insert the mains plug and set the temperature selector to the rated figure as indicated in the grill compass, bottom line. The appliance is not ready for operation until the control lamp has gone out. Then place the food to be cooked. For continuous operations such as baking waffles, for example, always wait until the appliance has become heated up. Only then add the batter!
Temperatures
The temperatures can be set continuously from Position 1 to 5.
Position 1: around 150^ C; Position 2: around 170^ C
Position 3: around 190°C; Position 4: around 210°C
Position 5: around 230°C
The times given in the grill compass assume a preheated appliance (the control lamp has gone out). Vary the times according to the thickness and the desired degree of cooking of the food.
Practical tips:
Contact grilling
Pieces of meat are suitable which you would also use for brief frying in the frying pan. Before grilling, the meat must be completely thawed out and thoroughly dry. Salter after grilling. If aluminium foil is used, grease it slightly on the inside. Breaded foods are preferably cooked at a lower heat for somewhat longer.
Browning
e.g., filled slices of toast.
Toast bread does not have to be pretoasted.
Party grilling
For "sociable grilling" at the table, the appliance is used like a large frying pan for grilling all quickly fried meat cuts. The food must be turned over.
Baking waffles
After they have been heated up, the waffle irons are greased once with oil or vegetable fat. If you are careful in measuring and pouring the batter evenly, you can avoid the running over of the batter. Always let waffles cool off on a kitchen grate. Note: Waffles made with milk and cream become softer and lighter, water waffles become crisper and browner.
Waffle recipes
Cheese waffles
Ingredients for about 20 waffles: 125 g of wheat flour • 125 g of potato flour • 1 teaspoon of baking powder • 200 g of soft margarine • 4 eggs • 6 cl of warm water • 4 tablespoons of grated Emmentaler (or similar) cheese • 1/2 teaspoon of paprica powder • 1 teaspoon of salt. With a handmixer beat all ingredients for about 3 minutes into a liquid batter. With a tablespoon pour the batter carefully into a thin layer on the lower waffle mould (plate 1) Baking-time: 4 to 6 minutes.
Biscuit waffles
Ingredients for about 24 waffles: 6 eggs • 3 teaspoons of hot water • 100 g of sugar • 100 g of wheat flour • 50 g of potato flour • 1/2 teaspoon of baking powder • grated lemon peel • 1/2 teaspoon of rum • 1 teaspoon of lemon juice
With a handmixer set to the highest speed, whip the eggs and the water for about 1 minute. Slowly add the sugar during the second minute and beat for a further 3 minutes. Stir in, little by little, the wheat flour, the potato flour, baking powder and lemon peel into the egg cream. Finally, blend in the rum and lemon juice. Bake the dough mixture immediately (Grease the waffle plates first).
Position: 3 Baking time: 4 to 6 minutes
Cream waffles
Ingredients for 10 - 12 waffles: 3 eggs • 25 g of flour • 1/2 teaspoon of salt • juice of 1/2 lemon.
Separate the egg whites from the yolks. Whip the egg white until stiff. Keep it in an separate bowl. With a handmixer, thoroughly mix the egg yolks with the other ingredients for about 2 minutes at the highest speed setting.
Then fold in the whipped egg white. Fry immediately.
Position: 3 • Frying time: min. 4 to 6 minutes
Yeast dough waffles
Ingredients for about 20 waffles: 500 g of flour • 30 g of yeast • 1/2 litre of milk • 80 g of sugar • pinch of salt • grated lemon peel • 1 packet of vanilla sugar • 50 g of soft margarine • 4 eggs • cinnamon
Sieve the flour into a bowl and make a well in the centre. Add the yeast, which has been previously diluted with a small amount of milk and blend into the mixture from the centre outwards. Sprinkle the mixture with a little flour and leave in a warm place until the layer of flour on the top of the mixture starts breaking open.
Add the remaining milk and sugar and with a handmixer knead all ingredients into a dough. Let the dough rise in a warm place.
Position: 4 • Baking time: 4 to 6 minutes.
Then sprinkle with cinnamon and sugar.
Cleaning
Caution: Pull out the mains plug before every cleaning.
The hot plates can be better cleaned if they are still somewhat warm.
Remove the hot plates from the appliance and clean with wash brush and detergent only. Do not use any scouring agents, soaped steel wool or metal scraper, since otherwise the anti-sticking coating will be damaged.
For cleaning the appliance surface and all other parts such as handles, adjusting hinges, etc. a moist cloth, possibly with a little detergent is sufficient.
Storage
To save space, the appliance can be stored resting on its rear side. To do this, close the appliance, press the closing handle into the base and wind up the cable (Fig. 11).
Disposal:
Packaging disposal:
Do not throw away the package materials. Please put it in the recycling bin.

PS

PP

PE
Gift box: Paper, should be put to the old paper collection point. Plastic packaging material and foils should be collected in the special collection containers.
Correct Disposal of this product
This marking indicates that this product should not be disposed with other household wastes throughout the EU. To prevent possible harm to the environment or human health from uncontrolled waste disposal, recycle it
■ responsibly to promote the sustainable reuse of material resources. To return
your used device, please use the return and collection systems or contact the retailer where the product was purchased. They can take this product for environmental safe recycling.
Service and Repair:
If the cord is damaged it must, for safety reasons, be replaced by Kenwood or an authorised Kenwood repairer.
If you need help with using this product or servicing or repairs
contact the shop where you bought your appliance
Grilling and baking table
The times given in the table are only guidelines. The cooking time can be changed according to your requirements.
| Type of food | Position of appliance | Approx. time in minutes | Thermoslat setting |
| Escalopes of veal | 4 - 5 | 4 | |
| Fillet of veal | 4 | 4 | |
| Rump steak | 3 | 5 | |
| Fillet of steak | 3 - 5 | 5 | |
| Entrecôte | 5 - 7 | 5 | |
| Escalope of porc | 5 | 4 | |
| Pork chops | 2 x 5 | 4 | |
| Fillet of porc | 4 | 4 | |
| Sirloin of pork | 12 - 15 | 4 | |
| Pork cutlet | 5 - 7 | 4 | |
| Rolled roast of pork | 5 | 4 | |
| Escalope of turkey | 3 - 5 | 4 | |
| Escalope of turkey in foil | 5 - 7 | 4 | |
| Poultry pieces | 10 - 12 | 4 | |
| Small roast chicken - Halved | 15 - 20 | 4 | |
| Filet of fish in foil | 5 | 5 | |
| Fish fingers | 2 x 5 | 4 | |
| Fish cakes | 2 x 4 - 6 | 4 |
Meaning of the symbols:

| Type of food | Position of appliance | Approx time in minutes | appliance setting |
| Trout, mackerel | 8 - 12 | 3 | |
| Prawns | 5 | 4 | |
| Sliced liver | 3 | 4 | |
| Brain - coated in breadcrumbs | 2 x 5 | 4 | |
| Sausages | 8 - 103 - 5 | 4 | |
| Burgers | 4 | 4 | |
| Kebab | 12 - 15 | 5 | |
| Sandwiches | 2 | 4 | |
| Open sandwiches, overbaked | 8 - 10 | 4 | |
| Escargots on toast in aluminium foil | 6 - 8 | 4 | |
| Slices of pineapple | 2 - 3 | 4 | |
| Corn on the cob | 2 x 4 - 5 | 4 | |
| Tomatoes | 5 7 | 3 | |
| Small pieces of meat | depending on sort of meat | 5 | |
| Cream waffles | 4 6 | 3 | |
| Biscuit waffles | 4 - 6 | 3 | |
| Cheese waffles | 5 | 3 | |
| Yeast dough waffles | 4 - 6 | 4 |


- Allgemein
- Description
- Safety Instructions!
- Application possibilities
- Contact grilling:
- Party grilling:
- Grill toasting:
- Baking waffles:
- Preparation
- Turning and removing the hot plates
- Application
- Grilling
- Browning
- Party grilling
- Baking waffles
- In all cases
- Temperatures
- Practical tips:
- Contact grilling
- Browning
- Party grilling
- Baking waffles
- Waffle recipes
- Cheese waffles
- Biscuit waffles
- Cream waffles
- Yeast dough waffles
- Cleaning
- Storage
- Disposal:
- Correct Disposal of this product
- Service and Repair:
Brand : KENWOOD
Model : PG2000
Category : Contact grill