
Pot System COB - Lighting Fun Generation - Free user manual and instructions
Find the device manual for free Pot System COB Fun Generation in PDF.


User questions about Pot System COB Fun Generation
0 question about this device. Answer the ones you know or ask your own.
Ask a new question about this device
Download the instructions for your Lighting in PDF format for free! Find your manual Pot System COB - Fun Generation and take your electronic device back in hand. On this page are published all the documents necessary for the use of your device. Pot System COB by Fun Generation.
USER MANUAL Pot System COB Fun Generation
natural_image
Black-and-white photo of a multi-lit streetlight fixture with four head-mounted spotlights (no text or symbols visible)fun generation
LED Pot System COB 40W RGB WW
LED lighting set
Musikhaus Thomann
Thomann GmbH
1.1 Further information.... 6
1.2 Notational conventions.... 7
1.3 Symbols and signal words.... 7
2 Safety instructions.... 10
3 Features.... 17
4 Installation.... 18
5 Starting up.... 22
6 Connections and controls.... 25
7 Operating.... 33
7.1 Starting the device.... 33
7.2 Main menu.... 33
7.3 Menu overview.... 42
7.4 Functions in 4-channel DMX mode.... 43
7.5 Functions in 6-channel DMX mode.... 43
LED Pot SystemCOB 40W RGB WW
th·mann MUSIC IS OUR PASSION
Table of contents
7.6 Functions in 8-channel DMX mode.... 44
7.7 Functions in 16-channel DMX mode.... 50
8 Technical specifications.... 52
9 Troubleshooting.... 55
10 Plug and connection assignments.... 57
11 Cleaning.... 58
12 Protecting the environment.... 59
1 General information
This user manual contains important information on the safe operation of the device. Read and follow all safety notes and all instructions. Save this manual for future reference. Make sure that it is available to all persons using this device. If you sell the device to another user, be sure that they also receive this manual.
Our products and user manuals are subject to a process of continuous development. We therefore reserve the right to make changes without notice. Please refer to the latest version of the user manual which is ready for download under www.thomann.de.
LED Pot SystemCOB 40W RGB WW

1.1 Further information
On our website (www.thomann.de) you will find lots of further information and details on the following points:
| Download This manual is also available as PDF file for you to download. | |
| Keyword search | Use the search function in the electronic version to find the topics of interest for you quickly. |
| Online guides | Our online guides provide detailed information on technical basics and terms. |
| Personal consultation For personal consultation please contact our technical hotline. | |
| Service | If you have any problems with the device the customer service will gladly assist you. |
1.2 Notational conventions
This manual uses the following notational conventions:
Letterings
The letterings for connectors and controls are marked by square brackets and italics.
Examples: [VOLUME] control, [Mono] button.
Displays
Texts and values displayed on the device are marked by quotation marks and italics.
Examples: '24ch', 'OFF'.
1.3 Symbols and signal words
In this section you will find an overview of the meaning of symbols and signal words that are used in this manual.
LED Pot SystemCOB 40W RGB WW

| Signal word Meaning | |
| DANGER! This combination of symbol and signal word indicates an immediate dangerous situation that will result in death or serious injury if it is not avoided. | |
| WARNING! This combination of symbol and signal word indicates a possible dangerous situation that can result in death or serious injury if it is not avoided. | |
| NOTICE! This combination of symbol and signal word indicates a possible dangerous situation that can result in material and environmental damage if it is not avoided. | |
| Warning signs Type of danger | |
 | Warning – high-voltage. |
 | Warning – dangerous optical radiation. |
Warning signs Type of danger

Warning – suspended load.

Warning - danger zone.
LED Pot SystemCOB 40W RGB WW
th·mann MUSIC IS OUR PASSION
2 Safety instructions
Intended use
This device is intended for use as an electronic lighting effect by means of LED technology. The device is designed for professional use and is not suitable for use in households. Use the device only as described in this user manual. Any other use or use under other operating conditions is considered to be improper and may result in personal injury or property damage. No liability will be assumed for damages resulting from improper use.
This device may be used only by persons with sufficient physical, sensorial, and intellectual abilities and having corresponding knowledge and experience. Other persons may use this device only if they are supervised or instructed by a person who is responsible for their safety.
Extend the life of the device by regular breaks in operation and avoid switching it on and off frequently. This device is not suitable for continuous use.
Safety

DANGER!
Danger for children
Ensure that plastic bags, packaging, etc. are disposed of properly and are not within reach of babies and young children. Choking hazard!
Ensure that children do not detach any small parts (e.g. knobs or the like) from the unit. They could swallow the pieces and choke!
Never let children unattended use electrical devices.
DANGER!
Electric shock caused by high voltages inside
Within the device there are areas where high voltages may be present. Never remove any covers.
There are no user-serviceable parts inside.
Do not use the device if covers, protectors or optical components are missing or damaged.
LED Pot SystemCOB 40W RGB WW

DANGER!
Electric shock caused by short-circuit
Always use proper ready-made insulated mains cabling (power cord) with a protective contact plug. Do not modify the mains cable or the plug. Failure to do so could result in electric shock/death or fire. If in doubt, seek advice from a registered electrician.
WARNING!
Eye damage caused by high light intensity
Never look directly into the light source.
WARNING!
Risk of epileptic shock
Strobe lighting can trigger seizures in photosensitive epilepsy. Sensitive persons should avoid looking at strobe lights.

NOTICE!
Risk of fire
Do not block areas of ventilation. Do not install the device near any direct heat source. Keep the device away from naked flames.
LED Pot SystemCOB 40W RGB WW


NOTICE!
Operating conditions
This device has been designed for indoor use only. To prevent damage, never expose the device to any liquid or moisture. Avoid direct sunlight, heavy dirt, and strong vibrations.
Only operate the device within the ambient conditions specified in the chapter 'Technical specifications' of this user manual. Avoid heavy temperature fluctuations and do not switch the device on immediately after it was exposed to temperature fluctuations (for example after transport at low outside temperatures).
Dust and dirt inside can damage the unit. When operated in harmful ambient conditions (dust, smoke, nicotine, fog, etc.), the unit should be maintained by qualified service personnel at regular intervals to prevent overheating and other malfunction.

NOTICE!
Power supply
Before connecting the device, ensure that the input voltage (AC outlet) matches the voltage rating of the device and that the AC outlet is protected by a residual current circuit breaker. Failure to do so could result in damage to the device and possibly injure the user.
Unplug the device before electrical storms occur and when it is unused for long periods of time to reduce the risk of electric shock or fire.

NOTICE!
Possible damage due to installation of a wrong fuse
The use of different types of fuses can cause serious damage to the unit. Fire hazard!
Only fuses of the same type may be used.
LED Pot SystemCOB 40W RGB WW


NOTICE!
Risk of short-circuits
Short-circuits may cause irreparable damages of the device. They can occur when you remove or change cables of the spots during operation.
Disconnect the device from the power supply before you change the cabling.

NOTICE!
Damages due to disconnection during operation
Only operate the unit when all spotlights are connected.
The disconnection of LED spotlights during operation may damage the unit. Disconnect the unit from the power supply before disconnecting LED spotlights.
3 Features
The LED light set offers an ideal combination of white and coloured light for parallel illumination of stage and dance floor in various shades.
■ four LED spots, each with one 40 W COB LED (RGB WW), pre-mounted on T-bar
Control via DMX (four different modes), via buttons and display on the unit as well as infrared remote control (supplied)
■ Preprogrammed automatic shows
Sound control
Master / Slave mode
- Noiseless operation due to convection cooling
■ Sturdy transport bag included
- Optionally available accessories: Stand, foot switch unit
For technological reasons, the light output of LEDs decreases over their lifetime. This effect increases with higher operating temperature. You can extend the service life of the illuminants by providing adequate ventilation and operating the LEDs with the lowest possible brightness.
LED Pot SystemCOB 40W RGB WW
th·mann MUSIC IS OUR PASSION
4 Installation
Unpack and check carefully there is no transportation damage before using the unit. Keep the equipment packaging. To fully protect the product against vibration, dust and moisture during transportation or storage use the original packaging or your own packaging material suitable for transport or storage, respectively.
WARNING!
Risk of injury caused by falling objects
Make sure that the installation complies with the standards and rules that apply in your country. Always secure the device with a secondary safety attachment, such as a safety cable or a safety chain.

NOTICE!
Damages due to disconnection during operation
Only operate the unit when all spotlights are connected.
The disconnection of LED spotlights during operation may damage the unit. Disconnect the unit from the power supply before disconnecting LED spotlights.

NOTICE!
Risk of overheating
The distance between light output and the illuminated surface must be more than 1.5 m (19.7in).
Provide sufficient ventilation.
The ambient temperature must always be below 40 °C (104 °F).

NOTICE!
Use of stands
When mounting the device onto a stand, ensure that the stand is in a safe and stable position and that the weight of the device does not exceed the maximum permissible load capacity of the stand.

NOTICE!
Possible data transmission errors
For error-free operation make use of dedicated DMX cables and do not use ordinary microphone cables.
Never connect the DMX input or output to audio devices such as mixers or amplifiers.
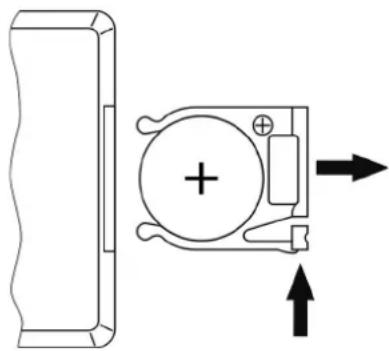
Inserting the battery into the remote control
natural_image
Pure mechanical diagram showing a bracket and a circular component with directional arrows, no text or symbols present.Press the lock of the battery holder to the centre of the housing and pull out the battery holder like a drawer. Insert the battery. The battery is correct if the positive pole points to the housing base of the remote control. Slide the battery holder back into the remote until it clicks into place.
When shipping, the battery is already installed in the remote and protected against discharge by a transparent plastic foil. Remove the plastic foil prior to first use.
LED Pot SystemCOB 40W RGB WW

5 Starting up
Create all connections while the device is off. Use the shortest possible high-quality cables for all connections. Take care when running the cables to prevent tripping hazards.
Connections in DMX mode
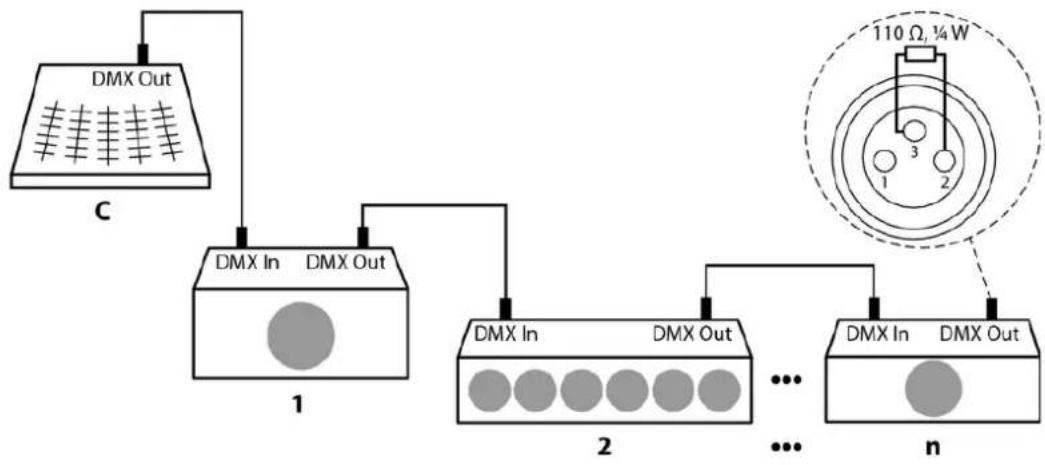
Connect the DMX input of the device to the DMX output of a DMX controller or another DMX device. Connect the output of the first DMX device to the input of the second one, and so on to form a daisy chain. Always ensure that the output of the last DMX device in the daisy chain is terminated with a resistor (110 Ω, ¼ W).
flowchart
graph TD
    A["DMX Out"] --> B["DMX In"]
    B --> C["DMX Out"]
    C --> D["1"]
    D --> E["DMX In"]
    E --> F["DMX Out"]
    F --> G["..."]
    G --> H["DMX In"]
    H --> I["DMX Out"]
    I --> J["n"]
    J --> K["110 Ω, ¼W"]
    K --> L["3"]
    K --> M["2"]
LED Pot SystemCOB 40W RGB WW

Connections in master/slave mode
When you configure a group of devices in master/slave mode, the first unit will control the other units for an automatic, sound-activated, synchronized show. This function is ideal when you want to start a show immediately. Connect the DMX output of the master device to the DMX input of the first slave device. Then connect the DMX output of the first slave device to the DMX input of the second slave device and so on.
6 Connections and controls
text_image
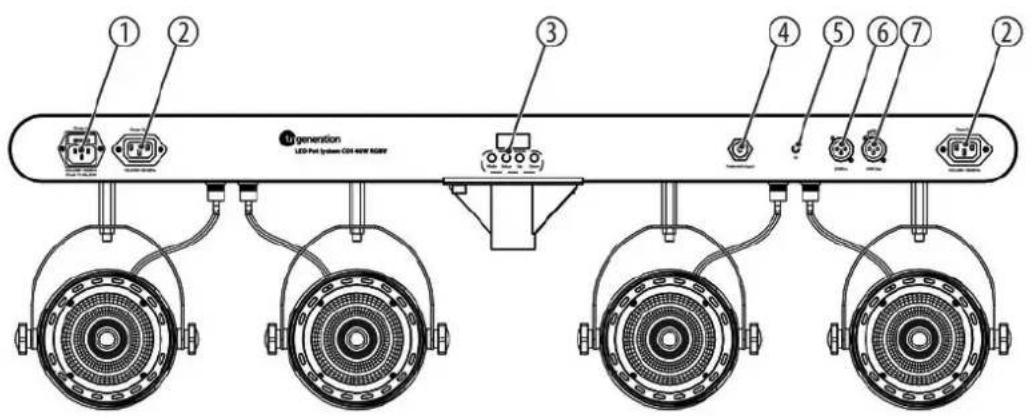
① ② ③ ④ ⑤ ⑥ ⑦ ② LED Port System COH NEW METERLED Pot SystemCOB 40W RGB WW

1 [Power In]
IEC chassis plug for power supply with fuse holder
2 [Power Out]
IEC chassis sockets for the power supply of further devices
3 Display and function buttons.
[Mode]
Activates the main menu and toggles between menu items. Closes an opened sub menu.
[Setup]
Selects an option of the respective operating mode, confirms the set value.
[Up]
Increases the displayed value by one.
[Down]
Decreases the displayed value by one.
4 [Foot switch Input]
1/4" phone socket to connect the foot controller unit
5 [IR] Infrared sensor for the remote control signals
6 [DMX In]
DMX input.
7 [DMX Out]
DMX output
Foot switch unit (optionally available)
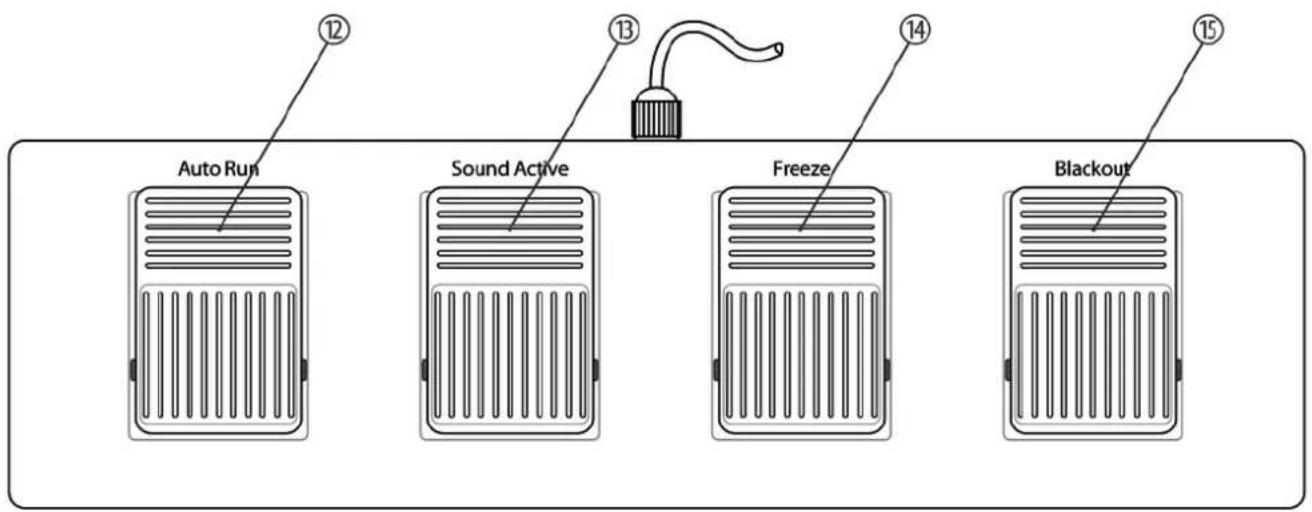
text_image
Auto Run Sound Active Freeze Blackout10 [Auto Run]
Activates the automatic mode (playback of preprogrammed automatic shows).
11 [Sound Active]
Activates the sound-controlled mode (playback of sound-controlled automatic shows).
12 [Freeze]
Pauses the running show and resumes it after a break.
13 [Blackout]
Blackouts all LEDs and turns them back on again.
Infrared remote control
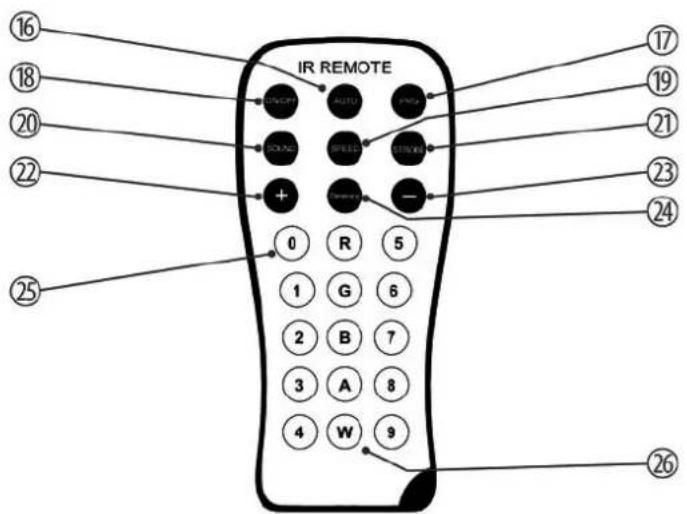
text_image
IR REMOTE 16 18 20 22 25 17 19 21 23 24 0 R 5 1 G 6 2 B 7 3 A 8 4 W 9 26
LED lighting set
| 14 [AUTO] |
| Activates the Automatic mode. |
| 15 [PRG] |
| Activates the operating mode 'Preprogrammed automatic show'. Select the desired programme with [+] and [-]. |
| 16 [ON/OFF] |
| Activates / deactivates the device. |
| 17 [SPEED] |
| Activates the setting mode for the programme speed. Adjust the speed using [+] and [-]. |
| 18 [SOUND] |
| Activates the Sound-controlled mode. Set the sensitivity of the built-in microphone with [+] and [-]. |
| 19 [STROBE] |
| Activates the setting mode for the Strobe speed. Adjust the speed using [+] and [-]. |
| 20 [+] |
| Increases the set value. |
21 [-]
Decreases the set value.
22 [Dimming]
Activates the dimming function for basic colours. Set the value for each basic colour using [+] and [-] .
23 [0 ... 9]
Numeric buttons for direct selection of a basic colour.
Buttons to select the colour shade in dimmer mode.
7 Operating
7.1 Starting the device
Connect the device to the power supply to start operation. After a few seconds, the display indicates that a reset is in progress. The device is then ready for use.
7.2 Main menu
Press [Mode] to activate the main menu and select an operating mode. Use [Setup] to select further options. Use [Up] and [Down] to change the respectively displayed value. When the display shows the desired value, press [MODE].
If you do not press any key for about 30 seconds, the display will be blanked. It will be reactivated to display the previously shown menu by pressing any button.
The set values are retained even when the device is disconnected from the mains power supply.
LED Pot SystemCOB 40W RGB WW

Operating mode 'Automatic'
Automatic operation can only be activated when the unit is operating in stand alone mode or as master in a master / slave combination. This setting is only relevant if the device is not controlled via DMX.
Press [Mode] repeatedly until the display shows 'AUTO'.
Operating mode 'Preprogrammed automatic show'
A preprogrammed automatic show can only be activated when the unit is operating in standalone mode or as master in a master / slave combination. This setting is only relevant if the device is not controlled via DMX.
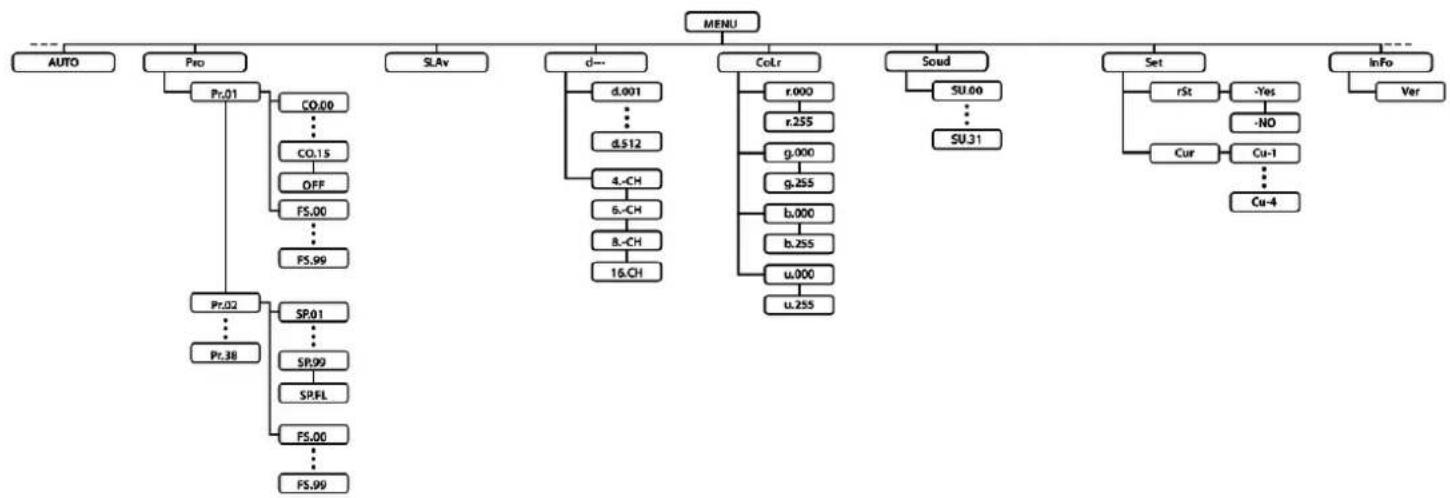
Press [Mode] repeatedly until the display shows 'Pro'. Press [Setup]. Now you can select one of the preprogrammed automatic shows. Use [Up] and [Down] to select a value between 'Pr.01' and 'Pr.38'.
Settings for programme 01:
For 'Pr.01', you can choose from 16 basic colours, maximum intensity or blackout of all LEDs. Press [Setup]. Now use [Up] and [Down] to select one of the following options: Blackout, Red, Green, Blue, White, Amber, Orange, Yellow, Magenta, Pink, Cyan, Light red, Light green, Light blue, Warm white, Cold white.
To adjust the flash frequency, press [Setup]. Use [Up] and [Down] to select a value between 'FS00' (slow) and 'FS99' (fast).
Settings for programmes 02 ... 28:
To adjust the speed of the selected auto show, press [Setup] repeatedly until the display indicates 'SPxx'. Now use [Up] and [Down] to select a value between 'SP.01' (slow) and 'SP.99' (fast) or 'SP.FL'.
To adjust the flash frequency, press [Setup] repeatedly until the display shows 'FS.xx'. Now use [Up] and [Down] to select a value between 'FS.00' (slow) and 'FS.99' (fast).
LED Pot SystemCOB 40W RGB WW

Operating
Operating mode 'Slave'
This setting is only relevant if the device is serving as Slave in a Master / Slave configuration and is not controlled via DMX.
Press [Mode] repeatedly until the display shows 'SLAv' and confirm with [Setup].
DMX mode
This setting is only relevant when the device is controlled via DMX.
Press [Mode] until the display shows 'd.xxx'. Press [Setup].
Now you can set the number of the first DMX channel to be used by the device (DMX address). Use [Up] and [Down] to select a value between 1 and 512 (display shows 'd.001' ... 'd.512').
Make sure that this number matches the configuration of your DMX controller. The following table shows the highest possible DMX address for the various DMX modes.
Mode Highest possible DMX address
| 4-channel 509 | |
| 6-channel 507 | |
| 8-channel 505 | |
| 16-channel 497 |
Press [Setup]. Now use [Up] and [Down] to select one of the following DMX operating modes:
'4-CH' (four channels)
- '6-CH' (six channels)
■ '8-CH' (eight channels)
LED Pot SystemCOB 40W RGB WW

'16CH' (sixteen channels)
Sound control
A sound-controlled show can only be activated when the unit is operating in stand alone mode or as master in a master / slave combination. This setting is only relevant if the device is not controlled via DMX.
Press [Mode] repeatedly until the display shows 'Soud'. Press [Setup]. Use [Up] and [Down] to activate one of the available sound modes 'SO.00' ... 'SO.38'.
Press [Setup]. Now you can adjust the sensitivity for the sound control. Use [Up] and [Down] to select a value between 0 (low sensitivity) and 31 (high sensitivity), display shows 'SU.00' ... 'SU.31'. The selected sensitivity also applies to the sound control activated via DMX.
The light effect keeps running slowly if no sound signal is received.
Constant unicoloured pattern
A constant unicoloured pattern can only be activated when the unit is operating in stand alone mode or as master in a master / slave combination. This setting is only relevant if the device is not controlled via DMX.
Press [Mode] repeatedly until the display shows 'CoLr'. Press [Setup].
Now use [Up] and [Down] to select one of the following options:
| Display Meaning | |
| 'r.000' ... 'r.255' Red | |
| 'g.000' ... 'g.255' Green | |
| 'b.000' ... 'b.255' Blue | |
| 'u.000' ... 'u.255' White |
To adjust the flash frequency, press [Setup] repeatedly until the display shows 'FS.xx'. Now use [Up] and [Down] to select a value between 'FS.00' (slow) and 'FS.99' (fast).
LED Pot SystemCOB 40W RGB WW

Dimmer curve
Press [Mode] repeatedly until the display shows 'Set'. Press [Setup]. Use [Up] | [Down] to select the menu item 'Cu.SE' and confirm with [Setup].
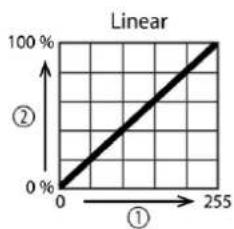
Use [Up] | [Down] to select one of the following dimmer curves. The dimmer curve determines how the brightness increases or decreases depending on the set DMX value.
| Display Meaning | |
| ‘Cu-1’Linear (proportional) course | |
| ‘Cu-2’ | Quadratic curve with a flat profile at the beginning and a steep profile at the end (Square) |
| ‘Cu-3’Inverted quadratic curve with a steep profile at the beginning and a flat profile at the end (Inv Square) | |
| ‘Cu-4’ | Non-linear curve with a distinctive flat profile at the beginning and the end (S-Type) |
The below figure schematically shows the adjustable dimmer curves. Depending on the selected DMX value (1) the device lights with a brightness (2) between 0 % and 100 %. Confirm the selection with [Setup]. Press [Mode].
line
Linear | X | Y | |---|---| | 0 | 0 | | 255 | 100% |
line
| X | Y | | --- | ----- | | 0 | 0% | | 255 | 100% |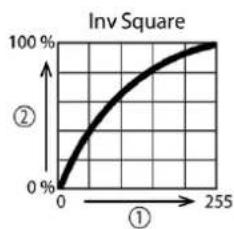
line
Inv Square | X-axis (x) | Inv Square (%) | |---|---| | 0 | 0 | | 255 | 100 |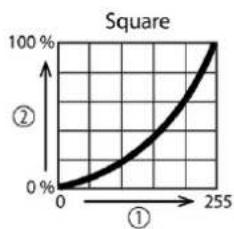
line
Square | X | Y (%) | |---|---| | 0 | 0 | | 255 | 100 |Reset
Press [Mode] repeatedly until the display shows 'Set'. [Setup]. Use [Up] | [Down] to select the menu item '-rSt' and confirm with [Setup]. Use [Up] | [Down] to select between '-Yes' (carry out reset) and '-NO' (no reset) and confirm with [Setup].
Firmware version
Press [Mode] repeatedly until the display shows 'InFo'. Press [Setup], the display shows 'Ver'. Press [Setup] to let the device show the firmware version.
LED Pot SystemCOB 40W RGB WW

7.3 Menu overview
flowchart
graph TD
    A["AUTO"] --> B["PRO"]
    B --> C["Pr.01"]
    C --> D["CO.00"]
    C --> E["CO.15"]
    C --> F["OFF"]
    C --> G["FS.00"]
    C --> H["..."]
    C --> I["FS.99"]
    J["SLAv"] --> K["d---"]
    K --> L["d.001"]
    K --> M["d.512"]
    K --> N["4.-CH"]
    K --> O["6.-CH"]
    K --> P["8.-CH"]
    K --> Q["16.CH"]
    R["MENU"] --> S["CoLr"]
    S --> T["r.000"]
    S --> U["r.255"]
    S --> V["g.000"]
    S --> W["g.255"]
    S --> X["b.000"]
    S --> Y["b.255"]
    S --> Z["u.000"]
    S --> AA["u.255"]
    AB["Soud"] --> AC["SU.00"]
    AB --> AD["SU.31"]
    AE["Set"] --> AF["rSt"]
    AF --> AG["-Yes"]
    AF --> AH["-NO"]
    AF --> AI["Cur"]
    AI --> AJ["Cu-1"]
    AI --> AK["Cu-4"]
    AL["Info"] --> AM["Ver"]
    AN["Pr.02"] --> AO["SP.01"]
    AN --> AP["SP.99"]
    AN --> AQ["SP.FL"]
    AN --> AR["FS.00"]
    AN --> AS["..."]
    AN --> AT["FS.99"]
7.4 Functions in 4-channel DMX mode
| Channel Value Function | |
| 1 0...255 Intensity red (0 % to 100 %), for all LEDs together | |
| 2 0...255 Intensity green (0 % to 100 %), for all LEDs together | |
| 3 0...255 Intensity blue (0 % to 100 %), for all LEDs together | |
| 4 0...255 Intensity white (0 % to 100 %), for all LEDs | |
7.5 Functions in 6-channel DMX mode
| Channel Value Function | |
| 1 0...255 Dimmer (0 % to 100 %) | |
| 2 0...255 Intensity red (0 % to 100 %), for all LEDs together | |
| 3 0...255 Intensity green (0 % to 100 %), for all LEDs together | |
LED Pot SystemCOB 40W RGB WW

| Channel Value Function | |
| 4 0...255 Intensity blue (0 % to 100 %), for all LEDs together | |
| 5 0...255 Intensity white (0 % to 100 %), for all LEDs | |
| 6 Strobe effect | |
| 0...255 Stroboscope effect (0 % to 100 %) | |
7.6 Functions in 8-channel DMX mode
| Channel Value Function | |
| 1 0...255 Dimmer (0 % to 100 %) | |
| 2 0...255 Intensity red (0 % to 100 %) | |
| 3 0...255 Intensity green (0 % to 100 %) | |
| 4 0...255 Intensity blue (0 % to 100 %) | |
| 5 0...255 Intensity white (0 % to 100 %) | |
| 6 0 No function | |
| 1...5 Preprogrammed automatic show 01 | |
| 11...16 Preprogrammed automatic show 02 | |
| 12...17 Preprogrammed automatic show 03 | |
| 18...23 Preprogrammed automatic show 04 | |
| 24...29 Preprogrammed automatic show 05 | |
| 30...35 Preprogrammed automatic show 06 | |
| 36...41 Preprogrammed automatic show 07 | |
| 42...47 Preprogrammed automatic show 08 | |
| 48...53 Preprogrammed automatic show 09 | |
| 54...59 Preprogrammed automatic show 10 | |
| 60...65 Preprogrammed automatic show 11 | |
LED Pot SystemCOB 40W RGB WW

| Channel Value Function | |
| 66...71 Preprogrammed automatic show 12 | |
| 72...77 Preprogrammed automatic show 13 | |
| 78...83 Preprogrammed automatic show 14 | |
| 84...89 Preprogrammed automatic show 15 | |
| 90...95 Preprogrammed automatic show 16 | |
| 96...101 Preprogrammed automatic show 17 | |
| 102...107 Preprogrammed automatic show 18 | |
| 108...113 Preprogrammed automatic show 19 | |
| 114...119 Preprogrammed automatic show 20 | |
| 120...125 Preprogrammed automatic show 21 | |
| 126...131 Preprogrammed automatic show 22 | |
| 132...137 Preprogrammed automatic show 23 | |
| 138...143 Preprogrammed automatic show 24 | |
| 144...149 Preprogrammed automatic show 25 | |
| 150...155 Preprogrammed automatic show 26 | |
| 156...161 Preprogrammed automatic show 27 | |
| 162...167 Preprogrammed automatic show 28 | |
| 168...173 Preprogrammed automatic show 29 | |
| 174...179 Preprogrammed automatic show 30 | |
| 180...185 Preprogrammed automatic show 31 | |
| 186...191 Preprogrammed automatic show 32 | |
| 192...197 Preprogrammed automatic show 33 | |
| 198...203 Preprogrammed automatic show 34 | |
| 204...209 Preprogrammed automatic show 35 | |
| 210...215 Preprogrammed automatic show 36 | |
| 216...221 Preprogrammed automatic show 37 |
LED Pot SystemCOB 40W RGB WW

| Channel Value Function | |
| 222...227 Preprogrammed automatic show 38 | |
| 228...255 Sound-controlled show (Selection of the sound programmes SO.01...SO.37 with channel 7) | |
| 7 Function depending on setting of channel 6 | |
Channel Value Function
| 128...143 R: 255; G: 0; B: 255; W: 0; | |
| 144...159 R: 255; G: 0; B: 140; W: 0; | |
| 160...175 R: 0; G: 255; B: 255; W: 0; | |
| 176...191 R: 255; G: 0; B: 0; W: 210; | |
| 192...207 R: 0; G: 255; B: 0; W: 210; | |
| 208...223 R: 0; G: 0; B: 255; W: 210; | |
| 224...239 R: 255; G: 200; B: 40; W: 90; | |
| 240...255 R: 255; G: 255; B: 255; W: 255; | |
| Channel 6 = 6...227 | |
| 0...255 Programme speed Pr.02...Pr.38 | |
| Channel 6 = 228...255 | |
| 0...255 Programme selection for sound-controlled mode SO.01...SO.37 |
LED Pot SystemCOB 40W RGB WW

Channel Value Function
| 8 Strobe effect | |
| 0...255 Stroboscope effect (0 % to 100 %) |
7.7 Functions in 16-channel DMX mode
Channel Value Function
| 1 0...255 Intensity red (0 % to 100 %), spot 1 |
| 2 0...255 Intensity green (0 % to 100 %), spot 1 |
| 3 0...255 Intensity blue (0 % to 100 %), spot 1 |
| 4 0...255 Intensity white (0 % to 100 %), spot 1 |
| 5 0...255 Intensity red (0 % to 100 %), spot 2 |
| 6 0...255 Intensity green (0 % to 100 %), spot 2 |
Channel Value Function
| 7 0...255 Intensity blue (0 % to 100 %), spot 2 |
| 8 0...255 Intensity white (0 % to 100 %), spot 2 |
| 9 0...255 Intensity red (0 % to 100 %), spot 3 |
| 10 0...255 Intensity green (0 % to 100 %), spot 3 |
| 11 0...255 Intensity blue (0 % to 100 %), spot 3 |
| 12 0...255 Intensity white (0 % to 100 %), spot 3 |
| 13 0...255 Intensity red (0 % to 100 %), spot 4 |
| 14 0...255 Intensity green (0 % to 100 %), spot 4 |
| 15 0...255 Intensity blue (0 % to 100 %), spot 4 |
| 16 0...255 Intensity white (0 % to 100 %), spot 4 |
LED Pot SystemCOB 40W RGB WW

8 Technical specifications
text_image
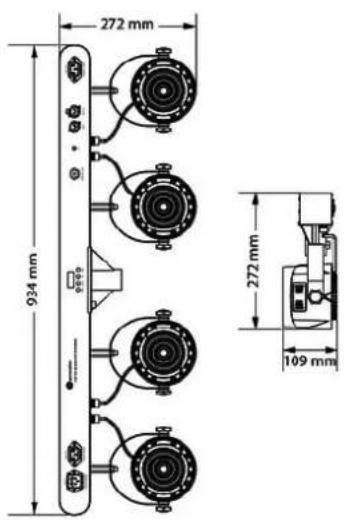
272 mm 934 mm 272 mm 109 mm| Light source 4 × COB LED (RGB WW), 40 W | ||
| Optical properties Beam angle 45° | ||
| Control DMX | ||
| IR remote control | ||
| Number of DMX channels 4, 6, 8, 16 | ||
| Input connections Voltage supply IEC chassis plug C14 | ||
| Output connections Voltage supply IEC chassis plug C13 | ||
| Power consumption 138 W | ||
| Supply voltage | 100 – 240 V ~50/60 Hz | |
| Fuse 5 mm × 20 mm, 1,5 A, 250 V, slow-blow | |
| Battery remote control Battery type Lithium button cell, 3 V, CR 2025 | |
| Degree of protection IP20 | |
| Mounting options Hanging, stand | 36 mm stand holder3 × M10 threaded bushes for mounting additional light effects or for mounting on a truss beam |
| Dimensions (W × H × D) 934 mm × 272 mm × 109 mm | |
| Weight 6.4 kg | |
| Ambient conditions Temperature range 0 °C...40 °C | Relative humidity 50 %, non condensing |
LED Pot SystemCOB 40W RGB WW

Further information
| Spotlight included Yes | |
| Effect devices included No | |
| LED bars included No | |
| Control included No | |
| Stand included No | |
| Case/bag included Yes |
9 Troubleshooting

NOTICE!
Possible data transmission errors
For error-free operation make use of dedicated DMX cables and do not use ordinary microphone cables.
Never connect the DMX input or output to audio devices such as mixers or amplifiers.
In the following we list a few common problems that may occur during operation. We give you some suggestions for easy troubleshooting:
LED Pot SystemCOB 40W RGB WW

| Symptom Remedy | |
| The unit does not work, no light Check the mains connection and the main fuse. | |
| No response to the DMX controller | 1. If the dot after the last digit in the display does not flash in ‘DMX’ mode, no DMX signal is received. Check whether the DMX controller is switched on. Check the DMX connectors and cables for proper connection. |
| 2. If the dot after the last digit in the display is flashing but there is still no response, check the address settings and the DMX polarity. | |
| 3. Try using another DMX controller. | |
| 4. Check whether the DMX cables run near or parallel to high-voltage cables that may cause damage or interference to a DMX interface circuit. | |
If the procedures recommended above do not succeed, please contact our Service Center. You can find the contact information at www.thomann.de.
10 Plug and connection assignments
Introduction
This chapter will help you select the right cables and plugs to connect your valuable equipment so that a perfect light experience is guaranteed.
Please take our tips, because especially in 'Sound & Light' caution is indicated: Even if a plug fits into a socket, the result of an incorrect connection may be a destroyed DMX controller, a short circuit or 'just' a not working light show!
DMX connections
natural_image
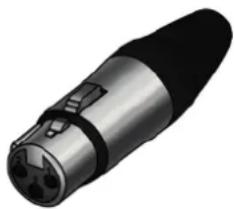
3D rendering of a metallic connector with three ports (no text or symbols visible)The unit offers a 3-pin XLR socket for DMX output and a 3-pin XLR plug for DMX input. Please refer to the drawing and table below for the pin assignment of a suitable XLR plug.
Pin Configuration
1 Ground, shielding
2 Signal inverted (DMX-, 'cold signal')
3 Signal (DMX+, 'hot signal')
LED Pot SystemCOB 40W RGB WW

11 Cleaning
Optical lenses
Clean the optical lenses, that are accessible from the outside, regularly in order to optimize the light output. The frequency of cleaning depends on the operating environment: wet, smoky or particularly dirty surroundings can cause more accumulation of dirt on the optics of the device.
■ Clean with a soft cloth using our lamp and lens cleaner (item no. 280122).
■ Always dry the parts carefully.
Fan grids
The fan grids of the device must be cleaned of any contamination, such as dust, etc. on a regular basis. Before cleaning, switch off the device and disconnect mains-operated devices from the mains. Only use pH-neutral, solvent-free and non-abrasive cleaning agents. Clean the unit with a slightly damp lint-free cloth.

LED lighting set
12 Protecting the environment
Disposal of the packaging material

For the transport and protective packaging, environmentally friendly materials have been chosen that can be supplied to normal recycling.
Ensure that plastic bags, packaging, etc. are properly disposed of.
Do not just dispose these materials with your normal household waste, but make sure that they are fed to a recovery. Please follow the notes and markings on the packaging.
Disposal of batteries
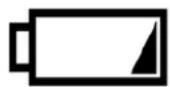
Batteries must not be disposed of as domestic waste or thrown into fire. Dispose of the batteries according to national or local regulations regarding hazardous waste. To protect the environment, dispose of empty batteries at your retail store or at appropriate collection sites.
LED Pot SystemCOB 40W RGB WW

Disposal of your old device
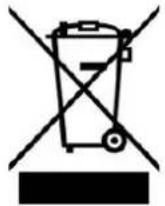
This product is subject to the European Waste Electrical and Electronic Equipment Directive (WEEE) in its currently valid version. Do not dispose with your normal household waste.
Dispose this device through an approved waste disposal firm or through your local waste facility. When discarding the device, comply with the rules and regulations that apply in your country. If in doubt, consult your local waste disposal facility.
Notes
LED Pot SystemCOB 40W RGB WW
th·mann MUSIC IS OUR PASSION
Notes
th·mann MUSIC IS OUR PASSION
LED lighting set
