
GW-L227HNYZ - Fridge LG - Free user manual and instructions
Find the device manual for free GW-L227HNYZ LG in PDF.


User questions about GW-L227HNYZ LG
0 question about this device. Answer the ones you know or ask your own.
Ask a new question about this device
Download the instructions for your Fridge in PDF format for free! Find your manual GW-L227HNYZ - LG and take your electronic device back in hand. On this page are published all the documents necessary for the use of your device. GW-L227HNYZ by LG.
USER MANUAL GW-L227HNYZ LG
Please read this manual carefully before operating your set and retain it for future reference.


Important
(In the UK Only)
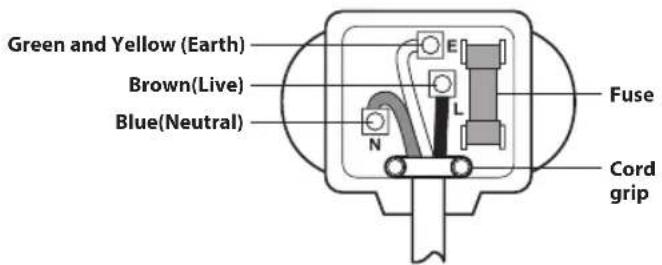
The wires in this mains lead are coloured in accordance with the following code:
GREEN AND YELLOW:EARTH
BLUE:NEUTRAL
BROWN:LIVE
This appliance must be earthed
text_image
Green and Yellow (Earth) Brown(Live) Blue(Neutral) E L N Fuse Cord gripAs the colours of the wires in the mains lead of this apparatus may not correspond with the coloured markings identifying the terminals in your plug, proceed as follows:
The wire which is coloured Green and Yellow must be connected to the terminal in the plug which is marked with the letter E or by the earth symbol( 12 ) or coloured Green or Green and Yellow.
The wire which is coloured Blue must be connected to the terminal which is marked with the letter N or coloured Black.
The wire which is coloured Brown must be connected to the terminal which is marked with the letter L or coloured Red.
If a 13 amp(BS 1363) plug is used, fit a 13 amp BS 1362 fuse.
Table of contents
Introduction 3
Important safety instructions 3
Identification of parts 5
Where to install 8
Door removal 8
Door replacement 9
Feed water pipe installation 10
Height adjustment 10
Starting 12
Adjusting the temperature and functions 12
Refreshment center (Applicable to some models only) 24
No Plumbing Ice & Water (Applicable to some models only) 25
Shelf (Applicable to some models only) 26
Wine holder (Applicable to some models only) 26
Egg box 26
Humidity control in the vegetable compartment 27
Convert into a vegetable or meat compartment (Applicable to some models only)
Deodorizer(Applicable to some models only) 28
Vacuum Fresh(Applicable to some models only) 28
Opti Temp Zone Temperature Transition Corner (Applicable to some models only)
Temperature Change at Opti Temp Zone (Applicable to some models only)
Opti Temp Zone (Applicable to some models only) 29
Location of foods 30
Storing foods 31
How to dismantle parts 32
General information 34
Cleaning 34
Trouble shooting 34
Entry
The model and serial numbers are found on the inner case on the back or one side of the refrigerator compartment of this unit. These numbers are unique to this unit and are not available to others. You should record requested information here and retain this guide as a permanent record of your purchase. Staple your receipt here.
| Date of purchase : | |
| Dealer purchased from : | |
| Dealer address : | |
| Dealer phone no. : | |
| Model no. : | |
| Serial no. : |
Important safety instructions
Before it is used, this refrigerator must be properly installed and located in accordance with the installation instructions in this document. This Refrigerator is intended for Domestic indoor use only.
Never unplug your refrigerator by pulling on the power cord. Always grip plug firmly and pull it straight out from the outlet.
When moving your appliance away from the wall, be careful not to roll over the power cord or to damage it in any way.
After your refrigerator is in operation, do not touch the cold surfaces in the freezer compartment, particularly when your hands are damp or wet. Skin could adhere to these extremely cold surfaces.
Unplug the power cord from the power outlet for cleaning or other maintenance. Never touch the appliance with wet hands as you may receive an electric shock or injure yourself.
Never damage, press, severely bend, pull or twist the power cord as damage to the cord may cause fire or electric shock. Never touch the cord if you are uncertain if the appliance is correctly earthed.
Never place glass items in the freezer as they may break due to expansion of their contents on freezing.
Never put your hands into the storage bin of the automatic ice maker as you could be injured during its operation.
The appliance is not intended for use by young children or infirm persons without supervision.
Young children should be supervised to ensure that they do not play with the appliance.
Never allow anyone to climb, sit, stand or hang on the refreshment centre door. These actions may damage the refrigerator and even tip it over, causing severe personal injury. It is advised that this appliance should be connected through an independent power socket to prevent it and other appliances from overloading the circuit and causing a power outage.
The appliance should be positioned so that the supply plug is easily accessible for quick disconnection should an accident occur.
If the supply cord is damaged, it must be replaced by the manufacturer or its service agent or a similarly qualified person in order to avoid a hazard.
* Do not modify or extend the Power Cord length. It may cause electric shock or fire.
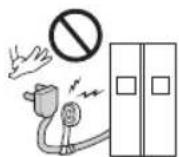
Don't use an extension cord
Accessibility of Supply Plug Supply Cord Replacement

Warning
Child entrapment

Warning
DANGER: Risk of child entrapment.
Before you dispose of your old refrigerator please remove doors but leave the shelves in place so that children cannot climb inside.

on't store Warning
Grounding (Earthing)

Warning
This appliance is not intended for use by persons (including children) with reduced physical, sensory or mental capabilities, or lack of experience and knowledge, unless they have been given supervision or instruction concerning use of the appliance by a person responsible for their safety.
Children should be supervised to ensure that they do not play with the appliance.
Do not store or use gasoline or other flammable vapour and liquids in the vicinity of this or any other appliance.
In the event of an electric short circuit, grounding (earthing) reduces the risk of electric shock by providing an escape wire for the electric current.
In order to prevent possible electric shock this appliance must be earthed. Improper connection of the earthing plug can cause electric shock. Consult a qualified electrician or service engineer if the earthing instructions are not completely understood, or if you have doubts as to whether the appliance is properly earthed.

Warning
⚠️ Keep ventilation openings in the room where the appliance is installed clear of obstruction.
Do not use mechanical devices or other means to accelerate the defrosting process, other than those recommended by the manufacturer.
Do not damage the refrigerant circuit.
Do not use electrical appliances inside the food storage compartments of the appliance, unless they are of the type recommended by the manufacturer.
⚠ Disposal procedures. If disposing of this appliance, please consult with a service agent or a similarly qualified person for more details.

This appliance may contain (Check the rating/compliance label for the refrigerant type and amount. Applicable to some models only) a small amount of isobutane refrigerant (R600a),
natural gas with high environmental compatibility, but it is also combustible. When transporting and installing the appliance, care should be taken to ensure that no parts of the refrigerating circuit are damaged. Refrigerant squirting out of the pipes could ignite or cause an eye injury. If a leak is detected, avoid any naked flames or potential sources of ignition and air the room in which the appliance is standing for several minutes.
In order to avoid the creation of a flammable gas air mixture if a leak in the refrigerating circuit occurs, the size of the room in which the appliance may be sited depends on the amount of refrigerant used. The room must be 1m^2 in size for every 8g of R600a refrigerant inside the appliance. The amount of refrigerant in your particular appliance is shown on the identification plate inside the appliance. Never start up an appliance showing any signs of damage. If in doubt, consult your dealer.
Identification of parts
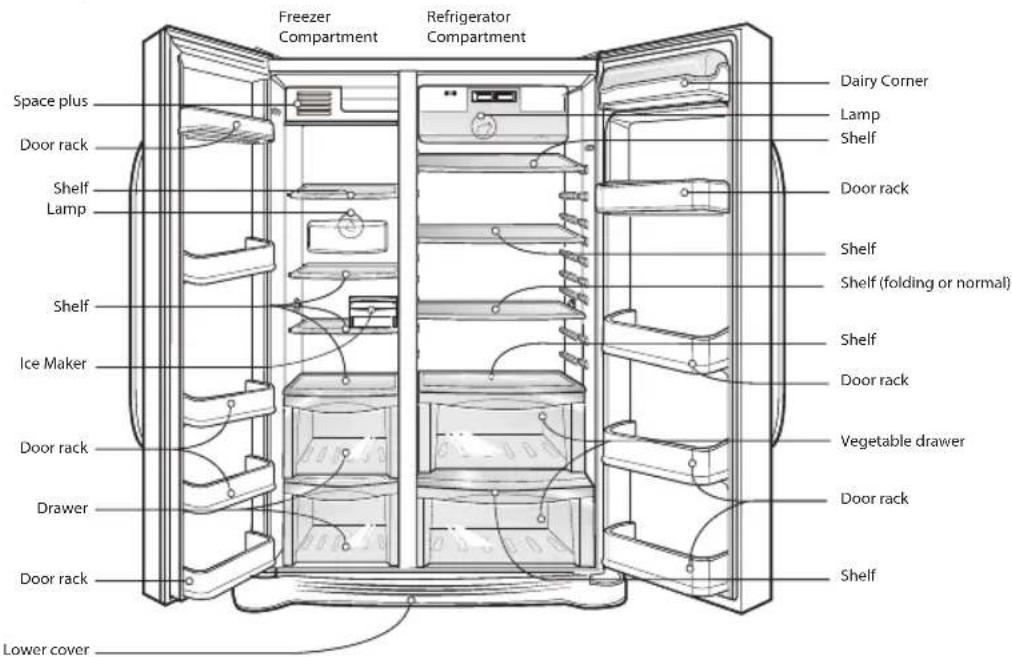
*Non dispenser model - Type 1
text_image
Freezer Compartment Refrigerator Compartment Space plus Door rack Shelf Lamp Shelf Ice Maker Door rack Drawer Door rack Lower cover Dairy Corner Lamp Shelf Door rack Shelf Shelf (folding or normal) Shelf Door rack Vegetable drawer Door rack ShelfNOTE
- Parts, features, and options vary by model. Your model may not include every option.
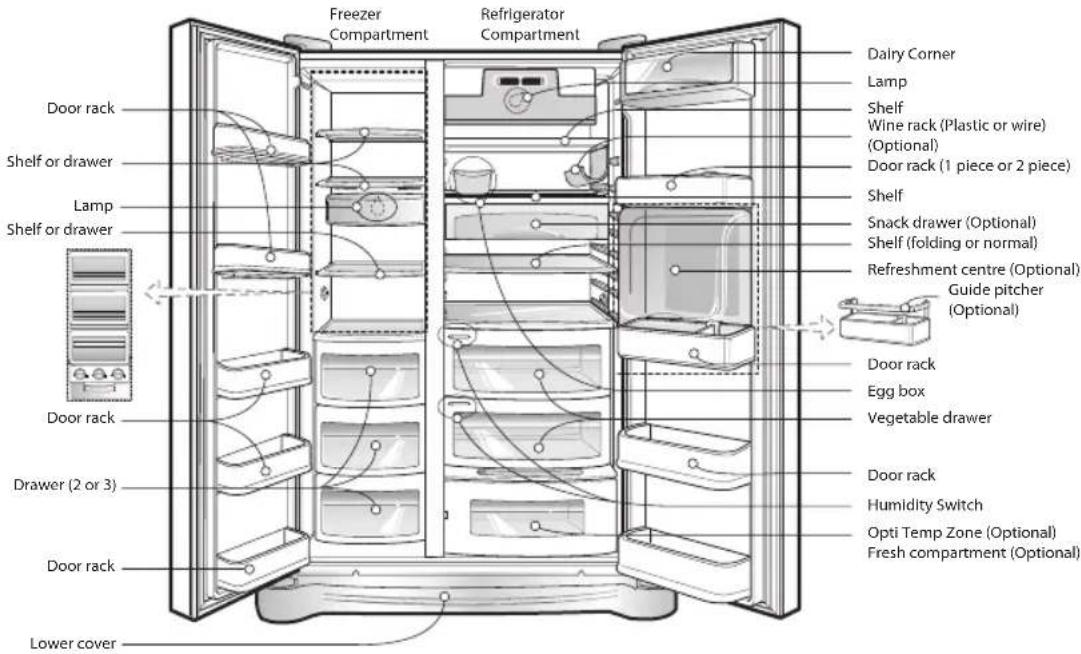
*Non dispenser model - Type 2
text_image
Freezer Compartment Refrigerator Compartment Dairy Corner Lamp Shelf Wine rack (Plastic or wire) (Optional) Door rack (1 piece or 2 piece) Shelf Snack drawer (Optional) Shelf (folding or normal) Refreshment centre (Optional) Guide pitcher (Optional) Door rack Egg box Vegetable drawer Door rack Humidity Switch Opti Temp Zone (Optional) Fresh compartment (Optional) Lower coverNOTE
- Parts, features, and options vary by model. Your model may not include every option.
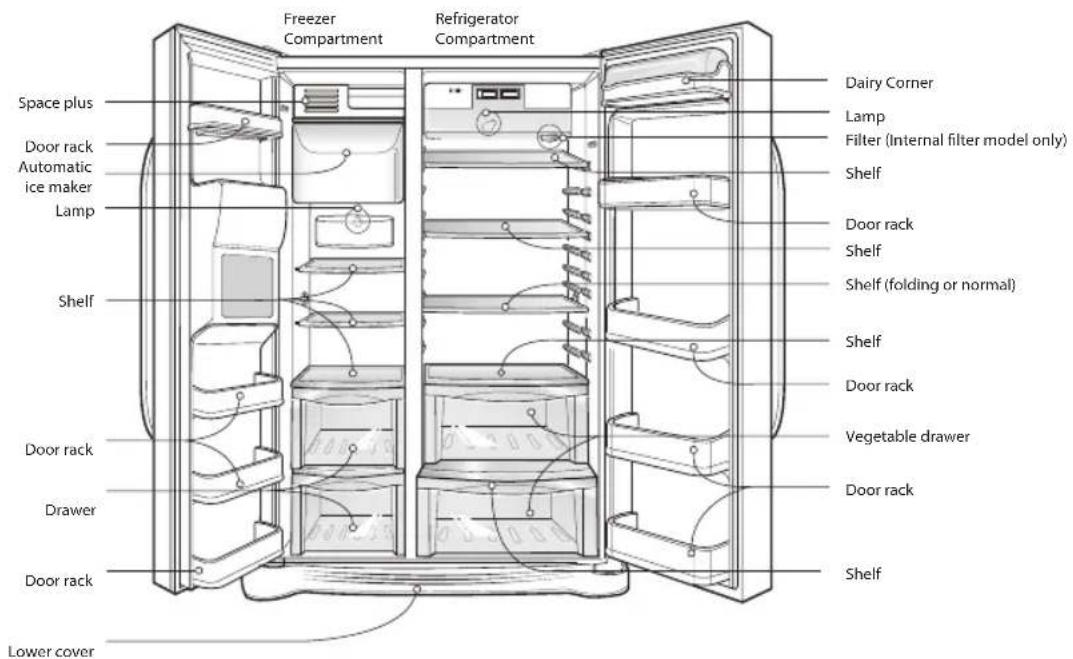
*Dispenser model - Type 1
text_image
Freezer Compartment Refrigerator Compartment Space plus Door rack Automatic ice maker Lamp Shelf Door rack Drawer Door rack Lower cover Dairy Corner Lamp Filter (Internal filter model only) Shelf Door rack Shelf Shelf (folding or normal) Shelf Door rack Vegetable drawer Door rack ShelfNOTE
- Parts, features, and options vary by model. Your model may not include every option.
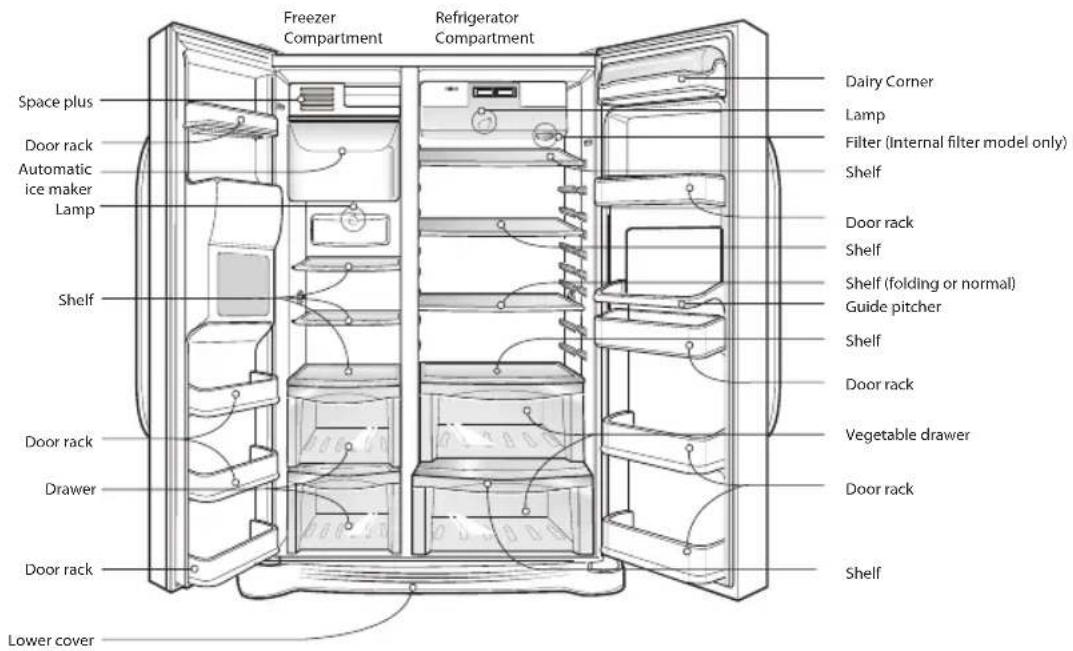
*Dispenser model - Type 2
text_image
Freezer Compartment Refrigerator Compartment Space plus Door rack Automatic ice maker Lamp Shelf Door rack Drawer Door rack Lower cover Dairy Corner Lamp Filter (Internal filter model only) Shelf Door rack Shelf Shelf (folding or normal) Guide pitcher Shelf Door rack Vegetable drawer Door rack ShelfNOTE
- Parts, features, and options vary by model. Your model may not include every option.
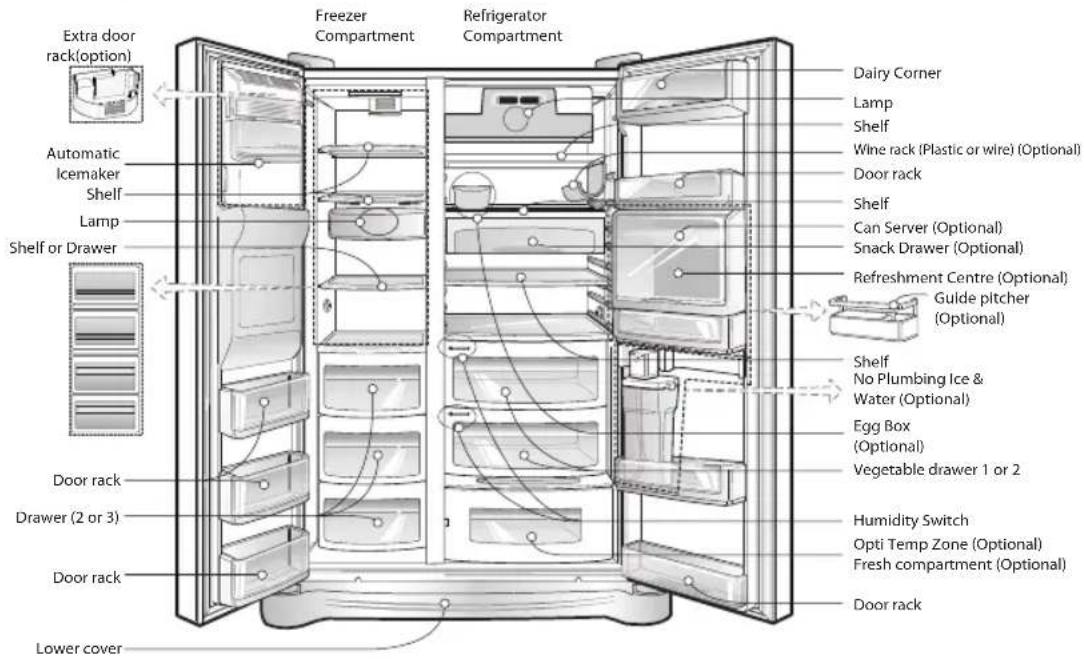
*Dispenser model - Type 3
text_image
Extra door rack (option) Automatic Icemaker Shelf Lamp Shelf or Drawer Door rack Drawer (2 or 3) Door rack Lower cover Freezer Compartment Refrigerator Compartment Dairy Corner Lamp Shelf Wine rack (Plastic or wire) (Optional) Door rack Shelf Can Server (Optional) Snack Drawer (Optional) Refreshment Centre (Optional) Guide pitcher (Optional) Shelf No Plumbing Ice & Water (Optional) Egg Box (Optional) Vegetable drawer 1 or 2 Humidity Switch Opti Temp Zone (Optional) Fresh compartment (Optional) Door rackNOTE
- Parts, features, and options vary by model. Your model may not include every option.
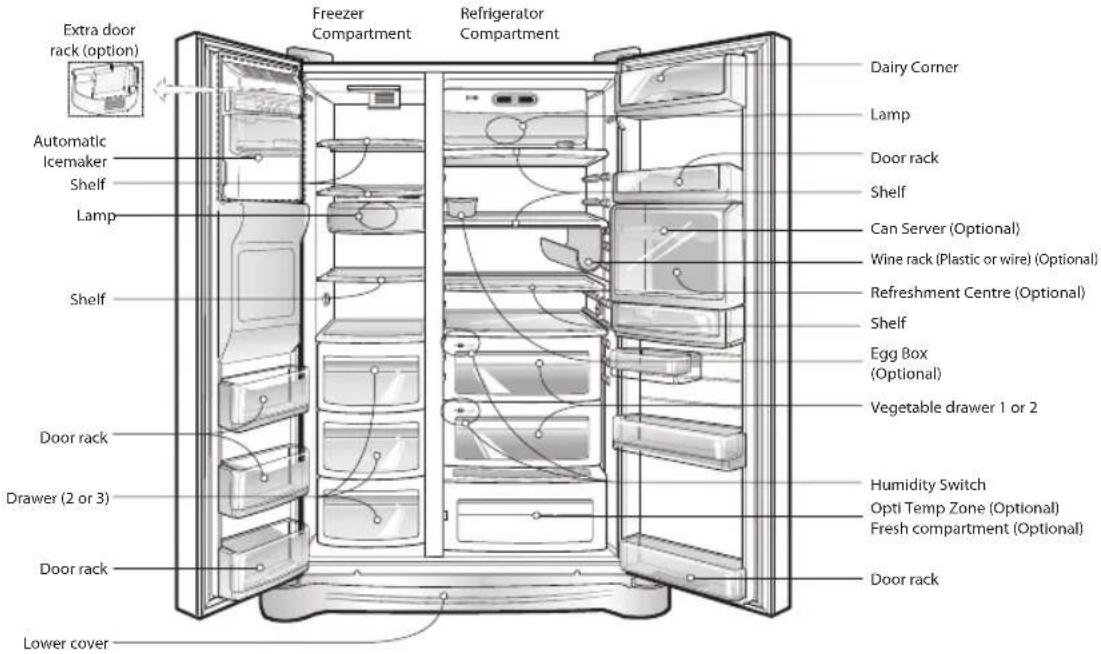
*Dispenser model - Type 4
text_image
Extra door rack (option) Automatic Icemaker Shelf Lamp Shelf Door rack Drawer (2 or 3) Door rack Lower cover Freezer Compartment Refrigerator Compartment Dairy Corner Lamp Door rack Shelf Can Server (Optional) Wine rack (Plastic or wire) (Optional) Refreshment Centre (Optional) Shelf Egg Box (Optional) Vegetable drawer 1 or 2 Humidity Switch Opti Temp Zone (Optional) Fresh compartment (Optional) Door rackNOTE
- Parts, features, and options vary by model. Your model may not include every option.
Select a good location
Disposal of the old appliance
Remove lower cover and then feed water tube
Remove the freezer compartment door
Where to install
- Place your appliance where it is easy to use.
- Avoid placing the unit near heat sources, direct sunlight or moisture. Do not operate the appliance outdoors where it can be exposed directly, or indirectly to sun, wind and rain.
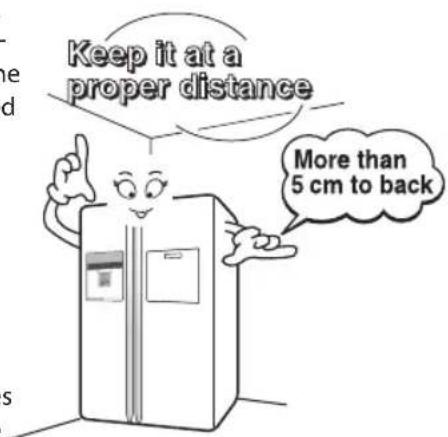
- To ensure proper air circulation around the fridge -freezer, please maintain sufficient space on both the sides as well as top and maintain at least 2 inches (5 cm) from the rear wall.
- To avoid vibrations, the appliance must be levelled.
- Do not install the appliance in temperatures of less than 5^ C as the performance may be affected.
text_image
Keep it at a proper distance More than 5 cm to backThis appliance contains fluid (refrigerant, lubricant) and is made of parts and materials which are reusable and/or recyclable.
All the packaging materials should be sent to the collection centre for recycling. For details of your local recycling centre, please contact your local council.
Door removal
Electric Shock Hazard
Disconnect electrical supply to refrigerator before installing. Failure to do so could result in death or serious injury.
If your front door is too narrow to get the refrigerator into the house, remove the refrigerator doors and pass the appliance through laterally.
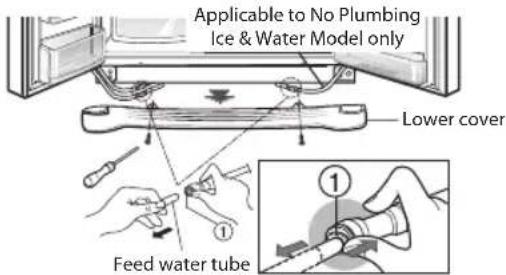
Remove the lower cover by loosening all the screws. Then push in the feed water tube while depressing the connector, as shown in the illustration on the righ
text_image
Applicable to No Plumbing Ice & Water Model only Lower cover Feed water tubeNOTE
- If a tube end is deformed or abraded, trim the end with sharp knife until perfectly round.
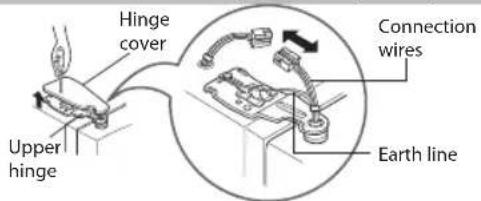
1) Remove the hinge cover by loosening the screws. Then separate all connection wires except for the earth.
text_image
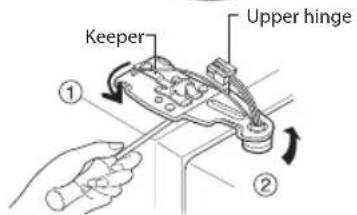
Hinge cover Upper hinge Connection wires Earth line2) Remove the keeper by rotating it counter clockwise (①) and then lifting the upper hinge up (②).
text_image
Keeper Upper hingeNOTE
- When removing the upper hinge, be careful that the door does not fall forwards.
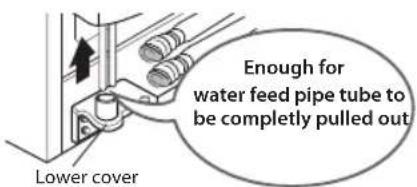
3) Remove the freezer compartment door by lifting it upward. The door should be lifted high enough for the feed water pipe tube to be completely pulled out.
text_image
Lower cover Enough for water feed pipe tube to be completely pulled outNOTE
- If you have removed the refrigerator compartment door to pass the appliance through an access door, lay the door down, but be careful not to damage the feed water pipe tube.
Remove the refrigerator compartment door
1) Loosen the hinge cover screws and remove the cover. Remove connection wires, if any, except for the earth line.
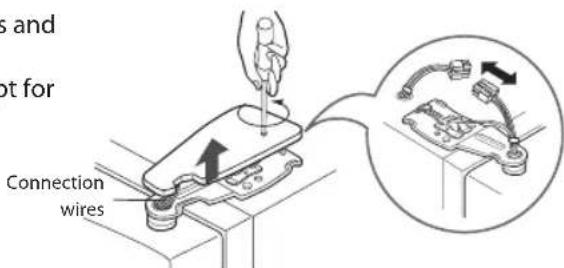
text_image
s and ot for Connection wires2) Remove keeper by rotating it clockwise (①) and then remove the upper hinge by lifting it up (②).
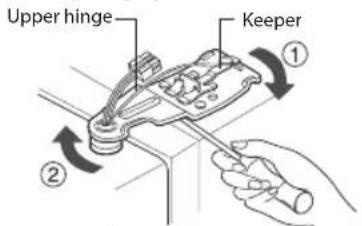
text_image
Upper hinge Keeper ① ②3) Remove the refrigerator compartment door by lifting it up.
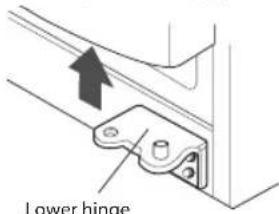
text_image
Lower hingePass the refrigerator
Pass the refrigerator laterally through the access door as illustrated to the right.
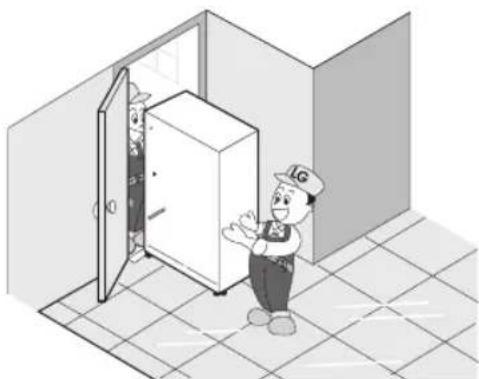
natural_image
Cartoon illustration of a worker opening a door with a sign, no text or symbols presentDoor replacement
Once the fridge is through the access door, remount the fridge doors by following the door removal instructions in reverse.
Before installation

Warning
If the freezer compartment door is lower than the refrigerator compartment door
If the freezer compartment door is higher than the refrigerator compartment door
Feed water pipe installation (Dispenser model only)
- Automatic ice maker operation needs water pressure of 147\~834kPa (1.5\~8.5kgf/cm2) (The pressure is correct when an instant paper cup (180cc) is filled in 3 sec.).
- If water pressure does not reach the rating 147kPa(1.5kgf/cm^2) or below, it is necessary to purchase a separate pressure pump for normal automatic icing and cool water feed.
- Keep the total length of the feed water pipe tube within 8m and be careful that the tube does not bend. If the tube is 8m or longer it may cause water feed problems owing to the drain water pressure. - Install the feed water pipe tube at a place free from heat.
- Connect to drinking water supply only.
- Refer to instructions with water filter kit for installation.
Height adjustment
Level the door by inserting flat(- type) driver into the groove of the left height adjusting screw and rotate it clockwise (①).
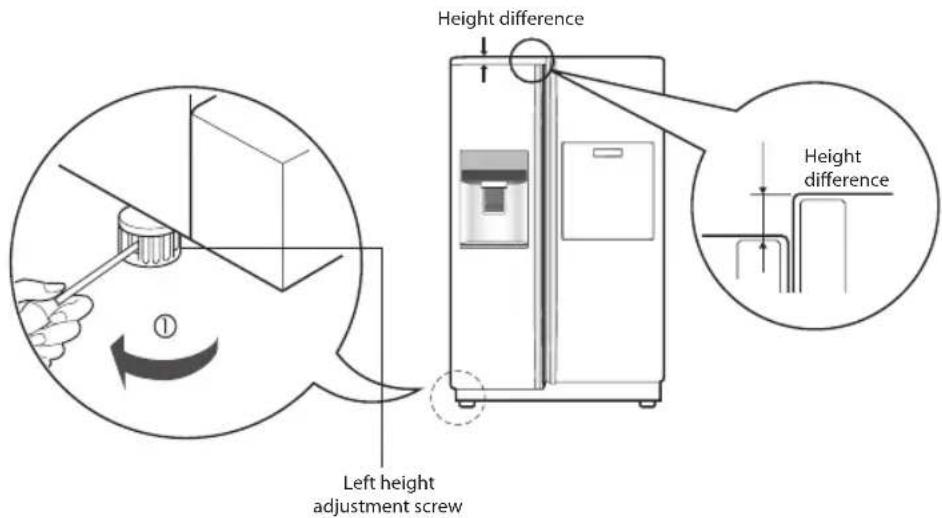
text_image
Height difference Height difference Left height adjustment screwLevel the door by inserting flat(- type) driver into the groove of the left height adjusting screw and rotate it clockwise (①).
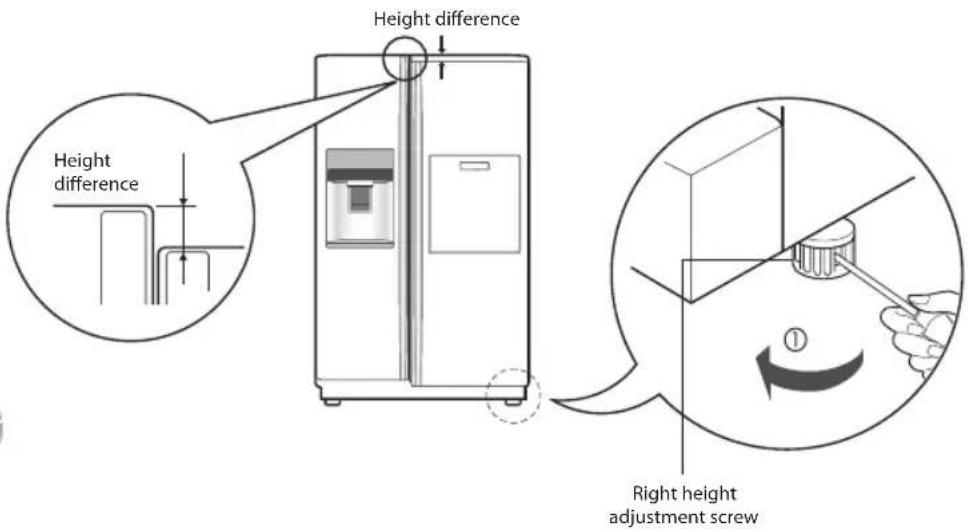
text_image
Height difference Height difference Right height adjustment screwAfter levelling the door height
Next
Usage of door rack (option)
The refrigerator doors will close smoothly by adjusting the front side using the height adjustment screw. If the doors do not close correctly, performance may be affected.
- Wipe off all dust accumulated during shipping and clean your appliance thoroughly.
- Install accessories such as the ice cube box, cover evaporating tray, etc., in their proper places. They are packed together to prevent possible damage during shipping.
- Connect the power supply cord (or plug) to the outlet. Don't double up with other appliances on the same outlet.
Use more space with door rack when you don't use Ice Maker.
- Disassemble and empty the automatic icemaker.
- Turn off the ice maker ①).
- Assemble the Door rack with care.
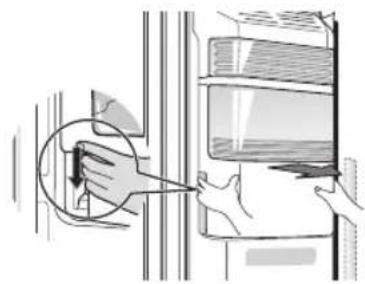
natural_image
Illustration of a hand inserting a small object into a door panel, with no visible text or symbols
text_image
Diagram showing a device interior with labeled parts and directional arrows indicating movement or flow.▶ Insert into bottom hole ( ). ③
- Don't store any food easily fallen. It might fall to the floor when you open the door.
Starting
When your refrigerator is first installed, allow it to stabilize at normal operating temperatures for 2-3 hours prior to filling it with fresh or frozen foods. If operation is interrupted, wait 5 minutes before restarting.
Adjusting the temperature and functions
*Non dispenser model - Type 1
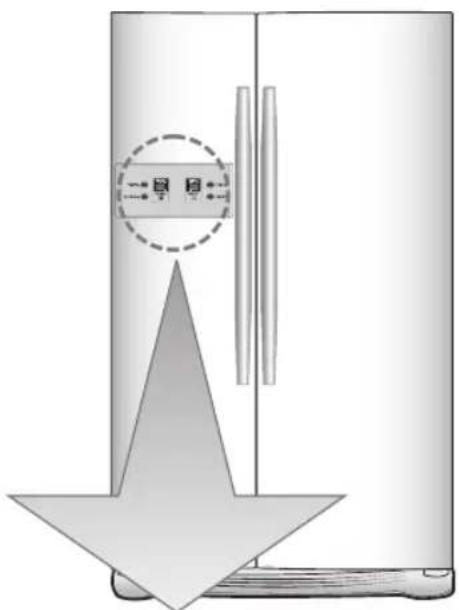
text_image
Diagram showing a device with a magnified view of its internal structure, labeled in Chinese characters.| Function display boardOptional | ||
| Type-1 | ||
| Type-2 | ||
| Type-3 | ||

NOTE
- Your model may not include every option.
- Display Type - 3: The control display is operated by touch. Excessive moisture on the display panel may cause a malfunction. Please keep the display panel clean and dry.
*Non dispenser model - Type 2
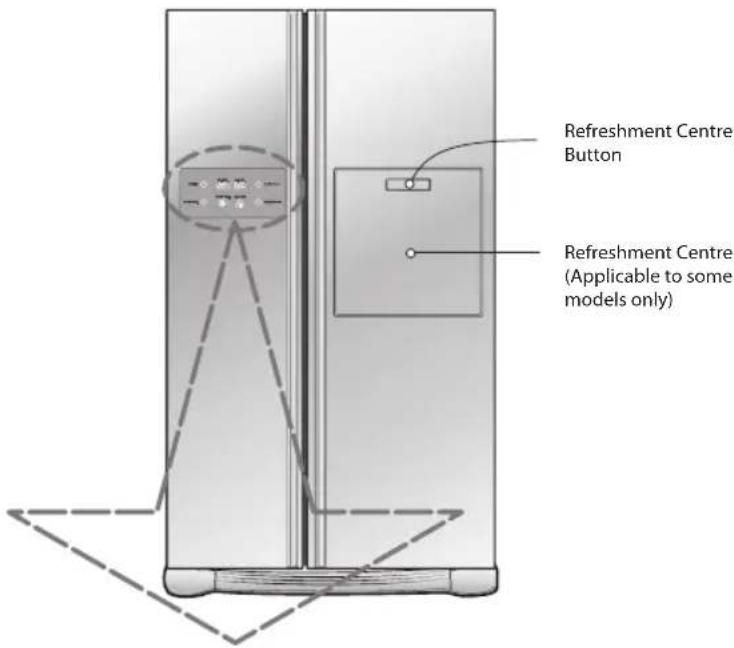
text_image
Refreshment Centre Button Refreshment Centre (Applicable to some models only)| Function display boardOptional | |
| Type-1 | |
| Type-2 | 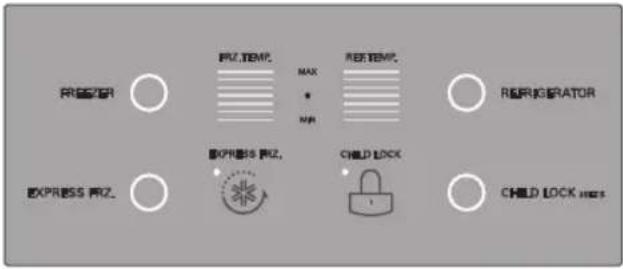 |
NOTE
- Your model may not include every option.
*Dispenser model - Type 1
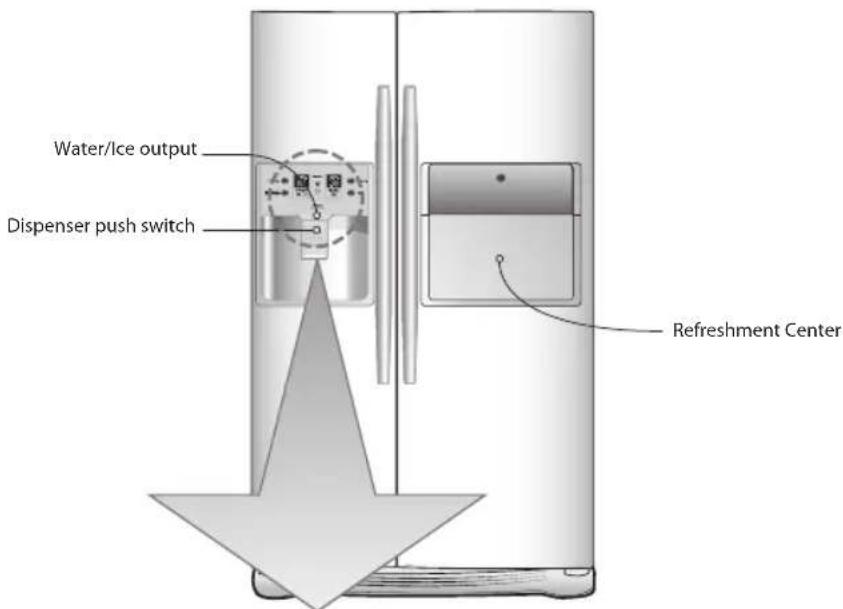
text_image
Water/Ice output Dispenser push switch Refreshment Center| Function display boardOptional | |||
| Type-1 | 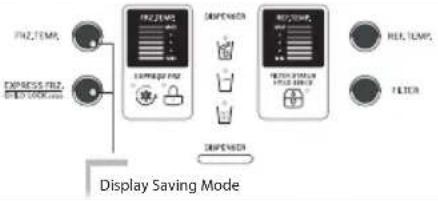 | ||
| Type-2 | 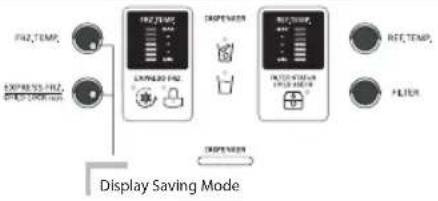 | ||
| Type-3 | 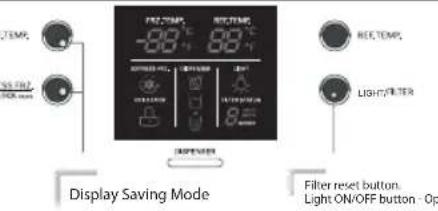 | ||
| Type-4 | 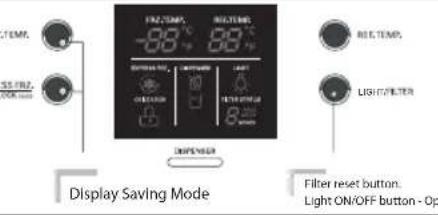 | ||


NOTE
- Your model may not include every option.
- Display Type - 3 and Type - 4: The control display is operated by touch. Excessive moisture on the display panel may cause a malfunction. Please keep display clean and dry.

*Dispenser model - Type 2
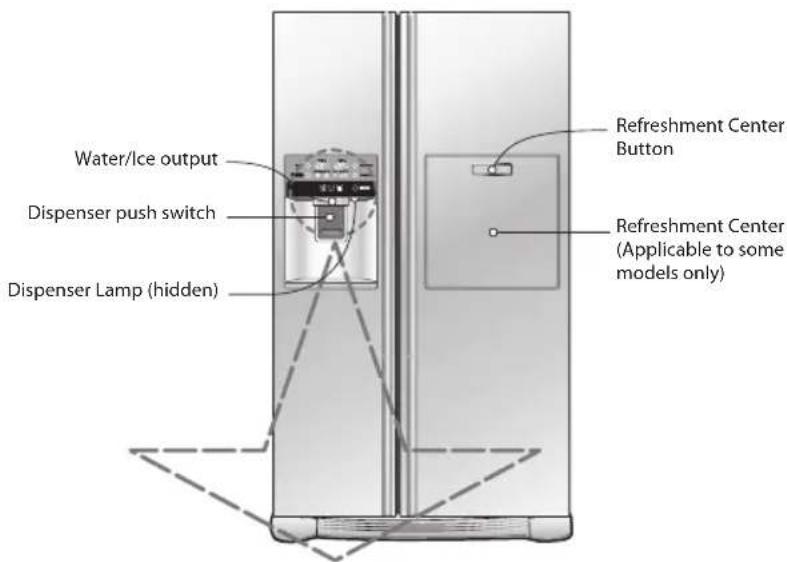
text_image
Water/Ice output Dispenser push switch Dispenser Lamp (hidden) Refreshment Center Button Refreshment Center (Applicable to some models only)| Function display boardOptional | |
| Type-1 | 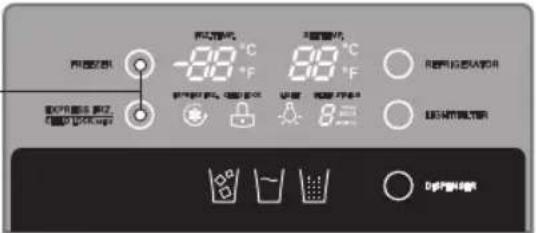 Display Power Saving Mode Display Power Saving Mode |
| Type-2 | 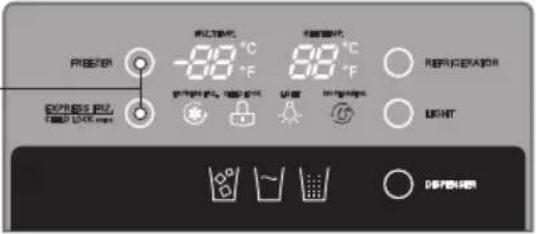 Display Power Saving Mode Display Power Saving Mode |
| Type-3 | 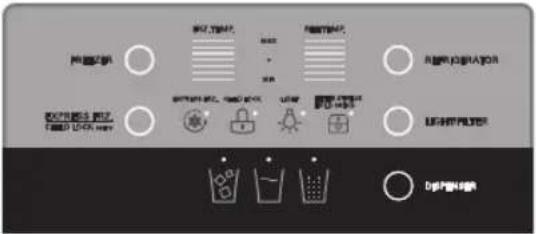 |
NOTE
- Your model may not include every option.
Display power-saving (on some model)
Display POWER-SAVE mode (on some model)
Freezer control
This function save the display power
Press the FREEZER and EXPRESS FRZ. buttons simultaneously and hold them for 5 seconds until the Ding sounds. All LED/LCDs will then turn ON, then OFF. When the power saving mode is activated, the display will remain off until the next time the door is opened. Then, it will come on whenever a door is opened or a button is pressed and remain on for 20 seconds after the last door opening or button selection. To deactivate the power saving mode, press the FREEZER and EXPRESS FRZ. buttons simultaneously and hold them for 5 seconds until the Ding sounds.
Display panel will automatically turn off in 20 seconds and turn on again when you open the door or press the button again.
You can adjust temperature of the fridge and freezer compartments
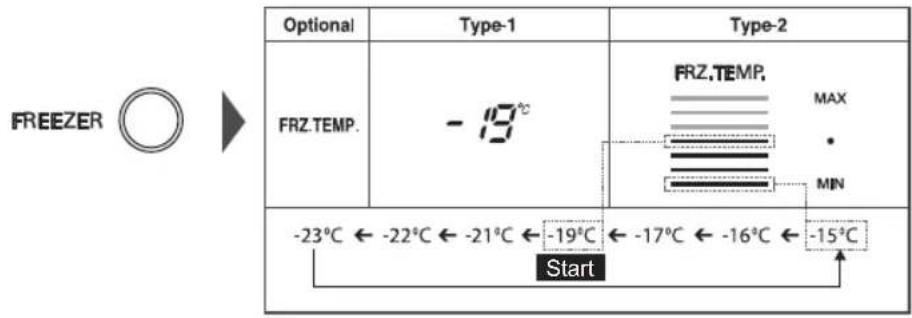
text_image
Optional Type-1 Type-2 FRZ.TEMP. -19°C FRZ.TEMP. MAX MIN -23°C ← -22°C ← -21°C ← -19°C ← -17°C ← -16°C ← -15°C StartRefrigerator control
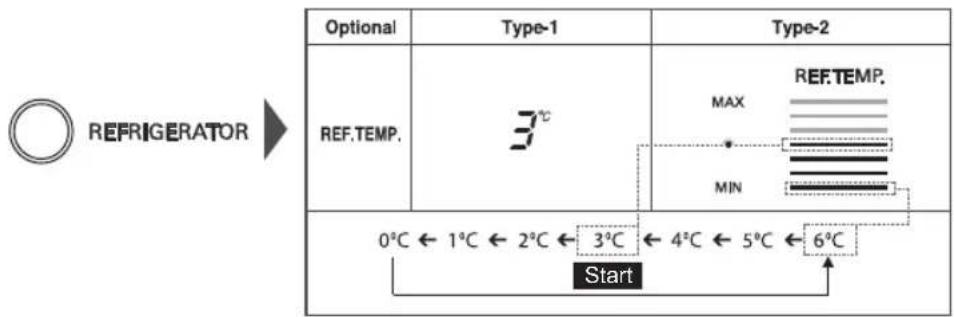
text_image
Optional Type-1 Type-2 REF.TEMP. 3°C MAX REF.TEMP. MIN 0°C ← 1°C ← 2°C ← 3°C ← 4°C ← 5°C ← 6°C Start• The actual inner temperature varies depending on the food status. The indicated temperature is a target temperature, not the actual temperature within the refrigerator.
- Until your refrigerator has settled from transit, it will not perform at its optimum. It takes 2 or 3 days for the fridge to stabilise. During this period, please adjust the temperature as above.
*Dispenser model - Type 3
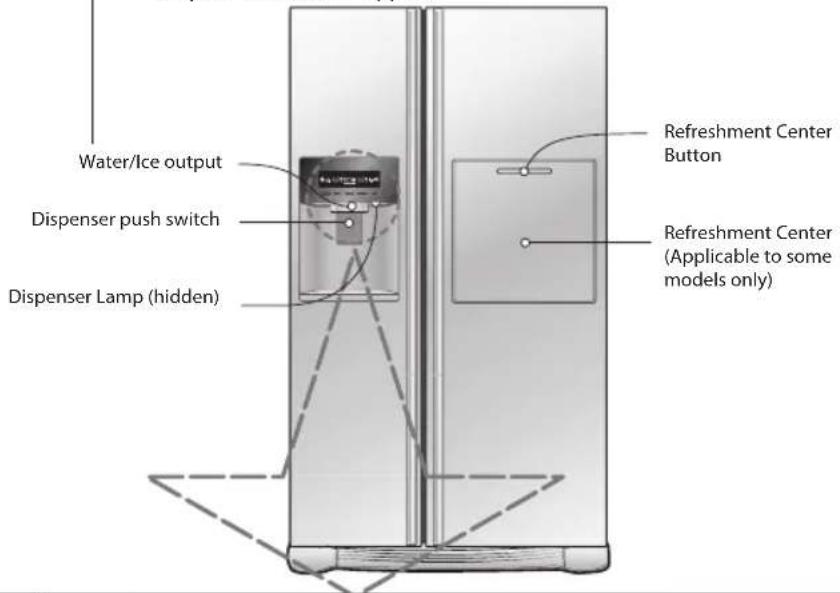
text_image
Water/Ice output Dispenser push switch Dispenser Lamp (hidden) Refreshment Center Button Refreshment Center (Applicable to some models only)| Type 1 |  |
| Type 2 | 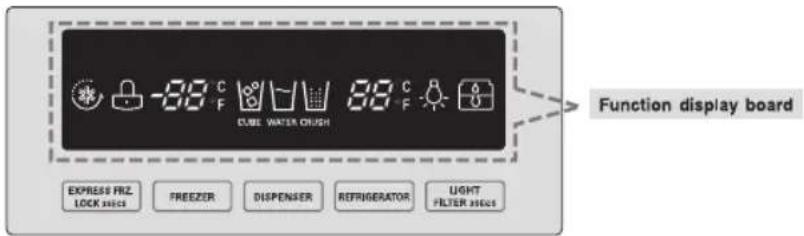 |
| Type 3 |  |
NOTE
- Your model may not include every option.
- The control display panel is operated by touch. Excessive moisture on the display panel may cause a malfunction. Please keep display panel clean and dry.
How to adjust the temperature in the freezer compartment
How to adjust the temperature in the refrigerator compartment
Display Power Saving Mode
Press the FREEZER and EXPRESS FRZ. buttons simultaneously and hold them for 5 seconds until the Ding sounds. All LED/LCDs will then turn ON, then OFF. When the power saving mode is activated, the display will remain off until the next time the door is opened. Then, it will come on whenever a door is opened or a button is pressed and remain on for 20 seconds after the last door opening or button selection. To deactivate the power saving mode, press the FREEZER and EXPRESS FRZ. buttons simultaneously and hold them for 5 seconds until the Ding sounds.
You can adjust temperature of the fridge and freezer compartments
Freezer Compartment temperature adjustment

text_image
FREEZER -88°C Setting temperature -15°C -17°C -19°C -22°C -23°CRefrigerator Compartment temperature adjustment

text_image
REFRIGERATOR 88°C Setting temperature 6°C 4°C 3°C 2°C 0°C*Whenever pressing button, setting is repeated in the order of (Middle)→(Middle Strong)→(Strong)→(Weak)→(Middle Weak).
- The actual inner temperature varies depending on the food status. The indicated temperature is a target temperature, not the actual temperature within the refrigerator
- Until your refrigerator has settled from transit, it will not perform at its optimum. It takes 2 or 3 days for the fridge to stabilise. During this period, please adjust the temperature as above.


Operation
Dispenser use (on some model)
Automatic ice maker
Dispenser use (on some model)
It is possible to select water or ice
*Select water and cubed ice by pressing the relevant button DISPENSER.
*Activate the dispenser by using a cup to press against it
- The function selected is highlighted on the panel.
- If 5 seconds pass and no ice has been dispensed, you will hear a "Tak!" sound. The sound signifies that the ice outlet is closed
- NB: Please wait for 2-3 seconds before removing the cup from beneath the dispenser to ensure it has finished dispensing the ice or water.
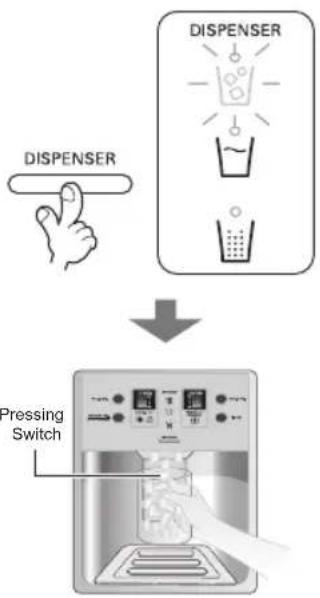
flowchart
graph TD
    A["Hand gesture: Dispenser"] --> B["Dispenser with liquid drop"]
    B --> C["Pressing Switch with container"]
- The icemaker can automatically make 8 pieces of ice cubes at anyone time, approximately 80 pieces per each 24 hr period. However these quantities may vary according to certain conditions. E.g. the duration and amount of times the refrigerator door is opened.
- When the ice storage bin is full, ice making ceases
- If you choose not to use the automatic ice making function, turn the icemaker selection switch to the off position, and the on position for reselection.
NOTE
• The manual selection function is only applicable to some models only.
- The sound produced when the ice drops into the ice storage bin is normal, and is not caused by a defect.
- Choose from crushed ice, water, and cubed ice and depress the dispenser switch with a glass or other container.
Crushed Ice
Select crushed ice by pressing the selection button, which will be highlighted.
Water
Select water by pressing the selection button, which will be highlighted.
Cubed Ice
Select cubed ice by pressing the selection button, which will be highlighted
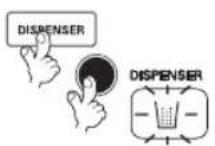
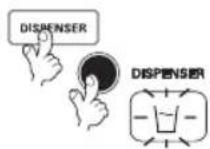
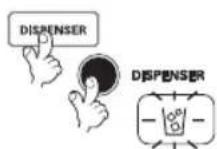
NB : Please wait for 2-3 seconds before removing the cup from beneath the dispenser to ensure it has finished dispensing the ice or water.
Door mounted automatic icemaker (on some model)
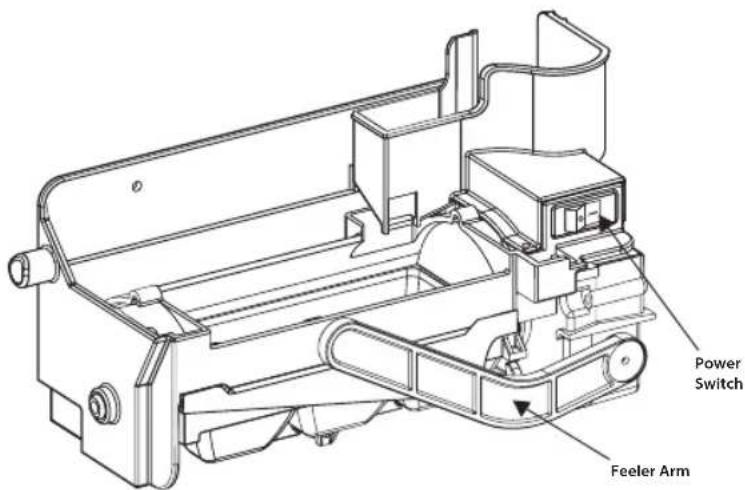
text_image
Power Switch Feeler Arm- The icemaker automatically makes 6 cubes of ice at any one time, which equals approximately 50-60 cubes per day. These quantities, however, may vary according to climatic conditions. E.g. the duration and amount of times the refrigerator door is opened.
- Icemaking stops when the ice storage bin is full.
- If you don't want to use the automatic icemaker, turn the icemaker switch to OFF. If you want to use automatic icemaker again, change the switch to ON.
NOTE
- The sound produced when the ice drops into the ice storage bin is normal, and is not caused by a defect.
WARNING
- Do not put your hands into the Ice maker during operation. You may injure yourself.
- Do not store ice (cubes) for longer than two weeks, they can cause the dispenser to malfunction as the ice cubes clump together.
Precautions when using the dispenser (on some model)
To get cold water
The dispensed water will not be icy cold, but just cool or cold. If you want colder water, dispense ice before dispensing water.
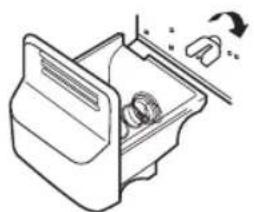
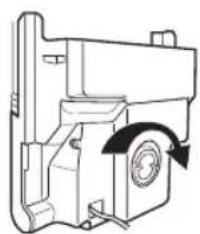
If you have difficulty in replacing the ice storage bin
Rotate the rotary gear in 1/4 cycle as shown in the illustration and then push it back.
①
natural_image
Line drawing of a mechanical device with a handle and internal components (no text or symbols)②
natural_image
Technical line drawing of a mechanical component with a circular component and directional arrow (no text or symbols)NOTE
• Figure ① and ② depends on model.
When the ice dispenser will not operate properly
It is normal that the ice maker will not operate correctly when there is only a small amount of ice left in the storage bin. Allow approximately one day for the ice maker to restock.
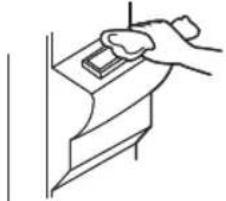
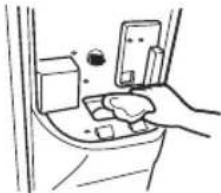
If the ice forms into a solid lump and interrupts the operation of the automatic ice maker mechanism, remove the ice storage bin, separate the ice, discard the inseparable ice, and put the usable ice pieces back into the bin. The intermittent dispensing of ice is normal. However, since ice may get stuck and block the ice chute, regularly check the ice chute and clear any obstacles.
①
natural_image
Line drawing of a hand pressing a small object on a surface (no text or symbols)②
natural_image
Line drawing of a hand pressing down on a car intake tray (no text or symbols)NOTE
• Figure ① and ② depends on model.
WARNING
- Never insert your hand or any other object into the ice chute as this may damage dispenser parts or cause injury to the hand.
- If ice is discoloured, stop using the dispenser and call the service centre.
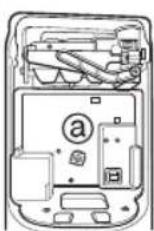
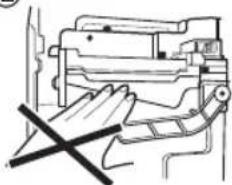
- Do not touch the blade ① ② as it may injure the hand.
- Never insert your hands into the ice maker during operation. It may cause injury ②.
- Do not allow your children to hang off the ice dispenser or the ice storage bin. This could cause injury.
①
②
natural_image
Line drawing of a machine with a hand operating it, no text or symbols presentWhen ice maker does not operate smoothly
Ice is lumped together
- When ice is lumped together, take the ice lumps out of the ice storage bin, break them into small pieces, and place them back into the ice storage bin.
- When the ice maker produces small or lumped together ice, the amount of water supplied to the ice maker may need to be adjusted. Contact the service centre.
* If ice is not used frequently, it may lump together.
Power failure
- Ice may melt and drop into the freezer compartment. Take the ice storage bin out and discard all the ice then dry it and place it back. After the machine is powered again, crushed ice will be automatically selected.
The unit is newly installed
- It takes about 12 hours for a newly installed refrigerator to make ice in the freezer compartment.
The other functions
How ice/cold water is supplied
Door open warning
- A warning bleep will sound 3 times every 30 seconds if the main or minibar door is left open or ajar for more than a minute.
- Please contact your local service centre if the warning continues to sound when the door is closed.
Diagnosis (failure detection) function
- The Diagnosis function automatically detects the problem when a failure is found whilst using of refrigerator.
- If a fault occurs, and none of the refrigerator buttons or functions are working, do not turn power off but immediately contact your local service centre. Once powered off it may not be possible for a service engineer to use the Diagnosis function to detect what caused the original fault.
Water is cooled while stored in the water tank in the refrigerator compartment, and then sent to the dispenser. Ice is made in the automatic ice maker and is then sent to the dispenser as either crushed or cubed ice.
NOTE
- It is normal that at first the water is not very cold. If you want colder water, add ice to the glass.
Throw away the first ice (about 20 pieces) and the first water (about 7 glasses) passing through the appliance when the refrigerator is initially installed.
The first ice and water may include particles or odour from the feed water pipe or the feed water box. The should also be done if the refrigerator has not been used for a long time.
Keep children away from the dispenser.
Children may push the dispenser switch incorrectly, or damage the dispenser by breaking associated parts. It may also cause them injury.
Always ensure that food does not block the ice chute.
If foods are placed at the entrance of the ice chute, ice may not be dispensed. The ice chute may become covered with ice powder if crushed ice is most commonly used. Remove the accumulated ice powder.
Never store beverage cans or other foods in the ice storage bin for rapid cooling.
This may damage the automatic ice maker.
Never use fine crystal glasses or crockery to collect ice.
Such glasses or containers may be broken.
Put ice into a glass before filling with water or other beverages.
Water may be splashed if ice is added after the drink.
Never touch the ice outlet either with hands or any implement.
Touching the ice outlet may cause a breakage or hand injury.
Never remove the ice maker cover. It might be necessary from time to time to level the ice so the storage bin can fill to capacity.
If ice is allowed to pile up near the ice maker, the ice maker may think that it is already full and it will stop producing ice.
If discolored ice is dispensed, stop using the appliance and contact your service centre immediately.
Ice may be jammed in ice chute causing the refrigerator to fail.
Never use narrow or deep glassware when using the icemaker as ice can back up into the ice chute and cause a malfunction.
Keep the glass at a proper distance from ice outlet.
A glass too close to the outlet may hinder ice from coming out.
Freezer basket (two stars section)
How to use
Use the minibar door as a stand
Never remove the inner minibar door cover
Never place heavy items on the minibar door or allow children to hang or sit on it.
Two stars section \*\* (Applicable to some models only)
- Two stars means the temperature in the section is -12^ -18^ .
- Freezer foods for short-term storage.
Refreshment center(Applicable to some models only)
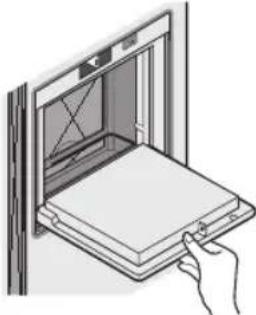
Open the minibar door.
- You can access the minibar without opening the refrigerator door, thus saving electricity.
-
Inner lamp is lit in the refrigerator compartment when the minibar door opens, making it easy to identify the contents.
-
Never use the minibar door as a chopping board and take care not to damage it with sharp tools.
- Never rest or press on the open minibar door.
- The minibar can not function correctly without the cover. Only applies to models with inner minibar cover.
- Not only may the minibar door be damaged, but children may be hurt.
natural_image
Illustration of a hand inserting a tray into an oven with a door (no text or symbols)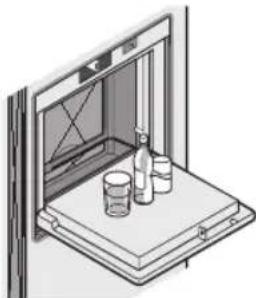
natural_image
Isometric line drawing of a laboratory or storage cabinet with bottles and containers (no text or symbols)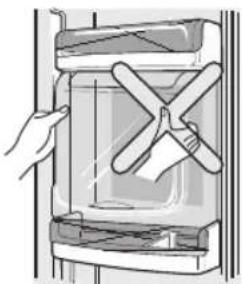
natural_image
Illustration of a hand placing a door panel with X-shaped components (no text or symbols)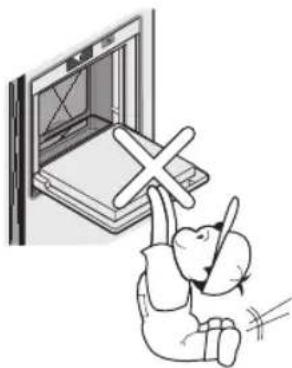
natural_image
Illustration of a child sitting on the floor next to a window with a cross symbol (no text or symbols present)The other functions
No Plumbing Ice & Water (Applicable to some models only)
Store water in the water tank to use the Auto Ice Maker function and Water Dispenser function without having to connect the water pipe to the refrigerator.
To disassemble the water tank
OPTION 1
Turn the security switch to the "OPEN" position, as shown in ①. Next, hold and pull the cap of the water tank ② to loosen the water tank.
OPTION 2
Turn the secure switch into "OPEN" position as shown in ①. Next to loosen the water tank hold and pull the cap of the water tank ② to loosen the water tank.
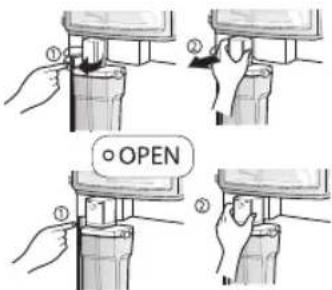
text_image
① ② OPENTo fill the water tank
Lift up the clamps on both sides to open the water tank cover, and then fill the tank. Pour water up to the marked line (3ℓ). When the tank is full, close the tank cover and lock the clamps on both sides.
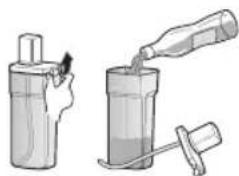
natural_image
Illustration of two containers: one with a lid and one with a bottle pouring liquid into a container (no text or symbols)To assemble the water tank
OPTION 1
Adjust the top of the water tank cap and align the Pump tube with the centre, pushing the tank in firmly. Use the lever ③ to keep fixed ④.
OPTION 2
Adjust the top of the water tank cap and align the pump tube with the centre, pushing the tank in firmly, as shown in ③. Turn the security switch to the "CLOSE" position ④.
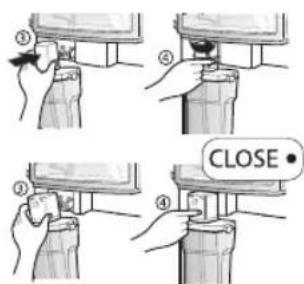
text_image
Illustration showing four steps of a door press or fixture installation, labeled with numbered instructions and a 'CLOSE' button.NOTE
- When assembling or disassembling the water tank, be careful not to apply excessive force as it can damage the water tank.
- If there is no water in the water tank, you will not be able to use the Auto Ice Maker function and Water Dispenser function.
• Using other liquid besides water can cause problems to the pump. - When the water in the water tank is low, the size of the ice cubes may become smaller.
- It's a good idea to clean out the water tank initially before filling it with water and placing it into position.
- The method of using the Dispenser and Ice Maker is the same as other common Dispenser models.
- Because the water tank can get heavy, don't let children use or hold the water tank, especially with one hand.
- You may hear the water pump operating 9\~10 times per day.
Folding Shelf
Shelf (Applicable to some models only)
You can store taller items such as a gallon container or bottles by simply pushing in front half of shelf underneath back half of shelf. Pull toward you to return to a full shelf.
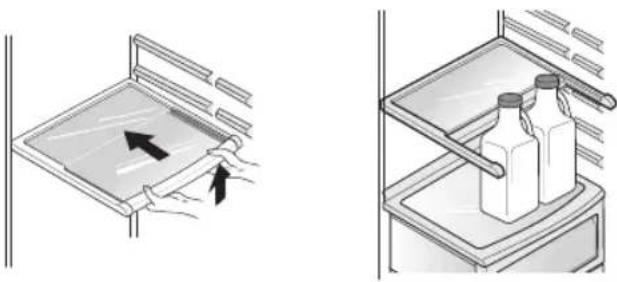
natural_image
Illustration of a kitchen appliance with arrows indicating motion, showing interior and exterior views (no text or symbols)Wine holder adjustment (Type 1)
Wine holder (Applicable to some models only)
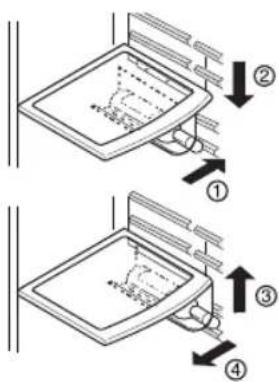
Bottles can be stored laterally with this wine corner. This can be attached to any shelf.
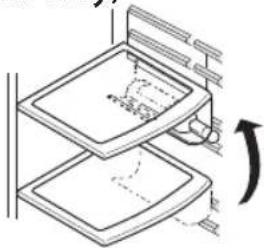
natural_image
Diagram of a multi-tiered appliance with internal components and a rotation arrow (no text or symbols)In case of inserting the wine holder: Pull the wine holder downward as in ② after inserting it into the side anchoring part of the shelf as in ① by catching it upward as in ①.
text_image
Diagram showing two steps of a kitchen appliance with labeled arrows indicating movement or assembly.In case of separating the wine holder: Pull the wine holder inward as in ③ after holding it upward as in ④ by catching it.
natural_image
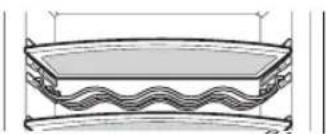
Technical line drawing of a rectangular plate with wavy base and curved top (no text or symbols)(Type 2)
Bottles can be stored laterally with this wine rack.
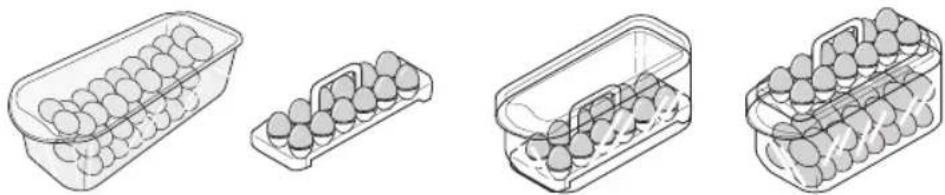
Egg box (Depends on model)
natural_image
Illustration of four different types of egg storage containers, showing different container designs (no text or labels)NOTE
- Never use the egg box as an ice storage bin. It can be broken.
- Never store the egg box in the freezer compartment or fresh compartment.
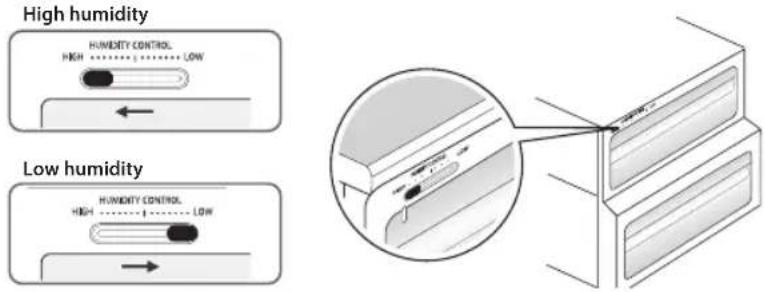
Humidity control in the vegetable compartment (Applicable to some models only)
The humidity can be controlled by adjusting the humidity control switch to the left/right when storing vegetables or fruits.
Convert into a vegetable or meat compartment (Applicable to some models only)
- The bottom drawer in the refrigerator can be converted into a vegetable or meat compartment
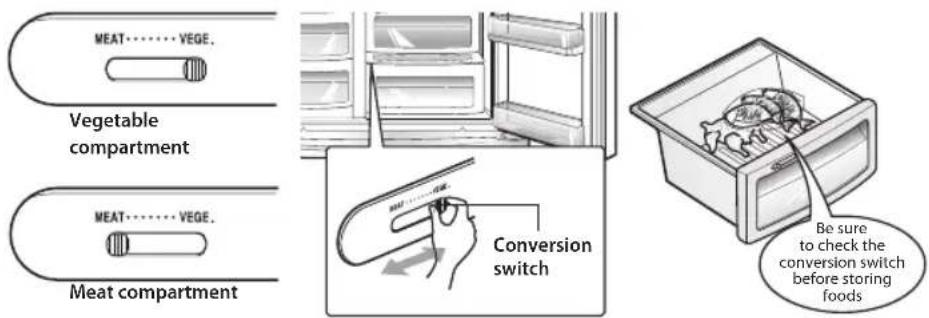
text_image
MEAT……VEGE. Vegetable compartment MEAT……VEGE. Meat compartment Conversion switch Be sure to check the conversion switch before storing foodsThe meat compartment maintains the temperature at a lower point than the refrigerator compartment so that meat or fish can be stored fresh longer.
NOTE
• Vegetables or fruit will be frozen if the conversion switch is set to meat compartment. Be sure to check its position before storing foods.
Deodorizer (Applicable to some models only)
This system efficiently absorbs strong odours by using an optical catalyst. This system does not have any affect on stored food.
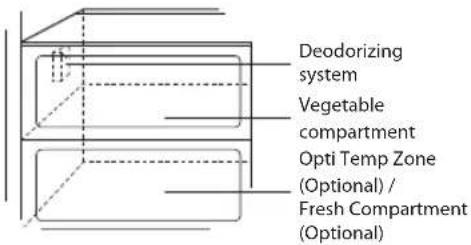
text_image
Deodorizing system Vegetable compartment Opti Temp Zone (Optional) / Fresh Compartment (Optional)How to use the deodorizing system
- The deodoriser is located behind the vegetable compartment. It can be removed for cleaning with soapy warm water from time to time.
- Please use closed containers to store pungent food. Odours are easily absorbed by other food in the compartment.
Vacuum Fresh (Applicable to some models only)
It helps to keep the vegetables and fruits fresher by allowing the drawer to have a partial vacuum due to a hermatical sealing.
How to use
- Pressing the button on the drawer allows the air to be pushed out and the seal to be effective.
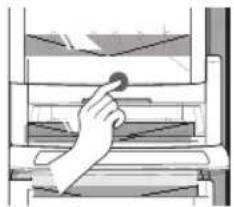
natural_image
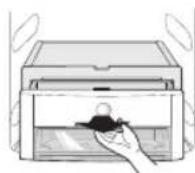
Illustration of a hand pressing down on stacked shelves (no text or symbols visible)- Put your hand inside to lift the button up and pull forward to ①, then open ② Drawer. When closing drawer, push it until you hear clicking.
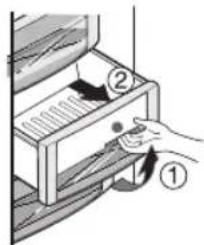
text_image
Diagram showing a hand inserting objects into a drawer with numbered arrows indicating direction of movement.Opti Temp Zone Temperature Transition Corner (Applicable to some models only)
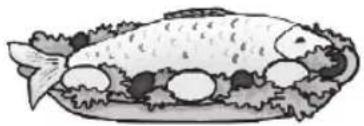
By pressing the button, store vegetables, fruits or other types of food such as defrosting meat, raw fish, etc.
natural_image
Illustration of a fish fillet with vegetables and meat (no text or symbols)Temperature Change at Opti Temp Zone (Applicable to some models only)
Method to use
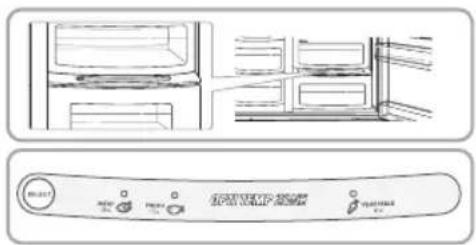
You can select optimum temperature range depending on types of foods stored.
- 3-step of temperature selection including -3^, -1^ and 4^ is available. Vegetables/fruits and cold storage foods requiring humidity maintenance and meats/ fishes can be more freshly stored.
text_image
Technical diagram of a refrigerator control panel with labeled buttons and indicators- When using the Opti Temp Zone as storage room of meats, storing vegetables or fruits, , undesirable freezing may occur to some items if the incorrect setting is selected. It is recommended that all meat and produce be stored in plastic or paper bags.
- The Opti Temp Zone is for temporary storage only(1\~2 days). Longer storage of Meat and Fish should be stored in the freezer to avoid it from spoiling.
- If opening the R-room, the lamp turns on and then turns off again on closing.
- (Vegetable/Fruit)→(Cold storage while maintaining humidity)→(Meat) is sequentially repeated whenever pressing the "SELECT" button.
Opti Temp Zone Temperature Transition Corner (Applicable to some models only)
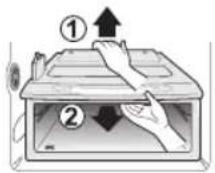
When removing Opti Temp Zone
- First, remove the vegetable bin.
- After lifting the Opti Temp Zone case slightly ①, reach inside and pull it outward ②.
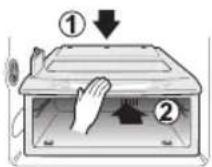
When installing Opti Temp Zone
- Fit the Opti Temp Zone case on to the ledge ① and gently slide it in ②.
- When forced, the connecting parts can be damaged.
Location of foods
(Refer to identification of parts)
Wine holder
Snack drawer
Freezer compartment shelf
Freezer compartment door rack
Freezer compartment drawer
Milk product corner
Egg box
Refreshment center
Refrigerator compartment shelf
Refrigerator compartment door rack
Vegetable drawer
Vegetable drawer/ meat drawer conversion corner
Store wine.
Store small foods such as bread, snacks, etc..
Store various frozen foods such as meat, fish, ice cream, frozen snacks, etc..
- Store small packed frozen food.
- Temperature is likely to increase as door opens. So, do not store long-term food such ice cream, etc..
- Store meat, fish, chicken, etc.. after wrapping them with tin foil.
- Store dry.
Store milk products such as butter, cheese, etc..
Place this egg box in the proper location.
Store foods of frequent use such as beverage,etc..
Store side dishes or other foods at a proper distance.
Store small packed food or beverages such as milk, juice, beer, etc..
Store vegetables or fruits.
Store vegetable, fruits, meat to thaw, raw fish, etc.. setting the conversion switch as necessary. Be sure to check the conversion switch setting before storing foods.

natural_image
Illustration of various food and food items arranged vertically, including bread, fish, snacks, and meat (no text or labels)Freezer Compartment
Refrigerator Compartment
Storing foods
- Store fresh food in the refrigerator compartment. How food is frozen and thawed is an important factor in maintaining its freshness and flavour.
- Do not store food which goes bad easily at low temperatures, such as bananas, and melons.
- Allow hot food to cool prior to storing. Placing hot food in a refrigerator could spoil other food, and lead to higher energy consumption.
- When storing food, cover it with vinyl wrap or store in a container with a lid. This prevents moisture from evaporating, and helps food to keep its taste and nutrients.
- Do not block air vents with food. Smooth circulation of chilled air keeps refrigerator temperatures even.
- Do not open the door frequently. Opening the door lets warm air enter the refrigerator and causes temperatures to rise.
- Never keep too much food in the door rack as it may push against the inner racks so that the door cannot fully close.
- Do not store bottles in the freezer compartment - they may break when frozen.
- Do not refreeze food that has been thawed. This causes loss of taste and nutrients.
- When storing frozen food like ice cream for a long period, place it on the freezer shelf, not in the door rack.
- Do not touch cold foods or containers - especially metallic containers - with wet hands or place glass products in the freezer compartment.
- You may get chill blains, and glass containers may break when frozen, causing personal injury.
- Avoid placing sauces on top refrigerator shelves, which could freeze on direct contact with chilled air.
- Always clean food prior to refrigeration. Vegetables and fruits should be washed and wiped, and packed food should be wiped, to prevent adjacent food from spoiling.
- When storing eggs in their storage rack or box, ensure that they are fresh, and always store them in an upright position, which keeps them fresh longer.
NOTE
- If you keeping the refrigerator in a hot and humid place, frequently open the door or store a lot of vegetables, dew may form. This has no effect on operation or performance. Remove the dew with an absorbent dry cloth.
How to dismantle parts
NOTE
- Dismantle by reversing the assembly instructions. Be sure to unplug the power plug before dismantling and assembly. Never apply severe force to dismantle parts. Parts may be damaged.
Freezer compartment lamp
Refrigerator compartment lamp
Freezer compartment shelf
Doorrackand support
Ice storage bin (Applicable to some models only)
After dispenser is used (Applicable to some models only)
Separate the lamp by pulling it out ③ while slightly pressing ① and rotating ② the lamp cover. Turn the bulb counterclockwise. Use a 40-watt bulb(max.) which can be purchased at a service centre.
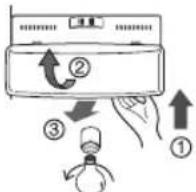
To remove the lamp cover, press the protrusion under the lamp cover to the front and then pull the lamp cover out. Turn the bulb counterclockwise. Max. 40 W bulb for refrigerator is used and can be purchased at a service centre.
NOTE
• Not all bulbs will fit your refrigerator.
Be sure to replace the bulb will one of the same size, shape and wattage.
• The dispenser lights are LEDs that can not be changed.
To remove a shelf, push the shelf to the left ②, lift the left part of the shelf a bit ①, lift the right part up ③, and take it out.

Lift the door rack holding both sides ① and pull it out ②.
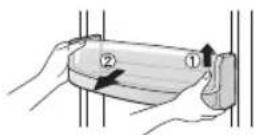
Hold the ice storage bin as shown in the right figure and pull it out ② while slightly lifting it ①.
- Do not dismantle the ice storage bin unless it is necessary.
- Use both hands to remove the ice bin to avoid dropping it.
text_image
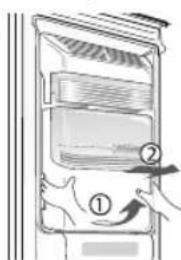
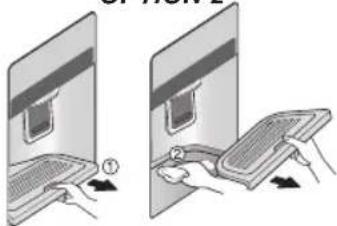
Diagram showing a refrigerator interior with labeled parts and directional arrows indicating movement or change.The water collector has no self-draining function. It should be cleaned regularly.
First take out the water collector cover. Press the cover where PUSH marked ① to lift the water collector cover up. Take out the water collector cover as illustrated ②.
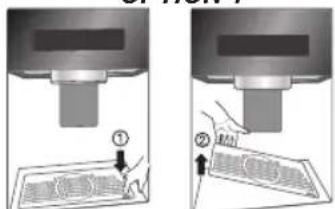
OPTION 1
text_image
Technical diagram showing two steps of a machine tool with labeled components and directional arrows indicating motion.Remove the cover by pulling the front side of water collector cover and dry it with a cloth.
Pull the cover fully to the front ① and pull it out. ② Clean the base and cover with a dry cloth.
OPTION 2
text_image
Diagram showing two-step computer setup with labeled parts and directional arrows indicating movement or change.
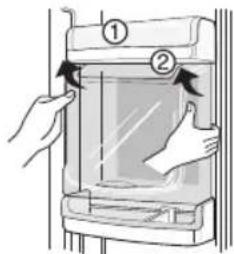
Refreshment centre (Applicable to some models only)
text_image
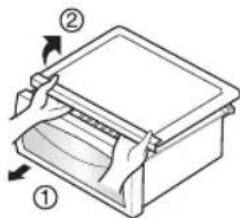
Diagram showing two hands inserting a device into a container with numbered labels ① and ②, indicating a step in the process.Vegetable compartment cover
NOTE
- Be sure to remove parts from the refrigerator door when removing the vegetable compartment, snack drawer and minibar cover.
- To remove the vegetable compartment cover, pull out the vegetable compartment a bit to the front ①, lift the front part of the vegetable compartment cover as shown by ②, and take it out.
text_image
Diagram of a printer with labeled parts and directional arrows indicating process flowVacuum Fresh (Applicable to some models only)
- To remove the vegetable compartment cover, pull out the vegetable compartment a bit to the front ①, lift the front part of the vegetable compartment cover as shown by ②, and take it out.
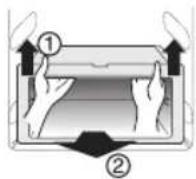
Space Plus (Applicable to some models only)
Lift the space plus ① and pull it out to ② direction.
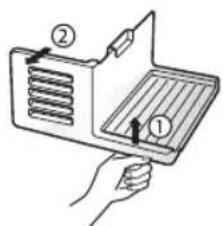
text_image
Diagram showing a hand holding a device with labeled parts, including numbered annotations ① and ②.Ice storage bin (Applicable to some models only)
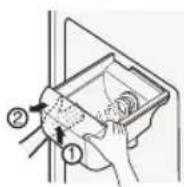
Hold the ice storage bin as shown in the right figure and pull it out ② while slightly lifting it ①.
- It is recommended that the ice storage bin is not dismantled unless absolutely necessary.
- Be sure to use both hands when removing the ice storage bin, so as not to drop it on the floor.
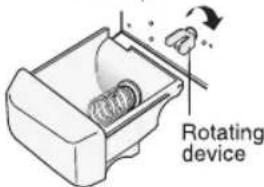
- If the ice storage bin does not fit well, slightly rotate the rotating device.
text_image
Rotating deviceIce maker (Applicable to some models only)
Turn off the Ice maker switch (off) after remove the SPACE PLUS, if you are on a long term vacation or don't use ice.
If you want to use for ice, turn on the Ice maker switch(on).
Vacation time
Power failure
If you move
Anti condensation pipe
Understanding sounds you may hear
General information
During average length vacations, you will probably find it best to leave the refrigerator in operation. Place freezable items in freezer for longer life. When you plan not to operate, remove all food, disconnect the power cord, clean the interior thoroughly, and leave each door OPEN to prevent odour formation.
Most power failures that are corrected in an hour or two will not affect your refrigerator temperatures. However, you should minimize the number of door openings while the power is off.
Remove or securely fasten down all loose items inside the refrigerator. To avoid damaging the height adjusting screws, turn them all the way into the base.
The outside wall of the refrigerator cabinet may sometimes get warm, especially just after installation. Don't be alarmed. This is due to the anti-condensation pipe, which pumps through the refrigerator to prevent "sweating" on the outer cabinet wall.
Your new refrigerator may make sounds that your old one didn't make. Because the sounds are new to you, you might be concerned about them. Most of the new sounds are normal. Hard surfaces, like the floor, walls and cabinets, can make the sounds seem louder than they describes the kinds of actually are. The following sounds and what may be making them:
- The defrost timer will click when the automatic defrost cycle begins and ends. The thermostat control (or refrigerator control, depending on the model) will also click when cycling on and off.
•Rattling noises may come from the flow of refrigerant, the water line, or items stored on top of the refrigerator.
-Your refrigerator is designed to run more efficiently to keep your food items at the desired temperature. The high efficiency compressor may cause your new refrigerator to run longer than your old one, and you may hear a pulsating or high-pitched sound.
- You may hear the evaporator fan motor circulating the air through the refrigerator and freezer compartments.
- As each cycle ends, you may hear a gurgling sound due the refrigerant flowing in your refrigerator.
Contraction cause a popping noise to and expansion of the inside walls may a popping noise.
•Water dripping on the defrost heater during a defrost cycle may cause a sizzling sound.
- You may hear air being forced over the condenser by the condenser fan.
- You may hear water running into the drain pan during the defrost cycle.
Cleaning
It is important that your refrigerator be kept clean to prevent undesirable odours. Spilled food should be wiped up immediately, since it may acidify and stain plastic surfaces if allowed to settle.
Use a luke warm solution of mild soap or detergent to clean the durable finish of your refrigerator. Wipe with a clean damp cloth and then dry.
Regular cleaning is recommended. Wash all compartments with a baking soda solution or a mild detergent and warm water. Rinse and dry.
Please verify that the power cord is not damaged, power plug is not overheated, or power plug is well inserted into the wall outlet socket.
Always remove power cord from the wall outlet prior to cleaning near to electrical equipment (lamps, switches, controls, etc.). Wipe up excess moisture with a sponge or cloth to prevent water or liquid from getting into any electrical part and causing an electric shock. Never use metallic scouring pads, brushes, coarse abrasive cleaners, strong alkaline solutions, flammable or toxic cleaning liquids on any surface. Do not touch frozen surfaces with wet or damp hands, because damp object will stick to extremely cold surfaces.
Exterior
Interior
After cleaning
Warning


General information
Before calling for service, review this list. It may save you both time and expense. This list includes common occurrences that are not the result of defective workmanship or materials in this appliance.
| Occurrence Possible cause Solution | ||
| Running of refrigerator | Refrigerator control is off. | Set refrigerator control. See setting the controls. |
| Refrigerator compressor does not run. | Refrigerator is in defrost cycle. This is normal for a fully automatic defrosting refrigerator. The defrost cycle occurs periodically. | |
| Plug at wall outlet is disconnected. Make sure plug is tightly pushed into outlet. | ||
| Power outage. Check house lights. Call your electricity supplier. | ||
| Refrigerator is larger than the previous one you owned. | This is normal. Larger, more efficient units run longer in these conditions. | |
| Room or outside weather is hot. It is normal for the refrigerator to work harder under these conditions. | ||
| Refrigerator compressor runs too often or too long. | Refrigerator has recently been disconnected for a period of time. | It takes some hours for the refrigerator to cool down completely. |
| Large amounts of warm or hot food may have been stored recently. | Warm food will cause the refrigerator to run longer until the desired temperature is reached. | |
| Doors are opened too frequently or too long. | Warm air entering the refrigerator causes it to run longer. Open the door less often. | |
| Refrigerator or freezer door may be slightly open. | Make sure the refrigerator is level. It is normal for the refrigerator to have a slight lean backwards. Keep food and containers from blocking door. See problem section OPENING/CLOSING of doors. | |
| Refrigerator control is set too cold. Set the refrigerator control to a warmer setting until the refrigerator temperature is satisfactory. | ||
| Refrigerator or freezer gasket is dirty, worn, cracked, or poorly fitted. | Clean or change gasket. Leaks in the door seal will cause refrigerator to run longer in order to maintain desired temperatures. | |
| Thermostat is keeping the refrigerator at constant temperature. | This is normal. Refrigerator goes on and off to keep the temperature constant. | |
ENGLISH
| Occurrence Possible cause Solution | ||
| Refrigerator compresses does not run | thermostat is keeping the refrigerator at a constant temperature. | Set refrigerator control. See setting the controls. |
| Temperatures are too cold | ||
| Temperature in the freezer is too cold but refrigerator temperature is satisfactory. | Freezer control is set too cold Set freezer control to a warmer setting until the freezer temperature is satisfactory. | |
| Temperature in the refrigerator is too cold but freezer temperature is satisfactory. | Refrigerator control is set too cold Set refrigerator control to a warmer setting until the refrigerator temperature is satisfactory. | |
| Food stored in drawers freezes. | Refrigerator control is set too cold See above solution. | |
| Meat stored in fresh meat drawer freezes. | Meat should be stored at a temperature just below the freezing point of water (32F, 0°C) for maximum fresh storage time. | It is normal for ice crystals to form due to the moisture content of meat. |
| Temperatures are too warm | ||
| Temperatures in the refrigerator or freezer too warm. | freezer control is set too warm. Set the refrigerator control to a colder setting until the freezer or refrigerator temperature is satisfactory. | |
| Refrigerator control is set too warm. Refrigerator control has some effect on freezer temperature. | Set the refrigerator control to a colder setting until the freezer or refrigerator temperature is satisfactory. | |
| Doors are opened too frequently or too long. | Warm air enters the refrigerator/freezer whenever the door is opened. Open the door less often. | |
| Door is slightly open. Close the door completely | ||
| Large amounts of warm or hot food may have been stored recently. | Wait until the refrigerator or freezer has a chance to reach its selected temperature. | |
| Refrigerator has recently been disconnected for a period of time. | A refrigerator requires some hours to cool down completely. Do not place food items inside the refrigerator until it has initially reached it's set temperature, or has cooled down considerably. | |
| Temperature in the refrigerator is too warm but the freezer temperature is satisfactory. | Refrigerator control is set too warm. Set the refrigerator control to a colder setting. | |


| Occurrence Possible cause Solution | ||
| Sound and noise | ||
| Louder sound levels when refrigerator is on | Today's refrigerators have increased storage capacity and maintain more even temperatures. | It is normal for sound levels to be higher. |
| Louder sound levels when compressor comes on. | Refrigerator operates at higher pressures during the start of the ON cycle. | This is normal. The sound will level o_c as the refrigerator continues to run. |
| Vibrating or rattling noise. | Floor is uneven or weak. Refrigerator rocks on the floor when it is moved slightly. | Be sure floor is level and solid and can adequately support refrigerator. |
| Refrigerator control is set too cold See above solution. | ||
| Items placed on the top of the refrigerator are vibrating. | Remove items. | |
| Dishes are vibrating on the shelves in the refrigerator. | It is normal for dishes to vibrate slightly. Move dishes slightly. Make sure refrigerator is level and firmly set on floor. It is normal for the refrigerator to have a slight lean backwards. | |
| Refrigerator is touching wall or cabinets. Move refrigerator so that it does not touch the wall or refrigerator. | ||
| Water/Moisture/Ice inside refrigerator | ||
| Moisture collects on the inside walls of the refrigerator. | The weather is hot and humid which increases the rate of frost buildup and internal sweating. | This is normal. |
| Door is slightly open. See problem section opening/closing of doors. | ||
| Door is opened too often or too long. Open the door less often. | ||
| Water/Moisture/Ice outside refrigerator | ||
| Moisture forms on the outside of the refrigerator or between doors. | Weather is humid. This is normal in humid weather. | When humidity is lower, the moisture should disappear. |
| Door is slightly open, causing cold air from the inside the refrigerator to meet warm air from the outside. | This time, close the door completely. | |
ENGLISH
| Occurrence Possible cause Solution | ||
| Odours in refrigerator | ||
| Interior needs to be cleaned. Clean interior with sponge, warm water and baking soda. | ||
| Food with strong odour is in the refrigerator. Cover food completely. | ||
| Some containers and wrapping materials produce odours. | Use a different container or brand of wrapping materials. | |
| Opening/Closing of doors/Drawers | ||
| Door(s) will not close. | Food package is keeping door open. Move packages that keep door from closing. | |
| Door was closed too hard, causing other door to open slightly | Close both doors gently. | |
| Refrigerator is not level. It rocks on the floor when it is moved slightly. | Adjust the height adjusting screw. | |
| Floor is uneven or weak. Refrigerator rocks on the floor when it is moved slightly. | Be sure floor is level and can adequately support refrigerator. Contact carpenter to correct sagging or sloping floor. It is normal for the refrigerator to have a slight lean backwards. | |
| Refrigerator is touching wall or cabinets. Move refrigerator. | ||
| Drawers are difficult to move. | Food is touching shelf on top of the drawer. Keep less food in drawer. | |
| Track that drawer slides on is dirty. Clean drawer and track. | ||
| Dispenser | ||
| Dispenser will not dispense ice | Ice storage bin is empty. When the first supply of ice is dropped into the bin, the dispenser should operate. | |
| Freezer temperature is set too warm. | Turn the freezer control to a higher setting so that ice cubes will be made. When the first supply of ice is made, the dispenser should operate. | |
| Household water line valve is not open. | Open household water line valve and allow sufficient time for ice to be made. When ice is made, dispenser should operate. | |
| Refrigerator or freezer door is not closed. | Be sure both doors are closed. | |
| Dispenser will not dispense ice | Ice has melted and frozen around auger due to infrequent use, temperature fluctuations and/or power outrages. | Remove ice storage bin, and thaw and the contents. Clean bin, wipe dry and replace in proper position. When new ice is made, dispenser should operate. |
| Ice dispenser is jammed. | Ice cubes are jammed between the icemaker arm and back of the bin. | Remove the ice cubes that are jamming the dispenser. |
| Ice cubes are frozen together. Only the ice cubes made by the ice maker should be used with the dispenser. | ||
| Ice cubes that have been purchased or made in some other way have been used in the dispenser. | Use a different container or brand of wrapping materials. | |
| Dispenser will not dispense water. | Household water line valve is not open. See problem "Ice maker is not making any ice." | Open household water line valve. |
| Refrigerator or freezer door is not closed. Be sure both doors are closed. | ||
| Water has an odd taste and/or odour. | Water has been in the tank for too long. Dispense and discard 7 glasses of water to freshen the supply. Dispense and discard an additional 7 glasses to completely rinse out tank. | |
| Unit not properly connected to cold water line. | Connect unit to cold water line which supplies water to kitchen tap. | |
| Sound of ice dropping | This sound is normally made when automatically made ice is dropped into ice storage bin. Volume may vary according to refrigerator's location. | |
| Sound of water supply | This sound is normally made when ice maker is supplied with water after dropping the automatically made ice. | |
| Other | Please thoroughly read 'Automatic ice maker and dispenser' in this manual. | |
Display shows the word OFF
The refrigerator control has been put into the store Demo(Demonstration) Mode. The Demonstration Mode disables the cooling system, only lamps and display work normally. To disable Demo Mode open one door, then press EXPRESS FRZ. and REF. TEMP buttons at the same time for 5 seconds. You will see the previous value setting you had on display when Demo Mode is deactivated.
natural_image
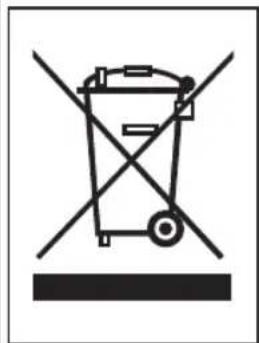
Symbol of a trash bin with crossed lines indicating no waste or discharge (no text or labels)DISPOSAL OF YOUR OLD APPLIANCE
- When this crossed-out wheeled bin symbol is attached to a product it means the product is covered by the European Directive 2002/96/EC.
- All electrical and electronic products should be disposed of separately from the municipal waste stream via designated collection facilities appointed by the government or the local authorities.
- The correct disposal of your old appliance will help prevent potential negative consequences for the environment and human health.
- For more detailed information about disposal of your old appliance, please contact your local Council, waste disposal service or the shop where you purchased the product.
This product contains fluorinated greenhouse gases covered by the Kyoto Protocol (Optional).
• Information of fluorinated greenhouse gases used as refrigerant of this refrigerator.
| Chemical name | Composition of Gases Total | GWP (kg CO _2 -eq) |
| R-134a 100% | HFC-134a 1300 |


