
RoomMatch RMU105 - Pregnant BOSE - Free user manual and instructions
Find the device manual for free RoomMatch RMU105 BOSE in PDF.

| Product Type | Small-Format Foreground/Fill Loudspeaker |
| Model | RoomMatch RMU105 |
| Brand | Bose |
| Frequency Response (±3 dB) | 100 Hz – 16 kHz |
| Frequency Range (-10 dB) | 90 Hz – 16 kHz |
| Coverage Pattern | 100° x 100° (non-rotatable) |
| Long-Term Power Handling (Bose) | 100 W |
| Long-Term Power Handling (AES) | 150 W |
| Maximum SPL (Peak at 1 m) | 118 dB |
| Low-Frequency Transducer | 1 x Bose 5.25-inch woofer |
| High-Frequency Transducer | 1 x Bose EMB2 compression driver |
| Nominal Impedance | 8 ohms (70V/100V optional) |
| Dimensions (H x W x D) | 6.0 x 12.0 x 7.5 in (152 x 305 x 191 mm) |
| Net Weight | 12 lb (5.4 kg) |
| Net Weight with U-Bracket | 15 lb (6.8 kg) |
| Finish Color | Black or White |
| Environmental Rating | Indoor use only |
| Mounting Options | Bolt-on U-bracket included; optional pan-and-tilt bracket |
| Connector Panel | Dual NL4 and screw-terminal barrier strip |
| Optional Accessories | 40W or 100W 70V/100V transformer kit, pan-and-tilt bracket |
| Recommended Amplifier Power | 100 – 400 W |
| Recommended DSP Settings | High-pass at 90 Hz (BW24), limiter thresholds for infrasonic protection |
| Safety Requirements | Professional installation, 10:1 safety factor, safety cable recommended |
| Maintenance | Regular inspection of mounting hardware for corrosion or damage |
Frequently Asked Questions - RoomMatch RMU105 BOSE
User questions about RoomMatch RMU105 BOSE
0 question about this device. Answer the ones you know or ask your own.
Ask a new question about this device
Download the instructions for your Pregnant in PDF format for free! Find your manual RoomMatch RMU105 - BOSE and take your electronic device back in hand. On this page are published all the documents necessary for the use of your device. RoomMatch RMU105 by BOSE.
USER MANUAL RoomMatch RMU105 BOSE
natural_image
Product lineup of various audio speakers including RMU108, RMU206, RMU208, and RMU105 (no visible text or labels on devices)RoomMatch® Utility
Small-Format Foreground/Fill Loudspeakers
Installation and Safety Guidelines
This product is intended for installation by professional installers only! This document is intended to provide professional installers with basic installation and safety guidelines for Bose RoomMatch® Utility loudspeakers in typical fixed-installation systems. Please read this document before attempting installation.
WARNING: All Bose ^® products must be used in accordance with local, state, federal and industry regulations. It is the installer's responsibility to ensure installation of the loudspeakers and mounting system is performed in accordance with all applicable codes, including local building codes and regulations. Consult the local authority having jurisdiction before installing this product.
WARNING: Unsafe mounting or overhead suspension of any heavy load can result in serious injury and equipment damage. It is the responsibility of the installer to evaluate the reliability of any mounting method used for their application. Only professional installers with the knowledge of proper hardware and safe mounting techniques should attempt to install any loudspeaker overhead.
Guidelines for Permanent Installation of RoomMatch Utility Loudspeakers
The installation information contained in this document is only a general guideline and cannot, as such, represent all requirements and precautions. Accordingly, anyone using this material assumes all liability and is expressly responsible for the safety of all loudspeaker array designs and mounting configurations applied in practice.
- Prior to the installation of any overhead loudspeaker, a licensed professional engineer must approve the location and method of attachment to the building structure and confirm they are consistent with all building codes and regulations. Ensure the mounting surface and the method of attaching the loudspeaker system to the surface is capable of supporting the total weight of the system. A safety factor of 10:1 is recommended.
- Obtain all mounting system components from reputable manufacturers. Select a mounting system appropriate for your loudspeaker system and its intended application. We recommend Bose mounting accessories when available. A licensed professional engineer must review the design and fabrication of any custom mounting hardware.
- Bose RoomMatch Utility loudspeakers feature integrated M8 threaded inserts to facilitate loudspeaker mounting by professional installers. Do NOT use SAE 5/16" size threaded hardware! Use only metric hardware. Fasteners should be metric Class 8.8 (load bearing rated) or equivalent. Unmarked (not rated for load bearing) fasteners should not be used.
- Use lock washers or a locking compound intended for hand disassembly, such as LOCTITE ^® THREADLOCKER BLUE 242 ^® compound, for a vibration resistant assembly.
- Fasteners should be tightened using torque of 15 to 20 foot-pounds (21 to 28 Newton-meters). Over-tightening the fasteners could result in irreparable damage to the cabinet and create an unsafe assembly.
- Do not attempt to alter the threaded attachment points or re-thread the attachment points to accommodate any other thread size or type; doing so will compromise the safety while permanently damaging the loudspeaker.
- Use a safety cable, separately attached to the cabinet, at a point not in common with the load bearing attachment points of the mounting system to the loudspeaker. This is recommended even if not required by local regulation. Consult a licensed professional engineer or a rigging professional for proper design and installation.
CAUTION: Installed loudspeakers require regular inspection and routine maintenance to ensure proper function and safe operation. Inspect mounting hardware and attachments for signs of corrosion, bending or any other condition that may decrease the structural integrity. Immediately replace worn or damaged components.
CAUTION: Make no modifications to the loudspeakers or mounting accessories. Unauthorized alterations may compromise safety and could result in damage, injury, or death.
CAUTION: Never exceed 1 RoomMatch Utility loudspeaker using the included U-bracket. Additionally, never exceed 1 RoomMatch Utility loudspeaker using the rear-enclosure M8 threaded inserts to attach to any supporting surface.
CAUTION: This product must be used indoors.
RoomMatch ^® Utility (RMU) small-format loudspeakers are intended for use in high-quality foreground music, under-balcony, zone fill, and vocal-range floor monitor applications. The design features a single Bose ^® EMB2 compression driver to provide mid/high frequency voicing similar to that of RoomMatch full-range array modules.
Common Features
• U-bracket is included for surface-mount installations
- Rear-panel threaded inserts can accept optional pan-and-tilt brackets
- Standard connector panel can be replaced with an optional 40-watt or 100-watt 70V/100V transformer kit
Figure 1. RoomMatch Utility loudspeakers with included U-Bracket
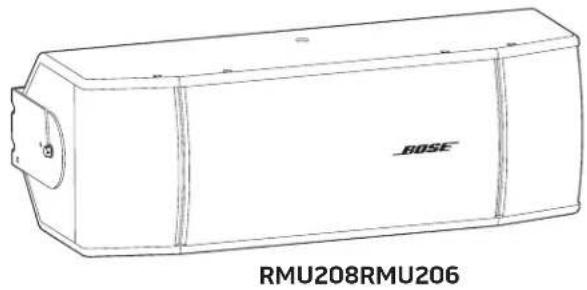
natural_image
Line drawing of a rectangular electronic device labeled 'RMU208RMU206' with no other text or symbols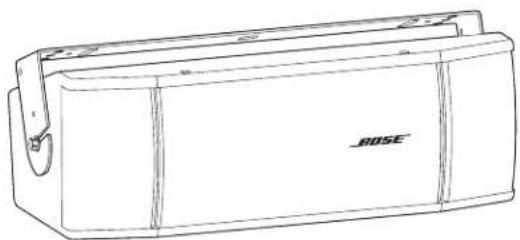
natural_image
Line drawing of a box labeled 'BOSE' with no other text or symbols
natural_image
Line drawing of a rectangular electronic device labeled 'RMU108RMU105' with no other text or symbols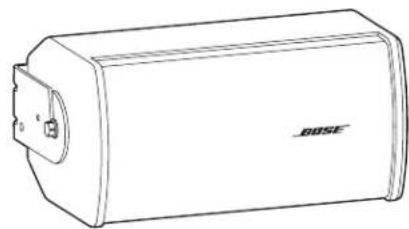
natural_image
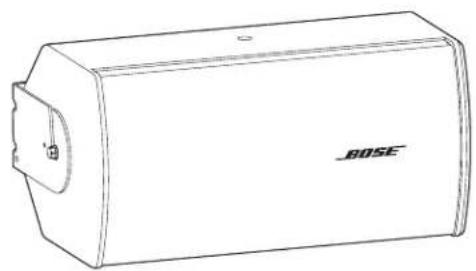
Line drawing of a beige box labeled 'BOSE' with a small protrusion on the top side (no other text or symbols)Parts List
Each RoomMatch Utility loudspeaker carton includes the following parts:
• RoomMatch Utility Loudspeaker
- U-bracket
- Hardware kit with M8 pan head bolts and rubber washers
- T3 square drive
- Installation guide
Loudspeaker and U-Bracket Dimensions
Figure 2. RMU208 loudspeaker and U-bracket dimensions
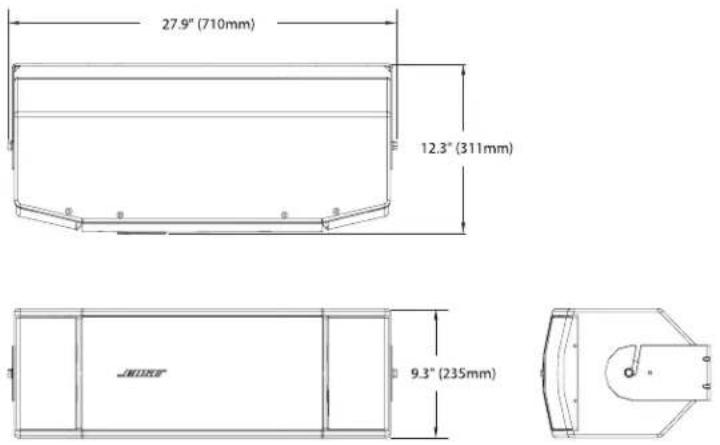
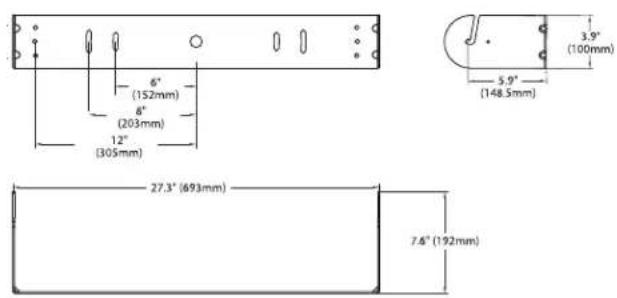
Figure 3. RMU206 loudspeaker and U-bracket dimensions

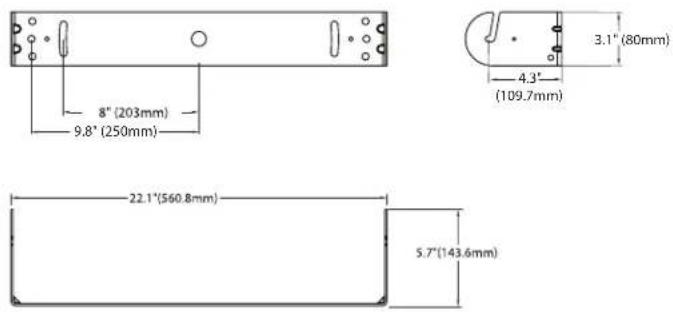
Figure 4. RMU108 loudspeaker and U-bracket dimensions
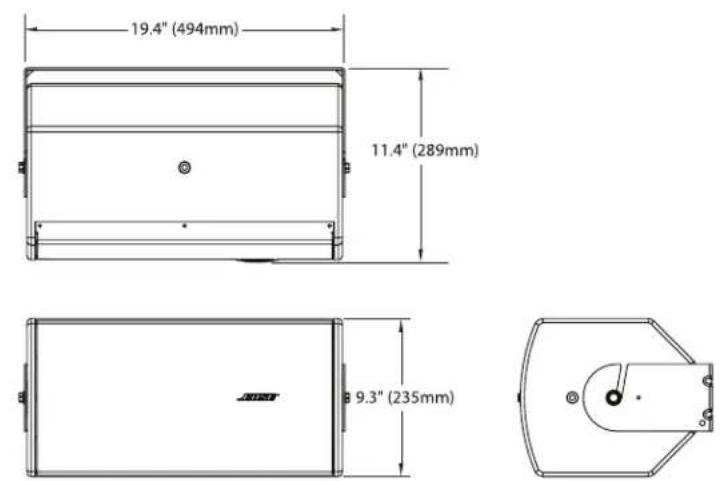
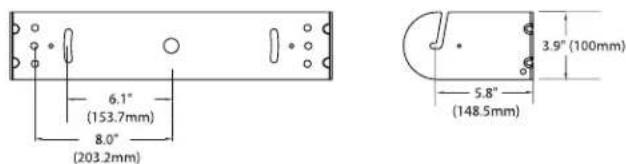
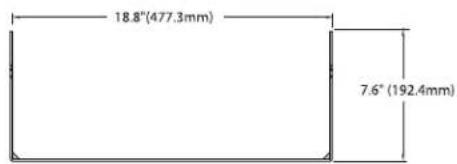
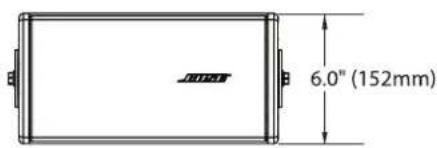
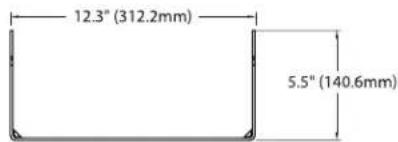
Figure 5. RMU105 loudspeaker and U-bracket dimensions
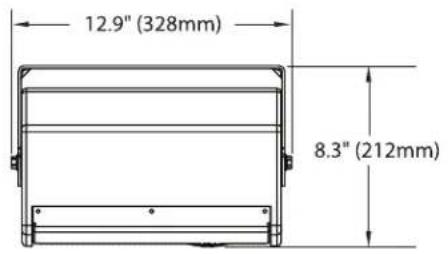
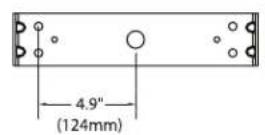
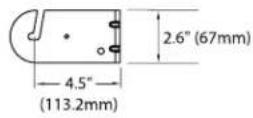

Connector Panel
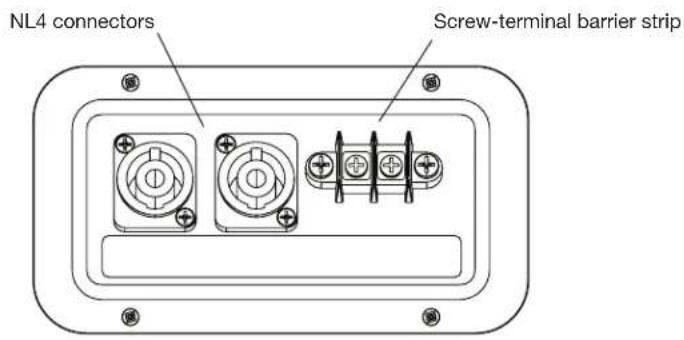
The connector panel is identical for all models and includes dual NL4 connectors, to allow "loop through" connections, and a screw-terminal barrier strip.
Figure 6. RMU speaker input connectors
Mounting RMU Loudspeakers with U-Bracket
Before You Begin – Recommended Tools
- 10 mm sockets and socket wrenches – for M8 bolts on U-bracket
- T3 square drive (included) – for removing plastic inserts
CAUTION: The RMU loudspeakers can weigh up to 43 lbs (19.5 kg) with U-brackets attached. Use caution when lifting to avoid injury and/or damage to the speaker. Refer to the following table for specific weights of each model.
Table 1: Weights of RMU Loudspeakers
| RMU208 RMU206 RMU108 RMU105 | |||
| Net Weight 37 lbs (16.8 kg) 25 lbs (11.3 kg) 21 lbs (9.5 kg) 12 lbs (5.4 kg) | |||
| Net Weight with U-Bracket 43 lbs (19.5 kg) 29 lbs (13.2 kg) 26 lbs (11.8 kg) 15 lbs (6.8 kg) | |||
CAUTION: Do not place loudspeakers resting on their grilles.
To install the RMU loudspeakers with the included U-bracket:
- Choose a mounting location that will safely support the weight of the loudspeaker.
- Remove packing materials and place the loudspeaker on the floor beneath the planned suspension point.
- Using the included T3 square drive, remove the plastic insert on each end of the loudspeaker.
CAUTION: Do not attach the loudspeaker to the U-bracket using the plastic inserts.
-
Insert one M8 bolt and rubber washer into the threaded hole on each end of the loudspeaker. Do not tighten.
-
Hold the U-bracket in the mounting location and mark the holes.
CAUTION: For attaching U-brackets to the surface, choose fasteners that are consistent with all local building codes and requirements to support the weight of the speaker (refer to "Table 1: Weights of RMU Loudspeakers"). As a general guideline, use 5/16" x 3" lag screws into wood and 5/16"-18 double expansion anchors into concrete and masonry block.
-
Drill holes into mounting surface using previously marked positions.
-
Attach the U-bracket to the building surface using the required fasteners specified in Step 3.
-
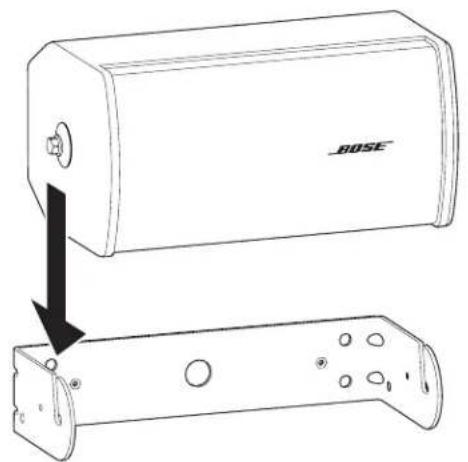
Hang the loudspeaker on the bracket by lowering the M8 bolts into the bracket slots keeping the rubber washers between the bracket and the speaker enclosure. See Figure 7.
Figure 7. Installing the speaker on the U-bracket
natural_image
Line drawing of a rectangular electronic device labeled 'BOSE' (no additional text or symbols)-
Position the loudspeaker in the desired pitch angle.
-
Tighten the 2 bolts with a 10 mm socket tool using a torque not to exceed 15 to 20 foot-pounds (21 to 28 Newton-meters).
Note: Optionally, for more secure mounting of pitch angles, a wood screw may be inserted into the small hole in the side of the U-bracket and tightened into the wood enclosure.
- Connect field wiring and test loudspeaker operation.
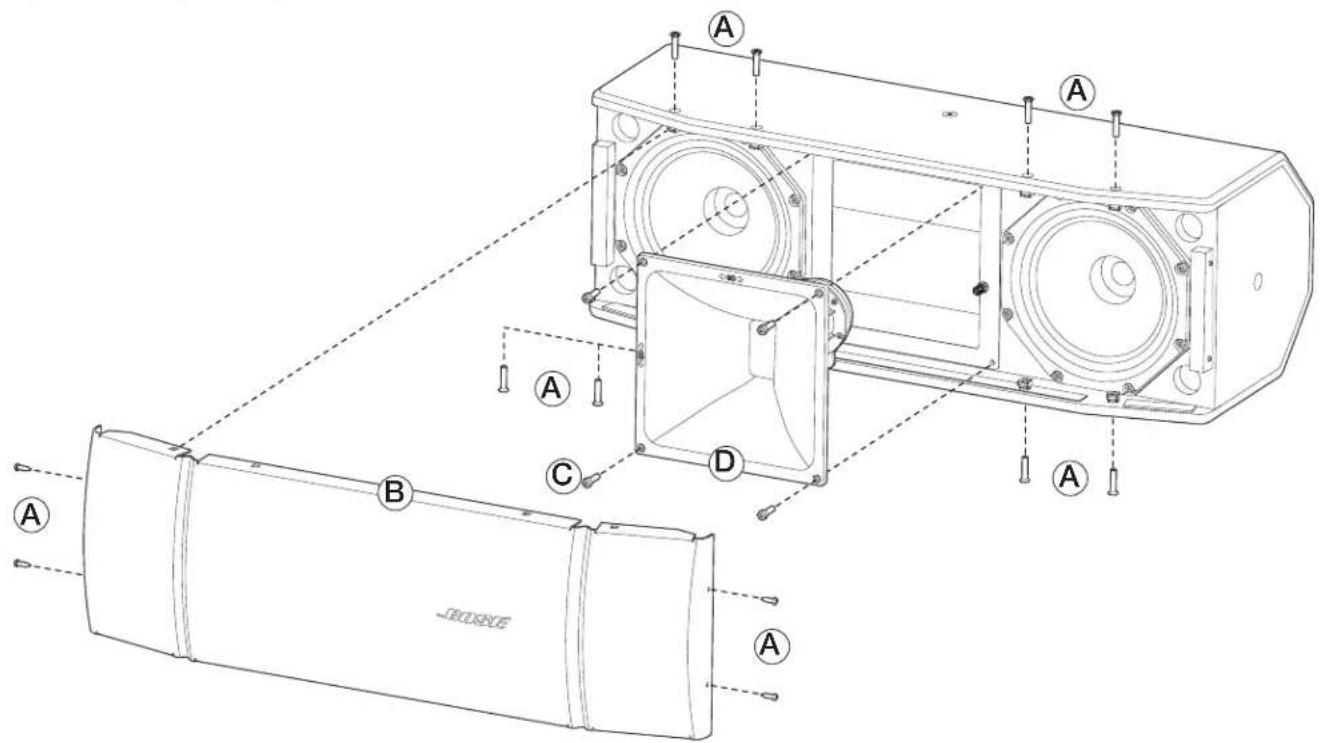
Rotating the High-Frequency Waveguides
The high-frequency waveguide in the RMU208, RMU206, and RMU108 loudspeakers can be rotated to provide the desired coverage pattern for horizontal or vertical speaker mounting. These speakers are assembled in the factory for horizontal mounting. To rotate the waveguide for vertical mounting, do the following.
- Remove the 12 screws from around the speaker grille and remove the grille from the enclosure.
- Remove the 4 waveguide screws.
- Pull the waveguide forward, rotate it 90° and place it back into the enclosure.
- Secure the waveguide using the screws removed in Step 2.
- Reattach the grille using the screws removed in Step 1.
Figure 8. Removing the waveguide for rotation
RMUXF40/RMUXF100 70V/100V Transformer Kit Accessory
The 70V/100V transformer kit is available in 40-watt and 100-watt versions. Both versions fit all RoomMatch Utility models, after removing the standard connector panel.
| Model Description Product Codes | ||
| RMUXF40W 40W 70V/100V Transformer Kit 720562-0010 | ||
| RMUXF100 100W 70V/100V Transformer Kit 720367-0010 |
Removing the standard connector panel
- Remove the four screws on the rear connector panel (Figure 9).
Figure 9. Removing rear connector panel
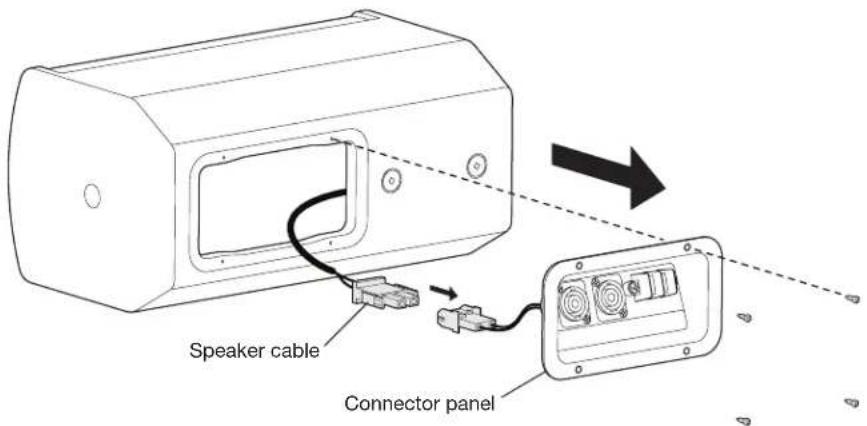
- Gently remove the connector panel from the speaker cabinet.
Note: The connector panel has a gasket that may cause some resistance when attempting to remove the connector panel. It may be necessary to lift one edge away from the speaker cabinet using a small blade screwdriver or another similar tool. - Disconnect the speaker cable from the connector panel.
Installing the transformer kit
- Connect the transformer kit cable to the speaker cable (Figure 10).
Figure 10. Installing transformer kit on speaker cabinet
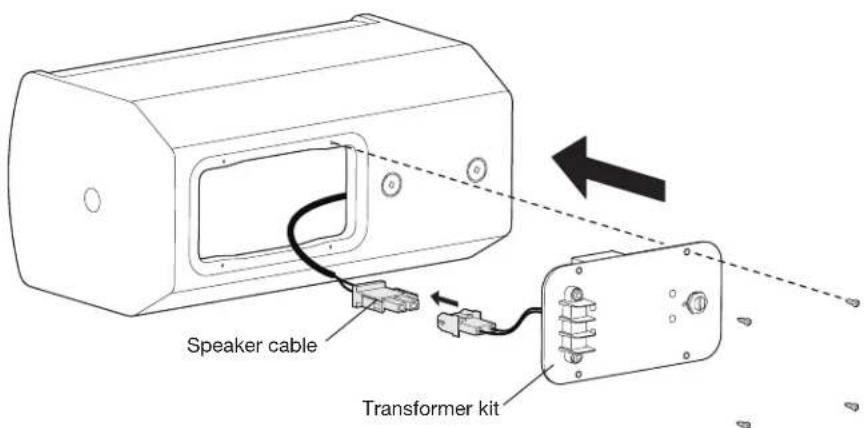
- Place the transformer kit on the speaker cabinet and secure it with four screws.
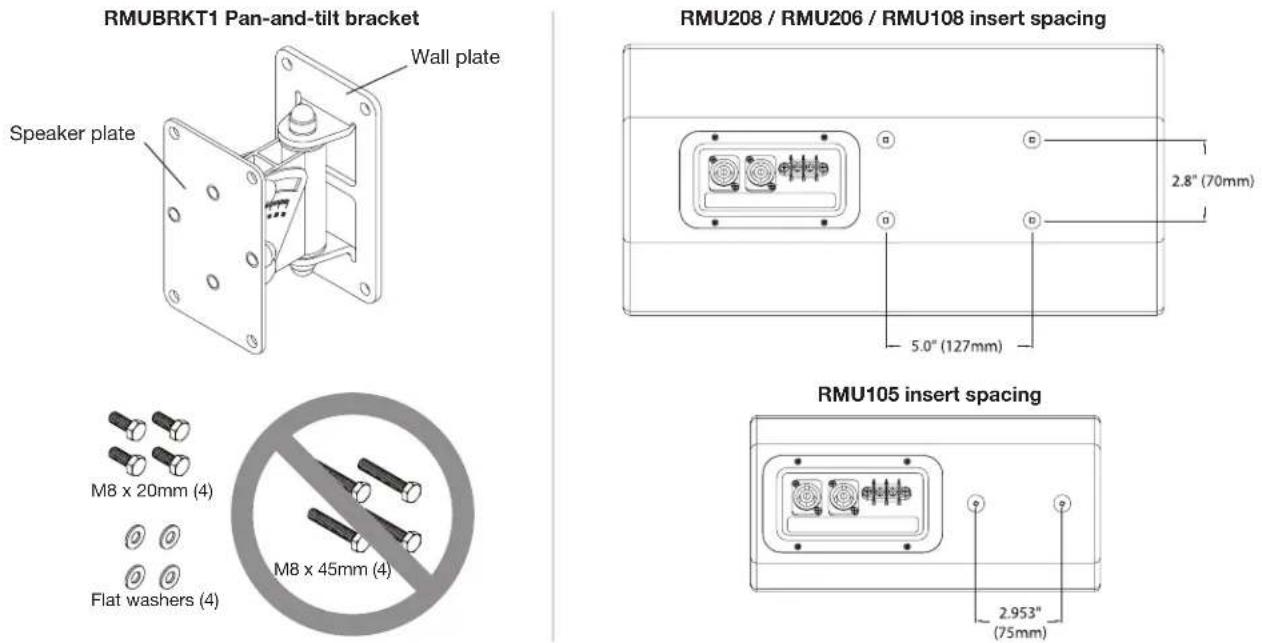
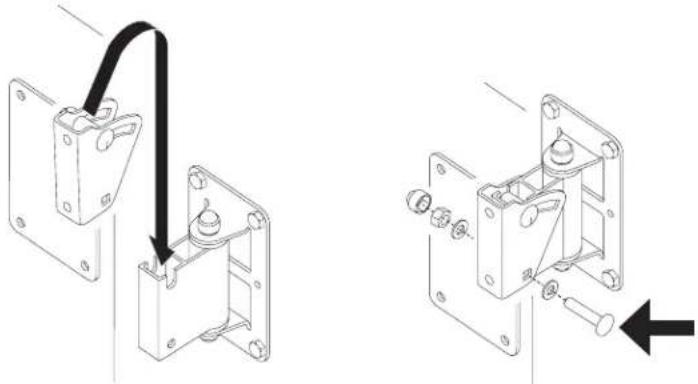
RMUBRKT1 RMU Pan-and-Tilt Bracket Accessory
The RMUBRKT1 pan-and-tilt wall bracket (Figure 11) allows both pitch and yaw adjustment and is available from Bose. The bracket fits the threaded inserts on the rear panel of loudspeakers.
CAUTION: Two lengths of M8 pan head screws are included. Use only the M8 x 20mm screws for attaching the bracket to RMU speakers. The M8 x 45mm screws are for use with non-RMU loudspeakers.
Figure 11. Pan and tilt bracket and speaker insert spacing
To mount the RMU loudspeakers using the bracket:
- Remove the lower carraige bolt and separate the front and rear halves of the bracket.
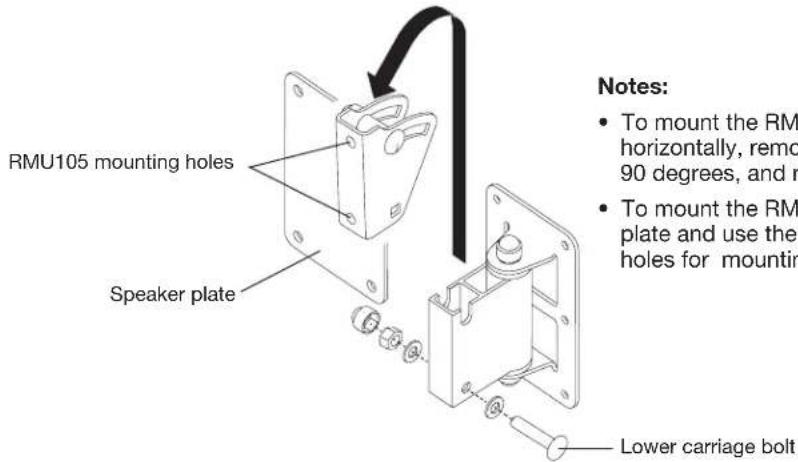
- Attach the bracket to the wall. Follow the instructions provided with the wall bracket.
natural_image
Technical line drawing of a mechanical switch or lever assembly (no text or symbols)CAUTION: Choose a position and mounting method consistent with local building codes and regulations. Ensure the mounting surface and the method of attaching the loudspeaker to the surface is structurally capable of supporting the weight of the loudspeaker. A 10:1 safety weight ratio is recommended.
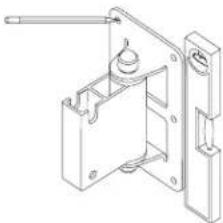
- Using the included T3 square drive, remove the plastic inserts on the rear panel of the loudspeaker and attach the bracket to speaker using only the included M8 x 20mm screws.
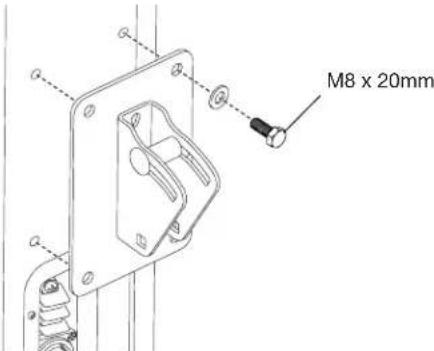
- Hang the speaker on the wall-mounted half of the bracket and install the lower carriage bolt removed earlier.
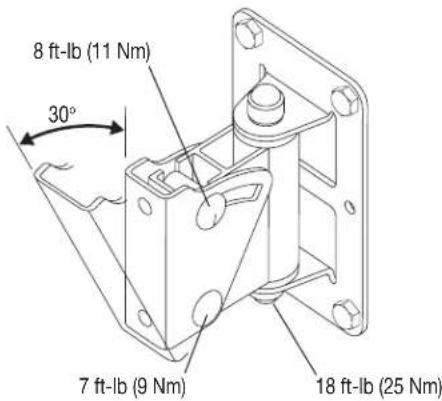
natural_image
Technical line drawing of a mechanical switch assembly with two views (no text or symbols)- Adjust the pitch and yaw using the specified tightening torque.
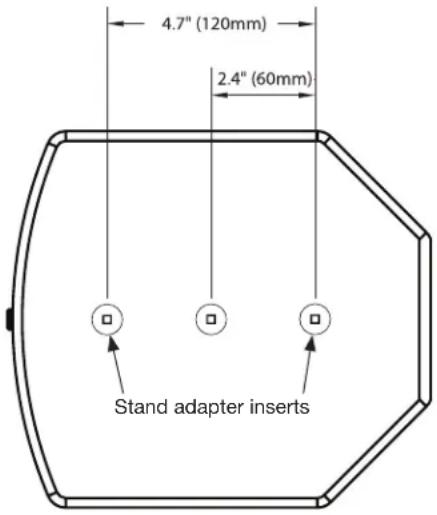
Mounting the RMU108 Loudspeaker on a Speaker Stand
The RMU108 is the only RMU loudspeaker that has two M8 threaded inserts on one end for mounting an industry-standard stand-mount adapter. This allows you to vertically mount the RMU108 on a speaker stand, such as the Bose SS10 model. Other stands have not been tested and may create a tipping hazard.
- Using the T3 square drive (included), remove the two plastic inserts on the end panel of the RMU108 loudspeaker.
Note: You may need to remove the center insert to allow the adapter to fit properly.
-
Attach the bracket to the loudspeaker using M8 screws.
-
Mount the loudspeaker on the stand and tighten the bracket.
Figure 12. RMU108 speaker stand adapter threaded inserts
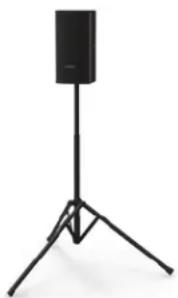
natural_image
Simple black-and-white photo of a stand-mounted device with a vertical screen and tripod base (no text or symbols visible)Recommended Amplifier
Selecting the proper amplifier size for a given loudspeaker requires analysis of the transducer long-term (or RMS) power rating, dynamic range of the input-source material (crest factor), desired sound pressure levels, and other factors. As a general guideline, the following table provides recommended power amplifier ranges for each RoomMatch® Utility model:
| RoomMatch Utility Model Nominal Impedance Required Channels Amp Power Rating | ||
| RMU208 8 ohms 1 300 – 1200 W | ||
| RMU206 8 ohms 1 250 – 1000 W | ||
| RMU108 8 ohms 1 200 – 800 W | ||
| RMU105 8 ohms 1 100 – 400 W | ||

CAUTION: Failure to follow these guidelines may result in damage to the loudspeaker.
The Bose ^® PowerMatch ^® configurable power amplifiers offer optimal amplification and DSP for RoomMatch Utility loudspeakers. Please refer to the specifications listed on the pro.bose.com website for PowerMatch amplifiers and compare with the table above to determine which PowerMatch model is best for your particular RoomMatch Utility system design.
Recommended Signal Processing
Digital signal processing (DSP) equipment is required for infrasonic protection and amplifier power limiting functions. This processing is available in optional products from Bose such as the PowerMatch ^® amplifiers and/or ControlSpace ^® DSP hardware.
The following table lists the recommended infrasonic bandpass protection and amplifier limiter settings for each RoomMatch® Utility loudspeaker when used without optional subwoofers:
| Bandpass Limiter | ||||||||||
| High Pass Low Pass V Peak V RMS | ||||||||||
| Speaker Type Freq. Type Freq. Threshold Attack Release Threshold Attack Release | ||||||||||
| RMU208 | BW24 | 70 | BW24 | 20000 | 98.0 | 1.5 | 100.00 | 49.0 | 1000.00 | 2000.00 |
| RMU206 | BW24 | 80 | BW24 | 20000 | 89.0 | 1.5 | 100.00 | 44.5 | 1000.00 | 2000.00 |
| RMU108 | BW24 | 80 | BW24 | 20000 | 80.0 | 1.5 | 100.00 | 40.0 | 1000.00 | 2000.00 |
| RMU105 | BW24 | 90 | BW24 | 20000 | 56.5 | 1.5 | 100.00 | 28.0 | 1000.00 | 2000.00 |
Technical Specifications
| RMU208 | RMU206 | RMU108 | RMU105 | |
| System Performance | ||||
| Frequency Response (±3 dB)1 | 80 – 16 kHz | 90 – 16 kHz | 90 – 16 kHz | 100 – 16 kHz |
| Frequency Range (-10 dB) | 70 – 16 kHz | 80 – 16 kHz | 80 – 16 kHz | 90 – 16 kHz |
| Coverage Pattern, Horizontal | 90° (rotatable) | 120° (rotatable) | 90° (rotatable) | 100° (rotatable) |
| Coverage Pattern, Vertical | 60° (rotatable) | 60° (rotatable) | 60° (rotatable) | 100° (rotatable) |
| Long-Term Power Handling, Bose2 | 300 W | 250 W | 200 W | 100 W |
| Long-Term Power Handling, AES3 | 400 W | 300 W | 250 W | 150 W |
| Calculated Maximum SPL@1 m, peak4 | 128 dB | 123 dB | 123 dB | 118 dB |
| Transducers | ||||
| Low Frequency | 2 x Bose 8-inch woofer | 2 x Bose 6.5-inch woofer | 1 x Bose 8-inch woofer | 1 x Bose 5.25-inch woofer |
| High Frequency | 1 x Bose EMB2 compression driver | |||
| Nominal Impedance | 8 ohms (70V / 100V optional) | |||
| Physical | ||||
| Dimensions (H x W x D), inches | 9.3" x 27.0" x 10.5" | 7.0" x 19.0" x 9.0" | 9.3" x 18.5" x 10.5" | 6.0" x 12.0" x 7.5" |
| Dimensions (H x W x D), mm | 236 x 686 x 267 mm | 178 x 483 x 229 mm | 236 x 470 x 267 mm | 152 x 305 x 191 mm |
| Net Weight | 37 lb (16.8 kg) | 25 lb (11.3 kg) | 21 lb (9.5 kg) | 12 lb (5.4 kg) |
| Net Weight with U-Bracket | 43 lb (19.5 kg) | 29 lb (13.2 kg) | 26 lb (11.8 kg) | 15 lb (6.8 kg) |
| Finish Color | black or white | |||
| Environmental Rating | Indoor | |||
Notes:
- Frequency response and range measured on-axis, in an anechoic environment.
- Long-Term Power Handling, Bose Extended-Lifecycle Test.
- Long-Term Power handling, AES Transducer Test.
- Maximum SPL calculated from acoustic half-space sensitivity and AES power handling specifications, exclusive of power compression.
Visit us on the web at pro.Bose.com.
Americas
(USA, Canada, Mexico, Central America, South America)
Bose Corporation
The Mountain
Framingham, MA 01701 USA
Corporate Center: 508-879-7330
Americas Professional Systems,
Technical Support: 800-994-2673
Australia
Bose Pty Limited
Unit 3/2 Holker Street
Newington NSW Australia
61 2 8737 9999
Belgium
Bose N.V. / S.A
Limesweg 2, 03700
Tongeren, Belgium
012-390800
China
Bose Electronics (Shanghai) Co Ltd
36F, West Gate Tower
1038 West Nanjing Road
Shanghai, P.R.C. 200041 China
86 21 6271 3800
France
Bose S.A.S
12 rue de Temara
78100 St. Germain en Laye, France
01-30-61-63-63
Germany
Bose GmbH
Max-Planck Strasse 36D 61381
1 Matheson Street, Causeway Bay, Hong Kong
852 2123 9000
India
Bose Corporation India Private Limited
Salcon Aurum, 3rd Floor
Plot No. 4, Jasola District Centre
New Delhi - 110025, India
91 11 43080200
Italy
Bose SpA
Centro Leoni A – Via G. Spadolini
5 20122 Milano, Italy
39-02-36704500
Japan
Bose Kabushiki Kaisha
Sumitomo Fudosan Shibuya Garden Tower 5F
16-17, Nanpeidai-cho
Shibuya-Ku, Tokyo, 150-0036, Japan
TEL 81-3-5489-0955
www.bose.co.jp
The Netherlands
Bose BV
1 Ambley Green, Gillingham Business Park
KENT ME8 0NJ
Gillingham, England
0870-741-4500
See website for other countries
BOSE® Better sound through research®