
ProScreen PXG30 - Video projector PHILIPS - Free user manual and instructions
Find the device manual for free ProScreen PXG30 PHILIPS in PDF.


User questions about ProScreen PXG30 PHILIPS
0 question about this device. Answer the ones you know or ask your own.
Ask a new question about this device
Download the instructions for your Video projector in PDF format for free! Find your manual ProScreen PXG30 - PHILIPS and take your electronic device back in hand. On this page are published all the documents necessary for the use of your device. ProScreen PXG30 by PHILIPS.
USER MANUAL ProScreen PXG30 PHILIPS
natural_image
Line drawing of a projector with lens and control panel (no text or symbols)1. Important Safeguards
IMPORTANT NOTE FOR USERS IN THE U.S.A.
The responsible party of this multi media projector is the following:
Philips Consumer Electronics Company One Philips Drive
Knoxville, TN 37914
Telephone (1888) 873-4672
WARNING:
TO REDUCE THE RISK OF FIRE OR ELECTRIC SHOCK, DO NOT EXPOSE THIS PRODUCT TO RAIN OR MOISTURE.
CAUTION
RISK OF ELECTRIC SHOCK. DO NOT REMOVE SCREWS EXCEPT SPECIFIED USER SERVICE SCREW.

CAUTION: TO REDUCE THE RISK OF ELECTRIC SHOCK, DO NOT REMOVE COVER.
NO USER-SERVICEABLE PARTS EXCEPT LAMP UNIT. REFER SERVICING TO QUALIFIED SERVICE PERSONNEL.

This "bolt of lightning" indicates uninsulated material within your unit that may cause an electric shock. For the safety of everyone in your household, please do not remove product covering.

The "exclamation point" calls attention to features for which you should read the enclosed literature closely to prevent operating and maintenance problems.
CAUTION
This projector produces intense light from the projection lens. Do not stare directly into the lens as it could possibly damage your eyes. Be especially careful that children do not stare directly into the beam.
THINGS YOU SHOULD KNOW
Note:
This equipment has been tested to comply with the limits for a class B digital device in accordance with Part 15 of the FCC Rules as well as the European CE marking.
Operation is subject to the following two conditions:
- This device may not cause harmful interference, and
2..This device must accept any interference received, including interference that may cause undesired operation.
These limits are designed to provide reasonable protection against harmful interference when the equipment is operated in a commercial environment.
This equipment generates, uses, and can radiate radio frequency energy and, if not installed and used in accordance with the user's guide, may cause harmful interference to radio communications.
Operation of this equipment in a residential area is likely to cause harmful interference in which case the user will be required to correct the interference at his own expense.
If this equipment does cause harmful interference to radio or television reception, which can be determined by turning the equipment off and on, the user is encouraged to try to correct the interference by one or more of the following measures:
- Reorientate or relocate the receiving antenna.
- Increase the distance between the equipment and receiver.
- Connect the equipment into an outlet on a circuit different from that to which the receiver is connected.
- Consult the dealer or an experienced radio/TV technician for help.
FCC WARNING:
To assure continued compliance, use only the provided grounded power supply cord and shielded interface cables when connecting this device to a computer. Also, any unauthorized changes or modifications to this equipment could avoid the user's authority to operate this device.

US LISTED
This symbol on the nameplate means the product is Listed by Underwriters Laboratories Inc. It is designed and manufactured to meet rigid U.L. safety standards against risk of fire, casualty and electrical hazards.

The CE Mark is a Directive conformity mark of the European Community (EC).
TRADEMARKS
- Apple and Macintosh are trademarks or registered trademarks of Apple Computer, Inc.
- IBM, VGA, XGA, and PS/2 are trademarks or registered trademarks of International Business Machines, Inc.
- Windows is a registered trademark of Microsoft Corporation.
- Each name of corporations or products in the user guide is a trademark or a registered trademark of its respective corporation.
1. Important Safeguards
CAUTION: Please read all of these instructions before you operate your projector. Save these instructions for future reference.
Electric energy can perform many useful functions.
This projector has been engineered and manufactured to meet applicable safety standards. IMPROPER USE CAN RESULT IN POTENTIAL ELECTRICAL SHOCK OR FIRE HAZARDS. In order not to defeat the safeguards incorporated into this projector, observe the following basic rules for its installation, use and servicing.
- Unplug the projector from the wall outlet before cleaning or lamp replacement.
- Do not use liquid cleaners or aerosol cleaners. Use a soft dry cloth to clean the projector unit. If the unit is very dirty, wet a cloth with neutral detergent, squeeze it tight, wipe the unit with it, and finish by wiping with a dry cloth. Do not use a chemical duster or polisher-cleaner because it can adversely affect the unit and peel the paint.
- Do not use attachments not recommended by PHILIPS, as they may cause hazards.
- Do not use the projector near water- for example, near a bathtub, washbowl, kitchen sink, or laundry tub, in a wet basement, near a swimming pool, etc. Never spill liquid into the projector.
- Do not place the projector on an unstable cart, stand, or table. The projector may fall, which may cause serious injury to a child or an adult and/or serious damage to the unit. Use only with a cart or stand recommended by its manufacturer as being suitable for use with a projector.
- Ceiling, wall or shelf mounting should be done with a mounting kit approved by the manufacturer for use with a projector and should follow the manufacturer's instructions.
- Projector equipment and cart combinations should be moved with care. Quick stops, excessive force, and uneven surfaces may cause the equipment and cart combination to overturn.
- Slots and openings of the cabinet are provided for ventilation. To ensure reliable operation of the projector and to protect it from overheating, these openings must not be blocked or covered. These openings should never be covered with cloth or other material. The bottom opening should not be blocked by placing the projector on a bed, sofa, rug, or other similar surface. The projector should not be placed near or over a radiator or heating vent. The projector should not be placed in a built-in installation such as a bookcase unless proper ventilation is provided.
- The projector should be operated only from the type of power source indicated on the bottom of the projector or in the specifications and with the appropriate power cord. If you are not sure of the type of power supplied to your business or the right type of power cord, consult your projector dealer or local power company.
- Do not allow anything to rest on the power cord. Do not place the projector where the cord will be walked on.
- Follow all warnings and instructions marked on the projector.
-
As a safety feature, this projector is equipped with the power cord with a 3-pin grounded plug (for USA-versions only) or a 2-pin grounded plug (for European versions only). The 3-pin/2-pin grounded plug will fit only into a grounding type power outlet. If the plug does not fit, use an adapter that is properly grounded or have an electrician install a grounded type outlet. Do not attempt to modify this AC plug.
-
For added protection of the projector during a lightning storm, or when it is left unattended or not in use for long periods of time, unplug it from the wall outlet and disconnect any cable systems. This will prevent damage to the projector due to lightning and power-line surges.
- Do not overload wall outlets and extension cords with too many products, because this can cause a fire or electric shock.
- Never push objects of any kind into the projector through cabinet slots as they may touch dangerous voltage points or short cut parts, which could result in a fire or electric shock.
-
Do not attempt to service the projector yourself other than maintenance issues presented in section "Maintenance". Opening or removing covers may expose you to dangerous voltage or other hazards. Refer all servicing to qualified service personnel.
-
Unplug the projector from the wall outlet and refer servicing to qualified service personnel under the following conditions:
A. When the power cord or plug is damaged or frayed.
B. If liquid has been spilled into the projector.
C. If the projector has been exposed to rain or water.
D. If the projector does not operate normally when you follow the operating instructions. Adjust only those controls that are covered by the operating instructions; improper adjustment of other controls may cause damage and will often require extensive work by a qualified technician to restore the projector to normal operation.
E. If the projector has been dropped or the cabinet has been damaged.
F. When the projector exhibits a distinct change in performance – (this indicates a need for service).
-
Upon completion of any service or repairs to the projector, ask the service technician to perform a routine safety check to check that the projector is in safe operating condition.
-
When replacement parts are required, be sure the service technician has used replacement parts specified by the manufacturer that have the same characteristics as the original parts. Unauthorized substitutions may result in fire, electric shock, or other hazards.
-
It is recommended to clean the air filter after every 100 lamp hours. The projector may become too hot if the filter is not cleaned when required.
-
If the lens becomes dirty or smudged, clean it with a clean, dampened cloth. Never touch the lens with your fingers.
-
Do not look directly into the aperture and lens while operating the projector as this may damage your eyes.
1. Important Safeguards
NOTES ON OPERATION
- The exhaust vent, the lamp cage cover and adjacent areas may be extremely hot during projector operation. To prevent injury, do not touch these areas until they have sufficiently cooled.
- Do not put any flammable object or spray can near the projector. Hot air is exhausted from the ventilation holes.
Note:
The cooling fan regulates the internal temperature, and its performance is automatically controlled. The sound of the fan may change during projector operation due to changes in the fan speed.
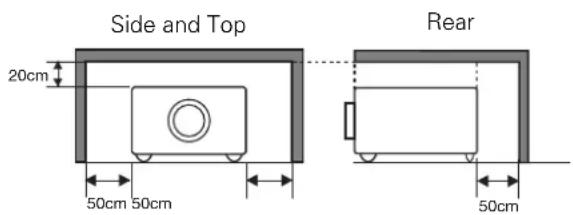
- Provide appropriate space on the top, sides and rear of the projector cabinet for allowing air circulation and cooling the projector. Minimum clearance must maintained. If the projector is to be built into a compartment or similarly enclosed, the minimum distances must be maintained. Do not cover the ventilation slot on the projector. Heat build-up can reduce the service life of your projector, and can also be dangerous.
text_image
Side and Top 20cm 50cm 50cm Rear 50cmCAUTION CONCERNING THE SETUP OF THE PROJECTOR
For minimal servicing and to maintain high image quality, Philips recommends that this projector be installed in an area free from humidity, dust and cigarettesmoke. If the projector is used in these environments, the lens and filters will need to be cleaned (or the filter replaced) more often, and internal cleaning may become necessary. As long as the projector is regularly cleaned, use in these environments will not reduce the overall operation life of the unit. Internal cleaning should only be performed by a Philips Authorised LCD Projector Dealer or Service Centre.
INSTALLING THE PROJECTOR IN THE PROPER POSITION.
Install the projector properly. Improper Installation may reduce the lamp lifetime and cause a fire hazard.
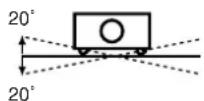
Do not tilt the projector more than 20 degrees to either side.

Do not point the projector up to project an image.

Do not point the projector down to project an image.
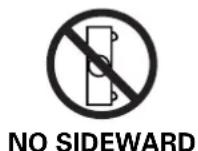
Do not put the projector on either side to project an image.
2.Table of Contents
-
Important Safeguards .... 2
-
Table of Contents .... 5
-
Projector Features.....6
-
Functional Overview.....7
-
Set Up 12-14
Connecting AC Power cord....12
Positioning the Projector....13
Adjustable Feet 14
Moving the Projector 14
- Installation 15-16
Connecting to a Computer ..... 15
Connecting to Video Equipment ..... 16
- Operation 17-22
Remote Control Operation ..... 17
Operating the On-Screen menu ..... 18
Turning On/Off the Projector ..... 20
Adjusting the Screen 21-22
Zoom Adjustment 21
Focus Adjustment....21
Lens Shift Adjustment ..... 21
Keystone Adjustment 21
Picture Freeze....22
AV Mute 22
SmartTimer 22
Sound Adjustment 22
Direct Operation 22
Menu Operation 22
- Computer Input ..... 23-30
Selecting Input Source 23
Direct Operation 23
Menu Operation 23
Selecting Computer System 24
PC Adjustment 25
Auto Image Adjustment 25
Manual PC Adjustment....26
Picture Image Adjustment ..... 28-29
Image Level Select (Direct)....28
Image Level Select (Menu).....28
Image Level Adjustment....29
Picture Screen Adjustment 30
- Video Input. 31-35
Selecting Input Source 31
Direct Operation 31
Menu Operation 31
Selecting the Video System .... 32
Video, S-Video, Input 32
Y/Pb/Cb, Y/Pr/Cr Input. 32
Picture Image Adjustment 32-35
Image Level Select (Direct)....33
Image Level Select (Menu)....33
Image Level Adjustment....34
Picture Screen Adjustment 35
-
Other Settings ..... 36-37
-
Operating Wireless Mouse .... 38
-
Maintenance....39-42
Temperature Warning Indicator 39
Air Filter Care and Cleaning. 40
Cleaning Projection Lens 40
Lamp Replacement....41
- Appendix ..... 43-50
Troubleshooting 43
Indicators and Projector Condition ..... 45
Menu Tree 46
Compatible Computer Specification ..... 49
Technical Specifications 50
3. Projector Features
1. Large audience suitable
Best in class brightness and contrast suite applications in boardrooms, lecture halls or auditoriums.
2. Motorised lens shift, zoom and focus systems
Motorised lens shift function moves an image up and down to an optimum position without distortion of the image and motorised zoom and focus complete a professional way of installation.
3. Advanced compatibility and extended connectivity
Compatible with up to SXGA (1280 x 1024 dots, 80kHz horizontal frequency), 6 color systems (NTSC, PAL, SECAM, NTSC 4.43, PAL-M, PAL-N), S-Video and component video signals (480i, 480p, 575i, 575p, 720p, 1035i, 1080i) through extended connectivity as :
3 x Audio in ( 3 x 3.5mm jack )
Composite video in ( RCA )
S-Video in (Y/C DIN)
Component (Y, Pb/Cb, Pr/Cr) in (3 x RCA)
Audio R and L in (2 x RCA)
4. Universal remote control, ProntoNEO
Supplied with a universal learning touch screen remote control with preprogrammed user interface and direct-access buttons to conveniently control the projector and wireless mouse by USB connection between the Projector and PC.
5. Superb video quality
Equipped with 3D Y/C separation, 3D noise reduction, 3D digital color uniformity correction and motion adaptive progressive scan conversion and cinema 2-3 pull down to secure superb video quality with 800TV lines.
6. Digital picture enhancement technologies
Featuring digital zoom (1/4 - 49 times), digital freeze and 2D digital keystone correction (correction range, vertically + / - 30° for Y axis, horizontally + / - 10° for axis).
7. Smart settings
Supported by SmartTimer (timer to count up punctual finish of presentation), SmartSet (auto image for trouble-free operation and optimal image quality) and SmartSave (power management to be green friendly).
8. High reliability
Philips UHP lamp guarantees long life, sustained brightness over the lamp's lifetime and excellent color reproduction.
9. Optional accessories
Ceiling mount units for high and low ceiling, hard case, Tele and Wide lenses are prepared to support various applications.
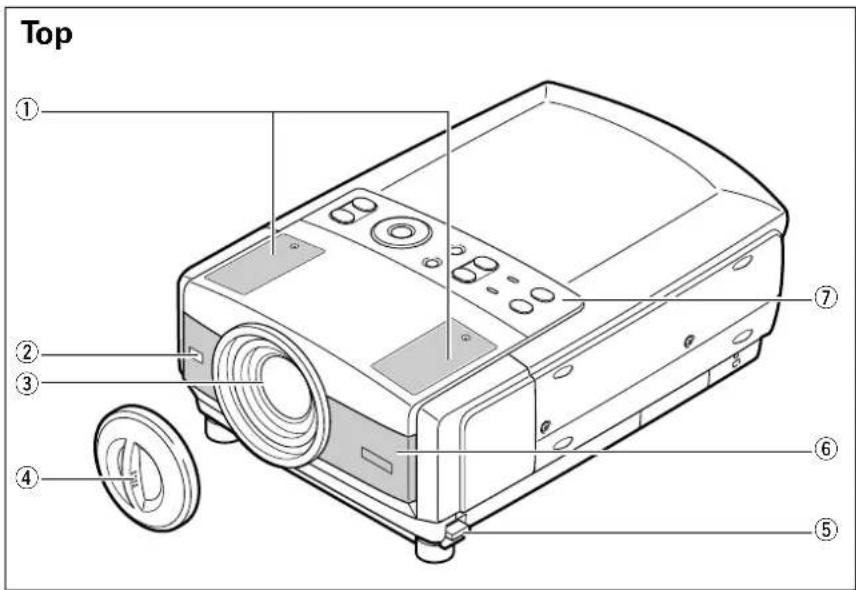
text_image
Top ① ② ③ ④ ⑤ ⑥ ⑦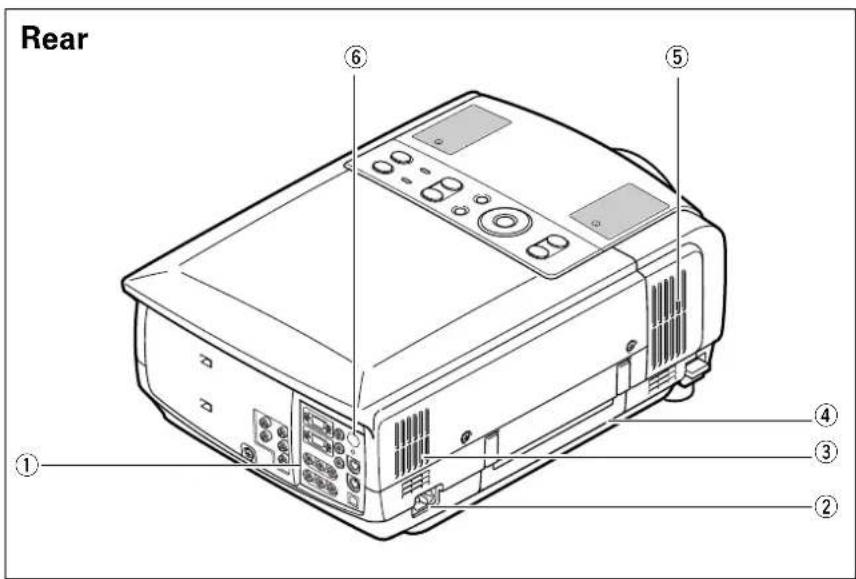
text_image
Rear ① ② ③ ④ ⑤ ⑥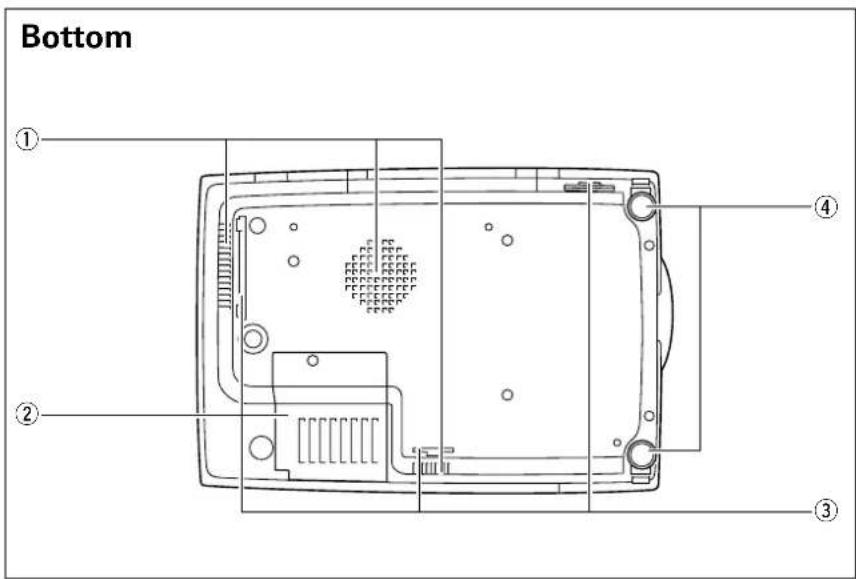
text_image
Bottom ① ② ③ ④① Speakers
② IR sensor
For receiving signals from the remote control.
③ Projection lends
④ Lens cap
⑤ Feet lock latches
⑥ Air intake vent
Intake of air for ventilation.
⑦ Top control
See the next page.
① Terminals
See page 9.
② AC socket
For connecting the projector to AC power cord.
③ Air exhaust vent
Exhaust of air for ventilation.
④ Carry handle
⑤ Air intake vent
Intake of air for ventilation.
⑥ IR sensor
For receiving signals from the remote control.
① Air intake vent
Intake of air for ventilation.
② Lamp cover
③ Air filters
④ Adjustable feet
For adjusting the picture tilt and projection angle.
Top Control
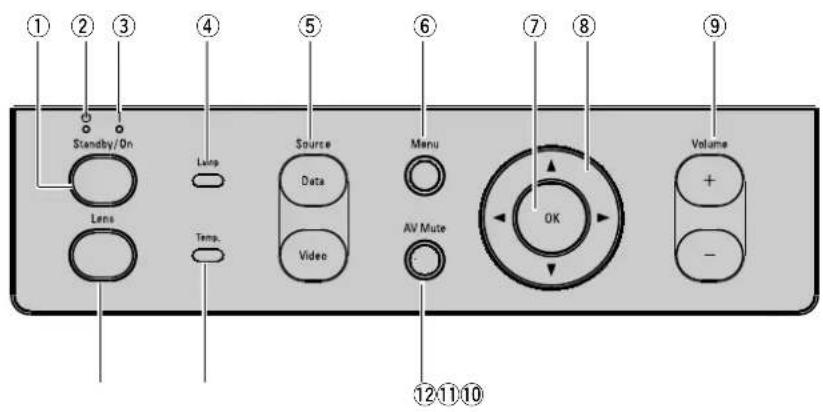
text_image
① ② ③ ④ ⑤ ⑥ ⑦ ⑧ ⑨ Standby/On Lamp Source Menu Lens Data AV Mute OK Volume Temp. 12/11/10① Standby / On
For turning on and off the projector.(P20,39,45)
② Power Indicator
Becomes dim red when the projector is turned on. Lights bright red in standby mode.(P20,45)
③ Standby Indicator
Lights green when the projector is ready to be turned on. (P20)
④ Lamp Indicator (Lamp)
Lights yellow when the life of the projection lamp draws to an end.(P41,42,45)
⑤ Source
For selecting the current input source.
- Data For selecting computer signal as a current input source. The button toggles among Data1, Data 2 and Data3.(P23)
- Video For selecting video signal as a current input source. The button toggles among Auto, Video, S-Video and Y,Pb/Cb, Pr/Cr.(P31)
⑥ Menu
For activating or de-activating the On-Screen Menu of the projector. (P18)
⑦ OK button
For executing the selected item.(P18)
⑧ Cursor Control
For selecting an item or adjust the value in the On-Screen Menu. (P18)
⑨ Volume + / -
For adjusting the volume.(P22)
⑩ Lens
For activating lens adjustment functions : zoom, focus and lens shift. The button toggles among the three functions. (P21)
⑪Temperature Warning Indicator (Temp.)
Flashes red when the internal temperature of the projector is too high. (P20,39,45)
⑫ AV Mute
For muting the sound and picture of the projector.(P22)
Terminals
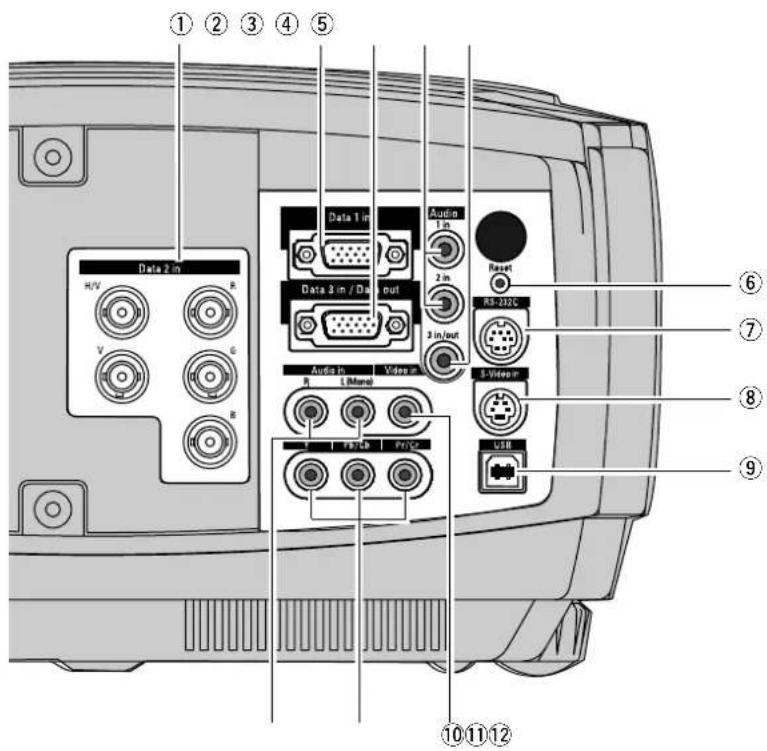
text_image
① ② ③ ④ ⑤ Data 2 in H/V V R G B Data 1 in Data 3 in / Data out Audio 1 in 2 in 3 in/out Audio in L (Mund) Video in RS-232C L-Video R USB ⑥ ⑦ ⑧ ⑨ ⑩ ⑪ ⑫① Data 2 in
Input socket for connecting computer output [ 5 BNC Type ( Red, Green, Blue, Horiz.sync., Vert.sync.)].
② Data 1 in
Input socket for connecting computer output (Analog HDB 15-pin type) or 21-pin Scart (RGB) output from video equipment.
③ Data 3 in / Data out (Switchable)
- Input socket for connecting computer output (Analog HDB 15-pin)
- Output socket for connecting to a Data monitor.
④ Audio 1 in / Audio 2 in
Input sockets for connecting audio output (stereo) from a computer.
⑤ Audio 3 in / out (Switchable)
- Input socket for connecting audio output (stereo) from a computer.
- Output socket for connecting an external audio amplifier.
⑥ Reset button
A microprocessor included in the projector may occasionally malfunction and need to be reset. If necessary, press this button with a sharp tool to restart the unit. Do not use it excessively.
⑦ RS-232C port
For connecting to mouse port of a computer which is controlled via the remote control of the projector.
⑧ S-video in
Input socket for connecting S-video output from video equipment.
⑨ USB
For connecting a PC or Apple Macintosh computer equipped with a USB downlink connection to control the mouse cursor of your computer via the remote control unit.
⑩ Video in
Input socket for connecting the composite video output from video equipment.
⑪ Component video input
Input socket for connecting the component video output from video equipment.
⑫ Audio in R / L
Input sockets for connecting to Audio out sockets of video equipment.
Remote Control Unit
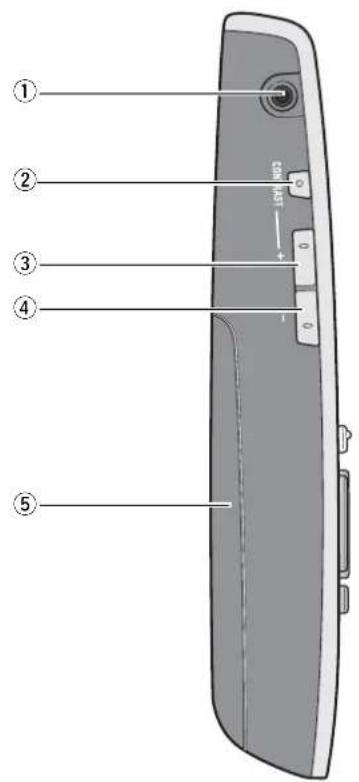
text_image
Diagram of a device rear panel with numbered parts and labeled ports, including 'CAN HOLT' and directional indicators.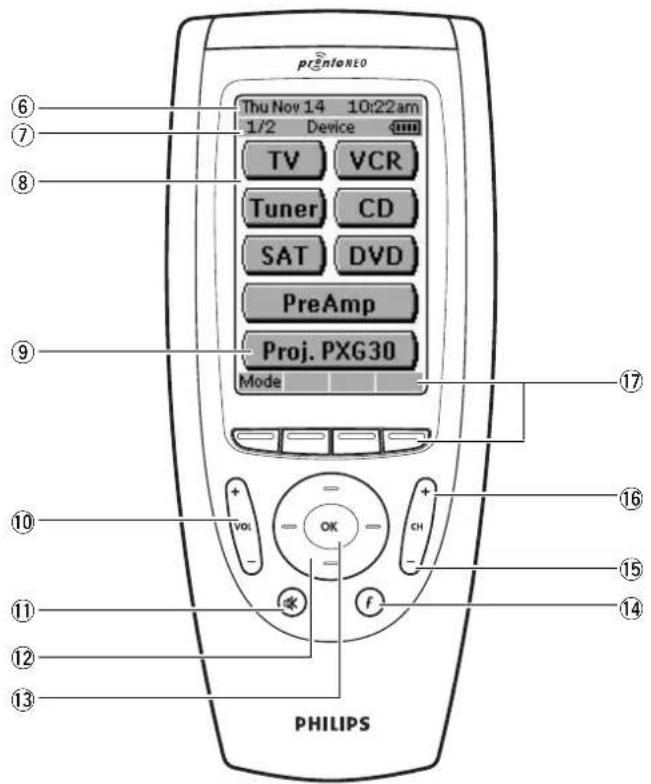
text_image
prenloneo Thu Nov 14 10:22am 1/2 Device TV VCR Tuner CD SAT DVD PreAmp Proj. PXG30 Mode ⑥ ⑦ ⑧ ⑨ ⑩ ⑪ ⑫ ⑬ ⑭ PHILIPS + - VOL OK CH f ⑮ ⑯ ⑰ ⑱ ⑲ ⑳* This figure shows the Device Overview screen.
① Serial Port
For communicating with a PC
② Backlight
For activating the display and adjusting the contrast.
(See ProntoNEO User Guide for details)
③ Page Up
④ Page Down
⑤ Battery Compartment
⑥ Current Date and Time
⑦ Page number, Active device and Battery Level Indicator
⑧ LCD Touch Screen
Soft buttons are provided to operate a device.
⑨ Proj. PXG30
For activating the projector, press this button.
(Jump to Main Menu, see the next page.)
⑩ Volume Up / Down
For adjusting the volume.(P22)
⑪ Mute
For muting the sound of the projector. (P22)
⑫ Cursor Control
For operating and navigate through the activated menu via Up/Down and Left/Right buttons.(P18)
⑬ OK
For executing the action in the menu when the menu is on the screen.(P18)
⑭ Function
For jumping back to 1st(Main) page.
⑮ CH-
For switching video input sources. The button toggles among Auto, Video, S-video and Y,Pb/Cb,Pr/Cr. (P31)
⑯ CH+
For switching data input sources. The button toggles among Data 1, Data 2 and Data3.(P23)
⑰ Labels and 4 hard buttons
See the next page.
Remote Control Unit
Projector Menu
1/4 Main Menu 2/4 Lens Menu 3/4 Feature Menu 4/4 Mouse Menu

* Pressing Page Up / Down buttons also switches these menus.
① on
For turning on the projector. (P20)
② D1
For selecting Data 1 input. (P23)
③ D2
For selecting Data 2 input. (P23)
④ video
For selecting Video input. (P31)
⑤ YPbPr
For selecting Y,Pb/Cb,Pr/Cr input. (P31)
⑥ feature
For jumping to the Feature Menu.
⑦ Mode
For jumping to the Mode Menu. (P17)
⑧ Menu
For activating or de-activating the On-Screen Menu of the projector. (P18)
⑨ AV Mute
For muting the sound and picture of the projector. (P22)
⑩ Device
For jumping to the Device Overview. (P10)
⑪ mouse
For jumping to the Mouse Menu. (P38)
⑫ lens
For jumping to the Lens Menu.
⑬ S-video
For selecting S-video input. (P31)
⑭ D3
For selecting Data 3 input. (P23)
⑮ off
For turing off the projector. (P20)
⑯ focus- / +
For adjusting the lens focus. (P21)
⑰ zoom- / +
For adjusting the zoom. (P21)
⑱ lens shift-/+
For adjusting the lens shift. (P21)
⑲ auto
For operating Auto Image function. (P 25)
⑳ D-freeze
For capturing a moving picture. (P22)
②1 D-keyst
For correcting the keystone distortion. (P21)
②2 reset
Pressing this button resets the keystone adjustment while the keystone dialog box is displayed on the screen. (P21)
②3 D-zoom
For resizing the projected image. (P30)
⑳ timer
For activating SmartTimer function. (P22)
⑲ V-effect
For selecting image level. (P28,33)
⑳ mouse left / right
When using the remote control as a PC mouse in wireless mouse operation, these buttons function as left and right buttons of a PC. (P38)
⑳ Cursor pointers
When using the remote control as a PC mouse in wireless mouse operation, this functions as PC mouse cursor. (P38)
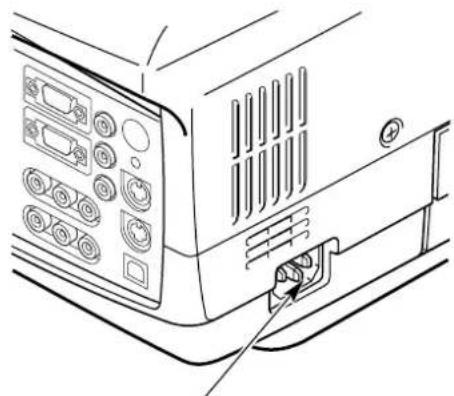
Connecting AC Power cord
This projector uses nominal input voltages of 100-120 V or 200-240 V AC. This projector automatically selects the correct input voltage. It is designed to work with single-phase power systems having a grounded neutral conductor. To reduce risk of electrical shock, do not plug into any other type of power system. Consult your authorized dealer or service station if you are not sure of the type of power supply being in use. Connect the projector with peripheral equipment before turning the projector on. (Refer to pages 15 \~ 16 for connection.)

CAUTION
For safety, unplug AC power cord when the projector is not used. When this projector is connected to the outlet with AC power cord, it is in Stand-by Mode and consumes a little electric power.
natural_image
Line drawing of a computer monitor rear panel with ports and an attached cable (no text or symbols)Connect AC power cord (supplied) to the projector. The AC outlet must be near the projector and easily accessible.
| Note:AC power cord must meet requirement of the country where you use the projector.Confirm the AC plug type with the chart below and proper AC power cord must be used.If supplied AC power cord does not match your AC outlet, contact your sales dealer. | |||
| Projector side | AC Outlet side | ||
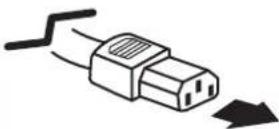 To the power cordConnector on your projector. To the power cordConnector on your projector. | For the U.S.A. and Canada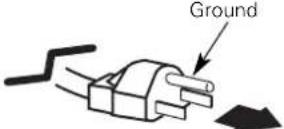 To the AC Outlet.(120 V AC) To the AC Outlet.(120 V AC) | For Continental Europe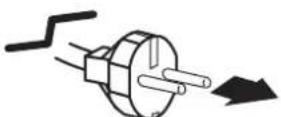 To the AC Outlet.(200 - 240 V AC) To the AC Outlet.(200 - 240 V AC) | For the U.K.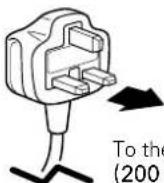 3 AC Outlet.- 240 V AC) 3 AC Outlet.- 240 V AC) |
Positioning the Projector
- This projector is designed to project on a flat projection surface.
- The projector can be focused from 4.1' (1.2m) \~ 32.8' (10.0m).
- Refer to the figure below to adjust the screen size.
Note:
The brightness of a room has a great influence on image quality. It is recommended to limit ambient lighting to provide the best image.
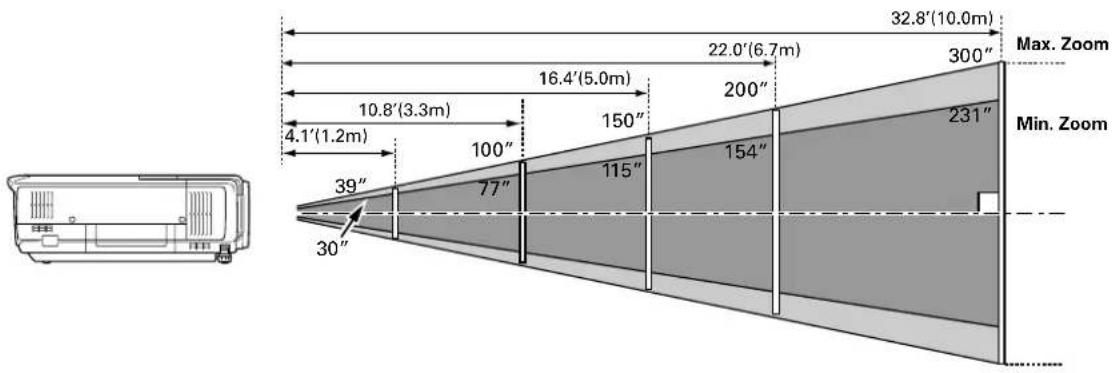
text_image
32.8'(10.0m) 22.0'(6.7m) 300" 16.4'(5.0m) 200" 10.8'(3.3m) 150" 100" 154" 231" 39" 77" 115" 30" 30" (1.2m) 4.1" 39" Min. Zoom| Screen Size | Max. Zoom | 39" | 100" | 150" | 200" | 250" | 300" |
| Min. Zoom | 30" | 77" | 115" | 154" | 192" | 231" | |
| Distance | 4.1' (1.2m) | 10.8' (3.3m) | 16.4' (5.0m) | 22.0' (6.7m) | 27.6' (8.4m) | 32.8' (10.0m) | |
Lens Shift Adjustment
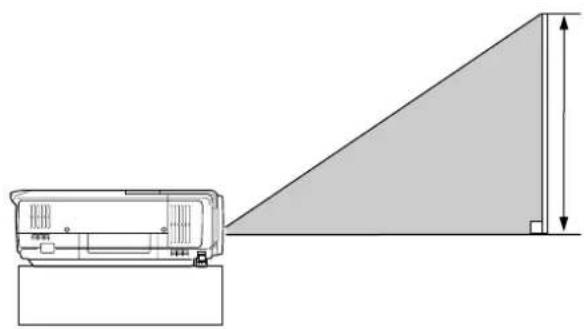
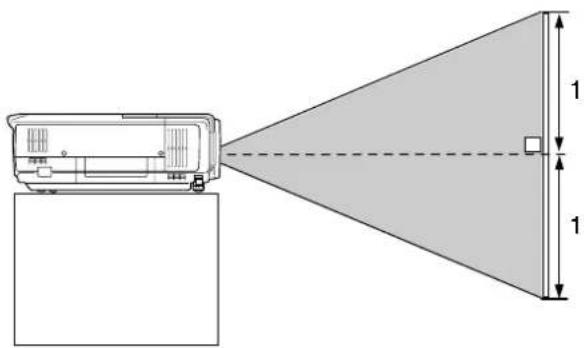
The Projection lens can be moved up and down with motorised lens shift function. This function makes it easy to move up and down the projected image to an optimum position. Refer to page 21 for operation.
natural_image
Technical line drawing of a mechanical component and its angled view with dimension lines (no text or symbols)The upper most lens shift.
text_image
Diagram showing a device emitting a triangular reflector with labeled dimensions and measurement markersThe lower most lens shift.
Adjustable Feet
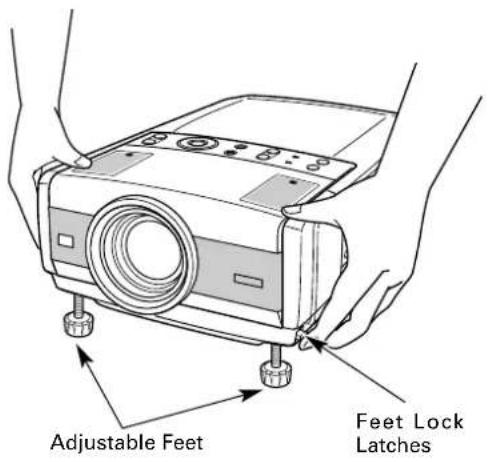
Picture tilt and projection angle can be adjusted by rotating the Adjustable Feet. Projection angle can be adjusted up to approximately 10 degrees.
1 Lift the front of the projector and pull the Feet Lock Latches on both sides of the projector.
2 Release the Feet Lock Latches to lock the Adjustable Feet and rotate the feet to fine-tune position and tilt.
3 To retract the Adjustable Feet, lift the front of the projector and pull and undo the Feet Lock Latches.
Note:
- When you adjust the image vertical level, adjust it with the Lens Shift function ahead of using the adjustable feet.
- When the height of the projector is adjusted, the image may be distorted.(keystoned). This keystone distortion can be adjusted by Menu Operation. (Refer to P21 and 36.)
text_image
Adjustable Feet Feet Lock LatchesMoving the Projector
Use the Carry Handle when moving the projector.
When moving the projector, attach the Lens cap and retract the Adjustable Feet to prevent damage to the lens and cabinet.
When the projector is not in use for an extended period, put it into the case (or cover with the supplied dust cover).

CAUTION
Dust Cover (supplied) is intended to protect from dust and scratches on the surface of a cabinet, not from external forces. Do not transport the projector through a courier or transport services with this cover. The projector can be damaged. When handling the projector, take care not to drop, bump, subject it to strong forces or put other things on the cabinet.

natural_image
Line drawing of a hand using a tool to press or install a microwave oven (no text or symbols present)
CAUTION IN CARRYING OR TRANSPORTING THE PROJECTOR
- Do not drop or bump the projector, otherwise damages or malfunctions may result.
- When carrying the projector, use a suitable carrying case.
- Do not transport the projector by using a courier or transport service in an unsuitable transport case. This may cause damage to the projector. To transport the projector through a courier or transport service, consult a Philips Authorised LCD Projector Dealer.
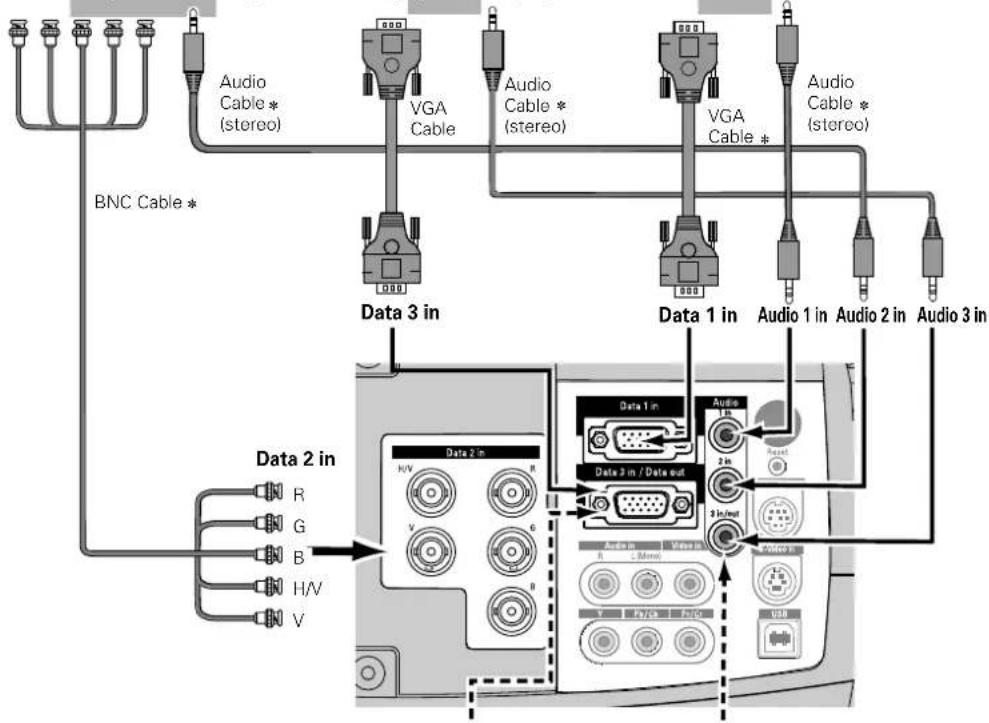
Connecting to a Computer
Cables used for connection
• VGA Cable (HDB 15 pin)
• BNC Cable (BNC x 5) *
• Audio Cables {Mini Plug (stereo)} *
* The listed cables are not supplied with the projector.
IBM-compatible computer or Macintosh computer (VGA / SVGA / XGA / SXGA)
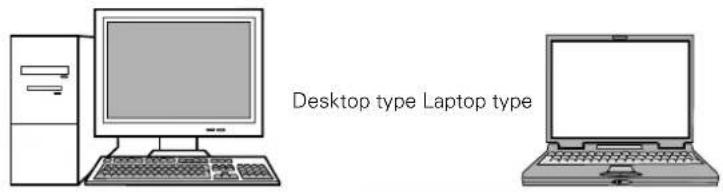
text_image
Desktop type Laptop typeMonitor Output Audio Output McMoortOutputAndAudioOutput
text_image
Audio Cable * (stereo) BNC Cable * VGA Cable Audio Cable * (stereo) VGA Cable * Audio Cable * (stereo) Data 3 in Data 1 in Audio 1 in Audio 2 in Audio 3 in Data 2 in R G B H/V V Data 2 in H/V V Data 1 in Audio 1 in Reset Data 2 in / Data out 3 in/out Audio 1 in PowerNote:
Data 3 in / Data out socket is switchable for Data Input and Monitor Out. Set this socket according to the purpose of use. (See page 23)
◆ MAC ADAPTER
A Macintosh adapter may be required for use with some Macintosh computers. Contact your nearest Philips Authorised LCD projector Dealer or Service Centre.

Note:
When connecting the cable, the power cords of both the projector and the external equipment should be disconnected from AC outlet. Turn the projector and peripheral equipment on before the computer is switched on.
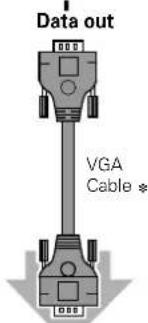
text_image
Data out VGA Cable *Monitor Input

text_image
Audio 3 in/out Audio Cable (stereo) *Audio Input
External Audio Equipment
Audio Amplifier
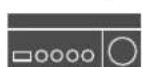
Audio Speaker (stereo)


Connecting to Video Equipment
Cables used for connection
- Video Cable (RCA x 1 or RCA x 3) • Audio Cable {Mini Plug (stereo)} • Audio Cable (RCA x 2)
- S-Video Cable • Scart Cable
Video Source (example)
Video Cassette Recorder Video Disc Player
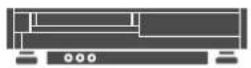
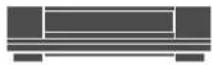
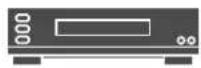
Component video output equipment. (such as DVD player or high-definition TV source.)
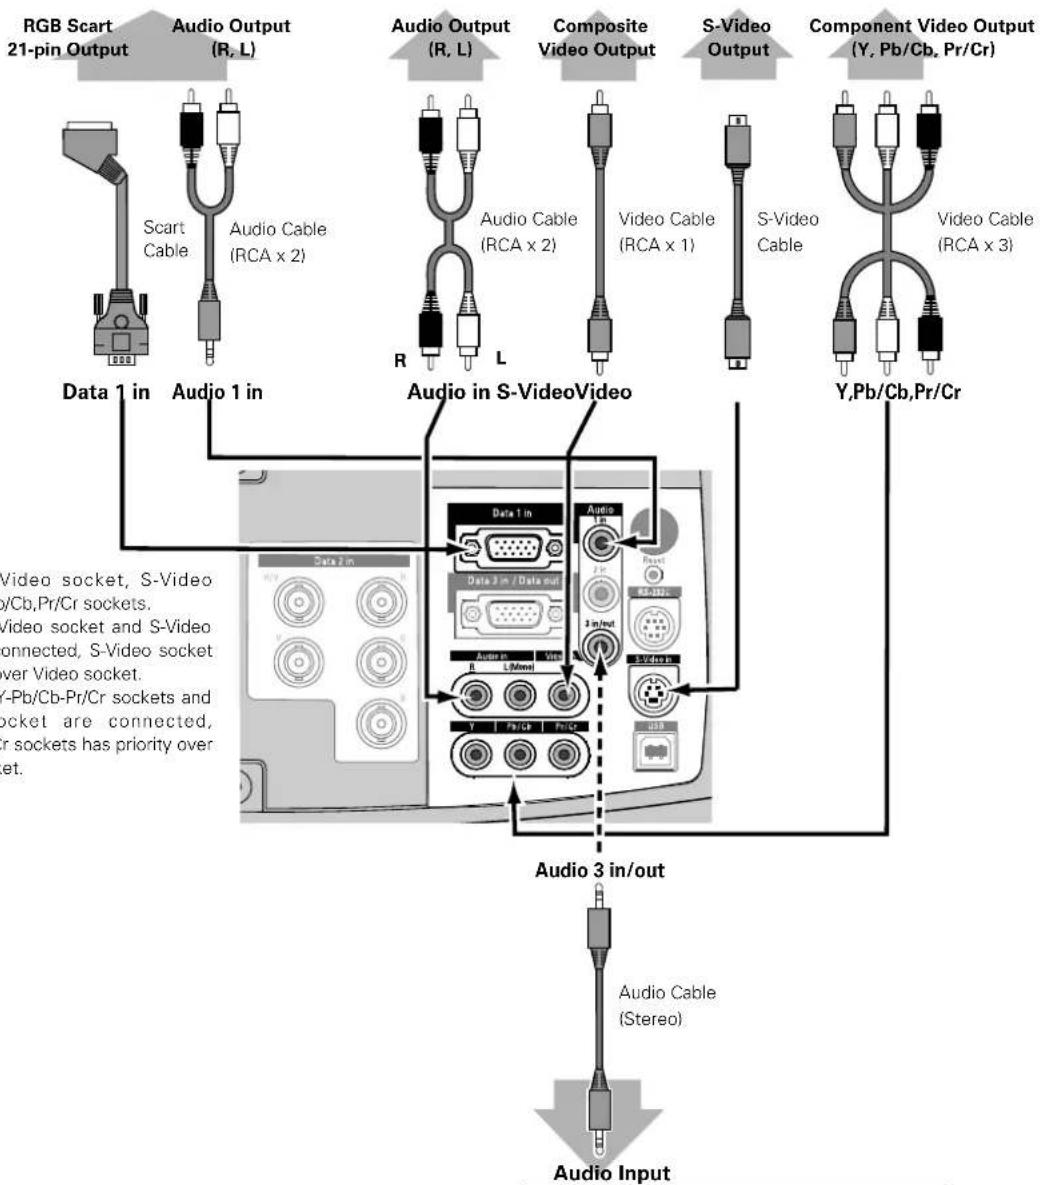
flowchart
graph TD
    A["RGB Scart 21-pin Output"] --> B["Scart Cable"]
    B --> C["Audio Output (R, L)"]
    C --> D["Audio Cable (RCA x 2)"]
    D --> E["Data 1 in"]
    E --> F["Audio 1 in"]
    F --> G["Audio in S-VideoVideo"]
    G --> H["Audio 3 in/out"]
    H --> I["Audio Input"]
    G --> J["Composite Video Output"]
    J --> K["Audio Cable (RCA x 2)"]
    K --> L["Video Cable (RCA x 1)"]
    L --> M["Video Cable"]
    M --> N["S-Video Cable"]
    N --> O["Component Video Output (Y, Pb/Cb, Pr/Cr)"]
    O --> P["Y,Pb/Cb,Pr/Cr"]

Note:
When connecting the cable, the power cords of both the projector and the external equipment should be disconnected from AC outlet.
External Audio Equipment
Audio Amplifier
Audio Speaker (stereo)

Remote Control Operation
Basic operation and preparation of the remote control are provided in the ProntoNEO RU 930 User Guide. Read the manual thoroughly for proper operation. Make sure to install the batteries into the remote control before use.
Operation
- Press the Device Button to show the Device Overview screen.
- Tap Proj. PXG 30 to go into the Projector Menu.
- Main Menu (1st page) will be displayed. Select a menu page by using Page up / down buttons or directly tap the soft buttons (lens, feature and mouse) on the LCD touch screen. Regarding the name and function of each button, refer to page10 and 11.
Changing the Remote Control Codeset
Eight selectable codes are provided for the remote control (code 1 \~ code 8). Code 1 is set by default.
- Press and hold the Mode button for 3 seconds when the Projector Menu is displayed. The Mode screen will appear.
-
Tap Brand on the Mode screen. An instruction screen appears indicating you can set the projector's codeset.
-
Tap Next to define your projector's codeset. The code set screen appears.
-
Enter the Codeset No. from the right table and press OK to complete the setting.
- If the codeset is correct, you will hear a confirmation beep.
- If you enter an incorrect code number, you will hear an error beep and an error message screen will appear. In this case, press OK and look up the correct codeset number. Then repeat this procedure.
* To get back to the Projector Menu, tap Use button on the mode screen.
| code 1 | codeset 9377 |
| code 2 | codeset 9378 |
| code 3 | codeset 9379 |
| code 4 | codeset 9380 |
| code 5 | codeset 9381 |
| code 6 | codeset 9382 |
| code 7 | codeset 9383 |
| code 8 | codeset 9384 |
Note:
Codeset of the remote control must be conformed with that of the projector. Accordingly, if you change the codeset of either of the two, you also need to change that of another. (See page 37)
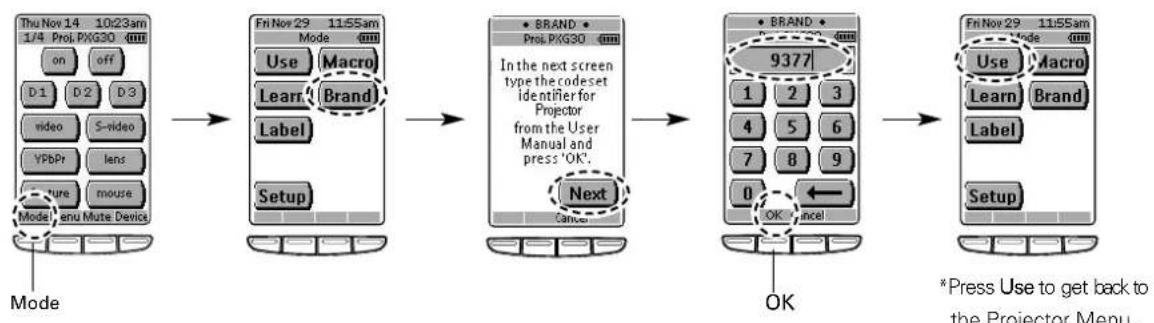
flowchart
graph LR
    A["Thu Nov 14 10:23am<br>1/4 Proj. PXG30 Mode on off D1 D2 D3 video S-video VPbPr lens Pure mouse Mode menu Mute Device"] --> B["Fri Nov 29 11:55am<br>Mode Use Macro Learn Brand Label Setup"]
    B --> C["In the next screen type the codeset identifier for Projector from the User Manual and press 'OK'. Next Cancel"]
    C --> D["Brand 9377<br>1 2 3 4 5 6 7 8 9 0 OK Cancel"]
    D --> E["Fri Nov 29 11:55am<br>Mode Use Macro Learn Brand Label Setup"]
    style A fill:#f9f,stroke:#333
    style B fill:#ccf,stroke:#333
    style C fill:#cfc,stroke:#333
    style D fill:#fcc,stroke:#333
    style E fill:#ffc,stroke:#333
Operating Range
Point the remote control toward the projector (IR sensors) when pressing any button. Maximum operating range for the remote control is about 16.4' (5m) and 60° in front and rear of the projector.
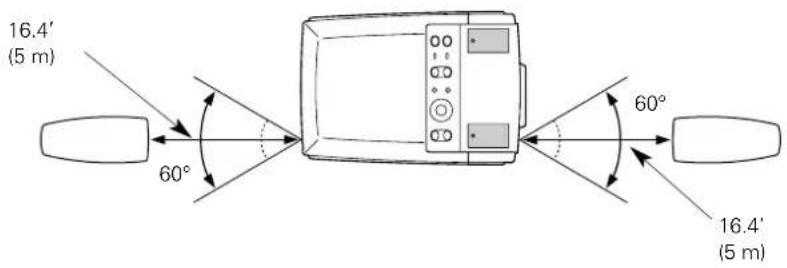
text_image
16.4' (5 m) 60° 60° 16.4' (5 m)Operating the On-Screen Menu
How to operate the On-Screen Menu
Adjustments and settings of this projector can be done via On-Screen Menu. Refer to the following pages regarding each adjustment and setting procedure.
1 Display the On-Screen Menu
Press Menu button to display the On-Screen Menu.
2 Select an item to adjust the value
Press Cursor Left/Right button to select a Menu icon to adjust. Press Cursor Up/Down button to select an item to adjust. (The selected icon is highlighted in orange.)
3 Adjust the value of the selected item
Press OK button to show the Item Data. Press Cursor Left/Right to adjust the Data.
Refer to the following pages regarding respective adjustment.
* The selected item is not in effective until OK button is pressed.
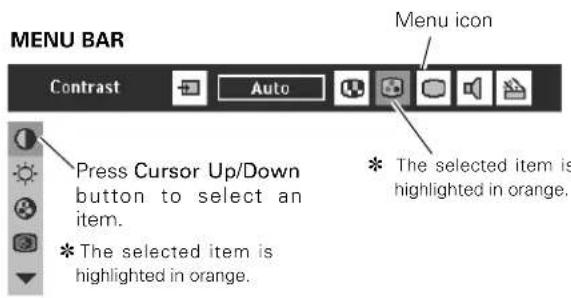
text_image
MENU BAR Contrast Auto Menu icon Press Cursor Up/Down button to select an item. * The selected item is highlighted in orange. * The selected item is highlighted in orange.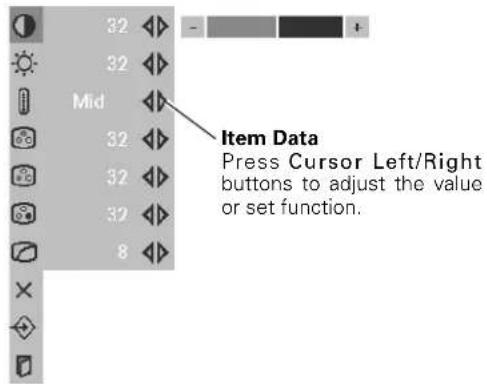
text_image
32 32 Mid 32 32 32 8 Item Data Press Cursor Left/Right buttons to adjust the value or set function.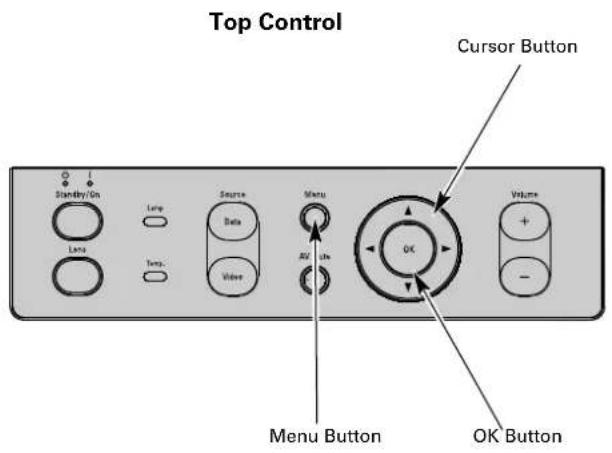
text_image
Top Control Cursor Button Standby/On Lamp Source Menu OK Menu Button OK Button Volume + - Volume - + - Menu ButtonRemote Control Unit
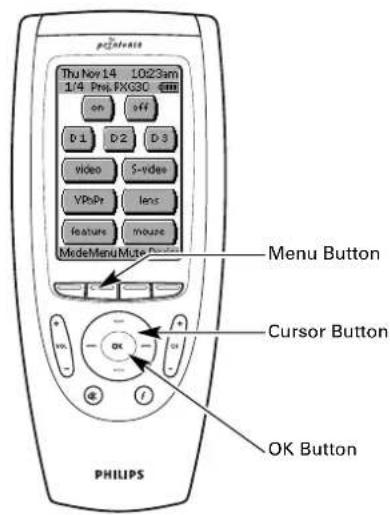
text_image
p2Intens Thu Nov 14 10:23am 1/4 PwL RXG30 on off D 1 D 2 D 3 video S-video VPhPr lens feature Mouse MadeMenu Mute Menu Button Cursor Button OK Button PHILIPSMenu Bar
- For PC Source Press Menu button while connecting to PC input source.
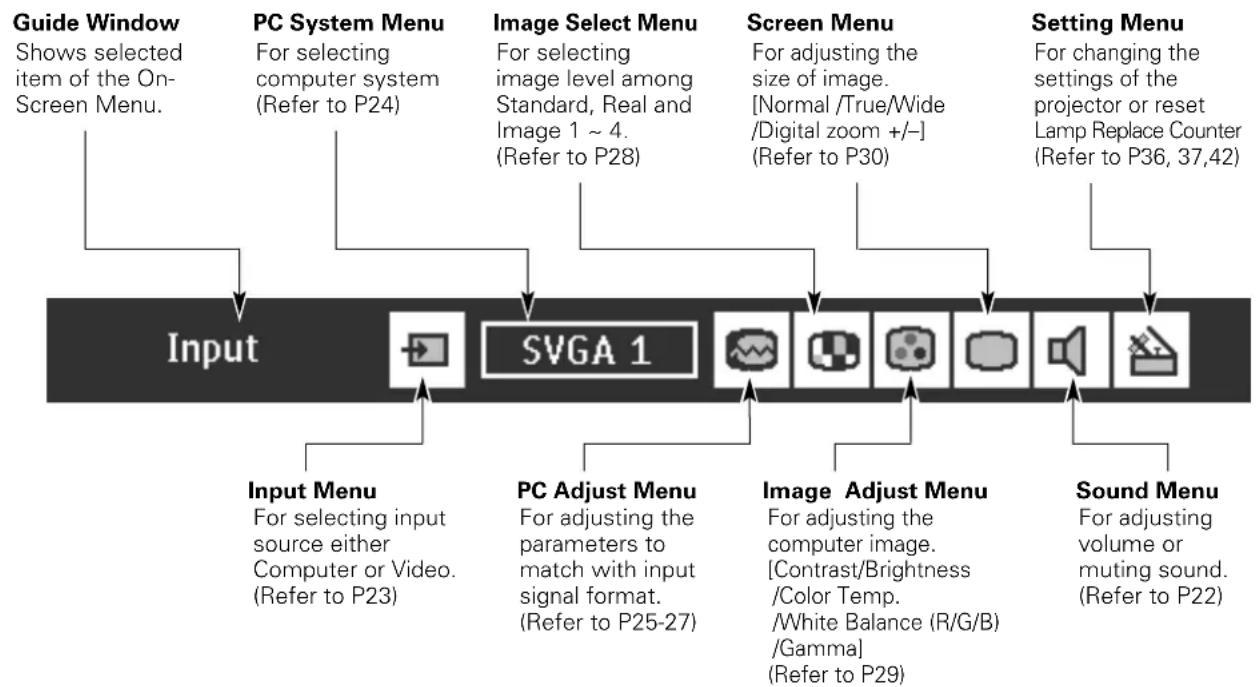
flowchart
graph TD
    A["Guide Window"] --> B["PC System Menu"]
    B --> C["Image Select Menu"]
    C --> D["Screen Menu"]
    D --> E["Setting Menu"]

    A --> F["Input"]
    B --> G["Input Menu"]
    C --> H["PC Adjust Menu"]
    D --> I["Image Adjust Menu"]
    E --> J["Sound Menu"]

    style A fill:#f9f,stroke:#333
    style B fill:#ccf,stroke:#333
    style C fill:#cfc,stroke:#333
    style D fill:#fcc,stroke:#333
    style E fill:#cff,stroke:#333
- For Video Source Press Menu button while connecting to Video input source.
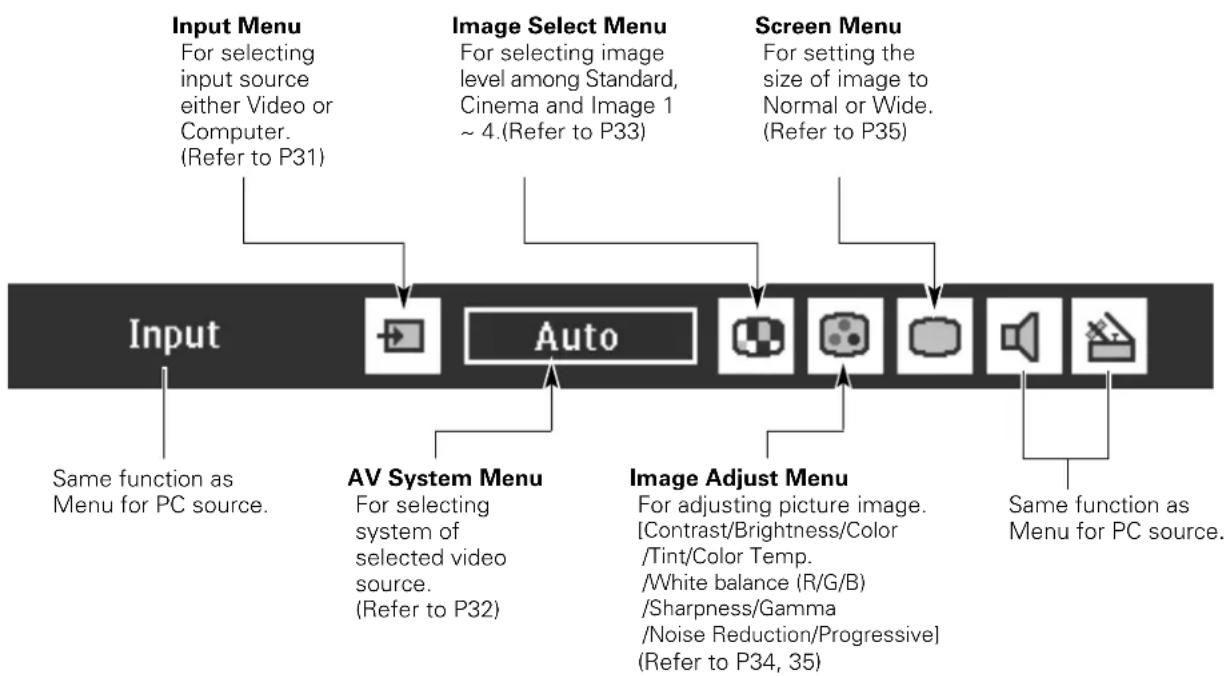
flowchart
graph LR
    A["Input"] --> B["Image Select Menu"]
    B --> C["Screen Menu"]
    A --> D["Auto"]
    D --> E["Image Adjust Menu"]
    E --> F["Same Function as Menu for PC Source."]

    subgraph Input
        G["For selecting input source either Video or Computer. (Refer to P31)"]
    end

    subgraph Image Select Menu
        H["For selecting image level among Standard, Cinema and Image 1 ~ 4. (Refer to P33)"]
    end

    subgraph Screen Menu
        I["For setting the size of image to Normal or Wide. (Refer to P35)"]
    end

    J["Input"] --> K["Same function as Menu for PC source."]
    L["AV System Menu"] --> M["For selecting system of selected video source. (Refer to P32)"]
    N["Image Adjust Menu"] --> O["For adjusting picture image. [Contrast/Brightness/Color /Tint/Color Temp. /White balance (R/G/B) /Sharpness/Gamma /Noise Reduction/Progressive"] (Refer to P34, 35)]
    end
Turning On / Off the Projector
Turning On the Projector
1 Complete peripheral connections (with a computer, VCR, etc.) before turning on the projector. (Refer to "Installation" on page 15\~16)
2 Connect the projector's AC power cord into an AC outlet. The Power Indicator lights red(dim), and the Standby Indicator lights green.
Note: When "On start" function is ON, this projector is turned on automatically when connecting the AC power cord to an AC outlet. (Refer to page 37.)
3 Press Standby/On button on the top control or on button on the remote control. The Power Indicator dims, and the cooling fans start to rotate. Preparation Display appears on the screen and count-down starts. The signal from a PC or video source comes up after 30 seconds. Current Input position and Lamp mode status are also displayed on the screen for 5 seconds. (Refer to "Lamp mode" on page 37.)
Turning Off the Projector
1 Press Standby/On button on the top control or off button on the remote control. The message "Power off?" appears on the screen.
2 Press Standby/On button on the top control or off button on the remote control again to turn off the projector. The Power Indicator turns bright red and the Standby Indicator turns off. The cooling fans remain running for 90 seconds after the projector is turned off. During this "Cooling Down" period, the projector cannot be turned on.
3 When the projector has been cooled down, the Standby Indicator lights on again and you can turn on the projector. Then AC power cord can be disconnected if necessary.

To maintain the lamp-life, once you turn on the projector, wait at least 5 minutes before turning it off.
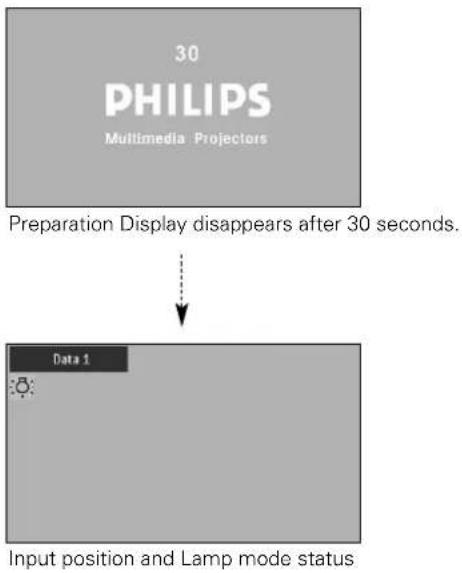
flowchart
graph TD
    A["Preparation Display disappears after 30 seconds."] --> B["Data 1"]
    B --> C["Input position and Lamp mode status"]
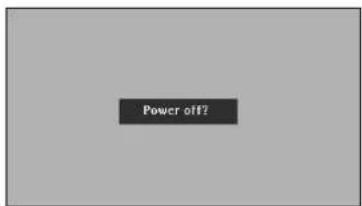
text_image
Power off?Message disappears after 4 seconds.
When "Power management" function is ON, the projector turns off its lamp when the signal is interrupted and no button is pressed for a certain period. Refer to "Power management" on page 37.
When the Temperature Warning Indicator flashes red, the projector will automatically shut itself off. Wait at least 5 minutes, and confirm if the Standby Indicator will light on and the projector can be turned on by pressing the Standby/On button. If the Temperature Warning Indicator continues to flash, refer to the section "Maintenance" on page 39 to take a proper maintenance.
Adjusting the Screen
Zoom Adjustment
- Top Control
Press Lens button and select Zoom function. Press Cursor Up/Down to adjust the image
- Remote Control
Press zoom - / + button to adjust the image.
Focus Adjustment
- Top Control
Press Lens button and select Focus function. Press Cursor Up/Down to adjust the focus of the image.
- Remote Control
Press focus - / + button to adjust the focus of the image.
Note:
Focus adjustment may not function properly if the image is corrected by Keystone adjustment.
Lens Shift Adjustment
- Top Control
Press Lens button and select Lens shift function. Press Cursor Up/Down to move up / down the image.
- Remote Control
Press lens shift - / + button to move up / down the image.
Keystone Adjustment
If a projected picture has keystone distortion, correct the image with Keystone adjustment.
1 Press D-keyst button on the remote control or select Keystone on Setting menu. (Refer to page 36.) Keystone dialog box appears.
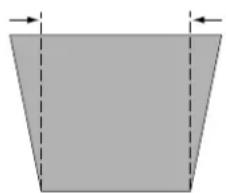
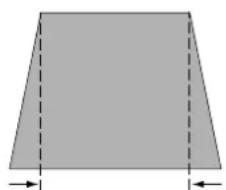
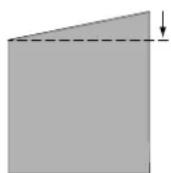
2 Correct the keystone distortion by pressing Cursor Up/Down/Left/Right button(s). Press Cursor Up button to reduce the upper part of the image, and press Cursor Down button to reduce the lower part. Press Cursor Left button to reduce the left part, and press Cursor Right button to reduce the right part.
text_image
ZoomThe message disappears after 4 seconds.
text_image
FocusThe message disappears after 4 seconds.

text_image
Lens shift
- The arrows are white in no correction.
- The arrow(s) of direction being corrected turn(s) orange.
- The arrow(s) disappear(s) at the maximum correction.
- If you press reset button on the remote control while the keystone dialog box is being displayed, the keystone adjustment will be canceled.
Reduce the upper width with Cursor Up button.
natural_image
Simple geometric diagram of a trapezoidal shape with dashed vertical lines and arrows indicating width (no text or symbols)Reduce the lower width with Cursor Down button.
natural_image
Simple geometric diagram of a trapezoid with dashed vertical lines and arrows indicating width (no text or symbols)Reduce the left part with Cursor Left button.
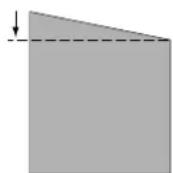
Reduce the right part with Cursor Right button.
Picture Freeze Function
Press D-freeze button on the remote control to capture a moving picture. To cancel, press D-freeze button once again or press any other button.
A/V Mute Function
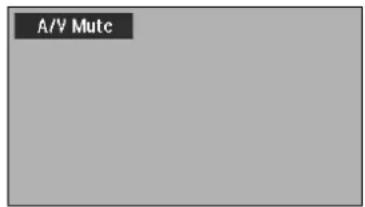
Press AV Mute button on the top control or the remote control to black out the image and to mute the sound. To restore to normal, press AV Mute button again or press any other button.
SmartTimer Function
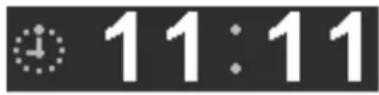
Press timer button on the remote control. The timer display "00 : 00" appears on the screen and the timer starts to count time (00 : 00 \~ 59 : 59).
To stop the timer display, press timer button. Press again to cancel this function.
text_image
A/V MutcMessage disappears after 4 seconds.
Sound Adjustment
Direct Operation
- Volume
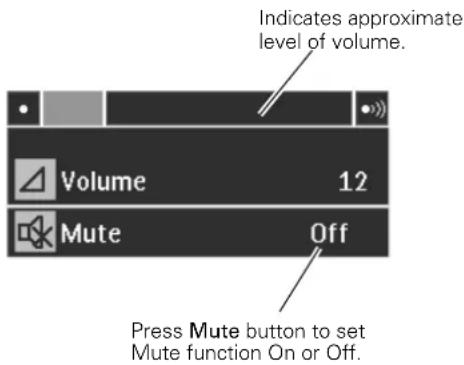
Press Volume + / - button(s) on the top control or on the remote control to adjust volume. Volume dialog box appears on the screen for a few seconds.
+ button for increasing volume, and – button for decreasing.
- Mute
Press Mute button on the remote control to mute the sound. To restore sound to its previous level, press Mute button again or press Volume + / - button(s).
Menu Operation
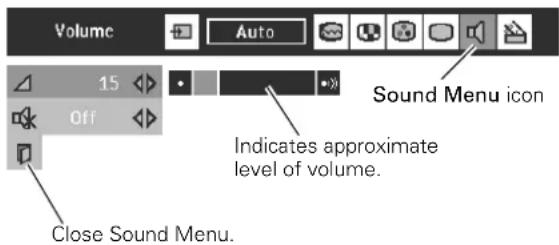
1 Press Menu button to display the On-Screen Menu. Press Cursor Left/Right buttons to select Sound Menu icon.
2 Press Cursor Down button to select the item to be adjusted, and then press OK button.

Volume
To increase volume, press Cursor Right button, and press Cursor Left button to decrease volume.

Mute
Press Cursor Left/Right button(s) to mute the sound. Dialog box display is changed to "On" and sound is muted. To restore sound to its previous level, press Cursor Left/Right button(s) again.
text_image
Indicates approximate level of volume. Volume 12 Mute Off Press Mute button to set Mute function On or Off.The display disappears after 4 seconds.
SOUND MENU
text_image
Volume 15 Off Sound Menu icon Indicates approximate level of volume. Close Sound Menu.Selecting Input Source
Direct Operation
Select an Input source by any of the followings:
- Press Data button on the top control or CH+ button on the remote control. The button toggles among Data1, Data2 and Data3.
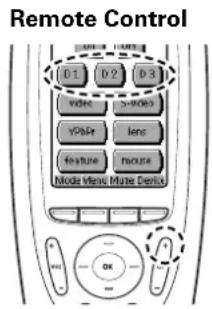
- Press D1, D2 or D3 button on the remote control.
If the projector cannot project properly, select a correct input source following the Menu Operation as shown below.
Note:
Data 3(D3) cannot be selected when Data (Out) is set as Data 3 source. Refer to the "Menu Operation" below.
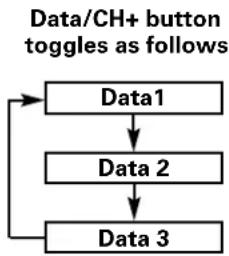
flowchart
graph TD
    A["Data1"] --> B["Data 2"]
    B --> C["Data 3"]
    C --> A
text_image
Remote Control D1 D2 D3 Video >Video Audio lens feature mouse Mode Menu Mouse DevicesMenu Operation
Data 1 : Data / RGB (Scart)
1 Press Menu button to display the On-Screen Menu. Press Cursor Left/Right button to select the Input Menu icon.
2 Press Cursor Up/Down button to select Data 1 and then press OK button. Source Select Menu will appear.
3 Press Cursor Up/Down button select "Data" or "RGB(Scart)" and press OK button.
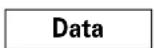
When computer output is connected to Data 1 in socket, select Data.
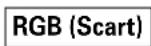
When video equipment is connected to Data 1 in socket, select RGB (Scart). Refer to page 31.
Data 2 : Data
1 Press Menu button to display the On-Screen Menu. Press Cursor Left/Right button to select the Input Menu icon.
2 Press Cursor Up/Down button to select Data 2 and then press OK button.
Data 3 : Data(In) / Data (Out)
1 Press Menu button to display the On-Screen Menu. Press Cursor Left/Right button to select the Input Menu icon.
2 Press Cursor Up/Down button to select Data 3 and then press OK button. Source Select Menu will appear.
3 Press Cursor Up/Down button to select "Data (In)" or "Data (Out)" and press OK button.
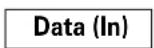
When Data 3 in/Data out socket is used as Data 3 in, select Data (In)
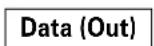
When Data 3 in/Data out socket is used as Data out, select Data (Out)
INPUT MENU (Selecting Data 1)
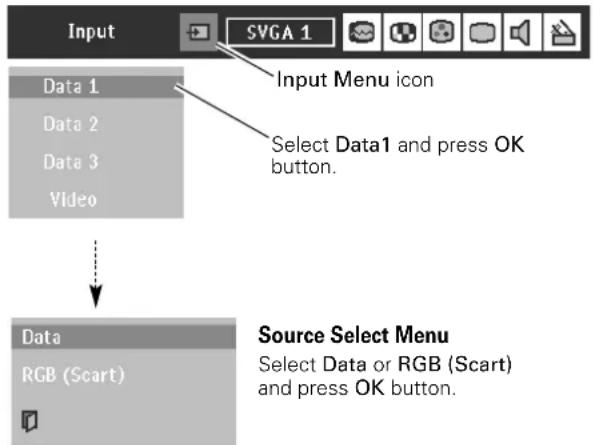
text_image
Input Data 1 Data 2 Data 3 Video Input Menu icon Select Data1 and press OK button. Data RGB (Scart) Source Select Menu Select Data or RGB (Scart) and press OK button.INPUT MENU (Selecting Data 2)
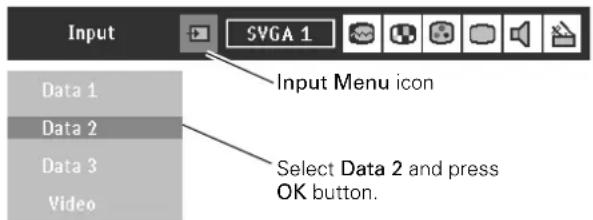
text_image
Input Data 1 Data 2 Data 3 Video Input Menu icon Select Data 2 and press OK button.INPUT MENU (Selecting Data 3)
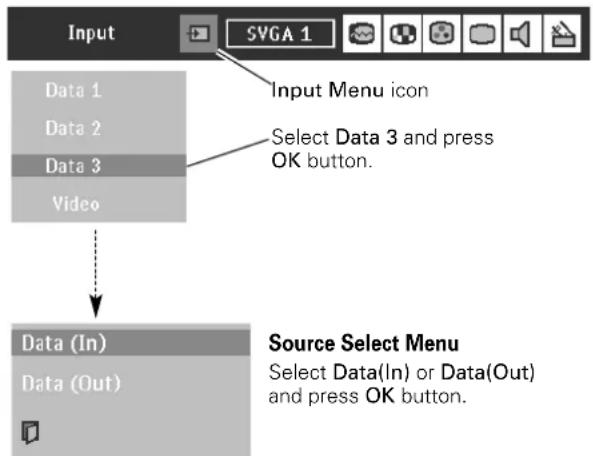
flowchart
graph TD
    A["Input"] --> B["Data 1"]
    A --> C["Data 2"]
    A --> D["Data 3"]
    A --> E["Video"]
    B --> F["Input Menu icon"]
    C --> G["Select Data 3 and press OK button."]
    E --> H["Data (In)"]
    E --> I["Data (Out)"]
    H --> J["Source Select Menu\nSelect Data(In) or Data(Out) and press OK button."]
Selecting Computer System
This projector accepts various kinds of computer signals including VGA, SVGA, XGA and SXGA. By selecting a Data input as a signal source, it automatically detects the signal format and tune itself to project a proper image without any additional settings. (Signal formats provided in this projector is shown on Page 49.)
Note : The projector may display one of the following messages.
Auto
When the projector cannot recognize connected signal as PC system provided in this projector, Auto Image Adjustment function operates to adjust the projector and the message "Auto" is displayed on System Menu icon. (Refer to page 25.)
—
There is no signal input from a computer. Make sure the computer and the projector are properly connected. (Refer to "Installation" on page 15.)
PC SYSTEM MENU
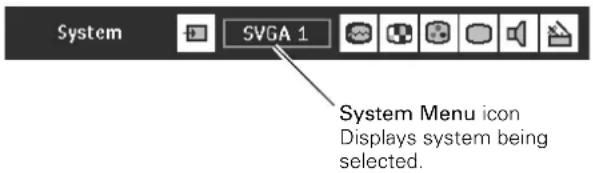
text_image
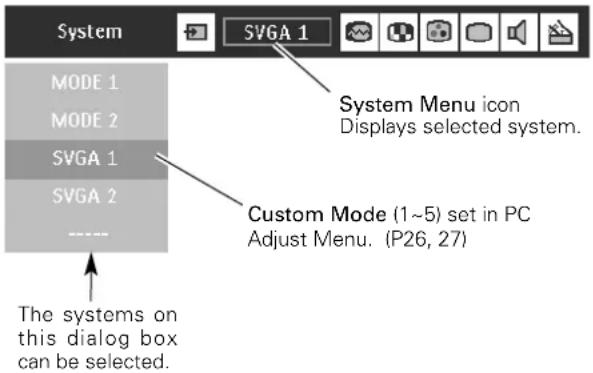
System SVGA 1 System Menu icon Displays system being selected.Select Computer System Manually
PC system can be also selected manually.
1 Press Menu button to display the On-Screen Menu. Press Cursor Left/Right buttons to select PC System Menu icon.
2 Press Cursor Down button to select the system that you want to set, and then press OK button.
Note:
If the image is not provided properly, manual adjustment may be required. Refer to the section "Manual PC Adjustment".(page 26\~27)
PC SYSTEM MENU
text_image
System SVGA 1 MODE 1 MODE 2 SVGA 1 SVGA 2 ---- The systems on this dialog box can be selected. System Menu icon Displays selected system. Custom Mode (1~5) set in PC Adjust Menu. (P26, 27)PC Adjustment
Auto Image Adjustment
Auto Image Adjustment function is provided to automatically conform Fine sync, Total dots and Picture Position to your computer. This function can be operated as follows.

Auto Image
1 Press Menu button to display the On-Screen Menu. Press Cursor Left/Right button to select PC Adjust Menu icon.
2 Press Cursor Down button to select Auto Image icon and then press OK button twice.
This Auto Image can be also executed by pressing auto button on the remote control.
*To store adjusted parameters.
Parameters adjusted with Auto Image function can be stored in this projector. Once parameters are stored, the setting can be done just by selecting Mode in PC System Menu (P24). Refer to step 3 of "Manual PC Adjustment" section (P27).
PC ADJUST MENU
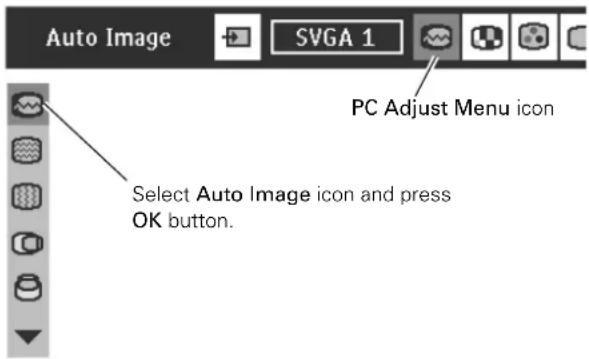
text_image
Auto Image SVGA 1 PC Adjust Menu icon Select Auto Image icon and press OK button.Note:
- Fine sync, Total dots and Picture Position of some computers can not be fully adjusted with Auto Image function. In this case, manual adjustments will be required. (Refer to page 26, 27.)
- Auto Image function cannot be operated when "RGB", "1035i (HDTV)", "1080i (HDTV)" is selected on PC System Menu (P24).
Manual PC Adjustment
This projector can automatically tune the display signals from the most of personal computers currently distributed. However, some computers employ the special signal formats which may not be tuned by SmartSet of this projector. In this case, the image may be recognized as a flickering picture, a non-synchronized picture, a non-centered picture or a skewed picture, and projected improperly.
The Manual PC Adjustment function allows you to manually adjust several parameters to match these special signal formats. Also, you can store these adjusted parameters in the 5 independent memory areas, enabling you to call up whenever you need.
1 Press Menu button to display the On-Screen Menu. Press Cursor Left/Right button to select PC Adjust Menu icon.
2 Press Cursor Down button to select the item to adjust and then press OK button. Adjustment dialog box will appear. Press Cursor Left/Right button to adjust the value.

Fine sync
Adjusts an image as necessary to eliminate flicker from the display. Press Cursor Left/Right button to adjust value.(From 0 to 31.)

Total dots
Adjusts the number of total dots in one horizontal period. Press Cursor Left/Right button(s) to adjust the number to match your PC image.

Horizontal
Adjusts horizontal picture position. Press Cursor Left/Right button(s) to adjust the position.

Vertical
Adjusts vertical picture position. Press Cursor Left/Right button(s) to adjust the position.

Current mode
Press OK button to show the information of the selected computer.

Clamp
Adjusts clamp level. When the image has a dark bar(s), try this adjustment.
PC ADJUST MENU
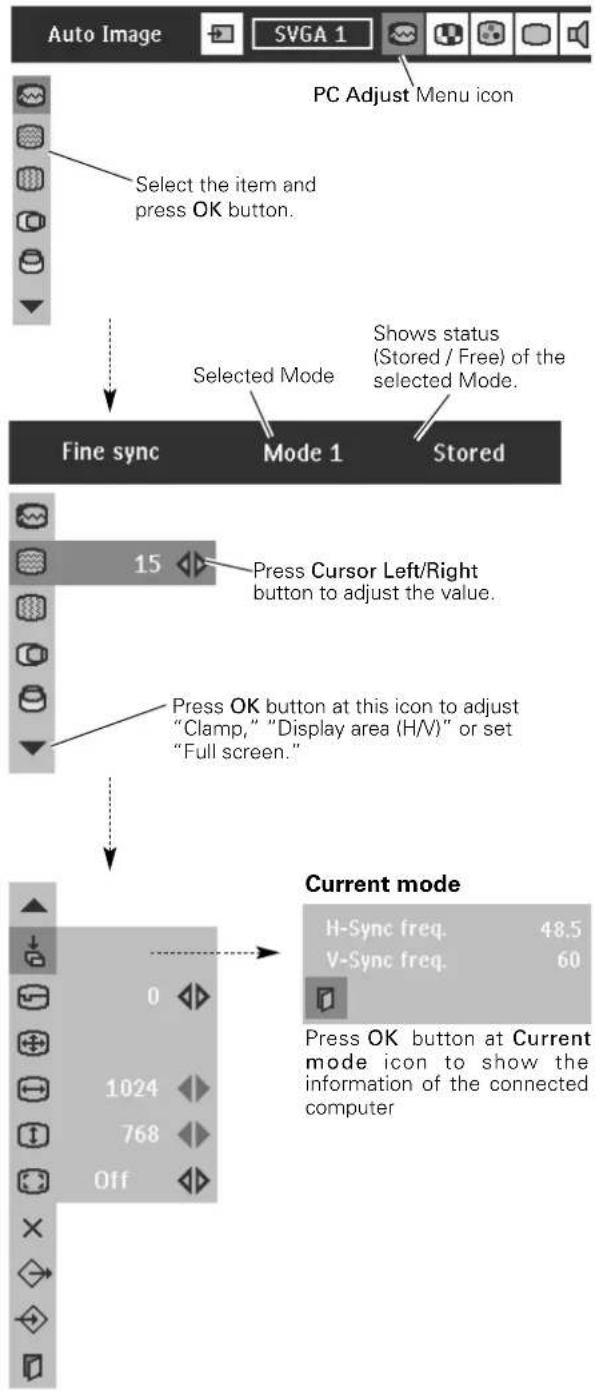
text_image
Auto Image SVGA 1 PC Adjust Menu icon Select the item and press OK button. Selected Mode Shows status (Stored / Free) of the selected Mode. Fine sync Mode 1 Stored 15 Press Cursor Left/Right button to adjust the value. Press OK button at this icon to adjust "Clamp," "Display area (H/V)" or set "Full screen." Current mode H-Sync freq. 48.5 V-Sync freq. 60 Press OK button at Current mode icon to show the information of the connected computer8. Computer Input

Display area
Selects the area displayed by this projector. Select the resolution at Display area dialog box.

Display area H
Adjusts the horizontal area displayed by this projector. Press Cursor Left/Right button(s) to decrease/increase value and then press OK button.

Display area V
Adjusts the vertical area displayed by this projector. Press Cursor Left/Right button(s) to decrease/increase value and then press OK button.

Full screen
Press Cursor Left/Right button(s) to switch Full screen function to "On" or "Off." Set "On" to resize the image with 4 x 3 aspect ratio to fit the screen.
Note: Fine sync, Display area, Display area H, Display area V and Full screen cannot be adjusted when "RGB", "1035i (HDTV)", "1080i(HDTV)" is selected on PC System Menu (P24).
3

Store
To store adjusted parameters, select Store icon and press OK button. Select any of Mode 1 to 5 that you want to store to and then press OK button.

Mode free
To clear adjusted parameters previously set, select Mode free icon and press OK button. Select the Mode that you want to clear and press OK button.

Reset
Resets all the adjusted parameters on adjustment dialog box to previous figure.

Quit
Closes PC Adjust Menu.
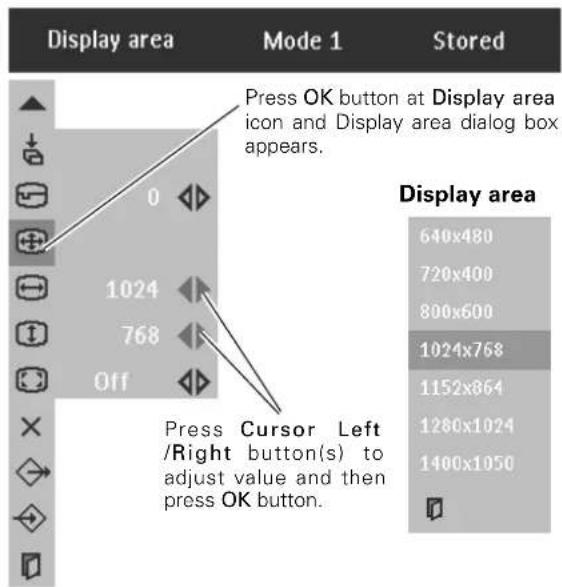
text_image
Display area Mode 1 Stored Press OK button at Display area icon and Display area dialog box appears. 0 1024 768 Off Press Cursor Left /Right button(s) to adjust value and then press OK button. Display area 640x480 720x400 800x600 1024x768 1152x864 1280x1024 1400x1050To store adjustment data
This Mode has parameters being stored.
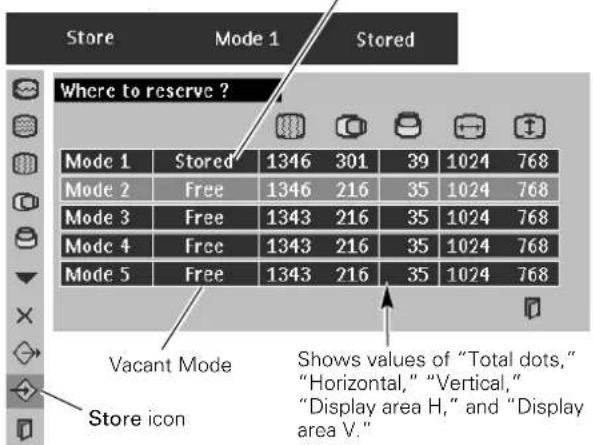
text_image
Store Mode 1 Stored Where to reserve ? Mode 1 Stored 1346 301 39 1024 768 Mode 2 Free 1346 216 35 1024 768 Mode 3 Free 1343 216 35 1024 768 Mode 4 Free 1343 216 35 1024 768 Mode 5 Free 1343 216 35 1024 768 Vacant Mode Store icon Shows values of "Total dots," "Horizontal," "Vertical," "Display area H," and "Display area V."To clear adjustment data
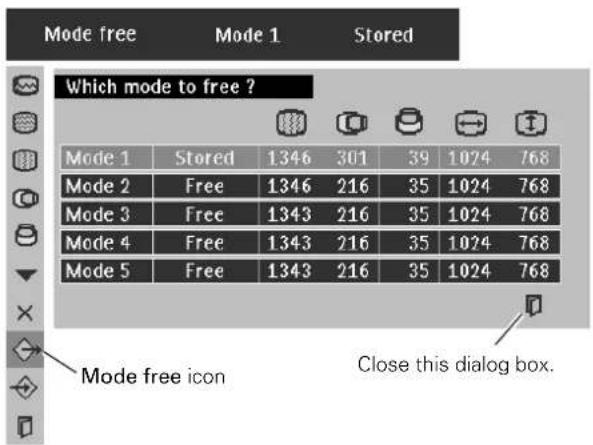
text_image
Mode free Mode 1 Stored Which mode to free ? Mode 1 Stored 1346 301 39 1024 768 Mode 2 Free 1346 216 35 1024 768 Mode 3 Free 1343 216 35 1024 768 Mode 4 Free 1343 216 35 1024 768 Mode 5 Free 1343 216 35 1024 768 Mode free icon Close this dialog box.Picture Image Adjustment
Image Level Select (Direct)
Select image level from Standard, Real, Image 1, Image 2, Image 3 and Image 4 by pressing V-effect button on the remote control.
Standard
Normal picture level preset on this projector.
Real
Picture level with improved halftone for graphics.
Image 1\~4
User preset image adjustment in Image Adjust Menu (P29).

flowchart
graph TD
    A["Standard"] --> B["Real"]
    B --> C["Image 1"]
    C --> D["Image 2"]
    D --> E["Image 3"]
    E --> F["Image 4"]
    F --> A
Image Level Select (Menu)
1 Press Menu button to display the On-Screen Menu. Press Cursor Left/Right button to select Image Select Menu icon.
2 Press Cursor Down button to select the level that you want to set and then press OK button.

Standard
Normal picture level preset on this projector.

Real
Picture level with improved halftone for graphics.

Image 1\~4
User preset picture adjustment in Image Adjust Menu (P29).
IMAGE SELECT MENU
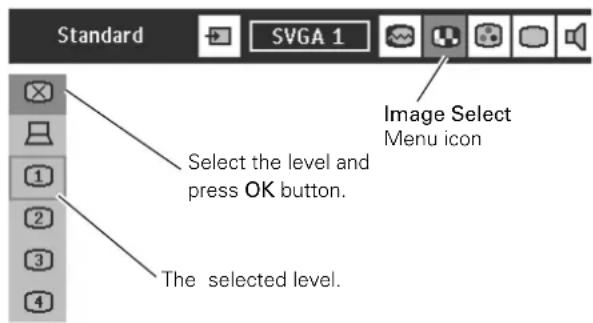
text_image
Standard SVGA 1 Image Select Menu icon Select the level and press OK button. The selected level.Image Level Adjustment
1 Press Menu button to display the On-Screen Menu. Press Cursor Left/Right buttons to select Image Adjust Menu icon.
2 Press Cursor Down button to select the item that you want to adjust. and then press OK button. The level of each item is displayed. Adjust each level by pressing Cursor Left/Right button(s).

Contrast
Press Cursor Left/Right button to adjust the image contrast (From 0 to 63.)

Brightness
Press Cursor Left/Right button to adjust the image brightness. (From 0 to 63.)

Color temp.
Press either Cursor Left or Right button to select the Color temp. level. (XLow, Low, Mid or High)

White balance (Red)
Press Cursor Left/Right button to adjust the red tone. (From 0 to 63.)

White balance (Green)
Press Cursor Left/Right button to adjust the green tone. (From 0 to 63.)

White balance (Blue)
Press Cursor Left/Right button to adjust the blue tone. (From 0 to 63.)

Gamma
Press either Cursor Left or Right button to obtain better balance of contrast. (From 0 to 15.)
3

Store
To store manually preset image, select Store icon and press OK button. Image Level Menu will appear. Select one from Image 1 to 4 where you want to set and then press OK button.

Reset
Reset all adjustment to previous figure.

Quit
Closes the Image Menu.
IMAGE ADJUST MENU
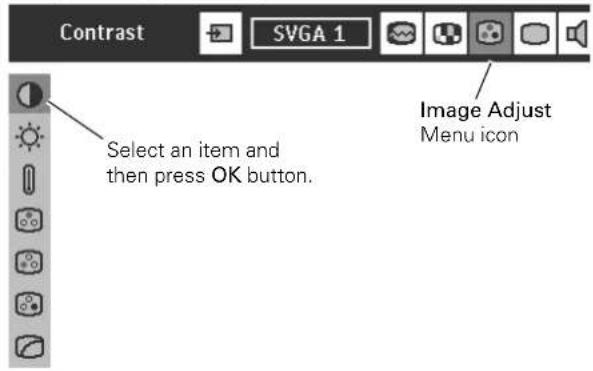
text_image
Contrast SVGA 1 Select an item and then press OK button. Image Adjust Menu icon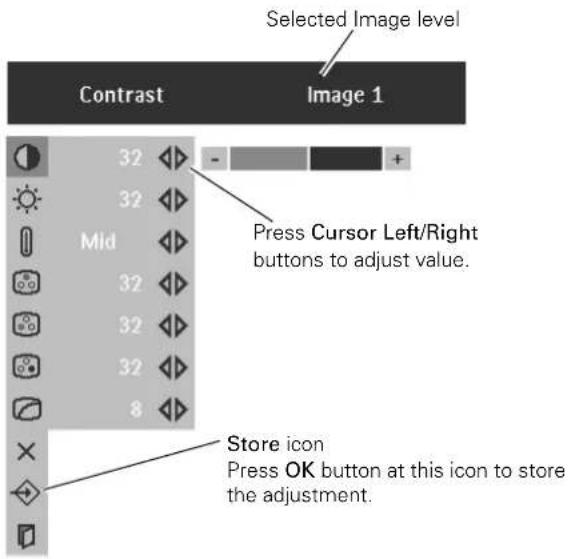
text_image
Selected Image level Contrast Image 1 32 - + Press Cursor Left/Right buttons to adjust value. Mld 32 32 32 8 Store icon Press OK button at this icon to store the adjustment.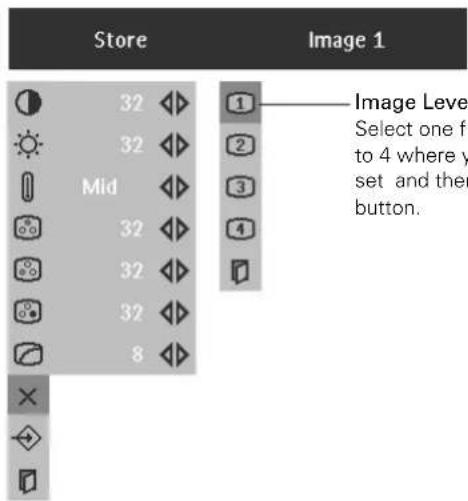
text_image
Store Image 1 32 32 Mid 32 32 32 8 Image Level Select one from 4 to 4 where y set and then button.Picture Screen Adjustment
This projector has a picture screen resize function, which enables you to display the desirable image size.
1 Press Menu button to display the On-Screen Menu. Press Cursor Left/Right button(s) to select Screen Menu icon.
2 Press Cursor Down button to select the function and then press OK button.

Normal
Provides image to fit screen size.

True
Provides an image in its original size. When the original image size is larger than the screen size (1024 x 768), this projector automatically enters "Digital zoom +" mode.

Wide
Provides image to fit wide video aspect ratio (16:9) by expanding image width uniformly. This function can be used for providing a squeezed video signal at 16:9.

Digital zoom +
When Digital zoom + is selected, the On-Screen Menu disappears and the message "D-Zoom +" is displayed. Press OK button to expand image size. And press Cursor Up/Down/Left/Right button(s) to pan the image. Panning function can work only when the image is larger than screen size.
A projected image can be also expanded by pressing D-zoom + button on the remote control.

Digital Zoom -
When Digital zoom – is selected, the On-Screen Menu disappears and the message "D-Zoom –" is displayed. Press OK button to compress the image size.
A projected image can be also compressed by pressing D-zoom – button on the remote control unit.
To cancel Digital Zoom +/- mode, press any button except D-zoom +/-, OK, Cursor buttons.
SCREEN MENU
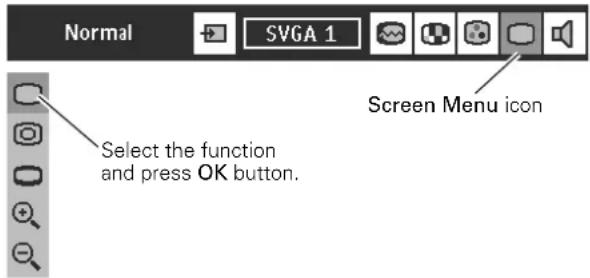
text_image
Normal SVGA 1 Select the function and press OK button. Screen Menu iconNote:
– Picture screen adjustment cannot be operated when "1035i (HDTV)", "1080i (HDTV)" is selected on PC System Menu (P24).
- Wide cannot be selected when "720p (HDTV)" is selected on PC System Menu (P24).
- True and Digital zoom +/- cannot be operated when "RGB" is selected on PC System Menu (P24).
- This projector cannot display any resolution higher than 1280 X 1024. If your computer's screen resolution is higher than 1280 X 1024, reset the resolution to the lower before connecting the projector.
- The image data in other than XGA (1024 x 768) is modified to fit the screen size in initial mode.
- Panning function may not operate properly if the computer system prepared on PC Adjust Menu is used.
Selecting Input Source
Direct Operation
Select Input source by any of the followings:
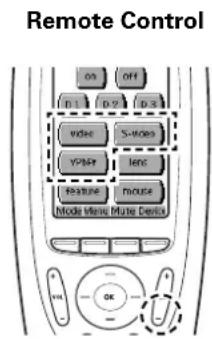
- Press Video button on the top control. Press CH- button on the remote control. (The button toggles among Auto, Video, S-video and Y,Pb/Cb,Pr/Cr.)
- Press video, S-video or Y, Pb/Cb, Pr/Cr button on the remote control.
If the projector cannot project properly, select correct input source through Menu Operation (see below).
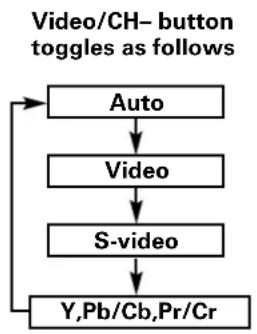
flowchart
graph TD
    A["Auto"] --> B["Video"]
    B --> C["S-video"]
    C --> D["Y,Pb/Cb,Pr/Cr"]
    D --> A
text_image
Remote Control on off D 1 D 2 D 3 video S-voes Y+Bar lent Feature mouse Node Mini,Mute Devices OKMenu Operation
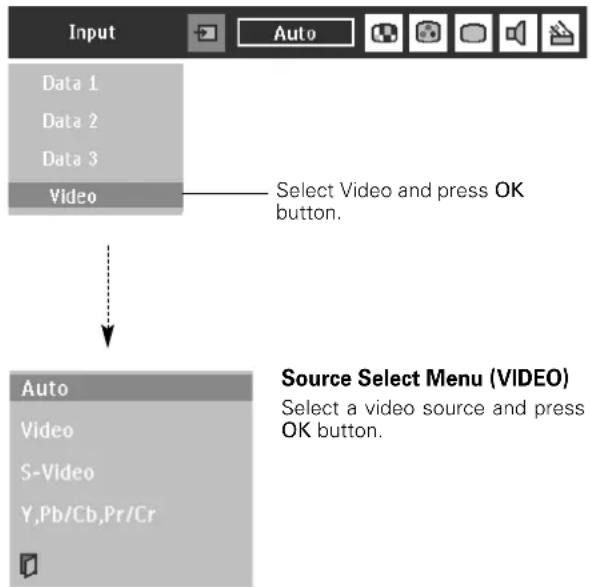
1 Press Menu button to display the On-Screen Menu. Press Cursor Left/Right button to select Input Menu icon.
2 Press Cursor Up/Down button to select Video and then press OK button. Source Select Menu will appear.
3 Select the type of video source and then press OK button.
Auto
The projector automatically detects incoming video signal, and adjusts itself to optimize its performance.
- When both Video socket and S-video socket are connected, S-video jack has priority over Video socket.
- When both Y-Pb/Cb-Pr/Cr sockets and S-video socket are connected, Y-Pb/Cb-Pr/Cr sockets have priority over S-video socket.
* The projector decides the priority by socket connection, not by incoming signals.
Video
When video input signal is connected to Video socket, select Video.
S-Video
When video input signal is connected to S-video socket, select S-Video.
Y,Pb/Cb,Pr/Cr
When video input signal is connected to Y-Pb/Cb-Pr/Cr sockets, select Y, Pb/Cb, Pr/Cr.
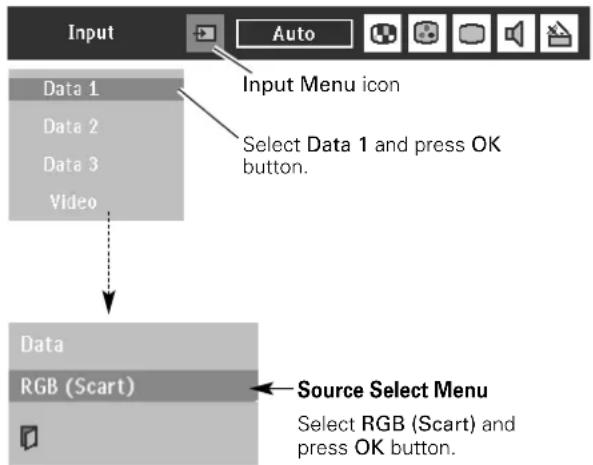
When connecting the 21-pin Scart (RGB) output from video equipment to Data 1 in (HDB 15-pin) socket on the projector.
1 Press Menu button to display the On-Screen Menu. Press Cursor Left/Right button to select Input Menu icon.
2 Press Cursor Up/Down button to select Data 1 and then press OK button. Source Select Menu will appear.
Press Cursor Up/Down button to select "RGB (Scart)" and press OK button.
INPUT MENU
flowchart
graph TD
    A["Input"] --> B["Data 1"]
    A --> C["Data 2"]
    A --> D["Data 3"]
    A --> E["Video"]
    E --> F["Select Video and press OK button."]
    E --> G["Source Select Menu (VIDEO)"]
    G --> H["Auto"]
    G --> I["Video"]
    G --> J["S-Video"]
    G --> K["Y,Pb/Cb,Pr/Cr"]
INPUT MENU
text_image
Input Data 1 Data 2 Data 3 Video Input Menu icon Select Data 1 and press OK button. Data RGB (Scart) Source Select Menu Select RGB (Scart) and press OK button.Selecting Video System
1 Press Menu button to display the On-Screen Menu. Press Cursor Left/Right buttons to select AV System Menu icon.
2 Press Cursor Down button to select the system to be required and then press OK button.
Video or S-video
- Auto
The projector automatically detects incoming Video system, and adjusts itself to optimize its performance. When Video System is PAL-M or PAL-N, select system manually.
- PAL / SECAM / NTSC / NTSC4.43 / PAL-M / PAL-N
If the projector cannot reproduce proper video image, it is necessary to select a specific broadcast signal format from PAL, SECAM, NTSC, NTSC 4.43, PAL-M, and PAL-N.
Y,Pb/Cb,Pr/Cr
- Auto
The projector automatically detects incoming video signal, and adjusts itself to optimize its performance.
- Component Video Signal Format
If the projector cannot reproduce proper video image, it is necessary to select a specific component video signal format from 480i, 575i, 480p, 575p, 720p, 1035i and 1080i.
text_image
System Auto AV System Menu icon This box indicates the system being selected. Select the system and press OK button.text_image
System Auto AV System Menu icon This box indicates the system being selected. Select the system and press OK button.Picture Image Adjustment
Image Level Select (Direct)
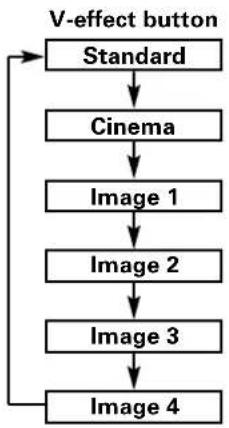
Select image level among Standard, Cinema, Image 1, Image 2, Image 3 and Image 4 by pressing V-effect button on the remote control.
Standard
Normal picture level preset on this projector.
Cinema
Picture level adjusted for the picture with fine tone.
Image 1\~4
User preset picture adjustment in Image Adjust Menu (P34, 35).
flowchart
graph TD
    A["V-effect button"] --> B["Standard"]
    B --> C["Cinema"]
    C --> D["Image 1"]
    D --> E["Image 2"]
    E --> F["Image 3"]
    F --> G["Image 4"]
    G --> A
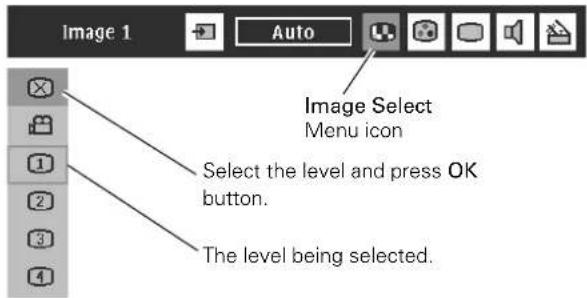
Image Level Select (Menu)
1 Press Menu button to show the On-Screen Menu. Press Cursor Left/Right button to select Image Select Menu icon.
2 Press Cursor Down button to select the level that you want to set and then press OK button.

Standard
Normal picture level preset on this projector.

Cinema
Picture level adjusted for the picture with fine tone.

Image 1\~4
User preset picture adjustment in Image Adjust Menu (P34, 35).
IMAGE SELECT MENU
text_image
Image 1 Auto Image Select Menu icon Select the level and press OK button. The level being selected.Image Level Adjust
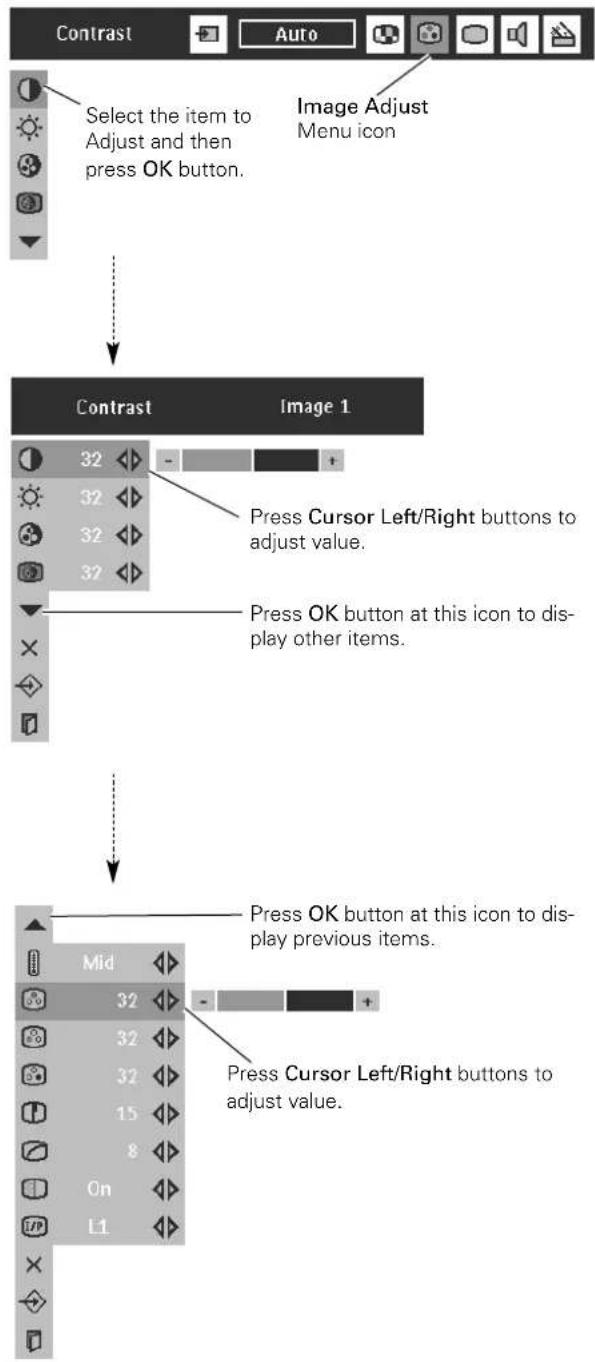
1 Press Menu button to display the On-Screen Menu. Press Cursor Left/Right button(s) to select Image Adjust Menu icon.
2 Press Cursor Down button to select the item to adjust and then press OK button. The level of each item is displayed. Adjust each level by pressing Cursor Left/Right button(s).

Contrast
Press Cursor Left/Right button to adjust image contrast. (From 0 to 63.)

Brightness
Press Cursor Left/Right button to adjust image brightness. (From 0 to 63.)

Color
Press Cursor Left/Right button to adjust color (From 0 to 63.)

Tint
Press Cursor Left/Right button to obtain proper color. (From 0 to 63.)

Color temp.
Press Cursor Left/Right button to select Color temp. level. (XLow, Low, Mid or High)

White balance (Red)
Press Cursor Left/Right button to adjust red tone (From 0 to 63.)

White balance (Green)
Press Cursor Left/Right button to adjust green tone. (From 0 to 63.)

White balance (Blue)
Press Cursor Left/Right button to adjust blue tone. (From 0 to 63.)

Sharpness
Press Cursor Left/Right button to adjust the image sharpness. (From 0 to 31.)

Gamma
Press Cursor Left/Right button to obtain better balance of contrast. (From 0 to 15.)

Noise reduction
Press Cursor Left/Right button(s) to change noise reduction mode. Dialog box display is changed to "On" to reduce noise (rough parts) of image. Press Cursor Left/Right button(s) again, to change noise reduction mode to off.

Progressive
Press Cursor Left/Right button(s) to change progressive scan mode. Dialog box display is changed to "Off", "L1", "L2".
Off ... Progressive scan mode to OFF.
L1 .... Progressive scan mode to ON (for moving picture).
L2 .... Progressive scan mode to ON (for still picture).
IMAGE ADJUST MENU
flowchart
graph TD
    A["Select the item to Adjust and then press OK button."] --> B["Image Adjust Menu icon"]
    B --> C["Contrast Image 1"]
    C --> D["Press Cursor Left/Right buttons to adjust value."]
    D --> E["Press OK button at this icon to display other items."]
    E --> F["Press OK button at this icon to display previous items."]
    F --> G["Press Cursor Left/Right buttons to adjust value."]
Note:
- Tint cannot be adjusted when the video system is PAL, SECAM, PAL-M or PAL-N.
- Progressive scan cannot be operated when "480p", "575p", "720p", "1035i" or "1080i" is selected on AV System Menu (P32).
9. Video Input
3

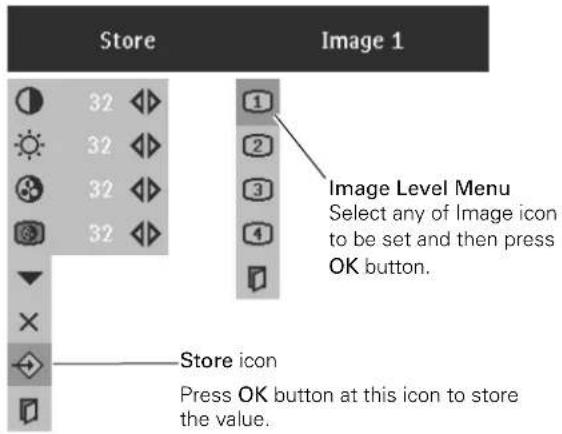
Store
To store the adjustment data, select Store icon and press OK button. Image Level Menu will appear. Select from the Image Level 1 to 4 and then press OK button.

Reset
Reset all adjustment to previous figure.

Quit
Closes Image Menu.
text_image
Store Image 1 32 32 32 32 1 2 3 4 Image Level Menu Select any of Image icon to be set and then press OK button. Store icon Press OK button at this icon to store the value.Picture Screen Adjustment
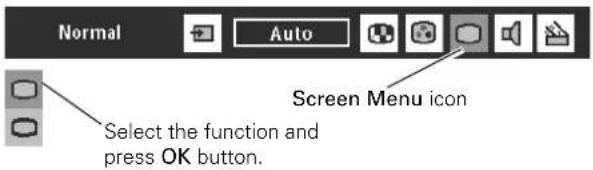
This projector has a picture screen resize function, which enables you to display the desirable image size.
1 Press Menu button to display the On-Screen Menu. Press Cursor Left/Right button(s) to select Screen Menu icon.
2 Press Cursor Down button to select the function and then press OK button.

Normal
Provides image at a normal video aspect ratio of 4:3.

Wide
Provides image at a wide screen ratio of 16:9.
SCREEN MENU
text_image
Normal Auto Screen Menu icon Select the function and press OK button.Note: Screen Menu cannot be operated when "720p," "1035i," or "1080i" is selected on AV System Menu (P32).
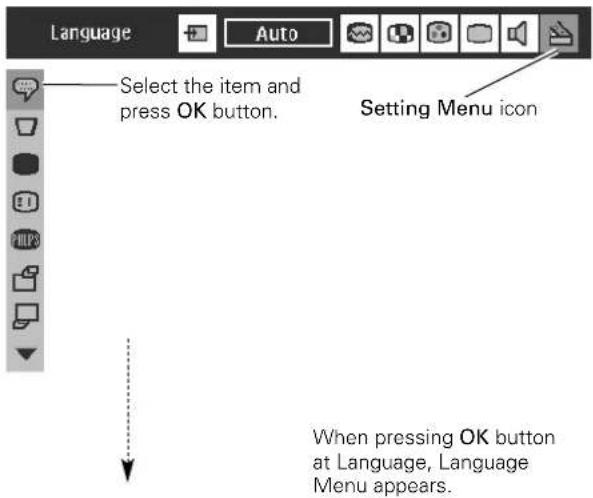
Setting Menu
1 Press Menu button to display the On-Screen Menu. Press Cursor Left/Right button(s) to select Setting icon.
2 Press Cursor Down button to select the item that you want to set and then press OK button. Setting dialog box appears.

Language
Language used in the On-Screen Menu is selectable from English, German, French, Italian, Spanish, Portuguese, Dutch, Swedish, Chinese, Korean and Japanese.

Keystone
When the image is distorted, select Keystone. The On-Screen Menu disappears and Keystone dialog box is displayed.
Store ... Store the keystone adjustment data even if disconnecting AC power cord from an AC outlet.
Reset … Reset the keystone adjustment data when disconnecting AC power cord from an AC outlet.
Correct keystone distortion by pressing Cursor Up/Down/Left /Right button(s). Refer to Keystone Adjustment on page 21.

Blue back
When this function is "On," the projector will produce a blue image instead of the video noise on the screen when any input source is unplugged or turned off.

Display
This function decides whether to display On-Screen Displays.
On … shows all the On-Screen Displays.
Off .... sets On-Screen Displays disappeared except;
- On-Screen Menu
- "Power off?" message

Logo
When this function is "On," projector displays Philips logo when starting up.

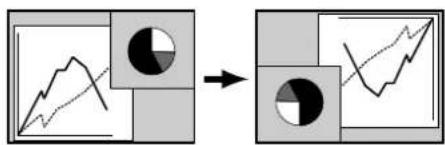
Ceiling
When this function is "On," picture is top / bottom and left / right reversed. This function is used to project the image from a ceiling mounting the projector.

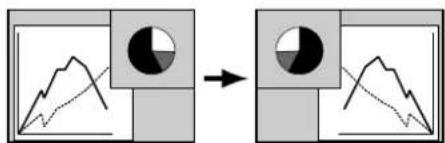
Rear
When this function is "On," picture is left / right reversed. This function is used to project the image to a rear projection screen.
SETTING MENU
text_image
Language Auto Select the item and press OK button. Setting Menu icon When pressing OK button at Language, Language Menu appears.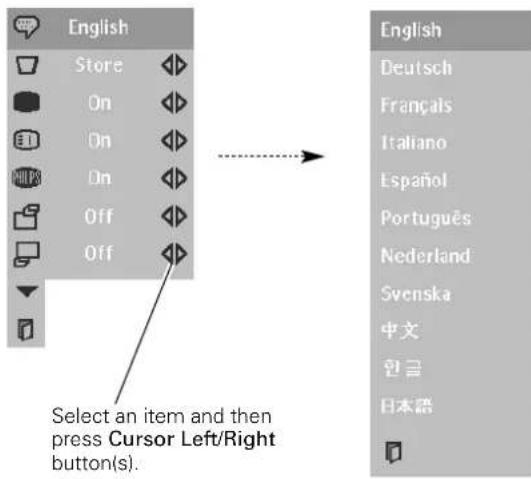
text_image
English Store On On On Off Off Select an item and then press Cursor Left/Right button(s). English Deutsch Français Italiano Español Português Nederland Svenska 中文 한글 日本語Ceiling function
flowchart
graph LR
    A["Line Graph"] --> B["Circle Node"]
    B --> C["Line Chart"]
Rear function
text_image
Diagram illustrating the transformation of a graph to a pie chart, showing two separate views with shaded regions and a directional arrow.
Power management
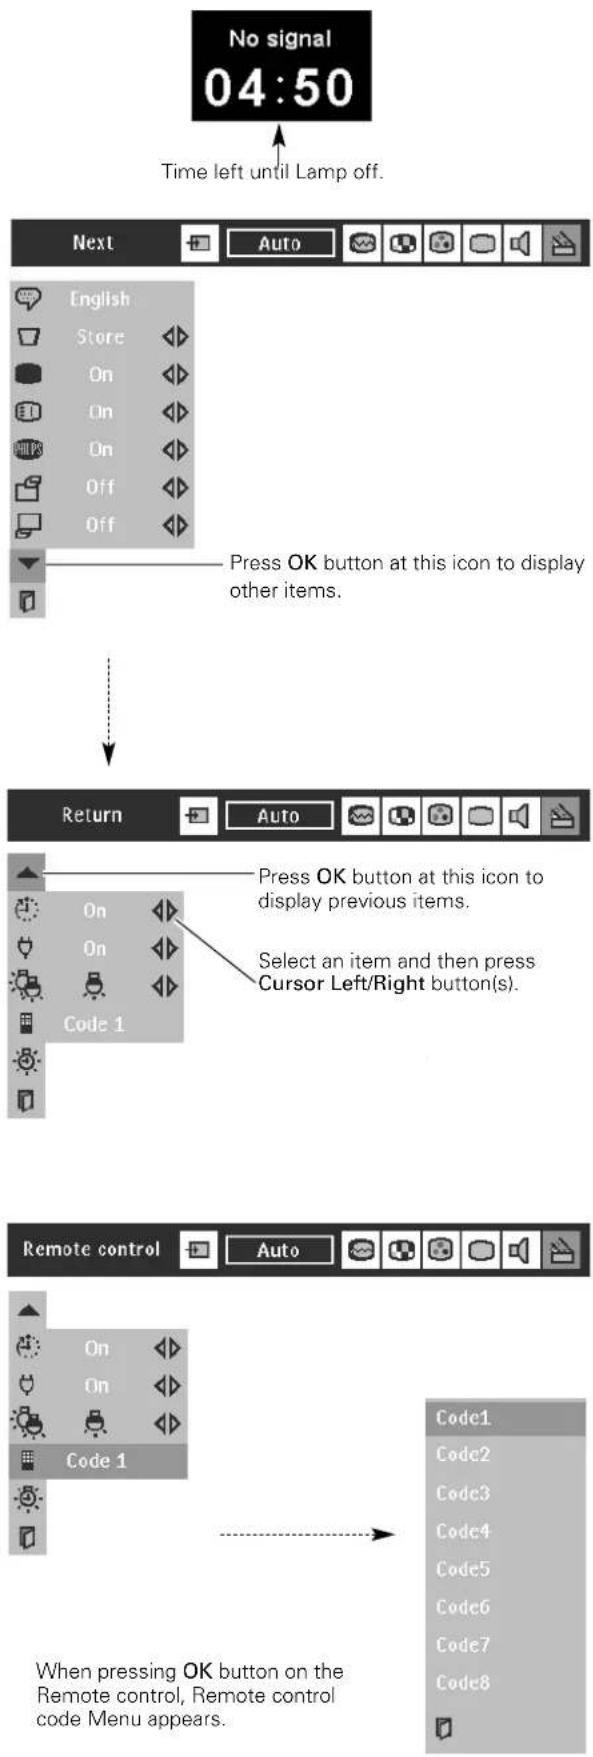
Power Management is a SmartSave function for reducing power consumption as well as maintaining the Lamp-life. When the input signal is interrupted and any button is not pressed over 5 minutes, the Projection Lamp will be automatically turned off. (This function is set "On" by default.)
This function operates as follows;
- When any input signal is interrupted, the message "No signal" is displayed and the counting down display appears (for 5 minutes).
- After counting down for 5 minutes, the Projection Lamp and Standby Indicator will be turned off. (Cooling Fans keep running.)
- The Standby Indicator starts to flash after cooling down the Projection Lamp for 90 seconds (Power Management mode). In this Power Management mode, Projection Lamp is automatically turned on when the input signal is connected or the projector is operated with any button on the top control or on the remote control again.

On start
When this function is "On," the projector is automatically turned on just by connecting AC power cord to a wall outlet.
Note ; Be sure to turn projector off properly (refer to the section "Turning Off the Projector" on P20). If the projector is turned off in the wrong steps, On Start function does not operate properly.

Lamp mode
When selecting the “☐” (Eco), the projector reduce the brightness and set into the low power consumption mode.

Remote control
Eight different remote control codesets are provided in this projector.(Code1\~Code8) Code 1 is set by default. This function is provided for avoiding mutual interference of the remote controls when operating several projectors or video equipment together. Select your desired code from Code 1 to Code 8.
* When you change the codeset of the projector, you must also change that of the remote control in accordance with the table on Page17.

Lamp counter reset
This function is used to reset Lamp Replace Counter. When replacing Projection Lamp, reset Lamp Replace Counter by using this function. Refer to page 42 for operation.
flowchart
graph TD
    A["No signal 04:50"] --> B["Time left until Lamp off."]
    B --> C["Next"]
    C --> D["English Store On On Off"]
    D --> E["Press OK button at this icon to display other items."]
    E --> F["Return"]
    F --> G["Press OK button at this icon to display previous items."]
    G --> H["Select an item and then press Cursor Left/Right button(s)."]
    H --> I["Code 1"]
    I --> J["Remote control"]
    J --> K["Code 1"]
    K --> L["When pressing OK button on the Remote control, Remote control code Menu appears."]
Operating the Wireless Mouse
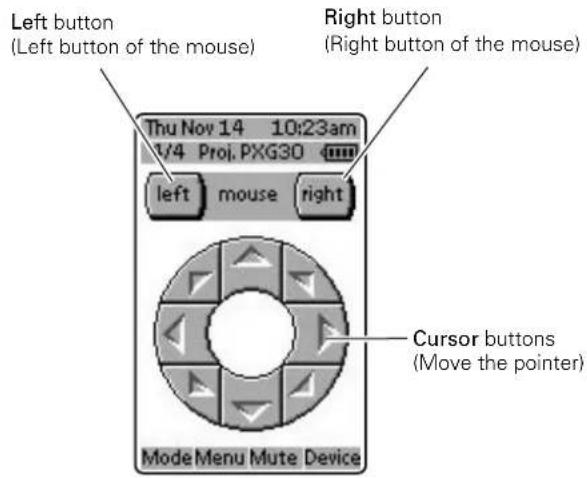
The remote control is able to not only operate this projector but also function as a wireless mouse for most Personal Computers. Left button, Right button and Cursor buttons in the mouse menu are used for wireless mouse operation.
This Wireless Mouse function is available only when PC mouse pointer is displayed on a projected screen. When the On-Screen Menu or any message / dialog box is displayed on the screen, this function does not work.
Installation
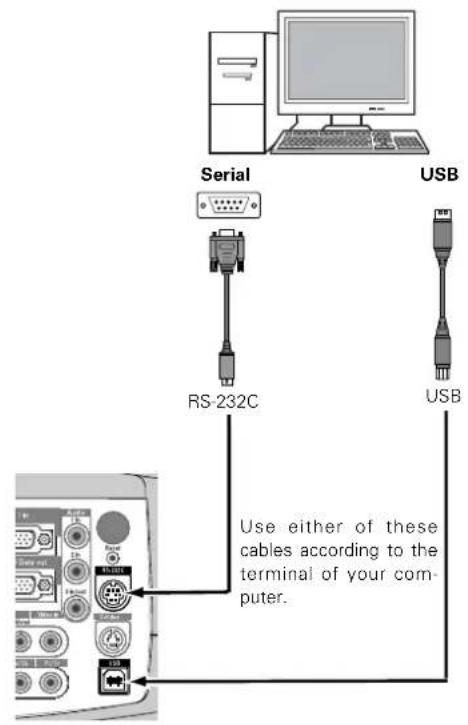
To use the remote control as the wireless mouse for a personal computer. Make sure that the mouse driver is properly installed in your computer and its USB port (or mouse port) is activated.
1 Connect the USB port (or mouse port) of your computer to the USB socket (or RS-232C socket) of the projector with the supplied USB Cable (or Serial Cable).
2 Turn on the projector, and then turn on your computer. When the computer is switched on first, Wireless Mouse may not work properly.
text_image
Serial RS-232C USB USB Use either of these cables according to the terminal of your computer.Operating the Wireless Mouse
When controlling a PC mouse pointer, operate Wireless Mouse with Cursor buttons, Left button and Right button on the remote control.
Cursor buttons
Used to move PC mouse pointer. The pointer is moved corresponding with the direction you are pressing.
Left button
This button has the same function as the left button on a PC mouse.
Press this button and the Cursor button to drag a selected screen object.
Right button
This button has the same function as the right button on a PC mouse.
text_image
Left button (Left button of the mouse) Thu Nov 14 10:23am V/4 Proj. PXG30 left mouse right Right button (Right button of the mouse) Cursor buttons (Move the pointer) Mode Menu Mute DeviceTemperature Warning Indicator
text_image
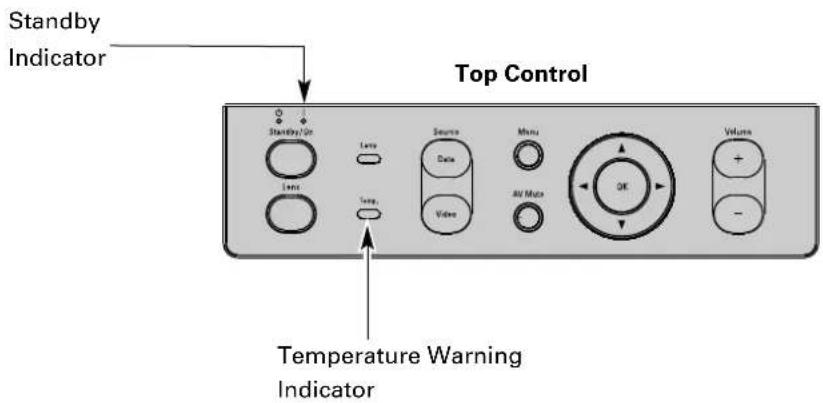
Standby Indicator Top Control Standby/Dr Lens Lens Source Date Video Menu Air Mode OK Volume Temperature Warning IndicatorThe Temperature Warning Indicator flashes red and the projector will automatically shut down when the internal temperature of the projector exceeds normal level. At this time, the Standby Indicator lights off and the Temperature Warning Indicator continues flashing. After cooling-off period, the Standby Indicator lights on again and the projector can be turned on by pressing the Standby / On button on the top control or on button on the remote control. If the Temperature Warning Indicator continues to flash, check the followings:
- Ventilation Slots of the projector may be blocked. In such an event, reposition the projector so that Ventilation Slots are not obstructed.
- Air Filters may be clogged with dust particles. Clean the Air Filters by following the section "Air-filter Care and
- If the Temperature Warning Indicator remains on after performing the above checks, Cooling Fans or the Internal Circuits may be malfunctioning. Contact a Philips Authorised LCD Projector Dealer or Service Centre.
Ensure the Standby Indicator is lighted when turning on the projector. If the temperature is not lowered enough, the Temperature Warning Indicator flashes and the projector will shut down again.
When both of the Temperature Warning and Standby Indicators are flashing
When the projector detects an internal problem, it will shut itself down and both the Temperature Warning and Standby Indicators start flashing. In this condition, the projector cannot be turned on even if you press Standby/On button on the top control or on button on the remote control. If this case happens, disconnect and connect the AC power cord, and then turn on the projector again to check its operation. If the projector shuts itself down again or fails to be turned on, the internal check and repair will be required. Plug off the AC power cord and contact a Philips Authorised LCD Projector Dealer or Service Centre. Do not leave the AC power cord plugged into the AC outlet. It may cause fire hazard or accident.
Air-filter Care and Cleaning
The Air Filters prevent dust from accumulating on the surface of the Projection Lens and the Projection Mirror. Should Air Filters become clogged with dust particles, it will reduce Cooling Fans' effectiveness and may result in internal heat build up and adversely affect the life of the projector. Clean the Air Filters as follows:
1 Turn off the projector, and disconnect AC power cord from the AC outlet.
2 Turn the projector upside down and remove three Air Filters by pulling the latches upward.
3 Clean the Air Filters with a brush or wash out dust and particles.
4 Replace three Air Filters properly. Make sure that the Air Filters are fully inserted.

CAUTION
Do not operate the projector with the Air Filters removed. Dust may accumulate on the LCD Panel and Projection Mirror degrading picture quality.
Do not put any objects into the Air Intake Vents. It may result in malfunction of the projector.
Recommendation:
For minimal servicing and to maintain high image quality, Philips recommends that this projector be installed in an area free from humidity, dust and cigarettesmoke. If the projector is used in these environments, the lens and filters will need to be cleaned (or the filter replaced) more often, and internal cleaning may become necessary. As long as the projector is regularly cleaned, use in these environments will not reduce the overall operation life of the unit. Internal cleaning should only be performed by a Philips Authorised LCD Projector Dealer or Service Centre.
Air Filters
Pull up to remove.
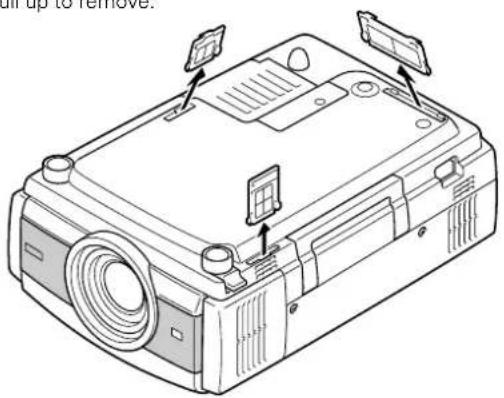
text_image
air up to remove.Cleaning the Projection lens
Follow these steps to clean the Projection Lens:
1 Apply non-abrasive camera lens cleaner to a soft, dry cleaning cloth. Avoid using excessive amount of the cleaner. Abrasive cleaners, solvents or other harsh chemicals might scratch the surface.
2 Lightly wipe a cleaning cloth over the Projection Lens.
3 When the projector is not in use, attach the Lens Cap.
Lamp Replacement
When the life of the Projection Lamp of this projector draws to an end, the Lamp Indicator lights yellow. If this indicator lights yellow, replace the projection lamp with a new one promptly.

CAUTION
For continued safety, replace with a lamp assembly of the same type. Do not drop the lamp assembly or touch the glass bulb! The glass can shatter and may cause injury.

Cool the projector down, for at least 45 minutes before opening the Lamp Cover. The inside of the projector can become very hot.
Follow these steps to replace the lamp assembly.
1 Turn off the projector and disconnect the AC plug. Allow the projector to cool for at least 45 minutes.
2 To remove the Lamp Cover, unscrew the screw with a screwdriver.
3 Loosen 2 screws with a screwdriver and pull out the Lamp Assembly by grasping Handle.
4 Replace the Lamp Assembly with a new one and tighten the 2 screws back into position. Make sure that the Lamp Assembly is set properly. Replace Lamp Cover and tighten the screw.
5 Connect AC power cord to the projector and turn on the projector.
6 Reset the Lamp Replace Counter.
Refer to "Lamp Replace Counter Reset" on the next page.
Top Control
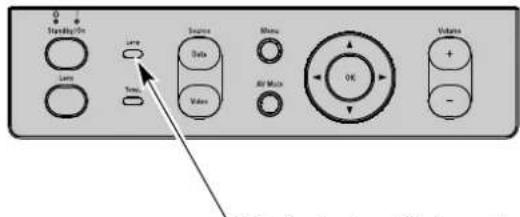
text_image
Standdown Lamps Scales Scales Volume Volume OK Air Motor Air Motor VolumeThis indicator lights yellow when the life of the projection lamp draws to an end. Replace the Projection Lamp with a new one promptly.
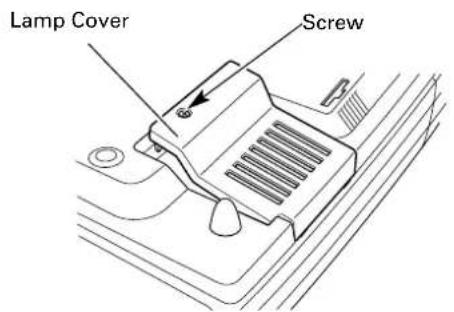
text_image
Lamp Cover Screw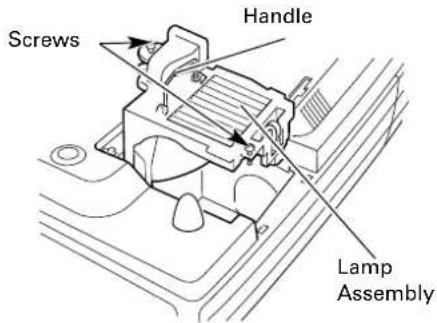
text_image
Screws Handle Lamp AssemblyOrder Replacement Lamp
Replacement Lamp can be ordered through your dealer. Give the following information to the dealer when you order.
- Model No. of your projector : LC1345 or LC1341
- Replacement Lamp Type No.: LCA3121/00(250W), 12nc: 8670 931 21009
(Service Parts No. 610 301 7167)
12. Maintenance
Lamp Replace Counter Reset
Be sure to reset the Lamp Replace Counter after the Lamp Assembly is replaced. When the Lamp Replace Counter is reset, the Lamp Indicator will light off.
1 Turn the projector on, press Menu button to display the On-Screen Menu. Press Cursor Left/Right button(s) to select Setting Menu icon (refer to page 36, 37).
2 Press the Cursor Down button to select Lamp counter reset and then press the OK button. The message "Lamp replace counter reset?" is displayed. Select [Yes] and then press the OK button.
3 Another confirmation dialog box appears and select [Yes] to reset Lamp Replace Counter.
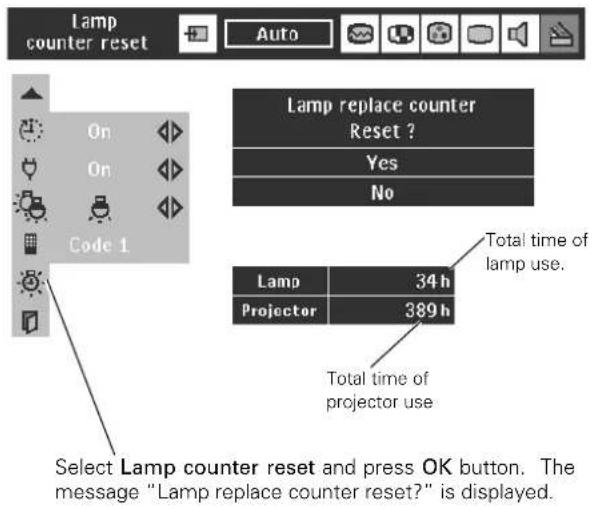
text_image
Lamp counter reset Auto On On Code 1 Lamp replace counter Reset ? Yes No Total time of lamp use. Lamp 34h Projector 389h Total time of projector use Select Lamp counter reset and press OK button. The message "Lamp replace counter reset?" is displayed.Note : Do not reset the Lamp Replace Counter when the Projection Lamp is not replaced.

LAMP HANDLING PRECAUTIONS
This projector uses a high-pressure lamp which must be handled carefully and properly. Improper handling may result in accidents, injury, or create a fire hazard.
- Lamp lifetime may differ from lamp to lamp and according to the environment of use. There is no guarantee of the same lifetime for each lamp. Some lamps may fail or terminate their lifetime in a shorter period of time than other similar lamps.
- If the projector indicates that the lamp should be replaced, i.e., if the LAMP INDICATOR lights up, replace the lamp with a new one IMMEDIATELY after the projector has cooled down. (Follow carefully the instructions in the LAMP REPLACEMENT section of this manual.) Continuous use of the lamp with the LAMP INDICATOR lighted may increase the risk of lamp explosion.
- A Lamp may explode as a result of vibration, shock or degradation as a result of hours of use as its lifetime draws to an end. Risk of explosion may differ according to the environment or conditions in which the projector and lamp are being used.
IF A LAMP EXPLODES, THE FOLLOWING SAFETY PRECAUTIONS SHOULD BE TAKEN.
If a lamp explodes, disconnect the projector's AC plug from the AC outlet immediately. Contact an authorized service station for a checkup of the unit and replacement of the lamp. Additionally, check carefully to ensure that there are no broken shards or pieces of glass around the projector or coming out from the cooling air circulation holes. Any broken shards found should be cleaned up carefully. No one should check the inside of the projector except those who are authorized trained technicians and who are familiar with projector service. Inappropriate attempts to service the unit by anyone, especially those who are not appropriately trained to do so, may result in an accident or injury caused by pieces of broken glass.
Troubleshooting
Before calling your dealer or service center for assistance, check the matters below once again.
- Make sure you have properly connected the projector to peripheral equipment as described in the section "Installation" on page15 and 16.
- Make sure all equipment is connected to AC outlet and turned on the power.
- When you operate the projector with a computer, and it does not project an image, restart the computer.
| Problem: | - Try these Solutions |
| No power. | - Plug the power cord of the projector into the AC outlet.- Make sure Standby Indicator lights on.- After turning off the projector, wait 90 seconds(cool-down period) to turn it on again.Note : After pressing Standby/On button to turn off, make sure the projector works as follows:1. The Power Indicator lights bright and the Standby Indicator turns off.2. After 90 seconds, the Standby Indicator lights green again and the projector may be turned on by pressing Standby/On button.- Check the Temperature Warning and the Standby Indicator. If both indicators flash, the projector cannot be turned on.(Refer to the section "Maintenance" on page 39.)- Check the Projection Lamp. (Refer to page 41.) |
| Image is out of focus. | - Adjust focus of the projector.- Make sure the projection screen is at least 4.1' (1.2m) from the projector.- Check the Projection Lens to see if it needs cleaning.Note : Moving the projector from a cool temperature location to a warm temperature location may result in moisture condensation on the Projection Lens. In such an event, leave the projector OFF and wait until condensation disappears. |
| Picture is Left/Right reversed. | - Check Ceiling / Rear feature. (See "Other Settings" section on page 36.) |
| Picture is Top/Bottom reversed. | - Check Ceiling feature. (See "Other Settings" section on page 36.) |
| Some displays are not seen during the Operation. | - Check Display feature.(See "Other Settings" section on page 36.) |
| No image. | - Check the connection between your computer or video equipment and the projector.- It takes about 30 seconds to display an image after turning on the projector.- Check if the selected system is corresponding with your computer or video equipment.- Make sure the temperature is not out of the Operating Temperature (5°C ~ 35°C). |
| No sound. | - Check audio cable connection from audio input source.- Adjust the audio source.- Press Volume + button.- Press Mute button. |
| Data 3 in cannot be selected. | - Check the Data 3 in / Data Out socket is set as Data 3 in. ( See "Computer Input" section on page 23 ) |
| Computer signal not output from Data Out | - Check the Data 3 in / Data Out socket is set as Data Out in. ( See "Computer Input" section on page 23 ) |
| The Remote Control does not work. | - Check the batteries.- Make sure no obstruction is between the projector and the remote control.- Make sure you are not too far from the projector when using remote control.Maximum operating range is 16.4' (5m).- Make sure the code of the remote control is conformed to the projector.(See “Other Settings” section on page 36, 37.) |
| Wireless Mouse function does not work. | - Check cable connection between the projector and your computer.- Check the mouse setting on your computer.- Turn the projector on before turning on a computer. |
If the problem still persists after following all operating instructions, contact a Philips Authorised LCD Projector Dealer or Service Centre. Give the model number and explain the difficulty. Advice to obtain service will be given.
WARNING :
High voltages are used to operate this projector. Do not attempt to open the cabinet.
Indicators and Projector Condition
Check the Indicators for projector condition.
| Indicators | Projector Condition | |||
| Lamp yellow | Temperature Warning red | Standby green | Power red | |
 | [HK50] |  |  | The projector is Off. (The AC power cord is unplugged.) |
 | [ACW0] |  | [XXW] | The projector is ready to be turned on with Standby/On button on the top control or on button on the remote control. |
 | [3703] |  |  | The projector is operating normally. |
| [ZKKX] |  |  |  | The temperature inside the projector is abnormally high. The projector cannot be turned on. When the projector is cooled down enough and the temperature returns to normal, the Standby Indicator lights on and the projector can be turned on. (The Temperature Warning Indicator keeps flashing.) Check and clean the Air Filter. |
| [708T] | [K00H] |  | [TKBW] | The projector is cooled down enough and the temperature returns to normal. When turning on the projector, the Temperature Warning Indicator stops flashing. Check and clean the Air Filter. |
| [340C] |  |  | [YYTK] | The projector is being cooled down. It cannot be turned on until the Standby Indicator lights on. |
 |  | [DBKA] |  | The projector detects an abnormal condition and cannot be turned on. For details of this symptom, refer to page 39. |
| [077K] |  |  |  | The projector is in the Power management mode. |


* When the life of the projection lamp draws to an end, the Lamp Indicator lights yellow. When this indicator lights yellow, replace the projection lamp with a new one promptly. Make sure to reset the Lamp Replace Counter after its replacement.
Menu Tree (Projector)
Main menu
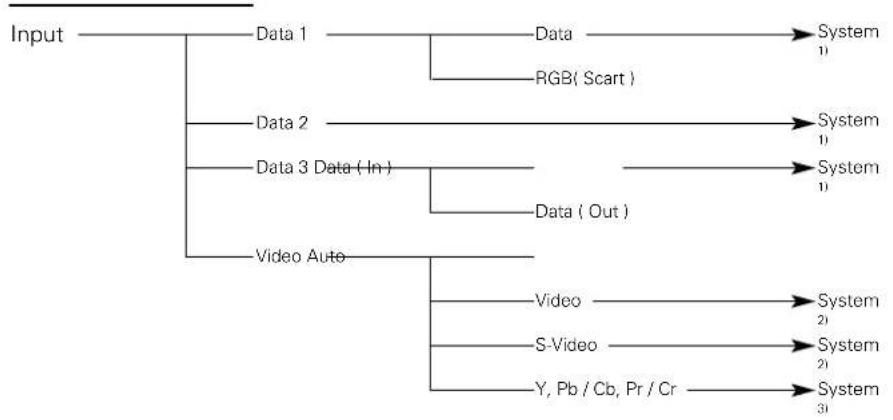
flowchart
graph TD
    A["Input"] --> B["Data 1"]
    A --> C["Data 2"]
    A --> D["Data 3 Data (In)"]
    A --> E["Video Auto"]
    B --> F["Data"]
    B --> G["RGB(Scart)"]
    C --> H["System 1"]
    C --> I["System 2"]
    D --> J["System 1"]
    D --> K["System 2"]
    D --> L["System 3"]
    E --> M["Video"]
    E --> N["S-Video"]
    E --> O["Y, Pb/Cb, Pr/Cr"]
Data Input
Main menu
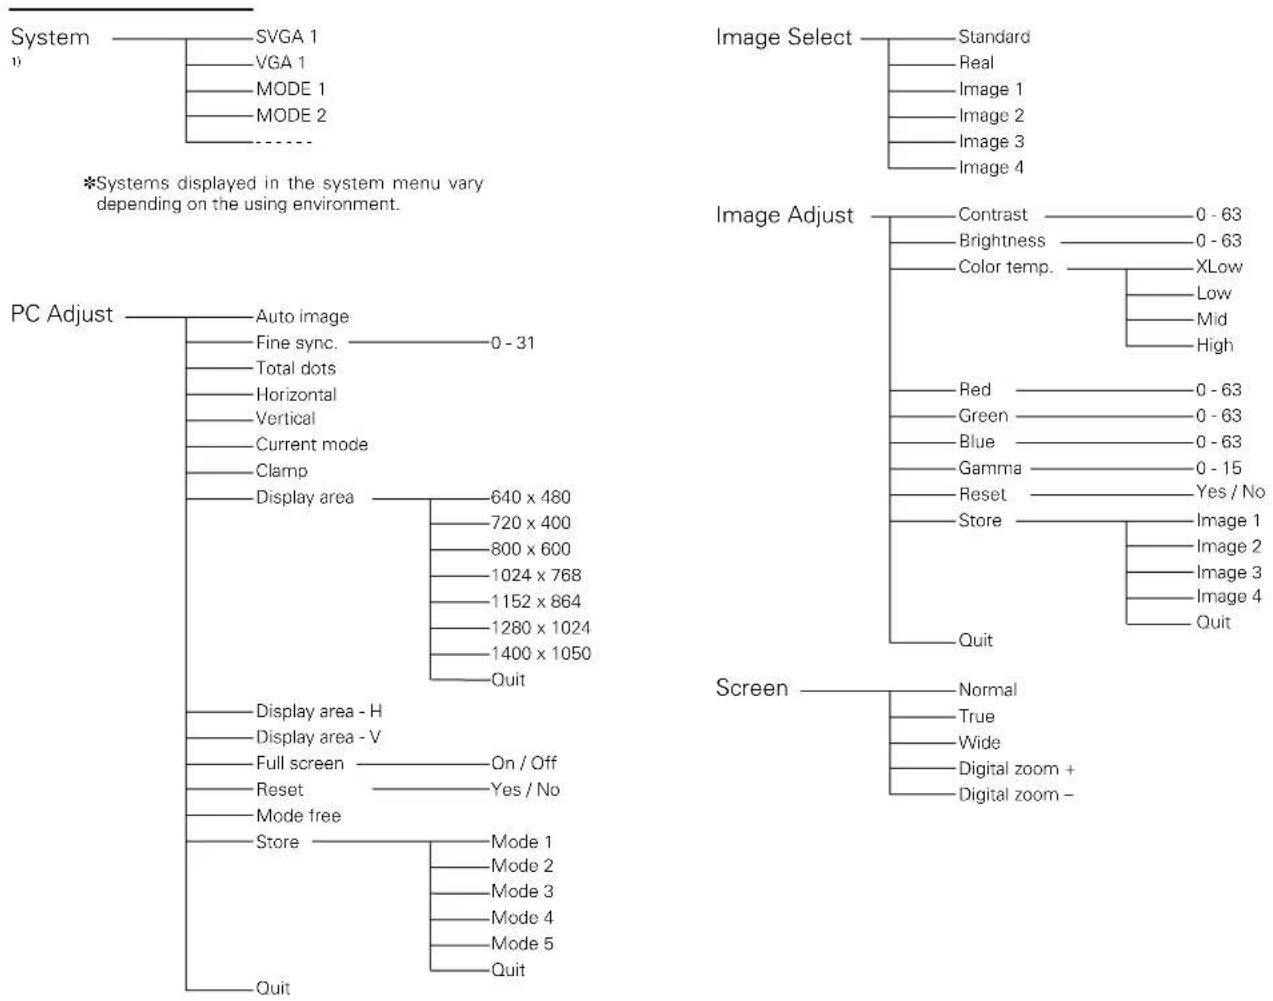
flowchart
graph TD
    A["System"] --> B["SVGA 1"]
    A --> C["VGA 1"]
    A --> D["MODE 1"]
    A --> E["MODE 2"]
    A --> F["......"]

    G["PC Adjust"] --> H["Auto image"]
    H --> I["Fine sync. 0 - 31"]
    I --> J["Total dots"]
    J --> K["Horizontal"]
    K --> L["Vertical"]
    L --> M["Current mode"]
    M --> N["Clamp"]
    N --> O["Display area 640 x 480"]
    O --> P["720 x 400"]
    P --> Q["800 x 600"]
    Q --> R["1024 x 768"]
    R --> S["1152 x 864"]
    S --> T["1280 x 1024"]
    T --> U["1400 x 1050"]
    U --> V["Quit"]

    W["Screen"] --> X["Display area - H"]
    X --> Y["Display area - V"]
    Y --> Z["Full screen On / Off"]
    Z --> AA["Reset Yes / No"]
    AA --> AB["Mode free"]
    AB --> AC["Store Mode 1"]
    AC --> AD["Mode 2"]
    AD --> AE["Mode 3"]
    AE --> AF["Mode 4"]
    AF --> AG["Mode 5"]
    AG --> AH["Quit"]

    I --> AI["Image Select Standard"]
    I --> AJ["Image Select Real"]
    I --> AK["Image Select Image 1"]
    I --> AL["Image Select Image 2"]
    I --> AM["Image Select Image 3"]
    I --> AN["Image Select Image 4"]

    K --> AO["Image Adjust Contrast 0 - 63"]
    K --> AP["Image Adjust Brightness 0 - 63"]
    K --> AQ["Image Adjust Color temp. XLow Low Mid High"]

    O --> AR["Image Adjust Red 0 - 63"]
    O --> AS["Image Adjust Green 0 - 63"]
    O --> AT["Image Adjust Blue 0 - 63"]
    O --> AU["Image Adjust Gamma 0 - 15"]
    O --> AV["Image Adjust Reset Yes / No"]
    O --> AW["Image Adjust Store Image 1"]
    O --> AX["Image Adjust Image 2"]
    O --> AY["Image Adjust Image 3"]
    O --> AZ["Image Adjust Image 4"]
    O --> BA["Image Adjust Quit"]

    Z --> BB["Screen Normal True Wide Digital zoom + Digital zoom -"]
13. Appendix
Video Input
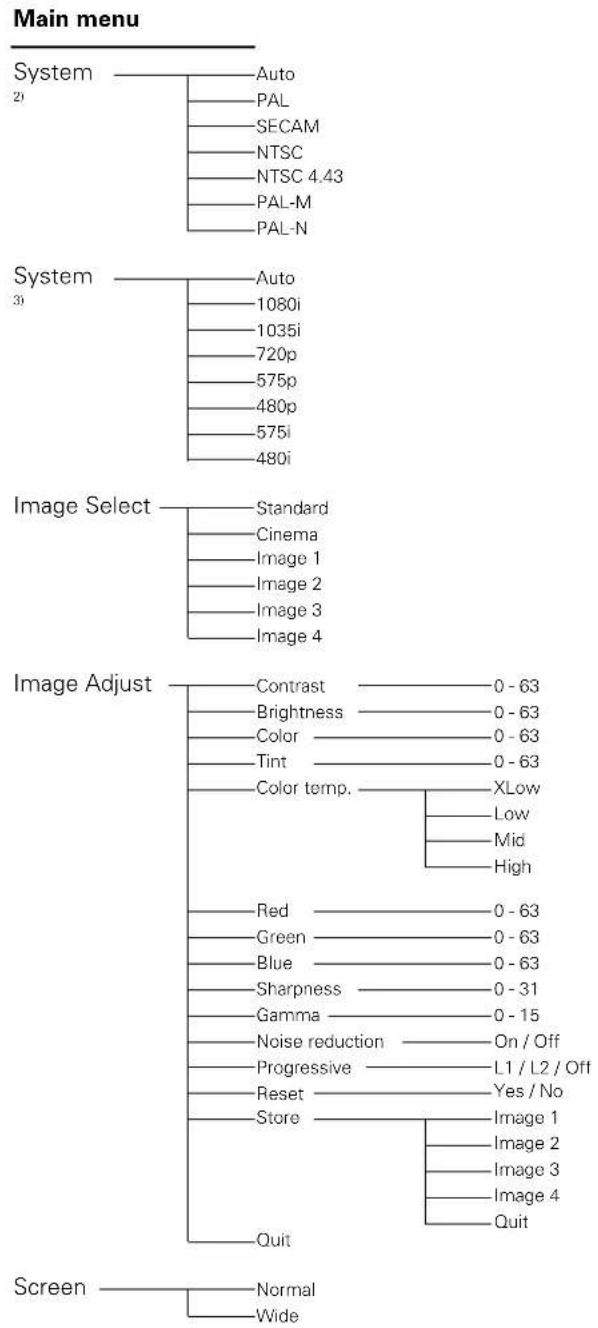
flowchart
graph TD
    A["Main menu"] --> B["System 2"]
    A --> C["System 3"]
    A --> D["Image Select"]
    A --> E["Image Adjust"]
    A --> F["Screen"]

    B --> B1["Auto"]
    B --> B2["PAL"]
    B --> B3["SECAM"]
    B --> B4["NTSC"]
    B --> B5["NTSC 4.43"]
    B --> B6["PAL-M"]
    B --> B7["PAL-N"]

    C --> C1["Auto"]
    C --> C2["1080i"]
    C --> C3["1035i"]
    C --> C4["720p"]
    C --> C5["575p"]
    C --> C6["480p"]
    C --> C7["575i"]
    C --> C8["480i"]

    D --> D1["Standard"]
    D --> D2["Cinema"]
    D --> D3["Image 1"]
    D --> D4["Image 2"]
    D --> D5["Image 3"]
    D --> D6["Image 4"]

    E --> E1["Contrast 0-63"]
    E --> E2["Brightness 0-63"]
    E --> E3["Color 0-63"]
    E --> E4["Tint 0-63"]
    E --> E5["Color temp. XLow"]
    E --> E6["Red 0-63"]
    E --> E7["Green 0-63"]
    E --> E8["Blue 0-63"]
    E --> E9["Sharpness 0-31"]
    E --> E10["Gamma 0-15"]
    E --> E11["Noise reduction On/Off"]
    E --> E12["Progressive L1/L2/Off"]
    E --> E13["Reset Yes/No"]
    E --> E14["Store Image 1"]
    E --> E15["Image 2"]
    E --> E16["Image 3"]
    E --> E17["Image 4"]
    E --> E18["Quit"]
    E --> E2["Quit"]
    E --> E3["Quit"]
Settings
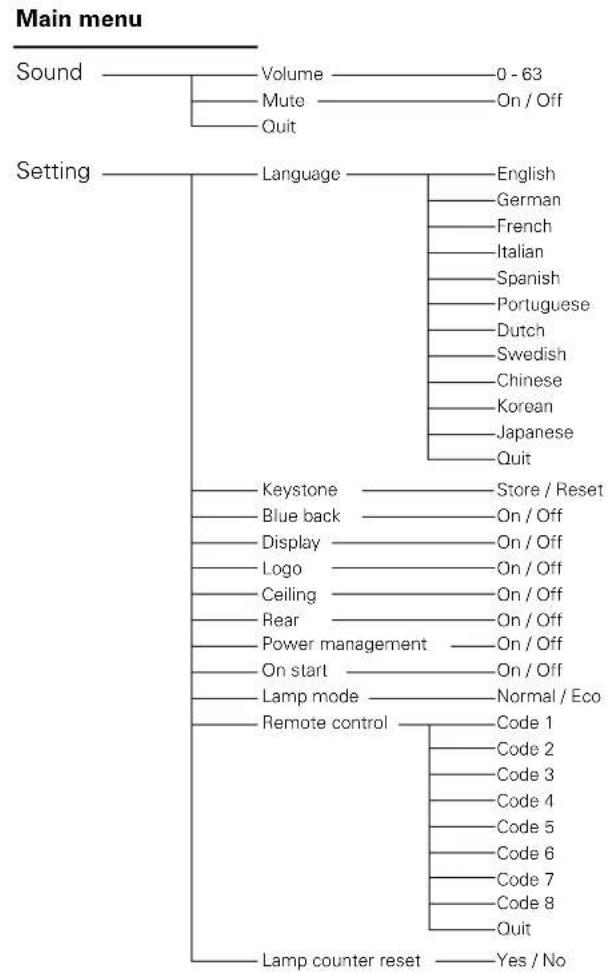
flowchart
graph TD
    A["Sound"] --> B["Volume 0-63"]
    A --> C["Mute On/Off"]
    A --> D["Quit"]
    E["Setting"] --> F["Language"]
    F --> G["English"]
    F --> H["German"]
    F --> I["French"]
    F --> J["Italian"]
    F --> K["Spanish"]
    F --> L["Portuguese"]
    F --> M["Dutch"]
    F --> N["Swedish"]
    F --> O["Chinese"]
    F --> P["Korean"]
    F --> Q["Japanese"]
    F --> R["Quit"]
    S["Keystone"] --> T["Store / Reset"]
    U["Blue back"] --> V["On / Off"]
    W["Display"] --> X["On / Off"]
    Y["Logo"] --> Z["On / Off"]
    AA["Ceiling"] --> AB["On / Off"]
    AC["Rear"] --> AD["On / Off"]
    AE["Power management"] --> AF["On / Off"]
    AG["On start"] --> AH["On / Off"]
    AI["Lamp mode"] --> AJ["Normal / Eco"]
    AK["Remote control"] --> AL["Code 1"]
    AK --> AM["Code 2"]
    AK --> AN["Code 3"]
    AK --> AO["Code 4"]
    AK --> AP["Code 5"]
    AK --> AQ["Code 6"]
    AK --> AR["Code 7"]
    AK --> AS["Code 8"]
    AK --> AT["Quit"]
    AU["Lamp counter reset"] --> AV["Yes / No"]
13. Appendix
Menu Tree (Remote Control)
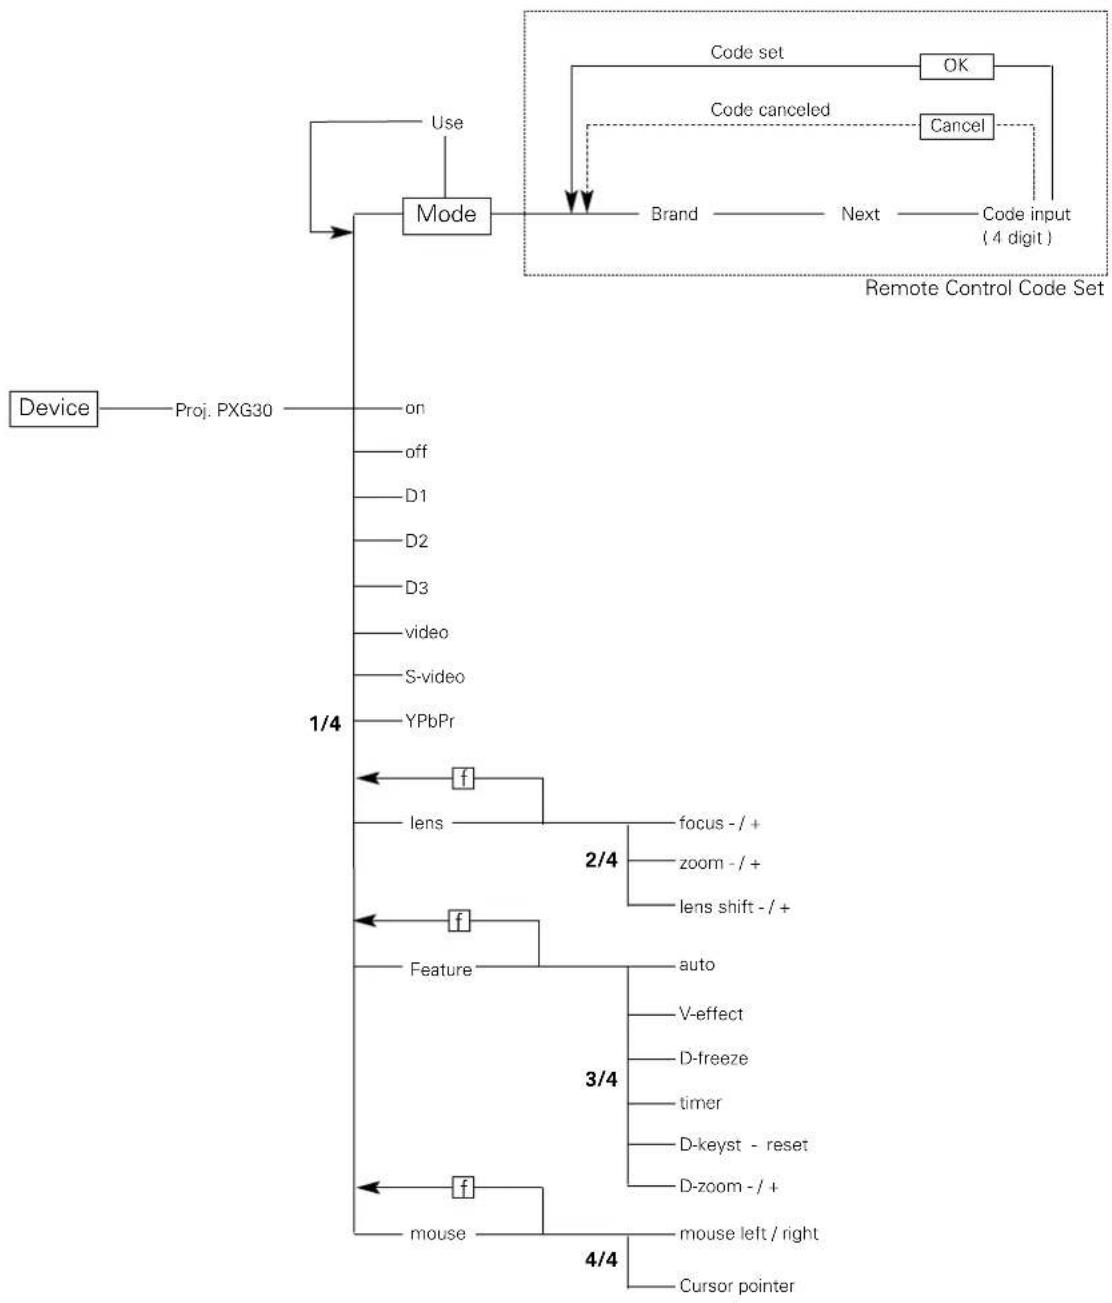
flowchart
graph TD
    A["Device"] --> B["Proj. PXG30"]
    B --> C["Mode"]
    C --> D["Use"]
    C --> E["Code set"]
    E --> F["OK"]
    E --> G["Cancel"]
    F --> H["Code canceled"]
    G --> I["Code input (4 digit)"]
    C --> J["Brand"]
    C --> K["Next"]
    J --> L["Remote Control Code Set"]
    K --> L
    L --> M["1/4"]
    M --> N["f"]
    N --> O["lens"]
    O --> P["2/4"]
    P --> Q["focus -/+"]
    P --> R["zoom -/+"]
    P --> S["lens shift -/+"]
    N --> T["f"]
    T --> U["Feature"]
    U --> V["auto"]
    U --> W["V-effect"]
    U --> X["D-freeze"]
    U --> Y["timer"]
    U --> Z["D-keyst - reset"]
    U --> AA["D-zoom -/+"]
    T --> AB["f"]
    AB --> AC["mouse"]
    AC --> AD["4/4"]
    AD --> AE["mouse left / right"]
    AD --> AF["Cursor pointer"]
* □ stands for the hard buttons on the remote control.
Compatible Computer Specifications
Basically this projector can accept the signal from all computers with the V, H-Frequency below mentioned and less than 140 MHz of Dot Clock.
| On-Screen Display | Resolution | H-Freq. (kHz) | V-Freq. (Hz) | On-Screen Display | Resolution | H-Freq. (kHz) | V-Freq. (Hz) |
| VGA 1 640 x 480 31.47 59.88 | XGA 11 1 | 024 x 768 | 61.00 75.70 | ||||
| VGA 2 720 x 400 31.47 70.09 | XGA 12 1 | 024 x 768 | 35.522 | 86.96(Interlace) | |||
| VGA 3 640 x 400 31.47 70.09 | XGA 13 1 | 024 x 768 | 46.90 58.20 | ||||
| VGA 4 640 x 480 37.86 74.38 | XGA 14 1 | 024 x 768 | 47.00 58.30 | ||||
| VGA 5 640 x 480 37.86 72.81 | XGA 15 1 | 024 x 768 | 58.03 72.00 | ||||
| VGA 6 640 x 480 37.50 75.00 | MAC 19 1 | 024 x 768 60.24 | 75.08 | ||||
| VGA 7 640 x 480 43.269 85.00 | MAC 21 | 1152 x 870 | 68.68 75.06 | ||||
| MAC LC13 | 640 x 480 34 | 97 66.60 | SXGA 1 1 | 152 x 864 | 64.20 70.40 | ||
| MAC 13 640 x 480 35.00 66.67 | SXGA 2 1 | 280 x 1024 | 62.50 58.60 | ||||
| RGB | —— | 15.625 | 50(Interlace) | SXGA 3 | 1280 x 1024 | 63.90 60.00 | |
| RGB | —— | 15.734 | 60(Interlace) | SXGA 4 1 | 280 x 1024 | 63.34 59.98 | |
| SVGA 1 800 x 600 35.156 56.25 | SXGA 5 1 | 280 x 1024 | 63.74 60.01 | ||||
| SVGA 2 800 x 600 37.88 60.32 | SXGA 6 1 | 280 x 1024 | 71.69 67.19 | ||||
| SVGA 3 800 x 600 46.875 75.00 | SXGA 7 1 | 280 x 1024 | 81.13 76.107 | ||||
| SVGA 4 800 x 600 53.674 85.06 | SXGA 8 1 | 280 x 1024 | 63.98 60.02 | ||||
| SVGA 5 800 x 600 48.08 72.19 | SXGA 9 1 | 280 x 1024 | 79.976 75.025 | ||||
| SVGA 6 800 x 600 37.90 61.03 | SXGA 10 1 | 280 x 960 | 60.00 60.00 | ||||
| SVGA 7 800 x 600 34.50 55.38 | SXGA 11 1 | 152 x 900 | 61.20 65.20 | ||||
| SVGA 8 800 x 600 38.00 60.51 | SXGA 12 1 | 152 x 900 | 71.40 75.60 | ||||
| SVGA 9 800 x 600 38.60 60.31 | SXGA 13 1 | 280 x 1024 | 50.00 | 86.00(Interlace) | |||
| SVGA 10 800 x 600 32.70 51.09 | SXGA 14 1 | 280 x 1024 | 50.00 | 94.00(Interlace) | |||
| SVGA 11 800 x 600 38.00 60.51 | SXGA 15 1 | 280 x 1024 | 63.37 60.01 | ||||
| MAC 16 832 x 624 49.72 74.55 | SXGA 16 1 | 280 x 1024 | 76.97 72.00 | ||||
| XGA 1 1024 x 768 | 48.36 60.00 | SXGA 17 1 | 152 x 900 | 61.85 66.00 | |||
| XGA 2 1024 x 768 | 68.677 84.997 | SXGA 18 1 | 280 x 1024 | 46.43 | 86.70(Interlace) | ||
| XGA 3 1024 x 768 | 60.023 75.03 | SXGA 19 1 | 280 x 1024 63.79 | 60.18 | |||
| XGA 4 1024 x 768 | 56.476 70.07 | SXGA 21 1 | 400 x 1050 63.93 | 60.00 | |||
| XGA 5 1024 x 768 60.31 74.92 | MAC 12 1 | 80 x 960 | 75.00 | 75.08 | |||
| XGA 6 1024 x 768 | 48.50 60.02 | MAC 12 1 | 80 x 1024 | 80.00 | 75.08 | ||
| XGA 7 1024 x 768 | 44.00 54.58 | 720p (HDTV) | —— | 45.00 60.00 | |||
| XGA 8 1024 x 768 | 63.48 79.35 | 1035i (HDTV) | —— | 33.75 | 60.00(Interlace) | ||
| XGA 9 | 1024 x 768 | 36.00 | 87.17(Interlace) | 1080i (HDTV) | —— | 33.75 | 60.00(Interlace) |
| XGA 10 1 | 1024 x 768 | 62.04 77.07 | 1080i (HDTV) | —— | 28.125 | 50.00(Interlace) | |
Note : Specifications are subject to change without notice.
Technical Specifications
Projector type Multi-media Projector
Dimensions 306mm x 166mm x 436mm (12.0" x 6.5" x 17.2") (W x H x D)
Net weight 7.9 kg (17.4 lbs)
LCD LC1345/00 : 3 x 1.0" HT Poly Silicon TFT with μ lens
LC1341/00 : 3 x 1.0" HT Poly Silicon TFT
Resolution XGA (1024 x 768), RGB Stripe
Number of pixels 2,359,296 (1024 x 768 x 3 panels)
Input compatibilities
Video PAL, SECAM, NTSC, NTSC4.43, PAL-M and PAL-N
S-Video / S-VHS (Y/C)
Component video input (RGB-Y,YCbCr,YPbPr)
EDTV / HDTV video input (480p, 575p, 720p, 1035i, and 1080i)
Data H-sync. 15 \~ 100 KHz, V-sync. 50 \~ 100 Hz
Projection image size (Diagonal) Adjustable from 30" to 300"
Horizontal resolution 800 TV lines (video input)
Lens F 1.7 \~ 2.1, f=34.0 mm \~ 44.0 mm
Projection distance 1.2 m \~ 10.0 m (4.1' \~ 32.8')
Lamp UHP™ 250 W, user replaceable
Input connectors
Video 1 x Component video (3 x RCA), 1 x CVBS (RCA), 1 x S-video (Y/C DIN)
Data 1 Mini D-sub
Data 2 5 BNC
Data 3 Mini D-sub
Audio
Video 1 x Stereo audio (2 x RCA)
Data 1 \~Data 3 1 x Stereo audio (3.5mm jack)
Mouse USB type B
Output connectors
Data out Mini D-sub (user selectable with Data 3)
Audio out 1 x Stereo audio (3.5mm jack, user selectable with Audio Data 3)
Built-in speakers 2W + 2W Stereo
Operating voltage AC 100-120 V / 200-240V, 50 / 60 Hz
Power consumption 350W
Standby power 13W
Temperature range
Operational +5 °C \~ +35 °C (41 °F \~ 95 °F)
Storage -10 °C \~ +60 °C (14 °F \~ 140 °F)
Supplied accessories Printed user guide (8 languages)
AC power cord x 2 (US and Europe type)
Remote control ProntoNEO (including batteries, CD-ROM, Instruction for use, Quick start guide)
VGA cable
USB cable
Control cable for serial port
Dust cover
Lens cap
Quick setup card
Warranty card + envelopes
Optional accessories UHP™ 250 W replacement lamp (LCA3121/00)
Ceiling mount for high ceiling (LCA2215/00)
Ceiling mount for low ceiling (LCA2216/00)
Tele zoom lens (LCA3003/00)
Wide zoom lens (LCA3004/00)
– The specifications are subject to change without notice.
– LCD panels are manufactured to the highest possible standards. Even though 99.99% of the pixels are effective, a tiny fraction of the pixels (0.01% or less) may be ineffective by the characteristics of the LCD panels.