
D24W33 - Screen V7 - Free user manual and instructions
Find the device manual for free D24W33 V7 in PDF.


| Product Type | LED Monitor |
| Brand | V7 |
| Model | D24W33 |
| Screen Size | 24 inches (diagonal) |
| Resolution | 1920 x 1080 (Full HD) |
| Aspect Ratio | 16:9 |
| Refresh Rate | 60 Hz |
| Response Time | 5 ms (typical) |
| Brightness | 250 cd/m² |
| Contrast Ratio | 1000:1 (static) |
| Viewing Angle | 178° / 178° (horizontal/vertical) |
| Connectivity | 1 x VGA, 1 x DVI-D, 1 x HDMI 1.4 |
| Power Consumption | 25 W (typical), 0.5 W (standby) |
| VESA Mount Compatible | 100 x 100 mm |
| Stand Adjustments | Tilt: -5° to +15° |
| Dimensions (with stand) | 55.4 x 40.0 x 20.0 cm |
| Weight (with stand) | 4.2 kg |
| Features | Flicker-Free, Low Blue Light mode |
| What's in the Box | Monitor, Stand, Power Cord, VGA Cable, User Manual |
| Warranty | 3 years |
Frequently Asked Questions - D24W33 V7
User questions about D24W33 V7
0 question about this device. Answer the ones you know or ask your own.
Ask a new question about this device
Download the instructions for your Screen in PDF format for free! Find your manual D24W33 - V7 and take your electronic device back in hand. On this page are published all the documents necessary for the use of your device. D24W33 by V7.
USER MANUAL D24W33 V7
To connect the monitor to your PC 4
To connect the monitor to the power source 4
Adjusting your monitor ....5
Functions of the buttons and indicator 5
OSD icon list 5
Troubleshooting ....7
Specifications 8
24" Wide-Screen LCD monitor 8
1. Package contents
 | 1. LCD Monitor |
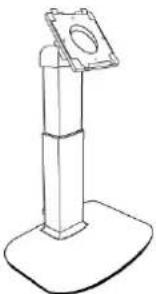 | 2. Monitor Base (the shape of base may vary according to the monitor model) |
 | 3. Power Cord (plug may vary according to the electrical standards for your area) |
 | 4. Analog Signal Cable |
 | 5. Quick Installation Guide |
 | 6. CD-ROM (contains user manual) |
 | 7. Audio Cable (optional) |
2. Installation
To connect the monitor to your PC
- Make sure that the PC and monitor are unplugged.
- Connect the signal cable (VGA/HDMI) to the monitor and the PC.

flowchart
graph LR
    A["Computer monitor"] --> B["Switch"]
    B --> C["Server"]
To connect the monitor to the power source
Connect the separate power cable to the monitor and a grounded outlet.

flowchart
graph LR
    A["Computer monitor"] --> B["Plug-in Device"]
    B --> C["Output Device"]
    style A fill:#f9f,stroke:#333
    style B fill:#ccf,stroke:#333
    style C fill:#cfc,stroke:#333
3. Adjusting your monitor
Functions of the buttons and indicator
| Item Function | |
| Enter | Enter OSD menu, select item, enter submenu, and confirm recall. |
| ▶ | 1. Positive adjustment, change within several selections.2. Hot key of "Brightness". |
| ◀ | 1. Minus adjustment, change within several selections.2. Hot key of "Contrast". |
| Exit | 1. Leave menu, cancel recall. (Settings will be saved automatically after adjustments are made.)2. Hot key of "Input Select" for selecting input signal through hardware. |
| Auto | Hot key of auto adjustment (for geometric settings only). |
OSD icon list
| Icon Function Description | ||
 | Auto Adjust * Optimize the picture performance automatically | |
 | Input Select | * Select the input from Analog and Digital Inputs* Factory default: Analog (VGA) |
 | Audio * Select "Volume" and "Mute" submenu | |
 | Luminance * Select "Brightness" and "Contrast" adjustment submenu | |
 | Geometry | * Select "H. Position", "V. Position", "Pixel Clock" and "Phase" adjustment submenu |
 | Color * Select color temperature or to set up user mode | |
 | OSD * Adjust the position and time of OSD menu on the screen | |
 | Language * Select your own preference of language of OSD menu | |
 | Recall * Reset monitor parameters back to factory preset value | |
 | Miscellaneous * Select "Miscellaneous" adjustment submenu | |
 | Brightness * Adjust the luminance of the screen | |
 | Contrast * Adjust the contrast level of the screen | |
 | H. Position * Shift the screen left or right | |
 | V. Position * Shift the screen up or down | |
 | Pixel Clock * Adjust the monitor internal sampling clock rate | |
 | Phase * Adjust the monitor internal signal phase | |
 | OSD H. Position * Shift the OSD left or right | |
 | OSD V. Position * Shift the OSD up or down | |
 | OSD Time * Set OSD display duration time | |
 | Sharpness * Adjust the sharp level of the screen | |
 | DDC/CI * Switch "DDC/CI" On or Off | |
 | Information * Show the display information | |
 | Volume * Adjust the level of the sound | |
 | Audio Input Select * Select the audio input source: Auto Detect/Line-In. | |
 | Mute * Turn the sound to mute | |
 | DCR * Switch "DCR" On or Off | |
 | Over Drive * Adjust the level of the "Over Drive" | |
 | Display Mode * Switch "Display Mode": Aspect/Full/1:1 | |
 | Overscan * Switch "Overscan" On or Off* Select On to remove the black borders around the displayed image | |
4. Troubleshooting
| Symptom Remedy | |
| *Blank Screen*Power indicator is off | Make sure the power cable is connected properly (see Installation on page 4).Make sure that the monitor was turned on using the power switch (see To connect the monitor to your PC on page 4). |
| Power indicator lights orange | Perhaps a power saving mode is active? Press any key on your keyboard or move the mouse. |
| Power indicator lights green | A screen saver may have activated automatically after a certain period of inactivity. Press any key on your keyboard or move the mouse. |
| "No Signal Detected!" message | Is the signal cable connected to the monitor and the PC's graphics port (see Installation on page 4)?Is the PC turned on (see your PC's documentation)? |
| *Display Problems*Image is displaced to the left/right or to the top/bottom | If the image appears normal but off-center, you can adjust it using the OSD functions. For further information, see "Auto Adjust" in the OSD icon list section. |
| Image is blurred | Check brightness and contrast settings (see "Luminance" in the OSD icon list section).Check the sharpness setting (see "Sharpness" in the OSD icon list section). |
| Color problems | If the colors are off (e.g., white is not really displayed as white etc.), you should adjust the color temperature (see "Color" in the OSD icon list section). |
5. Specifications
24" Wide-Screen LCD monitor
| Item T241W | ||
| Panel | Display Size 518.4 (H) x 324 (V) mm | |
| Pixel Pitch 0.27 (H) x 0.27 (V) mm | ||
| Monitor Display Colors 16.7 M colors | ||
| Input Signal Frequency | Horizontal: 30 - 94 KHzVertical: 50 - 76 Hz | |
| Connector | Analog D-sub 15 pin | |
| HDMI HDMI 19 pin | ||
| Tilt Tilt Angle -5° - +20° | ||
| Swivel Swivel Angle -45° - +45° | ||
| Dimensions(W x H x D) | Net 565.6(W) x 444.8(H) x 220.1(D) mm | |
| Weight | Net 8.7 kg | |
| Power | AC | AC 90-264V, 47-63 Hz |
| Consumption | Active: < 70W / Standby: < 2W | |
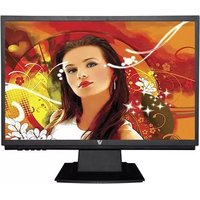

Brand : V7
Model : D24W33
Category : Screen