
WDT1652BDS - Washing machine LG - Free user manual and instructions
Find the device manual for free WDT1652BDS LG in PDF.


| Type | Front-Loading Washer |
| Brand | LG |
| Model | WDT1652BDS |
| Dimensions (W x D x H) | 27" x 29 3/4" x 38 11/16" (68.6 cm x 75.6 cm x 98.3 cm) |
| Depth with door open | 51" (129.5 cm) |
| Net Weight | 231.5 lbs (105 kg) |
| Wash Capacity | 16.0 kg (35.3 lbs) |
| Maximum Spin Speed | 1,320 RPM |
| Power Requirements | 127 VAC @ 60 Hz, 1200 W |
| Water Pressure Range | 14.5 - 116 PSI (100 - 800 kPa) |
| Drum Material | Stainless Steel |
| Motor Type | Direct-Drive (no belt or pulleys) |
| Steam Feature | Yes (SteamFresh, Sanitary, Allergiene cycles) |
| Dispenser Drawer | 4 compartments: prewash, main wash, bleach, fabric softener |
| Control Panel | LCD display with cycle settings, delay wash, child lock |
| Special Cycles | Sanitary, Allergiene, SteamFresh, Bulky/Large, Perm. Press, Cotton/Normal, Delicates, Hand Wash/Wool, Speed Wash |
| Additional Options | Water Plus, Pre-Wash, Extra Rinse, Stain Cycle, SpinSense |
| Interior Drum Light | LED (automatically turns off during cycle; can be activated manually) |
| RollerJet System | Yes (integrated jets for improved cleaning) |
| Door Lock | Yes (automatic lock during operation, delayed unlock for safety) |
| Child Lock | Yes (disables all buttons except Power) |
| Self-Cleaning Cycle | Yes (TUB CLEAN cycle with bleach recommended monthly) |
| Included Accessories | Hot and cold water hoses, non-skid pads, floor pads, wrench, elbow bracket, tie strap, stainless steel cleaner and cloth |
| Optional Accessories | Pedestal base (WDP3S), stacking kit (SSTK1), remote laundry monitor |
| Grounding | 3-prong grounded plug, do not use adapter or extension cord |
Frequently Asked Questions - WDT1652BDS LG
User questions about WDT1652BDS LG
0 question about this device. Answer the ones you know or ask your own.
Ask a new question about this device
Download the instructions for your Washing machine in PDF format for free! Find your manual WDT1652BDS - LG and take your electronic device back in hand. On this page are published all the documents necessary for the use of your device. WDT1652BDS by LG.
USER MANUAL WDT1652BDS LG
Before beginning installation, read these instructions carefully. This will simplify installation and ensure that the washer is installed correctly and safely. Leave these instructions near the washer after installation for future reference.
STEAMWASHERER™
LAVADORA A
GUÍADELEUSUS BA BIOEE
natural_image
Abstract black-and-white graphic of a stylized figure with flowing lines, no text or symbols presentNOM

IMPORTANT SAFETY INSTRUCTIONS
Basic Safety Precautions 3-6
PARTS AND FEATURES
Special Features 7
Key Parts and Components 8
INSTALLATION INSTRUCTIONS
Choose the Proper Location 9
Clearances 9
Flooring 10
Installations With Optional Pedestal Base
or Stacking Kit 10
Unpacking and Removing Shipping Bolts ...... 11
Connecting the Water Lines 12
Connecting the Drain Line 13
Leveling the Washer 14
Installation of non-skid pads (optional) 14
HOW TO USE
Sorting Wash Loads 15
Selecting Detergent 16
About the Dispenser 16
Loading the Dispenser 17
Control Panel Features 18
Cycle Guide 19
The LCD Display 20
Operating the Washer 21
Steam Cycles 22
Cycle Setting Buttons 23
Special Function Buttons 24
Custom Program 25
Secondary Functions 25
The Option Button 26
Special Care Cycles 26
CARE AND CLEANING
Regular Cleaning 27-28
Cleaning the Washer 28
Maintenance 29-30
TROUBLESHOOTING
Normal Sounds You May Hear 31
Before Calling for Service 31-33
SPECIFICATIONS/OPTIONAL ACCESSORIES
Key Dimensions and Specifications 34
Optional Accessories 34
Pedestal Installation 35-36
Stacking Kit Installation 37-38
THANK YOU!
Congratulations on your purchase
and welcome to the LG family.
Your new LG Steam Washer™
combines the most advanced
washing technology with simple
operation and high efficiency.
By following the operating and care
instructions in this manual, your
washer will provide you with many
years of reliable service.
natural_image
Silhouette of a clothes hanger with a cloth and a spray bottle beside it (no text or symbols)READ ALL INSTRUCTIONS BEFORE USE
WARNING
For your safety, the information in this manual must be followed to minimize the risk of fire or explosion, electric shock, or to prevent property damage, personal injury, or loss of life.
Your Safety and the safety of others is very important.
We have provided many important safety messages in this manual and on your appliance. Always read and obey all safety messages.

This is the safety alert symbol.
This symbol alerts you to potential hazards that can kill or hurt you and others.
All safety messages will follow the safety alert symbol and either the word DANGER or WARNING.
These words mean:
⚠️DANGER:
You can be killed or seriously injured if you don't immediately follow instructions.
WARNING:
You can be killed or seriously injured if you don't follow instructions.
All safety messages will tell you what the potential hazard is, tell you how to reduce the chance of injury, and tell you what can happen if the instructions are not followed.
READ ALL INSTRUCTIONS BEFORE USE
⚠ WARNING For your safety, the information in this manual must be followed to minimize the risk of fire or explosion, electric shock, or to prevent property damage, personal injury, or loss of life.
BASIC SAFETY PRECAUTIONS
⚠ WARNING: To reduce the risk of fire, electric shock, or injury to persons when using this appliance, follow basic precautions, including the following.
- Before use, the washer must be properly installed as described in this manual.
- Do not wash articles that have been previously cleaned in, washed in, soaked in, or spotted with gasoline, dry cleaning solvents, or other fl ammable or explosive substances, as they give off vapors that could ignite or explode.
- Do not add gasoline, dry cleaning solvents, or other fl ammable or explosive substances to the wash water. These substances give off vapors that could ignite or explode.
- Under certain conditions, hydrogen gas may be produced in a hot water system that has not been used for 2 weeks or more. HYDROGEN GAS IS EXPLOSIVE. If the hot water system has not been used for such a period, before using the washer, turn on all hot water faucets and let the water flow from each for several minutes. This will release any accumulated hydrogen gas. As the gas is flammable, do not smoke or use an open flame during this time.
- Do not allow children to play on or in the washer. Close supervision of children is necessary when the washer is used near children.
- Before the washer is removed from service or discarded, remove the door to prevent children from climbing inside.
- Do not install or store the washer where it will be exposed to the weather or freezing temperatures.
-
Do not tamper with controls.
-
Do not repair or replace any part of the washer or attempt any servicing other than as described in this manual. We strongly recommend that any service be performed by a qualified individual.
- See Installation Instructions for grounding requirements.
- ALWAYS follow the fabric care instructions supplied by the garment manufacturer.
- Do not place items exposed to cooking oil in your washer. Items contaminated with cooking oils may contribute to a chemical reaction that could cause a load to catch fi re.
- Use fabric softeners or products to eliminate static only as recommended by the manufacturer.
- This washer is not designed for maritime use or for mobile installations such as in RVs, aircraft, etc.
- Turn off the water taps and unplug the washer if the machine is to be left for an extended period of time, such as during vacations.
- Do not use to dry articles containing foam rubber or similarly textured rubber-like materials.
- Packaging material can be dangerous for children. There is a risk of suffocation! Keep all packaging from children.
- Always check the inside of the washer for foreign objects before loading laundry. Keep the door closed when not in use.
gROUNDING INSTRUCTIONS
This appliance must be grounded. In the event of malfunction or breakdown, grounding will reduce the risk of electric shock by providing a path of least resistance for electric current. This appliance is equipped with a cord having an equipment-grounding conductor and grounding plug. The plug must be plugged into an appropriate outlet that is properly installed and grounded in accordance with all local codes and ordinances.
⚠ WARNING: Improper connection of the equipment-grounding conductor can result in risk of electric shock. Check with a qualified electrician or serviceman if you are in doubt as to whether the appliance is properly grounded. Do not modify the plug provided with the appliance. If it does not fit the outlet, have a proper outlet installed by a qualified electrician. Failure to follow these warnings can cause serious injury, fire, electrical shock, or death.
READ ALL INSTRUCTIONS BEFORE USE
⚠ WARNING For your safety, the information in this manual must be followed to minimize the risk of fire or explosion, electric shock, or to prevent property damage, personal injury, or loss of life.
SAFETY INSTRUCTIONS FOR INSTALLATION
⚠ WARNING: To reduce the risk of fire, electric shock, or injury to persons when using this appliance, follow basic precautions, including the following.
- Refer to INSTALLATION INSTRUCTIONS for detailed grounding procedures. Installation instructions are packed in the washer for installer's reference. If the washer is moved to a new location, have it checked and reinstalled by a qualified service person. Failure to follow this warning can cause serious injury, fire, electrical shock, or death.
- Do not, under any circumstances cut or remove the third (ground) prong from the power cord. Failure to follow this warning can cause serious injury, fire, electrical shock, or death.
- For personal safety, this appliance must be properly grounded. Failure to follow this warning can cause serious injury, fire, electrical shock, or death.
- The power cord of this appliance is equipped with a 3-prong (grounding) plug which mates with a standard 3-prong (grounding) wall outlet to minimize the possibility of electric shock hazard from this appliance.
- This washer must be plugged into a 127VAC, 60Hz grounded outlet. Failure to follow this warning can cause serious injury, fire, electrical shock, or death.
- Have the wall outlet and circuit checked by a qualified electrician to make sure the outlet is properly grounded. Failure to follow this warning can cause serious injury, fire, electrical shock, or death.
- Where a standard 2-prong wall outlet is encountered, it is your personal responsibility and obligation to have it replaced with a properly grounded 3-prong wall outlet. Failure to follow this warning can cause serious injury, fire, electrical shock, or death.
- Do not install on carpet. Install washer on a solid floor. Failure to follow this warning can cause serious leak damage.
-
Do not remove ground prong. Do not use an adapter or extension cord. Plug into a grounded 3-prong outlet. Failure to follow these warnings can cause serious injury, fire, electrical shock, or death.
-
The washer should always be plugged into its own individual electrical outlet which has a voltage rating that matches the rating plate. This provides the best performance and also prevents overloading house wiring circuits which could cause a fire hazard from overheated wires.
- Never unplug your washer by pulling on the power cord. Always grip plug firmly and pull straight out from the outlet. Failure to follow this warning can cause serious injury, fire, electrical shock, or death.
- Repair or replace immediately all power cords that have become frayed or otherwise damaged. Do not use a cord that shows cracks or abrasion damage along its length or at either end. Failure to follow this warning can cause serious injury, fire, electrical shock, or death.
- When installing or moving the washer, be careful not to pinch, crush, or damage the power cord. Failure to follow this warning can cause serious injury, fire, electrical shock, or death.
- The washer must be installed and electrically grounded by a qualified service person in accordance with local codes to prevent shock hazard and assure stability during operation.
- Washer is heavy. Two or more people may be needed to install and move the appliance. Failure to do so can result in back or other injury.
- Store and install the washer where it will not be exposed to temperatures below freezing or exposed to outdoor weather conditions. Failure to follow this warning can cause serious leak damage.
- Do not install the washer in humid spaces to reduce the risk of electric shock. Failure to follow this warning can cause serious injury, fire, electrical shock, or death.
READ ALL INSTRUCTIONS BEFORE USE
⚠ WARNING For your safety, the information in this manual must be followed to minimize the risk of fire or explosion, electric shock, or to prevent property damage, personal injury, or loss of life.
SAFETY INSTRUCTIONS FOR USE, CARE AND CLEANING, AND DISPOSAL
⚠ WARNING: To reduce the risk of fire, electric shock, or injury to persons when using this appliance, follow basic precautions, including the following.
- Unplug the washer before cleaning to avoid the risk of electric shock.
- Never use harsh chemicals, abrasive cleaners, or solvents to clean the washer. They will damage the fi nish.
- Do not put oily or greasy rags or clothing on top of the washer. These substances give off vapors that could ignite the materials.
- Do not wash items that are soiled with vegetable or cooking oil. These items may contain some oil after laundering. Due to the remaining oil, the fabric may smoke or catch fire by itself.
- Disconnect this appliance from the power supply before attempting any user maintenance. Turning the controls to the OFF position does not disconnect this appliance from the power supply. Failure to follow this warning can cause serious injury, fire, electrical shock, or death.
- Do not combine laundry products for use in one load unless specified on the label.
- Do not mix chlorine bleach with ammonia or acids such as vinegar. Follow package directions when using laundry products. Incorrect usage can produce poisonous gas, resulting in serious injury or death.
-
Do not reach into the washer while parts are moving. Before loading, unloading, or adding items, push in the cycle selector knob and allow the drum to coast to a complete stop before reaching inside. Failure to follow this warning can cause serious injury, fire, electrical shock, or death.
-
Do not allow children to play on or in the washer. Close supervision of children is necessary when the washer is used near children. As children grow, teach them the proper, safe use of all appliances. Failure to comply with these warnings could result in serious personal injuries.
- Destroy the carton, plastic bag, and other packing materials after the washer is unpacked. Children might use them for play. Cartons covered with rugs, bedspreads, or plastic sheets can become airtight chambers. Failure to comply with these warnings could result in serious personal injuries.
- Keep laundry products out of children's reach. To prevent personal injury, observe all warnings on product labels. Failure to comply with these warnings could result in serious personal injuries.
- Remove the door to the washing compartment to avoid the danger of children or small animals getting trapped inside before your washer is removed from service or discarded. Failure to do so can result in serious personal injury or death.
SAVE THESE INSTRUCTIONS
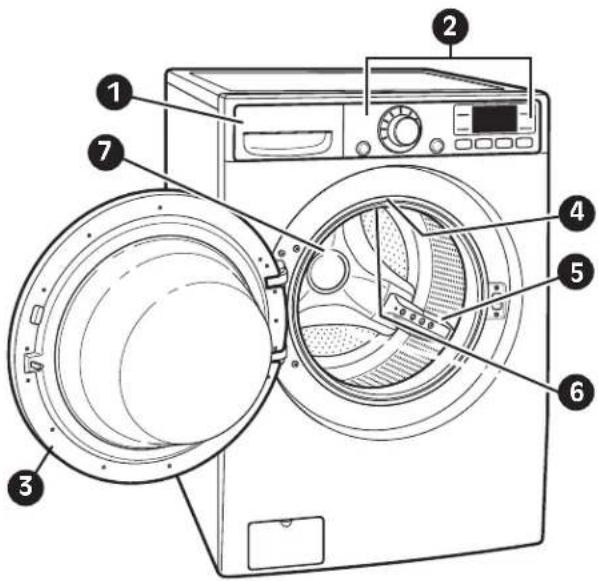
SPECIAL FEATURES
1 DETERgENT DISPENSER DRAWER
This four-compartment drawer provides separate dispensers for prewash and main wash detergent, liquid bleach, and liquid fabric softener.
2 CONTROL PANEL LCD DISPLAY SCREEN
Simple electronic controls are user-friendly. The LCD screen shows cycle options and cycle information and displays status messages during operation.
3 EASY-ACCESS LOCKING DOOR
Extra-large door locks during operation and features a delay to prevent the door from being opened until the washer interior has cooled and the water level has lowered.
4 HlgH-EFFICIENCY STEAM CYCLES
During LG's unique high-efficiency STEAM cycles, the steam nozzle injects fabrics with hot steam to gently remove tough stains.
5 ROLLERJETS
The RollerJet system enhances wash performance while reducing fabric wear. Integrated jets spray clothes to further improve washing efficiency.
6 INTERIOR DRUm Light
The drum light illuminates the washer interior for greater visibility when loading and unloading. The ultra long-life LED bulbs should never need replacement.
7 DIRECT-DRIVE mOTOR
Direct-drive motor eliminates the belt and pulleys found on most washers to provide improved performance and reliability while increasing energy efficiency.
text_image
Diagram of a washing machine with numbered parts for identification and assembly referenceKEY PARTS AND COMPONENTS
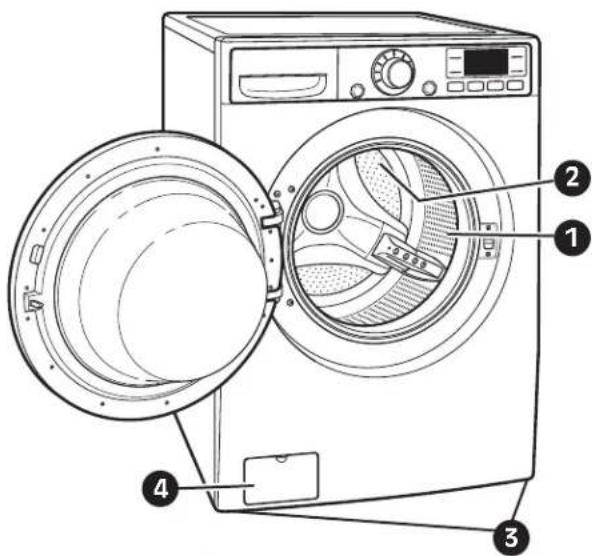
In addition to the special features and components outlined in the Special Features section, there are several other important components that are referenced in this manual.
1 ULTRA-CAPACITY STAINLESS STEEL DRUm
The ultra-large stainless steel drum offers extreme durability and is tilted to improve efficiency and allow easier access for large items.
2 WATER CIRCULATION AND STEAM NOZZLES
The water circulation nozzles spray the water/detergent solution directly onto garments for super cleaning performance. During LG's unique high-efficiency STEAM cycles, the steam nozzle injects fabrics with hot steam to gently remove tough stains.
3 LEVELING FEET
Four leveling feet (two in the front and two in the back) adjust to improve washer stability on uneven floors.
4 DRAIN ACCESS PANEL
Provides access to the drain line and drain pump filter.
5 PLC mMODEm ACCESS PANEL
This panel covers the PLC modem and should only be removed by a technician or servicer, or when installing the optional Remote Laundry Monitor (purchased separately).
• USAgE OF CLEANING CLOTH
DIRECTION: Saturate the cloth with Stainless Steel Cleaner and wipe the surface in the direction of the brush marks.
NOTE: Cloth itself will not scratch surfaces, but can pick up particles that may scratch.
CARE INSUCTION: Do not iron. Do not use fabric softener. Wash separately or with non-linting articles. Warm machine washing and low heat drying keep it in best performance.
Stainless Steel Cleaner Directions
- Shake well before using.
- Apply a small amount of cleaner to paper towel or sponge and rub surface to be cleaned.
- Polish surface with clean, dry paper towel or cloth.
WARNING
To reduce the risk of injury to persons when using this cleaner, follow basic precautions, including the following:
1) Do not put into your eyes. Failure to follow this warning can result in injury. If it comes in contact with eyes, rinse thoroughly with water.
2) Do not swallow this cleaner. Failure to do so can result in injury. If in taken internally, do not induce vomiting; call a physician.
3) When using, gloves need to be put on. Failure to follow this warning can result in injury. If it comes in contact with skin, wash with soap and water.
4) Do not operate the product with this cleaner in the drum. Failure to do so can result in damage of cloth.
5) Keep out of reach of children. Failure to do so can result in injury.
text_image
Diagram of a washing machine with labeled parts including door, fan, and control panel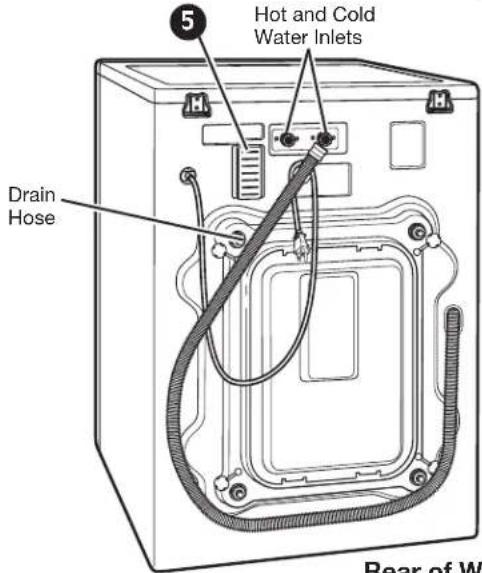
text_image
Hot and Cold Water Inlets Drain Hose Rear of WRear of Washer
Included Accessories
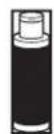
Stainless Steel
Cleaner
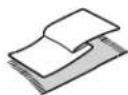
Cleaning Cloth
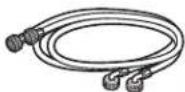
Hot and Cold Water Hoses
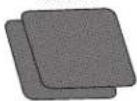
Non-skid pads
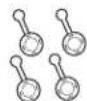
Caps (4)
(for covering
shipping bolt holes)
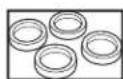
Floor pads (4)
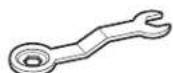
Wrench
(for removing
shipping bolts and
adjusting leveling feet)
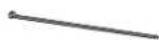
Tie Strap (for securing drain hose)
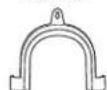
Elbow Bracket (for securing drain hose)
- Washer is heavy! Two or more people are required when moving and unpacking the washer. Failure to do so can result in back or other injury.
- Store and install the washer where it will not be exposed to temperatures below freezing or exposed to outdoor weather conditions. Failure to follow this warning can cause serious injury, fire, electrical shock, or death.
- Properly ground washer to conform with all governing codes and ordinances. Failure to follow this warning can cause serious injury, fire, electrical shock, or death.
- To reduce the risk of electric shock, do not install the washer in humid spaces. Failure to follow this warning can cause serious injury, fire, electrical shock, or death.
- The base opening must not be obstructed by carpeting when the washer is installed on a carpeted floor.
- Do not remove ground prong. Do not use an adapter or extension cord. Plug into a grounded 3-prong outlet. Failure to follow this warning can cause serious injury, fire, electrical shock, or death.
Power Outlet
- The power outlet must be within 60 in. (1.5 m) of either side of the washer.
- The appliance and outlet must be positioned so that the plug is easily accessible.
- Do not overload the outlet with more than one appliance.
- The outlet must be grounded in accordance with current wiring codes and regulations.
- Time-delay fuse or circuit breaker is recommended.
NOTE: It is the personal responsibility and obligation of the product owner to have a proper outlet installed by a qualified electrician.
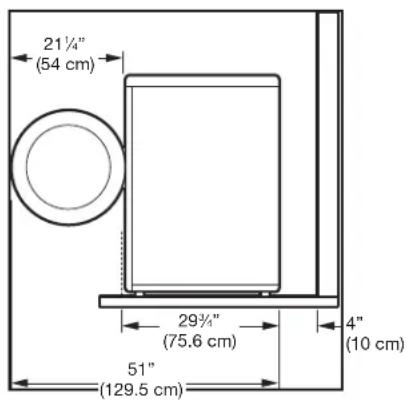
CLEARANCES
text_image
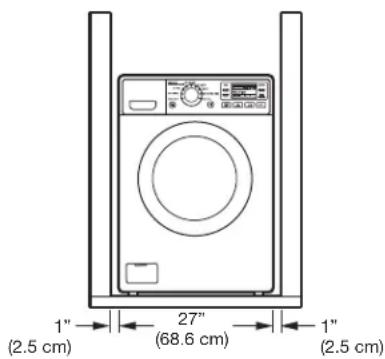
21¼" (54 cm) 29½" (75.6 cm) 51" (129.5 cm) 4" (10 cm)To ensure sufficient clearance for water lines and airflow, allow minimum clearances of at least 1 in. (2.5 cm) at the sides and 4 in. (10 cm) behind the unit. Be sure to allow for wall, door, or floor moldings that may increase the required clearances.
text_image
1" (2.5 cm) 27" (68.6 cm) 1" (2.5 cm)Allow at least 24 in. (61.2 cm) in front of the washer to open the door.
FLOORING
- To minimize noise and vibration, the washer MUST be installed on a solidly constructed floor. See the NOTE at right.
- Allowable slope under the entire washer is 1^ maximum.
- Carpeting and soft tile surfaces are not recommended.
- Never install the washer on a platform or weakly supported structure. Use only an approved accessory pedestal as described below.
Using the Floor Pads
- When installing the washer on a wooden floor, place the included floor pads under the legs of the washer. This will help reduce vibration when the washer is operating.
NOTE: If a pedestal is being used, the floor pads should be placed beneath the pedestal legs.
NOTE: Please note that the floor must be strong and rigid enough to support the weight of the washer when fully loaded, without flexing or bouncing. If your floor has too much flex in it, you may need to reinforce it to make it more
rigid. A floor that is adequate for a top-loading washer may not be rigid enough for a front-loading washer, due to the difference in the spin speed and direction. If the floor is not solid, your washer may vibrate and you may hear and feel the vibration throughout your house.
NOTE: Before installing the washer, make sure the floor is clean, dry and free of dust, dirt, water and oils so the washer feet can not slide easily. Leveling feet that can move or slide on the contribute to excess vibration and poor contact with the floor.
NOTE: If a drip pan must be used, take extra care to follow the instructions provided with the drip pan and make sure the leveling feet are adjusted for firm and even contact with the pan. Use of drip pans and failure to properly level the machine may result in increased vibration and noise during operation.
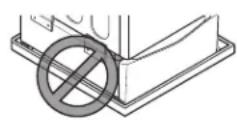
INSTALLATIONS WITH OPTIONAL PEDESTAL BASE OR STACKING KIT
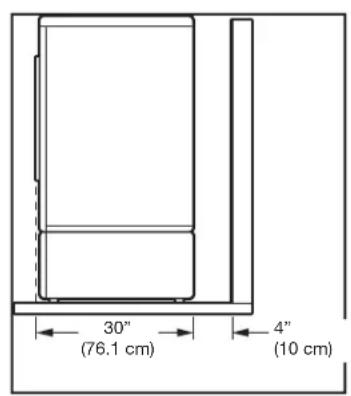
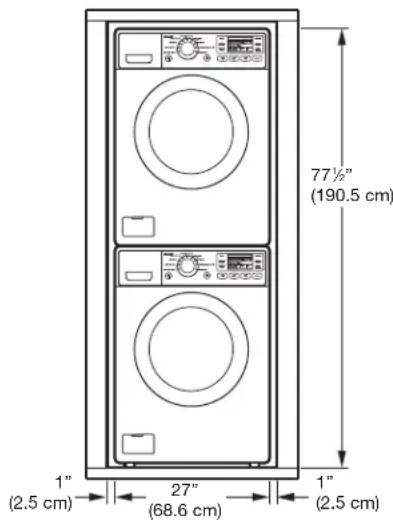
IMPORTANT: If you are installing your washer using an optional pedestal base or stacking kit, please refer to Optional Accessories in this manual or to the instructions for your pedestal or stacking kit before proceeding with the installation.
Required Dimensions for Installation With Pedestal
text_image
30" (76.1 cm) 4" (10 cm)Required Dimensions for Installation With Stacking Kit
text_image
77½" (190.5 cm) 1" (2.5 cm) 27" (68.6 cm) 1" (2.5 cm)UNPACKING AND REMOVING SHIPPING BOLTS
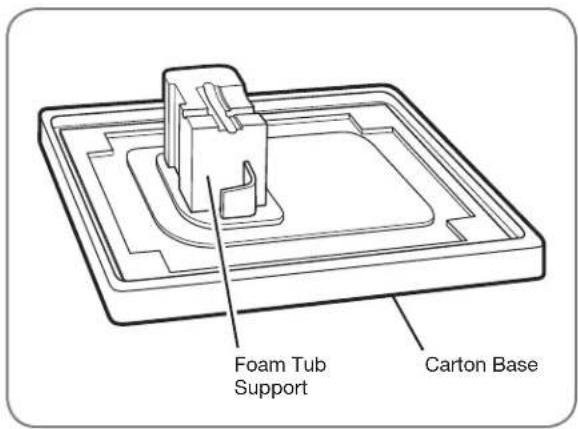
When removing the washer from the carton base, be sure to remove the foam tub support in the middle of the carton base.
If you must lay the washer down to remove the base packaging materials, always lay it carefully on its side. Do NOT lay the washer on its front or back.
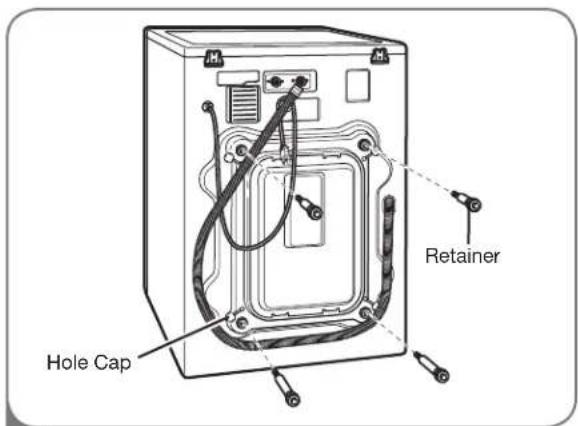
IMPORTANT: To prevent internal damage during transport, the washer is equipped with 4 shipping bolts and plastic retainers. These bolts and retainers MUST be removed before operating the washer.
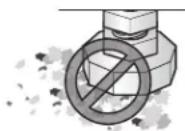
- Failure to remove shipping bolts and retainers may cause severe vibration and noise, which can lead to permanent damage to the washer. The cord is secured to the back of the washer with a shipping bolt to help prevent operation with shipping bolts in place.
text_image
Foam Tub Support Carton Base
text_image
Shipping Bolts1 Starting with the bottom 2 shipping bolts, use the included wrench to remove the 4 shipping bolts by turning them counterclockwise.
WARNING
To reduce the risk of injury to persons when using this cleaner, follow basic To reduce the risk of fire when using and install this appliance
follow basic precautions, including the following :
- Do not install nearby heat item. Such as stove, cooking oven. Failure to do so can cause deform, smoke and fire.
- Do not place candle and cigarettes on top of the product. Failure to do so can cause deform, smoke and fire.
- Remove all protective vinyl film from the product. Failure to do so can cause deform, smoke and fire.
Removing the Protective Film
The top, sides, and front of the washer are covered with a protective vinyl film. This film is to protect the finish during shipping, and should be removed before use.
text_image
Hole Cap Retainer2 Remove the retainers by turning them slightly while pulling. Rotate and press the hole caps into the shipping bolt holes.
NOTE: Save the bolts and retainers for future use. To prevent damage to internal components, the shipping bolts and retainers must be installed when transporting the washer.
Once the protective film has been removed, transfer the Service Call Number label from the top film to an easy to find location on the side of the washer.
CONNECTING THE WATER LINES
- IMPORTANT: Use new hoses when installing the washer. Do NOT reuse old hoses.
- IMPORTANT: Use ONLY the inlet hoses provided by LG with this laundry product. Aftermarket hoses are not guaranteed to fi t or function correctly. Other hoses may not tighten correctly and could cause leaks. Subsequent damage to product or property will not be covered under the terms of LG's warranty.
- Water supply pressure must be between 14.5 PSI and 116 PSI (100\~800 kPa). If the water supply pressure is more than 116 PSI, a pressure reducing valve must be installed.
• Periodically check the hose for cracks, leaks, and wear, and replace the hose if necessary.
• Make sure that the water lines are not stretched, pinched, crushed, or kinked.
- The washer should never be installed or stored in a location subject to freezing temperatures. Damage to the water lines and internal mechanisms of the washer can result. If the washer was exposed to freezing temperatures prior to installation, allow it to stand at room temperature for several hours before use.
text_image
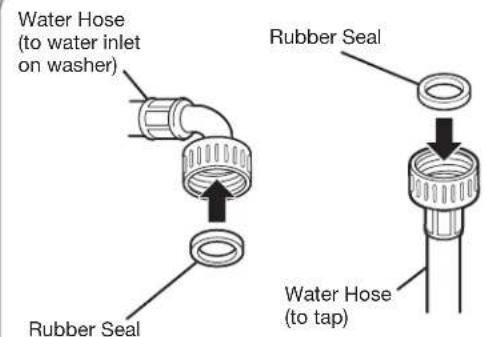
Water Hose (to water inlet on washer) Rubber Seal Rubber Seal Water Hose (to tap)1 Insert a rubber seal into the threaded fi ttings on each hose.
text_image
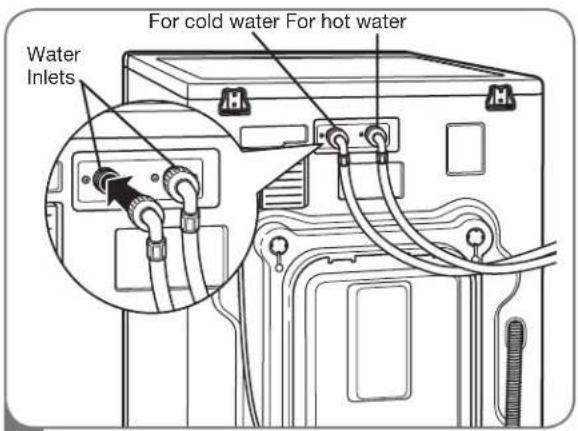
For cold water For hot water Water Inlets2 NOTE: Do not cross-thread the hose fittings. Attach the hot water line to the red hot water inlet on the back of the washer. Attach the cold water line to the blue cold water inlet on the back of the washer. Tighten the fittings securely.
text_image
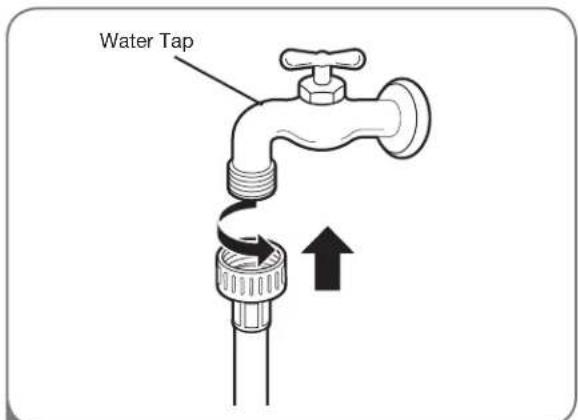
Water Tap3 Connect the water supply hoses to the HOT and COLD water faucets tightly by hand and then tighten another 2/3 turn with pliers. Turn on the water faucets and check for leaks.
CONNECTING THE DRAIN LINE
- The drain hose should always be properly secured. Failure to properly secure the drain hose can result in flooding and property damage.
- Do not install the end of the drain hose higher than 96 in. (244.8 cm) above the bottom of the washer.
- The drain must be installed in accordance with any applicable local codes and regulations.
• Make sure that the water lines are not stretched, pinched, crushed, or kinked.
NOTE: If the drain hose is extended more than 4 inches beyond the end of the end of the elbow bracket, mold, or microorganisms could spread to the inside of the washer.
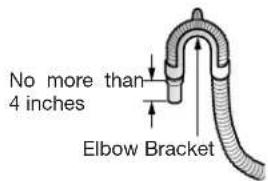
text_image
No more than 4 inches Elbow BracketOption 1: Standpipe
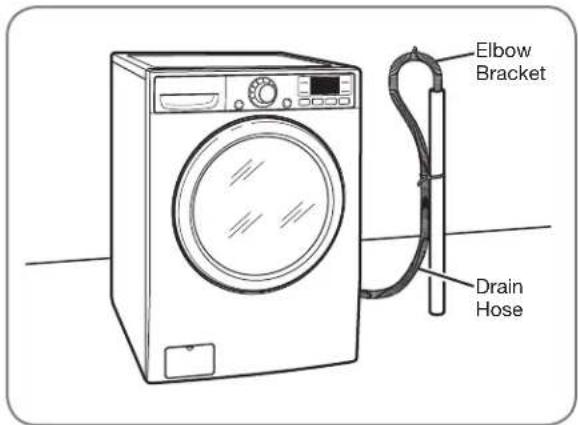
text_image
Elbow Bracket Drain HoseClip the end of the hose into the elbow bracket. Insert the end of the drain hose into a standpipe. Use tie strap to secure the drain hose in place.
NOTE: Total height of the hose end should not exceed 96 in. (244.8 cm) from the bottom of the washer.
Option 2: Laundry Tub
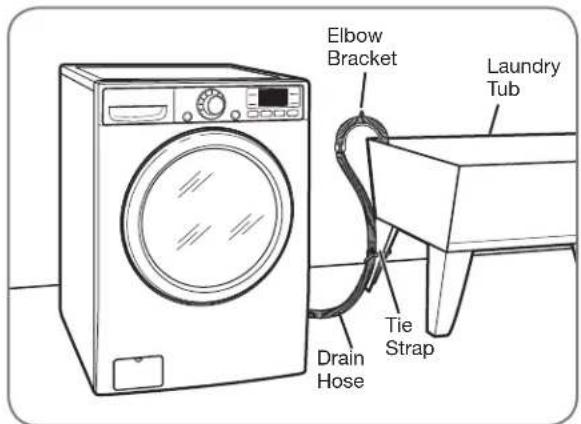
text_image
Elbow Bracket Laundry Tub Tie Strap Drain HoseClip the end of the hose into the elbow bracket. Hang the end of the drain hose over the side of the laundry tub. Use tie strap to secure the drain hose in place.
NOTE: Total height of the hose end should not exceed 96 in. (244.8 cm) from the bottom of the washer.
Option 3: Floor Drain
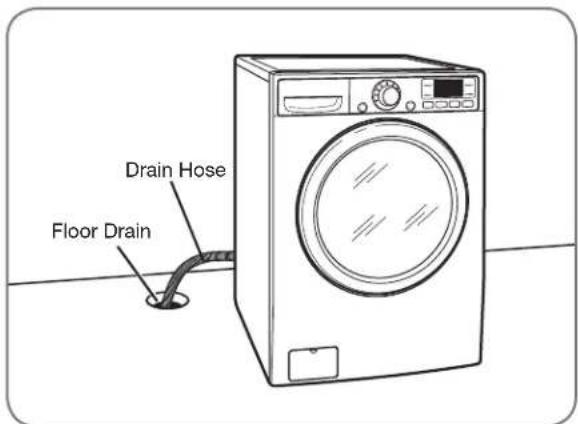
text_image
Drain Hose Floor DrainInsert the end of the drain hose into the floor drain. Secure the hose in place to prevent it from moving.
INSTALLATION INSUCRUCONS
LEVELING THE WASHER
The drum of your new washer spins at very high speeds, up to 1,320 RPM. To minimize vibration, noise, and unwanted movement, the floor must be a perfectly level, solid surface.
NOTE: Adjust the leveling feet only as far as necessary to level the washer. Extending the leveling feet more than necessary can cause the washer to vibrate.
text_image
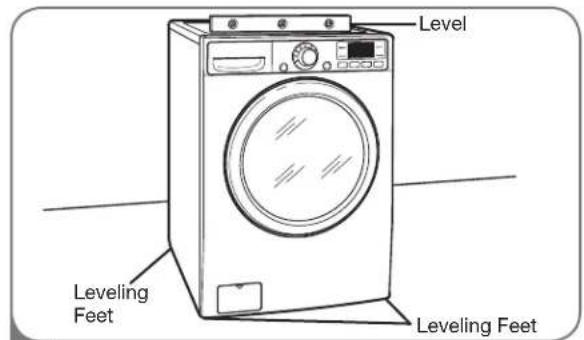
Level Leveling Feet Leveling Feet1 Position the washer in the final location, taking special care to not pinch, strain, or crush the water and drain lines. Place a level across the top of the washer.
text_image
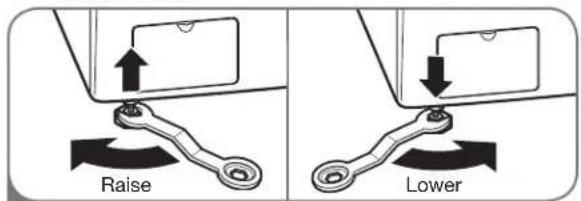
Raise Lower2 Loosen the locknuts on all 4 leveling feet until you can turn the feet with the included wrench. Turn clockwise to raise the washer or counterclockwise to lower it.
NOTE:
- Transparent protection films are being attached to top plate, side cabinet and front cover. You could remove the films if you want.
- Please keep the label attached on the top plate (CIC Telephone number label, Steam caution label)
- Using the leg stoppers is optional Without the pedestal, insert the leg stoppers to the legs of the washer With the pedestal, please insert the leg stoppers to the legs of the pedestal

INSTALLATION OF NON-SKID PADS (OPTIONAL)
Some floor surfaces are too slippery to prevent the washer from moving on the floor during heavily unbalanced loads. While it is normal for an occasional load to be out of balance, excess noise and vibration can result from the washer moving out of position. If these conditions are encountered, follow the instructions below for installation of the non-skid pads. These pads will help prevent the washer from moving during heavy out of balance conditions thereby reducing noise and vibration.
- All four leveling feet must rest solidly on the floor. Rock the washer gently from corner to corner to make sure that the washer does not rock.
If you are installing the washer on the optional pedestal, you must use the leveling feet on the pedestal to level the washer. The washer's leveling feet should be fully retracted and locked into position with the locknuts.
text_image
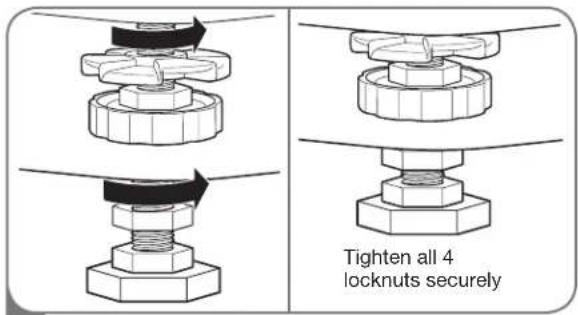
Tighten all 4 locknuts securely3 Once the washer is level from side to side and front to back, tighten all locknuts securely. Make sure that all 4 leveling feet are in firm contact with the floor.
NOTE: To make sure that the washer is properly level, run the washer with a test load: place approximately 6 pounds of laundry in the machine. Then press POWER, press RINSE+SPIN, and then press the START/PAUSE button. See the following sections for additional information on cycle selection and operation.
Verify that the washer does not rock or vibrate excessively during the spin cycle. If the washer vibrates or shakes, adjust the leveling feet until the washer is stable and retest.
text_image
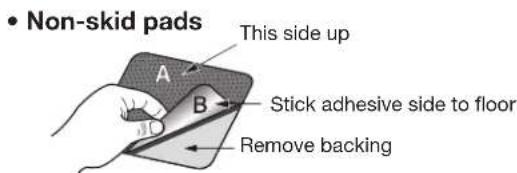
• Non-skid pads This side up A B Stick adhesive side to floor Remove backing* Place the pads under both front feet.
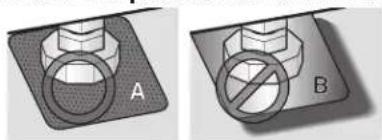
natural_image
Two diagrams showing a bolt and a cross symbol, labeled A and B, with no readable text or symbols.SORTING WASH LOADS
Fabric Care Labels
Most articles of clothing feature fabric care labels that include instructions for proper care.
Fabric Care Labels
Machine wash cycle

Normal

Permanent press/wrinkle resistant

Gentle/ delicate

Hand wash

Do not wash Do not wring

o not wring
Water temperature

Hot (50°C/120°F)

Warm (40°C/105°F)

Cold/cool (30°C/85°F)
Bleach symbols

Any bleach (when needed)

Only non-chlorine bleach (when needed)

Do not bleach
Grouping Similar Items
For best results, sort clothes into loads that can be washed with the same wash cycle.
Different fabrics have different care requirements. Always wash dark colors separately from light colors and whites to prevent discoloration. If possible, do not wash heavily soiled items with lightly soiled ones. The chart below shows recommended groupings.
Sort Laundry...
by Colors by Soil by Fabric by Lint
| Whites Heavy | Delicates Lint Producer |
| Lights Normal | Easy Care Lint Collector |
| Darks Light | Sturdy |
Loading the Washer
- Check all pockets to make sure that they are empty. Items such as clips, matches, pens, coins, and keys can damage both your washer and your clothes.
- Close zippers, hooks, and drawstrings to prevent these items from snagging or tangling on other clothes.
- Pretreat heavily stained areas for best results.
- Combine large and small items in a load. Load large items first.
- Large items should not be more than half of the total washload.
- The washer can be fully loaded, but the drum should not be tightly packed with items. The door of the washer should close easily.
- To prevent an out-of-balance load, do not wash single items. Add one or two similar items to the load. Large, bulky items, such as a blanket, comforter, or bedspread should be washed individually.
- Do not wash or spin waterproof clothes.
- When unloading the washer, check under the door seal for small items.
NOTE: The front loading washer rotates the wet laundry to wash it with less water. If you do not see the water during washing, it is not a problem because the laundry is sufficiently wet.

natural_image
Black square speaker icon with white circular design and circular head (no text or symbols)SELECTING DETERgENT
IMPORTANT: Your Steam Washer™ is designed for use with only High-Efficiency (HE) detergents. HE detergents are formulated specifically for front-load washers and contain suds-reducing agents. Always look for the HE symbol when purchasing detergent.
HE detergents produce fewer suds, dissolve more efficiently to improve washing and rinsing performance, and help to keep the interior of your washer clean.
Using a regular detergent may cause oversudising and unsatisfactory performance.
IMPORTANT: Do not place or store laundry products, such as detergent, bleach, or liquid fabric softener, on top of your washer or dryer. Wipe up any spills immediately. These products can damage the finish and controls.
ABOUT THE DISPENSER
The automatic dispenser consists of four compartments which hold:
- Liquid chlorine bleach.
- Liquid fabric softener.
- Liquid or powdered detergent for prewash.
- Liquid or powdered detergent and color-safe bleach for main wash.
All laundry products can be added at once in their respective dispenser compartments. They will be dispensed at the appropriate time for the most effective cleaning.
After adding the laundry products to the dispenser, close the dispenser drawer.
To add detergent, bleach, and fabric softener to the automatic dispenser:
1 pen the dispenser drawer.
2oad the laundry products into the appropriate compartments.
3 Slowly close the dispenser drawer to avoid early dispensing of the laundry products.
NOTE: It is normal for a small amount of water to remain in the dispenser compartments at the end of the cycle.
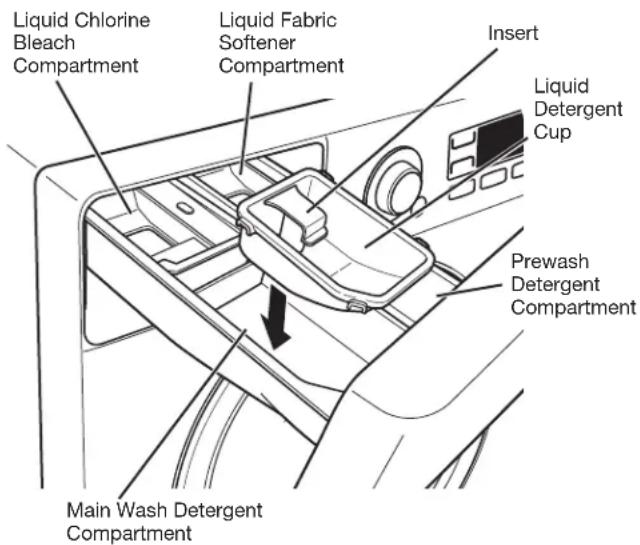
text_image
Liquid Chlorine Bleach Compartment Liquid Fabric Softener Compartment Insert Liquid Detergent Cup Prewash Detergent Compartment Main Wash Detergent CompartmentLOADING THE DISPENSER
Prewash Detergent Compartment
Add liquid or powdered detergent to this compartment when using the Prewash option. Always use HE (High-Efficiency) detergent with your washing machine.
- The amount of detergent added for the Prewash option is 1/2 the amount recommended for the main wash cycle. For example, if the main wash cycle requires one measure of detergent, add 1/2 measure for the Prewash option.
NOTE: If liquid detergent is to be used for the main wash when using the pre-wash option, the liquid detergent cup accessory must be used in main wash dispenser to prevent the main wash liquid detergent from being dispensed immediately.
Main Wash Detergent Compartment
This compartment holds laundry detergent for the main wash cycle, which is added to the load at the beginning of the cycle. Always use HE (High-Efficiency) detergent with your washing machine.
Never exceed the manufacturer's recommendations when adding detergent. Using too much detergent can result in detergent buildup in clothing and the washer. Either powdered or liquid detergent may be used.
- When using liquid detergent, make sure the liquid detergent cup and insert are in place. Do not exceed the maximum fill line.
- When using powdered detergent, remove the insert and liquid detergent cup from the compartment. Powdered detergent will not dispense with the liquid detergent cup and insert in place.
NOTE: Liquid or powdered color-safe bleach may be added to the main wash compartment with detergent of the same type.
Liquid Bleach Compartment
This compartment holds liquid chlorine bleach, which will be dispensed automatically at the proper time during the wash cycle.
- Do not add powdered or liquid color-safe bleach to this compartment.
- Always follow the manufacturer's recommendations when adding bleach. Do not exceed the maximum fill line. Using too much bleach can damage fabrics.
- Never pour undiluted liquid chlorine bleach directly onto the load or into the drum. Fabric damage can occur.
Fabric Softener Compartment
This compartment holds liquid fabric softener, which will be automatically dispensed during the final rinse cycle.
- Always follow the manufacturer's recommendations when adding fabric softener. Do not exceed the maximum fill line. Using too much fabric softener may result in stained clothes.
- Dilute concentrated fabric softeners with warm water. Do not exceed the maximum fill line.
- Never pour fabric softener directly onto the load or into the drum.
CONTROL PANEL FEATURES
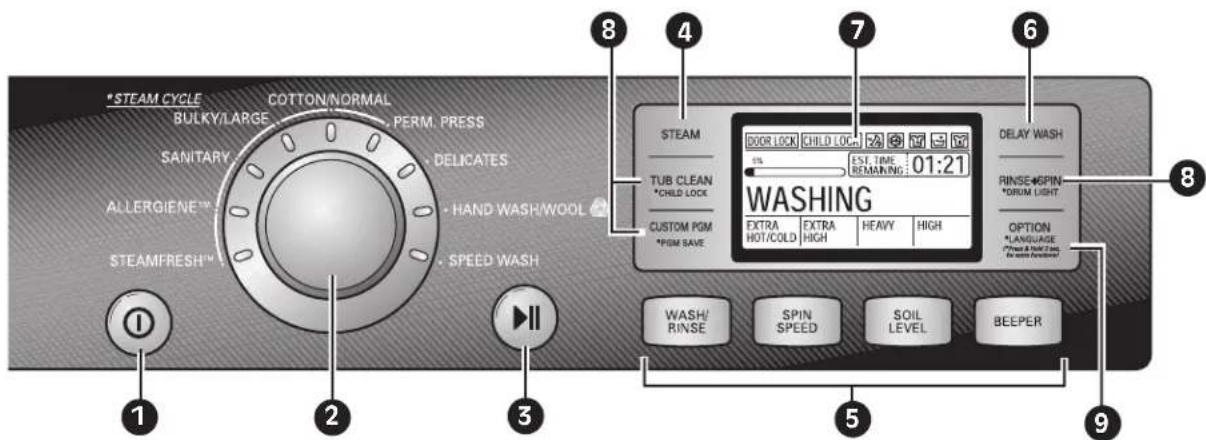
text_image
STEAM CYCLE COTTON/NORMAL BULKY/LARGE PERM. PRESS SANITARY DELICATES ALLERGIENE HAND WASH/WOOL STEAMFRESH SPEED WASH 1 2 3 4 5 6 7 8 STEAM DOOR LOCK CHILD LOC EST. TIME REMAINING: 01:21 TUB CLEAN CHILD LOCK CUSTOM PGM EXTRA EXTRA HEAVY HIGH *POM SAVE HOT/COLD HIGH WASHING DELAY WASH RINSE+SPIN *DRUM LIGHT OPTION *LANGUAGE *Feed & Hold Test for water functions/ WASH/RINSE SPIN SPEED SOIL LEVEL BEEPER1 POWER ON/OFF BUTTON
Press to turn the washer ON. Press again to turn the washer OFF.
NOTE: Pressing the ON/OFF button during a cycle will cancel that cycle and any load settings will be lost.
2 CYCLE SELECTOR KNOB
Turn this knob to select the desired cycle. Once the desired cycle has been selected, the standard presets will be shown in the display. These settings can be adjusted using the cycle setting buttons anytime before starting the cycle.
3 START/PAUSE BUTTON
Press this button to START the selected cycle. If the washer is running, use this button to PAUSE the cycle without losing the current settings.
NOTE: If you do not press the START/PAUSE button within 8 minutes of selecting a cycle, the washer automatically turns off.
4 STEAm BUTTON
Press the STEAM button to add steam to the selected cycle for added cleaning power.
NOTE: Steam can only be added to the following cycles: STEAMFRESH™, SANITARY, BULKY/LARGE, PERM. PRESS, COTTON/NORMAL, and ALLERGIENE™.
5 CYCLE SETTING BUTTONS
Use these buttons to select the desired cycle options for the selected cycle. The current options are shown in the display. Press the button for that option to view and select other settings.
6 DELAY BUTTON
Press this button to delay the start of the wash cycle. Each press of the button increases the delay time by one hour, up to 19 hours.
7 LCD DISPLAY
The display shows the settings, estimated time remaining, options, and status messages for your Steam Washer™. The light in the display will remain on through the cycle.
8 SPECIAL FUNCTION BUTTONS
The special function buttons allow you to select additional functions and will light when selected. Certain buttons also allow you to activate secondary functions by pressing and holding the button for 3 seconds.
For detailed information about the individual functions, please see the following pages.
9 OPTION BUTTON
Press this button to select additional cycle options such as WATER PLUS, PRE WASH, EXTRA RINSE, STAIN CYCLE, and SPINSENSE.
Press the button next to the desired option in the display to select. The button will light to show the option has been selected.
CYCLE gUIDE
The cycle guide below shows the options and recommended fabric types for each cycle.
| Cycle | Fabric Type | Wash/Rinse Temp. | Spin Speed | Soil Level | Pre-Wash | Rinse + Spin | Extra Rinse | Stain Cycle | Water Plus | Steam | Maximum Load |
| Steam Fresh^TM | Dress shirts, blouses | ● | 1.5 kg | ||||||||
| Sanitary | Heavily soiled underwear, work clothes, diapers, etc. | Extra Hot/Cold | High | Normal | ● | ● | ● | ● | ● | ● | 8.0 kg |
| Extra High No Spin Low Medium | Heavy Light | ||||||||||
| Bulky/ Large | Large items such as blankets and comforters | Warm/Cold | Low | Normal | ● | ● | ● | ● | ● | ● | 8.0 kg |
| Warm/Warm Hot/Cold Cold/Cold | Medium No Spin | Heavy Light | |||||||||
| Perm. Press | Dress shirts/pants, wrinkle-free clothing, poly/cotton blend clothing, tablecloths | Warm/Cold | Medium | Normal | ● | ● | ● | ● | ● | ● | 8.0 kg |
| Warm/Warm Hot/Cold Cold/Cold | High No Spin Low | Heavy Light | |||||||||
| Cotton/ Normal | Cotton, linen, towels, shirts, sheets, jeans, mixed loads | Warm/Cold | High | Normal | ● | ● | ● | ● | ● | ● | 16.0 kg |
| Warm/Warm Hot/Cold Cold/Cold | Extra High No Spin Low Medium | Heavy Light | |||||||||
| Allergiene^TM | Cotton, underwear, pillow covers, bed sheets, baby wear | High | ● | 8.0 kg | |||||||
| Extra High No Spin Low Medium | |||||||||||
| Delicates | Dress shirts/blouses, nylons, sheer or lacy garments | Cold/Cold | Medium | Normal | ● | ● | ● | ● | 4.0 kg | ||
| Warm/Cold Warm/Warm | No Spin Low | Heavy Light | |||||||||
| Hand Wash/ Wool ⚙ | Items labeled “hand-washable” | Warm/Cold | Low | Normal | ● | ● | ● | 3.0 kg | |||
| Cold/Cold Warm/Warm | No Spin | Light | |||||||||
| Speed Wash | Lightly soiled clothing and small loads | Hot/Cold | Extra High | Light | ● | ● | ● | 2.0 kg | |||
| Cold/Cold Warm/Cold Warm/Warm | No Spin Low Medium High | Normal Heavy |
NOTE: To protect your garments, not every wash/rinse temperature, spin speed, soil level, or option is available with every cycle.
THE LCD DISPLAY
The LCD display shows the settings, estimated time remaining, options, and status messages for your washer. When the washer is turned on, the light in the display will illuminate.
1 STATUS/CYCLE DISPLAY
This portion of the display shows the selected cycle, operating status, and special messages. If a cycle has special instructions, they will also be displayed in this area.
2 ESTIMATED TIME REMAINING
When the START/PAUSE button is pressed, the washer automatically detects the wash load (weight) and optimizes the washing time, based on the selected cycle and options. The display will then indicate the estimated time remaining for the selected wash cycle.
NOTE: The cycle time displayed may appear much longer than that of a top-loading washer. The displayed time is for the complete cycle, rather than just the agitation portion of the cycle, as is typically shown on a top-loading washer.
3 CYCLE COMPLETION INDICATOR
Shows how much of the current wash cycle has been completed.
4 DOOR LOCK INDICATOR
Indicates that the door is locked. The washer door will lock while the washer is operating. The door can be unlocked by pressing the START/PAUSE button to stop the washer.
NOTE: If the temperature in the washer is too high, the door cannot be unlocked until the washer has cooled. If the water level is too high, select the DRAIN & SPIN cycle to drain excess water. Do not try to force open the door.
5 CHILD LOCK INDICATOR
When CHILD LOCK is set, the Child Lock indicator will appear and all buttons are disabled except the ON/OFF button. This prevents children from changing settings while the washer is operating.
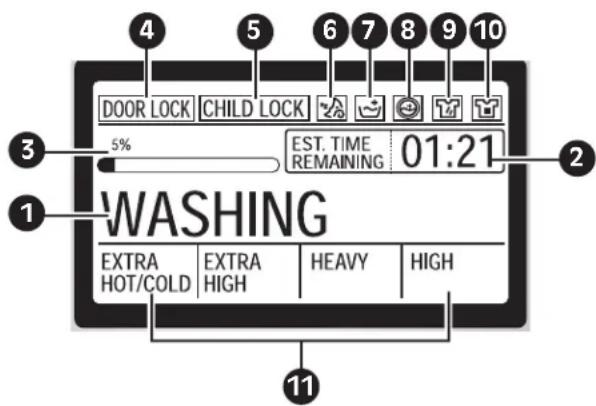
text_image
4 5 6 7 8 9 10 DOOR LOCK CHILD LOCK EST. TIME 01:21 5% REMAINING WASHING EXTRA EXTRA HEAVY HIGH HOT/COLD HOT COLD HIGH6 SPINSENSE™ INDICATOR
This indicator shows that the washer has been set for SPINSENSE ^™ .
7 EXTRA RINSE INDICATOR
This indicator shows that the washer has been set for the EXTRA RINSE option.
8 WATER PLUS INDICATOR
This indicator shows that the washer has been set for the WATER PLUS option.
9 STAIN CYCLE INDICATOR
This indicator shows that the washer has been set for the STAIN CYCLE option.
10 PRE WASH INDICATOR
This indicator shows that the washer has been set for the PRE WASH option.
11 CYCLE SETTING INDICATORS
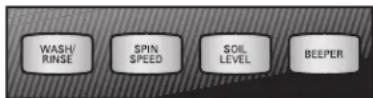
These indicators show the current cycle settings for WASH/RINSE, SPIN SPEED, SOIL LEVEL, and BEEPER. To change these settings, press the appropriate settings button.
NOTE: To protect your garments, not every wash/ rinse temperature, spin speed, soil level, or option is available with every cycle.
Once you have loaded the washer and added laundry products (detergent, bleach, and/or fabric softener):
1 Press the ON/OFF button to turn on the washer. The lights around the cycle selector knob will illuminate.
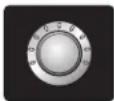
2 Turn the cycle selector knob to the desired cycle. The display will show the preset Rinse/Wash Temperature, Spin Speed, Soil Level, and Option settings for that cycle.
3 If you would like to change the settings for that cycle, press the option button(s) to display additional settings for that option. Press the button again to cycle through the settings until the desired setting is shown.
washer. The lights around the cycle selector knob will illuminate.
cycle. The display will show the preset Rinse/Wash Temperature, Spin Speed, Soil Level, and Option settings for that cycle.
If you would like to change the settings for that cycle, press the option button(s) to display additional settings for that option. Press the button again to cycle through the settings until the desired setting is shown.

NOTE: To protect your garments, not every wash/rinse temperature, spin speed, soil level, or option is available with every cycle.
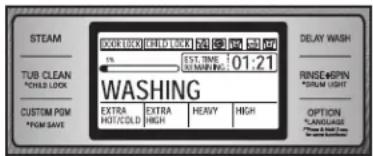
4 Select any additional cycle options, such as STEAM or DELAY WASH by pressing the button for that option, or by pressing the OPTION button for additional options.
text_image
STEAM TUB CLEAN *CHILD LOCK CUSTOM PGM *PGM SAVE OUTRICK 1% WASHING EXTRA HOT/COLD EST. TIME 01:21 EXTRA HIGH HEAVY HIGH DELAY WASH RINSE46PN *RUM LIGHT OPTION *LANGUAGE *THAT 3.0000000000000000000000000000000000000000000000000000000000000000000000000000000000000000 *STORM REG. *STORM WMG. *STORM WMG. *STORM WMG. *STORM WMG. *STORM WMG. *STORM WMG. *STORM WMG. *STORM WMG. *STORM WMG. *STORM WMG. *STORM WMG. *STORM WMG. *STORM WMG. *STORM WMG. *STORM WMG. *STORM WMG. *STORM WMG. *STFORM WMG. *STORM WMG. *STORM WMG. *STORM WMG. *STORM WMG. *STORM WMG. *STORM WMG. *STORM WMG. *STORM WMG.NOTE: To protect your garments, not every wash/rinse temperature, spin speed, soil level, or option is available with every cycle.
5 Press the START/PAUSE button to begin the cycle. The door will latch, the display will change, and the washer will calculate the estimated time remaining. Once
the washer has calculated the estimated total cycle time, the washer will start. To pause the cycle at any time, press PAUSE.
NOTE: The cycle time displayed may appear much longer than that of a top-loading washer. The displayed time is for the complete cycle, rather than just the agitation portion of the cycle, as is typically shown on a top-loading washer.
NOTE: If the temperature in the washer is too high, the door cannot be unlocked until the washer has cooled. If the water level is too high, select the DRAIN & SPIN cycle to drain excess water. Do not try to force the door open.
Washing time can be reduced significantly for small or lightly soiled loads by selecting the Speed Wash cycle and setting the Soil Level button to Light.
6 When the load is finished, the beeper (if set) will sound and the door will unlock.
Remove damp clothes from the washer immediately. Check under the door seal for small items.
STEAM CYCLES
STEAM cycles include the Sanitary, Bulky/Large, Perm. Press, Cotton/ Normal, and ALLERGIENE cycles. Adding the Steam option to these cycles provides superior cleaning performance while reducing energy and water consumption. By using a hot steam spray from above and cooler water below, fabrics get the cleaning benefits of a super hot wash, without the energy usage or potential damage to fabrics.
To Add STEAM to a Standard Cycle:
1 Turn on the washer and turn the cycle selector knob to select a cycle with the STEAM option.
2 Press the STEAM button. The washer will automatically adjust the cycle settings.
3 Set any other desired options.
4 Press the START/PAUSE button to start the cycle. The washer will start automatically.
CAUTION:
Do not touch the door during steam cycles. The door surface can become very hot. Allow the door lock to release before opening the door.
Do not attempt to override the door lock mechanism or reach into the washer during a steam cycle. Steam can cause severe burns.
IMPORTANT NOTES ABOUT STEAM CYCLES:
- Steam may not be clearly visible during the steam cycles. This is normal. Too much steam could damage clothing.
- Do not use steam with delicate fabrics such as wool, silk, or easily discolored fabrics.
- Do not touch the door.
Using the SteamFresh™ Cycle
SteamFresh uses the power of steam alone to quickly reduce wrinkles and odor in fabrics. It brings new life to wrinkled clothes that have been stored for an extended time and makes heavily wrinkled clothes easier to iron. SteamFresh can also be used to help reduce odors in fabrics.
To Use the SteamFresh Cycle:
1 Turn on the washer and turn the cycle selector knob to select the SteamFresh cycle.
2 Load up to 5 items and close the door.
NOTE: If there is any moisture inside the drum, such as from a previous wash cycle, wipe the drum dry with a towel before adding clothes.
3 Press the STEAM button until the correct number of items is shown in the display. No other options need to be set.
4 Press the START/PAUSE button to start the cycle.
After the SteamFresh cycle is complete, the washer will tumble the clothes for up to 30 minutes to prevent rewrinkling.
After removing clothes from the SteamFresh cycle, they may feel slightly damp. Place clothes on a hanger for at least 10 minutes to allow them to dry.
- The SteamFresh cycle is not recommended for use with 100% cotton clothing.
- Remove stains from clothing before using the SteamFresh cycle; the high heat could cause stains to set permanently.
- Do not use SteamFresh with the following items: wool, blankets, leather jackets, silk, wet clothes, lingerie, foam products, or electric blankets.
- Best results are achieved when articles are of similar size and fabric type. Do not overload.
CYCLE SETTING BUTTONS
Each cycle has preset settings that are selected automatically. You may also customize the settings using the cycle setting buttons. Press the button for that option to view and select other settings.
The washer automatically adjusts the water level for the type and size of wash load for best results and maximum efficiency. It may seem there is no water inside the drum in some cycles, but this is normal.
NOTE: To protect your garments, not every wash/ rinse temperature, spin speed, soil level, or option is available with every cycle. See the Cycle Guide for details.
WASH/RINSE
Selects the wash and rinse temperature combination for the selected cycle. Press the WASH/RINSE button repeatedly to scroll through available settings.
- Your washer features a heating element to boost the hot water temperature for Extra Hot settings. This provides improved wash performance at normal water heater settings.
- Select the water temperature suitable for the type of load you are washing. Follow the fabric care label for best results.
- Warm rinses leave the loads drier than cold rinses. Warm rinses can increase wrinkling.
- In cold climates, a warm rinse makes the load more comfortable to handle.
- Cold rinses use less energy.
SOIL LEVEL
Adjusts the selected cycle to allow more time for heavily soiled clothes or less time for lightly soiled clothes.
SPIN SPEED
The washer drum spins at up to 1,320 RPM. This reduces drying time and saves energy.
Press the SPIN SPEED button to select
the maximum spin speed. Some fabrics, such as delicates, require a slower spin speed.
BEEPER
Adjusts the volume of the end-of-cycle beeper, or turns it off.
natural_image
Silhouette of a black long-sleeve top hanging on a white hanger (no text or symbols)SPECIAL FUNCTION BUTTONS
Your Steam Washer ^™ features several additional cycle options to customize cycles to meet your individual needs. Certain option buttons also feature a special function (see the following page for details) that can be activated by pressing and holding that option button for 3 seconds.
To Add Cycle Options to a Cycle:
1 Turn on the washer and turn the cycle selector knob to select the desired cycle.
2 Use the cycle setting buttons to adjust the settings for that cycle.
3 Press the cycle option button(s) for the option you would like to add. The cycle option buttons, except STEAM and DELAY, will light when selected.
4 Press the START/PAUSE button to start the cycle. The washer will start automatically.
NOTE: To protect your garments, not every wash/ rinse temperature, spin speed, soil level, or option is available with every cycle. See the Cycle Guide for details.
STEAM
Use the STEAM button to add steam to the cycle for extra cleaning power and improved efficiency. See Steam Cycles section for additional details.
NOTE: Not all cycles can be used with the STEAM option.
DELAY WASH

Once you have selected the cycle and other settings, press this button to delay the start of the wash cycle. Each press of the button increases the delay time by one hour, up to 19 hours.
TUB CLEAN

A buildup of detergent residue can occur in the wash tub over time and can lead to a mildewy or musty smell. The TUB CLEAN cycle is specially
designed to remove this buildup. The display will show a message to add liquid bleach to the dispenser. After the cycle has ended, open the door and allow the drum interior to dry completely.
NOTE: Do NOT use this cycle with clothes, and do NOT add detergent or fabric softener.
NOTE: If you use the TUB CLEAN cycle on a monthly basis, the wash drum will be kept clean.
RINSE+SPIN
Select this option to rinse and spin a load separately from a regular cycle. This can be helpful in preventing fresh stains from setting in fabrics.
To activate the Rinse+Spin cycle:
1 Press the ON/OFF button to turn on the washer.
2 Press the RINSE+SPIN button.
3 Press the START/PAUSE button.
CUSTOM PROGRAM
CUSTOM PROGRAM allows you to store a customized wash cycle for future use. It allows you to save favorite temperature, spin speed, soil
level, and other options for a cycle, and then recall them at the touch of a button.
To store a Custom Program:
1 Select a cycle.
2 Adjust the Wash/Rinse Temperature, Spin Speed, and Soil Level to the desired settings.
3 Set any other desired options.
4 Press and hold the CUSTOM PROGRAM button for 3 seconds. You will hear two beeps to confirm the settings have been stored.
SECONDARY FUNCTIONS
The special function buttons also activate secondary functions, including CHILD LOCK, DRUM LIGHT, and LANGUAGE. Press and hold the button marked with the secondary function for 3 seconds to activate.
CHILD LOCK

Use this option to prevent unwanted use of the washer or to keep cycle settings from being changed while the washer is operating. Press and hold
the TUB CLEAN button for 3 seconds to activate or deactivate CHILD LOCK.
CHILD LOCK will be shown in the display, and all controls are disabled except the ON/OFF button. The washer can be locked during a cycle.
DRUM LIGHT
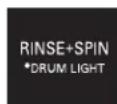
The drum is equipped with a blue LED light that illuminates when the washer is turned on. This light automatically turns off when the door is closed and
the cycle starts. To turn on the light during a cycle, press and hold the RINSE+SPIN button for 3 seconds. The drum light will illuminate and then turn off automatically after 4 minutes.
IMPORTANT: If you press and hold the CUSTOM PROGRAM button for 3 seconds, you will overwrite any previously stored CUSTOM PROGRAM.
To recall a Custom Program:
1 Press and release the CUSTOM PROGRAM button. The stored settings will be displayed.
2 Press and release the START/PAUSE button to start the cycle. The washer will start automatically.
LANGUAGE
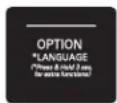
This option allows you to change the language shown in the display. Once set, the selected language will stay set even after the power is turned off.
The display language options are English, French, and Spanish; English is the default language.
To change the language:
1 Press the ON/OFF button to turn on the washer.
2 Press and hold the OPTION button for 3 seconds, until the following screen appears in the display.
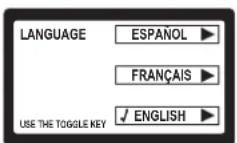
3 When OPTION is pushed, English is displayed as the default language. Press the RINSE + SPIN button to select FRANÇAIS (French) or DELAY WASH for ESPAÑOL (Spanish).
THE OPTION BUTTON
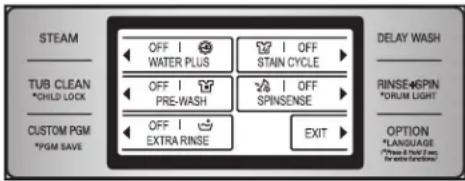
Pressing the OPTION button will display cycle options that can be added to regular wash cycles, including WATER PLUS, PRE-WASH, STAIN CYCLE, and SPINSENSE.
To activate cycle options:
1 Turn on the washer and turn the cycle selector knob to select the desired cycle.
2 Press the OPTION button. The cycle options will be displayed: WATER PLUS, PRE-WASH, EXTRA RINSE, STAIN CYCLE, and SPINSENSE.
text_image
STEAM TUB CLEAN *CHILD LOCK CUSTOM PGM *PGM SAVE OFF | WATER PLUS OFF | PRE-WASH OFF | EXTRA RINSE OFF | STAIN CYCLE OFF | SPINSENSE OFF | EXIT DELAY WASH RINSE Spin *ORUM LIGHT OPTION *LANGUAGE Please call to add a new user's function3 Press the button next to the desired option; the status will change to ON. To turn the option OFF, press the button again.
4 To return to the main display, press OPTION again, or wait 3 seconds.
5 Press START/PAUSE to start the cycle with the selected options.
EXTRA RINSE
This option will add an extra rinse cycle to the selected cycle. Use this option to help ensure the removal of detergent or bleach residue from fabrics.
SPECIAL CARE CYCLES
ALLERgiENE™
The ALLERGIENE™ cycle is a powerful, high temperature cycle designed specifically to reduce certain allergens.
- Selecting the ALLERGIENE™ cycle automatically incorporates steam into the wash cycle.
- The ALLERGIENE™ cycle can significantly reduce allergens in bedding and clothing.
- The ALLERGIENE™ cycle helps reduce dust mite populations and helps reduce allergens.
- Due to the higher energy and temperatures used, the ALLERGIENETM cycle is not recommended for wool, silk, leather, or any other delicate or temperature sensitive items.
STAIN CYCLE
Select this option for heavily stained clothes, such as play clothes or work clothes. Stain Cycle will add extra wash time to the selected cycle, as well as an additional rinse cycle.
WATER PLUS
Select this option to add extra water to the wash and rinse cycles for superior results, especially with large or bulky items.
PREWASH

Select this option to add a 16-minute prewash and spin cycle to the chosen cycle. This is especially useful for heavily soiled items.
SPINSENSE™
SPINSENSE can be used to help reduce or eliminate vibrations, especially on wood floor installations.
The SPINSENSE indicator will remain lit while the washer is running to show that SPINSENSE is active. The SPINSENSE function will remain active for every cycle, even after a power failure.
HAND WASH/WOOL

- Only woolen items that are designated as “Machine-Washable” should be washed in this washing machine
- Wash only small loads for optimum fabric care (less than 8 lbs.)
- Only neutral (wool safe) detergents should be used (Only a small quantity of detergent is needed due to the small load size and low volume of water in the cycle.)
- The HANDWASH/WOOL cycle uses a gentle tumble action and low speed spin for ultimate fabric care

WOOLMARK
The wool wash cycle of this machine has been approved by Woolmark for the washing of machine washable Woolmark products provided that the products are washed according to the instructions on the garment label and those issued by the manufacturer of this washing machine, M0807
REGULAR CLEANING
WARNING:
- Unplug the washer before cleaning to avoid the risk of electric shock. Failure to follow this warning can cause serious injury, fire, electrical shock, or death.
- Never use harsh chemicals, abrasive cleaners, or solvents to clean the washer. They will damage the finish.
Cleaning the Exterior
Proper care of your washer can extend its life. The outside of the machine can be cleaned with warm water and a mild, nonabrasive household detergent.
Immediately wipe off any spills with a soft, damp cloth.
IMPORTANT: Do not use methylated spirits, solvents, or similar products.
Never use steel wool or abrasive cleansers; they can damage the surface.
Care and Cleaning of the Interior
Use a towel or soft cloth to wipe around the washer door opening, door seal, and door glass. These areas should be kept clean to ensure a watertight seal. Be sure to wipe under the inside rubber seal to remove any moisture or soil.
Always remove items from the washer as soon as the cycle is completed. Leaving damp items in the washer can cause wrinkling, color transfer, and odor.
Run the TUB CLEAN cycle regularly to remove detergent buildup and other residue.
NOTE: If you use the TUB CLEAN cycle on a monthly basis, the wash drum will be kept clean.
Cleaning the Steam and Water Circulation Nozzles
Use a cotton swab to remove lime or detergent buildup from the inside of the steam and water circulation nozzles. NEVER use a sharp or pointed object; you could damage the nozzles.
Removing the Stain in Door Seal
NOTE: Wear rubber gloves and eye protection while performing the following procedure:
① lute 3/4 cup (177 ml) liquid chlorine bleach with 1 gallon (3.8 L) of warm/hot water.
2 Use this solution to wipe down all surfaces of the gasket to remove the deposits that are causing any odor. (Be sure to fold back the lip of the gasket to get under the edge where residue can build up.)
3 Wipe the gasket with a dry cloth.
4 Leave the door open to allow the gasket to dry completely.
Do not use undiluted bleach as this will damage the gasket. Follow the manufacturer's instructions for proper use of bleach.
If the gasket cannot be cleaned properly, it should be replaced.
Read these instructions carefully before beginning the TUB CLEAN cycle.
1 Open the door and remove any clothing in the wash drum.
2 Open the dispenser drawer.
3 Add liquid chlorine bleach or tub cleaner. Some powder or tablet tub cleaners which are manufactured for this purpose can be used.
(NOTE : Do not add any laundry detergent or fabric softener to the drawer when using TUB CLEAN.)
- If using liquid chlorine bleach
Add liquid chlorine bleach to the bleach compartment of the drawer.
(NOTE : Do not exceed the maximum fill line and do not pour undiluted liquid bleach directly into the wash drum.)
- If using powder cleaner
Remove the liquid detergent cup and add powder cleaner to the main wash compartment of the drawer.
- If using tablet cleaner
Add tablet cleaner to the wash drum directly. (NOTE : Do not add tablet cleaner to the drawer.)
4 Close the drawer and washer door.
5 Select TUB CLEAN and press START.
NOTE : It is recommended that TUB CLEAN should be repeated monthly.
If mildew or musty smell already exists, run TUB CLEAN for 3 consecutive weeks.
After TUB CLEAN is complete or when the washer is not used, leave the washer door open for better ventilation and drying inside of the washer.
REGULAR CLEANING (cont.)
Storing the Washer
If the washer will not be used for an extended period of time and is in an area that could be exposed to freezing temperatures:
1 Turn off water supply tap.
2 Disconnect hoses from water supply and drain water from hoses.
3 Plug the power cord into a properly grounded electrical outlet.
4 Add 1 gallon of nontoxic recreational vehicle (RV) antifreeze to the empty wash drum. Close door.
5 Select the spin cycle and let washer spin for 1 minute to drain out all the water.
NOTE: Not all of the RV antifreeze will be expelled.
6 Unplug the power cord, dry the drum interior with a soft cloth, and close the door.
7 Remove the inserts from the dispenser. Drain any water in compartments and dry the compartments.
8 Store the washer in an upright position.
9 To remove the antifreeze from the washer after storage, run washer through a complete cycle using detergent. Do not add laundry!
Removing Lime Buildup
If you live in an area with hard water, lime scale can form on internal components of the washer. Use of a water softener is recommended in areas with hard water. If a descaler is used, make sure that it is suitable for use in a washer, and run the TUB CLEAN cycle before washing clothing.
Lime scale and other spots may be removed from the stainless steel drum using a stainless steel cleaner. Do NOT use steel wool or abrasive cleansers; they can damage the surface.
CLEANING THE WASHER
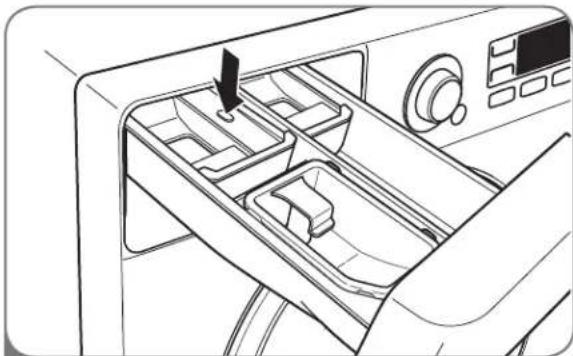
Cleaning the Dispenser
The dispenser should be cleaned periodically to remove buildup from detergent and other laundry products.
natural_image
Line drawing of a refrigerator interior showing drawer, control panel, and door (no text or symbols)1 Pull out the dispenser drawer until it stops. Press the button in the center of the drawer and pull to remove the drawer.
NOTE: If you clean the detergent dispenser once a week, it will always dispense properly.
natural_image
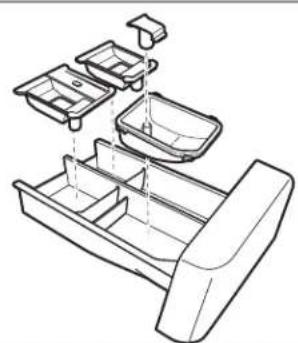
Line drawing of a multi-tiered plastic tray holder with internal compartments (no text or symbols)2 Remove the inserts from the drawer, and clean them with warm water and a soft cloth or brush to remove any residue or buildup. Wipe out the inside of the drawer opening with a damp cloth. Reassemble the drawer and reinstall in the drawer opening.
NOTE: Do not use anything other than water to clean the drawer, inserts, and drawer opening. If any sort of household cleaner drains into the interior of the washer, run a RINSE+SPIN cycle before washing clothes.
mAINTENANCE
Cleaning the water Inlet Filters
If the washer detects that water is not entering the dispenser, an error message will show on the display. If you live in an area with hard water, this may be caused by clogged inlet filters.
IMPORTANT: Use extreme care when removing and cleaning the filters. If the filters cannot be cleaned or are damaged, do NOT operate the washer without the inlet filters. Contact LG Customer Service or a qualified LG servicer.
natural_image
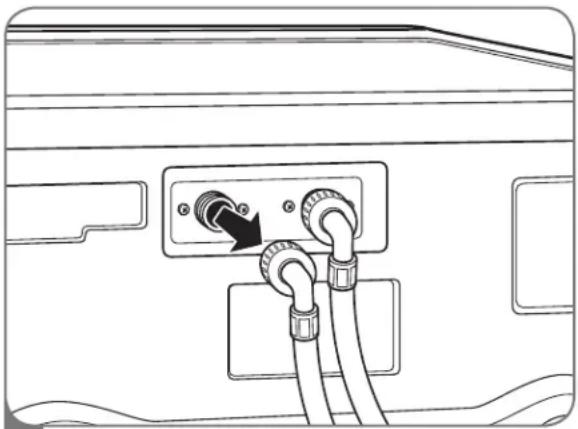
Line drawing of a device's rear panel showing cable routing and a control panel with an arrow indicator (no text or symbols)1 Turn off both water taps completely. Unscrew the hot and cold water lines from the back of the washer.
IMPORTANT: Use ONLY the inlet hoses provided by LG with this laundry product. Aftermarket hoses are not guaranteed to fit or function correctly. Other hoses may not tighten correctly and could cause leaks. Subsequent damage to product or property will not be covered under the terms of LG's warranty.
text_image
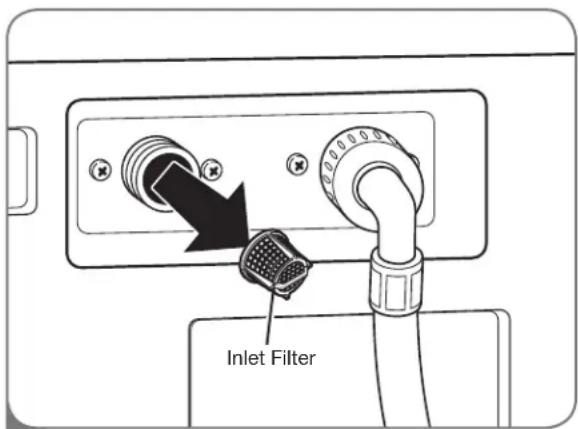
Inlet Filter2 Carefully remove the filters from the water inlets, and soak them in white vinegar or a lime scale remover, following the manufacturer's instructions. Rinse thoroughly before reinstalling.
Press the filters back into place and reattach the water lines. Do NOT operate the washer without the inlet filters.
MAINTENANCE (cont.)
Cleaning the Drain Pump Filter
Lint and other objects may accumulate and clog the drain pump filter. If the washer fails to drain properly, unplug the washer and allow the water to cool, if necessary, before proceeding.
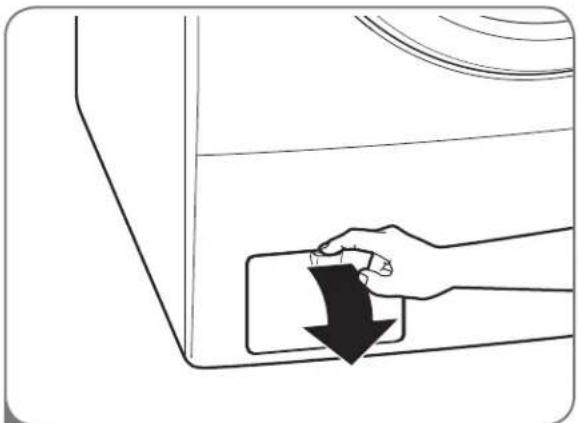
natural_image
Line drawing of a hand pressing down on a door panel with a black arrow indicating downward motion (no text or symbols)1 Open the drain pump filter access panel.
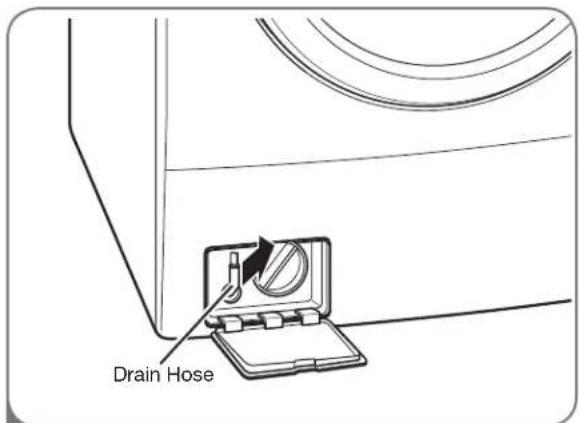
text_image
Drain Hose2 Unclip the drain hose and pull it out. Place the end of the drain hose in a pan, bucket, or floor drain to catch water.
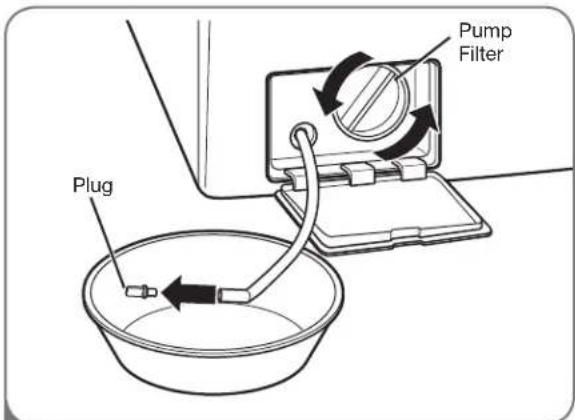
text_image
Plug Pump Filter3 Remove the plug from the drain hose, and allow the water to drain completely.
Twist the pump filter counterclockwise to remove. Remove any lint and foreign objects from the pump filter.
Reverse the above steps to reinstall the drain pump filter and drain hose. Be sure to close the cover panel when finished.
NORMAL SOUNDS YOU MAY HEAR
The following sounds may be heard while the washer is operating. They are normal.
Clicking:
Door lock relay when the door locks and unlocks.
Spraying or hissing:
Steam or water spraying or circulating during the cycle.
Humming or gurgling:
Drain pump pumping water from the washer at the end of a cycle.
Splashing:
Clothes tumbling in the drum during the wash and rinse cycles.
BEFORE CALLING FOR SERVICE
Your Steam Washer ^™ is equipped with an automatic error-monitoring system to detect and diagnose problems at an early stage. If your washer does not function properly or does not function at all, check the following before you call for service.
| Problem Possible Causes Solutions | ||
| Rattling and clanking noise | ·Foreign objects, such as keys, coins, or safety pins, may be in drum or pump. | ·Stop washer and check drum and drain filter for foreign objects. If noise continues after washer is restarted, call for service. |
| Thumping sound | ·Heavy wash loads may produce a thumping sound.·Washer load may be out of balance. | ·This is normal. If sound continues, washer is probably out of balance. Stop and redistribute wash load.·Stop and redistribute wash load. |
| Vibrating noise | ·Shipping bolts and/or packaging materials not removed.·Wash load may be unevenly distributed in the drum.·Not all leveling feet are resting firmly on the floor.·Floor not rigid enough. | ·See Installation Instructions for removing shipping bolts and packaging.·Stop washer and rearrange wash load.·Adjust the leveling feet. Make sure all four feet are in firm contact with the floor while the washer is in the spin cycle with a load.·Make sure that the floor is solid and does not flex. Refer to “Flooring” in the Installation section. |
| Water leaking around washer | ·Fill hose connection is loose at tap or washer.·House drain pipes are clogged. | ·Check hoses. Check and tighten hose connections.·Unclog drain pipe. Contact a plumber if necessary. |
| Excessive sudsing | ·Too much detergent or incorrect detergent. | ·Reduce detergent amount or use low-sudsing detergent. |
| Staining | ·Laundry products added directly to the washer drum.·Washer not unloaded promptly.·Clothes not sorted properly. | ·Load the laundry products into the dispenser.·Always remove items from the washer as soon as the cycle is completed.·Always wash dark colors separately from light colors and whites to prevent discoloration. If possible, do not wash heavily soiled items with lightly soiled ones. |
BEFORE CALLING FOR SERVICE (cont.)
| Problem Possible Causes Solutions | ||
Water in the washer drains slowly or not at all, or the display shows: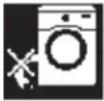 | Drain hose is bent, pinched, or clogged.The drain fi lter is clogged. | Make sure the drain hose is free of clogs, kinks, etc., and is not pinched behind or under the washer.Clean the drain fi lter. See the Care and Cleaning section. |
Washer fills with water slowly or not at all, or the display shows: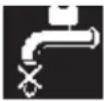 | Water supply taps are not open fully.Water line hoses are kinked, pinched, or bent.Water inlet fi liters are clogged.Water pressure to tap or house is too low. | Make sure that the water taps are open fully.Make sure the hoses are not kinked or pinched. Be careful when moving the washer.Clean the inlet fi liters. See the Care and Cleaning section.Check another faucet in the house to make sure that household water pressure is adequate. |
| Washer will not turn on | Power cord is not properly plugged in.House fuse is blown, circuit breaker has tripped, or power outage has occurred. | Make sure that the plug is plugged securely into a grounded, 3-prong, 127-VAC, 60-Hz. outlet.Reset circuit breaker or replace fuse. Do not increase fuse capacity. If the problem is a circuit overload, have it corrected by a qualifi ed electrician. |
Washer won't spin, or the display shows: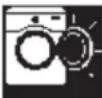 | The door is not closed properly. | Make sure that the door is closed properly and press the START/PAUSE button. After starting a cycle, it may take a few moments before the drum begins to turn or spin. The washer will not spin unless the door is locked (DOOR LOCK will appear in the display).If the door is closed and locked and the open door error message is displayed, call for service. |
| Door will not unlock when cycle is stopped or paused | Interior temperature of washer is too high.Water level in washer is too high. | The washer door has a safety lock to prevent burns.Allow the washer to cool until the DOOR LOCK indicator turns off in the display.Allow the washer to complete the programmed cycle, or run the DRAIN & SPIN cycle to drain the water. |
| Wash cycle time is longer than usual | The washer automatically adjusts the wash time for the amount of laundry, water pressure, water temperature, and other operating conditions. | This is normal. The washer adjusts cycle time automatically to provide optimal results for the selected cycle. |
| Musty or mildewy odor in washer | Incorrect or too much detergent has been used.Inside of tub not cleaned properly. | Use only HE (High-Effi ciency) detergent in accordance with the manufacturer's instructions.Run the TUB CLEAN cycle regularly. Be sure to wipe around and under the door seal frequently. |
| Steam is not visible during STEAM cycle | This is normal. | Because it uses pressurized steam, the washer requires very small amounts of steam to achieve optimal results. Excess steam could damage fabrics and reduce effi ciency. |
BEFORE CALLING FOR SERVICE (cont.)
| Problem Possible Causes Solutions | ||
| Wrinkling | Washer not unloaded promptly.Washer overloaded.Hot and cold water inlet hoses are reversed. | Always remove items from the washer as soon as the cycle is completed.The washer can be fully loaded, but the drum should not be tightly packed with items. The door of the washer should close easily.Hot water rinse can set wrinkles in garments. Check the inlet hose connections. |
| Drum light does not stay on | This is normal. | The drum light shuts off automatically when the washer starts. Press and hold the RINSE+SPIN button for 3 seconds to turn on the light; it will turn off automatically after 4 minutes. |
| Remote Laundry Monitor (optional accessory) not working properly | Refer to the instruction manual for the Remote Laundry Monitor. | Refer to the instruction manual for the Remote Laundry Monitor. |
The display shows: | Load is too small.Load is out of balance.The washer has an imbalance detection and correction system. If individual heavy articles are loaded (bath mat, bath robe, etc.) and the imbalance is too great, the washer will make several attempts to restart the spin cycle. If an imbalance is still detected, the washer will stop and the error code will be displayed. | Add 1 or 2 similar items to help balance the load.Rearrange items to help balance the load. |
The display shows: | Control error. | Unplug the washer and call for service. |
The display shows: | Water level is too high due to a faulty water valve. | Close the water taps, unplug the washer, and call for service. |
The display shows: | The water level sensor is not working correctly. | Close the water taps, unplug the washer, and call for service. |
The display shows: | Thermal overload protection circuit in the motor has been tripped. | Allow the washer to stand for 30 minutes to allow the motor to cool; then restart the cycle. If the LE error code still appears, unplug the washer and call for service. |
The display shows: | A power failure has occurred. | Restart the cycle. |
SPECIFICATIONSNSPTOPNALDANCEACCRISSORIES
KEY DIMENSIONS AND SPECIFICATIONS
The appearance and specifications listed in this manual may vary due to constant product improvements.
| Steam WasherTM Model WDT1652BDS | |
| Description Front-Loading Washer | |
| Electrical Requirements | 127 VAC @ 60 Hz. |
| Max. Water Pressure 14.5~116 PSI (100~800 kPa) | |
| Dimensions 27"(W) X 2968.6 cm (W) X 75.6 cm (D) | ^3/_4 "(D) X 38^11/_16 "(H), 51"(D with door open)X 98.3 cm (H), 129.5 cm (D with door open) |
| Net Weight 231.5 lbs. (105 kg) | |
| Wash capacity 16.0 kg | |
| Max. Watt 1200 W | |
| Max. Spin Speed 1,320 RPM | |
OPTIONAL ACCESSORIES
For these and other LG products, contact your local LG dealer, or visit our Web site at us.lge.com.
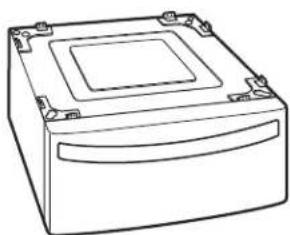
natural_image
Line drawing of a rectangular electronic device with a central square top and side panel (no text or symbols)Pedestal
Give your LG washer and dryer a boost with matching 14-inch high pedestals.
They feature a storage drawer for added convenience.
14" Pedestal
Color
WDP3S
Stainless Steel
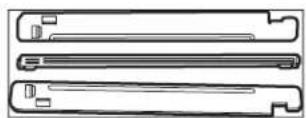
Stacking Kit
If space is at a premium, use this kit to securely stack your LG front-load washer and dryer.
Bracket Kit
Color
SSTK1
Titanium
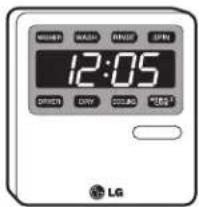
text_image
NEEER MASC RHO SPN 12:05 OFFSET DRY COOLING LOGS LGRemote Laundry Monitor
Check the status of a load of laundry from anywhere in the house without special wiring. This unit plugs into any standard household outlet and toggles between washer and dryer status.
PEDESTAL INSTALLATION
The pedestal accessory includes:
- Screws (18) † • Retainers (4) ††
- Drawer divider (1) • Wrench (1)
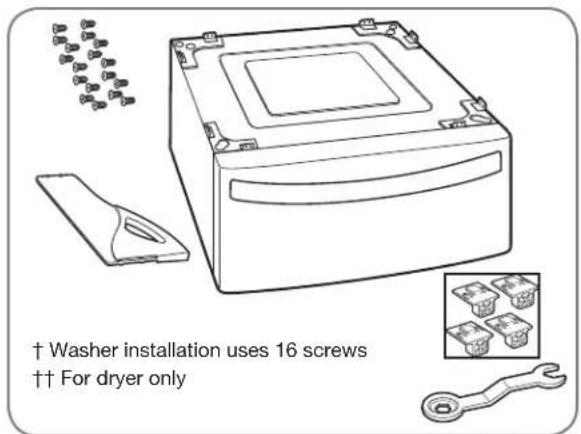
text_image
† Washer installation uses 16 screws †† For dryer onlyTools Needed for Installation:
• Phillips-head screwdriver
- Wrench (supplied)
To ensure safe and secure installation, please thoroughly follow the instructions below.
WARNING
- Incorrect installation can cause serious accidents.
• The appliances are heavy. Two or more people are required when installing the pedestal. There is a risk of serious back injury or other injuries. - Do not allow children to play in or on the drawer. There is a risk of suffocation or injury.
- Do not step on the handle. There is a risk of serious injury.
- If appliances are already installed, disconnect them from all power, water, or gas lines and from draining or venting connections. Failure to do so can result in electrical shock, fire, explosion, or death.
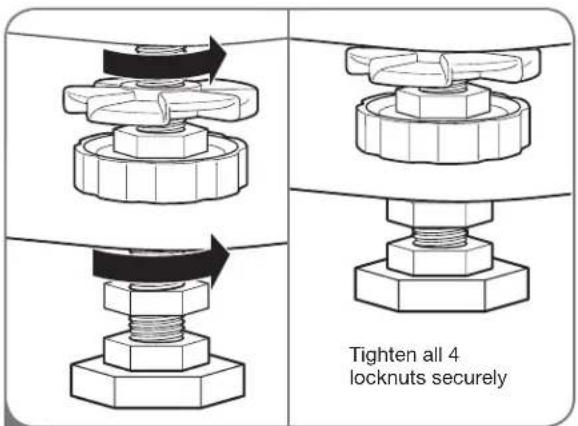
text_image
Tighten all 4 locknuts securely1 Make sure the leveling feet of the appliance are fully retracted.
Once the leveling feet of the washer are fully retracted, tighten all locknuts securely.
NOTE: The leveling feet on the dryer do not have locknuts.
NOTE: The appliance and pedestal assembly must be placed on a solid, sturdy, level floor for proper operation.
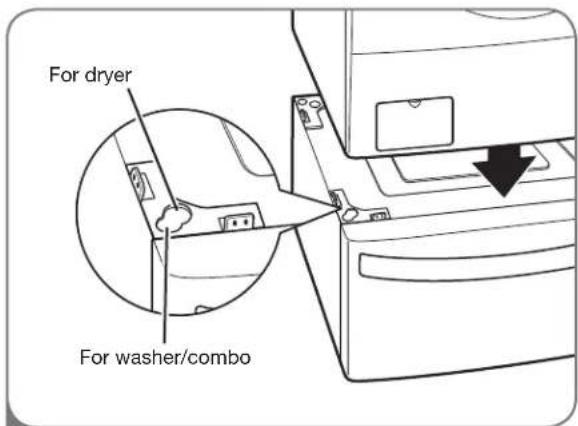
text_image
For dryer For washer/combo2 Position the appliance on top of the pedestal. The washer feet will fit into the outermost corner positions and the dryer feet will fit into the innermost positions as shown.
PEDESTAL INSTALLATION (cont.)
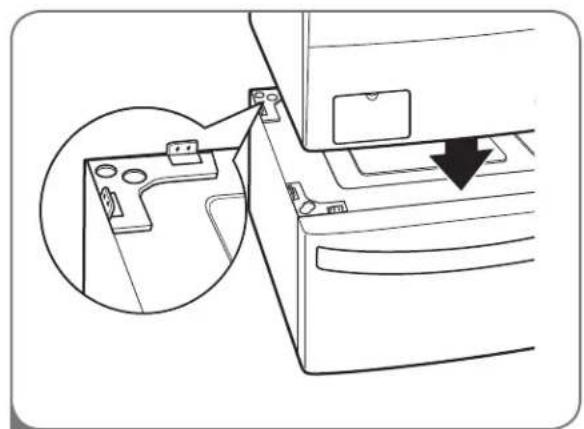
natural_image
Line drawing of a door handle assembly with an inset showing a close-up of the component (no text or symbols)3 Make sure the back feet are in the correct positions.
The washer feet will fi t into the outermost corner positions and the dryer feet will fi t into the innermost positions as shown.
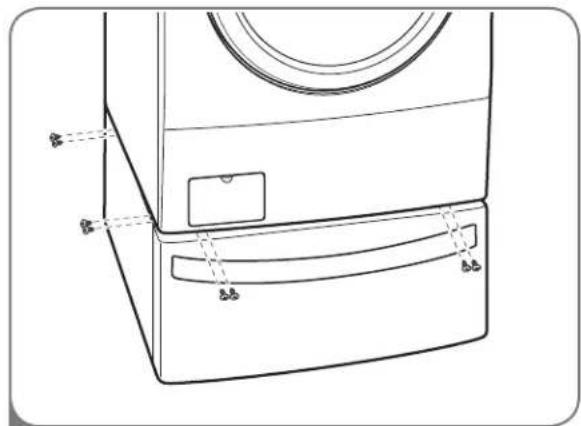
text_image
Technical diagram of a washing machine with labeled parts and dimension annotations4 Make sure the holes on the pedestal align with the holes in the appliance, then install 4 screws at each corner to securely attach the appliance to the pedestal.
NOTE: If the screws are not installed properly, noise and vibration may result.
Move the appliance to the desired location.
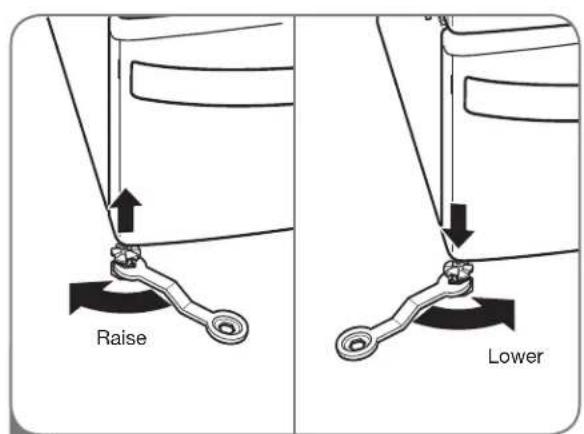
text_image
Raise Lower5 Loosen the locknuts on all 4 leveling feet of the pedestal until you can turn them with the wrench. Turn clockwise to raise or counterclockwise to lower until the pedestal is level and all 4 feet are solidly against the floor.
Using the Floor Pads
When installing the pedestal on a wooden floor, place the included floor pads under the legs of the pedestal. This will help reduce vibration when the washer is operating.
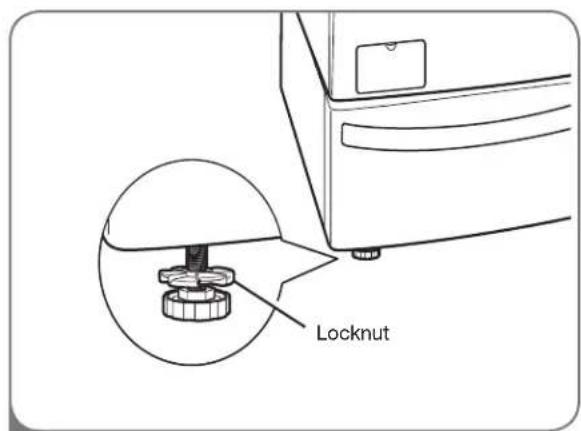
text_image
Locknut6 Securely tighten all locknuts by hand.
NOTE: Noise and vibration may result if locknuts are not tightened.
Be sure to connect the appliances to all water, power, or gas lines and draining or venting connections before operation.
If there is excessive vibration during the first operation after installation, slightly adjust the leveling feet.
STACKING KIT INSTALLATION
This stacking kit includes:
- Two (2) side rails
- One (1) front rail
- Four (4) screws
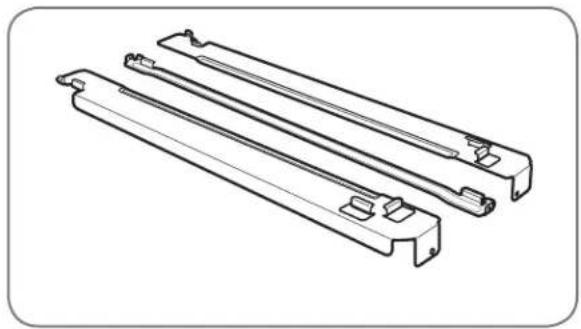
natural_image
Technical line drawing of three parallel metal bracket components (no text or symbols)Tools Needed for Installation:
• Phillips-head screwdriver

To ensure safe and secure installation, please observe the following instructions.
WARNING
- Incorrect installation can cause serious accidents.
- The weight of the dryer and the height of installation make this stacking procedure too risky for one person. Two or more people are required when installing the stacking kit. There is a risk of serious back injury or other injuries.
- Do not use the stacking kit with a gas dryer in potentially unstable conditions such as a mobile home. Failure to follow this warning can result in serious injury.
- Place the washer on a solid, stable, level floor capable of supporting the weight of both appliances. Failure to follow this warning can result in serious injury.
- Do NOT stack the washer on top of the dryer. Failure to follow this warning can result in serious injury.
- If appliances are already installed, disconnect them from all power, water, or gas lines and from draining or venting connections. Failure to do so can result in electrical shock, fire, explosion, or death.
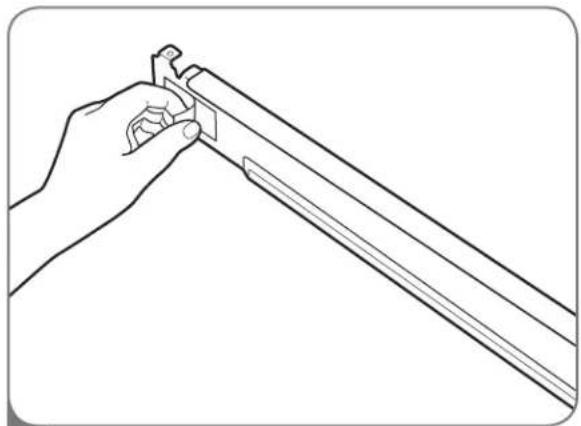
natural_image
Line drawing of a hand holding a tool, no text or symbols present1 Make sure the surface of the washer is clean and dry. Remove paper backing from the tape on one of the stacking kit side brackets.
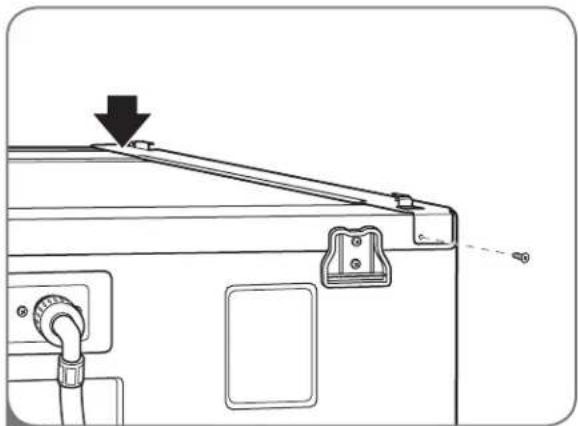
natural_image
Technical line drawing of a mechanical device with adjustment arrows (no text or symbols)2 Fit the side bracket to the side of the washer top as shown in the above illustration. Firmly press the adhesive area of the bracket to the washer surface. Secure the side bracket to the washer with a screw on the back side of the bracket. Repeat steps 1 and 2 to attach the other side bracket.
STACKING kIT INSTALLATION (cont.)
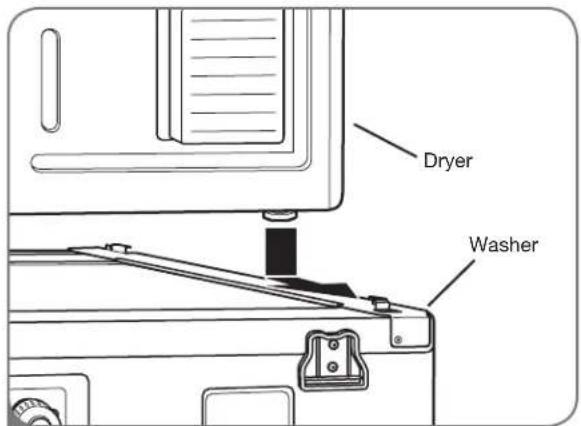
text_image
Dryer Washer3
Place the dryer on top of the washer by fi tting the dryer feet into the side brackets as illustrated. Avoid fi nger injuries; do not allow fi ngers to be pinched between the washer and dryer. Slowly slide the dryer toward the back of the washer until the side bracket stoppers catch the dryer feet.
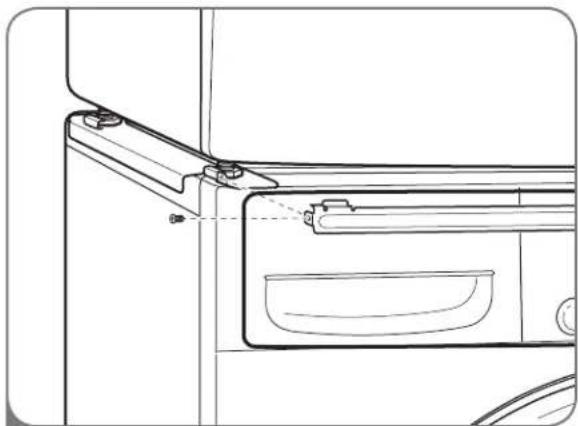
natural_image
Technical line drawing of a door handle assembly with mounting feet and internal compartments (no text or symbols)4
Insert the front rail between the bottom of the dryer and the top of the washer. Push the front rail toward the back of the washer until it comes in contact with the side rail stoppers. Install the two remaining screws to secure the front rail to the side rails.
HOME CODE CLEAR
- Replacing or repairing (lost or broken) the monitor -
If you replace the monitor, reset the Home Code as detailed below.
WARNING
Use the method below when necessary.
1 The appliance must be switched off. After pressing the buttons listed below simultaneously, turn the Power button on.
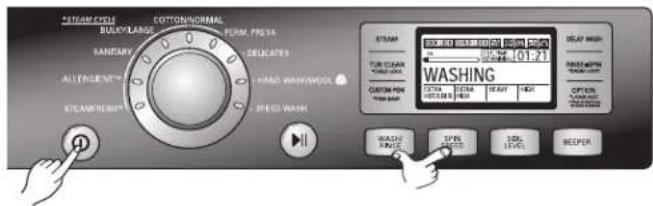
text_image
STREAM CIRCLE COTTON/NORMAL BULKY/LARGE TERM PRESS SANITARY EQUATES ALTERNATING HAND WASH/WASH STEAM/SHORT SPEED WASH STREAM TUR CLEAN WASHING CUSTOM HOW WHIP WASHING WASHING WASHING WASHING WASHING WASHING WASHING WASHING WASHING WASHING WASHING WASHING WASHING WASHING WASHING WASHING WASHING WASHING WASHING WASHING WASHING WASHING WASHING WASHING WASHING WASHION WASHION WASHION WASHION WASHION WASHION WASHION WASHION WASHION WASHION WASHION WASHION WASHION WASHION WASHION WASHION WASHION WASHION WASHION WASHION WASHION WASHION WASHION WASHION WASHION WASHIOA WASHIOA WASHIOA WASHIOA WASHIOA WASHIOA WASHIOA WASHIOA WASHIOA WASHIOA WASHIOA WASHIOA WASHIOA WASHIOA WASHIOA WASHIOA WASHIOA2 The screen shows "HOME CODE CLEAR IS PROCESSING...." as the power turns on, and All LEDs are turned on.
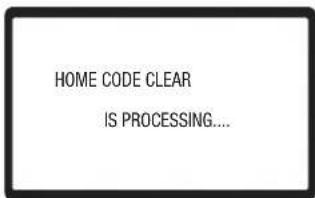
text_image
HOME CODE CLEAR IS PROCESSING...- "HOME CODE CLEAR IS PROCESSING..." will display on the LCD.
3 The Home Code becomes cleared automatically. After showing "HOME CODE CLEAR IS PROCESSING...." for 3 seconds, the machine is automatically turned off.
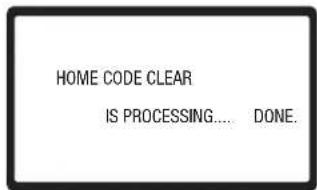
text_image
HOME CODE CLEAR IS PROCESSING..... DONE.- "HOME CODE CLEAR IS PROCESSING....DONE." will display on the LCD, then the machine is automatically turned off.
4 Home Code clear is completed.
5 Set the Home Code on the RLM. If you replace the monitor, you must reset the Home Code.
INSTRUCCIONES ImportANTE de SEgURIdad
natural_image
Silhouette of a hanger holding a garment and a bottle, both without any text or symbolsLEA TODAS LAS INSTRUCCIONES ANTES DE USAR
text_image
Diagram of a washing machine with numbered parts for identification and assembly reference.PIEzaS Y COMPONENTES CLavE
Using the Floor Pads
text_image
30" (76,1 cm) 4" (10 cm)natural_image
Two diagrams showing a bolt and nut assembly with no text or symbols, labeled A and B (no readable text or symbols)natural_image
Black square speaker icon with white circular design and a small circle on top (no text or symbols)text_image
STEAM TUB CLEAN *CHILD LOCK CUSTOM PGM *PGM SAVE DOOR LOCK CHILD LOCK 01:21 ST. TIME GALAWAING WASHING EXTRA HOT/COLD EXTRA HIGH HEAVY HIGH DELAY WASH RINSE4SPN *DRUM LIGHT OPTION *LANGUAGES Please call to you for your connection to the device.natural_image
Silhouette of a black long-sleeve top hanging on a hanger (no text or symbols)text_image
STEAM TUB CLEAN *CHILD LOCK CUSTOM PGM *PGM SAVE OFF | WATER PLUS OFF | PRE-WASH OFF | EXTRA RINSE OFF | STAIN CYCLE OFF | SPINSENSE OFF | EXIT DELAY WASH RINSE+SPIN *DRUM LIGHT OPTION *LANGUAGE Please call to your right, please check for your best order.natural_image
Line drawing of a washing machine interior showing handshelves and control panel (no text or symbols)natural_image
Line drawing of a multi-tiered plastic container with multiple compartments (no text or symbols)natural_image
Line drawing of a device rear panel with two hoses and a switch, no text or symbols presentnatural_image
Line drawing of a hand pressing down on a door panel with a black arrow indicating downward motion (no text or symbols)natural_image
Line drawing of a rectangular electronic device with a central square top and side panel (no text or symbols)Pedestal
natural_image
Technical line drawing of a mechanical component with an inset showing a close-up view of a bracket and a downward arrow indicating direction (no text or symbols present)text_image
Technical diagram of a washing machine with labeled parts and dimension annotationstext_image
Levantar Lowernatural_image
Technical line drawing of three parallel metal bracket components (no text or symbols)natural_image
Line drawing of a hand holding a tool, no text or symbols presentnatural_image
Technical line drawing of a mechanical component with no visible text or symbolsnatural_image
Technical line drawing of a refrigerator door handle and front panel (no text or symbols)4