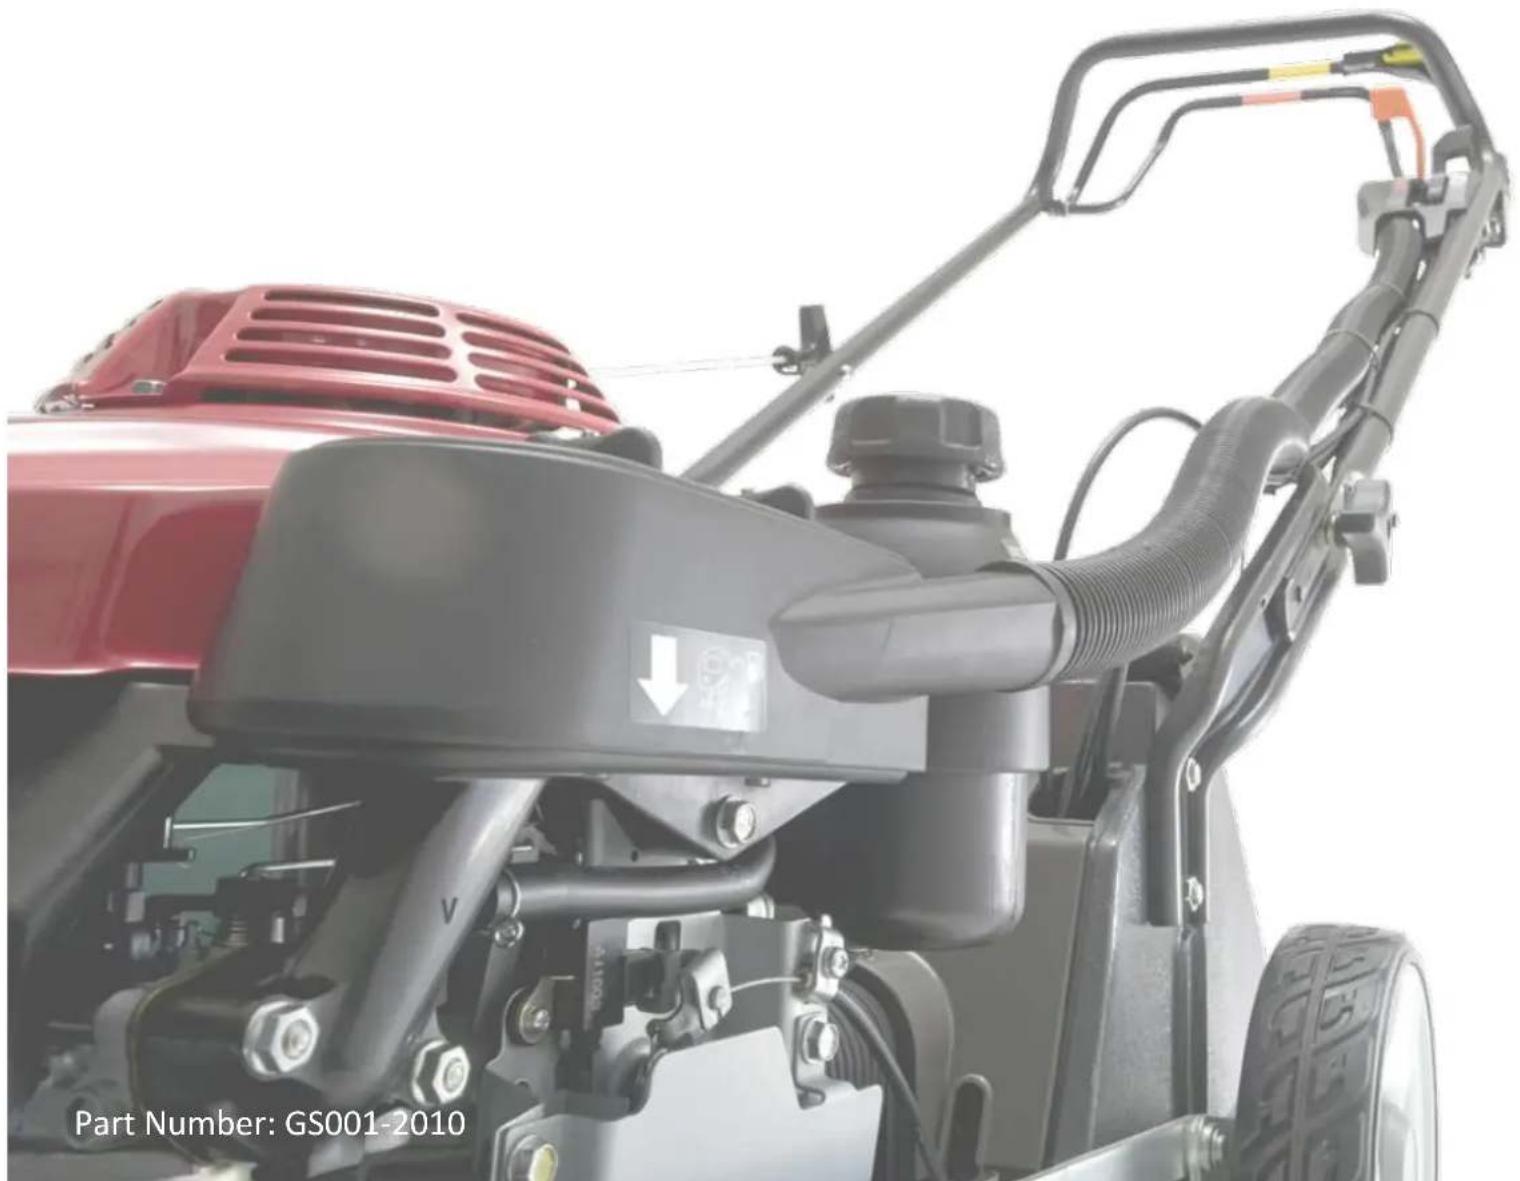
Buffalo Buck HRU19K1 - Lawn mower Honda - Free user manual and instructions
Find the device manual for free Buffalo Buck HRU19K1 Honda in PDF.


| Product Type | Lawn Mower |
| Brand | Honda |
| Model | Buffalo Buck HRU19K1 |
| Engine Type | 4-stroke, overhead valve |
| Engine Displacement | 190 cc |
| Power Source | Petrol (unleaded) |
| Cutting Width | 46 cm (18 inches) |
| Cutting Height Adjustment | Central lever, 6 positions |
| Cutting Height Range | 20 – 75 mm |
| Grass Collection Mode | Grass bag (capacity 60 L) |
| Mulching Function | Yes (mulch plug included) |
| Drive Type | Self-propelled, rear wheel drive |
| Speed Control | Variable, single lever |
| Start System | Recoil start |
| Wheel Size (Front/Rear) | 8 inches / 11 inches |
| Handle Type | Ergonomic, foldable |
| Weight (approx.) | 30 kg (66 lbs) |
| Overall Dimensions (L x W x H) | 145 x 55 x 105 cm |
| Fuel Tank Capacity | 1.5 L |
| Oil Capacity | 0.5 L |
| Maintenance Schedule | Check oil and air filter before each use; annual service recommended |
| Noise Level (Lwa) | 96 dB(A) |
| Safety Features | Brake lever, operator presence control |
| Spare Parts Availability | Blades, air filters, spark plugs, belts available from Honda dealers |
| Repairability Index | ~8.0 / 10 (based on typical Honda mowers) |
Frequently Asked Questions - Buffalo Buck HRU19K1 Honda
User questions about Buffalo Buck HRU19K1 Honda
0 question about this device. Answer the ones you know or ask your own.
Ask a new question about this device
Download the instructions for your Lawn mower in PDF format for free! Find your manual Buffalo Buck HRU19K1 - Honda and take your electronic device back in hand. On this page are published all the documents necessary for the use of your device. Buffalo Buck HRU19K1 by Honda.
USER MANUAL Buffalo Buck HRU19K1 Honda
Service Record Booklet
natural_image
Black Honda lawn mower with red and black body, no visible text or symbols on the device itselfRead and understand this Owners Manual before operating your Honda mower and ensure that you have identified the information applicable to your particular model mower.
Thank you for purchasing a Honda lawn mower.
This manual covers the operation and maintenance of the Honda lawn mower range.
We want to help you get the best results from your mower and to operate it safely. This manual contains the information on how to do that; please read it carefully.
This manual should be considered a permanent part of the lawn mower and should remain with it, if it is resold.
If you have a problem or questions concerning the mower, contact your supplying dealer.
SAFETY MESSAGES
Pay special attention to statements preceded by the following words:

You WILL be KILLED or SERIOUSLY HURT if you don't follow instructions.

You CAN be KILLED or SERIOUSLY HURT if you don't follow instructions.

You CAN be HURT if you don't follow instructions.
Each message tells you what the hazard is, what can happen, and what you can do to avoid injury.
DAMAGE PREVENTION MESSAGES
You will also see other important messages that are preceded by the following word:
Your lawn mower or other property can be damaged if you don't follow instructions.
The purpose of these messages is to help prevent damage to your lawn mower, other property, or the environment.
Do not use this lawn mower except for mowing lawns.
Illustrations in this manual are for instructional purposes only and may not be exact representations. All information contained in this manual is based on the latest product information available at the time of publication. Honda Australia Motorcycle and Power Equipment Pty. Ltd. reserves the right to make changes at any time without notice. No part of this publication may be reproduced, stored in a retrieval system, or transmitted in any form by any means, electronic, mechanical, photocopying, recording, or otherwise, without the prior written permission of Honda Australia Motorcycle and Power Equipment Pty. Ltd. This includes text, figures and tables.
Honda Australia Motorcycle and Power Equipment Pty. Ltd.
ABN 96 006 662 862 (trading as Honda MPE).
- WARRANTY....4
Honda limited Warranty....4
-
SAFETY INSTRUCTIONS....5
-
COMPONENT IDENTIFICATION....7
-
CONTROLS....9
Fuel Valve....9
Throttle Lever....9
Blade Control Lever....10
Drive Clutch Lever....11
Cutting Height Adjustment Lever....12
Shift Lever....13
Front Guard....14
- PRE-OPERATION CHECKS....15
ARE YOU READY TO MOW? 15
CHECK YOUR LAWN....15
CHECK YOUR MOWER....16
Blades....16
Engine Oil Level....19
Fuel....20
Air Cleaner....21
Grass Bag 21
Cutting Height....23
- OPERATION....24
MOWING PRECAUTIONS....24
STARTING THE ENGINE....24
Throttle Lever....25
Blade Control Lever....27
Drive Clutch Lever....28
Shift Lever....29
STOPPING THE ENGINE....30
SAFE MOWING PRACTICES....31
MOWING TIPS....33
- TRANSPORTING/STORAGE....36
BEFORE LOADING....36
LOADING AND UNLOADING....36
STORAGE PREPARATION....37
Handlebar Folding....40
STORAGE PRECAUTIONS....41
- MAINTENANCE....42
THE IMPORTANCE OF MAINTENANCE....42
MAINTENANCE SAFETY....43
MAINTENANCE SCHEDULE....44
ENGINE MAINTENANCE....45
Engine Oil Change....45
Engine Oil Recommendations....46
Air Cleaner Service....47
Spark Plug Service....48
Carburettor Modification for Altitude operation....50
Fuel Recommendations....50
BLADE REMOVAL & INSTALLATION....51
GRASS BAG CLEANING & REPLACEMENT....56
-
TROUBLESHOOTING....57
-
SPECIFICATIONS....59
-
OPERATOR SAFETY FEATURES....62
-
SET UP INSTRUCTIONS....63
13.SERVICE SCHEDULE SHEET....65
Honda* warrants each new Honda lawn mower to be free from defects in material and workmanship for the period detailed on your warranty registration form.
The Honda warranty is limited. In order to qualify, the service schedule sheets located at the back of this manual must be completed. Any Authorised Honda Lawnmower Dealer will repair any part that proves defective within the limits of this warranty at no charge to the owner for parts and labour. All parts replaced under this warranty become the property of Honda. Transportation costs for the product either to or from the dealer is the responsibility of the owner.
This warranty will not apply to:
- Any part which has been subject to misuse, negligence, accidental damage, improper or inadequate maintenance, or improper storage.
- Repairs rendered necessary by, or arising from, the use of other than genuine Honda parts.
- Normal maintenance items, including, but not limited to, adjustment of valves, cleaning of carburettor, fuel strainer and air filter.
- Normal replacement of service items, including but not limited to spark plug, air filter and cutting blades.
- Deterioration of any item due to normal use, fair wear and exposure unless due to a defect in material or workmanship.
- Any work or adjustment performed by persons other than Authorised Honda Lawnmower Dealers, nor damage resulting therefrom.
The benefits conferred by this warranty are in addition to all other rights and remedies in respect of the product which the purchaser has under the Trade Practices Act 1974 and/or any relevant State or Territory Acts. Where permitted, the liability of Honda shall be limited at its option to the repair or the replacement of the mower.
NOTE: For full details of the Honda Warranty policy, coverage and conditions please go to www.hondampe.com.au, under the banner "Owning a Honda".
*Honda is: Honda Australia Motorcycle and Power Equipment Pty. Ltd. ABN 96 006 662 862, Private Bag No. 19, Somerton, Victoria, 3062. These warranty conditions apply to Australia only. Purchasers in other countries should refer to their local distributor for warranty conditions.

WARNING
To ensure safe operation
- Read and understand the Owner's Manual before operating the mower. Failure to do so could result in personal injury or equipment damage.
- Read instructions carefully, become familiar with controls and proper use of equipment.
- Never allow children or people unfamiliar with these instructions to use the lawn mower.
- Never mow while people, especially children, or pets are nearby.
- Keep in mind that the operator is responsible for accidents or hazards that occur to people or their property.
- While mowing, always wear substantial footwear and long trousers. Do not operate the equipment when barefoot or wearing open sandals.
- Thoroughly inspect the area where the equipment is to be used and remove all objects which may be thrown by the mower.
• Petrol is highly flammable:
- Store fuel in containers specifically designed for this purpose
- Refuel outdoors only and do not smoke while refuelling
- Add fuel before starting the engine. Never remove the cap of the fuel tank or add petrol while the engine is running or when the engine is hot.
- If petrol is spilled, do not attempt to start the engine but move the mower away from the area of spillage and avoid creating any source of ignition until the petrol vapours have dissipated.
- Before using, always visually inspect to see that the blades, blade bolt(s) and mower housing are not worn or damaged. Replace worn or damaged blades and bolt(s) in sets to preserve balance.
- Do not operate the engine in a confined space where dangerous carbon monoxide fumes can collect.
- Mow only in daylight or good artificial light.
- Avoid operating the equipment in wet grass, where feasible.
- Mowing on slopes:
- Always be sure of your footing on slopes.
- Mow across slopes, never up and down.
- Walk, never run.
- Exercise extreme caution when changing direction on slopes.
-
Do not mow on slopes of 20 degrees or more for extended periods.
-
Use extreme caution when reversing or pulling the lawn mower toward you.
- Stop the blades if the lawn mower has to be tilted for transporting, when crossing surfaces other than grass and when transporting the lawn mower to and from the area to be mowed.
- Never operate the lawn mower with defective guards or shields, or without guard devices (for example, discharge guard).
- Do not attempt to make cutting height adjustments while the engine is running.
- Do not change the engine governor setting or over-speed the engine.
- Disengage drive clutch before starting the engine.
- Always start the engine according to the instructions and keep hands and feet well away from the blades and discharge opening at all times..
- Do not tilt the lawn mower when starting the engine.
- Do not start the engine when standing in front of the discharge opening.
- Do not put hands or feet near or under rotating parts.
- Never pick up or carry a lawn mower while the engine is running.
- Stop the engine and disconnect the spark plug cap:
- Before clearing a blockage or unclogging the mower.
- Before checking, cleaning or working on the mower.
- After striking a foreign object. Inspect the mower for damage and make repairs before restarting and operating the mower.
- If the mower starts to vibrate abnormally, check immediately.
- Stop the engine:
- Whenever you leave the mower.
- Before refuelling the mower. Allow to cool before refuelling.
- Reduce the throttle setting during engine shut down and turn the fuel valve off at the conclusion of mowing (Except Auto Choke models).
- Keep all nuts, bolts and screws tight to be sure the mower is in safe working condition.
- Never store the mower with petrol in the tank inside a building where fumes may reach an open flame or spark. Allow the engine to cool before storing in any enclosure.
- To reduce the fire hazard, keep the engine, muffler and petrol tank area free of grass, leaves or excessive grease.
- Replace worn or damaged parts for safety.
- If the fuel tank has to be drained, this should be done outdoors.
- Wear eye protection.
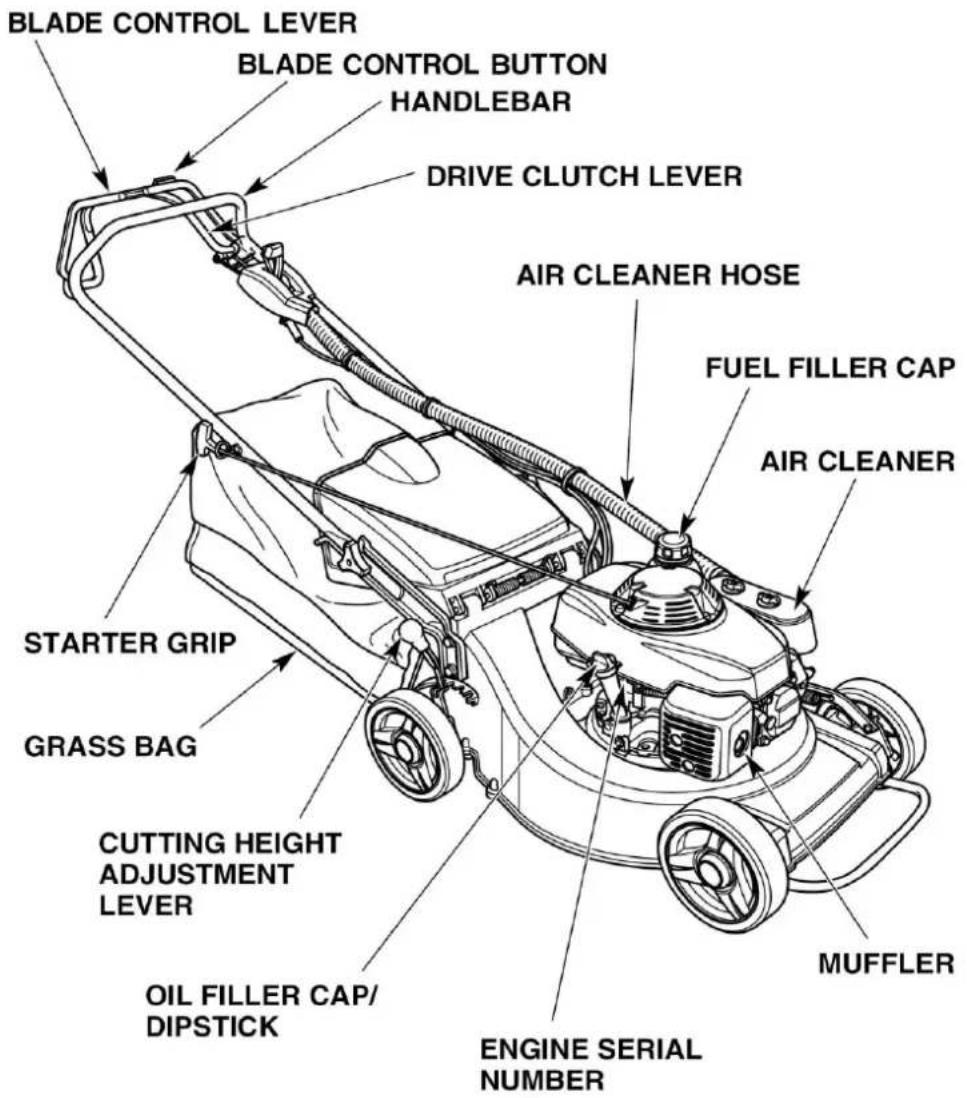
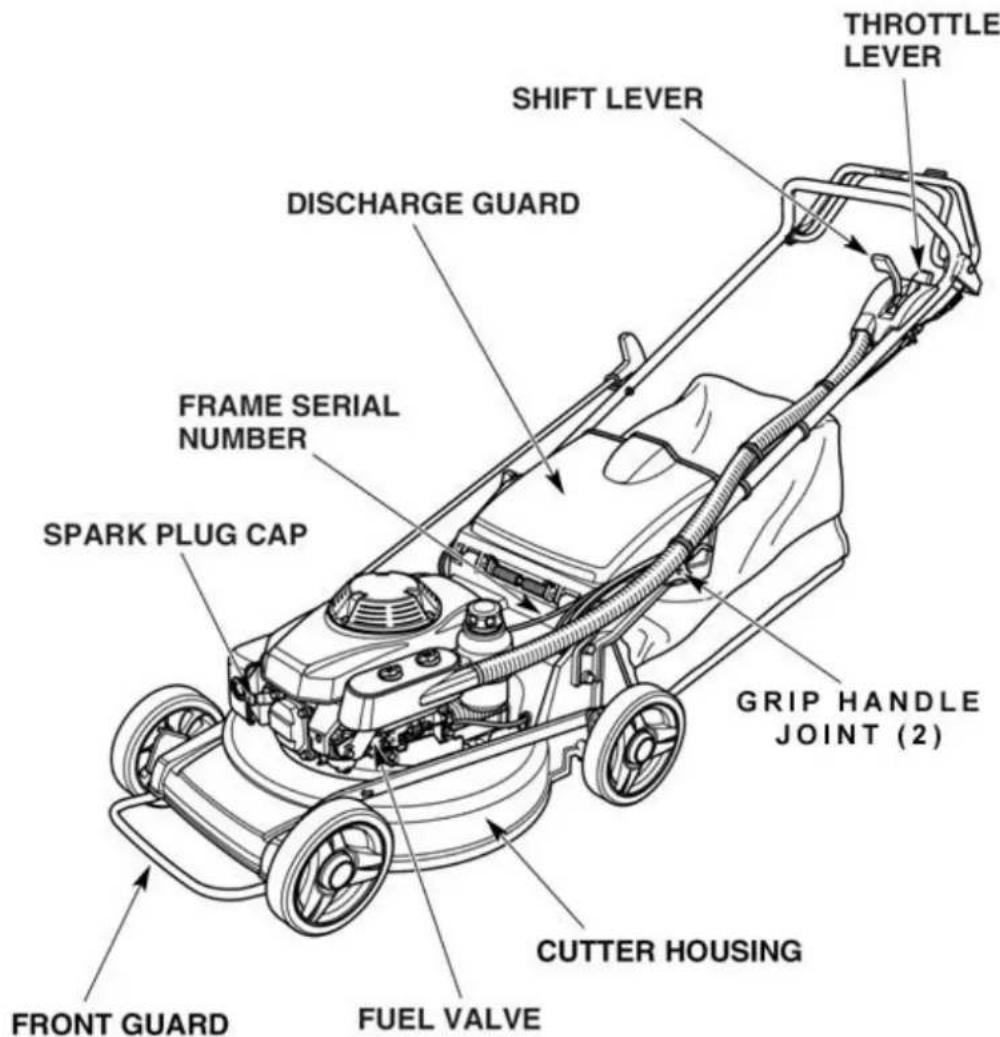
3. COMPONENT IDENTIFICATION
HRU216M2 / K2 SHOWN
text_image
BLADE CONTROL LEVER BLADE CONTROL BUTTON HANDLEBAR DRIVE CLUTCH LEVER AIR CLEANER HOSE FUEL FILLER CAP AIR CLEANER STARTER GRIP GRASS BAG CUTTING HEIGHT ADJUSTMENT LEVER OIL FILLER CAP/ DIPSTICK MUFFLER ENGINE SERIAL NUMBERHRU197K1 / M1

text_image
THROTTLE CABLE STAY THROTTLE CABLE3. COMPONENT IDENTIFICATION - continued
text_image
THROTTLE LEVER SHIFT LEVER DISCHARGE GUARD FRAME SERIAL NUMBER SPARK PLUG CAP GRIP HANDLE JOINT (2) CUTTER HOUSING FRONT GUARD FUEL VALVE(21" Models only)
Record the frame and engine numbers and serial codes, and date of purchase, in the space below. You will need this information when ordering parts and when making technical or warranty inquiries.
Frame Serial Number:
Engine Serial Number: ____
Date of Purchase:
DESCRIPTION OF CONTROLS
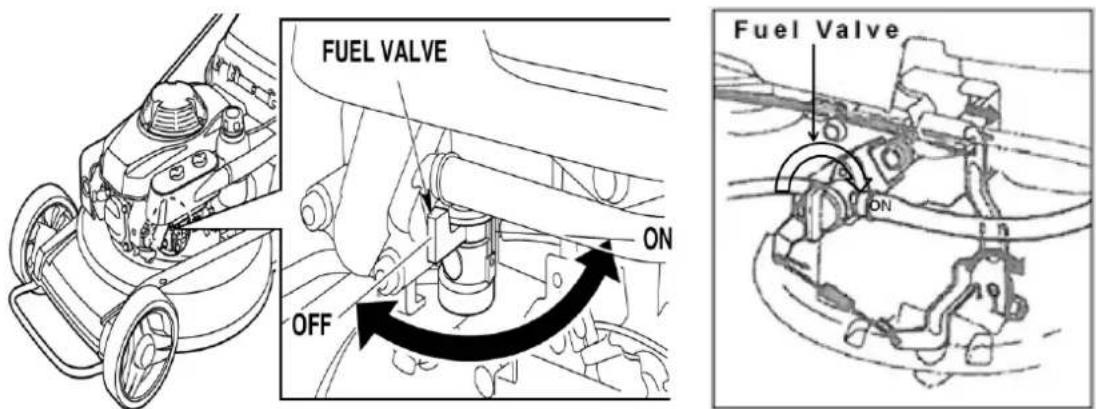
Fuel Valve
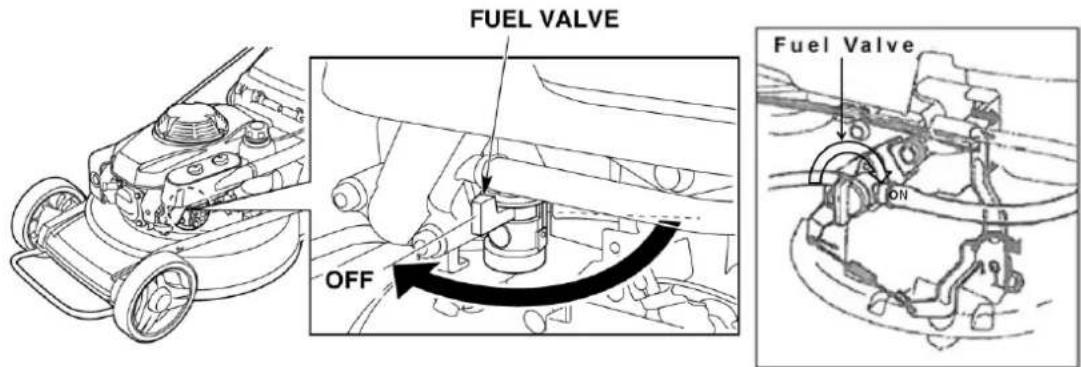
The fuel valve opens and closes the fuel passage from the fuel tank to the carburettor. The fuel valve must be ON to start and operate the mower. The fuel valve should be kept OFF when the mower is not in use.
text_image
FUEL VALVE ON OFF Fuel Valve ONNOTE: Fuel Valve may vary in appearance depending on engine model.
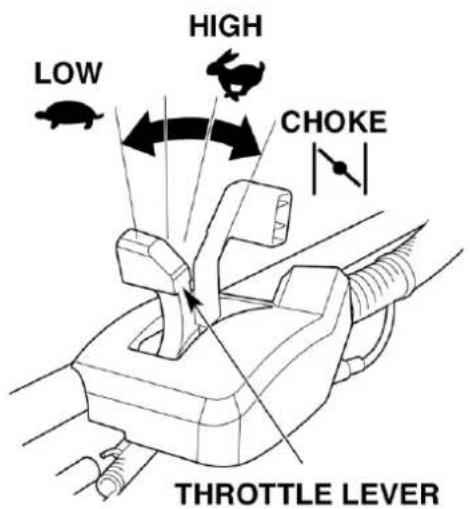
Throttle Lever

CHOKE ____ For starting a cold engine ( Not for HRU19K1 or HRU19M1 )

HIGH For restarting a warm engine and for mowing

LOW For idling the engine
text_image
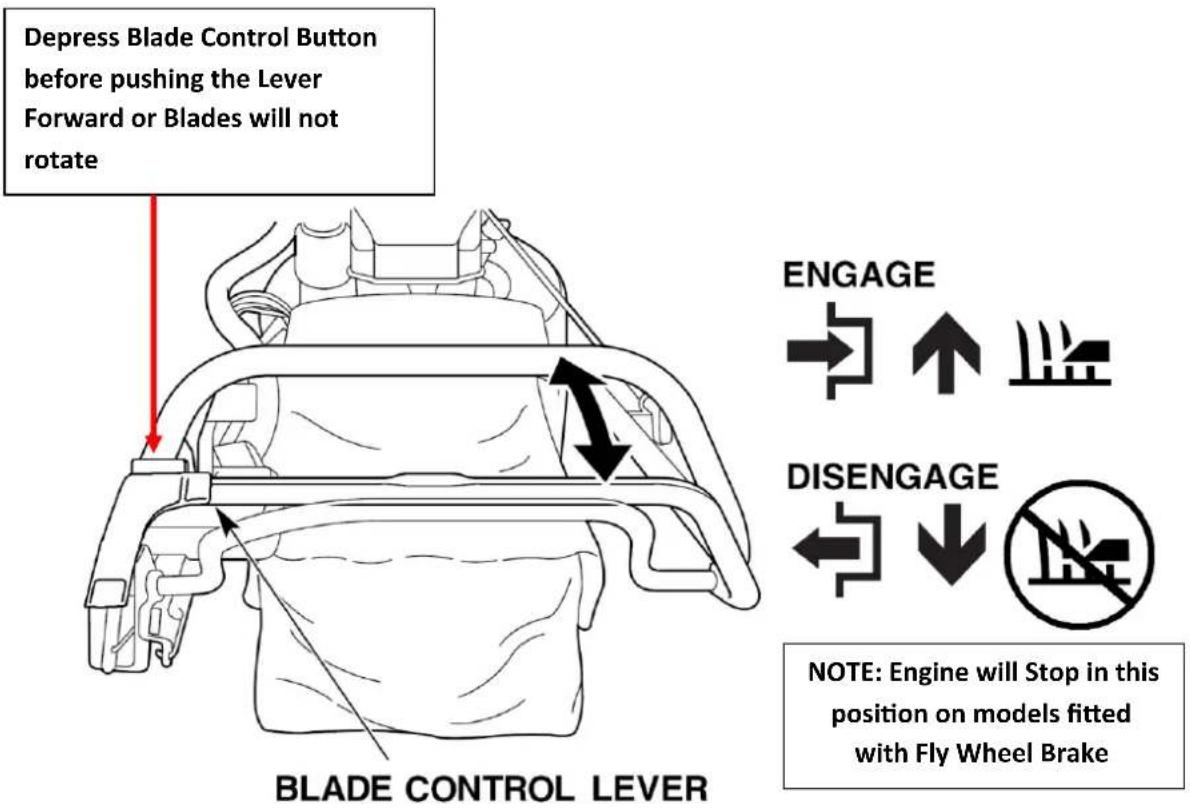
LOW HIGH CHOKE THROTTLE LEVERBlade Control Lever ( HRU196M1 and all 21" Models )
This lever is connected to the Roto-Stop blade control system. The blades will not turn unless the blade control button is pushed in conjunction with the blade control lever being pushed forward.
text_image
Depress Blade Control Button before pushing the Lever Forward or Blades will not rotate BLADE CONTROL LEVER ENGAGE ↑ ↑ DISENGAGE ← ↓ NOTE: Engine will Stop in this position on models fitted with Fly Wheel BrakeDrive Clutch Lever ( 21" Models Only )
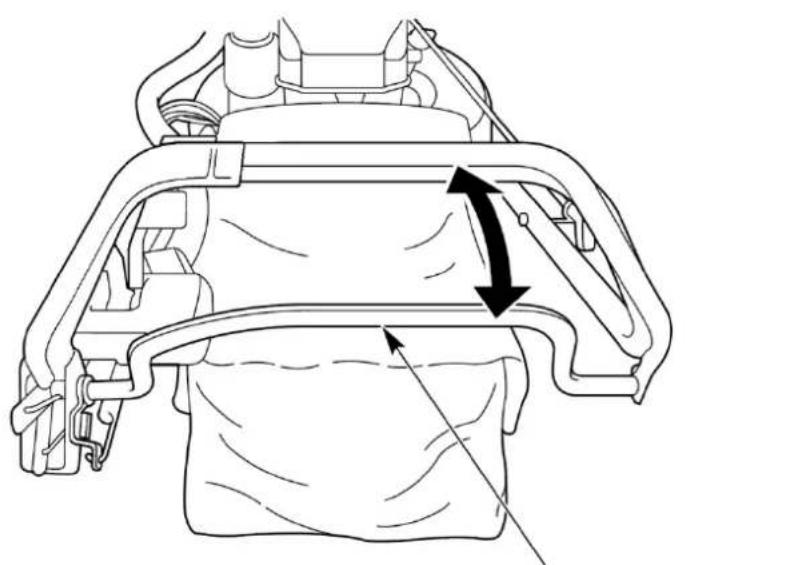
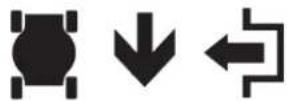
The drive clutch lever engages (push forward) and disengages (release) the transmission that drives the rear wheels. The drive clutch lever should only be engaged after the engine has been started.
natural_image
Technical line drawing of a mechanical component with directional arrows indicating movement or force (no text or symbols)DRIVE CLUTCH LEVER
ENGAGE

DISENGAGE
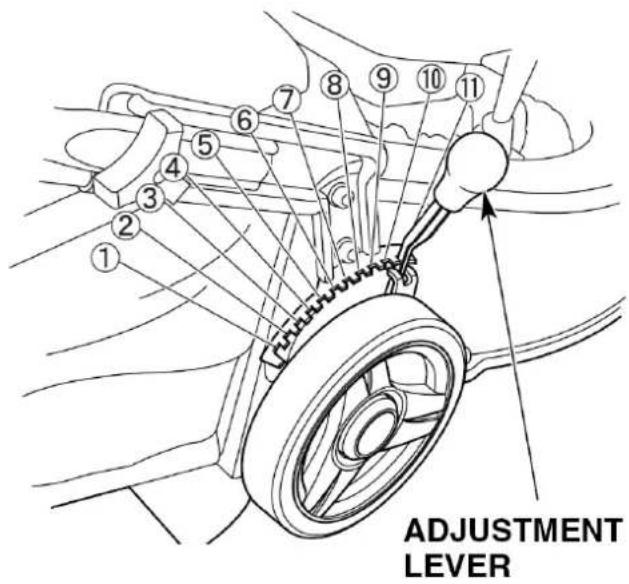
Cutting Height Adjustment Lever
All wheels of the mower can be adjusted at the same time with one lever.
The cutting heights listed are approximate. The actual height of cut grass will vary with lawn and soil conditions.
Move the adjuster forward to lower and back to raise the cutter housing.
| Position | Approx. Height |
| 1 | 76 mm |
| 2 | 70 mm |
| 3 | 64 mm |
| 4 | 58 mm |
| 5 | 51 mm |
| 6 | 45 mm |
| 7 | 39 mm |
| 8 | 33 mm |
| 9 | 28 mm |
| 10 | 22 mm |
| 11 | 16 mm |
text_image
ADJUSTMENT LEVERNOTE: The 19" models have the Height Adjustment Lever on the left hand side, so the above figures will be reversed.
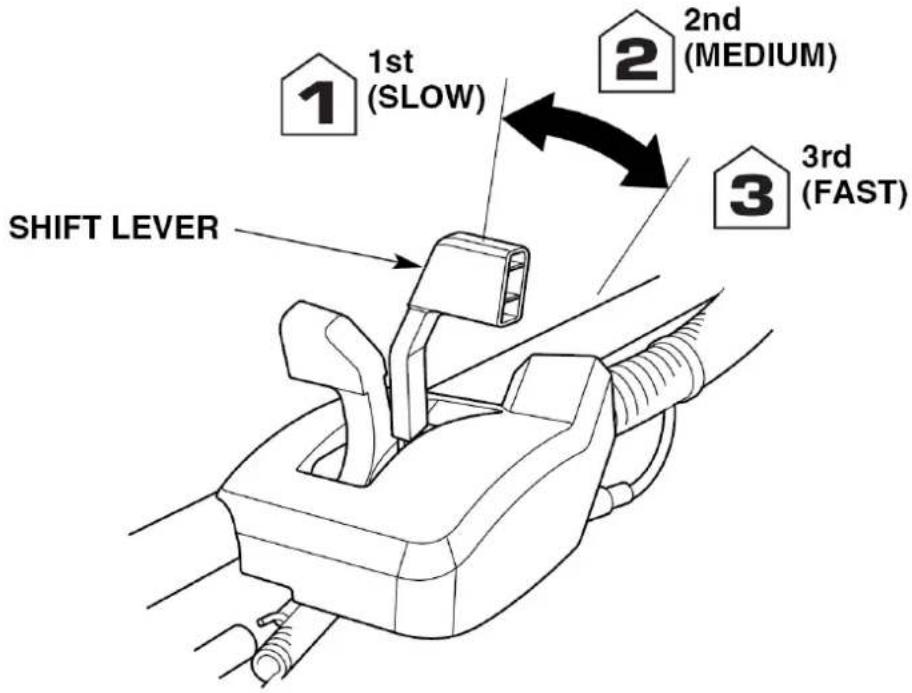
Shift Lever ( 21" Models Only )
The shift lever selects and controls the self-propelled drive speed.
text_image
SHIFT LEVER 1 1st (SLOW) 2 2nd (MEDIUM) 3 3rd (FAST)
1st (SLOW)
For mowing thick grass or manoeuvring in small areas.

2nd (MEDIUM)
For intermediate self-propelled mowing speed.

3rd (FAST)
For maximum self-propelled transport speed.
4. CONTROLS - continued
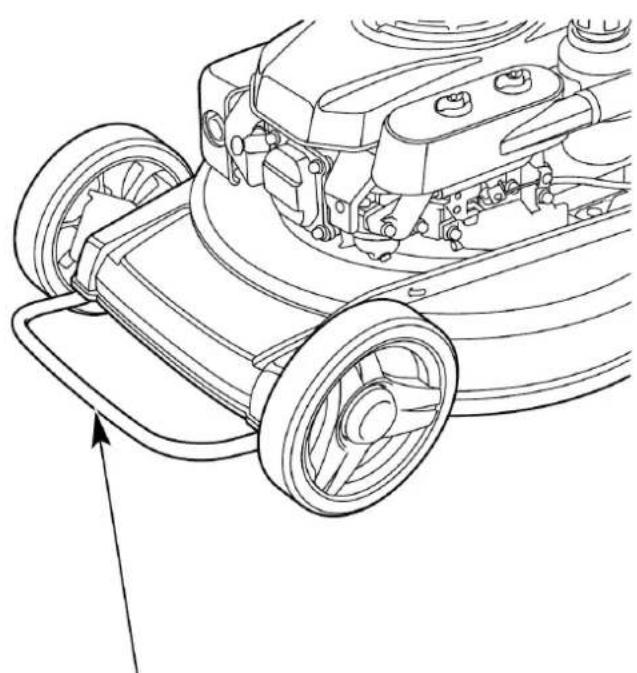
Front Guard ( 21" Models Only )
Use the front guard when lifting the lawn mower, the front guard can also be utilised to tie down lawnmower for transportation.
NOTICE
Do not step on the front guard.
Have the front guard replaced by an authorised Honda service dealer whenever it is deformed.
natural_image
Technical line drawing of a lawn mower assembly with visible wheel and mounting components (no text or labels)FRONT GUARD
ARE YOU READY TO MOW?
Be sure to wear protective clothing. Long pants and eye protection can lower your risk of injury from thrown objects. Wear footwear that protects your feet and won't let you slip if you mow on slopes or uneven ground.
CHECK YOUR LAWN
For your safety and for the safety of others, always inspect the area before mowing.
OBJECTS
Anything which can be picked up by the blades and thrown is a potential hazard to you and others. Look for things like stones, sticks, bones and wire. Remove them from the mowing area.
PEOPLE & PETS
People and animals near the mowing area can move into your path or into a position where they could be struck by thrown objects. Clear the area of people, especially children, and pets. Their safety is your responsibility.
LAWN
Check the length and condition of the grass, so you will know what cutting height and mowing speed to use.
Avoid mowing wet grass. Not only will wet grass clog your cutter housing and collect in clumps on the lawn, it also gives poor traction, increasing your risk of losing your footing.
CHECK YOUR MOWER
Blades
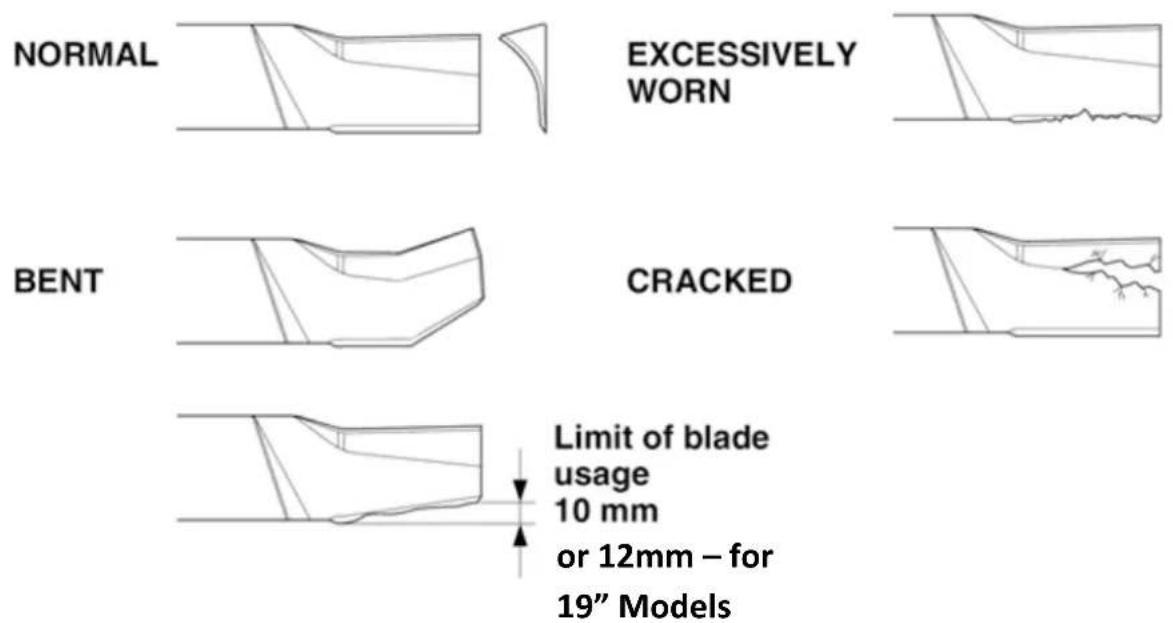
Before each use, check the cutter blades for damage or excessive wear.

WARNING
To avoid severe personal injury, disconnect the spark plug cap to prevent accidental starting, and wear heavy gloves to protect your hands from the cutter blades.
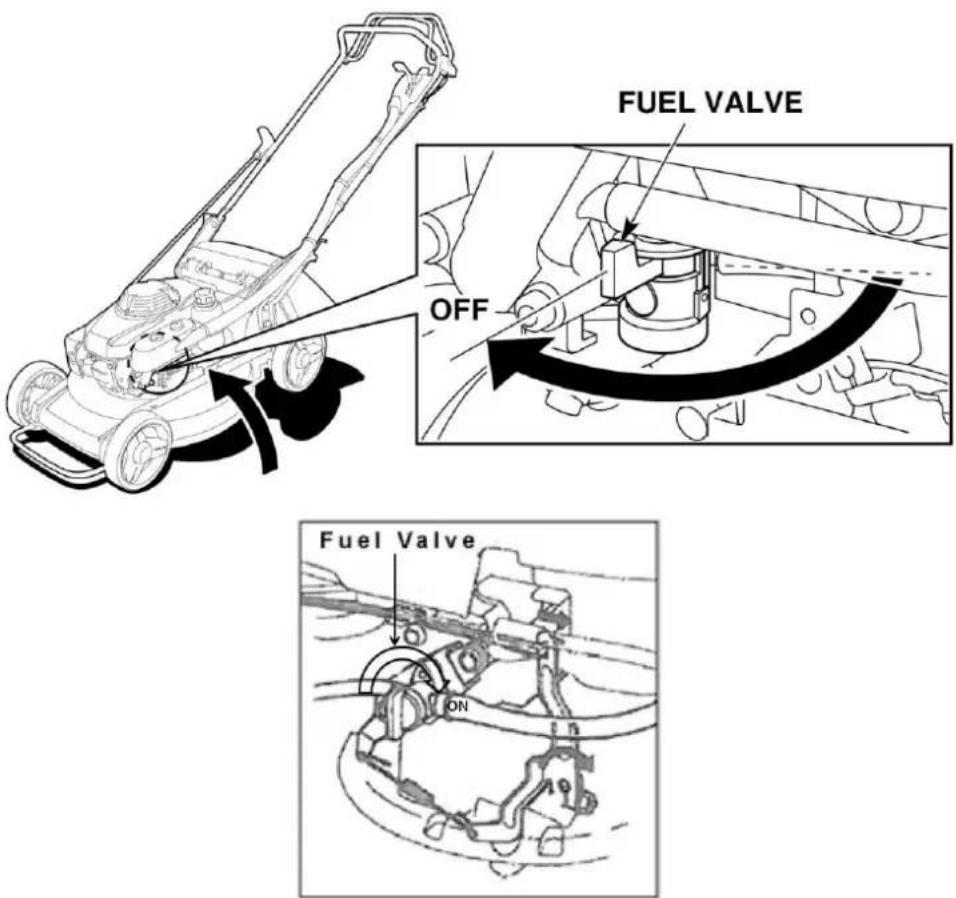
- Stop the engine and turn the fuel valve to the OFF position.
- Disconnect the spark plug cap from the spark plug (see page 48).
- Remove the grass bag (if installed).
- Tilt the mower to the right, so the carburettor side is up. This will help to prevent fuel leakage, oil contamination of the air cleaner and hard starting.
text_image
FUEL VALVE OFF Fuel Valve ONNOTE: Remember, Fuel Valve may appear different depending on engine model.
5. PRE-OPERATION CHECKS - continued
-
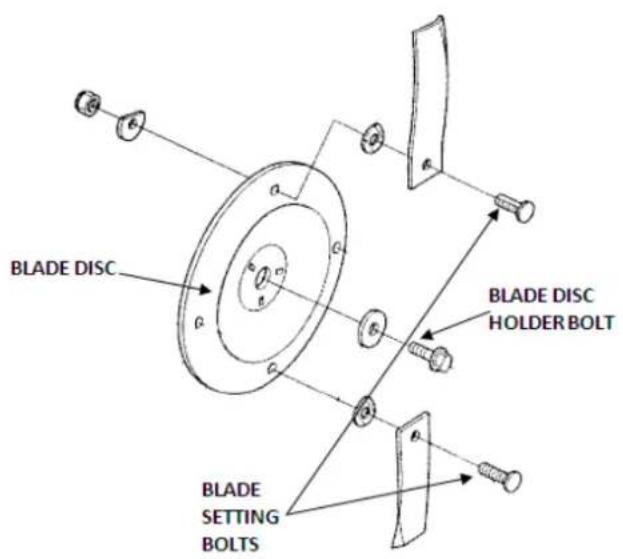
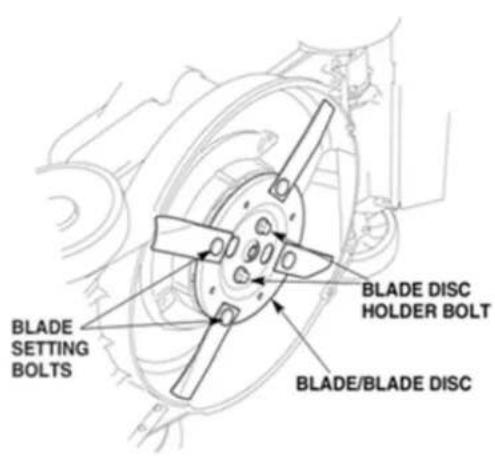
Inspect the blades for wear and damage.
-
Check that the blade setting bolts and the blade disc holder bolt are tight (see page 51).
text_image
BLADE DISC BLADE DISC HOLDER BOLT BLADE SETTING BOLTSTwo Blades Models
text_image
BLADE SETTING BOLTS BLADE DISC HOLDER BOLT BLADE/BLADE DISCFour Blade Models

WARNING
Never operate the mower with worn, damaged, split or dented blades. A piece of blade which breaks off and is thrown outwards can cause serious bodily injuries.
NOTICE
Blade wear is increased when the mower is used on sandy soils. Inspect the blades more often when the mower is used in sandy conditions.
text_image
NORMAL EXCESSIVELY WORN BENT CRACKED Limit of blade usage 10 mm or 12mm – for 19" ModelsA dull blade can be sharpened, but a blade that is worn out, bent, cracked or otherwise damaged must be replaced. A worn or damaged blade can break, causing blade pieces to be thrown from the mower.
When a blade needs sharpening or replacement, take the lawn mower to an authorised Honda servicing dealer. Uneven or incorrect sharpening can cause imbalance and vibration. If you have a torque wrench and the other correct tools, you can remove and install the blades yourself (see page 51).
Engine Oil Level
Check the engine oil level with the engine stopped and the mower on a level surface.
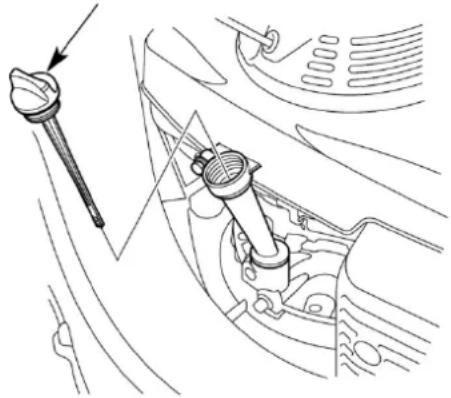
- Clean the area around the oil filler cap.
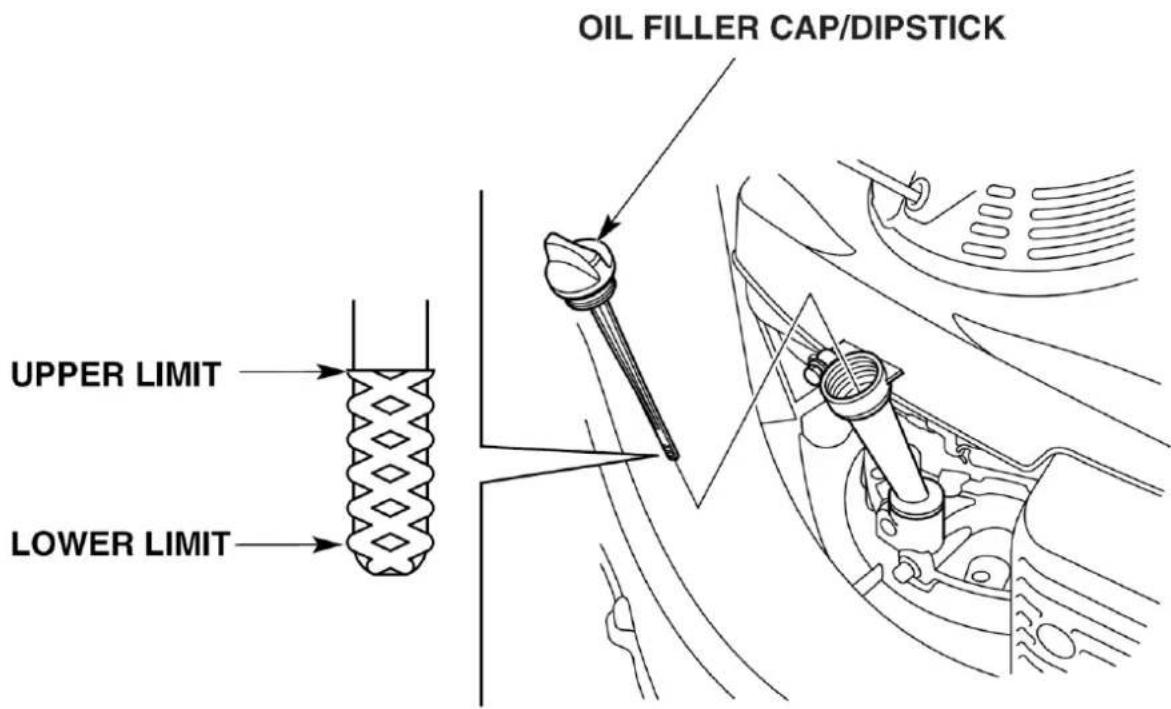
- Remove the oil filler cap, and wipe the dipstick clean.
- Insert the dipstick without screwing it into the filler neck. Remove it and check the oil level shown on the dipstick.
- If the oil level is low, add the recommended oil (see page 46) to reach the upper limit mark on the dipstick. Do not overfill.
- After checking the engine oil level, screw in the oil filler cap/dipstick securely.
text_image
OIL FILLER CAP/DIPSTICK UPPER LIMIT LOWER LIMITNOTE: OIL FILLER CAP / DIPSTICK MAY VARY IN APPEARANCE DEPENDING ON ENGINE TYPE.
5. PRE-OPERATION CHECKS - continued
Fuel
Refuel in a well-ventilated area before starting the engine. If the engine has been running, allow it to cool. See page 50 for fuel recommendations.
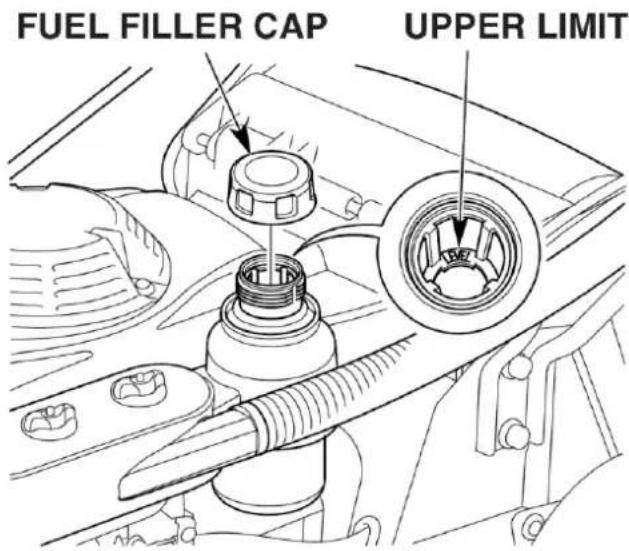
Remove the fuel filler cap and check the fuel level. Refill the tank if the fuel level is low. Refuel carefully to avoid spilling fuel. Do not overfill; there should be no fuel over the limit mark. After refuelling, tighten the fuel filler cap securely.
text_image
FUEL FILLER CAP UPPER LIMITDO NOT OVERFILL FUEL TANK – NOTE "LEVEL" MARK. "LEVEL" MARK MAY VARY DEPENDING ON ENGINE TYPE.

WARNING
Petrol is highly flammable and explosive.
You can be burned or seriously injured when handling fuel.
- Stop the engine and keep heat, sparks and flame away.
- Handle fuel only outdoors.
- Wipe up spills immediately.
Do not smoke while refuelling the mower. Never refuel the mower inside a building where petrol fumes may reach flames or sparks. Keep petrol away from appliances with pilot lights, barbecues, electric appliances, etc.
NOTICE
Fuel can damage paint and some plastic. Be careful not to spill fuel when filling your fuel tank. Damage caused by spilled fuel is not covered under warranty.
Air Cleaner
Inspection
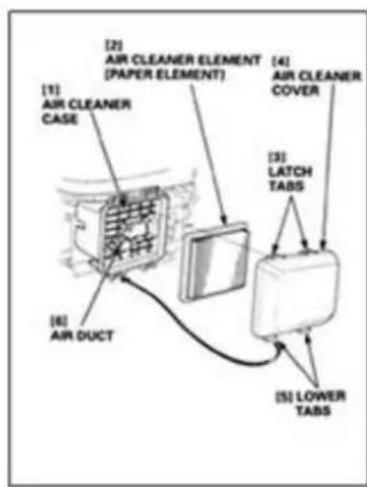
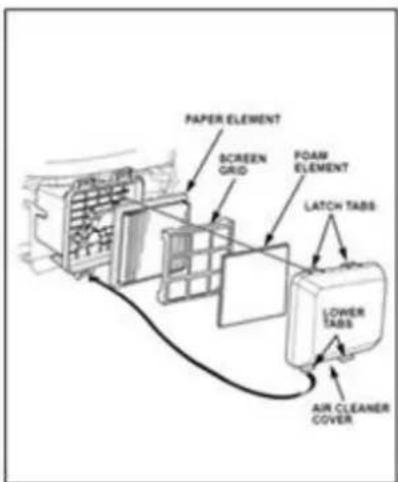
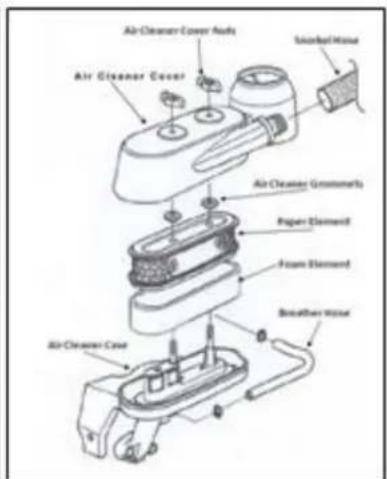
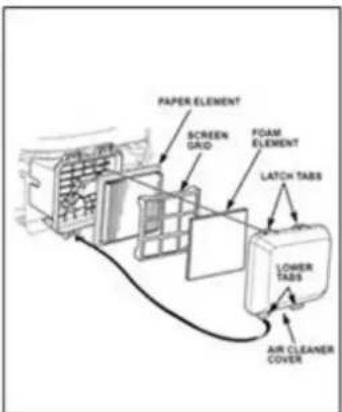
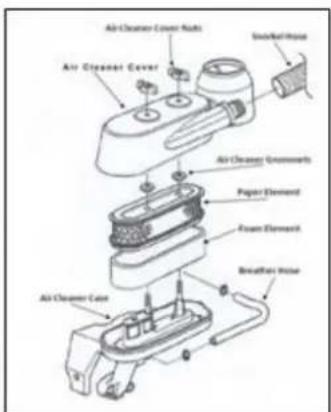
Ensure the air filters are clean and in good condition. A dirty air filter will restrict air flow to the carburettor, reducing engine performance. Refer to page 47 for air cleaner service. Ensure Snorkel hose is attached and in good condition ( GXV160 Engine only – Refer Page 60 )
text_image
[1] AIR CLEANER CASE [2] AIR CLEANER ELEMENT (PAPER ELEMENT) [3] LATCH TABS [4] AIR CLEANER COVER [5] LOWER TABS [6] AIR DUCTGCV160
text_image
PAPER ELEMENT SCREEN GRID FOAM ELEMENT LATCH TABS LOWER TABS AIR CLEANER COVERGSV190
text_image
Air Cleaner Cover Units Air Cleaner Cover Sliced House Air Cleaner Groom marks Paper Element Foam Element Breaker House Air Cleaner CaseGXV160
Grass Bag
A lawn mower works like a vacuum cleaner; it blows air through the bag, which traps the grass clippings. Always empty the grass bag before it becomes filled to the limit of its capacity. Bagging performance will diminish after the bag becomes about 90% filled. Also the bag is easier to empty when not packed full.
Inspection
Inspect the grass bag before use.
Check for holes, tears and excessive wear.
The grass bag will wear during normal use and will eventually require replacement (See page 56).
NOTE: Under heavy mowing / grass catching conditions the grass bag weave may become clogged with dust and dirt. This will affect the bagging performance of the catcher bag. To ensure optimum bagging performance, a dirty grass bag may be washed with water and air dried as necessary.
Installation
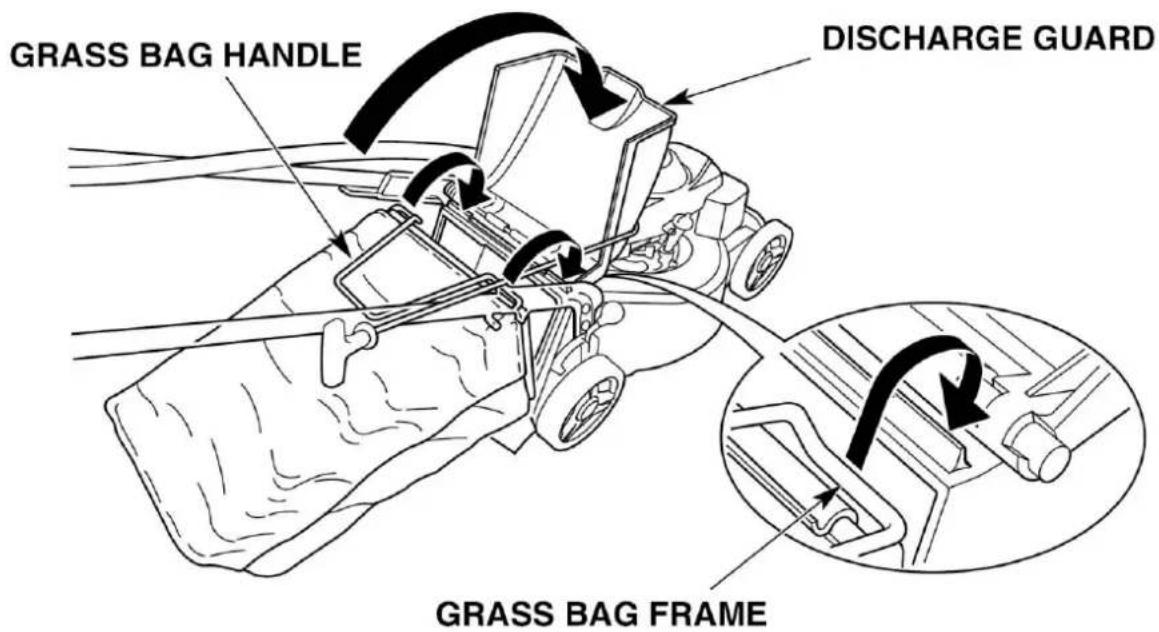
- Raise the discharge guard and hook the grass bag frame onto the cutter housing as shown.
- Release the discharge guard to secure the grass bag in place.
text_image
GRASS BAG HANDLE DISCHARGE GUARD GRASS BAG FRAMENOTE: GRASS BAG DESIGN MAY VARY DEPENDENT ON MODEL, BUT ATTACHMENT PROCEDURE REMAINS THE SAME FOR ALL MODELS.
Removal
- Raise the discharge guard, grasp the grass bag handle and remove the grass bag.
- Release the discharge guard.
- When the grass bag is clear of the discharge guard, you can lift the grass bag through the handlebars, or remove it from the rear of the mower below the handlebar.
5. PRE-OPERATION CHECKS - continued
Cutting Height
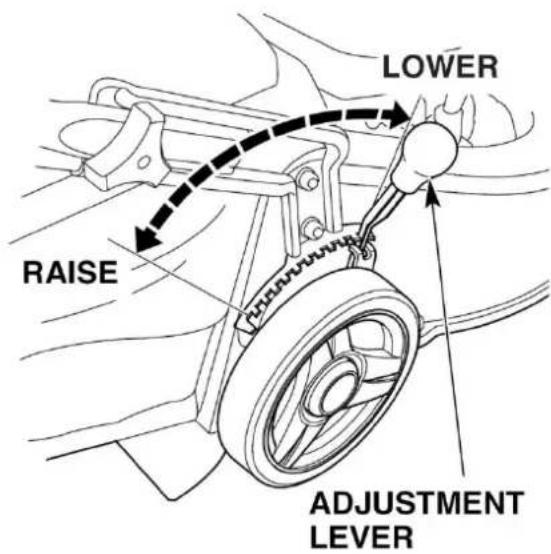
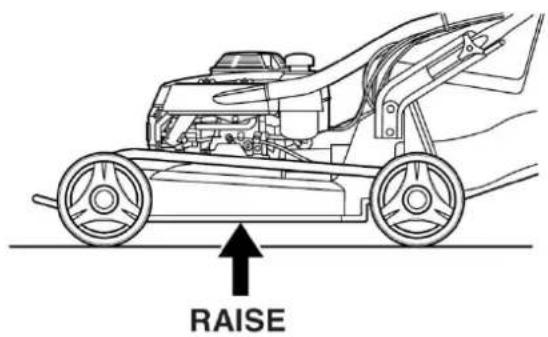
Check the cutter housing height settings. The lowest is approximately 16 mm and the highest setting is 75 or 76mm. To adjust cutting height, pull the adjustment lever toward the wheel, and move it into another notch.
If you are not sure what cutting height to select, start with a high setting and check the appearance of the lawn after mowing a small area. Then readjust cutting height if necessary.
text_image
LOWER RAISE ADJUSTMENT LEVERNOTE: 19" model shown. Remember heights are reversed compared to other models (Page 12).
text_image
RAISE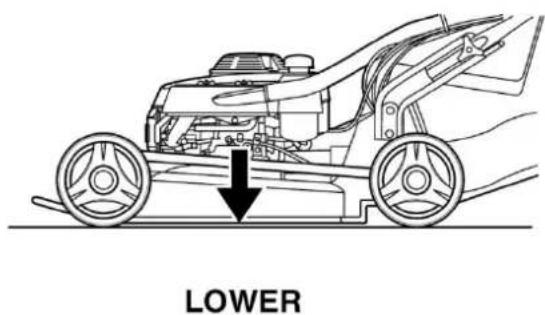
text_image
LOWERNOTE: All 19" models have the height adjuster lever on the left hand side of the Cutter Housing.
MOWING PRECAUTIONS
Before operating the mower for the first time, please review the SAFETY INSTRUCTIONS beginning on page 5 and SAFE MOWING PRACTICES on page 31.
Even if you have operated other mowers, take time to become familiar with how this mower works and practice in a safe area until you build up your skills.
For your safety, avoid starting or operating the engine in an enclosed area such as a garage. Your mower's exhaust contains poisonous carbon monoxide gas which can collect rapidly in an enclosed area and cause illness or death.
STARTING THE ENGINE
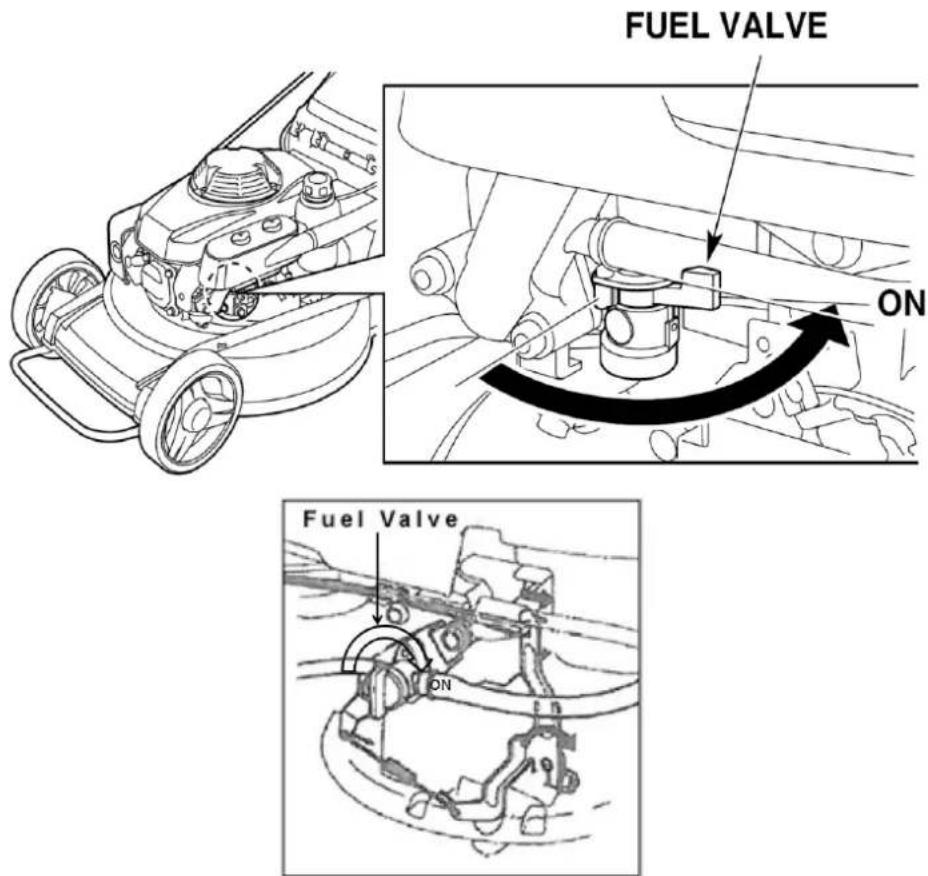
- Turn the fuel valve to the ON position.
text_image
FUEL VALVE ON Fuel Valve ONNOTE: Fuel Valve may vary, depending on Engine Model
6. OPERATION - continued
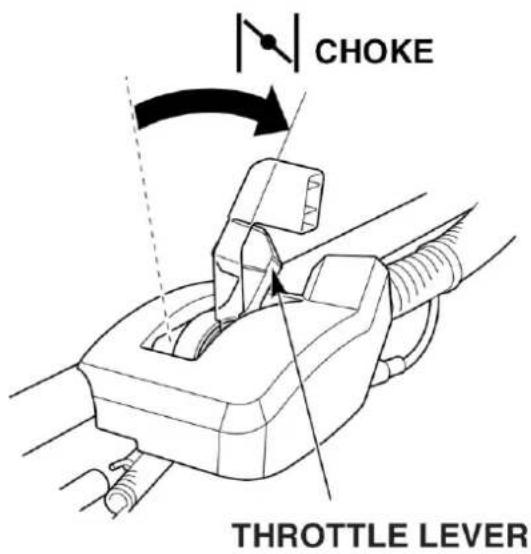
- Move the throttle lever to the proper starting position COLD ENGINE:
Move the throttle lever to the CHOKE position ( NOT APPLICABLE TO HRU19 Models )
text_image
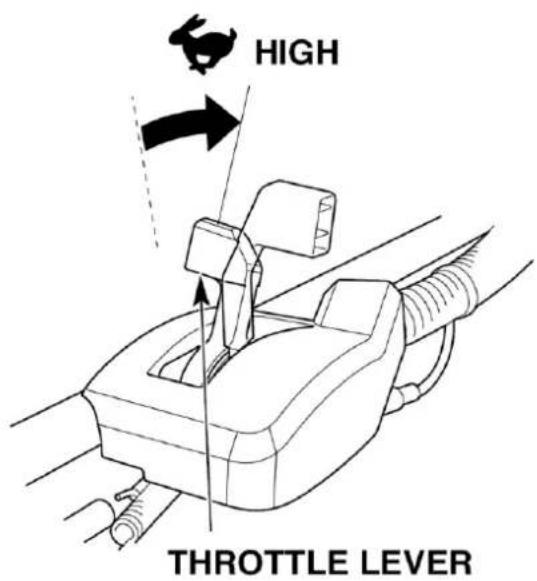
CHOKE THROTTLE LEVERWARM ENGINE:
Move the throttle lever to the HIGH position.
text_image
HIGH THROTTLE LEVER6. OPERATION - continued
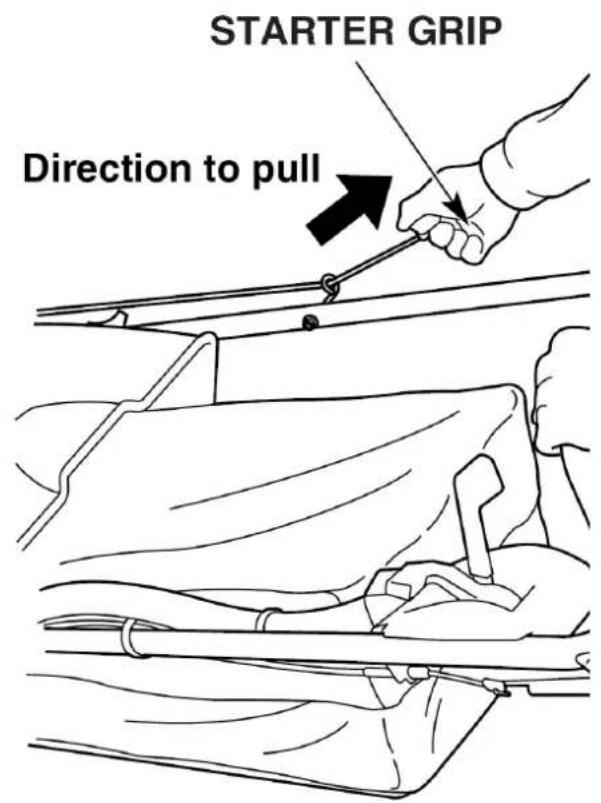
- Pull the starter grip lightly until you feel resistance, then pull briskly in the direction of the arrow as shown below. To avoid possible damage, return the starter grip gently, do not just release it and let it go on its own. Keep your hands and feet away from the cutter housing at all times when starting and running the engine.
NOTE: HRU196M1 and all 21" Models – Do not engage the Blade Control Lever or Drive Control Lever during starting.
All Other Models – Engage the Blade Control Lever during starting.
text_image
STARTER GRIP Direction to pull- If the CHOKE position was used during starting, move the throttle lever away from the CHOKE position as soon as the engine warms up enough to run smoothly. Set the throttle lever at HIGH to mow or at LOW to idle.
OPERATING THE CONTROLS FOR MOWING
Throttle Lever
For best cut quality, always mow with the throttle lever in the HIGH position. When the blades rotate at the preset fast speed, it creates a strong fan action that lifts and cuts grass more efficiently. Do not try to increase the preset engine speed, the blades could fracture and come apart and engine life will be shortened.
When you need to leave the mower for any reason, always turn the engine OFF by moving the throttle lever to the STOP position or by releasing the Blade Control Lever if your model is fitted with Fly Wheel Brake.
Blade Control Lever ( HRU196M1 and all 21" Models )
To prevent stalling, always put the throttle lever in the fast position before engaging the blade control lever.
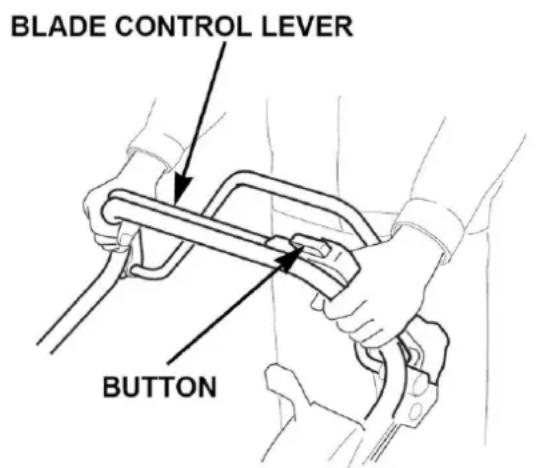
To start blade rotation, press the button on top of the blade control lever, then push the lever forward quickly and hold it against the handlebar.
All other models – There is no Button to press, simply engage the lever. Release the blade control lever to stop the blades.
NOTE: On Models equipped with Fly Wheel Brake, the Engine will stop when you release the lever.
Operate the blade control lever with a quick and complete motion, so the blade control is always either fully engaged or stopped. This will help to prevent stalling the engine, and will also extend the service life of the blade control mechanism.
text_image
BLADE CONTROL LEVER BUTTONDrive Clutch Lever ( 21" Models only )
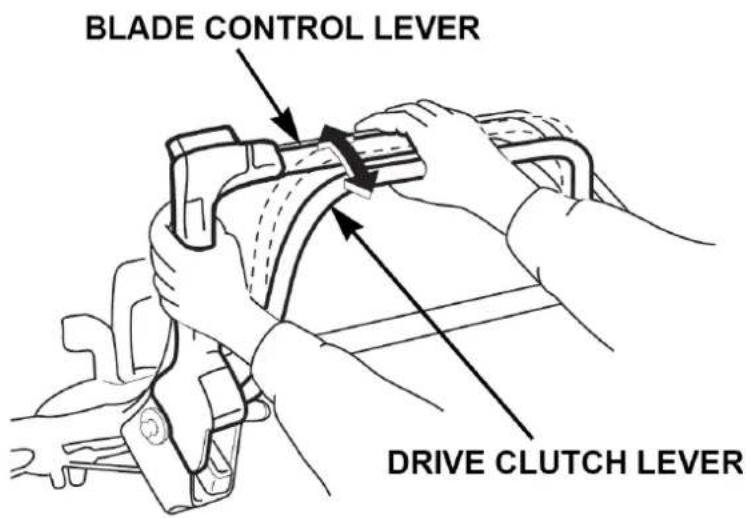
Push the drive clutch lever forward and hold it against the handlebar to propel the mower forward.
Release the drive clutch lever to stop the mower's forward movement.
Always release the drive clutch lever before starting the engine. If the drive clutch is engaged, the mower will move forward when you operate the starter.
Operate the drive clutch lever with a quick and complete motion, so the drive clutch is either fully engaged or released. Hold the drive clutch lever against the handlebar during self-propelled mowing. This will help to extend the service life of the clutch mechanism.
NOTE: Do not engage the Clutch Lever when the mower is moving backwards.
Shift Lever ( 21" Models only )
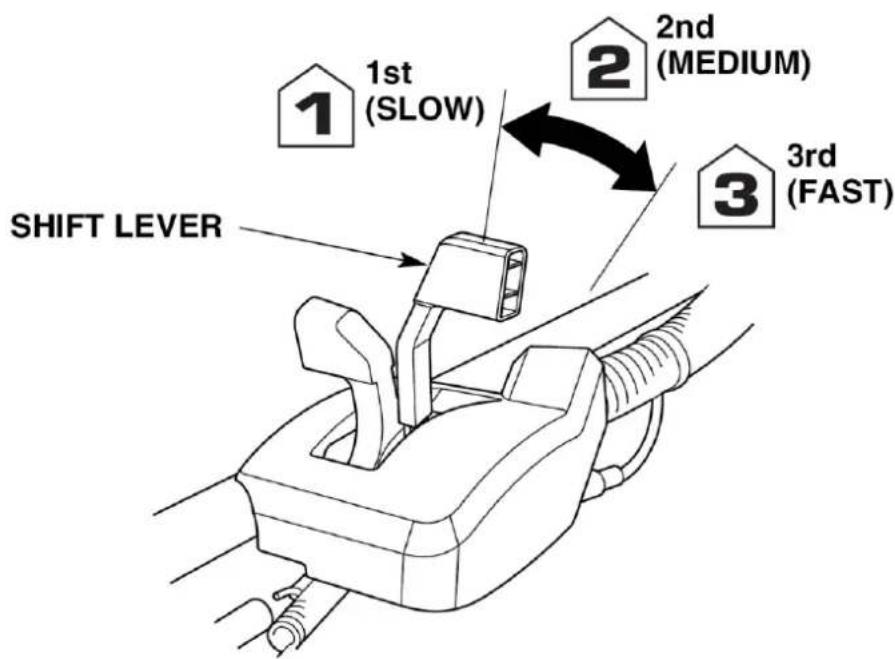
With the drive clutch released, move the shift lever to select 1^st (slow), 2^nd (medium) or 3^rd (fast).
Do not use the throttle lever to adjust your forward speed. Forward speed should be adjusted with the shift lever, not the throttle lever. The throttle lever must remain in the “HIGH” position for good mowing performance. Otherwise, cut quality suffers.
text_image
SHIFT LEVER 1st (SLOW) 2nd (MEDIUM) 3rd (FAST)The speed must only be changed with the mower stationary, release the clutch lever before changing gears.
For maximum mowing performance, use 1^st and 2^nd gears for mowing and 3^rd gear for transporting. Always disengage blades when transporting mower.
To avoid incomplete gear engagement, be sure the shift lever is centred in one of the three detent positions.
STOPPING THE ENGINE
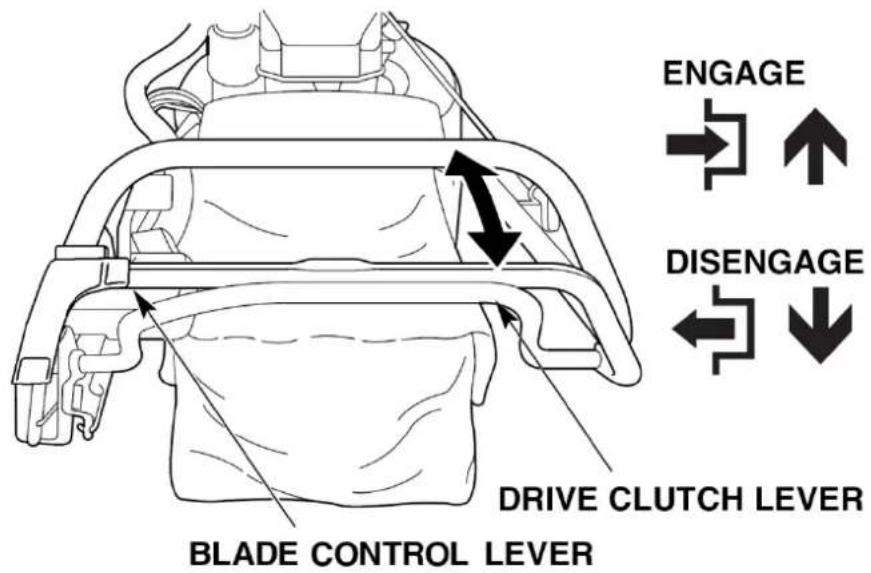
- Release the drive clutch lever and the blade control lever.
NOTE: On models equipped with Fly Wheel Brake, Engine will stop automatically.
text_image
ENGAGE ↑ DISENGAGE ← DRIVE CLUTCH LEVER BLADE CONTROL LEVERFor models not equipped with Fly Wheel Brake:
- Move the throttle lever to the STOP position.

text_image
STOP STOPTHROTTLE LEVER
- When the mower is not in use, turn the fuel valve to the OFF position as shown on (Page 9).
SAFE MOWING PRACTICES
For your safety, keep all four wheels on the ground and be careful to avoid losing your footing and your control of the mower. Keep a firm grip on the handlebar and walk, never run with the mower. Be very careful when mowing uneven or rough ground. Never mow while walking backwards.
If stuck, do not kick or shove the mower with your foot. Use the handlebar to control mower.

WARNING
The blades are sharp and spin at high speed.
A spinning blade can cut you severely and can amputate fingers and toes.
- Wear protective footwear.
- Keep your hands and feet away from the cutter housing while the engine is running.
- Stop the engine before performing any adjustment, inspection or maintenance.
Slopes
Mow across slopes, not up and down. Avoid steep slopes (more than 20^ ), and be careful when changing direction. Mowing on a slope when the grass is damp or wet could cause you to slip, fall and lose control of the mower.
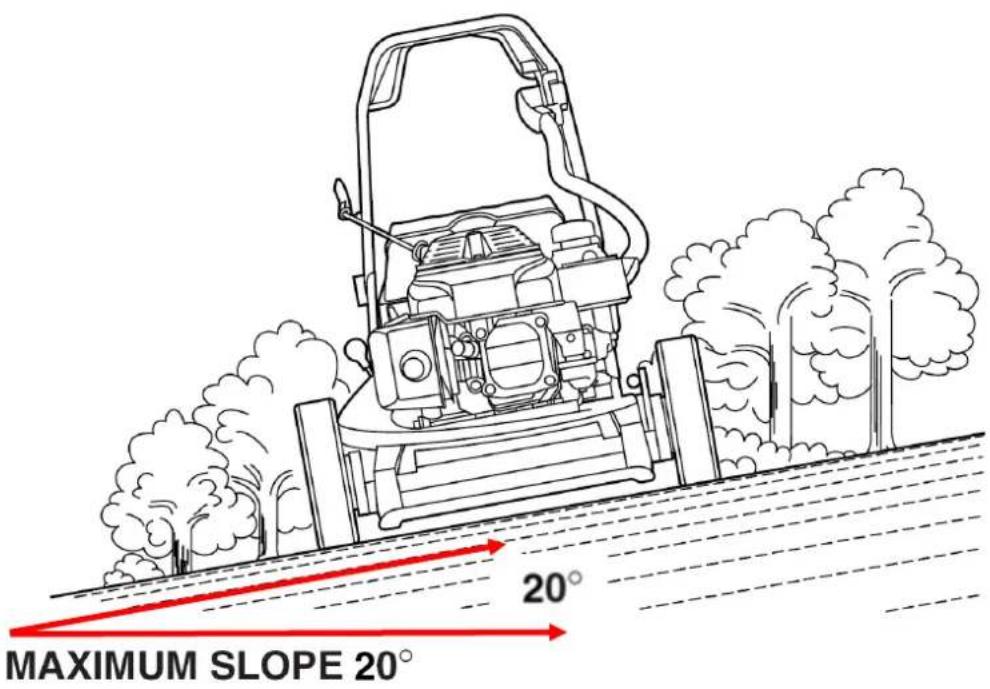
text_image
MAXIMUM SLOPE 20° 20°Obstacles
Use the side of the mower to cut close to large obstacles, such as fences or walls.
Release the drive clutch lever to disengage the drive when mowing around trees and other obstacles. Push the mower around obstacles for better directional control. Be careful when mowing over obstacles embedded in the lawn, such as sprinkler heads, paving, edging, etc. Avoid anything that sticks up above the surface of the lawn.
If a blade hits something, or if the mower starts to vibrate, stop the engine immediately, disconnect the spark plug cap and check for damage (see page 16). Striking objects may damage the blades, bend the crankshaft, and/or break the cutter housing or other components. Vibration usually indicates damage to the mower or debris caught in the blades.

WARNING
A worn, cracked, or damaged blade can break, and pieces of the damaged blade can become dangerous projectiles.
Thrown objects can cause serious injury.
Inspect the blades regularly, and do not operate the mower with a worn or damaged blade.
The Warranty does not cover parts damaged by accident or collision.
Gravel and Loose Objects
Gravel, loose stones and landscaping material can be picked up by the mower and thrown many feet with enough force to cause serious personal injury and/or property damage. The best way to prevent potential injury from thrown objects is to release the blade control lever to stop the blades before reaching areas with gravel, loose stones or landscaping material.
MOWING TIPS
Cutting Height
Consult a local nursery or lawn and garden centre for cutting height recommendations and advice about specific types of grasses and growing conditions in your area.
If you look closely, you'll see that most grass has stems and leaves. If you cut off the leaves, you'll scalp the lawn. Let the grass recover between mowing. Your mower will work better and your lawn will look better.
If your grass gets too tall, cut it once at the highest cutting height setting then mow again in 2 or 3 days. Don't take off more than one third of total grass height in any one mowing, or brown patches may develop.
Cutting height adjustment is explained on page 23

natural_image
Diagram of a grassy field with a sloped slope and a small rectangular structure, no text or symbols present.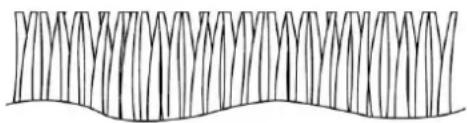
natural_image
Simple line drawing of a wavy, abstract pattern with no text or symbolsLONG ENOUGH

TOO SHORT
Cutting Width
For an even lawn finish, overlap each mowing swath by approximate 10cm. If the grass is very tall or thick, use more overlap and a narrower mowing swath.
Blade Speed
The blades must spin very fast to cut properly. Always use the HIGH throttle setting and keep the engine running at maximum rpm. If the engine speed drops, it could mean the engine is being overloaded by the blades trying to cut too much grass. Mow a narrower swath, move the mower slower, or raise the cutting height.
Blade Sharpness
A sharp blade cuts cleanly. A dull blade tears the grass, leaving shredded ends that turn brown. When your blades don't cut cleanly anymore, have them sharpened or replaced.
Dry Grass
If the ground is too dry, mowing will stir up a lot of dust. Besides being unpleasant to work in, too much dust will clog the air filter. If dust is a problem, water your lawn the day before mowing. Mow when the grass is dry to your touch, but the soil is still moist.
Wet Grass
Wet grass is slippery and can make you lose your footing. Also, wet grass clippings will clog the cutter housing and collect in clumps on the lawn. Always wait for wet grass to dry before mowing.
Fallen Leaves
When equipped with the grass bag, your mower can be used to pick up fallen leaves for disposal. If using the mower to bag large amounts of fallen leaves, and not for mowing, set the cutting height adjustment lever at highest setting.
If you want to mulch fallen leaves into your lawn, don't let the leaf cover get too deep before you begin. For best results, start mulching while grass still shows through the leaf cover. In places where fallen leaves completely cover the grass remove the leaves by raking, or install a grass bag, so your mower can pick them up for disposal.
Clogged Cutter Housing
If the cutter housing becomes clogged, before attempting to clear it, stop the engine and turn the fuel valve to the OFF position. With the spark plug cap disconnected, tilt the mower to the right hand side so the carburettor is facing up.
NOTE: Clear any blockage with a stick, not by your hands.
Mowing Patterns
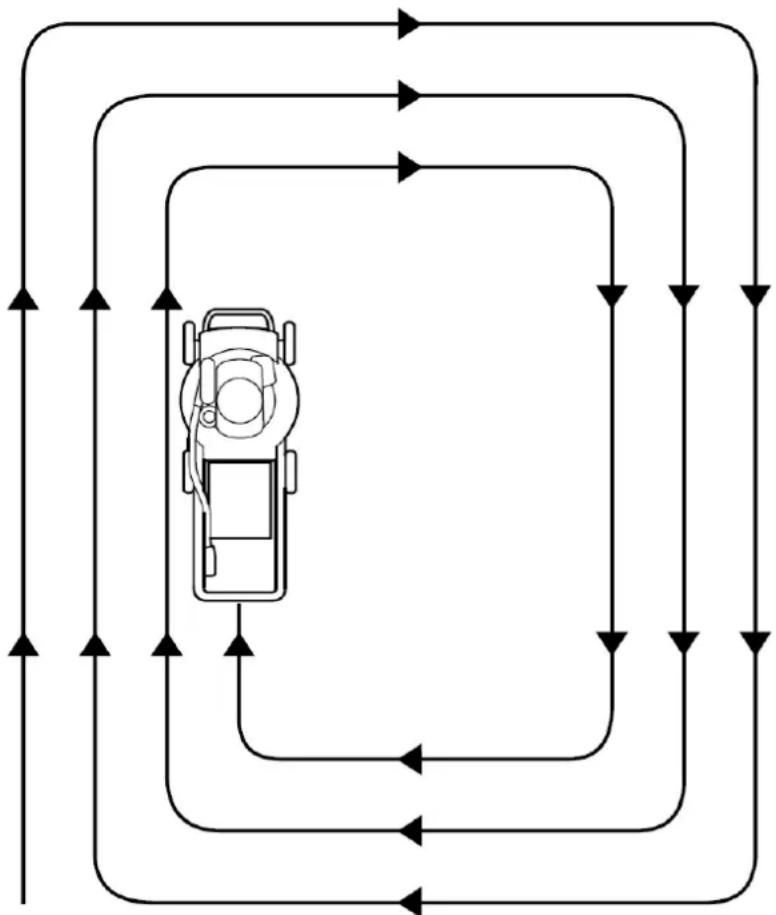
Your Honda mower will work most efficiently if you use the following mowing patterns as much as possible. Cutter housing, equipment design and the direction in which the blades rotate, cause these mowing patterns to give the best results.
Bagging
Use a clockwise mowing pattern. This will give the best bagging performance, leaving the least amount of clippings on the lawn.
NOTE: If your mower is fitted with a Mulching Plug, mowing in a Counter Clockwise direction will give the best result.
If the engine has been running, allow it to cool for at least 15 minutes before loading the mower onto the transport vehicle. A hot engine and exhaust system can burn you and can ignite some materials.
Turn the fuel valve to the OFF position. This will prevent carburettor flooding and reduce the possibility of fuel leakage.
text_image
FUEL VALVE OFF Fuel Valve ONIf equipped, remove the grass bag.
LOADING AND UNLOADING
If a suitable loading ramp is not available, two people should lift the mower on and off the transport vehicle while holding the mower level.
Position the mower so all four wheels are on the bed of the transport vehicle. Tie the mower down with rope or straps and block the wheels. Keep the tie-down rope or straps away from the controls, adjustment levers, cables and the carburettor.
The handlebar can be folded so the mower will take up less space (see page 40).
STORAGE PREPARATION
Proper storage preparation is essential for keeping your lawn mower trouble-free and looking good. The following steps will help to keep rust and corrosion from impairing your lawn mowers function and appearance and will make the engine easier to start when you use the lawn mower again.
Cleaning
Wash your mower after use, by hand, and be careful to prevent water from entering the air cleaner and/or muffler.
NOTE: Using a garden hose or pressure washing equipment can force water into the air cleaner, which will soak the filters and can enter the carburettor or engine, causing damage.
Cold water on a hot engine can cause damage. If the engine has been running, allow it to cool for at least 30 minutes before washing.
Cutter Housing
If using a garden hose or pressure washing equipment to clean the upper side of the cutter housing, be careful to avoid getting water into controls and cables or anywhere near the engine air cleaner or muffler opening.
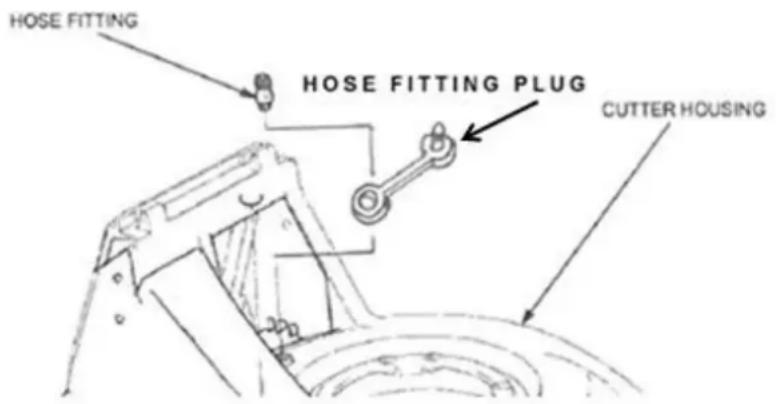
To wash the underside of the cutter deck, attach a garden hose to the fitting on the cutter deck (see below) and turn water on. Start engine, engage blades, and allow it to run at normal operating speed for several minutes. This should be done in an area where the water and debris can run onto grass or a dirt surface. Do not flush the water or debris into the storm water system.
text_image
HOSE FITTING HOSE FITTING PLUG CUTTER HOUSING- After washing the lawn mower, remove garden hose and wipe dry all accessible surfaces.
- With the mower in an upright position, start the engine outdoors and let it run until it reaches normal operating temperature to evaporate any water remaining on the engine.
- Stop the engine and allow it to cool.
- After the lawn mower is clean and dry, coat areas that may rust with a light film of oil or Silicon Spray. Also lubricate the control cable cores with a silicon spray lubricant.
Fuel
Petrol will oxidize and deteriorate over time when stored. Old petrol will cause hard starting and it leaves gum deposits that clog the fuel system. If the petrol in your mower deteriorates during storage, you may need to have the carburettor and other fuel system components serviced or replaced.
The length of time that petrol can be left in your fuel tank and carburettor without causing functional problems will vary with such factors as petrol blend, your storage temperatures and whether the fuel tank is partially or completely filled. The air in a partially filled fuel tank promotes fuel deterioration. Very warm or humid storage temperatures will accelerate fuel deterioration.
Fuel deterioration problems may occur within 30 days, or even less, if the petrol was not fresh when you filled the fuel tank.
NOTE: Your Honda mower can operate on blended fuel containing a maximum of 10% Ethanol. However, fuel containing Ethanol may deteriorate quicker than non-blended fuel.
The Warranty does not cover fuel system damage or engine performance problems resulting from the use of blended fuels or neglected storage preparation.
You can avoid fuel deterioration problems by draining the fuel tank and carburettor.
NOTICE
Petrol spoils very quickly depending on factors such as light exposure, temperature and time.
In worst cases, petrol can become stale within 30 days.
Using stale or contaminated fuel can seriously damage the engine (carburettor clogged, sticking valves).
Such damage due to spoiled fuel is not warrantable.
To avoid this please strictly follow these recommendation:
- Only use specified fuel (see page 50).
- Only use fresh and clean fuel of appropriate Octane Rating.
- To slow deterioration, keep fuel in a certified fuel container.
- If long storage (more than 30 days) is foreseen, drain fuel tank and carburettor (see page 39).
7. TRANSPORTING/STORAGE - continued
Draining the Fuel Tank and Carburettor
- Empty the fuel tank into an approved petrol container.
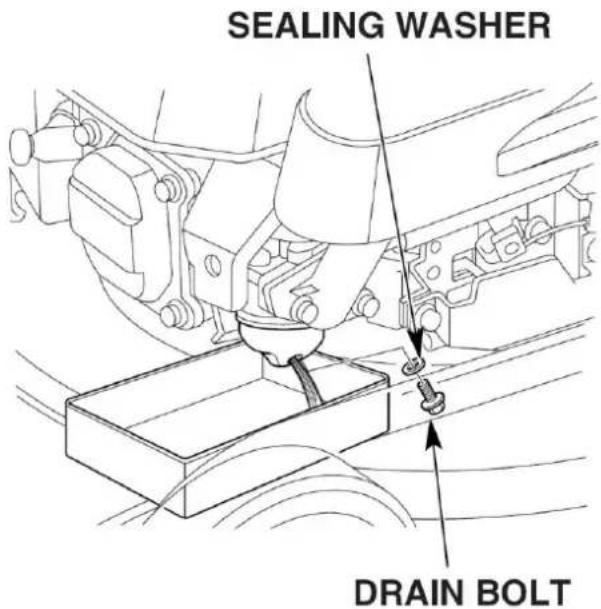
- Remove the carburettor drain bolt with a 10mm wrench and drain the carburettor bowl fuel into an approved container.
WARNING
Petrol is highly flammable and explosive.
You can be burned or seriously injured when handling fuel.
- Stop the engine and keep heat, sparks and flame away.
- Handle fuel only outdoors.
-
Wipe up spills immediately.
-
Turn the fuel valve to the ON position (see page 24). This will allow fuel in the fuel tank to drain through the carburettor bowl. After the fuel is completely drained, reinstall the sealing washer and the drain bolt.
text_image
SEALING WASHER DRAIN BOLTEngine Oil
Change the engine oil (see page 45).
Engine Cylinder
- Remove the spark plug (see pages 48).
- Pour 5-10cc (One Teaspoon) of clean engine oil into the cylinder.
- Pull the starter grip several times to distribute the oil in the cylinder. Reinstall the spark plug.
- Pull the starter grip slowly until resistance is felt, then return the starter grip gently. This closes the valves so moisture cannot enter.
Handlebar Folding
- Remove the grass bag (if installed).
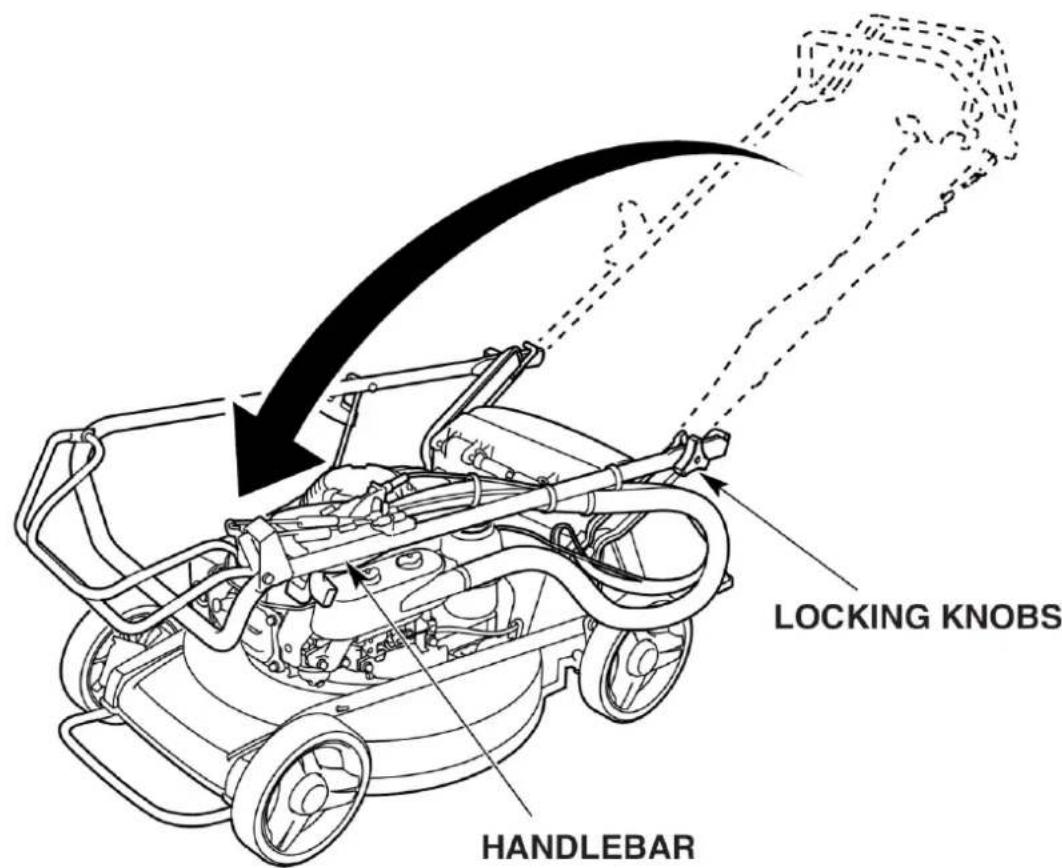
- Loosen or remove the two handlebar locking knobs.
NOTE: IF you remove the bolts, take care not to lose the Spacer washers. - Pull the handlebar struts to release them from the locating grooves then swing the handlebar forward with the drive clutch lever held by your hand. Don't allow the cables and air cleaner hose to be bent or pinched.
- Loosely install the two handlebar locking knobs.
text_image
LOCKING KNOBS HANDLEBARHandlebar Setting
Squeeze the drive clutch lever and raise the handlebar in place in the reverse order of handlebar folding, taking care that the cables and air cleaner hose are not bent or pinched.
STORAGE PRECAUTIONS
If your mower will be stored with petrol in the fuel tank and carburettor, it is important to reduce the hazard of petrol vapour ignition. Select a well ventilated storage area away from any appliance that operates with a flame, such as a furnace or water heater. Also avoid any area with a spark-producing electric motor, or where power tools are operated.
If possible, avoid storage areas with high humidity, humidity promotes rust and corrosion.
Unless all fuel has been drained from the fuel tank, turn the fuel valve to the OFF position to reduce the possibility of fuel leakage.
Place the mower with its wheels on a level surface. Tilting can cause fuel or oil leakage.
The handlebar can be folded for compact storage (see page 40).
With the engine and exhaust system cool, cover the mower to keep out dust. A hot engine and exhaust system can ignite or melt some materials. Do not use plastic sheet as a dust cover. A nonporous cover will trap moisture around the mower, promoting rust and corrosion.
A liberal coating of Silicon spray or similar, over the entire mower, will help to prevent any corrosion or “freezing up” of any moveable components during storage. Wipe off any excess before starting the mower.
NOTE: When the mower is started, some smoking may occur as the mower warms up, this is normal.
If the cylinder was coated with oil during the storage preparation, the engine will smoke briefly at start-up. This is also normal.
THE IMPORTANCE OF MAINTENANCE
Good maintenance is essential for safe, economical and trouble-free operation. It will also help reduce air pollution.

WARNING
To avoid the mower starting accidentally, pull off the spark plug cap before carrying out maintenance work.
Improper maintenance or failure to correct a problem before operation can cause a malfunction in which you can be seriously hurt or killed.
Always follow the inspection and maintenance recommendations and schedules in this owner's manual.
To help you properly care for your mower, the following pages include a maintenance schedule, routine inspection procedures and simple maintenance procedures using basic hand tools.
Other service tasks that are more difficult or require special tools, are best handled by professionals and are normally performed by a Honda technician or other qualified mechanic. The maintenance schedule applies to normal operating conditions. If you operate your mower under severe conditions, such as sustained high-load conditions, consult your servicing dealer for recommendations applicable to your individual needs and use.
MAINTENANCE SAFETY
Some of the most important safety precautions follow. However, we cannot warn you of every conceivable hazard that can arise in performing maintenance. Only you can decide whether or not you should perform a given task.

WARNING
Failure to properly follow maintenance instructions and precautions can cause you to be seriously hurt or killed.
Always follow the procedures and precautions in this owner's manual.
Safety Precautions
- Make sure the engine is off before you begin any maintenance or repairs. This will eliminate several potential hazards:
□ Carbon monoxide poisoning from engine exhaust.
Be sure there is adequate ventilation whenever you operate the engine.
□ Burns from hot parts.
Let the engine and exhaust system cool before touching.
□ Injury from moving parts.
Do not run the engine unless instructed to do so.
- Read and understand the instructions before you begin and make sure you have the tools and skills required.
- To reduce the possibility of fire or explosion, be careful when working around petrol. Do not use petrol to clean parts, use only a non-flammable solvent. Keep cigarette, sparks and flames away from all fuel-related parts.
Remember that an authorised Honda servicing dealer knows your mower best and is fully equipped to maintain and repair it.
To ensure the best quality and reliability, use only new, Honda genuine parts for repair and replacement.
MAINTENANCE SCHEDULE
| REGULAR SERVICE PERIOD (4)Perform at every indicatedmonth or operating hour interval,whichever comes first. | Each use | First monthor20 hrs. | Every3 monthsor50 hrs. | Every6 monthsor100 hrs. | Everyyearor200 hrs. | Refer to page | |
| ITEM | |||||||
| Engine oil | Check level | ○ | 19 | ||||
| Change | ○ | ○(3) | 45 | ||||
| Air cleaner | Check | ○ | 21 | ||||
| Clean | ○(1) | 47 | |||||
| Replace | ○ | 47 | |||||
| Spark plug | Check-adjust | ○ | 48 | ||||
| Replace | ○ | 48 | |||||
| Idle speed | Check-adjust | ○(2) | — | ||||
| Valve clearance | Check-adjust | ○(2) | — | ||||
| Combustion chamber | Clean | Every 250 hrs.(2) | — | ||||
| Fuel tank and filter | Check | ○ | — | ||||
| Clean | ○(2) | — | |||||
| Fuel tube | Check | Every 2 years (Replace if necessary)(2) | — | ||||
| Blade bolt tightness | Check | ○ | 16 | ||||
| Grass bag | Check-clean | ○ | 21 | ||||
| Throttle cable | Check-adjust | ○(2) | — | ||||
| Flywheel Brake Shoes Check | ○(2) | -- | |||||
1) Service more frequently when used in dusty areas.
2) These items should be serviced by your servicing dealer, unless you have the proper tools and are mechanically proficient. Refer to the Honda workshop manual for service procedures.
3) Change engine oil every 25 hours when used under heavy load or in high ambient temperatures.
4) For commercial use, log hours of operation to determine proper maintenance intervals.
ENGINE MAINTENANCE
Engine Oil Change
Drain the used oil while the engine is warm. Warm oil drains quickly and completely.
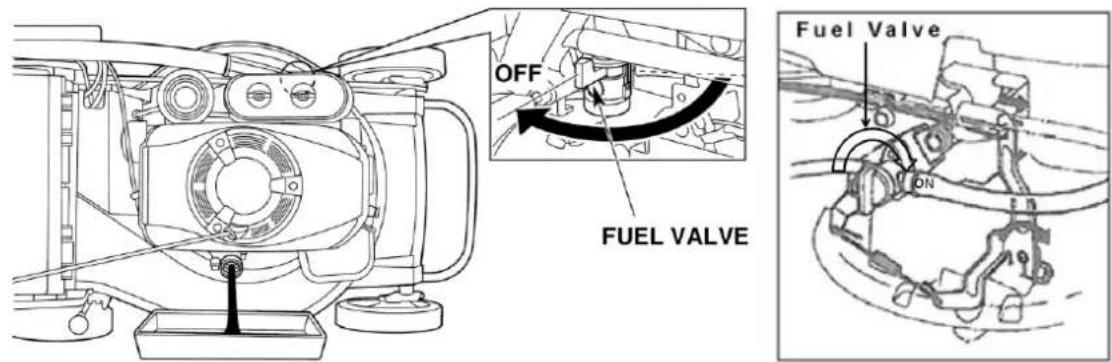
- Turn the fuel valve to the OFF position to reduce the possibility of fuel leakage (see page 9).
- Wipe the oil filler area clean, and then remove the oil filler cap/dipstick.
- Place a suitable container next to the mower to catch the used oil, and then tilt the mower on its right side. The used oil will drain through the filler neck. Allow the oil to drain completely.
Please dispose of used motor oil and containers in a manner that is compatible with the environment.
NOTE: Do not throw waste oil or containers in the trash or pour oil on the ground or down a drain. We suggest you take it in a sealed container to your local recycling centre or service station for reclamation.
text_image
OFF FUEL VALVE ON Fuel Valve- Fill with the recommended oil. Do not overfill; measure the oil level as shown on page 46.
Engine oil capacity: GXV160 = 0.65 Litre
GSV190 / GCV160 = 0.55 Litre
NOTICE
Using non-detergent oil can shorten the engine's service life and using 2-stroke engine oil will damage the engine.
- After changing the engine oil and before starting the engine, check the oil level with the mower on a level surface:
a) Wipe the dipstick clean.
b) Insert and remove the dipstick without screwing it into the filler neck. Check the oil level shown on the dipstick.
c) If the oil level is low, add oil to reach the upper limit mark on the dipstick. Do not overfill. If the engine is overfilled, the excess oil may get transferred to the air cleaner housing and air cleaner.
NOTICE
Running the engine with a low oil level can cause severe engine damage.
d) Screw the oil filler cap/dipstick securely
Engine Oil Recommendations
Oil is a major factor affecting performance and service life.
Use 4-stroke motor oil that meets or exceeds the requirements for API service classification SG or higher (or equivalent). Always check the API service label on the oil container to be sure it includes the letters SG or higher (or equivalent).
SAE 10W-30 is recommended for general use in Australia.
Please contact your local Honda Power Equipment Dealer for Genuine Oils.
OIL FILLER CAP/DIPSTICK
natural_image
Technical line drawing of a car engine intake manifold with a tool inserted (no text or symbols)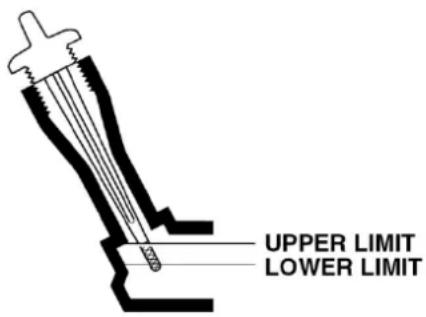
text_image
UPPER LIMIT LOWER LIMIT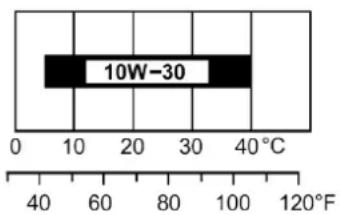
text_image
10W-30 0 10 20 30 40°C 40 60 80 100 120°FAMBIENT TEMPERATURE
Air Cleaner Service
A dirty air cleaner will restrict air flow to the carburettor, reducing engine performance. If you operate the mower in very dusty areas, clean the air cleaner more often than specified in the MAINTENANCE SCHEDULE.
NOTICE
Operating the engine without an air filter or with damaged filters, will allow dirt to enter the engine, causing rapid engine wear. This type of damage is not covered by Warranty.
HRU196K1, HRU196M1, HRU216K2 & HRU216M2 are equipped with a Snorkel to help prevent dust entry. Ensure the hose is properly attached and is in good condition at all times.
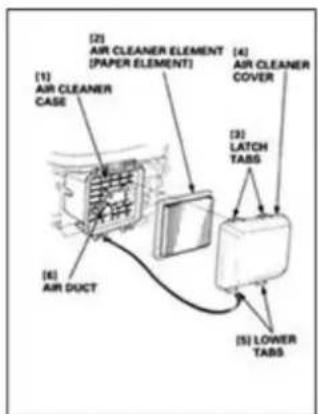
- Unscrew and remove the two air cleaner nuts, then remove the air cleaner cover.
- Remove the filter elements from the air cleaner housing and remove the foam filter element from the paper filter element.
- Inspect the filter elements for holes or tears; and replace them if damaged.
text_image
[1] AIR CLEANER CASE [2] AIR CLEANER ELEMENT [PAPER ELEMENT] [3] LATCH TABS [4] AIR CLEANER COVER [5] LOWER TABSGCV160
text_image
PAPER ELEMENT SCREEN GRID FOAM ELEMENT LATCH TABS LOWER TABS AIR CLEANER COVERGSV190
text_image
Air Cleaner Cover Rials Air Cleaner Cover Installed House Air Cleaner Groomparts Paper Element Foam Element Breather Hose Air Cleaner CaseGXV160
- Clean the filter elements.
Paper filter element: Tap the filter several times on a hard surface to remove dirt, or blow compressed air (not exceeding 207kPa) through the filter from the inside. Never try to brush off dirt; brushing will force dirt into the fibres.
Foam element: Clean in warm soapy water, rinse and allow it to dry thoroughly. Or, clean in non-flammable solvent and allow it to dry. Dip the filter element in clean engine oil, and then squeeze out excess oil.
-
Wipe dirt from the inside of the air cleaner housing and cover, using a moist rag. Be careful to prevent dirt from entering the air duct that leads to the carburettor.
-
Reinstall the filters and cover and (where used) tighten the air cleaner nuts securely.
Spark Plug Service
Recommended spark plug:
GXV160 BPR5ES (NGK) or W16EPR-U (DENSO)
GCV160 / GSV190 BPR6ES (NGK)
NOTICE
An incorrect spark plug can cause engine damage.
For good performance, the spark plug must be properly gapped and free of deposits.
- Disconnect the spark plug cap and remove the dirt from around the spark plug, to avoid it entering the engine when plug is removed.
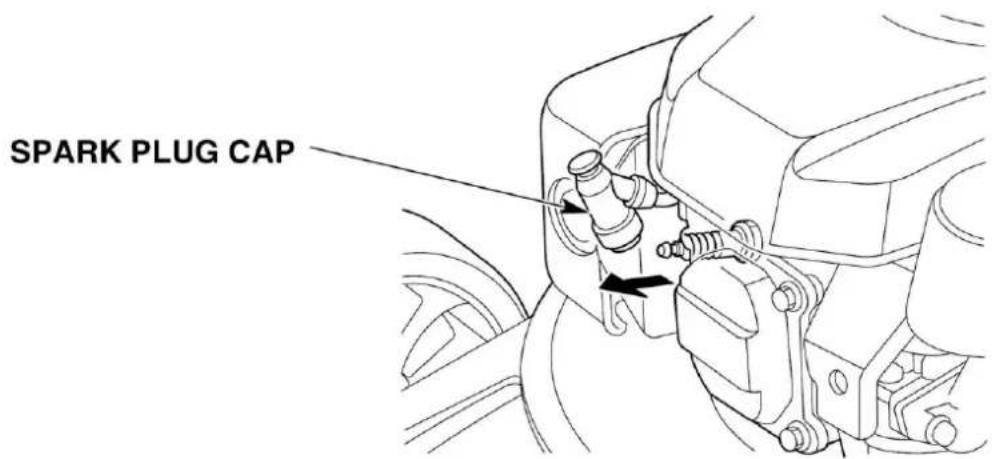
text_image
SPARK PLUG CAP-
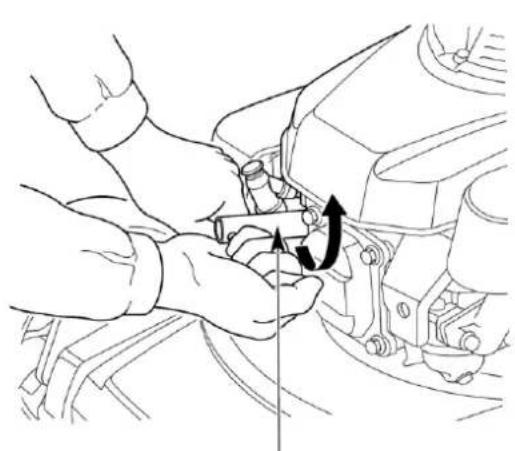
Use a spark plug wrench to remove the spark plug.
-
Inspect the plug; replace it if the electrode is worn, or if the insulator is cracked or chipped.
-
If you are going to reuse the spark plug, remove carbon deposits with a stiff wire brush.
-
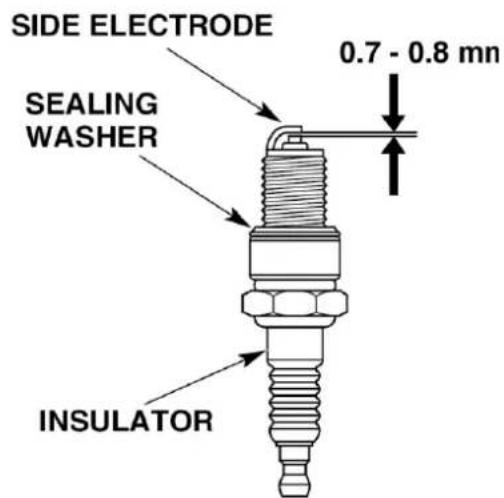
Measure the spark plug gap with a suitable gauge. The gap should be 0.7-0.8mm. Correct the gap, if necessary by bending the side electrode.
natural_image
Line drawing of hands performing a mechanical switch or levering operation on a vehicle engine (no text or symbols present)SPARK PLUG WRENCH
text_image
SIDE ELECTRODE 0.7 - 0.8 mn SEALING WASHER INSULATOR-
Install the spark plug carefully by hand, to avoid cross-threading.
-
After the spark plug seats, tighten with a spark plug wrench to compress the washer.
If reinstalling the old spark plug, tighten 18 to 14 turn after the spark plug seats.
If installing a new spark plug, tighten 12 turn after the spark plug seats.
NOTICE
- A loose spark plug can overheat and damage the engine.
- Over tightening the spark plug can damage the threads in the cylinder head.
- Install the spark plug cap on the spark plug.
Carburettor Modification for High Altitude Operation
At high altitude, the standard air-fuel mixture will be too rich. Performance will decrease and fuel consumption will increase. A very rich mixture will also foul the spark plug and cause hard starting.
High altitude performance can be improved by specific modifications to the carburettor. If you always operate your lawn mower at altitude above 1,500 metres, have your servicing dealer perform carburettor modifications.
Even with carburettor modification, engine horsepower will decrease about 3.5% for each 300 metres increase in altitude. The effect of altitude on horsepower will be greater than this if no carburettor modification is made.
NOTICE
When the carburettor has been modified for high altitude operation, the air-fuel mixture will be too lean for low altitude use. Operation at altitude below 1,500m with modified carburettor may cause the engine to overheat and result in serious engine damage. For use at low altitude, have your servicing dealer return the carburettor to original factory specifications.
Fuel Recommendations
Use unleaded petrol with a pump octane rating of 86 or higher. This engine is certified to operate on unleaded petrol. Unleaded petrol produces fewer engine and spark plug deposits and extends exhaust system life. Never use stale or contaminated petrol or an oil/petrol mixture. Avoid getting dirt or water in the fuel tank. Occasionally you may hear light “spark knock” or “pinging” (metallic rapping noise) while operating under heavy loads. This is no cause for concern. If spark knock or pinging occurs at a steady engine speed, under normal load, change brands of petrol. If spark knock or pinging persists, see an authorised Honda servicing dealer.
NOTICE
Running the engine with persistent spark knock or pinging can cause engine damage. Running the engine with persistent spark knock or pinging is misuse and the Warranty does not cover parts damaged by misuse. For Ethanol blended or oxygenated fuel information, refer to page 38.
BLADE REMOVAL AND INSTALLATION
If you have removed the blade assembly, always use a torque wrench to reinstall. Wear heavy gloves to protect your hands. To avoid weakening the blades or cause imbalance or poor cutting, the blades should be sharpened by trained staff at an authorised Honda servicing dealer. If you are replacing the blades, use Honda genuine replacement blades or equivalent.
Removal:
- Turn the fuel valve to the OFF position.
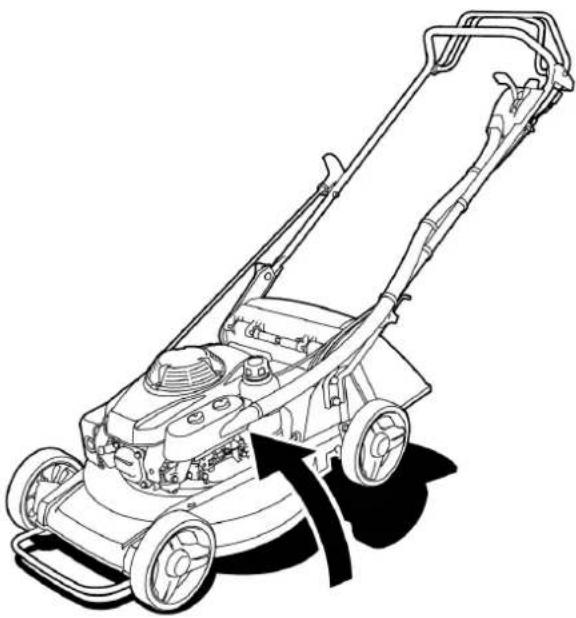
- Disconnect the spark plug cap, and tilt the mower to the right side, so the carburettor side is facing up.
- Hold the blade disc firmly by inserting a suitable screwdriver through the blade disc to prevent it from turning when removing the blade disc holder bolt.
natural_image
Line drawing of a lawn mower with a curved arrow indicating motion (no text or symbols)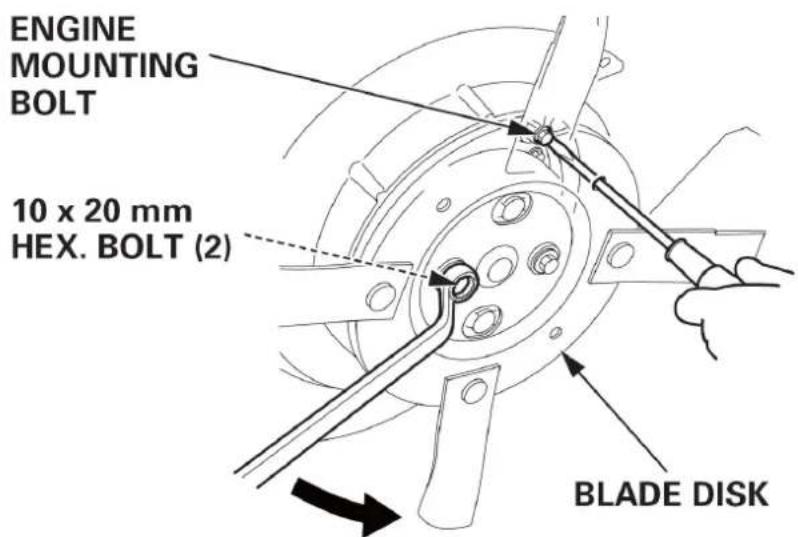
text_image
ENGINE MOUNTING BOLT 10 x 20 mm HEX. BOLT (2) BLADE DISKFOUR BLADE MODEL SHOWN
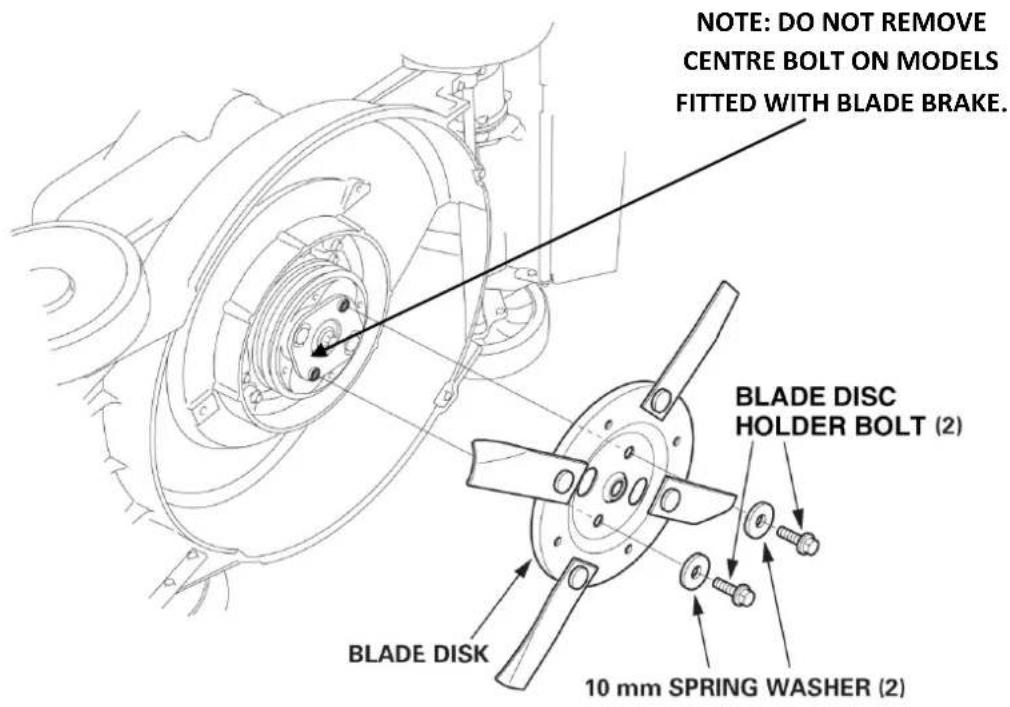
Illustration showing the blade disc holder bolts, washers, blades/blade disc removed.
text_image
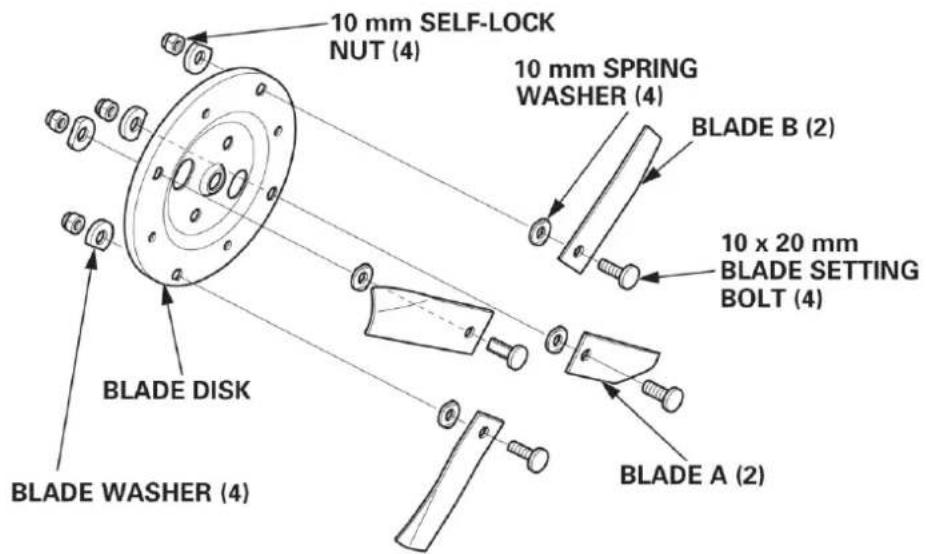
NOTE: DO NOT REMOVE CENTRE BOLT ON MODELS Fitted with BLADE BRAKE. BLADE DISC HOLDER BOLT (2) BLADE DISK 10 mm SPRING WASHER (2)- Remove the blade setting bolts, blades, spring washers, blade washers and self-lock nuts from the blade disc.
NOTE: Do not mix up the Blade Setting Bolts and the Blade Holder Bolts.
text_image
10 mm SELF-LOCK NUT (4) 10 mm SPRING WASHER (4) BLADE B (2) 10 x 20 mm BLADE SETTING BOLT (4) BLADE DISK BLADE WASHER (4) BLADE A (2)Installation:
- Clean dirt and grass from the blades, blade disc and the inside on the cutter housing.
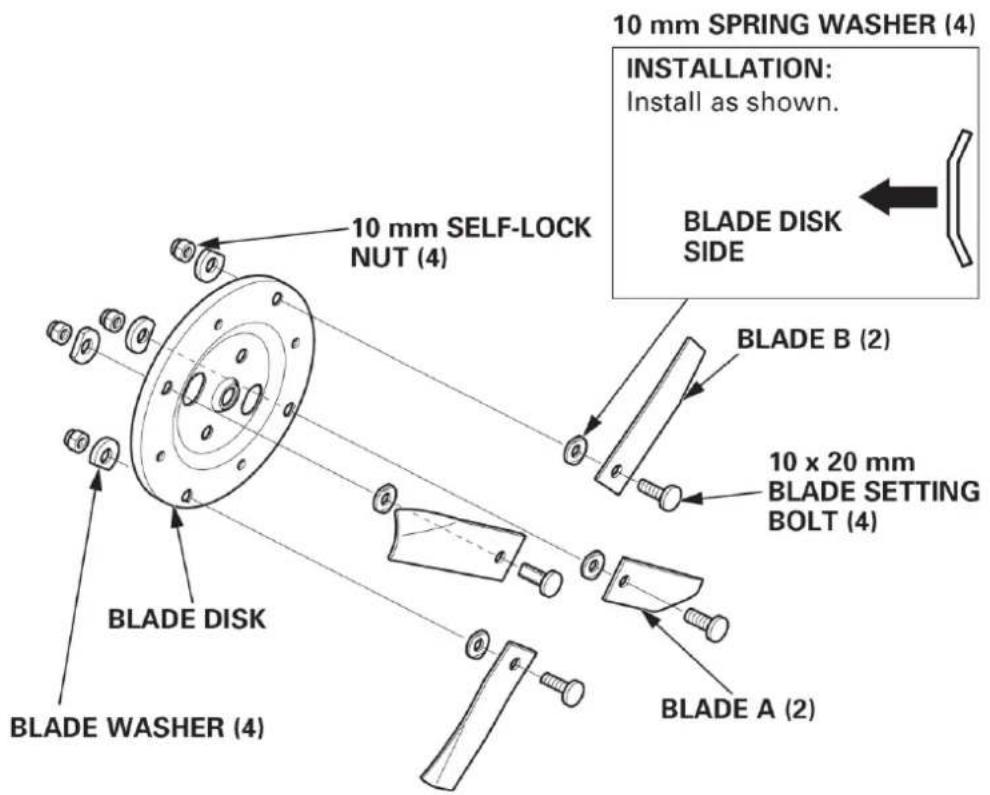
- Install the blade, spring washers, blade washers and self-lock nuts to the blade disc using the blade setting bolt as described below.
text_image
10 mm SPRING WASHER (4) INSTALLATION: Install as shown. BLADE DISK SIDE 10 mm SELF-LOCK NUT (4) BLADE B (2) 10 x 20 mm BLADE SETTING BOLT (4) BLADE DISK BLADE WASHER (4) BLADE A (2)- Tighten the self-lock nuts with a torque wrench. Prevent the blade disc from turning when tightening the self-lock nuts; tighten the self-lock nuts to the specified torque.
The blade setting bolts are specially designed for the mower. When you replace them, use only Honda genuine parts. Otherwise, the blade may detach from the mower and cause serious injury.
Self-lock nuts tightening torque:
29.4 - 39.2 Nm (3.9 kgf.m)
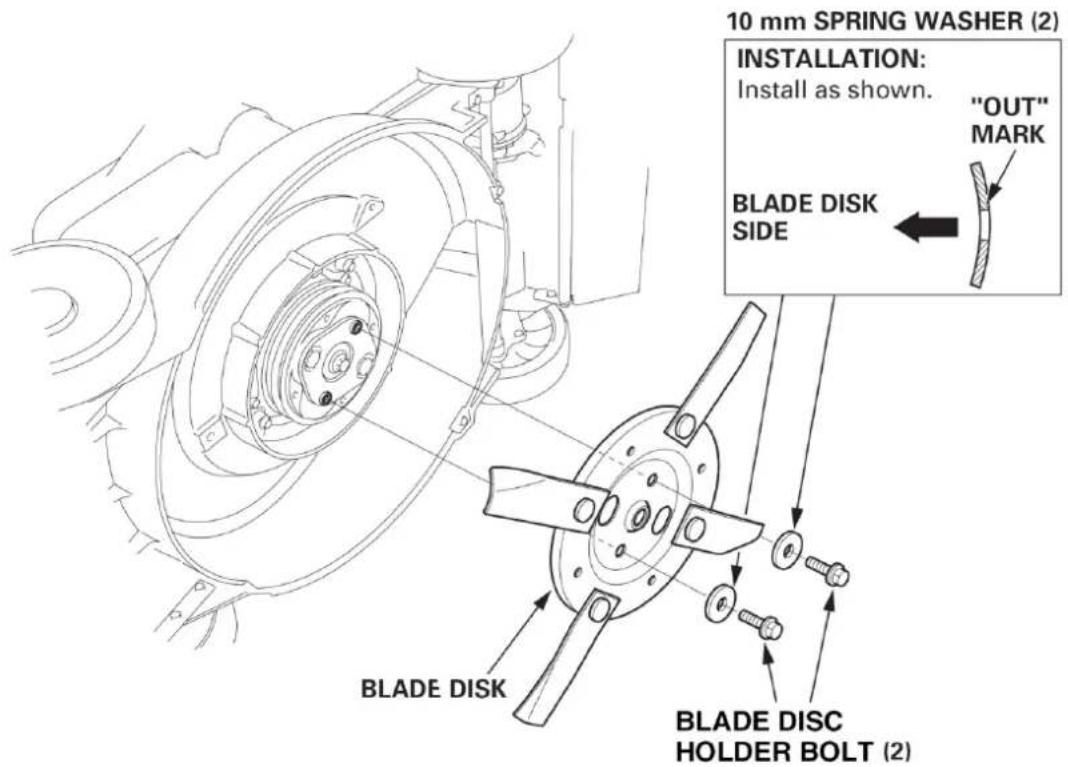
- Install the blade/blade disc, washers and blade disc holder bolts.
text_image
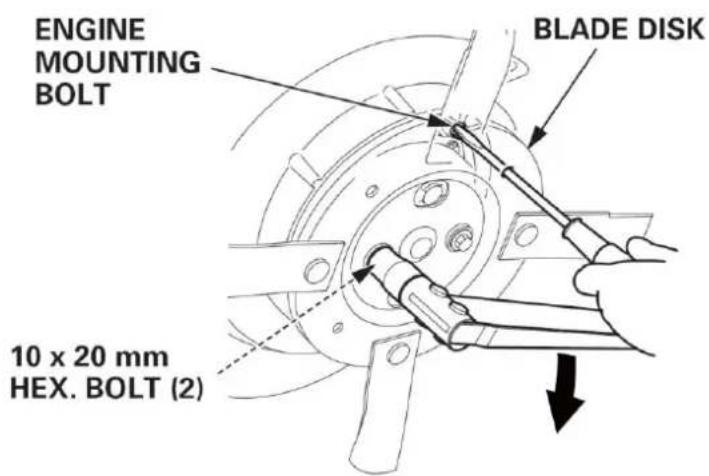
10 mm SPRING WASHER (2) INSTALLATION: Install as shown. "OUT" MARK BLADE DISK SIDE BLADE DISK BLADE DISC HOLDER BOLT (2)- Hold the blade disc firmly and install the blade disc holder bolts.
text_image
ENGINE MOUNTING BOLT BLADE DISK 10 x 20 mm HEX. BOLT (2)- Tighten the blade disc holder with a torque wrench. Hold the blade disc firmly by inserting a suitable screwdriver through the blade disc to prevent it from turning when tightening the blade disc holder bolt.
Blade disc holder bolt tightening torque:
49.0 - 58.8 Nm (6.0 kgf.m)
- After installing the blade/blade disc check that it does not interfere with the housing. If the blades contact the housing, consult an authorised Honda servicing dealer.
WARNING
A bent blade can be the cause of serious personal injury or accident.
If you don't have a torque wrench, have an authorised Honda servicing dealer tighten the blade setting bolts and the blade disc holder bolt before you use the mower. If the blade setting bolts and the blade disc holder bolt are over tightened, they could break. If the blade setting bolts and the blade disc holder bolt are not tightened enough, they could loosen or come out. In either case, it would be possible for the blade to fly off while you are operating the mower.
GRASS BAG CLEANING AND REPLACEMENT
Grass Bag Cleaning
Wash the bag with a garden hose and allow it to dry completely before use, a wet bag will clog quickly.
Grass Bag Replacement
Replace a worn or damaged bag with a Honda genuine bag or its equivalent.
Bag Removal
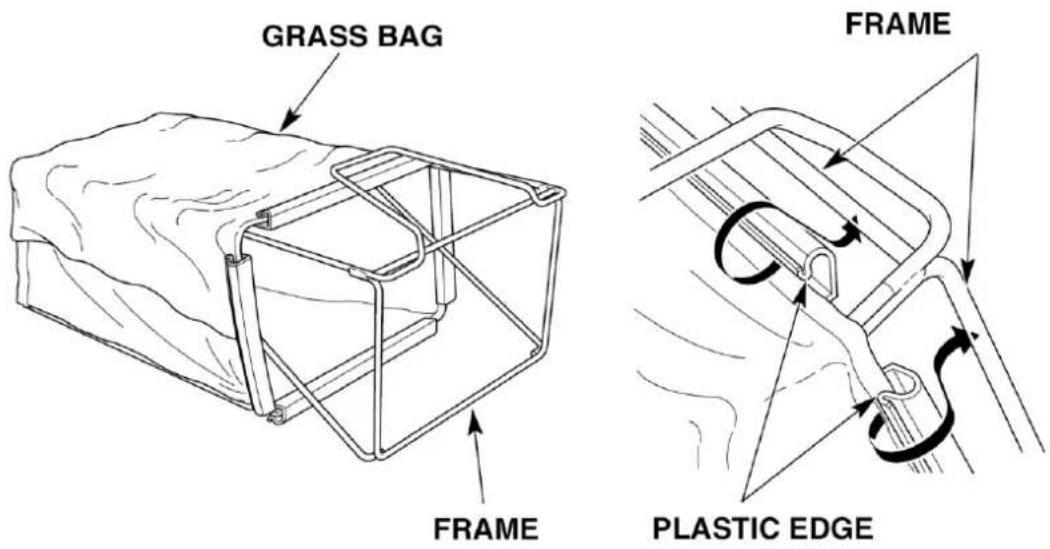
Unclip the plastic edges of the bag from the frame. Remove the bag from the frame.
Bag Installation
Insert the frame into the new bag. Clip the plastic edges to the frame a shown.
text_image
GRASS BAG FRAME FRAME PLASTIC EDGEENGINE PROBLEMS
| Engine Will Not Start | Possible Cause | Correction |
| 1. Check control positions, including Blade Brake Lever. | Fuel valve OFF. | Turn fuel valve ON (page 24). |
| Throttle lever in wrong position. | If applicable, move throttle lever to CHOKE position, unless the engine is warm (page 25). | |
| 2. Check fuel. | Out of fuel. | Refuel (page 20). |
| Bad fuel; mower stored without treating or draining petrol or refuelled with bad petrol. | Drain fuel tank and carburettor (page 39). Refuel with fresh petrol (page20). | |
| 3. Remove and inspect spark plug. | Spark plug faulty fouled or improperly gapped. Spark plug wet with fuel (flooded engine). | Clean, adjust or replace spark plug (page 48). Dry and reinstall spark plug. Start engine with throttle lever in HIGH position. |
| 4. Take mower to an authorised Honda servicing dealer or refer to shop manual. | Fuel filter clogged, carburettor malfunction, ignition malfunction, valves stuck etc. | Replace or repair faulty components as necessary. |
| Loss of Power | Possible Cause | Correction |
| 1. Check throttle position. | Throttle not set to HIGH. | Move throttle to HIGH (page 25). |
| 2. Check grass height. | Grass too tall to cut. | Raise cutting height (page 23), cut narrower swath (page 33) or cut more frequently. |
| 3. Check under cutter housing. | Cutter housing clogged. | Clean out cutter housing (page 37). |
| 4. Check air filter. | Air filter clogged. | Clean or replace air filter (page 47). |
| 5. Check fuel. | Bad fuel; mower stored without treating or draining petrol or refuelled with bad petrol | Drain fuel tank and carburettor (page 39). Refuel with fresh petrol (page 20). |
| 6. Take mower to an authorised Honda servicing dealer or refer to shop manual | Fuel filter clogged, carburettor malfunction, ignition malfunction, valves stuck etc. | Replace or repair faulty components as necessary. |
VIBRATION PROBLEMS
| Excessive Vibration | Possible Cause | Correction |
| 5. Check cutter housing and blades. | Grass and debris lodged under cutter housing | Clean out cutter housing (page 37). |
| Blade loose, damaged or unbalanced by improper sharpening. | Tighten loose blade bolts. Replace damaged blade (page 51). | |
| 6. Take mower to an authorised Honda servicing dealer to repair. | Mechanical damage, such as a bent crankshaft. | Replace or repair faulty components as necessary. |
MOWING AND BAGGING PROBLEMS
| Poor Cut Quality or Poor Mowing/Bagging Performance | Possible Cause | Correction |
| 7. Check that the throttle lever is in the HIGH position. | Engine speed is too slow to cut well. | Move throttle lever to the HIGH position (page 25) |
| 8. Reduce forward speed. | Mower is moving too fast for lawn conditions. | Select a slower speed or release the drive clutch lever and push mower. |
| 9. Check cutting height adjustment levers. | Adjustment lever is set at incorrect positions. | Set lever at the correct height position (pages 23 and 33). |
| 10. Check grass bag (if equipped). | Grass bag overfilled or clogged. | Empty the grass bag.Wash the grass bag if clogged with dirt (page 56). |
| 11. Check the cutter housing and blades. | Cutter housing clogged. | Clean out the cutter housing (page 37). |
| Blade dull, worn or damaged. | Sharpen or replace blade if necessary (page 51). | |
| Wrong blade installed. | Install correct blade (page 53). |
MOWER MODELS
| Model | HRU216M2 | HRU216K2 | HRU196M1 | HRU196K1 | HRU197M1 | HRU197K1 | HRU19M1 | HRU19K1 |
| Frame code | MATU | MASU | MAWU | MAYU | MAVU | MAUU | MBBU | MBAU |
| Type | TBUH | TBUH | PBUH | PWUH | PDUA | PDUA | PKUA | PKUA |
| Engine | GXV160 | GXV160 | GXV160 | GXV160 | GSV190 | GSV190 | GCV160 | GCV160 |
DIMENSIONS, WEIGHTS & CAPACITIES
NOTE: Overall height and wheel base are measured with cutting height set at 28mm [third position from the bottom].
| Model | HRU216M2 | HRU216K2 | HRU196M1 | HRU196K1 | HRU197M1 |
| Overall Length | 1695mm | 1540mm | |||
| Overall Width | 570mm | 505mm | |||
| Overall Height | 1050mm | 1025mm | |||
| Dry Weight | 53.0kg | 44.0kg | 40.0kg | 36.0kg | |
| Wheel Base | 25mm | 565mm | |||
| Tread | Front700mm | 440mm | |||
| Rear500mm | 458mm | ||||
| Cutting Width | 530mm | 470mm | |||
| Grass Bag Cap. | 70 | 70 | 60 | 60 | 60 |
| Cutting Height | 16-76mm(11 stages) | 16 – 75mm( 11 stages ) | |||
| Fuel Tank Cap. | 1.5 | 1.5 | 1.5 | 1.5 | 0.9 |
10. SPECIFICATIONS - continued
| Model | HRU197K1 | HRU19K1 | HRU19M1 | ||
| Overall Length | 1540mm | 1540mm | |||
| Overall Width | 505mm | 505mm | |||
| Overall Height | 1025mm | 1025mm | |||
| Dry Weight | 36.0kg | 34.0kg | |||
| Wheel Base | 565mm | 565mm | |||
| Tread | Front 440mm | 440mm | |||
| Rear 458mm | 458mm | ||||
| Cutting Width | 470mm | 470mm | |||
| Grass Bag Cap. | 60 | 60 | 60 | ||
| Cutting Height | 16-75mm(11 stages) | 16-75mm(11 stages) | 16-75mm(11 stages) | ||
| Fuel Tank Cap. | 1.1 | 1.1 | 1.1 | ||
ENGINE DESIGN AND PERFORMANCE
| Model | HRU216M2 / HRU216K2 / HRU196M1 / HRU196K1 |
| Engine Model | GXV160H2 |
| Engine Type | 4-stroke, overhead valve, single cylinder |
| Displacement | 163cm^2 |
| Bore and Stroke | 68 x 45mm |
| Compression Ratio | 8.0 ± 0.2 |
| Ignition System | Transistor type magneto ignition |
| Fuel | Unleaded petrol with a pump octane rating of 86 or higher |
| Engine Oil | SAE 10W-30, API SG or higher |
| Engine Oil Capacity | 0.65 ℓ |
| Spark Plug Type | BPR5ES (NGK), W16EPR-U (DENSO) |
| Spark Plug Gap | 0.7 – 0.8mm |
| Maximum Engine Speed | 3,000 + 0 rpm- 150 rpm |
| Idle Speed | 1,700 ± 150 rpm |
| Valve Clearance (cold) | Intake: 0.15 ± 0.02mmExhaust: 0.20 ± 0.02mm |
| Model | HRU197M1 / HRU197K1 |
| Engine Model | GSV190A |
| Engine Type | 4-stroke, overhead valve, single cylinder |
| Displacement | 187cm^2 |
| Bore and Stroke | 69 x 50mm |
| Compression Ratio | 8.5 : 1 |
| Ignition System | Transistor type magneto ignition |
| Fuel | Unleaded petrol with a pump octane rating of 86 or higher |
| Engine Oil | SAE 10W-30, API SG or later |
| Engine Oil Capacity | 0.55 ℓ |
| Spark Plug Type | BPR6ES (NGK) |
| Spark Plug Gap | 0.7 – 0.8mm |
| Maximum Engine Speed | 3,100 + 0 rpm- 150 rpm |
| Idle Speed | 1,700 ± 150 rpm |
| Valve Clearance (cold) | Intake: 0.15 ± 0.02mmExhaust: 0.20 ± 0.02mm |
| Model | HRU19M1 / HRU19K1 |
| Engine Model | GCV160A0 |
| Engine Type | 4-stroke, overhead valve, single cylinder |
| Displacement | 160cm^2 |
| Bore and Stroke | 64 x 50mm |
| Compression Ratio | 8.5 : 1 |
| Ignition System | Transistor type magneto ignition |
| Fuel | Unleaded petrol with a pump octane rating of 86 or higher |
| Engine Oil | SAE 10W-30, API SG or later |
| Engine Oil Capacity | 0.55 ℓ |
| Spark Plug Type | BPR6ES (NGK) |
| Spark Plug Gap | 0.7 – 0.8mm |
| Maximum Engine Speed | 3,100 + 0 rpm- 150 rpm |
| Idle Speed | 1,700 ± 150 rpm |
| Valve Clearance (cold) | Intake: 0.15 ± 0.02mmExhaust: 0.20 ± 0.02mm |
10. SPECIFICATIONS - continued
DRIVE TRAIN – ( Self Propelled Models Only )
| Mechanism from engine to transmission | Shaft Drive | |
| Clutch | Type | Dog Clutch |
| Operation | Manual Lever | |
| Transmission | Type | Gear Transmission |
| Operation | Remote Control | |
| Number of Speeds | 3 Speeds | |
| Lubrication System | Oil Bath & Splash | |
| Lubricant | Hypoid Gear Oil SAE #90 | |
| Oil Capacity | 0.2 ℓ | |
| Ground Speed 1^st2^nd | 0.8 m/sec | |
| 1.1 m/sec | ||
| 1.4 m/sec | ||
OPERATOR SAFETY FEATURES – All Models
| MODEL | HRU216M2 | HRU216K2 | HRU196M1 | HRU196K1 | HRU197M1 | HRU197K1 | HRU19M1 | HRU19K1 |
| FLYWHEELBRAKE | N | N | N | Y | Y | Y | Y | Y |
| BLADECONTROL | Y | Y | Y | N | N | N | N | N |
| AUTOSTOP | N | N | N | Y | Y | Y | Y | Y |
UNPACKING
Remove all protective packaging materials from the mower.
Handlebar Setup
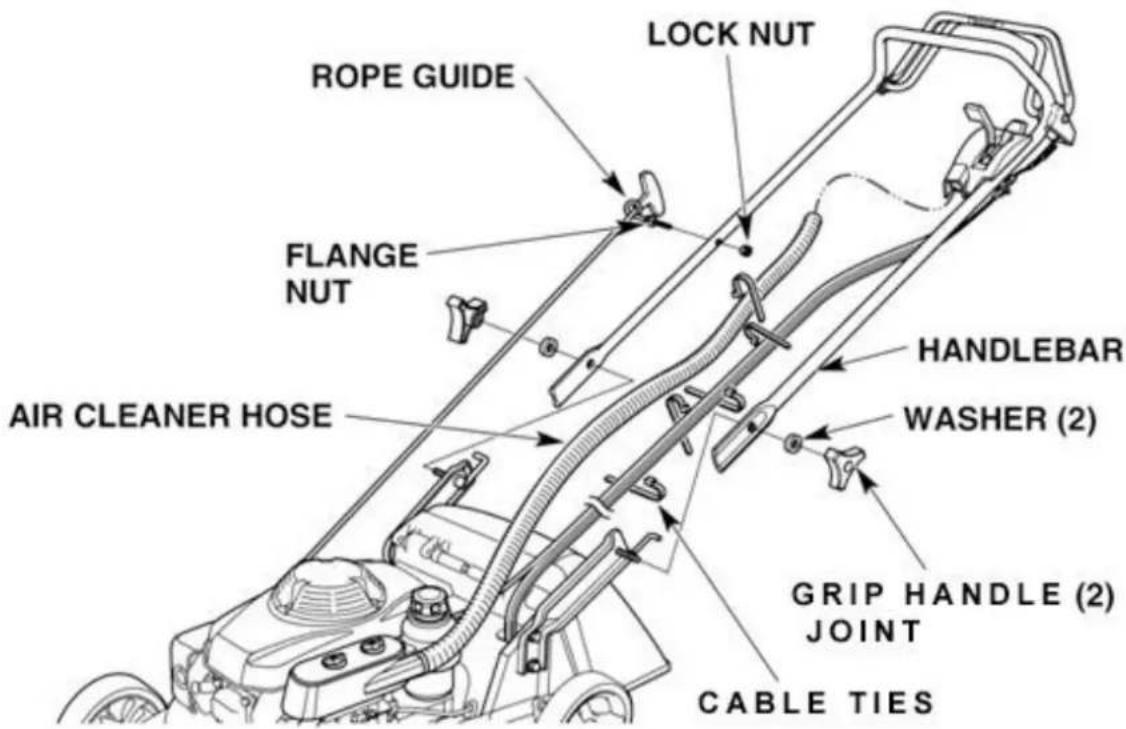
- Loosen the Grip Handle Joints on the handlebar, taking care not to lose the washers, and raise the handlebar into the normal position. Tighten the grip handle joints securely.
- Check that the rope guide is installed correctly and that the locking nut is tight.
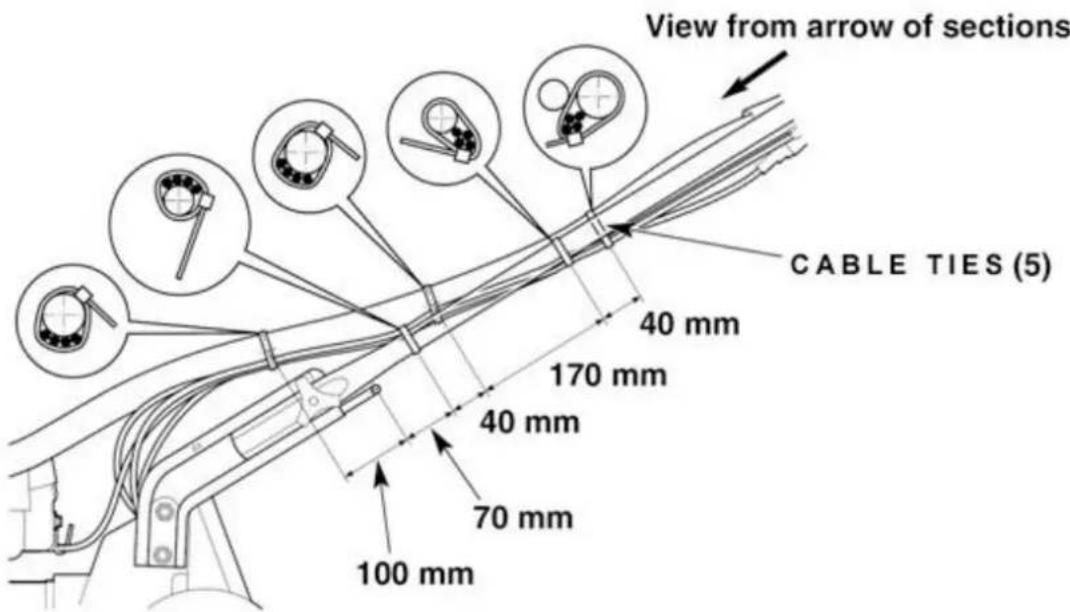
- Ensure all cable ties are fitted correctly and that operating cables are correctly routed and not binding (Refer Page 64).
- On Models fitted with a Snorkel, check that the air cleaner hose is firmly connected to the air cleaner cover and throttle lever cover.
text_image
ROPE GUIDE FLANGE NUT AIR CLEANER HOSE LOCK NUT HANDLEBAR WASHER (2) GRIP HANDLE (2) JOINT CABLE TIES11. SET-UP INSTRUCTIONS - continued
- Secure the cables and air cleaner hose with the cable ties as shown below. Secure the cables with the cable ties as shown below.
text_image
View from arrow of sections CABLE TIES (5) 40 mm 170 mm 40 mm 70 mm 100 mm- Fill Engine with appropriate Engine Oil (Page 46)
- Fill Fuel tank with fresh Unleaded Petrol (Page 20)
- Start and Run Engine.
- Confirm Operation of all controls and Levers.
Service Record First Year
1ST MONTH OR 20 HOUR SERVICE
| Hours Use (Tanks x Hrs/Tank) | Date | Notes |
| Servicing Dealer Stamp | Date: |
EVERY 6 MONTHS OR 100 HOUR SERVICE
| Hours Use (Tanks x Hrs/Tank) | Date | Notes |
| Servicing Dealer Stamp | Date: |
Service Record
Record further services here:
NEXT SERVICE
| Hours Use (Tanks x Hrs/Tank) | Date | Notes |
| Servicing Dealer Stamp | Date: |
NEXT SERVICE
| Hours Use (Tanks x Hrs/Tank) | Date | Notes |
| Servicing Dealer Stamp | Date: |
Here is an easy way to keep track of the hours your Honda lawnmower has done. Record how many hours you get from a tank of fuel, then simply record the number of tanks used. TANKS X HOURS per TANK = TOTAL HOURS USE.
HONDA
The Power of Dreams