
SM225RVS - Microwaves ETNA - Free user manual and instructions
Find the device manual for free SM225RVS ETNA in PDF.

| Product Type | Microwave Oven |
| Brand | ETNA |
| Model | SM225RVS |
| Power Output | 800 W |
| Power Supply | 230 V, 50 Hz |
| Capacity | 0.9 cu ft (25 L) |
| Dimensions (H x W x D) | 25.5 x 45.5 x 35.0 cm |
| Weight | 10.5 kg |
| Display | Digital LED |
| Control Type | Touch buttons and dial |
| Timer | Up to 99 minutes 99 seconds |
| Defrost Function | By weight or time |
| Auto Cook Programs | 10 presets for common foods |
| Turntable | Yes, diameter 27 cm |
| Child Lock | Yes |
| Interior Light | Yes |
| Material | Stainless steel exterior |
| Cleaning | Wipe with damp cloth; do not use abrasives |
| Spare Parts Available | Turntable, glass tray, waveguide cover, fuse |
| Repairability | User-replaceable fuse; service center for other parts |
| Safety Features | Auto shut-off, overheating protection, door interlock |
Frequently Asked Questions - SM225RVS ETNA
User questions about SM225RVS ETNA
0 question about this device. Answer the ones you know or ask your own.
Ask a new question about this device
Download the instructions for your Microwaves in PDF format for free! Find your manual SM225RVS - ETNA and take your electronic device back in hand. On this page are published all the documents necessary for the use of your device. SM225RVS by ETNA.
USER MANUAL SM225RVS ETNA
Productspecifications 24
natural_image
Front view of a black microwave oven with control panel and display screen (no visible text or symbols)31 42
natural_image
Technical line drawing of a circular mechanical component with mounting holes and a central hub (no text or symbols)567

Let op!
natural_image
Simple line drawing of a 3D rectangular container or enclosure (no text or symbols)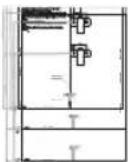

natural_image
Line drawing of a microwave oven with an open door and control panel, showing a right-pointing arrow (no text or symbols)natural_image
Line drawing of a microwave oven with an open door and control panel (no text or symbols)Description of the appliance 6
Control panel 7
First use
Before first use 9
Using the microwave 9
Guidelines for microwave cookware 10
Operation
Attention! 12
Notes about operation 12
Clock setting 12
Kitchen timer 13
Quick start 13
Microwave cooking 14
Multi-stage cooking 15
Automatic programs 16
Defrosting (by weight) 17
Defrosting (by time) 17
Checking time or power 17
Child lock 18
Cooking tips
Warming up and cooking 19
Defrosting 19
Factors that influence the cooking process 20
Basic techniques 20
Cooking vegetables 21
Cooking fish 21
Maintenance
Cleaning the appliance 22
Faults
Solving problems 23
Sparks in the microwave 23
CONTENTS
Installation
Technical specifications 24
Product specifications 24
Electrical connection 24
Placement 25
Installation dimensions 25
Mounting the bracket 26
Installing 27
Environmental aspects
Disposal of packaging and appliance 28
Introduction
Congratulations on your choice of this Etna microwave. This product was designed with simple operation and optimum comfort in mind.
This manual describes the best way to use this microwave. In addition to information on operation, you will also find background information that may come in handy when using the appliance.

Please read the separate safety instructions carefully before using the appliance!
Read this manual before using the appliance and keep it in a safe place for future use.
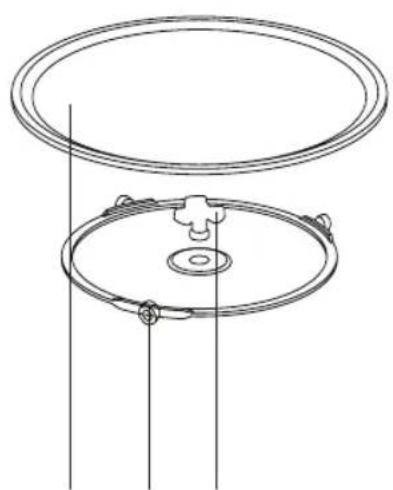
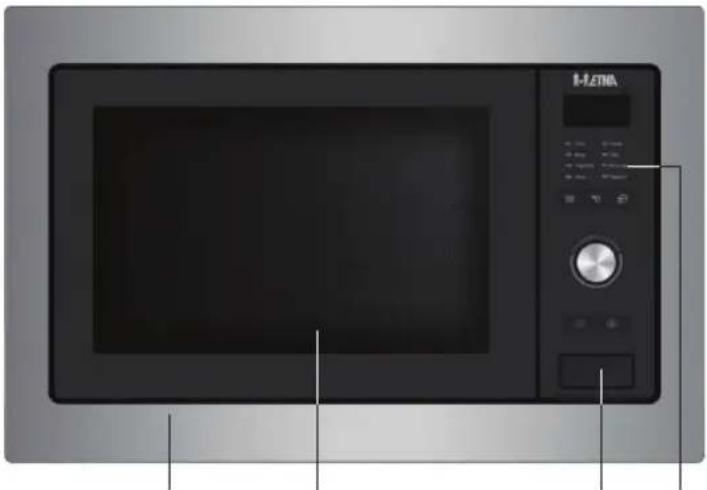
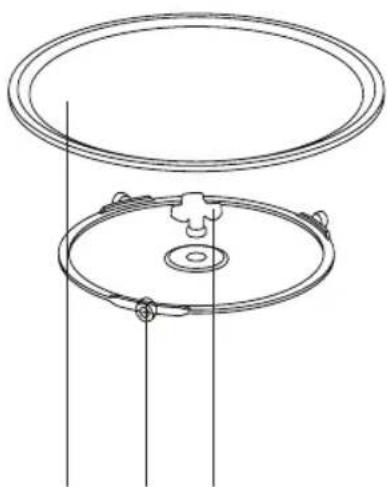
Description of the appliance
- Door
- Window
- Door release
- Control panel
- Glass turntable
- Guiding ring
- Drive shaft
natural_image
Front view of a black HLENA microwave oven with control panel and display screen (no visible text or symbols)31 42
natural_image
Technical line drawing of a circular mechanical component with mounting holes and a central hub (no text or symbols)567

Attention!
The microwave may not be used without the guiding ring and turntable. The turntable should be fitted with the opening for the drive shaft facing downwards.
Control panel
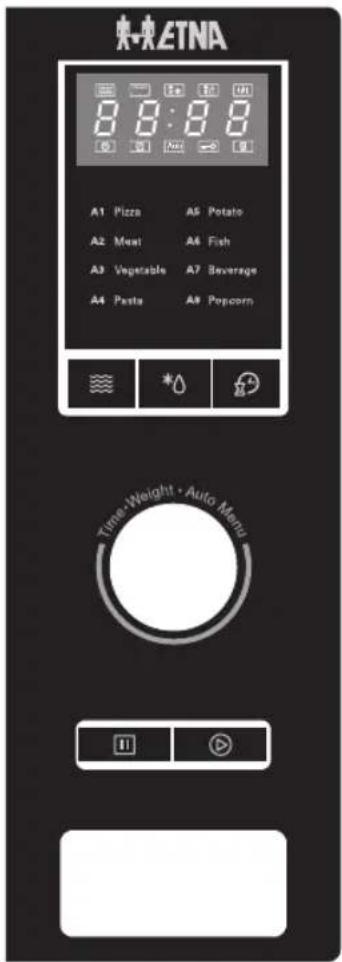
Microwave
*Weight/Time Defrost
Kitchen Timer/Clock
II Stop
Start
Stop button
- Press the button once to pause the cooking (for instance, to turn over the food). After that, press the start button to start the cooking again.
During pause, the remaining time and the chosen setting are shown in the display.
- Press the button twice to stop the cooking.
The time is shown in the display.
Adjust knob
- Turning; selecting an automatic program.
- Turning; setting the time.
▶Turn to the left; go right away to 95 minutes.
▶Turn to the right; steps of 5, 10, 30, 60 and 300 seconds.
- Turning; setting the weight in a defrost program and in an automatic program.
The weight setting that can be made depends on the weight range belonging to the chosen defrost program.
The weight setting that can be made depends on the pre-programmed weight settings belonging to the chosen automatic program.
- Pressing (Enter); confirming the choice after choosing an automatic program.
- Pressing the knob to confirm will only function for the automatic programs. If you press the knob another moment, you will hear a beep and nothing will happen.

Tip
During cooking you can increase or decrease the time by turning the adjust knob. This isn't possible during the defrost programs and automatic programs; here the time is fixed.
Before first use
- Open the door, remove the packaging and check the microwave for damage.
- Do not use the microwave if it is damaged, contact your supplier.
- Remove the protective film from the casing.
- Clean the oven interior and accessories with a damp cloth. Do not use any abrasive cleaner or strong-smelling cleaning products.
- First, place the guiding ring and then the turntable in the centre of the oven cavity with the opening for the drive shaft facing downwards.

Attention!
The microwave may not be used without the guiding ring and turntable.
Using the microwave
Microwaves are high-frequency electromagnetic waves. The energy makes it possible to cook or warm up a dish without affecting the form or colour.
Cooking principle
- The microwaves which the microwave generates are spread evenly by a distribution system. This cooks the dish evenly.
- The food absorbs the microwaves to a depth of approximately 2.5 cm. Cooking then continues, because the heat is spread in the dish.
- The cooking times vary and depend on the dish you use and the properties of the food:
▶Quantity and density
▶Moisture content
▶Starting temperature (whether or not it is cooled)

Attention!
The dish is cooked from the inside out by means of heat distribution. The cooking continues even when you take the dish from the oven. Standing times in recipes and in this book should therefore be adhered to, in order to ensure:
• Even heating into the middle of the dish;
• Equal temperatures in all parts of the dish.
Guidelines for microwave cookware
Cookware that you use for the microwave function should not block the microwaves. Metals such as stainless steel, aluminium and copper reflect microwaves. For that reason, do not use metal cookware. Cookware which is designated as microwave-safe can be used safely. For more information about suitable cookware, consult the following guidelines.
√ Recommended
√ X Careful
x Unsafe
| Cookware Microwave | safe | Remarks |
| Aluminium foil Can be used in | small quantities | to prevent certain parts of the food from overcooking.Arcing can occur if the foil is too close to the oven wall or if too much foil is used. |
| Porcelain and earthenware Porcelain, earthenwareand ivory porcelain are usually suitable, unless they have a metal edge. | ||
| Disposable crockery made from polyester or cardboard | √ | Frozen meals are sometimes packaged in disposable tableware. |
| Fast food packagingPolystyrene cupsPaper bags or newspaperRecycled paper or metal edges | √✗✗ | Can be used to warm up food.Polystyrene can melt if it overheats.Can catch fire.Can cause arcing. |
| GlasswareOven dishesFine glasswareGlass jars | √✗√ | Can be used, unless it has a metal edge.Can be used to warm up food or liquids.Thin glass can break or shatter with sudden heating.The lid must be removed. Only suitable for warming. |
| Metal Can cause arcing or fire. | ✗ | |
| Paper• Plates, cups, kitchen paper• Recycled paper | √× | For short cooking times and warming. For absorbing excess moisture.Can cause arcing. |
| Plastic Especially heat-resistant thermoplastic | material. Other types of plastic can warp or discolour at high temperatures. Do not use melamine plastic. Can be used to hold moisture. May not touch the food. Be careful when you remove the film; hot steam can escape. Only if boil-proof or ovenproof. Must not be airtight. If necessary, prick it with a fork. | |
Attention!

Attention!
Heating liquids in the microwave can result in delayed boiling. This means that the liquid may start to boil furiously after it is removed from the microwave, with the risk of scalding. You can offset the delayed boiling effect by placing a plastic or glass spoon in the liquid prior to heating it in the microwave.

Attention!
Take care with baby food:
- Shake or stir the content of babies' bottles or pots of baby food after heating.
- Check the temperature of the food carefully prior to consumption to prevent scalding injuries.

Attention!
Cutlery and tableware may become hot after using the microwave.
Notes about operation
- The first time you turn the knob you will hear a beep.
- If you open the door while the oven is on, you must press the start button to continue cooking.
- If the start button is not pressed within 1 minute after you set a cooking program, the setting will be cancelled and the current time will be shown.
- When a button is pressed properly, you will hear a beep. Otherwise there is no response.
- When the cooking program is finished you will hear 5 beeps.
Clock setting


- Connect the microwave to the power mains.
- Press the kitchen timer/clock button twice. ▷'00:00' is shown and the hour digits flash.
- Turn the adjust knob to set the hour (0 to 23).
- Press the kitchen timer/clock button again. ▶The minute digits flash.
- Turn the adjust knob to set the minutes (0 to 59).
- Press the kitchen timer/clock button to exit clock setting mode. ▶‘:’ flashes.

Attention!
If the clock is not set, the time will not be shown.
While setting the clock, you can press the stop button to return to the previous mode.
Kitchen timer

- Press the kitchen timer/clock button once. ▷'0:00' is shown.
- Turn the adjust knob to set the length of time from 5 seconds to 95 minutes (0:05 to 95:00).
- Press the start button to confirm.


Note
You cannot set a program while the kitchen timer is running.
Quick start
If you want to start the appliance immediately, without making any settings in advance:

- Press the start button to start the microwave function for 30 seconds at 100% power (0:30).
- Each additional press increases the time by 30 seconds. The maximum cooking time is 95 minutes (95:00).
Microwave cooking
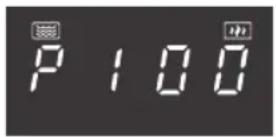


- Press the 'Microwave' button once. ▷'P100' is shown.
- Press several times the 'Microwave' button or turn the adjust knob to select the microwave power (100% to 10%). ▷ 'P100', 'P80', 'P50', 'P30' and 'P10' appear in order.
- Press the start button to confirm.
- Turn the adjust knob to adjust the cooking time (0:05 to 95:00).
- Press the start button to start cooking.

Tip
When you adjust the cooking time, the step interval is as follows:
0-1 min > 5 s, 1-5 min > 10 s, 5-10 min > 30 s, 10-30 min > 1 min, 30-95 min > 5 min
Microwave power chart
| Press 1x 2x 3x 4x 5x | ||||
| Display P100 P80 P50 P30 P10 | ||||
| Microwave power 100% 80% 50% 30% 10% |
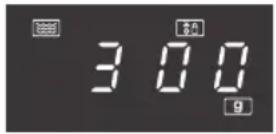
Multi-stage cooking
With multi-stage cooking you can set two functions. After the first is finished, you hear a beep and the second begins.

Note
‘Defrosting’ can only be set as the first function. The automatic programmes cannot be used.
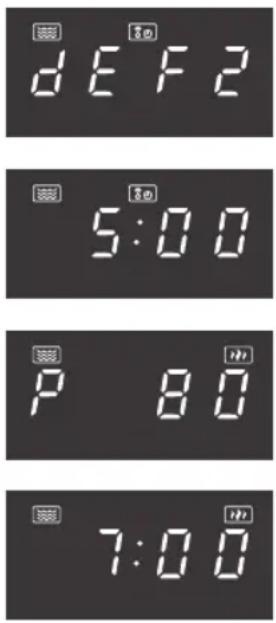
For example, to defrost for 5 minutes and then cook at 80% microwave power for 7 minutes:
- Press the weight/time defrost button twice.
▶'dEF2' is shown.
-
Turn the adjust knob to set a defrost time of 5 minutes.
-
Press the 'Microwave' button once.
▷'P100' is shown.
- Press the 'Microwave' button again or turn the adjust knob to select 80% microwave power.
▷'P80' is shown.
-
Press the start button to confirm.
-
Turn the adjust knob to set the cooking time to 7 minutes.
-
Press the start button to start cooking.
Automatic programs
With this function you can prepare popular dishes very simply. Select the appropriate program from the table, suitable for the kind of food and the weight.
In the table you will see the automatic programs with the corresponding weight settings.
The temperature, weight and shape of the food will influence the cooking effect. At the end of the automatic program, you can start the microwave again to extend the cooking process for a better result.
| Menu Weight Display | ||
| A-1PIZZA | 200 g 200 | |
| 400 g 400 | ||
| A-2MEAT | 250 g 250 | |
| 350 g 350 | ||
| 450 g 450 | ||
| A-3VEGETABLE | 200 g 200 | |
| 300 g 300 | ||
| 400 g 400 | ||
| A-4PASTA | 50 g (with 450 ml cold water) 50 | |
| 100 g (with 800 ml cold water) 100 | ||
| A-5POTATO | 200 g 200 | |
| 400 g 400 | ||
| 600 g 600 | ||
| A-6FISH | 250 g 250 | |
| 350 g 350 | ||
| 450 g 450 | ||
| A-7BEVERAGE | 1 cup (120 ml) 1 | |
| 2 cups (240 ml) 2 | ||
| 3 cups (360 ml) 3 | ||
| A-8POPCORN | 50 g 50 | |
| 100 g 100 | ||
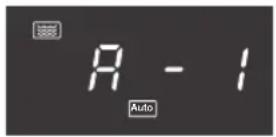
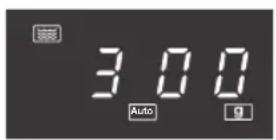
- Turn the adjust knob to the right to select the desired automatic program (A1 - A8).
- Press the start button to confirm.
- Turn the adjust knob to select the weight. ▷'g' is shown.
- Press the start button to start cooking.
Defrosting (by weight)
If you are going to defrost food, it is necessary to turn over the food half way the defrost time to get a better result.

- Press the weight/time defrost button.
▶'dEF1' is shown.
- Turn the adjust knob to select the weight (100-2000 g).
^4 'g' is shown.
- Press the start button to start defrosting.

Note
If the food weighs over 200 g, place the food at the edge of the glass turntable rather than in the middle.
Defrosting (by time)
If you are going to defrost food, it is necessary to turn over the food half way the defrost time to get a better result.
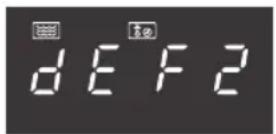
- Press the weight/time defrost button twice.
▶'dEF2' is shown.
-
Turn the adjust knob to select the time (0:05 to 95:00).
-
Press the start button to start defrosting.

Checking time or power
- You can press the kitchen timer/clock button during cooking to check the current time.
- You can press the 'Microwave' button during cooking to check the power level.
Child lock
You can ‘lock’ your microwave so that it is no longer possible to start it accidentally (for example during cleaning the appliance).

Activating
Press the stop button for 3 seconds.
▶A long beep sounds and the lock indicator goes on to confirm the controls are locked.
The current time or is shown.
Deactivating
Press the stop button for 3 seconds.
▶A long beep sounds and the lock indicator goes out to confirm the controls are unlocked.
Warming up and cooking
- The microwave always heats with the same intensity. The more you place in the microwave, the longer the cooking time.
- Flat, level dishes heat up more quickly than narrow, tall dishes.
- Covering dishes with microwave film or a fitting lid prevents spattering, reduces cooking time and helps retain moisture levels. After cooking remove the foil or lid carefully. Please note! The steam released can be extremely hot!
- Dishes that dry out quickly can be moistened. Place potatoes and vegetables in cold water briefly before you place them in the microwave. This prevents a skin forming.
- For an even result it is best to stir or turn a dish a few times.
- For warming up dishes which have already been cooked, always use the highest microwave setting.
- You don't need much water, salt or herbs for the cooking. Salt is best added after cooking. This prevents moisture from being withdrawn from the food.
- After the microwave is switched off, the dish continues cooking for a short time. Take this into account and don't heat up the dish for too long.

Note
When heating small quantities of powder-forming products (such as when drying herbs), always place a small cup of water in the microwave. Self-combustion is possible if small quantities are heated.
Defrosting
- Always use the defrost programme to defrost large compact items. Because the dish is defrosted gradually and evenly, you don't run the risk that the outside dries out while the core is still frozen.
- To accelerate the defrosting process, it is advised to separate the item into sections after a certain amount of time.
- For large pieces of meat and compact dishes, have two breaks in the process.
- When defrosting an irregularly-formed dish you can cover thin areas halfway through the defrosting process or wrap them with aluminium foil.
Factors that influence the cooking process
- The temperature of the ingredients influences the preparation time. A cold meal needs more cooking time than a meal at room temperature.
- Lighter dishes cook faster than heavier and solid dishes, such as stews or rolled meats. Take care in preparing light, porous dishes. The edges will quickly become dry and tough.
- Smaller dishes are warmed more evenly if you place them in the microwave separate from each other, preferably in a circle.
- Bones and fat conduct heat better than meat. Aluminium foil blocks the microwaves. By covering thinner areas of dishes (such as chicken legs and wings) you prevent them from cooking too quickly.
- Grease-proof paper prevents spattering and helps retain the heat.
Basic techniques
Placement
Place thicker pieces on the outside of the turntable. Dishes placed on the outside of the turntable receive the most microwaves.
Stirring
Stirring dishes regularly distributes the stored heat. Always stir from the outside in, since the outside of the dish always heats up first.
Turning over
Large, thick dishes should be turned over regularly. They then cook more evenly and quickly.
Pricking
Food with a skin or shell bursts open in the microwave, such as egg yolks, seafood and fruit. Prevent this by pricking it before cooking a few times with a fork or satay stick.
Checking
Dishes cook quickly. That's why you should check them regularly. Take them out of the microwave just before they're ready.
Continued cooking
In general, allow dishes to stand covered for 3 to 10 minutes after removing them from the microwave. The dishes continue to cook. Don't cover dishes with a dry crust, such as cake.
Freezing
When freezing food you should take defrosting in the microwave into account, by not using aluminium foil or trays and by freezing in flat portions.
Cooking vegetables
- If possible, always use fresh vegetables. If vegetables have become a little limp because they've been left for too long, you can place them in cold water for a while so that they absorb moisture.
- Use a large dish to cook vegetables, so that the layer covering the dish base is not too thick.
- Do not add any more water to vegetables than that remaining after rinsing.
• Always cover the dish with a lid or microwave film. - Do not add salt. The salts present naturally in the vegetables should give sufficient flavour. If you still wish to add salt, you can do this after cooking.
- Cook vegetables for the shortest time possible. Take into account the fact that the vegetables will continue to cook.
- Check with a satay stick or fork whether the vegetables are ready.
Cooking fish
Fish needs to cook evenly. For thin fish, oily fish or small portions set the power low (about 30%). In other cases you can set the power somewhat higher. Take continued cooking into account. Fish is ready when it becomes opaque.
Cleaning the appliance
Clean the appliance regularly to prevent fat and food particles from accumulating, especially on the surfaces of the interior and the exterior, the door and the seal.
- Clean the interior and outer casing regularly; use some washing-up liquid and water and dry the oven well with a dry cloth.
- Ensure that the cover of the microwave distributor (right of the oven cavity) is clean. Dirt in the cover can lead to spark formation.
- Clean the interior immediately after use. Remove condensation, boiled over liquid and food remnants with a damp cloth. Remnants of crumbs and moisture absorb microwaves and increase cooking time.
- Clean the accessories regularly; use some washing-up liquid and water with a brush and dry the accessories well with a dry cloth. The accessories are also dishwasher-safe.
- Smells will disappear if you place a glass of vinegar or water with lemon in the oven cavity. Switch the microwave on at full power for two minutes. Then rub down with a damp cloth.

Attention!
• Make sure that no water enters the vents.
- NEVER use abrasive cleaning materials or chemical solvents.
- DO NOT USE any abrasive cleaners or metal scrapers to clean the glass door. This will scratch the surface which may cause the glass to break.
- DO NOT USE high pressure cleaners or steam cleaners to clean the microwave.
- If the seal of the microwave is very dirty, the door won't close properly. The front of adjacent furniture can become damaged. Keep the seal clean.
Solving problems
If you are uncertain about whether your appliance is functioning properly, this does not automatically mean there is a defect. Try to deal with the problem yourself first by checking the points mentioned below. If the recommendations below do not solve your problem, call our service department.
Check:
• Is the plug in the socket?
• Is the door closed properly?
- Is the fuse in the fuse box faulty?
- Are the power settings and times set properly?
- Are there objects in the microwave that shouldn't be there?
• Did you use the correct kitchen utensils?
- Are the ventilation openings blocked?
- Has the food been defrosted sufficiently?
- Did you turn over or stir the food during preparation?
Also try the following:
Place a cup with water (approx. 150 ml) in the microwave, close the door securely and set the time knob at 1 minute.
- Does the oven lamp light?
- Does the cooling fan work?
- Does the turntable rotate?
- Has the water in the cup become hot?
If you answered 'no' to any of the questions above, please check the fuse or circuit breaker in your meter cupboard.
If it is OK, contact your service agent.
Sparks in the microwave

Attention!
If you see sparks in the microwave, turn the microwave off immediately. Sparks can be caused by:
- metal or aluminium foil that touches the interior of the microwave;
- aluminium foil that is not correctly covering the food (points that stick up act as an antenna);
- metal from a closing strip or tableware with metallic edges;
• recycled paper that contains small metal particles.
Technical specifications
The data plate indicates the total nominal load, the required voltage and the frequency.
This appliance meets all relevant CE guidelines.
Product specifications
| Appliance dimensions (w x d x h) 595 mm x 400* mm x 388 mm | |
| Volume 25 litres | |
| Diameter of the turntable 315 mm | |
| Connection 230V~50Hz | |
| Rated input power 1450 W | |
| Rated output power 900 W | |
* Depth excludes the knob on the control panel.
Electrical connection
The oven is fitted with a plug and must only be connected to a properly installed earthed socket. The socket must only be installed and the connecting cable must only be replaced by a qualified electrician, and in accordance with the appropriate regulations. If the plug is no longer accessible following installation, an all-pole isolating switch must be present on the installation side with a contact gap of at least 3 mm.
The fitted cabinet must not have a back wall behind the appliance.
Minimum installation height: 85 cm.
Do not cover ventilation slots and suction holes.

Note
Do not trap or bend the power cable
Placement

Danger!
- Do not disassemble this appliance. Touching internal components of this appliance can cause serious personal injury or death.
- Make sure that there is sufficient ventilation around the microwave oven.
- Do not cover the air vents.
- Do not place the microwave oven near a heat source.
- Transmitting and receiving equipment such as radios and televisions can affect the operation of the microwave oven.
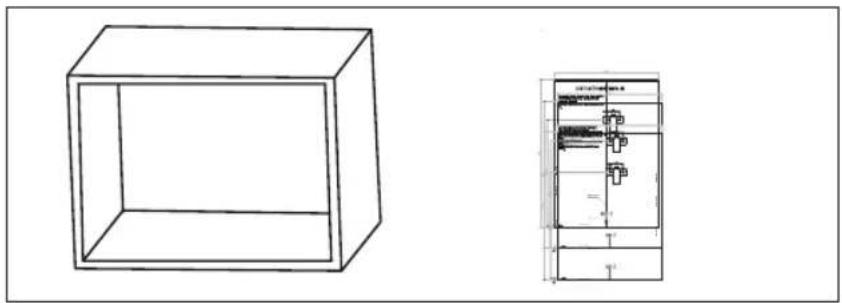
Installation dimensions

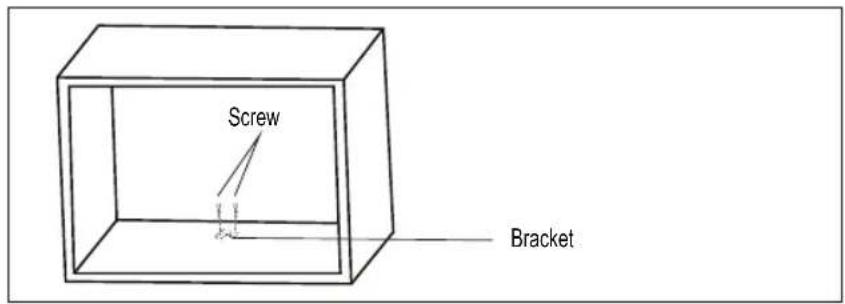
Mounting the bracket
- Caution! Read the instructions on the included template.
natural_image
Technical line drawing of a 3D rectangular box and its side view showing internal components (no text or symbols)- Use of the template to determine the position of the bracket.

- Screw the bracket in the cabinet.
Installing
- Carefully push the microwave into the box, making sure that it is in the centre.
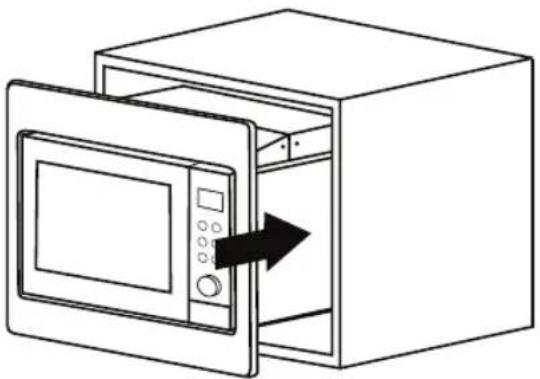
natural_image
Line drawing of a microwave oven with an open door and control panel, showing a black arrow indicating direction (no text or symbols)- Open the door of the microwave. At the front in the middle is a round opening for a screw. Attach the microwave; tighten the screw that was supplied. Put the cap that was supplied on the screw.
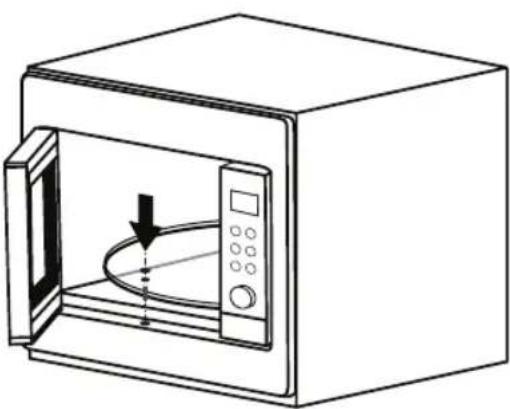
natural_image
Line drawing of a microwave oven with an open door and control panel (no text or symbols)Disposal of packaging and appliance
Sustainable materials have been used during manufacture of this appliance. This appliance must be disposed of responsibly at the end of its service life. Ask your local authorities for more information about how to do this.
The appliance packaging is recyclable. The following materials may have been used:
- cardboard;
• polyethylene film (PE);
• CFC-free polystyrene (PS rigid foam).
Dispose of these materials in a responsible manner and in accordance with government regulations.
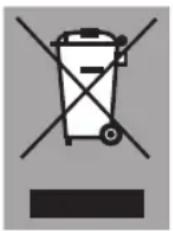
The product has been marked with a crossed-out dustbin symbol to remind you of the obligation to dispose of electrical household appliances separately. This means that the appliance may not be included with normal domestic refuse at the end of its service life. The appliance must be taken to a special municipal centre for separated waste collection or to a dealer providing this service.
Separate collection of household appliances helps to prevent any potential negative impact on the environment and on human health caused by improper disposal. It ensures that the materials of which the appliance is composed can be recovered to obtain significant savings in energy and raw materials.
CE
Declaration of Conformity
We hereby declare that our products satisfy the applicable European Directives, Orders and Regulations, as well as the requirements stated in the referenced standards.

846090 / VER 1 / 06-01-2021

- Let op!
- First use
- Operation
- Cooking tips
- Maintenance
- Faults
- CONTENTS
- Installation
- Environmental aspects
- Introduction
- Please read the separate safety instructions carefully before using the appliance!
- Description of the appliance
- Attention!
- Stop button
- Adjust knob
- Tip
- Before first use
- Using the microwave
- Cooking principle
- Guidelines for microwave cookware
- Notes about operation
- Clock setting
- Kitchen timer
- Note
- Quick start
- Microwave cooking
- Multi-stage cooking
- Automatic programs
- Defrosting (by weight)
- Defrosting (by time)
- Checking time or power
- Child lock
- Activating
- Deactivating
- Warming up and cooking
- Defrosting
- Factors that influence the cooking process
- Basic techniques
- Placement
- Stirring
- Turning over
- Pricking
- Checking
- Continued cooking
- Freezing
- Cooking vegetables
- Cooking fish
- Cleaning the appliance
- Solving problems
- Check:
- Also try the following:
- Sparks in the microwave
- Technical specifications
- Product specifications
- Electrical connection
- Danger!
- Installation dimensions
- Mounting the bracket
- Installing
- Disposal of packaging and appliance
Brand : ETNA
Model : SM225RVS
Category : Microwaves