
GSP 7412 IX - Dishwasher BOMANN - Free user manual and instructions
Find the device manual for free GSP 7412 IX BOMANN in PDF.


| Type | Household Dishwasher |
| Brand | Bomann |
| Model | GSP 7412 IX |
| Dimensions (H x W x D) | 84.5 x 59.8 x 60.0 cm |
| Net Weight | approx. 42.8 kg |
| Place Settings | 12 |
| Energy Efficiency Class | Not specified (see energy label) |
| Power Supply | 220-240 V~ / 50 Hz |
| Rated Power | 1760 - 2100 W |
| Rated Current | 10 A |
| Water Pressure | 0.04 - 1.0 MPa |
| Programs | Intensive, Universal, ECO, Glass, 90 Min, Rapid, Soak |
| Special Functions | Half Load, Extra Drying, Delay Start (1-24h), Child Lock |
| Salt Container Capacity | approx. 1.5 kg |
| Rinse Aid Dispenser Capacity | approx. 110 ml |
| Water Connection | Cold water only, 3/4 inch thread |
| Drain Hose Length | 1.5 m (extendable up to 4 m) |
| Included Accessories | 2 dish baskets, cutlery basket, cutlery rack, cup shelf, salt funnel tube, inlet hose safety system |
| Safety Features | Inlet hose safety system, child lock, water leak protection |
| Filter System | 3-part: main, coarse, micro filter |
| Noise Level | Not specified |
Frequently Asked Questions - GSP 7412 IX BOMANN
User questions about GSP 7412 IX BOMANN
0 question about this device. Answer the ones you know or ask your own.
Ask a new question about this device
Download the instructions for your Dishwasher in PDF format for free! Find your manual GSP 7412 IX - BOMANN and take your electronic device back in hand. On this page are published all the documents necessary for the use of your device. GSP 7412 IX by BOMANN.
USER MANUAL GSP 7412 IX BOMANN
HOUSEHOLD DISHWASHER
natural_image
Line drawing of a kitchen appliance inside a circular frame (no text or symbols)General notes Page 24
Special safety information for this unit Page 25
Transport and packaging Page 26
Appliance equipment Page 26
Installation Page 27
Prior using for the first time Page 29
Loading the dishwasher Page 31
Startup / Operation Page 34
Cleaning and maintenance Page 37
Troubleshooting Page 38
Technical data Page 39
Disposal Page 40
Einleitung
flowchart
graph LR
    A["Hand holding cup with inlet"] --> B["Add salt to a container"]
    B --> C["Transfer to a glass jar with salt and liquid"]
    C --> D["Hear pouring from a glass jar into a glass jar with inlet"]
Reinigungstabletten (Tabs)
natural_image
Diagram showing two mechanical assembly steps: one with internal parallel lines and another with a curved arrow indicating motion (no text or symbols)natural_image
Diagram showing a structural mesh with curved elements and directional arrows, no text or symbols present.natural_image
Technical illustration of a mechanical assembly with hand positioning and close-up views of components (no text or symbols)flowchart
graph LR
    A["Handwashing"] --> B["After 5 sec"]
    B --> C["Handwashing with brushstroke marks"]
    C --> D["Water washing machine"]
    D --> E["Handwashing with brushstroke marks"]
Thank you for choosing our product. We hope you will enjoy using the appliance.
Symbols in these instructions for use
Important information for your safety is specially marked. It is essential to comply with these instructions to avoid accidents and prevent damage.

WARNING:
This warns you of dangers to your health and indicates possible injury risks.

CAUTION:
This refers to possible hazards to the machine or other objects.

NOTE: This highlights tips and information.
General notes

Read the operating instructions very carefully before putting the appliance into operation and keep the instructions including the warranty and the receipt. If you give this appliance to other people, also pass on the operating instructions.

NOTE:
- Due to constant product modifications, your appliance may differ slightly from these operating instructions; Functions and methods of use remain unchanged.
- The illustrations in these operating instructions may differ from the original appliance.
- The appliance is designed exclusively for private use and for the envisaged purpose. This appliance is not fit for commercial use.
- The appliance is only to be used as described in the user manual. Do not use the appliance for any
other purpose. Any other use is not intended and can result in damages or personal injuries.
- Do not use it outdoors. Keep it away from sources of heat, direct sunlight and humidity.
- Do not operate the appliance without supervision.
- When not in use, for cleaning, user maintenance works or with disruption, switch off the appliance and disconnect the plug (pull the plug itself, not the lead) or turn off the fuse.
- The appliance and if possible the mains lead have to be checked regularly for signs of damage. If damage is found the appliance must not be used.
- For safety reasons, alterations or modifications of the appliance are prohibited.
- To ensure your children's safety, please keep all packaging (plastic bags, boxes, polystyrene etc.) out of their reach.

WARNING:
Do not allow small children to play with the foil. There is a danger of suffocation!
Special safety information for this unit
- The maximum number of place settings to be washed is 12.
- This unit is intended to be used in household and similar applications such as
- staff kitchen areas in shops, offices and other working environments;
- by clients in hotels, motels and other residential type environments; - in farm houses.
- The appliance is to be connected to the water mains using new hose sets and that old hose-sets should not be reused.
- The maximum permissible inlet water pressure is 1 Mpa.
- The minimum permissible inlet water pressure is 0.04 Mpa.
- In the appliance bottom are located ventilation openings (depending on model). These may not be clogged e. g. by carpet.
- Pay attention to a proper loading of the appliance. Follow the instructions in the chapter "Loading the dishwasher".
- Knives and other utensils with sharp points must be loaded with their points down in the cutlery basket (depending on model) or placed in a horizontal position in the dishwasher basket.
- The door should not be left open as this could increase the risk of tripping.
- This appliance can be used by children aged from 8 years and above and persons with reduced physical, sensory or mental capabilities or lack of experience and knowledge if they have been given supervision or instruction concerning use of the appliance in a safe way and understand the hazards involved.
- Children who are younger than 8 years must be kept away from the appliance.
• Children shall not play with the appliance. - Cleaning and user maintenance shall not be made by children, unless they are older than 8 years and are supervised.
- Do not try to repair the appliance on your own. Always contact an authorized technician. If the supply cord is damaged, it must be replaced by the manufacturer, its service agent or similarly qualified persons in order to avoid a hazard.
Transport and packaging
Transport the appliance
Transport the appliance in an upright position if possible. The risk when transporting in a horizontal position is the leakage of residual water!
Protect the appliance during transport against weather influences.
Unpacking the appliance
- Remove the appliance from its packaging.
- Remove all packaging material, such as foils, filler and cardboard packaging.
Dispose of packaging materials that are no longer required in accordance with the locally applicable regulations. - To prevent hazards, check the appliance for any transport damage.
- In case of damage, do not put the appliance into operation. Contact your distributor.
i NOTE:
Production residue or dust may have collected on the appliance. We recommend cleaning the appliance according to chapter “Cleaning and maintenance”.
Appliance equipment
Appliance overview
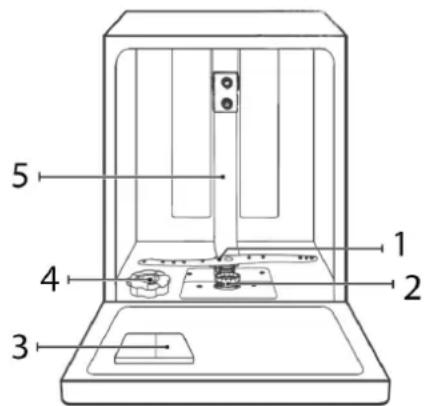
1 Lower spray arm 4 Salt container
2 Filter system 5 Inner pipe
3 Dispenser
Delivery scope
2x dish basket, 1x cutlery basket, 1x cutlery rack, 1x cup shelf, 1x salt funnel tube, 1x inlet hose safety system
Installation
WARNING:
The appliance must not be connected to the mains during installing. Otherwise, there is danger to life or electric shock hazard!
CAUTION:
- For proper operation, the appliance must be connected professionally. The data of inlet and outlet as well as the electrical connection values must meet the required criteria.
- It is recommended that the installation, water connection and electrical connection, be carried out by a specialist.
Installation location
- The site should be located near the water inlet and outlet, as well as near a properly grounded power socket.
- Place the appliance so that all controls are easily to reach, and the appliance door can open without being impeded.
- Take care of a solid and horizontal position of the appliance. If the appliance is not horizontally leveled, adjust the feet accordingly (see "Adjusting the feet").
- Power cord and water hoses may not kinked or squashed.
-
Avoid the installation:
-
near heaters, next to a stove, direct sunlight or any other heat sources;
- at locations with high humidity (e. g. outdoors), as metal parts would be susceptible to corrosion under such circumstances;
- in rooms where the temperature could drop below freezing. Do not expose the appliance any weather.
- near volatile or flammable materials (e.g. gas, fuel, alcohol, paint, etc.).
Removing the appliance cover
The appliance cover can be removed and thus reducing the unit height to 81.5 cm; to place the dishwasher under a suitable kitchen worktop.
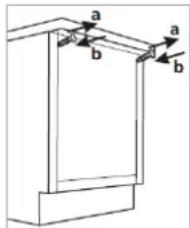
a) Loosen the screws on the unit back and remove the cover.
b) After removing the cover, re-
tighten the screws.
Adjusting the feet
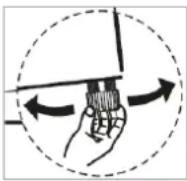
Check with a spirit level whether the appliance is leveled horizontally. If the unit is not in balance, the feet must be adjusted.
Water connection
CAUTION:
- Installation to the water supply must be carried out in accordance with local laws and regulations.
- The appliance is not suitable for hot water supply.
- Use the new hose set supplied to connect the appliance to the water supply. Do not reuse old or used connection sets.
- If the water supply is new or has not been used for a long time, make sure that the water is clear and free of impurities before connecting it to the water supply.
NOTE, the connection to the water mains may only be made in accordance with DIN EN 1717 of the drinking water ordinance. A suitable safety device against drinking water contamination through back-flow must be installed.
Notes on inlet hose safety system
(delivery scope depending on model)
The safety system consists of a double-walled inlet hose. It guarantees to cut off the water supply when
leakage of the inner hose. Switching off the water supply leads over an electronic contact.
If necessary, you can order an inlet hose safety system from your dealer or in our online accessories shop, www.bomann-germarny.de. To order, use the reference number found under “Technical data”.
Connecting the water inlet hose (cold water connection)
i NOTE:
The water pressure must be between 0.04-1.0 MPa. For higher water pressure: connect pressure reducing valve upstream.
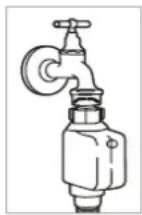
- Connect the water inlet hose to a water thread with 34 . Tighten the hose in the direction of the screw thread; make sure it is firmly seated.
- Connect the other end of the inlet hose to the inlet valve on the rear of the appliance; also ensure that it is firmly seated.
Connecting the water drain hose
i NOTE:
The water drain hose is approx. 1.5 m long and can be extended to max. 4 m with a suitable hose and connector.

CAUTION:
To prevent dirty water from flowing back, the free end of the hose must not be below the water level of the drain.
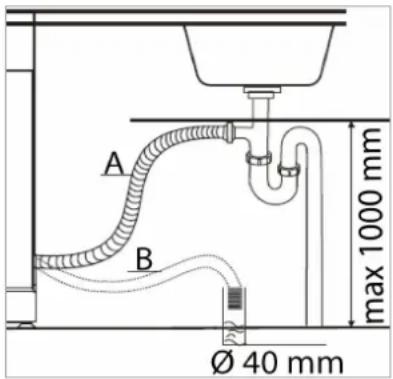
- Connect the drain hose to a drainpipe (B) with a minimum diameter of 40 mm; alternatively, the hose can be attached to a sink or directly to the drain (A).
- In any case, make sure that the drain hose is not bent or squeezed.
- The drain hose may be installed up to a maximum height of 1000 mm above the rinsing floor.
- Fasten the hose securely to prevent it from changing its position and thus leaking water.
Electrical connection
WARNING:
- The installation to the mains supply must conform to the local standards and regulations.
- Improper connection may cause to an electric shock!
- Do not use multiple sockets or extension cords.
- It is not allowed to modify the plug provided with the appliance! If the plug does not fit properly to the outlet, let install a proper outlet by an authorized specialist.
- The accessibility of the power plug must always be ensured to disconnect the appliance from the power supply in case of an emergency.
- Make sure that the voltage supply matches the specifications on the rating label (door frame) before connecting.
- Connect the mains cable to a properly installed and earthed wall outlet.
- If the plug after installation is not accessible, a corresponding disconnect device must be available to meet the relevant safety regulations.
Prior using for the first time
Before using your dishwasher for the first time:
A. Filling salt into the salt container (water softener)
B. Filling the rinse aid dispenser
C. Filling detergent
CAUTION:
- Use only salt, rinse aid and detergent for dishwashers. Other products may damage the appliance.
- Always consider the dosage and storage recommendations on the sales packaging.
WARNING:
Keep salt, rinse aid and detergent out of reach of children.
A. Filling salt into the salt container (water softener)
Water softener
Water hardness varies regionally. If hard water is used in the dishwasher, deposits form on the dishes and kitchen utensils. The appliance is equipped with a water softener, that removes lime and minerals from the water by using water softening in the salt container. Your local water authority can advise you on the hardness of the water in your area.
Adjusting the salt consumption
The salt consumption can be adjusted according to your water hardness and thus be regulated optimally.
- Switch on the appliance.
- Press the program button for more than 5 seconds, the setting mode is now activated for approx. 60 seconds.
- By repeatedly pressing the program button the water hardness can be selected: H1->H2->H3->H4->H5->H6. The display indicates the selection (see below table).
- The setting will be saved automatically after a few seconds; alternatively, exit the setup via the power button.
| Water hardness | Setting | Regeneration occurs every X program sequence1) | Salt consumption / cycle | |
| °dH | Mmol/l | |||
| 0 – 5 | 0 – 0.94 | H1 | No regeneration | 0 g |
| 6 – 11 | 1.0 – 2.0 | H2 | 10 | 9 g |
| 12 – 17 | 2.1 – 3.0 | H3 (factory setting) | 5 | 12 g |
| 18 – 22 | 3.1 – 4.0 | H4 | 3 | 20 g |
| 23 – 34 | 4.1 – 6.0 | H5 | 2 | 30 g |
| 35 – 55 | 6.1 – 9.8 | H6 | 1 | 60 g |
°dH: German degree of hardness
1) Every cycle with a regeneration operation consumes additional 2.0 liters of water, the energy consumption increases by 0.02 kWh and the program extends by 4 minutes.
Fill with salt

CAUTION:
- Only refill the salt container when the salt warning lamp is lighting.
- During filling the salt container, salt and water can escape. Start a program immediately after you have filled the container to prevent corrosion.
flowchart
graph LR
    A["Person mixing bowl"] --> B["Add salt"]
    B --> C["Add salt with salt can be added"]
    C --> D["Add salt into container"]
    D --> E["Add salt into container"]
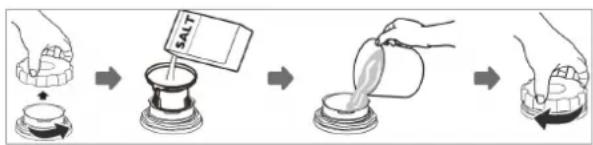
- Remove the lower basket and unscrew the lid of the salt container.
- Add about 1.5 kg of salt by using the supplied funnel tube.
- Full fill the salt container with water (just before the first use).
- Screw the lid firmly on again after filling the container.
- Depending on salt resolution, the warning lamp usually disappears immediately after filling.
B. Fill the rinse aid dispenser
Function of rinse aid
The rinse aid is automatically added during the final rinse, ensuring thorough rinsing and a spot and streak free drying.
When to refill the rinse aid dispenser
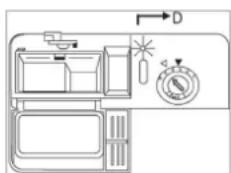
If the corresponding message does not light up in the display, you can estimate the amount of remaining rinse aid to the
optical level indicator (D) next to the dispenser.
When the rinse aid dispenser is full, the indicator is completely dark. If the rinse aid diminishes, the size of the black dot changes as shown below. To avoid spotting, the rinse aid level must not drop below 14 .

full

^3/_4 full

12 full

14 full

empty
Fill in the rinse aid

- To open the dispenser, screw the lid counterclockwise to the open position and remove the lid.
- Add the rinse aid into the dispenser, being careful not to overfill. The dispenser contains approx. 110 ml.
- Before closing the appliance door, put on the lid in the open position back and turn it clockwise to the closed position.
i NOTE:
Remove spilled rinse aid with an absorbent cloth to avoid excessive foaming during the next rinse.
Adjusting the rinse aid dosage
When forming spots and the dishes dries poorly, increase the added amount of rinse aid. You can set the amount of addition between level 1 (min.) and level 6 (max.).

Take off the lid of the rinse aid dispenser and adjust the dial to the desired level. The factory setting is "4".
i NOTE:
Increase the dosage if there are drops of water or lime spots on the dishes after rinsing. Reduce the dosage if there are sticky whitish stains on dishes or a bluish film on glassware or knife blades.
C. Fill in detergent
Function of detergent
Detergents with its chemical ingredients are necessary to remove dirt, crush dirt and transport it out of the dishwasher. The most commercially, high-quality cleaning agents are suitable for this purpose.
Detergent
Normally new pulverized detergent is without phosphate. Thus, the water softener function of phos-
phate is not given. In this case we recommend filling salt in the salt container even when the hardness of water is only 6^ dH. If detergents without phosphate are used in the case of hard water often white spots appear on dishes and glasses. In this case add more detergent to reach better results. Detergents without chlorine do only bleach a little. Strong and colored spot will not be removed completely. In this case choose a program with a higher temperature.
Detergent tablets (tabs)
Dishwasher tablets from different manufacturers dissolve at different rates. It is possible that they will not fully dissolve in programs with short running time and low water temperature and thus does not reach their full productive efficiency. To ensure the complete removal of detergent residues, we recommend choosing rinse programs with long running times and high-water temperature. Always follow the manufacturer's instructions!
Fill in the detergent

NOTE:
- Always add the detergent just before starting the rinse cycle, otherwise it could get damp and will not dissolve properly.
- You'll find information about the amount of detergent for the respective programs in the "Program table". Note that depending on the degree of soil-ing and water hardness differences are possible.
- At the end of the rinse cycle the detergent dispenser must be empty.
The dispenser must be refilled before the start of each rinse cycle according to the instructions in the "Program table".
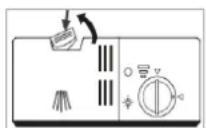
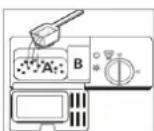
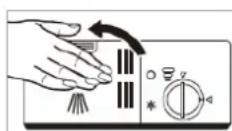
- Press the release button to open the dispenser.
A Chamber of detergent in powder form for the main rinse
B Chamber of detergent for the pre-rinse / Chamber for detergent in tablet form
- The main rinse chamber must be filled at least up to the marking MIN.
- Add with heavily soiled dishes an additional dose of detergent in the chamber for the pre-rinse.
- Close the dispenser. Make sure that the lid locks into place.
Loading the dishwasher

CAUTION:
Only rinse such dishes and cutlery in the dishwasher, which is expressly marked as "dishwasher resistant".

NOTE:
- Remove gross scraps of food and soak burnt leftovers. Pre-rinse under running water is not necessary.
- Do not overload! This is important for adequate cleaning results and reasonable energy consumption.
- Very small items should not be rinsed in the appliance, as they could easily fall out of the baskets.
For rinsing in the dishwasher the following cutlery and dishes..
..are not suitable:
- cutlery with hand pieces of wood, porcelain mother of pearl
- plastic items that are not heat resistant
- older cutlery with glued parts that are not temperature resistant
- bonded cutlery items or dishes
- pewter or cooper items
-
crystal glass
-
steel items subject to rusting
- wooden platters
- items made from synthetic fibres
..are limited suitable:
- some types of glasses can become dull after many washes
- silver and aluminum parts tend to discolor during washing
- Glazed patterns may fade if machine washed frequently
Recommendations for loading
- Arrange sensitive, light tableware items such as glasses, coffee and teacups in the upper basket.
- Place large items that are most difficult to clean in the lower basket.
• Make sure that the tableware is placed securely and cannot tip over. - Place all items so, that the spray arms can rotate freely during rinsing.
- Arrange all items with openings facing down.
- Curved items, or ones with recesses, should be loaded aslant so that water can drain off.
• Make sure that glasses do not touch each other. - Set the dishes and cutlery not into each other or covering each other.
- Arrange cutlery in the cutlery basket.
- Store long as well as sharp cutlery horizontally in the dishwasher basket.
Methods for loading normal dishware
Loading the upper basket
On the upper basket only small and medium items should be loaded. Load e. g. glasses, cups, saucers and small bowls.
Loading the lower basket
Because of the particularly intense cleaning action of the lower spray arm the lower basket is suitable for heavily soiled dishes. Load e. g. pots and plates.
| Loading upper basket acc. EN60436 | ||
| 1 Cups 2 Saucers 3 Glasses 4 Mugs 5 Small pot 6 Small bowl | 7 Dessert plates 8 Dinner plates 9 Soup plates 10 Oval platter 11 Melamine dessert plates | 12 Melamine bowl 13 Glass bowl 14 Dessert bowls 15 Cutlery basket |
| Loading lower basket acc. EN60436 | ||
Rack shelves
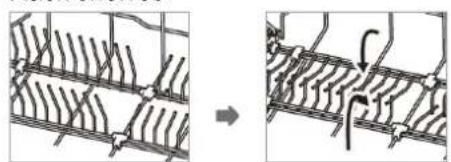
natural_image
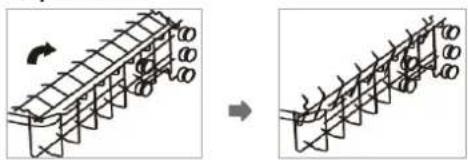
Diagram showing two stages of a mechanical or structural assembly, with no visible text or symbols.To create a better arrangement for bulky dishes, the rack shelves can be folded. Lift the racks slightly and fold them down.
Cup shelves
natural_image
Diagram showing a structural grid with arrows indicating direction, no text or symbols presentIf necessary, fold down or remove the cup shelf.
Adjusting the upper basket
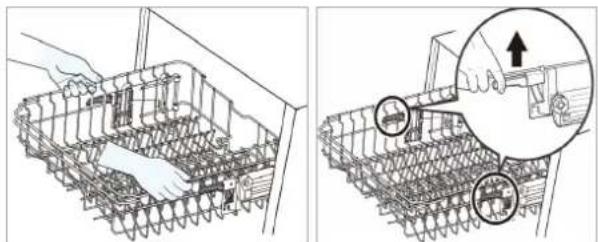
The upper basket is height adjustable. This allows more space for large dishes in the upper or lower basket.
natural_image
Two technical diagrams showing a robotic platform with internal components and a close-up of the mechanism (no text or symbols present)- To lift the basket, lift it centrally on both sides until the basket locks into the upper position. The adjustment handles do not have to be operated for this.
- To lower the basket, lift the adjustment handles on both sides to release the basket and lower it to the lower position.
Cutlery basket / cutlery rack

WARNING: Risk of injury!
- Cutlery must not protrude above the cutlery basket base.
- Knives and other utensils with sharp points must be placed with the tip down in the cutlery basket or in a horizontal position in the dishwasher basket and/or on the cutlery rack.

NOTE:
If necessary, remove the basket and/or the rack to create more space for large dishware.
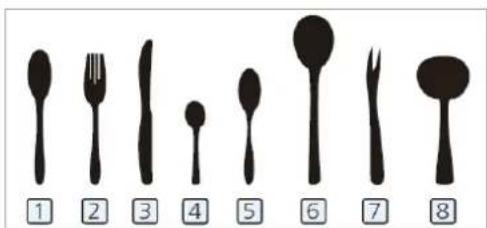
1 Soup spoon 4 Teaspoon 6 Serving spoon
2 Fork 5 Dessert 7 Serving fork
3 Knife spoon 8 Gravy ladle
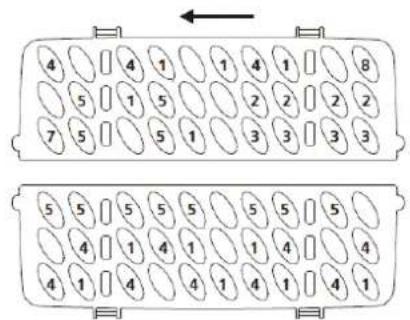
Cutlery basket
The basket is equipped with grid inserts in which the cutlery is arranged uniformly and with the handles downwards.
Cutlery rack
Use the shelf in the upper basket for long cutlery types, such as serving cutlery, salad servers and kitchen knives.
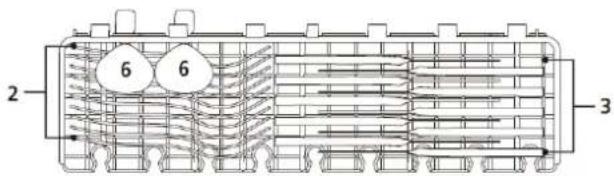
Startup / Operation
Program table
The values listed are guide values and recommendations under normal conditions and therefore not binding.
Select a suitable program depending on dishes and degree of soiling.
| Program | Program selection information | Program sequence | Detergent pre/main (g) | Time (min) | Energy (kWh) | Water (l) |
 Intensive Intensive | heavily soiled dishes and dried leftovers | Pre-rinse (50°C) Main rinse (65°C) Rinse Rinse Rinse (65°C) Drying | 4/16 (or tab) | 205 | 1.621 | 17.8 |
 Universal Universal | normal soiled dishes, daily use | Pre-rinse (45°C) Main rinse (55°C) Rinse Rinse (65°C) Drying | 4/16 (or tab) | 175 1.302 14.3 | ||
| ECO (*EN60436) | standard program for normally soiled dishes | Main rinse (45°C) Rinse Rinse (60°C) Drying | 20 (or tab) | 220 | 0.923 | 11.0 |
| [SAT2] Glass | low adhesive, fresh leftovers, such as glasses | Pre-rinse Main rinse (50°C) Rinse Rinse (65°C) Drying | 4/16 (or tab) | 120 1.100 14.3 | ||
| 90 Min | for lightly soiled dishes | Main rinse (60°C) Rinse Rinse (65°C) Drying | 20 (or tab) | 90 1.350 11.7 | ||
| [ANSB] Rapid | rapid rinse cycle for lightly soiled dishes without drying | Main rinse (50°C) Rinse Rinse (45°C) | 20 30 0.751 11.2 | |||
 Soak Soak | for dishes to be rinsed later in the day | Pre-rinse | - | 15 | 0.020 | 4.1 |
| 12 Loading function: use this function with a loading of half or less dishes; energy and water consumption are reduced. Add slightly less detergent than for a full load. The function is not available for the programs "Rapid" and "Soak". | ||||||

Extra drying function: Additional drying process to the previously set rinse program.

The function is not available for the programs "Rapid" and "Soak".
i NOTE:
*ECO program is the test cycle. The information for comparability test in accordance with EN60436.
General information!
- The ECO program is suitable for cleaning normally soiled dishes, which is the most efficient program in terms of combined energy and water consumption. The program is used to check compliance with EU ecodesign legislation.
→ Informationen for the comparability test:
Capacity: 12 settings; Position of upper basket: lower position; Rinse aid setting: max; Softener setting: H3 - Loading the domestic dishwasher to the specified capacity helps to save energy and water.
- Manual pre-washing of the dishes leads to higher water and energy consumption!
- Washing dishes in a household dishwasher generally uses less energy and water than hand washing, provided the dishwasher is used according to the instructions.
Operating overview
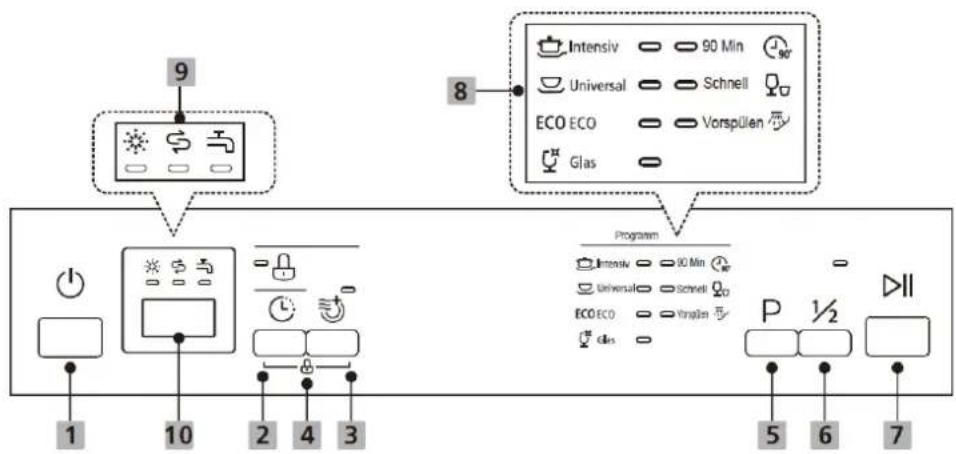
flowchart
graph TD
    A["9"] --> B["Programm"]
    C["8"] --> D["Intensiv 90 Min 90°"]
    C --> E["Universal Schnell"]
    C --> F["ECO ECO Vorspülen"]
    C --> G["Glas"]
    H["1"] --> I["Power Control Icon"]
    J["10"] --> K["Switch Icon"]
    L["2"] --> M["Lock Icon"]
    N["4"] --> O["Control Icon"]
    P["3"] --> Q["Control Icon"]
    R["P ½"] --> S["Units 5 6 7"]
    T["II"] --> U["Units 5 6 7"]
1 ⏻ Power: button for switching the power supply on/off.
2 Delay: button for selecting the start delay of 1-24 hours. Set the operating conditions and start the rinsing program. The appliance starts automatically after the selected time has elapsed.
3 Extra drying: button for activating/deactivating the extra drying function. Consider that the function is program dependent!
4 Child lock: keep pressing button combination for several seconds to activate/deactivate the
1 Power: button for switching the power supply on/off.
2 Delay: button for selecting the start delay of 1-24 hours. Set the operating conditions and start the rinsing program. The appliance starts automatically after the selected time has elapsed.
3 Extra drying: button for activating/deactivating the extra drying function. Consider that the function is program dependent!
4 Child lock: keep pressing button combination for several seconds to activate/deactivate the
child lock. All buttons, except power button, are locked for operation.
5 12 Loading: button for activating/deactivating the 12 loading function. Consider that the function is program dependent!
6 P Program: button for selecting the rinsing program.
7 ▷Ⅱ Start/pause: button for starting/interrupting the selected or running rinsing program.
8 The program indicator lights show the selection.
5 12 Loading: button for activating/deactivating the 12 loading function. Consider that the function is program dependent! 6 P Program: button for selecting the rinsing program. 7 ▷ll Start/pause: button for starting/interrupting the selected or running rinsing program. 8 The program indicator lights show the selection.
9 Warning lamp: lights up when rinse aid needs to be refilled.
Warning lamp: lights up when dishwasher salt needs to be refilled.
Control lamp: lights up when the water supply is closed.
10 Display: the salt consumption (water hardness) and the start delay are selected via the display. The start delay (when activated), the remaining program time and any error codes are displayed.
Starting a program
- The water supply must be opened to the maximum pressure.
- Load the dishwasher baskets.
- Fill in the detergent.
- Switch on the appliance.
- Set the required program options.
- Start the operation.
Changing the program
CAUTION:
A program change should only be done a short time after the program start. Otherwise, cleaning agent may already have been released and rinsing water already drained off.

flowchart
graph LR
    A["Hand gesture"] --> B["3 sec"]
    B --> C["ECO Device"]
    C --> D["Hand gesture"]
- First press the start/pause button to interrupt the running rinsing program.
- Keep pressing the program selection button for more than 3 seconds; the program is deleted.
- Select a new program and start the new operation.
Forgot to add dishes?
WARNING:
Open the door very carefully during operation, there is a risk of hot water spraying out.
Dishes can be reloaded as long as the detergent dispenser has not opened.

flowchart
graph LR
    A["Hand holding"] --> B["After 5 sec"]
    B --> C["Water bath with liquid"]
    C --> D["Bag holding"]
    D --> E["Bag holding"]
- Press the start/pause button to stop the operation. Once the spray arms have stopped, you can fully open the appliance door.
- Adjust any forgotten dishes.
- Press the start/pause button, after approx. 10 seconds the operation will continue.
End of program
CAUTION:
After the end of the program, allow the appliance to cool down a little before opening the appliance door. This will prevent steam from escaping and causing long-term damage, possibly to your built-in furniture.
At the end of the rinse cycle, several signal tones will sound; then appliance will switch to standby mode.
If no operation is performed within 15 minutes, the appliance switches off automatically - energy-saving!
Switching off
- Switch off the appliance.
- Close the water supply if necessary!
- Remove the dishes after they have cooled down (see "Unloading the dishwasher").
- Leave the appliance door slightly open until the next rinse cycle to avoid odors.
- If the appliance is not in use for an extended period, disconnect it from the power supply!
Unloading the dishwasher
CAUTION:
Allow dishes to cool for approx. 15 minutes before removing them. Hot dishes are susceptible to shock.
i NOTE:
Water droplets may still be inside the appliance at the end of the program.
Recommendation: to avoid water drops from the upper basket falling onto the dishes in the lower basket, it is recommended to empty the appliance from the bottom to the top.
- Open the appliance door and pull out the basket to be emptied.
Energy saving tips
- Washing dishes as intended in a residential dishwasher generally uses less energy and water than hand dishwashing.
- Whenever possible, do not use the dishwasher until it is fully loaded.
- Do not rinse dishes in advance under running water.
- Use the most appropriate rinse program for the load.
- Do not perform a pre-rinse cycle (depending on the model) unless absolutely necessary.
Cleaning and maintenance
WARNING:
- Always switch off the appliance and disconnect it from the power supply before cleaning and maintenance work.
- Allow the appliance to cool down sufficiently before cleaning.
- Do not use steam cleaners for cleaning the appliance; moisture could enter electrical components. Risk of electric shock! Hot steam could damage the plastic parts.
WARNING:
- The appliance must be dry before you put it back into operation.
CAUTION:
- Do not use a wire brush or other sharp, abrasive objects.
- Do not use any acidic or abrasive detergents.
i NOTE:
Dirty filters and clogged spray arms will affect rinsing results. Check the filters and the spray arms regularly and clean them if necessary.
Filter system
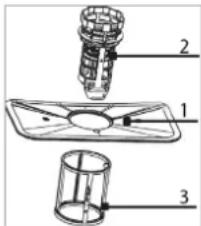
The three-part filter system prevents large quantities of food residues or foreign bodies from entering the rinsing system.
1 Main filter: collected food and dirt particles are pulverized by a special jet on the spray arm and rinsed out via the water drain.
2 Coarse filter: filters larger objects such as pieces of bone or broken glass that could block the drain.
3 Micro filter: filters dirt and food residues in the sump area and prevents these contaminants from settling back onto the dishes during the rinse cycle.
Cleaning the filter system
CAUTION:
- The dishwasher must never be operated without filters.
- Improper insertion of the filters may affect the performance and damage the appliance.
- Do not tap out the filters for cleaning to avoid possible deformation of the filters.
i NOTE:
After each rinse, check the filter for residues.
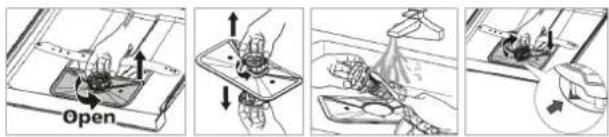
- Turn the coarse filter counterclockwise and remove the entire filter system upwards.
- Detach the coarse and the micro filters from the main filter.
- Remove food residues and clean the filters under running water. Use a soft cleaning brush if necessary.
- Reassemble the filter system properly in reverse order and in its intended position. Fix the entire system by turning the filter unit clockwise.
Cleaning the spray arms
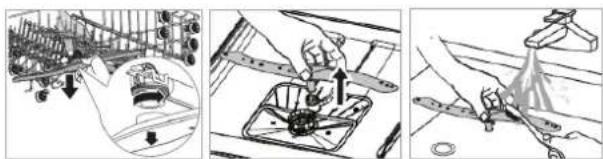
Lime and impurities from the rinsing water can block nozzles and bearings of the spray arms. Check the outlet nozzles of the spray arms regularly for blockages.
natural_image
Three-panel illustration showing mechanical assembly steps: wire connection, tool path adjustment, and tool tip (no text or symbols)- Unscrew the fastening nut of the upper spray arm and pull the arm downwards.
- Remove the lower arm upwards.
- Clean the spray arms under running water; if necessary, use a soft cleaning brush for the nozzles.
- Replace the spray arms until they audibly click into place. Tighten the nut of the upper spray arm.
Care of the dishwasher
CAUTION:
Do not use spray cleaners to clean the door panel, as they may damage the door latch and electrical components.
- Carefully clean the exterior surfaces of the appliance and the rubber door seal with a soft, damp cloth. Only use mild cleaning agents.
- To remove stains inside the appliance, use a cloth moistened with a little vinegar or a special cleaning agent for dishwashers. If necessary, add detergent and start the appliance without dishes in the program with the highest temperature.
- Thoroughly dry the outer surfaces of the appliance before putting it back into operation.
Antifreeze protection
If the appliance is out of service and exposed to temperatures below zero, contrary to our recommendation, observe the following measures:
- Disconnect the appliance from the power supply.
- Close the water supply and remove the inlet hose from the water valve.
- Drain the water from the inlet hose and the water valve.
- Remove the lid of the salt container and take out the filter system. Remove the remaining water in the sump with an absorbent sponge.
Troubleshooting
Before contacting authorized specialist
| Malfunction / cause / action |
| Appliance does not start |
| - Check the power supply.- Is the appliance switched on?- Is a program selected?- Is the water supply connected correctly, is the water supply open? |
| Water is not drained off |
| - Check the drain hose.- Are the filters or the kitchen drain blocked? |
| Noises |
| - Make sure all dishes are secured in the dishwasher. - Place items so that the spray arms can rotate freely. |
| Foaming |
| Use only special dishwasher detergent to prevent foaming. Should this occur, open the dishwasher door and allow the foam to escape. If necessary, add some cold water to the tub. Start a rinse cycle to drain the water. |
| Plates, other flatware is not clean |
| - Select a stronger program. - Make sure that the function of the spray arms is not blocked by large dishes. |
| Stains and film formation |
| - Extremely hard water. - Low inlet temperature. - Overloading, incorrect loading. - Old or damp detergent. - Incorrect detergent dosage. |
| Staining of glassware |
| Use less detergent with soft water and select the shortest rinse cycle to clean and rinse glassware. |
| Black, gray stains |
| Dishes were in contact with aluminum parts. Use a mild scouring agent to remove these stains. |
| Stains on inner pan |
| Only use cleaning agents without dyes. |
| White film inside the appliance |
| Minerals in hard water: Use a damp sponge with dishwasher detergent. Wear rubber gloves when doing so. |
| Unsatisfactory drying result |
| - Incorrect loading. - Dishes are removed too early. - Incorrect program selection. - Use of cutlery with poor coating. |
Error codes
In case of some malfunctions, the appliance displays the following error codes to warn you:
| Code | Meaning / possible cause |
| E1 | Water inlet fault! Faucet not open, inlet blocked or water pressure too low. |
| E3 | Malfunction of the heating element!Rinsing temperature is not reached. |
| E4 | Overflow / water leakage! |
| Ed | Communication error between main and display board. |
CAUTION:
- In case of water leakage, close the main valve before contacting an authorized technician.
- If there is water in the lower part of the housing due to overfilling or a small leak, remove this water before restarting the appliance.
iNOTE:
If a problem persists after following the steps above, contact your distributor or an authorized technician.
Technical data
Electrical connection / water supply......
Connection voltage: 220-240 V\~ / 50 Hz
Rated power: 1760 - 2100 W
Rated current: 10 A
Water pressure: 0.04 - 1 Mpa
Dimension H x W x D / weight.....
Unit size: 84.5 x 59.8 x 60.0 cm
Net weight: ......ca. 42.8 kg
Available accessory......
Inlet hose safety system: ....Art.-No. 8900 410
For more information about the product, scan the QR code on the supplied energy label and/or visit the official website of the product data bank:
https://eprel.ec.europa.eu
The right to make technical and design modifications during continuous product development remains reserved.
This appliance has been tested according to all relevant current CE guidelines, such as electromagnetic compatibility and low voltage directives, and has been constructed in accordance with the latest safety regulations.
Disposal
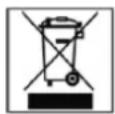
Meaning of the "dustbin" symbol
Protect our environment; do not dispose of electrical equipment in the domestic waste.
Please return any electrical equipment that you will no longer use to the collection points provided for their disposal.
This helps avoid the potential effects of incorrect disposal on the environment and human health.
This will contribute to the recycling and other forms of reutilization of electrical and electronic equipment.
Information concerning where these can be disposed of can be obtained from your local authority. Your dealer and contractual partner is also obliged to take back the old appliance free of charge.

WARNING:
Remove or disable any existing snap and bolt locks if you take the unit out of operation or dispose it.
BOMANN®
C. Bomann GmbH
www.bomann-germany.de
Made in P.R.C.

- Einleitung
- Reinigungstabletten (Tabs)
- WARNING:
- CAUTION:
- General notes
- NOTE:
- Special safety information for this unit
- Transport and packaging
- Unpacking the appliance
- i NOTE:
- Appliance equipment
- Delivery scope
- Installation
- Installation location
- Removing the appliance cover
- Adjusting the feet
- Water connection
- Notes on inlet hose safety system
- Electrical connection
- Prior using for the first time
- Water softener
- Adjusting the salt consumption
- Fill with salt
- Fill the rinse aid dispenser
- Function of rinse aid
- When to refill the rinse aid dispenser
- Fill in the rinse aid
- Adjusting the rinse aid dosage
- Fill in detergent
- Function of detergent
- Detergent
- Detergent tablets (tabs)
- Fill in the detergent
- Loading the dishwasher
- Recommendations for loading
- Methods for loading normal dishware
- Loading the upper basket
- Loading the lower basket
- Adjusting the upper basket
- WARNING: Risk of injury!
- Cutlery basket
- Cutlery rack
- Startup / Operation
- Program table
- General information!
- Operating overview
- Starting a program
- Switching off
- Unloading the dishwasher
- Energy saving tips
- Cleaning and maintenance
- Filter system
- Cleaning the filter system
- Cleaning the spray arms
- Care of the dishwasher
- Antifreeze protection
- Troubleshooting
- Before contacting authorized specialist
- Error codes
- iNOTE:
- Technical data
- Disposal
- BOMANN®
Brand : BOMANN
Model : GSP 7412 IX
Category : Dishwasher