
FinePix REAL 3D V3 - Digital photo frame FUJIFILM - Free user manual and instructions
Find the device manual for free FinePix REAL 3D V3 FUJIFILM in PDF.

| Product Type | Digital photo frame with 3D display |
| Brand | Fujifilm |
| Model | FinePix REAL 3D V3 |
| Display Size | 7.2 inches |
| Display Resolution | 800 × 600 (3D: 800 × 600 × 2 channels) |
| Number of Colors | Approx. 16.77 million |
| Aspect Ratio | 4:3 |
| Viewing Angle | 160° horizontal, 140° vertical |
| Luminosity | Approx. 340 cd/m² |
| Internal Memory | 512 MB |
| Supported Still Image Formats | 3D: MPO; 2D: JPEG |
| Supported Movie Formats | 3D: AVI (Motion JPEG, 2 channels); 2D: AVI (Motion JPEG) |
| Supported Audio Formats | WAV (Linear PCM) |
| Memory Card Slot | SD/SDHC |
| Interfaces | HDMI (type A), mini-B USB, type A USB |
| Dimensions (W × H × D) | Approx. 188.8 × 153.5 × 28.2 mm (excluding stand) |
| Weight | Approx. 415 g (including stand) |
| Power Supply | AC 100–240 V, 50/60 Hz via supplied AC adapter |
| Power Consumption | Max. approx. 14 W; approx. 8 W in normal use |
| 3D Technology | Lenticular sheet (no glasses required) |
| Slide Show Effects | 12 transition effects (3D and 2D) |
| Remote Control Battery | CR2025 (included) |
| Cleaning | Unplug and wipe with damp cloth; do not use liquid cleaners |
| Safety | Use only specified AC adapter; avoid water; do not disassemble |
Frequently Asked Questions - FinePix REAL 3D V3 FUJIFILM
User questions about FinePix REAL 3D V3 FUJIFILM
0 question about this device. Answer the ones you know or ask your own.
Ask a new question about this device
Download the instructions for your Digital photo frame in PDF format for free! Find your manual FinePix REAL 3D V3 - FUJIFILM and take your electronic device back in hand. On this page are published all the documents necessary for the use of your device. FinePix REAL 3D V3 by FUJIFILM.
USER MANUAL FinePix REAL 3D V3 FUJIFILM
Thank you for your purchase of this product. This manual describes how to use your FUJIFILM FinePix REAL 3D V3 digital viewer. Be sure that you have read and understood its contents before using the viewer.
natural_image
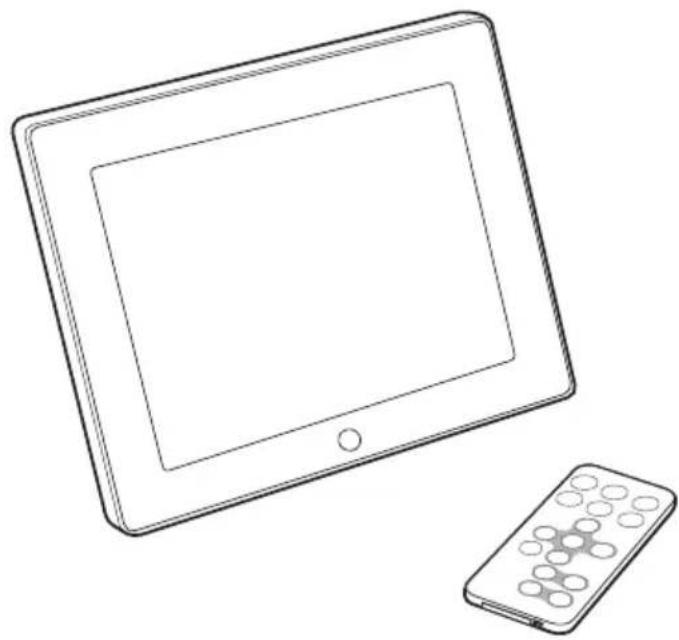
Line drawing of a tablet and remote control device (no text or symbols)For information on related products, visit our website at http://www.fujifilm.com/products/index.html
Before You Begin
First Steps
Viewing Pictures
Other Options
Troubleshooting
Appendix
FUJIFILM Worldwide Network
IMPORTANT SAFETY INSTRUCTIONS
- Read Instructions: All the safety and operating instructions should be read before the appliance is operated.
- Retain Instructions: The safety and operating instructions should be retained for future reference.
- Heed Warnings: All warnings on the appliance and in the operating instructions should be adhered to.
- Follow Instructions: All operating and use instructions should be followed.
Installation
Power Sources: This video product should be operated only from the type of power source indicated on the marking label. If you are not sure of the type of power supply to your home, consult your appliance dealer or local power company. For video products intended to operate from battery power, or other sources, refer to the operating instructions.
Grounding or Polarization: This video product is equipped with a polarized alternating-current line plug (a plug having one blade wider than the other). This plug will fi t into the power outlet only one way. This is a safety feature. If you are unable to insert the plug fully into the outlet, try reversing the plug. If the plug should still fail to fi t, contact your electrician to replace your obsolete outlet. Do not defeat the safety purpose of the polarized plug.
Alternate Warnings: This video product is equipped with a three-wire grounding-type plug, a plug having a third (grounding) pin. This plug will only fit into a grounding-type power outlet. This is a safety feature. If you are unable to insert the plug into the outlet, contact your electrician to replace your obsolete outlet. Do not defeat the safety purpose of the grounding type plug.
Overloading: Do not overload wall outlets and extension cords as this can result in a risk of fire or electric shock.
Ventilation: Slots and openings in the cabinet are provided for ventilation, to ensure reliable operation of the video product and to protect it from overheating, and these openings must not be blocked or covered. The openings should never be blocked by placing the video product on a bed, sofa, rug, or other similar surface.
This video product should not be placed in a built-in installation such as a bookcase or rack unless proper ventilation is provided or the manufacturer's instructions have been adhered to. This video product should never be placed near or over a radiator or heat register.
Attachments: Do not use attachments not recommended by the video product manufacturer as they may cause hazards.
Water and Moisture: Do not use this video product near water—for example, near a bath tub, wash bowl, kitchen sink, or laundry tub, in a wet basement, or near a swimming pool, and the like (excluding waterproof products).
Power-Cord Protection: Power-supply cords should be routed so that they are not likely to be walked on or pinched by items placed upon or against them, paying particular attention to cords at plugs, convenience receptacles, and the point where they exit from the appliance.
Accessories: Do not place this video product on an unstable cart, stand, tripod, bracket, or table. The video product may fall, causing serious injury to a child or adult, and serious damage to the appliance. Use only with a cart, stand, tripod, bracket, or table recommended by the manufacturer, or sold with the video product. Any mounting of the appliance should follow the manufacturer's instructions, and should use a mounting accessory recommended by the manufacturer.
An appliance and cart combination should be moved with care. Quick stops, excessive force, and un-even surfaces may cause the appliance and cart combination to overturn.

Antennas
Outdoor Antenna Grounding: If an outside antenna or cable system is connected to the video product, be sure the antenna or cable system is grounded so as to provide some protection against voltage surges and built-up static charges. Section 810 of the National Electrical Code, ANSI/NFPA No. 70, provides information with respect to proper grounding of the mast and supporting structure, grounding of the lead-in wire to an antenna discharge unit, size of grounding conductors, location of antenna discharge unit, connection to grounding electrodes, and requirements for the grounding electrode.
EXAMPLE OF ANTENNA GROUNDING AS PER NATIONAL ELECTRICAL CODE
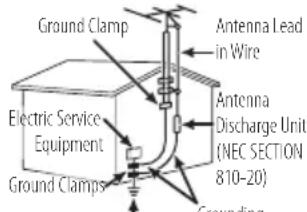
Power Service Grounding Electrode System (NEC ART 250, PART H) Conductors (NEC SECTION 810-21)
Power Lines: An outside antenna system should not be located in the vicinity of overhead power lines or other electric light or power circuits, or where it can fall into such power lines or circuits. When installing an outside antenna system, extreme care should be taken to keep from touching such power lines or circuits as contact with them might be fatal.
Use
Cleaning: Unplug this video product from the wall outlet before cleaning. Do not use liquid cleaners or aerosol cleaners. Use a damp cloth for cleaning.
Object and Liquid Entry: Never push objects of any kind into this video product through openings as they may touch dangerous voltage points or short out parts that could result in a fire or electric shock. Never spill liquid of any kind on the video product (excluding waterproof products).
Lightning: For added protection for this video product receiver during a lightning storm, or when it is left unattended and unused for long periods of time, unplug it from the wall outlet and disconnect the antenna or cable system. This will prevent damage to the video product due to lightning and power-line surges.
Service
Servicing: Do not attempt to service this video product yourself as opening or removing covers may expose you to dangerous voltage or other hazards. Refer all servicing to qualified service personnel.
Damage Requiring Service: Unplug this video product from the wall outlet and refer servicing to qualified service personnel under the following conditions:
- When the power-supply cord or plug is damaged.
- If liquid has been spilled, or objects have fallen into the video product.
• If the video product has been exposed to rain or water (excluding waterproof products). - If the video product has been dropped or the cabinet has been damaged.
If the video product does not operate normally follow the operating instructions. Adjust only those controls that are covered by the operating instructions as an improper adjustment of other controls may result in damage and will often require extensive work by a qualified technician to restore the video product to its normal operation.
When the video product exhibits a distinct change in performance—this indicates a need for service.
Replacement Parts: When replacement parts are required, be sure the service technician has used replacement parts specified by the manufacturer or have the same characteristics as the original part. Unauthorized substitutions may result in fire, electric shock or other hazards.
Safety Check: Upon completion of any service or repairs to this video product, ask the service technician to perform safety checks to determine that the video product is in proper operating condition.
Be sure to read these notes before use
SafetyNotes
• Make sure that you use your product correctly. Read these safety notes and your Owner's Manual carefully before use.
• After reading these safety notes, store them in a safe place.
About the Icons
The icons shown below are used in this document to indicate the severity of the injury or damage that can result if the information indicated by the icon is ignored and the product is used incorrectly as a result.

WARNING

CAUTION
This icon indicates that death or serious injury can result if the information is ignored.
This icon indicates that personal injury or material damage can result if the information is ignored.
The icons shown below are used to indicate the nature of the instructions which are to be observed.


Triangular icons tell you that this information requires attention ("Important").
Circular icons with a diagonal bar tell you that the action indicated is prohibited ("Prohibited").
Filled circles with an exclamation mark indicate an action that must be performed ("Required").

WARNING

Unplug from power socket
If a problem arises, turn the device off and disconnect and unplug the AC power adapter. Continued use of the device when it is emitting smoke, is emitting any unusual odor, or is in any other abnormal state can cause a fire or electric shock. Contact your FUJIFILM dealer.

Avoid exposure to water
Do not allow water or foreign objects to enter the device. If water or foreign objects get inside the device, turn the device off and disconnect and unplug the AC power adapter. Continued use of the device can cause a fire or electric shock. Contact your FUJIFILM dealer.

Do not use in the bathroom or shower
Do not use the device in the bathroom or shower. This can cause a fire or electric shock.

Do not disassemble
Never attempt to change or take apart the device. (Never open the casing.) This can cause a fire or electric shock.

Do not touch internal parts
Should the case break open as the result of a fall or other accident, do not touch the exposed parts. Failure to observe this precaution could result in electric shock or in injury from touching the damaged parts. Disconnect the AC power adapter immediately, taking care to avoid injury or electric shock, and take the product to the point of purchase for consultation.

Do not change, heat or unduly twist or pull the connection cord and do not place heavy objects on the connection cord. These actions could damage the cord and cause a fire or electric shock. If the cord is damaged, contact your FUJIFILM dealer.

Do not place the device on an unstable surface. This can cause the device to fall or tip over and cause injury.

Never attempt to view pictures while in motion. Do not use the device while you are walking or driving a vehicle. This can result in you falling down or being involved in a traffic accident.

Do not touch any metal parts of the device during a thunderstorm. This can cause an electric shock due to induced current from the lightning discharge.

Do not use the battery except as specified. Load the battery as shown by the indicator.

WARNING

Do not heat, change or take apart the battery. Do not drop or subject the battery to impacts. Do not store the battery with metallic products. Any of these actions can cause the battery to burst or leak and cause fire or injury as a result.

Use only the AC power adapters specified for use with this device. Do not use voltages other than the power supply voltage shown. The use of other power sources can cause a fire.

If the battery leaks and fluid gets in contact with your eyes, skin or clothing, flush the affected area with clean water and seek medical attention or call an emergency number right away.

When carrying the battery, install it in the remote control or keep it in a plastic case. When storing the battery, keep it in a plastic case. When discarding, cover the battery terminals with insulation tape. Contact with other metallic objects or batteries could cause the battery to ignite or burst.

Keep memory cards and USB memory out of the reach of small children. These small devices are easily swallowed and should be kept out of reach of small children. If a child swallows a storage device, seek medical attention or call an emergency number.

CAUTION

Do not use in the presence of steam or fl ammable gas or (with the exception of waterproof products) in locations exposed to high levels of humidity or dust. This can cause a fire or electric shock.

Do not leave this device in places subject to extremely high temperatures. Do not leave the device in locations such as a sealed vehicle or in direct sunlight. This can cause a fire.

Keep out of the reach of small children. This product could cause injury in the hands of a child.

Do not place heavy objects on the device. This can cause the heavy object to tip over or fall and cause injury.

Do not move the device while the AC power adapter is still connected. Do not pull on the connection cord to disconnect the AC power adapter. This can damage the power cord or cables and cause a fire o electric shock.

Do not cover or wrap the device or the AC power adapter in a cloth or blanket. This can cause heat to build up and distort the casing or cause a fire.

When you are cleaning the device or you do not plan to use the device for an extended period, disconnect and unplug the AC power adapter. Failure to do so can cause a fire or electric shock.

When a memory card is removed, the card could come out of the slot too quickly. Use your finger to hold it and gently release the card.

Request regular internal testing and cleaning for the device. Build-up of dust in the device can cause a fire or electric shock. Contact your FUJIFILM dealer to request internal cleaning every two years. Please note that this service is not free of charge.
The Battery and Power Supply
Button Batteries
- Do not immerse in or expose to water.
- Cease use immediately should you notice leakage, deformation, discoloration, or other abnormalities.
- Insert in the correct orientation.

in the unlikely event of the battery leaking, remove any liquid from the battery chamber and insert a fresh battery.
AC Power Adapters
Use only FUJIFILM AC power adapters designated for use with this device. Other adapters could damage the device.
- The AC power adapter is for indoor use only.
- Be sure the DC plug is securely connected to the device.
- Turn the device off before disconnecting the adapter. Disconnect the adapter by the plug, not the cable.
- Do not use with other devices.
- Do not disassemble.
- Do not expose to high heat and humidity.
- Do not subject to strong physical shocks.
- The AC power adapter may hum or become hot to the touch during use. This is normal.
- If the AC power adapter causes radio interference, reorient or relocate the receiving antenna.
Using the Device
Electrical Interference
This device may interfere with hospital or aviation equipment. Consult with hospital or airline staff before using the device in a hospital or on an aircraft.
Liquid Crystal
In the event that the monitor is damaged, care should be taken to avoid contact with liquid crystal. Take the urgent action indicated should any of the following situations arise:
- If liquid crystal comes in contact with your skin, clean the area with a cloth and then wash thoroughly with soap and running water.
- If liquid crystal enters your eyes, flush the affected eye with clean water for at least 15 minutes and then seek medical assistance.
- If liquid crystal is swallowed, rinse your mouth thoroughly with water. Drink large quantities of water and induce vomiting, then seek medical assistance.
NOTICES
To prevent fire or shock hazard, do not expose the unit to rain or moisture.
Please read the "Safety Notes" (iii) and make sure you understand them before using the device.
Perchlorate Material—special handling may apply. See http://www.dtsc.ca.gov/hazardouswaste/perchlorate.
For Customers in the U.S.A.
Tested To Comply With FCC Standards
FOR HOME OR OFFICE USE
FCC Statement
This device complies with Part 15 of the FCC Rules. Operation is subject to the following two conditions: (1) This device may not cause harmful interference, and (2) this device must accept any interference received, including interference that may cause undesired operation.
CAUTION
This equipment has been tested and found to comply with the limits for a Class B digital device, pursuant to Part 15 of the FCC Rules. These limits are designed to provide reasonable protection against harmful interference in a residential installation. This equipment generates, uses, and can radiate radio frequency energy and, if not installed and used in accordance with the instructions, may cause harmful interference to radio communications. However, there is no guarantee that interference will not occur in a particular installation. If this equipment does cause harmful interference to radio or television reception, which can be determined by turning the equipment off and on, the user is encouraged to try to correct the interference by one or more of the following measures:
- Reorient or relocate the receiving antenna.
- Increase the separation between the equipment and receiver.
- Connect the equipment into an outlet on a circuit different from that to which the receiver is connected.
- Consult the dealer or an experienced radio/TV technician for help.
You are cautioned that any changes or modifications not expressly approved in this manual could void the user's authority to operate the equipment.
Notes on the Grant
To comply with Part 15 of the FCC Rules, this product must be used with a FUJIFILM-specified ferrite-core A/V cable, USB cable, and DC supply cord.
For Customers in Canada
CAUTION: This Class B digital apparatus complies with Canadian ICES-003.
EC Declaration of Conformity
We
Name: FUJIFILM Electronic Imaging Europe GmbH
Address: Benzstrasse 2, 47533 Kleve, Germany
declare that the product
Product Name: FUJIFILM DIGITAL VIEWER FINEPIX REAL 3D V3
Manufacturer's Name: FUJIFILM Corporation
Manufacturer's Address: 7-3, AKASAKA 9-CHOME, MINATO-KU, TOKYO 107-0052 JAPAN
conforms to the following Standards:
Safety: EN60950-1: 2006 + A11: 2009
EMC: EN55022: 2006 + A1: 2007 Class B
EN55024:1998+A1:2001+A2:2003
EN61000-3-2:2006
EN61000-3-3:2008
following the provision of the EMC Directive (2004/108/EC) and Low Voltage Directive (2006/95/EC).

Kleve, Germany October 1, 2011

Place Date Signature, Managing Director
Disposal of Electrical and Electronic Equipment in Private Households
Disposal of Used Electrical and Electronic Equipment (Applicable in the European Union, Norway, Iceland and Liechtenstein)

This symbol on the product, or in the manual and in the warranty, and/or on its packaging indicates that this product shall not be treated as household waste. Instead it should be taken to an applicable collection point for the recycling of electrical and electronic equipment.
By ensuring this product is disposed of correctly, you will help prevent potential negative consequences to the environment and human health, which could otherwise be caused by inappropriate waste handling of this product.

This symbol on the batteries or accumulators indicates that those batteries shall not be treated as household waste. If your equipment contains easy removable batteries or accumulators please dispose these separately according to your local requirements.
The recycling of materials will help to conserve natural resources. For more detailed information about recycling this product, please contact your local city office, your household waste disposal service or the shop where you purchased the product.
In Countries Outside the European Union, Norway, Iceland and Liechtenstein
If you wish to discard this product, including the batteries or accumulators, please contact your local authorities and ask for the correct way of disposal.
Notes on Copyright
Unless intended solely for personal use, images displayed on your digital viewer cannot be used in ways that infringe copyright laws without the consent of the owner. Note that some restrictions apply to the photographing of stage performances, entertainments, and exhibits, even when intended purely for personal use. Users are also asked to note that the transfer of storage devices containing images or data protected under copyright laws is only permissible within the restrictions imposed by those copyright laws.
Trademark Information
xD-Picture Card is a trademark of FUJIFILM Corporation. Microsoft, Windows, the Windows logo, Windows 7, Windows Vista and the Windows Vista logo are trademarks or registered trademarks of Microsoft Corporation in the United States and/or other countries. "Windows" is an abbreviation used in reference to the Microsoft Windows operating system. Adobe and Adobe Reader are either trademarks or registered trademarks of Adobe Systems Incorporated in the U.S.A. and/or other countries. SD, miniSD, microSD, SDHC, miniSDHC, and microSDHC are trademarks. The SDHC logo is a trademark of SD-3C, LLC. The HDMI logo is a trademark. All other trade names mentioned in this manual are the trademarks or registered trademarks of their respective owners.
Note: The "Designed for Microsoft® Windows® XP" and CERTIFIED FOR Windows Vista™ logos apply only to the viewer and viewer hardware driver.
Table of Contents
For Your Safety ...... ii
IMPORTANT SAFETY INSTRUCTIONS .....ii
Safety Notes ....iii
NOTICES iv
Before You Begin 1
Viewing 3D Images ....1
Getting Started 2
Symbols and Conventions......2
Package Contents......2
Parts of the Digital Viewer 3
Parts of the Remote Control 4
First Steps 5
Readying the Remote Control ....5
Replacing the Battery......6
Adjusting the Stand 7
Turning the Viewer On 8
Turning the Viewer Off 8
Basic Setup 9
Viewing Pictures 11
External Storage Devices 11
SD/SDHC Memory Cards....11
USB Storage Devices.... 11
Displaying Selected Images 12
Slide Shows 14
Slide Show Options....14
Viewing 3D Images 15
Viewing Movies 16
Other Options 17
The Clock Calendar 17
Copying and Deleting Files 18
Deleting Files 18
Copying Files....18
The Setup Menu 19
Setup Menu Options 19
Connecting the Viewer to a Computer ..... 21
Connecting the Viewer to an HDMI Device...22
Troubleshooting 23
Troubleshooting 23
Appendix 25
Specifications 25
Movie Files 26
Storage Devices 26
FUJIFILM Worldwide Network 27
Before You Begin
Viewing 3D Images
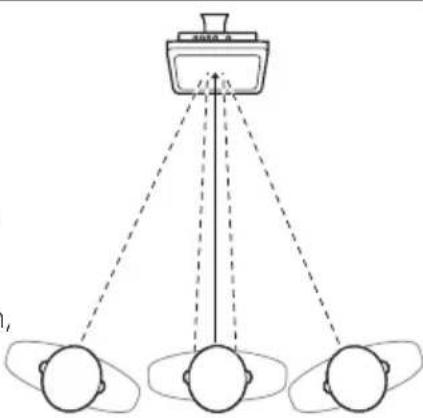
The FinePix REAL 3D V3 displays 3D photographs taken with cameras such as the FinePix REAL 3DW3 (15). 3D images are best viewed from a position directly in front of the screen (or, if more than one person is present, slightly to one side) at a distance of about 40 to 50 cm (1.3 to 1.6 ft).
The optimal viewing distance varies from person to person, and may change with changes in location and temperature. This is not a malfunction.
natural_image
Diagram of a three-person radar or vision system with a central axis and three head-mounted sensors (no text or labels)
3D Display
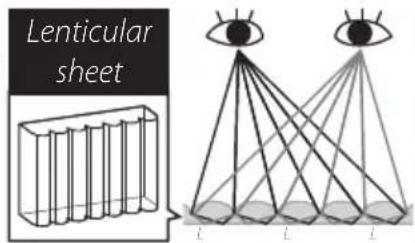
The FinePix REAL 3D V3 uses a lenticular display covered with a sheet of small convex lenses that present different images to each eye, allowing you to view pictures in 3D without using 3D glasses. Flicker and cross-talk are reduced for a bright, easy-to-view screen.
When 3D photographs are viewed through a lenticular sheet, the left eye sees only the left image and the right eye only the right image, creating a 3D effect.
Do not view 3D display if you have a history of photosensitive or other epilepsy, heart disease, or have other existing, serious medical conditions.
Do not view 3D display if you are suffering from fatigue, insomnia, the affects of alcohol, or are pregnant.
① Should you experience fatigue or discomfort while viewing 3D images, refrain from continued viewing.
① A ten-minute break is recommended about once every half hour while viewing 3D images, or more frequently when using common blue and red anaglyph 3D glasses.
① If 3D images on LCD appear double, then adjust the camera parallax.
① 3D viewing is not recommended for young children (especially age six and under), because their eyes may be very sensitive and 3D viewing may affect the eye's growth process. Children should be supervised by parents or adult when viewing in 3D.
① HDMI devices should be viewed from a distance equal to at least twice the width of the screen to reduce the risk of adverse effects on vision.
① Individuals with notable differences in vision between their two eyes may find it difficult or impossible to observe the 3D effect unless corrective lenses are used.
Getting Started
Before using the FinePix REAL 3D V3 digital viewer, read the warnings (📖 ii) and take a few minutes to familiarize yourself with the terms and conventions used in this manual. For information on specific topics, consult the sources below.
√ Table of Contents ...... vi
The "Table of Contents" gives an overview of the entire manual. The principal digital viewer operations are listed here.
√ Troubleshooting...... 23
Having a specific problem with the digital viewer? Find the answer here.
Symbols and Conventions
The following symbols are used in this manual:
① This information should be read before use to ensure correct operation.
Additional information that may be helpful when using the device.
Other pages in this manual on which related information may be found.
Menus and other text in the display are shown in bold. In the illustrations in this manual, the display may be simplified for explanatory purposes.
Package Contents
Before using the viewer confirm that the package contains these items:

natural_image
Simple gray rectangular frame with a white center, no text or symbols present.FinePix REAL 3D V3 digital viewer

Remote control
(ships with battery installed)
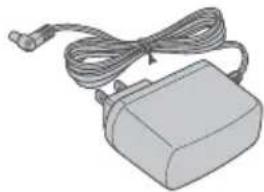
natural_image
Illustration of a gray rectangular device with a coiled cable and connector, no text or symbols visible.AC power adapter (shape varies with country or region of sale)
- USB cable
- Warranty
- Owner's Manual (this manual)
Compatible Storage Devices
This product supports SD, SDHC, and USB storage devices (26), referred to in this manual as "storage devices."
Parts of the Digital Viewer
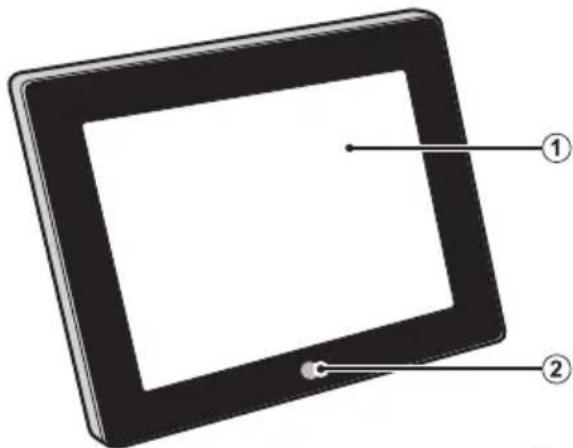
natural_image
Illustration of a tablet device with labeled parts (no text or symbols on the screen)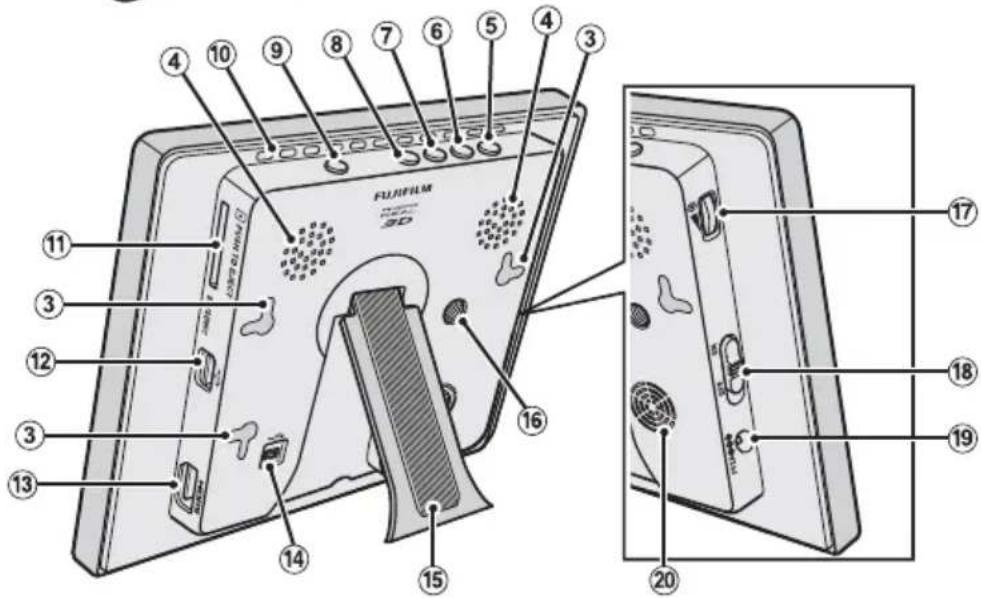
| Part | ||
| 1 | Display — | |
| 2 | Infrared receiver 5 | |
| 3 | Wall hooks 7 | |
| 4 | Stereo speakers — | |
| 5 | ◄ button 9 | |
| 6 | OK button 9 | |
| 7 | ► button 9 | |
| 8 | BACK button 9 | |
| 9 | MENU button 10 | |
| 10 | Vents — |
| Part | 目 | |
| 11 | Memory card slot 11 | |
| 12 | USB connector for storage devices 11 | |
| 13 | HDMI connector (type A) | 22 |
| 14 | Mini-B USB connector | 21 |
| 15 | Stand | 7 |
| 16 | Tripod mount | 7 |
| 17 | Brightness control | 22 |
| 18 | Power switch | 8 |
| 19 | Connector for AC power adapter | 8 |
| 20 | Cooling fan | — |
① The cooling fan turns on automatically as required. The motor may be audible while the fan is running.
Parts of the Remote Control
Buttons with the same names as those on the digital viewer perform the same functions. Unless otherwise noted, the descriptions in this manual refer to the controls on the remote.
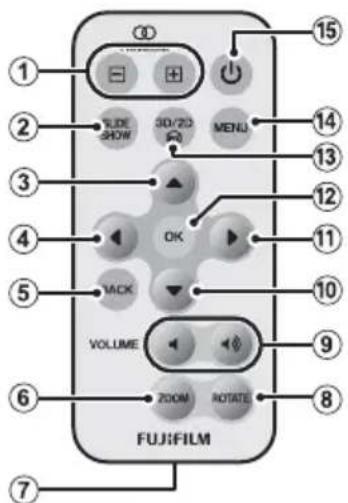
| Part | ||
| 1 | ○○ PARALLAX (⊕/⊖) buttons | 15 |
| 2 | SLIDE SHOW button 14 | |
| 3 | ▲ button 9 | |
| 4 | ◀ button 9 | |
| 5 | BACK button 9 | |
| 6 | ZOOM button 13 | |
| 7 | Battery holder 6 | |
| 8 | ROTATE button 13 |
| Part | ||
| 9 | VOLUME (//·) buttons 16 | |
| 10 | ▼ button 9 | |
| 11 | ▶ button 9 | |
| 12 | OK button 9 | |
| 13 | 3D/2D button 15 | |
| 14 | MENU button 10 | |
| 15 | (power) button 8 |
First Steps
Readying the Remote Control
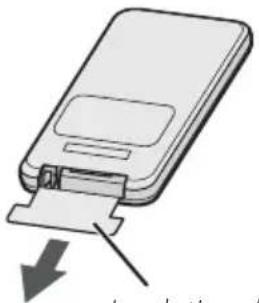
A battery is inserted in the remote control at shipment. Before using the remote control, remove the plastic insulating sheet from the battery chamber.
The battery supplied with the remote control is intended for trial use only. Replace the battery (6) if the remote control does not function as expected.
natural_image
Diagram of a device with a download arrow and label (no readable text or symbols)Insulating sheet

Using the Remote
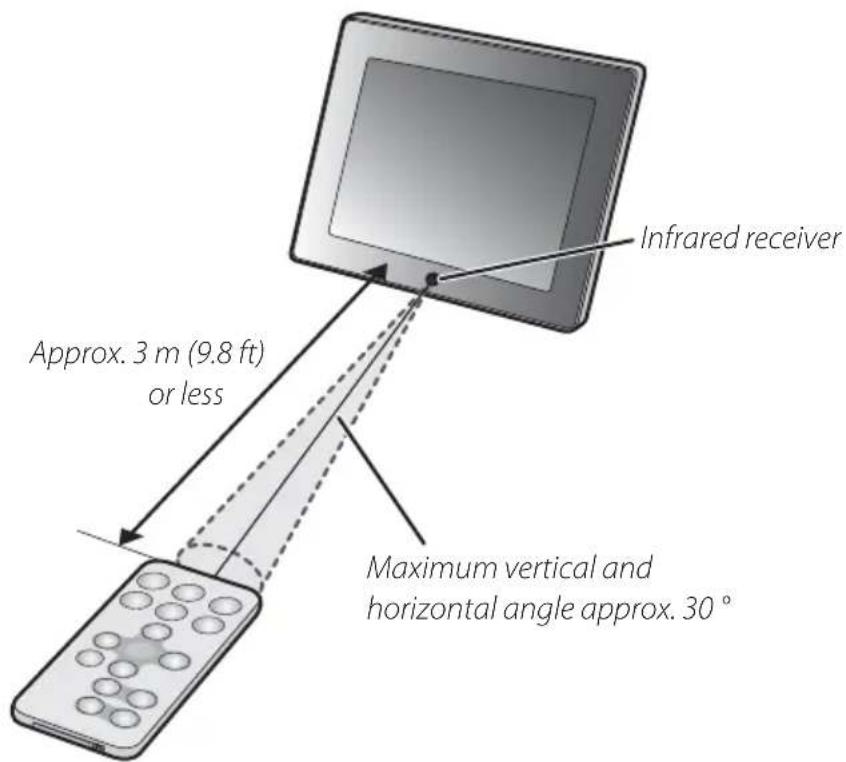
Point the remote at the infrared receiver on the digital viewer.
Replacing the Battery
If the remote control does not function as expected, replace the battery with a fresh CR2025 battery (available separately from third-party suppliers).
1 Turn the remote control over and remove the battery holder.
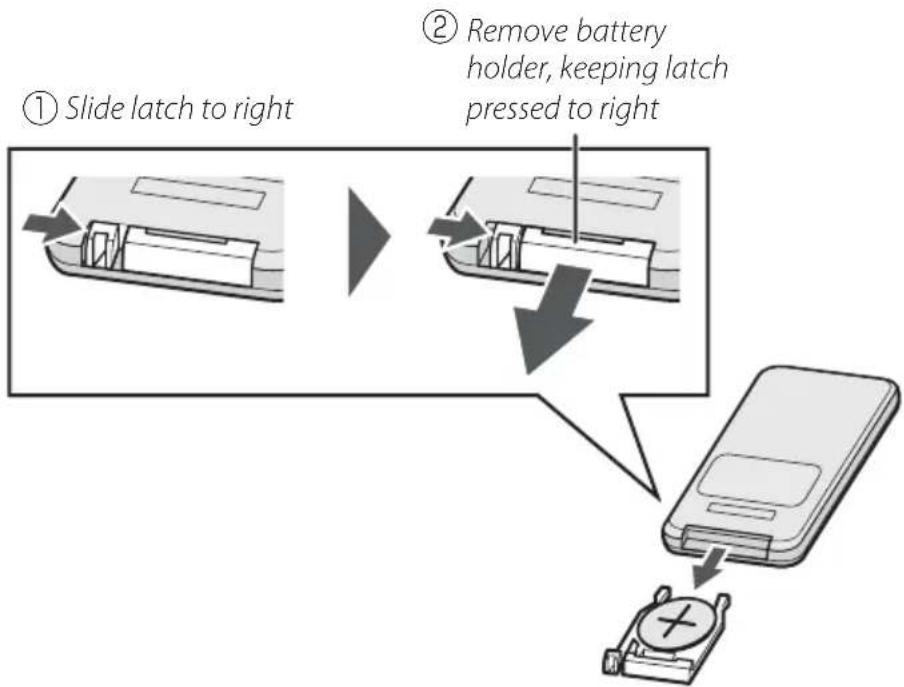
flowchart
graph TD
    A["① Slide latch to right"] --> B["② Remove battery holder, keeping latch pressed to right"]
    B --> C["③ Screen with battery holder and switch"]
2 Remove the old battery from the holder and insert a fresh battery as shown, with the "+" indicator uppermost.
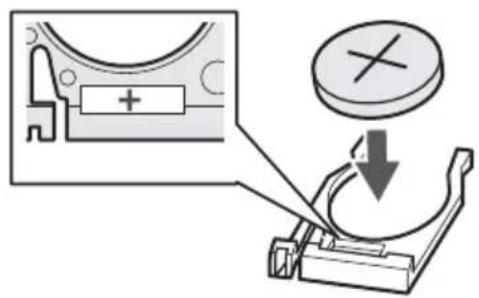
①Insert the battery in the correct orientation.
3 Slide the holder into the remote control until the latch clicks into place.

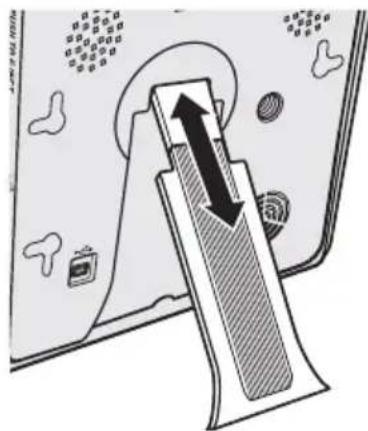
Adjusting the Stand
Extend the stand and adjust it for ease of viewing.
1 Extend the stand.
The viewer can be placed in tall orientation for 2D viewing, but must be in wide orientation to provide a 3D effect with 3D images.
The viewer can also be mounted on a tripod.

natural_image
Illustration of a mechanical device with a striped component and surrounding components (no text or symbols)2 Adjust the stand for ease of viewing.

Using a Tripod
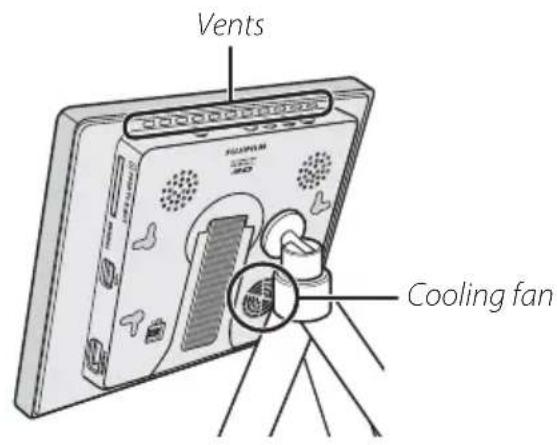
Mount the viewer on a tripod for greater freedom in choosing the height and angle. Choose a tripod sturdy enough to support the viewer and attach it as shown below on the left.
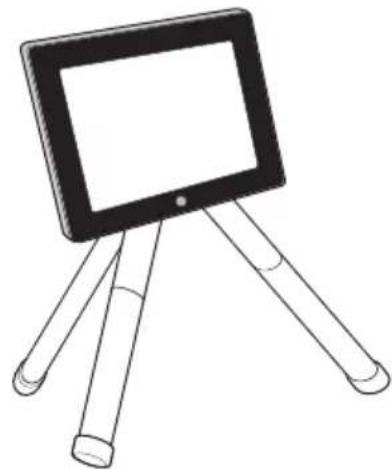
natural_image
Line drawing of a tablet device with three legs and a blank screen (no text or symbols)① When using a tripod or the wall hook, be sure not to block the vents and cooling fan. If abnormally high temperatures are detected due to a build up of heat, the viewer will shut down automatically.
① To ensure that the tripod does not fall over or collapse, choose a firm, level location and be sure the tripod is stable and that the legs and tripod head are secure.
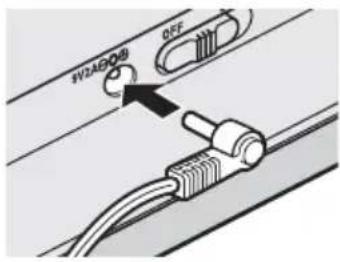
Turning the Viewer On
Connect the supplied AC power adapter and turn the viewer on.
1 Connect the AC power adapter to the viewer as shown and then plug the adapter into a power outlet.
① Use only the supplied AC power adapter. Do not use the viewer with other power adapters.
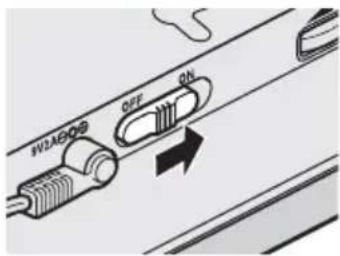
2 Slide the power switch to ON. A welcome screen will be displayed and then a product demonstration slide show will begin.

The Product Demonstration Slide Show
The viewer ships with a slide show in internal memory consisting of demo images illustrating some of the product's key features and accompanied by a background track, which starts automatically when the viewer is turned on (if an external storage device is detected, the viewer will instead display the images on the device; if devices are found both in the card slot and plugged into the USB port, the viewer will display the images on the device in the card slot). The images in the demo slide show can be deleted when the camera is connected to a computer (21).
① The images and music in the demonstration slide show are deleted when internal memory is formatted using the System Setup > Format option in the setup menu (☐ 19). If you wish to keep a copy of the slide show, copy the images and music to a computer before formatting internal memory (☐ 21).
Turning the Viewer Off
To turn the viewer off, slide the power switch to OFF.
The On/Off Timer Setting option in the setup menu can be used to automatically activate and deactivate the display (☐ 20).

Using the Remote Control ⏻ (Power) Button
The viewer will not respond to the ⏻ button on the remote control when the power switch is in the OFF position. When the power switch is in the ON position, the ⏻ button can be used to turn the display on and off.
BasicSetup
Before using the viewer for the first time, choose a language and set the clock. Setting the clock to the correct time and date makes it possible to use the calendar (17), on/off timer (20), and alarm (17).
1 Press MENU to display the main menu (☐ 10).
2 Press ▲, ▼, ◀, or ▶ to highlight Setup and press OK.
3 Press ▲ or ▼ to highlight System Setup and press OK.
4 Press ▲ or ▼ to highlight 言語/LANG. and press OK to display the options shown on the right.
5 Press ▲ or ▼ to highlight the desired language and press OK, and then press BACK to return to the system setup menu.
6 Press ▲ or ▼ to highlight Date/Time Setting and press OK to display the options shown on the right.


7 Press ◀ or ▶ to highlight the year, month, day, hour, or minute and press ▲ or ▼ (or, if you are using the controls on the viewer, MENU) to change. Press OK to return to the system setup menu when settings are complete.
8 Press BACK to exit to the main menu.
The current date and time can be displayed by selecting On for Clock Display in the setup menu (19).
① The clock will be reset if the viewer is without power for an extended period.

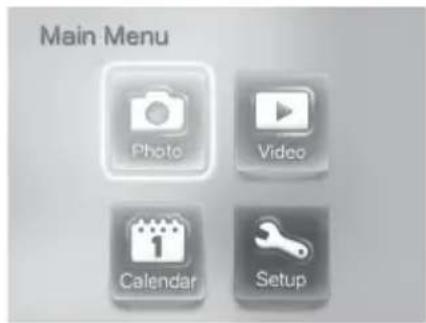
The Main Menu
Pressing the MENU button when the viewer is on displays the main menu, which contains the options listed below. Highlight options using ▲, ▼, ◀, or ▶ and press OK to select.
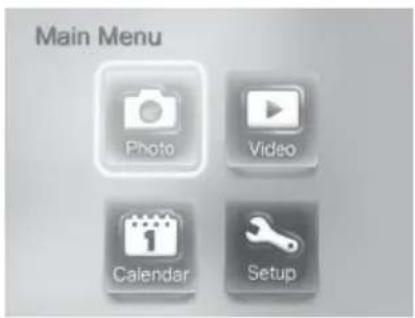
| Option | Description | Displays |
 Photo Photo | View photos and slide shows (12). | 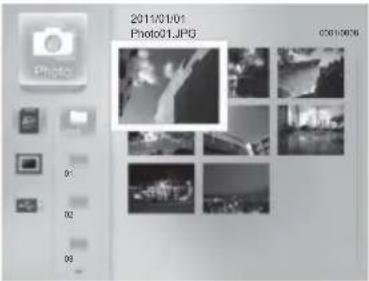 Photo list Photo list |
 Video Video | View movies (16). | 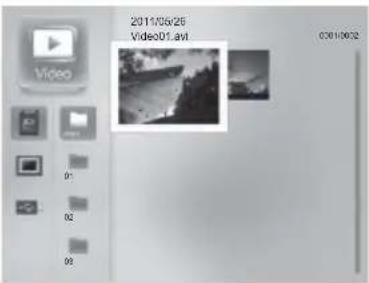 Video list Video list |
 Calendar Calendar | View the clock calendar (17). |  Calendar Calendar |
 Setup Setup | Adjust settings (19). | 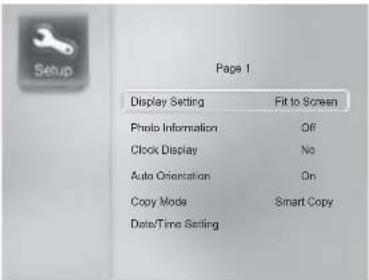 Setup menu Setup menu |
Viewing Pictures
External Storage Devices
The viewer supports the storage devices listed on page 26 and the file types listed on page 25. Before using external storage devices in the viewer, be sure to copy any important files to a computer.
① When inserting a memory card or connecting a USB storage device, be sure the device is in the correct orientation; do not insert it at an angle or use force. If you are using the stand or have the viewer mounted on a tripod, steady the viewer to prevent damage that could result were it to fall over.
① Turn the viewer off before removing external storage devices. Files could be corrupted if the viewer is on when storage devices are removed.
The viewer may be unable to display files that have been modified on a computer.
SD/SDHC Memory Cards
To insert a memory card, hold it in orientation shown by the indicator next to the memory card slot and slide it in until it clicks into place.
① Be sure the card is in the correct orientation. Inserting a card upside down or backwards could prevent it being removed and result in damage to the card or viewer. ①The viewer does not support SDXC cards.
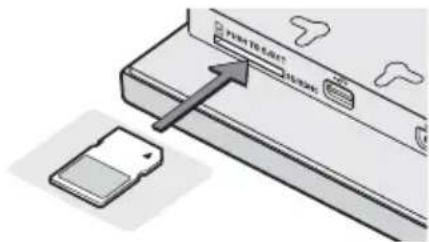
SD/SDHC memory cards
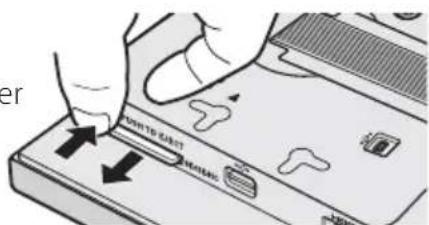
Removing Memory Cards
Gently press the card in, and release it slowly.
①The memory card may spring out if you remove your finger immediately after pushing the card in.
USB Storage Devices
Plug the device into the USB connector for storage devices.
①Commercially-available USB storage devices may not function as expected.
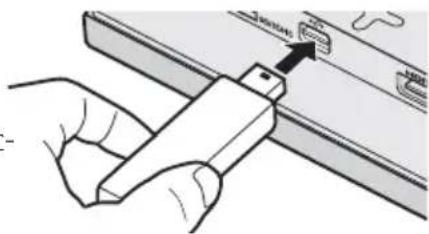
natural_image
Illustration of a hand holding a tool interacting with a device panel (no text or symbols visible)USB storage device

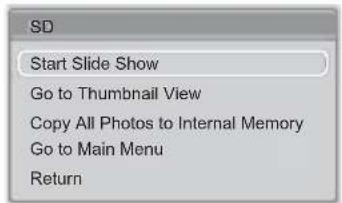
The External Storage Device Pop-up Menu
The options shown on the right are displayed if a memory card is inserted or a USB storage device is connected while the viewer is on. Press ▲ or ▼ to highlight an option and press OK to select.
To view still images stored in internal memory or on an external storage device:
1 Select Photo in the main menu.
The main menu can be displayed by pressing the MENU button (10) or by selecting Go to Main Menu in the external storage device pop-up menu (11).
The photo list will be displayed.
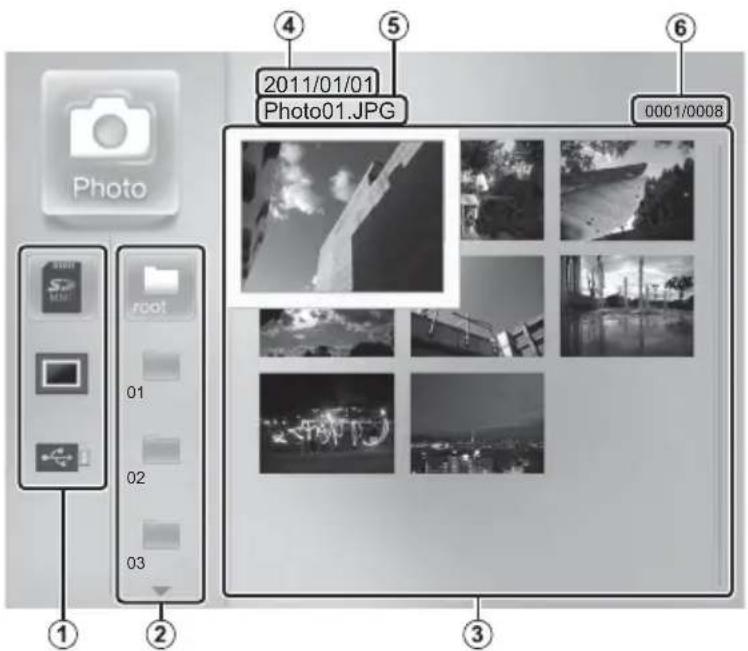
1 Device list: A list of the currently available devices that contain images in supported formats (图 25).
: SD/SDHC memory card : Internal memory : USB storage device
2 Folder list: A list of the folders on the device selected in the device list that contain images in supported formats.
3 Photo list: A list of the images in the folder selected in the folder list. By default, images are listed in ascending order by file name; the order can be changed using the System Setup > Sort by option in the setup menu (19).
4 Date modified: The date on which the current image was last modified.
5 File name: The file name of the image currently selected in the photo list.
6 File number/total files: The position of the image currently selected in the photo list and the total number of files in the current folder.
2 Press ▲ or ▼ to highlight a device in the device list (①) and press OK to view the folders it contains (②).
3 Press ▲ or ▼ to highlight a folder and press OK to view the photos it contains (③).
4 Press ▲, ▼, ◀, or ▶ to highlight an image and press OK to view it full frame.
Press BACK at any time to return to the previous step.
The following operations can be performed when an image is displayed full frame:
- To view the pictures in the selected folder as a slide show (14), press OK
• To return to the photo list, press BACK - To view other images, press ◀ or ▶
• To zoom in or out, press ZOOM - To rotate the current image, press ROTATE (2D photographs only; note that the image will appear in its original orientation the next time it is displayed)
- To adjust parallax (3D photographs only; 15), press the 📄 PARALLAX buttons
- To view all the pictures on the current device in a slide show (14), press SLIDE SHOW
- To switch between 3D and 2D display (3D photographs only; 15), press 3D/2D
SlideShows
Follow the steps below to view the pictures on a selected device as a slide show. Note that parallax can not be adjusted during slide shows; if the show includes 3D images, adjust parallax as described in "Viewing 3D Images" (15) before proceeding.
1 Select Photo in the main menu to display the photo list.
2 Press ▲ or ▼ to highlight a device in the device list and press OK to select the highlighted device.
3 Press SLIDE SHOW to start the slide show from the first picture on the current device.
If the current folder contains 3D (MPO) and 2D (JPEG) images with identical file names (e.g., "DSCF0001.MPO" and "DSCF0001.JPG"), only the 3D images will be displayed.
By default, images are displayed in ascending order by file name; the order can be changed using the System Setup > Sort by option in the setup menu (19).
Slide Show Options
Slide show options can be adjusted using the Slideshow Setup option in the setup menu (19).
| Option | Description |
| Music Turn background audio on or off. | |
| Time/Frame Choose how long each picture is displayed. | |
| Effects Choose the transition between pictures. | |
| Order | Choose whether slides are displayed in random order or in the order selected for System Setup > Sort by in the setup menu (19). |

Background Tracks
The viewer automatically plays any audio fi les on the selected device that are in a supported fi le format (📖 25), including voice memo fi les.
Use the System Setup > Sort by option in the setup menu (☐ 19) to choose the order in which audio files are played.
◆ Audio fi les are played only during slide shows.
Audio files can be copied to or deleted from internal memory when the viewer is connected to a computer (21). A computer can also be used to copy audio files to or delete them from memory cards and USB storage devices.
To view 3D images in 3D:
1 Display the image full frame (📖 12).
2 Press the 3D/2D 📋 button. 3D will be displayed in the monitor and 3D images will be displayed in 3D (2D pictures will still be displayed in 2D). The 3D effect is only visible when the viewer is in wide orientation (horizontal).

natural_image
Black-and-white photo of a smiling child outdoors, wearing a cap and hat (no text or symbols visible)3 Adjust parallax by pressing the ☐ PARALLAX (☐/☐) buttons on the remote control. Note that adjusting parallax reduces horizontal frame coverage; the new crop is shown by black borders in the display.

natural_image
Black-and-white photo of a smiling child outdoors, no visible text or symbols4 Press OK. A confirmation dialog will be displayed; highlight STORE and press OK to save the updated image (to exit without saving changes, press BACK or highlight CANCEL and press OK).
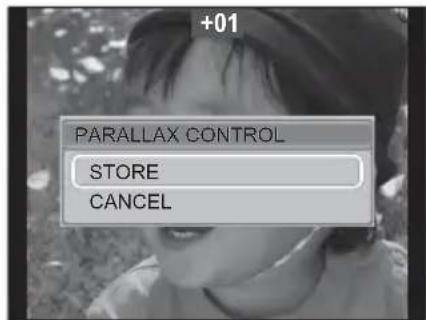
① Switch to 2D if 3D images still appear double after you have adjusted parallax.
① The 3D effect is only visible from certain angles (☐ 1). Too much parallax may make it impossible to perceive the 3D effect.
①If the current folder contain 3D (MPO) and 2D (JPEG) images with identical file names (e.g., "DSCF0001.MPO" and "DSCF0001.JPG"), only the 3D images will be displayed.
ViewingMovies
The viewer supports the movie file formats listed on page 25–26. To view movies stored in internal memory or on an external storage device:
1 Select Video in the main menu to display the movie list.
2 Highlight a movie as described in Steps 2–4 on page 12 and press OK to begin playback. Playback of the next movie will begin automatically when the selected movie is complete.
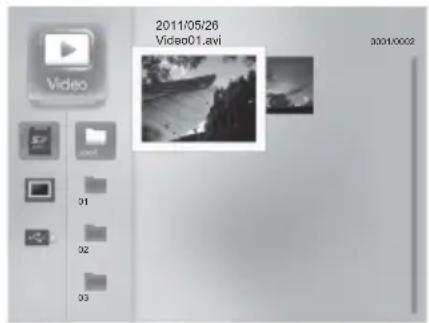
By default, movies are displayed in ascending order by file name; the order can be changed using the System Setup > Sort by option in the setup menu (19).
The following operations can be performed during movie playback:
• To pause or resume playback, press OK
- To end playback and return to the movie list, press BACK
- To advance or rewind, press ◀ or ▶
- To raise or lower volume, press the VOLUME (☐/☐☐) buttons
- To adjust parallax (3D movies only; 15), press the ○ PARALLAX button while the movie is paused (note that changes to parallax can not be saved)
- To switch between 3D and 2D display (3D movies only; 📄 15), press 3D/2D 📋
① Some movies may not play back correctly.
Other Options
The Clock Calendar
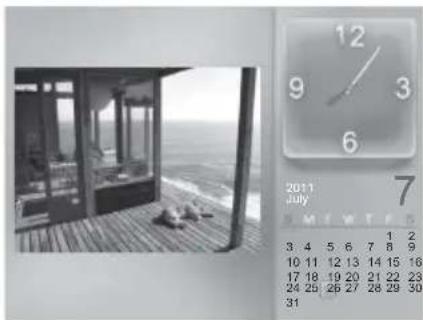
For a clock calendar display and slide show, highlight Calendar in the main menu and press OK. If an external storage device is detected, the viewer will show the images on the device (if both a memory card and a USB storage device are detected, the viewer will show the images on the memory card); otherwise the viewer will show the pictures in internal memory. Press BACK to exit the clock calendar display.
natural_image
Black-and-white photo of a window at night with a house and ocean in the background, next to a calendar showing July 2011 (no text on clock or surroundings)Slide show settings can be adjusted using the Slideshow Setup option in the setup menu (14). Transition effects are not available.
The clock calendar is displayed in "wide" (landscape) orientation only.
Images can not be selected for playback.
See page 9 for information on setting the clock calendar to the correct time and date.

Alarm Options
To display alarm options, press MENU in the clock calendar display and select Alarm Setting in the calendar menu. Press ▲ or ▶ to highlight the following options and press ▲ or ▼ (or, if you are using the controls on the viewer, MENU) to change.

| Option | Description |
| Tone Choose | the sound played when the alarm goes off. |
| Mode | Turn the alarm off or set it to sound only once or every day. |
| Time | Choose the time (hour and minute) that the alarm sounds. |
To end the alarm, press BACK.
Photos and movies can be deleted or copied.
DeletingFiles
Note that deleted files can not be recovered. Copy important files to a computer or other storage device before proceeding.
1 Highlight a file in the photo or movie list (📖 12) and press MENU.
2 Highlight Delete File and press OK.
3 A confirmation dialog will be displayed; highlight Yes and press OK.
① If the current folder contains 3D (MPO) and 2D (JPEG) images with identical file names (e.g., "DSCF0001.MPO" and "DSCF0001.JPG"), the 2D file will automatically be erased when the 3D file is deleted.
- Files that were protected on the camera can not be deleted.
Copying Files
To copy a file:
1 Highlight the file in the photo or movie list (📖 12) and press MENU.
2 Highlight Copy File and press OK.
3 A confirmation dialog will be displayed; highlight Yes and press OK.
A copy option is also available in the external storage pop-up menu (11).
If an image with the same name already exists at the destination, the viewer will automatically rename the copy by adding "Copy(n)_" to the beginning of the file name, where "n" is a number incremented by 1 each time a copy with the same name is encountered. For example, if you copy several fi les named "DSCF0001.jpg" when a fi le with the same name is already present at the destination, the fi rst copy will be renamed "Copy(1)_DSCF0001.jpg", the second copy "Copy(2)_DSCF0001.jpg", and so on.
Copies of protected files are also protected.
To use the setup menu:
1 Highlight Setup in the main menu and press OK.
2 Press ▲ or ▼ to highlight an item and press OK to display options for the highlighted item.
3 Adjust settings (see below).
4 Press BACK to exit when settings are complete.
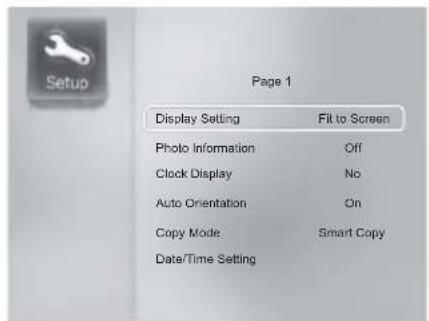
Setup Menu Options
| Menu item | Description | Default |
| Display Setting | Select Fit to Screen to resize images to fit the display, Stretch to Screen to crop images to fill the display. | Fit to Screen |
| Photo Information | Choose whether to display photo information for 2D photographs. | Off |
| Clock Display | Choose whether to display the clock during playback. | No |
| Auto Orientation | Turn auto image rotation on or off. Note that images created with some models of camera may not be rotated. | On |
| Copy Mode | Select Smart Copy to automatically reduce the scale of high-resolution images when they are copied to internal memory, Original Copy to copy images at their original size. | Smart Copy |
| Date/Time Setting Set the clock (17).— | ||
| Alarm Setting Set the alarm (17).— | ||
| HDMISettingAdjust settings for connection to an HDMI device (22). Auto | ||
| 3D CAUTION DISP | If 30 Minutes is selected, a message will be displayed after 30 minutes of continuous 3D use to warn of possible fatigue. | 30 Minutes |
| On/Off Timer Setting | Set the viewer to turn on and off automatically at selected times. | — |
| Slideshow Setup | Adjust slide show settings. | — |
| SystemSetup | 言語/LANG.: Choose a language for the viewer's display. | English |
| Sort by: Display fi les and folders in the photo and movie lists by name in ascending (File Name (A to Z)) or descending (File Name (Z to A)) order, or by date of modification in ascending (Copied Date (New to Old)) or descending (Copied Date (Old to New)) order. | File Name (A to Z) | |
| FW Update: To update the viewer fi rmware, download the latest version to a memory card, insert the card in the viewer, select System Setup > FW Update in the setup menu, and select Yes in the confirmation dialog. | — | |
| System Reset: Restore factory default settings. | — | |
| Format: Format internal memory. Note that this deletes all files in internal memory, including protected fi les and the fi les used in the demonstration slide show. | — | |
TheOn/Off Timer
On/Off Timer Setting sets the viewer to automatically turn on at a selected time daily or on weekdays or weekends and then turn off again at a selected time. For example, to set the viewer to turn on daily at 10:00 a.m. and turn off at 5:00 p.m.:
1 Select On/Off Timer Setting in the setup menu (📖 19).
2 Highlight Auto Power On/Off and press OK, and then highlight On and press OK to turn the timer on.
3 Highlight Frequency and press OK, and then highlight Every Day and press OK.
4 Highlight Time Setting and press OK. Set the viewer to turn on at 10:00 and turn off at 17:00 and press OK.
① If the remote control is used to turn the viewer on at a time not in the selected period (in the above example, between the hours of 5:00 p.m. and 10:00 a.m. the following day), the viewer will turn off automatically after a few minutes. To use the viewer outside the selected times, select Off for Auto Power On/Off.
Connecting the Viewer to a Computer
Connect the viewer to a computer to manage the files in the viewer's internal memory. We recommend that you use a computer that meets the following system requirements:
| OS | Preinstalled versions of Windows 7, Windows Vista (Service Pack 2), Windows XP Home Edition (Service Pack 3), or Windows XP Professional (Service Pack 3) |
| Other Built-in USB port recommended. Operation is not guaranteed with other USB ports. | |
① Other versions of Windows are not supported. Operation is not guaranteed on home-built computers or computers that have been upgraded from earlier versions of Windows.
1 Turn the viewer off and connect the supplied USB cable as shown, making sure the connectors are fully inserted (the orientation and location of the computer connector may differ from that shown; consult the computer manual for details). Connect the viewer directly to the computer; do not use a USB hub or keyboard.
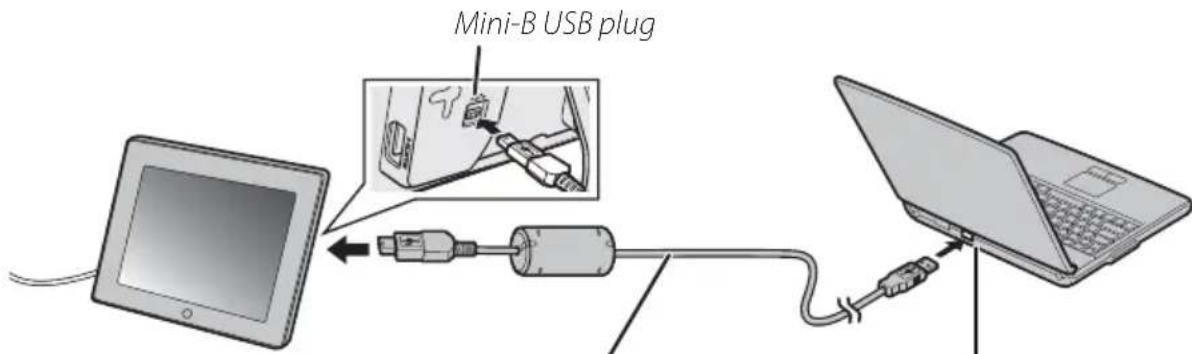
Computer USB connectorUSB cable
Do not connect the cable while the viewer is on.
2 Turn the viewer on. The viewer's internal memory will appear as a removable disk in "My Computer"; copy files to or from the viewer or delete files using normal Windows operations. External storage devices inserted in or connected to the viewer can not be accessed from the computer.
① Do not use the computer to format internal memory.
① The computer may require some time to register the viewer with the system the first time it is connected.
① Viewer controls can not be used while the viewer is connected to a computer.
①The viewer can not be used as a computer monitor.
3 After using the "safely remove" option to remove the viewer from the system, turn the viewer off and disconnect the USB cable.
① Do not disconnect the cable before removing the viewer from the system. Failure to observe this precaution could result in loss of data.
Connecting the Viewer to an HDMI Device
When connected to a FinePix Real 3D W3 camera or other HDMI device using an HDMI cable (available separately from third-party suppliers), the viewer can be used to display 3D and 2D images.
1 Turn the viewer on.
2 Turn the HDMI device on and enable HDMI output.
3 Connect the HDMI cable as shown.
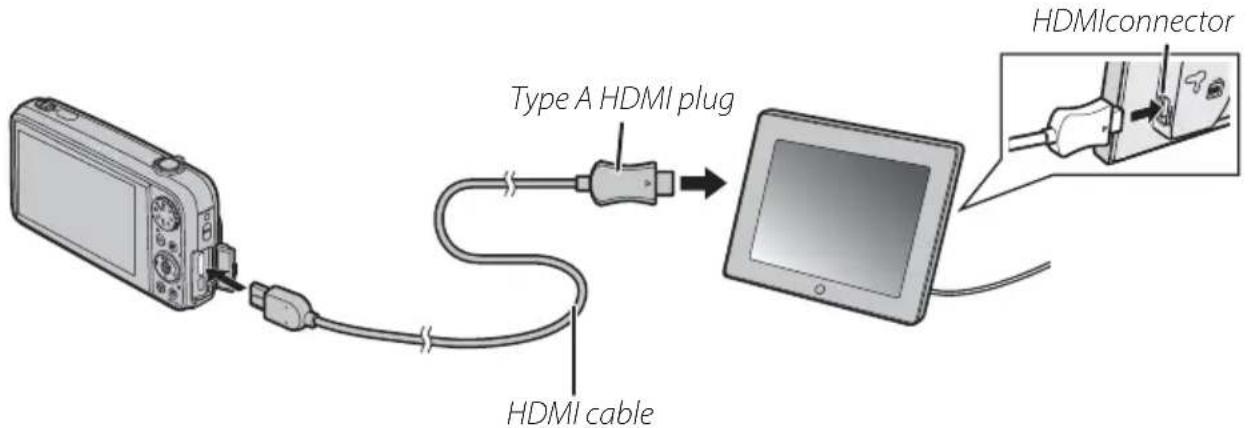
① An HDMI cable can not be connected while a USB cable is connected.
① HDMI output is available only with cables that conform to the HDMI standard.
① Use a high-speed cable for 3D display.
The viewer will suspend operation when the cable is connected and the output from the HDMI device will appear in the display.
4 The viewer will display images played back on the HDMI device. The following operations can be performed:
- To raise or lower volume, press the VOLUME (◄/◄◄) buttons on the remote control or press the ◀ or ▶ buttons on the viewer (the volume indicator will not be displayed)
• To adjust brightness, rotate the viewer brightness control
Choose from Auto and Side by Side HDMI 3D display modes using the HDMI Setting option in the viewer setup menu (19).
For information on using the HDMI device, see the documentation provided with the equipment.
The HDMI Connector
• Image signal input:
| 2D | 480/60p, 720/60p, 1080 /60i |
| 3D | Frame packing 720/60p, 1080/24p |
| Side-by-side 1080 /60i | |
| Top and bottom 720/60p, 1080/24p |
• Audio signal input: Linear PCM with a sampling frequency of 32, 44.1, or 48 kHz.
Troubleshooting
Troubleshooting
Power
| Problem | Possible cause | Solution | |
| The viewer does not turn on. | The AC power adapter is not correctly connected. | Check the connection. 8 |
■ Viewing Pictures
| Problem | Possible cause | Solution | |
| No pictures are displayed. | The external storage device is not correctly inserted. | Insert the device in the correct orientation. | 11 |
| The external storage device or internal memory contains no pictures. | Use a computer, camera, or other device to check that the storage device or internal memory contains pictures. | — | |
| Unsupported image file format. Use | a supported format. 25 | ||
| The pictures have been modified on a computer. | Pictures that have been modified on a computer may not display correctly. | — | |
| Cannot find picture. | The picture has been modified on a computer. | The viewer may fail to read files that have been modified on a computer. | — |
■ Copying and Deleting Pictures
| Problem | Possible cause | Solution | |
| Cannot delete pictures. | Pictures are protected. | Remove protection using a camera (if applicable) or computer. Protection can be removed from the files in internal memory when the viewer is connected to a computer. | 21 |
Computer
| Problem | Possible cause | Solution | |
| Computer can not detect internal memory. | The USB cable is not correctly connected. | Check the connection. 21 | |
| The computer does not meet the recommended system requirements. | Use a computer that meets the recommended system requirements. | 21 |
HDMI
| Problem | Possible cause | Solution | |
| Problem with picture or sound. | The output device is not configured correctly. | Pictures may not be displayed due to improper settings or the inherent limitations of the output device. You may need to adjust HDMI output settings for the device after turning it off and then on again; see the documentation provided with the device for details. | — |
| The HDMI cable is not correctly connected. | Check the connection. 22 | ||
| The cable does not conform to the HDMI standard. | Use a cable that conforms to the HDMI standard. | — | |
| The HDMI cable does not support high speed. | Use a high-speed cable when viewing 3D images. | — | |
| Cannot connect cable. | The connector is not in the correct orientation. | Insert the connectors in correct orientation. | 22 |
| The connector is not type A. | Use a cable with a type A connector. | — | |
| Images are displayed side-by-side. | Side-by-side pictures will not be displayed in 3D if Auto is selected for HDMI Setting. | Select Side by Side. | 1 |
| 3D display not available. | The current HDMI Setting does not match output device. | Choose the appropriate option for HDMI Setting. | 19 |
| The current picture is a 2D image. | 2D images are displayed in 2D. | — | |
| The output device is not set up correctly. | See the documentation provided with the device. | — |
Miscellaneous
| Problem | Possible cause | Solution | |
| Remote control has no effect. | The battery is exhausted. Insert a fresh battery. 6 | ||
| Clock has been reset. | Power has been interrupted for an extended period. | Connect the AC power adapter and reset the clock. | 8,9 |
Specifications
| Display | Type High-resolution 3D and 2D color LCD display; lenticular sheet used for 3D display | |
| Screen size 7.2 in. | ||
| Resolution | 800×600 (3D display is 800×600×2 channels) | |
| Number of dots 2 | 880,000 (1,600×600×RGB) | |
| Number of colors | Approx. 16.77 million | |
| Aspect ratio 4:3 | ||
| Viewing angle 160° horizontal, 140° vertical | ||
| Luminosity Approx. 340 cd/m2 | ||
| Max. viewable frame size | Still images | 10,000×10,000 pixels (JPEG) |
| Movies1 | 720p (1,280×720 pixels) | |
| Internal memory | 512 MB | |
| Supportedfile types | Still images | 3D: Multi-picture-format-compliant MPO2D: JPEG |
| Movies | 3D: AVI (Motion JPEG) with 2 image channels2D: AVI (Motion JPEG) | |
| Audio | Linear PCM (WAV) with bit depth of 8/16 bits and a sampling frequency of 8-48 KHz. | |
| Memory card slot | SD/SDHC | |
| Supported memory cards | SD, miniSD2, microSD2, SDHC, miniSDHC2, microSDHC2 | |
| Interface | HDMI ×1 (type A)3, mini-B USB ×1, type A USB ×1 | |
| Slide show transition effects | 3D: 12 types2D: 12 types | |
| Index displays | 12 | |
| Power supply | AC 100V-240V, 50/60Hz using supplied AC power adapter | |
| Power consumption (in use) | Max. approx. 14 W; approx. 8 W in normal use | |
| Dimensions (W × H × D) | Approx. 188.8×153.5×28.2 mm/7.4×6.0×1.1 in.(excluding stand and other projections) | |
| Weight | Approx. 415 g/0.9 lb (including stand) | |
1 Frame rate for HDMI input depends on performance of output device. The viewer may be unable to display movies recorded with HD digital video cameras or movies that have been modified on a computer.
2 SD/SDHC adapter required.
3 High speed cable required for 3D input.
Specifications subject to change without notice. FUJIFILM shall not be held liable for damages resulting from errors in this manual.
Although the display is manufactured using advanced high-precision technology, a small number of pixels (less than 0.01%) may always be lit or may not light. This is normal for this type of display and does not indicate a malfunction; image data are unaffected.
MovieFiles
The following restrictions apply when movies are played back from internal memory, memory cards, or USB storage devices:
- This product supports only AVI format fi les that have a frame size of 1,280 × 720 or smaller and use Motion JPEG compression; MOV fi les and fi les recorded using H.264 compression can not be played back
- Use a CLASS④ SD memory card or a USB storage device with equivalent performance to view 3D and HD movies. Frames may be dropped when internal memory or other external storage devices are used.
StorageDevices
The following devices have been successfully tested with this product:
• SD cards: Cards with a capacity of up to 2 GB
• SDHC cards: Cards with a capacity of up to 32 GB
• USB storage devices: Devices with a capacity of up to 32 GB
①Operation is not guaranteed with all makes.
Do not use force when removing storage device. Failure to observe this precaution could damage viewer or the storage device.
Do not touch the device terminals with your fingers or metal objects.
① Do not remove a card from an adapter without first removing the adapter from the viewer. The viewer may not function as expected with only an adapter inserted.
① Do not remove storage devices while images are displayed. Failure to observe this precaution could result in loss of data or in damage to the viewer or storage devices.
FUJIFILM Worldwide Network
Contact your local distributor (see list below) for technical support (S) or repairs (R). Please present the warranty and purchase receipt when requesting repairs; refer to the warranty card for the conditions of the warranty. Technical support may not be available for models not handled by the local distributor. The following information is subject to change without notice.
NORTH AMERICA
| Canada | FUJIFILM North America Corporation | S 1-866-818-FUJI (3854)R 1-800-263-5018 | http://www.fujihelp.ca |
| U.S.A. | FUJIFILM North America Corporation | S 800-800-3854R 800-659-3854 | digitalinfo@fujifilm.com |
CENTRAL AND SOUTH AMERICA
| Argentina | Imagen e informacion S.A. | S/R 54-11-4737-1030 | servtec@imageneinformacion.com.ar |
| Bolivia | Reifschneider Bolivia Ltda. | S/R +591 33 441129 | info@reifschneider.com.bo |
| Brazil | FUJIFILM do Brasil Ltda. | S/R 0800 7706627 | camarasdigitais@fujifilm.com.br |
| Chile | Reifschneider SA | S/R 56-2-6781111 | adobson@reifschneider.clserviciotecnico@reifschneider.cl |
| Colombia | Importaciones Espacri Colombia S.A.S. | S/R +57-1-475 4343 | soportedigital@espacri.com |
| Ecuador | Importaciones Espacri Cia. Ltda. | S/R +593 72 835 526 | dtecnico@fujifilm.com.ec |
| Mexico | Fujifilm de Mexico, S.A. de C.V. | S +52 (55) 5263 5500R +52 (55) 5366 5150 | soporte@fujifilm.com.mxcamaras@fujifilm.com.mx |
| Paraguay | Difoto. | S/R +595-21-281948 | larson@rieder.net.py |
| Peru | Procesos de Color S.A. | S/R +51 14 338000 | serviciotecnico@fujifilm.com.pe |
| Uruguay | Service y ProyectosKiel S.A. | S/R (05982) 901 0852S/R (05982) 419 4542 | serviceproyecto@adinet.com.uykiel@fujifilm.com.uy |
| Venezuela | C. Hellmund & Cia Sa | S/R 58-212-2022300 | hellmund@hellmund.cominfoventas@hellmund.com |
EUROPE
| Austria | FUJIFILM Recording Media AUSTRIA | S/R 00800 38543854 | service@fujifilm-digital.com |
| Belgium | Belgian Fuji Agency | S/R 3210242090 | pm2s@pm2s.fr |
| Croatia | I&I d.o.o. | S +385 1 233 26 53 | tkrsnik@fujifilm.hr |
| FOTOTEH d.o.o | R +385 1 619 66 08 | info@fototeh.hr | |
| Cyprus | PMS IMAGING LTD | S/R 35722746746 | info@fujifilm.com.cy |
| S/R 35722314719 | dorosn@logosnet.cy.net | ||
| Czech Republic | Fujifilm Cz., s.r.o. | S 00420 234 703 431 | petr.barta@fujifilm.cz |
| AWH servis | R 00420 222 721 525 | awh@awh.cz | |
| Denmark | Fujifilm Danmark A/S | S/R 0045 45662244 | fujifilm@fujifilm.dk |
| Finland | Neoport Ltd | S +358 (0)50 4343 500 | info@neoport.fihttp://www.fujifilm.eu/fi |
| R +358 (0)50 4343 500 | huolto@neoport.fihttp://www.neoport.fi | ||
| France | FUJIFILM France | S/R +33 1 30 68 67 66 | pm2s@pm2s.fr |
| Germany | FUJIFILM Electronic Imaging Europe GmbH | S/R 00800 38543854 | service@fujifilm-digital.com |
| Greece | FUJIFILM HELLAS S.A. | S/R 0030 210 9404100 | fujifilm@fujifilm.gr |
| Hungary | Fujifilm Hungary Ltd. | S +3615779870 | fujifilm@fujifilm.hu |
| R +3613633777 | info@foto-paradicsom.hu | ||
| Iceland | Icephoto (Ljosmyndavorur) | S/R 354 568 0450 | framkollun@fujifilm.is |
| Ireland | Fujifilm Ireland | S/R 35318820200 | info@fujifilm.ie |
| EUROPE | |||
| Italy | FujiFilm Italia S.p.a. | S/R +39 02 33490345 | online@fujifilm.it |
| Kazakhstan | JEL Corporation | S/R +7 727 264 2222 | kamol@jelcorp.com |
| Kyrgyzstan | JEL Corporation | S/R +7 727 264 2222 | kamol@jelcorp.com |
| Lithuania | Fujifilm Lithuania | S/R 370-5-2133017 | info@fujifilm.lt |
| Malta | Ciancio (1913) Co.Ltd. | S/R +356-21-480500 | info@fujifilm.com.mthttp://www.fujifilm.com.mt/ |
| Norway | Fujifilm Norge AS | S 0047-02273 | http://www.fujifilm.no/mailto:post@fujifilm.no |
| R 0047-55393880 | http://www.camera.no/mailto:service@camera.no | ||
| Poland | Fujifilm Polska Distribution Sp. z o.o. | S +48-22-609-65-96 | serwis@fujifilm.pl |
| R +48-22-886-94-40 | serwis@fujifilm.pl | ||
| Portugal | Fujifilm Portugal, Lda | S (351) 22 619 42 00 | sac@fujifilm.pt |
| R (351) 22 906 98 40 | assist.camaras@pm2s.pt | ||
| Romania | CTS-Cardinal Top Systems Ltd | S/R +40212300982or +40212302683 | service@fujifilmservice.ro |
| Russia | ZAO "FUJIFILM-RU" | S/R 8-495-545-38-54 (Для бесплатных звонков из России)* Для звонков из других стран набирайте +7-800-700-38-54http://www.fujifilm.ru/info@fujifilm.ru | |
| Slovakia | Fujifi Im Europe GmbH -organizačná zložka | S +421 (2) 33 595 107 | fujifilm@fujifilm.sk www.fujifilm.sk |
| R +421 (2) 33 595 119 | servis@fujifilm.sk www.fujifilm.sk | ||
| Slovenia | Image & Information | S/R +386-1-5864660 | damir.sajko@fujifilm-slovenia.com |
| Spain FUJIFILM Europe GmbH, Sucursal enEspaña | S/R 902012535 | http://www.fujifilm.es/soporte/tallersat@fujifilm.es | |
| Sweden | Fujifilm Sverige AB | S 46 8 506 141 45 | http://www.fujifilm.sekamera@fujifilm.se |
| R 46 8 506 141 00 | http://www.fujifilm.sekameraverkstaden@fujifilm.se | ||
| Switzerland /Lichtenstein | Fujifilm (Switzerland) AG | S/R +41 44 855 5154 | RepairCenter@fujifilm.ch |
| The Netherlands | FUJIFILM Electronic ImagingNederland | S/R 00800 38543854 | helpdesk@fujifilm-digital.nl |
| Turkey | Filmat | S/R +90 212 698 99 77 | servis@filmat.com.tr |
| U.K. | FUJIFILM UK Ltd. | S +44 (0)844 553 2322 | fujitec@fuji.co.uk |
| R +44 (0)844 553 2323 | fujitec@fuji.co.uk | ||
| Ukraine | FUJIFILM Electronic Imaging Europe(Kiev office) | S +38 (044) 390 5929 | |
| R +38 (044) 499 2949or +38 (044) 545 0897 | http://servicecenter.com.ua/support.php | ||
| Uzbekistan | JEL Corporation | S/R +7 727 264 2222 | kamol@jelcorp.com |
| MIDDLE EAST | |||
| Iran | Tehran Fuka Co. | S/R (+98-21) 22254810 | fuka@neda.net |
| Israel | Shimone Group Ltd. | S (+) 972 3 9250666 | digital@fujifilm.co.il |
| R (+) 972 3 9250683 | khaim@shimone.comhaimy@shimone.com | ||
| Jordan | Grand Stores Al-swaifi eh,Anman/Jordan | S/R 009626-5829157 Digital@grandstoresjo.com | |
| Kuwait | Boushahri Group W.L.L. | S/R +965 18855 | photo@boushahrigroup.com |
| Lebanon | Fototek S.A.R.L. | S/R +961 1 252474 | fototek@antakiholding.com |
| Qatar | Techno Blue | S 00974 44 66 175 | prabu@techno-blue.com |
| Saudi Arabia | Emam Distribution Co. Ltd. | S 96626978756 | service@fujifilm.com.sa |
| Syria | Film Trading Company | S +963 11 2218049 | ftc@amirgroup.com |
| R +963 21 4641903 | filmtradin@amirgroup.com | ||
| U.A.E. | Grand Stores | S/R +971-4-2823700 | photography@grandstores.ae |
MIDDLE EAST
Yemen Al-Haidary Trading S 00967-1-503980
R 00967-1-503977
AFRICA
| D R Congo KINSHASA | FIS-FUJI IMAGE SERVICE | S +243 818138001 | girish@fujifilm.cd |
| Egypt | Foto Express Egypt | S/R +20 2 37762062 | m.farag@fotoexpress.com.eg |
| Kenya | Fuji Kenya Ltd | R (254-20)4446265-8 | info@fujifilm.co.ke |
| Madagascar | Photorama | S/R 261-320729835 | photorama@blueline.mg |
| South Africa | Cameratek CC. | S/R +27 11 251 2400 | www.cameratek.co.za |
OCEANIA
| Australia | FUJIFILM Australia Pty Ltd | S/R 1800 226 355 | digital@fujifilm.com.au |
| Fiji | Brijlal & Co. Ltd | S/R (679)3304133 | kapadia@connect.com.fj |
| New Caledonia | Phocidis SARL | S/R (00 687) 25-46-35 | phocidis@phocidis.nc |
| New Zealand | Fujifilm NZ Ltd | S/R +64-9-4140400 | glenn.beaumont@fujifilm.co.nz |
| Papua New Guinea | Oceania PNG Limited | S +675 3256411 | oceania@daltron.com.pg |
ASIA
| Bangladesh | JEL TRADING (Bangladesh) LTD | S/R (880) 288 61271 | http://www.jelcorp.com/ |
| Cambodia | JEL DISTRIBUTION (CAMBODIA) PTELTD | S/R (855) 23 219 076 | http://www.jelcorp.com/ |
| Hong Kong | Fuji Photo Products Co., Ltd. | S/R (852)2406 3287 | rsd@chinahkphoto.com.hk |
| India | FUJIFILM INDIA PRIVATE LIMITED | S/R +91-124-4325500 | contact@fujifilmindia.com |
| Indonesia | PT. Modern Internasional, Tbk. | S/R +62 21 2801000 | assd_kmrsrv@moderninternasional.co.id |
| Malaysia | FUJIFILM (Malaysia) Sdn. Bhd. | S 603-55698388R 603-55698388 | technical@fujifilm.com.mycamera@fujifilm.com.my |
| Mongol | Tavan Bogd Group, Mongolia | S/R +976-99052517or +976-91118833 | batkhuyag@tavanbogd.comor_gantsolmon@tavanbogd.com |
| Myanmar | Indobest Co. Ltd | S/R (95) 1 577996 | indobest@myanmar.com.mm |
| Pakistan | Fujifilm Pakistan Pvt Ltd. | S R 92-42-7237704-6 | finepix@fujifilm.com.pkfinepix@fujifilm.com.pk |
| Philippines | YKL COLOR INC. | S 632-7436601~06R 632-7436601~06 | digital_info@yklcolor.comtechop_services@yklcolor.com |
| Singapore | FUJIFILM (Singapore) Pte Ltd | S/R 65-63805553 | service@fujifilm.com.sg |
| South Korea | Korea Fujifilm Co., Ltd. | S +82-2-3282-7383 | digitalas@fujifilm.co.kr |
| Yongsan AS Center (Fujidigital) | R +82-2-701-1472 | 1bowl@hanmail.net | |
| Kangnam AS Center (Digitalgallery) | R +82-2-2203-1472 | 0101saint@hanmail.net | |
| Busan AS Center (fuji finepix) | R +82-51-806-1472 | fujicamera@nate.com | |
| Kwangju AS Center (Cheil camera) | R +82-62-363-7887 | in9943@hanmail.net | |
| Taiwan | Hung Chong Corp. | S/R 886-2-6602-8988 | service@mail.hungchong.com.tw |
| Thailand | FUJIFILM (Thailand) Ltd. | S +662-2706000ext. 751,752 | Preecha@fujifilm.co.thyaowarat@fujifilm.co.thwarin@fujifilm.co.th |
| R +662-2706000ext. 761,762 | |||
| Vietnam | International Minh Viet Co., Ltd. | S/R +84-8-4135740ext. 322 | diep.phanthithanh@imv.com.vn |
FUJIFILM
FUJIFILM Corporation
http://www.fujifilm.com/products/3d/index.html

- IMPORTANT SAFETY INSTRUCTIONS
- Installation
- Antennas
- Use
- Service
- Be sure to read these notes before use
- SafetyNotes
- About the Icons
- WARNING
- CAUTION
- The Battery and Power Supply
- Button Batteries
- AC Power Adapters
- Using the Device
- Electrical Interference
- Liquid Crystal
- NOTICES
- FCC Statement
- Notes on the Grant
- EC Declaration of Conformity
- Disposal of Electrical and Electronic Equipment in Private Households
- Disposal of Used Electrical and Electronic Equipment (Applicable in the European Union, Norway, Iceland and Liechtenstein)
- In Countries Outside the European Union, Norway, Iceland and Liechtenstein
- Notes on Copyright
- Trademark Information
- Table of Contents
- Before You Begin 1
- First Steps 5
- Viewing Pictures 11
- Other Options 17
- Troubleshooting 23
- Appendix 25
- FUJIFILM Worldwide Network 27
- Before You Begin
- Viewing 3D Images
- 3D Display
- Getting Started
- √ Table of Contents ...... vi
- √ Troubleshooting...... 23
- Symbols and Conventions
- Package Contents
- Compatible Storage Devices
- Parts of the Digital Viewer
- Parts of the Remote Control
- First Steps
- Readying the Remote Control
- Using the Remote
- Replacing the Battery
- Adjusting the Stand
- Using a Tripod
- Turning the Viewer On
- The Product Demonstration Slide Show
- Turning the Viewer Off
- Using the Remote Control ⏻ (Power) Button
- BasicSetup
- The Main Menu
- Viewing Pictures
- External Storage Devices
- SD/SDHC Memory Cards
- Removing Memory Cards
- USB Storage Devices
- The External Storage Device Pop-up Menu
- SlideShows
- Slide Show Options
- Background Tracks
- ViewingMovies
- Other Options
- The Clock Calendar
- Alarm Options
- DeletingFiles
- Copying Files
- TheOn/Off Timer
- Connecting the Viewer to a Computer
- Connecting the Viewer to an HDMI Device
- The HDMI Connector
- Troubleshooting
- Specifications
- MovieFiles
- StorageDevices
- FUJIFILM Worldwide Network
- FUJIFILM
- FUJIFILM Corporation
Brand : FUJIFILM
Model : FinePix REAL 3D V3
Category : Digital photo frame