DPA804 - Receiver Atlas Sound - Free user manual and instructions
Find the device manual for free DPA804 Atlas Sound in PDF.


User questions about DPA804 Atlas Sound
0 question about this device. Answer the ones you know or ask your own.
Ask a new question about this device
Download the instructions for your Receiver in PDF format for free! Find your manual DPA804 - Atlas Sound and take your electronic device back in hand. On this page are published all the documents necessary for the use of your device. DPA804 by Atlas Sound.
USER MANUAL DPA804 Atlas Sound
text_image
Atlas IEDDPA404 / DPA804
Digital Power Amplifiers

text_image
Atlas Sound DPA404 Digital Power Amplifier
text_image
Atlas Sound Channel 1 2 3 4 Systeres Media Super 5 6 7 8 9 10 11 12 13 14 15 16 17 18 19 20 21 22 23 24 Power DPA804 Digital Power Amplifier
Atlas
IED
1601 Jack McKay Blvd. • Ennis, Texas 75119 U.S.A.
Telephone: 800.876.3333 • Fax: 800.765.3435
- 1 - AtlasIED.com
Table of Contents
Important Safety Instructions....3
Introduction 5
Key Features.... 5
DPA Amplifier Configuration.... 6
Front Panel Description 8
Rear Panel Description....10
Accessory Card Slot....11
Accessing the GUI Control Panel 12
I. Direct Connection via Ethernet....12
II. Web Browser via Network Router 13
III. AtlasIED DPA Site Manager Software 13
IV. Smartphone or Tablet 14
V. Static IP - Accessing the DPA Outside the Local Network 15
Resetting the DHCP 15
Identifying the Firmware Version.... 16
GUI Pages Defined....17
User / Home Page 17
Password Login....17
Setup Page 18
Amp Configuration Page 19
Mute, Link & Port Assign Page 20
Input & Output Router Page 21
High & Low Pass Filter Page 22
Output EQ Page 23
Output Level Page 24
Output Delay Page 25
Output Limiter Page 26
Remote Level Control Port Assignment & Wiring 27
Input Mute Assignment 30
Accessory Card Installation....32
Installation and Considerations 32
Understanding the 3 AC Power Consumption Idle States 33
Changing From 115V - 120V to 220V-240V Operation....34
Specifications 35
Warranty 40
Important Safety Instructions


WARNING: SHOCK HAZARD - DO NOT OPEN AVIS: RISQUE DE CHOC ELÉCTRIQUE - NE PAS OUVRIR
WARNING: TO REDUCE THE RISK OF FIRE OR ELECTRIC SHOCK DO NOT EXPOSE THIS EQUIPMENT TO RAIN OR MOISTURE
AVIS: NE PAS EXPOSER CE MATÉRIEL À LA PLUIE OU L'HUMIDITE AFIN DE REDUIRE LE RISQUE D'INFLAMMATION OU DE CHOC ÉLÉCTRIQUE

The lightning flash with arrowhead symbol within an equilateral triangle, is intended to alert the user to the presence of uninsulated "dangerous voltage" within the product's enclosure that may be of sufficient magnitude to constitute a risk of electric shock to persons.

The exclamation point within an equilateral triangle is intended to alert the user to the presence of important operating and maintenance (servicing) instructions in the literature accompanying the product.
- Read these instructions.
- Keep these instructions.
- Heed all warnings.
- Follow all instructions.
- Do not use this device near water.
- Clean only with dry cloth.
- Do not block any ventilation openings. Install in accordance with the manufacturer's instructions.
- Do not install near any heat sources such as radiators, heat registers, stoves, or other devices that produce heat.
- Do not defeat the safety purpose of the polarized or grounding-type plug. A polarized plug has two blades with one wider than the other. A grounding type plug has two blades and a third grounding prong. The wide blade or the third prong are provided for your safety. If the provided plug does not fit into your outlet, consult an electrician for replacement of the obsolete outlet.
- Protect the power cord from being walked on or pinched particularly at plugs, convenience receptacles, and the point where they exit from the device.
- Only use attachments/accessories specified by the manufacturer.
- Use only with the cart, stand, tripod, bracket, or table specified by the manufacturer, or sold with the device. When a cart is used, use caution when moving the cart / device combination to avoid injury from tip-over.

- This product is equipped with a three-wire grounding-type plug, a plug having a third (grounding) pin. This plug will only fit into a grounding-type power outlet. This is a safety feature. If you are unable to insert the plug into the outlet, contact your electrician to replace your obsolete outlet. Do not defeat the safety purpose of the grounding-type plug.
- Unplug this device during lightning storms or when unused for long periods of time.
- Refer all servicing to qualified service personnel. Servicing is required when the device has been damaged in any way, such as power-supply cord or plug is damaged, liquid has been spilled, or objects have fallen into the device, the device has been exposed to rain or moisture, does not operate normally, or has been dropped.
- WARNING: To reduce the risk of fire or electric shock, this device should not be exposed to rain or moisture and objects filled with liquids, such as a vase, should not be placed on this device.
- To completely disconnect this equipment from the mains, disconnect the power supply cord plug from the receptacle.
- The mains plug of the power supply cord shall remain readily operable.
- Protective earthing terminal. The apparatus should be connected to a mains socket with a protective earthing connection.

Atlas

1601 Jack McKay Blvd. • Ennis, Texas 75119 U.S.A.
Telephone: 800.876.3333 • Fax: 800.765.3435
- 3 - AtlasIED.com

NING - When The Device Is In Use
- WARNING: For the terminals marked with symbol of may be of sufficient magnitude to constitute a risk of electric shock. The external wiring connected to the terminals requires installation by an instructed person or the used of ready-made leads or cords.
- WARNING: The apparatus shall not be exposed to dripping or splashing and that objects filled with liquids, such as vases, shall not be placed on apparatus.
- WARNING: The mains plug is used as disconnect device, the disconnect device shall remain readily operable.
- To prevent electric shock, do not remove the product cover as there are high voltage components inside. Refer all servicing to AtlasLED.
- Should any of the following irregularities occur during use, immediately switch off the power, disconnect the power cord from the AC outlet and contact AtlasLED. Do not to attempt to continue operation with the product as this may cause fire or electric shock:
- Smoke or strange smell coming from the unit.
- If the product falls or the case is damaged.
- If water or any metallic objects falls into the product.
- If the power supply cord is damaged in any way.
- If the unit is malfunctioning.
- Do not insert or drop metallic objects or flammable materials into the ventilation holes of the product's cover, as this may result in electric shock or fire.
- Do not place any containers with liquid or metallic objects on the top of the product. If any liquid spills into the unit, fire or electric shock may result.
- Never operate this product or touch the power supply cord during an electrical storm, electric shock may result.
- Never exceed the power rating on the product when connecting equipment. Fire and/or property damage may result.
- Operate the product only with the voltage specified on the unit. Fire and/or electric shock may result if a higher voltage is used.
- Do not modify, kink, or cut the power cord. Do not place the power cord in close proximity to heaters and do not place heavy objects on the power cord, including the product itself, doing so may result in fire or electrical shock.
- Ensure that the safety ground terminal is connected to a proper ground. Never connect the ground to a gas pipe as a catastrophic disaster may result.
- Be sure the installation of the product is stable, avoid slanted surfaces as the product may fall and cause injury or property damage.

TION - When Installing The Product
- Plugging in or unplugging the power cord with wet hands may result in electric shock.
- Never move the unit with the power cord plugged into the wall, as damage to the power cord may result.
- When unplugging the cord from the wall, grasp the plug, NOT the cord.
- Never install this product in humid or dusty locations, nor in direct sunlight, near sources of heat, or in areas where sooty smoke or steam are present. Fire and electric shock may result.
- Keep all sides of the unit at least 3 1/2 away from objects that may obstruct air flow to prevent the unit's internal temperature rise.

TION - When The Product Is In Use
- Never place heavy objects on the product, causing it to fall and/or break, resulting in personal injury and property damage. In addition, the product itself may fall and cause injury and property damage.
- Contact AtlasIED for instructions on cleaning the inside of the unit. Large accumulations of dust inside the unit may result in heat buildup and fire.
- Ensure that the power supply plug is securely plugged into the wall outlet. Never allow dust to accumulate on the power plug or inside the wall outlet.
- When cleaning the unit or the unit is not to be operated for an extended period, unplug the power cord from the wall.

Atlas

1601 Jack McKay Blvd. • Ennis, Texas 75119 U.S.A.
Telephone: 800.876.3333 • Fax: 800.765.3435
Introduction
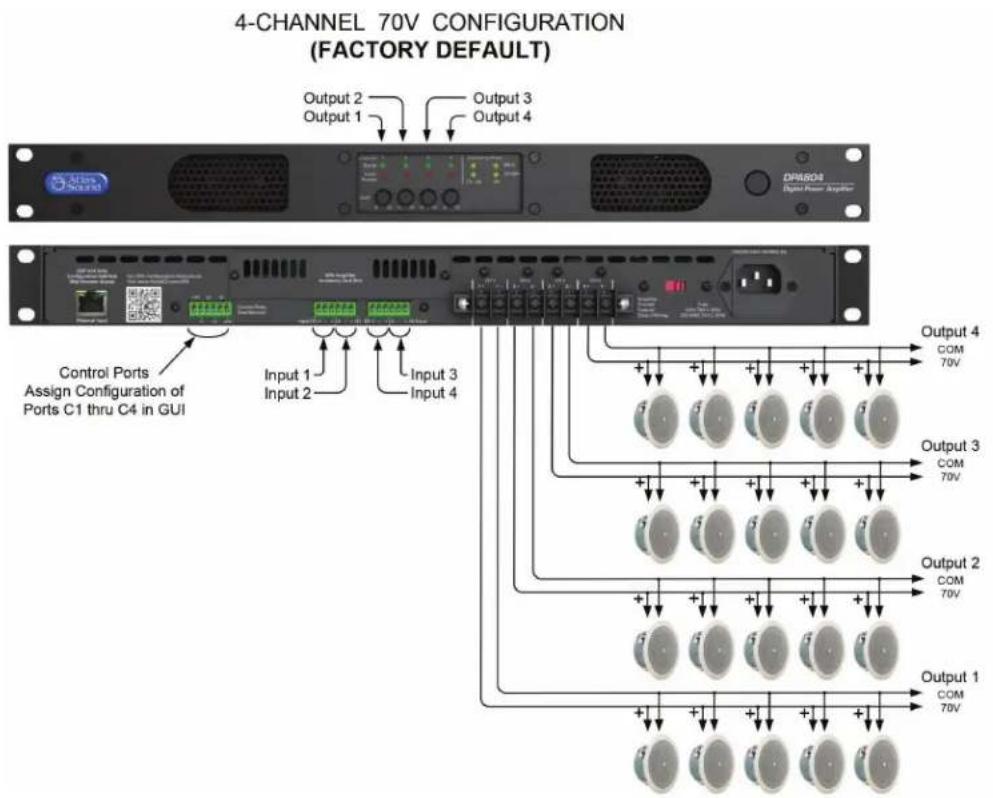
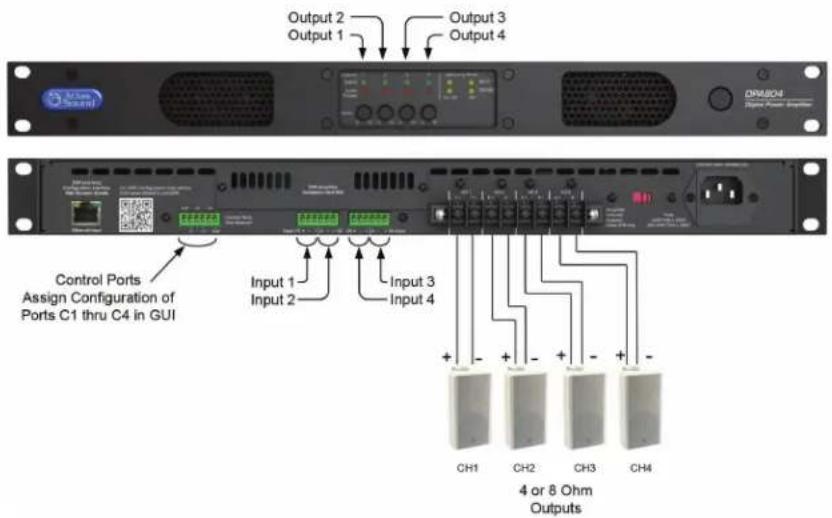
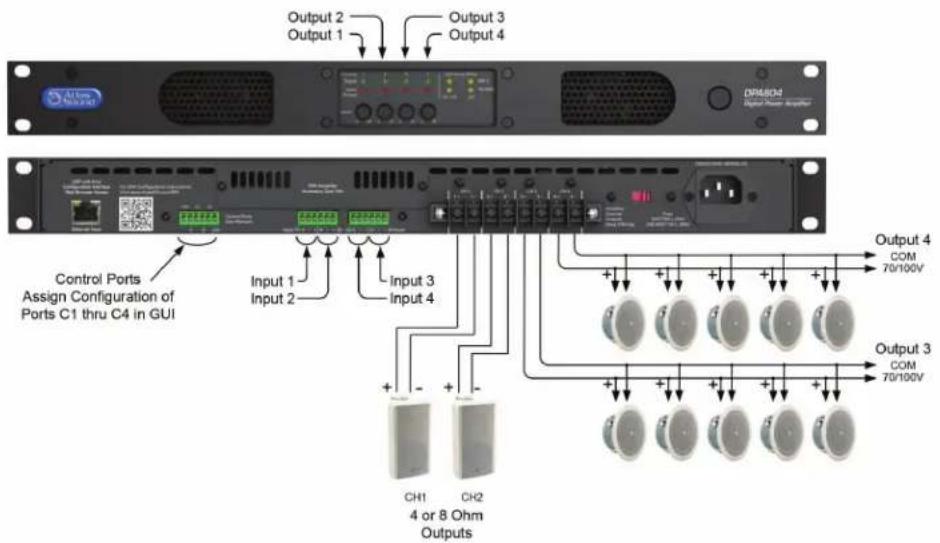
The AtlasIED DPA amplifier series features a combination of flexibility, performance and control to provide high value features for applications that require more than just great sound. The network based DPA404 and DPA804 are DSP controlled four-channel amplifiers that can be configured in three different amplification arrangements to meet the design requirements of any installation. These DPA models are factory preconfigured in a four-channel 70V mode. If the design requires four channels of low impedance amplification, the DPA amplifiers can be configured as four-channel models with either 4-Ohm or 8-Ohm load impedances. Many system designs require both low and high impedance amplification. These DPA models can be configured to deliver 70V / 100V for a paging / background system on two channels plus two additional 4/8-Ohm amplifier channels for a foreground stereo application.
These DPA models come standard with four balanced line inputs and an accessory slot for an optional DPA-DAC4 four-channel Dante ^™ receiver card or a DPA-AMIX (2) mic / line, (2) AUX input card, giving the DPA404 and DPA804 a total of 8 inputs. All inputs can be mixed and routed to any of the four amplifier channels. All four amplifier channels have an assortment of DSP tools including level controls, EQ's, limiters, high & low pass filters, and delay to provide flexibility for a range of applications.
DPA Series amplifiers feature either local or network control making them a true "game changer" in the commercial audio world. The output level can be assigned to either the front panel potentiometers or to the onboard GUI. Wired remote level control and input select can be configured to allow simple control for the end user. Each unit also features GUI based input and output level metering along with assignable mute functions that are triggered via an audio signal or contact closure. Access to the DSP settings is accomplished via computer, tablet or mobile device using a web browser. All settings can be password protected.
The DPA series amplifiers also include PC based site manager software that automatically searches within a specific network for all DPA amplifiers on the network. It will list them and allow single click access to any unit. The DPA Site Manager software can do a variety of functions besides locating IP addresses including fault reporting, input & output status, standby status and remote activation via a scheduler timer.
The DPA404 and DPA804 are ready to use, out of the box in four-channel 70V / 100V mode, with no configuration or network connectivity required making them a cost effective solution even for applications that do not require processing or network control.
Key Features
DPA404 Configuration Power Levels
- 4 x 100 Watt 70V (Factory Default)
- 4 x 100 Watt 100V
- 4 x 75 Watt 8Ω
- 4 x 50 Watt 4Ω
• 2 × 100 Watt 70V / 100V & 2 × 75 Watt @ 8Ω - 2 x 100 Watt 70V / 100V & 2 x 50 Watt @ 4Ω
DPA804 Configuration Power Levels
- 4 x 200 Watt 70V (Factory Default)
- 4 × 200 Watt 100V
- 4 × 150 Watt 8Ω
- 4 x 100 Watt 4Ω
• 2 x 200 Watt 70V / 100V & 2 x 150 Watt @ 8Ω
• 2 × 200 Watt 70V / 100V & 2 × 100 Watt @ 4Ω
• GPIO - Assignable for remoter level & mute
• No computer required to use
- Configurable DSP
• PC, iOS ^® , & Android ^® controllable
- User page with assignable input & output level control
- Site manager software with network auto-discovery, fault reporting, input & output status, standby status and remote activation via a scheduler timer
- On board web GUI for remote monitoring of status & levels
- Mute assignments triggered via audio signal or contact closure
- APD - auto power down with audio sense turn on
- 4 balanced inputs (up to 8 inputs with optional accessory card)
- Optional accessory card slot for a DPA-DAC4 four-channel Dante™ receiver card or a DPA-AMIX (2) mic / line, (2) AUX input card
- Assignable level controls, on board GUI (security password protected) or by front panel pots with tamper deterring covers
- Assignable remote level control when used with optional WPD-VC10K
• DPA amplifier site manger software
• DPA amplifier discovery software

Atlas

1601 Jack McKay Blvd. • Ennis, Texas 75119 U.S.A.
Telephone: 800.876.3333 • Fax: 800.765.3435
- 5 - AtlasIED.com
Applications
The flexible DSP, remote web monitoring, and control of the DPA Series amplifiers makes them the perfect choice for presentation rooms, classrooms, conference rooms, and retail background / foreground music applications.
DPA Amplifier Configurations
Note: For illustration purposes, model DPA804 is used for all examples. The DPA404 will be wired and configured just like the DPA804. All DPA models have the same features and panel layout. The differences between models are the output power levels.
Configuration #1 4-Channel 70V / 100V (Factory Default)
text_image
4-CHANNEL 70V CONFIGURATION (FACTORY DEFAULT) Output 2 Output 1 Output 3 Output 4 Control Ports Assign Configuration of Ports C1 thru C4 in GUI Input 1 Input 2 Input 3 Input 4 Output 4 COM 70V Output 3 COM 70V Output 2 COM 70V Output 1 COM 70VConfiguration #2 4-Channel 4 Ohm / 8 Ohm
4-CHANNEL 4 or 8 Ohm Configuration
text_image
Output 2 Output 1 Output 3 Output 4 DP4804 Control Ports Assign Configuration of Ports C1 thru C4 in GUI Input 1 Input 2 Input 3 Input 4 CH1 CH2 CH3 CH4 4 or 8 Ohm OutputsConfiguration #3 2-Channel 70V / 100V & 2-Channel 4 Ohm / 8 Ohm
Split System Configuration
Outputs 1&2 = 4/8 Ohm; Outputs 3&4 = 70/100V
text_image
Output 2 Output 1 Output 3 Output 4 Control Ports Assign Configuration of Ports C1 thru C4 in GUI Input 1 Input 2 Input 3 Input 4 CH1 CH2 4 or 8 Ohm Outputs Output 4 COM 7G/100V Output 3 COM 7G/100V
Atlas

1601 Jack McKay Blvd. • Ennis, Texas 75119 U.S.A.
Telephone: 800.876.3333 • Fax: 800.765.3435
- 7 - AtlasIED.com
Front Panel

text_image
Atlas Sound DPA804 Digital Power Amplifier ⑦ ⑦ ② ①1. Power Switch
This toggles the amplifier between Active Mode or Sleep Mode. Refer to section "Understanding the 3 Amplifier Idle States".
2. LED Power Indicator
The DPA amplifier has three states of Idle power that are indicated as follows:
A. Idle Active Mode - When the LED outer ring of the power switch illuminates a steady blue color, the amplifier is in Active Mode and is ready to pass audio.
B. Sleep Mode - When the outer ring LED is Off, the amp is in Sleep Mode. In Sleep Mode, the Ethernet is active for access to the amplifiers on board GUI. The amplifier output stage and DSP is off. Audio will not pass in Sleep Mode.
C. Standby APD Mode - When the amplifier Auto Power Down (APD) is enabled and the amplifier is in the APD mode, the LED outer ring will blink blue once every 5 seconds.
For further information refer to section "Understanding the 3 Amplifier Idle States" on page 35.
text_image
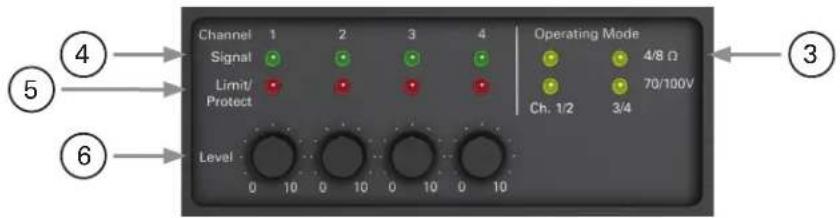
Channel 1 2 3 4 Signal Limit/ Protect Operating Mode 4/8 Ω 70/100V Ch. 1/2 3/4 Level 0 10 0 10 0 10 0 10 ③ ④ ⑤ ⑥3. Operating Mode Indicators
The DPA four-channel amplifiers can be configured three ways. The LEDs in this area indicate the configuration of the amplifier. These indicators illustrate if Channels 1/2 and 3/4 can be operated separately in 4/8Ω mode or 70V / 100V mode. Amplifier operation mode setting is completed using the internal DSP GUI.
A. 4-Channel High impedance 70V / 100V mode
B. 4-Channel Low impedance 4Ω or 8Ω mode
C. 2-Channel High impedance 70V / 100V mode & 2-Channel Low impedance 4/8Ω mode
4. Channel 1, 2, 3, 4 Signal LED
The Signal LED will illuminate green if audio signal is present at the Output of the amplifier.
5. Channel 1, 2, 3, 4 Limit/Protect/Mute LED
The Limit / Protect LEDs will illuminate Red if one of the following conditions occurs.
A. Any channel of the DPA amplifier reaches maximum output power. The DPA features an adjustable amplifier OUTPUT limiter which helps prevent the amplifier from hard clipping. An occasional flash of the LED is OK but if the LED illuminates continuously reduce the input level of the amp. If the Clip LED remains On after reducing the input level, recheck the load connected to the amplifier.
B. The OUTPUT has been Muted in the GUI.
C. A fault is detected within the amplifier. Once the fault is corrected, it may be required to reset the AC Mains power to reset the amplifier protect mode.

1601 Jack McKay Blvd. • Ennis, Texas 75119 U.S.A. Telephone: 800.876.3333 • Fax: 800.765.3435
AtlasIED.com - 8 -
Front Panel
6. Channel 1, 2, 3, 4 Level Controls
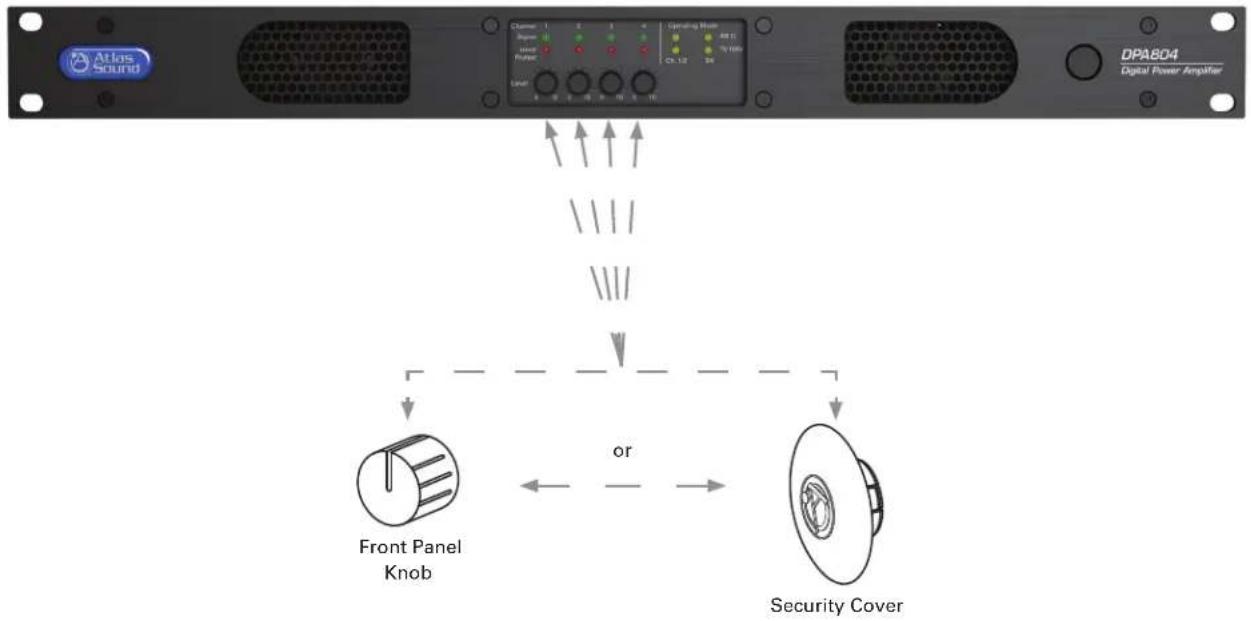
Each model has four potentiometer level controls on the front panel, one level control for each of the four amplifier channels. Each model is shipped factory pre-configured for 4-CH 70V / 100V mode. Note: The front panel level controls ship enabled but can be defeated in the DSP GUI. If the front panel level controls are used, knobs can be placed on the potentiometer shaft for ease of operation or can be removed and replaced with the included security covers to prevent tampering.
flowchart
graph TD
    A["ATLAS Sound"] --> B["Front Panel Knob"]
    B <--> C["Security Cover"]
    C <--> D["DPA804 Digital Power Amplifier"]
    D --> E["Channel 1-4: Signal 1-5, Power 1-2, Current 1-3, Am 1-2, V 1-3, T 1-2, V 1-3"]
    E --> F["Output Signal"]
    style A fill:#f9f,stroke:#333
    style D fill:#ccf,stroke:#333
    style B fill:#cfc,stroke:#333
    style C fill:#fcc,stroke:#333
    style D fill:#ffc,stroke:#333
7. Air Exhaust
Each model includes convection cooling with dynamic fan assist for extreme conditions. If the unit is not being used or in Standby mode, the fan is not needed for cooling and remains Off until the unit is in heavy use. As heat is generated in the amplifier during use, the fan activates at a low speed and increases as needed to keep the amplifier at safe operating temperature. This cooling method eliminates the need for air filters that can become clogged and require maintenance. The DPA amplifier's air flow is from rear to front.

Atlas

1601 Jack McKay Blvd. • Ennis, Texas 75119 U.S.A.
Telephone: 800.876.3333 • Fax: 800.765.3435
Rear Panel
text_image
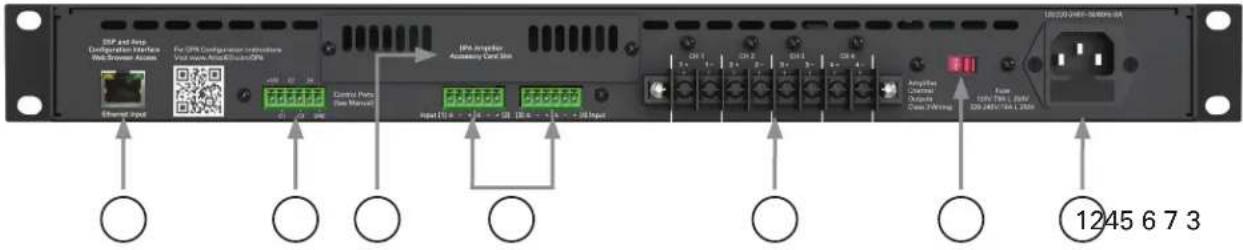
USB and Base Configuration Services Web Browser Access For OPR Configuration Indicators First home, First Base/OPRs IPA Adapter Accessory Card Bin Ethernet Input Control Ports (See Manual) Input 10k - 30k - 50k 10k - 30k - 50k Input Analog/Inter Ductors Cass / Wiring 400 MHz / 500 MHz / 1245 MHz / 64 L / 2500 1245 6 7 31. IEC AC Receptacle
The DPA amplifier can operate from 110V - 120V (115V AC Mains Line Selection) & 220V - 240V (230V AC Mains Line Selection). Use the external switch for AC Mains voltage change over. Note: The DPA404 & DPA804 use different fuses for 115V or 230V operation and will need to be changed by a qualified technician. The 230V fuses are included within the amplifier packaging. The included IEC cord is designed to work with 110 - 120VAC. A separate IEC cord will need to be purchased for 220 - 240VAC operation.
The AC Mains fuse is located inside the IEC AC receptacle. A small tool is required to pry oped the Fuse Holder housing. Do not force. Changing the fuse is required to operate from 220V - 240V. Refer to Page 34 for converting the AC Mains from 120V to 230V operation.
Note: Changing the fuse must be completed by a qualified technician.
• DPA404 120V line voltage operation: T4AL 250V, Slow Blown, 5mm x 20mm, Glass
• DPA404 230V line voltage operation: T2AL 250V, Slow Blown, 5mm x 20mm, Glass
- DPA804 120V line voltage operation: T8AL 250V, Slow Blown, 5mm x 20mm, Glass
- DPA804 230V line voltage operation: T4AL 250V, Slow Blown, 5mm x 20mm, Glass
text_image
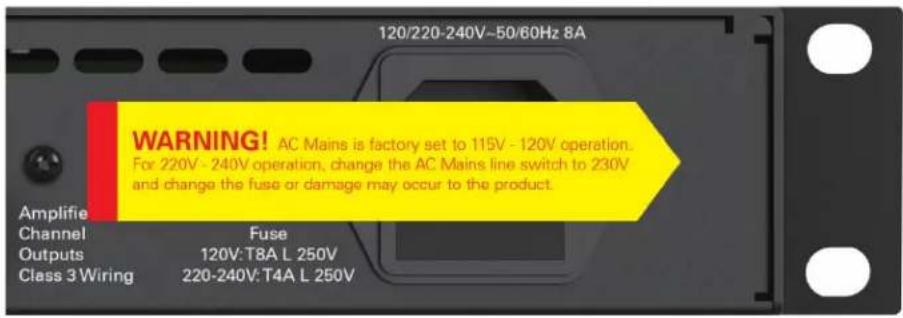
120/220-240V~50/60Hz 8A WARNING! AC Mains is factory set to 115V - 120V operation. For 220V - 240V operation, change the AC Mains line switch to 230V and change the fuse or damage may occur to the product. Amplify Channel Fuse Outputs 120V:T8A L 250V Class 3 Wiring 220-240V:T4A L 250V2. AC Mains Line Voltage Select Switch
The DPA amplifier comes configured to the 115V setting. This setting can be used with AC Mains between 110V - 120V. If 220V - 240V operation is required, the Line Voltage Select Switch and fuse need to changed. Refer to Page 34 for instructions.
3. Input Connections
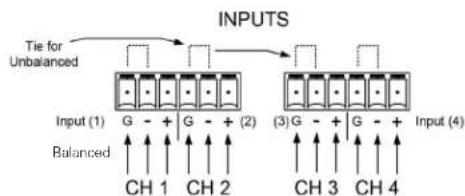
Inputs 1 - 4 accept balanced input signals via the removable 3.5mm Phoenix type connector. For wiring follow the labeling on the rear of the amp. For unbalanced signals connect the (−) and (GND) pins together.
Note: Amplifier Configuration and I/O Routing are done in the GUI. Any Input can be routed to any Output. The DPA is factory shipped preconfigured in a four-channel 70V / 100V mode. The I/O Router is configured as follows: Input I is routed to Output 1, Input 2 is routed to Output 2, Input 3 is routed to Output 3, and Input 4 is routed to Output 4.

text_image
Input [1] G - + G - + [2] [3] G - + G - + [4] Input
1601 Jack McKay Blvd. • Ennis, Texas 75119 U.S.A. Telephone: 800.876.3333 • Fax: 800.765.3435
AtlasIED.com - 10 -
4. Speaker Connection
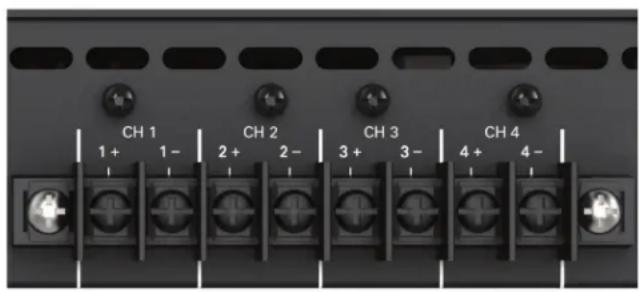
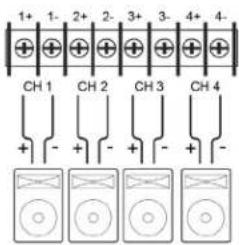
A screw terminal block connector is supplied to connect speakers to the DPA amplifier. It is recommended to use Class 3 rated, 14-gauge wire or lower for speaker wiring. Amplifier output channel configurations are done in the amplifier GUI. The DPA is shipped with two speaker output terminal covers. AtlasIED recommends placing the security covers on the amplifier after wiring and before turning the amplifier on for configuration. Included in the carton are 8 (QTY) spade crimp terminals that accept up to 12-gauge wire and 4 (QTY) security cover screws (M3 x 8mm). Terminal block screws are M4.
text_image
CH 1 1+ 1- CH 2 2+ 2- CH 3 3+ 3- CH 4 4+ 4-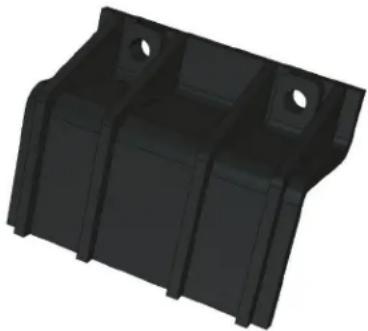
natural_image
3D rendered black plastic mechanical bracket with mounting holes (no text or symbols)Note: The DPA amp is preconfigured at the factory for four-channel 70V / 100V mode. Follow the manual wiring information to connect the distributed audio system.
5. Ethernet Port
Connect the amplifier to the network, local computer, or router/switch using CAT5 cable to access the amplifier's DSP and control settings.
6. Control Ports
The DPA Series allows you to assign / configure the four control ports located on the rear of the amplifier to perform Remote Level or Mute functions. Note: Each Control Port pin can only be assigned to one function such as Mute or Level, but not both. Control Port assignment is done in the DPA GUI "Mute, Link, Port Assignment Page". See page 20 for details on how to connect / assign a Remote Level and a Contact Closure Mute. Note: The factory default assignments for the DPA Amplifier Control Ports are as follows:
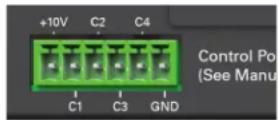
Control Port Factory Default Settings (Refer to Remote Level Control)
• C1 Controls CH 1 Output Remote Level
• C2 Controls CH 2 Output Remote Level
• C3 Controls CH 3 Output Remote Level
• C4 Controls CH 4 Output Remote Level
7. Accessory Card Slot
The DPA404 and DPA804 offer 4 additional inputs that can be routed to any of the four output channels. Optional accessory cards DPA-DAC4 (Four-Channel Dante™ Digital Audio Input Card) and DPA-AMIX (Four-Channel Analog Mic / Line, Auxiliary Input Card) are available. Contact AtlasIED for a list of accessory cards. See section "Accessory Card Installation" on Page 32 for information on installation or damage may occur. Note: Accessory card installation must be done by a qualified technician.

Note: In standby mode there are DC voltages present at the accessory card port. The DPA amp must be removed from the AC Mains source in order to prevent damage to the card or amplifier.

Atlas

1601 Jack McKay Blvd. • Ennis, Texas 75119 U.S.A.
Telephone: 800.876.3333 • Fax: 800.765.3435
Accessing the GUI Control Panel
DPA amplifiers include a unique set of features and configurations. All DPA amplifiers are configured from the factory out of the box to operate as traditional commercial power amplifiers. Ethernet connectivity is not required for operation of a DPA amplifier. However, to take full advantage of the DSP settings such as, EQ, High & Low Cut filters, level control / assignment and limiter settings, the DPA Control Panel must be accessed via the network or local computer. External software is not required to operate the DPA amplifier; the software is embedded in the amplifier in what is called the web browser GUI Control Panel interface. To access the onboard control panel, follow one of the five methods listed below.
Accessing the GUI Control Panel
I. Direct Connection via Ethernet
II. Web Browser via Network Router
III. AtlasIED DPA Site Manager Software
IV. Smartphone or Tablet
V. Accessing the DPA Outside the Local Network
I. Direct Connection via Ethernet
Use this method if there is no network access available.
- Connect an Ethernet cable from a laptop or desktop computer to the Ethernet Input on the DPA amplifier. Most computers will allow direct connection from the DPA amplifier using a standard CAT5 cable. Some older computers may require the use of a Crossover cable to connect to the DPA amplifier. If a connection cannot be made using a CAT5 cable, use a Crossover cable.
- Turn OFF the computer's Wi-Fi.
- Open a Web browser, AtlasLED suggests using Google Chrome or Mozilla Firefox.
- In the Web Browser address bar, type in the following: http://DPA804 and hit enter. For this example we are connecting to the DPA model DPA804. An example is shown in Figure 1.

text_image
New Tab http://dpa804Figure 1
-
Out of the box the amplifier's model number is all that is needed to connect. It is not case sensitive, but the full exact name is required. Note: During configuration, the amplifier's name can be changed. As an example at a school the amp may be renamed "ROOM1". After the name is changed, follow the same process to log onto the amp as outlined above, but change the name from "http://dpa804" to "http://room1".
-
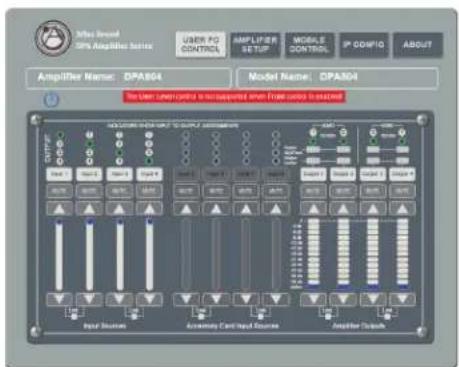
The amplifier will be discovered and the DPA User PC Control Page will launch after pressing the "Enter" key. An example of the DPA User PC Control Page GUI web page is shown in Figure 2.
-
The DPA amplifier's IP address can be directly entered into the Web Browser to access the DPA GUI.
Example: "http://192.168.1.110".
Note: It is required to enter the Administrator Name and Password to access the home page. Factory default for User Name is "admin" and the password is "admin".
Note: When on the Mobile Page, on the Setup page, the faders will not function. To make setting changes the value of change must be entered in the data box. In the amp configure page the Level faders can be linked together for stereo level adjustment.

Atlas

1601 Jack McKay Blvd. • Ennis, Texas 75119 U.S.A.
Telephone: 800.876.3333 • Fax: 800.765.3435
II. Web Browser via Network Router
This method is very similar to the Direct Connection method covered in Section 1, but using a web browser on your local network to find the DPA amp.
- Connect the DPA Amplifier using a standard Ethernet cable to a Router. Make sure the Router is in DHCP mode, the usual default.
- Connect your computer to the same Router via an Ethernet cable or Wi-Fi.
- Open a Web browser, AtlasLED suggests using Google Chrome or Mozilla Firefox.
- In the Web Browser address bar, type in the following: http://DPA804 and hit enter. For this example we are connecting to the DPA model DPA804. An example is shown in Figure 1.
- Out of the box the amplifier's model number is all that is needed to connect. It is not case sensitive, but the full exact name is required. Note: Once connected, the name of the amplifier can be changed to meet the install's naming orientation.
- The amplifier will be discovered and the DPA User PC Control Page will launch after pressing the "Enter" key. An example of the DPA User PC Control Page GUI web page is shown in Figure 2.
- If the DPA Amplifier's IP address is known, enter the IP number into the Web Browser to access the DPA GUI. Example: "http://192.168.1.110"
III. AtlasIED DPA Site Manager Software
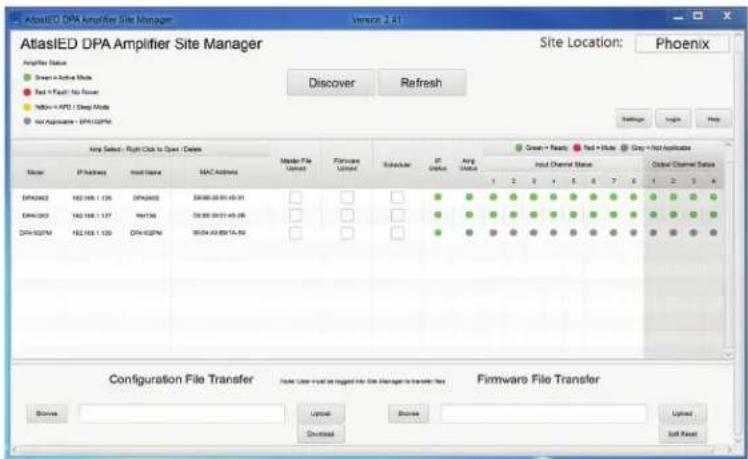
This method is the easiest way to find and connect to any DPA Amplifiers on the Network. See Figure 3.
- Download the DPA Amplifier Site Manager software at https://www.atlasied.com/SoftwareLibrary.
- The DPA Amplifier Software is a small zip file and can be emailed but has to remain a zip file because it has an executable (.exe) file to launch the software. Most Internet security software will block any .exe file unless it is in zip file format. Also download the DPA Amplifier PC IP Site Manager Software user guide to make installation easier.
- The DPA Site Manager software can do a variety of functions besides locating IP addresses such as; fault reporting, input & output status, standby status and remote activation via a scheduler timer. Refer to the DPA Site Manager instructions for the complete capabilities of the software.
text_image
Wire Broad Wire Amplifier Series USER FG CONTROL AMPLIFIER SETUP MOBILE CONTROL IP SODIFQ ABOUT Amplifier Name: DPA504 Model Name: DPA504 To User user control is supported when Flow used is loaded Signal Sources Accuracy Card Head Sequence Amplifier ToolsFigure 2
text_image
AtlasLED DPA Amplifier Site Manager Site Location: Phoenix Amplifier Status Green = Active Mode Red = Fault = No Power Yellow = AFD Sleep Mode Not Applicable - DPA/02PMA Any Select - Right Click to Open / Delete Marker File Used Firmware Used Substrate IP Direction Avg Status Input Channel Status Color Channel Status DPA/02PMA 192.108.1.135 DPA/02PMA 200.00-00-01-01-01 DPA/02PMA 242.108.1.137 WMTM 252.00-00-01-01-01-01 DPA/02PMA 192.108.1.135 DPA/02PMA WMTM-01-01-01-01-01 Configuration File Transfer Home User is not logged into the Site Manager to transfer free Firmware File Transfer Browse Upload Browse Updated Soft NewerFigure 3

Atlas

1601 Jack McKay Blvd. • Ennis, Texas 75119 U.S.A.
Telephone: 800.876.3333 • Fax: 800.765.3435
IV. Smartphone or Tablet (Wi-Fi)
- DPA amplifiers can be accessed remotely using a smartphone or tablet device using the IP address for the amplifier being accessed. Use method 1, 2, or 3 to create the initial DSP configurations and then access the amplifiers using the mobile device interface.
- To access a DPA amplifier on a network using a smartphone or tablet requires that the smartphone or tablet be able to access the same network via Wi-Fi.
- Open the Smartphone or Tablet's browser and enter the IP address in the address bar. Example: "192.168.1.110/mt1.html"
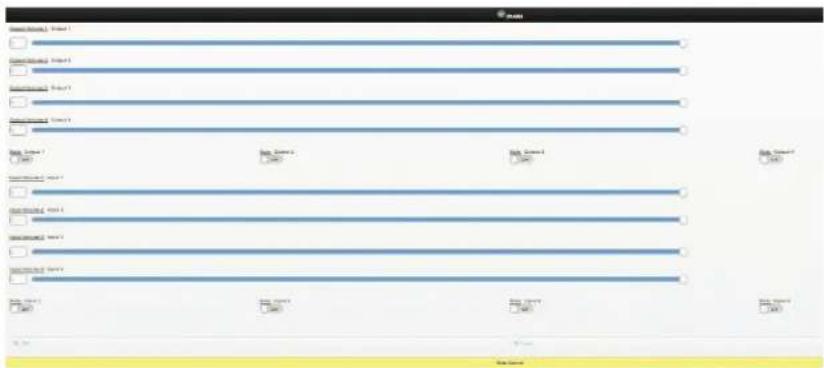
Note: Some network firewalls may block access. If this occurs consult an IT technician for firewall setting adjustment. - The GUI will open to a Mobile page as shown in Figure 4. Mobile access will allow for volume level adjustment and home page access once the administrator user name and password are accurately entered when prompted.
- On the Mobile page of the GUI, the amplifier output level and mute can be adjusted and the Home page can be accessed. The page resolution size has been created to fit most mobile devices.
text_image
Start End Start End Start End Start End Start End Start End Start End Start End Start End Start End Start End Start End Start End Start End Start End Start End Start End Start End Start End Start End Start End Start End Start End Start End Start End Start EndFigure 4
Note: It is required to enter the Administrator Name and Password to access the home page. Factory default for User Name is "admin" and the password is "admin".
Note: When on the Mobile Page, on the Setup page, the faders will not function. To make setting changes the value of change must be entered in the data box. In the amp configure page the Level faders can be linked together for stereo level adjustment.
- After accessing the Mobile web page, the IP connection can be saved to the device's screen as APP ICON short cut where its name can be changed to reflect its location or other description.
Apple ^® iOS
- Open the DPA amplifier mobile web page using Safari.
- At the bottom of the screen select the box with the arrow.
- Select "Add to Home Screen"
- Open the DPA amplifier mobile web page using the Safari browser.
- Press the Menu button and select Bookmarks.
- Select the top left thumbnail labeled Add.
- Press OK to add it.
V. Static IP - Accessing the DPA Outside the Local Network
Follow these instructions in order to access a particular DPA amplifier from another network not connected to the DPA amplifier(s).
Example: An amplifier is in a school in Los Angeles and the volume in the classroom is not loud enough. The installer has the maximum level set via the limiter. Instead of the installer having to drive to the school which is three hours away, he can access the amplifier from his desk or phone. During the installation of the amp, the amplifier can be configured with a static IP address and a specific port assigned by the school's IT manager. This enables the installer access only to the specific DPA amplifier that needs the level adjusted. Below is a safe convenient way to allow limited access to a specific product via a protected network. Setting up an external IP address eliminates the requirement to VPN into a network to gain access to the LAN. This allows the person needing to maintain the device a single point of entry and keeps the LAN secure.
- Plug DPA amp into local network, determine the IP address assigned to the amp, and change it to a static IP address.
- Create a NAT (Network Address Translation) on the WAN router or firewall using port 80. An external static IP address will be needed for this process to work.
- Once the external IP address is translated to the internal IP address, go to another Internet connection outside the Local Network where the DPA amp is present and try connecting to the external IP address. Verify correct NAT has been established.
This link is an example of a DPA804 amplifier connected to a Network that allows access from the Internet. Type this link into a web browser to access a live demonstration: http://dpa1202demo.atlasied.com. After connecting to the DPA amp, click the Setup tab and enter the USER NAME (admin) and PASSWORD (admin) to gain full access of the amplifier.
Resetting the DPA IP to Factory DHCP
- Remove AC Power from DPA amp and wait 1 minute
- Apply AC while at the same time, press and hold the front power button until the LED blinks 5 times at which point it will be reset. Note: typically the button must be held for about 10 seconds.
- DHCP will be enabled
- Follow standard login procedures
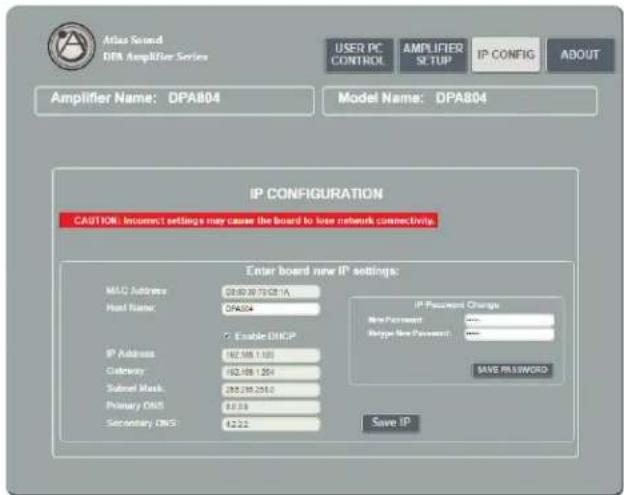
IP Config Page
text_image
Atlas Sound DPA Amplifier Series USER PC CONTROL AMPLIFIER SETUP IP CONFIG ABOUT Amplifier Name: DPA804 Model Name: DPA804 IP CONFIGURATION CAUTION: Incorrect settings may cause the board to lose network connectivity. Enter board new IP settings: MAC Address 50.00.79/021A Host User: DPA804 Enable DHCP IP Address 162.388.1.105 Gateway 162.388.1.204 Subnet Mask 255.239.2010 Primary DNS $1.18 Secondary DNS 42.22 IP Required Change New Payment Rename New Payment SAVE PASSWORD Save IPFigure 5

Atlas

1601 Jack McKay Blvd. • Ennis, Texas 75119 U.S.A.
Telephone: 800.876.3333 • Fax: 800.765.3435
Identifying the Firmware Version
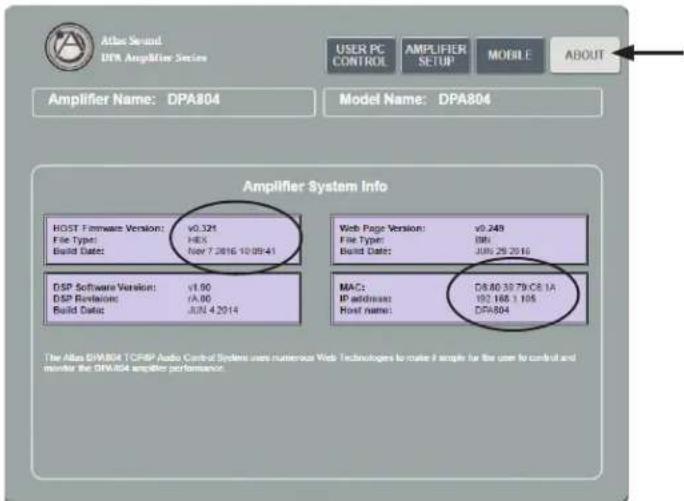
- About Page-To gain access to feature enhancements or bug fixes, it may be required to update the firmware on the amp. The About Page contains information such as the MAC address and firmware versions. There are 2 types of firmware that may need upgrading, Host (HEX) firmware and Web (BIN) firmware. This is illustrated in Figure 6.
Visit https://www.atlasied.com/dpa-series, choose the DPA model being updated, and click the "Support Files" tab. Click the "About" page in the Control Panel and it will list the firmware versions installed on the amplifier. Compare these to the firmware versions available for download on the AtlasLED website. If they don't match, download the firmware versions that need to be updated. Read the DPA Amplifier Firmware Update Guide for instructions on how to install the firmware updates.
text_image
Atlas Second DPA Amplifier Series USER PC CONTROL AMPLIFIER SETUP MOBILE ABOUT Amplifier Name: DPA804 Model Name: DPA804 Amplifier System Info HOST Firmware Version: v0.321 File Type: HEX Build Date: Nov 7 2016 10/09/41 DSP Software Version: v1.00 DSP Revisions: A.00 Build Date: JUN 4 2014 Web Page Version: v0.249 File Type: D8: Build Date: JUN 29 2016 MAC: D8.80.39.79-C8.1A IP address: 192.168.1.105 Host name: DPA804 The Atlas DPA804 TCPSP Audio Control System uses numerous Web Technologies to make it simple for the user to control and monitor the DPA804 amplifier performance.Figure 6
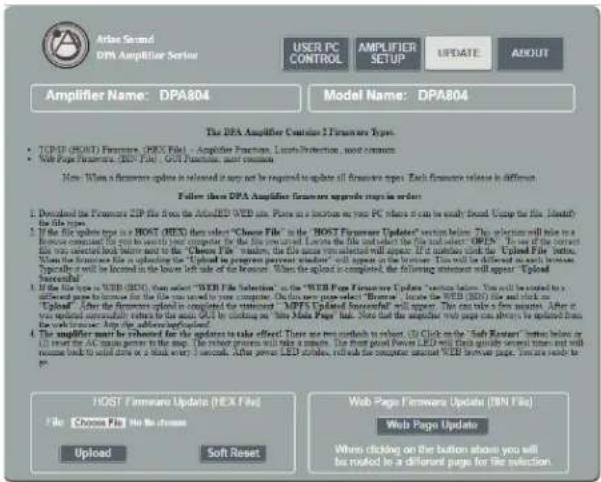
- Update Page - As features and updates are created it may be required to update the firmware on the amp. This page provides directions on how to perform a firmware update as shown in Figure 7.
For a more detailed description on firmware upgrades visit https://www.atlasied.com/dpa-series to download the DPA amplifier upgrade Reference Guide and up-to-date firmware files.
flowchart
graph TD
    A["Amplifier Name: DPA804"] --> B["Model Name: DPA804"]
    B --> C["SETUP"]
    C --> D["Output Layer"]
    C --> E["Reset to default factory settings"]
    C --> F["Output Output"]
    style A fill:#f9f,stroke:#333
    style B fill:#ccf,stroke:#333
    style C fill:#cfc,stroke:#333
    style D fill:#fcc,stroke:#333
    style E fill:#cff,stroke:#333
    style F fill:#ffc,stroke:#333
Figure 7 Figure 8
text_image
Arista Second DPA Amplifier Server USER PC CONTROL AMPLIFIER SETUP UPDATE ABOUT Amplifier Name: DPA804 Model Name: DPA804 The DPA Amplifier Course 2 Features Types. TCP (IF CHINT) Features, CPEX File - Amplifier Function, Lattice Protection, most common. Web Page Features: CPEX File - GCP Function, most common. Now: When a features update is released it may not be required to update all features types. Each features release in different Follow these DPA Amplifier Features upgrade steps in order. 1. Detailed the Features TCP file from the Advanced WEB file. Push us a location on your PC where it can be easily found. Stop the file. Identify the files. 2. If the file type is to be HOST (HES) then select "Choose File" in the "HOST Features Updated" version below. The options will take to a reverse communication from the computer for the file you add and locate the file and select the file and select "OPEN". In use if the current file was selected look before next to the "Choose File" version, the file name is selected will appear. If no number click the "Uploaded File" version, there are the features that is uploading the "Upload in progress present window" will appear in the browser. This will be different to each browser. "Upgrade" will be located in the lower left side of the browser. When the upload is completed, the following features will appear "Upload Successful" 3. If the file type is to WEB (HES), then select "WEB File Selection" in the "HOST Features Updated" version below. You will be started to a different page between for the file you need to view computer. On this page we select "Browse" to locate the WEB (HES) file and click on "Upload". After the features upload in completed the server(s) "MPFS Updated Successful" will appear. This can take a few minutes. After it was updated simultaneously to date this URL to download our Web Page file. Note that the installed web pages can always be updated from the Web Page to http the Webpage-upbound! 4. The amplifier must be reloaded for the updates to take offered. There are two methods to launch. (1) Click on the "Sub Remaster" button below or LT insert the AC open program in the map. Do remote programs will take a minute. The first panel Power LED must provide several times and will continue back to solid area at a total every 1 second. Other power LED outputs, read up the computer instead of WEB server page. You are ready to be HOST Features Update (HEX File) File Choose File No Bit choose Upload Soft Reset Web Page Features Update (WIN File) Web Page Update When clicking on the button above you will be moved to a different page for the selection.
Atlas

1601 Jack McKay Blvd. • Ennis, Texas 75119 U.S.A.
Telephone: 800.876.3333 • Fax: 800.765.3435
AtlasIED.com - 16 -
DPA GUI Pages Defined
User / Home Page
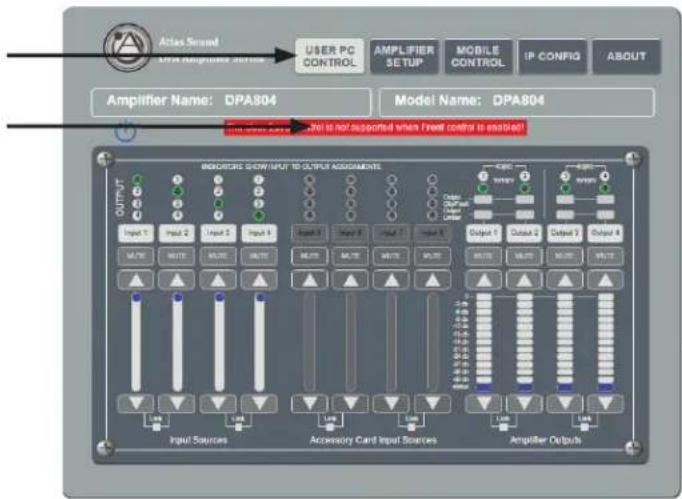
When the DPA GUI is accessed for the first time, the DPA amplifier is configured as a 4-channel 70V / 100V mode amplifier with the front panel level controls active and the USER level control on the GUI page deactivated. Note: The DPA amp Output Level can be controlled by either the front panel Level or by the GUI, but not both at the same time. To use the GUI User Level Control, the amp needs to be configured for that operation.
If the DPA amp GUI is open and looks like Figure 9, the front panel level controls are active. Notice the fader controls are invisible. This is the factory shipping default mode. If the Amplifier Activation Switch is illuminated red, the amplifier is in Sleep or APD Mode. If the switch is illuminated green, the amplifier is in Active Mode. Click to select between modes.
text_image
Atlas Second MTR (Signal) Setup USER PC CONTROL AMPLIFIER SETUP MOBILE CONTROL IP CONFIG ABOUT Amplifier Name: DPA804 Model Name: DPA804 Input is not supported when Front controls is enabled! BIOGRAPHIC SHOW INPUT TO OUTPUT ASSIGNMENTS OUTPUT Output 1 Input 2 Input 3 Input 4 Output 1 Output 2 Output 3 Output 4 Output 1 Output 2 Output 3 Output 4 Input Sources Accessory Card Input Sources Amplifier OutputsFigure 9
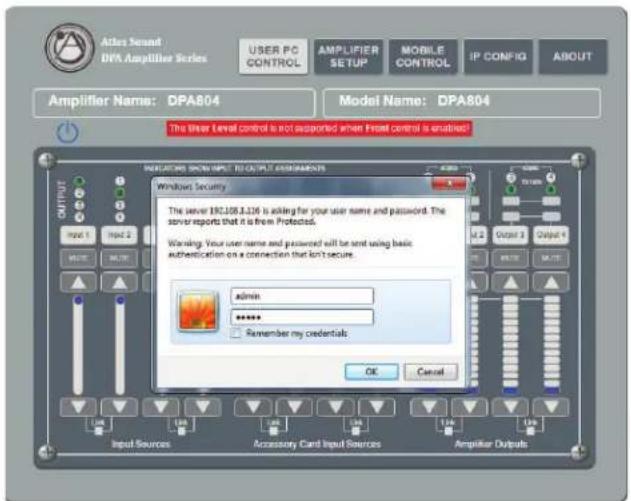
Password Login
To access the full command of the DPA GUI, click on the Setup tab and enter the user name and password. Factory Default for User Name is "admin" and the Password is "admin". This is shown in Figure 10. Note: The user name and password can be changed anytime.
text_image
Adobe Sound DPA Amplifier Series USER PC CONTROL AMPLIFIER SETUP MOBILE CONTROL IP CONFIG ABOUT Amplifier Name: DPA804 Model Name: DPA804 The Linear Level Control is not supported when Front Control is enabled! OUTPUT INPUT 1 INPUT 2 Windows Security The server 19C.106.3.106 is asking for your user name and password. The server reports that it is from Protected. Warning: Your user name and password will be sent using basic authentication on a connection that isn't secure. admin ****** Remember my credentials OK Cancel Input Sources Accessory Card Input Sources Amplifier OutputsFigure 10

Atlas

1601 Jack McKay Blvd. • Ennis, Texas 75119 U.S.A.
Telephone: 800.876.3333 • Fax: 800.765.3435
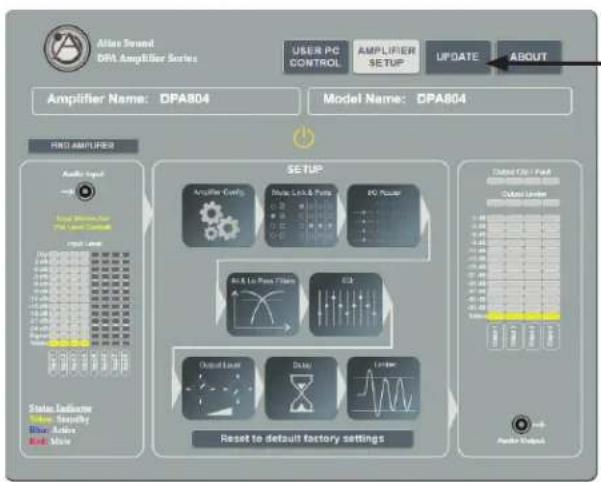
Setup Page
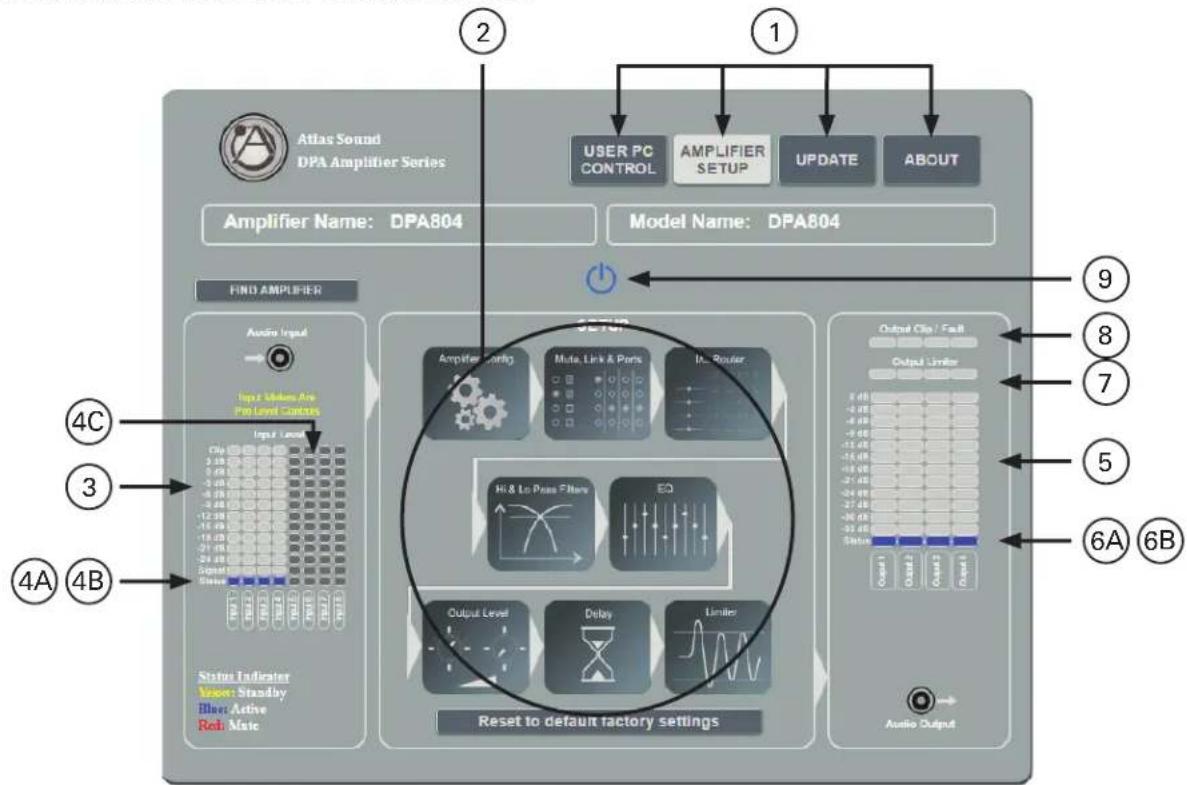
From the Setup Page the user can view and access the following:
- Access the Home, Update and About page
- Access the Amp Config, Mute Port & Link, I/O Route, HP & LP Filters, EQ, Output Level, Delay and Limiter control pages.
- View Input Meters - Input Meter readings are Pre all Level Controls
- Input Status Indicator - Located at the bottom of the Input meters.
A. Blue indicator means ready and active.
B. Red indicator means the channel is muted.
C. Grayed Out means not enabled (applies to inputs 5 - 8)
-
Output Level Meters
-
Output Status Indicator - Located at the bottom of the Output meters.
A. Blue indicator means ready and active.
B. Red indicator means the channel is Muted
-
Output Limiter - Illuminates yellow when the limiter is engaged.
-
Output Clip / Fault Indicator
A. Clip illuminates red when the amplifier output has reached its maximum output power.
B. Fault illuminates red when the channel has a fault condition such as an improper load applied for the configuration setting, short on the output or failed output channel. Note: It may be necessary to reset the AC Mains Power to clear the amplifier from protect mode.
- Amplifier On / Off Status and Activation Switch - If illuminating red the amplifier is in Sleep or APD Mode. If illuminating blue the amplifier is in Active Mode. Click to select between modes.
flowchart
graph TD
    A["①"] --> B["USER PC CONTROL"]
    B --> C["AMPLIFIER SETUP"]
    C --> D["UPDATE"]
    D --> E["ABOUT"]
    F["②"] --> G["AMPLIFIER Setup"]
    G --> H["Model Name: DPA804"]
    I["③"] --> J["FIND AMPLIFIER"]
    K["④A ④B"] --> L["⑤"]
    M["⑥A ⑥B"] --> N["⑦"]
    O["⑧"] --> P["OUTPUT LIMITER"]
    Q["⑨"] --> R["OUTPUT CL# / Fault"]
    S["⑩"] --> T["HI & Lo Press Filter"]
    U["⑪"] --> V["EO"]
    W["⑫"] --> X["Output Level"]
    Y["⑬"] --> Z["Delay"]
    AA["⑭"] --> AB["Limiter"]
    AC["⑮"] --> AD["Reset to default factory settings"]
    AE["⑯"] --> AF["Audio Output"]
Figure 11

Atlas

1601 Jack McKay Blvd. • Ennis, Texas 75119 U.S.A.
Telephone: 800.876.3333 • Fax: 800.765.3435
AtlasIED.com - 18 -
Amp Configuration Page
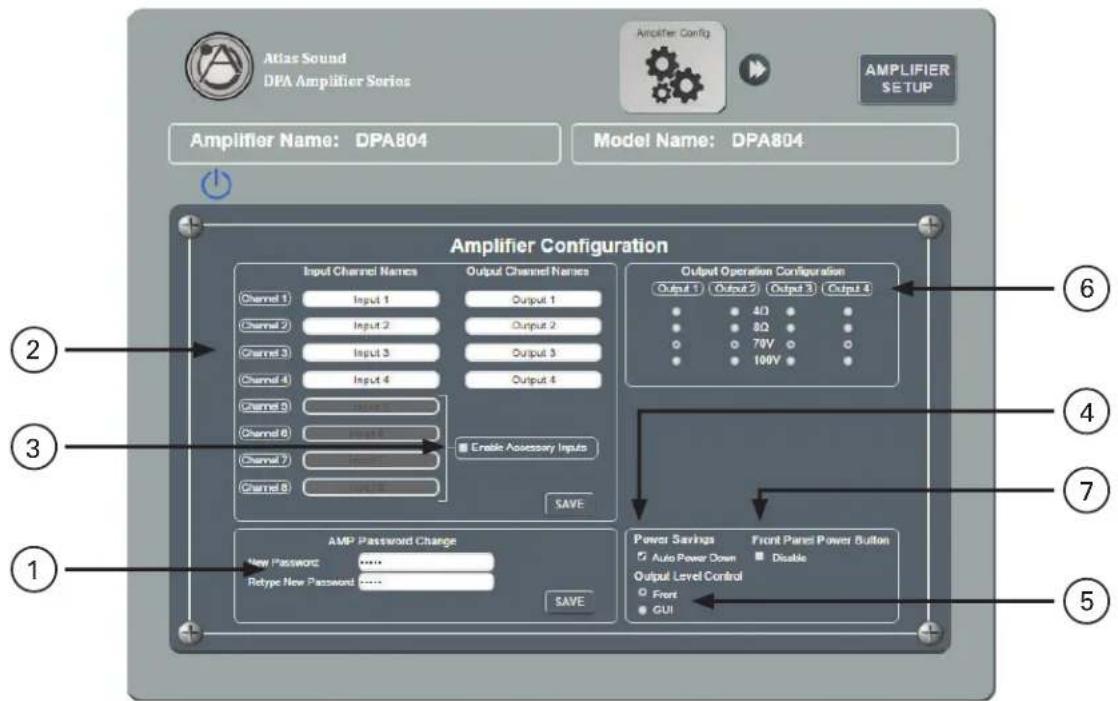
- Password Name
- Name Inputs and Outputs
- Accessory Inputs - Enable / Disable Note: Factory default accessory inputs are not engaged.
- Auto Power Down (APD) Enable / Disable. When this box is checked the amp is in Auto Power Down (APD) mode. After 30 minutes with no audio signal at the amplifier, the DPA amp will enter Standby APD Mode. In Standby Mode the amp will draw less power. The DPA amplifier has three states of idle power consumption to meet installation energy power consumption requirements. Refer to the amplifier specification page for power consumption data. Refer to the section on "Understanding the 3 AC Power Consumption Idle States" for a definition on how each idle state operates. When the amplifier senses signal on any of the 8 inputs, the amplifier will automatically switch from APD Mode to Active Mode. Note: Factory default APD is not engaged.
- Level Control Assignment - Check the appropriate box for desired mode of output level control method. The DPA output level can be controlled by either Front Panel pots or by the GUI, but not both at the same time. Note: Factory default Front Panel Level Control is engaged.
- Amplifier Output Configuration - Configure the amplifier outputs to be either 70V / 100V or 4Ω / 8Ω. Note: Factory default CH1, CH2, CH 3, CH 4 are set to 70V.
- Front Panel Power Disable Box - When selecting this box the front panel power switch is disabled. The amplifier can only be turned On / Off by removing the power cord. Note: Factory default Front Panel Power Button is engaged.
text_image
Atlas Sound DPA Amplifier Series Amplifier Config AMPLIFIER SETUP Amplifier Name: DPA804 Model Name: DPA804 Amplifier Configuration Input Channel Names Output Channel Names Channel 1 Input 1 Output 1 Channel 2 Input 2 Output 2 Channel 3 Input 3 Output 3 Channel 4 Input 4 Output 4 Channel 5 Input 5 Enable Accessory Inputs Channel 6 Input 6 Channel 7 Input 7 Channel 8 Input 8 SAVE AMP Password Change New Password ****** Retype New Password ****** SAVE Output Operation Configuration Output 1 Output 2 Output 3 Output 4 4Ω 8Ω 70V 100V Power Savings Auto Power Down Output Level Control Front GUI Front Panels Power Button DisableFigure 12

Atlas

1601 Jack McKay Blvd. • Ennis, Texas 75119 U.S.A.
Telephone: 800.876.3333 • Fax: 800.765.3435
Mute, Link & Port Assignment Page
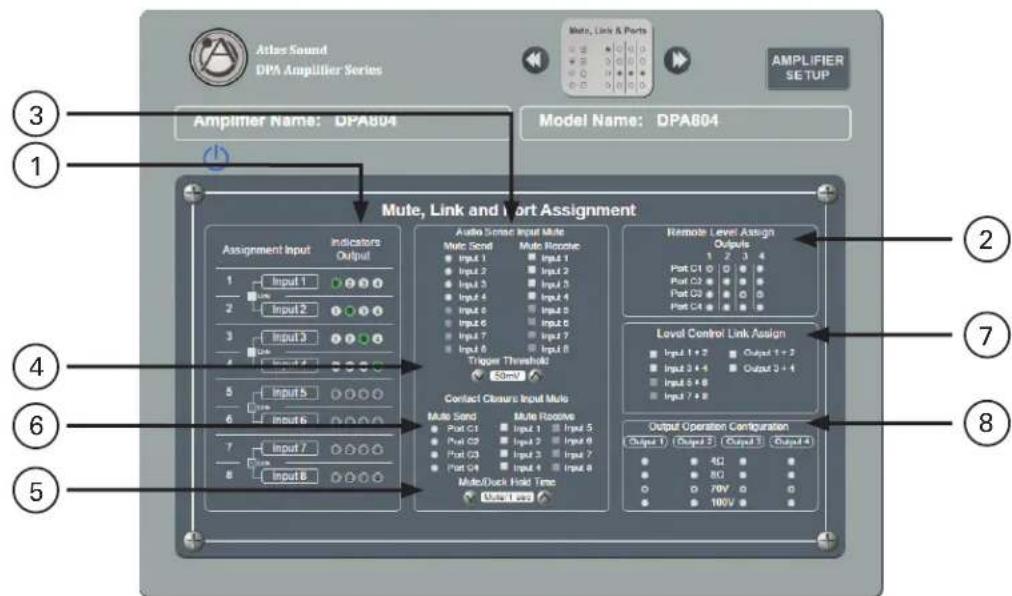
This page allows you to view the amplifiers configuration and assign VOX Mute & Contact Closure Mute, Remote Level and Link Level Faders.
- Output Configuration Indicators - This section is a visual aide to see how the amplifier is configured. This is important information to know when assigning a Remote Level or Linking Faders.
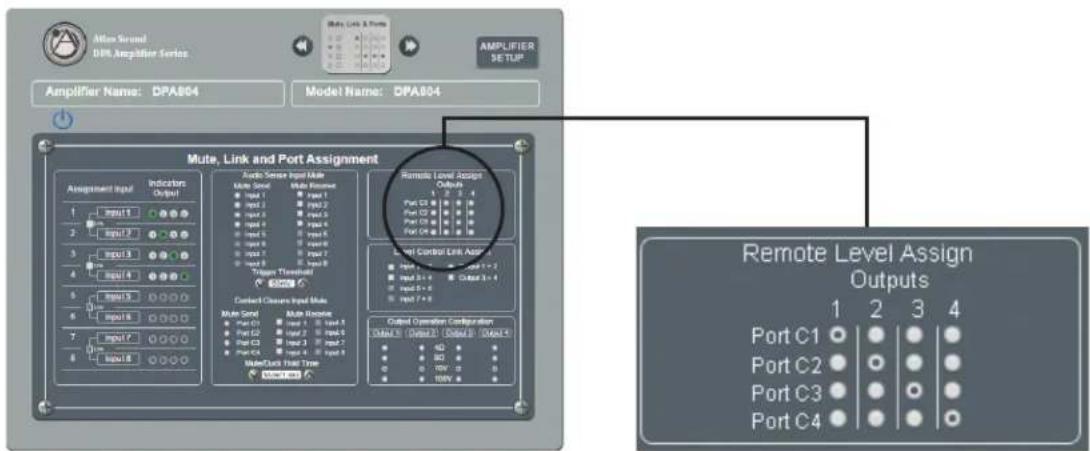
- Remote Level Assign - This section allows the user to assign the Control Port on the rear of the amplifier to control the amplifier output selected by the user. Note: Factory Default C1 is assigned to control Output 1, C2 controls Output 2, C3 controls Output 3, and C4 controls Output 4. Refer to Page 27 for information on configuring and wiring a remote level control.
- Auto Sense Input Mute (VOX) - This section allows the user to assign a selected input to be a Mute Send trigger when it senses an input signal. It will then send a Mute command to other inputs that are assigned to receive the mute command. There are two levels of priority that can be assigned. Refer to Page 30 for information on how to set up a VOX Auto Sense Mute.
- Audio Sense Trigger Threshold - Audio levels vary and are dependent on the source material. Levels from a CD vary from a microphone. In the GUI the level to activate or trigger the Mute can be selected in 1mV increments up to 50mV. When setting the trigger level you need to allow for noise on the audio line and set the level high enough to avoid false triggers. The level sent applies to Mute Send #1 / Mute Receive #1 and Mute Send #2 / Mute Receive #2.
- Mute / Duck Hold Time - How long or how much the selected input needs to be muted and reduced in level (Duck) will depend on the application. In the GUI there are four selections to choose from. Refer to Page 31 for information on selections. Note: This setting applies to both the Audio Sense Trigger and the Contact Closure Mute:
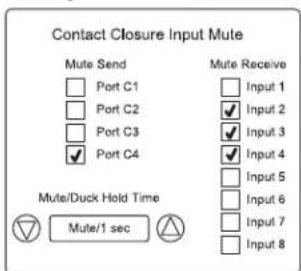
- Contact Closure Input Mute - A rear panel control port can be assigned to mute any Input as seen in the Mute, Link, and Port Assignment GUI page shown below. A remote switch can be used to control the mute trigger as shown in the illustration below. Refer to Page 31 for setup.
- Input Level Control Link Assign - The DPA amp has 4 line inputs with an additional optional 4 inputs. Some of the Inputs or Outputs may be used for stereo applications. For control convenience you can assign two faders to be linked together.
- Level Control Assignment Indicators - This section displays a combination of settings gathered from other pages. This allows the user to see which Inputs are assigned to what Output, Input Names and if faders are linked together while making other configuration settings. The example below shows that Input 1 is assigned to Output 1, Input 2 is assigned to Output 2, Input 3 is assigned to Output 3, and Input 4 is assigned to Output 4. The amps are configured as 4 CH 70V / 100V amplifier and no Inputs are linked together. This is also the factory default setting.
text_image
Atlas Sound DPA Amplifier Series Mate, Link & Ports AMPLIFIER SETUP Amplimer Name: DPA804 Model Name: DPA804 Mute, Link and Port Assignment Assignment Input Indicators Output 1 Input 1 2 Input 2 3 Input 3 4 Input 4 5 Input 5 6 Input 6 7 Input 7 8 Input 8 Audio Sense Input Mute Mute Send Mute Receiver Input 1 Input 1 Input 2 Input 2 Input 3 Input 3 Input 4 Input 4 Input 5 Input 5 Input 6 Input 6 Input 7 Input 7 Input 8 Input 8 Trigger Threshold Slow Remote Level Assign Outputs 1 2 3 4 Port C1 O O O Port C2 O O O Port C3 O O O Port C4 O O O Level Control Link Assign Input 1 + 2 Output 1 + 2 Input 3 + 4 Output 3 + 4 Input 5 + 6 Input 7 + 8 Input 7 + 9 Contact Closure Bond Mute Multi Send Multi Receiver Port C1 Input 1 Input 5 Port C2 Input 2 Input 6 Port C3 Input 3 Input 7 Port C4 Input 4 Input 8 Multi/Dock Hold Time Multi Load Output Operation Configuration Output 1 Output 2 Output 3 Output 4 4Q 8Q 70V 100VFigure 13

Atlas

1601 Jack McKay Blvd. • Ennis, Texas 75119 U.S.A.
Telephone: 800.876.3333 • Fax: 800.765.3435
AtlasIED.com - 20 -
Input / Output Router Page
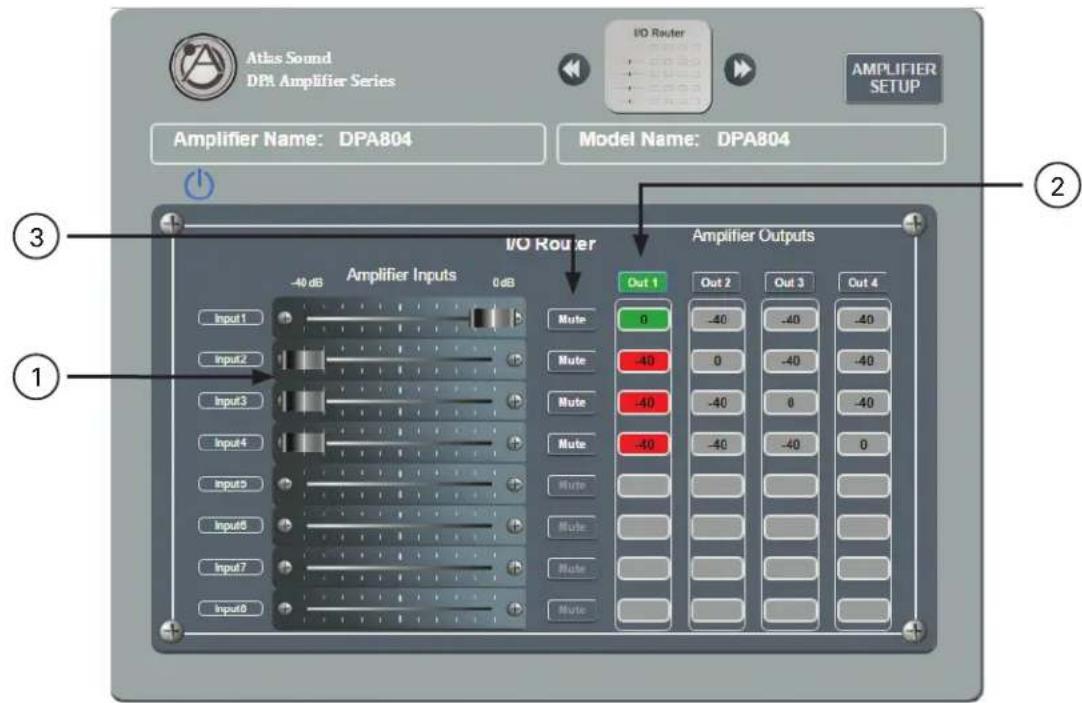
Any of the DPA 4 Line or optional 4 inputs can be mixed to any output. Select the channel and assign the input levels desired to go to the amplifiers output stage. If more than one Input is assigned to the same Output the signal will be summed.
- Input Channel Level Faders - Inputs 5 - 8 need to be enabled in the Amp Configure page if you have an accessory card installed. The fader buttons for Inputs 5 - 8 are not visible because the inputs are not enabled. See Figure 14.
- Output Channel Select Button - Click on the Output Channel and assign Input Levels 1 - 8. Note: Each Output Channel has its own independent Input level mix.
- Input Mute Button - This button will turn red when selected, indicating the input is muted.
text_image
Atlas Sound DPA Amplifier Series I/O Router AMPLIFIER SETUP Amplifier Name: DPA804 Model Name: DPA804 I/O Router Amplifier Inputs -40 dB 0 dB Mute Out 1 Out 2 Out 3 Out 4 Input1 Input2 Input3 Input4 Input5 Input6 Input7 Input8 Mute -40 -40 -40 -40 -40 -40 -40 -40 -40 -40 -40 -40 -40 -40 -40 -40 -40 -40 -40 -40 -40 -40 -40 -40 -40 -4Figure 14

Atlas

1601 Jack McKay Blvd. • Ennis, Texas 75119 U.S.A.
Telephone: 800.876.3333 • Fax: 800.765.3435
High / Low Pass Filter Page
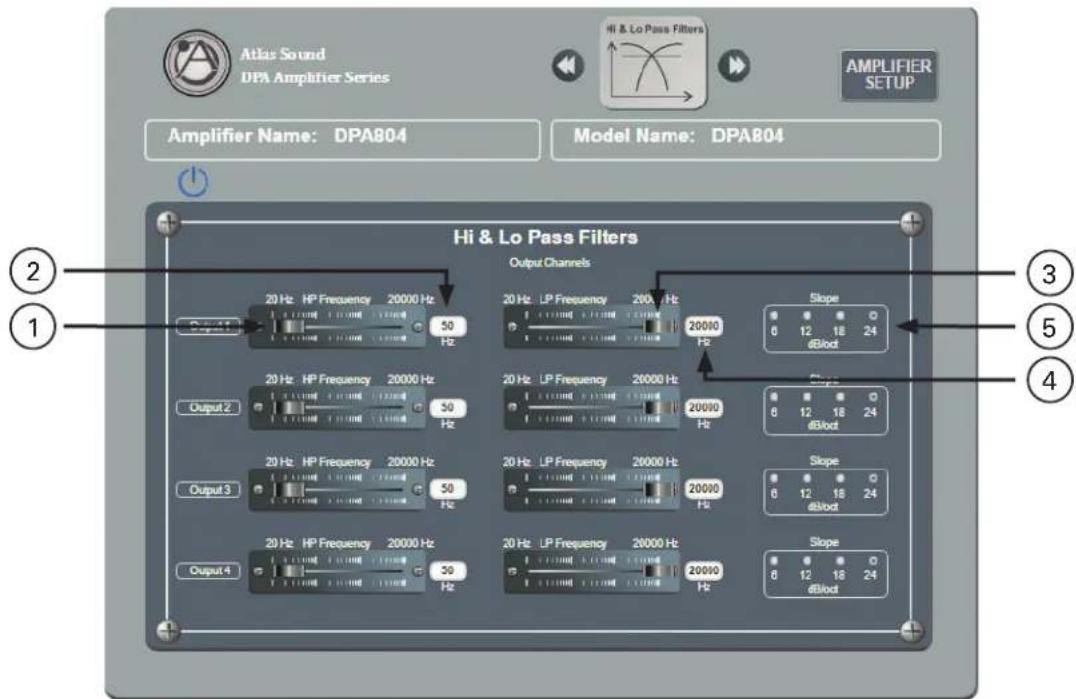
Each Output Channel has a High Pass and Low Pass filter. Filter slope and frequency can be assigned by dragging the fader or typing a value.
- High Pass Filter Frequency Fader - Slide the Fader to the desired Frequency the filter should start at. The data window indicates the frequency selected, which can be adjusted by clicking on the display window and entering the desired frequency.
- High Pass Filter Frequency Display - This window will indicate the frequency of the filter that the fader has been set to. Click on the window and enter the desired frequency to change.
- Low Pass Filter Frequency Fader - Slide the Fader to the desired Frequency the filter should start at. The data window indicates the frequency selected, which can be adjusted by clicking on the display window and entering the desired frequency.
- Low Pass Filter Frequency Display - This window will indicate the frequency of the filter that the fader has been set to. Click on the window and enter the desired frequency to change.
- Filter Slope Select - Click on the desired filter slope of 6dB, 12db, 18dB or 24dB. Note: this setting will apply to both the High and Low Pass Filters.
text_image
Atlas Sound DPA Amplifier Series Hi & Lo Pass Filters AMPLIFIER SETUP Amplifier Name: DPA804 Model Name: DPA804 Hi & Lo Pass Filters Output Channels 20 Hz HP Frequency 20000 Hz 50 Hz Output 1 20 Hz HP Frequency 20000 Hz 50 Hz Output 2 20 Hz HP Frequency 20000 Hz 50 Hz Output 3 20 Hz HP Frequency 20000 Hz 50 Hz Output 4 20 Hz HP Frequency 20000 Hz 50 Hz Output 5 20 Hz LP Frequency 20000 Hz 20000 Hz Slope 6 12 18 24 dBlot 20 Hz LP Frequency 20000 Hz 20000 Hz Slope 6 12 18 24 dBlot 20 Hz LP Frequency 20000 Hz 20000 Hz Slope 6 12 18 24 dBlotFigure 15

Atlas

1601 Jack McKay Blvd. • Ennis, Texas 75119 U.S.A.
Telephone: 800.876.3333 • Fax: 800.765.3435
AtlasIED.com - 22 -
Output EQ Page
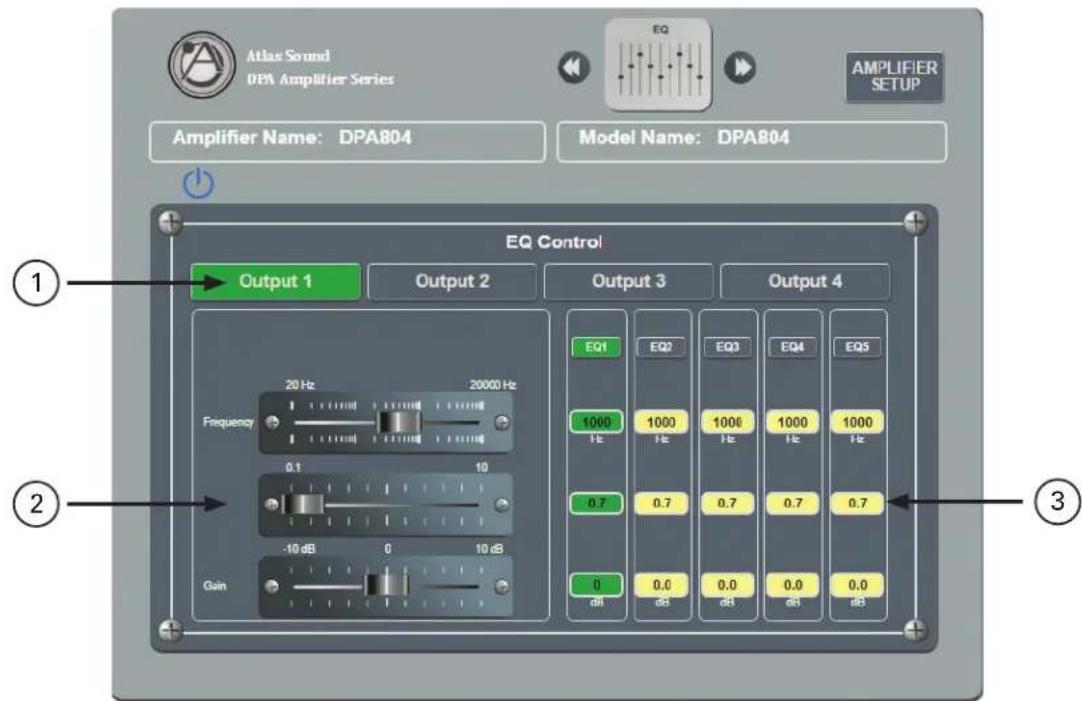
Each output channel has 5 parametric filters available.
- Output Channel Select - Select the Output Channel and apply the EQ setting. Each Output has independent settings.
- Frequency, Q, Gain Fader - Adjust all three the Faders to configure the desired filter. The data window indicates the frequency selected. Click on the window and enter the desired frequency to change.
- Frequency, Q, Gain Display - This window will indicate the numerical values for each setting applied to the filter. Click on the window and enter the desired frequency to change.
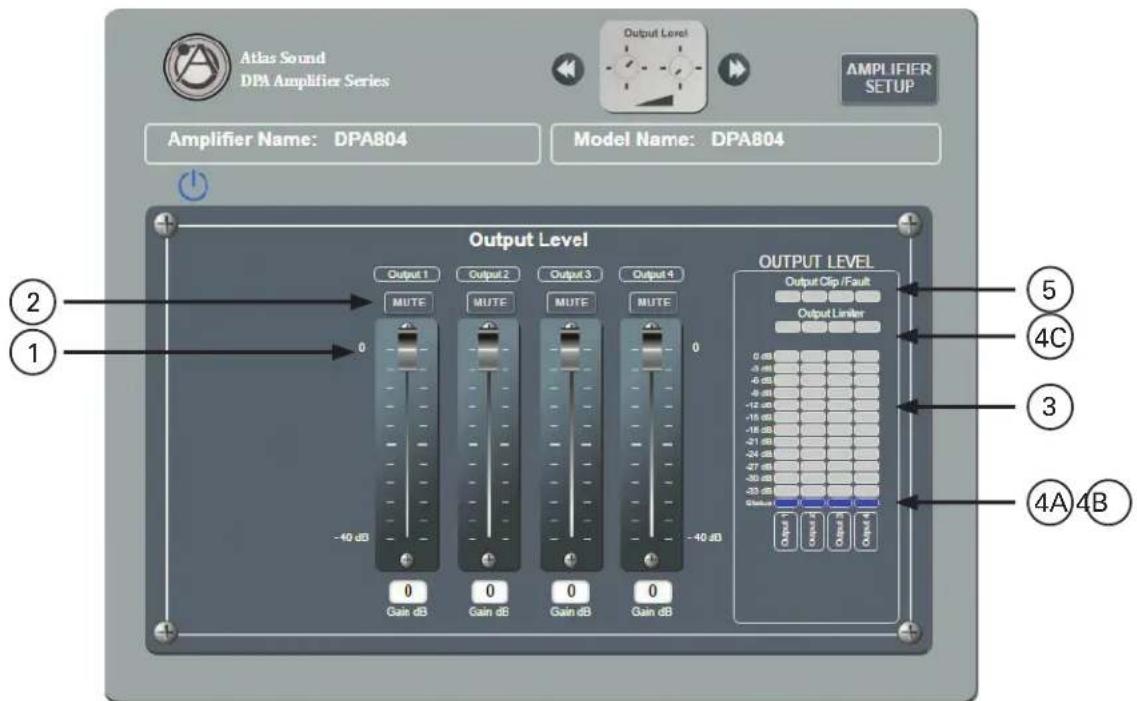
The output level controls have the accumulations of all the settings except the limiter. The output level is PRE limiter. Note: The output level is the same levels as the Home Page User Level Control.
- Output Level Faders - Set the maximum level of the amplifier channel.
- Output Mute - Illuminates red when in Mute mode. Click on it to release the mute.
- Output Level Meters - Same meter as in the Setup Page
- Output Status Indicator
A. Blue indicates ready & active.
B. Red indicates the channel is muted.
C. Yellow indicates the limiter is engaged.
- Output Clip / Fault Indicator
A. Clip illuminates red when the amplifier output has reached its maximum output power.
B. Fault illuminates red when the channel has a fault condition such as an improper load applied for the configuration setting, short on the output or failed output channel. Note: It may be necessary to reset the AC Mains Power to clear amplifier from protect mode.
text_image
Atlas Sound DPI Amplifier Series Output Level AMPLIFIER SETUP Amplifier Name: DPA804 Model Name: DPA804 Output Level Output 1 MUTE Output 2 MUTE Output 3 MUTE Output 4 -40 dB 0 Gain dB 0 Gain dB 0 Gain dB -40 dB OUTPUT LEVEL Output Clip / Fault Output Limiter 0 dB -2 dB -6 dB -12 dB -16 dB -21 dB -24 dB -27 dB -30 dB -33 dB Gain dB Output Output Clip / Fault Output Limiter ⑤ ④C ③ ④A ④BFigure 17

Atlas

1601 Jack McKay Blvd. • Ennis, Texas 75119 U.S.A.
Telephone: 800.876.3333 • Fax: 800.765.3435
AtlasIED.com - 24 -
Output Delay Page
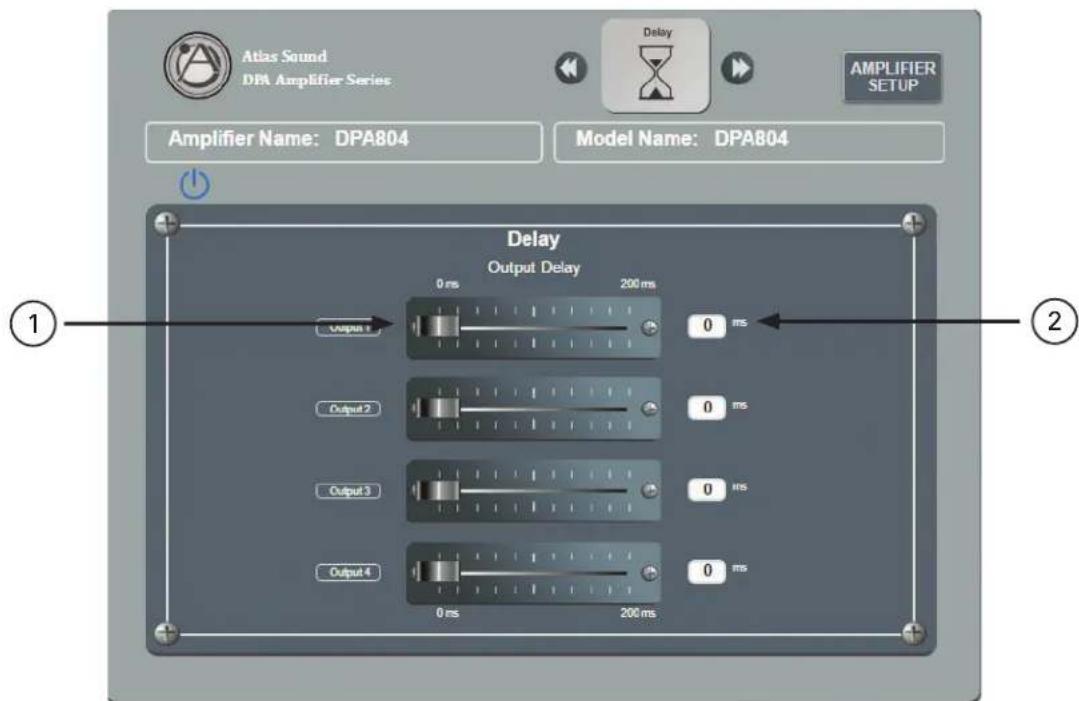
Each Output channel has up to 60mS of assignable delay.
- Delay Fader - Adjust the fader for the desired amount of Delay.
- Delay Data Display - Show the amount of Delay being applied to that specific Output. Double Click on the box and enter the desired time frame to change.
text_image
Atlas Sound DB Amplifier Series Delay AMPLIFIER SETUP Amplifier Name: DPA804 Model Name: DPA804 Delay Output Delay 0 ms 200 ms 0 ms Output1 Output2 Output3 Output4 0 ms 200 ms 0 ms 0 ms 0 msFigure 18

Atlas

1601 Jack McKay Blvd. • Ennis, Texas 75119 U.S.A.
Telephone: 800.876.3333 • Fax: 800.765.3435
Output Limiter Page
Each output channel has up to -12dB of limiting to be assigned. Note: The limiter threshold is fixed and is designed to be a hard limiter. All gain controls are PRE limiter.
- Output Limit Faders - Set the maximum level of the amplifier channel.
- Output Level Meters - Same meter as in the Setup Page
- Output Status Indicator
A. Blue indicates ready & active.
B. Red indicates the channel is Muted.
C. Yellow indicates the limiter is engaged.
- Output Clip / Fault Indicator
A. Clip illuminates red when the amplifier output has reached its maximum output power.
B. Fault illuminates red when the channel has a fault condition such as an improper load applied for the configuration setting, short on the output or failed output channel. Note: it may be necessary to reset the AC Mains Power to clear the amplifier from protect mode.
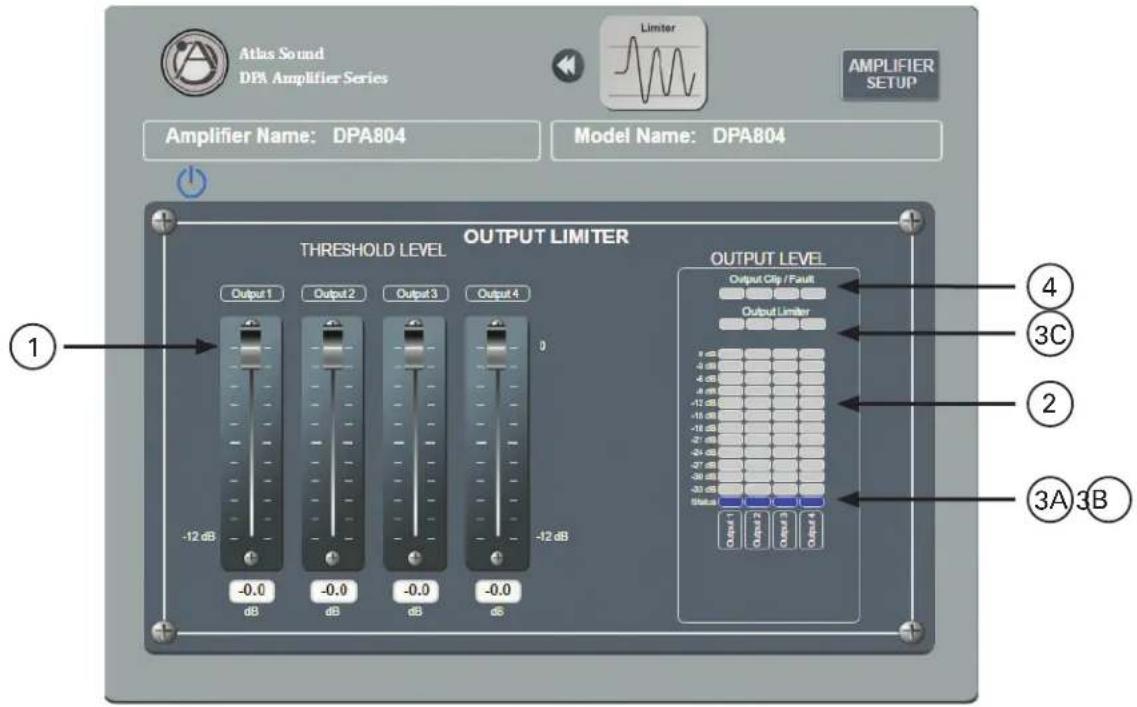
text_image
Atlas Sound DPA Amplifier Series Limiter AMPLIFIER SETUP Amplifier Name: DPA804 Model Name: DPA804 THRESHOLD LEVEL OUTPUT LIMITER Output Level Output Clip / Fault Output Limiter -12 dB -0.0 dB -0.0 dB -0.0 dB -12 dB -0.0 dB Output 1 Output 2 Output 3 Output 4 Output 1 Output 2 Output 3 Output 4 Output Clip / Fault Output Limiter ④ ③C ② ③A ③BFigure 19

Atlas

1601 Jack McKay Blvd. • Ennis, Texas 75119 U.S.A.
Telephone: 800.876.3333 • Fax: 800.765.3435
AtlasIED.com - 26 -
Remote Level Control Port Assignment & Wiring
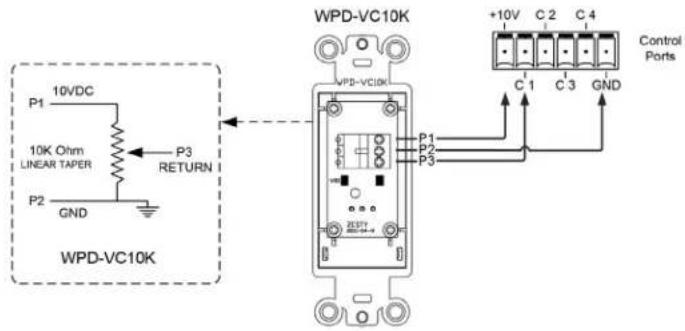
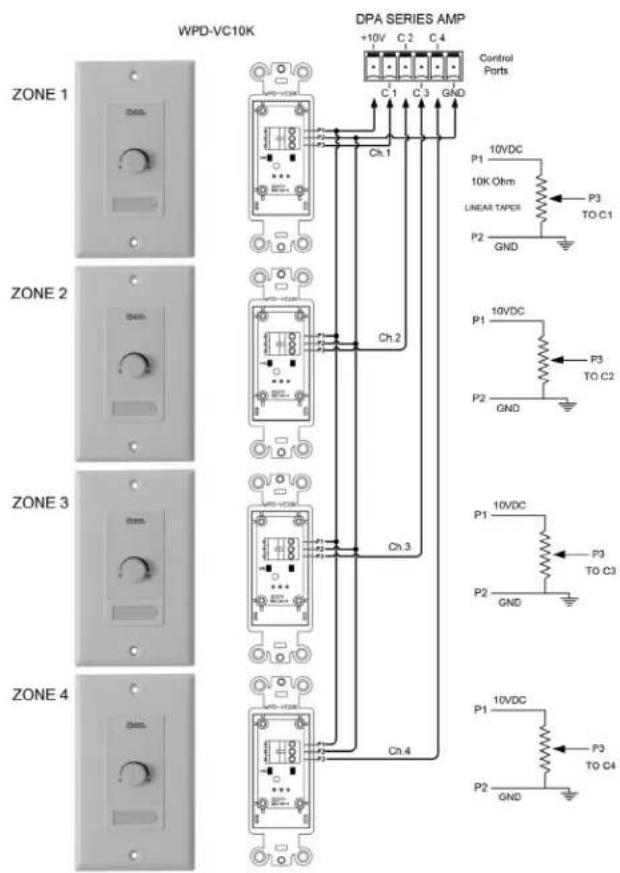
Remote level control can be accomplished by wiring an external 10kΩ potentiometer to the Control Port on the rear of the DPA Amplifier. Assign a Control Port pin to the amplifier channels that need to be level controlled remotely. The Remote Level topology is a VCA +10VDC based system. AtlasLED recommends using the optional AtlasLED WPD-VC10K wall control. Set the system's maximum levels using the amplifiers internal level controls and then use the remote 10KΩ potentiometer as an attenuator from the amplifiers preset level that was set on the front panel level controls or the internal GUI levels. Each WPD-VC10K will require using three conductor wire connecting the WPD terminals to the amp Control Port. Maximum distance can be up to 500 feet. Follow these steps before starting.
- Decide how the amplifier output channels are to be configured for the install. There are three different amplification arrangements to meet your design requirements. Refer to the section on "How to Configure The DPA Amplifier Output Channels"
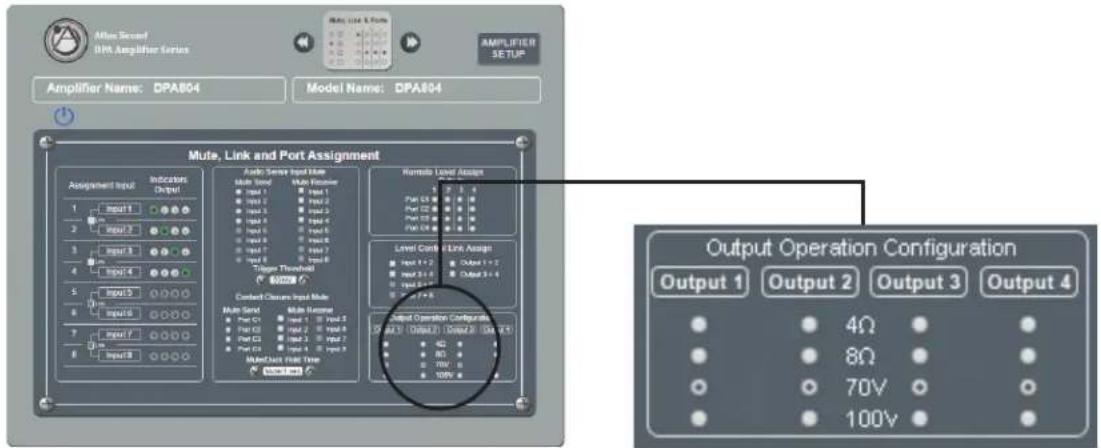
text_image
Altius Second DPA Amplifier Series Amplifier Name: DPA804 Model Name: DPA804 AMPLIFIER SETUP Mule, Link and Port Assignment Indicators Output Input 1 Input 2 Input 3 Input 4 Input 5 Input 6 Input 7 Input 8 Input 9 Input 10 Input 11 Input 12 Input 13 Input 14 Input 15 Input 16 Input 17 Input 18 Output Threshold Control Closure Input Mode Multi Signal Multi Response Multi Output Field Time Radio Level Assign Level Cond /Link Assign Input 1+2 Output 1+2 Output 2+2 Output 3+2 Output 4+2 Output Operation Configurations: 4Ω (Output1) (Output2) (Output3) (Output4) Output 1 Output 2 Output 3 Output 4 Output 1 4Ω Output 2 8Ω Output 3 70V Output 4 100VFigure 20
Figure 21
- After configuring the amplifier output channels choose which channels to remotely control. This will be dependent on the amplifier configuration and installation requirements. If the factory default settings do not meet the installation requirements, configure / assign the output channels desired to control in the "Mute, Link & Port Assignment" page in DPA GUI. Select the Port and Output Channel desired to remotely control.
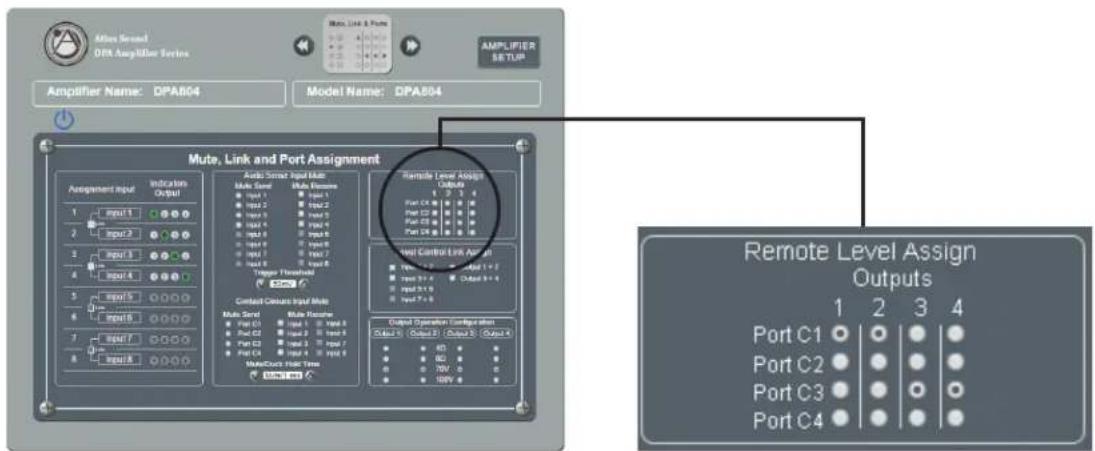
text_image
Altius Second DPA Amplifier Series Max. Link & Ports AMPLIFIER SETUP Amplifier Name: DPA804 Model Name: DPA804 Mute, Link and Port Assignment Audio Source Input Mode Multi-Load Multi-Resist Input 1 Input 2 Input 3 Input 4 Input 5 Input 6 Input 7 Input 8 Output Configuration Input Mode Multi-Load Multi-Resist Input C1 Input C2 Input C3 Input C4 Multi-Load Time Remote Level Assign Output 0 Port C1 Port C2 Port C3 Port C4 Output Operation Configuration Output 0 (Output 1) (Output 2) (Output 3) Output 1 (Output 2) (Output 3) Output 2 (Output 4) (Output 5) Output 3 (Output 4) (Output 5) Output 4 (Output 5) (Output 6) Output 5 (Output 6) (Output 7) Output 6 (Output 7) (Output 8) Output 7 (Output 8) (Output 9) Output 8 (Output 9) (Output 10) Output 9 (Output 11) (Output 12) (Output 13) Output 10 (Output 12) (Output 13) (Output 14) Output 11 (Output 13) (Output 14) (Output 15) Output 12 (Output 14) (Output 15) (Output 16) Output 13 (Output 15) (Output 16) (Output 17) Output 14 (Output 16) (Output 17) (Output 18) Output 15 (Output 17) (Output 18) (Output 19) Output 16 (Output 18) (Output 19) (Output 20) Output 17 (Output 19) (Output 20) (Output 21) Output 18 (Output 20) (Output 21) (Output 22) Output 19 (Output 21) (Output 22) (Output 23) Output 20 (Output 22) (Output 23) (Output 24) Output 21 (Output 23) (Output 24) (Output 25) Output 22 (Output 24) (Output 25) (Output 26) Output 23 (Output 25) (Output 26) (Output 27) Output 24 (Output 26) (Output 27) (Output 28) Output 25 (Output 27) (Output 28) (Output 29) Output 26 (Output 28) (Output 29) (Output 30) Output 27 (Output 29) (Output 30) (Output 31) Output 28 (Output 30) (Output 31) (Output 32) Output 29 (Output 31) (Output 32) (Output 33) Output 30 (Output 32) (Output 33) (Output 34) Remote Level Assign Outputs Port C1 Port C2 Port C3 Port C4Figure 22 Figure 23
- Note: Each channel of the DPA can have separate remote levels or all channels can be combined together onto one level control.

Atlas

1601 Jack McKay Blvd. • Ennis, Texas 75119 U.S.A.
Telephone: 800.876.3333 • Fax: 800.765.3435
Remote Level Example for 4 Channels Controlled by 1 Level Control
Option A – One External Remote Level Pot controlling all four amplifier output channels
The DPA amplifiers can be configured to allow all four output channel levels to be adjusted remotely by one remote level control. The illustrations below show the settings in the Mute, Link & Port Assignment Page and how to wire the Remote Level.
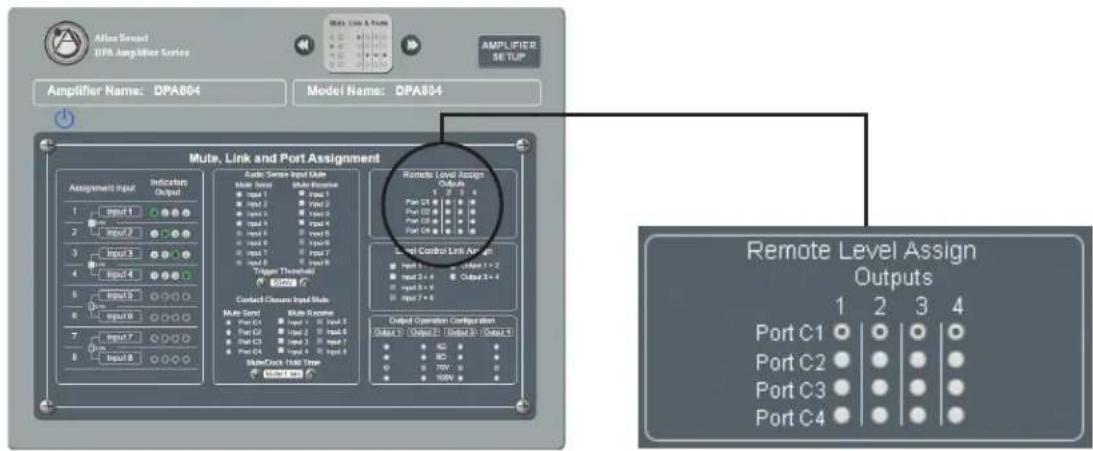
text_image
After Ground DPA Amplifier Series Mute, Link & Frame AMPLIFIER SET TUP Amplifier Name: DPA804 Model Name: DPA804 Mute, Link and Port Assignment Assignment Input Indicating Output 1 Input 1 2 Input 2 3 Input 3 4 Input 4 5 Input 5 6 Input 6 7 Input 7 8 Input 8 Audio Series Input Mode Multi-Channel Mode Response Input 1 Input 2 Input 3 Input 4 Input 1 Input 2 Input 3 Input 4 Input 1 Input 2 Input 3 Input 4 Input 1 Input 2 Input 3 Input 4 Input 1 Input 2 Input 3 Input 4 Input 1 Input 2 Input 3 Input 4 Input 1 Input 2 Input 3 Input 4 Input 1 Input 2 Input 3 Input 4 Input 1 Input 2 Input/Control Link Angle Input 1 Input 2 Output 3 - 4 Input 1 Input 2 Output 3 - 4 Input 1 Input 2 Output 3 - 4 Control Cavity Input Mode Multi-Channel Mode Response Input C1 Input 1 Input 2 Input C2 Input 2 Input 3 Input C3 Input 2 Input 3 Input C4 Input 1 Input 2 Multi-Check Rate Time Remote Level Assign Outputs 1 2 3 4 Port C1 ● ● ● ● Port C2 ● ● ● ● Port C3 ● ● ● ● Port C4 ● ● ● ●Figure 24 Figure 25
text_image
10VDC 10K Ohm LINEAR TAPER P2 GND WPD-VC10K P3 RETURN WPD-VC10K +10V C 2 C 4 C 1 C 3 GND Control Ports4-CHANNEL CONFIGURATION
flowchart
graph TD
    A["Inputs"] --> B["Input (1)"]
    A --> C["Input (2)"]
    A --> D["Input (3)"]
    A --> E["Input (4)"]
    B --> F["Balanced"]
    C --> G["Balanced"]
    D --> H["Balanced"]
    F --> I["CH 1"]
    F --> J["CH 2"]
    G --> K["CH 3"]
    G --> L["CH 4"]
    H --> M["CH 4"]
    style A fill:#f9f,stroke:#333
    style B fill:#ccf,stroke:#333
    style C fill:#ccf,stroke:#333
    style D fill:#ccf,stroke:#333
    style E fill:#ccf,stroke:#333
4-CHANNEL CONFIGURATION OUTPUTS
text_image
1+ 1- 2+ 2- 3+ 3- 4- CH 1 CH 2 CH 3 CH 4 + - + - + - + D
Atlas

1601 Jack McKay Blvd. • Ennis, Texas 75119 U.S.A.
Telephone: 800.876.3333 • Fax: 800.765.3435
AtlasIED.com - 28 -
Remote Level Example for 4-Channel Zone (Factory Setting)
Option B - Each Amplifier Output Channel has a Remote Level Pot
text_image
Amplifier Name: DPA804 Model Name: DPA804 Mute, Link and Port Assignment Assignment Input Indicators 1 Input 1 2 Input 2 3 Input 3 4 Input 4 5 Input 5 6 Input 6 7 Input 7 8 Input 8 Audio-Sense Input Mode Multi-Noise Output Input 1 Input 2 Input 3 Input 4 Input 1 Input 2 Input 3 Input 4 Input 1 Input 2 Input 3 Input 4 Input 1 Input 2 Input 3 Input 4 Input 1 Input 2 Input 3 Input 4 Input 1 Input 2 Input 3 Input 4 Input 1 Input 2 Input 3 Input 4 Input 1 Input 2 Input 3 Input 4 Input 1 Input 2 Input T Threshold Control Closures Input Mode Multi-Noise Output Input C1 Input 1 Input S Input C2 Input 2 Input S Input C3 Input 3 Input S Input C4 Input 4 Input S Multi-Link Filter Time Remote Level Assign Outputs Port C1 Port C2 Port C3 Port C4 Output Operation Configuration Output B Output 1 Output B Output S Output B Output 2 Output B Output S Output B Output 3 Output B Output S Output B Output 4 Output B Output S Output B Output 5 Output B Output S Output B Output 6 Output B Output S Output B Output 7 Output B Output S Output B Output 8 Output B Output S Output B Output 9 Output B Output S Output B Output 10 Output B Output S Output B Output 11 Output B Output S Output B Output 12 Output B Output S Output B Output 13 Output B Output S Output B Output 14 Output B Output S Output B Output 15 Output B Output S Output B Output 16 Output B Output S Output B Output 17 Output B Output S Output B Output 18 Output B Output S Output B Output 19 Output B Output S Output B Output 20 Output B Output S Output B Output 21 Output B Output S Output B Output 22 Output B Output S Output B Output 23 Output B Output S Output B Output 24 Output B Output S Output B Output 25 Output B Output S Output B Output 26 Output B Output S Output B Output 27 Output B Output S Output B Output 28 Output B Output S Output B Output 29 Output B Output S Output B Output 30 Output B Output S Output B Output 31 Output B Output S Output B Output 32 Output B Output S Output B Output 33 Output B Output S Output B Output 34 Output B Output S Remote Level Assign Outputs Port C1 Port C2 Port C3 Port C4Figure 26 Figure 27
4 ZONE REMOTE VOLUME CONTROLS
DPA CONFIGURED IN
4 CHAN 4 Ohm MODE
text_image
WPD-VC10K DPA SERIES AMP +10V C2 C4 Control Ports C1 C3 GND Ch.1 P1 10VDC 10K Ohm P3 LINEAR TAPER TO C1 P2 GND Zone 1 Zone 2 Zone 3 Zone 4
Atlas

1601 Jack McKay Blvd. • Ennis, Texas 75119 U.S.A.
Telephone: 800.876.3333 • Fax: 800.765.3435
Input Mute Assignment
The DPA amplifiers offer two methods to trigger or activate an Input Mute. Combining the features of the Input Mute assignment with the I/O router allows the ability to assign paging or make announcements to a particular zone or multiple zones. Many installations require an emergency override, requiring all inputs to be muted except for the emergency page. Mute trigger or activation can be accomplished via an external Contact Closure (CC) or by sensing the audio signal on a particular assigned input.
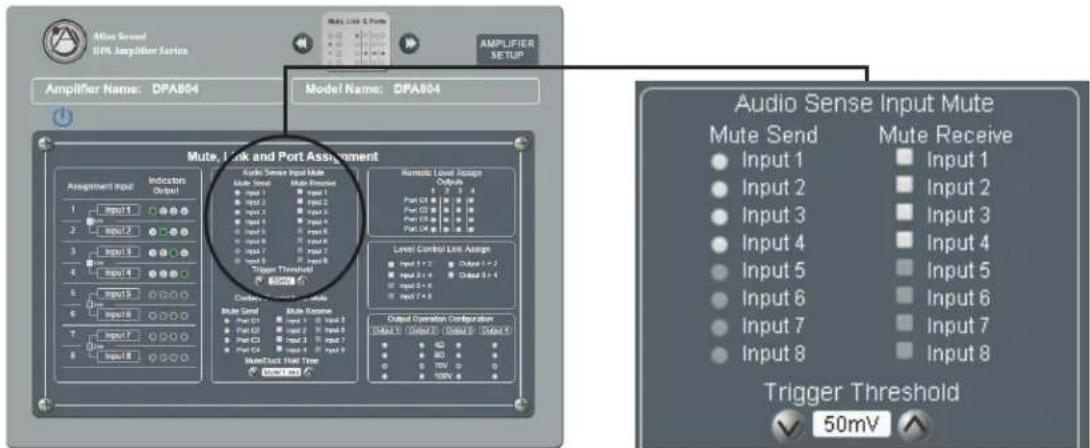
A. Audio Signal Sensing Mute (VOX): The DPA Series offers two priority levels of VOX muting. The Send or Receive assignment is done in the Mute, Link and Port Assignment GUI page as shown below. Any Input can be assigned to Mute any other input. Follow the steps below on how to set up VOX mute.
text_image
Audio Sense Input Mute Mute Send Mute Receive Input 1 Input 1 Input 2 Input 2 Input 3 Input 3 Input 4 Input 4 Input 5 Input 5 Input 6 Input 6 Input 7 Input 7 Input 8 Input 8 Trigger Threshold Trigger Threshold 50mVFigure 28 Figure 29
- Assigning the Audio Sense Mute Send - Select the input desired to be the trigger input. This is known in the GUI as Audio Sense Mute Send. Usually this input is the main paging input. The DPA offers two levels of Mute Send and Mute Receive assignment. Note: Only select one Mute Send per priority of #1 or #2. Start by selecting the Input you want to be Mute Send #1 audio signal trigger.
- Assigning the Audio Sense Mute Receive - Select the inputs desired to receive the Mute command from the Input selected, the Audio Sense Mute Send. All channels can be selected to receive the Mute command except for the same associated Input. In other words Mute Send #1 Input 1 cannot be assigned to Mute Receive #1 Input 1. Note: Mute Send #1 / Mute Receive #1 and Mute Send #2 / Mute Receive #2 correspond to each other.
- Setting the Audio Sense Trigger Threshold - Audio levels vary and are dependent on the source material. Levels from a CD vary from a microphone. In the GUI the level at which the Mute is activated or triggered can be selected in 1mV increments up to 50mV. When setting the trigger level allow for noise on the audio line and set the level high enough to avoid false triggers. The level set applies to Mute Send #1 / Mute Receive #1 and Mute Send #2 / Mute Receive #2.
-
Setting the Mute / Duck Hold Time - In the GUI there are four selections to choose from for the mute duration and level reduction. Note: This setting applies to both the Audio Sense Trigger and the Contact Closure Mute.
-
Full Mute with a hold time of 1 Second
- Full Mute with a hold time of 5 Seconds
- 10dB Duck with a hold time of 1 Second
- 10dB Duck with a hold time of 5 Seconds

Atlas

1601 Jack McKay Blvd. • Ennis, Texas 75119 U.S.A.
Telephone: 800.876.3333 · Fax: 800.765.3435
AtlasIED.com - 30 -
Input Mute Assignment
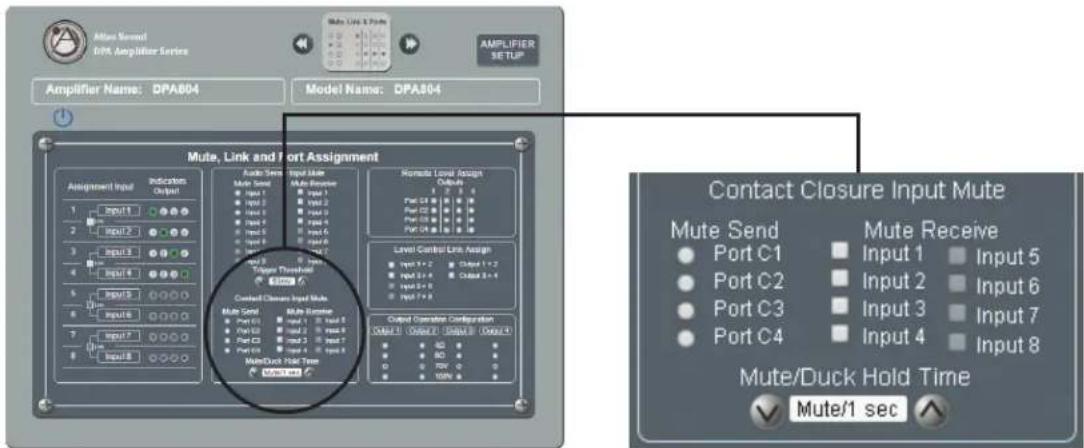
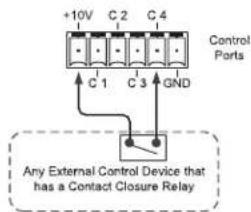
B. Mute (Contact Closure) Port Assignment - A rear panel control port can be assigned to mute any Input as seen in the Mute, Link, and Port Assignment GUI page shown below. A remote switch can be used to control the mute trigger as shown in the illustration below. Follow the steps below to set up a Contact Mute function.
text_image
Mute, Link and Port Assignment Mute Send Mute Receive Input 1 Input 2 Input 3 Input 4 Input 5 Input 6 Input 7 Input 8 Input 9 Input 10 Input 11 Input 12 Input 13 Input 14 Input 15 Input 16 Input 17 Input 18 Input 19 Input 20 Input 21 Input 22 Input 23 Input 24 Input 25 Input 26 Input 27 Input 28 Input 29 Input 30 Input 31 Input 32 Input 33 Input 34 Input 35 Input 36 Input 37 Input 38 Input 39 Input 40 Input 41 Input 42 Input 43 Input 44 Input 45 Input 46 Input 47 Input 48 Input 49 Input 50 Output:1 sec Output:2 sec Output:3 sec Output:4 sec Output:5 sec Output:6 sec Output:7 sec Output:8 sec Output:9 sec Output:10 sec Output:11 sec Output:12 sec Output:13 sec Output:14 sec Output:15 sec Output:16 sec Output:17 sec Output:18 sec Output:19 sec Output:20 sec Output:21 sec Output:22 sec Output:23 sec Output:24 sec Output:25 sec Output:26 sec Output:27 sec Output:28 sec Output:29 sec Output:30 sec Output:31 sec Output:32 sec Output:33 sec Output:34 sec Output:35 sec Output:36 sec Output:37 sec Output:38 sec Output:39 sec Output:40 sec Output:41 sec Output:42 sec Output:43 sec Output:44 sec Output:45 sec Output:46 sec Output:47 sec Output:48 sec Output:49 sec Output:50 sec Output:51 sec Output:52 sec Output:53 sec Output:54 sec Output:55 sec Output:56 sec Output:57 sec Output:58 sec Output:59 sec Output:60 sec Output:61 sec Output:62 sec Output:63 sec Output:64 sec Output:65 sec Output:66 sec Output:67 sec Output:68 sec Output:69 sec Output:70 sec Output:71 secFigure 30
Figure 31
- Assigning the Contact Closure Mute Send - Select the Control Port to be the Mute Send trigger to Mute the inputs that are assigned Mute Receive inputs. This is known in the GUI as Contact Closure Mute Send.
- Assigning the Contact Closure Mute Receive - Select the Inputs that are to receive the Mute command from the Control Port selected Mute Send. All channels can be selected to receive the Mute command.
- Setting the Mute / Duck Hold Time - In the GUI there are four selections to choose from for the mute duration and level reduction. Note: This setting applies to both the Audio Sense Trigger and the Contact Closure Mute.
- Control Port Wiring - After the Control Port has been assigned in the GUI, match the assigned port to the corresponding Control Port Pin on the rear panel of the DPA. To activate the Mute Send trigger Control Port Pins P1 – P4, a +10V source needs to be applied to it. This can be done by connecting a switch between the +10V to the assigned Mute Send P1 – P4 Control Port on the rear panel of the DPA as shown below. A remote +V source may be used and will require connecting the ground from two devices together. Wiring for this is shown below. Current requirements are very low, 2mA. Maximum wiring distances will vary with the wire gauge size used. It is typical to use 22-gauge wire to achieve distances over 500 ft.
REMOTE ACTIVATION OF MUTE OR PRIORITY USING A CONTACT CLOSURE EXAMPLE
text_image
+10V C2 C4 Control Ports C 1 C 3 GND Any External Control Device that has a Contact Closure RelayNote: See Manual for GUI Port Assignment Configuration Settings
Factory Default = No Mute Assignments
Activating a Function must be done in GUI
text_image
Contact Closure Input Mute Mute Send Port C1 Port C2 Port C3 Port C4 Mute/Duck Hold Time Mute/1 sec Mute Receive Input 1 Input 2 Input 3 Input 4 Input 5 Input 6 Input 7 Input 8Note: Illustration represents, Port C4 to mute inputs 2,3,4, when C4 is activated by connecting C4 to +10V.

Atlas

1601 Jack McKay Blvd. • Ennis, Texas 75119 U.S.A.
Telephone: 800.876.3333 • Fax: 800.765.3435
Accessory Card Installation
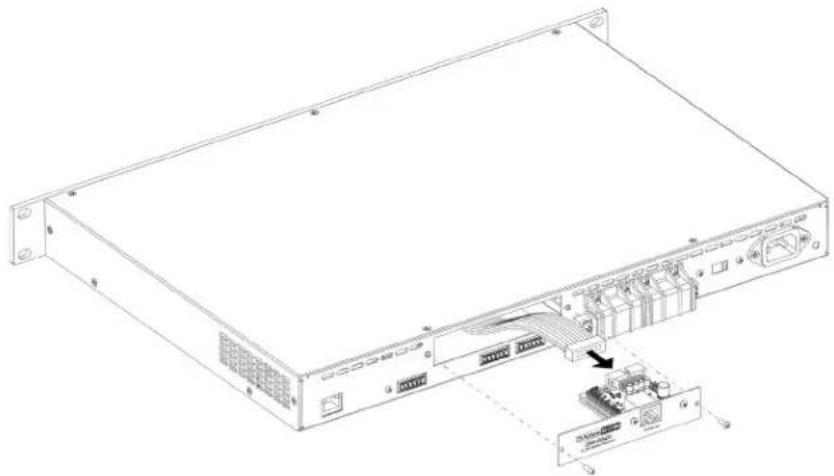
The DPA404 and DPA804 offer four additional inputs that can be routed to any of the four output channels. Optional accessory cards DPA-DAC4 (4-Channel Digital Audio Input Card) and DPA-AMIX (4-Channel Analog Mic/Line, Auxiliary Input Card) are available. Contact AtlasLED for a list of available accessory cards. Note: Accessory card installation must be done by a qualified technician.
- Remove the DPA Amplifier from the AC Mains source.
- Remove the two screws (M3 x 8mm Pan Head Black) holding the DPA Accessory blank panel.
- Remove the ribbon cable from the cover plate.
- Connect the accessory card to the ribbon cable by carefully aligning the ribbon cable connector to the mating PCB connector. Do not force. If aligned correctly the cable will mate easily.
- Carefully guide the accessory card into the slot without forcing the PCB or cable.
- After the card is inserted and the accessory panel is flush to the chassis, align the two screws holes and secure them together by using the M3 x 8mm screws.
natural_image
Technical line drawing of a server rack with internal components and an attached module (no text or symbols)Installation and Considerations
Cabling - These amplifiers can be used with either balanced or unbalanced sources, provided the proper cabling is used. A balanced line is defined as two-conductor shielded cable with the two center conductors carrying the same signal but of opposite polarity when referenced to ground. An unbalanced line is generally a single-conductor shielded cable with the center conductor carrying the signal and the shield at ground potential.
Balanced Input - Use 20-22-gauge, 2-conductor shielded wire for low level signals. Maintain the proper polarity, + to +, - to - and shield to ground. For unbalanced signals using the Phoenix connector connect the (-) pin of the amplifier input to the GND center pin and the (+) pin to positive.
Speaker Outputs - Use 2-conductor unshielded wire of the appropriate gauge. The DPA Series is approved for Class 3 wiring. Contact AtlasLED Tech Support at 1-800-876-3333 if issues arise.
Placement And Mounting - Turn off all equipment before making connections. The amplifier can be mounted in a standard width 19' rack. It can be mounted above or below anything that does not generate excessive heat. Although the unit's chassis is shielded against radio frequency and electromagnetic interference, extremely high fields of RF and EMI should be avoided.
Ventilation - The amplifier should be situated so that its location or position does not interfere with its proper ventilation. For example, the DPA Series Amplifiers should not be situated in a sealed cabinet or on a shelf with obstacles that may impede the flow of air through the ventilation openings.
Heat - The DPA Series Amplifiers should be installed away from heat sources such as radiators, heat registers, stoves, or other appliances (including amplifiers) that produce excessive heat. Ambient temperatures should not exceed 113°F (45°C)
Understanding the 3 AC Power Consumption Idle States
The DPA amplifier has three states of Idle power consumption to meet the installation energy power consumption requirements. Refer to the amplifier specification page for power consumption data. Below is the definition how each idle state operates.
A. Idle Active Mode - When the LED outer ring of the power switch illuminates a steady state blue color, the amplifier is in Active Mode and is ready to pass audio.
B. Sleep Mode - If the outer ring LED is Off, the amp is in Sleep Mode. Sleep Mode allows the Ethernet to be active for access to the amplifiers on board GUI. The amplifier output stage and DSP is off. Audio will not pass audio in Sleep Mode. Press the front panel power switch to activate Idle Active Mode or press the AMP ON button in the amplifiers GUI to activate the amplifiers Active Mode. The LED outer ring of the power switch will illuminate a steady state blue color indicating the amplifier is in Active Mode.
Note: The DPA Site Manager software has a scheduler that can toggle the DPA amplifier between Active Mode and Sleep Mode. Sleep Mode is the most efficient power consumption mode of the DPA amplifier.
C. Standby APD Mode - When the amplifier Auto Power Down (APD) is enabled and the amplifier is in the APD mode, the LED outer ring will blink blue once every 5 seconds. When the amplifier is in the APD state the amplifier can be toggled into Active Mode by pressing the front panel power switch, selecting the AMP ON button in the GUI, or applying input signal. When the amplifier is activated, the LED outer ring of the power switch will illuminate a steady blue color.

text_image
AT&T Sound DPA804 Digital Power Amplifier Power LED Indicator Power Switch
Atlas

1601 Jack McKay Blvd. • Ennis, Texas 75119 U.S.A.
Telephone: 800.876.3333 • Fax: 800.765.3435
110V - 120V and 220V - 240V Operation
The DPA Amplifier is factory configured for AC Mains 110V - 120V. It can be used with 220V - 240V, but the following must be done.
- Change the AC Mains Line Voltage Select switch to 230V.
- Change the fuse.
- Acquire an IEC power cord that mates with your AC Mains wall power outlets. Note: Only a 120V USA power cord is included.
Refer to Changing the AC Mains Line Switch and Fuse to 230V Operation.
The AC Mains fuse is located inside the IEC AC receptacle. A small tool is required to pry open the Fuse Holder housing. Do not force. Changing the fuse is required to operate from 220V - 240V. Note: Changing the fuse must be done by a qualified technician.
- DPA404 120V line voltage operation: T4AL 250V, Slow Blown, 5mm x 20mm, Glass
- DPA404 230V line voltage operation: T2AL 250V, Slow Blown, 5mm x 20mm, Glass
• DPA804 120V line voltage operation: T8AL 250V, Slow Blown, 5mm x 20mm, Glass - DPA804 230V line voltage operation: T4AL 250V, Slow Blown, 5mm x 20mm, Glass
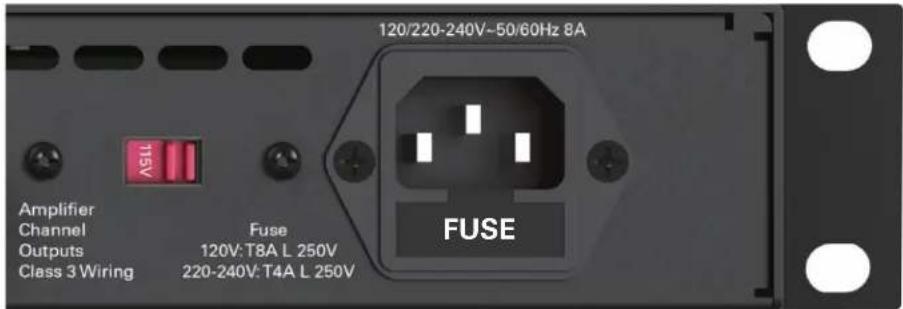
text_image
120/220-240V~50/60Hz 8A Amplifier Channel Outputs Class 3 Wiring Fuse 120V:T8A L 250V 220-240V:T4A L 250V FUSESystem
| Type 4-Channel Configurable Network Digital Commercial Power Amplifier | |
| Power Supply Type Global Switch Mode | |
| Amp Topology Class AB Hybrid-BASH | |
| Number of Fixed Inputs 4 | |
| Accessory Inputs 4 (Optional Accessory Card Required) | |
| DSP Internal Yes | |
| Network Ethernet | |
| Optional Accessory Card Slot Yes x 1 | |
Output Power (Note 1) DPA404
| 100V x 4 CH | 100W | 200W |
| 70V X 4 CH (Factory Default) | 100W | 200W |
| 8Ω x 4 CH | 75W | 150W |
| 4Ω x 4 CH | 50W | 100W |
| 2Ω x 4 CH | NA | NA |
| 8Ω Bridge | NA | NA |
| 4Ω Bridge | NA | NA |
| 100V x 1 + 8Ω x 2CH | 100W / 75W 200W / 150W | |
| 70V x 1 + 8Ω x 2CH | 100W / 75W 200W / 150W | |
| 100V x 1 + 4Ω x 2 CH | 100W / 50W 200W / 100W | |
| 70V x 1 + 4Ω x 2 CH | 100W / 50W 200W / 100W |
Factory Default Settings (As Shipped)
| Amplifier Configuration | 4 CH 70V Mode |
| Level Controls Assignment | Front Panel |
| I/O Matrix | Input 1 Routed to Output 1, Input 2 to Output 2, Input 3 to Output 3, Input 4 to Output 4 |
| Level Postion | DSP Set to 0dBU, Front Panel Level Control Set to Off |
| EQ & Filters | DSP High Pass Filers Set to -3dB 50 Hz, EQ Filters Flat |
| Limiter | 0dB (Max Power) |
| GPIO Control Ports (Rear Panel) | Remote Level, C1 Assigned to Output 1, C2 to Output 2, C3 to Output 3, C4 to Output 4 |
| Auto Power Down (APD) | Disabled |
Inputs
| Input Quantity | 4 Balanced Inputs, Expandable to 8 via Accessory Card |
| Input Type (Line Balanced or Unbalanced) | Balanced |
| Input Impedance, Ω | 40kΩ |
| Input Sensitivity | 750mV Balanced, 0dBu |
| Maximum Input Level dBu & Vrms | 14dBu, 3.82V |
| Input Connectors Type | 3.5mm Euro Block |
| Accessory Slot | Four Input DanteTM Digital Card (DPA-DAC4) or Four Input Analog Mic / Line Analog (DPA-AMIX) |
Level Control
| Front Panel Manual (Enable-Disable in GUI) | Removable Knobs and Security Cover |
| GUI Control | PC (Requires Ethernet Cable), iPhone®, Android® Using a Standard Web Browser |

Atlas

1601 Jack McKay Blvd. • Ennis, Texas 75119 U.S.A.
Telephone: 800.876.3333 • Fax: 800.765.3435
Status Indicators
| Power Blue Indicator | |
| Standby (Remote Turn ON) Blinking Blue Indicator | Front Panel Only |
| Output Signal Green | |
| LED Bar Meter GUI Only | |
| Output Limit / Protect Red | |
| 4/8 Ohm Yellow, CH 1/2 & CH 3/4 | |
| 70V / 100V Operation Yellow, CH 1/2 & CH 3/4 | |
| Output Mute Status Flashing Red | |
| DSP Elements | |
| IO Routing Matrix Mixer | |
| Hi & Low Pass Filters One Per Output, Adjustable Slopes and Frequencies | |
| EQ | 5 Parametric Filters Per Output |
| Delay | 60mS Per Output |
| Limiter | Each Output up to 12dB of Assignable Limiting |
| DSP Frequency Type | 48k, 24bit |
| Interface Control Ports | |
| USB | No |
| Ethernet | GUI Access, RJ45 Rear Panel |
| WiFi | No |
| Bluetooth | No |
| GPIO Ports | |
| Location | Rear |
| GPIO Ports | QTY 4, Remote Level & Mute Functions, Assignable, PHX Connector |
| Connection | Euro Block PHX Type 3.5mm, 6 Pins, Ground, +10VDC, C1, C2, C3, C4 |
| Functions | Mute, Remote Level (Assignable) |
| Output Terminals (Speaker) | |
| Output Connectors Type | Screw Terminal Barrier Strip with Cover |
| Output Connectors Number of Terminals | 8, M4 Thread |
| Output Connectors Fixed or Removable | Fixed |
| Wire Size | 18-10 AWG When Using Yellow Spade Lug .250 Terminal, QTY 8 Included (Class 3 Wiring Required) |
| Terminal Spacing | .300" (7.62mm) |
| Current Rating | 25A per Terminal |
| Cooling | |
| APD Standby, Active Idle | Convection Cooled |
| In Use | Convection Cooled with Variable Speed Fan Assist |
| Cooling Air Flow Direction | Rear to Front |
| Electrical Specifications (General) | |||
| Total Harmonic Distortion 1 kHz and 1 dB Below Rated Power | Typical, .2% | ||
| Frequency Response 20Hz - 20kHz (DSP Filters Set to Flat) | |||
| Signal to Noise Ratio >100dB Below Rated Output | (A-weighted) | ||
| Damping Factor (20Hz to 400Hz) 100 (Measurement is Limited Due To DSP) | |||
| Slew Rate | |||
| Crosstalk 73dB @ 1KHz, CH1-2 & CH 2-1, CH3-4 & CH4-3 | |||
| Protection Hi / Low Input Voltage, Thermal, Short, Over Current | |||
| Max Output Peak Voltage 100V Mode 140V | |||
| Max Output Peak 4Ω Mode DPA404: 3.5A | DPA804: 7A | ||
| AC Power Requirements | |||
| Operating Voltage 110V - 120V & 220V - 230V 50/60Hz, Auto Voltage Sense | |||
| Mains Interface IEC 15A Receptical | |||
| Power Cord (Included) 1.5m, IEC C13 to NEMA 5-15P Plug, 1BAWG | |||
| Minimum Power-Up Voltage | 90V | ||
| Maximum Operating Voltage | 264V | ||
| Recommended AC Mains Current Requirements | DPA404: 2.7A (Speech & Background Music), 8.2A (Max Usage)DPA804: 5.3A (Speech & Background Music), 15A (Max Usage) | ||
| DPA404Power Consumption / Current Draw (Note 5) | Amps | Watts | BTU |
| Sleep Mode | 90mA | 4W | 12 BTU |
| Standby / APD Mode (Note 2) | 225mA | 18W | 56 BTU |
| Idle Active Mode (Note 2) | 650mA | 40W | 126 BTU |
| Average Power 4Ω, All Channels Driven (Note 3) | 2.2A | 160W | 504 BTU |
| Average Power 70V, All Channels Driven (Note 3) | 2.7A | 215W | 648 BTU |
| Max Power 4Ω, All Channels Driven (Note 4) | 6.1A | 486W | 1479 BTU |
| Max Power 70V, All Channels Driven (Note 4) | 8.2A | 710W | 2079 BTU |
| DPA804Power Consumption / Current Draw (Note 5) | Amps | Watts | BTU |
| Sleep Mode | 90mA | 4W | 12 BTU |
| Standby / APD Mode (Note 2) | 225mA | 18W | 56 BTU |
| Idle Active Mode (Note 2) | 650mA | 40W | 126 BTU |
| Average Power 4 Ω, All Channels Driven (Note 3) | 3.7A | 270W | 964 BTU |
| Average Power 70V, All Channels Driven (Note 3) | 5.3A | 425W | 1280 BTU |
| Max Power 4 Ω, All Channels Driven (Note 4) | 9.5A | 794W | 2369 BTU |
| Max Power 70V, All Channels Driven (Note 4) | 15.9A | 1362W | 3692 BTU |
| Dimensions and Weight | |||
| Rack Mount Requirements | 1 RU, 19" | ||
| Dimensions - Unit | W 19' x H 1.77' x D 15.5' (483mm x 45mm x 394mm) | ||
| Dimensions - Shipping | W 24.5' x H 3.5' x D 18.7' (635mm x 89mm x 477mm) | ||
| Weight - Unit | 13 lbs. (5.92kg) | ||
| Weight - Shipping 17.4 lbs (7.94kg) | |||

Atlas

1601 Jack McKay Blvd. • Ennis, Texas 75119 U.S.A.
Telephone: 800.876.3333 • Fax: 800.765.3435
Agency Approvals
| North America Agency TUV | |
| Testing Standard North America 60065 | |
| FCC Class A (Conducted & Radiated Emissions) Part 15 of the FCC Rules | |
| RoHS / WEEE Compliant Yes | |
| CE Yes | |
| Optional Accessories | |
| DPA Site Manager Software | |
| AA-YSUM Stereo Signal Passive Summing Cable | |
| WPD-VC10K Potentiometer on Wall Plater for Remote Level Control | |
| DPA-DAC4 | 4 CH Dante® Receiver |
| DPA-AMIX | Analog 4 CH Mic / Line / AUX Input Card |
NOTES:
- Power level measurement is defined as follows: 1Hz Sine wave signal burst of 20 cycles (20mS) at 1% THD+N, followed by 480 cycles of a 1kHz sine wave at 10% of the max power. Other power measurements are available upon requests.
- Power measurement with Ethernet connected. Without Ethernet connected deduct .2W
- Average Power is defined as Pink Noise input signal applied to achieve 1/4 of the 4 Ohm or 70.7V power rating.
- Max Power is defined as 1 KHz input signal applied to achieve the maximum power output before clipping into a 4 Ohm or 70.7V load.
- BTU is calculated by the AC Mains Power consumed minus the total power output measured at the specified load and condition, multiplied by 3.412.
Example: 785 Watts from the AC Source - 600 Watts Total Output power = 185 x 3.412 = 631 BTU
Notes:

Atlas

1601 Jack McKay Blvd. • Ennis, Texas 75119 U.S.A.
Telephone: 800.876.3333 • Fax: 800.765.3435
Limited Warranty
All products manufactured by AtlasLED are warranted to the original dealer/installer, industrial or commercial purchaser to be free from defects in material and workmanship and to be in compliance with our published specifications, if any. This warranty shall extend from the date of purchase for a period of three years on all AtlasLED products, including SOUNDOLIER brand, and ATLAS SOUND brand products except as follows: one year on electronics and control systems; one year on replacement parts; and one year on Musician Series stands and related accessories. Additionally, fuses and lamps carry no warranty. AtlasLED will solely at its discretion, replace at no charge or repair free of charge defective parts or products when the product has been applied and used in accordance with our published operation and installation instructions. We will not be responsible for defects caused by improper storage, misuse (including failure to provide reasonable and necessary maintenance), accident, abnormal atmospheres, water immersion, lightning discharge, or malfunctions when products have been modified or operated in excess of rated power, altered, serviced or installed in other than a workman like manner. The original sales invoice should be retained as evidence of purchase under the terms of this warranty. All warranty returns must comply with our returns policy set forth below. When products returned to AtlasLED do not qualify for repair or replacement under our warranty, repairs may be performed at prevailing costs for material and labor unless there is included with the returned product(s) a written request for an estimate of repair costs before any nonwarranty work is performed. In the event of replacement or upon completion of repairs, return shipment will be made with the transportation charges collect.
EXCEPT TO THE EXTENT THAT APPLICABLE LAW PREVENTS THE LIMITATION OF CONSEQUENTIAL DAMAGES FOR PERSONAL INJURY, ATLASIED SHALL NOT BE LIABLE IN TORT OR CONTRACT FOR ANY DIRECT, CONSEQUENTIAL OR INCIDENTAL LOSS OR DAMAGE ARISING OUT OF THE INSTALLATION, USE OR INABILITY TO USE THE PRODUCTS. THE ABOVE WARRANTY IS IN LIEU OF ALL OTHER WARRANTIES INCLUDING BUT NOT LIMITED TO WARRANTIES OF MERCHANTABILITY AND FITNESS FOR A PARTICULAR PURPOSE.
AtlasIED does not assume, or does it authorize any other person to assume or extend on its behalf, any other warranty, obligation, or liability. This warranty gives you specific legal rights and you may have other rights which vary from state to state.
Service
Should your DPA Series Digital Power Amplifier require service, please contact the AtlasIED warranty department at 1-877-689-8055, ext. 277 or atlasied.com/support to obtain an RA number.
AtlasIED Tech Support can be reached at 1-800-876-3333 or atlasied.com/support
Visit our website at www.AtlasIED.com to see other Atlas products.
©2017 Atlas Sound L.P. The Atlas "Circle A", Soundolier, and Atlas Sound are trademarks of Atlas Sound L.P. IED is a registered trademark of Innovative Electronic Designs LLC. All Rights Reserved. All other trademarks are the property of their respective owners. All specs are subject to change without notice. ATS005589 RevC 5/17

1601 Jack McKay Blvd. • Ennis, Texas 75119 U.S.A. Telephone: 800.876.3333 • Fax: 800.765.3435
AtlasIED.com - 40 -