
GR-P207EQ - Freezer LG - Free user manual and instructions
Find the device manual for free GR-P207EQ LG in PDF.


User questions about GR-P207EQ LG
0 question about this device. Answer the ones you know or ask your own.
Ask a new question about this device
Download the instructions for your Freezer in PDF format for free! Find your manual GR-P207EQ - LG and take your electronic device back in hand. On this page are published all the documents necessary for the use of your device. GR-P207EQ by LG.
USER MANUAL GR-P207EQ LG
Please read this guide thoroughly before operating and keep it handy for reference at all times.

natural_image
Abstract circular design with a stylized white 'L' and a small circle, no text or symbols present.Important
(In the UK Only)
The wires in this mains lead are coloured in accordance with the following code :
GREEN AND YELLOW : EARTH
BLUE : NEUTRAL
BROWN : LIVE
This appliance must be earthed
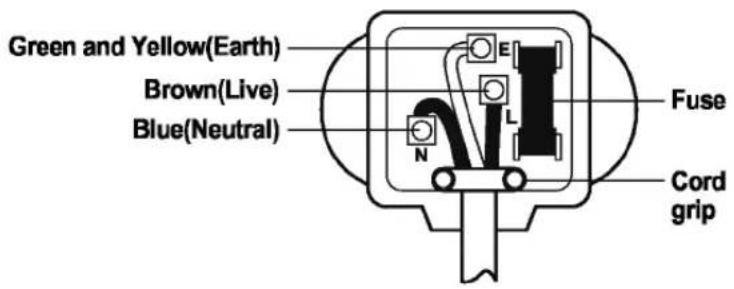
text_image
Green and Yellow(Earth) Brown(Live) Blue(Neutral) Fuse N L Cord gripAs the colours of the wires in the mains lead of this apparatus may not correspond with the coloured markings identifying the terminals in your plug, proceed as follows:
The wire which is coloured Green and Yellow must be connected to the terminal in the plug which is marked with the letter E or by the earth symbol(b) or coloured Green or Green and Yellow.
The wire which is coloured Blue must be connected to the terminal which is marked with the letter N or coloured Black.
The wire which is coloured Brown must be connected to the terminal which is marked with the letter L or coloured Red.
If a 13 amp(BS 1363) plug is used, fit a 13 amp BS 1362 fuse.
Table of contents
Introduction
Entry 3
Important safety instruction 3
Identification of parts 4
Installation
Where to install 5
Door removal 6
Door replacement 7
Feed water pipe installation 7
Height adjustment 8
Operation
Starting 9
Adjusting the temperatures and functions 9
Automatic ice maker & dispenser 11
Refreshment center 14
Shelf 15
Wine holder 15
Egg box 16
Convert into a vegetable or meat compartment 16
Suggestion on food storage
Location of foods 18
Storing foods 19
Care and maintenance
How to dismantle parts 20
General information 22
Cleaning 22
Trouble shooting 23
Entry
The model and serial numbers are found on the inner case or back of refrigerator compartment of this unit. These numbers are unique to this unit and not available to others. You should record requested information here and retain this guide as a permanent record of your purchase. Staple your receipt here.
| Date of purchase | : |
| Dealer purchased from | : |
| Dealer address | : |
| Dealer phone no. | : |
| Model no. | : |
| Serial no. | : |
Important safety instruction
Before it is used, this refrigerator must be properly installed and located in accordance with the installation instructions in this document.
Never unplug your refrigerator by pulling on the power cord. Always grip plug firmly and pull it straight out from the outlet.
When moving your appliance away from the wall, be careful not to roll over the power cord or to damage it in any way.
After your refrigerator is in operation, do not touch the cold surfaces in the freezer compartment, particularly when your hands are damp or wet. Skin could adhere to these extremely cold surfaces.
Unplug the power cord from the power outlet for cleaning or other requirements. Never touch it with wet hands because you can get an electric shock or be hurt.
Never damage, process, severely bend, pull out, or twist the power cord because damage the power cord may cause a fire or electric shock. You have doubts on whether the appliance is properly grounded.
Never place glass products in the freezer because they may be broken due to expansion when their contents are frozen.
Never allow your hands within the ice storage bin of the automatic ice maker. You could be hurt by the operation of the automatic ice maker.
The appliance is not intended for use by young children or infirm persons without supervision.
Young children should be supervised to ensure that they do not play with the appliance.
Never allow anyone to climb, sit, stand or hang on the refreshment center door. These actions may damage the refrigerator and even tip it over, causing severe personal injury.
If possible, connect the refrigerator to its own individual electrical outlet to prevent it and other appliances or household lights from causing an overload that could cause a power outage.
If the supply cord is damaged, it must be replaced by a special cord or assembly from the manufacturer or its service agent.
Don't use an extension cord
Power cord replacement
Child entrapment warning
Don't store
Grounding (Earthing)
DANGER: Risk of child entrapment.
Before you throw away your old refrigerator or freezer:
Take off the doors but leave the shelves in place so that children may not easily climb inside.
The appliance is not intended for use by young children or infirm persons without supervision.
Young children should be supervised to ensure that they do not play with the appliance.
Don't store or use gasoline or other flammable vapor and liquids in the vicinity of this or any other appliance.
In the event of an electric short circuit, grounding (earthing) reduces the risk of electric shock by providing an escape wire for the electric current.
In order to prevent possible electric shock, this appliance must be grounded improper use of the grounding plug can result in an electric shock. Consult a qualified electrician or service person if the grounding instructions are not completely understood, or if you have doubts on whether the appliance is properly grounded.
Identification of parts
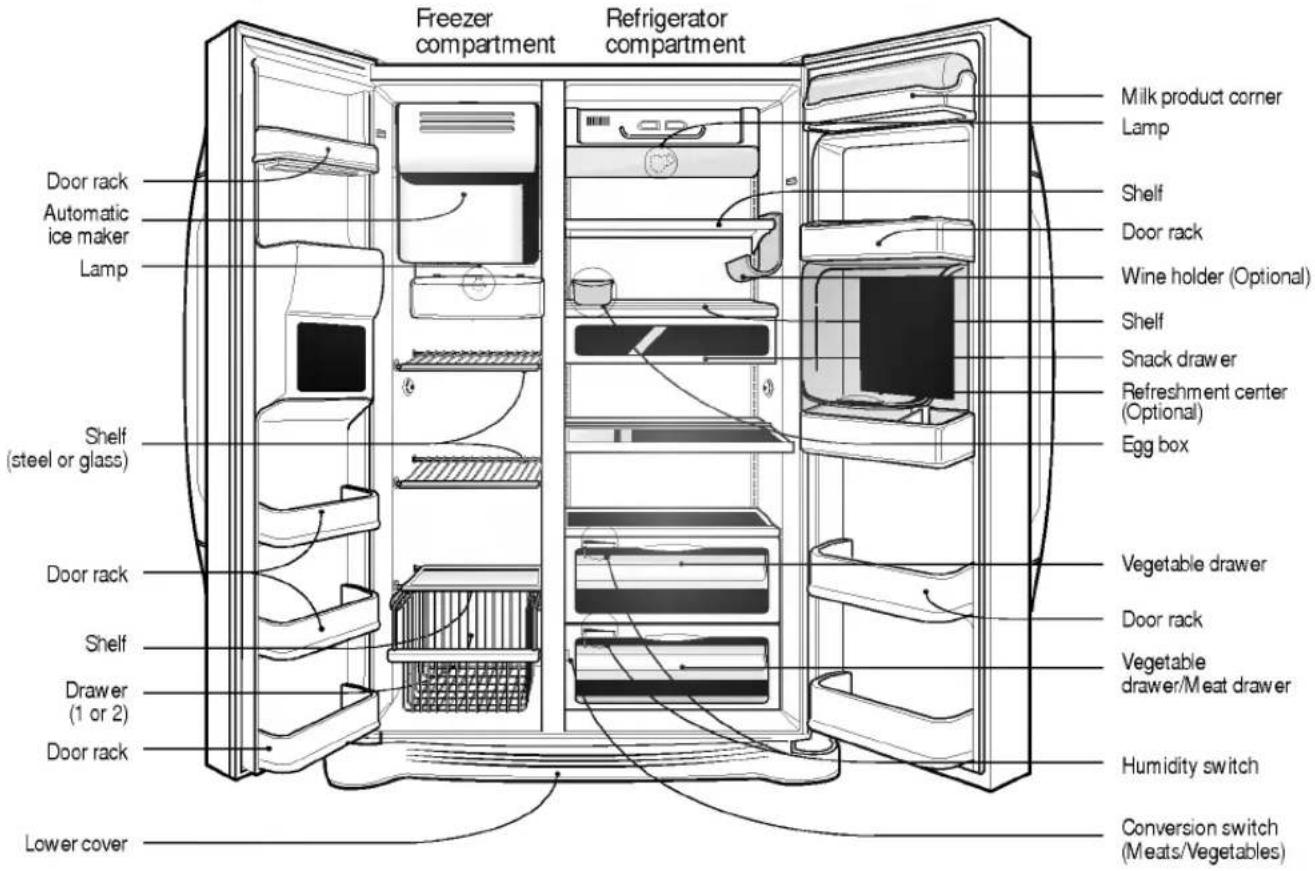
text_image
Freezer compartment Refrigerator compartment Door rack Automatic ice maker Lamp Shelf (steel or glass) Door rack Shelf Drawer (1 or 2) Door rack Lower cover Milk product corner Lamp Shelf Door rack Wine holder (Optional) Shelf Snack drawer Refreshment center (Optional) Egg box Vegetable drawer Door rack Vegetable drawer/Meat drawer Humidity switch Conversion switch (Meats/Vegetables)NOTE
- If you found some parts missing from your unit, they may be parts only used in other models. (i.c. the "Refreshment center" is not included in all models)
Select a good location
Where to locate
-
Place your appliance where it is easy to use.
-
Avoid placing the unit near heat sources, direct sunlight or moisture.
-
Air must circulate properly around your appliance to ensure efficient operation. If your appliance is placed in a recessed area in the wall, allow at least a 12 inches (30 cm) or greater clearance above the appliance and 2 inches (5 cm) or more from the wall. The appliance should be elevated 1 inch (2.5 cm) from the floor, especially if it is carpeted.
-
To avoid vibrations, the appliance must be leveled.
-
Don't install the appliance below 5°C. It may cause affect the performance.
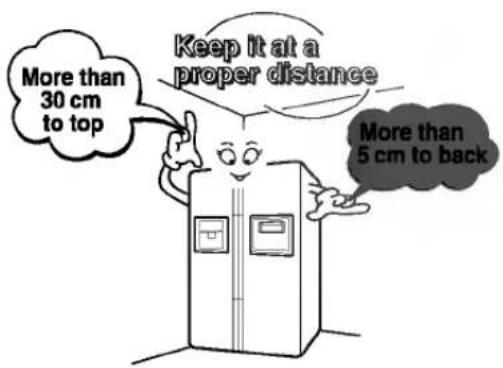
text_image
More than 30 cm to top Keep it at a proper distance More than 5 cm to back
Warning
Remove lower cover and then feed water tube
Remove the freezer compartment door
Remove the refrigerator door
Door removal
Electric Shock Hazard
Disconnect electrical supply to refrigerator before installing. Failure to do so could result in death or serious injury.
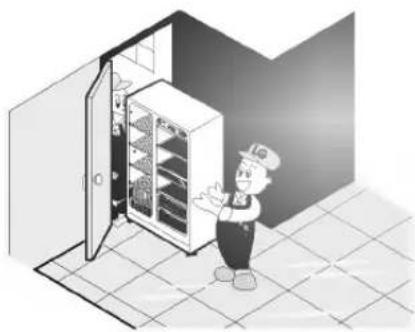
If your access door is too narrow for the refrigerator to pass through, remove the refrigerator door and pass the refrigerator laterally.
Remove the lower cover by lifting upward, and then pull up the feed water tube while pressing area ① shown in the figure to the right.
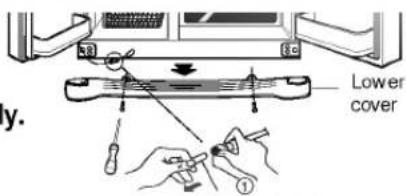
text_image
y. Lower cover ①Feed water tube

natural_image
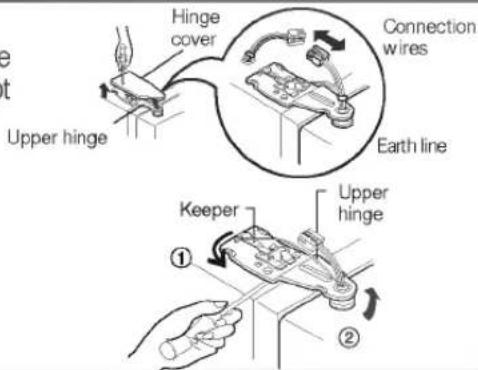
Pure grayscale gradient bar with no text, symbols, or identifiable objects1) Removing the hinge cover by loosening the screws. Separate all connection wires except for the earth line after.
2) Remove the keeper by rotating it counter clockwise (①) and then lifting the upper hinge up (②).
text_image
Hinge cover Upper hinge Connection wires Earth line Keeper Upper hingeNOTE
- When removing the upper hinge, be careful that the door does not fall forwards.
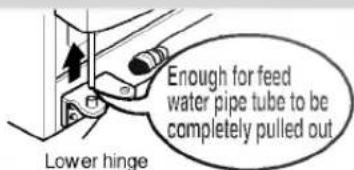
3) Remove the freezer compartment door by lifting it upward. This time, the door should be lifted enough for the feed water pipe tube to be completely pulled out.
text_image
Lower hinge Enough for feed water pipe tube to be completely pulled outNOTE
- Move the refrigerator compartment door passing through the access door and lay it down, but be careful not to damage the feed water pipe tube.
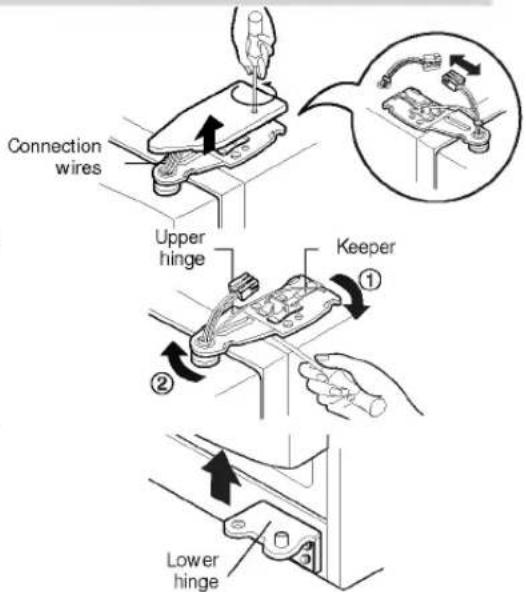
1) Loosen the hinge cover screws and remove the cover. Remove connection wire, if any, except for the earth line.
2) Remove keeper by rotating it clockwise (①) and then remove the upper hinge by lifting it up (②).
3) Remove the refrigerator compartment door by lifting it up.
text_image
Connection wires Upper hinge Keeper Lower hingePass the refrigerator
Pass the refrigerator laterally through the access door as shown in the right figure.
natural_image
Illustration of a worker standing beside an open refrigerator with shelves, inside a tiled room (no text or symbols)Door replacement
Mount them in the reverse sequence of removal after they pass through the access door.
Before installation
Feed water pipe installation
- Automatic ice maker operation needs water pressure of 147\~834 kPa (1.5\~8.5 kgf/cm ^2 ) (That is, an instant paper cup (180 cc) will be fully filled within 3 sec.).
- If water pressure does not reach the rating 147 kPa (1.5 kgf/cm²) or below, it is necessary to purchase a separate pressure pump for normal automatic icing and cool water feed.
- Keep the total length of the feed water pipe tube within 12 m and be careful for the tube not be bent. If the tube is 12 m or longer it may cause trouble in water feed owing to the drain water pressure.
- Install the feed water pipe tube at a place free from heat.

Warning
■ Connect to potable water supply only.
- Refer to instructions with water filter kit for installation.
If the freezer compartment door is lower than the refrigerator compartment door
If the freezer compartment door is higher than the refrigerator compartment door
After leveling the door height
Next
Height adjustment
Level the door by inserting flat (- type) driver into the groove of the left height adjusting screw and rotate it clockwise (①).
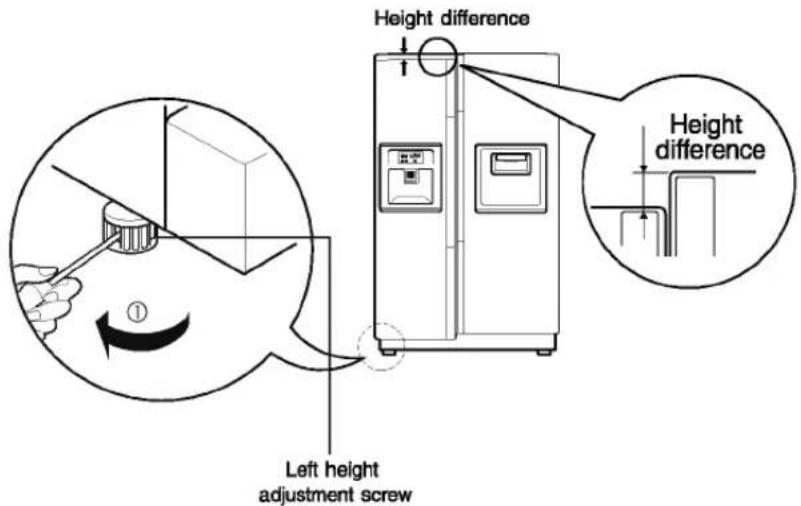
text_image
Height difference Height difference Left height adjustment screwLevel the door by inserting flat (- type) driver into the groove of the right height adjusting screw and rotate it clockwise (①).
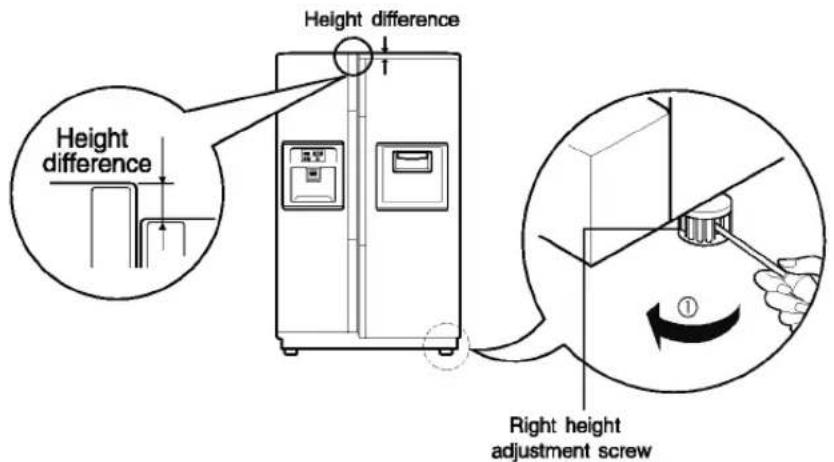
text_image
Height difference Height difference Right height adjustment screwThe refrigerator doors will close smoothly by heightening the front side by adjusting the height adjusting screw. If the doors do not close correctly, performance may be affected.
- Wipe off all dust accumulated during shipping and clean your appliance thoroughly.
- Install accessories such as the ice cube box, cover evaporating tray, etc., in their proper places. They are packed together to prevent possible damage during shipping.
- Connect the power supply cord (or plug) to the outlet. Don't double up with other appliances on the same outlet.
Starting
When your refrigerator is first installed, allow it to stabilize at normal operating temperatures for 2-3 hours prior to filling it with fresh or frozen foods. If operation is interrupted, wait 5 minutes before restarting.
Adjusting the temperatures and functions
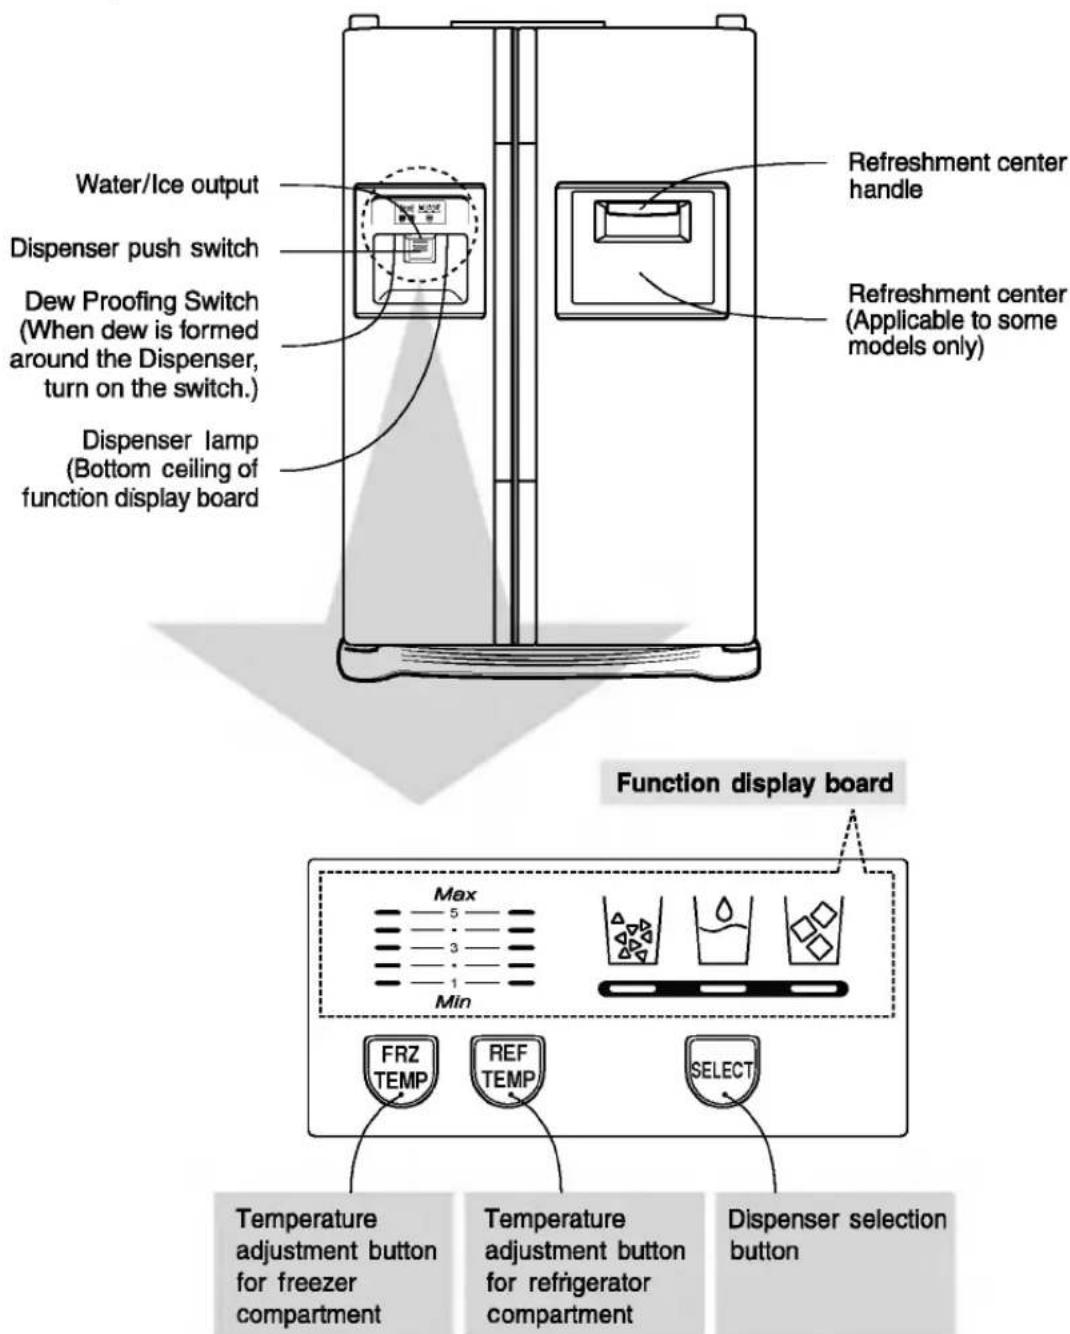
text_image
Water/Ice output Dispenser push switch Dew Proofing Switch (When dew is formed around the Dispenser, turn on the switch.) Dispenser lamp (Bottom ceiling of function display board) Refreshment center handle Refreshment center (Applicable to some models only) Function display board Max 5 3 1 Min FRZ TEMP REF TEMP SELECT Temperature adjustment button for freezer compartment Temperature adjustment button for refrigerator compartment Dispenser selection buttonHow to adjust the temperature in the freezer compartment
This lamp indicates the temperature status of the freezer compartment.
- At first powering or after a power failure, 3(Normal) will be lit. (Mid setting)
- Pressing FRZ temperature button will move the temperature setting through 3 (Normal) → 4 → 5 (Coldest) → 1 (Warmest) → 2 (Proper weak) in sequence.
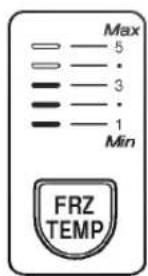
text_image
Max 5 3 1 Min FRZ TEMP
Low temperature

High temperature
- Generally, 3 (Normal) is correct for food storing. Select an appropriate setting 1 (Warmest), 2 or 4, and 5 (Coldest) according to the storage amount and frequency of use.
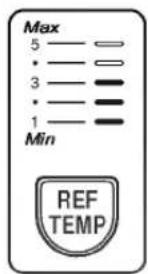
How to adjust the temperature in refrigerator compartment
This lamp indicates the temperature status of the refrigerator compartment
- At first powering or after a power failure, 3(Normal) will be lit. (Mid setting)
- Pressing button will move the temperature setting through 3 (Normal) → 4 → 5 (Coldest) → 1 (Warmest) → 2 (Proper weak) in sequence.
text_image
Max 5 ———— · ———— 3 ———— · ———— 1 ———— Min REF TEMP
Low temperature

High temperature
■ Generally, 3(Normal) is correct for food storing. Select an appropriate setting
1 (Warmest), 2 or 4, and 5 (Coldest) according to the storage amount and frequency of use.
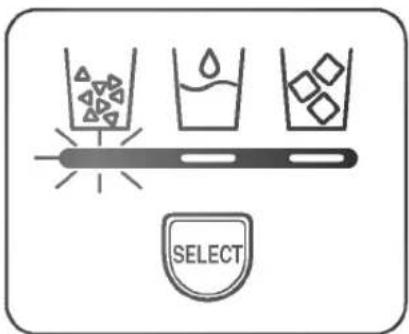
Dispenser use selection
This lamp indicates the selection between water and ice.
- At the first powering or after a power failure, will be lit.
- Crushed ice, water, or cubed ice can be selected with the SELECT button.
text_image
SELECTDoor open alarm
Self-diagnosis (fault detection) function
How ice/cold water is supplied
How to use dispenser
An alarm will sound 3 times when the refrigerator door is left open for more than 1 minute. This alarm will be rung at an intervals of 30 sec. and stop at the close of the door. If the alarm sound does not stop even after the freezer and refrigerator compartment doors are closed, contact the service center.
Self-diagnosis function operates when a problem occurs in the unit. When an error occurs in the unit. Immediately contact the service center without turning the power OFF. If the power is OFF, it will take the engineer longer to find out where the fault occurs.
The pressing of any function buttons will not alter the temperature setting when a fault occurs.
Automatic ice maker and dispenser
Water is cooled while stored in the water tank in the refrigerator compartment, and then sent to the dispenser.
Ice is made in the automatic ice maker and sent to the dispenser divided into crushed or cubed form ice.
NOTE
- It is normal that the water is not very cold at first. If you want colder water, add ice into the glass.
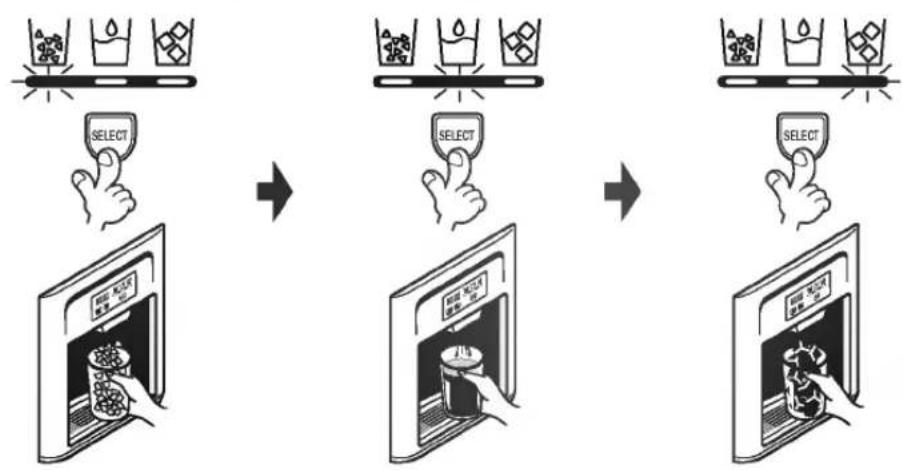
- Select one among crushed ice, water, and cubed ice and slightly press the push switch with a glass or other container.
Crushed ice
Light the crushed ice indicating lamp by pressing the selection button.
- Crushed ice will be dispensed by pressing the push switch with a glass.
Water
Light the water indicating lamp by pressing the selection button.
• Water will be dispensed by pressing the push switch with a glass.
Cubed ice
Light the cubed ice indicating lamp by pressing the selection button.
• Cubed ice will be dispensed by pressing the push switch with a glass.
flowchart
graph TD
    A["Glass tube with liquid"] --> B["Select"]
    B --> C["Digital display with 20% select rate"]
    C --> D["Select"]
    D --> E["Digital display with 10% select rate"]
Automatic ice maker
When ice maker does not operate smoothly
NOTE
- Crushed ice will be automatically selected after a power failure or when the power plug is connected again.
- Place glasses or other containers near the ice outlet otherwise ice is likely to be dropped on the floor.
- A snap sound will be heard in 5 seconds after ice is fully dispensed. This sound is made when the ice outlet is closed.
- Please leave your glass near the ice outlet for 2-3 seconds after releasing your glass from pressing the push switch to allow any left over water or ice to be dispensed.
- Please wipe away water dropped below the dispenser by removing the water collector cover.
-
If cubed ice is selected following crushed ice, there may still be some left over crushed ice dispensed.
-
The automatic ice maker can automatically make 8 pieces of ice cube at a time, 80 pieces a day. But these quantities may be varied according to various conditions including how many times the refrigerator door opens and closes.
- Ice making stops when the ice storage bin is full.
NOTE
- It is normal that a noise is produced when ice made is dropped into the ice storage bin.
Ice is lumped together
- When ice is lumped together, take the ice lumps out of the ice storage bin, break them into small pieces, and then place them into the ice storage bin again.
- When the ice maker produces too small or lumped together ice, the amount of water supplied to the ice maker need to adjusted. Contact the service center.
* If ice is not used frequently, it may lump together.
Power failure
- Ice may drop into the freezer compartment. Take the ice storage bin out and discard all the ice then dry it and place it back. After the machine is powered again, crushed ice will be automatically selected.
The unit is newly installed
- It takes about 12 hours for a newly installed refrigerator to make ice in the freezer compartment.
Cautions
Throw away the ice (about 20 pieces) and water (about 7 glasses) first made after refrigerator installation.
The first ice and water may include particles or odor from the feed water pipe or feed water box. This is necessary in case that the refrigerator has not been used for a long time.
Keep children away from the dispenser.
Children may push switch incorrectly bad or damage lamps.
Be careful that food is not block the ice passage.
If foods are placed at the entrance of ice passage, ice may not be dispensed. The ice passage may also be covered with ice powder if splinter ice is used only. This time, remove the ice powder accumulated.
text_image
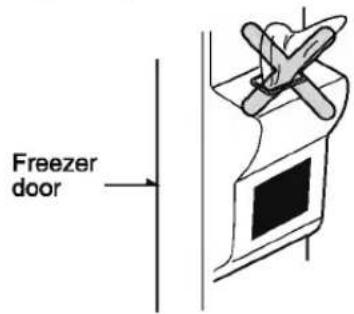
Freezer doorNever store beverage cans or other foods in ice storage bin for the purpose of rapid cooling.
Such actions may damage the automatic ice maker.
Never use thin crystal glass or crockery to collect ice.
Such glasses or containers may be broken.
Put ice first into a glass before filling water or other beverages.
Water may be splashed if ice is added to existing liquid in a glass.
Never touch a hand or other tools on ice outlet.
Touch may cause a part breakage or hand injury.
Never remove the ice maker cover.
Sometimes level the surface so that the ice storage bin is fully filled with ice.
Ice is piled up just near the ice maker. So, such status may be considered, by the ice maker, that the ice storage bin is fully filled and ice making operation may stop.
If discolored ice is dispensed, immediately contact service center, stopping use.
Never use too narrow or deep glass.
Ice may be jammed in ice passage and, thus, the refrigerator may be failed.
Keep the glass at a proper distance from ice outlet.
A glass too close to the outlet may hinder ice from coming out.
Refreshment center (Applicable to some models only)
How to use
Store frequently used foods, such as beverages in the refreshment center.
Use the refreshment center door as a stand
Never take out the inner refreshment center cover
Never place heavy items on the refreshment center door or allow children to hang it on.
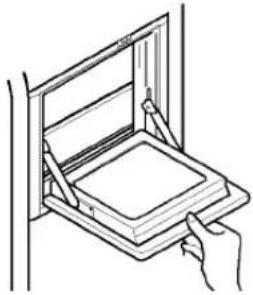
Open the refreshment center door.
- You can access the refreshment center without opening refrigerator door and thus saving electricity.
- Inner lamp is lit in refrigerator compartment when the refreshment center door opens. Thus it is easy to identify the contents.
- The refreshment center is kept at a correct temperature thanks to a temperature sensor only for the refreshment center.
- Never use the refreshment center door as a chopping board and take care not to damage it with sharp tools.
- Never rest your arms or severely press on it.
- The refreshment center can not function normally without the cover.
- Not only can the refreshment center door may be damaged, but also children may be hurt.
natural_image
Line drawing of a hand inserting a rectangular object into a rack (no text or symbols)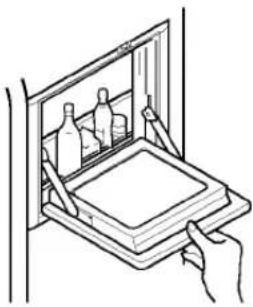
natural_image
Line drawing of a hand holding a tray with bottles inside a cabinet (no text or symbols)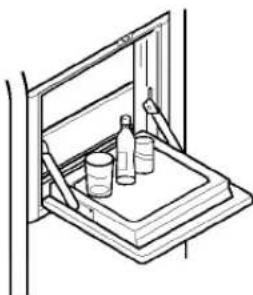
natural_image
Line drawing of a cabinet with bottles and a tray, no text or symbols present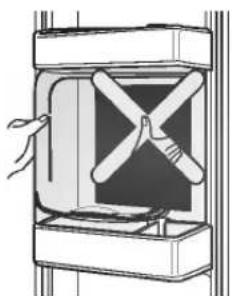
natural_image
Diagram of a door with a handle and cross-shaped panel, showing internal components (no text or symbols)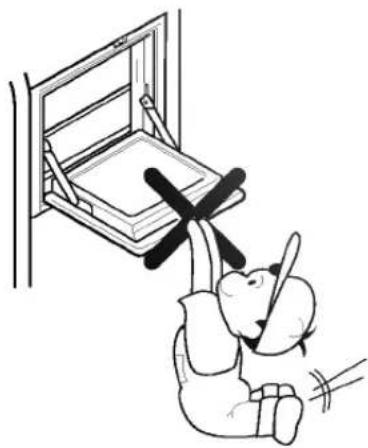
natural_image
Illustration of a person climbing a wooden structure with a cross symbol, no text or symbols presentShelf height adjustment
Shelf
The refrigerator compartment shelf is movable so that you can place it at a height according to space requirement of foods.
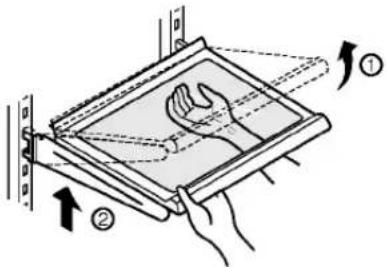
How to separate a shelf :
Lift a shelf incling to ① direction, and then separate it lifting to ② direction.
text_image
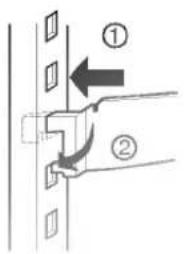
Diagram illustrating hand positioning and movement of a device with labeled parts and directional arrowsHow to install a shelf :
Position a shelf to a desirable height and push into the grooves. Then lower the front side of the shelf and push into grooves.
text_image
Technical diagram showing a mechanical assembly with labeled parts and directional arrowsWine holder adjustment
Wine holder
(Applicable to some models only)
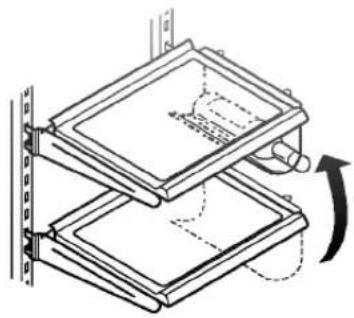
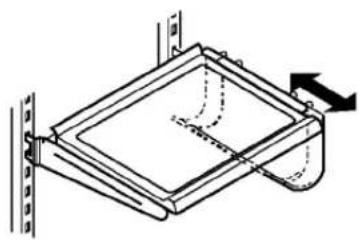
Bottles can be stored laterally with this wine corner. This can be attached to any shelf.
natural_image
Diagram of a mechanical assembly with layered plates and a rotating arrow indicating motion (no text or symbols)Wine holder adjustment :
Wine holder can be separated by pulling it straight out and installed by placing it at the end of the shelf you want and pushing it inward.
natural_image
Technical line drawing of a mechanical assembly with no visible text or symbolsEgg box
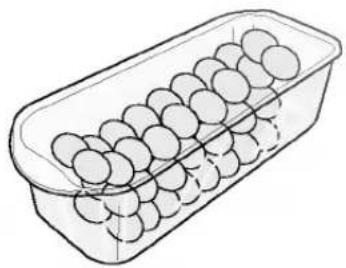
You can move the egg box to wherever you want.
natural_image
Line drawing of a rectangular container filled with eggs (no text or symbols)NOTE
- Never use the egg box as an ice storage bin. It can be broken.
- Never store the egg box in the freezer compartment or fresh compartment.
Humidity control in the vegetable compartment
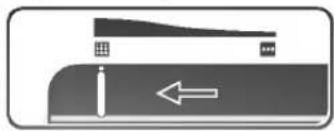
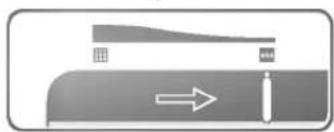
The humidity can be controlled by adjusting the humidity control switch to the left/right when storing vegetables or fruits.
High humidity
natural_image
Diagram showing a road with a curved ramp and directional arrow, no text or symbols presentLow humidity
natural_image
Pure diagram of a road with directional arrow, no text or symbols present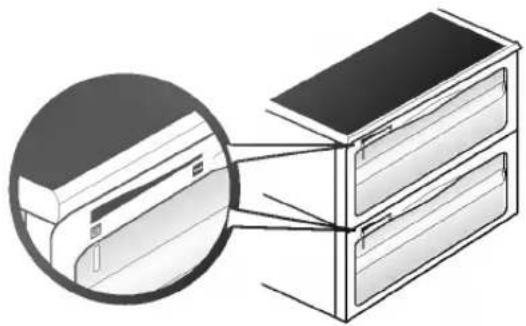
natural_image
Diagram of a double-door air conditioner unit with a magnified inset showing internal structure (no text or labels)Convert into a vegetable or meat compartment
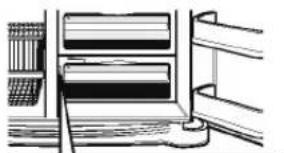
- The bottom drawer in the refrigerator can be converted into a vegetable or meat compartment
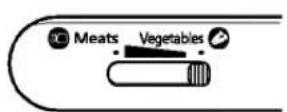
Vegetable compartment
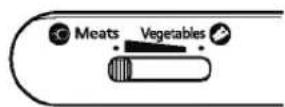
Meat compartment
natural_image
Illustration of a bookshelf with books and a shelf, no text or symbols present
text_image
Conversion switch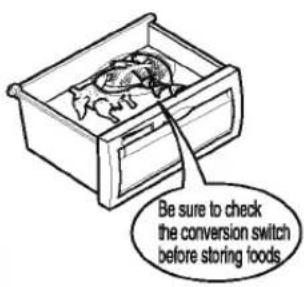
text_image
Be sure to check the conversion switch before storing foodsThe meat compartment maintains the temperature at a lower point than the refrigerator compartment so that meat or fish can be stored fresh longer.
NOTE
- Vegetables or fruits are frozen if the conversion switch is set to meats compartment. So, be sure to check it before storing foods.
How to use the deodorizing system
Deodorizer (Applicable to some models only)
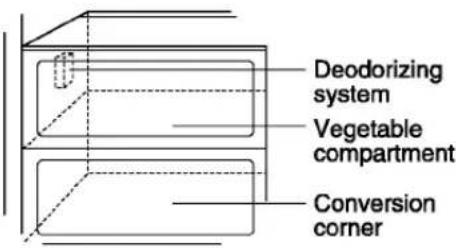
This system efficiently absorbs strong odors by using the optical catalyst. This system does hot have any affect on stored food.
text_image
Deodorizing system Vegetable compartment Conversion corner- Since it is installed already installed onto the cool air intake duct from the from the refrigerator compartment, you need no separate installation.
- Please use closed containers to store food with pungent odors. Otherwise, this oder can be absorbed by other food in the compartment.
Location of foods
(Refer to identification of parts)
Wine holder
Snack drawer
Freezer compartment shelf
Freezer compartment door rack
Freezer compartment drawer
Milk product corner
Egg box
Refreshment center
Refrigerator compartment shelf
Refrigerator compartment door rack
Vegetable drawer
Vegetable drawer /meat drawer conversion corner
Store wine.
Store small foods such as bread, snacks, etc..
Store various frozen foods such as meat, fish, ice cream, frozen snacks, etc..
■ Store small packed frozen food.
- Temperature is likely to increase as door opens. So, do not store long-term food such ice cream, etc..
- Store meat, fish, chicken, etc.. after wrapping them with thin foil.
■ Store dry.
Store milk products such as butter, cheese, etc..
Place this egg box in the proper location.
Store foods of frequent use such as beverage, etc..
Store side dishes or other foods at a proper distance.
Store small packed food or beverages such as milk, juice, beer, etc..
Store vegetables or fruits.
Store vegetable, fruits, meat to thaw, raw fish, etc.. setting the conversion switch as necessary.
Be sure to check the conversion switch setting before storing foods.

natural_image
Illustration of various food and food items arranged vertically, including bread, fish, milk, cheese, and seafood (no text or labels)Freezer compartment
Refrigerator compartment
Storing foods
- Store fresh food in the refrigerator compartment. How food is frozen and thawed is an important factor in maintaining its freshness and flavor.
- Do not store food which goes bad easily at low temperatures, such as bananas, and melons.
- Allow hot food to cool prior to storing, placing hot food in the refrigerator could spoil other food, and lead to higher energy consumption.
- When storing the food, cover it with vinyl wrap or store in a container with a lid. This prevents moisture from evaporating, and helps food to keep its taste and nutrients.
- Do not block air vents with food. Smooth circulation of chilled air keeps refrigerator temperatures even.
- Do not open the door frequently. Opening the door lets warm air enter the refrigerator, and cause temperatures to rise.
-
Never keep too much food in door rack because they may push against by inner racks so that the door cannot be fully closed.
-
Do not store bottles in the freezer compartment - they may break when frozen.
- Do not refreeze food that has been thawed. This causes loss of taste and nutrient.
-
When storing frozen food like ice cream for a long period, place it on the freezer shelf, not in the door rack.
-
Avoid placing moist food in top refrigerator shelves, it could freeze from direct contact with chilled air.
- Always clean food prior to refrigeration. Vegetables and fruits should be washed and wiped, and packed food should be wiped, to prevent adjacent food from spoiling.
- When storing eggs in their storage rack or box, ensure that they are fresh, and always store them in an upright position, which keeps them fresh longer.
NOTE
- If you keep the refrigerator in a hot and humid place, frequent opening of the door or storing a lot of vegetables in it may cause dew to form which has no effect on its performance. Remove the dew with dust cloth free from care.
How to dismantle parts
NOTE
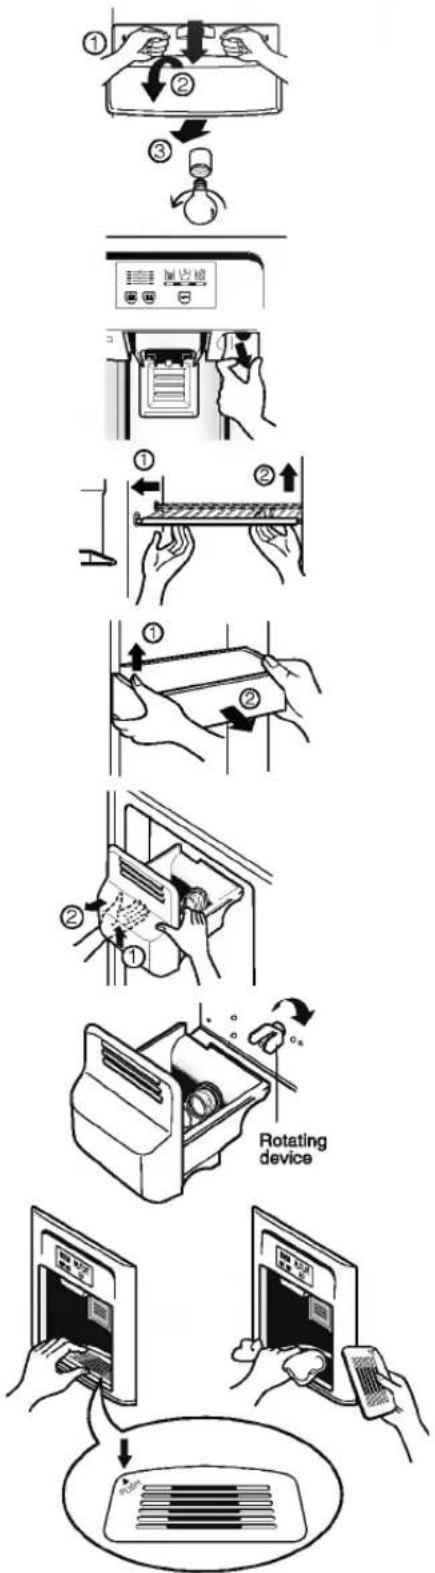
- Dismantling is done in the reverse sequence of assembly. Be sure to unplug the power plug before dismantling and assembly. Never apply severe force to dismantle parts. Parts may be damaged.
Freezer compartment lamp
Separate the lamp by pulling it out (③) while slightly striking (①) and rotating (②) the lamp cover.
Turn the bulb counterclockwise. Max. 240 V 40 W bulb for refrigerator is used and can be purchased at a service center.
Dispenser lamp
Seperate the lamp by pulling it out, and then remove the lamp. Max. 240 V 15 W bulb for refrigerator is used and can be purchased at a service center.
Freezer compartment shelf
To remove a shelf, lift the left part of the shelf a bit, push it to the direction (①), lift the right part to the direction (②), and take it out.
Door rack and support
Lift the door rack holding both sides (①) and pull it out to (②) direction.
Ice storage bin
Hold the ice storage bin as shown in the right figure and pull it out (②) while slightly lifting it (①).
- It is recommended not to dismantle the ice storage bin unless it is necessary.
- Be sure to use both hands when removing the ice storage bin, so as not to drop it on the floor.
- If the ice storage bin does not fit well, slightly rotate the rotating device.
After dispenser is used
The water collector has no self-drainage function. So it should be cleaned regularly. Remove the cover by pressing the left side of water collector cover and dry it with a cloth. Press the point marked as shown in the figure to the right to remove the water collector cover.
flowchart
graph TD
    A["① Heating System"] --> B["② Cooling Unit"]
    B --> C["③ Heat Exchanger"]
    C --> D["④ Air Conditioner"]
    D --> E["⑤ Refrigerator"]
    E --> F["⑥ Air Filter"]
    F --> G["⑦ Pressed Plate"]
    G --> H["⑧ Refrigerator"]
    H --> I["⑨ Air Conditioner"]
    I --> J["⑩ Air Conditioner"]
    J --> K["⑪ Air Conditioner"]
    K --> L["⑫ Air Conditioner"]
    L --> M["⑬ Air Conditioner"]
    M --> N["⑭ Air Conditioner"]
    N --> O["⑮ Air Conditioner"]
    O --> P["⑯ Air Conditioner"]
    P --> Q["⑰ Air Conditioner"]
    Q --> R["⑱ Air Conditioner"]
    R --> S["⑲ Air Conditioner"]
    S --> T["⑳ Air Conditioner"]
    T --> U["⑴ Air Conditioner"]
    U --> V["⑵ Air Conditioner"]
    V --> W["⑶ Air Conditioner"]
    W --> X["⑷ Air Conditioner"]
    X --> Y["⑧ Air Conditioner"]
    Y --> Z["⑨ Air Conditioner"]
    Z --> AA["⑩ Air Conditioner"]
    AA --> AB["⑪ Air Conditioner"]
    AB --> AC["⑫ Air Conditioner"]
    AC --> AD["⑬ Air Conditioner"]
    AD --> AE["⑭ Air Conditioner"]
    AE --> AF["⑮ Air Conditioner"]
    AF --> AG["⑯ Air Conditioner"]
    AG --> AH["⑮ Air Conditioner"]
Lamp in refrigerator compartment
To remove the lamp cover, press the protrusion under the lamp cover to the front and then pull the lamp cover out.
Turn the bulb counterclockwise. Max. 240 V 40 W bulb for refrigerator is used and can be purchased at a service center.
Refreshment center
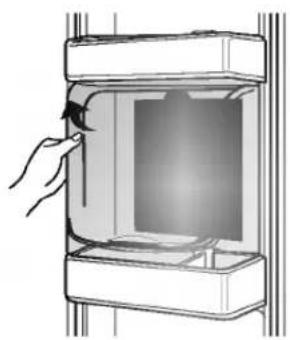
- Separate the upper rack of the refreshment center and then pull out the refreshment center cover (①).
- The refreshment center can be removed by pulling it upwards.
natural_image
Illustration of a hand inserting a device into a rectangular device (no text or symbols visible)NOTE
- Be sure to remove parts from the refrigerator door when removing the vegetable compartment, snack drawer and refreshment center cover.
Vegetable compartment cover
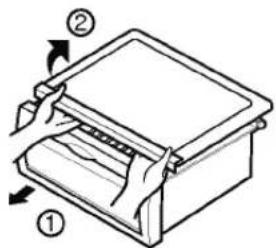
- To remove the vegetable compartment cover, pull out the vegetable compartment a bit to the front ①, lift the front part of the vegetable compartment cover as shown by ②, and take it out.
text_image
Technical diagram of a mechanical device with numbered parts and directional arrows indicating assembly or movement.General information
Vacation time
During average length vacations, you will probably find it best to leave the refrigerator in operation. Place freezable items in freezer for longer life.
When you plan not to operate, remove all food, disconnect the power cord, clean the interior thoroughly, and leave each door OPEN to prevent odor formation.
Power failure
Most power failures that are corrected in an hour or two will not affect your refrigerator temperatures.
However, you should minimize the number of door openings while the power is off.
If you move
Remove or securely fasten down all loose items inside the refrigerator.
To avoid damaging the height adjusting screws, turn them all the way into the base.
Anti condensation pipe
The outside wall of the refrigerator cabinet may sometimes get warm, especially just after installation.
Don't be alarmed. This is due to the anti-condensation pipe, which pumps hot refrigerator to prevent "sweating" on the outer cabinet wall.
Cleaning
It is important that your refrigerator be kept clean to prevent undesirable odors. Spilled food should be wiped up immediately, since it may acidify and stain plastic surfaces if allowed to settle.
Exterior
Use a lukewarm solution of mild soap or detergent to clean the durable finish of your refrigerator.
Wipe with a clean damp cloth and then dry.
Interior
Regular cleaning is recommended. Wash all compartments a baking soda solution or a mild detergent and warm water. Rinse and dry.
After cleaning
Please verify that the power cord is not damaged, power plug is not overheated, or power plug is well inserted into the power consent.
Warning
Always remove power cord from the wall outlet prior to cleaning in the vicinity of electrical parts (lamps, switches, controls, etc.).
Wipe up excess moisture with a sponge or cloth to prevent water or liquid from getting into any electrical part and causing an electric shock.
Never use metallic scouring pads, brushes, coarse abrasive cleaners, strong alkaline solutions, flammable or toxic cleaning liquids on any surface.
Do not touch frozen surfaces with wet or damp hands, because damp object will stick or adhere to extremely cold surfaces.
Trouble shooting
Before calling for service, review this list. It may save you both time and expense. This list includes common occurrences that are not the result of defective workmanship or materials in this appliance.
| Running of refrigerator | ||
| Refrigerator compressor does not run. | Refrigerator control is off. | Set refrigerator control. See setting the controls. |
| Refrigerator is in defrost cycle. | This is normal for a fully automatic defrosting refrigerator. The defrost cycle occurs periodically. | |
| Plug at wall outlet is disconnected. | Make sure plug is tightly pushed into outlet. | |
| Power outage. Check house lights. | Call local electric company. | |
| Refrigerator runs too much or too long | Refrigerator is larger than the previous one you owned. | This is normal. Larger, more efficient units run longer in these conditions. |
| Room or outside weather is hot. | It is normal for the refrigerator to work longer under these conditions. | |
| Refrigerator has recently been disconnected for a period of time. | It takes some hours for the refrigerator to cool down completely. | |
| Large amounts of warm or hot food may have been stored recently. | Warm food will cause the refrigerator to run longer until the desired temperature is reached. | |
| Doors are opened too frequently or too long. | Warm air entering the refrigerator causes it to run longer. Open the door less often. | |
| Refrigerator or freezer door may be slightly open. | Make sure the refrigerator is level. Keep food and containers from blocking door. See problem section. OPENING/CLOSING of doors. | |
| Refrigerator control is set too cold. | Set the refrigerator control to a warmer setting until the refrigerator temperature is satisfactory. | |
| Refrigerator or freezer gasket is dirty, worn, cracked, or poorly fitted. | Clean or change gasket. Leaks in the door seal will cause refrigerator to run longer in order to maintain desired temperatures. | |
| Thermostat is keeping the refrigerator at a constant temperature. | This is normal. Refrigerator goes on and off to keep the temperature constant. | |
| Refrigerator compressor does not run. | Thermostat is keeping the refrigerator at a constant temperature. | This is normal. The refrigerator goes on and off to keep the temperature constant. |
| Temperatures are too cold | ||
| Temperature in the freezer is too cold but the refrigerator temperature is satisfactory. | Freezer control is set too cold | Set the freezer control to a warmer setting until the freezer temperature is satisfactory. |
| Temperature in the refrigerator is too cold and the freezer temperature is satisfactory. | Refrigerator control is set too cold. | Set the refrigerator control to a warmer setting |
| Food stored in drawers freezes. | Refrigerator control is set too cold. | See above solution. |
| Meat stored in fresh meat drawer freezes. | Meat should be stored at a temperature just below the freezing point of water (32°F, 0°C) for maximum fresh storage time. | It is normal for ice crystals to form due to the moisture content of meat. |
| Temperatures are too warm | ||
| Temperatures in the refrigerator or freezer are too warm. | Freezer control is set too warm. | Set the freezer or refrigerator control to a colder setting until the freezer or refrigerator temperature is satisfactory. |
| Refrigerator control is set too warm. Refrigerator control has some effect on freezer temperature. | Set the freezer or refrigerator control to a colder setting until the freezer or refrigerator temperature is satisfactory. | |
| Doors are opened too frequently or too long. | Warm air enters the refrigerator/ freezer whenever the door is opened. Open the door less often. | |
| Door is slightly open. | Close the door completely. | |
| Large amounts of warm or hot food may have been stored recently. | Wait until the refrigerator or freezer has a chance to reach its selected temperature. | |
| Refrigerator has recently been disconnected for a period of time. | A refrigerator requires some hours to cool down completely. | |
| Temperature in the refrigerator is too warm but the freezer temperature is satisfactory. | Refrigerator control is set too warm. | Set the refrigerator control to a colder setting. |
| Sound and noise | ||
| Louder sound levels when refrigerator is on. | Today's refrigerators have increased storage capacity and maintain more even temperatures. | It is normal for sound levels to be higher. |
| Louder sound levels when compressor comes on. | Refrigerator operates at higher pressures during the start of the ON cycle. | This is normal. The sound will level off as the refrigerator continues to run. |
| Vibrating or rattling noise. | Floor is uneven or weak. Refrigerator rocks on the floor when it is moved slightly. | Be sure floor is level and solid and can adequately support refrigerator. |
| Items placed on the top of the refrigerator are vibrating. | Remove items. | |
| Dishes are vibrating on the shelves in the refrigerator. | It is normal for dishes to vibrate slightly. Move dishes slightly. Make sure refrigerator is level and firmly set on floor. | |
| Refrigerator is touching wall or cabinets. | Move refrigerator so that it does not touch the wall or refrigerator. | |
| Water/Moisture /Ice inside refrigerator | ||
| Moisture collects on the inside walls of the refrigerator. | The weather is hot and humid which increases the rate of frost buildup and internal sweating. | This is normal. |
| Door is slightly open. | See problem section opening/closing of doors. | |
| Door is opened too often or too long. | Open the door less often. | |
| Water/Moisture /Ice outside refrigerator | ||
| Moisture forms on the outside of the refrigerator or between doors. | Weather is humid. | This is normal in humid weather. When humidity is lower, the moisture should disappear. |
| Door is slightly open, causing cold air from the inside the refrigerator to meet warm air from the outside. | This time, close the door completely. | |
| Odors in refrigerator | ||
| Interior needs to be cleaned. | Clean interior with sponge, warm water and baking soda. | |
| Food with strong odor is in the refrigerator. | Cover food completely. | |
| Some containers and wrapping materials produce odors. | Use a different container or brand of wrapping materials. | |
| Opening/Closing of doors/Drawers | ||
| Door(s) will not close. | Food package is keeping door open. | Move packages that keep door from closing. |
| Door(s) will not close. | Door was closed too hard, causing other door to open slightly. | Close both doors gently. |
| Refrigerator is not level. It rocks on the floor when it is moved slightly. | Adjust the height adjusting screw. | |
| Floor is uneven or weak. Refrigerator rocks on the floor when it is moved slightly. | Be sure floor is level and can adequately support refrigerator. Contact carpenter to correct sagging or sloping floor. | |
| Refrigerator is touching wall or cabinets. | Move refrigerator.. | |
| Drawers are difficult to move. | Food is touching shelf on top of the drawer | Keep less food in drawer. |
| Track that drawer slides on is dirty. | Clean drawer and track. | |
| Dispenser | ||
| Dispenser will not dispense ice | Ice storage bin is empty. | When the first supply of ice is dropped into the bin, the dispenser should operate. |
| Freezer temperature is set too warm. | Turn the freezer control to a higher setting so that ice cubes will be made. When the first supply of ice is made, the dispenser should operate. | |
| Household water line valve is not open. | Open household water line valve and allow sufficient time for ice to be made. When ice is made, dispenser should operate. | |
| Refrigerator or freezer door is not closed. | Be sure both doors are closed. | |
| Dispenser will not dispense ice. | Ice has melted and frozen around auger due to infrequent use, temperature fluctuations and/or power outrages. | Remove ice storage bin, and thaw and the contents. Clean bin, wipe dry and replace in proper position.When new ice is made, dispenser should operate. |
| Ice dispenser is jammed. | Ice cubes are jammed between the ice maker arm and back of the bin. | Remove the ice cubes that are jamming the dispenser. |
| Ice cubes are frozen together. | Use the dispenser often so that cubes do not freeze together. | |
| Ice cubes that have been purchased or made in some other way have been used in the dispenser. | Only the ice cubes made by the ice maker should be used with the dispenser. | |
| Dispenser will not dispense water. | Household water line valve is not open.See problem “ Ice maker is not making any ice.” | Open household water line valve. |
| Refrigerator or freezer door is not closed. | Be sure both doors are closed. | |
| Water has an odd taste and/or odor. | Water has been in the tank for too long. | Draw and discard 7 glasses of water to freshen the supply. Draw and discard an additional 7 glasses to completely rinse out tank. |
| Unit not properly connected to cold water line. | Connect unit to cold water line which supplies water to kitchen faucet. | |
| Sound of ice dropping | This sound is normally made when automatically made ice is dropped into ice storage bin. Volume may vary according to refrigerator's location. | |
| Sound of water supply | This sound is normally made when ice maker is supplied with water after dropping the automatically made ice. | |
| Other | Please thoroughly read ‘Automatic ice maker and dispenser’ in this manual. | |

LG Electronics Inc.
LG Twin Tower, 20, Yoido-Dong, Youngdungpo-Gu, Seoul, 150-721, Korea. http://www.lge.com