
PT-P1SDU - Vidéo-projecteur PANASONIC - Free user manual and instructions
Find the device manual for free PT-P1SDU PANASONIC in PDF.


User questions about PT-P1SDU PANASONIC
0 question about this device. Answer the ones you know or ask your own.
Ask a new question about this device
Download the instructions for your Vidéo-projecteur in PDF format for free! Find your manual PT-P1SDU - PANASONIC and take your electronic device back in hand. On this page are published all the documents necessary for the use of your device. PT-P1SDU by PANASONIC.
USER MANUAL PT-P1SDU PANASONIC
LCD Projector Commercial Use
Operating Instructions
Model No. PT-P1SDU
ENSOLIDH

Before operating this product, please read the instructions carefully and save this manual for future use.
TQBJ 0184
Dear Panasonic Customer:
This instruction booklet provides all the necessary operating information that you might require. We hope it will help you to get the most out of your new product, and that you will be pleased with your Panasonic LCD projector. The serial number of your product can be found on its bottom. You should note it in the space provided below and retain this booklet in case service is required.
Model number: PT-P1SDU
Serial number:
IMPORTANT SAFETY NOTICE
WARNING: TO REDUCE THE RISK OF FIRE OR ELECTRIC SHOCK, DO NOT EXPOSE THIS PRODUCT TO RAIN OR MOISTURE.
Power Supply: This LCD Projector is designed to operate on 100 V – 240 V, 50 Hz/60 Hz AC, house current only.
CAUTION: The AC power cord which is supplied with the projector as an accessory can only be used for power supplies up to 125 V, 7 A. If you need to use higher voltages or currents than this, you will need to obtain a separate 250 V power cord. If you use the accessory cord in such situations, fire may result.

WARNING
RISK OF ELECTRIC
SHOCK DO NOT OPEN

MISE EN GARDE-RISQUE DE CHOC ÉLECTRIQUE.
NE PAS OUVRIR.
The lightning flash with arrowhead symbol, within an equilateral triangle, is intended to alert the user to the presence of uninsulated “dangerous voltage” within the product’s enclosure that may be of sufficient magnitude to constitute a risk of electric shock to persons.

The exclamation point within an equilateral triangle is intended to alert the user to the presence of important operating and maintenance (servicing) instructions in the literature accompanying the product.
CAUTION:
This equipment is equipped with a three-pin grounding-type power plug. Do not remove the grounding pin on the power plug. This plug will only fit a grounding-type power outlet. This is a safety feature. If you are unable to insert the plug into the outlet, contact an electrician. Do not defeat the purpose of the grounding plug.
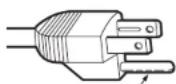
Do not remove
2-ENGLISH
WARNING:
Do not look into the lens while the projector is being used.


- Strong light is emitted from the projector's lens. If you look directly into this light, it can hurt and damage your eyes. - Be especially careful not to let young children look into the lens. In addition, disconnect the power cord plug when you are away from the projector.
WARNING:
This equipment has been tested and found to comply with the limits for a Class B digital device, pursuant to Part 15 of the FCC Rules. These limits are designed to provide reasonable protection against harmful interference in a residential installation. This equipment generates, uses and can radiate radio frequency energy and, if not installed and used in accordance with the instructions, may cause harmful interference to radio communications. However, there is no guarantee that interference will not occur in a particular installation. If this equipment does cause harmful interference to radio or television reception, which can be determined by turning the equipment off and on, the user is encouraged to try to correct the interference by one or more of the following measures:
– Reorient or relocate the receiving antenna.
– Increase the separation between the equipment and receiver.
- Connect the equipment into an outlet on a circuit different from that to which the receiver is connected.
- Consult the dealer or an experienced radio/TV technician for help.
FCC CAUTION: To assure continued compliance, use only shielded interface cables when connecting to computers or peripheral devices.
Any unauthorized changes or modifications to this equipment will void the users authority to operate.
WARNING:
- Not for use in a computer room as defined in the Standard for the Protection of Electronic Computer/Data Processing Equipment, ANSI/NFPA 75.
- For permanently connected equipment, a readily accessible disconnect device shall be incorporated in the building installation wiring;
- For pluggable equipment, the socket-outlet shall be installed near the equipment and shall be easily accessible.
Declaration of Conformity
Model Number: PT-P1SDU
Trade Name: Panasonic
Responsible party: Panasonic Corporation of North America
Address: One Panasonic Way Secaucus New Jersey 07094
Telephone number: 1-800-528-8601 or 1-800-222-0741
Email: pbtsservice@panasonic.com
This device complies with Part 15 of the FCC Rules. Operation is subject to the following two conditions: (1) This device may not cause harmful interference, and (2) this device must accept any interference received, including interference that may cause undesired operation.
ENGLISH-3
Contents
Preparation
IMPORTANT SAFETY NOTICE ...2
Precautions with regard to safety 5
Accessories 9
Before use ....10
Read this page first ....12
Location and function of each part....14
Getting started
Setting-up....20
Projection methods, Projector position, Projection distances Connections......22 Connecting to computer, Connecting to video equipment, Preparation for the remote control unit......24
Basic operation
Turning on the power....26 Turning off the power....28
Useful functions
Correcting the image position automatically....30
Turning off the picture and sound momentarily ....31
Adjusting the volume .....31
Using the SD memory card.....32 Inserting and removing the SD memory card, SD selection screen Playing back images from a SD memory card .....35
Button functions during playback Setting a detailed playback method for the SD memory card
37 MODE, AUTO PLAY, INTERVAL, EFFECT AUDIO
EFFECT, AUDIO Making a presentation without using a computer....39
Adjustments and settings
On-screen menus ....40
Menu screens, Menu operation
guide, Returning a setting to the factory default Adjusting the picture......44 PICTURE MODE, DAYLIGHTVIEW, DETAILED SETUP
Adjusting the position....46 KEYSTONE, ASPECT, POSITION, DETAILED SETUP
Other settings ....49 AUTO SIGNAL, TV-SYSTEM, FRONT/REAR, DESK/CEILING, HIGHLAND, LAMP RUNTIME, SXGA MODE, CTRL PANEL, NR
Changing the display language....51 Setting up the security function....52
SETUP, AMEND PASSWORD, TO REGISTER SD KEY 1(2), INSERTED SD KEY
Care and maintenance
When the TEMP indicator and the LAMP indicator are illuminated....54
Cleaning and replacing the air filter ....56 Replacing the lamp unit ....57
Before calling for service......60
Cleaning and maintenance .....62
Others
Specifications 63
Appendix 65
List of compatible signals, DCF standard, Guide screen for computer connection, Projection dimensions calculation methods
Dimensions 69
Trademark acknowledgements ....70
NOTES IMPORTANTES CONCERNANT LA SECURITE...71 Précautions de sécurité .....72
Precautions with regard to safety
WARNING
If you notice smoke, strange smells or noise coming from the projector, disconnect the power cord plug from the wall outlet.
- Do not continue to use the projector in such cases, otherwise fire or electric shocks could result.
- Check that no more smoke is coming out, and then contact an Authorized Service Center for repairs.
- Do not attempt to repair the projector yourself, as this can be dangerous.
Do not install this projector in a place which is not strong enough to take the full weight of the projector.
- If the installation location is not strong enough, it may fall down or tip over, and severe injury or damage could result.
Installation work (such as ceiling suspension) should only be carried out by a qualified technician.
- If installation is not carried out correctly, there is the danger that injury or electric shocks may occur.
If foreign objects or water get inside the projector, or if the projector is dropped or the cabinet is broken, disconnect the power cord plug from the wall outlet.
- Continued use of the projector in this condition may result in fire or electric shocks.
- Contact an Authorized Service Center for repairs.
Do not overload the wall outlet.
- If the power supply is overloaded (for example, by using too many adapters), overheating may occur and fire may result.
Do not remove the cover or modify it in any way.
- High voltages can cause fire or electric shocks.
- For any inspection, adjustment and repair work, please contact an Authorized Service Center.
Clean the power cord plug regularly to prevent it from becoming covered in dust.
- If dust builds up on the power cord plug, the resulting humidity can damage the insulation, which could result in fire. Pull the power cord plug out from the wall outlet and wipe it with a dry cloth.
- If not using the projector for an extended period of time, pull the power cord plug out from the wall outlet.
Do not do anything that might damage the power cord or the power cord plug.
- Do not damage the power cord, make any modifications to it, place it near any hot objects, bend it excessively, twist it, pull it, place heavy objects on top of it or wrap it into a bundle.
- If the power cord is used while damaged, electric shocks, short-circuits or fire may result.
- Ask an Authorized Service Center to carry out any repairs to the power cord that might be necessary.
Do not handle the power cord plug with wet hands.
● Failure to observe this may result in electric shocks.
Insert the power cord plug securely into the wall outlet.
- If the plug is not inserted correctly, electric shocks or overheating could result.
- Do not use plugs which are damaged or wall outlet which are coming loose from the wall.
Do not place the projector on top of surfaces which are unstable.
- If the projector is placed on top of a surface which is sloped or unstable, it may fall down or tip over, and injury or damage could result.
Do not place the projector into water or let it become wet.
- Failure to observe this may result in fire or electric shocks.
Do not place the projector on soft materials such as carpets or sponge mats.
- Doing so may cause the projector to overheat, which can cause burns, fire or damage to the projector.
Do not place liquid containers on top of the projector.
- If water spills onto the projector or gets inside it, fire or electric shocks could result.
- If any water gets inside the projector, contact an Authorized Service Center.
Do not insert any foreign objects into the projector.
- Do not insert any metal objects or flammable objects into the projector or drop them onto the projector, as doing so can result in fire or electric shocks.
Keep the SD memory card (sold separately) and batteries out of the reach of infants.
- If the SD memory card and batteries are swallowed, death by suffocation may result. If you believe that the SD memory card and batteries may have been swallowed, seek medical advice immediately.
Do not allow the + and - terminals of the batteries to come into contact with metallic objects such as necklaces or hairpins.
- Failure to observe this may cause the batteries to leak, overheat, explode or catch fire.
- Store the batteries in a plastic bag and keep them away from metallic objects.
6-ENGLISH
During a thunderstorm, do not touch the projector or the cable.
• Electric shocks can result.
Do not use the projector in a bath or shower.
- Fire or electric shocks can result.
Do not place your skin into the light beam while the projector is being used.
- Strong light is emitted from the projector's lens. If you place directly into this light, it can hurt or damage your skin.
Do not place your hands or other objects close to the air outlet port.
- Heated air comes out of the air outlet port. Do not place your hands or face, or objects which cannot withstand heat close to this port [allow at least 10cm (4") of space], otherwise burns or damage could result.
Replacement of the lamp should only be carried out by a qualified technician.
- The lamp has high internal pressure. If improperly handled, explosion might result.
- The lamp can easily become damaged if struck against hard objects or dropped, and injury or malfunctions may result.
When replacing the lamp, allow it to cool for at least one hour before handling it.
- The lamp cover gets very hot, and touching it can cause burns.
Before replacing the lamp, be sure to disconnect the power cord plug from the wall outlet.
- Electric shocks or explosions can result if this is not done.
Caution
Do not cover the air inlet port or the air outlet port.
- Doing so may cause the projector to overheat, which can cause fire or damage to the projector.
- Do not place the projector in narrow, badly ventilated places such as closets or bookshelves.
- Do not place the projector on cloth or papers, as these materials could be drawn into the air inlet port.
Do not set up the projector in humid or dusty places or in places where the projector may come into contact with smoke or steam.
- Using the projector under such conditions may result in fire or electric shocks.
When disconnecting the power cord, hold the plug, not the cord.
- If the power cord itself is pulled, the cord will become damaged, and fire, short-circuits or serious electric shocks may result.
Always disconnect all cables before moving the projector.
- Moving the projector with cables still attached can damage the cables, which could cause fire or electric shocks to occur.
ENGLISH-7
Do not place any heavy objects on top of the projector.
- Failure to observe this may cause the projector to become unbalanced and fall, which could result in damage or injury.
Do not short-circuit, heat or disassemble the batteries or place them into water or fire.
- Failure to observe this may cause the batteries to overheat, leak, explode or catch fire, and burns or other injury may result.
When inserting the batteries, make sure the polarities (+ and -) are correct.
- If the batteries are inserted incorrectly, they may explode or leak, and fire, injury or contamination of the battery compartment and surrounding area may result.
Use only the specified batteries.
- If incorrect batteries are used, they may explode or leak, and fire, injury or contamination of the battery compartment and surrounding area may result.
Insulate the battery using tape or similar before disposal.
- If the battery comes into contact with metallic objects or other batteries, it may catch fire or explode.
Do not put your weight on this projector.
- You could fall or the projector could break, and injury may result.
- Be especially careful not to let young children stand or sit on the projector.
If not using the projector for an extended period of time, disconnect the power cord plug from the wall outlet.
- If dust builds up on the power cord plug, the resulting humidity may damage the insulation, which could result in fire.
- This projector continues to draw approximately 3 W of power even when the power is turned off.
Disconnect the power cord plug from the wall outlet as a safety precaution before carrying out any cleaning.
• Electric shocks can result if this is not done
If the lamp has broken, ventilate the room immediately. Do not touch or bring your face close to the broken pieces.
- Failure to observe this may cause the user to absorb the gas which was released when the lamp broke and which contains nearly the same amount of mercury as fluorescent lamps, and the broken pieces may cause injury.
- If you believe that you have absorbed the gas or that the gas has got into your eyes or mouth, seek medical advice immediately.
- Ask your dealer to replace the lamp unit and check the inside of the projector.
Ask an Authorized Service Center to clean inside the projector at least once a year.
- If dust is left to build up inside the projector without being cleaned out, it can result in fire or problems with operation.
- It is a good idea to clean the inside of the projector before the season for humid weather arrives. Ask your nearest Authorized Service Center to clean the projector when required. Please discuss with the Authorized Service Center regarding cleaning costs.
We are constantly making efforts to preserve and maintain a clean environment. Please take non repairable units back to your dealer or a recycling company.
NOTICE:
- This product has a High Intensity Discharge (HID) lamp that contains a small amount of mercury. It also contains lead in some components. Disposal of these materials may be regulated in your community due to environmental considerations. For disposal or recycling information please contact your local authorities, or the Electronics Industries Alliance: http://www.eiae.org
Accessories
Check that all of the accessories shown below have been included with your projector.
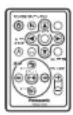
| Card remote control unit (N2QAYC000001 x1) | Lithium battery for remote control unit (CR-2025 x1) | RGB signal cable [1.8 m (5'10"), K1HA15DA0002 x1] |
 | 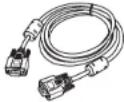 | |
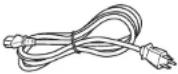
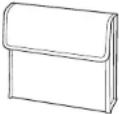
 | Power cord (K2CG3DR00005 x 1) | Softcase (TPEP017 x 1) |
 |  |
Before use
Caution when moving the projector
Be sure to check that the lens cover has been attached to the lens before moving the projector.
The projection lens is extremely susceptible to vibration and shocks. When moving the projector, use the accessory softcase. When placing the projector inside the softcase, position it so that the lens is facing upward.
Do not put anything else in the softcase other than the projector, cables, remote control unit and the SD memory card.
Cautions regarding setting-up
Avoid setting up in places which are subject to vibration or shocks.
The internal parts can be damaged, which may cause malfunctions or accidents.
Avoid setting up in places which are subject to sudden temperature changes, such as near an air conditioner.
The life of the lamp may be shortened.
Do not set up the projector near high-voltage power lines or near motors.
The projector may be subject to electromagnetic interference.
If installing the projector to the ceiling, ask a qualified technician to carry out all installation work.
You will need to purchase the separate installation kit (Model No.ET-PKP1).
Furthermore, all installation work should only be carried out by a qualified technician.
If using this projector at high elevations (above 1 400 m), set the "HIGHLAND" to "ON". (Refer to page 50.)
Failure to observe this may result in malfunctions.
Notes on use
In order to get the best picture quality
Draw curtains or blinds over any windows and turn off any lights near the screen to prevent outside light or light from indoor lamps from shining onto the screen.
Do not touch the glass parts of the lens and the lens cover with your bare hands.
If the glass parts of the lens and the lens cover become dirty from fingerprints or anything else, it will be magnified and projected onto the screen.
Screen
Do not apply any volatile substances which may cause discoloration to the screen, and do not let it become dirty or damaged.
SD memory card slot
Make sure that there are no foreign objects inside the slot when inserting the SD memory card (sold separately). Failure to observe this may damage the card and the slot.
Lamp
The lamp may need to be replaced earlier due to variables such as individual lamp characteristics, usage conditions and the installation environment, especially when the projector is subjected to continuous use for more than 10 hours or the power is frequently turned on and off.
Liquid crystal panel
The liquid crystal panel of the projector is built with very high precision technology to provide fine picture details. Occasionally, a few non-active pixels may appear on the screen as fixed points of blue, green or red. Please note that this does not affect the performance of your LCD.
Read this page first
When you turn on the power for the first time after purchase, the "LANGUAGE SETUP" and "OTHER SETUP" menus will be displayed. Adjust the settings according to the place and situation where you are using the projector.
These menus will be displayed only when you turn on the power for the first time, but you will be able to change the settings by operating the on-screen menus. (Refer to page 40 for details.)
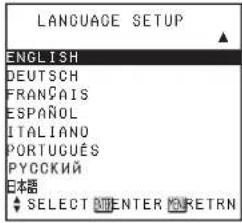
LANGUAGE SETUP menu
① Select the language in which the on-screen menus will be displayed by pressing the ▲ or ▼ button on the remote control unit, and then press the ENTER button.
- The confirmation screen will be displayed.
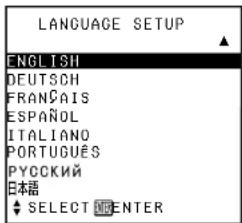
text_image
LANGUAGE SETUP ENGLISH DEUTSCH FRANÇAIS ESPAÑOL ITALIANO PORTUGUÊS PYOCKИЙ 日本語 ♦ SELECT ENTER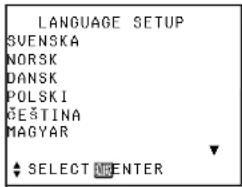
text_image
LANGUAGE SETUP SVENSKA NORSK DANSK POLSKI GESTINA MAGYAR SELECT URENTER②Press the ENTER button again.
- The on-screen menus will be displayed in the selected language.
- Press the MENU button to return to the language selection screen.
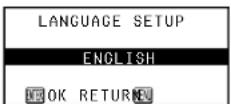
NOTE:
- The "OTHER SETUP" menu will be displayed in turn automatically after confirming the selected language.
OTHER SETUP menu
①Press the ▲ or ▼ button to select an item, and then press the ◀ or ▶ button to change the setting.
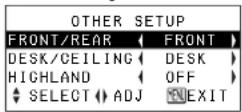
FRONT/REAR
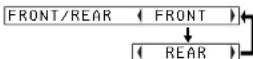
This setting should be changed in accordance with the projector setting-up method. (Refer to page 20.)
FRONT
When the projector is placed in front of a screen.
REAR
When using a translucent screen.
DESK/CEILING
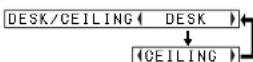
This setting should be changed in accordance with the projector setting-up method. (Refer to page 20.)
DESK
When the projector is placed on a desk or similar.
CEILING
When the projector is suspended from a ceiling using the ceiling bracket (sold separately).
HIGHLAND
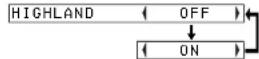
Set "HIGHLAND" to "ON", when using this projector at high elevations (above 1 400 m) only.
②Press the MENU button to cancel the screen after adjusting.
Location and function of each part
Projector
text_image
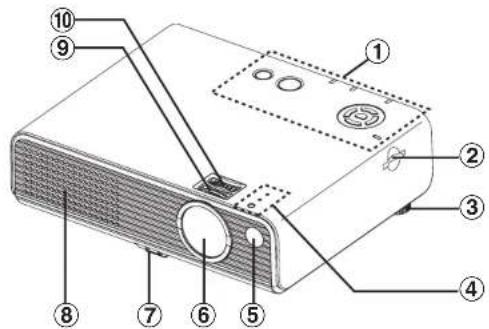
Labeled diagram of a projector with numbered parts for identification①Projector control panel (page 16)
②SD memory card slot
③Back adjustable leg (page 27)
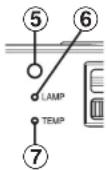
④Illumination sensor and LAMP/TEMP indicators (page 16)
⑤Remote control signal receptor (page 24)
⑥Lens cover (page 62)
Use the projector with the lens cover attached.
⑦Front leg adjuster button (page 27)
This button is used to unlock the front adjustable leg. Press to adjust the angle of tilt of the projector.
⑧Air inlet port
Do not cover this port.
⑨ Focus ring (page 27)
⑩Zoom ring (page 27)
Projector
text_image
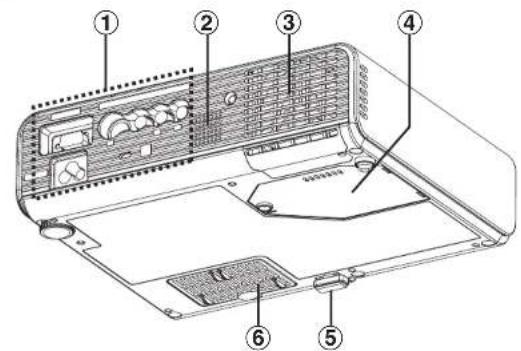
Labeled diagram of an electronic device showing numbered components for identification①Connector panel (page 19)
②Speaker
③Air outlet port
Do not cover this port.
④Lamp unit cover (page 58)
⑤Front adjustable leg (page 27)
⑥Air inlet port, Air filter (page 56)
Do not cover this port.
NOTE:
- During projection of an image, the cooling fan will operate, emitting a small noise as it operates. This noise may change depending on the ambient temperature. Turning the lamp on or off will cause this noise to increase a little.
WARNING
Do not place your hands or other objects close to the air outlet port.
- Heated air comes out of the air outlet port. Do not place your hands or face, or objects which cannot withstand heat close to this port [allow at least 10cm (4") of space], otherwise burns or damage could result.
Projector control panel
text_image
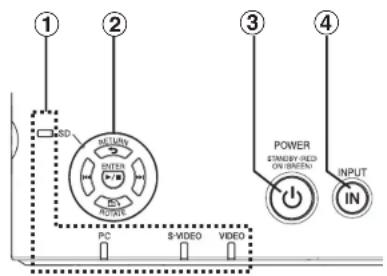
① ② ③ ④ SD SECURD INTER RUTS PC #VIDEO VIDEO POWER STANDY-RED ON BREAD INPUTIllumination sensor and LAMP/TEMP indicators
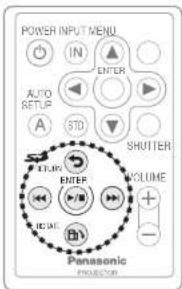
Remote control unit
text_image
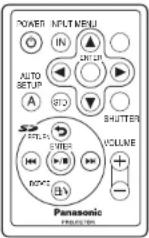
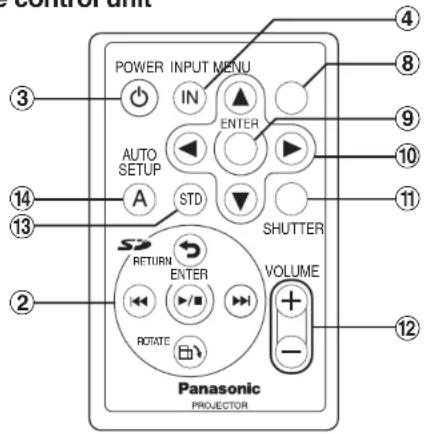
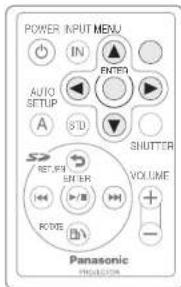
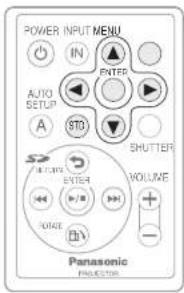
POWER INPUT MENU IN ENTER AUTO SETUP A STD SHUTTER RETURN ENTER VOLUME ROTATE Panasonic PROJECTOR①Input signal indicators
These indicators illuminate when a signal is being input to the connector that has been selected using the INPUT button. The indicators flash when no signal is being input to the connector that was selected using the INPUT button and when signals that are not compatible with the projector are being input.
②SD operation buttons (pages 18 and 35)
These buttons are used for operation when the SD selection screen is being displayed and when files in the SD memory card are being played back.
③POWER button (pages 26, 28 and 29)
This button is used to turn the power on and off. This button on the projector illuminates red when the projector is in standby mode, and it illuminates green when a picture starts to be projected.
④INPUT button (page 27)
This button is used to switch the input signals from the connected equipment.
⑤Illumination sensor (page 44)
This sensor detects the luminance when the "DAYLIGHTVIEW" function is operating. Do not cover the projector and do not place any object on the projector when using it.
⑥LAMP indicator (page 55)
This indicator illuminates when it is time to replace the lamp unit. It flashes if a circuit abnormality is detected.
⑦TEMP indicator (page 54)
This indicator illuminates if an abnormally high temperature is detected inside the projector or around it. If the temperature rises above a certain level, the power supply will be turned off automatically and the indicator will flash.
⑧MENU button (pages 40 and 42)
This button is used to display the "MAIN MENU". When a menu screen is being displayed, this button can be used to return to a previous screen or to clear the screen.
⑨ENTER button (page 42)
This button is used to accept and to activate items selected in the on-screen menus.
⑩Arrow (▲▼◀ and ▶) buttons (page 42)
These buttons are used to select and adjust items in the on-screen menus.
⑪SHUTTER button (page 31)
This button is used to momentarily turn off the picture and sound.
⑫VOLUME +/- buttons (page 31)
These buttons are used to adjust the volume of the sound output from the projector's built-in speaker.
⑬ STD (standard) button (page 43)
This button is used to reset the projector adjustment values to the factory default settings.
⑭ AUTO SETUP button (pages 27 and 30)
If this button is pressed while a PC signal is being projected, the position of the image and the settings for "DOT CLOCK" and "CLOCK PHASE" will be adjusted automatically.
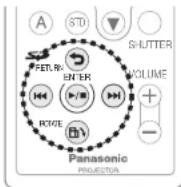
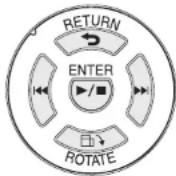
SD operation buttons
text_image
RETURN ENTER 1 2 ROTATE 3 4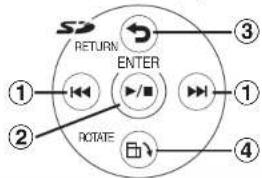
flowchart
graph TD
    A["1"] --> B["2"]
    B --> C["3"]
    C --> D["4"]
    D --> E["5"]
    E --> F["6"]
    F --> G["7"]
    G --> H["8"]
    H --> I["9"]
    I --> J["10"]
    J --> K["11"]
    K --> L["12"]
    L --> M["13"]
    M --> N["14"]
    N --> O["15"]
    O --> P["16"]
    P --> Q["17"]
    Q --> R["18"]
    R --> S["19"]
    S --> T["20"]
    T --> U["21"]
    U --> V["22"]
    V --> W["23"]
    W --> X["24"]
    X --> Y["25"]
    Y --> Z["26"]
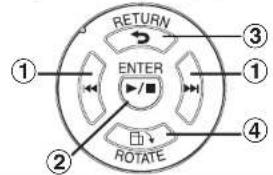
①SD ◀◀/▶▶ button
These buttons are used to select folders and files on the SD selection screen.
Press the SD button to switch to the previous file, and the SD button to switch to the next file.
You can start and stop the slide show by holding down the SD button.
②SD ENTER button
This button is used to accept the selection made on the SD selection screen.
③SD RETURN button
This button is used to return to the previous screen.
④SD ROTATE button
Each press of this button rotates the still image being played back 90 degrees clockwise.
Connector panel
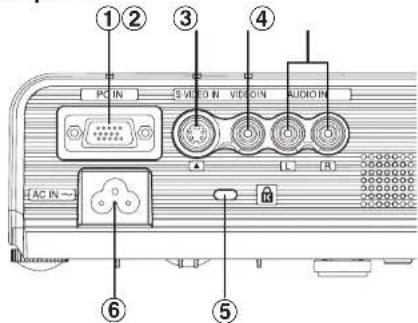
text_image
①② PC IN S VIDEO IN VIDEO IN AUDIO IN AC IN ~ ③ ④ ⑤ ⑥①PC IN connector (pages 22 and 23)
This connector is used to input PC signals and YPBPR signals.
②S-VIDEO IN connector (pages 23 and 47)
This connector is used to input signals from S-VIDEO-compatible equipment such as a DVD player. The connector is S1 signal compatible, and it automatically switches between 16:9 and 4:3 aspect ratios in accordance with the type of signal being input.
③VIDEO IN connector (page 23)
This connector is used to input video signals from video equipment such as a video deck.
④AUDIO IN L-R connectors (pages 22 and 23)
⑤Security lock
This can be used to connect a commercially-available theft-prevention cable (manufactured by Kensington). This security lock is compatible with the Microsaver Security System from Kensington.
⑥Power input socket (AC IN) (page 26)
The accessory power cord is connected here.
Do not use any power cord other than the accessory power cord.
Setting-up
Projection methods
In way of installing projector, any one of the following four projection methods are used. Select whichever projection method matches the setting-up method. (The projection method can be set from the "OTHER SETUP" menu. Refer to page 50 for details.)
- Front-desk projection - Front-ceiling projection
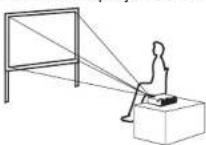
| Menu items Setting | |
| FRONT/REAR | FRONT |
| DESK/CEILING | DESK |
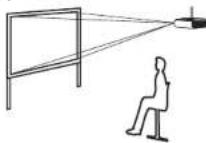
| Menu items Setting | |
| FRONT/REAR | FRONT |
| DESK/CEILING | CEILING |
- Rear-desk projection (Using a translucent screen)
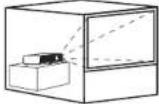

| Menu items Setting | |
| FRONT/REAR | REAR |
| DESK/CEILING | DESK |
- Rear-ceiling projection (Using a translucent screen)
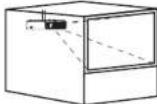

| Menu items Setting | |
| FRONT/REAR | REAR |
| DESK/CEILING | CEILING |
NOTE:
- You will need to purchase the separate ceiling bracket (ET-PKP1) when using the ceiling installation method.
- Do not set up the projector vertically or tilted horizontally, otherwise it may cause damage to the projector.
- It is recommended that you set up the projector in a place that is tilted at less than ± 30^ vertically. Setting up the projector in places that are tilted at more than ± 30^ vertically may shorten component life.
Projector position
text_image
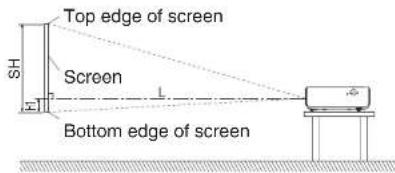
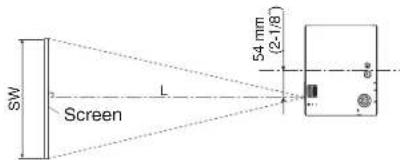
Top edge of screen Screen Bottom edge of screenL: Projection distance SH: Image height SW: Image width H1: Distance from center of lens to bottom edge of projected image
text_image
SW Screen L 54 mm (2-1/8)Projection distances
| 4:3 Screen size (diagonal) | Projection distance (L) | Height position (H1) | |
| Wide (LW) Telephoto (LT) | |||
| -1.02 m(40') | 1.2 m(3'11') | 0.13 m(5-3/32') | |
| 1.14 m(45') | 1.3 m(4'3') | 1.4 m(4'7') | 0.15 m(5-7/8') |
| 1.27 m(50') | 1.4 m(4'7') | 1.6 m(5'2') | 0.17 m(6-11/16') |
| 1.52 m(60') | 1.7 m(5'6') | 1.9 m(6'2') | 0.20 m(7-27/32') |
| 1.78 m(70') | 2.0 m(6'6') | 2.2 m(7'2') | 0.23 m(9-1/32') |
| 2.03 m(80') | 2.3 m(7'6') | 2.6 m(8'6') | 0.26 m(10-7/32') |
| 2.29 m(90') | 2.5 m(8'2') | 2.9 m(9'6') | 0.30 m(11-25/32') |
| 2.54 m(100') | 2.8 m(9'2') | 3.2 m(10'5') | 0.33 m(12-31/32') |
| 3.05 m(120') | 3.4 m(11'1') | 3.9 m(12'9') | 0.40 m(15-23/32') |
| 3.81 m(150') | 4.2 m(13'9') | 4.9 m(16') | 0.50 m(19-21/32') |
| 5.08 m(200') | 5.6 m(18'4') | 6.6 m(21'7') | 0.66 m(25-31/32') |
| 6.35 m(250') | 7.0 m(22'11') | 8.2 m(26'10') | 0.83 m(32-21/32') |
| 7.62 m(300') | 8.4 m(27'6') | 9.9 m(32'5') | 0.99 m(38-31/32') |
NOTE:
- The dimensions in the table above are approximate.
- For details about projected image distances, refer to page 68.
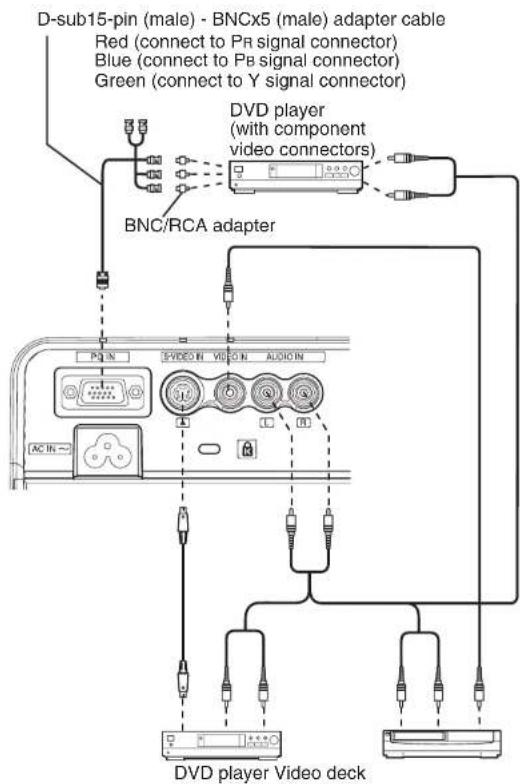
Connections
Notes on connections
- Read the instruction manual for each peripheral device carefully before connecting it.
- Turn off the power supply for all peripheral devices before making any connections.
- If the cables necessary for connection are not included with the peripheral device or available as an option, you may need to prepare a proper cable for the device concerned.
- If there is a lot of jitter in the video signal, the projected image may flicker. In such cases, it will be necessary to connect a TBC (time base corrector).
- Refer to the list on page 65 for details on compatible signals which can be input to the projector.
- Only one audio system circuit is available for the AUDIO IN L-R connectors, so if you change the audio input source, you will need to remove and insert the appropriate plugs.
Connecting to computer
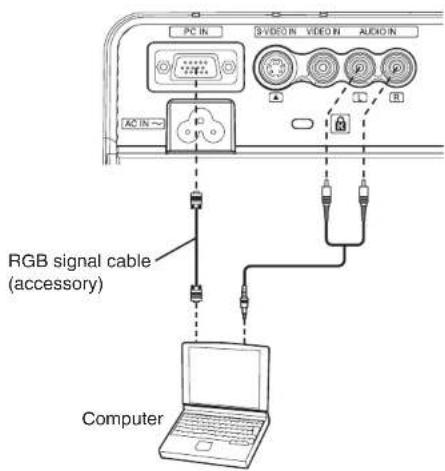
text_image
PC IN 3V/200 IN VIDEO IN AUDIO IN AC IN RGB signal cable (accessory) ComputerConnecting to video equipment
text_image
D-sub15-pin (male) - BNCx5 (male) adapter cable Red (connect to Pr signal connector) Blue (connect to Pb signal connector) Green (connect to Y signal connector) DVD player (with component video connectors) BNC/RCA adapter PQ IN S-VIDEO IN VIDEO IN AUDIO IN AC IN DVD player Video deckPreparation for the remote control unit
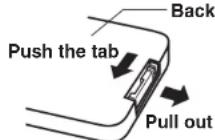
Insert the accessory lithium battery while making sure that the polarities are correct.
①While pushing the battery holder tab to the left, pull out the battery holder. Back side
②Insert the battery into the battery holder so that the + side is facing upward.
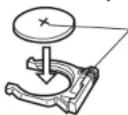
- Match the “+” surface of the battery with the “+” marked side of the battery holder.
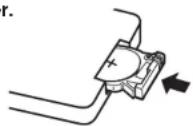
③Insert the battery holder.
NOTE:
- Do not drop the remote control unit.
- Keep the remote control unit away from liquids.
- Remove the battery if not using the remote control unit for long periods.
- Be sure to use a Panasonic CR2025 battery as a replacement.
- If the remote control unit is held so that it is facing directly in front of the remote control signal receptor, the operating range is within approximately 7 m (23°) from the surfaces of the receptor. Furthermore, the remote control unit can be operated from an angle of ±30° to the left or right and ±15° above or below the receptor.
- If the buttons on the remote control unit are kept pressed, the battery power will be consumed rapidly.
- If there are any obstacles in between the remote control unit and the receptor, the remote control unit may not operate correctly.
- If strong light is allowed to shine onto the remote control signal receptor, correct projector operation may not be possible. Place the projector as far away from light sources as possible.
- If facing the remote control unit toward the screen to operate the projector, the operating range of the remote control unit will be limited by the amount of light reflection loss caused by the characteristics of the screen used.
Turning on the power
Make sure that all peripheral devices are connected properly before turning on the power.
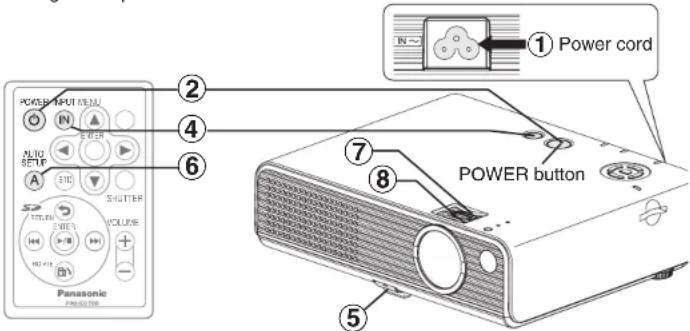
text_image
POWER INPUT MENU IN AUTO S10 SHUTTER STRAW SWEER VOLUME HOLDEN Panasonic PRODUCTION ① Power cord ② ④ ⑥ ⑦ ⑧ POWER button ⑤① Connect the accessory power cord to the AC IN socket and insert the power cord plug into the wall outlet.
● The POWER button on the projector will illuminate red.
- If the SD memory card is inserted into the SD memory card slot, the lamp will turn on automatically and the projection will start. (The image displayed will vary depending on the "MODE" setting in the "SD PICTURE SETUP" menu. Refer to page 38 for details.)
Press the POWER button.
- The POWER button on the projector will flash green. After a short period, it will illuminate green, and a picture will be projected.
- The input signal indicators will illuminate while the projector is searching for an input signal (approximately 3 minutes). If the projector detects an input signal, it will use that signal for projection. If no signal is detected, the guide screen for computer connection will be displayed. The input signal search will be finished if the INPUT button or MENU button is pressed while the guide screen is being displayed.
③ Turn on the power of all connected devices.
- Start the play function of a device such as a DVD player.
NOTE:
- If the power cord was disconnected during projection when the projector was used the last time, projection will start after the power cord is connected.
- A tinkling sound may be heard when the lamp unit is turned on, but this is not a sign of a malfunction.
④ Press the input select button to select the input signal.
| Input select button | Changing signals |
 |   |
- A picture will be projected in accordance with the selected input signal.
- When YPBPR signals are being input to the PC IN connector using an adapter cable, "YPBPR" will be displayed.
- If you insert the SD memory card while other signals are being projected, the input signal will switch to "SD".
Follow the procedure below when you set the projector up first, and when you change the setup place.
⑤ Adjusting the angle
- Place the projector so that it is vertical to the screen.
- While pressing the front leg adjuster button, adjust the forward/back angle of tilt of the projector. This projector detects its own degree of tilt and
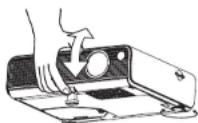
corrects the keystone distortion automatically. If the projector is tilted horizontally, turn the back adjustable leg to adjust the horizontal tilt. Adjust so that the projected image is placed at the center of the screen.
- If the keystone distortion remains, adjust "KEYSTONE" in the "POSITION ADJUSTMENT" menu. (page 46)
⑥ Press the AUTO SETUP button (when PC signals are being input).
- Settings such as the position of the image will be corrected automatically. (page 30)
AUTO SETUP
⑦ Adjusting the size
- Turn the zoom ring to adjust the size of the projected image.
⑧ Adjusting the focus
- Turn the focus ring to adjust the focus of the projected image.

Turning off the power
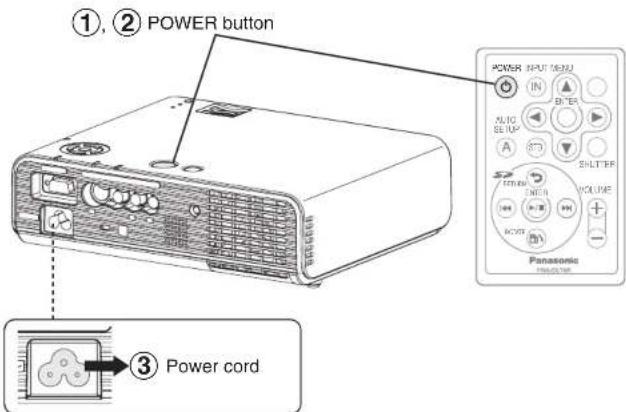
text_image
①, ② POWER button POWER INPUT MENU IN ALTER AUTO SET UP A SHT SHUTTER RETURN NEER VOLUME BOOT Panasonic POWER cord① Press the POWER button.
- The "POWER OFF" confirmation screen will be displayed.
POWER OFF [POWER] OK
Press the POWER button again.
- The lamp unit will switch off and the picture will stop being projected. (The POWER button on the projector will illuminate orange while the cooling fan is still operating.)
NOTE:
- Press any button other than the POWER button to cancel the "POWER OFF" screen.
- The "POWER OFF" screen will disappear in five seconds.
③ Disconnect the power cord after the POWER button on the projector illuminates red.
NOTE:
- You can also turn off the power by holding down the POWER button for at least 0.5 seconds.
Direct power off function
You can disconnect the power cord during projection or immediately after use and move the projector. The cooling fan will operate by the internal power supply to cool down the lamp.
- When this function is used, it may take more time for the lamp to turn back on again compared to when the lamp cools down with the power cord connected.
- Do not put the projector in the softcase while the POWER button on the projector is illuminated.
NOTE:
- Do not disconnect the power cord while the files in the SD memory card are being played back.
CAUTION
If not using the projector for an extended period of time, disconnect the power cord plug from the wall outlet.
- If dust builds up on the power cord plug, the resulting humidity may damage the insulation, which could result in fire.
- This projector continues to draw approximately 3 W of power even when the power is turned off.
POWER button on the projector
| POWER button status | Projector status | |
| Red | Illuminated | The projector is in standby mode and image projection is possible by pressing the POWER button. |
| Green | Flashing | The projector is preparing for projection after the power has been turned on while the POWER button on the projector is illuminated red. (After a short period, a picture will be projected.) |
| Illuminated | A picture is being projected. | |
| Orange | Illuminated | The lamp is cooling down after the power has been turned off or while direct power off function is operating. |
| Flashing | The projector is preparing for projection after the power has been turned on while the POWER button on the projector is illuminated orange. (After a short period, a picture will be projected.) | |
Correcting the image position automatically (AUTO SETUP)
This projector can adjust the position of the image and the settings for "DOT CLOCK" and "CLOCK PHASE" when PC signals are being input.
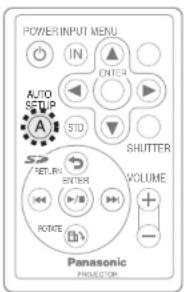
text_image
POWER INPUT MENU IN ENTER AUTO SETUP A STD SHUTTER VOLUME SET.INR ENTER POWER Panasonic PROECONPress the AUTO SETUP button while PC signals are being projected.
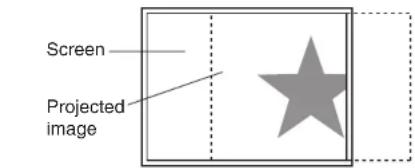
text_image
Screen Projected image● Automatic positioning will be carried out.

NOTE:
- If the dot clock frequency is 100 MHz or higher, "DOT CLOCK", and "CLOCK PHASE" will not be adjusted automatically. Refer to page 48 for details.
- If the edges of the projected image are indistinct, or if a dark picture is being projected, the automatic setup processing may stop automatically before it is complete. If this happens, project a different picture and then press the AUTO SETUP button again.
Turning off the picture and sound momentarily (SHUTTER)
The “SHUTTER” function can be used to momentarily turn off the picture and sound from the projector when the projector is not being used for short periods of time, such as during breaks in meetings or when carrying out preparation. The projector uses less power in “SHUTTER” mode than it does in normal projection mode.
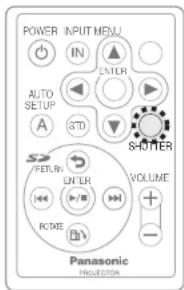
text_image
POWER INPUT MENU IN ENTER AUTO SETUP A STD SHORTER FETLRN ENTER VOLUME PCME Panasonic PROJECTIONPress the SHUTTER button.
- The picture and sound will be turned off.
- Press any button on either the projector or remote control unit to return to normal operating mode.
Adjusting the volume (VOLUME)
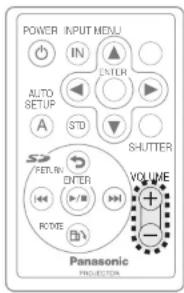
text_image
POWER INPUT MENU IN ENTER AUTO SETUP A STD SHUTTER PETER ENTER VOLUME RONE Panasonic PROJECTIONPress the VOLUME +/- button.
- Press the + button to raise the volume.
- Press the - button to lower the volume.
Using the SD memory card
Information on the SD memory card (sold separately)
The SD memory card is a semiconductor memory with a size of 24 mm x 32 mm x 2.1mm, as small as a postage stamp, and is expected to be a next-generation recording medium that will replace MDs (minidiscs), CDs (compact discs) and cassette tapes. It allows repetition of data reading, writing and deleting. This projector can be used to play back still image data and moving image data that has been recorded by digital cameras as well as presentation data whose format has been converted by ImageCreator 1.5.
Notes on using SD memory cards
- Do not disconnect the power cord and do not remove the SD memory card while files are being played back. Failure to observe this may result in data corruption or data loss.
- Be sure to make a backup of the data stored in the SD memory card. Note that important user data may be subject to potential corruption although it very rarely occurs.
- When using a miniSD ^M card, be sure to attach the miniSD ^TM card adapter. Insert and remove the miniSD ^TM card with the adapter attached.
- If only the miniSD ^TM card adapter is inserted into the SD memory card slot, the projector will not operate correctly. Be sure to use the miniSD ^TM card adapter with the miniSD ^TM card inside.
- Correct operation of a MultiMedia Card in the projector is not guaranteed.
- Use of a Panasonic SD memory card is recommended.
Data that can be played back
Only folder and file names that comply with the DCF standard will be recognized. (Refer to page 66 for details on the DCF standard.)
Still image data:
The format for still images is Exif2.2-compliant JPEG.
- Still image data recorded by the LUMIX Panasonic digital camera.
- Still image data whose format has been converted by ImageCreator 1.5.
Moving Image data:
The format for moving images is QuickTime Motion JPEG.
- Moving image data recorded by the LUMIX Panasonic digital camera.
ImageCreator 1.5
ImageCreator 1.5 is software that allows you to convert image formats for presentation files made by Microsoft PowerPoint® to a format that can be played back by this projector. You can download ImageCreator 1.5 from our website. http://panasonic.co.jp/pavc/projector
Refer to the operating instructions for ImageCreator 1.5 that can also be downloaded from the website above for details on operation.
NOTE:
- We shall not be responsible for any damage, whether direct or indirect, caused by the use of or by the fault of the product.
- We shall not be responsible for any data corruption and loss caused by the product.
Inserting and removing the SD memory card
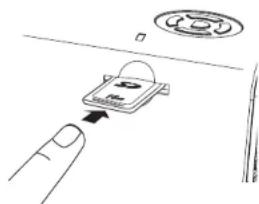
Inserting
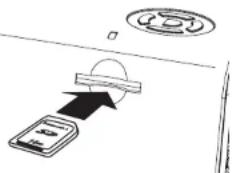
①Insert the SD memory card with the label side facing upward until a click is heard.
- The input signal will switch to "SD" automatically. If the projector is in standby mode, the lamp will turn on automatically, and then the input signal will switch to "SD".
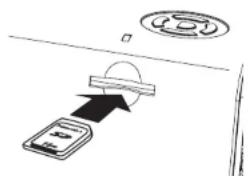
text_image
Diagram showing a device with an attached screen and a circular button, likely illustrating a mobile phone or app interface.NOTE:
- If you try to force the SD memory card to go in the wrong way, it may damage the SD memory card and the card slot.
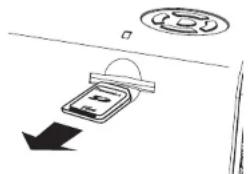
Removing
①Push in the middle of the SD memory card. (A click will be heard.)
text_image
Diagram showing a finger pressing a device with a circular button labeled 'Control' above it, indicating a reset or action.②Remove the card.
natural_image
Simple line drawing of a refrigerator with a downward arrow indicating quantity (no text or symbols)NOTE:
- Always be sure to check that the files in the SD memory card are not being played back before removing the SD memory card. Failure to observe this may result in data corruption or data loss.
SD selection screen
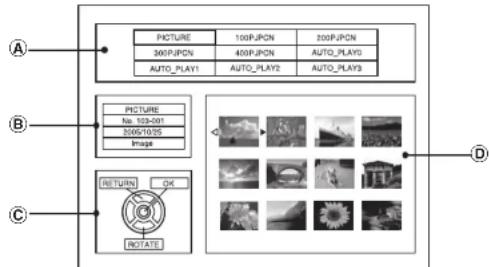
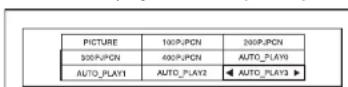
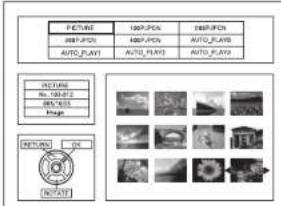
When you insert the SD memory card into the SD memory card slot, the input signal will automatically switch to "SD" and the SD selection screen will be displayed. (An image will be played back depending on the "MODE" setting in the "SD PICTURE SETUP" menu. Refer to page 38 for details.) When the SD selection screen is displayed and files in the SD memory card are being played back, use the SD operation buttons (page 18) for operation.
flowchart
graph TD
    A["Picture"] --> B["300P/PCN"]
    B --> C["AUTO_PLAY1"]
    B --> D["AUTO_PLAY2"]
    B --> E["AUTO_PLAY3"]
    F["PICTURE"] --> G["100P/PCN"]
    G --> H["200P/PCN"]
    I["PICTURE No. 103-001"] --> J["2005-10/25 Image"]
    K["RETURN OK"] --> L["ROTATE"]
    M["D"] --> N["Image & Camera Icon"]
Ⓐ: Folders
This displays the folders in the SD memory card.
NOTE:
- The "PICTURE" folder contains still image data and moving image data recorded by a LUMIX Panasonic digital camera.
⑧: Information on the folder and file
This displays the type of folder, the counting number, the date and the type of file starting from the top.
PICTURE
The "PICTURE" folder contains still image data and moving image data recorded by a LUMIX Panasonic digital camera.
PRESENTATION
The folders that are categorized as "PRESENTATION" contain files for presentation that have been created by ImageCreator 1.5. The folders created by ImageCreator 1.5 are assigned a DCF-compliant folder name (three numerals followed by "PJPCN").
DPOF
Folders categorized as "DPOF" contain files for which various settings have been made by digital cameras. (For example, settings for slide shows.) You can make settings by DPOF-compatible digital cameras. The files with DPOF settings are stored in the "AUTO_PLAY#" folder in addition to the "PICTURE" folder. (The folder name consists of "AUTO_PLAY" followed by one numeral.)
This displays the counting number of the selected file. [Folder number (three numerals)-file number (four numerals)]
This displays the date when the selected file was created.
Image
Still image
Movie
Moving image
©: Operation guide
This displays the buttons which can be used for operation.
D: Thumbnails
Thumbnails of images in the selected folder are displayed.
NOTE:
- If the thumbnail has not been incorporated into the image file in advance, it will take a longer time before the thumbnail appears.
- “?” is displayed for files whose thumbnails cannot be displayed for some reason. (For example, the data had been corrupted.)
- For moving images, the first frame will be displayed.
Playing back images from a SD memory card
SD operation buttons
①Select a folder by pressing the SD 🎨SD ➤ button.
Thumbnails will be displayed (page 34 Ⓓ).
- If there are more than 9 folders, press the SD button when selecting the lower-right folder to display the next 9 (or less) folders.
- If there are some folders that are not displayed, their folder names may not compatible with the DCF standard. Press the SD ROTATE button to display the help screen. Press any SD operation button to return to the SD selection screen from the help screen.
②Press the SD ENTER button.
The cursor will move to the thumbnail area.
text_image
POWER INPUT MENU IN ENTER AUTO SETUP A STD SHUTTER OUTPUT ENTER VOLUME I/O/IEC Panasonic PRODUCTIONSD operation buttons
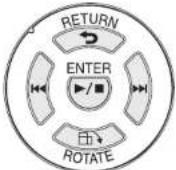
③Select a file by pressing the SD &SD button.
- A maximum of 12 files can be displayed at a time. If there are more than 12 files, press the SD button when selecting the lower-right file to display the next 12 (or less) files.
- Press the SD RETURN button to return to the folder selection area.
text_image
PICTURE 160P-PCN 160P-PCN 260P-PCN 80P-PCN AUTO-PLAYD AUTO_PLAYD AUTO-PLAYD PICTURE No. 154472 Auto-VL Image PICTURE ON AUTO-VL AUTO-VL④Press the SD ENTER button.
The selected file will be played back.
If a moving image is selected, the playback will begin.
- If a still image is selected and "AUTO PLAY" in the "SD PICTURE SETUP" menu is set to "ON", the slide show will begin.
- Photographs which are 6M (6 million pixels) or more and photographs which are 2M (2 million pixels) or more with wide setting may not be played back correctly. In such cases, use ImageCreator 1.5 to convert the image data and reduce the number of pixels to make projection smoother.
Button functions during playback
To switch the file:
Press the SD button to switch to the previous file, and the SD button to switch to the next file.
To start/stop the slide show:
Keep pressing the SD button for at least 3 seconds.
To rotate the image:
Each press of the SD ROTATE button rotates the still image being played back 90 degrees clockwise.
To display the SD selection screen:
Press the SD RETURN button.
NOTE:
- You cannot forward, rewind and freeze the moving images.
Setting a detailed playback method for the SD memory card
You can set the playback method for the SD memory card in detail by adjusting the items on the on-screen menu.
text_image
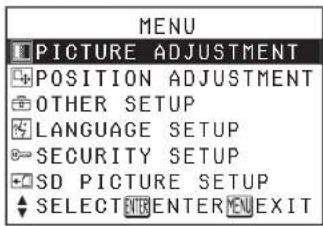
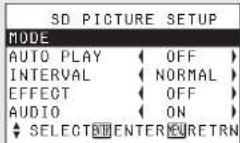
POWER INPUT MENU IN ENTER AUTO SETUP A STD SHUTTER RETURN ENTER VOLUME POWER Panasonic①Press the MENU button on the remote control unit to display the "MAIN MENU".
text_image
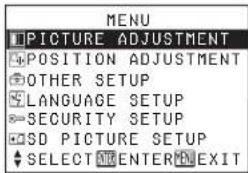
MENU PICTURE ADJUSTMENT POSITION ADJUSTMENT OTHER SETUP LANGUAGE SETUP SECURITY SETUP SD PICTURE SETUP SELECT ENTER EXIT②Press the ▲ or ▼ button to select the "SD PICTURE SETUP" menu and then press the ENTER button.
The "SD PICTURE SETUP" menu will be displayed.
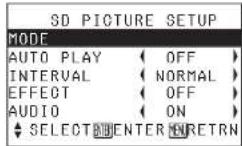
③Press the ▲ or ▼ button to select an item, and then press the ◀ or ▶ button to change the setting.
For items without any selective setting, press the ENTER button. The next screen for the item will then be displayed.
MODE
This sets the image which is displayed on the screen when the SD memory card is inserted.
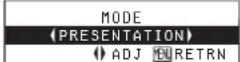
PRESENTATION
This mode is used for making a presentation without using a computer. If there is only one
"PRESENTATION" folder, the first image will be played back. If there is more than one folder, the SD selection screen will be displayed.
MANUAL
The SD selection screen will be displayed.
AUTO PLAY
This sets the playback method for still images.
ON
The slide show will begin from the selected file.
The files contained in the same folder will be played back in order.
OFF
Only the selected file will be played back.
INTERVAL
This sets the duration of the period to change to the next file in the slide show.
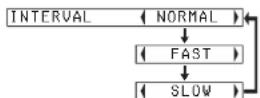
NORMAL
About 10 seconds
FAST
About 5 seconds
SLOW
About 30 seconds
NOTE:
- It may take time for the images to be displayed on the screen depending on the images. In such cases, the play interval may become longer than the set time.
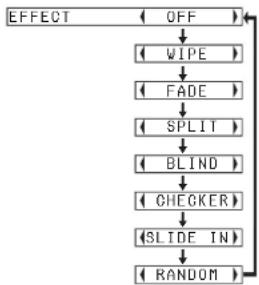
EFFECT
This sets the effect that is applied when switching the still images in a slide show.
flowchart
graph TD
    A["EFFECT"] --> B["OFF"]
    B --> C["WIPE"]
    C --> D["FADE"]
    D --> E["SPLIT"]
    E --> F["BLIND"]
    F --> G["CHECKER"]
    G --> H["SLIDE IN"]
    H --> I["RANDOM"]
OFF
No effect is applied.
WIPE
An image is wiped by the next image from the left side.
FADE
An image darkens gradually and the next image appears in turn.
SPLIT
An image is split from the center and the next image appears.
BLIND
An image is divided into stripe pattern, and the next image appears.
CHECKER
An image is divided into checker pattern, and the next image appears.
SLIDE IN
The next image slides into the present image.
RANDOM
The various effects will be applied at random every time the image is switched.
AUDIO
ON
The sound is played back when a file which contains sound is played back.
OFF
The sound is not played back when a file which contains sound is played back.
Making a presentation without using a computer
You can make a smooth presentation without using a computer by following the procedures below.
Preparation
①Use ImageCreator 1.5 to convert the format of Microsoft PowerPoint presentation file to a format that can be played back by this projector.
②Store only one "PRESENTATION" folder created by ImageCreator 1.5 in the SD memory card.
③Set "MODE" in the "SD PICTURE SETUP" menu to "PRESENTATION" (page 38).
①Connect the accessory power cord to the AC IN socket and insert the power cord plug into the wall outlet.
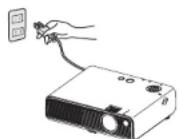
②Insert the prepared SD memory card into the SD memory card slot. The lamp will turn on automatically, and the first image in the "PRESENTATION" folder will be played back.
text_image
Diagram showing a device with an arrow pointing to a screen, possibly indicating a connection or signal flow.NOTE:
- If there is more than one "PRESENTATION" folder, the SD selection screen will be displayed so that you can select a folder.
③Operate by using the SD operation buttons. (Refer to page 18.)
On-screen menus
Menu screens
The various settings and adjustments for this projector can be carried out by selecting the operations from on-screen menus.
The general arrangement of these menus is shown below.
MAIN MENU
text_image
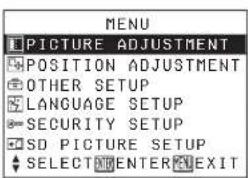
MENU PICTURE ADJUSTMENT POSITION ADJUSTMENT OTHER SETUP LANGUAGE SETUP SECURITY SETUP SD PICTURE SETUP SELECT ENTER EXIT- Press the MENU button to display the "MAIN MENU".
Refer to page 42 for details on how to operate the on-screen menus.

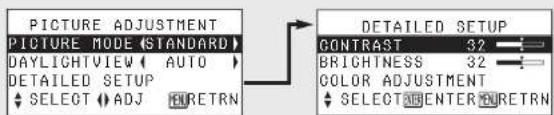
PICTURE ADJUSTMENT menu (page 44)
text_image
PICTURE ADJUSTMENT PICTURE MODE (STANDARD) DAYLIGHTVIEW AUTO DETAILED SETUP SELECT ADJ MORETRN DETAILED SETUP CONTRAST 32 BRIGHTNESS 32 COLOR ADJUSTMENT SELECT ENTER MORETRN- "COLOR ADJUSTMENT" will be displayed only when an S-VIDEO/VIDEO/YPBPR signal is being input.
POSITION ADJUSTMENT menu (page 46)
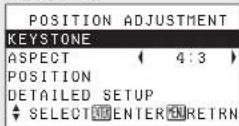
- If an SD signal is being input, only "KEYSTONE" will be displayed.
- "ASPECT" will not be displayed if a PC signal is being input.
OTHER SETUP menu (page 49)

text_image
OTHER SETUP AUTO SIGNAL ON TV-SYSTEM AUTO FRONT/REAR FRONT DESK/CEILING DESK HIGHLAND OFF LAMP RUNTIME 10H SXGA MODE SXGA CTRL PANEL VALID NR OFF SELECT ADJ MORETRN- "TV-SYSTEM" will be displayed only when an S-VIDEO/VIDEO signal is being input.
- "SXGA MODE" will be displayed only when an PC(SXGA) signal is being input.
SECURITY SETUP menu (page 52)
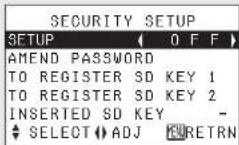
When a PC/YPBPR signal is being input
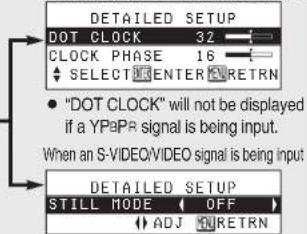
text_image
DETAILED SETUP DOT CLOCK 32 CLOCK PHASE 16 SELECT ENTER RETRN • "DOT CLOCK" will not be displayed if a YPbPR signal is being input. When an S-VIDEO/VIDEO signal is being input DETAILED SETUP STILL MODE OFF ADJ RETRNLANGUAGE SETUP menu (page 51)
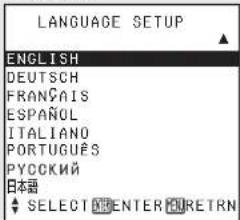
text_image
LANGUAGE SETUP ENGLISH DEUTSCH FRANÇAIS ESPAÑOL ITALIANO PORTUGUÊS PYCCKИЙ 日本語 SELECT ENTER RETRN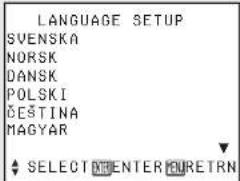
text_image
LANGUAGE SETUP SVENSKA NORSK DANSK POLSKI ČESTINA MAGYAR SELECT ENTER RETRNSD PICTURE SETUP menu (page 37)
Menu operation guide
text_image
POWER INPUT MENU IN ENTER AUTO SETUP A STD SHUTTER VOLUME PANASONIC PROXEDUCTOR①Press the MENU button.
The "MAIN MENU" will be displayed.
text_image
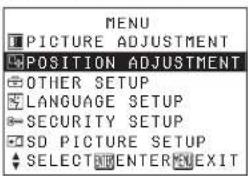
MENU PICTURE ADJUSTMENT POSITION ADJUSTMENT OTHER SETUP LANGUAGE SETUP SECURITY SETUP SD PICTURE SETUP SELECT ENTER EXIT②Press the ▲ or ▼ button to select an item.
Selected item will be displayed in blue.
text_image
MENU PICTURE ADJUSTMENT POSITION ADJUSTMENT OTHER SETUP LANGUAGE SETUP SECURITY SETUP SD PICTURE SETUP SELECT ENTER EXIT③Press the ENTER button to accept the selection.
The selected menu screen will then be displayed. (Example: "POSITION ADJUSTMENT" menu)
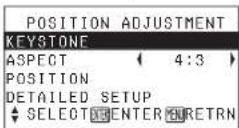
NOTE:
- Press the MENU button to return to the previous screen.
42-ENGLISH
④Press the ▲ or ▼ button to select an item, and then press the ◀ or ▶ button to change the setting. For items without any selective setting, press the ENTER button. The next screen for the item will then be displayed.
For items with bar scales, press the ENTER button or the ◀ or ▶ button to display the adjustment screen, and then press the ◀ or ▶ button to make the adjustment.
(Example: DOT CLOCK)

The bar scale will turn green when any adjustment changes the setting from the factory set value.
Unavailable on-screen menu items
This projector has unadjustable items and unusable functions depending on the signal being input. When an item cannot be adjusted or a function cannot be used, the corresponding on-screen menu display does not appear, and the item or function will not work even if the ENTER button is pressed.
Returning a setting to the factory default
If you press the STD (standard) button on the remote control unit, you can return settings to the factory default settings. However, the operation of this function varies depending on which screen is being displayed.
- When a menu screen is being displayed
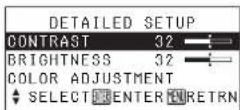
Only the item selected will be returned to the factory default setting, and the bar scale will appear white.
- When an individual adjustment screen is being displayed

All items displayed will be returned to their factory default settings, and the bar scale will appear white.
NOTE:
- Triangle symbols above and below the bar scale indicate the factory default setting.
Indicates the standard factory default setting
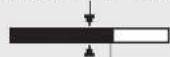
Indicates the current adjustment value
ENGLISH-43
Adjusting the picture
Press the ▲ or ▼ button on the remote control unit to select an item, and then press the ◀ or ▶ button to change the setting.
For items without any selective setting, press the ENTER button. The next screen for the item will then be displayed.
For items with bar scales, press the ENTER button or the ◀ or ▶ button to display the adjustment screen, and then press the ◀ or ▶ button to make the adjustment.
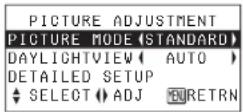
PICTURE MODE
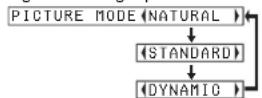
When an S-VIDEO/VIDEO/YPBPR signal is being input
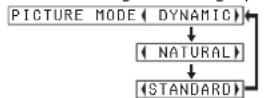
When a PC signal is being input
When an SD signal is being input PICTURE MODE AUTO
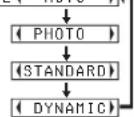
Select the picture mode that best matches the image source and room conditions.
The mode best used in dark rooms is "NATURAL". For rooms having regular lighting conditions in use, select "STANDARD". For exceptionally bright rooms, use "DYNAMIC".
"PHOTO" and "AUTO" are available only if an SD signal is being input. Set to "PHOTO" when projecting photographs. When set to "AUTO", the picture mode will be automatically switched to the best mode.
DAYLIGHTVIEW
This adjusts the vividness of the projected images when the projector is used under bright lighting.
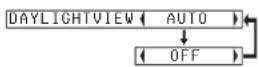
AUTO
The vividness of the projected images will be adjusted according to the lighting condition of the room.
OFF
"DAYLIGHTVIEW" is disabled.
NOTE:
- "AUTO" may not function correctly if any objects are placed on the projector.
- "DAYLIGHTVIEW" will be disabled when "FRONT/REAR" in the "OTHER SETUP" menu is set to "REAR".
DETAILED SETUP
You can adjust the picture quality of the projected images in detail. Press the ENTER button to display the "DETAILED SETUP" menu.
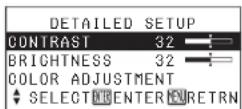
CONTRAST
This adjusts the contrast of the picture. (Adjust the "BRIGHTNESS" setting first if required before adjusting the "CONTRAST" setting.)
The picture is bright: ◀ button
The picture is dark: ▶ button
BRIGHTNESS
This adjusts the darker areas (black areas) in the picture.
Black areas are too light: ◀ button Dark areas are too solid: ▶ button
COLOR ADJUSTMENT
(S-VIDEO/VIDEO/YPBPR only) You can adjust the color of the projected image. Press the ENTER button to display the adjustment screen.
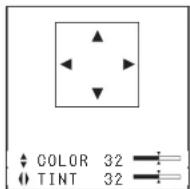
COLOR
The color is too pale: ▲ button The color is too deep: ▼ button
TINT
[S-VIDEO/VIDEO (NTSC/NTSC
4.43)/YPBPR only]
This adjusts the flesh tones in the picture.
The flesh tones are greenish:
button
The flesh tones are reddish:
▶ button
Adjusting the position
Press the ▲ or ▼ button on the remote control unit to select an item, and then press the ◀ or ▶ button to change the setting.
For items without any selective setting, press the ENTER button. The next screen for the item will then be displayed. For items with bar scales, press the ENTER button or the ◀ or ▶ button to display the adjustment screen, and then press the ◀ or ▶ button to make the adjustment.
| POSITION ADJUSTMENT | |
| KEYSTONE | |
| ASPECT | ( 4:3 ) |
| POSITION | |
| DETAILED SETUP | |
| SELECT ENTER RETRN | |
- If an SD signal is being input, only "KEYSTONE" will be displayed.
- "ASPECT" will not be displayed if a PC signal is being input.
KEYSTONE
This projector detects its own degree of tilt and corrects the keystone distortion automatically. However, keystone distortion may still affect the images in some cases (e.g. when the projector is tilted slightly and the tilt is corrected slowly by hand or when the screen itself is tilted). In such cases, you can correct the vertical keystone distortion manually.
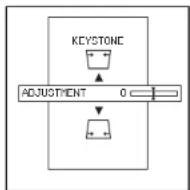
| Picture condition | Operation |
| Press the ▲ or ▶button. | |
| Press the ▼ or ◀button. |
NOTE:
- Vertical keystone distortion can be corrected to ± 30^ of the angle of tilt by combining automatic correction and manual correction. However, the greater the correction amount, the more the picture quality will deteriorate, and the harder it will become to achieve a good level of focus. To obtain the best picture quality, set up the projector and screen in such a way that the amount of keystone correction required is as minimal as possible.
- The picture size will also change when correction of keystone distortion is carried out.
- The ratio of length and width of an image may become incorrect depending on the amount of the keystone correction.
- Keystone distortion of the on-screen display will not be corrected.
- If you correct the keystone distortion manually, the amount of correction will be stored by the projector even after the power is turned off. However, when you turn on the power, the amount of correction will be
reset if the tilt is different from the last time you used the projector. In such cases (e.g. when you change the setup place), correct the keystone distortion again.
ASPECT
(S-VIDEO/VIDEO/480i, 576i, 480p and 576p YPBPR only)
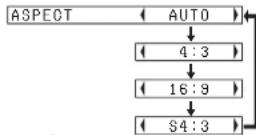
AUTO
(S-VIDEO only)
When an S1 video signal is being input, the aspect ratio is changed automatically to project a 16:9 picture.
4:3
The input signal is projected without change.
16:9
The picture is compressed to a ratio of 16:9 and projected.
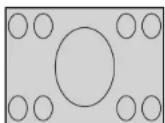
When a horizontally squeezed signal is being input.
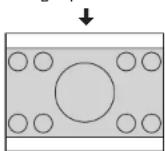
S4:3
The size of the input signal is compressed to 75% and projected. (This is useful for projecting a picture with a 4:3 aspect ratio onto a 16:9 screen.)
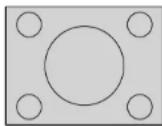
When a 4:3 signal is being input.

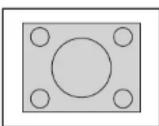
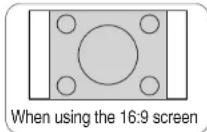
S1 video signals
- S1 video signals are a type of video signal with an aspect ratio of 16:9 which include a detector signal. This detector signal is output by some sources such as wide-vision video decks.
- When "ASPECT" is set to "AUTO", the projector recognizes the detector signal and automatically switches the aspect ratio to 16:9.
NOTE:
- If using this projector in places such as cafes or hotels to display programmes for a commercial purpose or for public presentation, note that if the aspect ratio (16:9) selection function is used to change the aspect ratio of the screen picture, you may be infringing the rights of the original copyright owner for that programme under copyright protection laws.
- If a 4:3 picture is projected onto a 16:9 screen, distortion may occur around the edges of the picture so that part of the picture is no longer visible. Programes which have 4:3 aspect ratios should be viewed in 4:3 mode to give proper consideration to the aims and intentions of the original programme's creator.
POSITION
(PC/YRbPR/S-VIDEO/VIDEO only) Moves the picture position.
Press the ENTER button to display the "POSITION" screen.
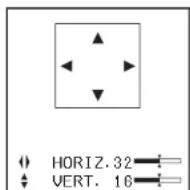
Press the ◀ or ▶ button to move the picture horizontally. Press the ▲ or ▼ button to move the picture vertically.
DETAILED SETUP
You can adjust the noise and flicker of the projected images. Press the ENTER button to display the "DETAILED SETUP" menu.
When a PC/YPBPR signal is being input
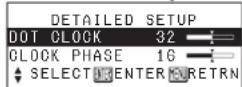
When an S-VIDEO/VIDEO signal is being input
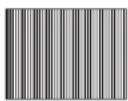
DOT CLOCK
(PC only)
Periodic striped pattern interference (noise) may occur when a striped pattern such as the one below is projected. If this happens, press the ◀ or ▶ button to adjust so that any such noise is minimised.
CLOCK PHASE
(PC/YPBPR only)
Adjust the "DOT CLOCK" setting first before carrying out this adjustment. Press the ◀ or ▶ button to adjust so that the noise level is least noticeable.
NOTE:
- If signals with a dot clock frequency of 100 MHz or higher are being input, interference may not be completely eliminated when the "DOT CLOCK" and "CLOCK PHASE" adjustments are carried out.
Other settings
Press the ▲ or ▼ button on the remote control unit to select an item, and then press the ◀ or ▶ button to change the setting.
text_image
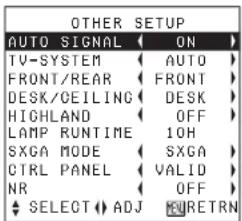
OTHER SETUP AUTO SIGNAL ON TV-SYSTEM (AUTO) FRONT/REAR (FRONT) DESK/CEILING (DESK) HIGHLAND (OFF) LAMP RUNTIME 10H SXGA MODE (SXGA) CTRL PANEL VALID NR (OFF) SELECT ADJ MURETRNAUTO SIGNAL
This should normally be set to "ON". ON
"AUTO SETUP" will be carried out when the input signal is changed to "PC".
OFF
"AUTO SETUP" will not function when the input signal is changed to "PC".
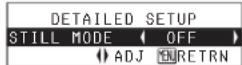
STILL MODE
(S-VIDEO/VIDEO only) To reduce flickering of still images (vertical flicker), set "STILL MODE" to "ON".
NOTE:
- Set to "OFF" when playing back moving images.
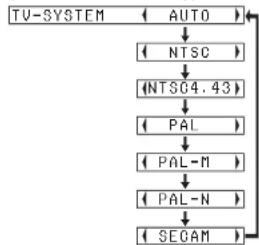
TV-SYSTEM
(S-VIDEO/VIDEO only)
flowchart
graph TD
    A["TU-SYSTEM"] --> B["AUTO"]
    B --> C["NTSC"]
    C --> D["NTSC4.43"]
    D --> E["PAL"]
    E --> F["PAL-M"]
    F --> G["PAL-N"]
    G --> H["SEGAM"]
This should normally be set to "AUTO". If the signal is of such poor quality that the correct format cannot be automatically distinguished, change the setting manually to the required TV system.
NOTE:
- When set to "AUTO", the projector automatically distinguishes between NTSC/NTSC 4.43/PAL/PAL60/PAL-M/PAL-N/SECAM signals.
FRONT/REAR
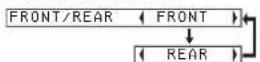
This setting should be changed in accordance with the projector setting-up method. (Refer to page 20.)
FRONT
When the projector is placed in front of a screen.
REAR
When using a translucent screen.
DESK/CEILING
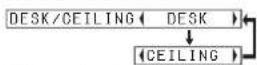
This setting should be changed in accordance with the projector setting-up method. (Refer to page 20.)
DESK
When the projector is placed on a desk or similar.
CEILING
When the projector is suspended from a ceiling using the ceiling bracket (sold separately).
HIGHLAND
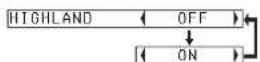
Set "HIGHLAND" to "ON", when using this projector at high elevations (above 1 400 m) only.
LAMP RUNTIME
This setting displays the usage time for the lamp unit which is currently being used. When replacing the
lamp unit, follow the instructions on page 58, and reset "LAMP RUNTIME" to "0".
NOTE:
- The lamp's operating life varies depending on the usage conditions.
SXGA MODE
[PC(SXGA) only]
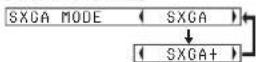
Adjust this item if the projected image overflows from the screen when an SXGA signal is being input.
SXGA
Select this item normally.
SXGA+
When the edges of the projected image are not visible, select this item.
CTRL PANEL
To disable the buttons on the projector, set "CTRL PANEL" to "INVALID". A confirmation screen will then be displayed. Select "OK" by using ◀ or ▶ button. To use the buttons on the projector, set to "VALID" by using the remote control unit.
NR (Noise Reduction)
(S-VIDEO/VIDEO only) If the signal is of such poor quality that picture interference appears, set "NR" to "ON". To turn off the "NR" feature, set to "OFF".
Changing the display language
Press the ▲ or ▼ button on the remote control unit to select a language, and then press the ENTER button to accept the setting.
text_image
LANGUAGE SETUP ENGLISH DEUTSCH FRANÇAIS ESPAÑOL ITALIANO PORTUGUÉS PYCOKHÍ 日本語 SELECT ENTER RETRN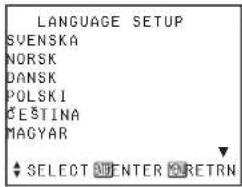
text_image
LANGUAGE SETUP SVENSKA NORSK DANSK POLSKI ČESTINA MAGYAR SELECT ENTER RETRNSetting up the security function
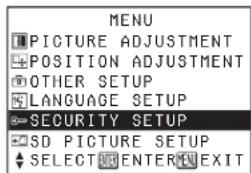
This projector is equipped with a security function. All of the controls other than the POWER button are disabled unless the password is entered correctly or the registered SD memory card is inserted properly.
Press the ▲ or ▼ button on the remote control unit to select "SECURITY SETUP", and then press the ENTER button.
text_image
MENU ■ PICTURE ADJUSTMENT + POSITION ADJUSTMENT + OTHER SETUP + LANGUAGE SETUP → SECURITY SETUP + SD PICTURE SETUP + SELECT ENTER EXIT
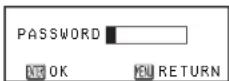
(When you use the "SECURITY SETUP" function for the first time) Press the ▲, ▶, ▼, ◀, ▲, ▶, ▼ and ◀ buttons in order, then press the ENTER button.
(When a password change has been made before) Type in the changed password, then press the ENTER button.

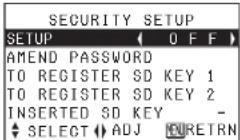
Press the ▲ or ▼ button to select an item, and then press the ◀ or ▶ button to change the setting. For items without any selective setting, press the ENTER button. The next screen for the item will then be displayed.
SETUP
You can select the security lock method for when the power is turned on.
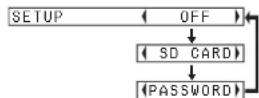
OFF
"SETUP" is disabled.
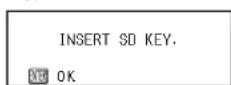
SD CARD
When the power is turned on, the screen below will be displayed. Inserting the registered SD card (SD key) will release the lock.
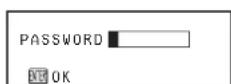
PASSWORD
When the power is turned on, the screen below will be displayed. Entering the password will release the lock.
NOTE:
- "SD CARD" will not be displayed when no SD memory card is registered.
AMEND PASSWORD
Passwords can be changed.
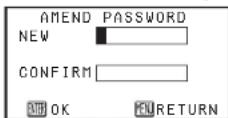
① Set a password by pressing the ▲,▼,◀, and ▶ buttons.
A maximum of 8 buttons can be set.
②Press the ENTER button.
③Enter the password again for confirmation.
④Press the ENTER button.
NOTE:
- The entered password will appear as *. It will not be displayed on the screen.
- If you enter the wrong password, the letters "PASSWORD" and "NEW" will become red. Enter the correct password again.
TO REGISTER SD KEY 1(2)
You can register up to 2 SD memory cards as a SD key.
NOTE:
- "SD key 2" can be registered after "SD key 1" has been registered. Register "SD key 2" in the same way as for "SD key 1".
(When you register the SD key for the first time)
①The "INSERT SD KEY 1 FOR REGISTRATION." screen will be displayed.
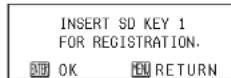
②Insert the SD memory card which you would like to register as a SD key 1.
③Press the ENTER button.
(To change the registered SD key)
①The "INSERT SD KEY." screen will be displayed.
INSERT SD KEY.
OK RETURN
Insert the current SD key.
②Press the ENTER button.
The "INSERT SD KEY 1 FOR REGISTRATION." screen will be displayed.
③Remove the current SD key, insert the new SD memory card which you would like to register as a SD key and press the ENTER button.
NOTE:
- If you insert a SD memory card which has not been registered as SD key, the letters on the screen will become red. Insert the correct SD key again.
INSERTED SD KEY
This shows whether the inserted SD memory card is registered as a SD key.
The inserted SD memory card has not been registered as a SD key.
,
SD key 1
1
SD key 2
When the TEMP indicator and the LAMP indicator are illuminated
There are two indicators on the control panel of the projector which give information about the operating condition of the projector. These indicators illuminate or flash to warn you about problems that have occurred inside the projector, so if you notice that one of the indicators is on, turn off the power and check the table below for the cause of the problem.
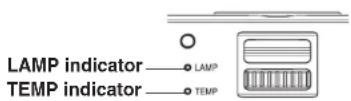
| TEMP Indicator | ||
| Indicator display | Illuminated (red)(Lamp unit on) | Flashing (red)(Lamp unit off) |
| Problem | The surrounding temperature or the temperature inside the projector has become unusually high. | The surrounding temperature or the temperature inside the projector has become dangerously high, causing the lamp unit to automatically shut off. |
| Possible cause | The ventilation holes may be covered.The ambient temperature in the place of use may be too high.The air filter may be blocked. | |
| Remedy | Uncover the ventilation holes.Set up the projector in a place where the temperature is between 0 °C (32 °F) and 40 °C (104 °F) and the humidity is between 20% and 80% (with no condensation). [If you set the “HIGHLAND” to “ON” (page 50), set up the projector in a place where the temperature is between 0 °C (32 °F) and 35 °C (95 °F) and the humidity is between 20% and 80% (with no condensation).]Disconnect the power cord by following the procedure on page 28, and then clean the air filter. (Refer to page 56.) | |

| LAMP indicator | |||
| Indicator display | Illuminated (red) | Flashing (red) | |
| Problem | It is nearly time to replace the lamp unit. | An abnormality has been detected in the lamp circuit. | |
| Possible cause | Does “REPLACE LAMP” appear on the screen after the projector is turned on? | The power may have been turned on straight away after it was turned off. | There may be an abnormality in the lamp circuit.The lamp unit may be blown. |
| Remedy | This occurs when the operation time for the lamp unit is nearing 2 250 hours. Ask your dealer or an Authorized Service Center to replace the lamp unit. (page 57) | Wait for a while until the lamp unit cools down before turning the power back on again. | Disconnect the power cord by following the procedure on page 28, and then contact an Authorized Service Center.Ask your dealer or an Authorized Service Center to replace the lamp unit. (page 57) |
NOTE:
- Be sure to disconnect the power cord by following the procedure given in "Turning off the power" on page 28 before carrying out any of the procedures in the "Remedy" column.
- If the TEMP indicator is illuminated and the power turns off after the procedures in the "Remedy" column have been carried out, it means an abnormality has occurred. Please contact an Authorized Service Center so that the necessary repairs can be made.
Cleaning and replacing the air filter
If the air filter becomes clogged with dust, the internal temperature of the projector will rise, the TEMP indicator will illuminate and the projector's power will turn off (the TEMP indicator will flash after the power is turned off). The air filter should be cleaned every 100 hours of use.
Cleaning
Use a vacuum cleaner to clean off any accumulated dust.
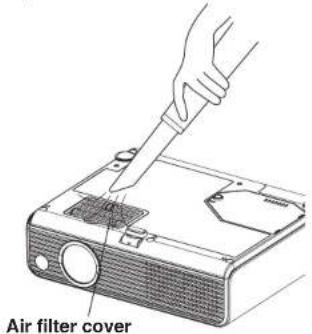
text_image
Air filter coverNOTE:
- If the dust cannot be cleaned by a vacuum cleaner, remove the air filter and soak it in water, and then wash out the dust by hand. Be sure to install the air filter after it has dried.
- Do not use detergent when washing the air filter.
- If the dust cannot be removed by cleaning, it is time to replace the air filter. Please consult your dealer. Furthermore, if the lamp unit is being replaced, replace the air filter at this time also.
Replacement procedure
①Turn off the power and disconnect the power cord. Be sure to disconnect the power cord by following the procedure given on page 28.
②Gently turn the projector upside down, and then remove the air filter cover.
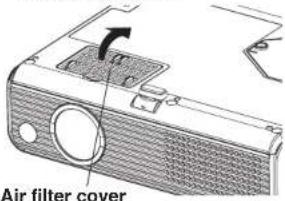
text_image
Air filter cover③Replace the air filter, and then install the air filter cover.
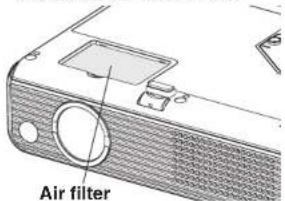
text_image
Air filterNOTE:
- Be sure to install the air filter before using the projector. If the projector is used without the air filter installed, dust and other foreign particles will be drawn into the projector, and malfunctions will result.
Replacing the lamp unit
Warning
The lamp unit should only be replaced by a qualified technician.
When replacing the lamp, allow it to cool for at least one hour before handling it.
- The lamp cover gets very hot, and touching it can cause burns.
Notes on replacing the lamp unit
- The light generating lamp is made of glass, so dropping it or allowing it to hit hard objects may cause it to burst. Be careful when handling the lamp.
- Dispose of the removed old lamp with the same care that would be taken with a fluorescent light.
- A Phillips screwdriver is necessary for removing the lamp unit.
NOTE:
- The projector is not supplied with a replacement lamp unit. Please ask your dealer for details. Lamp unit product no.: ET-LAP1
CAUTION:
- Do not use any lamp unit other than the one with the product number indicated above.
Lamp unit replacement period
The lamp is a consumable product. Even when the full life of the bulb has not been exhausted, the brightness of the light will gradually decline. Therefore periodic replacement of the lamp is necessary. The intended lamp replacement interval is 2 500 hours, but it is possible that the lamp may need to be replaced earlier due to variables such as a particular lamp's characteristics, usage conditions and the installation environment. Early preparation for lamp replacement is encouraged. The lamp will automatically shut off after approximately 10 minutes when 2 500 hours of use have been reached because of a much greater chance of it exploding after this time.
NOTE:
- While 2 500 hours is the intended replacement interval, it is not a period of time covered by warranty.
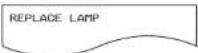 | LAMP indicatorOn-screen display | |
| More than 2 250 hours | Displayed for 30 seconds. Pressing any button will clear the display. | Illuminates red during image projection and standby mode. |
| More than 2 500 hours | Remains displayed until any button is pressed. |
Lamp unit replacement procedure
NOTE:
- If the lamp usage time has passed 2 500 hours, the projector will switch to standby mode after approximately 10 minutes of operation. The steps ⑦ to ⑬ on the next page should thus be completed within 10 minutes.
①Disconnect the power cord from the projector by following the procedure on page 28, and check that the area around the lamp unit has cooled down. ②Use a Phillips screwdriver to turn the lamp unit cover fixing screw at the bottom of the projector, and then remove the lamp unit cover.
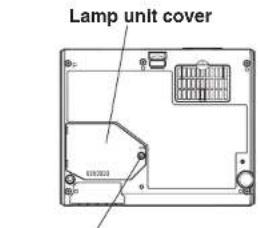
text_image
Lamp unit cover 60000000Lamp unit cover fixing screw
③Use a Phillips screwdriver to loosen the lamp unit fixing screw until the screw turns freely. Then hold the handle of the lamp unit and gently pull the lamp unit out from the projector.
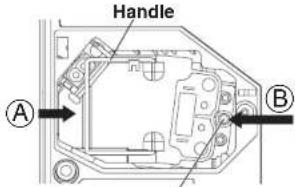
text_image
Handle A BLamp unit fixing screw
④Insert the new lamp unit while making sure that the direction of insertion is correct, and then use a Phillips screwdriver to securely tighten the lamp unit fixing screw.
When inserting the new lamp unit, be sure to push it in at the point A and B.
⑤Install the lamp unit cover, and then use a Phillips screwdriver to securely tighten the lamp unit cover fixing screw.
NOTE:
- Be sure to install the lamp unit and the lamp unit cover securely. If they are not securely installed, it may cause the protection circuit to operate so that the power cannot be turned on.
⑥Connect the power cord.
⑦Press the POWER button so that a picture is projected onto the screen.
NOTE:
- If the power cord was disconnected during projection when the projector was used the last time, projection will start after the power cord is connected.
⑧Press the MENU button to display the "MAIN MENU", and then press the ▲ or ▼ button to select "OTHER SETUP".
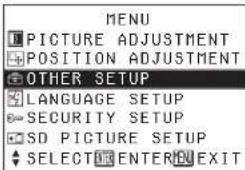
text_image
MENU PICTURE ADJUSTMENT POSITION ADJUSTMENT OTHER SETUP LANGUAGE SETUP SECURITY SETUP SD PICTURE SETUP SELECT ENTER EXIT⑨ Press the ENTER button to display the "OTHER SETUP" menu, and then press the ▲ or ▼ button to select "LAMP RUNTIME".
| OTHER SETUP | |
| AUTO SIGNAL | ON |
| TV-SYSTEM | AUTO |
| FRONT/REAR | FRONT |
| DESK/CEILING | DESK |
| HIGHLAND | OFF |
| LAMP RUNTIME | 2300H |
| SXGA MODE | SXGA |
| CTRL PANEL | VALID |
| NR | OFF |
| SELECT | #REFTRN |
⑩ Press and hold the ENTER button for approximately 3 seconds. The "LAMP TIME RESET" screen will be displayed.
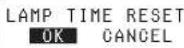
⑪ Select "OK" by pressing the ▲ or ▶ button on the remote control unit and then press the ENTER button. The "POWER OFF" confirmation screen will be displayed.
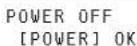
NOTE:
- The "POWER OFF" screen will disappear in five seconds.
- If the MENU button is pressed, the "LAMP TIME RESET" screen and the "POWER OFF" confirmation screen will be cancelled.
⑫Press the POWER button to turn off the power.
⑬Disconnect the power cord after the POWER button on the projector illuminates red. This will reset the cumulative usage time for the lamp unit to "0".
ENGLISH-5958-EN
Before calling for service
Before calling for service, check the following points.
| Problem Possible cause | Page | |
| Power does not turn on. | The power cord may not be connected.The main power supply is not being supplied to the wall outlet.TEMP indicator is illuminated or flashing.LAMP indicator is illuminated or flashing.The lamp unit cover has not been securely installed. | ——5455— |
| No picture appears. | The video signal input source may not be connected properly.The input selection setting may not be correct.The “BRIGHTNESS” adjustment setting may be at the minimum possible setting.The “SHUTTER” function may be in use. | ——274531 |
| The picture is fuzzy. | The lens focus may not have been set correctly.The projector may not be at the correct distance from the screen.The lens and the lens cover may be dirty.The projector may be tilted too much. | 2721——20 |
| The color is pale or grayish. | “COLOR ADJUSTMENT” settings may be incorrect.The input source which is connected to the projector may not be adjusted correctly. | 45— |
| No sound can be heard. | The audio signal source may not be connected properly.The volume adjustment may be at the lowest possible setting.“AUDIO” in the “SD PICTURE SETUP” may be set to “OFF” while the SD signal is being projected. | ——3139 |
| The remote control unit does not operate. | The battery may be weak.The battery may not be inserted correctly.The remote control signal receptor on the projector may be obstructed.The remote control unit may be out of the operation range. | ——242424 |
| The buttons on the projector do not function. | The “CTRL PANEL” may be set to “INVALID”. In order to set the “CTRL PANEL” to “VALID” without using the remote control unit, keep holding down the SD ENTER button on the projector and press the INPUT button for more than 2 seconds. | 50 |
| Problem Possible cause | Page | |
| The picture does not display correctly. | The signal format (“TV-SYSTEM”) may not be set correctly.There may be a problem with the video tape or other signal source.A signal which is not compatible with the projector may be being input. | 49-65 |
| Picture from computer does not appear. | The cable may be too long.The external video output for the laptop computer may not be set correctly.(You may be able to change the external output settings by pressing the [Fn]+[F3] or [Fn]+[F10] keys simultaneously. The actual method varies depending on the type of computer, so refer to the documentation provided with your computer for further details.) | -67 |
Cleaning and maintenance
Before carrying out cleaning and maintenance, be sure to disconnect the power cord plug from the wall outlet.
Wipe the cabinet with a soft, dry cloth.
If the cabinet is particularly dirty, soak the cloth in water with a small amount of neutral detergent in it, squeeze the cloth very well, and then wipe the cabinet. After cleaning, wipe the cabinet dry with a dry cloth. If using a chemically-treated cloth, read the instructions supplied with the cloth before use.
Do not wipe the lens or the lens cover with a cloth that is dusty or which produces lint.
If any dust or lint gets onto the lens or the lens cover, such dust or lint will be magnified and projected onto the screen. Use a blower to clean any dust and lint from the lens and the lens cover surface, or use a soft cloth to wipe off any dust or lint.
Removing and attaching the lens cover
Removing
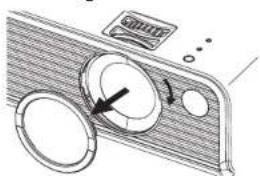
natural_image
Diagram of a car air conditioner unit with two fans and a digital display (no text or symbols)- Turn the ring to the right and remove the lens cover.
Attaching
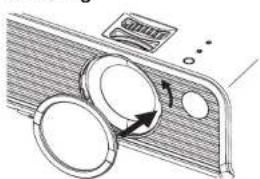
natural_image
Diagram of a refrigerator interior showing two circular doors with arrows indicating rotation (no text or symbols)- Replace the lens cover and turn it to the left to lock it in place.
NOTE:
- The lens cover is made of glass, so dropping it or allowing it to hit hard objects may cause it to break. Be careful when handling the lens cover
- Use the projector with the lens cover attached.
Specifications
Power supply: 100 V - 240 V -, 50 Hz/60 Hz
Power consumption: 180 W [During standby (when fan is stopped): Approx. 3 W]
Amps: 2.2 A - 1.0 A
LCD panel:
Panel size (diagonal): 0.6 type (15.24 mm)
Aspect ratio: 4:3
Micro lens array: Available
Display method: 3 transparent LCD panels (RGB)
Drive method: Active matrix method
Pixels: 480 000 (800 x 600) x 3 panels
Lens: Manual zoom (1.2 x) / Manual focus
F 1.7 - 1.8 f 17.0 mm - 20.4 mm
Lamp: UHM lamp (130 W)
Luminosity: 1 500 lm
Scanning frequency (for RGB signals):
Horizontal scanning frequency: 15 kHz - 91 kHz
Vertical scanning frequency: 50 Hz - 85 Hz
Dot clock frequency: Less than 100 MHz
| YPBPR signals: | 480i, 576i, 480p, 576p, 1 080/60i, 1 080/50i, 720/60p |
| Color system: | 7 (NTSC/NTSC 4.43/PAL/PAL-M/PAL-N/PAL60/SECAM) |
| Projection size: | 965 mm - 7 620 mm (38" - 300") |
| Throw distance: | 1.2 m - 9.9 m (3'11" - 32'5") |
| Optical axis shift: | 4:1 (fixed) |
| Screen aspect ratio: | 4:3 |
| Installation: Front/Rear/Ceiling/Desk (menu selection) | |
| Speaker: | 2.0 cm round x 1 |
| Max. usable volume output: | 0.5 W (mono) |
Connectors
PC IN: Single-line, D-sub HD 15-pin (female)
During RGB input:
R.G.B.: 0.7 V [p-p], 75 Ω
G.SYNC: 1.0 V [p-p], 75 Ω
HD/SYNC: TTL, automatic positive/negative polarity compatible
VD: TTL, automatic positive/negative polarity compatible
During YPBPR input:
Y: 1.0 V [p-p] (Including sync), 75 Ω
PB, PR: 0.7 V [p-p], 75 Ω
VIDEO IN: Single-line, RCA pin jack
1.0 V [p-p], 75 Ω
S-VIDEO IN: Single-line, Mini DIN
Y 1.0 V [p-p], C 0.286 V [p-p], 75 Ω
AUDIO IN: Single-line, 0.5 V [rms
RCA pin jack x 2 (L-R)
SD memory card slot: SD memory card
Cabinet: Moulded plastic (PC/ABS)
Dimensions:
Width: 234 mm (9-3/16")
Length: 188 mm (7-3/8")
Height: 65 mm (2-17/32") (Not including the
projection parts)
Weight: 1.3 kg (2.9 lbs.)
Operating environment:
Temperature: 0 °C - 40 °C (32 °F - 104 °F)
[When the "HIGHLAND" is set to "ON"
(page 50): 0 °C - 35 °C (32 °F - 95 °F)]
Humidity: 20% - 80% (no condensation)
Certifications: UL60950, C-UL
FCC Class B
| Power supply: | 3 V DC (Lithium CR2025 battery x 1) |
| Operating range: | Approx. 7 m (23") (when operated directly in front of signal receptor) |
| Weight: | 32 g (1.1 ozs.) (including battery) |
| Dimensions: | |
| Width: | 54 mm (2-1/8") |
| Length: 86 mm (3-3/8") | |
| Height: | 8.2 mm (-5/16") |
Ceiling bracket ET-PKP1
Appendix
List of compatible signals
| Compatible signals | Display resolution (dots)*1 | Scanning frequency | Dot clock frequency (MHz) | Picture quality*2 | Format | |
| H (kHz) | V (Hz) | |||||
| NTSC/NTSC4.43/PAL-M/PAL60 | 720 x 480i | 15.7 | 59.9 | A | S-Video/Video | |
| PAL-PAL-N/SECAM | 720 x 576i | 15.6 | 50.0 | A | S-Video/Video | |
| 480i | 720 x 480i | 15.7 | 59.9 | 13.5 | A | YPbPa |
| 576i | 720 x 576i | 15.6 | 50.0 | 13.5 | A | YPbPa |
| 480p | 720 x 483 | 31.5 | 59.9 | 27.0 | A | YPbPa |
| 576p | 720 x 576 | 31.3 | 50.0 | 27.0 | A | YPbPa |
| 1 080/60i | 1 920 x 1 080i | 33.8 | 60.0 | 74.3 | A | YPbPa |
| 1 080/50i | 1 920 x 1 080i | 28.1 | 50.0 | 74.3 | A | YPbPa |
| 720/60p | 1 280 x 720 | 45.0 | 60.0 | 74.3 | A | YPbPa |
| VGA400 | 640 x 400 | 31.5 | 70.1 | 25.2 | A | PC |
| 640 x 400 | 37.9 | 85.1 | 31.5 | A | PC | |
| VGA480 | 640 x 480 | 31.5 | 59.9 | 25.2 | A | PC |
| 640 x 480 | 35.0 | 66.7 | 30.2 | A | PC | |
| 640 x 480 | 37.9 | 72.8 | 31.5 | A | PC | |
| 640 x 480 | 37.5 | 75.0 | 31.5 | A | PC | |
| 640 x 480 | 43.3 | 85.0 | 36.0 | A | PC | |
| SVGA | 800 x 600 | 35.2 | 56.3 | 36.0 | AA | PC |
| 800 x 600 | 37.9 | 60.3 | 40.0 | AA | PC | |
| 800 x 600 | 48.1 | 72.2 | 50.0 | AA | PC | |
| 800 x 600 | 46.9 | 75.0 | 49.5 | AA | PC | |
| 800 x 600 | 53.7 | 85.1 | 56.3 | AA | PC | |
| MAC16 | 832 x 624 | 49.7 | 74.6 | 57.3 | A | PC |
| XGA | 1 024 x 768 | 48.4 | 60.0 | 65.0 | A | PC |
| 1 024 x 768 | 56.5 | 70.1 | 75.0 | A | PC | |
| 1 024 x 768 | 60.0 | 75.0 | 78.8 | A | PC | |
| 1 024 x 768 | 68.7 | 85.0 | 94.5 | A | PC | |
| 1 024 x 768i | 35.5 | 87.0 | 44.9 | A | PC | |
| MXGA | 1 152 x 864 | 64.0 | 71.2 | 94.2 | A | PC |
| 1 152 x 864 | 67.5 | 74.9 | 108.0 | B | PC | |
| 1 152 x 864 | 76.7 | 85.0 | 121.5 | B | PC | |
| MAC21 | 1 152 x 870 | 68.7 | 75.1 | 100.0 | B | PC |
| MSXGA | 1 280 x 960 | 60.0 | 60.0 | 108.0 | B | PC |
| SXGA | 1 280 x 1 024 | 64.0 | 60.0 | 108.0 | B | PC |
| 1 280 x 1 024 | 80.0 | 75.0 | 135.0 | B | PC | |
| 1 280 x 1 024 | 91.1 | 85.0 | 157.5 | B | PC | |
| 1 400 x 1 050 | 64.0 | 60.0 | 108.0 | B | PC | |
| 1 400 x 1 050 | 65.1 | 59.9 | 122.4 | B | PC | |
| UXGA | 1 600 x 1 200 | 75.0 | 60.0 | 162.0 | B | PC |
*1 The "i" appearing after the resolution indicates an interlaced signal.
*2 The following symbols are used to indicate picture quality.
AA Maximum picture quality can be obtained.
A Signals are converted by the image processing circuit before picture is projected.
B Some loss of data occurs to make projection easier.
DCF standard
For data recorded by digital cameras, folder and file names that comply with the DCF standard will be automatically assigned. The DCF standard has the following requirements.
Files or folders that do not comply with these requirements cannot be recognised by the projector. If you change the folder and file names on computers, the projector may not be able to recognise them correctly.
Folder (directory) name
- Folders are created as sub-folders of the DCIM folder on the SD memory card.
Data located in folders other than the DCIM folder is not recognized. - Folder names consist of three numerals (folder number) followed by five alphanumeric characters. (Example: 100ABCDE)
Numbers between 100 and 999 can be used for the three numerals and the alphanumeric characters can be taken from the following set of 37 characters: 0123456789ABCDEFGHIJKLMNOPQRSTUVWXYZ_(No distinction is made between upper-case and lower-case alphabetic characters. Double-byte characters cannot be used.)
- Multiple folders using the same three-digit combination (folder number) cannot be recognised correctly.
- Folder sub-hierarchies are not supported.
File name
- File names consist of four alphanumeric characters followed by four numerals (file number), followed by ".JPG" (extension). (Example: ABCD0001.JPG)
The alphanumeric characters can be taken from the following set of 37 characters: 0123456789 ABCDEFGHIJKLMNOPQRSTUVWXYZ_and numbers between 0001 and 9999 can be used for the four numerals (No distinction is made between upper-case and lower-case alphabetic characters. Double-byte characters cannot be used.)
- Multiple files using the same four-digit combination (file number) cannot be recognised correctly.
File format
Only Exif2.2-compliant JPEG images are supported.
NOTE:
- If you convert image formats using ImageCreator 1.5, folder and file names that comply with the DCF standard will be automatically assigned. (Folder names consist of three numerals followed by "PJPCN" and file names consist of "JPCN" followed by four numerals. Refer to page 32 for details on ImageCreator 1.5.)
Example of folder structure
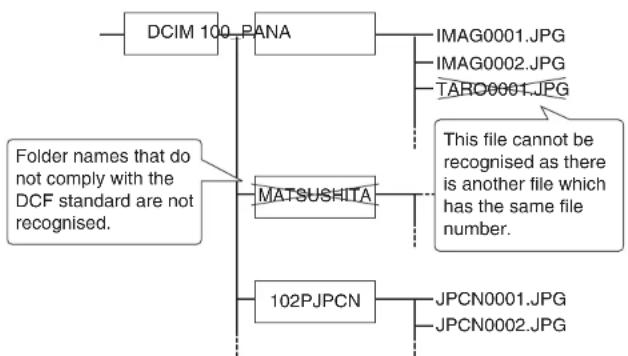
flowchart
graph TD
    A["DCIM 100_PANA"] --> B["IMAG0001.JPG"]
    A --> C["IMAG0002.JPG"]
    A --> D["TARC0001.JPG"]
    E["MATSUSHITA"] --> F["This file cannot be recognised as there is another file which has the same file number."]
    G["102PJPCN"] --> H["JPCN0001.JPG"]
    G --> I["JPCN0002.JPG"]
    J["Folder names that do not comply with the DCF standard are not recognised."] --> E
: Folder XXXXXXXXX.JPG: Name of file
Guide screen for computer connection
Refer to the list below for details on the keyboard commands to change the output setting.
| Manufacturer | Keyboard command | Manufacturer | Keyboard command |
| Panasonic NEC | Fn + F3 | EPSON DELL | Fn + F8 |
| TOSHIBA SHARP HP | Fn + F5 | IBM SONY | Fn + F7 |
| Other | Fn + ☐☐ | ||
| FUJITSU | Fn + F10 | Apple | F7 |
Projection dimensions calculation methods
If the screen size (diagonal) is SD (m), then the following formula is used to calculate the projection distance for the wide lens position (LW) and the projection distance for the telephoto lens position (LT).
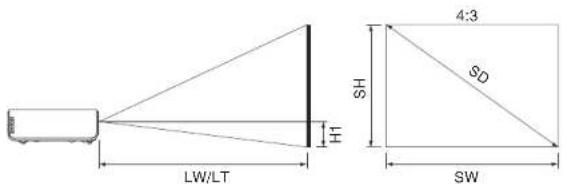
text_image
LW/LT H SH 4:3 SD SW| Minimum Projection Distance | LW=0.028xSD/0.0254-0.042 |
| Maximum Projection Distance | LT=0.033xSD/0.0254-0.043 |
For 16:9 aspect ratios, the following formula can be used to calculate the projection distance.
| Minimum Projection Distance | LW=0.031xSD/0.0254-0.042 |
| Maximum Projection Distance | LT=0.036xSD/0.0254-0.043 |
*The values obtained from the formulas above are approximate.
NOTE:
- If 4:3 images are projected onto a 16:9 screen that has been set using the projection distance for a 16:9 screen, the 4:3 images will overflow the screen at the top and bottom. In such cases, set "ASPECT" to "S4:3". (Refer to page 47 for details.)
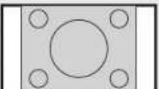
Dimensions
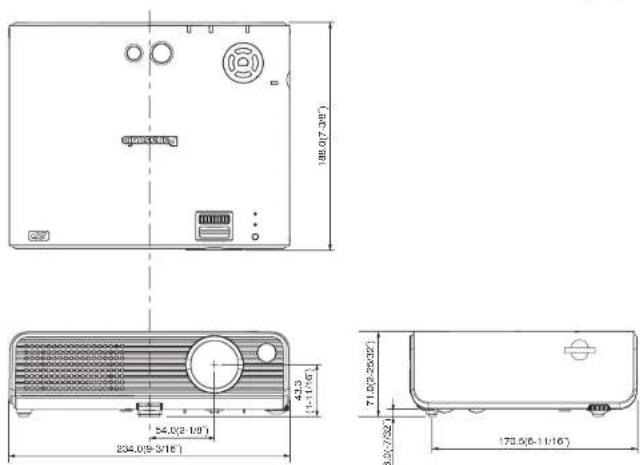
text_image
188.0(7-3/16") 234.0(9-3/16) 42.3 154.0(2-1/16) 234.0(9-3/16) 71.0(2-28/3/2) 8.0(7/3/2) 179.5(6-11/16)Trademark acknowledgements
• The SD logo is a trademark.
- Windows and PowerPoint are trademarks or registered trademarks of Microsoft Corporation in the United States of America and other countries.
- VGA and XGA are trademarks of International Business Machines Corporation.
• Macintosh is a registered trademark of Apple Computer, Inc.
- S-VGA is a registered trademark of the Video Electronics Standards Association.
All other trademarks are the property of the various trademark owners.
Information on Disposal in other Countries outside the European Union

This symbol is only valid in the European Union. If you wish to discard this product, please contact your local authorities or dealer and ask for the correct method of disposal.
NOTES IMPORTANTES CONCERNANT LA SECURITE
AVERTISSEMENT: POUR REDUIRE LES RISQUES DE FEU OU DE CHOC ÉLECTRIQUE, NE PAS EXPOSER CE PRODUIT À L'EAU OU À L'HUMIDITÉ