BM280-4K - Pregnant Lilliput - Free user manual and instructions
Find the device manual for free BM280-4K Lilliput in PDF.


User questions about BM280-4K Lilliput
0 question about this device. Answer the ones you know or ask your own.
Ask a new question about this device
Download the instructions for your Pregnant in PDF format for free! Find your manual BM280-4K - Lilliput and take your electronic device back in hand. On this page are published all the documents necessary for the use of your device. BM280-4K by Lilliput.
USER MANUAL BM280-4K Lilliput
text_image
28" 15.6" 23.8" LILLIPUTIMPORTANT SAFETY INSTRUCTIONS

The device has been tested for conformance to safety regulations and requirements, and has been certified for international use. However, like all electronic equipment, the device should be used with care. Please read and follow the safety instructions to protect yourself from possible injury and to minimize the risk of damage to the unit.
➢ Please do not place the display screen towards the ground to avoid scratching the LCD surface.
➢ Please avoid heavy impact.
➢ Please do not use chemical solutions to clean this product. Simply wipe with a clean soft cloth to maintain the brightness of the surface.
➢ Please do not block any vent hole.
➢ Please follow the instructions and trouble-shooting to adjust the product.
➢ Internal adjustments or repairs must be performed by a qualified technician.
➢ Please keep user guide for future reference.
➢ Please unplug the power and remove the battery if long-term no-use, or thunder weather.
FEATURES
➢ Support multiple signal inputs 3G-SDI, HDMI, DVI and VGA.
➢ Multiple View Display supports quad view split from different input singles simultaneously.
➢ Ultra HD 4K screens containing 8.3 million pixel (3840×2160), so the resolution is four times that of Full HD.
3D LUT for Accurate Color Reproduction and Color space display (Native/Rec.709/User1\~User3).
➢ Support to upload 3D LUT table via USB port.
▶ Equip HDR function.
Image flip offers great convenience for user's user to place the monitor with various mounting methods under different conditions. Users can view the monitor normally no matter what mounting angles.
➢ Perfect size for both suitcase and rack mount.
▶ Wireless HDMI function for optional.
Contents
- PRODUCT DESCRIPTION .... 3
- SUN SHADE INSTALLATION 8
- MENU SETTING 9
- ACCESSORIES 24
-
PARAMETERS ...... 27
-
TROUBLE SHOOTING 28
1. PRODUCT DESCRIPTION
Front
text_image
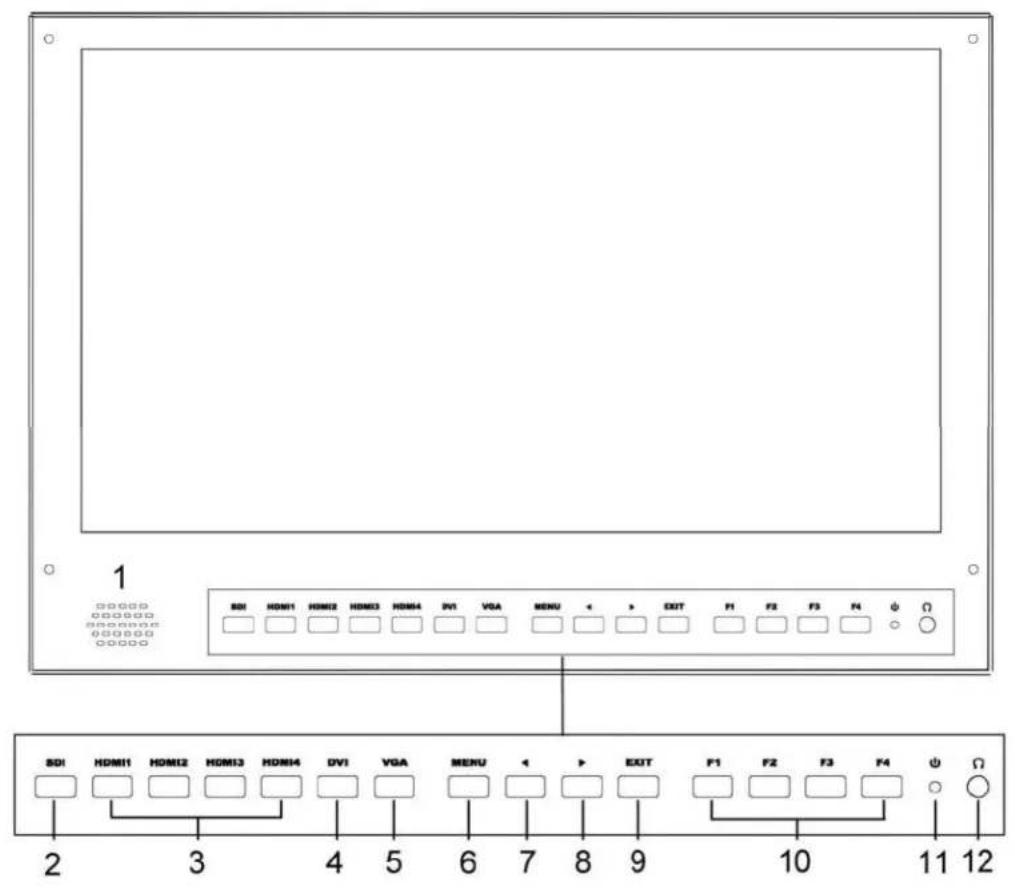
1 SDI HDM11 HDM12 HDM13 HDM14 DV1 VGA MENU ← > EXIT F1 F2 F3 F4 ψ Ω SDI HDM11 HDM12 HDM13 HDM14 DV1 VGA MENU ← > EXIT F1 F2 F3 F4 ψ Ω 2 3 4 5 6 7 8 9 10 11 12- Speaker
- SDI
Signal switch to SDI mode when light on.
- HDMI 1 \~ 4
Signal switch to HDMI mode when light on.
- DVI
Signal switch to DVI mode when light on.
- VGA
Signal switch to VGA mode when light on.
6. MENU
Press to enter menu.
Press to enter option in the menu.
7.
Select option in the menu.
Decrease the option value.
Before enter the menu, single press to activate volume, press again to decrease the volume.
8. ▶
Select option in the menu.
Increase the option value.
Before enter the menu, single press to activate volume, press again to increase the volume.
9. EXIT
Back or exit.
10. F1\~F4 User definable buttons
Default function options:
F1: Color Space
F2: Display Mode
F3: Safety Marker
F4: Aspect
(functions can be customized by long keep pressing any one of the
4 buttons)
-
Power indicating light (green light: working).
-
Earphone jack
Back
text_image
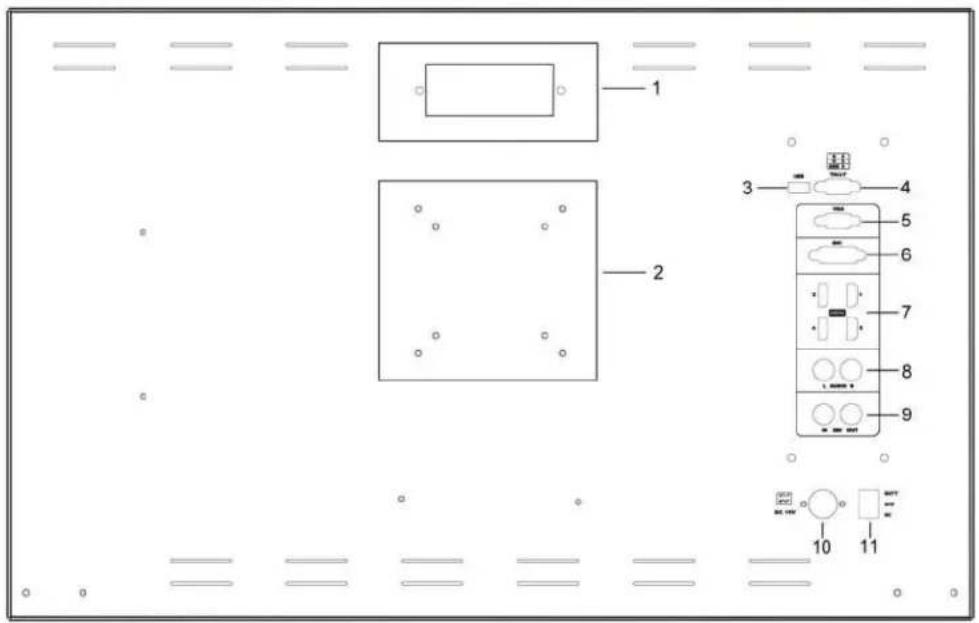
Technical diagram of a device panel layout with numbered components and labeled ports- Handle (Only available for BM230/BM280)
- VESA 75×75 & VESA 100×100 mounting port
- USB port
- TALLY port
- VGA input port
- DVI input port
- HDMI input port×4。
HDMI 1 & HDMI 2 : HDMI2.0, support 4K 60Hz
HDMI 3 & HDMI 4: HDMI1.4, support to 4K 30Hz
NOTE: HDR is only available under HDMI 1 signal input.
- Audio L/R
- SDI input/output ports
- DC IN (XLR) terminal
Connects the DC power supply to the monitor.
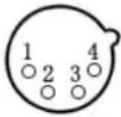 | Pin number Signal |
| 1 GND | |
| 23...... |
| 4 +15V |
11. Power switch
"I" is battery power, "o" is power off, "l" is DC power.
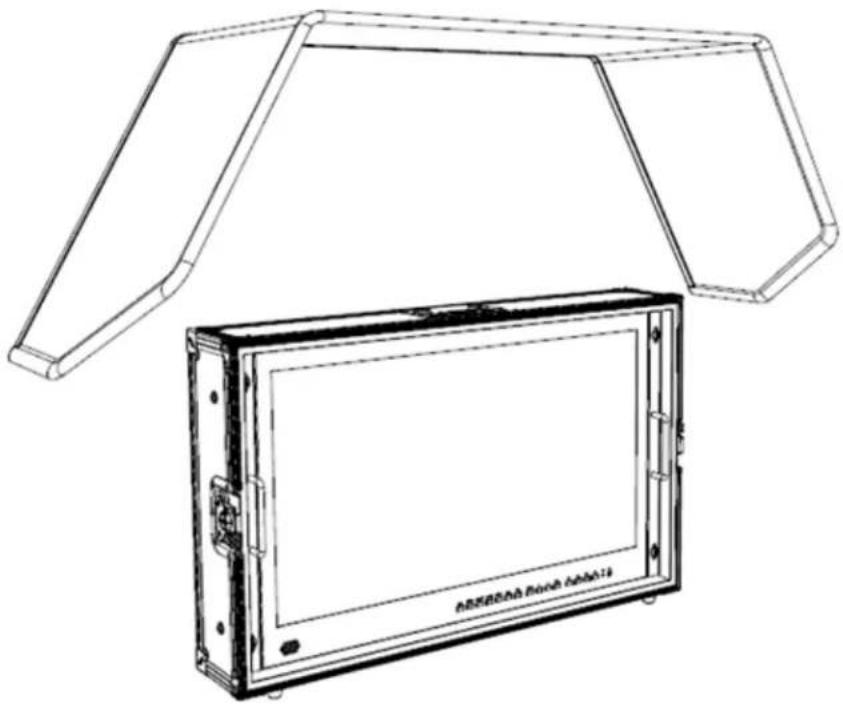
2. SUN SHADE INSTALLATION
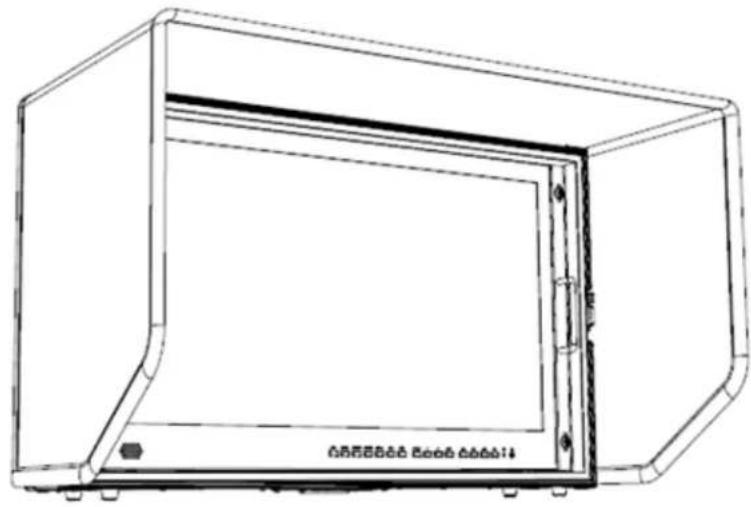
- Put the sun shade on the suitcase, and match the magnets on both sides.
natural_image
Technical line drawing of a rectangular electronic device with a transparent top frame and internal panel (no text or symbols)- As shown below after finished.
natural_image
Line drawing of a rectangular enclosure with internal frame and mounting feet (no text or symbols)3. MENU SETTING
Please check whether the device is connected well or not.
3-1. F1\~F4 user definable shortcut buttons
Long keep pressing any one of the 4 buttons for 3-5 seconds to activate shortcut menu setting. Option selected will be highlighted as white. option will be highlighted as yellow, unavailable option will be highlighted as gray.
Select option via "◀/▶" buttons.
Then press "MENU" button to confirm to set as default option.
Shortcut functions can be customized to meet user's needs as following:
| NO. Shortcut | Menu when long press any F shortcut button |
| 1 Center Marker | |
| 2 Safety Marker | |
| 3 Aspect Marker | |
| 4 Aspect | |
| 5 Underscan | |
| 6 Check Field | |
| 7 Freeze | |
| 8 Pixel to Pixel | |
| 9 Peaking | |
| 10 False Color | |
| 11 Exposure (Only available under SDI mode) | |
| 12 Histogram(Only available under SDI mode) | |
| 13 Time Code (Only available under SDI mode) | |
| 14 Display Mode | |
| 15 Disp Mirror | |
| 16 Color Space |
Default options:
F1: Color Space
F2: Display Mode
F3: Safety Marker
F4: Aspect
3-2. ◀ / ▶ Buttons Operation
Under non menu screen, press "◀/▶" buttons to activate volume bar, Use "◀ / ▶" buttons to select the desired option.
Press the "MENU" button to select Volume, Brightness, Contrast, Saturation, Hue, Sharpness.
3-3. MENU Operation
When power on, press "MENU" on the device, the menu of function setting will display on the screen.
Press "◀ / ▶" button to choose menu;
Then press "MENU" button to confirm;
Press "EXIT" button to return / exit menu.
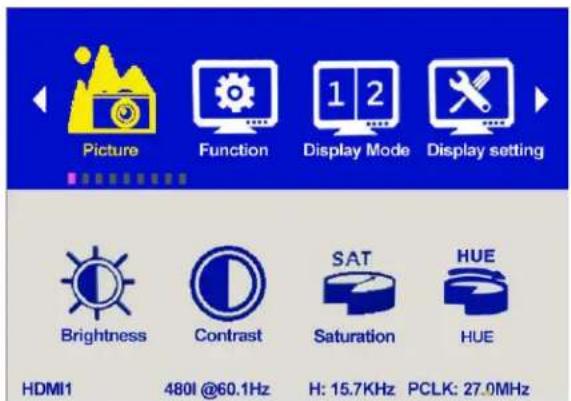
3-3-1. Picture
text_image
Picture Function Display Mode Display setting Brightness Contrast SAT HUE HDMI1 480I @60.1Hz H: 15.7KHz PCLK: 27.0MHz| Picture | Brightness 0~100 | ||
| Contrast 0~100 | |||
| Saturation 0~100 | |||
| Hue 0~100 | |||
| Sharpness 0~4 | |||
| Color Space Native/Rec.709/User1~User3 | |||
| HDR | Off/Auto/HDR10 | ||
| Backlight Mode | Standard/Outdoor/User | ||
| Backlight | 0~100 | ||
| Temperature | 9300/7500/6500/5800/User | ||
| Red Gain | 0~256 | Note: Available only under “User” mode. | |
| Green Gain | 0~256 | ||
| Blue Gain | 0~256 | ||
Brightness
Adjust the general brightness of the LCD. For example, if it uses outside in bright conditions, increase the LCD brightness to make it easier to view.
Contrast
Increase or decrease the range between the bright and dark areas of the image. High contrast can reveal detail and depth in the image, and low contrast can make the image appear soft and flat.
Saturation
Adjust the color intensity. Press "◀/▶" buttons to increase or decrease the color intensity.
Hue
It means tint. Use this setting to choose the tint from 0 to 100.
Sharpness
Increase or decrease the sharpness of the image. When the sharpness of image is insufficient, the value of sharpness can be increased to make the image clearer.
Color Space
Selects the color space from among [Native], [Rec.709] [User1\~User3]:
- Saturation/Hue/Color Temperature is only available under Native mode.
- Select [AUTO] or [HDR10] mode under HDR function, the color space will be saved as Native mode automatically. It can be only changed to other color space mode by hand.
- It supports to upload user-defined Lut table "User1\~User3".
- User-defined Lut table only support RGB format. If the format is not correct, please transform it to the correct format by using tool "Lut Converter" (See appendix 1 for details) and named as User1.cube, User2.cube or User3.cube.
- Copy the User-defined Lut table to flash disk and insert it to the device, the screen displays a prompt message to show whether to upgrade. Select upgrade, the device will be loading automatically in a black screen and then restart after finishing loading.
■ Requirements for flash disk
Format: FAT32
Memory: <16G
File directory: root directory
Must be formatting before using it
■ Please note that the responding time for loading user-defined Lut table will be a bit slower. Please wait patiently.
- The device only supports loading one table at a time. If needs to load more than one tables, please load them one by one.
HDR
Select HDR from among [Off], [Auto], [HDR10].
● HDR is only available under HDMI 1 signal input.
- HDR under AUTO or DHR10 mode, and the input signal support HDR, the below function is disabled:
Contrast, Brightness, Saturation, Hue, Sharpness, Color Space, BackLight
Color Temperature
• [Auto]
Automatically recognize whether the input HDMI signal supports HDR. If it supports, the input signal shows as the HDR10 performance. If it doesn't, HDR function is disabled. It's suggested select [Auto] when use HDR function.
• [HDR10]
Do not recognize whether the input HDMI signal supports HDR, it will activate the HDR function enforcedly when input signal. If the input signal does not support the HDR function, the image displays abnormal color.
Backlight Mode
Select Backlight Mode from among [Standard], [Outdoor], [User].
Backlight
It is only available under [User] mode.
Temperature
Adjust the color temperature to make the image warmer (Yellow) or colder (Blue). Increase the value to make the image be warmer, decrease the value to make the image be colder. User can use this function to strengthen, weaken or balance the image color according requirements. The standard white light color temperature is 6500K.
Note: Only available under "User" mode to adjust Color Gain.
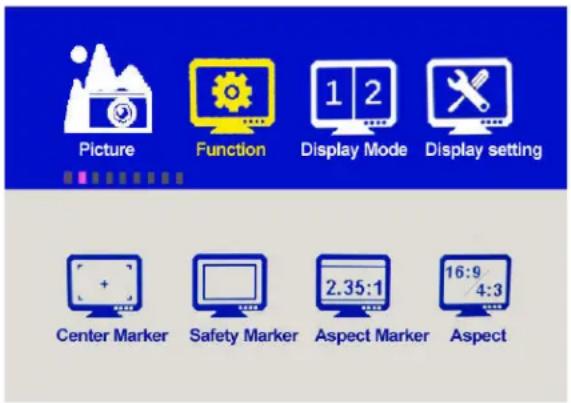
3-3-2.Function
text_image
Picture Function Display Mode Display setting Center Marker Safety Marker Aspect Marker Aspect 2.35:1 16:9/4:3Center Marker
Select On, it will appear "+" marker on center of screen.
Safety Marker
Use this setting to set off the safety marker or choose the one of the safety markers: [OFF], [95%], [93%], [90%], [88%], [85%], [80%].
Aspect Marker
Display the different aspect of the displayed image. [OFF], [Full], [17:9], [16:9], [4:3], [1.85:1], [2.35:1].
Aspect
Switch aspect ratio setting among from [Full][17:9][16:9][4:3][1.85:1][2.35:1]. For example:
| Function | Center Marker ON, OFF | ||
| Safety Marker OFF, 95%, 93%, 90%, 88%, 85%, 80% | |||
| Aspect Marker OFF, Full, 17:9, 16:9, 4:3, 1.85:1, 2.35:1 | |||
| Aspect Full ,17:9, 16:9, 4:3, 1.85:1, 2.35:1 | |||
| Underscan ON, OFF | |||
| Pixel To Pixel ON, OFF | |||
| Check Filed OFF, Red, Green, Blue | |||
| Freeze ON, OFF | |||
| Peaking ON, OFF | |||
| Peaking color | Red/Green/Blue/White | Only available when under SDI Mode. | |
| Peaking level | 0~100 | ||
| False Color | OFF/ON | ||
| Exposure | OFF/ON | Only available when under SDI Mode. | |
| Exposure level | 0~100 | ||
| Histogram | OFF/ON | ||
| Time Code OFF/LTC/VITC | |||
In [Full] mode, images are scaled to fill the entire screen.
In [4:3] mode, images are scaled up or down to fill the maximum 4:3 portion of the screen.
In [16:9] mode, images are scaled to fill the entire screen if the device aspect is 16:9.
Underscan
If the image shows size error, use this setting to zoom in/out pictures automatically when receiving HDMI signals
Pixel to Pixel
The pixel to pixel is a monitor set to 1:1 pixel mapping with native fixed pixels, which avoids loss of sharpness due to scaling artifacts and normally avoids incorrect aspect ratio due to stretching.
Check Field
Use the check field modes for monitor calibration or to analyze individual color components of an image. The device preset in Blue, Green, and Red check field modes, only the selected color will be shown.
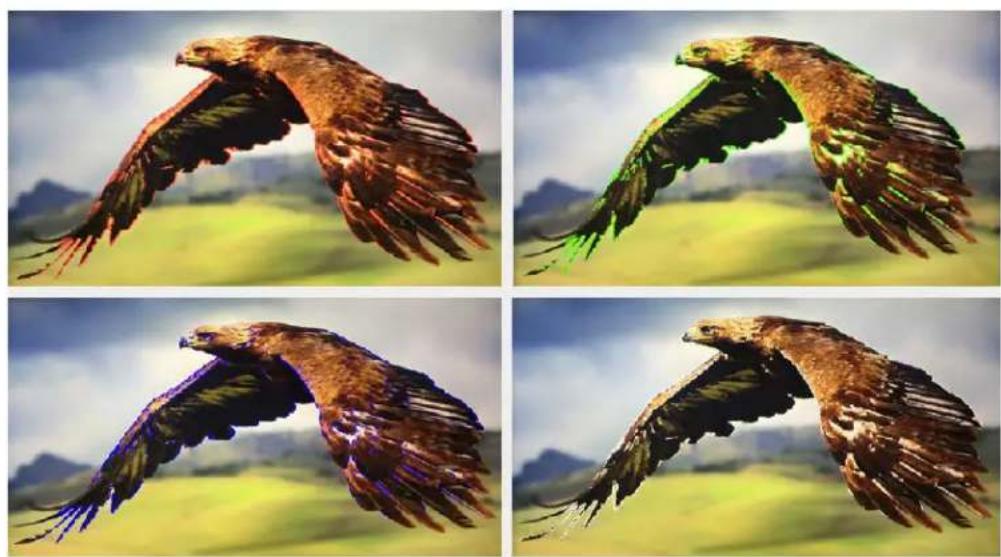
Peaking
The peaking is used to aid the camera operator in obtaining the sharpest possible picture. Select "On" to display colored outlines around sharp areas of the image.
NOTE: Peaking color and level only can be changed when under SDI mode.
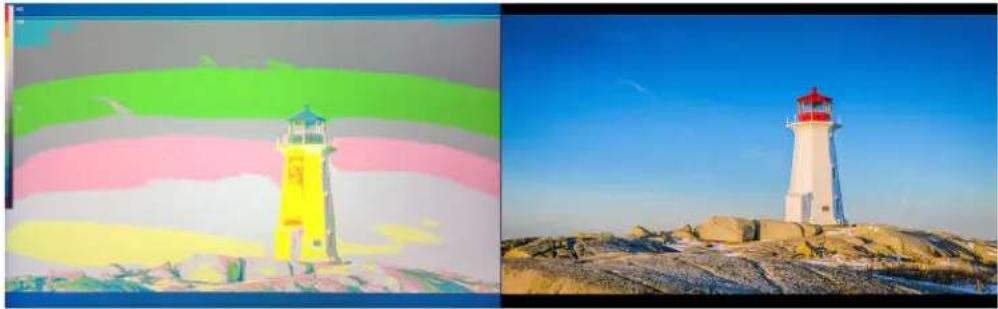
False Color
This monitor has a false color filter to aid in the setting of camera exposure. As the camera Iris is adjusted, elements of the image will change color based on the luminance or brightness values. This enables proper exposure to be
achieved without the use of costly, complicated external equipment.
natural_image
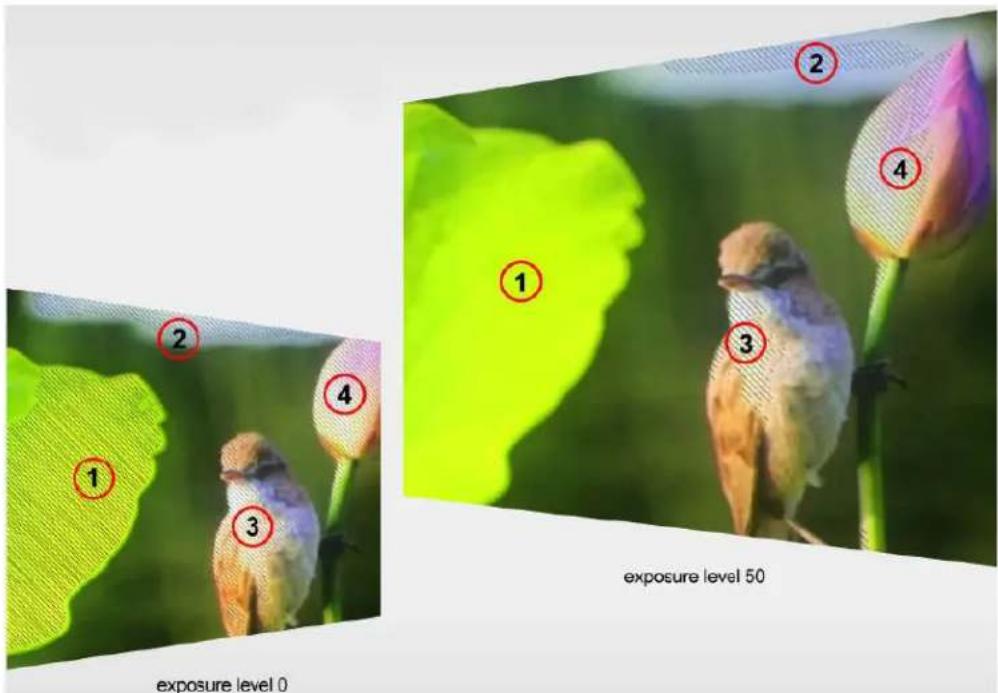
Two lighthouse photos: one in a colorful sky with yellow and green lights, the other on a rocky outcrop under a clear blue sky (no text or symbols visible)Exposure & Exposure Level
The exposure feature helps the user achieve optimum exposure by displaying diagonal lines over areas of the image that exceed the setting exposure level.
The exposure level can be set to 0\~100.
Note: Only available when under SDI mode.
text_image
2 1 3 4 1 2 4 1 3 exposure level 50 exposure level 0Histogram
The histogram makes users view visually the exposure of whole and each RGM channels. It has the full contrast range of video for easy color correction during post production.
NOTE: Only available when under SDI mode.
Time Code
The Time Code supports Longitudinal time code (LTC) and Vertical interval time
code (VITC). The time code display on the monitor is synchronizing with that of Full HD camcorder's. It displays the duration of the clips in hours: minutes: seconds: frames. It's very useful for identifying specific frame in film and video production.
Note: Only available when under SDI mode.
3-3-3. Display Mode
text_image
Picture Function Display Mode Display setting 1P 2P LR 2P TB 2P PIP| Display Mode | 1P, 2P LR, 2P TB, 2P PIP, 4P |
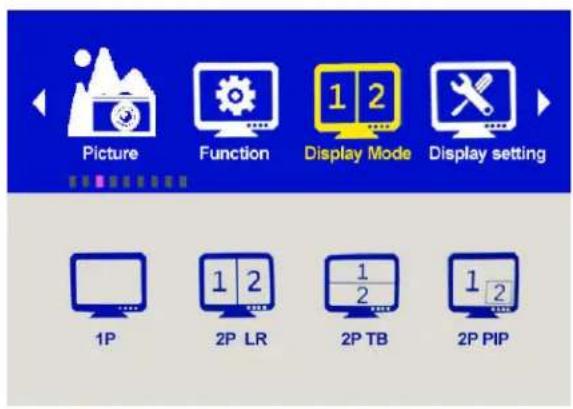
Display Mode
The monitor presets 1P, 2P LR, 2P TB, 2P PIP, 4P five display modes. This function can be work with Select Region function to meet user's requirement. For example:
In 1P mode, images are scaled to fill the entire screen.
In 2P LR, display two different signals on the left and right sides.
3-3-4. Display Setting
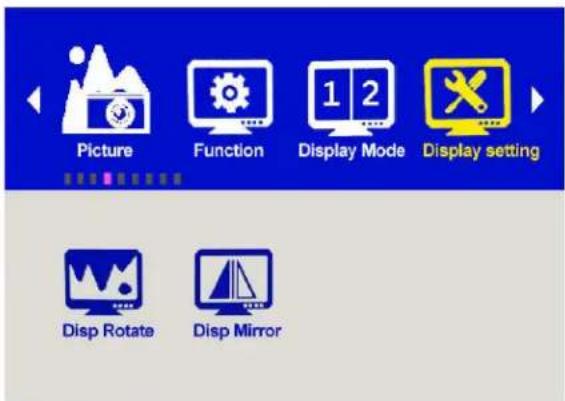
| Display Setting | Display Rotate | 0°, 90°, 180°, 270° | Available when single display. |
| Display Mirror | OFF, L/R, U/D | Available when dual display on left and right. |
text_image
Picture Function 1 2 Display Mode Display setting Disp Rotate Disp MirrorDisplay Rotate and Display Mirror
This setting support to flip the image to 0^ , 90^ , 180^ , 270^ modes. It is only available when single display.
Display mirror
This setting displays two different input signals to Light/Right or Up and Down, the user can choose it to view the images according to the requirement. It is only available when dual display on left and right.
3-3-5. Select Region
text_image
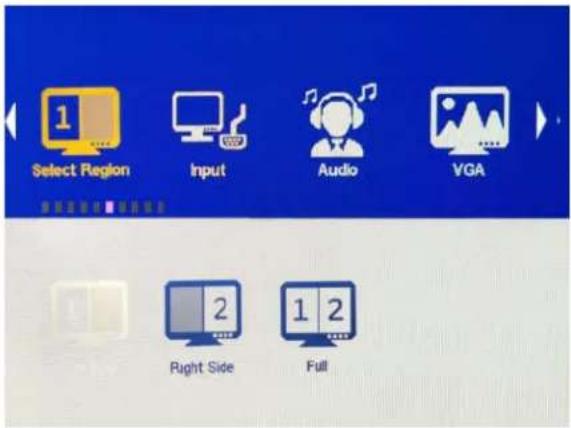
1 Select Region Input Audio VGA Right Side Full| Select Region | Unavailable Display mode 1P | |
| Left Side/Right Side/Full Display mode 2P LR | ||
| Top Side/Bottom Side/Full Display mode 2P TB | ||
| Main/Sub/Full Display mode 2P PIP | ||
| 1P In/1P Out/2P In/2P Out/3P In/3P Out/4P In/4P Out/4P full | Display mode 4P | |
Note: This Menu is enabled for audio source selection. It is only available when under multi-picture and picture-in-picture mode. Activate the corresponding EN source to select the needed audio and picture under Audio Source function.
3-3-6. Input
text_image
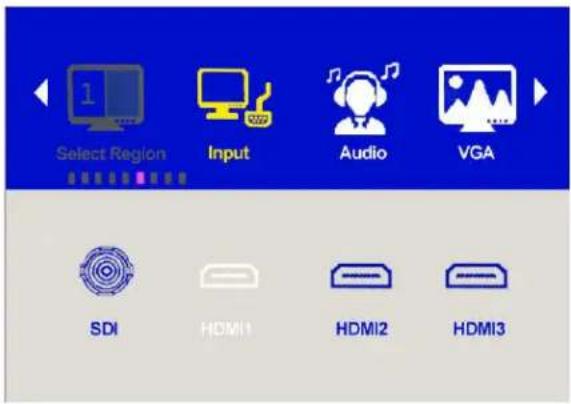
Select Region Input Audio VGA SDI HDMI1 HDMI2 HDMI33-3-7. Audio
Input Signal switch to region selected according to users' needs.
text_image
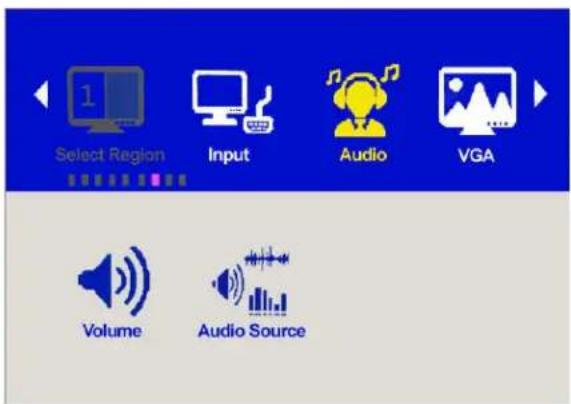
Select Region Input Audio VGA Volume Audio Source| Audio | Volume 0~100 | ||
| Level Meter | OFF/ON | NOTE: Only available when under SDI mode | |
| Audio Source | Analog/Digital region 1~4 | ||
Digital region 2\~4 is only available under multi-displays mode and must activate the corresponding Region under Select Region function at the same time.
3-3-8. VGA
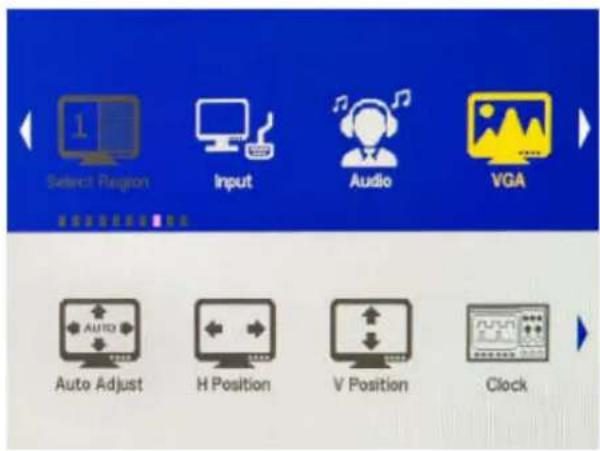
text_image
Select Region Input Audio VGA Auto Adjust H Position V Position Clock| Auto Adjust |
| VGA | H Position 0~100 | |
| V Position 0~100 | ||
| Clock | ||
| Phase 0~100 |
3-3-9. System
| System | Reset Press to confirm after selected. | |
| Menu Time 10~60s | ||
| OSD H Position 0~100 (To set menu display area) | ||
| OSD V Position 0~100 (To set menu display area) | ||
| Language English, Chinese | ||
| Transparency 0~255 (To set menu transparency) | ||
| Color Calibration Off/On | ||
| Rotate | 0°, 90°, 270° | |
| Border Width | 0~10 | |
| Border Color | R, G, B, W | |
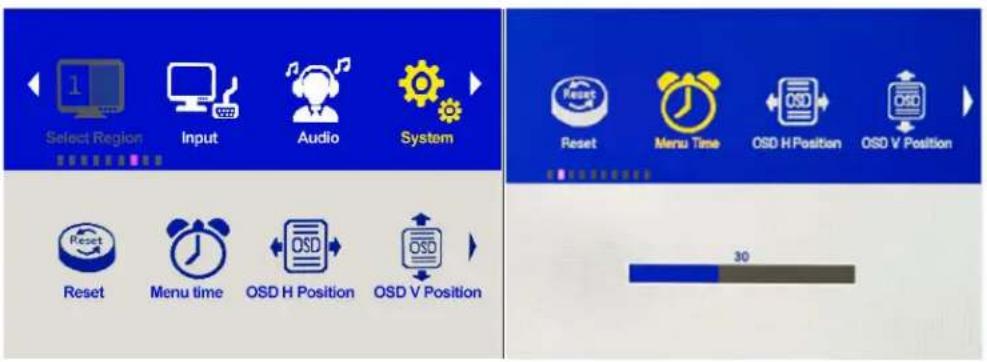
text_image
Select Region Input Audio System Reset Menu time OSD H Position OSD V Position Reset Menu Time OSD H Position OSD V Position 30Reset
If there is any problem unknown, press to confirm after selecting. The monitor will return to default set.
Menu Time
Adjust the OSD displaying time form 10 to 60s.
OSD H Position and OSD V Position
Move OSD horizontally or vertically.
Language
Switch between English and Chinese.
Transparency
Set Menu transparency. Increase the value, the more transparent it will be.
OSD Rotate
Flip OSD to three modes.
Border Width and Border Color
Information To display current information.
User can choose the border color among Red, Green, Blue, White. And adjust the thickness by using Border Width function.
This setting is available when display in 2P LR, 2P TB, 2P PIP, 4P mode.

natural_image
Four-panel collage showing a microphone, stage performance with colorful smoke, crowd celebration, and heart-shaped hands (no visible text or symbols)signals means Border.
The lines separate the different input
3-3-10. Information
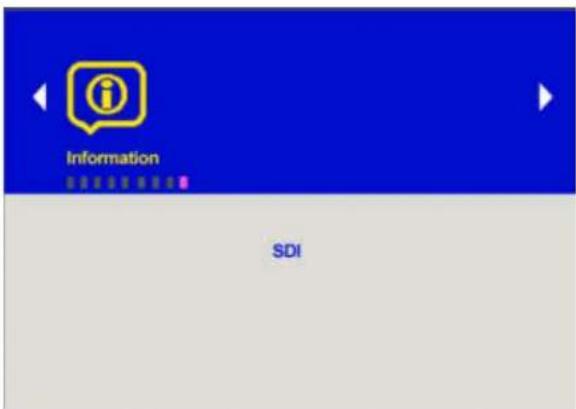
text_image
Information SDI4. ACCESSORIES
- Folding sun shade cover 1 piece
- TALLY connector (in bulk) 1 piece
- V-mount or Anton Bauer mounts Power cable 1 piece
- V-mount or Anton Bauer mount 1piece
- Manual 1 copy
- Carry-on suitcase 1 piece
- 15V DC adapter 1 piece
- Battery plate bracket 1 piece
- Adapter fixing belt 2 pieces
- Base bracket 1 pair
- Acrylic screen protector(Optional for BM150 only) 1 piece
-
WHDI Accessories (optional) 1pair
-
PARAMETERS
| Display Screen | 15.6" 8bit IPS 23.8" IPS 28" IPS | |
| Physical Resolution | 3840×2160 3840×2160 3840×2160 | |
| Aspect Ratio | 16: 9 16: 9 16: 9 | |
| Brightness | 330cd/m2 300cd/m2 300cd/m2 | |
| Contrast 1000: 1 1000: 1 1000: 1 | ||
| Viewing Angle | 176°/ 176°(H/V) | 178°/ 178°(H/V) |
| Input Voltage | DC12~24V(XLR) | DC 12~24V(XLR) |
| Input Signal | 3G-SDI, HDMI DVI, VGA, Audio, USB and TALLY | 3G-SDI, HDMI DVI, VGA, Audio, USB and TALLY |
| Output Signal | 3G-SDI | 3G-SDI |
| Power Consumption | ≤18W | ≤41W |
| Operating Temperature | 0°C~60°C | 0°C~60°C |
| Storage Temperature | -20°C~60°C | -20°C~60°C |
| Dimension (LWD) | 389×267×38mm | 579×376.5×45mm |
| Weight | 3.2kg / 12 kg(with case) | 8.6kg / 17.1kg(with case) |
6. TROUBLE SHOOTING
- Only black-and-white display.
Check whether the color saturation is properly setup or not.
- Power on but no pictures.
Check whether the cables of HDMI, VGA, DVI and 3G-SDI are correctly connected or not. Please use the standard power adapter coming with the product package. Improper power input may cause damage.
- Wrong or abnormal colors.
Check whether the cables are correctly and properly connected or not. Broken or loose pins of the cables may cause a bad connection.
- When on the picture shows size error.
Press “MENU → Function → Underscan” to zoom in/out pictures automatically when receiving HDMI signals
- Other problems.
Please press "MENU" button and choose "MENU → System → Reset → confirm".
- According to the ISP, the machine cannot function properly.
ISP for program upgrades, non-professionals do not use. Please reboot your device if press accidentally!
- No Sound.
Press HDMI button if no sound; if still unavailable, please contact the technician.
- No signal displayed when connecting with HDMI 1.
Please long press HDMI 1 button for 3-5 seconds to activate HDMI signal.
Note: Due to constant effort to improve products and product features, specifications may change without notice.
Appendix 1
3D LUT of Loading Manual
BM-4KS supports 3DLUT to load the color calibration document and the User Log by using flash disk
1. Format Requirement:
- LUT format:
Type: .cube
3D Size: 17x17x17
Data Order: RGB
Table Order: RGB
- USB flash disk version
USB: 2.0
System: FAT32
Size: <16G
● Color calibration document: Rec709.cube
- User Log: User1 \~User3.cube
2. LUT Format Conversion
The format of LUT should be transformed if it doesn't meet Lilliput's requirement. It can be transformed by using Lut Converter (V1.3.30).
2-1. Activate Lut Converter
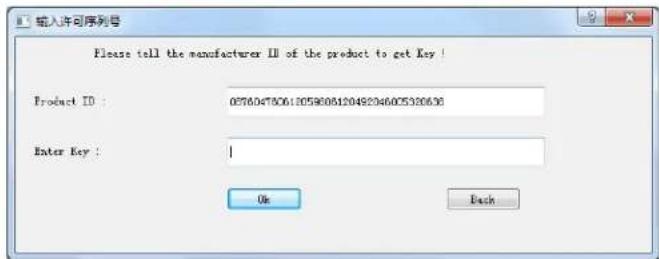
text_image
输入许可序列号 Please tell the manufacturer II of the product to get Key ! Product ID : 08760478061205900812049204605320638 Enter Key : | Ok BackOne individual Product ID for one computer. Please send the ID number to Lilliput to get an Enter Key. Then the computer gets the permission of Lilliput Lut Converter after inputting the Enter Key.
2-2. Enter the Lut Converter interface after input the Enter Key
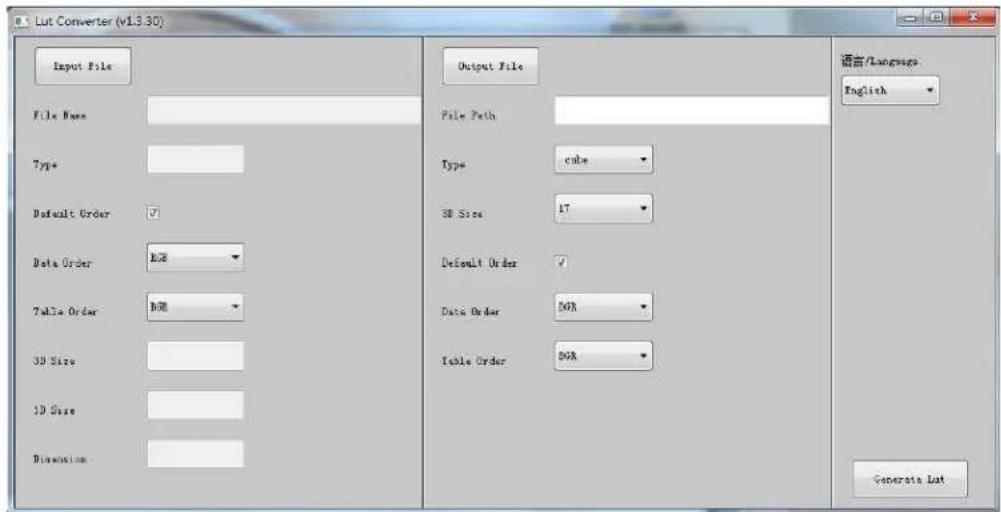
text_image
Lut Converter (v1.3.30) Input File File Name Type Default Order Data Order Table Order 3D Size 1D Size Dimension Output File File Path Type color 3D Size 17 Default Order Data Order 50K Table Order 50K 语言/Language English Generate List2-3. Click Input File, then select \*LUT
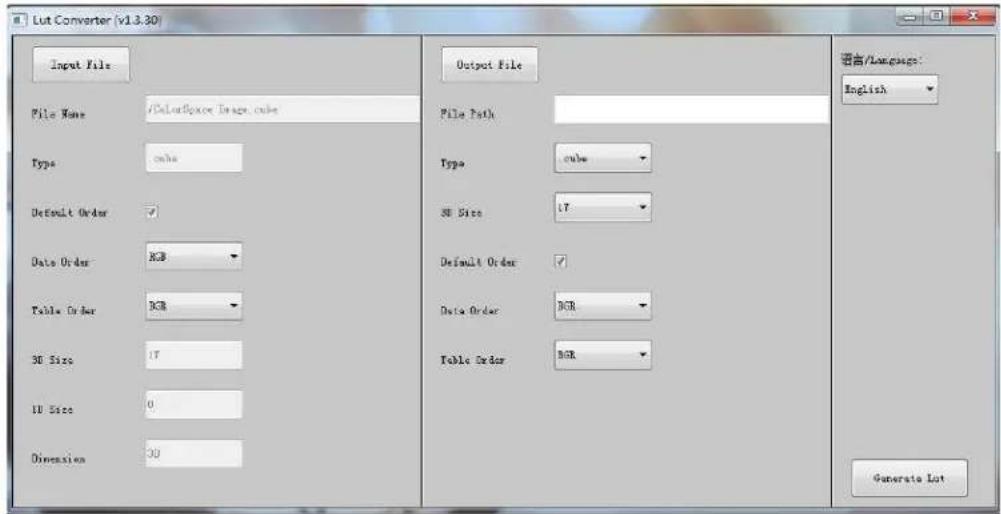
text_image
Lut Converter (v1.3.30) Input File File Name : /ColorSpace Image.cube Type : cube Default Order ✓ Data Order: RGB Table Order: RGB 3D Size: 17 10 Size: 0 Dimension: 30 Output File File Path Type : cube 3D Size : 17 Default Order ✓ Data Order: RGB Table Order: RGB 语言/Language: English Generate Lot2-4. Click Output File, and then select the file name as required format.
Such as:
Rec709.cube, 3D Size: 17, Data Order: RGB, Table Order: RGB.
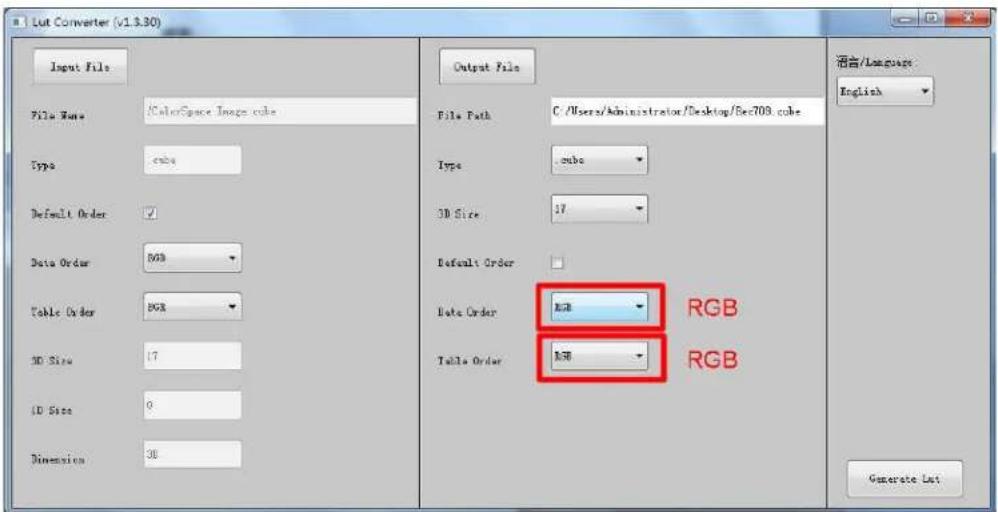
text_image
Cut Converter (v1.3.30) Input File File Name: /ColorSpace Image cube Type: cube Default Order ✓ Data Order RGB Table Order RGB 3D Size 17 ID Size 0 Dimension 38 Output File File Path C:/Users/administrator/Desktop/Sec708.cube Type: cube 3D Size 17 Default Order Data Order RGB RGB Table Order RGB RGB 语言/Language English Generate ListPlease note: The format which shown in Red Box above should be selected to RGB.
2-5. Click Generate Lut button to finish the transform.
3. USB Loading
- The USB flash disk must be formatted before using to make sure that there are no other files in the root directory.
- Copy needed files to the root directory of the USB flash drive.
Please note that the system only supports updating one LUT table at a time.
Therefore, only a single file to be loaded can be copied to the USB flash drive. If it needs to update more LUT tables, please delete other files in USB flash disk and repeat the above steps.
● Power on the device, insert the corresponding video signal into any video signal interface, and switch the signal to the corresponding channel to make sure the device displays normally.
(It doesn't suggest that update the LUT table when there is no input signal as the device will enter the power saving mode in such situation.)
- Insert the flash disk into the USB interface on the device and wait for about 5 seconds. It will pop-up prompt box "Load Rec709.cube" after detecting the flash disk. Operate by using press "MENU", "<", ">", "EXIT" on the front of device. Click "YES" to load, and click "NO" or press "EXIT" to exit.
The device displays a black screen after confirmed the loading, and it will update the corresponding LUT table back-stage according to the name of the updated LUT.
The device will be restarted automatically after completed. The whole updating process takes about 6 seconds according to the updated LUT name.
- Please activate and set up the updated LUT table under the menu after restart. It doesn't need to be reset if the current updated LUT has been selected before updating.
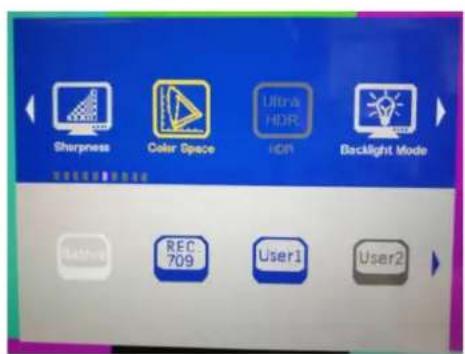
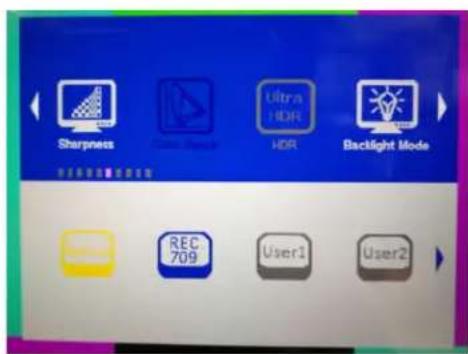
Please note it only calibrates the color for Rec709 mode and upload it to the device in the factory. User1\~User3 is grayed out and disabled in the menu. After loading the user LUT table, the corresponding button will be shown as blue and able to be use, shown as the following figure.
Before loading
text_image
Sharpness Ultra HDR Backlight Mode REC 709 User1 User2After loading