BM230-4K - Pregnant Lilliput - Free user manual and instructions
Find the device manual for free BM230-4K Lilliput in PDF.


User questions about BM230-4K Lilliput
0 question about this device. Answer the ones you know or ask your own.
Ask a new question about this device
Download the instructions for your Pregnant in PDF format for free! Find your manual BM230-4K - Lilliput and take your electronic device back in hand. On this page are published all the documents necessary for the use of your device. BM230-4K by Lilliput.
USER MANUAL BM230-4K Lilliput
IMPORTANT SAFETY INSTRUCTIONS
➢ Please read User Guide before using this product.
➢ Please keep User Guide for future reference.
➢ Please read the cautions to prevent possible danger and loss of property.
FEATURES
▶ Versatile 4K/QFHD Input Capability.
This monitor is equipped with standard 12G-SDI input interface(x2), 3G/HD-SDI input interface(x2) and support 4K 2-sample interleave signals and 4K square division signals.
Supporting 12G/6G-SDI(4K) 2 Channel, 3G/HD-SDI (Level A/B) 2 Channel.
▶ Quad Link Square Division.
▶ Quad Link 2 Sample Interleave (2SI).
Ultra HD 4K screens containing 8.3 million pixel(3840×2160), so the resolution is four times that of Full HD.
Image flip offers great convenience for user's to place the monitor with various mounting methods under different conditions. Users can view the monitor normally no matter what mounting angles.
CAUTIONS
➢ Please do not place the display screen towards the ground.
➢ Please avoid heavy impact or drop onto the ground.
➢ Please do NOT use chemical solutions to clean this product.
Please wipe with a clean soft cloth to maintain the brightness of the surface.
➢ Please do not block any vent hole.
➢ Please follow the instructions and trouble-shootings to adjust the product. Other improper adjustment may result in damage. Any further adjustment must be performed or conducted by a qualified technician.
➢ Please unplug the power and remove the battery if long-term no-use, or thunder weather.
Contents
1、PRODUCT DESCRIPTION....3
2、SUN SHADE INSTALLATION....7
3、MENU SETTING 8
4、CONNECTING THE SDI SIGNALS ...... 11
5、AVAILABLE SIGNAL FORMATS 12
6、ACCESSORIES....15
7、PARAMETERS 16
1、PRODUCT DESCRIPTION
Front
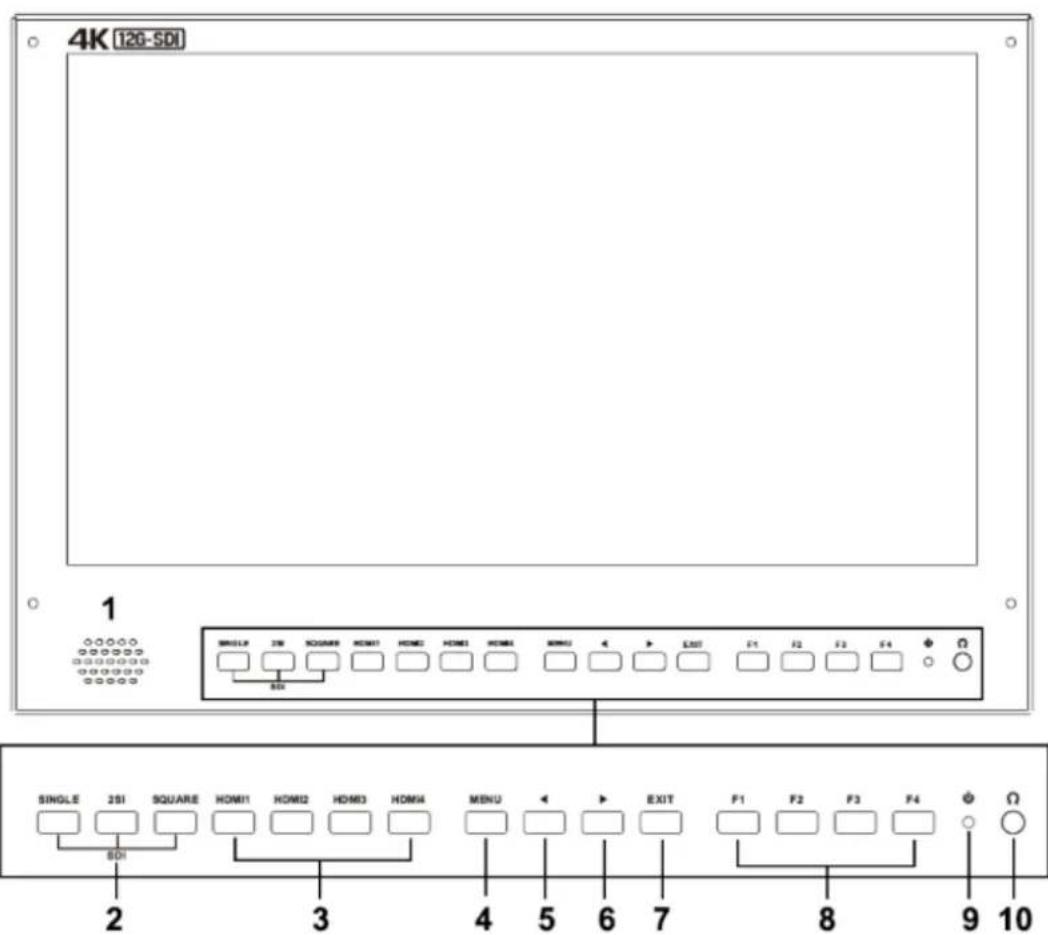
text_image
4K [12G-SDI] 1 SINGLE 2SI SQUARE HDMI1 HDMI2 HDMI3 HDMI4 MENU EXIT F1 F2 F3 F4 Φ Ω SDI 2 3 4 5 6 7 8 9 101. Speaker
2. SDI buttons / lamp
Press to monitor the signal input to each connector.
[SINGLE] Button/Lamp
- Press the button to select SDI input for one channel.
- Mode changes in the order of [12G SDI1], [12G SDI2], [3G SDI3], [3G SDI4].
[2SI] Button/Lamp
-Press the button to select 2-SAMPLE Interleave SDI input signal through two or four SDI input connectors.
- Mode changes in the order of [Dual-Link 2SI], [Quad-Link 2SI].
[SQUARE] Button/Lamp
- Press the button to select [Quad-Link Square Division] mode.
3. HDMI 1 \~ 4 buttons / lamp
Press the button to select HDMI input.
4. MENU/RETURN button
Activates and deactivates the display of the Main Menu.
Press to enter option in the menu.
When the on-screen menu is not displayed, if this button is pressed the main menu is display.
When the menu is displayed, press the button to return to the previous menu.
5. ◀button
Select option in the menu.
Decrease the option value.
Before enter the menu, single press to activate volume, press again to switch among of volume, brightness, contrast, color, hue, sharpness and backlight.
6. ▶ button
Select option in the menu.
Increase the option value.
7. EXIT
Back or exit.
8. F1\~F4User definable buttons
Press to adjust or turn on/off the assigned function.
The following functions are assigned at the factory.
F1: Display Mode
F2: Display Rotate
F3: Safety Marker
F4: Aspect
(functions can be customized by long keep pressing any one of the 4 buttons)
9. Power indicating light
Power on, the indicator flashes in green.
10. Earphone jack
Back
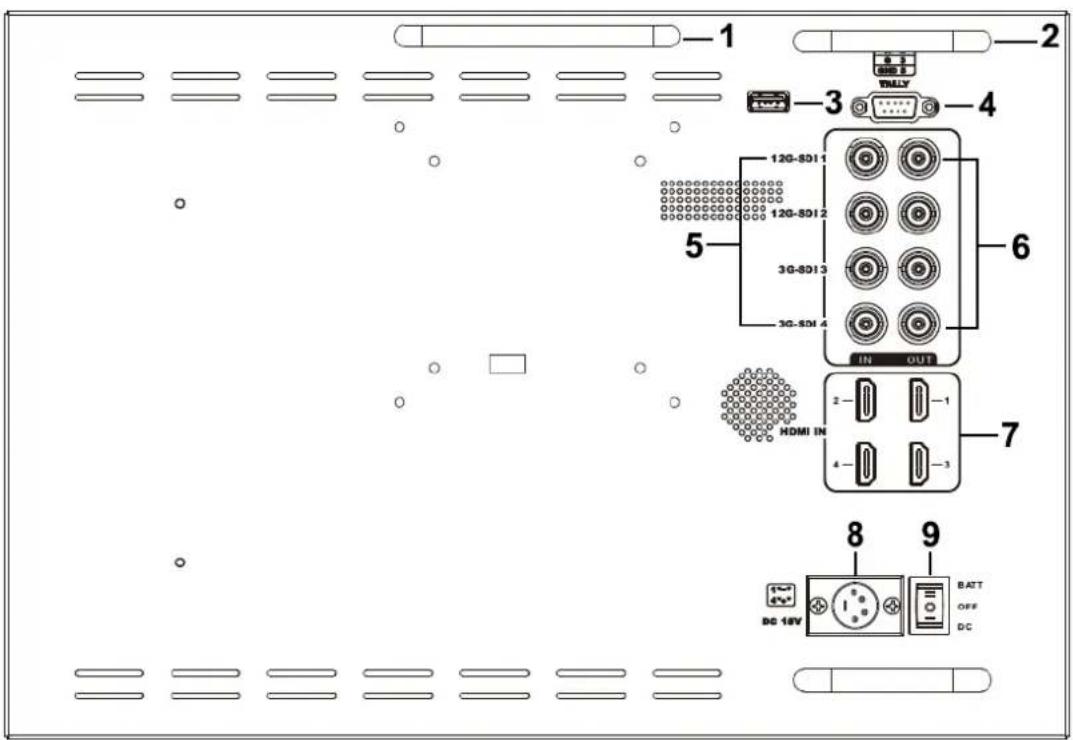
text_image
1 2 3 4 5 6 7 8 9 DC 1kV BATT OFF DC1. Handle
- Connector protector
Preventing connectors from damage.
-
USB port (Only for program upgrades, do NOT use if non-professionals).
-
TALLY port
-
SDI input connectors (BNC)
Input connectors for SDI signals. For details, see “Connecting the SDI Signals” (page 11).
- SDI output connectors (BNC)
Output connector for SDI signals.
Each connector outputs the signal which is input to the corresponding SDI IN connector.
Note - Output is activated only when the power is on. Output is not activated in standby mode.
- HDMI input connectors
Input connectors for HDMI signals.
HDMI 1:HDMI2.0, support 4K 60Hz.
HDMI 2, HDMI 3&HDMI 4: HDMI1.4, support 4K 30Hz
For an HDMI cable, High Speed HDMI Cable with the cable type logo or HDMI 2.0 Cable is recommended.
- DC IN (XLR) terminal
Connects the DC power supply to the monitor.
| Pin number | Signal | |
| 1 | GND | |
| 23 | ...... | |
| 4 | +15V |
9. Power switch
|| is battery power; ○is power off; | is DC power.
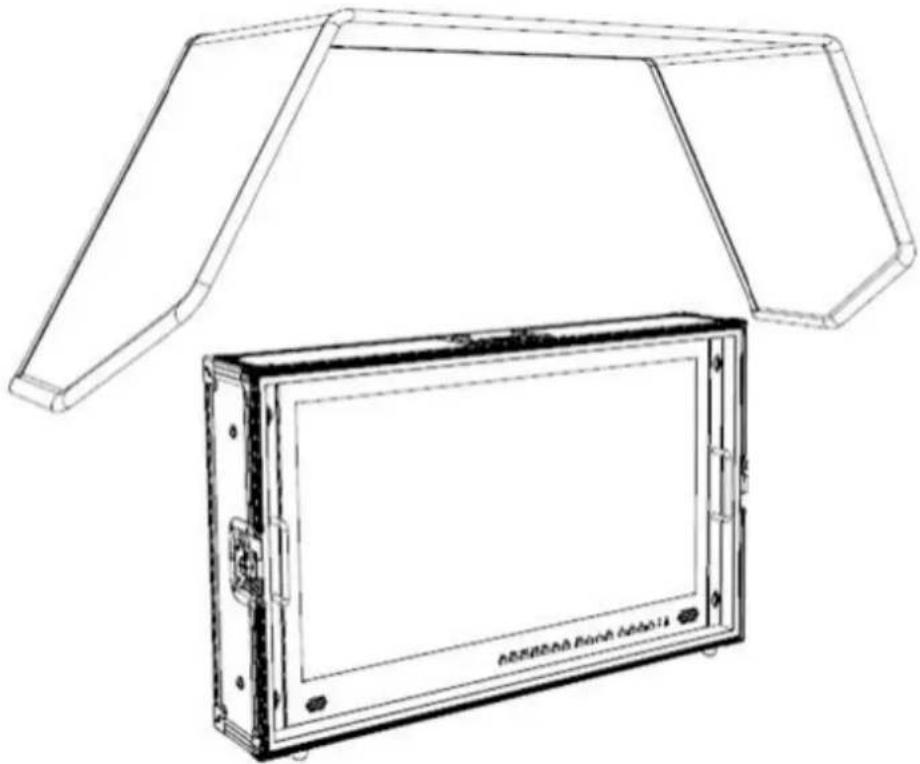
2. SUN SHADE INSTALLATION
- Put the sun shade on the suitcase, and match the magnets on both sides.
natural_image
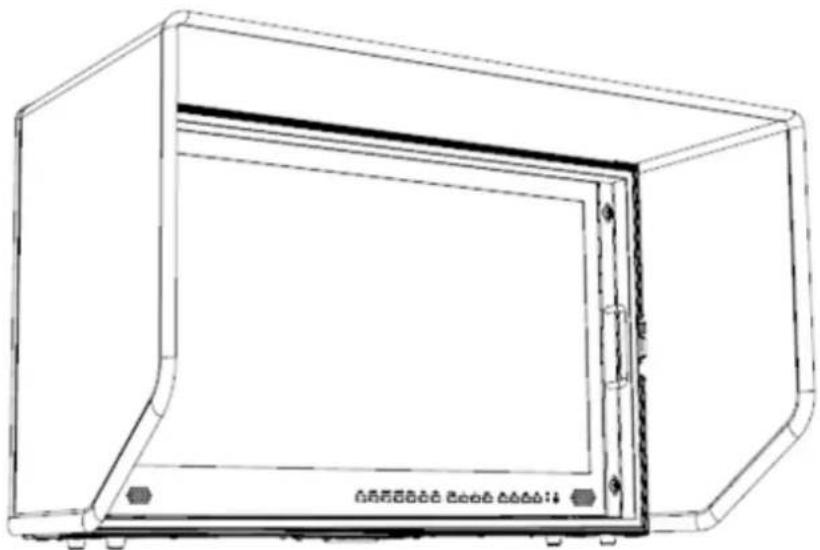
Line drawing of a rectangular electronic device with open top frame and internal panel (no text or symbols)- As shown below after finished.
natural_image
Line drawing of a 3D rectangular enclosure with internal panels and mounting feet (no text or symbols)3. MENU SETTING
Please check whether the device is connected well or not.
3-1.F1\~F4 user definable shortcut buttons
Long keep pressing any one of the 4 buttons for 3-5 seconds to activate shortcut menu setting. Option selected will be highlighted as white, option will be highlighted as yellow, unavailable option will be highlighted as gray.
Select option via “◀/▶” buttons.
Then press "MENU" button to confirm to set as default option.
Functions can be customized to meet user's needs: center marker, safety marker, aspect marker, aspect, underscan, check field, freeze, pixel to pixel, peaking, false color, display mode, disp rotate, disp mirror.
Default options:
F1: Display Mode
F2: Display Rotate
F3: Safety Marker
F4: Aspect
3-2. ◀ / ▶ Buttons Operation
Under non menu screen, press ◀/▶ buttons to activate volume bar:

Use “◀ / ▶” buttons to select the desired option.
Press the "MENU" button to select Volume, Brightness, Contrast,
Saturation, Hue, Sharpness, Backlight, Menu and Exit.
3-3. MENU Operation
When power on, press "MENU" on the device, The menu of function setting will display on the screen.
Press ◀ / ▶ button to choose menu;
Then press "MENU" button to confirm;
Press "EXIT" button to return / exit menu.
| Picture | Brightness | 0~100 | ||
| Contrast | 0~100 | |||
| Saturation | 0~100 | |||
| Hue | 0~100 | |||
| Sharpness | 0~4 | |||
| Temperature | 9300, 7500, 6500, 5800, User | |||
| Backlight | 0~100 | |||
| Function | Center Marker | ON, OFF | ||
| Safety Marker | OFF, 95%, 93%, 90%, 88%, 85%, 80% | |||
| Aspect Marker | Full, 17:9, 16:9, 4:3, 1.85:1, 2.35:1 | |||
| Aspect | Full, 17:9, 16:9, 4:3, 1.85:1, 2.35:1 | |||
| Underscan | ON, OFF | |||
| Pixel To Pixel | ON, OFF | |||
| Check Filed | OFF, Red, Green, Blue | |||
| Freeze Input | ON, OFF | |||
| Peaking | ON, OFF | |||
| False Color | ON, OFF | |||
| Display Mode | 1P, 2P LR, 2P TB, 2P PIP, 4P | |||
| Display Setting | Display Rotate | 0°,90°,180°,270° | Available when single display | |
| Display Mirror | OFF, L/R, U/D | Available when dual display on | ||
| Select Region | Menu setting to region selected according to users' needs. | |||
| Input | SDI 1, SDI 2, SDI 3, SDI 4, 2SI, SQUARE, HDMI 1, HDMI 2, HDMI 3, HDMI 4 | |||
| Audio | Volume | 0~100 | ||
| Audio CH. | CH0&CH1, CH2&CH3, CH4&CH5, CH6&CH7, CH8&CH9, CH10&CH11, CH12&CH13, CH14&CH15 (HDMI mode unavailable) | |||
| System | Reset | Press to confirm after selected. | ||
| Menu Time | 5~60s | |||
| OSD H Position | 0~100 (To set menu display area) | |||
| OSD V Position | 0~100 (To set menu display area) | |||
| Language | English, Chinese | |||
| Transparency | 0~255 (To set menu transparency) | |||
| OSD Rotate | 0°, 90°, 270° | |||
| Border Width | 0~10 | |||
| Border Color | R, G, B, W | |||
| Info | To display current information. | |||
4、Connecting the SDI signals
Single Link 12G/6G/3G/HD/SD-SDI, Dual-Link 3G-SDI, and Quad-Link 3G/HD-SDI signals can be input to the SDI IN connectors of this monitor.
Up to 2-channel Single Link 12G-SDI signals, up to 4-channel 3G/HD-SDI signals, 1-channel Quad-Link 3G-SDI signals can be input.
Use the appropriate input connectors depending on the input signal, referring to the tables below.
12G -SDI Single-Link Signal
| Connector | Input signal |
| SDI 1 | 12G SDI |
| SDI 2 | 12G SDI |
3G-SDI Dual-Link signal
* 2-sample interleave signals*Square division signals
| Connector | Input signal |
| SDI 1 | 3G SDI Link 1 |
| SDI 2 | 3G SDI Link 2 |
| Connector | Input signal |
| SDI 1 | Sub-image 1(upper left screen)Sub-image 2(lower left screen) |
| SDI 2 | Sub-image 3( upper right screen)Sub-image 4(lower right screen) |
Quad-Link 3G/HD -SDI Signal
* 2-sample interleave signals*Square division signals
| Connector | Input signal |
| SDI 1 | 3G SDI Link1 |
| SDI 2 | 3G SDI Link2 |
| SDI 3 | 3G SDI Link3 |
| SDI 4 | 3G SDI Link4 |
| Connector | Input signal |
| SDI 1 | Sub-image 1(upper left screen) |
| SDI 2 | Sub-image 2(lower left screen) |
| SDI 3 | Sub-image 3(upper right screen) |
| SDI 4 | Sub-image 4(lower right screen) |
Image of square division signals
| Sub-image1(upper left screen) | Sub-image 3(upper right screen) |
| Sub-image 2(lower left screen) | Sub-image 4(lower right screen) |
5、Available Signal Formats
This monitor is applicable to the following signal formats
SD-SDI
| Signal system | Signal format |
| 525i | 4:2:2 YCbCr10bits |
| 625i | 4:2:2 YCbCr 10bits |
HD-SDI
| Signal system | Signal format |
| 1280×720(23.98/24/25/29.97/30/50/59.94/60p) | 4:2:2 YCbCr10bits |
| 1920×1080 / 2048×1080(50/59.94/60i)(23.98/29.97/24/25/30p)(23.98/29.97/24/25/30Psf) | 4:2:2 YCbCr 10bits |
3G-SDI
| Signal system | Signal format | |
| 1920× 1080/2048× 1080(47.95/48/50/59.94/60p) | 4:2:2 YCbCr10bits | 3G-LevelA /DL 3G-Level B |
| 1920× 1080/2048× 1080(50/59.94/60i)(23.98/24/25/29.97/30p)(23.98/24/25/29.97/30Psf) | 4:4:4GBR 10bits4:4:4GBR+A 10bits4:4:4 YCbCr 10bits4:4:4 YCbCr+A 10bits4:4:4GBR 12bits4:4:4 YCbCr 12bits | 3G-LevelA /DL 3G-Level B |
| 1280× 720(23.98/24/25/29.97/30/50/59.94/60p) | 4:4:4GBR 10bits4:4:4GBR+A 10bits4:4:4 YCbCr 10bits4:4:4 YCbCr+A 10bits | 3G-LevelA /DL 3G-Level B |
| 1920× 1080/2048× 1080(50/59.94/60i)(23.98/24/25/29.97/30p)(23.98/24/25/29.97/30Psf) | 4:2:2 YCbCr10bits | DS 3G-Level B |
| 1280× 720(23.98/24/25/29.97/30P | 4:2:2 YCbCr10bits | DS 3G-Level B |
6G-SDI Single Link
| Signal system | Signal format |
| 3840× 2160/4096× 2160(23.98/24/25/29.97/30p) | 4:2:2 YCbCr10bits |
| 1920× 1080/2048× 1080(47.95/48/50/59.94/60p) | 4:4:4GBR 10bits4:4:4GBR+A 10bits4:4:4 YCbCr 10bits4:4:4 YCbCr+A 10bits4:4:4GBR 12bits4:4:4 YCbCr 12bits4:2:2 YCbCr 12bits |
6G-SDI Dual Link
| Signal system | Signal format |
| 3840×2160/4096×2160(47.95/48/50/59.94/60p) | 4:2:2 YCbCr10bits |
| 3840×2160/4096×2160(23.98/24/25/29.97/30p) | 4:4:4GBR 10bits4:4:4GBR+A 10bits4:4:4 YCbCr 10bits4:4:4 YCbCr+A 10bits4:4:4GBR 12bits4:4:4 YCbCr 12bits4:2:2 YCbCr 12bits |
12G-SDI Single Link
| Signal system | Signal format |
| 3840×2160/4096×2160(47.95/48/50/59.94/60p) | 4:2:2 YCbCr10bits |
| 3840×2160/4096×2160(23.98/24/25/29.97/30p) | 4:4:4GBR 10bits4:4:4GBR+A 10bits4:4:4 YCbCr 10bits4:4:4 YCbCr+A 10bits4:4:4GBR 12bits4:4:4 YCbCr 12bits4:2:2 YCbCr 12bits |
HD-SDI Quad Link
| Signal system | Signal format |
| 3840×2160/4096×2160(23.98/24/25/29.97/30p) | 4:2:2 YCbCr10bits |
3G-SDI Dual Link (2SI)
| Signal system | Signal format |
| 3840×2160/4096×2160(23.98/24/25/29.97/30p) | 4:2:2 YCbCr10bits |
3G-SDI Dual Link (Square Division)
| Signal system | Signal format |
| 3840× 2160/4096× 2160(23.98/24/25/29.97/30p) | 4:2:2 YCbCr10bits |
3G-SDI Quad Link (Square Division)
| Signal system | Signal format |
| 3840× 2160/4096× 2160(47.95/48/50/59.94/60p) | 4:2:2 YCbCr10bits |
| 3840× 2160/4096× 2160(23.98/24/25/29.97/30p) | 4:4:4GBR 10bits4:4:4GBR+A 10bits4:4:4 YCbCr 10bits4:4:4 YCbCr+A 10bits4:4:4GBR 12bits4:4:4 YCbCr 12bits4:2:2 YCbCr 12bits |
3G-SDI Quad Link (2SI)
| Signal system | Signal format |
| 3840×2160/4096×2160(47.95/48/50/59.94/60p) | 4:2:2 YCbCr10bits |
| 3840×2160/4096×2160(23.98/24/25/29.97/30p) | 4:4:4GBR 10bits4:4:4GBR+A 10bits4:4:4 YCbCr 10bits4:4:4 YCbCr+A 10bits4:4:4GBR 12bits4:4:4 YCbCr 12bits4:2:2 YCbCr 12bits |
6、ACCESSORIES
- Folding sun shade cover 1 piece
- 15V DC adapter 1 piece
- Carry-on suitcase 1 piece
- Adapter fixing belt 2 pieces
- Battery plate bracket 1 piece
- V-mount or Anton Bauer mounts 1 piece
- Base bracket 1 pair
- TALLY connector (in bulk) 1 piece
- Manual 1 copy
7、PARAMETERS
| Display Screen | 23.8" IPS | 28" IPS |
| Physical Resolution | 3840×2160 | 3840×2160 |
| Aspect Ratio | 16: 9 | 16: 9 |
| Brightness | 300cd/m2 | 300cd/m2 |
| Contrast | 1000: 1 | 1000: 1 |
| Viewing Angle | 178°/ 178°(H/V) | 170°/ 176°(H/V) |
| Input Voltage | DC 12~24V (XLR) | DC 12~24V (XLR) |
| Input Signal | 3G-SDI, 12G-SDI, HDMI and TALLY | 3G-SDI, 12G-SDI, HDMI and TALLY |
| Output Signal | 3G-SDI loop, 12G-SDI | 3G-SDI loop, 12G-SDI |
| Power Consumption | ≤61.5W | ≤61.5W |
| Operating Temperature | 0°C~60°C | 0°C~60°C |
| Storage Temperature | -20°C~60°C | -20°C~60°C |
| Dimension (LWD) | 579×376.5×45mm | 670×425×45mm |
| Weight | 19kg (with case) | 21 kg (with case) |
8、TROUBLE SHOOTING
- Only black-and-white display.
Check whether the color saturation is properly setup or not.
- Power on but no pictures.
Check whether the cables of HDMI, VGA, DVI and3G-SDI are correctly connected or not. Please use the standard power adapter coming with the product package. Improper power input may cause damage.
- Wrong or abnormal colors.
Check whether the cables are correctly and properly connected or not. Broken or loose pins of the cables may cause a bad connection.
- When on the picture shows size error.
Press “MENU → Function → Underscan” to zoom in/out pictures automatically when receiving HDMI signals.
- Other problems.
Please press "MENU" button and choose "MENU→System→Reset →confirm".
- According to the ISP, the machine cannot function properly.
ISP for program upgrades, non-professionals do not use. Please reboot your device if press accidentally!
- No Sound.
Press HDMI button if no sound; if still unavailable, please contact the technician.
- No signal displayed when connecting with HDMI 1
Please long press HDMI 1 button for 3-5 seconds to activate HDMI signal.