
DV3250 - Television BENQ - Free user manual and instructions
Find the device manual for free DV3250 BENQ in PDF.


| Product Type | LCD TV |
| Screen Size | 31.5 inches (80 cm) |
| Aspect Ratio | 16:9 |
| Resolution | 1366 x 768 |
| Brightness | 500 cd/m² (nits) |
| Contrast Ratio | 800:1 |
| Viewing Angle | 85°/85°/85°/85° (L/R/U/D) |
| Response Time | 12 ms |
| Audio Output | 10W x 2 |
| Sound Technology | Dolby Pro Logic II, SRS TruSurround XT |
| TV Tuner | Analog (PAL/SECAM/NTSC via country selection) |
| Video Inputs | Composite (RCA, SCART), S-Video, Component (YPbPr), PC (D-Sub), DVI/HDCP |
| Audio Inputs | PC audio, DVI audio, Composite audio (L/R) |
| Outputs | Audio out (L/R), Headphone |
| PIP/PBP | Yes (Picture-in-Picture, Picture-by-Picture) |
| Teletext | Yes |
| Sleep Timer | Up to 180 minutes (30-min increments) |
| Child Lock | Yes (channel locking, password protection) |
| Picture Modes | Vivid, Standard, Movie, Sports, Personal 1, Personal 2 |
| Aspect Ratio Modes | Full Screen, 4:3, Letterbox, Anamorphic, Real |
| Power Supply | AC 100-240V, 50/60 Hz |
| Operating Temperature | 0°C to 40°C |
| Storage Temperature | -10°C to 50°C |
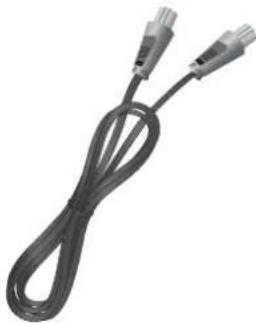
| Package Contents | LCD display, user manual, power cord, antenna cable, remote control, AAA batteries (x2) |
Frequently Asked Questions - DV3250 BENQ
User questions about DV3250 BENQ
0 question about this device. Answer the ones you know or ask your own.
Ask a new question about this device
Download the instructions for your Television in PDF format for free! Find your manual DV3250 - BENQ and take your electronic device back in hand. On this page are published all the documents necessary for the use of your device. DV3250 by BENQ.
USER MANUAL DV3250 BENQ
Copyright BenQ Corporation. All rights reserved. No part of this User's Manual may be reproduced, transmitted, transcribed, stored in a retrieval system or translated into any language or computer language, in any form or by any means, electronic, mechanical, magnetic, optical, chemical, manual or otherwise, without the prior written permission of BenQ Corporation.
Dolby, Pro Logic, and the double-D symbol are registered trademarks of Dolby
Laboratories. Manufactured under license from Dolby Laboratories.

is a trademark of SRS Labs, Inc. TruSurround XT technology is incorporated under
license from SRS Labs, Inc.
All other trademarks or product names used in this document are the registered property of their respective owners.

Disclaimer
BenQ Corporation makes no representations or warranties, either expressed or implied, with respect to the contents of this User's Manual. BenQ Corporation reserves the right to revise this publication and to make changes from time to time in the contents thereof without obligation to notify any person of such revision or changes.

Important Safety Instructions
Electrical energy can perform many useful functions, but it can also cause personal injury and property damage if improperly handled. This product has been engineered and manufactured with the highest priority on safety, however IMPROPER USE CAN RESULT IN POTENTIAL ELECTRICAL SHOCK OR FIRE HAZARD. In order to prevent potential danger, please observe the following instructions when installing, operating and cleaning the product. Proper care will also prolong the service life of your BenQ display. Just follow these simple instructions before using your display
- Read instructions - All operating instructions must be read and understood before the product is operated.
- Retain instructions - These safety and operating instructions must be kept in a safe place for future reference.
- Observe warnings - All warnings on the product and in the instructions must be observed closely.
-
Follow instructions - All operating instructions must be followe.
-
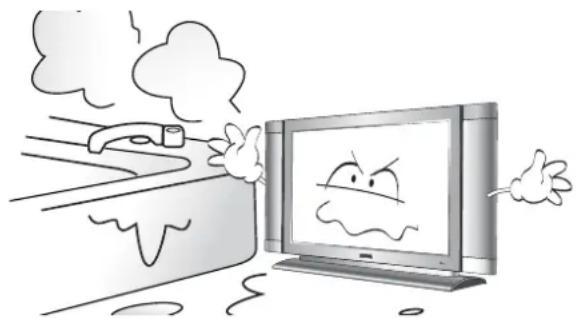
Water and moisture - Do not use this product near water - for example, near a bathtub, washbowl, kitchen sink, or laundry tub, in a wet basement, or near a swimming pool, and the like. Do not use immediately after moving from a low temperature to a high temperature environment, as this causes condensation, which may result in fire, electric shock, or other hazards.
natural_image
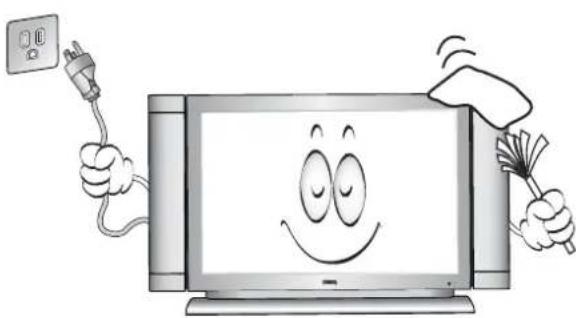
Cartoon illustration of a TV with a sad face emerging from the window, emitting smoke and clouds (no text or symbols)- Cleaning - Unplug this product from the wall outlet before cleaning. Do not use liquid cleaners or aerosol cleaners. Use a damp cloth for cleaning.
Periodically clean the liquid crystal panel of the display to ensure a clear screen and prolong the service life of the panel. Use a clean, soft and cotton-free dry cloth to dip into the specific cleaner for the liquid crystal panel. Quickly wipe over the whole panel and use another cloth to clean the panel.
-
Ventilation - The vents and other openings in the cabinet are designed to let hot air escape from the display. Do not cover or block these vents and openings since insufficient ventilation can cause overheating and/or shorten the life of the product. Do not place the display on a bed, sofa, rug or other similar surface, since they can block ventilation openings. This display is not designed for built-in installation; do not place the product in an enclosed place such as a bookcase or rack, unless proper ventilation is provided or the manufacturer's instructions are followed.
-
Heat sources - Keep the product away from heat sources such as radiators, heaters, stoves and other heat-generating products (including amplifiers).
natural_image
Cartoon illustration of a smiling computer monitor character holding a power outlet and cleaning tools (no text or symbols)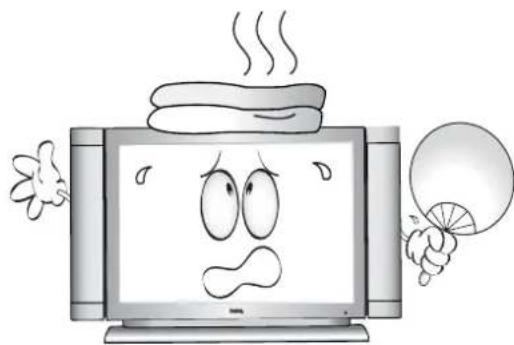
natural_image
Cartoon illustration of a steaming computer monitor character with a sad face and fan (no text or symbols)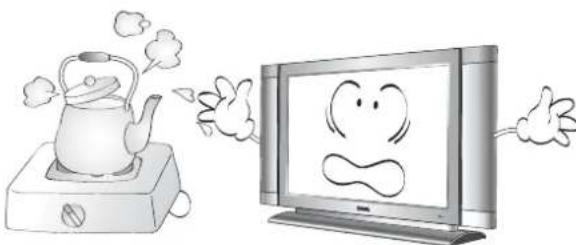
natural_image
Cartoon illustration of a kettle on a stove next to a TV with a smiling face (no text or symbols)-
Power cord protection - Power-supply cords should be routed so that they are not likely to be walked on or bitten by small animals. Pay particular attention to cords at doors, plugs, receptacles, and the point where they exit from the product.
-
Attachments - Do not use attachments not recommended by the manufacturer. Use of improper attachments can result in accidents.
-
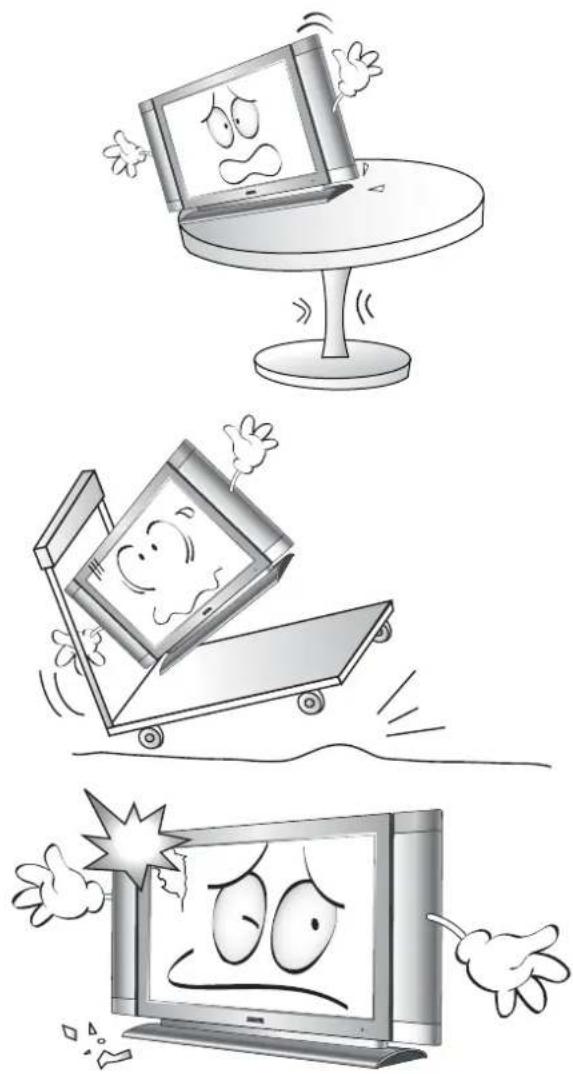
Accessories - When the product is used on a trolley, care should be taken to avoid quick stops, excessive force, and uneven surfaces that may cause the product and trolley to overturn, damaging equipment or causing possible injury to the operator. Do not place this product on an unstable trolley, stand, pedestal, bracket, or table. The product may fall, causing serious injury to a child or adult and serious damage to the product. The product should be mounted according to the manufacturer's instructions, and use only with a trolley, stand, pedestal, bracket, or table recommended by the manufacturer.
-
Servicing - Do not attempt to service the product yourself. Removing covers can expose you to high voltage and other dangerous conditions. Request a qualified service person to perform servicing.
-
Replacement parts - In case the product needs replacement parts, make sure that the service person uses replacement parts specified by the manufacturer, or those with the same characteristics and performance as the original parts. Use of unauthorized parts can result in fire, electric shock and/or other danger.
-
Overloading - Do not overload wall outlets, extension cords, or convenience receptacles on other equipment as this can result in a risk of fire or electric shock.
-
Entering of objects and liquids - Never poke an object into the product through vents or openings. High voltage flows in the product, and inserting an object can cause electric shock and/or short circuit internal parts. For the same reason, do not spill water or liquid on the product.
-
Damage requiring service - If any of the following conditions occurs, unplug the power cord from the AC outlet, and request a qualified service person to perform repairs.
- When the power cord or plug is damaged.
- When a liquid is spilled on the product or when objects have fallen into the product.
- When the product has been exposed to rain or water.
- When the product does not operate properly as described in the operating instructions.
- Do not touch the controls other than those described in the operating instructions. Improper adjustment of controls not described in the instructions can cause damage, which often requires extensive adjustment work by a qualified technician.
- If the product has been dropped or the cabinet has been damaged in any way.
- When the product displays an abnormal condition or exhibits a distinct change in performance. Any noticeable abnormality in the product indicates that the product needs servicing.
-
Safety checks - Upon completion of service or repair work, request the service technician to perform safety checks to ensure that the product is in proper operating condition.
-
Wall mounting - When mounting the product on a wall, be sure to install the product according to the method recommended by the manufacturer using only the manufacturers mounting hardware.
-
Stand - Do not place the product on an unstable trolley, stand, tripod or table. Placing the product on an unstable base can cause the product to fall, resulting in serious personal injuries as well as damage to the product.
-
Careful move - When relocating the product placed on a trolley, it must be moved with the utmost care. Sudden stops, excessive force and uneven floor surfaces can cause the product to fall from the trolley.
-
Panel protection - The LCD panel used in this product is made of glass. Therefore, it can break when the display is dropped or hit by other objects. Beware of injuries in the event of the LCD glass screen breaking.
natural_image
Cartoon illustration of three different scenes: a distressed laptop on a table, a sad roller car on a cart, and a sad computer monitor with angry faces (no text or symbols)- Pixel defect - The LCD panel is a high technology product, giving you finely detailed pictures. Occasionally, a few non-active pixels may appear on the screen as a fixed point of blue, green or red. Please note that this does not affect the performance of your product.
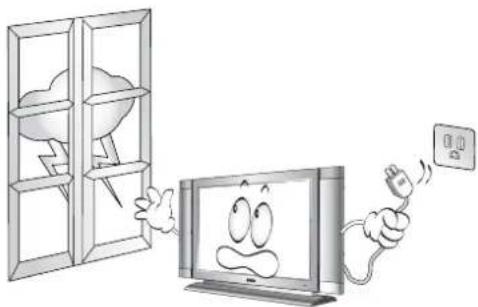
- Installation of an external antenna - If an outside antenna is connected to the television equipment, be sure the antenna system is grounded so as to provide some protection against voltage surges and built-up static charges.
For added protection for this television equipment during a lightning storm, or when it is left unattended and unused for long periods of time, unplug it from the wall outlet and disconnect the antenna. This will prevent damage to the equipment due to lightning and power-line surges.
natural_image
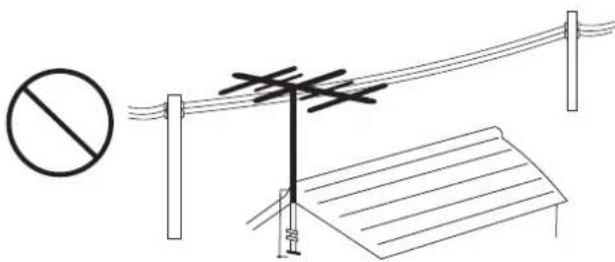
Cartoon illustration of a computer monitor with a sad face and connected to an electrical outlet (no text or symbols)An outside antenna system should not be located in the vicinity of overhead power lines or other electric light or power circuits, or where it can collide with such power lines or circuits. When installing an outside antenna system, extreme care should be taken to keep from touching such power lines or circuits, as contact with them might be fatal.
natural_image
Diagram showing a prohibition symbol, a line with crossed lines, and a roof structure (no text or labels)Important Information
WARNING: TO REDUCE THE RISK OF FIRE OR ELECTRIC SHOCK, DONOT EXPOSE THIS PRODUCT TO RAIN OR MOISTURE.
CAUTION: TO PREVENT ELECTRIC SHOCK, MATCH WIDE BLADE OF PLUG TO WIDE SLOT, FULLY INSERT.
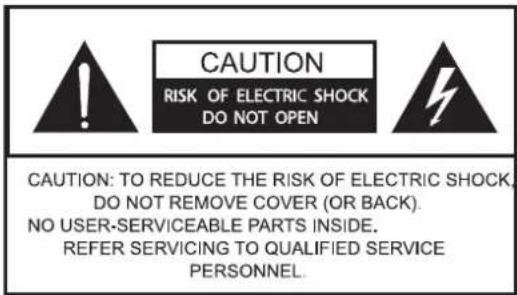
The exclamation point within a triangle is intended to alert the user to the presence of important operating and maintenance (servicing) instructions in the literature accompanying the product
The lightning flash with arrowhead symbol within a triangle, alerts the user to the presence of uninsulated "dangerous voltage" within the product's enclosure that may constitute a risk of electric shock.



Table of Contents
Introduction......1
Functions and Features .... 1
Package Contents....2
Getting Started with Your Display....3
Main Unit (Front View).... 3
Control Panel.... 3
Terminal Panel.... 4
Main Unit (Rear View).... 5
Setting up Your Display ....7
Connecting the Antenna 7
Connecting CATV....7
Antenna....7
Installation of an Outdoor Antenna....7
Connecting Audio and Video Signal Sources 8
Connecting Composite (AV) Video Signal (RCA)......8
Connecting Composite (AV) Video Signal (SCART) 9
Connecting S-Video Signals....9
Connecting Component Video Signals....1
Connecting RGB Signals (Mini D-SUB)....10
Connecting DVI/HDCP Signals ....1
Connecting Audio Output Signals ....1
Connecting the Power Cord 12
Initial Setup....12
Remote Control ....13
Using the Remote Control 15
Batteries....15
Notes on Using Batteries 15
Using the Remote Control ....16
Power on, Power off and Standby 16
Switching Inputs.... 16
Adjusting Volume.... 17
Changing Channels.... 17
Selecting a Picture Mode 18
Using the Freeze Function.... 18
Adjusting Aspect Ratio 19
Using the Picture-in-Picture (PIP)/Picture-by-Picture (PBP) Function ..... 20
Using the Sleep Timer 20
Adjusting Backlight.... 21
Display Information 21
Using the Teletext Function.... 22
On-Screen Display (OSD) Menu 23
OSD Structure.... 23
Navigating the OSD Menu 24
Audio Menu 25
Picture Menu.... 27
Picture Mode Settings....28
Selecting a Picture Mode 28
Feature Menu 29
TV Menu 32
Performing Manual Installation 33
Editing Channels....33
Naming a Channel 33
Swapping Channels 34
Locking (Preventing a Channel from Selection)/Unlocking a Channel 34
Deleting a Channel 34
Child Lock 34
Enabling/Disabling Child Lock 34
Changing Password 35
PC Menu 36
Troubleshooting.... 37
TV 37
Antenna 38
Specifications.... 39
Supported Modes 40
Dimensional Drawings.... 41

Introduction
Thank you for purchasing the BenQ DV3250 LCD Display. Your DV3250 will bring you years of high-quality viewing enjoyment. It is also extremely easy to operate, and provides exceptionally high image quality.
The DV3250 is also extremely versatile. You can install it on the wall (optional wall-mounting kit is required) or set it on a table, and it can be used under any type of illumination.
This manual will explain the operation of the DV3250, including its functions and features and other important information. Before installing or operating your liquid crystal display, please take the time to thoroughly read this manual, particularly the sections on safety.
Functions and Features
The DV3250 has many useful functions and features, including:
• 1366 x 768 image resolution
- 500 nits brightness
- 800:1 contrast ratio
- Compatible with all digital television (DTV) formats, including 480i / 480p /576p/ 720p / 1080i
• 2:2 Pull Down Recovery
- De-Interlacing
- Multiple picture modes
• Picture In Picture and Picture By Picture display functions
• Virtual Dolby Surround Pro Logic II surround experience
- SRS TruSurround XT surround experience
- Graphic OSD
- Shortcut buttons:
- Freeze frame
- Stereo/bi-lingual television sound
- Sleep timer
- Back light adjustment
- Auto calibration
- Aspect ratio adjustment
- Teletext

Package Contents
Please ensure that the following items are included with your DV3250 LCD Display. If any item is missing or damaged, contact an authorized dealer immediately.
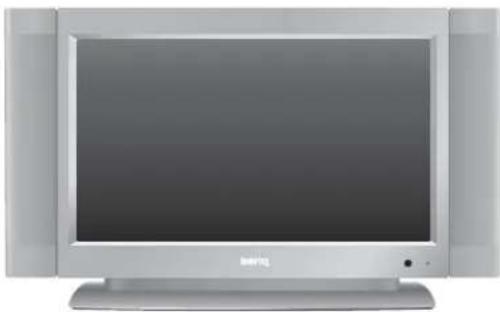
natural_image
Front view of a silver CRT television displaying its front panel and screen (no visible text or symbols on the screen)DV3250 LCD Display (x1)
natural_image
Illustration of a computer monitor with abstract wave patterns and no visible text or symbolsUser's manual (x1)
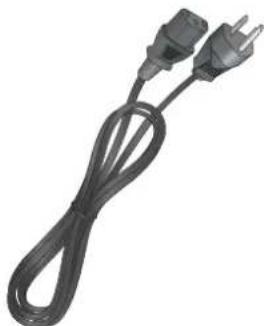
natural_image
Coiled black electrical outlet with two terminal plugs (no text or symbols visible)Power cord (x1)
natural_image
Coiled black cable with two connectors (no text or symbols visible)Antenna cable (x1)
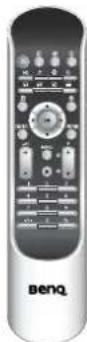
Remote control (x1)
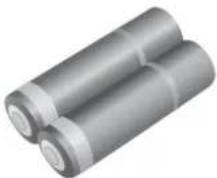
AAA batteries (x2)

Actual number and type of cables may vary with the location of purchase.

Getting Started with Your Display
Main Unit (Front View)
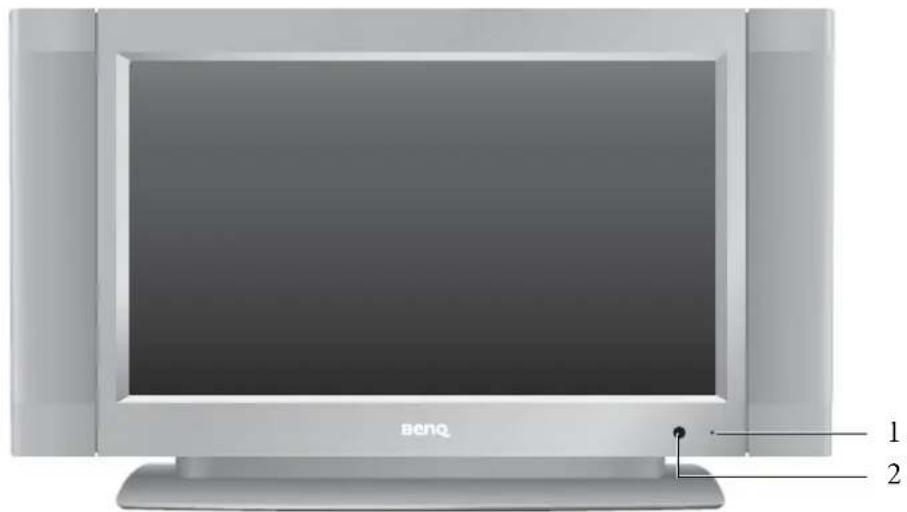
| No. Name Description | ||
| 1 Power indicator | Lights up in green when the display is powered on.Lights up in red when the display is in standby mode. | |
| 2 | Remote control sensor window | Receives the signal from the remote control. Do not put any objects in front of the window in order not to hinder the reception of signals. |
Control Panel
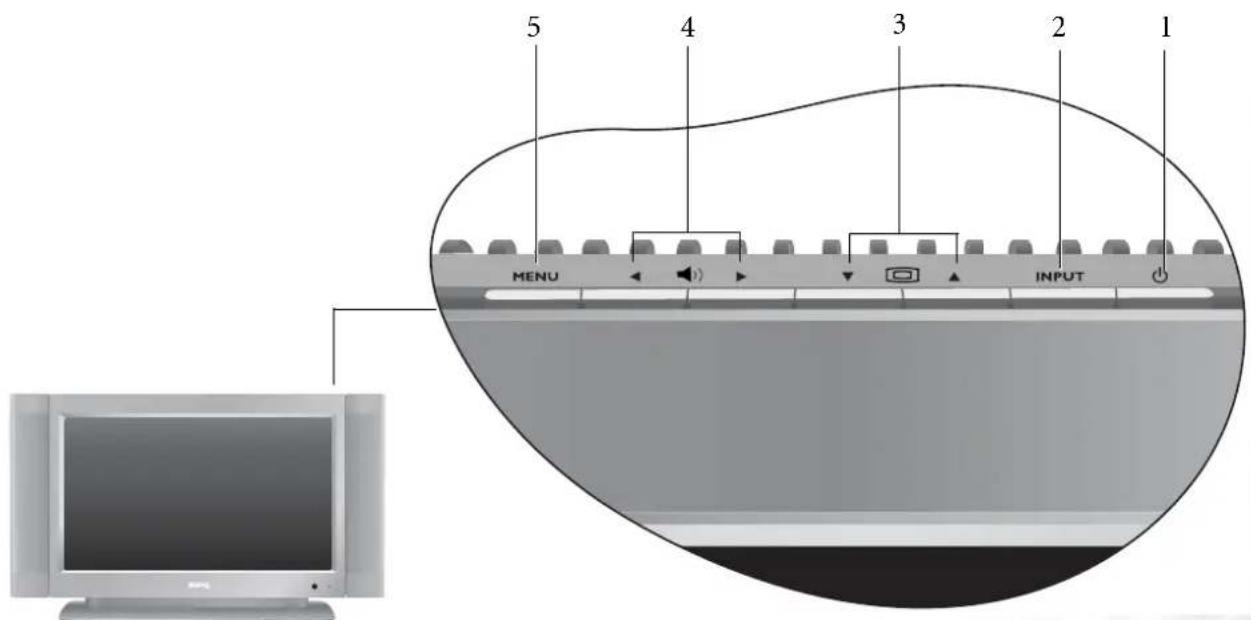
| No. | Name Description | |
| 1 | P o | Press this button to turn the display on when it is in standby mode.w e rPress this button once more to turn the display off by placing it into standby mode. |
| 2 | I N | This button allows you to switch among signal sources.When Phe OSD (Oh-Screen DTsplay) menu is on, press this button to enter the submenu. |
| 3 | Channel▼/▲button | Press these buttons to sequentially select channels.When the OSD menu is on, press these buttons to move the selection focus up or down or change settings. |
| 4 | Volume◄ / ►button | Press Volume ► to increase the volume, or Volume ◀ to decrease it.When the OSD menu is on, press these buttons to move the selection focus left and right or change settings. |
| 5 MENU button | Press this button to display the OSD menu.When the OSD menu is on, press this button to exit the menu. | |
Terminal Panel
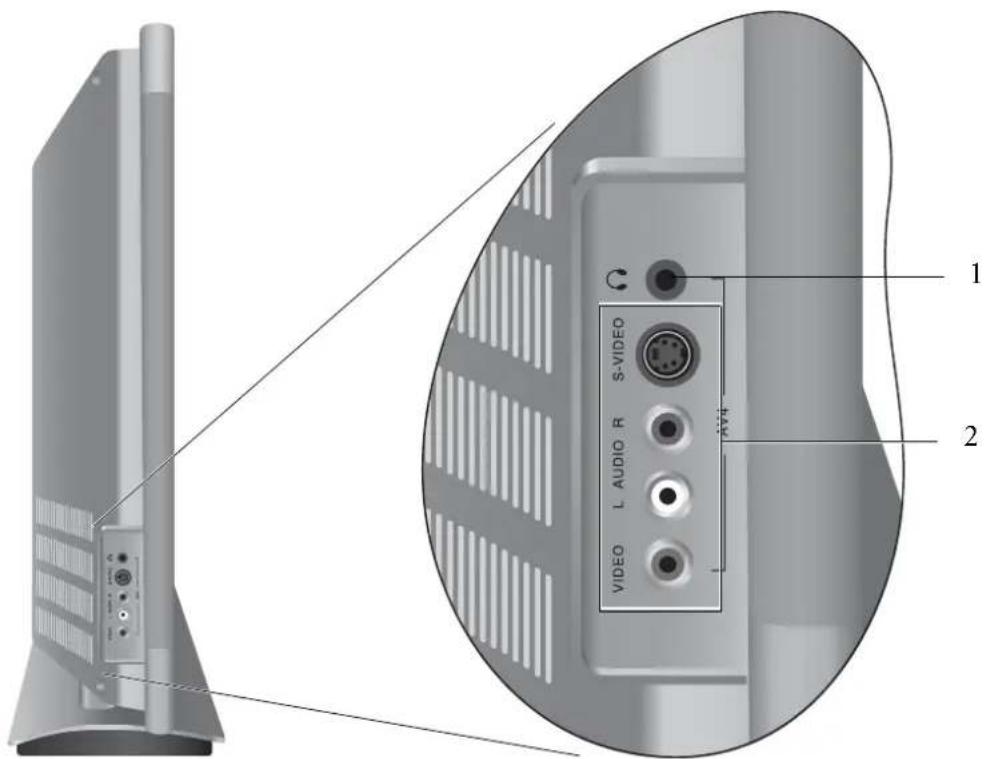
| No. Name Description | ||
| 1 Headset socket This socket is for connecting an external headset. | ||
| 2 | AV4 | •VIDEO (Composite (AV) signal input, RCA connector):Connect the Composite video output of your AV device here.•AUDIO (Audio input, L/R): Connect the audio out of your AV device here. This input is used common to both AV and S-VIDEO input.•S-VIDEO (S-VIDEO input): Connect the S-VIDEO OUT of your AV device here. |
Main Unit (Rear View)
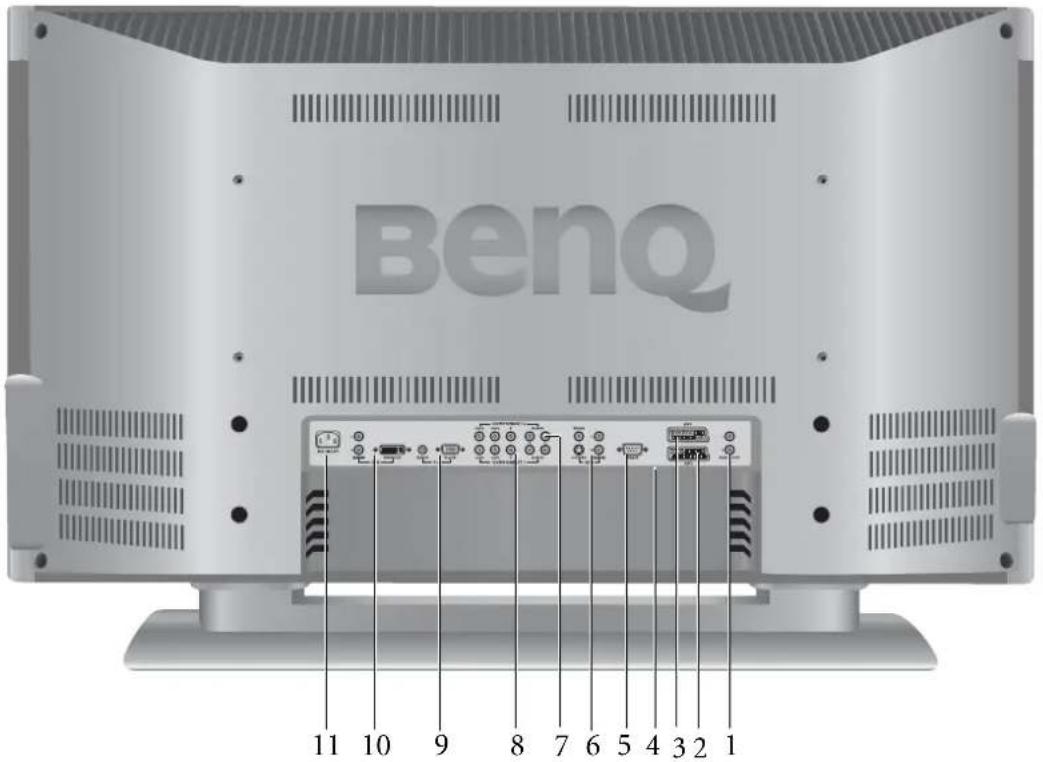
| No. | Name Description | |
| 1 | AUDIO OUT (L/R) Connect the audio input of an amplifier or here. | |
| 2 | AV2 (SCART connector) | Allows you to connect to the SCART output terminal of your DVD player or other AV devices. |
| 3 | AV1 (SCART connector) | Allows you to connect to the SCART output terminal of your DVD player or other AV devices. |
| 4 | TV/CATV Antenna Connect your antenna to this input. | |
| 5 | R232 This terminal is for service purpose only. | |
| 6 | AV3 (RCA connector) | •VIDEO (Composite (AV) signal input, RCA connector): Connect the Composite video output of your AV device here.•AUDIO (Audio input, L/R): Connect the audio output of your AV device here. This input is used common to both AV and S-VIDEO input.•S-VIDEO (S-VIDEO input): Connect the S-VIDEO output of your AV device here. |
| 7 | COMPONENT 2 | •Y_{CB}/P_B C_R/P_R(Y_{CB}/P_B C_R/P_Rinput): Connect the component image output of your AV devices or HDTV decoder here. The Y (green) connector can also be used as a second composite signal input.•AUDIO (Audio input, L/R): Connect the audio output of your AV device here. |
| 8 | COMPONENT 1 | •Y_{CB}/P_B C_R/P_R(Y_{CB}/P_B C_R/P_R$ input): Connect the component image output of your AV devices or HDTV decoder here. The Y (green) connector can also be used as a second composite signal input.•AUDIO (Audio input, L/R): Connect the audio output of your AV device here. |
| 9 | PC | • PC D-SUB (15-pin D-SUB computer signal input): For connecting to PC's analog video output.• PC AUDIO: For connecting to PC's audio output. |
| 10 | DVI/HDCP (Digital Visual Interface) | • DVI/HDCP (Digital Video Input): For connecting to PC's digital video output.• DVI AUDIO (Audio input, L/R): For connecting to DVI's digital audio output. |
| 11 AC INLET Connect the power cord to this input. | ||

Setting up Your Display
Connecting the Antenna
Connecting CATV
Your DV3250 LCD Display has an internal 75 ohm coaxial cable connector, so antennal hook-up is very easy. When connecting a 75-ohm coaxial cable, secure it firmly to the antenna connector. Some cable TV companies provide "pay per view" programming. Since the signal for these paid channels is encoded, most cable TV companies provide their own tuners/ decoders. You must install a tuner/ decoder to be able to view locked encoded programming. If you require special instructions on how to install cable service, please contact your cable TV provider. The tuner/ decoder provided by your cable TV company can be used according to the following instructions.
You must have an RF switch with two inputs (A and B).
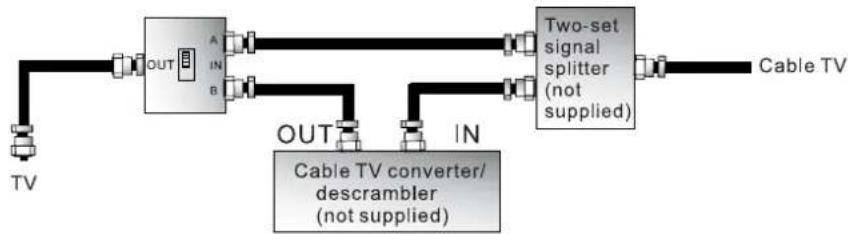
flowchart
graph LR
    TV --> OUT_B
    OUT_B --> A
    A --> OUT
    OUT --> IN_B
    IN_B --> OUT
    OUT --> IN
    IN_B --> OUT
    OUT --> IN
    IN_B --> Two_set["Signal Splitter (not supplied)"]
    Two_set --> Cable_TV
    Cable_TV --> Cable_TVref[" Cable TV"]
    Cable_TVref --> Cable_TVref[" Cable TV converter/descrambler (not supplied) "]
The "A" input on the RF switch allows you to use the display's Channel▼/▲ buttons to view unlocked channels. The "B" input on the RF switch allows you to use the channel selection button on your cable box to view locked encoded programming via the tuner/decoder.
Antenna
The antenna equipment has far more effect on reception for color TVs than on black and white models. We suggest you use a good-quality outdoor antenna. Following are simple explanations for the connection of various types of antennas.
-
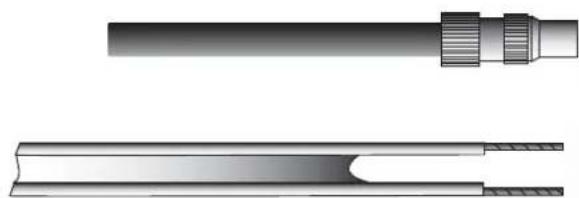
Generally speaking, 75 ohm systems have a round cable with a BNL connector which requires no tools. Attach the cable directly to the input.
-
300 ohm systems have a flat "dual lead" type cable. A 300-75 ohm transformer may be used to attach the antenna to a 75 ohm input.
natural_image
Technical illustration of a cable or connector assembly showing two cross-sectional views (no text or symbols)Installation of an Outdoor Antenna
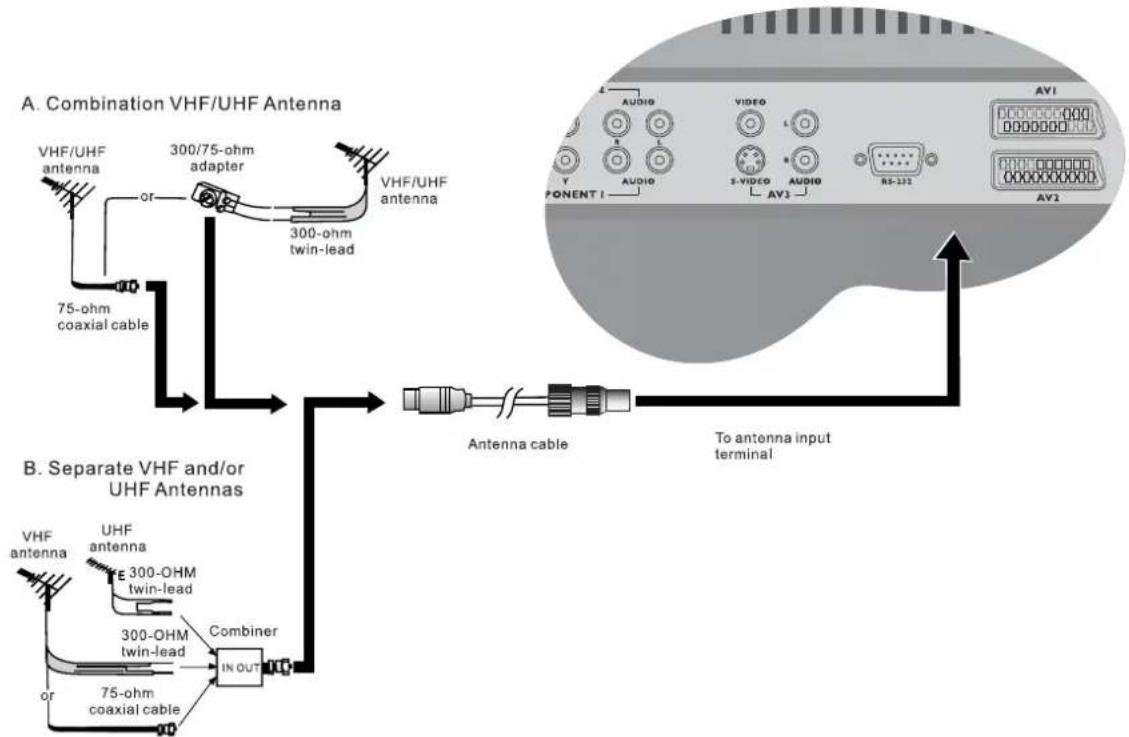
For best reception it is recommended that an Outdoor antenna be used.
A: Use a combination VHF/UHF outdoor antenna.
B: Use separate VHF and/or UHF outdoor antennas.
Connect the lead from the outdoor antenna to the antenna input on the rear of the display.
flowchart
graph TD
    A["Combination VHF/UHF Antenna"] --> B["300/75-ohm adapter"]
    B --> C["300-ohm twin-lead"]
    C --> D["VHF/UHF antenna"]
    D --> E["75-ohm coaxial cable"]
    E --> F["Antenna cable"]
    F --> G["To antenna input terminal"]
    H["Separate VHF and/or UHF Antennas"] --> I["Combiner"]
    I --> J["IN OUT"]
    J --> K["VHF/UHF antenna"]
    K --> L["UHF antenna"]
    L --> M["300-OHM twin-lead"]
    M --> N["300-ohm twin-lead"]
    N --> O["75-ohm coaxial cable"]
Connecting Audio and Video Signal Sources
- Before connecting any component, please familiarise yourself with the location and type of each input.
- If incorrect connections are made, picture or colour quality may be adversely affected. Please ensure that all connectors are firmly seated.
- Before connecting, turn off the power to the external devices for safety.
Connecting Composite (AV) Video Signal (RCA)
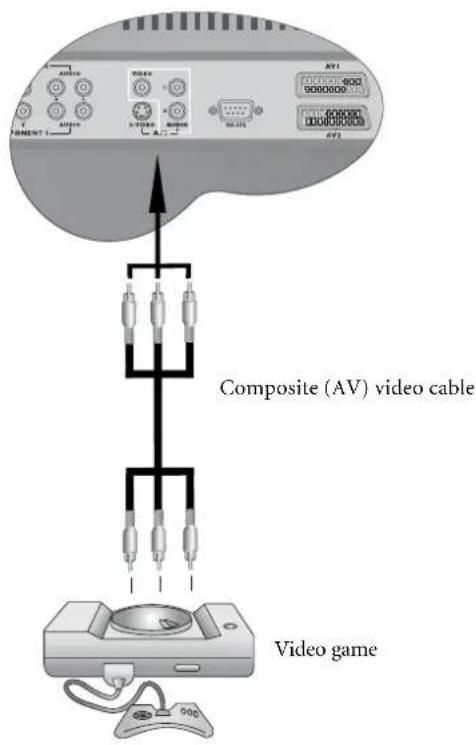
Connect the Composite (AV) output of your AV equipment to the Composite (AV3) signal terminal on the display using a Composite (AV) video cable (RCA connector) as illustrated.

Composite video input is the most commonly used signal input. However, this type of input also provides a less optimal image quality. Many video sources can only output Composite video signals, for example, VCRs and camcorders. Other video sources, such as laser disc players, actually produce slightly better results when using Composite video.
Connecting Composite (AV) Video Signal (SCART)
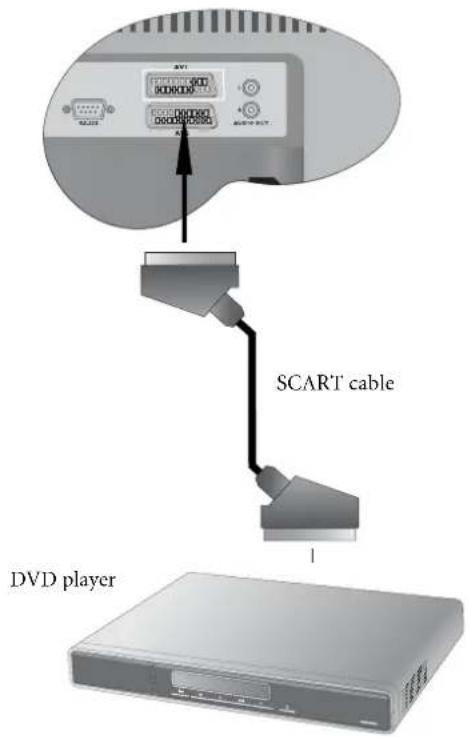
Connect the AV1 or AV2 (SCART) input terminal on the TV to the SCART terminal on the AV equipment using a SCART cable.
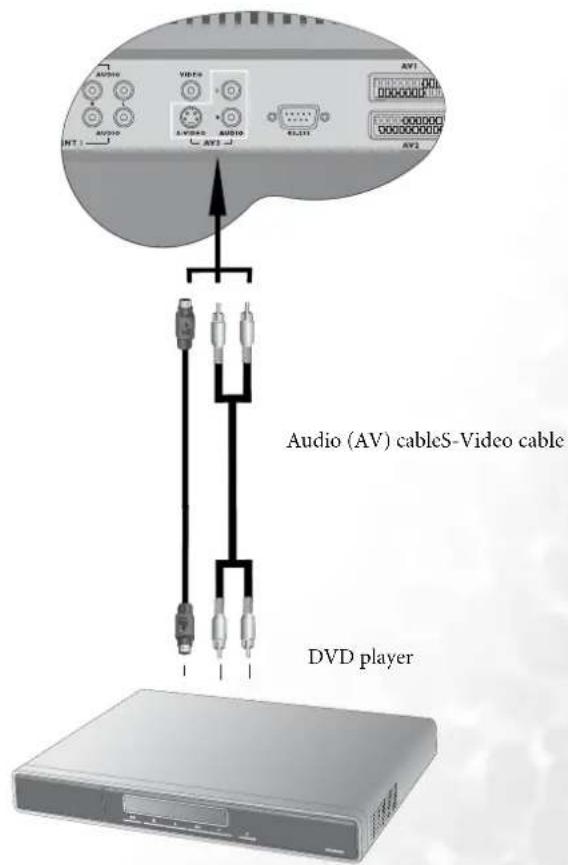
Connecting S-Video Signals
- Connect the S-Video output of your AV equipment to the display's S-VIDEO terminal using an S-Video cable. Pay attention to the direction of the connector on the S-Video cable when inserting.
- Connect the audio output of your AV equipment to the display's S-VIDEO AUDIO L/R input terminals using the AV cable or equivalent.
An S-video signal provides a higher quality image to that of Composite video. It is recommended to use this input whenever possible. If your AV equipment provides a component video output (YPBPR or YCBCR), this should be used in preference to either composite or S-video signals.
Connecting Component Video Signals
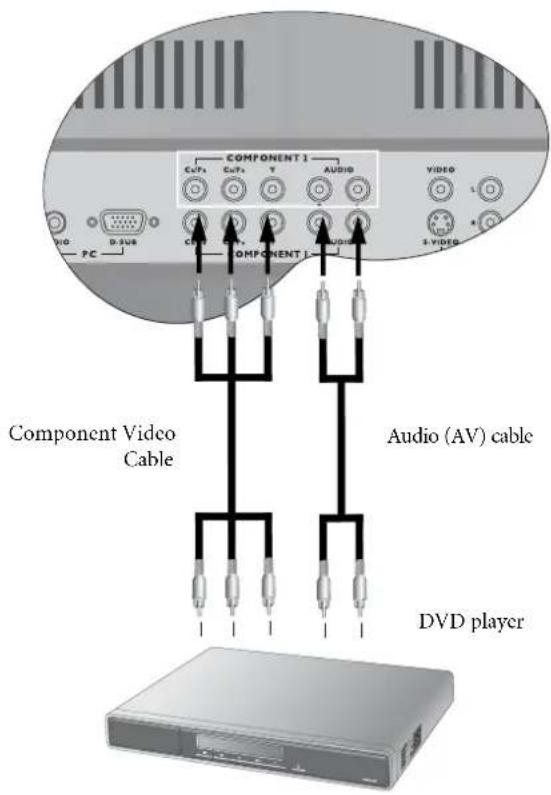
- Connect the Component video output of your AV equipment to the display's COMPONENT Y CB/PB CR/PR terminals using a Component video cable.
-
Connect the audio output of your AV equipment to the display's COMPONENT AUDIO L/R input terminals using the AV cable or equivalent.
-
Of the currently available video signal types, Component video input offers the best quality. Component video output is available on progressive scan DVD players and Digital television decoders. The image quality with this type of input is superior to that obtained with S-video. All High Definition Television signals must go through this input.
-
DV3250 supports 480i / 480p /576p/ 720p / 1080i HDTV signals provided by high definition AV equipment such as a HDTV decoder.
- Ensure the connector colors match, failure to connect the colors of the cables to the corresponding colored terminals will result in a incorrectly colour image or badly distorted image.
Connecting RGB Signals (Mini D-SUB)
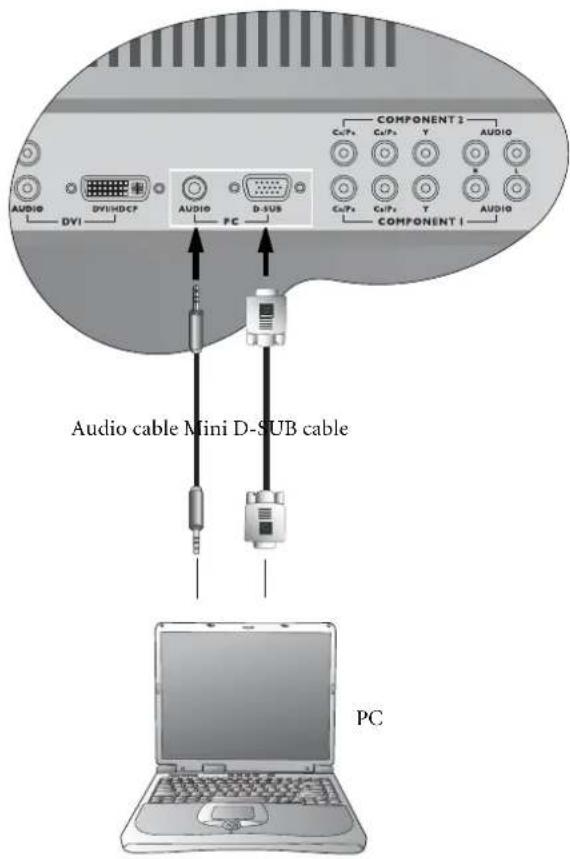
- Connect the analog video output of your PC to the PC D-SUB terminal on the display using a Mini D-SUB 15-pin cable.
-
Connect the audio output of your PC to the display's PC AUDIO input terminal using an appropriate cable.
-
If the signal resolution is greater than the default resolution, the screen may be unable to display image details clearly.
-
You will need a converter to connect a Macintosh computer video to the display using a PC D-SUB 15-pin cable.
- Certain PC models cannot be connected to the display.
- The computer in the illustration is shown only for reference; your equipment may vary.
- Additional equipment shown in the illustration is not provided.
- Do not set the computer's horizontal and vertical scanning frequencies less than or greater than the frequency range of the display. (refer to "Supported Modes" on page 40)
- If you require more information on how to connect your equipment, please refer to the manual for the piece of equipment you wish to attach.
Connecting DVI/HDCP Signals
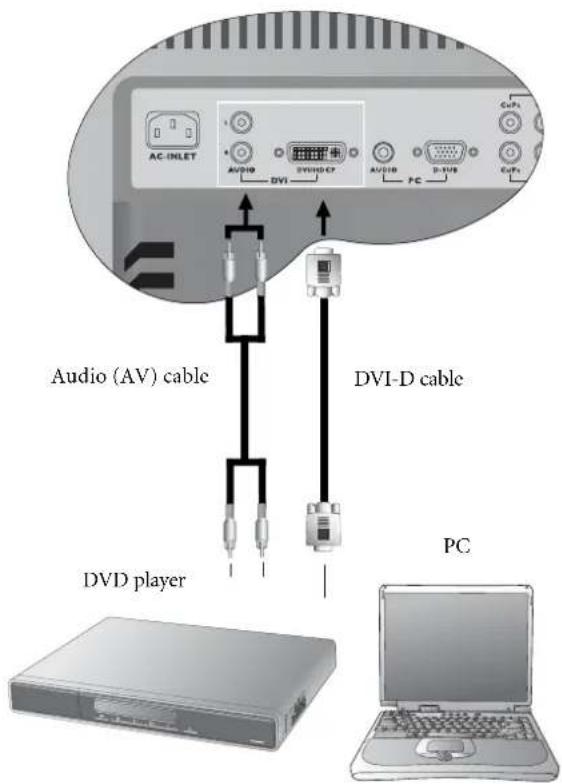
- Connect the digital video output of your PC to the DVI-HDCP terminal on the display using a DVI-D cable.
- Connect the audio output of your PC to the display's DVI AUDIO L/R input terminals using the AV cable or equivalent.
Connecting Audio Output Signals
DV3250 provides extra audio output terminals for delivering audio signal to an amplifier or other audio devices.
Connect the AUDIO OUT L/R terminals on the display to the signal input terminals of an amplifier or other audio devices using the AV cable or equivalent.
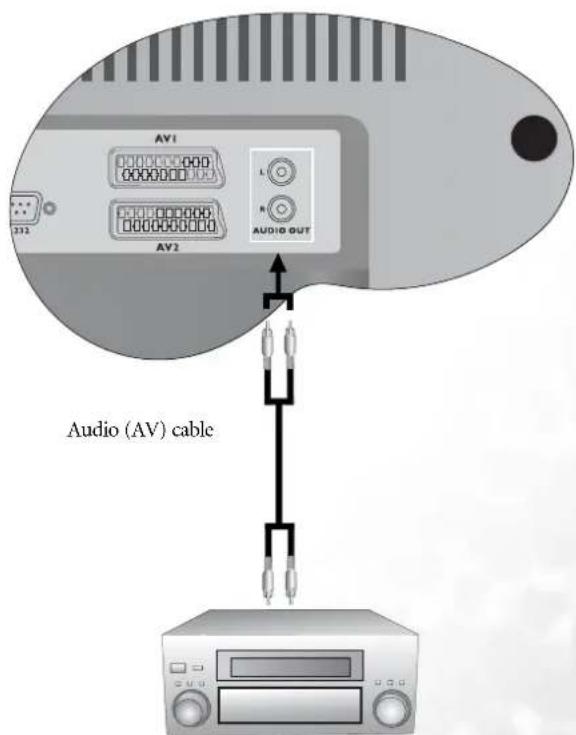
Connecting the Power Cord
- Connect the female end of the AC power cord to the AC input on the display.
- As shown in the diagram, connect the male end to a wall power outlet.
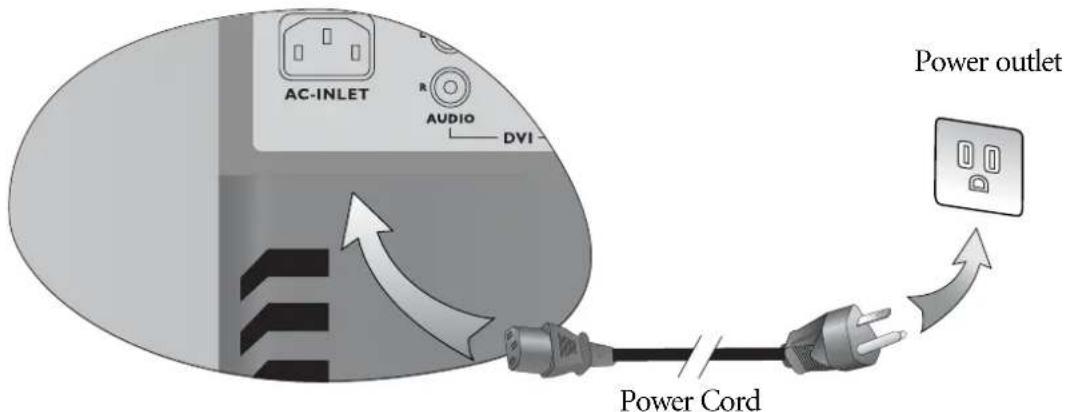
- The figure above shows the power cord connection. The shape of the physical power cord plug and socket will differ depending on the location where you purchased the display.
- This product must be operated only from the type of power source indicated on the marking label (AC 100\~240V 50/60 Hz).
- If the display will not be used for a long period of time, it should be unplugged from the wall outlet.
Initial Setup
- Check to make sure that all connections to your display are correct and firm.
- Press the Power button on the display. The display will turn on. The following First Turn On screen will appear.
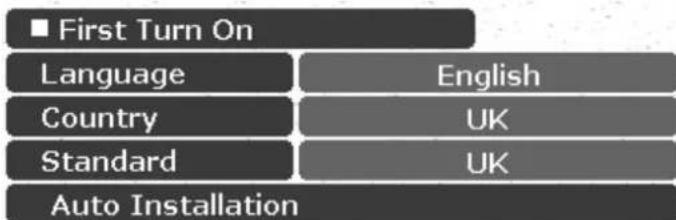
OK:Enter ^\~:Select <>:Adjust
- Press the Volume ◀ or Volume ▶ buttons on the display to select a screen display language, and then press the Channel ▼ button on the display to go to the next step.
- Press the Volume ◀ or Volume ▶ buttons on the display to select your country, and then press the Channel ▼ button on the display to go to the next step.
- (Optional) If Others is selected in Country, press the Volume ◀ or Volume ▶ buttons on the display to select a TV broadcast standard.
- Press the Channel ▼ button on the display to select Auto Installation and then press the INPUT button. The display will start searching for available channels and store them in the memory. This may take several minutes, depending on the available TV channels of your local TV system.
- Press the MENU button on the display to close the menu.

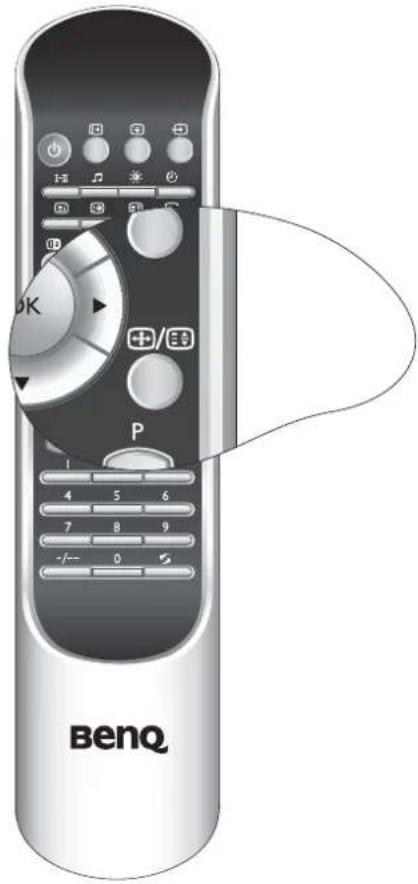
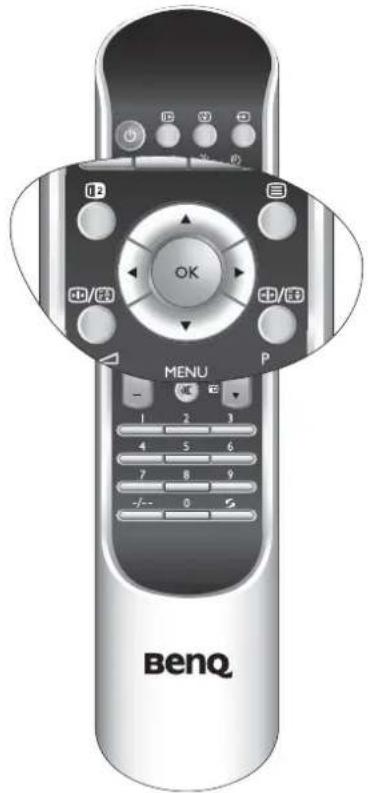
Remote Control
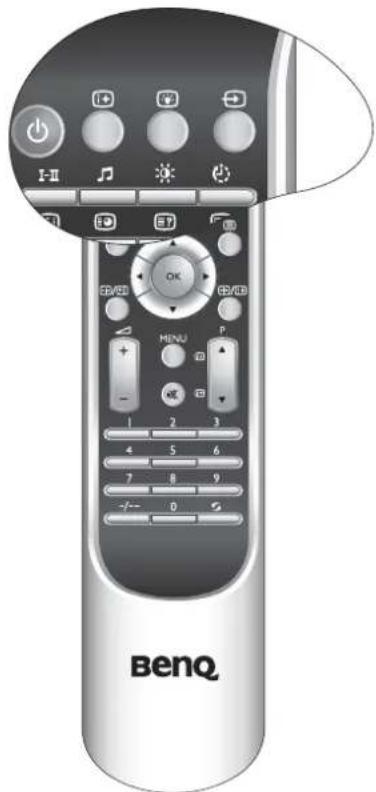
Below is the function description for each button on your remote control.
1. ⏻ (Power)
Press this button to power on the display. Press again to put the display to standby mode.
2. → (Input)
Press this button to select your desired input source.
3. (Backlight)
Press this button to adjust screen backlight.
4. i+ (Information)
Press this button to display the TV channel message and other signal messages (including video or computer signals).
5. (Sleep timer/Teletext page selection)
- Press this button to set the automatic shut-off timer.
- When Teletext is displayed on the screen, press this button to switch to a specific page.
6. (TV sound/Teletext page selection)
- Press this button to toggle between stereo and mono sound reception. During dual language broadcasts Lang-1 or Lang-2 can be selected.
- When Teletext is displayed on the screen, press this button to switch to a specific page.
7. (Picture mode/Teletext page selection)
- Press this button to select from among 6 picture modes.
- When Teletext is displayed on the screen, press this button to switch to a specific page.
8. (Audio mode/Teletext page selection)
- Press this button to select between Sound 1 (left audio), Sound 2 (right audio) and Stereo. (Not available during TV reception)
- When Teletext is displayed on the screen, press this button to switch to a specific page.
9. (Teletext display)
Press this button to cycle Teletext display types between Teletext only - mixed display.
10. ③ (Teletext index)
Press this button to go to Teletext index page.
11. ☐ (Teletext information)
Press this button to display some concealed Teletext information.
12. (Enter Teletext subpage)
Press this button to enter the subpage of a Teletext menu.
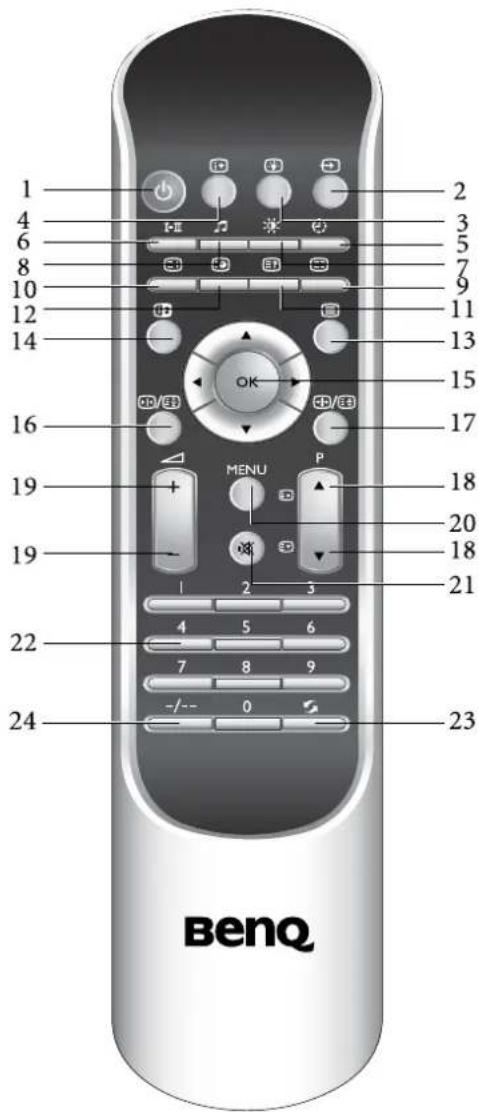
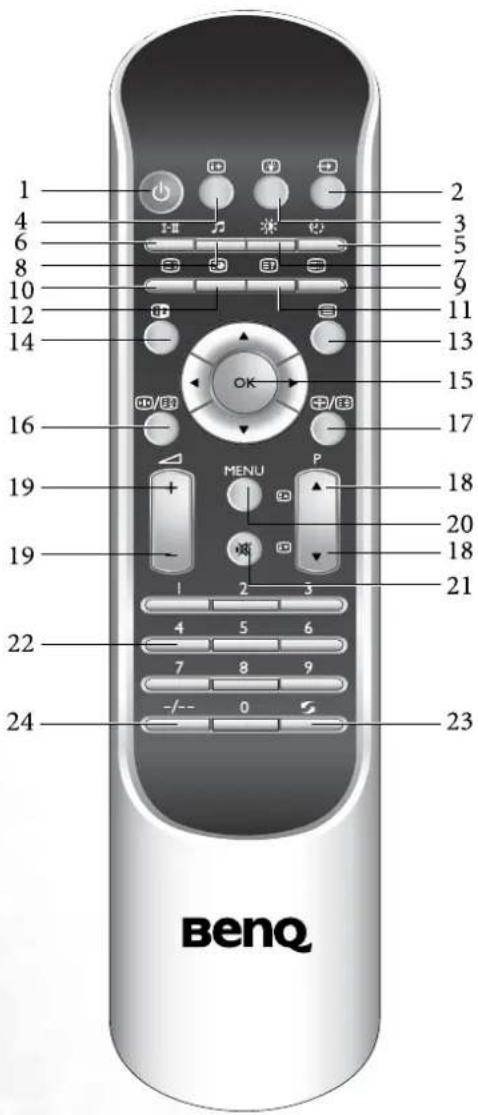
13. (Teletext)
Press this button to turn on the Teletext function. press this button again to turn it off.
14. ⑪ PIP/PBP
Press this button to simultaneously view signals from two different sources on the screen. You may choose picture-in-picture (PIP) mode or picture-by-picture (PBP) mode.
15. ▲/▼/▶/◀ and OK
- ▲▼: Press the ▲ or ▼ buttons to select settings.
- ▶ ◀ : Press the ▶ or ◀ buttons to adjust OSD menu settings.
- Press OK to execute selections, or to enter a submenu you have selected.
16. / (Freeze)
Press this button to freeze the image on the screen (the signal will continue to be broadcast). Press the button again to unfreeze.
17. ⏻/ ⏻ (Screen aspect ratio)
Press this button to adjust screen image aspect ratio settings.
18. ▲ /▼ (Sequential channel selection/Teletext page selection)
- Press these buttons to sequentially change channels.
- When the TV is off, press these buttons to turn it on and change channels.
- When Teletext is displayed on the screen, press these buttons to go to the previous or next page.
19. +/-
Press these buttons to raise or lower the volume level.
20. MENU
Press this button to display the OSD (On-Screen Display) menu for adjusting the image, sound and functions. Pressing this button again removes the OSD.
21. (Mute)
Press this button to mute the sound output. Press it again to restore the sound output.
22. Channel selection
- Press these buttons to select the channel you wish to view.
- When the TV is off, press a button to turn it on and go to the selected channel.
23. 5 (Channel return)
Press this button to toggle between the current and the previous channel you were viewing.
24. Channel entry
Press this button before entering double-digit channels.
Using the Remote Control
When using the remote control, aim it at the remote control sensor window on the display. If there is an object between the remote control and the signal remote control sensor window on the display, the remote may not operate.
When using the remote control, please note:
- Do not strike or drop the remote. Do not expose the remote control to liquids and do not place it in humid environments.
- Do not install or place the remote control in direct sunlight. The heat may damage the remote control.
- If the remote control sensor window on the display is in direct sunlight or strong light, the remote control may not operate normally. In this situation, change the light source or readjust the angle of your display, or operate the remote control from a location closer to the remote control sensor window on the display.
Batteries
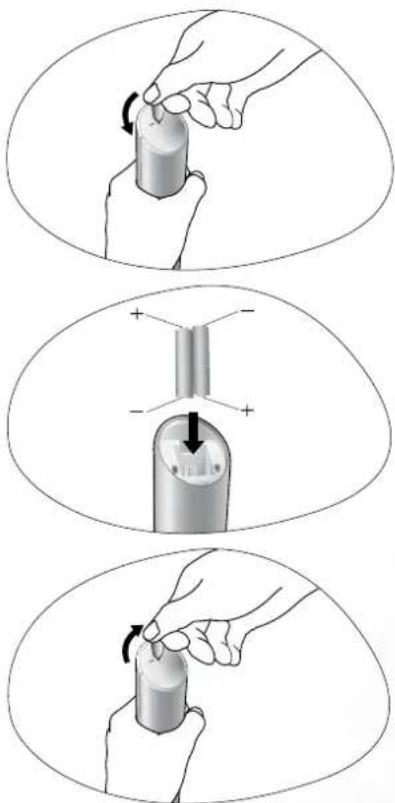
You will need to install the supplied batteries into the remote control to make it operate following the instructions below.
-
Open the lid of the remote control battery compartment.
-
Insert two size-AAA batteries (included).
Ensure that the batteries are inserted with the positive and negative terminals in the correct direction corresponding to the (+) and (-) marks in the battery compartment.
- Install the lid of the remote control battery compartment.
natural_image
Three-step illustration showing hand positioning of a cylindrical object on a base, with arrows indicating rotation (no text or symbols)Notes on Using Batteries
The use of the wrong type of batteries may cause chemical leaks and/or explosion. Please note the following:
• Always ensure that the batteries are inserted with the positive and negative terminals in the correct direction as shown in the battery compartment.
- Different types of batteries have different characteristics. Do not mix different types.
- Do not mix old and new batteries. Mixing old and new batteries will shorten battery life and/or cause chemical leaks from the old batteries.
- When batteries fail to function, replace them immediately.
• Chemicals which leak from batteries may cause skin irritation. If any chemical matter seeps out of the batteries, wipe it up immediately using a dry cloth.
- Due to varying storage conditions, the battery life for the batteries included with your display may be shortened. If the remote control is not used for a long period of time, remove the batteries.

Using the Remote Control
Power on, Power off and Standby
natural_image
Retro television remote control with buttons and keypad, labeled 'BenQ' at bottom (no other text or symbols visible)Turning on the display
-
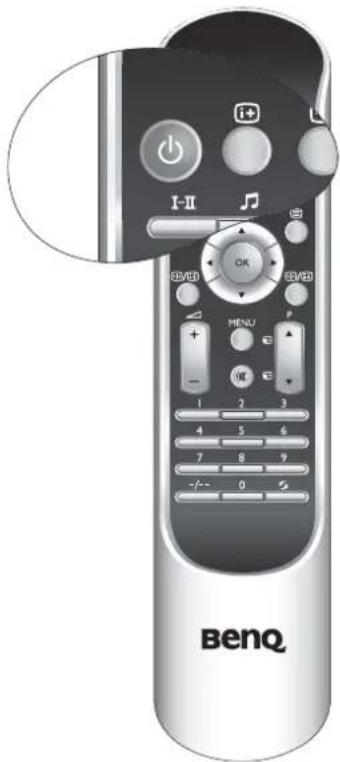
After plugging the display's power cord into a wall outlet, the display will turn on and enter standby mode automatically. The power indicator will light up red.
-
Press the Power button on the display, or press the
(Power) button on the remote control. The display will turn on. (The power indicator changes to green.)
Turning off the display
Press the Power button on the display, or the ⏻ (Power) button on the remote control again, and the display will go into standby mode. (The power indicator will turn red.)
Switching Inputs
natural_image
Front view of a BenQ remote control with function keys and buttons (no readable text beyond brand name)-
Turn on all connected equipment or devices.
-
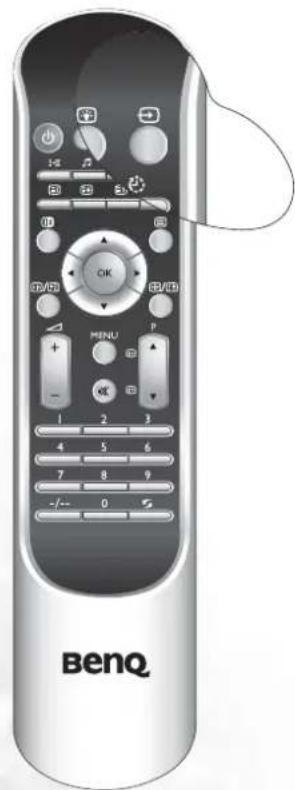
Press the INPUT button on your display, or press the (Input) button on your remote control to display the current selected input.
Press the button repeatedly until your desired input is displayed. The sequence is as follows: TV -> AV1 -> AV1-RGB -> AV2 -> AV2-S->AV3->AV3-S->AV4->AV4-S->Component 1-> Component 2->PC->DVI->TV...
AV2-S, AV3-S or AV4-S will appear only when the S-Video input signal is connected.
Adjusting Volume
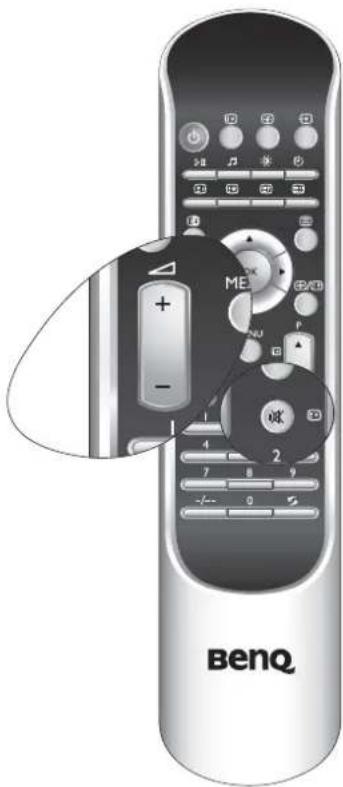
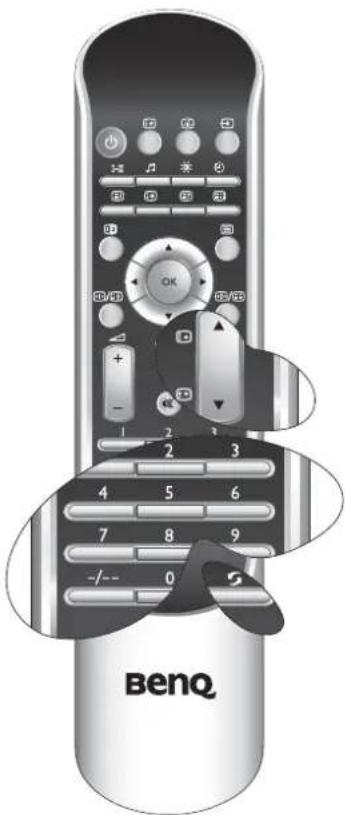
Changing Channels
Adjusting the volume
-
Press the Volume ▶ button on your display or press the △ + button on your remote control to increase volume. The volume indicator will increase in length as volume rises.
-
Press the Volume ◀ button on your display, or press the △ - button on your remote control to decrease volume. The volume indicator will decrease in length as volume falls.
Mute setting
-
Press the (Mute) button on your remote control to temporarily cut off the sound.
-
Press the (Mute) button once more, or press the Volume ◀ / ▶ or Power button on your display to restore the sound level.
TV sound mode selection
Press the I-II (TV sound mode selection) button on your remote control to select "Sound 1", "Sound 2", "Sound 3", "Auto", "Nicam", "Stereo" or "Mono" systems (the items available will depend on the TV sound system being received).
Using the Channel selection buttons on the Remote Control to Change Channels
- To select a single-digit channel, press the corresponding channel selection button on the remote control. For example, to select channel 8, press the channel selection button on the remote control.
• To select a double-digit channel, press the Channel entry button on the remote control, and then enter the channel number using the channel selection buttons. For example, to select channel 28, press the Channel entry button, and then the ,2channel selection buttons on the remote control.
Using the Channel ▲/▼ buttons to sequentially change channels
Press the Channel ▲ or Channel ▼ buttons on your remote control, or press the Channel ▲ or Channel ▼ buttons on the display to sequentially select the TV channels available in your area.
Using the channel return button to return to the previous viewed channel
To return to the previous viewed channel, press the
5 (Channel return) button on your remote control.
Selecting a Picture Mode
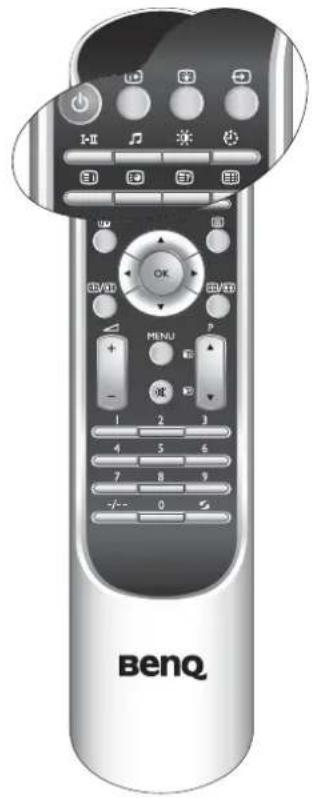
To select a picture mode, press the (Picture mode) button on the remote control. This enables you to select from the 6 preset memory settings. (Vivid, Standard, Movie, Sports, Personal 1 and Personal 2)
Using the Freeze Function
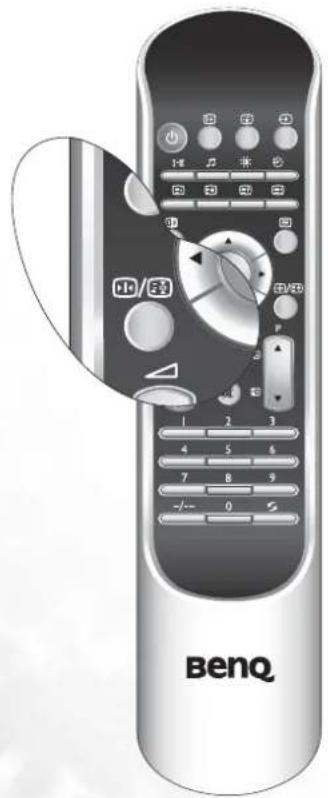
Press the ⏻ (☒ F r e e z e ) button on the rem freeze the image on the screen.
Press the ⏻ (F r e e z e ) button again to re motion.
Adjusting Aspect Ratio
Press the ⏻/≡ (Screen aspect ratio) button on your remote control to select the image aspect ratio you prefer.
Press the button several times to cycle through various ratios.
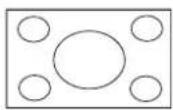
• Full Screen - Enlarge the standard 4:3 video signal (e.g. TV signal) to 16:9 full screen video signal. When the original input video source is 16:9 in ratio (e.g. DVD signal), no change will occur.
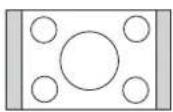
• 4:3 - Display the standard 4:3 video signal (e.g. TV signal) in the center of the screen at the ratio of 4:3. The screen does not change, but black blocks appears in the left and right sides of the screen. When the input video source is 16:9 in ratio, deformation will occur on the screen.
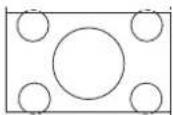
- Letterbox -Fill the entire 4:3 screen with a 4:3 video signal. The redundant part on the upper and bottom of the image will be removed and the image will extend vertically and horizontally to fill the full screen. When the input video source is 16:9 in ratio (e.g. DVD signal), no change will occur.
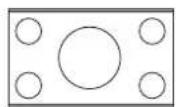
- Anamorphic - Fill the entire screen with a 4:3 video signal. Some deformations may be identified on the edge of the image. When the input video source is 16:9 in ratio (e.g. DVD signal), no change will occur.
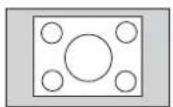
• Real - Display the actual size of the video source without zooming.
Using the Picture-in-Picture (PIP)/Picture-by-Picture (PBP) Function
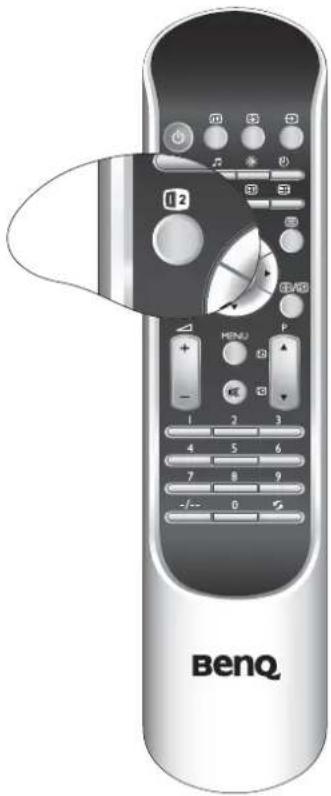
If your display is connected to an additional Video or PC source, pressing the ⑫ PIP/PBP button allows you to display both images on the screen at once in PIP (Picture In Picture) or PBP (Picture By Picture) modes:
• Full Screen: Normal display.
- PIP G on V: Enter PIP mode and display graphics in video.
- PIP V on G: Enter PIP mode and display video in graphics.
- PBP G by V: Enter PBP mode and display graphics by video.
- PBP V by G: Enter PBP mode and display video by graphics.
V (video)= TV, AV1, AV1-RGB, AV2, AV2-S, AV3, AV3-S, AV4, AV4-S input image. G (Graphics)= Component 1, Component 2, PC or DVI input image.
Using the Sleep Timer
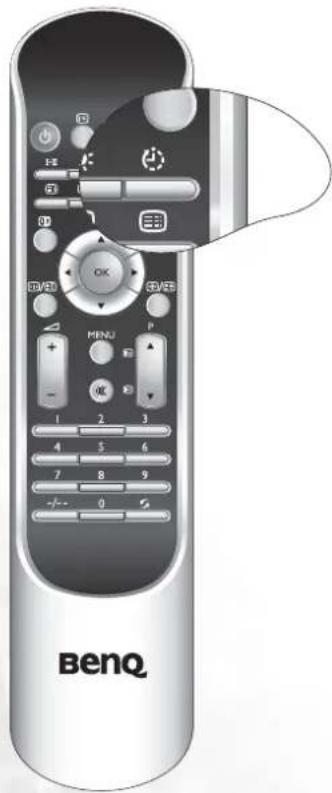
- Press the 📋 (Sleep timer) button on your remote control to set the automatic sleep timer.
- Press the button again to increase the time interval. Time is set in increments of 30 minutes, from 0 to 180 minutes.
Adjusting Backlight
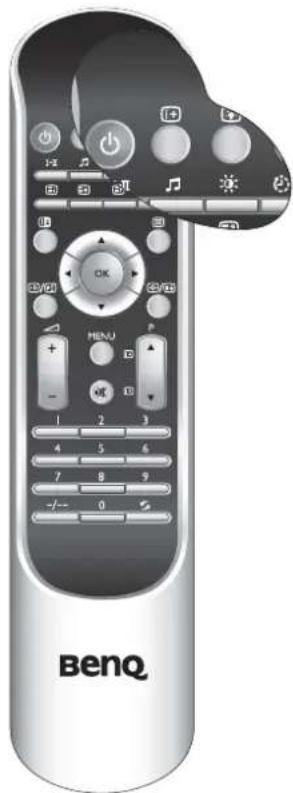
To adjust the intensity of your display's backlight, press the ⚙ (Backlight) button on your remote control to select "Dark", Normal" or "Bright".
When viewing the display in dimly lit rooms it is recommended to set the backlight to "Dark". Setting the backlight to "Dark" will reduce the image brightness and make the dark areas of the image darker thus maintaining a high contrast image in a dark environment.
Display Information
natural_image
Front view of a BenQ remote control with keypad, buttons, and function keys (no readable text beyond brand name)Press the ⓘ (Information) button on your remote control to display the signal information, including input video signal source, Video format, TV sound and current selected channel.
Using the Teletext Function
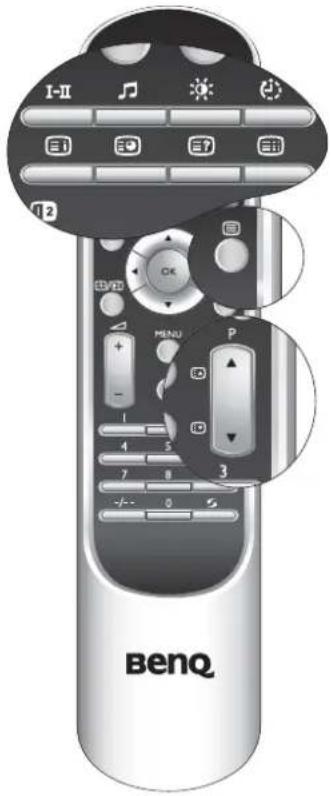
Press the Ⓞ (Teletext) button on the remote control to enable the Teletext function. To disable the function, press the button again.
When Teletext is displayed on the screen, you can:
- Press the 📊 (Teletext display) button to cycle Teletext display types among Teletext only - mixed display - TV video image only.
- Press the Ⓤi (Teletext index) button to go to Teletext index page.
- Press the Ⓞ (Teletext information) button to display some concealed Teletext information.
- Press the (Enter Teletext subpage) button to enter the subpage of a Teletext menu.
- Press the 🔊, or buttons to jump to different pages.
- Press the ▲ /▼ buttons to go to the previous or next page.

On-Screen Display (OSD) Menu
OSD Structure
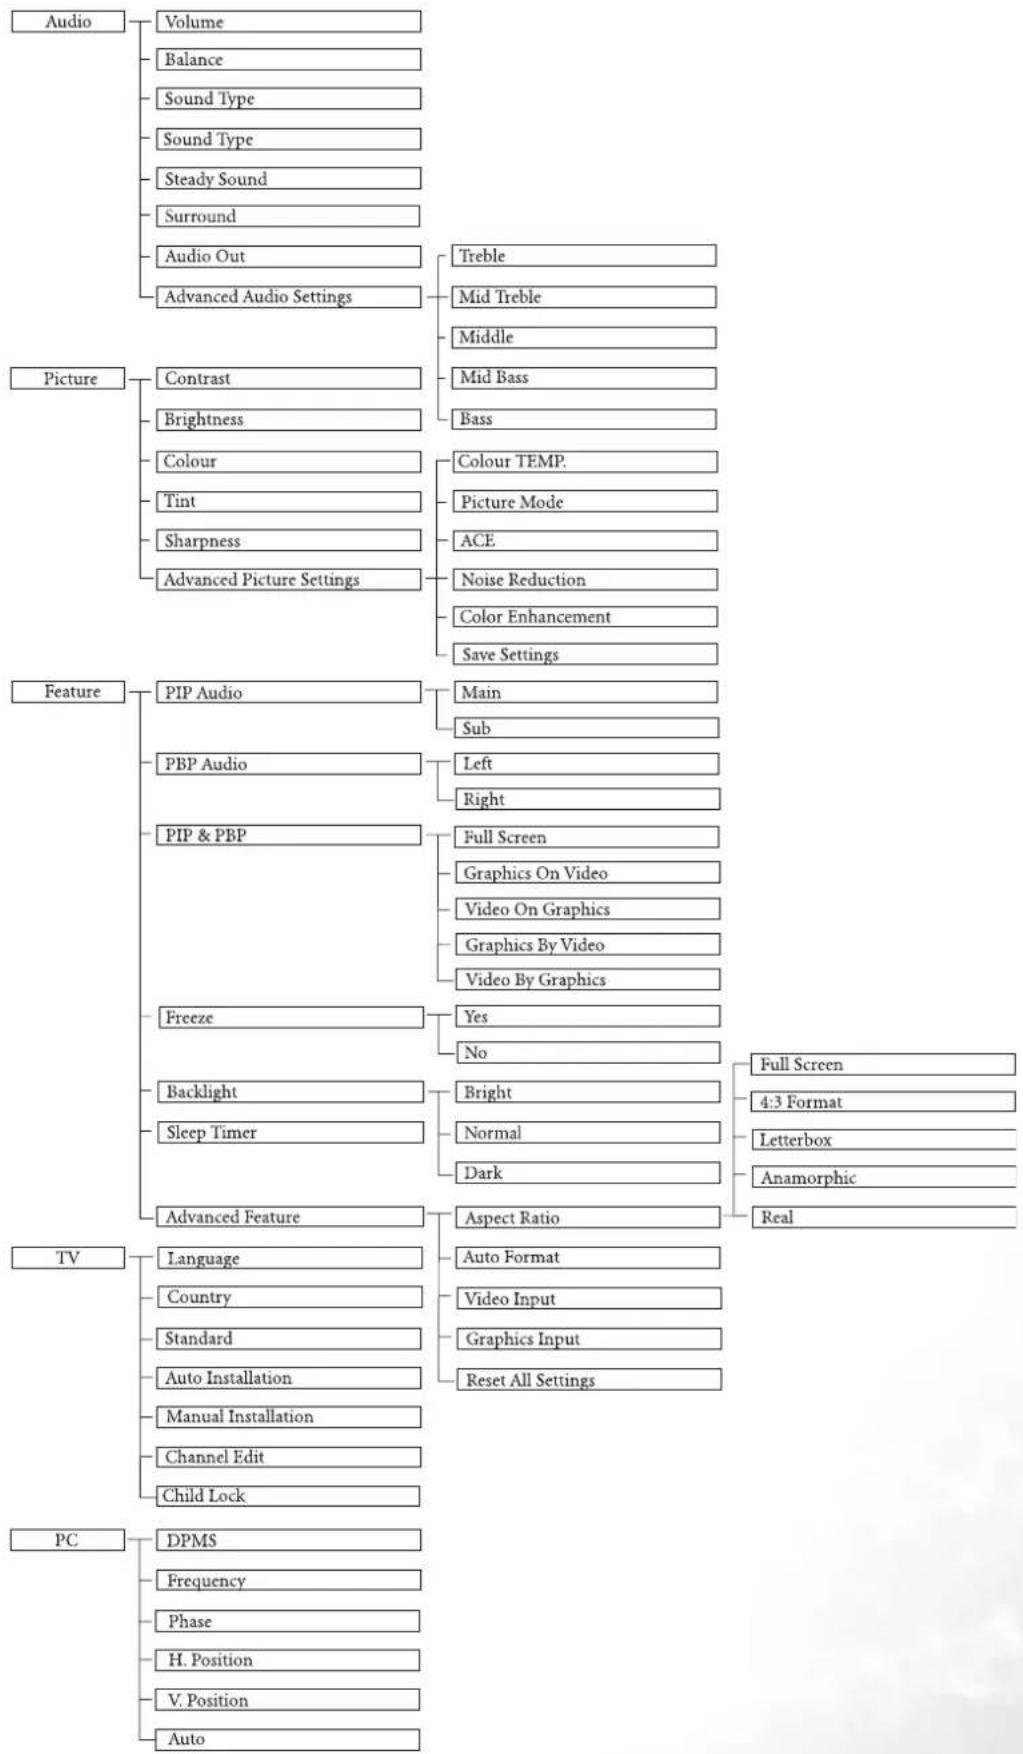
flowchart
graph TD
    A["Audio"] --> B["Volume"]
    A --> C["Balance"]
    A --> D["Sound Type"]
    A --> E["Sound Type"]
    A --> F["Steady Sound"]
    A --> G["Surround"]
    A --> H["Audio Out"]
    A --> I["Advanced Audio Settings"]

    J["Picture"] --> K["Contrast"]
    J --> L["Brightness"]
    J --> M["Colour"]
    J --> N["Tint"]
    J --> O["Sharpness"]
    J --> P["Advanced Picture Settings"]

    Q["Feature"] --> R["PIP Audio"]
    Q --> S["PBP Audio"]
    Q --> T["PIP & PBP"]
    Q --> U["Freeze"]
    Q --> V["Backlight"]
    Q --> W["Sleep Timer"]
    Q --> X["Advanced Feature"]

    Y["TV"] --> Z["Language"]
    Y --> AA["Country"]
    Y --> AB["Standard"]
    Y --> AC["Auto Installation"]
    Y --> AD["Manual Installation"]
    Y --> AE["Channel Edit"]
    Y --> AF["Child Lock"]

    AG["PC"] --> AH["DPMS"]
    AG --> AI["Frequency"]
    AG --> AJ["Phase"]
    AG --> AK["H. Position"]
    AG --> AL["V. Position"]
    AG --> AM["Auto"]

    B --> AN["Treble"]
    B --> AO["Mid Treble"]
    B --> AP["Middle"]

    K --> AQ["Colour TEMP."]
    K --> AR["Picture Mode"]
    K --> AS["ACE"]
    K --> AT["Noise Reduction"]
    K --> AU["Color Enhancement"]
    K --> AV["Save Settings"]

    R --> AW["Main"]
    R --> AX["Sub"]

    S --> AY["Left"]
    S --> AZ["Right"]

    T --> BA["Full Screen"]
    T --> BB["Graphics On Video"]
    T --> BC["Video On Graphics"]
    T --> BD["Graphics By Video"]
    T --> BE["Video By Graphics"]

    U --> BF"Yes]
    U --> BG["No"]

    V --> BH["Bright"]
    V --> BI["Normal"]
    V --> BJ["Dark"]

    X --> BK["Aspect Ratio"]

    Z --> BL["Auto Format"]
    Z --> BM["Video Input"]
    Z --> BN["Graphics Input"]
    Z --> BO["Reset All Settings"]

    AA --> BP["Full Screen"]
    AA --> BQ["4:3 Format"]
    AA --> BR["Letterbox"]
    AA --> BS["Anamorphic"]
    AA --> BT["Real"]
Navigating the OSD Menu
You can use the OSD menu screen to adjust all the settings on your display. Follow the steps outlined below to select the function you desire, and refer to the pages indicated for more information.
Press the MENU button on your remote control, or the MENU button on your display to bring up the following main OSD menu on the screen:
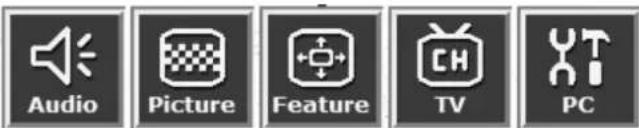
- Press the ◀, ▶, ▲ or ▼ buttons on the remote control, or the Channel ▲, Channel ▼, Volume ▶ or Volume ◀ buttons on the display to select items on the main menu, choose functions or change settings.
- Press the OK button on the remote control, or the INPUT button on the display to enter the submenu.
- Press the MENU button on the remote control, or the MENU button on your display to exit from the main menu.
For more information about the OSD menus, please refer to the following pages:
• "Audio Menu" on page 25
• "Picture Menu" on page 27
- "Feature Menu" on page 29
• "TV Menu" on page 32
- "PC Menu" on page 36
Audio Menu
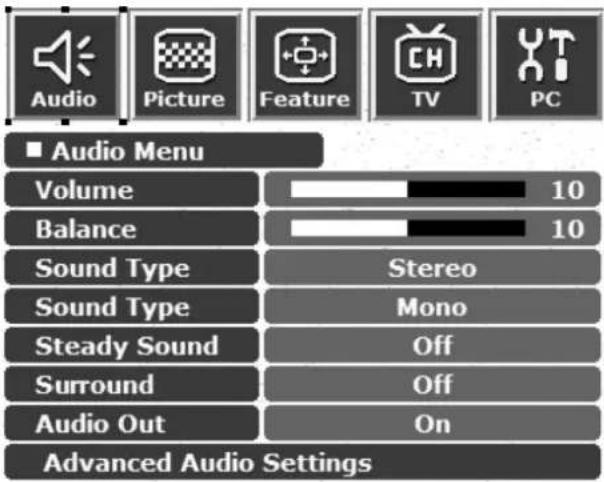
OK:Enter ^\~:Select <>:Adjust
- Press the MENU button on the remote control or the MENU button on the display to display the main menu.
- Press the ◀ or ▶ buttons to select Audio and then press OK to enter the submenu.
- Press the ▲ or ▼ buttons to select an item.
- In the Audio Menu, use the ◀ or ▶ buttons to adjust the setting or select the options.
- To return to the menu one level up, press the MENU button on the remote control, or the MENU button on the display.
| Item Function Operation Range | |||
| Volume Adjust volume level. | Use ▶ to increase or ◀ to decrease volume. | 0 to 47 | |
| Balance | Adjust left or right speaker volume level.This option will become unavailable if Audio Out is set to On. | Use ▶ to increase right speaker volume, ◀ to increase left speaker volume level. | -12 to +12 |
| Sound Type | Select audio type (This option will only appear when AV1, AV1-RGB, AV2, AV2-S, AV3, AV3-S, AV4, AV4-S, PC Component 1, Component 2 or DVI is selected as the signal source).This option will become unavailable if Audio Out is set to On. | Use the ▶ and ◀ buttons on the remote control or the Volume ▶ and Volume ◀ buttons on the display to change selection. | • Stereo• Sound 1• Sound 2 |
| Sound Type | Select TV audio (This option will only appear when TV is selected as the signal source). | Use the ▶ and ◀ buttons on the remote control or the Volume ▶ and Volume ◀ buttons on the display to change selection. | Auto, Mono, Stereo, Sound 1, Sound 2, Sound 3, NICAM |
| Steady Sound | Automatically adjusts the sound level to be constant amongst different TV stations when viewing TV programs.This option will become unavailable if Audio Out is set to On. | Use the ▶ and ◀ buttons on the remote control or the Volume ▶ and Volume ◀ buttons on the display to change selection. | • Off• Auto |
| Surround | Select a surround sound effect. | Use the ▶ and ◀ buttons on the remote control or the Volume ▶ and Volume ◀ buttons on the display to change selection. | • SRS TS• DOLBY Surround• Off |
| Audio Out | Select sound output from the internal speaker or or external speaker (e.g. headphone) | Use the ▶ and ◀ buttons on the remote control or the Volume ▶ and Volume ◀ buttons on the display to change selection. | • Off• On |
| Advanced Audio Settings- Press OK to enter.This option will become unavailable if the Audio Out option is set to On or the Surround option is set to DOLBY Surround or SRS TS. | |||
| Treble Adjust treble tones | Use ▶ to increase treble tone, ◀ to decrease treble tone. | -12 to +12 | |
| Mid Treble | Adjust mid-treble tones | Use ▶ to increase mid treble tone, ◀ to decrease mid treble tone. | -12 to +12 |
| Middle Adjust mid tones | Use ▶ to increase middle tone, ◀ to decrease middle tone. | -12 to +12 | |
| Mid Bass | Adjust mid-bass tones | Use ▶ to increase mid bass tone, ◀ to decrease mid bass. | -12 to +12 |
| Bass Adjust bass tones | Use ▶ to increase bass tone, ◀ to decrease bass tone. | -12 to +12 | |
Picture Menu
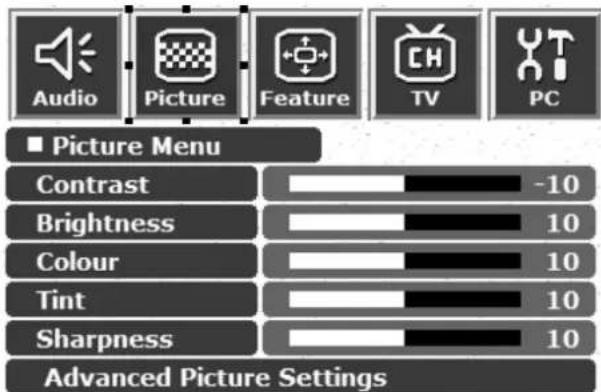
OK:Enter ^\~:Select <>:Adjust
-
Press the MENU button on the remote control or the MENU button on the display to display the main menu.
-
Press the ◀ or ▶ buttons to select Picture and then press OK to enter the submenu.
-
Press the ▲ or ▼ buttons to select an item.
-
In the Picture Menu, use the ◀ or ▶ buttons to adjust the setting or select the options.
-
To return to the menu one level up, press the MENU button on the remote control, or the MENU button on the display.
| Item Function Operation Range | |||
| Contrast Adjust image contrast. | Use ▶ to increase contrast, or ◀ to reduce it. | 0 to 32 | |
| Brightness Adjust image black level. | ▸ for brighter blacks, ◀ for darker blacks. | 0 to 60 | |
| Colour Adjust colour saturation. | ▸ for higher saturation, ◀ for lower saturation. | 0 to 64 | |
| Tint Adjust colour tint. | ▸ for redder tones, ◀ for greener tones. | 0 to 30 | |
| Sharpness | Adjust the sharpness level of the image. | ▸ for a sharper image, ◀ for softer image. | -14 to 25 |
| Advanced Picture Settings - Press OK to enter. | |||
| Colour TEMP. | Adjust the color tint of the black and white part of the image. | Use the ▶ and ◀ buttons on the remote control or the Volume ▶ and Volume ◀ buttons on the display to change selec-tion. | · Panel Default: Backlight color· Warm: Biased toward red· Normal: Standard video/ TV color temperature· Cool: Biased toward blue - for PC input |
| Picture Mode | To restore a factory preset or user customized picture mode from memory. | Use the ▶ and ◀ buttons on the remote control or the Volume ▶ and Volume ◀ buttons on the display to change selec-tion. | · Vivid· Standard· Movie· Sports· Personal 1· Personal 2 |
| ACE (Auto Contrast Enhancement) | Adjust the auto contrast enhancement function that optimizes the density of dark and bright areas of images. | Use the ▶ and ◀ buttons on the remote control or the Volume ▶ and Volume ◀ buttons on the display to change selec-tion. | · Off· High· Middle· Low |
| Noise Reduc-tion | Adjust the image noise reduction function that helps to remove noise in images. | Use the ▶ and ◀ buttons on the remote control or the Volume ▶ and Volume ◀ buttons on the display to change selec-tion. | · Auto· High· Middle· Low |
| Color Enhancement - Press OK to enter.This option will become unavailable if the ACE option is set to High, Middle or Low. | |||
| Red Adjust | red in image. | ▸ for more red concentration, ◀ for less red concentration. | 0 to 30 |
| Green Adjust | green in image. | ▸ for more green concentration, ◀ for less green concentration. | 0 to 30 |
| Blue Adjust | blue in image. | ▸ for more blue concentration, ◀ for less blue concentration. | 0 to 30 |
| Yellow Adjust | yellow in image. | ▸ for more yellow concentration, ◀ for less yellow concentration. | 0 to 30 |
| Save Settings | Two different user profiles can be set. | Press ◀ or ▶ buttons to select the user situation preset Personal 1 or Personal 2. Then press OK to save your current settings. | • To Personal 1• To Personal 2 |
Picture Mode Settings
- Press the MENU button on your remote control or the MENU button on the display to display the OSD menu.
- Press the ◀ or ▶ button to select Picture and press the OK button to enter the submenu.
- Select an option (Contrast, Brightness, Color, Tint...) from the Picture menu to adjust your favorite image quality.
- Press the ▲ or ▼ button to select Advanced Picture Settings, and press the OK button to enter the submenu.
- Press the ▲ or ▼ button to select Save Settings and press the OK button.
- Press the ▲ or ▼ button to select To Personal 1 or To Personal 2 and then press the OK button to confirm.
Selecting a Picture Mode
- Press the MENU button on your remote control or the MENU button on the display to display the OSD menu.
- Press the ◀ or ▶ button to select Picture and press the OK button to enter the submenu.
- Press the ▲ or ▼ button to select Advanced Picture Settings, and press the OK button to enter the submenu.
- Press the ▲ or ▼ button to select Picture Mode, and press the ◀ or ▶ button to select a picture mode you desire.
- Press the MENU button to close the menu.
You can also press the (Picture mode) button on the remote control to switch to the picture mode you want directly.
Feature Menu
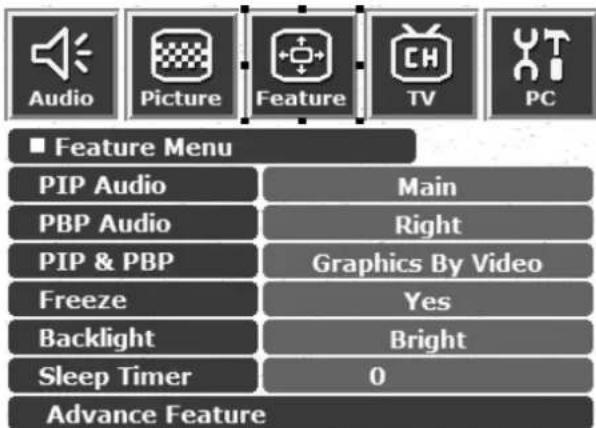
OK:Enter ^\~:Select <>;Adjust
-
Press the MENU button on the remote control or the MENU button on the display to display the main menu.
-
Press the ◀ or ▶ buttons to select Feature and then press OK to enter the submenu.
-
Press the ▲ or ▼ buttons to select an item.
-
In the Feature Menu, use the ◀ or ▶ buttons to adjust the setting or select the options.
-
To return to the menu one level up, press the MENU button on the remote control, or the MENU button on the display.
| Item Function Operation Range | |||
| PIP Audio | Select which audio source you want to hear.This option is available only if the PIP mode is activated. | Use the ▶ and ◀ buttons on the remote control or the Volume ▶ and Volume ◀ buttons on the display to change selection. | • Main• Sub |
| PBP Audio | Select which audio source you want to hear.This option is available only if the PBP mode is activated. | Use the ▶ and ◀ buttons on the remote control or the Volume ▶ and Volume ◀ buttons on the display to change selection. | • Left• Right |
| PIP & PBP* | Display video and images simultaneously in either Picture-In-Picture or Picture-By-Picture mode. | Use the ▶ and ◀ buttons on the remote control or the Volume ▶ and Volume ◀ buttons on the display to change selection. | • Full screen• Graphics On Video• Video On Graphics• Graphics By Video• Video By Graphics |
| Freeze | Freeze motion of screen image (however, broadcast continues). | Use the ▶ and ◀ buttons on the remote control or the Volume ▶ and Volume ◀ buttons on the display to change selection. | • No• Yes |
| Backlight | Adjust backlight intensity. | Use the ▶ and ◀ buttons on the remote control or the Volume ▶ and Volume ◀ buttons on the display to change selection. | • Dark• Normal• Bright |
| Sleep Timer | Set the Sleep timer to automatically turn off the display. | Use the ▶ and ◀ buttons on the remote control or the Volume ▶ and Volume ◀ buttons on the display to change selection. | 0, 30, 60, 90, 120, 150, 180 minutes |
| Advanced Feature- Press OK to enter. | |||
| Aspect Ratio | Adjust image aspect ratio. | Use the ▶ and ◀ buttons on the remote control or the Volume ▶ and Volume ◀ buttons on the display to change selection. | Full Screen - Enlarge the standard 4:3 video signal (e.g. TV signal) to 16:9 full screen video signal. When the original input video source is 16:9 in ratio (e.g. DVD signal), no change will occur.4:3 Format - Display the standard 4:3 video signal (e.g. TV signal) in the center of the screen at the ratio of 4:3. The screen does not change, but black blocks appears in the left and right sides of the screen. When the input video source is 16:9 in ratio, deformation will occur on the screen.Letterbox -Fill the entire 4:3 screen with a 4:3 video signal. The redundant part on the upper and bottom of the image will be removed and the image will extend vertically and horizontally to fill the full screen. When the input video source is 16:9 in ratio (e.g. DVD signal), no change will occur.Anamorphic - Fill the entire screen with a 4:3 video signal. Some deformations may be identified on the edge of the image. When the input video source is 16:9 in ratio (e.g. DVD signal), no change will occur.Real - Display the actual size of the video source without zooming. |
| Auto Format | Set the display to automatically adjust screen aspect ratio when the SCART input is used. | Use the ▶ and ◀ buttons on the remote control or the Volume ▶ and Volume ◀ buttons on the display to change selection. | YesNo |
| Video Input | Select video signal input source for PIP/PBP function. | Use the ▶ and ◀ buttons on the remote control or the Volume ▶ and Volume ◀ buttons on the display to change selection. | TV, AV1, AV1 RGB, AV2, AV2-S, AV3, AV3-S, AV4, AV4-S |
| Graphics Input | Select graphics signal input source for PIP/ PBP function. | Use the ▶ and ◀ buttons on the remote control or the Volume ▶ and Volume ◀ buttons on the display to change selection. | PCComponent 1Component 2DVI |
| Reset All Settings | Restore all settings to default values. | Press the OK button on the remote control or the INPUT button on the display to reset. | |
PIP/PBP Functions are available with 480p, 576p, 720p, 1080i HDTV formats.
TV Menu
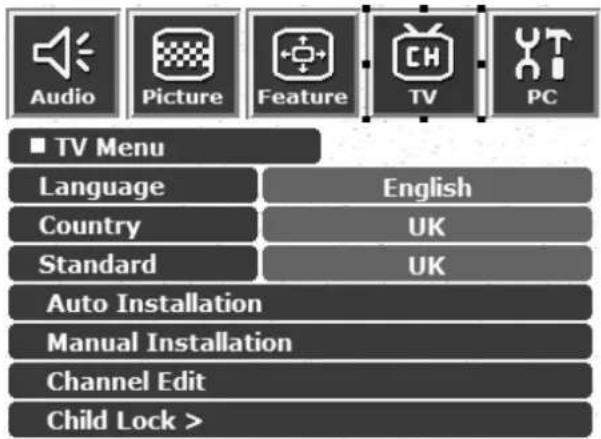
OK:Enter ^\~:Select <>;Adjust
- Press the MENU button on the remote control or the MENU button on the display to display the main menu.
- Press the ◀ or ▶ buttons to select TV and then press OK to enter the submenu.
- Press the ▲ or ▼ buttons to select an item.
- In the TV Menu, use the ◀ or ▶ buttons to adjust the setting or select the options.
- To return to the menu one level up, press the MENU button on the remote control, or the MENU button on the display.
| Item Function Operation Range | |||
| Language | Select language for the OSD menu. | Use the ▶ and ◀ buttons on the remote control or the Volume ▶ and Volume ◀ buttons on the display to change selection. | · English· Français· Nederlands· Deutsch· Italiano· Español |
| Country | Select your country where the TV is installed. | Use the ▶ and ◀ buttons on the remote control or the Volume ▶ and Volume ◀ buttons on the display to change selection. | · UK· France· Netherlands· Germany· Italy· Spain· Austria· Belgium· Luxembourg· Switzerland· Portugal· New Zealand· Australia· Others |
| Standard | Select the TV signal reception standard. | Use the ▶ and ◀ buttons on the remote control or the Volume ▶ and Volume ◀ buttons on the display to change selection. | · UK· FR· B/G/H· EURO· DK |
| Auto Installation | This function lets the TV tuner of your display search through all available channels and add them to memory. | Press the OK button to start auto installation. | |
| Manual Installation | Refer to "Performing Manual Installation" on page 33. | ||
| Channel Edit Refer to "Editing Channels" on page 33. | |||
| Child Lock Refer to "Child Lock" on page 34. | |||
Performing Manual Installation
The Manual Installation option allows you to manually adjust channel settings.
- In the TV Menu, press the ▲ or ▼ buttons to select Manual Installation. and then press the OK button. The following Manual Installation menu will appear.
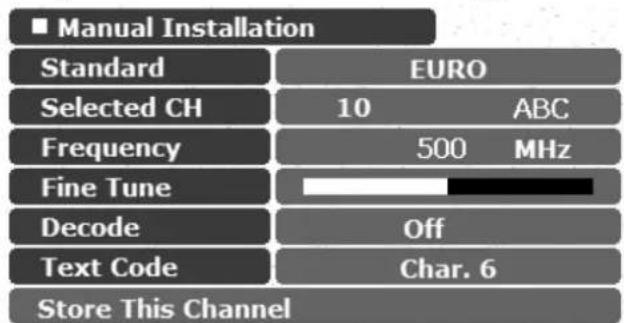
OK:Enter ^\~:Select <>;Adjust
-
Press the ◀ or ▶ buttons to select a TV standard according to your local TV system.
-
Press the ▼ button to highlight Select CH and then press the ◀ or ▶ buttons to select a TV channel you want to set up.
-
Press the ▼ button to highlight Frequency and then press the ◀ or ▶ buttons to start the tuning system. If the tuned channel is incorrect, press the ◀ or ▶ button again until your desired channel is located.
-
Press the ▼ button to highlight Fine Tune and then press the ◀ or ▶ buttons to adjust the reception of TV signal.
-
(Optional) If the SCART signal input is connected, press the ▼ button to highlight Decode and then press the ◀ or ▶ buttons to select from the following options:
- On: Select this option if you are using a decoder supplied from your TV system.
- Off: Select this option if no external decoder is used.
-
Press the ▼ button to highlight Text Code and then press the ◀ or ▶ buttons to select a code format for the Teletext function.
-
Press the ▼ button to highlight Store This Channel and then press the OK button to save current channel settings to the memory.
-
Press the MENU button again to close the menus.
Editing Channels
You can delete unwanted channels, add a channel name and sort the received channels onto their correct channel numbers.
Naming a Channel
- In the TV Menu, press the ▲ or ▼ buttons to select Channel Edit and then press the OK button. The following Channel Edit menu will appear.
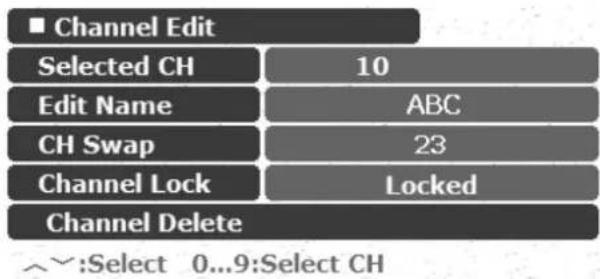
-
Press the ▼ button, and then the ◀ or ▶ buttons to select the channel you wish to name.
-
Press the ▼ button to highlight Edit Name and then press the ◀ or ▶ buttons to enter a name for the channel.
- Press the MENU button again to close the menus.
Swapping Channels
- In the TV Menu, press the ▲ or ▼ buttons to select Channel Edit and then press the OK button.
- In the Channel Edit menu that appears, press the ▼ button, and then the ◀ or ▶ buttons or the channel selection buttons to select the number of the channel you wish to change.
- Press the ▼ button to highlight PR Swap and then press the ◀ or ▶ or the channel select buttons to select the channel to be moved.
- Press the MENU button to close the menu. The channel will be moved on to the selected channel location.
Locking (Preventing a Channel from Selection)/Unlocking a Channel
- In the TV Menu, press the ▲ or ▼ buttons to select Channel Edit and then press the OK button.
- In the Channel Edit menu that appears, press the ▼ button, and then the ◀ or ▶ buttons or the channel selection buttons to select the number of the channel you wish to lock.
-
Press the ▼ button to highlight Channel Lock and then press the ◀ or ▶ buttons to select from the following options:
-
Lock: Lock selected channel.
-
Unlock: Unlock selected channel.
-
Press the MENU button to close the menus. If a channel is locked, it cannot be viewed if the Child Lock function (Refer to "Child Lock" on page 34) is enabled.
Deleting a Channel
- In the TV Menu, press the ▲ or ▼ buttons to select Channel Edit and then press the OK button.
- In the Channel Edit menu that appears, press the ▼ button, and then the ◀ or ▶ buttons or the channel selection buttons to select the number of the channel you wish to delete.
- Press the ▼ button to highlight Channel Delete and then press the OK button to delete the channel.
- Press the MENU button to close the menus.
Child Lock
The Child Lock function can be used for preventing children from viewing adult-only channels.
Enabling/Disabling Child Lock
- In the TV Menu, press the ▲ or ▼ buttons to select Child Lock and then press the OK button. The following Child Lock menu will appear.
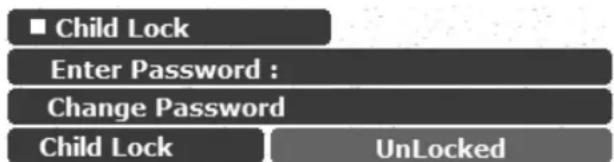
: Please enter 4 characters password!
- You will be prompted to enter the password (default password: 0000). Enter the password using the channel selection buttons. When entering, you can press the ◀ button to clear a wrong character.
-
Press the ▼ button to select Child Lock and then press the ◀ or ▶ buttons to select from the following options:
-
Locked: Enable Child Lock. Once enabled, the locked channels (Refer to "Locking (Preventing a Channel from Selection)/Unlocking a Channel" on page 34 for how to lock a channel) will be locked.
- UnLocked: Disable Child Lock.
- Press the MENU button to close menus.
Changing Password
- In the TV Menu, press the ▲ or ▼ buttons to select Child Lock and then press the OK button.
- Press the ▼ button to select Change Password and then enter a new 4-digit password using the channel selection buttons.
- Enter the new password again using the channel selection buttons.
- Press the MENU button to close the menu.
PC Menu
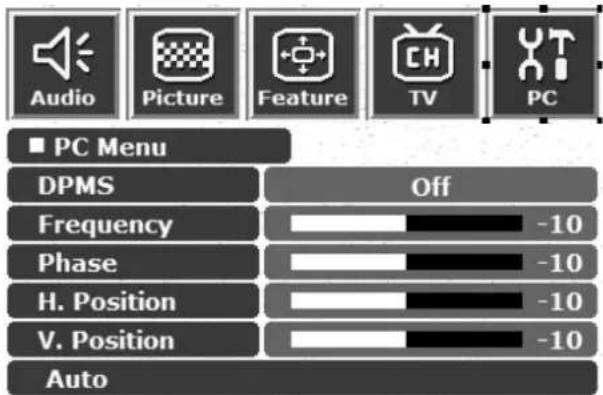
OK:Enter ^\~:Select <>:Adjust
- Press the MENU button on the remote control or the MENU button on the display to display the main menu.
- Press the ◀ or ▶ buttons to select PC and then press OK to enter the submenu.
- Press the ▲ or ▼ buttons to select an item.
- In the PC Menu, use the ◀ or ▶ buttons to adjust the setting or select the options.
- To return to the menu one level up, press the MENU button on the remote control, or the MENU button on the display.
| Item Function Operation Range | |||
| DPMS | Protect screen and enter power saver mode when no PC signal is detected. | Use the ▶ and ◀ buttons on the remote control or the Volume ▶ and Volume ◀ buttons on the display to change selection. | • Off• On |
| Frequency | Adjust display clock frequency. | Use the ▶ and ◀ buttons on the remote control or the Volume ▶ and Volume ◀ buttons on the display to change selection. | -15 to 15 |
| Phase Adjust display clock phase. | Use the ▶ and ◀ buttons on the remote control or the Volume ▶ and Volume ◀ buttons on the display to change selection. | 0 to 31 | |
| H. Position | Adjust horizontal position of the image. | Use the ▶ and ◀ buttons on the remote control or the Volume ▶ and Volume ◀ buttons on the display to change selection. | -30 to 30 |
| V. Position | Adjust vertical position of the image. | Use the ▶ and ◀ buttons on the remote control or the Volume ▶ and Volume ◀ buttons on the display to change selection. | -30 to 30 |
| Auto | Automatically adjusts frequency, phase, H. position and V. position to place the image on the screen. | Use the OK button on the remote control or the INPUT button on the display to begin auto adjustment. | |

Troubleshooting
Before calling a service center, attempt the following steps to diagnose the problem.
TV
| Symptoms Possible Causes | |
| Power does not turn ON | Ensure the power plug is securely inserted into the receptacle and wall socket. |
| There is no picture or sound | · Ensure the display power is ON (Indicated by the green Power indicator on the front of the unit)· Try a different input source to check whether the source is at fault.· Check for mis-connection of cables or for wrong input source. |
| There are spots on the screen | Your TV is being affected by interference from automobiles, trains, high-voltage transmission lines, neon signs or another sources of interference. Try redirecting or relocating your antenna to reduce the affects of the interference. |
| Degraded colours or tints | · Check whether all the picture adjustments have been properly performed.· Press the (Picture mode) button on the remote control to select a different picture mode. |
| Improper screen position or size | Try selecting a different aspect ration by pressing the ⏻/ ⏻ (Screen aspect ratio) button on the remote control. |
| The image appears distorted | Ensure the display's aspect ratio is correctly set to suit the program source. |
| The image appears too bright, and there is a loss of definition in the brightest areas of the image. | · Reduce the contrast setting.· The DVD player is set for a high-level output.· The AV video signal has not been terminated properly somewhere in the external AV equipment. |
| The image appears too 'washed out', or the darkest areas of the image appear too bright. | · Reduce the brightness level till the black areas of the picture appear as black.· The DVD player may be set at too high a brightness level. |
| Power indicator lamp flashes red. | · Check the PC/DVI cable for disconnection.· This indicates the PC/DVI input has been selected with no PC/DVI source signal.· The TV has been placed in PC Standby mode. |
| "Out of range" appears | · Check whether the input signal is acceptable to the display. |
| Remote control does not function properly | · Check for incorrect battery orientation.· Check for dead batteries· Check your distance and angle from the display.· Check whether remote control is properly being pointed at the display's remote control sensor window.· Check for any obstacle between the remote control and the remote control sensor window.· Check that the remote control sensor window is not under strong fluorescent lighting.· Check for any devices (PC or personal digital assistant, PDA) nearby that transmit infrared signal which may cause interference to signal transmission between the remote control and the LCD display. Turn off the infrared function of these devices. |
| There is no picture or sound, just noise. | Make sure the antenna cable is properly connected.Change channels to confirm if the symptom is still present. |
| Picture is not clear. | Make sure the antenna cable is properly connected.Change channels to confirm if the symptom is still present.If PC is selected as the input signal source, use the Auto function in the PC Menu to let the TV adjust picture automatically. |
| No sound. | Check whether you have selected Mute for Audio setting.Make sure the volume is not set to minimum.Check the AV cables for disconnection. |
Antenna
| Symptoms Possible Causes | ||
| The picture is not sharp or the picture moves contains image movement. | · The reception may be weak.· Change channels to confirm if the symptom is still present.· Make sure the outside antenna is not disconnected.· Make sure the antenna is facing the right direction. | |
| The picture is doubled or tripled | · Make sure the antenna is facing the right direction.· Picture ghosting is caused by reflections from buildings, large metal structures and mountains. Carefully realign your antenna to minimise the ghost images. Ultimately a higher quality antenna professionally installed may be necessary to reduce the ghosting. | |
| The picture is spotted | · There may be interference from automobiles, trains, high voltage lines, neon lights, etc.· There may be interference between the antenna cable and power cable. Try positioning them further apart. | |
| There are stripes on the screen or colours fade | · Is the display receiving interference from other devices? Transmission antennas of radio broadcasting stations and transmission antennas of amateur radios and cellular phones may also cause interference.· Use the display as far away as possible from devices that may cause possible interference. | |
| Model DV3250 | ||
| Size 80 cm (31.5 inches) | ||
| Aspect ratio 16:9 | ||
| Resolution 1366 x 768 | ||
| Pitch 0.51075 x 0.51075 (mm) | ||
| Brightness 500 nits | ||
| Contrast ratio 800:1 | ||
| Viewing angle(left/right/up/down) | 85°/85°/85°/85° | |
| Response time 12 ms | ||
| Amplifier 10W x 2 | ||
| Signal inputs | TV TV tuner | |
| Video | S-VideoComposite video (RCA)Composite video (SCART)Component video (YPBPR)Audio input | |
| PC & HDCP | DVI/HDCPPC D-subDVI audio inputPC audio | |
| Signal outputs | Audio outputHeadphone output | |
| Scan format 480i / 480p /576p/ 720p / 1080i | ||
| PC horizontal frequency | 31.5 ~ 60 kHz | |
| PC vertical frequency | 50 ~ 70 Hz | |
| Power supply | AC 100-240 V, 50/60 Hz | |
| Operating temperature | 0°C~40°C (at sea level) | |
| Storage temperature | -10°C ~ 50°C (at sea level) | |

Design and specifications are subject to change without notice.
10 Supported Modes
| Resolution | Horizontal Freq. (khz) | Vertical Freq. (Hz) | Bandwidth (Mhz) | Notes |
| 720 × 400 31.47 | 70.08 28.32 DOS mode | |||
| 640 × 480 31.47 | 60.00 25.18 DOS mode | |||
| 640 × 480 37.50 | 75.00 31.50 VESA | |||
| 640 × 480 37.86 | 72.80 31.50 VESA | |||
| 800 × 600 37.88 | 60.32 40.00 VESA | |||
| 800 × 600 46.86 | 75.00 49.50 VESA | |||
| 1024 × 768 48.36 | 60.00 65.00 VESA |
Optimal settings for this product are as listed above. It is suggested that you select appropriate settings from this table to obtain optimal performance.
11 Dimensional Drawings
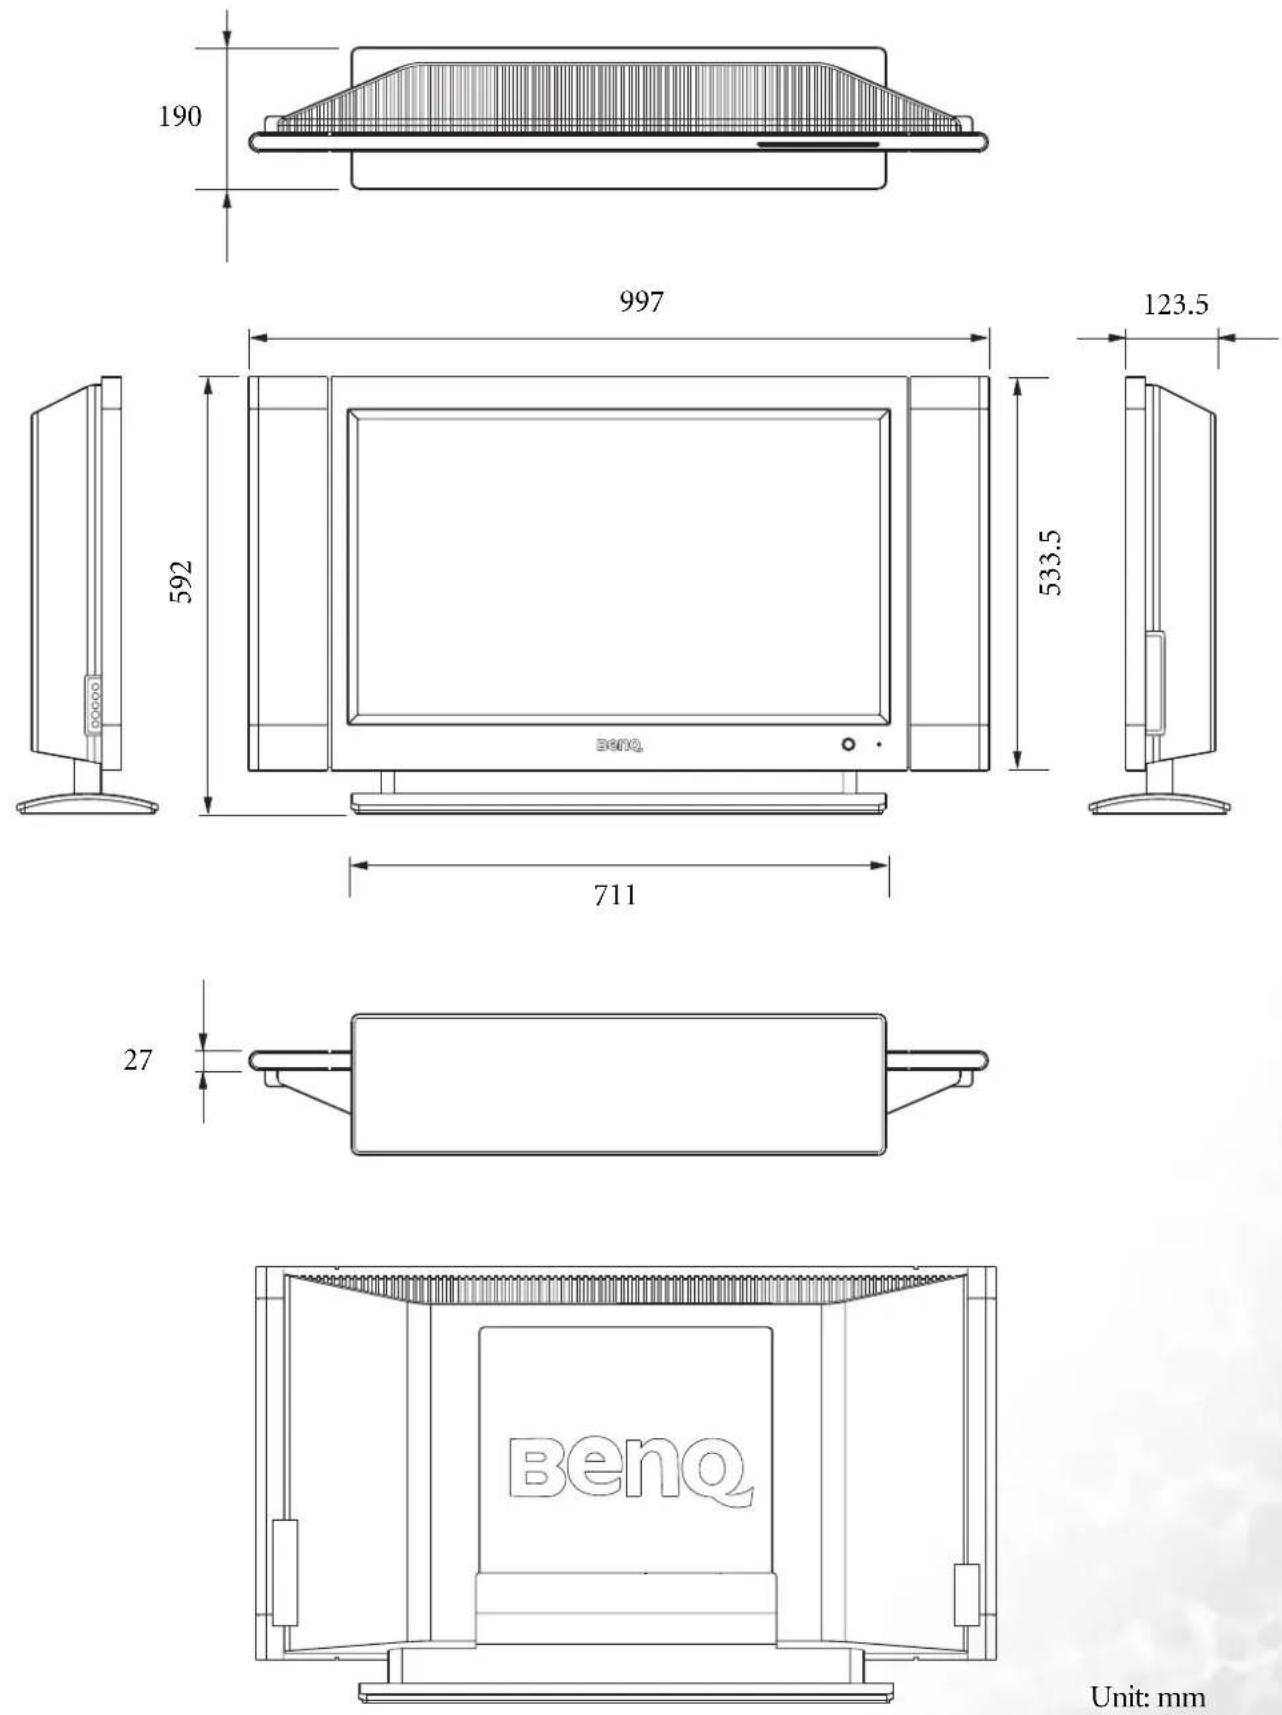
Unit: mm


- Disclaimer
- Important Safety Instructions
- Important Information
- Table of Contents
- Introduction......1
- Package Contents....2
- Getting Started with Your Display....3
- Setting up Your Display ....7
- Remote Control ....13
- Using the Remote Control ....16
- On-Screen Display (OSD) Menu 23
- Troubleshooting.... 37
- Specifications.... 39
- Supported Modes 40
- Dimensional Drawings.... 41
- Introduction
- Functions and Features
- Package Contents
- Getting Started with Your Display
- Terminal Panel
- Setting up Your Display
- Connecting the Antenna
- Connecting CATV
- Antenna
- Installation of an Outdoor Antenna
- Connecting Audio and Video Signal Sources
- Connecting Composite (AV) Video Signal (RCA)
- Connecting Composite (AV) Video Signal (SCART)
- Connecting S-Video Signals
- Connecting Component Video Signals
- Connecting RGB Signals (Mini D-SUB)
- Connecting DVI/HDCP Signals
- Connecting Audio Output Signals
- Connecting the Power Cord
- Initial Setup
- Remote Control
- ⏻ (Power)
- → (Input)
- (Backlight)
- i+ (Information)
- (Sleep timer/Teletext page selection)
- (TV sound/Teletext page selection)
- (Picture mode/Teletext page selection)
- (Audio mode/Teletext page selection)
- (Teletext display)
- ③ (Teletext index)
- ☐ (Teletext information)
- (Enter Teletext subpage)
- (Teletext)
- ⑪ PIP/PBP
- ▲/▼/▶/◀ and OK
- / (Freeze)
- ⏻/ ⏻ (Screen aspect ratio)
- ▲ /▼ (Sequential channel selection/Teletext page selection)
- +/-
- MENU
- (Mute)
- Channel selection
- 5 (Channel return)
- Channel entry
- Using the Remote Control
- Batteries
- Notes on Using Batteries
- Turning on the display
- Turning off the display
- Adjusting Volume
- Changing Channels
- Adjusting the volume
- Mute setting
- TV sound mode selection
- Using the Channel selection buttons on the Remote Control to Change Channels
- Selecting a Picture Mode
- Using the Freeze Function
- Adjusting Aspect Ratio
- Using the Picture-in-Picture (PIP)/Picture-by-Picture (PBP) Function
- Using the Sleep Timer
- Adjusting Backlight
- Display Information
- Using the Teletext Function
- On-Screen Display (OSD) Menu
- Navigating the OSD Menu
- Audio Menu
- Picture Menu
- Picture Mode Settings
- Feature Menu
- TV Menu
- Performing Manual Installation
- Editing Channels
- Naming a Channel
- Swapping Channels
- Locking (Preventing a Channel from Selection)/Unlocking a Channel
- Deleting a Channel
- Child Lock
- Enabling/Disabling Child Lock
- Changing Password
- PC Menu
- Troubleshooting
- Supported Modes
Brand : BENQ
Model : DV3250
Category : Television