
STB-6000 - TV Decoder Laser - Free user manual and instructions
Find the device manual for free STB-6000 Laser in PDF.


| Product Type | Laser Measuring Device |
| Brand | Laser |
| Model | STB-6000 |
| Power Source | 2 x AA batteries (1.5V) |
| Battery Life | Up to 20 hours continuous use |
| Laser Class | Class 2 (<1 mW, 635 nm) |
| Measurement Range | 0.05 – 50 m |
| Accuracy | ±2.0 mm |
| Dimensions (H x W x D) | 120 x 60 x 30 mm |
| Weight | 180 g (with batteries) |
| Operating Temperature | -10°C to +50°C |
| Housing Material | ABS plastic |
| Color | Yellow and black |
| Self-Leveling | Yes, automatic within 4° |
| Accessories Included | Carrying case, target plate, user manual |
| Safety Features | Auto power-off after 3 minutes idle |
| Maintenance | Clean lens with soft, dry cloth; store in case |
| Warranty | 2 years against manufacturing defects |
Frequently Asked Questions - STB-6000 Laser
User questions about STB-6000 Laser
0 question about this device. Answer the ones you know or ask your own.
Ask a new question about this device
Download the instructions for your TV Decoder in PDF format for free! Find your manual STB-6000 - Laser and take your electronic device back in hand. On this page are published all the documents necessary for the use of your device. STB-6000 by Laser.
USER MANUAL STB-6000 Laser
Please read carefully before use
Table of Contents
IMPORTANT SAFETY INSTRUCTIONS AND PRECAUTIONS 4
WHAT IN THE BOX 4
INSTALLING THE BATTERIES 4
SET TOP BOX 5
Front Panel 5
Rear Panel 5
REMOTE CONTROL 6
Key Function 7
CONNECTING TO A TELEVISION 8
Power 8
Video and Audio Connection 9
Connection Method A: Composite 9
Connection Method C: HDMI 9
Audio Connection 9
FIRST TIME INSTALLATION 9
OSD Language 9
Country 10
Channel Search 10
BASIC OPERATION 10
Channel Selection 10
Volume Control 10
Channel Information 10
MAIN MENU 11
Program 11
Program Edit 11
EPG & Scheduling 12
Sort 13
LCN 13
Picture. 13
Channel Search 14
Auto Search. 14
Manual Search 14
Country 14
Antenna Power 14
Time 15
Time Offset 15
Country Region 15
Time Zone 15
STB-6000
USER MANUAL
Sleep 15
Option 15
OSD Language 15
Subtitle Language 15
Audio Language 15
Digital Audio 15
System Setting 16
Parental Guidance 16
Set Password 16
Restore Factory Defaults 16
Information 16
USB 16
Multimedia 16
Photo Configure 17
Movie Configuration 17
PVR Configuration 17
Simple Program Recording 19
Time Shifting Live TV 19
Connecting a USB Device 19
Connecting a USB FLASH Drive 19
Connecting a 2.5" (Notebook) Hard Drive 19
TROUBLE SHOOTING 20
TECHNICAL SPECIFICATIONS 20
Available accessories 21
Contact information 21
IMPORTANT SAFETY INSTRUCTIONS AND PRECAUTIONS
- Read all instructions carefully before use.
- Retain manuals for future reference.
- Use this product only in the manner described.
- Only use a water-dampened soft-cloth to clean the surface of this product.
- Use electronic devices in well ventilated areas & not exposed to excess vibration.
- The following will damage this product: any liquid such as water or moisture, extreme heat, cold, humidity, dusty or sandy environments.
- Disconnect this product from mains power and antenna during lightning storms.
- Only place this device on stable surfaces and ensure that any attached cables are secure and will not cause the device to fall.
- There are no user serviceable parts in this product.
- Un-authorized attempts to dismantle or repair this product will void product warranty and may result in dangerous electric shock.
- Remove any power or data cords by pulling them from the plug and not the cord.
• Using this device near other electronic devices may cause interference. - When recording images or video using this product please be respectful or the
• Copyright requirements and restrictions as they apply to each program in your area. - Images shown in this document are for references only and there may be differences between images and actual products.
- Do not mix old and new batteries in the remote.
• We reserve the right to change the products and/or documentation without notice.
WHATS IN THE BOX
1 x STB-6000 HD Set Top Box
1 x Remote control
1 x AV Cable (Composite RCA)
1 x User Manual (This Document)
INSTALLING THE BATTERIES
- Remove the battery compartment cover on the rear of the Remote control.
- Insert the 2 X AAA batteries (supplied) in to the compartment being sure to match the polarities with the markings in the compartment.
- Fit the cover back on the remote control and make sure that it locks in place.
1.Open the cover
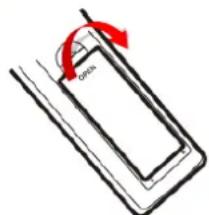
- Install batteries

natural_image
Diagram of a car door handle with a red arrow indicating direction (no text or symbols)- Close the cover
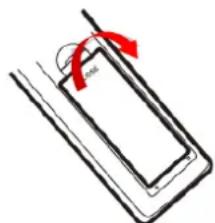
natural_image
Simple line drawing of a rectangular object with a red arrow indicating rotation or force direction (no text or symbols)Note: Please do not mix old and new batteries in this remote. Remove batteries if remote is not going to be used for long periods.
SET TOP BOX
Front Panel
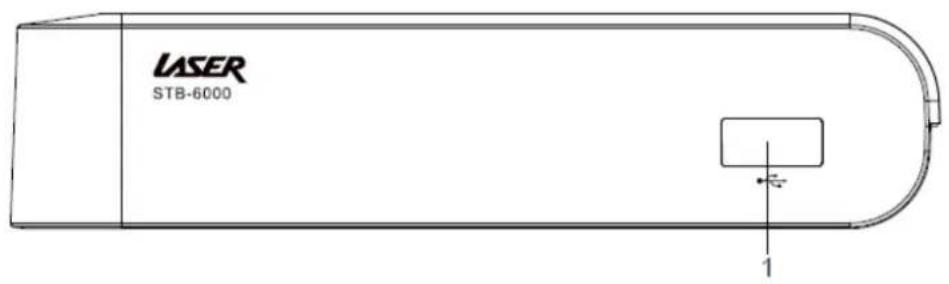
| Item | Description |
| 1 USB | Socket |
Rear Panel
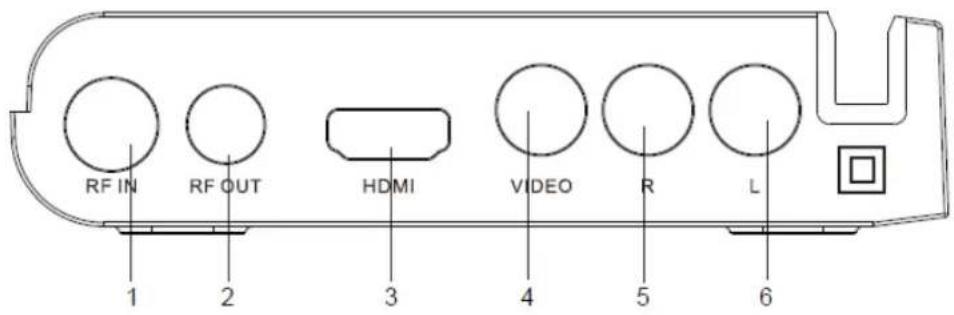
| Item | Description | Item | Description |
| 1 Antenna In 4 Video Output | |||
| 2 Antenna Loop Through 5 Audio Left/Right output | |||
| 3 HD MI Output 6 Audio Left/Right output | |||
STB-6000
USER MANUAL
REMOTE CONTROL
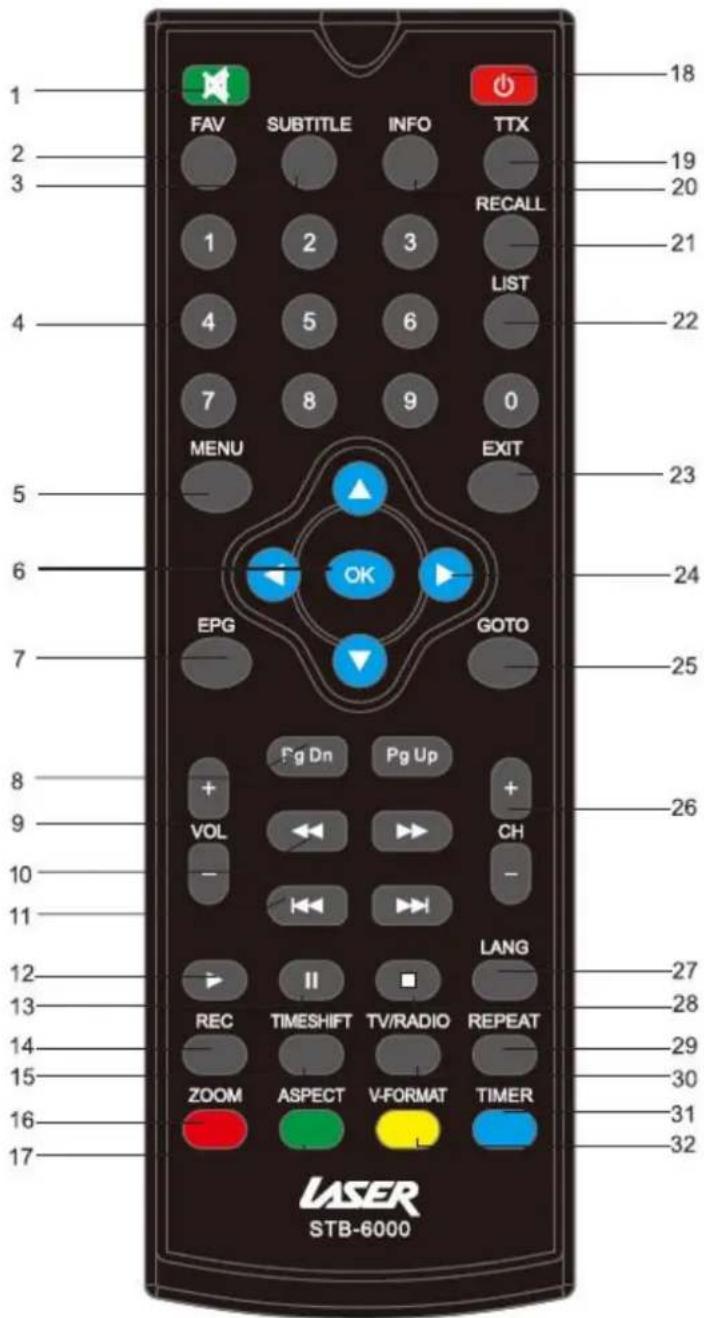
| 1 | MUTE |
| 2 | FAVOURITES |
| 3 | SUBTITLES |
| 4 | NUMERIC KEYS |
| 5 | MENU |
| 6 | OK (BUTTON) |
| 7 | EPG |
| 8 | PAGE UP/DOWN |
| 9 | VOLUME UP/DOWN |
| 10 | REWIND / FAST FOREWARD |
| 11 | PREVIOUS/NEXT |
| 12 | PLAY |
| 13 | PAUSE |
| 14 | RECORD |
| 15 | TIMESHIFT |
| 16 | ZOOM |
| 17 | ASPECT |
| 18 | POWER ON/OFF |
| 19 | TELETEXT (WHERE AVAILABLE) |
| 20 | INFORMATION |
| 21 | RECALL |
| 22 | LIST |
| 23 | EXIT |
| 24 | DIRECTION (FOR CURSER) |
| 25 | GOTO |
| 26 | CHANNEL UP/DOWN |
| 27 | LANGUAGE |
| 28 | STOP |
| 29 | REPEAT |
| 30 | TV / RADIO (SWITCH MODE) |
| 31 | TIMER |
| 32 | V-FORMAT (RESOLUTION) |
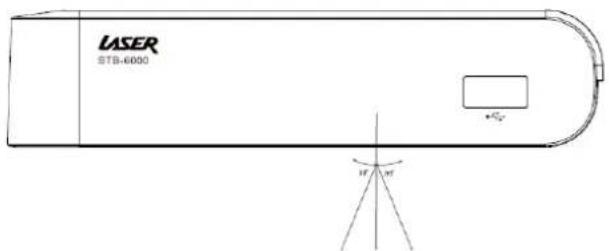
NOTE: To use the Remote Control, point it towards the front of the Digital Set Top Box. The Remote Control has a range of up to 7 metres from the Set Top Box at an angle of up to 30 degrees.
Key Function
| Button Action | |
| MUTE Mute or restore Audio | |
| FAVOURITES Displays Favourite Channel list. | |
| SUBTITLES Displays Subtitle language information | |
| NUMERIC KEYS Enter music track or chapters in movies (where supported) | |
| MENU Displays all the maim menus. | |
| OK (BUTTON) Displays Channel listing DVB-T mode or confirm selection | |
| EPG Displays EPG (Electronic Program Guide) | |
| PAGE UP/DOWN Navigate up and down through menu items | |
| VOLUME UP/DOWN Increase/Decrease volume | |
| REWIND / FAST FORWARD Rewind / Fast Forward through Media playback | |
| PREVIOUS/NEXT Skips to the Previous/next track/file during media playback | |
| PLAY Start playback | |
| PAUSE Pause playback | |
| RECORD | Start recording current program |
| TIMESHIFT | Pause live TV (records as a file for playback) |
| ZOOM Picture Viewing mode Press to Zoom in on Image | |
| ASPECT | In DTV mode, press to change to different Aspect Ratios. |
| POWER ON/OFF | Places the STB into Standby mode or wakes it up |
| TELETEXT | Streaming information on your TV (where service is provided) |
| INFORMATION | Displays additional channel and program information |
| RECALL | Previous/Last screen or channel. |
| LIST Display the PVR list of recordings | |
| EXIT | Exits current screen or returns to the previous channel |
| DIRECTION (FOR CURSER) | Navigate through menus. |
| CHANNEL UP/DOWN | Select a Channel up or down |
| LANGUAGE | Selects an Audio language or mode (if broadcast) |
| STOP | Stop the current playback |
| TV / RADIO (SWITCH MODE) | Switches between DVB-T (TV) and DVB-R (Radio) |
| TIMER | Display recording schedule |
| V-FORMAT (RESOLUTION) | In DVT mode press to cycle through different Resolutions options. |
NOTE: Some features on this remote rely on the feature being available during the broadcast. Button may not respond if function is not available.
CONNECTING TO A TELEVISION
Power
- Turn the TV off at the main power outlet.
- Check the Main Power switch on the rear of the STB-6000 and the mains outlet that it is to be connected too is in the off position.
- Connect the Antenna cable to the ANT In socket.
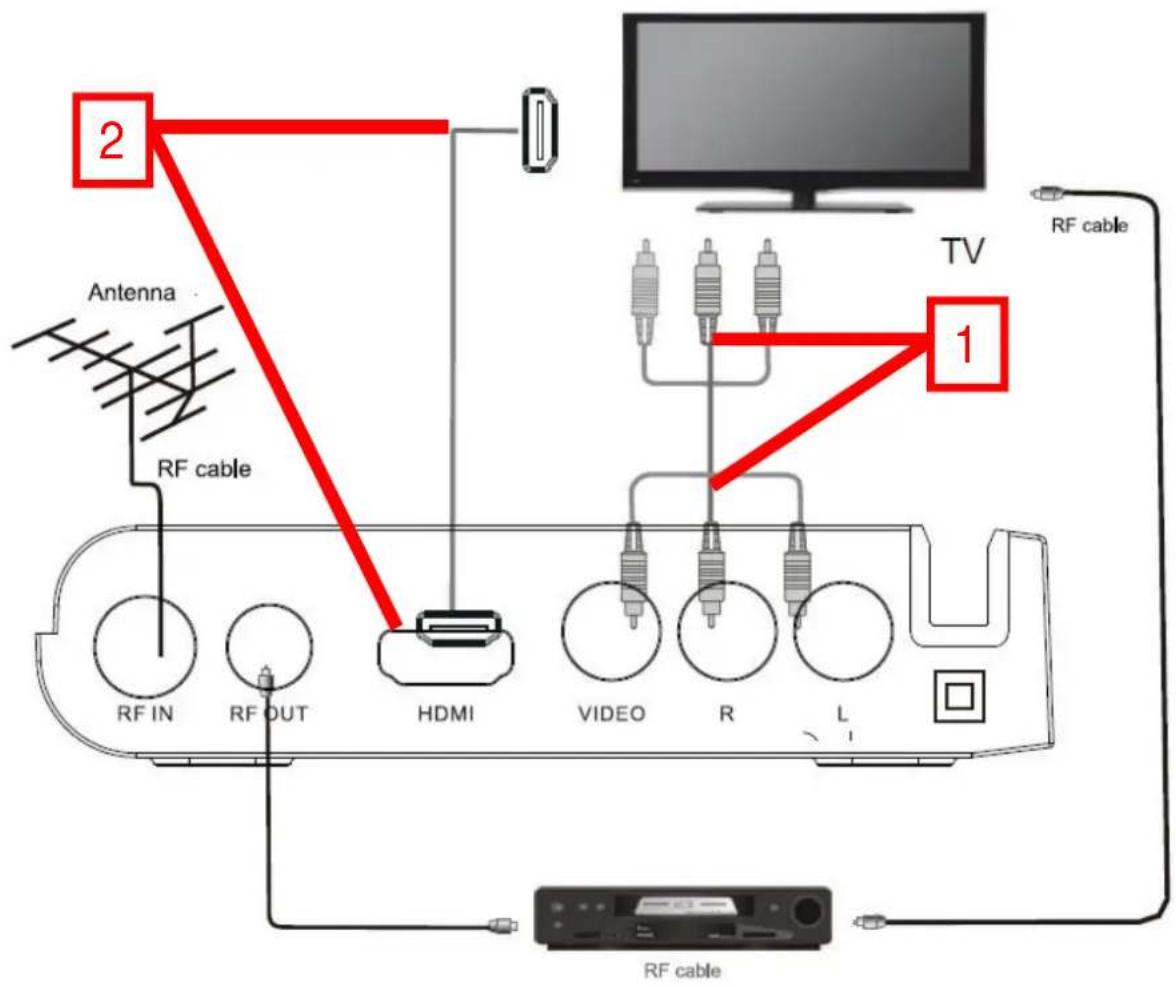
- Choose the best connection method for your Equipment. There are 2 possible connection methods and the type that you choose may depend on the type of TV that you have.
- You can also connect the digital 5.1 audio coaxial output to your Amplifier receiver if you have one.
STB-6000
USER MANUAL
Video and Audio Connection
Connection Method 1: Composite Quality = Fair to Good
The composite cable (supplied) comprises of 1 x Video Cable (yellow), 1 x Left Channel Audio (White) cable and 1 x Right Channel Audio (Red) cable.
Best Used for: Older CRT Type televisions or other displays with only a standard AV input.
Connection Method 2: HDMI Quality = Best
HDMI (High-Definition Multimedia Interface) is the preferred connection method as the HDMI cable (not supplied) allows full HD Digital signal transmission to the TV.
Best Used For: Any TV that has an HDMI input.
Audio Connection
Audio can be connected to an external amplifier / receiver.
- Connect the Stereo Left and Right channels (White & Red) to the back of the Set Top Box and the corresponding inputs on the back the audio device.
- Connect a SPDIF Coaxial Audio Cable (not supplied) to the rear of the Set Top Box and the corresponding inputs on the back the audio device for full surround sound.
FIRST TIME INSTALLATION
Once the STB-6000 has been connected to the power and to the TV and after all audio connections have been made properly, switch on TV.
Press Power button to switch the Set Top Box (STB) unit on.
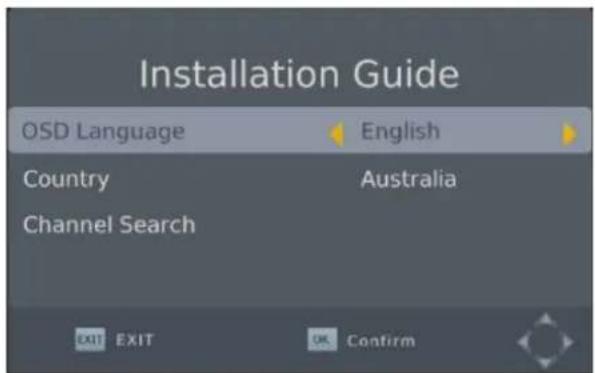
If you are using the unit for the first time or have restored the unit to Factory Default, the Installation Guide Menu will appear on your TV screen.
OSD Language
To set the OSD (On Screen Display) Language press the LEFT/RIGHT buttons on the remote until the desired Language is displayed and then press the DOWN button.
Country
To change the Country Settings press the LEFT/RIGHT buttons on the remote until the desired Country is displayed and then press the DOWN button.
Channel Search
Press OK to start the Channel Auto Search.
The System will now scan for the available channel in your area.
Found DVB-T Channels are shown in the left window and radio stations are displayed in the right.
Total progress is displayed in the bar below.
Press the EXIT or Menu Button to stop the scan at any time.
Once the Scan is complete the first Station is shown.
BASIC OPERATION
Channel Selection
A. Use the UP or Down Buttons to go up or down through the channels individually or
B. Press the OK button to display the Channel list.
C. Press the LEFT/RIGH button to Change to the radio channel List.
D. Press the EXIT button to close the channel list and return to TV viewing.
E. If you know the channel number it can be entered in directly using the Numeric Key Pad.
Volume Control
Press the LEFT (VOL-) button to decrease the volume
Press the Right (VOL +) button to increase the volume
Press the MUTE button to mute the audio output. Press again to restore audio.
Channel Information
Press the INFO button on the remote control to display the current channel and program information including:
- Current channel name, number and current time.
- Current and Next program name, start and finish time
Press the INFO Button again to see more detailed information about the channel and program as well as signal strength.
MAIN MENU
Press the MENU button to access the main system menu.
Use the LEFT and RIGHT buttons to scroll across to select the Menu Section that you require and then press the OK or DOWN button to access the required Menu Section.
Press the OK button to confirm any selection or changes made in the Menu or press the EXIT button to return to the previous screen.
Press the MENU button to close the menu button and return the TV screen.
Program
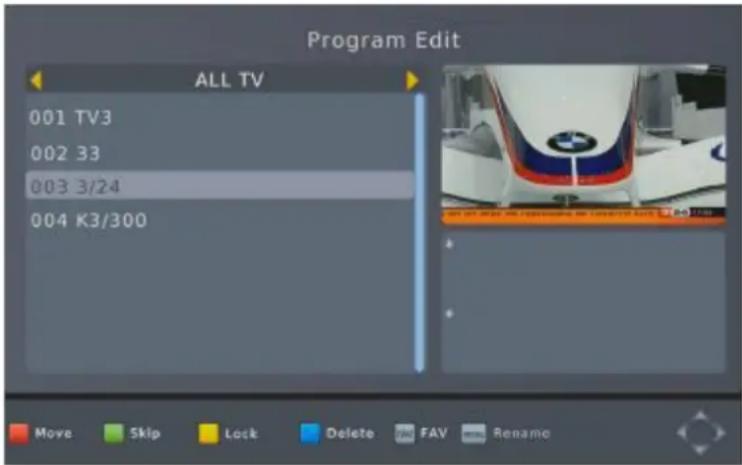
Program Edit
To edit your program preferences (lock, skip, favourite, move or delete), you will need to enter the Program Edit Menu. This Menu requires a password for access and it is "000000" (6 zeros)
Press the LEFT/RIGH button to Change to the radio channel List.
| Action | Button | Description |
| MOVE RED | Select the channel to move and press the RED button. Use the UP and Down Button to move the channel and then press the OK button to confirm. | |
| SKIP GREEN | Press the GREEN button to select the channel to be skipped. Press GREEN again to stop the SKIP | |
| LOCK YELLOW | Use the UP and DOWN buttons to select the channel to LOCK and then press the YELLOW button. Press again to unlock LOCKED channels will require the password to be viewed. | |
| DELETE BLUE | Use the UP and DOWN buttons to select the channel to DELETE and then press the BLUE button. Press OK to confirm or EXIT to cancel. | |
| FAVOURITE | FAV | Use the UP and DOWN buttons to select the channel to add as a FAVOURITE and then press the FAV button. Use the UP and Down button to select the category to save the channel as and press the OK button to confirm. Multiple categories are possible. |
| RENAME MENU | Use the UP and DOWN buttons to select the channel to rename and then press the MENU button. Use the UP/DOWN/LEFT/RIGHT button to select each letter and press the OK button to confirm the letter. Select and confirm the OK button on the screen to save the changes. |
Note: Please see "System Setting" section later in this manual for more information on password protection.
STB-6000
USER MANUAL
EPG & Scheduling
The EPG is an on-screen TV guide that shows scheduled programs up to seven days in advance for every tuned channel.
Press the EPG button on the Remote Control to access the guide.
Use the LEFT and RIGHT buttons to change the channel.
Use the UP and DOWN button to scroll through the EPG and highlight the program you are interested in. The program information is displayed on the right hand side of the window. If more than one page of information is available use the YELLOW or BLUE buttons to display the different pages.
Once you have found a program that you are interested in you can set a reminder to view the program or record it if you are not going to be available to watch it.
Press the OK button to Book or Schedule and program.
Use the UP and DOWN buttons to select the option to change and the use then the LEFT or RIGHT button to change it. All fields will default to the details of the program that you have selected.
| SELECTION | OPTION | DESCRIPTION |
| CHANNEL TYPE | TV / RADIO | Choose between TV and Radio |
| CHANNEL NO | Available Channels | Change the channel to book |
| CHANNEL NAME | Default | As per Broadcast or edited. |
| START DATE | Set the date of the booking to commence (MM/DD/YY) | Use the LEFT/RIGHT Button to select the field to change and use the numeric pad to enter the new number. |
| START TIME Set the Start Time | Use the LEFT/RIGHT Button to select the field to change and use the numeric pad to enter the new number. | |
| END TIME Set the End Time | Use the LEFT/RIGHT Button to select the field to change and use the numeric pad to enter the new number | |
| REPEAT ONCE / DAILY / WEEKLY | Select whether you wish to have the booking repeat every day, every week on the same day or just once. | |
| MODE VIEW / RECORD | Select to View the program or record it. Recording requires a USB device with enough available space for the recording. | |
MAIN MENU
To accept all details as displayed please use the OK button on the remote. Or change the options as described below.
Once a Booking has been made the Schedule screen will be shown with all bookings displayed.
STB-6000
USER MANUAL
The Status icons:
Green = Booked for Viewing
Orange/RED = Booked for recording
Programs are also marked as booked in the EPG.
MAIN MENU
| Action | Button | Description |
| ADD RED | Press the RED button to Add a booking manually. | |
| EDIT GREEN | Press the GREEN button to edit the selected booking. | |
| DELETE BLUE | Delete the selected booking. | |
| EXIT EXIT | Press the EXIT button to return to the EPG screen |
Sort
Sort your channels from the following options:
| Sort type | Description |
| LCN (LOGICAL CHANNEL NAME) | Sort the channels in ascending order. |
| ONID | Sort the channels according to ONID |
| SERVICE NAME | Sort the channels in alphabetical order. |
| SERVICE ID | Sort the channels according to the station. |
LCN
Set LCN to ON or OFF
Picture
The Picture menu allows you to alter the way the display is shown on you TV from the Aspect Ratio to the resolution.
| SELECTION | OPTIONS | DESCRIPTION |
| ASPECT RATIO | 16:9 Wide ScreenAuto4:3 Full4:3 Pan & Scan | Set the best aspect ratio that suits you TV and or picture being displayed. |
| RESOLUTION | [480P]: for NTSC TV system.[576P]: for PAL TV system.[720P]: for NTSC or PAL TV system.[1080I]: for NTSC or PAL TV system. | Change the output resolution to suit your TV.Not for Composite output. |
| TV FORMAT | PALNTSCAUTO | Set the colour system used by your TV. If in doubt use the Auto option. |
| VIDEO OUTPUT | CVBSS-VIDEOYPbPr | Set the analogue output used.(S-VIDEO is not used) |
STB-6000
USER MANUAL
Channel Search
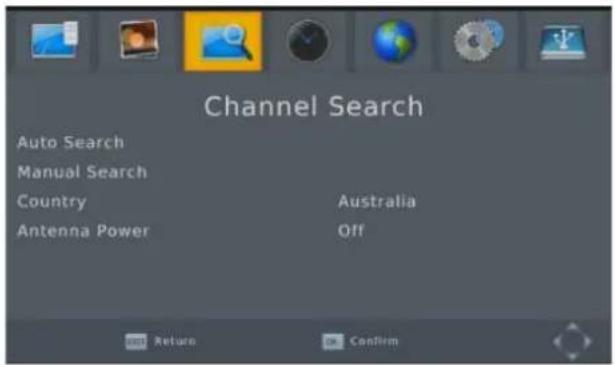
This Menu provides options to adjust the Search Channel settings.
Auto Search.
Use the RIGHT button or the OK button to start the full Auto search of all TV and Radio channels.
This option will delete all previously scanned channels. A full scan can take several minutes.
Manual Search
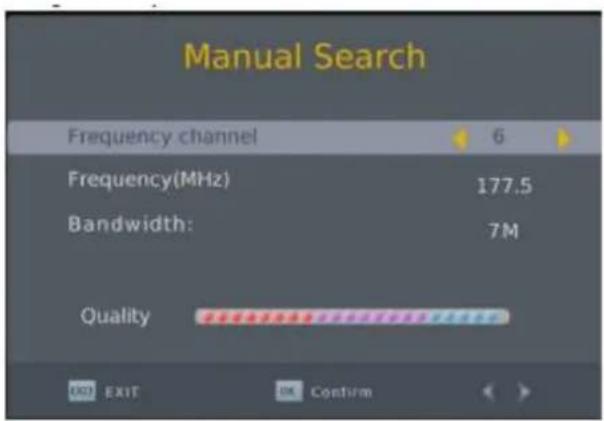
This option allows you to scan for new channels without deleting previously saved channels and settings.
Use the LEFT or RIGHT button to select the frequency channel to scan and then press the OK button to start the search.
The quality status bar will indicate the quality of the signal.
Country
Select your country of residence.
Antenna Power
Select ON only if an external active antenna is connected
MAIN MENU
Time
Set the times zone for you area of residences.
Time Offset
AUTO Sets GMT Offset based on Country Region
MANUAL Requires the GMT offset to be set manually and disables the Country Region option
Country Region
Use the LEFT and Right buttons to select the region of residence.
Time Zone
Set the GMT offset when Time Offset option is set to manual. Use the LEFT and Right buttons to select the Offset for your region.
Sleep
The Sleep option allows you to set a time that the STB will automatically turn off from the last input from the remote control. Options are 1 to 12 hours set in 1 hour increments. OFF disables the Sleep feature.
Option
OSD Language
Sets the language used by the display. Use the LEFT/RIGHT buttons on the remote, until the desired Language is displayed and then press the DOWN button.
Subtitle Language
Sets the language used by the subtitles. Use the LEFT/RIGHT buttons on the remote, until the desired Language is displayed and then press the DOWN button.
Note: Only available if chosen subtitle language is being transmitted.
Audio Language
Set the preferred audio language for watching TV channels. If the language is not available, the default program language will be used.
Note: Only available if chosen Audio language is being transmitted.
Digital Audio
Set the Digital audio output of the STB-6000.
Options are: PCM, RAW or OFF. Please refer to your Audio equipment documentation for the best setting for your equipment.
STB-6000
USER MANUAL
System Setting
The menu provides options to adjust the system settings.
Parental Guidance
Select the parental level you desire for disc with lock-out function or multiple rating levels.
There are listed in AGE from the level 1 to the highest level 18.
Note: This feature requires a password to access and allows viewing to be restricted via password for programs that are outside the restrictions.
Set Password
Set or change the password for locked programs.
Input Old Password: Use the Numeric keypad to enter the old password.
Input New Password: Use the Numeric keypad to enter the New password.
Confirm Password: Use the Numeric keypad to enter the New password to confirm.
Note: The Default password is "000000"
*WARNING* Restoring Factory Defaults will remove all saved channel information and settings. All Scheduled recordings will be deleted. Please use with care.
Press the OK button to begin and then enter the password.
Press the OK button to confirm or press the EXIT button to return to the previous screen without Restoring Defaults.
Information
Displays the current information about Model, Hardware and Software reversion numbers.
USB
The USB settings menu allows you to change the way the STB displays multimedia from USB devices as well as managing the device its self.
Multimedia
When a USB device is attached you can select from the Music, Photo or Movie options in this menu using the RIGHT/LEFT keys and OK to select.
If a USB device is not connected, the warning message "Not Find Any USB Device" will appear.
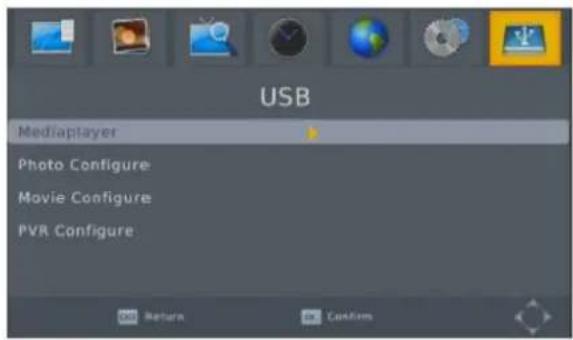
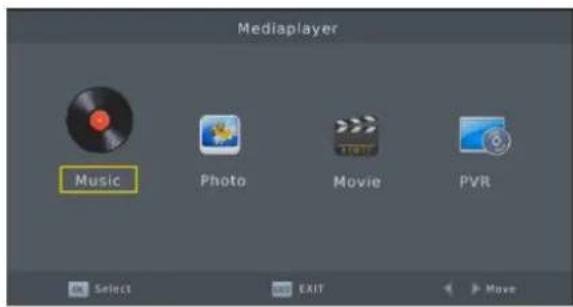
Photo Configure
Use the Right button to enter the Photo configuration menu and set the available options as required.
| SELECTION | OPTIONS | DESCRIPTION |
| SLIDE TIME 1 to 8 seconds | Set the number of seconds to display each picture. | |
| SLIDE SHOW | 1 to 59 Random | Set the Slide Show Effect to a fixed type or set to Random effects. |
| ASPECT RATIO | KEEP DISCARD | Use KEEP to show picture in original format or DISCARD to have images Fit the Screen. |
Movie Configuration
Use the Right button to enter the Movie configuration menu and set the available options as required.
| SUBTITLE SPECIFIC | SmallNormalBig | Sets the size of the Subtitles for Movie playback |
| SUBTITLE BG | TransparentGrayYellow/GreenWhite | Sets the background colour used for subtitles during movie playback |
| SUBTITE FONT COLOUR | WhiteBlackRedBlueGreen | Sets the font colour used to display subtitles during move playback. |
Note: this option requires the presence of subtitle files to be included in the same directory as the movie files.
PVR Configuration
Use the RIGHT button to enter the PVR Configuration Sub menu.
Record Device
This screen Display information about the connected USB device including
Device File System
Total space on device
Free Space on Device
This feature is useful for deciding if a device has enough room to record a program.
Format
The Format feature allows you to format the attached USB device.
Use the LEFT or RIGHT button to select the File System used to format the device.
FAT32
NTFS
With the selection made press the OK button to start and then again to confirm the format.
Time taken to complete this action will vary on size and type of attached device.
Note: Great care should be used when formatting attached devices. Once the format process is started it cannot be stopped and all data on the device will be lost and cannot be recovered.
MULITMEDIA PLAYBACK
To play back record programs or view media from USB drives MENU, go across to the USB MENU and select MEDIA PLAYER.
Use the LEFT or RIGHT button to select the type of media to access am then press the OK button to select.
Music
In the MUSIC Menu use the LEFT and RIGHT buttons to navigate to the folder on the USB device that contains the music files to play. Select the file and press the OK button to begin playback. Track and playback information are displayed on the right hand window.
Photo
In the Photo Menu use the LEFT and RIGHT buttons to navigate to the folder on the USB device that contains the picture files to view. Select the file and press the OK button to view an individual image or press the PLAY button to begin a Slide Show of all images in the current folder.
MULTIMEDIA PLAYBACK
Press the MENU button to display the images in a grid. Use the LEFT and RIGHT buttons to scroll through and select the image to view and press the OK button.
Movie
In the Movie Menu use the LEFT and RIGHT buttons to navigate to the folder on the USB device that contains the Video files to view. Select the file and press the OK button. Playback of the selected video file will start in the right hand window. Press the RED button to change the video to full screen.
PVR
In the PVR Menu use the LEFT and RIGHT buttons to navigate to the folder on the USB device that contains the Recorded files to view. By default, the STB-6000 will create a folder called PVRRECORD on the USB device when the first recording starts. All subsequent recordings will be saved to this folder automatically
GENERAL INFORMATION
Recordings are automatically named as in the following example.
Press the RED button to view the recorded program in full screen.
Press the YELLOW Button to delete the file.
Press the GREEN button to rename the file.
GENERAL INFORMATION
Simple Program Recording.
Press the REC Button on the remote control to record the current program. Recording will start from the moment the REC button pressed. Press the STOP button to end the recording. Recorded files can be viewed through the PVR menu.
NOTE: this function requires a USB drive to be connected with enough room to record the program.
Time Shifting Live TV
While watch a TV broadcast it is possible to pause the vision and then start the playback a few minute later. Press the PLAY/PAUSE button to the remote to pause the vision. When you ready press the PLAY/PAUSE button again to resume viewing.
GENERAL INFORMATION
The Status bar on the bottom of the screen will indicate how far behind you viewing time is in relation to the actual broadcast.
Up to 1 Hour can be reviewed in this feature.
Use the REV and FWD buttons to fast forward or Rewind the vision.
Press the YELLOW button to enter a specific time to jump to.
Press the STOP to end the time shifting and then press the OK button to confirm.
NOTE: this function requires a USB drive to be connected with enough room to allow the Time Shift Function to work.
Connecting a USB Device
In most cases connecting a USB FLASH drive will be a matter of simply plugging it I to the USB port on the STB-6000.
Please remember that HD TV requires a large amount of space to record.
Please allow approximately 4GB per hour if recording HD programs. Less space will be required for lower resolution programs.
Connecting a 2.5" (Notebook) Hard Drive
It is recommended that 2.5" drives are connected to the STB-6000 using a powered USB hub.
Only single partition drive should be used.
Due to the power requirements of some USB drives, the USB port on this device may not be able to power the drive.
Please ensure that the drive is formatted in FAT32 or NTFS before recording.
TROUBLE SHOOTING
| Problem | Possible Cause | Solution |
| No Picture Power is not connected | ected | Connect the power and make sure unit is turned on. |
| Screen Shows “No Signal” | Antenna cable is not connected | Check the antenna connection to the rear of the STB |
| No sound | No or incorrect audio cable connections | Check connections of audio cables |
| Sound is muted | Un-Mute audio | |
| No picture but sound OK | No or incorrect Video cable connections | Make sure cables are connected correctly. |
| Remote Control is not responding | Batteries are flat Replace. | |
| Picture is breaking up | Signal is too weak | Check antenna connection. |
| USB device is not detected Not powered correctly | Not powered correctly | Check power source (if fitted) or reconnect. |
| Movie Payback out of sync | Faulty file | Check file to ensure not encoding issue |
| File to large for STB | Re-encode file at lower resolution and/or data rate |
SPECIFICATIONS
TECHNICAL SPECIFICATIONS
| TUNER | INPUT FREQUENCY | 170~230MHz471~860MHZ |
| RF INPUT LEVEL | -25~-82DbM | |
| IF BANDWITCH | 7MHz & 8MHz | |
| MODULATION | QPSK, 16QAMM 64QAM | |
| VIDEO | DECODER FORMAT | MPEG4 AVC/H.264 HP@L4MPEG2 MP@ML.HL |
| OUTPUT FORMAT | 576p, 720p, 1080i, 4:3 & 16:9 | |
| OUTPUT PORT | HDMI (V1.3C) YpBpR, cvbs | |
| AUDIO | DECODER FORMAT | MPEG-1 (layer 1&2&3) WMA, AC3 |
| AUDIO OUTPUT | 2 X RCA (L/R), COAXIAL SPDIF | |
| USB 2.0 | SUPPORTED CAPACITY | 750GB |
| SUPPORTED MEDIA | MP3, WMA, JPEG, BMP, AVI, MKV | |
| POWER | SUPPLY VOLTAGE | 100~240VAC 50/60Hz |
| MAXIMUM POWER CONSUMPTION | 8W | |
| STANDBY POWER CONSUMPTION | < 1W |
CONTACT INFORMATION
Contact information
For more information on this product and technical support please visit HTTP://WWW.LASERCO.COM.AU
Warranty Against Defects
Laser Corporation Pty Ltd (“Laser”) warrants your new product to be free from defects in materials and workmanship for 12 months, from the date of purchase, provided that the product is used in accordance with accompanying recommendations or instructions where provided. The benefit of this warranty is in addition to your rights under the Australian Consumer Law and to other rights and remedies of the consumer under a law in relation to the goods or services to which the warranty relates.
Through a network of retailers and resellers, Laser will provide you with your choice of a refund, repair or exchange (where possible) for this product if it becomes defective within the warranty period. This warranty will no longer apply where the defect is a result of alteration, accident, misuse, abuse, normal wear and tear, neglect or improper storage.
Please retain your receipt as proof of purchase
How to make a product warranty claim:
Step 1: Find your receipt which proves the date of purchase. Where the date of purchase cannot be verified, your place of purchase or Laser will make an assessment based on the date of manufacture, the condition of the Laser Product and the type of defect.
Step 2a): Contact your place of purchase. They will assess the nature of the fault and refund or replace the product as per their store refund or warranty policy.
Step 2b): If your place of purchase cannot be contacted, then you can contact Laser. Customer Service with details of your defective Laser Product: Phone: (02) 9870 3388; or Email: support@laserco.com.au or online
www.laserco.net/support/warranty (click on "Consumers (End Users)"). Our business address is at 1/6-8 Byfield Street, North Ryde, NSW 2113
Step 3: Laser . will issue you with a Return Authorisation (RA) number within 48 hours. When requested, send us the defective Product and a copy of your receipt. Laser will cover the cost of the return delivery.
Step 4: Wait for us to contact you. Once we have received your defective Laser Product for inspection, we will inform you of our assessment of your claim within 7 days. When we contact you, we will firstly let you know whether you have a valid claim under this Warranty, and if so, we will inform you whether your defective Laser Product will be replaced or repaired, together with the number of days you can expect to wait to receive your replaced or repaired Laser Product.
Our goods come with guarantees that cannot be excluded under the Australian Consumer Law. You are entitled to a replacement or refund for a major failure and compensation for any other reasonably foreseeable loss or damage. You are also entitled to have the goods repaired or replaced if the goods fail to be of acceptable quality and the failure does not amount to a major failure.

NAVIG[8]R





- Table of Contents
- STB-6000
- USER MANUAL
- IMPORTANT SAFETY INSTRUCTIONS AND PRECAUTIONS
- WHATS IN THE BOX
- INSTALLING THE BATTERIES
- SET TOP BOX
- Front Panel
- Rear Panel
- REMOTE CONTROL
- CONNECTING TO A TELEVISION
- Power
- Video and Audio Connection
- Connection Method 1: Composite Quality = Fair to Good
- Connection Method 2: HDMI Quality = Best
- Audio Connection
- FIRST TIME INSTALLATION
- OSD Language
- Country
- Channel Search
- BASIC OPERATION
- Channel Selection
- Volume Control
- Channel Information
- MAIN MENU
- Program
- Program Edit
- EPG & Scheduling
- Sort
- LCN
- Picture
- Auto Search.
- Manual Search
- Antenna Power
- Time
- Time Offset
- Country Region
- Time Zone
- Sleep
- Option
- Subtitle Language
- Audio Language
- Digital Audio
- System Setting
- Parental Guidance
- Set Password
- Information
- USB
- Multimedia
- Photo Configure
- Movie Configuration
- PVR Configuration
- Record Device
- Format
- MULITMEDIA PLAYBACK
- Music
- Photo
- MULTIMEDIA PLAYBACK
- Movie
- PVR
- GENERAL INFORMATION
- Simple Program Recording.
- Time Shifting Live TV
- Connecting a USB Device
- Connecting a 2.5" (Notebook) Hard Drive
- SPECIFICATIONS
- CONTACT INFORMATION
- Warranty Against Defects
Brand : Laser
Model : STB-6000
Category : TV Decoder