
STB-9000-675 - TV Decoder Laser - Free user manual and instructions
Find the device manual for free STB-9000-675 Laser in PDF.


| Product Type | DVB-T2/C Digital Set Top Box |
| Dimensions (W x D x H) | 120 x 70 x 30 mm |
| Weight | Approximately 0.2 kg |
| Power Supply | 100-240V, 50/60Hz |
| Power Consumption | 6W (max) |
| Tuner Frequency Range | 170-230 MHz, 470-860 MHz |
| Input Impedance | 75 Ω |
| Video Resolution | 480i, 576i, 720p, 1080i, 1080p (Full HD) |
| Video Decoding | MPEG-2, MPEG-4 AVC/H.264 |
| Audio Decoding | MPEG-1 (Layer 1, 2, 3), MP3 |
| USB Drive Support | Up to 750 GB, FAT32 file system |
| Aspect Ratio | 4:3, 16:9, Letter Box |
| Antenna Connector | IEC Type Female (RF IN) |
| Operating Temperature | 5°C to 55°C |
| Storage Temperature | -40°C to +65°C |
| Key Features | Digital TV reception, PVR recording via USB, Timeshift, EPG, Teletext, Parental lock |
| Remote Control Batteries | 2 x AAA (included) |
| Warranty | 12 months (Australian Consumer Law) |
| Cleaning | Wipe with a dry, soft cloth; do not use liquid cleaners |
| Safety | Do not expose to moisture or heat sources; use only supplied power adapter |
Frequently Asked Questions - STB-9000-675 Laser
User questions about STB-9000-675 Laser
0 question about this device. Answer the ones you know or ask your own.
Ask a new question about this device
Download the instructions for your TV Decoder in PDF format for free! Find your manual STB-9000-675 - Laser and take your electronic device back in hand. On this page are published all the documents necessary for the use of your device. STB-9000-675 by Laser.
USER MANUAL STB-9000-675 Laser
Thank you for your purchase!
Laser Corporation is 100% Australian owned & operated. To get the most out of your product please read the user manual carefully and keep for future use.
For specific information relating to your product such as Spare Parts, FAQs, Warranty claims, and more, please scan the following QR code:

WHAT'S IN THE BOX
- Set Top Box
- Remote Control
- 2 x AAA Batteries
- Power Adapter
- RCA Cable
- User Manual
SPECIFICATIONS
TUNER:
| Antenna Connector: | IEC Type Female |
| Input Frequency Range: | 170 – 230MHz,470 – 860MHz |
| Input Impedance: | 75 Ω |
| Input Signal level: | 78 dBm to -20 dBm(average power) |
| IF Bandwidth: | 7MHz and 8MHz |
POWER SUPPLY :
| Input voltage: | 100-240V, 50-60Hz |
| Consumption: Max. | 6W |
AUDIO/VIDEO:
| Aspect Ratio: | 4:3, 16:9, Letter Box |
| Resolution: | 480i/576I /720P/1080i/1080P (FULL HD) |
| Video Decoding: | MPEG4 AVC/H.264 HP @ L4 MP @ L3, MPEG2 |
| Audio Decoding: | MPEG-1 (Layer 1, 2 & 3), MP3 |
MAIN UNIT:
| USB drive size supported: | 750GB (max) |
| USB file system supported: | FAT32 only |
| Set Top Box Dimensions: | 120 x 70 x 30mm |
| Operating Temperature: | 5°C ~ 55°C |
| Storage Temperature: | -40°C ~ +65°C |
SET TOP BOX
FRONT PANEL
![IR Receiver POWER MENU CH- CH+ [001] Power Menu Down Up Display USB Input](/content/2026/05/940326/images/d3810909ad5e2e219981268fd0420eaf93fb5a4207cdd3ff8237a7eb1d4e16d8.jpg)
REAR PANEL
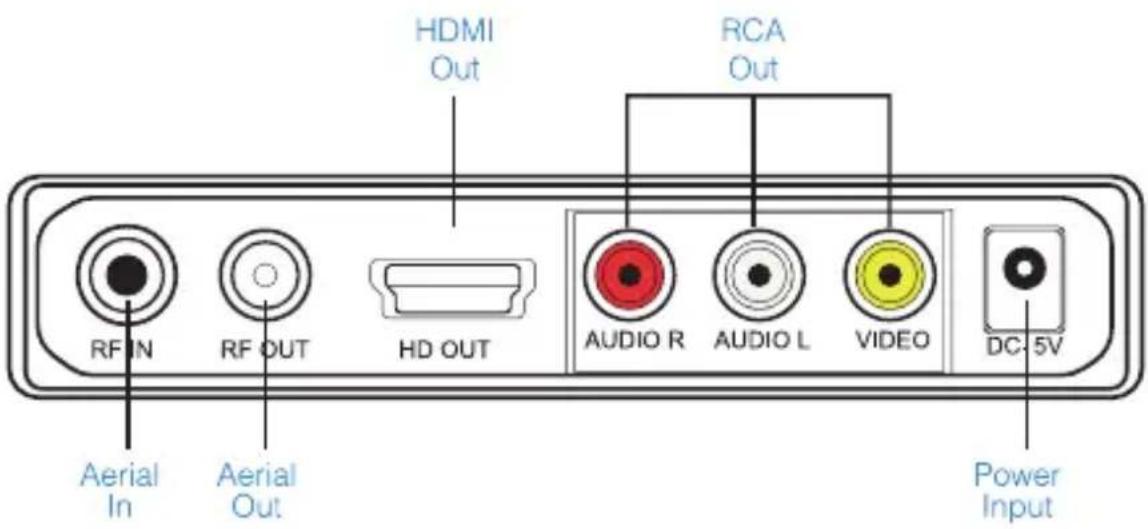
REMOTE CONTROL
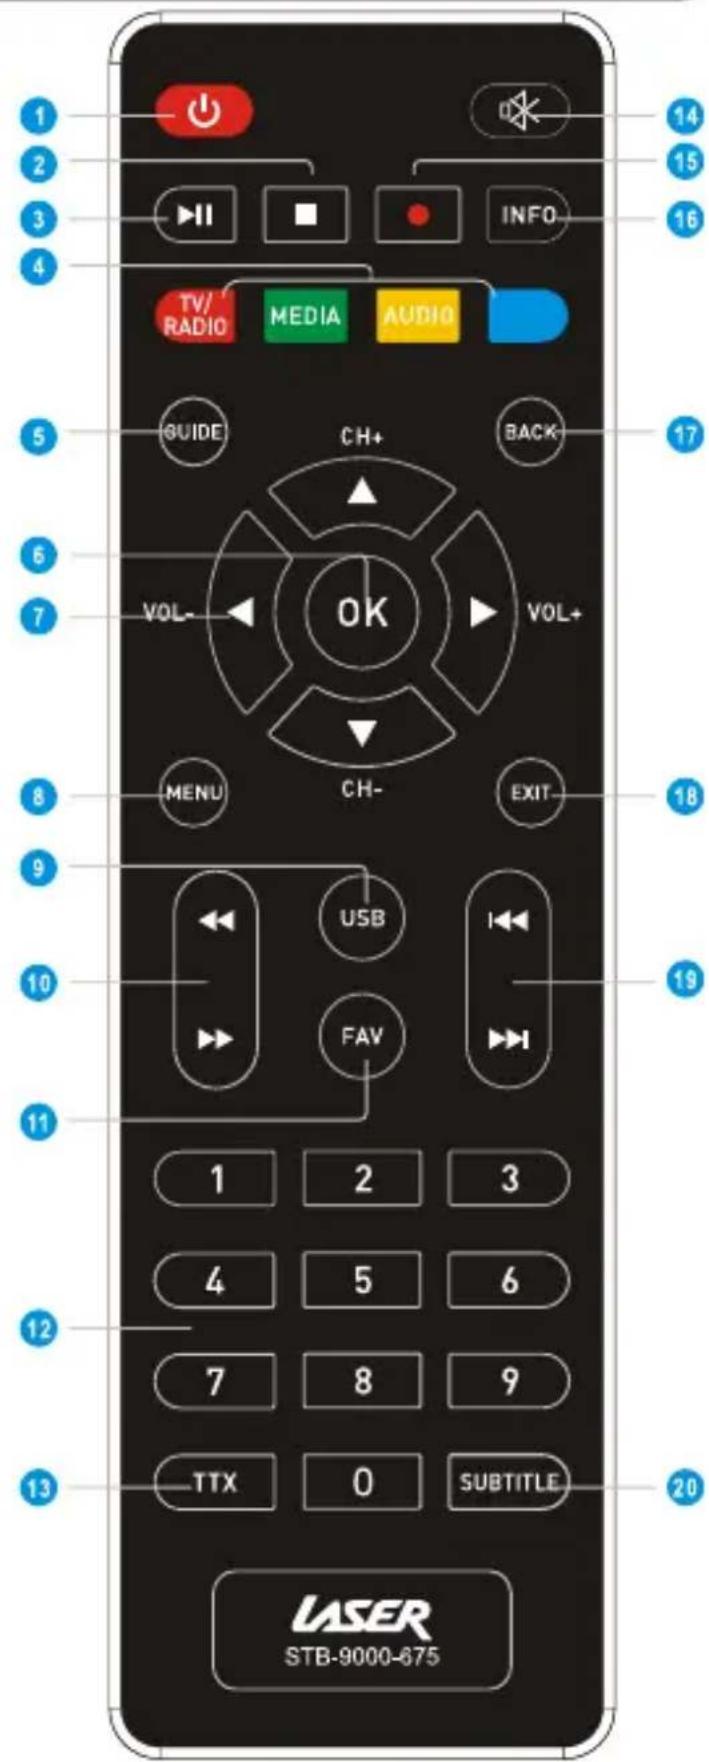
| 1 Power | Power on/off | 10 |  | Rewind | |
| 2 Stop | Stop playback or recording |  | Fast Forward | ||
| 3 | Play/Pause | Play or Pause | 11 FAV | Set or display favourite programs | |
| 4 | TV/Radio | Swap between TV and Radio | 12 0-9 | Number input | |
| Media | Playback recorded content | 13 TTX | Enter/exit Teletext Menu | ||
| Audio | Enter Audio Setting Menu | 14 MUTE | Enable/Disable Mute | ||
| Display recording schedule that was booked via EPG. | 15 |  | Press to manually record current TV/Radio channel when USB storage is connected. | ||
| 5 Guide | Electronic Programming Guide | ||||
| 6 OK | Confirm current selection | 16 INFO | Show/Hide Service information | ||
| 7 | V+ | Incease Volume | 17 BACK | Go back to previous menu/ function. | |
| V- | Decrease Volume | 18 EXIT | Exit current menu/ function. | ||
| CH+ | Channel UP | 19 |  | Skip forward | |
| CH- | Channel Down |  | Skip backward | ||
| 8 MENU | Enter Main Menu | 20 SUBTITLE | Display Subtitles | ||
| 9 USB | Access connected USB device | ||||
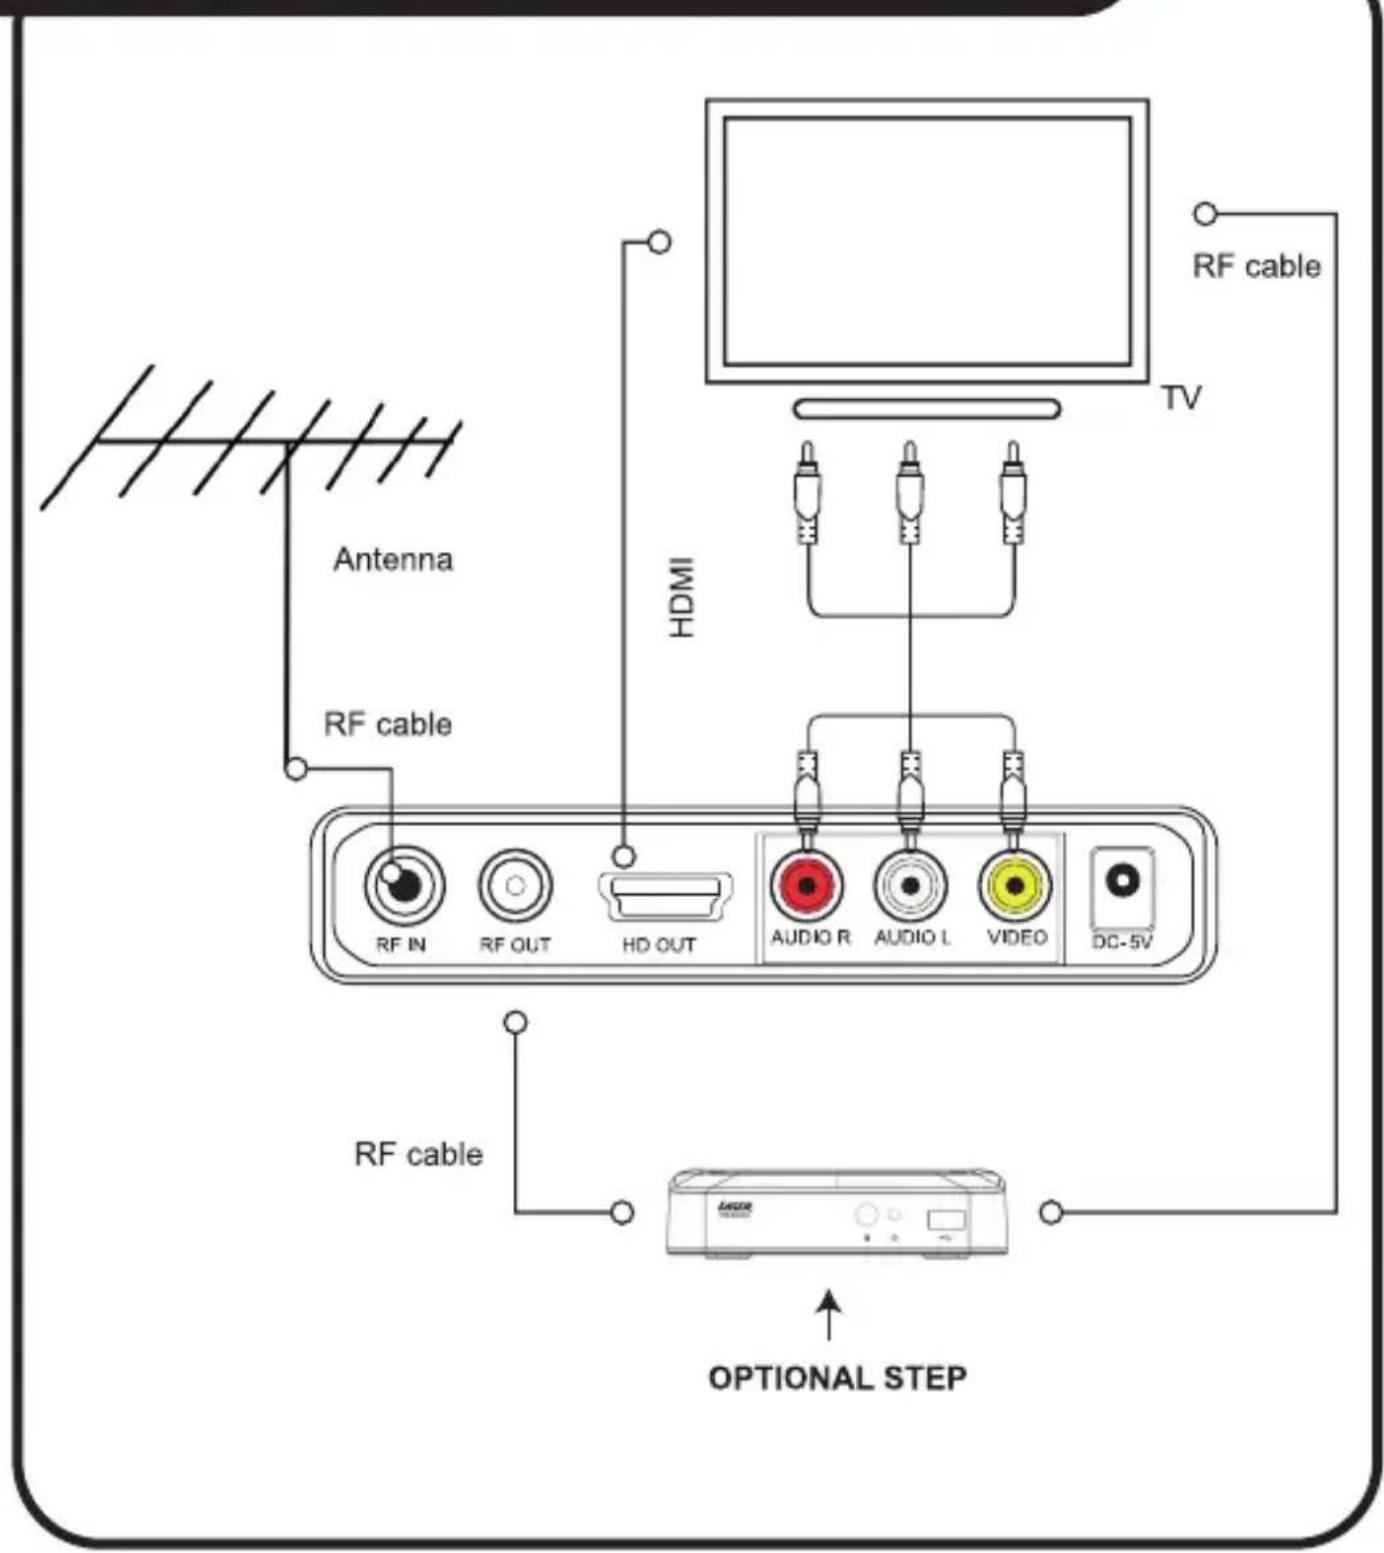
CONNECTING TO A TELEVISION
- Connect an antenna to the RF IN port on the back of the set top box.
- Connect the set top box to your TV using the included RCA cable or a HDMI cable (not included) if you want the best audio and video quality.
- Connect the set top box to the power.
- Optional Step – If you would like to record one channel while watching another or would simply like to send the antenna signal to another device then use the RF Out port and another RF cable.
CONNECTING TO A
TELEVISION
continued...
GETTING STARTED
• Make sure that all connections have been properly made and the power is connected.
- Turn on the TV and change the source/channel to the input that you have plugged the Set Top Box into.
- An installation guide will appear on the screen when your receiver is turned on for the first time or if you have just done a factory reset.
GETTING STARTED
continued...

- OSD Language: Sets the default language used for the on-screen display.
• Country: Set the country that you are using the Set Top Box in. - FTA Only: FTA = Free-to-Air channels only, ALL = Free-to-Air channels + Radio.
GETTING STARTED
continued...
- Search Mode: Set the signal format - DVB-T2 or DVB-C
- Antenna Power: Set whether your antenna is powered or not - Off/On
- Channel Search: Automatically find channel signals within reception range and save them to the default channel list. This list determines which channels are available when you press CH- or CH+.
- You MUST perform this channel search before you can use the Set Top Box.
Note: For Australian users we recommend the settings from the previous screenshot.
SYSTEM MENU
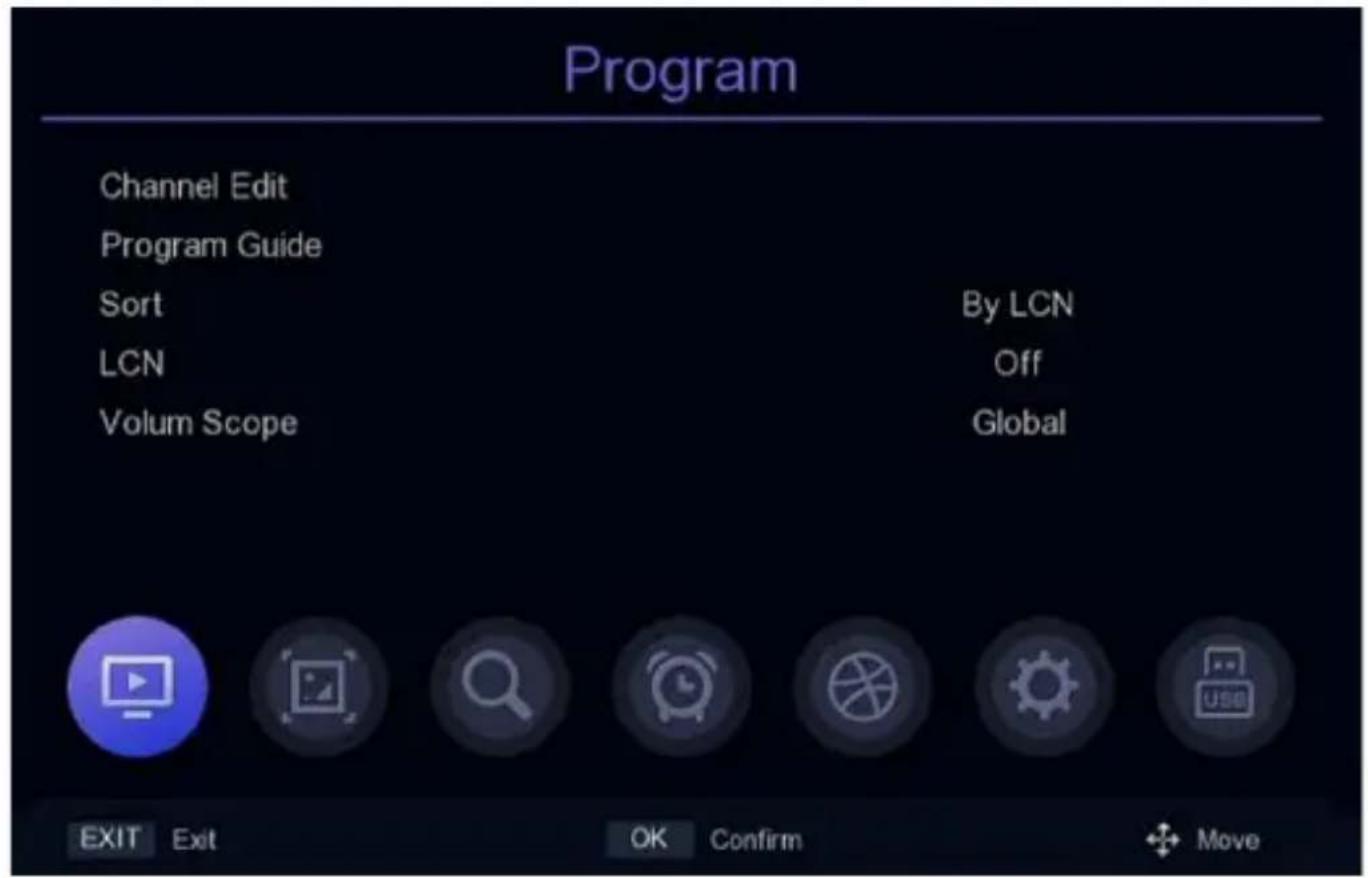
Program
Press MENU on the remote control to access the system menu. The first menu is Program.
SYSTEM MENU
continued...

Channel Edit: Edit your channel program preferences.
Delete: Press [01] to remove a program from the channel list.
SYSTEM MENU
continued...
Move: Press [02], then press UP/DOWN to move the position of the program when the move indicator appears, press OK to confirm.
Skip: Press [03] to mark the program to be skipped in the channel list.
Lock: Press [04] to require a passcode to view a program. A lock indicates that the channel is locked. The default passcode is 000000.
Fav: Press [05] to mark a program for inclusion in the favourite Channel List. A star indicates that the program is favoured.
Rename: Press MEDIA to edit the program name. Use on-screen keyboard to type a new name.
SYSTEM MENU
continued...
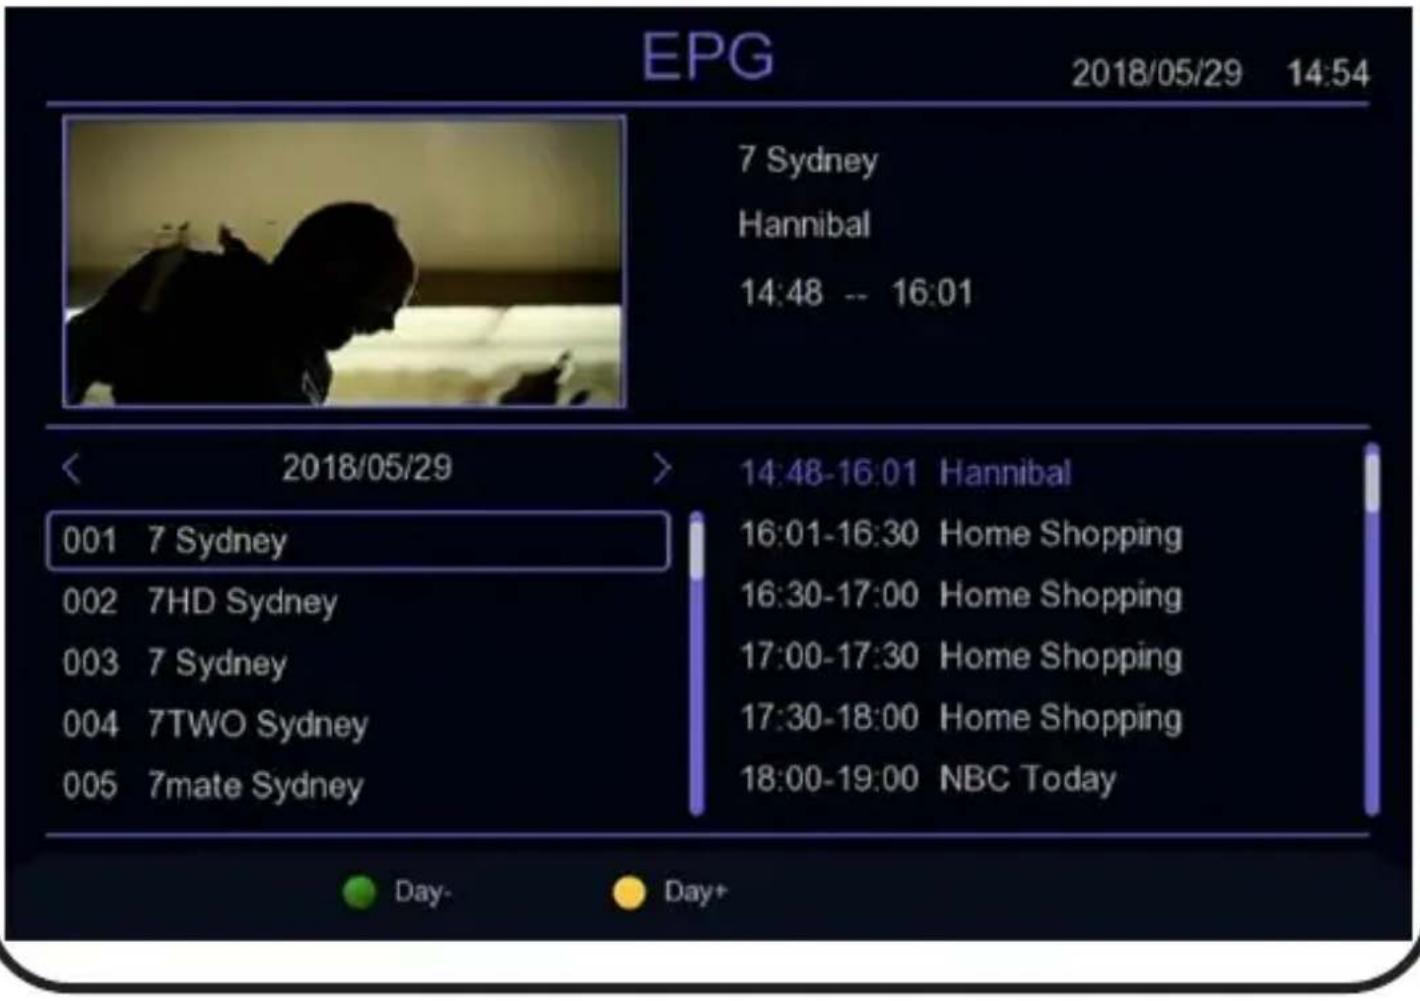
EPG: View the Electronic Program Guide. This guide shows seven days of channel schedule information. Press UP/DOWN to browse the list. You can also quickly access the EPG menu by pressing GUIDE on the remote control.
SYSTEM MENU
continued...
Sort: Change the order of the channels.
LCN: Display by logical channel number.
ONID: Display by original network identification.
TP: Display by frequency.
Service Name: Display in alphabetical order.
Service ID: Display by station identification.
PICTURE

Aspect Radio: Auto/16:9/4:3
Resolution: 720P/1080i/1080P
TV Format: NTSC/PAL
OSD Setting: To set transparency/brightness/chroma/contrast
Panel Setting: To set LED Brightness/Display
SEARCH

Auto Search: Automatically search and create a channel list, this will override the existing channel list.
SEARCH
continued...
- Select Auto Search and then press OK.
- Press EXIT to cancel the search.

bar
DVB T2 Search | Channel | Strength (%) | Progress (%) | Quality (%) | Exit | | :--- | :--- | :--- | :--- | :--- | | TV Channel | 0 | 100 | 0 | 474.0 | | Radio Channel | 0 | 100 | 0 | 474.0 | | Strength | 86 | 99 | 0 | 0 | | Progress | 0 | 0 | 100 | 0 | EXIT ExitSEARCH
continued...
Manual Search: Add channels to the Channel List manually without overriding the existing Channel List.

bar
| Metric | Value | | -------------- | ------ | | Channel | 21 | | Frequency(MHz) | 474.0 | | Bandwidth(M) | 8 | | Start | Press OK | | Strength | 85% | | Quality | 100% |SEARCH
continued...
- Select Manual Search and then press OK.
- On the Manual Search screen, you can input the frequency and Bandwidth, select “Press OK” on the Start option then press OK on your remote to begin the search
TIME

Region and Time: Set the local time zone.
- Auto: Obtain time zone information automatically from signal.
- Manual: Use the Time Zone option setting below.
- Time Zone: Set the local time zone. This option is only available when “Time Offset” is set to “Manual”.
- Summer Time: Set daylight savings.
TIME
continued...
Sleep: Set a sleep timer. The TV will turn off automatically when the timer ends. Set this option to “off” to disable it.
Timer Setting: Set up a TV viewing schedule.
Power On/Off: Set a time for the unit to turn on or off automatically.
OPTION
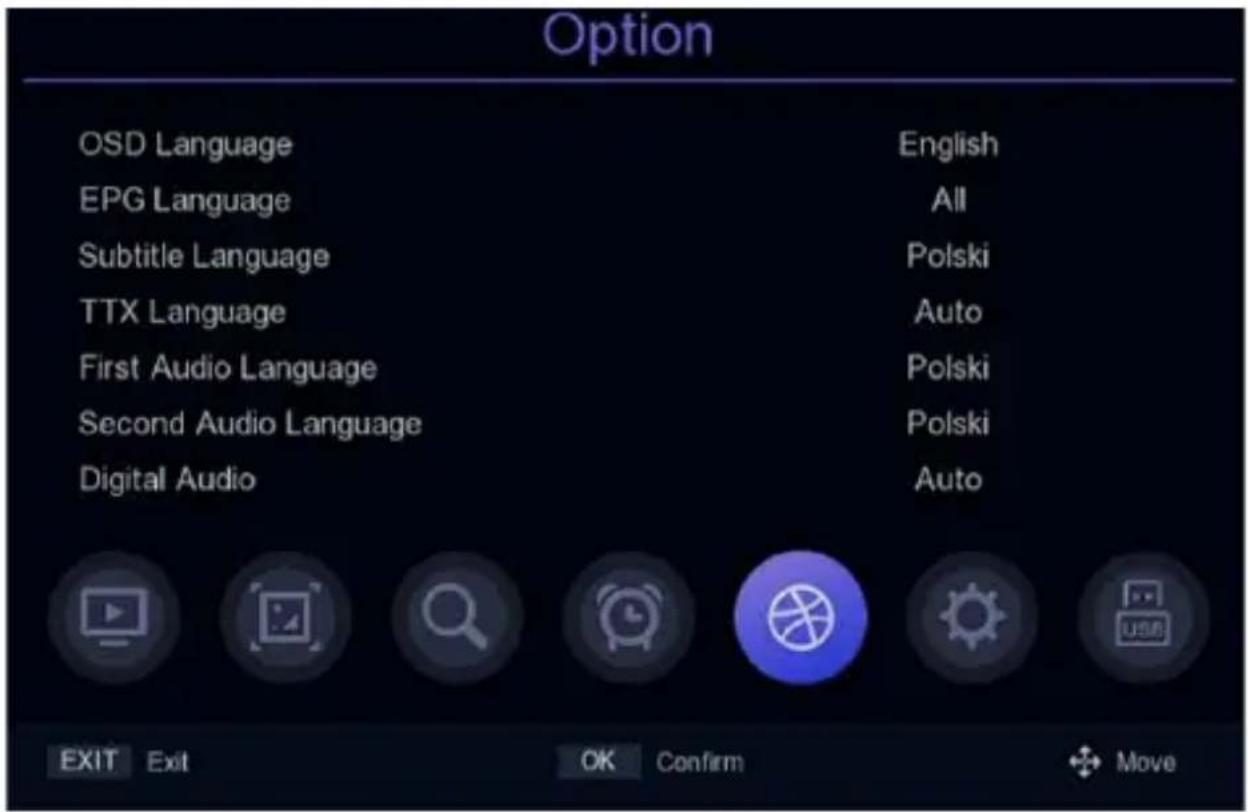
OSD Language: Set the language used by the system menu and other on-screen display elements.
EPG Language: Set the language in EPG.
Subtitle Language: Set the language of subtitles.
OPTION
continued...
TTX Language: Set the language of teletext.
First Audio Language: Set the first audio language.
Second Audio Language: Set the second audio language.
Digital Audio:
- Auto – Auto detect best audio signal settings.
- PCM – Decode the audio locally on the set top box.
- Bypass – Send audio signal to another device for decoding. Useful for home theatre setups which use an AV Receiver or Soundbar.
SYSTEM

Parental Guidance: This option is protected by the password (default is 000000). Set the age which is not allowed to watch the program.
Set Password: Set or change the password. This option is password protected; the default password is 000000.
SYSTEM
NOTE: Make a record of the password and keep it safe, the password cannot be reset or recovered.
Even the factory reset requires the password to action so it cannot be reset via factory resetting the set top box.
Restore Factory Default: Return all system options to the factory-default settings. All channel lists, favourites, and presets will be lost. This option is protected by the password (default is 000000).
SYSTEM
continued...
Information: Display hardware and software firmware version.
Software Update: Update the system firmware by the USB. Improper updating of the software can render the set top box non-functional.
Network Setting: Plug in a USB Wi-Fi dongle to setup a network connection. Power on Control: Set the mode of the set top box when it powers on.
USB

Media Centre: Play multimedia files from a connected USB drive.
USB
continued...
Note: A compatible USB device must be connected to the USB port. If no USB device is connected, the unit will report that “Not Find Any USB Device”.
USB devices must use FAT32 file system.
PVR Media: Play recorded files from connected USB drive.
PVR Configure: To set timeshift and record.
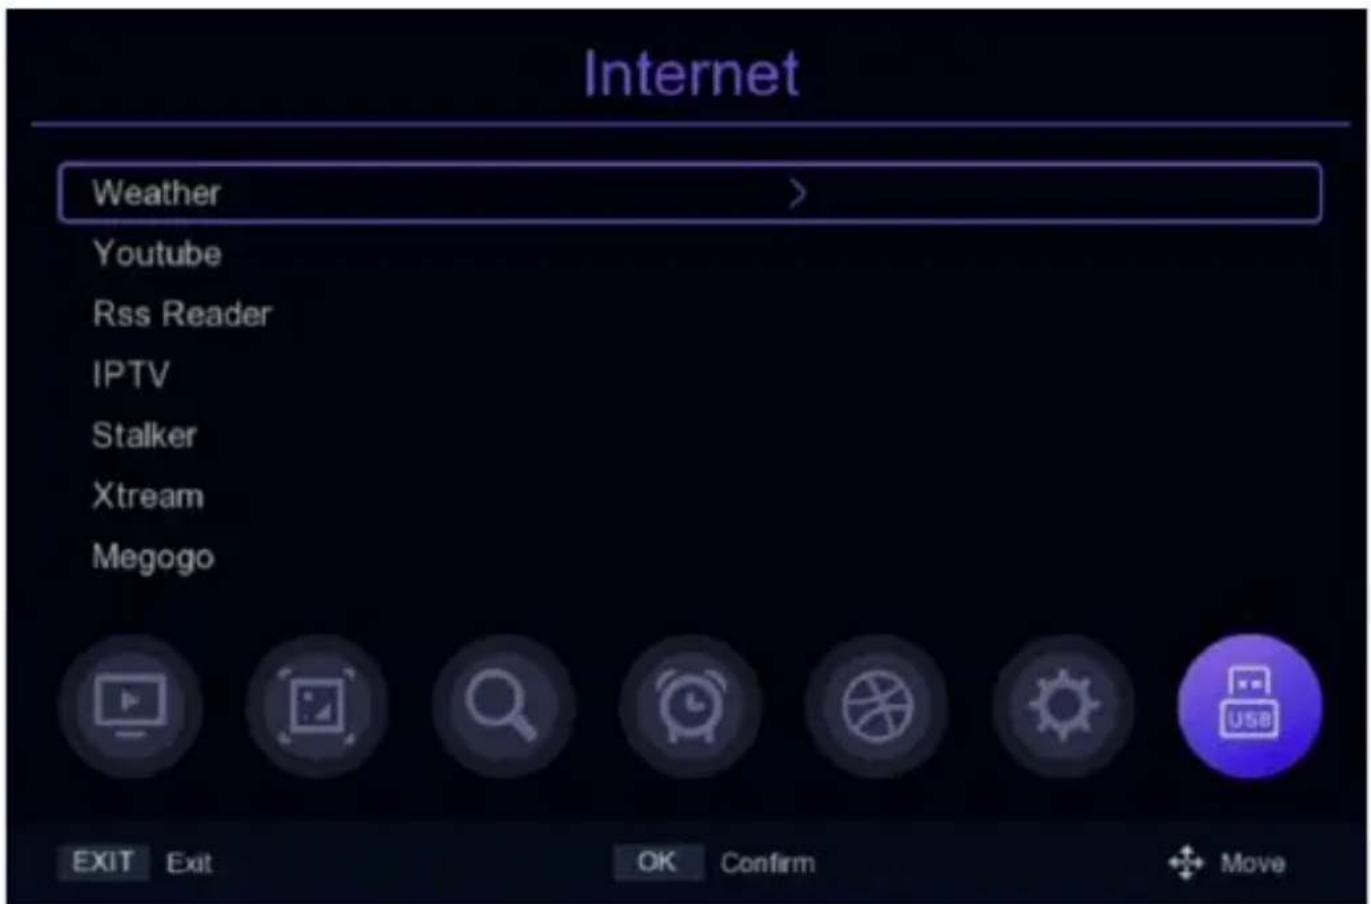
Internet: Engage with content from websites.
Recording and Timeshift require a compatible memory device to be connected to the set top box.
- The USB drive must support USB 2.0 speeds for proper recording.
- USB drive must use the FAT32 file system.
- Up to 750GB USB drives are compatible.
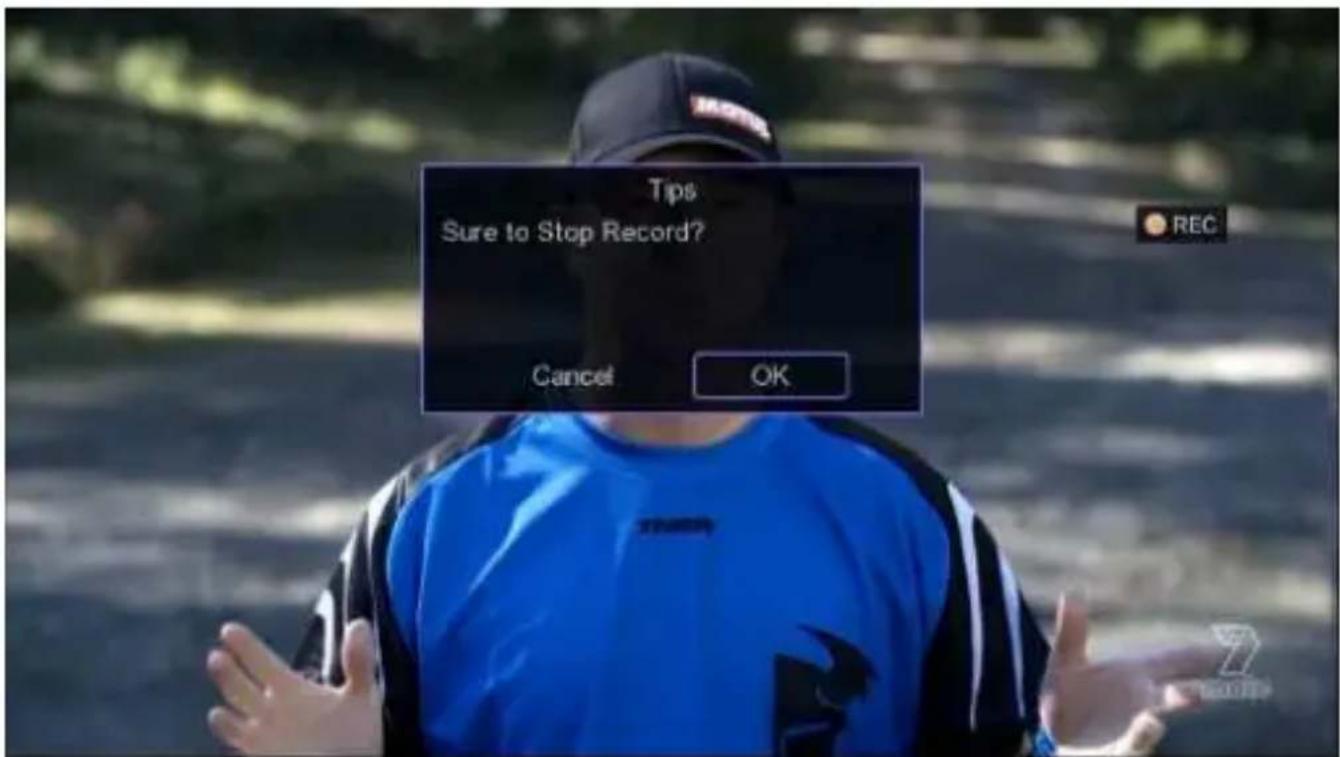
- Press on the remote control, you will see a record icon on the screen.

natural_image
Portrait of a man in a blue sports jacket and cap, standing outdoors on a paved path (no visible text or symbols)Press □ on the remote control, the system will ask for confirmation "Sure to Stop Record", press OK to stop recording or press EXIT to continue recording. You can find the recorded files in the "PVR Media" menu.
- Press the button on your remote to display the schedule “Book List”.
- Once in the Book List menu you can press the MEDIA button on your remote to add programs to the schedule.
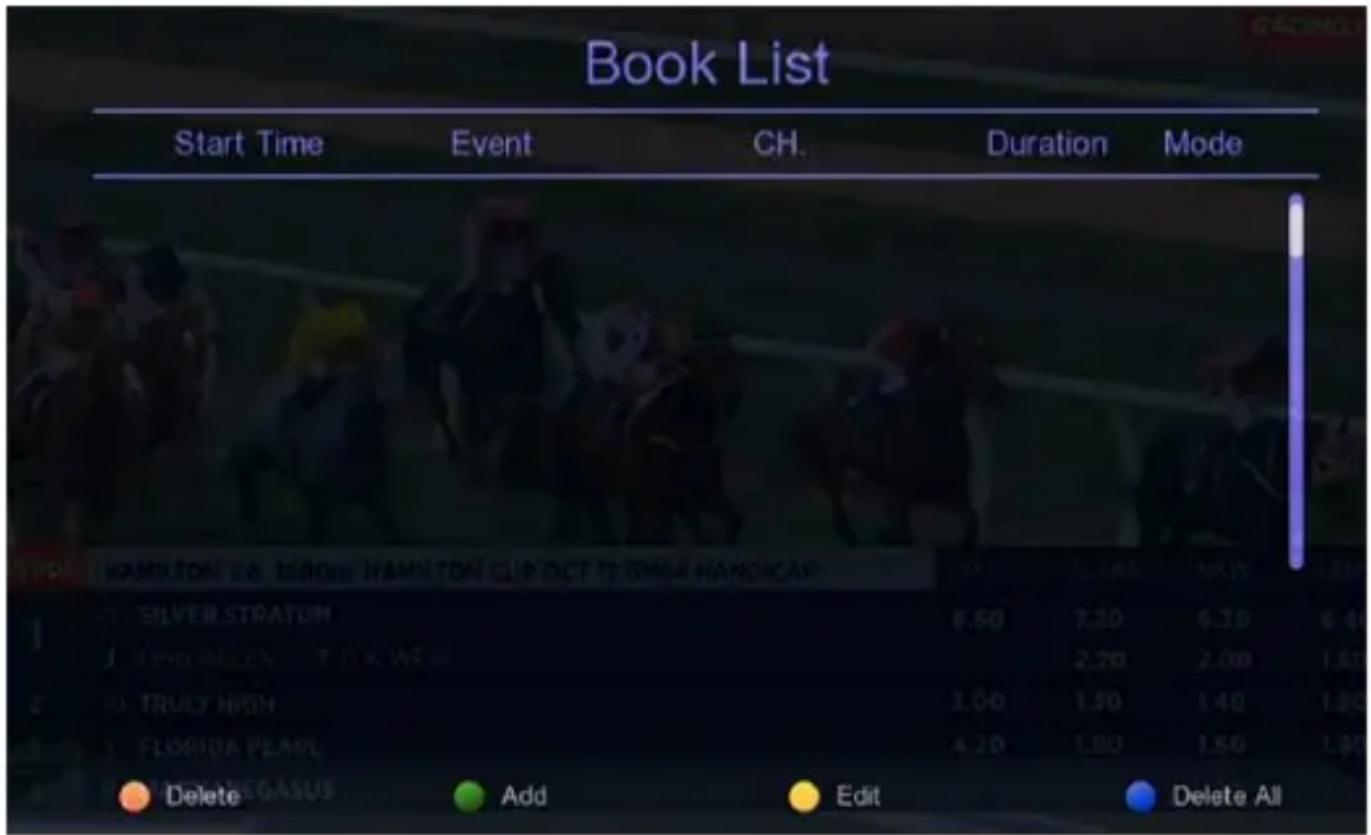
Select a program by pressing the button while in the program guide


- PLAY: When the timer is reached the Set Top Box will play the program.
- PVR: When the timer is reached the Set Top Box will record the program.
Select frequency of the previously selected mode.
Start Date
Set date.
Start Time
Set time.
Channel
Set channel.
After setting the recording parameters of a selected program, press the button on the remote to finish adding the program to the recording schedule.
TIMESHIFT
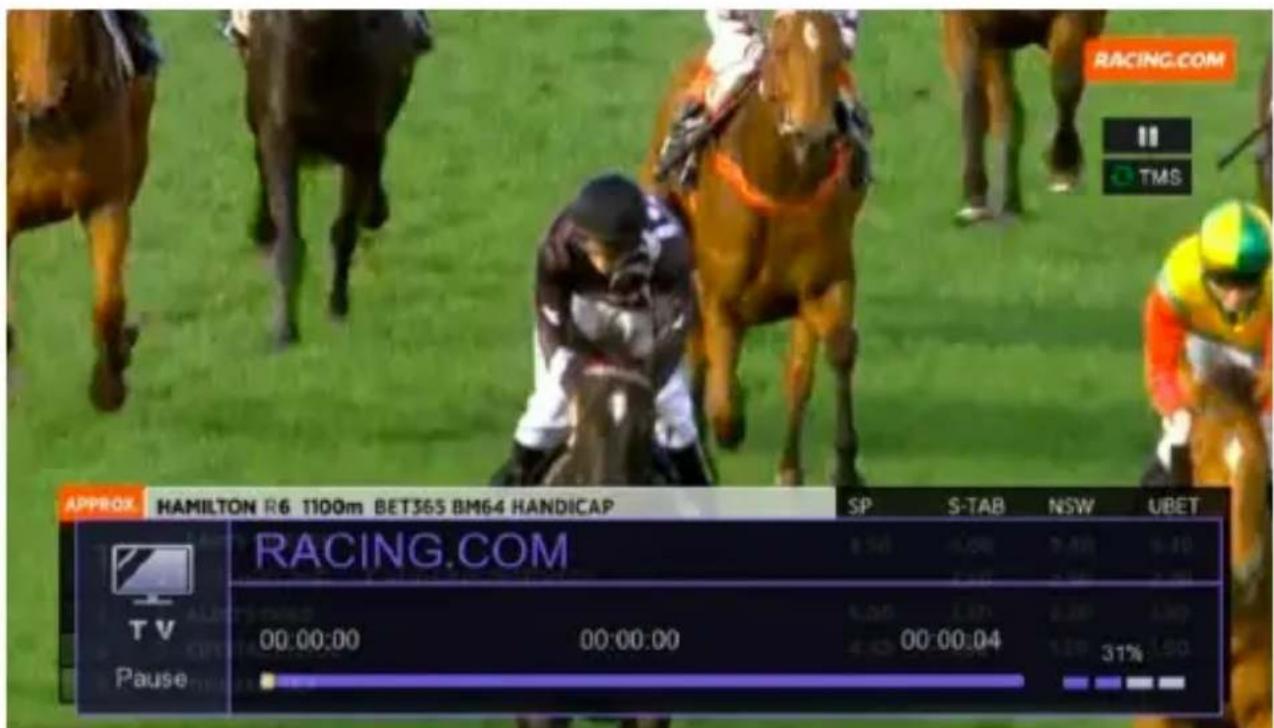
Start Timeshift
- When you are watching a program, press ▶ on your remote control, it will enter into Timeshift, then press ▶ again on remote control to activate Timeshift, a transport bar will appear on the screen.
TIMESHIFT
continued...
- When Timeshift is activated, you can pause the program or scan forward and reverse just like you would if you were playing a recorded video.

TIMESHIFT
continued...
Exit Timeshift
If you want to exit Timeshift, press the button on your remote, and then select OK.

TROUBLESHOOTING
The unit will not turn on.
- There is no power. Please check that the power cord is connected securely, and that the outlet is providing power.
- The unit has not been turned on. Press the power button on the remote or the front of the set top box to turn the unit on.
TROUBLESHOOTING
continued...
There is no picture, the picture is distorted, or the buttons on the unit are not working.
- The antenna may not be properly connected. Ensure that the RF IN antenna /cable connection is secure.
- The current station may be having broadcast difficulties. Try the station again later or try a different station.
- The video freezes or becomes distorted (e.g., tiled or discoloured). The TV signal may be too weak. You may need to amplify the signal. A larger or powered antenna may be required.
TROUBLESHOOTING
continued...
- The picture looks snowy. A snowy picture usually results from a weak signal. Adjust the antenna or install an antenna amplifier.
- The picture is doubled or there is a ghosting effect. Double images are usually caused by signal reflections from tall buildings. Adjust the direction of the antenna or try to elevate it.
- The picture is wavy. Wavy patterns across the screen are usually caused by nearby radio transmitters or other devices that are interfering with reception. Turn off other devices in the area.
TROUBLESHOOTING
continued...
The screen displays a “No Signal” message.
- Make sure you are selecting the correct input/source on your TV that you have plugged the Set Top Box into e.g. AV1, AV2, HDMI1, HDMI2 etc.
- The antenna cable is improperly connected, make sure the antenna cable is connected. You can test if the set top box is working by pressing the MENU button on the remote. If the menu comes up then the set top box signal to TV is working properly but the antenna connection is not.
TROUBLESHOOTING
continued...
- The TV format setting is incorrect. Make sure the setting matches your TV type (e.g., NTSC or PAL). Older TVs may need to be set to PAL as they only support max 50Hz signals.
TROUBLESHOOTING
continued...
There is no sound.
- Check the sound settings in the set top box “Option > Digital Sound” menu. If you are not sure of which setting to use then set the set top box to PCM.
- If using an AV/RCA cable make sure the cables have been connected to the correct ports on the set top box and your TV. Generally, the white and red plugs are for sound and the yellow plug is for video.
- Make sure that the MUTE function is not on.
TROUBLESHOOTING
continued...
The remote control is not working.
- The batteries may be exhausted.
Try replacing the batteries with new ones. - The remote control may be too far away from the sensor. Make sure there are no obstacles between the remote and the sensor.
PVR recording is not working or only recording intermittently.
- This issue can occur if you are using NTFS drives. Please make sure the USB drive you are using is formatted to the FAT32 file system and is no larger than 750gb.
WARRANTY AGAINST DEFECTS
Laser warrants your new product to be free from defects in materials and workmanship for 12 months, from the date of purchase, provided that the product is used in accordance with accompanying recommendations or instructions where provided. The benefit of this warranty is in addition to your rights under the Australian Consumer Law and to other rights and remedies of the consumer under a law in relation to the goods or services to which the warranty relates.
Through a network of retailers and resellers, Laser will provide you with your choice of a refund, repair, or exchange (where possible) for this product if it becomes defective within the warranty period. This warranty will no longer apply where the defect is a result of alteration, accident, misuse, abuse, normal wear and tear, neglect, or improper storage. Please retain your receipt as proof of purchase
How to make a product warranty claim:
- Find your receipt with date of purchase. If this is not available, Laser will make an assessment based on the date of manufacture, condition of the product and type of defect.
- Please contact your original place of purchase. They will assess the nature of the fault and refund or replace the product as per their store refund or warranty policy.
- If your original place of purchase cannot be contacted, please contact Laser with a description of the fault. To assist our team in providing you with a quick resolution, please include any photos and/or a short video demonstrating the fault with your product.
• Phone: (02) 9870 3388
- Email: support@laserco.com.au
• Online: www.laserco.net/support/warranty and follow the website instructions
• Business Address: U1 6-8 Byfield Street, Macquarie Park, 2113, NSW, Australia
- Laser will review your claim and in the first instance, attempt to troubleshoot and resolve the issue for you without the need to return the product.
- If it is determined via troubleshooting that your product may be faulty, our team will provide instructions to have the product returned for assessment. If the product does need to be returned within the warranty period, Laser will arrange return shipping at no cost to you.
- Once we receive the product, our experienced technicians will assess it and determine how best to resolve the issue.
Our goods come with guarantees that cannot be excluded under the Australian Consumer Law. You are entitled to a replacement or refund for a major failure and compensation for any other reasonably foreseeable loss or damage. You are also entitled to have the goods repaired or replaced if the goods fail to be of acceptable quality and the failure does not amount to a major failure.

- Thank you for your purchase!
- WHAT'S IN THE BOX
- SPECIFICATIONS
- SET TOP BOX
- CONNECTING TO A TELEVISION
- CONNECTING TO A
- TELEVISION
- GETTING STARTED
- SYSTEM MENU
- Program
- PICTURE
- SEARCH
- Manual Search: Add channels to the Channel List manually without overriding the existing Channel List.
- TIME
- OPTION
- Digital Audio:
- SYSTEM
- USB
- continued...
- Internet: Engage with content from websites.
- Start Date
- Start Time
- Channel
- TIMESHIFT
- Start Timeshift
- Exit Timeshift
- TROUBLESHOOTING
- The unit will not turn on.
- There is no picture, the picture is distorted, or the buttons on the unit are not working.
- The screen displays a “No Signal” message.
- There is no sound.
- The remote control is not working.
- PVR recording is not working or only recording intermittently.
- WARRANTY AGAINST DEFECTS
- How to make a product warranty claim:
Brand : Laser
Model : STB-9000-675
Category : TV Decoder